In This Chapter
Choosing a shooting mode
Selecting a metering mode
Modifying exposure
Evaluating exposure
Setting the ISO sensitivity
Getting sharp focus
Choosing a Drive mode
Viewing and playing back images
Erasing images
Protecting images
Using the EOS Integrated Cleaning System
Once the Rebel XSi/450D is set up, you're ready to begin a satisfying journey into the creative world of digital photography. If you haven't used a digital Single Lens Reflex (SLR) camera before, then using one of the automated shooting modes of the camera is a good place to begin.
The automatic modes of the Rebel XSi/450D are collectively referred to as Basic Zone modes. In these modes, all the exposure elements are set automatically so that you can concentrate on capturing the moment. These modes enable you to use the XSi/450D as you would use a point-and-shoot camera, but with the ability to change lenses to bring the subject closer or to get a wide, sweeping view of a scene. Each mode is designed for specific scenes or subjects. For example, if you're shooting fast action, the XSi/450D's Sports mode automatically sets the camera to shoot in rapid-fire sequence, and it tracks the subject movement to maintain subject focus.
However, if you are an experienced photographer or you're anxious to move beyond the automated modes to exercise your creativity by having more control over the exposure, then the Creative Zone modes give you creative control by enabling you to have partial or full control over some or all of the exposure settings. For example, in Aperture-Priority (Av) mode, you can set the aperture, or f-stop, that you want, and the camera automatically sets the appropriate shutter speed. In addition, you can control the focus point, the white balance, the drive mode, and much more. The possibilities are endless and exciting.
Because you can choose among different shooting modes, you may find that you enjoy using the automated Sports mode, but for other shots, you may prefer using Aperture-priority (Av) mode. With the XSi/450D, you can switch between modes and be assured of getting great shots regardless of the mode you use.
This chapter explains each of the shooting modes on the Rebel XSi/450D to help you get the most out of them.
A shooting mode determines how and what kinds of exposure settings are set. In addition, these modes determine whether you or the camera sets all or part of the exposure settings and other controls, including the autofocus (AF), white balance, shooting speed, and metering mode. Some modes function fully automatically, much like a point-and-shoot camera, while others are semiautomatic, giving you control over key exposure settings; there is a manual mode that gives you control over all the exposure and other camera settings.
The Mode dial is divided into two sections: the Basic Zone, and the Creative Zone. The Basic Zone section of the Mode dial identifies different modes using icons such as a person's head to designate Portrait mode, a running person to designate Sports mode, and so on. The exception is Full Auto mode, which is designated by a green rectangle. The Mode dial is shown in figure 2.1. Setting a shooting mode is as easy as turning the Mode dial to the mode you want.
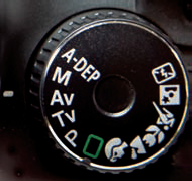
The other half of the dial groups the Creative Zone modes, which are designated by letter abbreviations such as P for Program AE (Auto Exposure), Tv for Shutter-priority, Av for Aperture-priority, M for Manual, and A-DEP for Automatic Depth of Field. These modes give you either partial or full control over the camera settings. As a result, you can control depth of field, how subject motion appears in the image, white balance, AF-point selection, and more. Creative Zone modes range from semiautomatic and manual modes to a semiautomatic but "shiftable" Program mode.
With the Rebel XSi/450D, you can choose to control none, all, or part of the exposure settings, and you do that by choosing a shooting mode. If you're new to photographic exposure, the brief discussion here will help you understand the descriptions of the shooting modes later in this chapter.
To make a good exposure, the camera requires that the ISO (International Organization for Standardization), aperture, or f-stop, and shutter speed be set correctly based on the amount of light in the scene or from the flash. When the ISO, f-stop, and shutter speed are set correctly, you get a well-exposed picture. Here is a brief overview of these elements.
Note
If you are new to photography, be sure to read Chapter 6 which gives much more detail about each exposure element.
FISO. The ISO setting determines how sensitive the image sensor is to light. A high ISO such as 400 or higher means that the sensor is more sensitive to light and needs less light to make the exposure. A low ISO such as 100 means that the sensor is less sensitive to light and needs more light to make the exposure.
Note
On digital cameras, high ISO sensitivity settings amplify the output of the sensor so that less light is needed. However, the amplification also increases digital noise, which has a grainy appearance, as well as unwanted color flecks particularly in the shadow areas of an image. High ambient temperatures and high ISO settings increase the incidence of digital noise.
Aperture. The aperture determines how much the lens diaphragm expands or contracts to let more or less light into the camera. The diameter of the lens diaphragm opening is determined by the aperture, or f-stop, you select. Aperture is the main factor that controls depth of field, or how much of the scene is in acceptably sharp focus from front to back from the plane of sharp focus. Each aperture, or "stop," doubles or halves the exposure.
Shutter speed. The shutter speed determines how long the shutter remains open to let light into the sensor. Shutter speeds are expressed as fractions of a second, such a 1/60, 1/125, 1/250 second, and so on. Shutter speed is most commonly associated with the ability to control how motion is shown in an image and the ability to handhold the camera in low-light scenes. As with aperture, each shutter speed change either doubles or halves the exposure.
All the exposure elements work together. If one changes, then the others change proportionally. Many different combinations of f-stop and shutter speed produce an "equivalent" exposure — in other words, they provide the same amount of light into the camera to make the exposure. For example, given the same ISO setting, f/11 at 1/15 second is equivalent to f/4 at 1/125 second.
The following sections summarize the shooting modes on the Rebel XSi/450D. As you read about them, keep the exposure summary here in mind because it will help you understand what you can control or expect with each mode.
The Basic Zone shooting modes are grouped together on one side of the Mode dial. They are the modes denoted by pictorial icons and by a green rectangle. The icons depict commonly photographed scenes or subjects. For example, the mountain icon denotes Landscape mode and gives exposure settings that provide acceptable sharpness from back to front in the image. To do this, the XSi/450D sets a narrow aperture (large f-stop number) based on the light to provide an extensive depth of field. Each of the other settings makes similar adjustments to give you a predictable photographic result.
In Basic Zone modes, the camera automatically sets all the exposure settings of ISO, aperture, and shutter speed as well as the focus, drive mode, white balance, and other settings. With the exception of Full Auto mode (denoted by the green rectangle), the only control you have is to specify the type of scene that you're shooting by setting the Mode dial.
Basic Zone modes are a good choice for quick shots. For example, if you're making a portrait, select Portrait mode, which sets a wide aperture (f-stop) to blur the background. Conversely, if you are shooting a football game and you want the motion of the players to be crisp and without blur, then choose Sports mode, which sets as fast a shutter speed as possible given the light in the scene. In short, Basic Zone modes are programmed to render the subject that its mode name represents in predictable ways.
In addition to setting the exposure elements, the Rebel XSi/450D automatically sets other aspects of the image.
In all Basic Zone modes, the camera also automatically sets the following:
FJPEG recording format, although you can select the quality level
Auto white balance
Evaluative metering
The sRGB (standard Red, Green, Blue) color space
Auto Lighting Optimizer, which automatically corrects underexposed (dark) and low-contrast images
In addition, the camera also sets the AF mode and AF point or points, drive mode, and Picture Style, and it determines whether to use the built-in flash. In Basic Zone modes, you cannot change the camera settings.
In Full Auto mode, the Rebel XSi/450D automatically selects all the exposure and camera settings. This can be a good mode to use for quick snapshots. However, keep in mind that the camera defaults to using the built-in flash in low-light scenes, although you may not want or need to use the flash. Also remember that in all modes, the lens that you choose enhances your creative control.
In Full Auto mode, the camera is set to AI Focus AF mode, which means that if the subject begins moving, the camera automatically switches to AI Servo AF mode to track the subject's movement and maintain focus. Autofocus modes are detailed later in this chapter.
The camera also automatically selects the AF point or points. It may choose one or multiple AF points that are typically determined by what is closest to the lens and/or what has the most readable contrast in the scene. The camera displays the selected AF points in red in the viewfinder so that you can see where the camera will set the point of sharpest focus.
Tip
If the camera doesn't set the point of sharpest focus where you want, you can try to force it to choose a different AF point by moving the camera position slightly one or more times. If you want to control where the point of sharpest focus is set in the image, then it is better to switch to a Creative Zone mode and set the AF point manually.

Figure 2.2. This image was taken in Full Auto mode, and it shows how the XSi/450D sets a wide aperture to blur the background and fires the flash in lower light. Exposure: ISO 200, f/2.8, 1/250 second.
In Full Auto mode, the camera automatically sets the following:
Standard Picture Style
Single-shot (one-image-at-a-time) drive mode with the option to set 10-second Self-timer/Remote control mode
Automatic flash, but you can choose to turn on Red-eye reduction
Note
Picture Styles are detailed in Chapter 3.
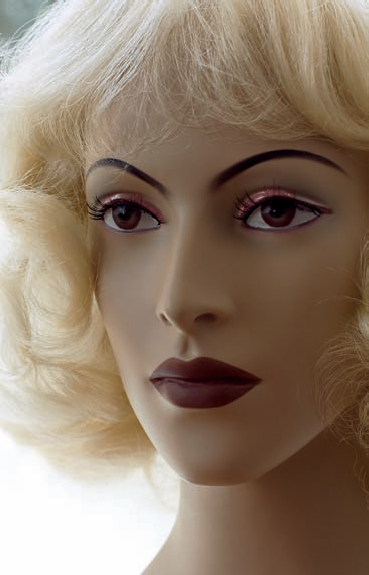
In Portrait mode, the Rebel XSi/450D sets a wide aperture (small f-stop number) providing a shallow depth of field, which blurs background details to prevent them from distracting from the subject. The Rebel also switches to Portrait Picture Style, which is designed to enhance the skin tones. Obviously, Portrait mode is great for people portraits, but it's also a great mode for taking pet portraits, indoor and outdoor still-life shots, and nature shots such as flowers that you photograph from a moderate distance. However, if you use Portrait mode for nature shoots, the Portrait Picture Style may render the color less vivid than if you use other modes that use other Picture Styles.
In Portrait mode, the camera automatically sets the following:
Portrait Picture Style
One-shot autofocus mode and automatic AF-point selection
Continuous drive mode so that you can take as many as 53 large JPEG images in a burst sequence with the option to set 10-second Self-timer/Remote control mode
Automatic flash, but you can turn on Red-eye reduction

Figure 2.3. This image was taken in Portrait mode, and it shows how the XSi/450D sets a wide aperture to blur the background and fires the flash automatically, as it did in this image. Exposure: ISO 400, f/4, 1/60 second.
Tip
To enhance the effect that Portrait mode provides of blurring the background, you can use a telephoto lens or move the subject farther from the background.
In Portrait mode, the camera automatically selects the AF point or points. When the camera chooses the AF point, it looks for points in the scene where lines are well defined, for the object that is closest to the lens, and for points of strong contrast. What should be the point of sharpest focus, such as the eyes of a portrait subject, may not fit the camera's criteria for setting focus. As a result, the camera often focuses on the subject's nose, mouth, or clothing. You can see which AF points the camera chooses when you half-press the Shutter button. If it isn't focusing on the eyes, then you can shift your shooting position slightly to try to force it to focus on the eyes. If you can't force the camera to refocus on the eyes, then you can switch to Av mode, set a wide aperture such as f/5.6, and then manually select the AF point that is over the subject's eyes.
In Landscape mode, the Rebel XSi/450D chooses a narrow aperture (large f-stop number) to ensure that both background and foreground elements are acceptably sharp to provide extensive depth of field. It also chooses the fastest shutter speed possible given the amount of light in the scene.
In lower light, the camera sets slower shutter speeds to maintain as narrow an aperture as possible for extensive depth of field. As the light fades, watch the viewfinder or LCD to monitor the shutter speed. If the shutter speed is 1/30 second or slower, or if you're using a telephoto lens, then steady the camera on a solid surface or use a tripod. As it does in all Basic Zone modes, the camera uses Evaluative metering to measure the light in the scene to determine the exposure settings.
This mode works well not only for landscapes but also for cityscapes and portraits of large groups of people. In Landscape mode, the camera automatically sets the following:

In Close-up mode, the Rebel XSi/450D allows a close focusing distance, and it sets a wide aperture to provide a shallow depth of field that blurs background details. It also sets as fast a shutter speed as possible given the light. This mode produces much the same type of rendering as Portrait mode, but it uses the Standard Picture Style. You can further enhance the close-up effect by using a macro lens. If you're using a zoom lens, zoom to the telephoto end of the lens.
In Close-up mode, the camera automatically sets the following:
Standard Picture Style
One-shot autofocus mode with automatic AF-point selection
Single-shot drive mode with the option to set 10-second Self-timer/Remote control mode
Automatic flash with the option to turn on Red-eye reduction
Tip
All lenses have a minimum focusing distance that varies by lens. To ensure sharpness, never focus closer than the minimum focusing distance of the lens. You know that the camera has achieved good focus when you hear the autofocus beep from the camera.
In Sports mode, the Rebel XSi/450D sets a fast shutter speed to freeze subject motion. This mode is good for capturing athletes in mid-air, a player sliding toward a base, or the antics of pets and children.

Figure 2.5. This image was taken in Close-up mode, where the camera also sets a wide aperture and automatically chooses the autofocus point. Exposure: ISO 400, f/4, 1/60 second.
In this mode, when you focus by half-pressing the Shutter button, the camera automatically tracks focus on the moving subject and locks the focus at the moment you fully press the Shutter button. And if you continue to hold the Shutter button down, the camera maintains focus for continuous shooting. In Sports mode, the camera automatically sets the following:
Standard Picture Style
AI Servo AF autofocus mode with automatic AF-point selection
Continuous drive mode, which enables a maximum burst rate of 53 large JPEG images and gives you the option to use the 10-second Self-timer/Remote control mode
Flash-off mode

In Night Portrait mode, the Rebel XSi/450D combines flash with a slow synch speed to correctly expose both the person and the background. Because this mode uses a longer exposure, it's important that the subject remain still during the entire exposure to avoid blur. Be sure to use a tripod or set the camera on a solid surface to take night portraits.
You should use this mode when people are in the picture, rather than for general night shots, because the camera blurs the background similar to the way it does in Portrait mode. For night scenes without people, use Landscape mode or a Creative Zone mode and a tripod.
In Night Portrait mode, the camera automatically sets the following:
Standard Picture Style
One-shot autofocus mode with automatic AF-point selection
Single-shot drive mode with the option to set 10-second Self-timer/Remote control mode
Automatic flash with the ability to turn on Red-eye reduction
In Flash-off mode, the Rebel XSi/450D does not fire the built-in flash or an external Canon Speedlite, regardless of how low the scene light is. In low-light scenes using Flash-off mode, be sure to use a tripod.
In Flash-off mode, the camera automatically sets the following:
Standard Picture Style
AI Focus AF autofocus mode with automatic AF-point selection which means that the camera uses One-shot AF designed for still subjects, but it automatically switches to the focus tracking mode AI Servo AF if the subject begins to move; automatically selects the AF point
Single-shot drive mode
Flash-off mode
You can easily change to any of the Basic Zone modes: turn the Mode dial so that one of the Basic Zone modes lines up with the white mark on the camera. Then press the Shutter button halfway down to focus, and press it completely to make the picture.
Creative Zone modes, grouped on the other side of the Mode dial, offer automatic, semiautomatic, or manual control over some or all exposure settings. These modes include two automated modes, P (Program AE) and A-DEP (Automatic Depth of Field). These modes could arguably be classified as Basic Zone modes, but they offer creative choices not found in the automatic Basic Zone modes. The three traditional Creative Zone modes — Tv (Shutter-priority AE), Av (Aperture-priority AE), and M (Manual) — put full or partial creative control of the exposure in your hands.
Program AE, shown as P on the Mode dial, is a fully automatic but shiftable mode. Shiftable means that you can change programmed exposure by changing or shifting the shutter speed or aperture. When you shift one exposure element, the camera automatically adjusts other settings to maintain the same or equivalent exposure.
For example, if you turn the Mode dial to P, the camera may initially suggest an exposure of f/2.8 at 1/30 second. But if you turn the Main dial one click to the left, you can "shift" the program to f/3.2 at 1/20 second to get a slightly more extensive depth of field but also a slower shutter speed. Turning the Main dial to the right results in a shift to f/4.0 at 1/15 second, and so on.
Unlike other Creative Zone modes, the change in exposure that you make in P mode is maintained for only one shot, after which the XSi/450D reverts to the camera's suggested ideal exposure.
P mode is handy when you want to quickly change the depth of field and shutter speed for a single shot and make minimum camera adjustments. For example, the camera's suggested exposure may set the aperture at f/8, but you may want to soften the background using a wide aperture such as f/4.0. You can turn the Main dial to shift the programmed exposure settings to a wider aperture. The camera then automatically adjusts the shutter speed to maintain the same overall exposure. However, if you're using the flash, you can't shift the program in P mode.
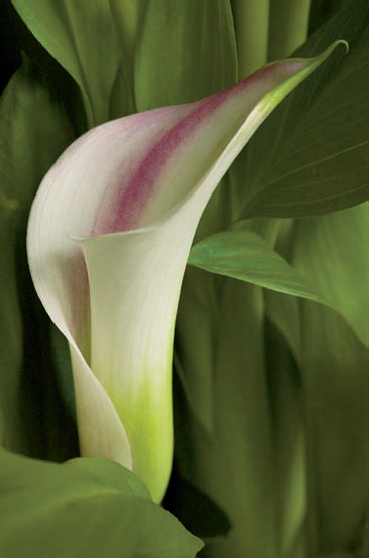
Figure 2.7. This image was taken in P mode, changing the camera's suggested aperture of f/5.6 to f/9 to get more extensive depth of field throughout the blossom. Exposure: ISO 1600, f/9, 1/125 second.
Tip
If you see 30 and the maximum lens aperture or 4000 and the minimum lens aperture blinking in the viewfinder, this indicates an underexposure or overexposure, respectively. In these instances, you can increase or decrease the ISO accordingly.
To switch to P mode, follow these steps:
Turn the Mode dial to line up P with the white mark on the camera. The XSi/450D displays its ideal suggested exposure settings in the viewfinder.
To shift the program, or to change the exposure, press the Shutter button halfway, and then turn the Main dial until the aperture or shutter speed that you want displays in the viewfinder. You cannot shift the program if you're using the flash.
Shutter-priority AE mode, shown as Tv on the Mode dial, is the semiautomatic mode that enables you to set the shutter speed while the camera automatically sets the aperture. Among other things, controlling the shutter speed allows you to freeze subject motion or show it as a blur. Setting a fast shutter speed freezes subject motion, while setting a slow shutter speed shows motion as a blur. You can also use this mode to ensure that the shutter speed is within handholding limits. For example, if you're shooting an indoor event and don't want the shutter speed to go slower than, say, 1/30 second, Tv mode enables you to set and maintain a constant shutter speed.
Note
How fast a shutter speed is necessary to avoid camera shake? If you're not using an Image Stabilization (IS) lens or a monopod or tripod, then the general rule is that you can handhold the camera and get a sharp image at the reciprocal of the focal length: 1/[focal length]. So if you're using a non-IS zoom lens zoomed to 200mm, then 1/200 second is the slowest shutter speed at which you can handhold the lens and not get blur from camera shake. For details on IS lenses, see Chapter 8.

Figure 2.8. This image was taken in Tv mode using a slow shutter speed to show the motion of the top as it spins out. Exposure: ISO 200, f/5.6, 1/25 second.
In Tv mode, you have full control over the AF mode, AF point, metering and drive modes, Picture Style, and using the built-in or an accessory flash. The shutter speeds that you can choose from depend on the light in the scene. In low-light scenes without a flash, you may not be able to get a fast enough shutter speed to freeze the action. Shutter speeds on the XSi/450D are 1/4000 to 30 seconds, and Bulb. Shutter speed increments can be changed from the default 1/3-stop to 1/2-stop increments using C.Fn-1. Flash sync speed is 1/200 second or slower.
To change to Tv mode, follow these steps:
Turn the Mode dial to line up Tv with the white mark on the camera.
Turn the Main dial to the shutter speed that you want. As you set the shutter speed, the camera sets the aperture automatically. At the default settings, shutter speed values display in the viewfinder and LCD in 1/3-stop increments; for example, 125 indicates 1/125 second, and "0"6" indicates 0.6 seconds. If the f-stop blinks, it means that a suitable aperture is not available at that shutter speed under the prevailing light conditions. You can switch to a higher ISO or a slower shutter speed.
Aperture-priority AE mode is shown on the camera Mode dial as Av. Av mode is a semiautomatic mode that enables you to control the aperture. In this mode, you change the aperture by turning the Main dial, and then the camera automatically calculates and sets the appropriate shutter speed. As detailed earlier, aperture is the primary factor that controls the depth of field. A wide aperture, such as f/3.5, provides a shallow depth of field that softly blurs the background. A narrow aperture, such as f/11, provides an extensive depth of field that shows both foreground and background elements reasonably sharp. For most day-to-day shooting, this is a good shooting mode because you can quickly control the depth of field by changing the aperture or f-stop.
Additionally, you may want to use Av mode to set and maintain the aperture at the "sweet spot" of the lens that you're using. The sweet spot is the aperture at which the lens provides the best detail, contrast, and sharpness, and it varies by lens. Or in low-light scenes, you may want to use Av mode because you know that you'll need to shoot consistently at the largest aperture.

Figure 2.9. This image was taken in Av mode with a wide aperture that provides a shallow depth of field and also places the concentration on the stem of the yellow pepper. Exposure: ISO 400, f/2.8, 1/00 second.
In Av mode, you have control over the AF mode, AF point, drive and metering modes, white balance, Picture Style, and use of the built-in or an accessory flash.
Tip
You can preview the depth of field for an image by pressing the Depth-of-field preview button on the front of the camera. When you press the button, the lens diaphragm closes to the aperture that you've set so that you can see the range of acceptable focus.
If you choose this mode, then check the shutter speed in the viewfinder; if it is 1/30 second or slower, be sure to use a tripod or use the handholding rule provided earlier in the Tv section. Aperture value increments can be changed from the default 1/3-stop to 1/2-stop increments using C.Fn-1.
Tip
For details on setting Custom Functions, see Chapter 5.
To change to Av mode, follow these steps:
Turn the Mode dial to line up Av with the white mark on the camera.
Turn the Main dial to the aperture that you want. The camera automatically sets the shutter speed. At the default settings, aperture values display in the viewfinder and LCD in 1/3-stop increments, such as 5.6, 6.3, 7.1, and so on. The higher the f-number, the smaller the aperture, and the more extensive the depth of field. The smaller the f-number, the larger the aperture, and the shallower the depth of field.
As the name implies, Manual mode, indicated by an M on the Mode dial, allows you to set both the aperture and the shutter speed, based on the camera's light-meter reading and the current ISO setting. M mode is helpful in difficult lighting situations when you want to override the camera's suggested ideal exposure, and in situations where you want consistent exposures across a series of photos, such as for a panoramic series. M mode is also used for fireworks and other low-light and night scenes where you know in advance the exposure that you want to use.
Note
Because it takes more time to set all the exposure settings yourself in M mode, many people prefer to routinely use semiautomatic modes such as Av and Tv.
Many of my photography students are anxious to shoot in Manual mode because they see it as a sort of "badge of honor" in mastering the camera. Certainly there are many times when Manual mode is the best choice. But many times, the camera's suggested exposure is the best choice. In those cases, using Manual mode requires more steps in making pictures than Tv or Av mode require. I recommend using Manual mode when you truly need it — to make pictures of a moon eclipse or fireworks, to make a Bulb exposure, or to override the camera's suggested exposure.
In M mode, you also have control over the AF mode, AF point, drive and metering modes, white balance, Picture Style, and use of the built-in or an accessory flash.
To use Manual mode, follow these steps:
Turn the Mode dial to line up M with the white mark on the camera.
Press the Shutter button halfway down. The exposure level index in the viewfinder and on the LCD has a tick mark that indicates how far the current exposure is from the camera's ideal or suggested exposure. Watch this index as you complete Step 3.
Turn the Main dial to the shutter speed that you want, and then press and hold the Aperture/ Exposure compensation (Av) button on the back of the camera as you turn the Main dial to set the aperture. If you want to use the camera's ideal exposure, then adjust the shutter speed or aperture until the tick mark is at the center of the exposure level index. You can also set the exposure above (to overexpose) or below (to underexpose) the ideal exposure. If the amount of under- or overexposure is +/- 2 Exposure Values (EV), the exposure level indicator bar blinks to show the amount of plus or minus EV in the viewfinder and on the LCD panel. You can then adjust either the aperture or shutter speed until the exposure level you want is displayed.
A-DEP, or Automatic Depth of Field, mode automatically calculates the optimum depth of field between near and far subjects. A-DEP mode uses the camera's nine AF points to detect near and far subject distances, and then calculates the aperture needed to keep the subjects in sharp focus. While the automatic depth-of-field calculation is handy, getting the maximum depth of field often means that the camera sets a narrow aperture, and that results in a slow shutter speed. Depending on the shutter speed, you'll need to use a tripod, monopod, and/or IS lens to avoid getting a blurry picture, or increase the ISO sensitivity setting.
In A-DEP mode, you cannot control the aperture, shutter speed, or AF points. You can use the built-in flash in this mode, but the maximum depth of field is sacrificed so that A-DEP mode performs more like P mode.
To change to A-DEP mode, follow these steps:
Turn the Mode dial to line up A-DEP with the white mark on the camera.
Focus on the subject. In the viewfinder, verify that the AF points displayed in red cover the subjects, and then take the picture. If the correct AF points aren't selected, shift the camera position slightly and refocus. If the aperture blinks, it means the camera can't get the maximum depth of field. Move back or switch to a wide-angle lens or zoom setting.
Metering modes determine how much of the scene the Rebel XSi/450D uses to measure light. To make a good exposure, the camera has to know the amount of light that illuminates the subject or scene. To determine this, the camera's light meter measures the amount of light in the scene, and, based on the ISO, calculates the aperture and shutter-speed combinations necessary to make a good exposure.
Most cameras, including the XSi/450D, use a reflective light meter that measures light reflected from the subject back to the camera. In addition, the meter is calibrated to assume that all scenes have an "average" distribution of light, medium, and dark tones so that the "average" of all tones in the scene is medium, or 18 percent, gray. And, in "average" scenes, the camera's meter produces a properly exposed image.
However, not all scenes contain average tonality; for example, a snow scene is predominantly white, while a scene with a large expanse of water is predominantly dark. Nonetheless, the meter still assumes that the scene has an average tonality, and it averages the tones to medium gray. In a snow scene, the result is gray snow. Conversely, in a scene with a large expanse of dark water, the result is gray water.
In other scenes, the subject may be positioned against a very dark or very light background. In these cases, averaging the tones produces a less than optimal exposure. Instead of metering the entire scene, you may want the camera to read the light falling only on the subject and to disregard the brighter or darker background. That's where metering modes and modifying exposure come into play. In Creative Zone modes, you can change the metering mode depending on the scene.
Note
In the fully automatic Basic Zone modes, such as Full Auto, Portrait, Landscape, and so on, you cannot change the metering modes. The Rebel XSi/450D chooses Evaluative metering in all Basic Zone modes.
The XSi/450D offers four metering modes that are differentiated by the size of the viewfinder area that's used to meter scene light.
It is important to know that metering is tied to the AF point you or the camera selects. When you press the Shutter button halfway down to focus, the camera simultaneously meters the light primarily at the selected AF point to calculate the exposure. The AF point may or may not be the point of critical metering. If it isn't, then be sure to read the topics on modifying exposure later in this chapter, which explain how to compensate exposure or decouple metering from the AF point.
Evaluative metering is the default metering mode on the Rebel XSi/450D, and it analyzes light from 35 zones throughout the entire viewfinder and links it to the autofocus system. The meter analyzes the point of focus and automatically applies compensation if the surrounding areas are much lighter or darker than the point of focus. To determine exposure, the camera analyzes subject position, brightness, background, front- and backlighting, and camera orientation.
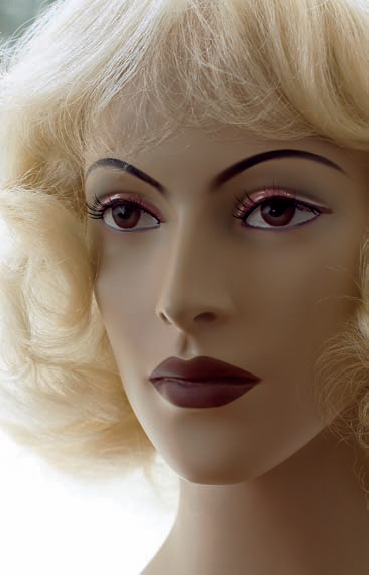
Figure 2.10. This image was taken using Evaluative metering. Subsequent images show the same subject in different metering modes. Exposure: ISO 100, f/6.3, 1/5 second.
Evaluative metering produces excellent exposures in average scenes that include a distribution of light, medium, and dark tones. However, in scenes where there is a large expanse of predominantly light or dark areas, the metering averages the tones to middle gray, thereby rendering snow scenes and large expanses of dark water as gray. In these situations, it's good to use Exposure compensation to increase or decrease exposure by one to two stops for scenes with predominantly light or dark tones, respectively.
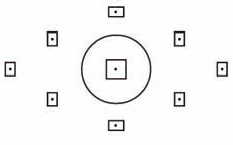
To select Evaluative metering mode, set the camera to a Creative Zone mode, press the Metering mode (top cross) key on the back of the camera, and then press the up or down cross key to select the icon showing a solid dot within a circle within a rectangle.
Note
If pictures are slightly underexposed, the camera automatically corrects them using Auto Lighting Optimizer. This optimization is applied to all images taken in Basic Zone modes, and to JPEG images taken in Creative Zone modes other than M mode. Optimization is handy if you print directly from the media card. But if you prefer to see the original exposure, you can turn off the optimization by disabling C.Fn-6. See Chapter 5 for details on Custom Functions.
Partial metering meters the scene from a central 9 percent of the viewfinder. Partial metering is handy in backlit or side-lit scenes where you want to ensure that the main subject is properly exposed. For example, if you take a portrait of a person who is backlit, you can use Partial metering mode to ensure that the person's face is properly exposed. This metering mode is also useful if the background is much darker than the subject.
Note
The XSi/450D's exposure meter is sensitive to stray light that can enter through the viewfinder. If you're using the self-timer or you don't have your eye pressed against the viewfinder, then stray light entering the viewfinder can result in improper exposures. Be sure to use the viewfinder eyepiece cover that is attached to the camera strap, or cover the viewfinder with your hand.
To select Partial metering mode, press the Metering mode (top cross key) button on the back of the camera, and then press the down or up cross key to select the icon showing an empty circle within a rectangle.
Spot metering mode calculates exposure from approximately 4 percent of the viewfinder at the center. Spot metering is an excellent mode when you need to meter for a critical subject area such as skin highlights.

For example, if you're shooting a portrait and you want to ensure that the skin tones are properly exposed, you can switch to Spot metering mode, move close and fill the frame with the subject's skin, and then use that meter reading to make the exposure. The reading is taken at the center of the frame. If that's not where you want to set the AF point, then you can use AE Lock, described later in this chapter, to use the Spot meter reading, and focus using an off-center AF point.
To select Spot metering mode, set the camera to a Creative Zone mode, press the Metering mode (top cross) key on the back of the camera, and then press the down or up cross key to select the icon showing a black dot within a rectangle.
Center-weighted Average metering gives more weight to the area of the scene within the seven AF points in the center of the viewfinder to calculate exposure. Then the camera averages the reading for the entire scene. This metering mode assumes that the main subject is in the center of the frame, so be aware that it may not produce the best exposure for off-center subjects.
Note
There are nine AF points, but in center-weighted metering not all the AF points are used — only the seven AF points in the center; hence the name, center-weighted.
To select Center-weighted Average metering mode, press the Metering mode (top cross) key on the back of the camera, and then press the down or up cross key to select the icon showing an empty rectangle.

For average scenes, using the camera's suggested exposure is usually excellent. However, many scenes are not average, and that's when the Rebel XSi/450D's exposure modification options including Auto Lighting Optimization, Highlight Tone Priority, Exposure Compensation, Auto Exposure Bracketing (AEB), and Auto Exposure (AE) Lock come in handy. These options are detailed in the following sections.
Auto Lighting Optimization is a built-in image-correction feature that boosts contrast and brightens images that are too dark.
Auto Lighting Optimization is not a setting that you can adjust manually, and it is used when you shoot in all Basic Zone modes such as Portrait, Landscape, Sports mode, and so on. It is also used when you shoot JPEG images in Creative Zone modes including P, Tv, Av, and A-DEP. It is not used in M mode or when you shoot RAW or RAW+JPEG format images.
While automatic brightening may be handy, it also tends to reveal any digital noise in the image. Digital noise appears with a grainy look and as multicolored flecks particularly in the shadow areas of the image. Also, by using Auto Lighting Optimization, the effect of exposure modification may not be evident. For example, if you set negative Exposure Compensation (detailed later in this section), then Auto Lighting Optimization will brighten the image. The same happens for other exposure modifications such as AEB and AE Lock. If you prefer to see the effect of exposure modifications, you can turn off Auto Lighting Optimization, but only for Creative Zone shooting modes.
To turn off Auto Lighting Optimization for Creative Zone shooting modes, follow these steps:
Set the Mode dial to a Creative Zone mode such as P, Tv, Av, or A-DEP.
Press the Menu button, and turn the Main dial until the Set-up 3 (yellow) menu is displayed.
If necessary, press the up or down cross key to highlight Custom Functions (C.Fn), and then press the Set button. The Custom Functions screen appears.
Press the right or left cross key until the number "6" is displayed in the box at the top right of the screen, and then press the Set button. The Custom Function option control is activated and the option that is currently in effect is highlighted.
Press the down cross key to highlight 1: Disable, and then press the Set button. This turns off Auto Lighting Optimization in Creative Zone shooting modes. Lightly press the Shutter button to return to shooting.
Highlight Tone Priority is designed to improve or maintain highlight detail by extending the range between 18 percent middle gray to the maximum highlight tones, effectively increasing the dynamic range to reduce blown, or detail-less highlights. In addition, the gradation between grays and highlights is finer. Using Highlight Tone Priority, however, limits the ISO range from 200 to 1600 and can increase noise in the shadow areas.
Highlight Tone Priority helps ensure that the image sensor pixel wells do not fill, or saturate, blowing out highlight details. Also with the 14-bit analog/digital conversion, the camera sets a tone curve that is relatively flat at the top in the highlight area to compress highlight data. The tradeoff, however, is a more abrupt move from deep shadows to black, which increases shadow noise. The result is an increase in dynamic range, the range of highlight to shadow tones as measured in f-stops in a scene, disregarding, of course, the potential for increased shadow noise.
Highlight Tone Priority is turned off by default. You can turn on Highlight Tone Priority by following these steps:
Set the Mode dial to a Creative Zone mode such as P, Tv. Av, M, or A-DEP.
Press the Menu button, and then press the right cross key until the Set-up 3 (yellow) menu is displayed.
If necessary, press the up cross key to highlight Custom Functions (C.Fn), and then press the Set button. The Custom Functions screen appears.
Press the right or left cross key until the number "5" is displayed in the box at the top right of the screen, and then press the Set button. The Custom Function option control is activated and the option that is currently in effect is highlighted.
Press the down cross key to highlight 1: Enable, and then press the Set button. This turns on Highlight Tone Priority in Creative Zone shooting modes. Lightly press the Shutter button to return to shooting.
Exposure Compensation enables you to purposely and continuously modify the standard exposure by a specific amount up to +/- 2 f-stops in 1/3-stop increments or in 1/2-stop increments via C.Fn-1.
Scenarios for using Exposure Compensation vary widely, but a common use is to override the camera's suggested ideal exposure in scenes that have large areas of white or dark tones. In these types of scenes, the camera's onboard meter averages light or dark scenes to 18 percent gray to render large expanses of whites as gray and large expanses of black as gray. To avoid this, you can use Exposure Compensation. For a snow scene, a +1 to +2 stop of Exposure Compensation will render snow as white instead of dull middle gray. A scene with predominately dark tones might require −1 to −2 stops of Exposure Compensation to get true dark renderings.
Here are a couple of things that you should know about Exposure Compensation:
Exposure Compensation works in all Creative Zone modes except in Manual mode and during Bulb exposures. In Tv mode, setting Exposure Compensation changes the aperture by the specified amount of compensation. In Av mode, it changes the shutter speed. In P mode, compensation changes both the shutter speed and aperture by the exposure amount you set.
The amount of Exposure Compensation you set remains in effect until you reset it. This applies whether you turn the camera off and back on, change the SD/SDHC card, or change the battery.
The XSi/450D is initially set to make exposure adjustments in 1/3-stop increments. This fine level of change gives more precise control. However, if you want larger exposure changes, you can set C.Fn-1 to select Option 1: 1/2-stop.
Note
Custom Function details are provided in Chapter 5.
You can set Exposure Compensation by following these steps:
Switch to any Creative Zone mode except Manual, and then press the Shutter button halfway down to initiate a meter reading on the subject.
Look in the viewfinder or on the LCD, press and hold the Aperture/Exposure Compensation button (the button marked Av) on the back of the camera, and then turn the Main dial as you watch the exposure index. To set positive (right of the center mark) compensation to lighten the exposure, turn the Main dial to the right. To set negative (left of the center mark) compensation to darken the exposure, turn the Main dial to the left.
Auto Exposure Bracketing (AEB) is a way to ensure that at least one exposure in a series of three images is acceptable. With AEB turned on, you can take three pictures at three different exposures: one picture at the standard exposure set by the camera, one picture at an increased (lighter) exposure, and another picture at a decreased (darker) exposure. The camera is initially set to 1/3 f-stop increment exposure changes. If you want a greater level of exposure difference, you can set C.Fn-1 to Option 1: 1/2-stop. With either setting, you can bracket image series up to +/- 2 stops.
While bracketing isn't necessary in all scenes, it's a good technique to use in scenes that are difficult to set up or that can't be reproduced. It is also useful in scenes with contrasty lighting such as a landscape with a dark foreground and a much lighter sky.
Here are some things to know about AEB:
You can't use AEB with the built-in or an accessory flash or when the shutter is set to Bulb. If you set AEB, and then pop up the built-in flash or pop it up while you're making one of the three bracketed images, the AEB settings are immediately cancelled.
AEB is available in all Creative Zone modes except Manual.
The order of bracketed exposures begins with the standard exposure followed by decreased (darker) and increased (lighter) exposures.
You can use AEB in combination with Exposure Compensation. If you combine AEB with Exposure Compensation, the shots are taken based on the compensation amount.
If Auto Lighting Optimizer is turned on in Creative Zone modes, the effects of AEB may not be evident in darker images because the camera automatically lightens dark images. You can turn off Auto Lighting Optimizer by setting C.Fn-6 to Option 1: Disable.
Note
AEB is handy because it produces three different exposures that you can combine in an image-editing program. For example, if a scene has a wide difference between highlight and shadow areas, bracketed exposures provide exposures of both extremes as well as the standard exposure. In an image-editing program, you can then composite the bracketed exposures to get the best of the highlights, midtones, and shadows.
Here's how AEB works in the different drive modes:
In Continuous and Self-timer modes, pressing the Shutter button once automatically takes three bracketed exposures. In the Self-timer drive modes, the three bracketed shots are taken in succession after the timer interval has elapsed.
In Single-shot drive mode, you have to press the Shutter button three separate times to get the three bracketed exposures.
If C.Fn-9 is set for Mirror Lockup, and you're using AEB and Continuous drive mode, only one of the bracketed shots is taken at a time. You press the Shutter button once to lock up the mirror and the exposure is made after the self-timer time elapses. The exposure level indicator in the viewfinder flashes after each exposure until all three bracketed images have been made. The exposure index also shows which of the exposures is currently being made, for example, the decreased exposure.
AEB settings are temporary. If you change lenses, pop up the built-in flash or mount an accessory flash, or turn off the camera, the AEB settings are cancelled.
You can set AEB by following these steps:
Press the Menu button, and then turn the Main dial to select the Shooting 2 (red) menu.
Press the up or down cross key to select AEB.
Press the Set button. The AEB bracketing scale is activated.
Press the right cross key to select the bracketing amount. Markers that show increased and decreased exposure settings are displayed on the bracketing scale. You can set bracketing up to +/- 2 stops. The default exposure increment is 1/3 stop.
Press the Set button. Lightly press the Shutter button to return to shooting.
If you're in One-shot drive mode, press the Shutter button to focus, and then make the shot. Continue pressing the Shutter button two more times to take all three bracketed shots. In Continuous or a Self-timer mode, the three shots are taken by pressing the Shutter button once.
With the Rebel XSi/450D, both the exposure and the focus are set at the selected AF point. However, there are times when you don't want to set the exposure at the same point where you set the focus. For example, if a person that you're photographing is lit by a spotlight, the brightest light may fall on the subject's forehead. In this situation, you want to set the exposure for the forehead highlight to ensure that the detail in this area is retained, but then you also want to focus on the person's eyes. To do this, you have to de-couple the exposure metering from autofocusing, and Auto Exposure (AE) Lock enables you to do this.

Figure 2.14. For this image, I used AE Lock and locked the exposure on the highlights of the brass fountain in the foreground. Exposure: ISO 100, f/2.8, 1/80 second.
By pressing and holding the AE Lock button, the camera sets and retains the exposure, and then you can move the camera and focus on a different area of the scene. This is one of the most useful features on the XSi/450D for preventing blowout of detail in the highlights, and for ensuring critical-area exposure.
If you shoot JPEG capture, then AE Lock is the best way to ensure that the brightest highlights retain detail. If you shoot RAW capture, there is more latitude because you can recover varying amounts of highlight detail during image conversion.
There are, however, some restrictions for using AE Lock. In Tv and Av modes, you have to use Evaluative metering, manual AF-point selection, and autofocusing rather than manual focusing.
Note
You cannot use AE Lock in the automated Basic Zone modes.
Table 2.1 shows how AE Lock works with each metering mode and AF point.
You can set AE Lock by following these steps:
Select the AF point that you want to use. For example, if you're making a portrait, select the AF point that is over the subject's eye that is nearest the lens.
Point the selected AF point on the part of the scene where you want to set the exposure, and then press the Shutter button halfway down. The exposure is displayed in the viewfinder.
Continue to hold the Shutter button halfway down as you press the AE Lock button. The AE Lock button has an asterisk icon above it on the camera. When you press this button, an asterisk icon appears in the viewfinder to indicate that AE Lock is activated. You can now release the Shutter button.
Move the camera to recompose the shot, half-press the Shutter button to focus on the subject, and then make the picture. As long as you see the asterisk in the viewfinder, you can take additional pictures using the locked exposure. After a few seconds, AE Lock shuts off automatically.
Table 2.1. AE Lock Behavior with Metering Mode and AF-Point Selection
AF-Point Selection | |||
|---|---|---|---|
Metering Mode | Manual AF-Point Selection | Automatic AF-Point Selection | (Lens Switch Is Set to MF) |
Evaluative | AE Lock is set at the selected AF point | AE Lock is set at the AF point that achieves focus | AE Lock is set at the center AF point |
Partial | AE Lock is set at the center AF point | ||
Spot | |||
Center-Weighted Average |
Following each exposure, you can best evaluate the exposure by looking at the histogram. If you're new to digital photography, the concept of a histogram may also be new. A histogram is a bar graph that shows either the grayscale brightness values in the image—from black (level 0) to white (level 255) — or the Red, Green, and Blue (RGB) brightness levels, along the bottom. The vertical axis displays the number of pixels at each location. The XSi/450D offers two types of histograms, a Brightness (or luminance) histogram, and an RGB (Red, Green, and Blue color channel) histogram.
The histograms are the most useful tools that you can use to ensure that highlights are not blown, or lacking detail, and that shadows are not blocked up or transitioning too quickly to solid black without detail. Here is an overview of each type of histogram.
A brightness histogram shows grayscale brightness values in the image along the horizontal axis of the graph. The values range from black (level 0 on the left of the graph) to white (level 255 on the right of the graph). This histogram shows you the exposure bias and the overall tonal distribution in the image. If the histogram has pixels crowded against the far right side of the graph, then the image is overexposed with a subsequent loss of detail in the highlights — it means that some highlight values are blown out; in other words, they are at 255, or totally white with no detail. If the histogram has pixels crowded against the far left side of the graph, then there is a subsequent loss of detail in the shadows.
Depending on the lighting and other factors, some scenes cause a weighting of tonal values more to one or the other side of the graph. For example, in scenes that have predominately light tones, the pixels are weighted toward the right side of the histogram, and vice versa. But in average scenes, good exposure is shown on the histogram with highlight pixels just touching the right side of the histogram. Underexposure, shown by a gap between the pixels and the right side of the histogram, increases the chances of getting digital noise in the image.
On the other hand, you want to avoid having pixels crowded against the left edge of the histogram because that type of exposure indicates blocked shadows; in other words, pixels at 0, or totally black with no detail. For a wedding, outdoor shooting, and nature shooting, the brightness histogram can be most useful for evaluating critical highlight exposure.
An RGB histogram shows the distribution of brightness levels for each of the three color channels — Red, Green, and Blue. Each color channel is shown in a separate graph so you can evaluate the color channel's saturation, gradation, and color bias. The horizontal axis shows how many pixels exist for each color brightness level, while the vertical axis shows how many pixels exist at that level. More pixels to the left indicates that the color is darker and more prominent, while more pixels to the right indicates that the color is brighter and less dense. If pixels are spiked on the left or right side, then color information is either lacking or oversaturated with no detail, respectively. If you're shooting a scene where color reproduction is critical, the RGB histogram is likely most useful.
The histogram is a very accurate tool to use in evaluating JPEG captures. If you shoot RAW capture, the histogram is based on the JPEG conversion of the image. So if you shoot RAW, remember that the histogram is showing a less robust version of the image than you'll get during image conversion. To display the histogram during image playback, follow these steps:
Press the Playback button on the back of the camera. The most recent image appears on the LCD.
Press the Display (Disp.) button on the top left back of the camera once to display the file capture type and current number of images on the SD card.
Press the Display button again to display the Brightness histogram with more extensive shooting and file information. This display also has a highlight alert that flashes to show areas of the image that are overexposed.
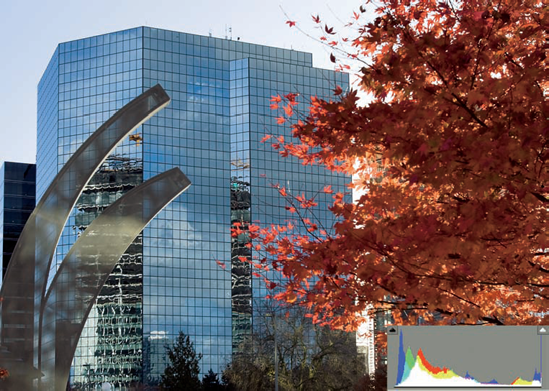
Figure 2.15. The histogram inset in this picture shows a cluster of pixels crowded against the right side of the histogram, indicating that areas of the image are overexposed in the highlights. Highlight overexposure is evident in the building behind the tree with little detail remaining in this area. Exposure: ISO 100, f/9, 1/80 second.
Press the Display button again to display the RGB histograms along with the Brightness histogram in addition to more limited shooting information.
To set the type of histogram that is displayed during image playback, follow these steps:
Press the Menu button, and turn the Main dial to select the Playback (blue) menu.
Press the down cross key to select Histogram, and then press the Set button. The camera displays the Brightness and RGB options.
Press the down or up cross key to select the type of histogram you want, and then press the Set button. The option you choose remains in effect until you change it.
Setting the ISO determines the sensitivity of the image sensor to light. At low settings such as ISO 100, the sensor needs comparatively more light to make an exposure than at a high ISO setting such as 800.
However, as the sensitivity setting increases on a digital camera (a higher ISO number), the output of the sensor is also amplified. So while you have the option of increasing the ISO sensitivity at any point in shooting, the tradeoff in increased amplification or the accumulation of an excessive charge on the pixels represents an increase in digital noise. And the result of digital noise, depending on the appearance and severity, is an overall loss of resolution and image quality.
In practice, the most compelling benchmark in evaluating digital noise is the quality of the image at the final print size. If the digital noise is visible and objectionable in an 8-x-10-inch or 11-x-14-inch print when viewed at a standard viewing distance of a foot or more, then the digital noise degraded the quality to an unacceptable level. It is worthwhile to test the camera by using all the ISO settings, processing and printing enlargements at the size you typically print, and then evaluating how far and fast you want to take the XSi/450Ds ISO settings.
The XSi/450D offers two useful Custom Functions that help counteract noise: C.Fn-3: Long-exposure noise reduction and C.Fn-4: High ISO speed noise reduction.
Note
See Chapter 5 for details on each of these Custom Functions and how to set them.
Note
The ISO sensitivity setting affects the effective range of the built-in flash, and the range depends on the lens that you're using. In general, the higher the ISO speed, the greater the effective flash range.
There really is no substitute for knowing how far and fast to push the ISO settings on the XSi/450D unless you test it at each of the ISO settings and compare the results. To compare the results, view the images at 100% enlargement in an image-editing program, and then compare the shadow areas. If you see grain and colorful pixels where the tones should be continuous and of the same color, then you're seeing digital noise. Having low levels of digital noise won't spoil prints from the image, but high levels of digital noise can be objectionable in prints of 8 × 10 inches and larger.
To change the ISO sensitivity setting on the XSi/450D, follow these steps:
Set the camera to a Creative Zone mode such as P, Tv, Av, and so on, and then press the ISO button on the top of the camera. The ISO speed screen appears in the viewfinder. If the ISO screen doesn't also appear on the LCD, it's because the shooting information display on the LCD was not active when you began. Press the Display button to display the shooting information on the LCD, and then press the ISO button.
To change the ISO setting as you watch the viewfinder, turn the Main dial to the setting you want. Or to change the ISO setting on the LCD, press the down or up cross key to select the setting you want. Options include Auto (the camera automatically selects an ISO between 100 and 800) and individual settings from 100 to 1600. The ISO option you select remains in effect until you change it again. The current ISO sensitivity setting is displayed in the viewfinder and on the LCD.
In addition to good exposure, the success of a picture also depends on getting tack-sharp focus. The XSi/450D offers nine AF points that are etched in the viewfinder. Once you or the camera selects an AF point or points, it is used to establish the point of sharpest focus in the image.
Note
Technically, getting tack-sharp focus depends on three factors: the resolving power of the lens (its ability to render fine details sharply), the resolution of the image sensor, and, if you print the image, the resolution of the printer.
Autofocus speed figures into the final image sharpness as well, especially for fleeting moments such as capturing a ball coming off the bat or the flight of a covey of birds taking flight. Autofocus speed depends on factors including the the speed of the lens-focusing motor, the speed of the AF sensor in the camera, and how easy or difficult it is for the camera to focus on the subject.
For most shooting situations, the Rebel XSi/450D's wide-area AI (artificial intelligence) AF system — a system that is tied closely to the camera's drive modes — is fast and reliable. The camera automatically chooses one of three focusing modes:
FOne-shot AF. This mode is designed for still subjects. In Basic Zone modes, the camera chooses the AF point. In Creative Zone modes, you can either select the AF point yourself, or you can have the camera select it automatically.
FAI Focus AF. This mode is designed for still subjects that may begin to move. In this mode, the camera automatically switches to wAI Servo AF if it detects subject movement. This mode is good for photographing wildlife, music concerts, events, and children at play.
AI Servo AF. This mode tracks focus on moving subjects and locks focus and exposure at the moment you take the picture. In this mode, the shutter fires even if sharp focus hasn't had time to be finalized. If the AF point is automatically selected by the camera, it uses the center AF point and tracks the subject as it moves across all nine AF points. If you manually select the AF point, then the camera uses the selected AF point to track the subject. This is also referred to as predictive focus because if a subject is moving toward or away from the camera at a constant rate, then the camera "predicts" the subject distance to calculate focus.
In Creative Zone modes, you can select among these AF modes. In Basic Zone modes, you cannot select a focus mode.
To change AF modes in Creative Zone modes, ensure that the lens is set to AF (autofocus), and then follow these steps:
Press the AF (right cross key) button on the back of the camera. The AF mode screen appears.
Press the right or left cross key to change the AF mode, and then press the Set button. The mode you choose remains in effect for shooting in Creative Zone modes until you change it.
As you've learned by now, almost every function of the camera relates to other functions, and the same is true for AF modes. Table 2.2 shows which mode is selected in each drive and exposure mode.
Table 2.2. Autofocus and Drive Modes
Drive Mode | One-shot AF | AI Focus AF | AI Servo AF |
|---|---|---|---|
One-shot shooting | In One-shot AF mode, the camera must confirm accurate focus before you can take the picture. If you're using Evaluative metering, exposure is also locked at the selected AF point. | If the subject moves, the AF mode automatically switches from One-shot AF to AI Servo AF to focus on and track the moving subject. | The camera focuses on the subject and maintains focus during subject movement. The set at the exposure is moment the image is captured. |
Continuous shooting | Same as One-shot AF mode during continuous shooting | Same as for One-shot shooting. with AF continuing during continuous shooting. | |
Selecting an AF point determines the point in the image that will have the sharpest focus. When you're shooting in P, Tv, Av, and M modes, you can manually choose one of the nine AF points shown in the viewfinder. Or you can have the XSi/450D automatically choose the AF point for you. In Basic Zone modes and in A-DEP mode, the camera automatically selects the AF point or points.
Having the camera automatically choose the AF points is iffy, at best. When the camera chooses the AF points automatically, it focuses on whatever is nearest the lens or has the most readable contrast. This may or may not be the area that should have the point of sharpest focus. Because sharp focus is critical to the success of any image, it's best to switch to a Creative Zone mode and manually select one AF point.
You can manually select the AF point by following these steps:
Set the Mode dial to P, Tv, Av, or M mode. In the other Creative Zone mode, A-DEP, the camera automatically sets the AF point or points for you.
Press the AF Point Selection button on the back upper-right corner of the camera. The AF-point selection button has a magnifying glass with a plus sign in an icon below the button. The currently selected AF point lights in red.
As you look in the viewfinder, turn the Main dial until the AF point that you want to use is highlighted in the viewfinder. The LCD also displays the AF points as long as the LCD shooting information display was turned on when you began these steps. You can also use the cross keys to select an AF point. If you select the option where all the AF points are highlighted, then the camera automatically selects the AF point or points. If you want to control the point of sharpest focus in the image, then do not choose this option. Rather, choose an option where one AF point is highlighted. To quickly move to the center AF point, press the Set button once.
Move the camera so that the AF point you selected is over the point in the scene that should have sharp focus, press the Shutter button halfway down to focus on the subject, and then press it fully to make the picture.
A Drive mode determines how many shots the camera takes at a time, or, in Self-timer modes, it sets the camera to fire the shutter automatically after a 10- or 2-second delay. The Rebel XSi/450D offers five Drive modes for different shooting situations: Single-shot, Continuous, and three Self-timer modes l. If you're shooting one image at a time, then the 3.5 fps speed applies. But if you're shooting in Continuous drive mode, then you can fire off a burst of 53 Large JPEGs.
In Basic Zone modes, the camera automatically chooses the Drive mode. You can select the Drive mode in all Creative Zone modes.
As the name implies, Single-shot means that the XSi/450D takes one picture each time you press the Shutter button. In this mode, you can shoot 3.5 fps, depending on shutter speed.
Per the camera specs, Continuous drive mode enables continuous shooting of 3.5 fps, or, if you press and hold the Shutter button, you get a continuous burst of 53 Large JPEG images, 6 RAW, or 4 RAW + JPEG Large images.
Note
In AI Servo AF mode, the burst rate may be less, depending on factors including the lens and subject.
When the buffer is full from a continuous shooting burst, you can't shoot until some of the images are offloaded to the SD/SDHC card. Thanks to Canon's smart-buffering capability, you don't have to wait for the buffer to empty all the images to the media card before you can continue shooting. After a continuous burst sequence, the camera begins offloading pictures from the buffer to the card. As offloading progresses, the camera indicates in the viewfinder when there is enough buffer space to continue shooting. When the buffer is full, a "busy" message appears in the viewfinder, but if you keep the Shutter button pressed, the number of pictures that you can take is updated in the viewfinder. This is where it is useful to have a fast SD/SDHC card, which speeds up image offloading from the buffer.
Note
If the AF mode is set to AI Servo AF, the XSi/450D focuses continually during continuous shooting. However, in One-shot AF mode, the camera only focuses once during the burst.
In Self-timer modes, the camera delays making the picture for 10 or 2 seconds after the Shutter is fully depressed. In addition, you can use 10-second delay plus Continuous shooting. For Self-timer shots, be sure to use the eyepiece cover included with the camera to prevent stray light from entering through the viewfinder.
Here is a summary of the Self-timer modes:
10-second self-timer. In this mode, the camera waits 10 seconds before the shutter is fired, giving you time to get into the picture. In addition, you can use the Remote Controller RC-1 or RC-5, or the Remote Switch RS-60E3 with this mode. On the Drive mode screen, this mode is depicted as a stopwatch with a remote control symbol beside it. This mode is useful when you want to be in the picture with others, and for nature, landscape, and close-up shooting. It can be combined with Mirror Lock-up (C.Fn-9). With this combination, you have to press the Shutter button once to lock the mirror, and then wait for the timer to elapse to make the exposure.
2-second self-timer. In this mode the camera waits for 2 seconds before firing the shutter. This is a good choice when you're photographing documents or artwork. On the Drive mode screen, this mode is depicted as a stopwatch with the numeral 2 beside it.
10-second self-timer plus continuous shots. In this mode, you can choose to have the camera take two to ten shots in sequence each with a 10-second delay. On the Drive mode screen, this mode is depicted as a stopwatch with a "C" beside it.
In 10-second Self-timer mode, the Self-timer lamp on the front of the camera blinks and a beep is emitted slowly for 8 seconds and then the speed of the beep and the lamp blinking increase for the final 2 seconds before the shutter releases. The camera displays the countdown to firing on the LCD panel if the LCD display is turned on.
To change the drive mode, follow these steps:
Press the Drive mode button (the left cross key) on the back of the camera. The Drive mode screen appears.
Press the right or left cross key to select the mode you want. Each mode is denoted by an icon: a single rectangle indicates Single-shot, tiled rectangles indicate Continuous mode, and stop watches with or without a numeral or the letter "C" denote the Self-timer modes. The mode you select remains in effect until you change it.
On the Rebel XSi/450D, you can not only view images after you take them, but you can also magnify images to verify that the focus is sharp, display and page through multiple images that you have stored on the SD/SDHC card, display an image with a brightness or RGB histograms and a brightness histogram, display images as a slide show, and display the image along with its exposure settings. The following sections describe viewing options and suggestions for using each option.
Single-image playback is the default playback mode, and it briefly displays the image on the LCD after you take the picture. Canon sets the initial display time to 2 seconds, hardly enough time to move the camera from your eye and to see the image preview. The display time is intentionally set to 2 seconds to maximize battery life, but a longer display time of 4 seconds is more useful. You can also choose to set the Hold option to display the image until you dismiss it by lightly pressing the Shutter button.
To turn on image review, press the Playback button on the back of the camera. If you have multiple pictures on the SD/SDHC card, you can use the left and right cross keys to move forward and back through the images.
If you want to change the length of time that images display on the LCD, follow these steps:
Turn the Main dial to select the Shooting 1 (red) menu, then press the down cross key to select Review time.
Press the Set button. The Review time options appear.
Press the down cross key to select Off, 2, 4, 8, or Hold. The numbers indicate the number of seconds that the image displays. Off disables image display, while Hold displays the image until you dismiss it by pressing the Shutter button.
Press the Set button. Lightly press the Shutter button to return to shooting.
Index Display shows thumbnails of four or nine images stored on the SD/SDHC card at a time on the LCD. This display is handy when you need to ensure that you have a picture of everyone at a party or event, or to quickly select a particular image on a card that is full of images.
To turn on the Index Display, follow these steps:
Press the Playback button on the back of the camera.
Press the AE/FE Lock button on the back of the camera. This button has an asterisk displayed above it. The LCD displays the last four images stored on the SD card. If you don't have four images on the card, it displays as many images as are stored on the card.
Press the cross keys to move among the images. The selected image has a blue border.
Press the Magnify button up to 15 times to magnify the image. You can move around the image using the cross keys to view different areas of the magnified image.
Lightly press the Shutter button to cancel the display.
When you want to sit back and enjoy all the pictures on the SD/SDHC card, the Auto Play option plays a slide show of images on the card, displaying each one for 3 seconds. Use this option when you want to share pictures with the people that you're photographing, or to verify that you've taken all the shots that you intended to take during a shooting session.
You can turn on Auto Play by following these steps:
Press the Menu button, and then turn the Main dial to select the Playback (blue) menu.
Press the down cross key to select Auto Play.
Press the Set button. Images are displayed in the display mode that you last used. For example, if you displayed images with the Brightness histogram, they are displayed in this mode during Auto Play. Images display sequentially and in a continuous loop until you press the Shutter button to stop the slide show. You can pause the automatic display by pressing the Set button. A Pause icon appears in the upper-left area of the image preview. Press the Set button again to resume Auto Play.
You can use the Display button to sequence through different displays in Playback mode. In Single-image playback mode, press the Display button once to display basic shooting information overlaid on the image preview. Press it again to display shooting information, a small image preview, and the image histogram. Press it yet again to display the images with the RGB histograms. Press it once more to return to an image display with no shooting information. You can use the cross keys to move forward and back through pictures in this display.
Note
During playback, you can press the up cross key to display a jump bar that enables you to move forward and back among images by 10 or 100 images at a time, or by date. To choose the jump method, press the up or down cross key to select the increment you want. Then you can turn the Main dial to browse through images. To return to single-image browsing, press the left or right cross key.
Erasing images is useful only when you know without a doubt that you don't want the image that you're deleting. From experience, however, I know that some images that appear to be mediocre on the LCD can very often be salvaged with some judicious image editing on the computer. For that reason, you should erase images with caution.
If you want to delete an image, follow these steps:
Press the Playback button on the back of the camera and press the left and right cross keys to select the picture that you want to delete.
Press the Erase button, and then press the right cross key to select Erase.
Press the Set button to erase the image. When the access lamp stops blinking, lightly press the Shutter button to continue shooting.
On the other end of the spectrum from erasing images is the ability to ensure that images that you want to keep are not accidentally deleted. When you have that perfect or once-in-a-lifetime shot, you can protect it to ensure that it is not erased.
Setting protection means that no one can erase the image when they use the Erase or Erase All option.
Warning
Even protected images are erased if you or someone else formats the SD/SDHC card.
You can protect an image by following these steps:
Press the Menu button, and then turn the Main dial to select the Playback (blue) menu.
Press the up or down cross key to select Protect images, and then press the Set button. The last image taken is displayed on the LCD with a protection icon in the upper-left corner. If this isn't the image you want to protect, press the left or right cross key to display the image you do want to protect.
Press the Set button to protect the displayed image. A protection icon denoted by a key appears in the display above the thumbnail display.
Press the left or right cross key to scroll to other images that you want to protect, and then press the Set button to add protection to the images. If you want to remove protection, scroll to a protected image, and then press the Set button. Protection is removed and is indicated by the protection icon being removed.
Each time you change the lens on the camera, dust can filter into the lens chamber and eventually settle on the low-pass filter in front of the image sensor. Dust spots on the image sensor inevitably appear as dark spots on your images. With the Rebel XSi/450D, a two-step automated cleaning system addresses both small, light particles and sticky particles that adhere to the low-pass filter in front of the image sensor.
The first step is automatic cleaning that uses ultrasonic vibrations to shake off dust from the first low-pass filter in front of the image sensor. Dust is captured by sticky material that surrounds the low-pass filter. Each time you turn the camera on and off, the self-cleaning unit operates for one second. You can suspend automatic cleaning by pressing the Shutter button.
The second step of the camera's Integrated Cleaning System addresses larger, sticky particles that can't be shaken off by vibration. This step, called Dust Delete Data, identifies the size and position of large dust particles from a picture that you take of a white piece of paper. The camera then appends the dust data to all upcoming JPEG and RAW images. To delete the dust, you use Canon's Digital Photo Professional Copy Stamp tool and apply the Dust Delete Data. Dust Delete Data can be updated at any time, and you can stop the camera from appending the data to images if you want.
Automatic sensor cleaning can be initiated and turned off at any time. To reduce the risk of overheating the cleaning element, self-cleaning can't be operated more than five consecutive times in a 10-second period.
To manually initiate sensor cleaning, follow these steps:
Press the Menu button, and then turn the Main dial to select the Setup 2 (yellow) menu.
Press the down cross key to select Sensor cleaning, and then press the Set button. The Sensor cleaning screen appears.
Press the up or down cross key to select the option you want.
Select the Auto Cleaning option if you want to turn off the default sensor cleaning when the power switch is turned on and off, then press the Set button. On the Auto cleaning screen, press the right cross key to select Disable, and then press the Set button.
Select the Clean now option to clean the sensor now, and then press the Set button to select OK on the Clean now screen.
If the camera is in a Creative Zone mode, you can also select the Clean manually option (available in Creative Zone modes such as P, Tv, Av, and so on) to clean the sensor manually. Then press the Set button. The reflex mirror flips up and the shutter opens to allow you to use appropriate cleaning tools to clean the sensor. When you finish, turn the power off.
For larger, sticky dust particles, you can determine the size and location of dust by taking a picture of a white piece of paper. Although you take a picture of the paper, no image is recorded to the SD/SDHC card. From the picture, the XSi/450D maps the coordinates of dust particles that are stuck to the low-pass filter and creates a tiny data file that is appended to future images. To erase the dust, use Canon's Digital Photo Professional, an editing program that is included on the Canon EOS Digital Solution Disk that comes with the Rebel XSi/450D.
Appending dust data does not increase the image file size, and it does not affect the continuous shooting speed or maximum burst rate of the XSi/450D.
Before you begin, ensure that you
Have a clean piece of white paper that will fill the viewfinder if you position it approximately one foot from the lens. Ensure that the paper is evenly lit by any light source.
Set the lens focal length to 50mm or longer. On a zoom lens, the focal-length settings are displayed on the lens ring. Turn the lens ring to a focal length of 50mm or longer.
Set the lens to manual focus by turning the switch on the side of the lens to MF.
With the camera facing forward, set the focus to infinity by turning the lens-focusing ring all the way to the left.
To obtain Dust Delete Data, follow these steps:
Press the Menu button, and then select the Shooting 2 (red) tab.
Press the down cross key to select Dust Delete Data, and then press the Set button. The Dust Delete Data screen appears.
Press the left cross key to select OK, and then press the Set button. The camera initiates the automatic sensor self-cleaning. A message appears with the last date that data was obtained.
Press the right cross key to select OK, and then press the Set button.
With the camera approximately one foot from the white paper and the paper filling the viewfinder, press the Shutter button completely to take a picture of the paper. The XSi/450D captures the Dust Delete Data and displays a message confirming the capture.
Select OK by pressing the Set button. The Shooting menu appears. Lightly press the Shutter button to return to shooting.
After you've acquired Dust Delete Data, you can use Canon's Digital Photo Professional program to apply the data to images. Be sure that you have installed Digital Photo Professional from the Canon EOS Digital Solution Disk that comes with the camera. You can apply Dust Delete Data to either JPEG or RAW images.
To apply Dust Delete Data in Digital Photo Professional, follow these steps:
Start Digital Photo Professional, and then navigate to the folder that contains images with Dust Delete Data appended.
Select an image, and then click in the Edit image window in the toolbar. The image-editing window appears.
On the menu, click Tools, and then click Start Stamp tool. A new window appears with the image and a tool palette on the right side.
Click Apply Dust Delete Data. A progress pane appears, and then a confirmation message that tells you that the data has been applied.
Click OK. You can repeat these steps to apply the Dust Delete Data to the remaining images in the folder.