
Chapter 11. Maintenance
In this chapter, we look at some things you can do to keep your Cassandra cluster healthy. Our goal here is to provide an overview of the various maintenance tasks available. Because the specific procedures for these tasks tend to change slightly from release to release, you’ll want to make sure to consult the DataStax documentation for the release you’re using to make sure you’re not missing any new steps.
Let’s put our operations hats on and get started!
Health Check
There are some basic things that you’ll want to look for to ensure that nodes in your cluster are healthy:
-
Use
nodetool statusto make sure all of the nodes are up and reporting normal status. Check the load on each node to make sure the cluster is well balanced. An uneven number of nodes per rack can lead to an imbalanced cluster. -
Check
nodetool tpstatson your nodes for dropped messages, especially mutations, as this indicates that data writes may be lost. A growing number of blocked flush writers indicates the node is ingesting data into memory faster than it can be flushed to disk. Both of these conditions can indicate that Cassandra is having trouble keeping up with the load. As is usual with databases, once these problems begin, they tend to continue in a downward spiral. Three things that can improve the situation are a decreased load, scaling up (adding more hardware), or scaling out (adding another node and rebalancing).
If these checks indicate issues, you may need to dig deeper to get more information about what is going on:
-
Check the logs to see that nothing is reporting at
ERRORorWARNlevel (e.g., anOutOfMemoryError). Cassandra generates warning logs when it detects bad or obsolete configuration settings, operations that did not complete successfully, and memory or data storage issues. -
Review the configuration of the cassandra.yaml and cassandra-env.sh files for your Cassandra nodes to make sure that they match your intended settings. For example, the heap should be set to its recommended size of 8 GB.
-
Verify keyspace and table configuration settings. For example, a frequent configuration error is to forget to update keyspace replication strategies when adding a new data center.
-
Beyond the health of your Cassandra nodes, it is always helpful to have a sense of the overall health and configuration of your system, including ensuring network connectivity and that Network Time Protocol (NTP) servers are functioning correctly.
These are a few of the most important things that experienced Cassandra operators have learned to look for. As you gain experience with your own deployments, you can augment this list with additional health checks that are appropriate for your own environment.
Basic Maintenance
There are a few tasks that you’ll need to perform before or after more impactful tasks. For example, it makes sense to take a snapshot only after you’ve performed a flush. So in this section we look at some of these basic maintenance tasks.
Many of the tasks we look at in this chapter work somewhat differently depending on whether you’re using virtual nodes or single token nodes. Because vnodes are the default, we’ll focus primarily on maintenance of those nodes, but provide pointers if you’re using single token nodes.
Flush
To force Cassandra to write data from its memtables to SSTables on the filesystem, you use the flush command on nodetool, like this:
$ nodetool flush
If you check the server logs, you’ll see a series of output statements similar to this, one per table stored on the node:
DEBUG [RMI TCP Connection(297)-127.0.0.1] 2015-12-21 19:20:50,794
  StorageService.java:2847 - Forcing flush on keyspace hotel,
  CF reservations_by_hotel_date
You can selectively flush specific keyspaces or even specific tables within a keyspace by naming them on the command line:
$ nodetool flush hotel
$ nodetool flush hotel reservations_by_hotel_date hotels_by_poi
Running flush also allows Cassandra to clear commitlog segments, as the data has been written to SSTables.
The nodetool drain command is similar to flush. This command actually performs a flush and then directs Cassandra to stop listening to commands from the client and other nodes. The drain command is typically used as part of an orderly shutdown of a Cassandra node and helps the node startup to run more quickly, as there is no commitlog to replay.
Cleanup
The cleanup command scans all of the data on a node and discards any data that is no longer owned by the node. You might ask why a node would have any data that it doesn’t own.
Say that you’ve had a cluster running for some time, and you want to change the replication factor or the replication strategy. If you decrease the number of replicas for any data center, then there will be nodes in that data center that no longer serve as replicas for secondary ranges.
Or perhaps you’ve added a node to a cluster and reduced the size of the token range(s) owned by each node. Then each node may contain data from portions of token ranges it no longer owns.
In both of these cases, Cassandra does not immediately delete the excess data, in case a node goes down while you’re in the middle of your maintenance. Instead, the normal compaction processes will eventually discard this data.
However, you may wish to reclaim the disk space used by this excess data more quickly to reduce the strain on your cluster. To do this, you can the nodetool cleanup command.
As with the flush command, you can select to cleanup specific keyspaces and tables. You don’t need to automate running cleanup, as you will only need to run it if you have performed one of the actions described earlier.
Repair
As we discussed in Chapter 6, Cassandra’s tuneable consistency means that it is possible for nodes in a cluster to get out of sync over time. For example, writes at consistency levels less than ALL may succeed even if some of the nodes don’t respond, especially when a cluster is under heavy load. It’s also possible for a node to miss mutations if it is down or unreachable for longer than the time window for which hints are stored. The result is that different replicas for a different partition may have different versions of our data.
This is especially challenging when the missed mutations are deletions. A node that is down when the deletion occurs and remains offline for longer than the gc_grace_seconds defined for the table in question can “resurrect” the data when it is brought back online.
Fortunately, Cassandra provides multiple anti-entropy mechanisms to help mitigate against inconsistency. We’ve already discussed how read repair and higher consistency levels on reads can be used to increase consistency. The final key element of Cassandra’s arsenal is the anti-entropy repair or manual repair, which we perform using the nodetool repair command.
We can execute a basic repair as follows:
$ nodetool repair
[2016-01-01 14:47:59,010] Nothing to repair for keyspace 'hotel'
[2016-01-01 14:47:59,018] Nothing to repair for keyspace 'system_auth'
[2016-01-01 14:47:59,129] Starting repair command #1, repairing
  keyspace system_traces with repair options (parallelism: parallel,
  primary range: false, incremental: true, job threads: 1,
  ColumnFamilies: [], dataCenters: [], hosts: [], # of ranges: 510)
...
The output of this will vary, of course, based on the current state of your cluster. This particular command iterates over all of the keyspaces and tables in our cluster, repairing each one. We can also specify specific keyspaces and even one or more specific tables to repair via the syntax: nodetool repair <keyspace> {<table(s)>}. For example: nodetool repair hotel hotels_by_poi.
Limiting Repair Scope
The repair command can be restricted to run in the local data center via the -local option (which you may also specify via the longer form --in-local-dc), or in a named data center via the -dc <name> option (or --in-dc <name>).
Let’s look at what is happening behind the scenes when you run nodetool repair on a node. The node on which the command is run serves as the coordinator node for the request. The org.apache.cassandra.service.ActiveRepairService class is responsible for managing repairs on the coordinator node and processes the incoming request. The ActiveRepairService first executes a read-only version of a major compaction, also known as a validation compaction. During a validation compaction, the node examines its local data store and creates Merkle trees containing hash values representing the data in one of the tables under repair. This part of the process is generally expensive in terms of disk I/O and memory usage.
Next, the node initiates a TreeRequest/TreeResponse conversation to exchange Merkle trees with neighboring nodes. If the trees from the different nodes don’t match, they have to be reconciled in order to determine the latest data values they should all be set to. If any differences are found, the nodes stream data to each other for the ranges that don’t agree. When a node receives data for repair, it stores it in SSTables.
Note that if you have a lot of data in a table, the resolution of Merkle trees will not go down to the individual partition. For example, in a node with a million partitions, each leaf node of the Merkle tree will represent about 30 partitions. Each of these partitions will have to be streamed even if only a single partition requires repair. This behavior is known as overstreaming. For this reason, the streaming part of the process is generally expensive in terms of network I/O, and can result in duplicate storage of data that did not actually need repair.
This process is repeated on each node, for each included keyspace and table, until all of the token ranges in the cluster have been repaired.
Although repair can be an expensive operation, Cassandra provides several options to give you flexibility in how the work is spread out.
Full repair, incremental repair, and anti-compaction
In Cassandra releases prior to 2.1, performing a repair meant that all SSTables in a node were examined in a repair, which is now referred to as a full repair. The 2.1 release introduced incremental repair. With incremental repairs, data that has been repaired is separated from data that has not been repaired, a process known as anti-compaction.
This incremental approach improves the performance of the repair process, as there are fewer SSTables to search on each repair. Also the reduced search means that fewer partitions are in scope, leading to smaller Merkle trees and less overstreaming.
Cassandra adds a bit of metadata to each SSTable file in order to keep track of its repair status. You can view the repair time by using the sstablemetadata tool. For example, examining an SSTable for our hotel data indicates the data it contains has not been repaired:
$ tools/bin/sstablemetadata data/data/hotel/
  hotels-d089fec0677411e59f0ba9fac1d00bce/ma-5-big-Data.db
SSTable: data/data/hotel/hotels-d089fec0677411e59f0ba9fac1d00bce/ma-5-big
Partitioner: org.apache.cassandra.dht.Murmur3Partitioner
Bloom Filter FP chance: 0.010000
Minimum timestamp: 1443619302081305
Maximum timestamp: 1448201891587000
SSTable max local deletion time: 2147483647
Compression ratio: -1.0
Estimated droppable tombstones: 0.0
SSTable Level: 0
Repaired at: 0
ReplayPosition(segmentId=1449353006197, position=326)
Estimated tombstone drop times:
2147483647:        37
...
Transitioning to Incremental Repair
Incremental repair became the default in the 2.2 release, and you must use the -full option to request a full repair. If you are using a version of Cassandra prior to 2.2, make sure to consult the release documentation for any additional steps to prepare your cluster for incremental repair.
Sequential and parallel repair
A sequential repair works on repairing one node at a time, while parallel repair works on repairing multiple nodes with the same data simultaneously. Sequential repair was the default for releases through 2.1, and parallel repair became the default in the 2.2 release.
When a sequential repair is initiated using the -seq option, a snapshot of data is taken on the coordinator node and each replica node, and the snapshots are used to construct Merkle trees. The repairs are performed between the coordinator node and each replica in sequence. During sequential repairs, Cassandra’s dynamic snitch helps maintain performance. Because replicas that aren’t actively involved in the current repair are able to respond more quickly to requests, the dynamic snitch will tend to route requests to these nodes.
A parallel repair is initiated using the -par option. In a parallel repair, all replicas are involved in repair simultaneously, and no snapshots are needed. Parallel repair places a more intensive load on the cluster than sequential repair, but also allows the repair to complete more quickly.
Partitioner range repair
When you run repair on a node, by default Cassandra repairs all of the token ranges for which the node is a replica. This is appropriate for the situation where you have a single node that is in need of repair—for example, a node that has been down and is being prepared to bring back online.
However, if you are doing regular repairs for preventative maintenance, as recommended, repairing all of the token ranges for each node means that you will be doing multiple repairs over each range. For this reason, the nodetool repair command provides the -pr option, which allows you to repair only the primary token range or partitioner range. If you repair each node’s primary range, the whole ring will be repaired.
Subrange repair
Even with the -pr option, a repair can still be an expensive operation, as the primary range of a node can represent a large amount of data. For this reason, Cassandra supports the ability to repair by breaking the token range of a node into smaller chunks, a process known as subrange repair.
Subrange repair also addresses the issue of overstreaming. Because the full resolution of a Merkle tree is applied to a smaller range, Cassandra can precisely identify individual rows that need repair.
To initiate a subrange repair operation, you will need the start token (-st) and end token (-et) of the range to be repaired.
$ nodetool repair -st <start token> -et <end token>
You can obtain tokens for a range programmatically via the DataStax Cassandra drivers. For example, the Java driver provides operations to get the token ranges for a given host and keyspace, and to split a token range into subranges. You could use these operations to automate a repair request for each subrange, or just print out the ranges, as we do in this example:
for (Host host : cluster.getMetadata().getAllHosts())
{
  for (TokenRange tokenRange :
       cluster.getMetadata().getTokenRanges("hotel", host))
  {
    for (TokenRange splitRange : tokenRange.splitEvenly(SPLIT_SIZE))
    {
       System.out.println("Start: " + splitRange.getStart().getValue() +
                          ", End: " + splitRange.getEnd().getValue());
    }
  }
}
A similar algorithm using subrange repair is implemented by the OpsCenter Repair Service, which we’ll examine momentarily.
Rebuilding Indexes
If you’re using secondary indexes, they can get out of sync just like any other data. While it is true that Cassandra stores secondary indexes as tables behind the scenes, the index tables only reference values stored on the local node. For this reason, Cassandra’s repair mechanisms aren’t helpful for keeping indexes up to date.
Because secondary indexes can’t be repaired and there is no simple way to check their validity, Cassandra provides the ability to rebuild them from scratch using nodetool’s rebuild_index command. It is a good idea to rebuild an index after repairing the table on which it is based, as the columns on which the index is based could have been represented among the values repaired. As with repair, remember that rebuilding indexes is a CPU- and I/O-intensive procedure.
Moving Tokens
If you have configured your cluster to use vnodes (which has been the default configuration since the 2.0. release), Cassandra handles the assignment of token ranges to each of the nodes in your cluster. This includes changing these assignments when nodes are added or removed from the cluster. However, if you’re using single token nodes, you’ll need to reconfigure the tokens manually.
To do this, you first need to recalculate the token ranges for each node using the technique described in Chapter 7. Then we use the nodetool move command to assign the ranges. The move command takes a single argument, which is the new start token for the node:
$ nodetool move 3074457345618258600
After adjusting the token of each node, complete the process by running nodetool cleanup on each node.
Adding Nodes
We learned briefly in Chapter 7 how to add a node using the Cassandra Cluster Manager (ccm), which was a great way for us to get started quickly. Now let’s dig a little deeper to discuss some of the motivations and procedures for adding new nodes and data centers.
Adding Nodes to an Existing Data Center
If your application is successful, sooner or later you’ll arrive at the point where you need to add nodes to your cluster. This might be as part of a planned increase in capacity, or it might be in reaction to something you’ve observed in a health check such as running low on storage space, or nodes that are experiencing high memory and CPU utilization, or increasing read and write latencies.
Whatever the motivation for your expansion, you’ll start by installing and configuring Cassandra on the machines that will host the new nodes. The process is similar to what we outlined in Chapter 7, but keep the following in mind:
- The Cassandra version must be the same as the existing nodes in the cluster. If you want to do a version upgrade, upgrade the existing nodes to the new version first and then add new nodes.
- You’ll want to use the same configuration values as you did for other nodes in files such as cassandra.yaml and cassandra-env.sh, including the
cluster_name,dynamic_snitch,partitioner, andlisten_address. - Use the same seed nodes as in the other nodes. Typically, the new nodes you add won’t be seed nodes, so there is no need to add the new nodes to the seeds list in your previously existing nodes.
- If you have multiple racks in your configuration, it’s a good idea to add nodes to each rack at the same time to keep the number of nodes in each rack balanced. For some reason, this always reminds me of the rule in the classic board game Monopoly that requires houses to be spread evenly across properties.
- If you’re using single token nodes, you’ll have to manually calculate the token range that will be assigned to each node as we discussed in “Moving Tokens”. A simple and effective way to keep the cluster balanced is to divide each token range in half, doubling the number of nodes in the cluster.
- In most cases, you’ll want to configure your new nodes to begin bootstrapping immediately—that is, claiming token ranges and streaming the data for those ranges from other nodes. This is controlled by the
autobootstrapproperty, which defaults totrue. You can add this to your cassandra.yaml file to explicitly enable or disable auto bootstrapping.
Once the nodes are configured, you can start them, and use nodetool status to determine when they are fully initialized.
You can also watch the progress of a bootstrap operation on a node by running the nodetool bootstrap command. If you’ve started a node with auto bootstrapping disabled, you can also kick off bootstrapping remotely at the time of your choosing with the command nodetool bootstrap resume.
After all new nodes are running, make sure to run a nodetool cleanup on each of the previously existing nodes to clear out data that is no longer managed by those nodes.
Adding a Data Center to a Cluster
There are several reasons you might want to add an entirely new data center to your cluster. For example, let’s say that you are deploying your application to a new data center in order to reduce network latency for clients in a new market. Or perhaps you need an active-active configuration in order to support disaster recovery requirements for your application. A third popular use case is to create a separate data center that can be used for analytics without impacting online customer transactions.
We’ll explore some of these deployments further in Chapter 14, but for now let’s focus on how we can extend our cluster to a new data center.
The same basic steps we followed for adding a node in an existing data center apply to adding nodes in a new data center. Here are a few additional things you’ll want to consider as you configure the cassandra.yaml file for each node:
- Make sure to configure an appropriate snitch for your deployment environment using the
endpoint_snitchproperty and any configuration files associated with the snitch. Hopefully you planned for this when first setting up your cluster, but if not, you will need to change the snitch in the initial data center. If you do need to change the snitch, you’ll first want to change it on nodes in the existing data center and perform a repair before adding the new data center. - Select a couple of the nodes in the new data center to be seeds, and configure the
seedsproperty in the other nodes accordingly. Each data center should have its own seeds independent of the other data centers. - The new data center is not required to have the same token range configuration as any existing data centers within the cluster. You can select a different number of vnodes or use single-token nodes if so desired.
- Disable auto bootstrapping by finding (or adding) the
autobootstrapoption and setting it tofalse. This will prevent our new nodes from attempting to stream data before we’re ready.
After all of the nodes in the new data center have been brought online, you then configure replication options for the NetworkTopologyStrategy for all keyspaces that you wish to replicate to the new data center.
For example, to extend our hotel keyspace into an additional data center, we might execute the command:
cqlsh> ALTER KEYSPACE hotel WITH REPLICATION =
  {'class' : 'NetworkTopologyStrategy', 'dc1' : 3, 'dc2' : 2};
Note that the NetworkTopologyStrategy allows us to specify a different number of replicas for each data center.
Next, run the nodetool rebuild command on each node in the new data center. For example, the following command causes a node to rebuild its data by streaming from data center dc1:
$ nodetool rebuild -- dc1
You can rebuild multiple nodes in parallel if desired; just remember to consider the impact on your cluster before doing this.
Once the rebuilding is complete, your new data center is ready to use. Don’t forget to reconfigure the cassandra.yaml file for each node in the new data center to remove the autobootstrap: false option, so that the nodes will recover successfully if restarted.
Don’t Forget Your Clients
You’ll also want to consider how adding another data center affects your existing clients and their usage of LOCAL_* and EACH_* consistency levels. For example, if you have clients using the QUORUM consistency level for reads or writes, queries that used to be confined to a single data center will now involve multiple data centers. You may wish to switch to LOCAL_QUORUM to limit latency, or to EACH_QUORUM to ensure strong consistency in each data center.
Handling Node Failure
From time to time, a Cassandra node may fail. Failure can occur for a variety of reasons, including: hardware failure, a crashed Cassandra process, or a virtual machine that has been stopped or destroyed. A node that is experiencing network connectivity issues may be marked as failed in gossip and reported as down in nodetool status, although it may come back online if connectivity improves.
In this section, we’ll examine how to repair or replace failed nodes, as well as how to gracefully remove nodes from a cluster.
Repairing Nodes
The first thing to do when you observe there is a failed node is to try to determine how long the node has been down. Here is a quick rule of thumb to know if repair or replacement may be required:
- If the node has been down for less than the hints delivery window specified by the
max_hint_window_in_msproperty, the hinted handoff mechanism should be able to recover the node. Restart the node and see whether it is able to recover. You can watch the node’s logs or track its progress usingnodetool status. - If the node has been down for less than the repair window defined lowest value of
gc_grace_secondsfor any of its contained tables, then restart the node. If it comes up successfully, run anodetool repair. - If the node has been down for longer than the repair window, it should be replaced, in order to avoid tombstone resurrection.
Recovering from disk failure
A disk failure is one form of hardware failure from which a node may be able to recover. If your node is configured to use Cassandra with multiple disks (JBOD), the disk_failure_policy setting determines what action is taken when a disk failure occurs, and how you may be able to detect the failure:
- If the policy is set to the default (
stop), the node will stop gossiping, which will cause it to appear as a downed node innodetool status. You can still connect to the node via JMX. - If the policy is set to
die, the JVM exits and the node will appear as a downed node innodetool status. - If the policy is set to
ignore, there’s no immediate way to detect the failure. - If the policy is set to
best_effort, Cassandra continues to operate using the other disks, but a WARN log entry is written, which can be detected if you are using a log aggregation tool. Alternatively, you can use a JMX monitoring tool to monitor the state of theorg.apache.cassandra.db.BlacklistedDirectoriesMBean, which lists the directories for which the node has recorded failures. - If a disk failure is detected on node startup and the policy is anything besides
best_effort, the node writes an ERROR log entry and exits.
Once you’ve detected a disk failure, you may want to try restarting the Cassandra process or rebooting the server. But if the failure persists, you’ll have to replace the disk and delete the contents of the data/system directory in the remaining disks so that when you restart the node, it comes up in a consistent state. When the node is up, run a repair.
Replacing Nodes
If you’ve determined that a node can’t be repaired, you will most likely want to replace it in order to keep your cluster balanced and maintain the same capacity.
While we could replace a node by removing the old node (as in the next section) and adding a new node, this is not a very efficient approach. Removing and then adding nodes results in excess streaming of data, first to move data away from the old node and then to move it back to the new node.
The more efficient approach is to add a node that takes over the token ranges of an existing node. To do this, we follow the previously outlined procedure for adding a node, with one addition. Edit the cassandra-env.sh file for the new node to add the following JVM option (where <address> is the IP address or hostname of the node that is being replaced):
JVM_OPTS="$JVM_OPTS -Dcassandra.replace_address=<address>"
After the replacement node finishes bootstrapping, you can remove this option, as it is not required for any subsequent restarts of the node.
If you’re using a snitch that uses a properties file to record the cluster topology, such as the GossipingPropertyFileSnitch or the PropertyFileSnitch, you’ll need to add the address of your new node to the properties file on each node and do a rolling restart of the nodes in your cluster. It is recommended that you wait 72 hours before removing the address of the old node to avoid confusing the gossiper.
Replacing a Seed Node
If the node you’re replacing is a seed node, select an existing non-seed node to promote to a seed node. You’ll need to add the promoted seed node to the seeds property in the cassandra.yaml file of existing nodes.
Typically, these will be nodes in the same data center, assuming you follow the recommendation of using a different seed list per data center. In this way, the new node we create will be a non-seed node and can bootstrap normally.
There are some additional details if you are using a package installation of Cassandra; consult the documentation for your specific release for additional details.
Removing Nodes
If you decide not to replace a downed node right away, or just want to shrink the size of your cluster, you’ll need to remove or decommission the node. The proper technique for removal depends on whether the node being removed is online or able to be brought online. We’ll look at three techniques, in order of preference: decommission, remove, and assassinate.
Decommissioning a node
If the node is reporting as up, we decommission the node. Decommissioning a node means pulling it out of service. When you execute the nodetool decommission command, you’re calling the decommission operation on Cassandra’s StorageService class. The decommission operation assigns the token ranges that the node was responsible for to other nodes and then streams the data to those nodes. This is effectively the opposite of the bootstrapping operation.
While the decommission is running, the node will report that it is in a leaving state in nodetool status via the code UL (up, leaving):
$ nodetool status

Datacenter: datacenter1
=======================
Status=Up/Down
|/ State=Normal/Leaving/Joining/Moving
--  Address    Load       Tokens  Owns  Host ID                           Rack
UN  127.0.0.1  340.25 KB  256     ?     31d9042b-6603-4040-8aac-...       rack1
UN  127.0.0.2  254.31 KB  256     ?     caad1573-4157-43d2-a9fa-...       rack1
UN  127.0.0.3  259.45 KB  256     ?     e78529c8-ee9f-46a4-8bc1-...       rack1
UL  127.0.0.4  116.33 KB  256     ?     706a2d42-32b8-4a3a-85b7-...       rack1
You can examine the server log of the decommissioned node to see the progress. For example, you’ll see a series of statements like this indicating the new home for each token range:
DEBUG [RMI TCP Connection(4)-127.0.0.1] 2016-01-07 06:00:20,923
  StorageService.java:2369 - Range (-1517961367820069851,-1490120499577273657]
  will be responsibility of /127.0.0.3
After this, you’ll see another log statement indicating the beginning of streaming data to other nodes:
INFO  [RMI TCP Connection(4)-127.0.0.1] 2016-01-07 06:00:21,274
  StorageService.java:1191 - LEAVING: replaying batch log and
  streaming data to other nodes
You can also use nodetool netstats to monitor the progress of data streaming to the new replicas.
When the streaming is complete, the node announces its departure to the rest of the cluster for a period of 30 seconds, and then stops:
INFO  [RMI TCP Connection(4)-127.0.0.1] 2016-01-07 06:00:22,526
  StorageService.java:3425 - Announcing that I have left the ring for 30000ms
...
WARN  [RMI TCP Connection(4)-127.0.0.1] 2016-01-07 06:00:52,529
  Gossiper.java:1461 - No local state or state is in silent shutdown, not
  announcing shutdown
Finally, the decommission is complete:
INFO  [RMI TCP Connection(4)-127.0.0.1] 2016-01-07 06:00:52,662
  StorageService.java:1191 - DECOMMISSIONED
If you call decommission on a node that can’t be decommissioned (i.e., one that isn’t part of the ring yet, or on the only node available), you’ll see an error message to that effect.
Removing a node
If the node is down, you’ll have to use the nodetool removenode command instead of decommission. If your cluster uses vnodes, the removenode command causes Cassandra to recalculate new token ranges for the remaining nodes and stream data from current replicas to the new owner of each token range.
If your cluster does not use vnodes, you’ll need to manually adjust the token ranges assigned to each remaining node (as discussed in “Moving Tokens”) prior to running removenode to perform the streaming. The removenode command also provides a -- status option to allow you to monitor the progress of streaming.
Most nodetool commands operate directly on the node identified via the -h flag. The syntax of the removenode command is a bit different, because it has to run on a node which is not the one being removed. Rather than the IP address, the target node is identified via its host ID, which you can obtain via the nodetool status command:
$ nodetool status
Datacenter: datacenter1
=======================
Status=Up/Down
|/ State=Normal/Leaving/Joining/Moving
--  Address    Load       Tokens  Owns  Host ID
UN  127.0.0.1  244.71 KB  256     ?     31d9042b-6603-4040-8aac-fef0a235570b
UN  127.0.0.2  224.96 KB  256     ?     caad1573-4157-43d2-a9fa-88f79344683d
DN  127.0.0.3  230.37 KB  256     ?     e78529c8-ee9f-46a4-8bc1-3479f99a1860

$ nodetool removenode  e78529c8-ee9f-46a4-8bc1-3479f99a1860
Assassinating a node
If the nodetool removenode operation fails, you can also run nodetool assassinate as a last resort. The assassinate command is similar to removenode, except that it does not re-replicate the removed node’s data. This leaves your cluster in a state where repair is needed.
Another key difference from removenode is that the assassinate command takes the IP address of the node to assassinate, rather than the host ID:
$ nodetool assassinate 127.0.0.3
Don’t Forget to Clean Up Seed Node Configuration
Whenever you remove a seed node, make sure you update the cassandra.yaml files on remaining nodes to remove the IP address of the node that was removed. You’ll also want to make sure you still have an adequate number of seed nodes (at least two per data center).
Upgrading Cassandra
Because Cassandra is a technology that continues to thrive and grow, new releases are made available on a regular basis, offering new features, improved performance, and bug fixes. Just as the Apache community has established a rhythm for its regular releases, you’ll also want to plan your adoption of these releases.
When you determine it is time for an upgrade, be careful to consult the NEWS.txt file found in the base directory of the new release and follow the upgrade instructions for releases between your current and new releases. An upgrade can be a complex process and it’s easy to cause a lot of damage to your cluster if the instructions aren’t followed carefully.
You should also consult the overall upgrade guide published by DataStax. This guide provides an excellent overview of the upgrade process and a summary of any intermediate upgrades that may be required in order to update to and from various versions.
A Cassandra cluster is upgraded via a process known as a rolling upgrade, as each node is upgraded one at a time. To perform a rolling upgrade, use the following steps:
- First, run a
nodetool drainon the node to clear out any writes that still need to be flushed to disk and stop receiving new writes. - Stop the node.
- Make a backup copy of configuration files such as cassandra.yaml and cassandra-env.sh so they don’t get overwritten.
- Install the new version.
- Update the configuration files to match your specific deployment.
Upgrading a major version number (and some minor version upgrades) requires you to run the nodetool upgradesstables command to convert your stored data files to the latest format. As with other nodetool commands we’ve examined, you can specify a keyspace or even tables within a keyspace to be upgraded, but in general you’ll need to upgrade all of the node’s tables. You can also update a node’s tables when it is offline via the bin/sstableupgrade script.
These steps are repeated for each node in the cluster. Although the cluster remains operational while the rolling upgrade is in process, you should carefully plan your upgrade schedule, taking into account the size of the cluster. While the cluster is still being upgraded, you should avoid making schema changes or run any repairs.
Backup and Recovery
Cassandra is built to be highly resilient to failure, with its support for configurable replication and multiple data centers. However, there are still a number of good reasons for backing up data:
- Defects in application logic could cause good data to be overwritten and replicated to all nodes before the situation becomes known.
- SSTables can become corrupted.
- A multi–data center failure could wipe out your disaster recovery plan.
Cassandra provides two mechanisms for backing up data: snapshots and incremental backups. Snapshots provide a full backup, while incremental backups provide a way to back up changes a little at a time.
Cassandra’s snapshots and backups are complementary techniques that are used together to support a robust backup and recovery approach.
Both the snapshot and backup mechanisms create hard links to SSTable files, which avoids creating extra files in the short term. However, these files can accumulate over time as compaction occurs and files that are deleted from the data directory are still preserved via the hard links.
The tasks of copying these files to another location and deleting them so they do not fill up disk space are left to the user. However, these tasks are easy to automate and there are various tools that support this such as DataStax OpsCenter, which we’ll introduce momentarily. An open source example is Jeremy Grosser’s Tablesnap.
Taking a Snapshot
The purpose of a snapshot is to make a copy of some or all of the keyspaces and tables in a node and save it to what is essentially a separate database file. This means that you can back up the keyspaces elsewhere or leave them where they are in case you need to restore them later. When you take a snapshot, Cassandra first performs a flush, and then makes a hard link for each SSTable file.
Taking a snapshot is straightforward:
$ nodetool snapshot
Requested creating snapshot(s) for [all keyspaces] with snapshot name
  [1452265846037]
Snapshot directory: 1452265846037
Here, a snapshot has been taken for all of the keyspaces on the server, including Cassandra’s internal system keyspace. If you want to specify only a single keyspace to take a snapshot of, you can pass it as an additional argument: nodetool snapshot hotel. Alternatively, you can use the -cf option to list the name of a specific table.
We can list the snapshots that have been taken with the nodetool listsnapshots command:
$ nodetool listsnapshots
Snapshot name   Keyspace name   Column family name   True size   Size on disk
1452265846037   hotel           pois_by_hotel        0 bytes     13 bytes
1452265846037   hotel           hotels               0 bytes     13 bytes
...

Total TrueDiskSpaceUsed: 0 bytes
To find these snapshots on the filesystem, remember that the contents of the data directory are organized in subdirectories for keyspaces and tables. There is a snapshots directory under each table’s directory, and each snapshot is stored in a directory named for the timestamp at which it was taken. For example, we can find the hotels table snapshot at:
Each snapshot also contains a manifest.json file, that lists the SSTable files which are included in the snapshot. This is used to make sure that the entire contents of a snapshot are present.
Point-in-Time Snapshots Across Multiple Nodes
The nodetool snapshot command only operates on a single server. You will need to run this command at the same time on multiple servers if you want a point-in-time snapshot, using a parallel ssh tool such as pssh.
Cassandra also provides an auto snapshot capability that takes a snapshot on every DROP KEYSPACE, DROP TABLE, or TRUNCATE operation. This capability is enabled by default via the auto_snapshot property in the cassandra.yaml file to prevent against accidental data loss. There is an additional property, snapshot_before_compaction, which defaults to false.
Clearing a Snapshot
You can also delete any snapshots you’ve made, say, after you’ve backed them up to permanent storage elsewhere. It is a good idea to delete old snapshots before creating a new one.
To clear your snapshots, you can manually delete the files, or use the nodetool clearsnapshot command, which takes an optional keyspace option.
Enabling Incremental Backup
After you perform a snapshot, you can enable Cassandra’s incremental backup using the nodetool enablebackup command. This command applies to all keyspaces and tables in the node.
You can also check whether incremental backups are enabled with nodetool statusbackup and disable incremental backups with nodetool disablebackup.
When incremental backups are enabled, Cassandra creates backups as part of the process of flushing SSTables to disk. The backup consists of a hard link to each data file Cassandra writes under a backups directory—for example:
To enable backups across a restart of the node, set the incremental_backups property to true in the cassandra.yaml file.
You can safely clear incremental backups after you perform a snapshot and save the snapshot to permanent storage.
Restoring from Snapshot
The process of restoring a node from backups begins with collecting the most recent snapshot plus any incremental backups since the snapshot. There is no difference in how data files from snapshots and backups are treated.
Before starting a restore operation on a node, you will most likely want to truncate the tables to clear any data changes made since the snapshot.
Don’t Forget to Restore the Schema!
Be aware that Cassandra does not include the database schema as part of snapshots and backups. You will need to make sure that the schema is in place before doing any restore operations. Fortunately, this is easy to do using the cqlsh’s DESCRIBE TABLES operation, which can easily be scripted.
If your cluster topology is the same as when the snapshots were taken, there have been no changes to the token ranges for each node, and there are no changes to the replication factor for the tables in question, you can copy the SSTable data files into the data directory for each node. If the nodes are already running, running the nodetool refresh command will cause Cassandra to load the data.
If there has been a change to the topology, token ranges, or replication, you’ll need to use a tool called sstableloader to load the data. In some ways, the sstableloader behaves like a Cassandra node: it uses the gossip protocol to learn about the nodes in a cluster, but it does not register itself as a node. It uses Cassandra’s streaming libraries to push SSTables to nodes. The sstableloader does not copy SSTable files directly to every node, but inserts the data in each SSTable into the cluster, allowing the partitioner and replication strategy of the cluster to do their work.
The sstableloader is also useful for moving data between clusters.
SSTable Utilities
There are several utilities found in the bin and tools/bin directories that operate directly on SSTable data files on the filesystem of a Cassandra node. These files have a .db extension. For example:
In addition to the sstablemetadata, sstableloader, and sstableupgrade tools we’ve seen already, here are a few other SSTable utilities:
- The
sstableutilutility will list the SSTable files for a provided table name. - The
sstablekeysutility lists the partition keys that are stored in a given SSTable. - The
sstableverifyutility will verify the SSTable files for a provided keyspace and table name, identifying any files that exhibit errors or data corruption. This is an offline version of thenodetool verifycommand. - The
sstablescrubutility is an offline version of thenodetool scrubcommand. Because it runs offline, it can be more effective at removing corrupted data from SSTable files. If the tool removes any corrupt rows, you will need to run a repair. - The
sstablerepairedsetis used to mark specific SSTables as repaired or unrepaired to enable transitioning a node to incremental repair. Because incremental repair is the default as of the 2.2 release, clusters that have been created on 2.2 or later will have no need to use this tool.
Several of the utilities help assist in managing compaction, which we’ll examine further in Chapter 12:
- The
sstableexpiredblockersutility will reveal blocking SSTables that prevent an SSTable from being deleted. This class outputs all SSTables that are blocking other SSTables from getting dropped so you can determine why a given SSTable is still on disk. - The
sstablelevelresetutility will reset the level to 0 on a given set of SSTables, which will force the SSTable to be compacted as part of the next compaction operation. - The
sstableofflinerelevelutility will reassign SSTable levels for tables using theLeveledCompactionStrategy. This is useful when a large amount of data is ingested quickly, such as with a bulk import. - The
sstablesplitutility is used to split SSTables files into multiple SSTables of a maximum designated size. This is useful if a major compaction has generated large tables that otherwise would not be compacted for a long time.
Under normal circumstances, you probably won’t need to use these tools very often, but they can be quite useful in debugging and gaining a greater understanding of how Cassandra’s data storage works. Utilities that modify SSTables such as sstablelevelreset, sstablerepairedset, sstablesplit, sstableofflinerelevel must be run when Cassandra is not running on the local host.
Maintenance Tools
While it is certainly possible to maintain a Cassandra cluster entirely via nodetool, many organizations, especially those with larger installations, have found it helpful to make use of advanced tools that provide automated maintenance features and improved visualizations.
Let’s take a quick look at the capabilities provided by two of these tools: DataStax OpsCenter and Netflix Priam.
DataStax OpsCenter
DataStax OpsCenter is a web-based management and monitoring solution for Cassandra that automates maintenance tasks including those we discussed in this chapter. OpsCenter comes in two editions: the free Community Edition, which manages clusters built on the Apache Cassandra distribution, and the Enterprise version, which manages DataStax Enterprise clusters.
The core of OpsCenter is the dashboard, which provides an immediate visual summary of the health of your cluster, as shown in Figure 11-1.
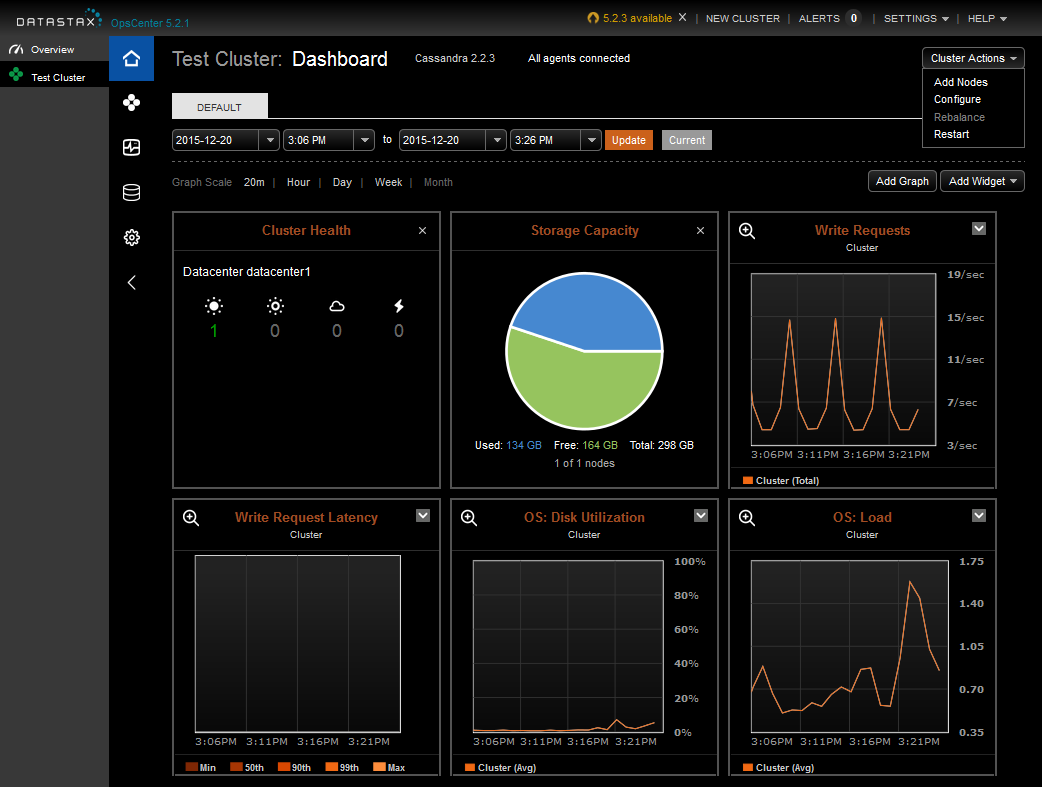
Figure 11-1. DataStax OpsCenter Dashboard for the Test Cluster
In addition to cluster health, the dashboard includes metrics to track capacity and write latency. You can customize the dashboard to add graphs to monitor many other metrics reported by Cassandra via JMX. The Enterprise Edition also allows you to configure thresholds on these metrics for generation of alerts and email notifications.
Operations that can be performed on a cluster are shown at the upper right of the figure and include adding nodes, configuring cassandra.yaml settings for all nodes, and restarting the cluster. There is also a “Rebalance” command that can be used to automatically reallocate token ranges in clusters not using vnodes.
DataStax Enterprise Edition also provides a Repair Service which automates repairs across the cluster. The Repair Service runs continuously, using incremental repairs to repair subranges of the cluster. The Repair Service monitors the progress of these subrange repairs and throttles its repairs to minimize impact to the cluster. Once all subranges have been repaired, a new repair cycle is started.
The OpsCenter Nodes view provides a helpful graphical representation of the nodes in the cluster in a ring configuration, as shown in Figure 11-2.

Figure 11-2. DataStax OpsCenter Nodes View
From the Nodes view, we can select an individual node by its position on the ring and view statistics on the node’s memory, storage capacity, load, tpstats info, and other metrics. We can also start and stop nodes and perform maintenance actions such as cleanup, compaction, flush, repair, decommission, and drain.
Use a Separate Cluster for OpsCenter Data
Behind the scenes, OpsCenter uses Cassandra to store metadata and metrics for the clusters it is managing. While it is possible to configure OpsCenter to put its tables in an existing cluster, the recommended configuration is to create a separate cluster for OpsCenter to store its data. By following this guideline, you will avoid impacting your production clusters.
Netflix Priam
Priam is a tool built by Netflix to help manage its Cassandra clusters. Priam was the King of Troy in Greek mythology, and the father of Cassandra. Priam automates the deployment, starting, and stopping of nodes, as well as backup and restore operations.
Priam is also well integrated with the Amazon Web Services (AWS) cloud environment, although AWS deployment is not required. For example, Priam supports deployment of Cassandra in auto-scaling groups (ASGs), automated backup of snapshots to the Simple Storage Service (S3), and configuration of networking and security groups for Cassandra clusters that span multiple regions.
While Priam does not include a user interface, it does provide a RESTful API that you can use to build your own frontend or access directly via curl. The API provides the ability to start and stop nodes, access nodetool commands (with JSON-formatted output), and perform backup and restore operations.
Summary
In this chapter, we looked at some of the ways you can interact with Cassandra to perform routine maintenance tasks; add, remove, and replace nodes; back up and recover data with snapshots, and more. We also looked at some tools that help automate these tasks to speed up maintenance and reduce errors.