
Chapter 11. Configuring Cisco Next-Generation IPS
This chapter covers the following topics:
![]() Policy
Policy
![]() Snort rules
Snort rules
![]() Performance settings
Performance settings
![]() Stack/cluster
Stack/cluster
You learned in Chapter 10, “Introduction to and Deployment of Cisco Next-Generation IPS,” how security architects can use next-generation intrusion prevention systems (NGIPS) in modern networks. A simple and efficient configuration interface allows administrators to use a wealth of NGIPS functions easily. The Cisco NGIPS product is not only properly architected to offer the best functionality in the industry but also comes with an intuitive management platform, the Firepower Management Center (FMC).
This chapter introduces the configuration options available in the FMC. It describes policy configuration options, IPS rules, Snort, and NGIPS preprocessors. Finally, it goes over performance settings as well as stack and cluster configuration.
Note
You can also use Adaptive Security Device Manager (ASDM) with FirePOWER services and Firepower Threat Defense (FTD) to configure NGIPS features in Cisco ASA with FirePOWER Services. ASDM is presented in Chapter 4, “Troubleshooting Cisco ASA with FirePOWER Services and Firepower Threat Defense (FTD).”
Policy
In Cisco Firepower NGIPS, an IPS policy consists of a set of settings that control the features available in Cisco NGIPS products. The FMC is built to efficiently manage all the features and allow security engineers to leverage the tools at their disposal in a simple and consistent manner. As NGIPS features keep growing, the management interface adds extra functionality but keeps complexity for administrators to a minimum.
Note
Cisco ASA with FirePOWER Services, Firepower Threat Defense and Cisco NGIPS appliances (after version 5.4) have the capability to locally manage SSL/TLS communications and decrypt the traffic before applying attack, application, and malware detection policies. SSL decryption can be used in passive and active mode and supports HTTPS- and StartTLS-based protocols like SMTPS and FTPS. Thus, the NGIPS policy configuration options presented in the following sections can also be applied to encrypted traffic that is first processed by the SSL decryption engine.
Policy Layers
An intrusion policy in Cisco NGIPS consists of the base policy and a set of other policies that customize the base policy. These policies are applied to the system in a layered order as the overall intrusion policy (see Figure 11-1).
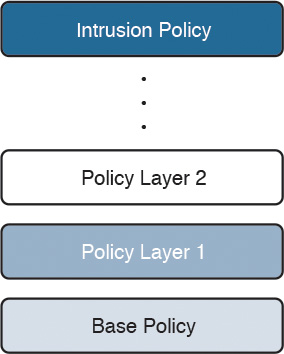
In FMC, you can see the policy layers by going into a policy and editing the Policy Layers settings (see Figure 11-2). The base policy is the bottom policy and contains a summary of the rules in it. The Policy Layer page has multiple options to edit or reorder the policy layers in the IPS.

Variables
Variables are used in multiple locations in Cisco Firepower NGIPS. IPS rules use preconfigured variables representing networks and ports. For example, the inside (protected) network is represented by the variable $HOME_NET, and the outside (unprotected) network is represented by the variable $EXTERNAL_NET. Other variables are used in more specialized rules. For example, $HTTP_SERVERS represents the web servers and $HTTP_PORTS the ports used by these servers.
There are two types of variables:
![]() System default variables that are the preconfigured variables in the system: These include $AIM_SERVERS, $DNS_SERVERS, $EXTERNAL_NET, $FILE_DATA_PORTS, $GTP_PORTS, $HOME_NET, $HTTP_PORTS, $HTTP_SERVERS, $ORACLE_PORTS, $SHELLCODE_PORTS, and more.
System default variables that are the preconfigured variables in the system: These include $AIM_SERVERS, $DNS_SERVERS, $EXTERNAL_NET, $FILE_DATA_PORTS, $GTP_PORTS, $HOME_NET, $HTTP_PORTS, $HTTP_SERVERS, $ORACLE_PORTS, $SHELLCODE_PORTS, and more.
![]() Policy variables that override default variable: They are used in specific policies.
Policy variables that override default variable: They are used in specific policies.
You can manage variables can in the FMC’s Variable Set section of the Objects tab. Here you can edit or create the default and other variable sets to be used in an IPS policy.
If you click the Add Variable Set button shown in Figure 11-2, you get the screen shown in Figure 11-3, where you can create new network or port variables and assign them to the default or policy-specific (customized) variable sets used in an IPS policy, as shown in Figure 11-4.


When creating a network variable, you can use more than one address; just separate addresses with commas—for example, [192.168.1.2, 10.10.10.2, 172.18.1.2]. You can also use CIDR representation—for example, [192.168.1.2, 10.10.10.2, 172.18.1.0/24]. In addition, you can exclude addresses from a list by using an exclamation point—for example, [192.168.1.2, !10.10.10.2, 172.18.1.0/24].
When creating port variables, you can use ranges, such as [25-121]. The following are some other possibilities:
![]() For ports less than a number, you can use this format: [-1024].
For ports less than a number, you can use this format: [-1024].
![]() For ports more than a number, you can use this format: [1024-].
For ports more than a number, you can use this format: [1024-].
![]() To exclude ports, you can use this format: [!25].
To exclude ports, you can use this format: [!25].
![]() To list ports, you can use this format: [25, !21, 80-].
To list ports, you can use this format: [25, !21, 80-].
When you accurately define variables, the processing of the rules using them is optimized and the right systems are monitored for illegitimate traffic. By leveraging variables, you can more efficiently change the variable value without changing all the rules for which that variable is used. For example, if multiple rules are defined to protect the web servers, you would need only to define or update variable $HTTP_SERVERS instead of updating all the rules.
Configuring a Cisco Firepower Intrusion Policy
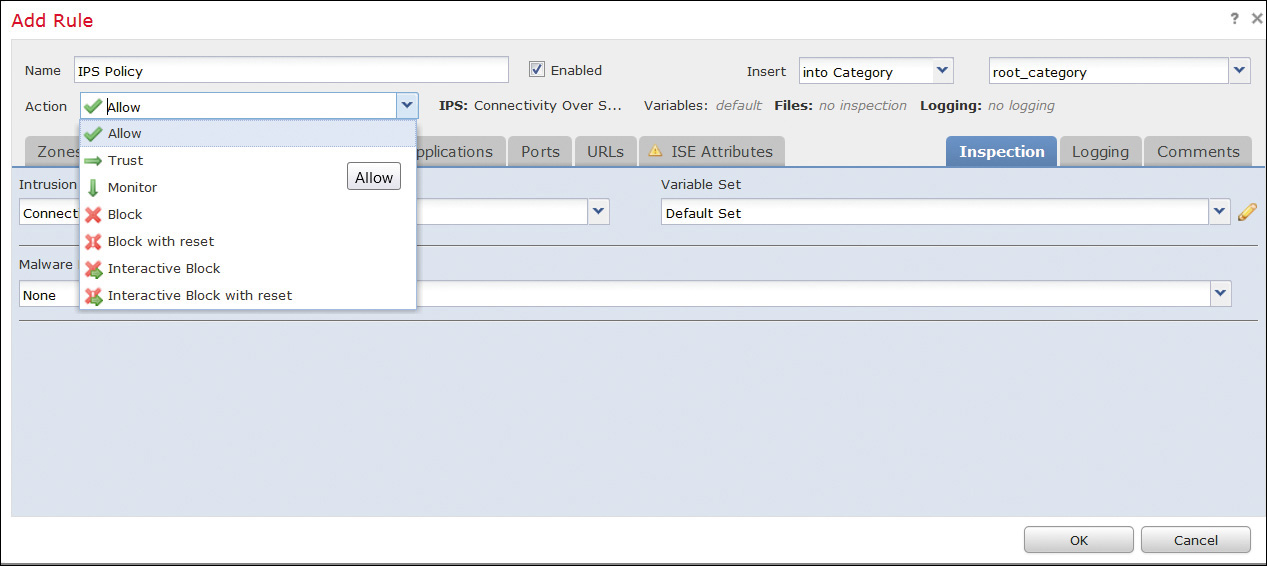
A Cisco Firepower intrusion policy is configured in the IPS Policy tab in the FMC (see Figure 11-5). A policy is applied in an access control policy, which in turn is enforced in the Cisco Firepower system. This section assumes that the NGIPS system interfaces are already configured and the access policy that will use an IPS policy for inspection is set with an Allow action, as shown in Figure 11-6. (Other actions cannot be used with IPS policies.) Depending on the software version of the system, the policies in the intrusion policy could be in the Access Control dropdown instead of in a separate Intrusion dropdown.

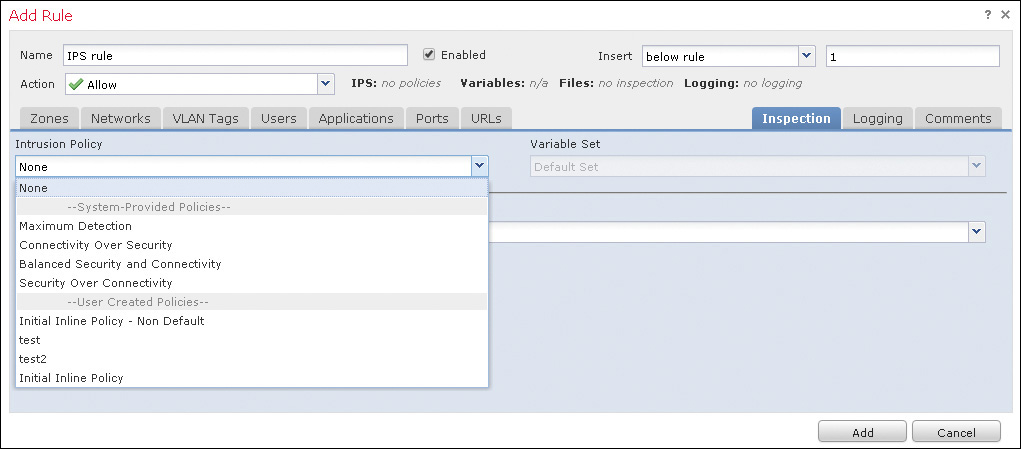
You can click the Create Policy button to create a new policy. The next prompt, shown in Figure 11-7, allows you to set a name, a description, whether to drop and trigger an event when deployed inline and a rule with an action of Drop and Generate Event is matched, and the default policy used as a base policy.

The default intrusion policies are policies that exist in the system by default and can be used as starting points for new configurations. These are the available default intrusion policies:
![]() Balanced Security and Connectivity: This policy is built for both speed and detection. It serves as a good starting point for most organizations and deployments.
Balanced Security and Connectivity: This policy is built for both speed and detection. It serves as a good starting point for most organizations and deployments.
![]() Connectivity over Security: This policy is for organizations where connectivity takes precedence over network infrastructure security. It enables far fewer rules than does the Security over Connectivity policy.
Connectivity over Security: This policy is for organizations where connectivity takes precedence over network infrastructure security. It enables far fewer rules than does the Security over Connectivity policy.
![]() Maximum Detection: This policy is built to encompass a selection of critical recent vulnerabilities with CVSS scores of at least 7.5. This policy favors detection over throughput.
Maximum Detection: This policy is built to encompass a selection of critical recent vulnerabilities with CVSS scores of at least 7.5. This policy favors detection over throughput.
![]() No Rules Active: This policy has all rules and preprocessors disabled. It is used when an administrator chooses to create a policy from scratch. This is not true for FirePOWER version 5.4 and later, where all preprocessors have been abstracted out of an IPS policy and are configured in the network analysis policy.
No Rules Active: This policy has all rules and preprocessors disabled. It is used when an administrator chooses to create a policy from scratch. This is not true for FirePOWER version 5.4 and later, where all preprocessors have been abstracted out of an IPS policy and are configured in the network analysis policy.
![]() Security over Connectivity: This policy is built for organizations where security takes precedence over user convenience. This policy could generate false positives and disruptions when first deployed.
Security over Connectivity: This policy is built for organizations where security takes precedence over user convenience. This policy could generate false positives and disruptions when first deployed.
A newly deployed Firepower system comes with two custom default policies provided by Cisco: Initial Inline (see Figure 11-8) and Initial Passive. They are not default policies applied by default.

After you create a policy, it appears in the Policy Information section in the IPS Policy tab, as shown in Figure 11-9.

When using a default policy as the base policy, an administrator can edit the base policy (using the Manage Base Policy option) and choose whether to allow rule updates to modify the base policy. Note that rule updates change rules, preprocessor rules, and default policy settings for rules that have not been customized by the administrator.
The rules deployed by the default policy in use can be edited by using the Rules option in the Policy Information section. When you’re editing a rule, it appears in the My Changes section of the Policy Information. You’ll learn more about editing and creating IPS rules later in this chapter.
Committing a Policy
The preceding sections explain how to configure various aspects of an IPS policy. After all the changes have been made, the policy doesn’t take effect unless it is committed. When you click the Commit Changes button (refer to Figure 11-8), you might be prompted to insert a comment that describes the change. The comment is a configurable option under the intrusion policy preferences. Comments are stored in the audit logs and thus are searchable. Alternatively, you can choose to discard the changes, in which case you remove the changes since the last commit. Finally, if you choose to leave the Intrusion Policy screen with uncommitted changes, the changes are not lost. They remain uncommitted and can be revisited later to be committed or discarded.
After a policy is committed, Firepower performs a validation check to make sure there are no incorrect or invalid settings. For example, enabling a rule that uses a disabled preprocessor would be flagged after the commit. For version 5.4 and later, the preprocessor check does not happen.
The committed policy configuration or changes further need to be applied to an access control policy (see Figure 11-10).
The access control policy that contains the IPS policy is then applied to a device in the Targets tab of the policy, as shown in Figure 11-11.

Snort Rules
The core of Cisco Firepower system’s IPS capability is the IPS rule base and the detection engine, which includes preprocessors. When a Cisco NGIPS is booted, the engine is initialized, the rule structures are initialized, and then traffic is matched against the rules.
The Cisco Firepower NGIPS engine is based on Snort. Snort is an open source IPS tool, originally created by SourceFire, that is widely used in the industry. Snort identifies malicious traffic that is subjected to deep inspection according to the enabled rules in the IPS policy.
A rule defines a set of keywords and options to match against in order to identify security policy violations, known network attack patterns, and other malicious activity. The IPS engine matches packets against the criteria specified in each rule, and if a rule is matched, the rule action field is triggered. For example, if a rule matches on an exploit with the action Drop, the offending packet is dropped. After the offending packet is dropped, the flow is blacklisted, and no new packets from the flow are passed.
During initialization, the Firepower NGIPS engine groups rules into sets on Snort rule headers and options properties. These sets are organized so that the rule options for all the rules with common unique characteristics are listed together.
A malicious packet could possibly match more than one rule and trigger event. As rule options are matched, events are queued until all options are processed. The final selection of the event triggered is chosen based on the following criteria:
![]() Event processing order is considered.
Event processing order is considered.
![]() Rules generating events supersede those set to Drop and Generate.
Rules generating events supersede those set to Drop and Generate.
![]() Content-matching events supersede anomaly detection events.
Content-matching events supersede anomaly detection events.
![]() Protocol content events supersede generic content events.
Protocol content events supersede generic content events.
![]() Longer content length matches supersede shorter content matches.
Longer content length matches supersede shorter content matches.
The events are sent from the NGIPS device to FMC, and they are stored in the database of all intrusion events and can be queried later.
Rule Anatomy
Snort uses a simple and flexible description language that is powerful for defining the indicators that the IPS policy should be matching against. Although most Snort rules are written in a single line, you can have rules span multiple lines by adding a backslash () to the end of each line, as in this example:
alert top $EXTERNAL_NET any -> HTTPS_SERVERS $HTTPS_PORTS
(msg: "Example rule"; flow: to_server, established;
uricontent: "cgi/test/mal.exe"; reference: cve-1991-1345;
classtype: web-application-activity; sid: 9991; rev:1;)
A Snort rule has two sections: a header and a body. The header contains the action, protocol, source, and destination IP addresses and netmasks, as well as the source and destination port. The body contains keywords that define the criteria to trigger an alert. The body keywords contain event messages, patterns in the payload to match, and specifications of which parts of the packet to match on. In the preceding rule, this is the header:
alert top $EXTERNAL_NET any -> HTTPS_SERVERS $HTTPS_PORTS
(msg: "Example rule"; flow: to_server, established;
uricontent: "cgi/test/mal.exe"; reference: cve-1991-1345;
classtype: web-application-activity; sid: 9991; rev:1;)
As you can see, the rule content is included in parentheses. The keywords are separated by semicolons.
In the FMC, all IPS policy rules are available in a policy under Policy Information (see Figure 11-12). Rules are grouped based on categories. Multiple other rule classification options can be used to look through the rules. For example, you can view the rules according to the rule configuration in order to match on the rule state. Using the Rule Content option allows you to view the rules based on the matched content. The Platform Specific option allows you to look for rules based on the platform of interest. Many more options are available.

The following sections provide more information of the anatomy and the details of rules.
Rule Headers
In the previous rule example, this is the header:
alert tcp $EXTERNAL_NET any -> HTTPS_SERVERS $HTTPS_PORTS
As you can see, these are the header options:
![]() alert: Generates an event when triggered. Other options are pass, generate events, drop and generate event, and disabled.
alert: Generates an event when triggered. Other options are pass, generate events, drop and generate event, and disabled.
![]() tcp: Matches TCP traffic only. Other protocols are udp, icmp, and ip.
tcp: Matches TCP traffic only. Other protocols are udp, icmp, and ip.
![]() $EXTERNAL_NET: Matches traffic from any host that is not on the internal network.
$EXTERNAL_NET: Matches traffic from any host that is not on the internal network.
![]() any: Matches traffic sent to any destination.
any: Matches traffic sent to any destination.
![]() -> : Matches external traffic destined for the TLS servers on the network. A bidirectional operator <> is also available.
-> : Matches external traffic destined for the TLS servers on the network. A bidirectional operator <> is also available.
![]() $HTTPS_SERVERS: Matches traffic to be delivered to TLS servers.
$HTTPS_SERVERS: Matches traffic to be delivered to TLS servers.
![]() $HTTPS_PORTS: Matches TLS port traffic.
$HTTPS_PORTS: Matches TLS port traffic.
You can access Snort rules in the FMC by selecting Policies > Intrusion > Intrusion Policy > Rule Editor (shown later, in Figure 11-16). Figure 11-13 shows how an IPS rule header is accessible and editable in the rule editor. You can see all the header options and how they can be configured according to the rule author’s needs.
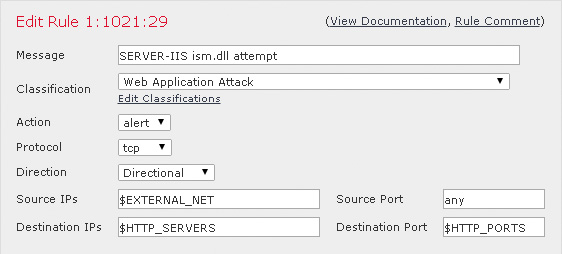
Note
The Classification field is from the rule body and belongs in the classtype Snort option.
Rule Body
The body of a rule looks like this:
(msg: "Example rule"; flow: to_server, established;
uricontent: "cgi/test/mal.exe"; reference: cve-1991-1345;
classtype: web-application-activity; sid: 9991; rev:1;)
The flow value can be set to_client, to_server, from_client, or from_server, based on who initiates the connection. flow can also be set to established, stateless, no_stream, or only stream based on the type of connection.
Content rules contain the content keyword. More than one content condition can exist in a rule. content can use an offset and a depth for where and how long to match in the packet.
sid is a unique Snort identifier. rev is the revision of the rule.
A flags keyword can be used to match on the TCP flags of the packet.
Another option that can be added to the rule is metadata that signifies the service the rule is matching on. It can also affect impact_flag. metadata is not necessarily a required match. Until the service is identified for a flow or until there is not a service identified, the IPS falls back to ports to identify a service. If the service is identified, the ports the traffic traverses from are ignored.
Other options are file_data to match on HTTP or email response data, detection_filter to define the rate that must be exceeded by a source or destination host before a rule can generate, fast_pattern to define patterns that qualify for further inspection, flowbits for tags to be used in subsequent rules, and byte_jump, byte_test, and byte_extract to extract and test through certain bytes in the packet payload.
Figure 11-14 shows the rule’s body options as they appear when editing a rule in rule editor. You can change the option order in the rule. Also, you can add more options to match different packet fields.

Step 1. Clearly identify the problem that requires a rule. If the issue is a security vulnerability, for example, then that malicious indicator of compromise needs to be written to alert on exploit attempts.
Step 2. Capture the offending traffic in question by using packet captures.
Step 3. Look into the captured traffic to identify common characteristics, such as ports, protocols, and source or destinations.
Step 4. Identify unique characteristics in the traffic. For example, are you looking for a specific pattern in the packet payload?
Step 5. After completing the analysis, write a rule in the FMC that satisfy all the criteria defined in the previous steps.
Step 6. Push the rule to the IPS and, after generating the offending traffic, make sure the rule operates as expected.
Because Snort is an open source language, custom rules can be written by anyone and reused in the Firepower NGIPS configuration. Cisco Firepower can use third-party rules. You can import them by clicking the Import button in the Rule Updates tab in the FMC (see Figure 11-15).
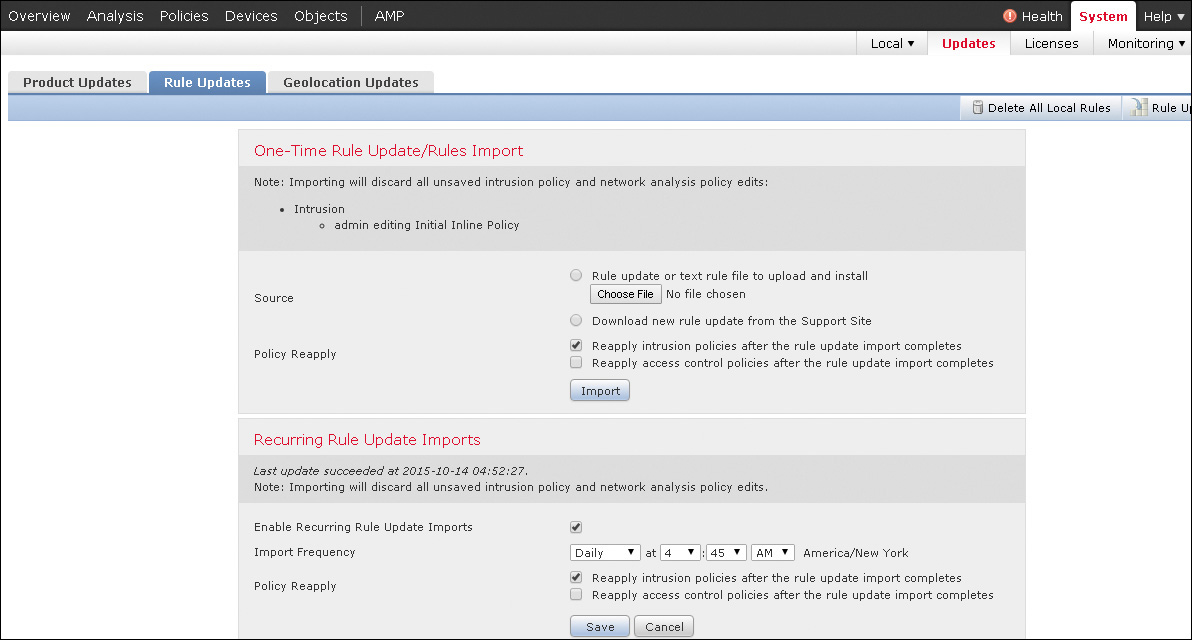
You can further use and edit the imported rules in the layered IPS policy. You can configure the Rule Update function to perform periodic updates of Cisco-authored SourceFire Rule Updates (SRU) from an external location (feed).
Managing Snort Rules in FMC
You can access and manage Snort rules in an IPS policy in the FMC by using Policies > Intrusion > Intrusion Policy > Rule Editor, as shown in Figure 11-16, or in an intrusion policy found under Policy > Access Control > Intrusion in versions 5.4 and later.
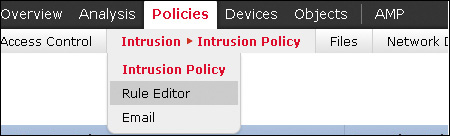
Figure 11-17 shows the rules as they appear in the IPS policy editor.

To view the rules in another layer of an IPS policy, you can use the Policy dropdown, as shown in Figure 11-18.

The rule options bar, shown in Figure 11-19, allows you to set various options to multiple rules at the same time. For example, you can set comments or alerts, change the temporary state, or filter rules.
Other rule management capabilities the FMC offers are rule filtering with the filter bar, rule grouping with the rule grouping accordion, rule querying, setting of rule state, event filtering to limit the events triggered based on certain criteria, setting of dynamic state to rate limit the events triggered, alerting (SNMP), and comments.
You can see that the FMC allows for fine-grained and efficient management of all IPS rules used in Cisco NGIPS devices.
Cisco NGIPS Preprocessors
IPS pattern matching is almost impossible because of the different protocols and their intricacies. For example, matching a file pattern in SMTP email traffic is not performed the same way as matching it when flowing through HTTP with compression enabled. For that reason, the Cisco NGIPS offers a variety of preprocessors that normalize traffic so that it can be matched against the defined Snort rules.
The preprocessors attempt to make the streams of packets as much as possible like the reassembled packets that will be seen by the endpoints receiving them. For example, the preprocessors perform checksum calculation, stream and fragment reassembly, stateful inspection, and more. Each preprocessor has a variety of settings to be configured in order to minimize false positives and false negatives. In addition, customized ones perform dedicated resources to detect specific suspicious attack activity to avoid burdening the system with these tasks.
The following preprocessors are available in the Cisco Firepower NGIPS:
![]() DCE/RPC: The DCE/RPC preprocessor monitors DCE/RPC and SMB protocol streams and messages for anomalous behavior or evasions.
DCE/RPC: The DCE/RPC preprocessor monitors DCE/RPC and SMB protocol streams and messages for anomalous behavior or evasions.
![]() DNS: The DNS preprocessor inspects DNS responses for overflow attempts and for obsolete and experimental DNS record types.
DNS: The DNS preprocessor inspects DNS responses for overflow attempts and for obsolete and experimental DNS record types.
![]() FTP and Telnet: The FTP and Telnet preprocessor normalizes FTP and Telnet streams before they are passed to the IPS engine. It requires TCP stream preprocessing.
FTP and Telnet: The FTP and Telnet preprocessor normalizes FTP and Telnet streams before they are passed to the IPS engine. It requires TCP stream preprocessing.
![]() HTTP: The HTTP preprocessor normalizes HTTP requests and responses for IPS processing, separates HTTP messages to improve IPS rule performance, and detects URI-encoding attacks.
HTTP: The HTTP preprocessor normalizes HTTP requests and responses for IPS processing, separates HTTP messages to improve IPS rule performance, and detects URI-encoding attacks.
![]() Sun RPC: The Sun RPC preprocessor normalizes and reassembles fragmented SunRPC records so the rules engine can process the complete record.
Sun RPC: The Sun RPC preprocessor normalizes and reassembles fragmented SunRPC records so the rules engine can process the complete record.
![]() SIP: The SIP preprocessor normalizes and inspects SIP messages to extract the SIP header and body for further rule processing and generates events when identifying out-of-order calls and SIP message anomalies.
SIP: The SIP preprocessor normalizes and inspects SIP messages to extract the SIP header and body for further rule processing and generates events when identifying out-of-order calls and SIP message anomalies.
![]() GTP: The GTP preprocessor normalizes General Service Packet Radio (GPRS) Tunneling Protocol (GTP) command channel signaling messages and sends them to the rules engine for inspection.
GTP: The GTP preprocessor normalizes General Service Packet Radio (GPRS) Tunneling Protocol (GTP) command channel signaling messages and sends them to the rules engine for inspection.
![]() IMAP and POP: The IMAP and POP preprocessors monitor server-to-client email traffic and alert on anomalies. They also extract and decode email attachments and allow further processing by the NGIPS rules engine and other Cisco Firepower features.
IMAP and POP: The IMAP and POP preprocessors monitor server-to-client email traffic and alert on anomalies. They also extract and decode email attachments and allow further processing by the NGIPS rules engine and other Cisco Firepower features.
![]() SMTP: The SMTP preprocessor inspects SMTP traffic for anomalous behavior and extracts and decodes email attachment for further processing.
SMTP: The SMTP preprocessor inspects SMTP traffic for anomalous behavior and extracts and decodes email attachment for further processing.
![]() SSH: The SSH preprocessor detects SSH buffer overflow attempts and monitors for illegal SSH versions.
SSH: The SSH preprocessor detects SSH buffer overflow attempts and monitors for illegal SSH versions.
![]() SSL: The SSL preprocessor monitors the SSL handshake transactions. After the SSL session is encrypted, the SSL preprocessor stops inspecting. It requires TCP stream preprocessing. The SSL preprocessor can reduce the amount of false positives and save detection resources from the IPS system.
SSL: The SSL preprocessor monitors the SSL handshake transactions. After the SSL session is encrypted, the SSL preprocessor stops inspecting. It requires TCP stream preprocessing. The SSL preprocessor can reduce the amount of false positives and save detection resources from the IPS system.
![]() SCADA: There are two supervisory control and data acquisition (SCADA) protocols for which the Cisco Firepower NGIPS offers preprocessors: DNP3 and Modbus. These protocols monitor and control industrial facilities. The SCADA preprocessors monitor the DNP and Modbus protocols for anomalies and decode their messages for further rule inspection.
SCADA: There are two supervisory control and data acquisition (SCADA) protocols for which the Cisco Firepower NGIPS offers preprocessors: DNP3 and Modbus. These protocols monitor and control industrial facilities. The SCADA preprocessors monitor the DNP and Modbus protocols for anomalies and decode their messages for further rule inspection.
![]() Network: Multiple network and transport layer preprocessors detect attacks exploiting the following:
Network: Multiple network and transport layer preprocessors detect attacks exploiting the following:
![]() Checksum verification
Checksum verification
![]() Ignoring VLAN headers
Ignoring VLAN headers
![]() Inline normalization
Inline normalization
![]() IP defragmentation
IP defragmentation
![]() Packet decoding
Packet decoding
![]() TCP stream
TCP stream
![]() UDP stream
UDP stream
The packet decoder normalizes packet headers and payloads for further processing. The inline normalization preprocessor normalizes traffic to prevent evasion techniques in inline deployments. The rest of the network preprocessors detect anomalous network or transport layer behavior.
![]() Threat detection: The threat detection preprocessors detect specific threats and include the following:
Threat detection: The threat detection preprocessors detect specific threats and include the following:
![]() Back Orifice Detection
Back Orifice Detection
![]() Portscan Detection
Portscan Detection
![]() Rate-Based Attack Prevention
Rate-Based Attack Prevention
![]() Sensitive Data Detection
Sensitive Data Detection
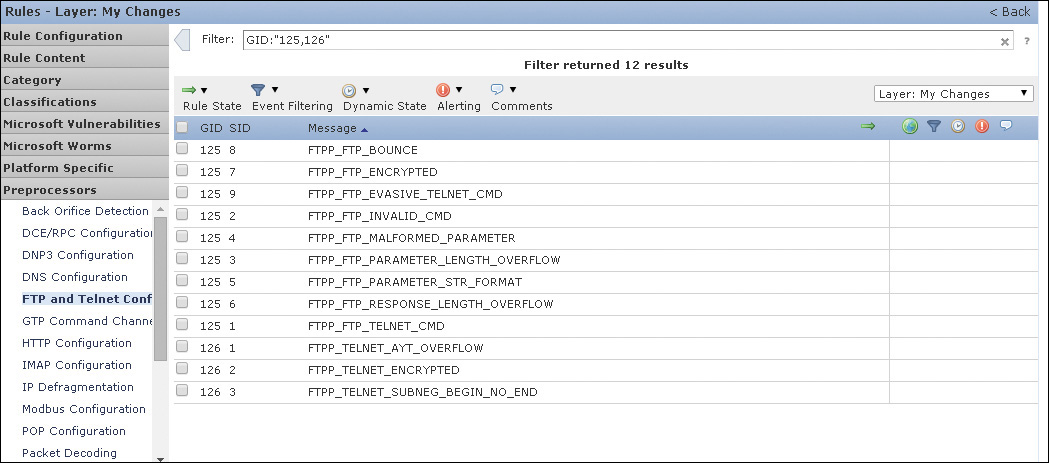
The FMC offers a wealth of settings for each preprocessor that are available in the IPS policy Advanced Settings view. Rules can also be viewed based on the preprocessor they are using (see Figure 11-20). For version 5.4 and later, the rules can be edited under Policy > Access Control > Intrusion.
Firepower Recommendations
Firepower can offer recommendations about rules that apply to the operating systems and the server and client applications detected by the system. When you configure the Recommendations feature, Firepower searches through the base policy to find the rules that protect against vulnerabilities that have been identified for the discovered assets.
Based on the base policy rules, the system identifies the states in the policy and proposes new states. It optionally can automatically set the rules to the recommended settings. The rules that are disabled or that generate events and apply to the vulnerabilities discovered are set to generate events; the rules that drop and generate events and protect the assets are set to drop and generate events. Finally, the rules that do not protect identified assets are disabled. The proposed changes can be for rules and preprocessor settings as well. You can also automate generation of recommendations by using task schedules.
You can enable the Recommendations feature under IPS Policy Information as shown in Figure 11-21. In versions 5.4 and later, the Recommendations feature is set via Policy > Access Control > Intrusion Policy. There are two options: one to generate and preview the recommendations and the other to generate and use the recommendations. When generating recommendations, the system displays filtered views of the rules recommended to be set to Generate Events, Drop and Generate Events, or Disable. After previewing the recommendations, you can manually set the recommended options. Rules that have been set manually are not updated by the Recommendations feature. After using the proposed changes, Firepower adds a read-only Recommendations layer to the intrusion policy. Choosing not to use recommended rule states removes the layer.

The FMC also provides advanced settings in the Recommendations configuration. If the advanced settings are not used, the system applies all the recommendations to all the hosts in the system. When using the advanced settings, you can define which hosts (networks) on the network are monitored for vulnerabilities in order to provide recommendations. That influences which rules are recommended based on rule overhead and which are disabled.
In Firepower, each rule is categorized based on the rule’s potential overhead introduced to the system: none, low, medium, high, or very high. In the advanced settings, you can choose the overhead level that is taken into consideration when making rule recommendations. For example, when you set medium overhead in the advanced settings, the system makes recommendations based on all rules with an overhead rating of none, low, or medium and does not make any recommendations for rules with high or very high overhead.
Performance Settings
You can improve performance of a Cisco NGIPS sensor by leveraging some performance settings in the advanced policy configuration. In version 5.4 and later, the performance settings are in the advanced settings, under Policy > Access Control > Intrusion:
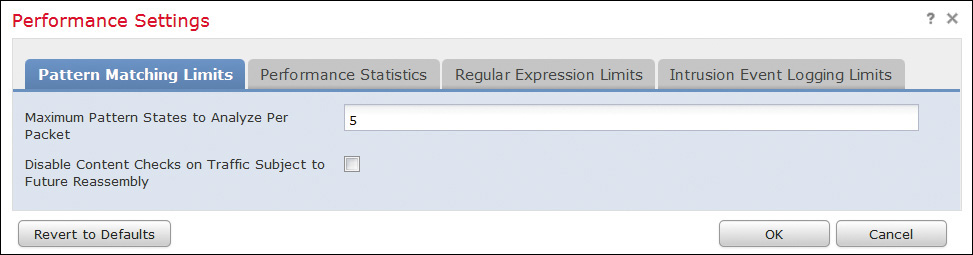
![]() Event Queue Configuration: You can set the Event Policy configuration in the Advanced tab when editing an access control policy. You can set the maximum packet states per packet and disable content checks that will be inserted through the stream reassembly process (see Figure 11-22).
Event Queue Configuration: You can set the Event Policy configuration in the Advanced tab when editing an access control policy. You can set the maximum packet states per packet and disable content checks that will be inserted through the stream reassembly process (see Figure 11-22).
![]() Latency-Based Packet Thresholding: Many applications are not tolerant of latency. For example, high-frequency-trading traffic has a very low latency requirement. The IPS operations, especially when processing through rules and preprocessors, can introduce latency to the streams. In cases where latency is an issue, latency-based packet thresholding can be used (see Figure 11-23). Packet latency thresholding measures the total time taken to process a packet by IPS decoders, preprocessors, and rules, and it stops inspection if the processing time exceeds the configured threshold. For more accuracy, packet latency thresholding measures elapsed time from the time the packets enters the decoder; it does not measure processing time. It is obvious that when used, latency packet thresholding can let attacks pass when the threshold is met and traffic is allowed through uninspected. The options are set in the Advanced tab when editing an access control policy in the FMC.
Latency-Based Packet Thresholding: Many applications are not tolerant of latency. For example, high-frequency-trading traffic has a very low latency requirement. The IPS operations, especially when processing through rules and preprocessors, can introduce latency to the streams. In cases where latency is an issue, latency-based packet thresholding can be used (see Figure 11-23). Packet latency thresholding measures the total time taken to process a packet by IPS decoders, preprocessors, and rules, and it stops inspection if the processing time exceeds the configured threshold. For more accuracy, packet latency thresholding measures elapsed time from the time the packets enters the decoder; it does not measure processing time. It is obvious that when used, latency packet thresholding can let attacks pass when the threshold is met and traffic is allowed through uninspected. The options are set in the Advanced tab when editing an access control policy in the FMC.

![]() Latency-Based Rule Thresholding: Latency-based rule thresholding is also set in the advanced settings of the IPS policy or under Policy > Access Control > Intrusion in version 5.4 and later. It measures and enforces a maximum processing time of packets through a rule. If a rule takes more time than the threshold specifies, a counter gets incremented, and when the counter reaches a limit, the rule is suspended for a specified period and an alert is triggered (see Figure 11-24). Latency rule thresholding is a software-based latency implementation that does not enforce strict timing. Latency rule thresholding could, of course, let attacks pass while the rule is disabled.
Latency-Based Rule Thresholding: Latency-based rule thresholding is also set in the advanced settings of the IPS policy or under Policy > Access Control > Intrusion in version 5.4 and later. It measures and enforces a maximum processing time of packets through a rule. If a rule takes more time than the threshold specifies, a counter gets incremented, and when the counter reaches a limit, the rule is suspended for a specified period and an alert is triggered (see Figure 11-24). Latency rule thresholding is a software-based latency implementation that does not enforce strict timing. Latency rule thresholding could, of course, let attacks pass while the rule is disabled.

![]() Performance Statistics Configuration: The Cisco Firepower IPS maintains statistics In the IPS policy advanced settings, to alleviate processing load, you can set the intervals at which the performance statistics of the device are updated. These intervals are in seconds and number of packets analyzed.
Performance Statistics Configuration: The Cisco Firepower IPS maintains statistics In the IPS policy advanced settings, to alleviate processing load, you can set the intervals at which the performance statistics of the device are updated. These intervals are in seconds and number of packets analyzed.
![]() Regular Expression Limits: Perl Compatible Regular Expressions (PCRE) are often used in Snort rules to match on packet payloads. Regular expression processing can add processing load to a device. The default regular expression match and recursion limits can be overridden in the Regular Expression Limits setting in the advanced settings of an IPS policy. Increasing the default limits could improve security but could also degrade the performance of the device.
Regular Expression Limits: Perl Compatible Regular Expressions (PCRE) are often used in Snort rules to match on packet payloads. Regular expression processing can add processing load to a device. The default regular expression match and recursion limits can be overridden in the Regular Expression Limits setting in the advanced settings of an IPS policy. Increasing the default limits could improve security but could also degrade the performance of the device.
![]() Event Logging Limits: A packet could be matched against more than one IPS rules that generate events. When more than one events are generated by a packet, they are placed in the event queue, and the top events are logged by the device. The rule processing configuration can be set in the Advanced tab when editing a policy access control and allows you to set the queue size, the number of top events to be logged, and how the events are prioritized in the queue, as illustrated in Figure 11-25.
Event Logging Limits: A packet could be matched against more than one IPS rules that generate events. When more than one events are generated by a packet, they are placed in the event queue, and the top events are logged by the device. The rule processing configuration can be set in the Advanced tab when editing a policy access control and allows you to set the queue size, the number of top events to be logged, and how the events are prioritized in the queue, as illustrated in Figure 11-25.

The advanced settings also allow you to set a global threshold (see Figure 11-26) to manage the number of events generated by each rule over a period of time. When you’re using the global threshold, that threshold applies to all rules that do not have an overriding specific threshold set.

Stack/Cluster
As described in Chapter 10, Firepower NGIPS offers stacking of multiple devices that can offer much higher IPS throughput and clustering that allows for redundancy. Both options can be configured in the FMC’s Devices tab.
Clicking Add brings up cluster and stack options, as shown in Figure 11-27. For either feature, more devices must be managed in the FMC in order to be configured.

Refer to Chapter 10 for more information on clustering and stacking.
Summary
As you have seen in this chapter, Cisco NGIPS products can be fully managed using the FMC. You have seen how IPS policies can be configured and customized for each network’s needs. In this chapter you also learned about Snort rules and how to write new ones. You have also learned how preprocessors are used for more efficient protocol processing in the system. You have also seen the intelligent recommendations Cisco NGIPS can offer for more efficient configuration and how to configure redundancy and stacking.
ASDM is another management platform specifically for Cisco ASA with SourceFire Services. It is covered in Chapter 12, “Reporting and Troubleshooting with Cisco Next-Generation IPS.”