
Case Study: Using IPv6 Integration and Coexistence Strategies with Cisco
Practice the skills you learned in this chapter by completing the following exercises. You will configure integration and coexistence mechanisms on networks.
Objectives
In these exercises, you will complete the following tasks:
Enabling configured tunnels on a router
Assigning IPv6 addresses to tunnel interfaces
Adding a default IPv6 route
Advertising an IPv6 prefix on a link
Enabling a 6to4 router
Adding a default route to a 6to4 relay
Enabling the NAT-PT mechanism
Configuring a static NAT-PT mapping
Verifying NAT-PT mapping
Commands List
In this configuration exercise, you will use the commands shown in Table 5-11. Refer to this list during the exercise.
| Command | Description |
|---|---|
| copy run start | Saves a current configuration to nonvolatile RAM (NVRAM). |
| ip address 206.123.31.2 255.255.255.0 | Assigns an IPv4 address to an interface. |
| ipv6 unicast-routing | Enables IPv6 traffic forwarding. |
| ipv6 address 2001:420:ffff:0::1/64 | Configures an IPv6 static address. |
| ipv6 address 2001:420:ffff:1::/64 eui-64 | Configures an IPv6 static address using EUI-64 format. |
| ipv6 nat | Enables the NAT-PT mechanism. |
| ipv6 nat prefix 2001:420:ffff:0:0:1::/96 | Defines a prefix for the NAT-PT operation. |
| ipv6 nat v4v6 source 10.1.1.100 2001:420:ffff:0:0:1:0:100 | Defines a static mapping between an IPv6 address and 10.1.1.100. |
| ipv6 nat v4v6 source 10.1.1.150 2001:420:ffff:0:0:1:0:150 | Defines a static mapping between an IPv6 address and 10.1.1.150. |
| ipv6 nat v6v4 source 2001:420:ffff:2::1 10.1.1.2 | Defines a static mapping between an IPv4 address and 2001:420:ffff:2::1. |
| ipv6 route ::/0 tunnel0 | Defines a default IPv6 route. |
| show ipv6 nat translation | Displays the translation of the NAT-PT mechanism. |
| tunnel destination 132.214.1.199 | Defines the IPv4 destination address of a tunnel interface. |
| tunnel mode ipv6ip | Defines the tunnel interface as a configured tunnel. |
| tunnel mode ipv6ip 6to4 | Defines the tunnel interface as a 6to4 tunnel. |
| tunnel source 206.123.31.100 | Assigns an IPv4 source address to a tunnel interface. |
Network Architecture for Task 1
Figure 5-25 shows the network architecture for Task 1. An ISP in your city proposed to provide IPv6 connectivity for your site and to allocate one aggregatable global unicast /48 prefix to it. The ISP received one IPv6 prefix (/32) from ARIN (American Registry for Internet Numbers). The ISP can provide the native IPv6 link and connectivity to your site within the next 12 months. However, your network and the ISP are connected to the IPv4 Internet. In the meantime, you can set up a configured tunnel with the provider to get IPv6 connectivity over the IPv4 Internet.
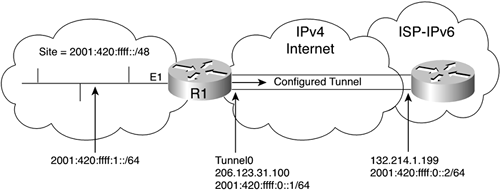
Task 1: Enable a Configured Tunnel and Default IPv6 Route
Complete the following steps:
Step 1. | Enter the command to enable IPv6 forwarding on the router to forward unicast IPv6 packets between interfaces. What commands will you use? RouterR1#conf t RouterR1(config)#ipv6 unicast-routing RouterR1(config)#exit | ||||||||||||
Step 2. | Based on the following table, enable a configured tunnel on Router R1's tunnel0 interface to get IPv6 connectivity from the ISP. Which commands enable a configured tunnel on Cisco?
RouterR1#conf t RouterR1(config)#int tunnel0 RouterR1(config-if)#ipv6 address 2001:420:ffff:0::1/64 RouterR1(config-if)#tunnel source 206.123.31.100 RouterR1(config-if)#tunnel destination 132.214.1.199 RouterR1(config-if)#tunnel mode ipv6ip RouterR1(config-if)#exit RouterR1(config)#exit | ||||||||||||
Step 3. | The IPv6 Internet can be reached through the ISP-IPv6. Add a default IPv6 route in the router that points to the configured tunnel interface tunnel0. What commands will you use? RouterR1#conf t RouterR1(config)#ipv6 route ::/0 tunnel0 RouterR1(config)#exit | ||||||||||||
Step 4. | Assign an IPv6 address to the interface ethernet1 using EUI-64 format, and advertise the prefix 2001:420:ffff:1::/64 on the ethernet1 interface. Which commands will you use? RouterR1#conf t RouterR1(config)#int ethernet1 RouterR1(config-if)#ipv6 address 2001:420:ffff:1::/64 eui-64 RouterR1(config-if)#exit | ||||||||||||
Step 5. | Save the current configuration to NVRAM. RouterR1#copy run start
Destination filename [startup-config]?
Building configuration...
|
Network Architecture for Task 2
Figure 5-26 shows the network topology for Task 2. Your site can't get IPv6 connectivity from an ISP-IPv6. However, getting IPv6 connectivity using the 6to4 mechanism is an interesting alternative for your site. Your network is already connected to the IPv4 Internet. Therefore, one of your border routers can be configured to act as a 6to4 router, and a 6to4 prefix must be advertised within your internal network on the link behind the 6to4 router.

Task 2: Enable a 6to4 Router
Complete the following steps:
Step 1. | Assign an IPv4 address to Router R2's loopback0 interface, as shown in the following table. This address will be used for the 6to4 operation. What commands will you use?
RouterR2#conf t RouterR2(config)#int loopback0 RouterR2(config-if)#ip address 206.123.31.2 255.255.255.0 RouterR2(config-if)#exit | |||||||||
Step 2. | The source IPv4 address for the 6to4 router is 206.123.31.2. Calculate the /48 prefix of your 6to4 site. Then append the result to the 2002::/16 prefix to get the /48 prefix for your site. 206.123.31.2 converted to hexadecimal = CE7B:1F02 /48 prefix of the 6to4 site = 2002:CE7B:1F02::/48 | |||||||||
Step 3. | Assign an IPv6 address in your /48 prefix to Router R1's ethernet1 interface using EUI-64 format, and advertise the prefix 2002:CE7B:1F02:1::/64 on that interface. RouterR2#conf t RouterR2(config)#int ethernet1 RouterR2(config-if)#ipv6 address 2002:ce7b:1f02:1::/64 eui-64 RouterR2(config-if)#exit | |||||||||
Step 4. | Enable the 6to4 router using the tunnel5 interface. What commands enable a router into a 6to4 site? RouterR2#conf t RouterR2(config)#int tunnel5 RouterR2(config-if)#no ip address RouterR2(config-if)#ipv6 unnumbered ethernet1 RouterR2(config-if)#tunnel source loopback0 RouterR2(config-if)#tunnel mode ipv6ip 6to4 RouterR2(config-if)#exit RouterR2(config)#ipv6 route 2002::/16 tunnel5 RouterR2(config)#exit | |||||||||
Step 5. | The IPv6 Internet can be reached through the 6to4 relay, as shown in Figure 2-26. Add a default IPv6 route pointing to this 6to4 relay. What commands will you use? RouterR2#conf t RouterR2(config)#ipv6 route ::/0 2002:0101:0101:: RouterR2(config)#exit | |||||||||
Step 6. | Save the current configuration to NVRAM. RouterR2#copy run start
Destination filename [startup-config]?
Building configuration...
|
Network Architecture for Task 3
Figure 5-27 shows the network topology for Task 3. Your domain is divided into two subnets. Inside the IPv6-only subnet A, you enable only the IPv6 protocol, and IPv6-only hosts are deployed. Inside the IPv4/IPv6 subnet B, you enable both IPv4 and IPv6, and all nodes deployed in subnet B have dual-stack support. However, some legacy systems, such as the mainframe and the printer on subnet B, support only IPv4 as the protocol. Therefore, configure Router R3 to act as NAT-PT to allow the IPv6-only host A on subnet A to communicate with the mainframe and the printer.

Task 3: Enable the NAT-PT Mechanism with Static Mapping
Complete the following steps:
Step 1. | Assign IPv4 and IPv6 addresses to Router R3's interfaces according to the following table. What commands will you use?
RouterR3#configure terminal RouterR3(config)#int ethernet0 RouterR3(config-if)#ip address 10.1.1.1 255.255.255.0 RouterR3(config-if)#int ethernet1 RouterR3(config-if)#ipv6 address 2001:420:ffff:2::1/64 | |||||||||
Step 2. | Enable the NAT-PT mechanism on both interfaces of Router R3. What commands enable the NAT-PT mechanism on interfaces? RouterR3#configure terminal RouterR3(config)#int ethernet0 RouterR3(config-if)#ipv6 nat RouterR3(config-if)#int ethernet1 RouterR3(config-if)#ipv6 nat RouterR3(config-if)#exit | |||||||||
Step 3. | The dedicated prefix for NAT-PT is 2001:420:ffff:0:0:1::/96. Define this prefix as global for the NAT-PT operation on Router R3. RouterR3#configure terminal RouterR3(config)#ipv6 nat prefix 2001:420:ffff:0:0:1::/96 RouterR3(config)#exit | |||||||||
Step 4. | Enable static NAT-PT mapping for the mainframe and the printer. The static NAT-PT mapping must allow the IPv6-only host A (2001:420:ffff:2::10) to communicate with the legacy IPv4 systems. Use 10.1.1.2 as the source IPv4 address for the static NAT-PT mapping. Refer to the following table for the configuration of the static mapping.
RouterR3#configure terminal RouterR3(config)#ipv6 nat v4v6 source 10.1.1.100 2001:420:ffff:0:0:1:0:100 RouterR3(config)#ipv6 nat v4v6 source 10.1.1.150 2001:420:ffff:0:0:1:0:150 RouterR3(config)#ipv6 nat v6v4 source 2001:420:ffff:2::10 10.1.1.2 RouterR3(config)#exit | |||||||||
Step 5. | Display the static NAT-PT configuration to verify your setup. What is the command to display the NAT-PT mapping? RouterR3#show ipv6 nat translation
Prot IPv4 source IPv6 source
IPv4 destination IPv6 destination
--- --- ---
10.1.1.100 2001:420:FFFF:0:0:1:0:100
--- --- ---
10.1.1.150 2001:420:FFFF:0:0:1:0:150
--- 10.1.1.2 2001:420:FFFF:2::10
--- ---
| |||||||||
Step 6. | Save the current configuration to NVRAM. RouterR3#copy run start
Destination filename [startup-config]?
Building configuration...
|