
19. Connecting to Datomic from Your Application
We’re going to look at connection to Datomic from Clojure, Java, and a REST client. Let’s get started!
Assumptions
In this chapter we assume the following:
![]() You are familiar with creating projects in Maven and can create and run a Maven project.
You are familiar with creating projects in Maven and can create and run a Maven project.
![]() You are familiar with the concept of RESTful web services (or have worked through the REST server in Chapters 3 and 4).
You are familiar with the concept of RESTful web services (or have worked through the REST server in Chapters 3 and 4).
![]() You are familiar with the CURL library and can run it on your command line.
You are familiar with the CURL library and can run it on your command line.
Benefits
It is conventional for many enterprise applications to be built to interact with a database. This chapter will enable you to take that pattern and use Datomic as the database.
The Recipe—Code
This recipe is really five recipes in one.
Getting Set Up
To get our Datomic instance started so we can connect to it via the Datomic shell in the next section, follow these steps:
1. Download Datomic from the website here: http://downloads.datomic.com/free.html and expand it.
2. Open a new command prompt and change to the Datomic directory (for the version you’ve downloaded):
cd datomic-free-0.8.3767
3. In your file system, create a new directory in your Datomic directory inside the config directory called clojurerecipes:
mkdir config/clojurerecipes
4. In this directory download the sample schema and data from the website1 in the datomic-intro.zip file. You should add the following files to the clojurerecipes directory:
1. http://clojurerecipes.net/datomic-intro.zip
book-schema1.dtm
book-data1.dtm
book-schema2.dtm
book-data2.dtm
5. Start a new Datomic instance (backed by the file system) by running the following command:
bin/transactor config/samples/free-transactor-template.properties
6. Open a second command window and change to the Datomic directory
cd datomic-free-0.8.3767
Connecting to Datomic in the Shell
Now we are ready to connect to Datomic in the shell.
1. Start a new Datomic shell:
bin/shell
2. Create a URI and use it to create a database in your Datomic instance. Note that creating a database is optional if this is the second or later time that you’re connecting to the database, but it doesn’t hurt to run it a second time—you’ll just get a result of ‘false’:
uri = "datomic:free://localhost:4334/bookdemo";
Peer.createDatabase(uri);
3. Connect to the database:
conn = Peer.connect(uri);
4. Check your current path:
new File(".").getAbsolutePath();
and observe the result—you should get a result similar to:
</Users/Julian/Downloads/
Loading Schema and Data
Next we are going to load the database schema and data.
1. Load the database schema:
schema_rdr = new FileReader("config/clojurerecipes/book-schema1.dtm");
schema_tx = Util.readAll(schema_rdr).get(0);
txResult = conn.transact(schema_tx).get();
We will reuse these steps later. Note that you only need to load the schema the first time you connect to the database. If you do it the second time it will have no effect.
2. Load the database data:
data_rdr = new FileReader("config/clojurerecipes/book-data1.dtm");
data_tx = Util.readAll(data_rdr).get(0);
txResult = conn.transact(data_tx).get();
Note that if you run this a second time (the second time you connect to this database), you’ll get duplicate data!
Connecting to Datomic from Clojure
1. First we’ll look at connecting to Datomic from Clojure. In the new command prompt in the projects directory, start by creating a new Leiningen project:
lein new datomic-connect
cd datomic-connect
2. Modify the project.clj to add the dependency:
[com.datomic/datomic-free "0.8.3767"]
3. It will look like this:
(defproject datomic-connect "0.1.0-SNAPSHOT"
:dependencies [[org.clojure/clojure "1.6.0"]
[com.datomic/datomic-free "0.9.5173"]])
4. Now load the dependencies:
lein deps
5. Now start a new REPL:
lein repl
6. Now run the following commands (assuming you still have the Datomic instance running that you set up in the previous section Loading Schema and Data):
(use 'datomic.api)
(def uri "datomic:free://localhost:4334/bookdemo")
(def conn (connect uri))
(def results (q '[:find ?book_entity :where [_ :borrow/title ?title]
[?book_entity :book/title ?title]] (db conn)))
(println (count results))
(first results)
(def id (first (first results)))
(def entity1 (-> conn db (entity id)))
(println (keys entity1))
(println (:book/title entity1) " - " (:book/author entity1))
7. For the final line, you should see the following result:
Patterns of Enterprise Architecture - Martin Fowler
Here we have connected to Datomic from Clojure.
Connecting to Datomic from Java
Now we’ll look at connecting to Datomic from Java.
1. Create a new Maven project in your projects directory with the following group, artifact, and version, and change to that directory:
mvn archetype:generate -DarchetypeGroupId=org.apache.maven.archetypes
-DgroupId=com.clojurerecipes -DartifactId=datomic.java.client.demo
-DinteractiveMode=false
cd datomic.java.client.demo
2. Now put the following into the pom.xml:
<project xmlns="http://maven.apache.org/POM/4.0.0" xmlns:xsi="http://www.
w3.org/2001/XMLSchema-instance"
xsi:schemaLocation="http://maven.apache.org/POM/4.0.0 http://maven.apache.
org/xsd/maven-4.0.0.xsd">
<modelVersion>4.0.0</modelVersion>
<groupId>com.clojurerecipes</groupId>
<artifactId>datomic.java.client.demo</artifactId>
<version>1.0-SNAPSHOT</version>
<packaging>jar</packaging>
<name>datomic.java.client.demo</name>
<url>http://maven.apache.org</url>
<properties>
<project.build.sourceEncoding>UTF-8</project.build.sourceEncoding>
</properties>
<repositories>
<repository>
<id>clojars.org</id>
<url>http://clojars.org/repo</url>
</repository>
</repositories>
<dependencies>
<dependency>
<groupId>com.datomic</groupId>
<artifactId>datomic-free</artifactId>
<version>0.9.5206</version>
</dependency>
<dependency>
<groupId>junit</groupId>
<artifactId>junit</artifactId>
<version>4.11</version>
</dependency>
</dependencies>
<build>
<plugins>
<plugin>
<groupId>org.codehaus.mojo</groupId>
<artifactId>exec-maven-plugin</artifactId>
<version>1.2.1</version>
<configuration>
<mainClass>com.clojurerecipes.DatomicConnect</mainClass>
<arguments>
<argument></argument>
</arguments>
</configuration>
</plugin>
</plugins>
</build>
</project>
3. Create a file named DatomicConnect.java in the directory src/main/java/com/clojurerecipes with the following contents:
package com.clojurerecipes;
import java.util.Collection;
import java.util.List;
import datomic.Connection;
import datomic.Database;
import datomic.Entity;
import datomic.Peer;
public class DatomicConnect {
public static void main(String[] args) {
String uri = "datomic:free://localhost:4334/bookdemo";
Connection connection = Peer.connect(uri);
Database database = connection.db();
Collection<List<Object>> results =
Peer.q(
"[:find ?bo :where [_ :borrow/title ?t]
[?bo :book/title ?t]]",
database);
List<Object> result = results.iterator().next();
Object entityId = result.get(0);
Entity entity = database.entity(entityId);
System.out.println(entity.keySet());
System.out.println("Displaying the value of the entity's book
name...");
System.out.println(entity.get(":book/title"));
}
}
mvn package
mvn exec:java
You should see the following result:
Patterns of Enterprise Architecture
5. Then type CRTL-C to finish.
Here we have connected to Datomic from Java using the native driver and run a query. From here the next steps are adding facts with Datomic transactions, but we’ve given you enough to get you started down that path.
Connecting to Datomic from a REST Client
The Datomic server itself comes with a REST server that you can start up after you’ve started the Datomic server.
1. Check that you still have the Datomic server running from “Getting Set Up” in Step 5 on page 180.
2. To start the REST server, open up another command prompt in the same directory and run:
bin/rest -p 4619 test datomic:free://localhost:4334/
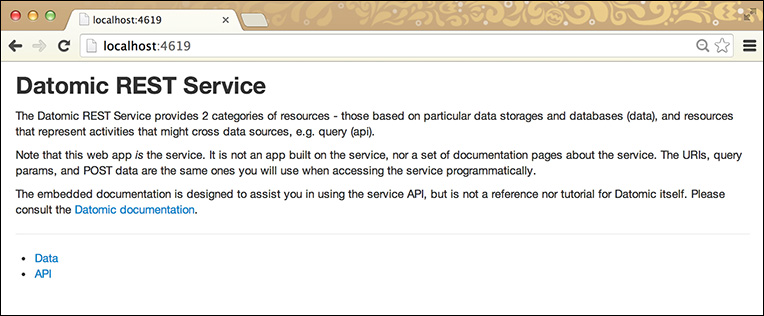
3. The documentation for the REST server is now available via your web browser. Navigate to http://localhost:4619/. You should get a screen that looks like the one shown in Figure 19.1.
4. Click the API link, and then click the Query link. You should get a screen like the one in Figure 19.2.
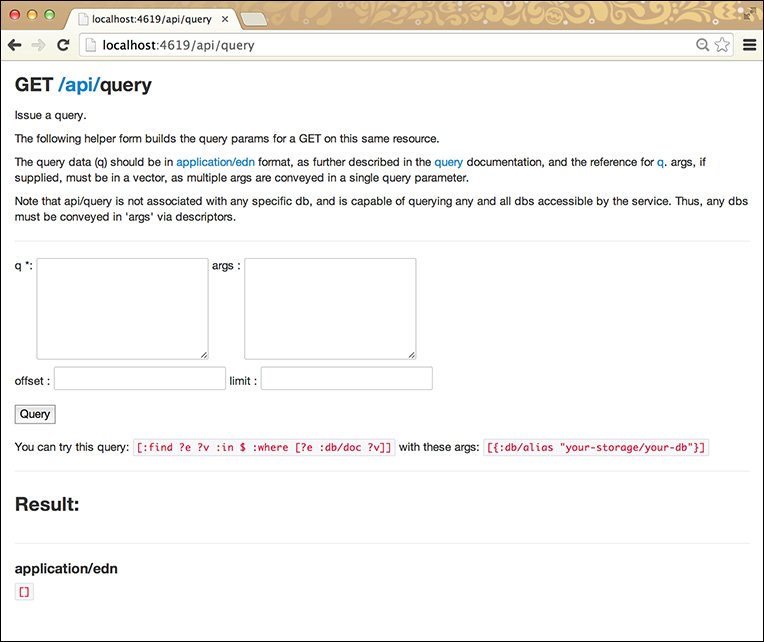
5. You can enter queries in here to simulate calling them from a REST client. Enter the following in the q field
[:find ?title :where [_ :borrow/title ?title] [?book_entity :book/title
?title]]
and the following in the args field.
[{:db/alias "test/bookdemo"}]
6. Then click Query. You should get the following under the Result: heading.
?title
"The Rails 3 Way"
"Patterns of Enterprise Architecture"
7. That’s the query console for building and testing a REST query. Now let’s try it out with a REST client. Open up a new command prompt. Enter the following command:
curl -i -H 'Accept: application/edn' -X GET
http://localhost:4619/api/query
-d 'args=[{:db/alias "test/bookdemo", :basis-t 1047}]' -d 'q=[:find
?book_entity ?title :where [_ :borrow/title ?title] [?book_entity :book/title
?title]]'
This gets us a result similar to the following:
HTTP/1.1 200 OK
Date: Tue, 17 Mar 2015 02:35:32 GMT
Vary: Accept
Content-Type: application/edn;charset=UTF-8
Content-Length: 91
Server: Jetty(7.6.5.v20120716)
[[17592186045418 "Patterns of Enterprise Architecture"]
[17592186045419 "The Rails 3 Way"]]
Note the following about the above query:
![]() The
The –q parameter has the same value used previously with the Datomic Query page.
![]() The results are the same as what we saw before with the Datomic Query page.
The results are the same as what we saw before with the Datomic Query page.
![]() The
The –i parameter is optional. It helps you debug your command if something has gone wrong.
![]() The URI
The URI http://localhost:4619/api/query is the same as that we were using for the web browser, yet the results don’t have html in them
![]() We’re using the header command
We’re using the header command -H 'Accept: application/edn' to tell the REST server that we’re not a web browser but a REST client.
8. Just for the fun of it, we’ll do one more. Run the following query:
curl -H 'Accept: application/edn' -X GET http://localhost:4619/api/query -d
'args=[{:db/alias "test/bookdemo", :basis-t 1047}]' -d 'q=[:find ?book_entity
?title :where [?book_entity :book/title ?title][?book_entity :book/author
"Martin Fowler"]]'
9. You should a result similar to:
[[17592186045418 "Patterns of Enterprise Architecture"]]
One other thing to consider—you can also use this interface to query against the database as a value (i.e., the database at a point in time). To get the current database value, go back to the original URL http://localhost:4619/, and then click data and test and then bookdemo. You should see a screen that looks like the one shown in Figure 19.3.

In other words, your URL should be http://localhost:4619/data/test/bookdemo/-/. Note in particular the line
{:db/alias "test/bookdemo", :basis-t 1057}
You can use this as an argument on the query screen. Instead of the value
[{:db/alias "test/bookdemo"}]
use the value
[{:db/alias "test/bookdemo", :basis-t 1047}]
Here we have started the Datomic REST server, tested REST queries in the web console, and run REST queries from a client.
Conclusion
In this chapter we have looked at the following:
![]() Connecting to Datomic from the Datomic shell.
Connecting to Datomic from the Datomic shell.
![]() Populating schema from the Datomic shell.
Populating schema from the Datomic shell.
![]() Inserting data from the Datomic shell.
Inserting data from the Datomic shell.
![]() Connecting to Datomic from Clojure.
Connecting to Datomic from Clojure.
![]() Connecting to Datomic from Java using the native driver and running a query.
Connecting to Datomic from Java using the native driver and running a query.
![]() Starting the Datomic REST server, testing REST queries in the web console, and running REST queries from a client.
Starting the Datomic REST server, testing REST queries in the web console, and running REST queries from a client.