
7
Automating Deployment with Terraform and Cloud Build
The flexibility of Cloud Build provides a foundation for automating more than just the pipeline for building applications and services. The capabilities inherent in Cloud Build, such as leveraging Git as the source of truth and container images to drive the execution of a build step, help formulate the automation of infrastructure provisioning. One such pattern for this is the combination of using Cloud Build and Terraform (https://www.terraform.io/). In this chapter, we will walk through an example of using Cloud Build to automatically provision application infrastructure using Terraform’s configuration language known as HashiCorp Configuration Language (HCL) and the Command-Line Interface (CLI).
We will cover the following topics in this chapter:
- Treating infrastructure as code
- Building a custom builder
- Managing the principle of least privilege for builds
- Human-in-the-loop with manual approvals
Treating infrastructure as code
What does it mean to treat infrastructure as code (IaC)? Infrastructure can be provisioned in many ways, such as imperatively or manually executing a set of commands to bring up an environment. An IaC provider intends to define how you would like an environment or component to be set up using a series of configurations. As noted in the introduction, with Terraform, we will be using its HCL to define a standard configuration interpreted by the terraform CLI tool. This configuration dictates the type of provider, such as a plugin, to interact with the service’s API and provision what is specified. The configuration files help define the resource you wish to create and are ideally stored in a Source Code Management (SCM) repository for version control management.
Building code requires a set of instructions and defined prerequisites necessary to successfully compile and package the code. This configuration is defined in the Cloud Build configuration, along with the supporting container images for each step and the configuration dependencies stored in an SCM repository. When working with infrastructure, particularly a cloud provider such as Google Cloud, we will also define a Cloud Build configuration, the supporting container image to execute the Terraform CLI, the Terraform configuration files, and the configuration dependencies stored in an SCM repository.
Cloud Build can help orchestrate the execution and processing of Terraform configurations using its CLI tool. Terraform configurations are intended to be idempotent, meaning that re-running the Terraform command using the same configuration after the first run should result in zero changes, assuming that the infrastructure configuration was not changed outside of the pipeline. This allows for Cloud Build trigger referencing and the SCM repository to execute multiple times and only change the infrastructure if the configurations have changed.
Each Cloud Build execution (as in, build) is stateless. If the state does need to be persisted, it can be done in build steps to a service such as Google Cloud Storage (GCS). Otherwise, overall, the supported artifacts in a build can be stored in a service such as Artifact Registry. In the case of Terraform, it also requires the state to be stored externally so it is aware of configurations that have been provisioned. If the state is stored only within the run, Terraform wouldn’t be aware of previous actuations. For Google Cloud, it is recommended to store this state in a GCS bucket with version control enabled. This allows for the state to be maintained, versioned, protected with permissions, encrypted at rest, and optionally encrypted using encryption keys. An additional example tutorial can be found here: https://cloud.google.com/architecture/managing-infrastructure-as-code.
The examples in this chapter focus on using Terraform to provision Google Cloud compute and network services. It is worth noting that Terraform resources are also available for provisioning Cloud Build components, such as triggers and private worker pools.
Simple and straightforward Terraform
Let’s get started by preparing a bucket in GCS to store our Terraform state.
Note
The examples in this chapter were executed through a GCP Cloud Shell environment – you may run these in your terminal, but the configuration of gcloud and other tools may be necessary.
Set the project that you would like to create this bucket in:
$ gcloud config set project ${PROJECT_ID}
$ PROJECT_ID=$(gcloud config get-value project)
Create the bucket and enable versioning:
$ gsutil mb gs://${PROJECT_ID}
$ gsutil versioning set on gs://${PROJECT_ID}
Note
By enabling the versioning capability, we are asking GCS to maintain older versions of objects while newer objects are saved. The bucket name must also be unique throughout Google Cloud, not just within your project.
The Terraform state (managed within GCS) is also different from the Terraform configuration (for example, .tf or .tfvars), which are typically stored in an SCM for version control.
Once we have our bucket set up, before we start using Cloud Build to automate our infrastructure pipeline, let’s do a quick test to spin up a Google Compute Engine (GCE) virtual machine (VM).
We'll start with some quick files to get Terraform started.
Note
The examples include syntax and versions that worked during the writing of this book. However, changes may need to be made depending on the version of the Terraform CLI tool and Terraform provider for Google Cloud.
In this example, we are using the environment variable, PROJECT_ID, that we stored in the previous command to generate the following backend.tf file. Terraform does not allow us to use Terraform variables to dynamically specify the backend bucket used for storing the state.
We will reference the bucket that was created in the previous command, to tell terraform where to store and retrieve the state:
$ mkdir ~/packt/cloudbuild-terraform; cd ~/packt/cloudbuild-terraform
cat << EOF > backend.tf
terraform {
backend "gcs" {
bucket = "${PROJECT_ID}"
prefix = "tfstate"
}
}
EOF
Specify the versions of terraform that will work with this configuration, as well as the Google Cloud provider version:
$ cat << EOF > versions.tf
terraform {
required_version = ">= 1.0.0, < 1.2.0"
required_providers {
google = {
source = "hashicorp/google"
version = ">= 3.68.0"
}
}
}
provider "google" {
project = var.project_id
region = var.region
zone = var.zone
}
EOF
The list of variables and their default values that are required for setting up the Google Cloud provider and the GCE VM instance we will be asking Terraform to spin up. The following example is broken up into different sections:
$ cat << EOF > variables.tf
variable "project_id" {
description = "Unique identifer of the Google Cloud Project that is to be used"
type = string
default = "${PROJECT_ID}"
}
variable "region" {
description = "Google Cloud Region in which regional GCP resources are provisioned"
type = string
default = "us-west1"
}
variable "zone" {
description = "Google Cloud Zone in which regional GCP resources are provisioned"
type = string
default = "us-west1-a"
}
EOF
Network-related variables, such as name and network range, will be used by the compute instance:
$ cat << EOF >> variables.tf
variable "network_name" {
description = "The name of the network to be used when deploying resources"
type = string
default = "packt-network"
}
variable "subnet_name" {
description = "The name of the subnet to be used when deploying resources"
type = string
default = "packt-subnet"
}
variable "subnet_cidr" {
description = "The name of the subnet to be used when deploying resources"
type = string
default = "10.128.0.0/24"
}
EOF
Here are the compute-related variables that define the machine type, name, and operating system (OS) image:
$ cat << EOF >> variables.tf
variable "instance_name" {
description = "The name of the GCE VM instance named to be provisioned"
type = string
default = "packt-instance"
}
variable "instance_machine_type" {
description = "The machine type you want the GCE VM to use"
type = string
default = "e2-medium"
}
variable "instance_image" {
description = "The OS image you want the GCE VM boot disk to use"
type = string
default = "rocky-linux-cloud/rocky-linux-8-v20220406"
}
EOF
Set up the network to be used by the GCE VM instance:
$ cat << EOF > vpc.tf
resource "google_compute_network" "packt_network" {
name = "vpc-network"
auto_create_subnetworks = false
}
resource "google_compute_subnetwork" "packt_subnet" {
name = var.subnet_name
ip_cidr_range = var.subnet_cidr
region = var.region
network = google_compute_network.packt_network.name
}
EOF
The bare-minimum configuration required to spin up a GCE VM instance is as follows:
$ cat << EOF > gce.tf
resource "google_compute_instance" "packt_instance" {
name = var.instance_name
machine_type = var.instance_machine_type
boot_disk {
initialize_params {
image = var.instance_image
}
}
network_interface {
subnetwork = google_compute_subnetwork.packt_subnet.name
}
}
EOF
Now that we have all the Terraform configuration files defined, we can run a few Terraform commands to test and spin up the GCE instance we have configured. We start with the terraform init command to verify our connectivity to the backend and the necessary modules specified within our configurations:
$ terraform init
The following is an example output of the init command:
Initializing the backend...
Successfully configured the backend "gcs"! Terraform will automatically
use this backend unless the backend configuration changes.
Initializing provider plugins...
- Reusing previous version of hashicorp/google from the dependency lock file
- Installing hashicorp/google v4.16.0...
- Installed hashicorp/google v4.16.0 (signed by HashiCorp)
Terraform has been successfully initialized!
We run the terraform plan command to preview the changes specified in the configuration, along with the -out switch to output the plan as recommended by Terraform. This will allow for validation and code reviews of what Terraform will attempt to perform on the specified Google Cloud project. Developers and operators can use terraform show terraform.tfplan to view the plan:
$ terraform plan -out terraform.tfplan
The following is an example output of a plan:
Terraform used the selected providers to generate the following execution plan. Resource actions are indicated
with the following symbols:
  + create
Terraform will perform the following actions:
  # google_compute_instance.main will be created
  + resource "google_compute_instance" "main" {
      + can_ip_forward       = false
      + cpu_platform         = (known after apply)
...
          + node_affinities {
              + key      = (known after apply)
              + operator = (known after apply)
              + values   = (known after apply)
            }
        }
    }
Plan: 1 to add, 0 to change, 0 to destroy.
...
Saved the plan to: terraform.tfplan
To perform exactly these actions, run the following command to apply:
    terraform apply "terraform.tfplan"
Rather than just using terraform apply to actuate the changes, we now have a plan file to specifically apply the approved changes if this were in a pipeline:
$ terraform apply terraform.tfplan
The following is an example output of an apply function:
google_compute_instance.main: Creating...
google_compute_instance.main: Still creating... [10s elapsed]
google_compute_instance.main: Creation complete after 11s [id=projects/**REDACTED_project_id**/zones/us-west1-a/instances/test-instance]
Apply complete! Resources: 1 added, 0 changed, 0 destroyed.
Now that we’ve manually tested a Terraform execution, we can add it to a Cloud Build configuration pipeline to automate this process. In Cloud Build, we will execute the individual Terraform command steps described previously, with each represented as a build step. If you do not de-provision (as in, destroy) the previously created resources, the Cloud Build configuration will not make any changes, because the Terraform configurations created previously are being re-used. Run the following command to destroy the created resources:
$ terraform destroy --auto-approve
Before we start using Cloud Build, we will need to grant the Cloud Build default service account network and compute permissions to create our resources. The previous commands, when running terraform in the terminal, used your local service account. When we execute with Cloud Build and we do not specify a service account, it will use the Cloud Build default service account:
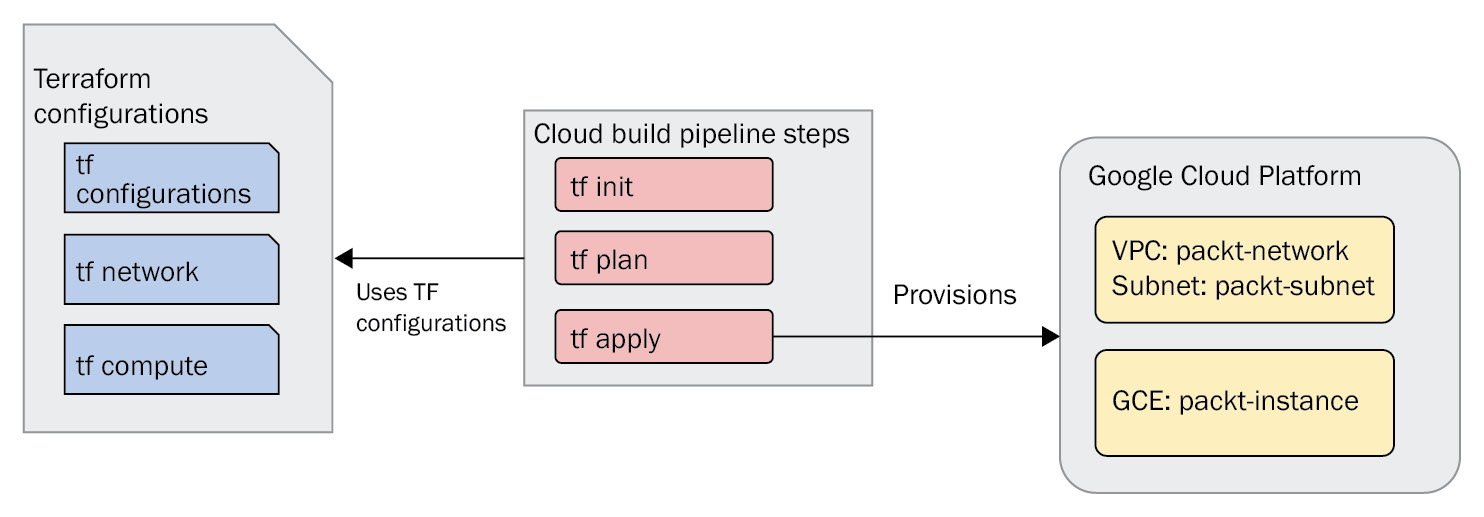
Figure 7.1 – Cloud Build and Terraform, all in one approach
First, we need to retrieve the Google Cloud project number, as it is needed to construct the Cloud Build default service account, [email protected]:
$ export PROJECT_NUMBER=$(gcloud projects list
--filter="$(gcloud config get-value project)"
--format="value(PROJECT_NUMBER)"
)
Give the Cloud Build service account administrative permissions on the resources we will be creating:
$ gcloud projects add-iam-policy-binding ${PROJECT_ID}
--member=serviceAccount:${PROJECT_NUMBER}@cloudbuild.gserviceaccount.com
--role=roles/compute.networkAdmin
$ gcloud projects add-iam-policy-binding ${PROJECT_ID}
--member=serviceAccount:${PROJECT_NUMBER}@cloudbuild.gserviceaccount.com
--role=roles/compute.instanceAdmin.v1
In this example, we will be using the hashicorp/terraform:1.0.0 container image to provide the terraform executable, starting with terraform init:
$ cat << EOF > cloudbuild.yaml
timeout: 3600s
steps:
- id: 'tf init'
name: 'hashicorp/terraform:1.0.0'
env:
- "TF_IN_AUTOMATION=true"
entrypoint: 'sh'
args:
- '-c'
- |
terraform init -input=false
EOF
The next build step is terraform plan, for outlining the changes:
$ cat << EOF >> cloudbuild.yaml
- id: 'tf plan'
name: 'hashicorp/terraform:1.0.0'
env:
- "TF_IN_AUTOMATION=true"
entrypoint: 'sh'
args:
- '-c'
- |
terraform plan -input=false -out terraform.tfplan
EOF
The last build step is terraform apply, for applying the outlined changes:
$ cat << EOF >> cloudbuild.yaml
- id: 'tf apply'
name: 'hashicorp/terraform:1.0.0'
env:
- "TF_IN_AUTOMATION=true"
entrypoint: 'sh'
args:
- '-c'
- |
terraform apply -input=false terraform.tfplan
EOF
Once we have our Cloud Build configuration available to us, we can manually execute the build by running the command used in previous chapters to submit a build. The default Cloud Build service account will be used:
$ gcloud builds submit --region us-west1
A successful build will yield the following truncated output with a SUCCESS status:
...
Step #2 - "tf apply": Apply complete! Resources: 3 added, 0 changed, 0 destroyed.
Finished Step #2 - "tf apply"
PUSH
DONE
...
STATUS: SUCCESS
Note
In automation, the TF_IN_AUTOMATION variable is set so that some instructions are truncated and manual instructions are not presented. For example, after executing terraform plan automatically with the variable set, the following statement is not outputted to the console: “To perform exactly these actions...”.
If you recall from earlier, it was noted that Terraform is intended to be idempotent, so subsequent build submissions with the same configuration will yield the following output for a terraform plan execution:
Step #1 - "tf plan": No changes. Your infrastructure matches the configuration.
Step #1 - "tf plan":
Step #1 - "tf plan": Your configuration already matches the changes detected above. If you'd like
Step #1 - "tf plan": to update the Terraform state to match, create and apply a refresh-only plan.
Executing tf apply to a plan with no changes will result in the following:
Step #2 - "tf apply": Apply complete! Resources: 0 added, 0 changed, 0 destroyed.
There are many things that we can do to build on top of this example, such as putting the created files into an SCM repository for version control and auditing. You can find this example at https://github.com/PacktPublishing/Cloud-Native-Automation-With-Google-Cloud-Build/tree/main/chapter07/terraform – the files that we created previously are located in the single folder.
The separation of resource creation and the build steps
In the following section, we will look into the multiple folder, where we expand on the example in the previous section by separating the creation of the VPC and subnet from the GCE VM instance. This will allow resource management with more separation and control. The configuration and setup for this are available in the multiple folder of the following repository: https://github.com/PacktPublishing/Cloud-Native-Automation-With-Google-Cloud-Build/tree/main/chapter07/terraform.

Figure 7.2 – Cloud Build and Terraform (VPC and compute provisioning as separate pipelines)
The majority of examples are the same, except for moving specific resource configurations into their respective vpc and compute folders. In the previous example, it consisted of executing the trio of terraform init, plan, and apply commands once – however, when the resources are separated, the trio of terraform commands will be executed twice, once for each set of resource configurations. Another difference is because they are executed separately, we will need to use another capability available to us in Terraform known as remote state.
remote state allows us to reference provisioned resources from other applied Terraform configurations, so rather than manually leveraging variables to reference a resource, we can retrieve the outputs of a previous Terraform execution to link to created resources. When we create a GCE VM instance, we need access to the subnet that the resource will be associated with.
Note the following output of the gce.tf configuration:
resource "google_compute_instance" "packt_instance" {
  name         = var.instance_name
  machine_type = var.instance_machine_type
  boot_disk {
    initialize_params {
      image = var.instance_image
    }
  }
  network_interface {
    subnetwork = data.terraform_remote_state.vpc.outputs.subnet_name
  }
}
The subnetwork references remote state from our VPC configuration. The VPC Terraform configuration outputs the subnet_name value that will be used by our GCE VM.
Similar to the Terraform backend configuration, the remote state references the VPC state in the GCS bucket and path specified by the VPC backend.
data "terraform_remote_state" "vpc" {
backend = "gcs"
config = {
bucket = "${PROJECT_ID}"
prefix = "tfstate/vpc"
}
}
In the pipeline, folders are used to separate the resources, so the Cloud Build steps need to know where to find the appropriate Terraform configurations – we use the dir notation to signify where to execute the terraform commands.
- id: 'tf init - vpc'
  name: 'hashicorp/terraform:1.0.0'
  dir: chapter07/terraform/multiple/vpc
  env:
  - "TF_IN_AUTOMATION=true"
  entrypoint: 'sh'
Let’s go ahead and execute this Cloud Build infrastructure pipeline. While the configurations have changed and additional build steps were added, the result is the same as the single instance we constructed earlier in the chapter. If you would like to execute this yourself, after cloning the repository, you will need to replace some variables:
$ gcloud config set project ${PROJECT_ID}
$ PROJECT_ID=$(gcloud config get-value project)
$ envsubst < chapter07/terraform/multiple/variables.tf_tmpl > multiple/variables.tf
$ envsubst < chapter07/terraform/multiple/vpc/backend.tf_tmpl > multiple/vpc/backend.tf
$ envsubst < chapter07/terraform/multiple/compute/backend.tf_tmpl > multiple/compute/backend.tf
$ envsubst < chapter07/terraform/multiple/compute/vpc-remote-state.tf_tmpl > multiple/compute/vpc-remote-state.tf
Now, we can submit the Cloud Build configuration:
$ gcloud builds submit --region us-west1 --config cloudbuild-multiple.yaml
Notice that the additional steps for the creation of VPC resources and compute resources are separate, unlike the simple example, Apply complete! Resources: 3 added, previously deployed:
Step #2 - "tf apply - vpc": Apply complete! Resources: 2 added, 0 changed, 0 destroyed.
Step #2 - "tf apply - vpc":
Step #2 - "tf apply - vpc": Outputs:
Step #2 - "tf apply - vpc":
Step #2 - "tf apply - vpc": subnet_name = "packt-m-subnet"
...
Step #5 - "tf apply - compute": Apply complete! Resources: 1 added, 0 changed, 0 destroyed.
Finished Step #5 - "tf apply - compute"
Just as with the simple preceding example, executing the multiple example over and over again will output the following for each of the resources attempting to be provisioned:
Apply complete! Resources: 0 added, 0 changed, 0 destroyed.
Note
The respective cloudbuild-destroy.yaml and cloudbuild-multiple-destroy.yaml are available in the repository to clean up the created resources. You will need to make adjustments to the variables, backends, and remote states to reference your project:
$ gcloud builds submit --region us-west1 --config cloudbuild-multiple-destroy.yaml
The following example output shows the destroyed resources that were created in the multiple example created previously:
Step #2 - "tf apply - compute": Apply complete! Resources: 0 added, 0 changed, 1 destroyed.
...
Step #5 - "tf apply - vpc": Apply complete! Resources: 0 added, 0 changed, 2 destroyed.
The primary focus of the book has been the compilation of the source code stored in an SCM repository. The flexibility of Cloud Build allows each step to use a container image – in this case, we used the terraform image to deploy Terraform configurations using multiple build steps. So far, we’ve used pre-built images in our build steps and described the concept of custom builders. We will be jumping into the creation of our own custom builder in the next section.
Building a custom builder
Cloud Build uses a container image for each build step, which provides flexibility to essentially execute whatever binary or commands your build requires. Another pattern is where you build a custom builder image consisting of all the necessary build binaries required by the team. This can reduce complexity by having only one image to be used in build steps, but also only one image to be maintained.
Let’s start with an example where your build needs access to a few Google Cloud resources such as gcloud and gsutil, but you would still like a few more for your overall builds such as terraform, kustomize, and skaffold. While the base image provides the first two, we would have to either use the available community builder images for each tool (https://github.com/GoogleCloudPlatform/cloud-builders-community), build a new custom image for each tool, or a single image that the team can maintain with the latter three.
We start with a Dockerfile that we define, the smaller cloud-sdk image based on alpine, and then add a few tools we desire, along with some cleanup:
$ mkdir ~/packt/cloudbuild-custombuilder; cd ~/packt/cloudbuild- custombuilder
$ gcloud config set project ${PROJECT_ID}
$ PROJECT_ID=$(gcloud config get-value project)
$ cat << EOF > Dockerfile
FROM gcr.io/google.com/cloudsdktool/cloud-sdk:alpine
ENV TERRAFORM_VERSION=1.1.0
RUN echo "INSTALL TERRAFORM v${TERRAFORM_VERSION}"
&& wget -q -O terraform.zip https://releases.hashicorp.com/terraform/${TERRAFORM_VERSION}/terraform_${TERRAFORM_VERSION}_linux_amd64.zip
&& unzip terraform.zip
&& chmod +x terraform
&& mv terraform /usr/local/bin
&& rm -rf terraform.zip
RUN gcloud components install
kustomize
skaffold
&& rm -rf $(find google-cloud-sdk/ -regex ".*/__pycache__")
&& rm -rf google-cloud-sdk/.install/.backup
EOF
The preceding is just an example, but while we’ve primarily focused on Cloud Build as a mechanism to execute Cloud Build configurations, it can also build container images noted in previous chapters. Depending on your environment, you may need additional permissions, to enable Artifact Registry, and create a repository named core-image:
$ gcloud builds submit --region us-west1 --tag us-docker.pkg.dev/${PROJECT_ID}/core-image/builder:latest
We can use the build image as described in the following Cloud Build configuration file:
$ cat << EOF > cloudbuild.yaml
steps:
- id: 'See what gcloud components are installed'
name: 'us-docker.pkg.dev/${PROJECT_ID}/core-image/builder:latest'
entrypoint: 'sh'
args:
- '-c'
- |
gcloud components list --only-local-state --format "value(id)"
- id: 'Check terraform version'
name: 'us-docker.pkg.dev/${PROJECT_ID}k/core-image/builder:latest'
entrypoint: 'sh'
args:
- '-c'
- |
terraform version
EOF
Executing a manual builds submit of the preceding configuration will install gcloud components and validate the terraform version available:
$ gcloud builds submit --region us-west1
The following is a sample output of which gcloud components are installed locally for the image and the version of terraform:
Step #0 - "See what gcloud components are installed": Your current Google Cloud CLI version is: 381.0.0
Step #0 - "See what gcloud components are installed": kubectl
Step #0 - "See what gcloud components are installed": bq
Step #0 - "See what gcloud components are installed": core
Step #0 - "See what gcloud components are installed": kustomize
...
Step #1 - "Check terraform version": Terraform v1.1.0
Step #1 - "Check terraform version": on linux_amd64
...
The team that owns the image may differ depending on your organization, but ideally, it is maintained by a single team. In an end-to-end build, requirements, suggestions, and feedback may come from different teams within the organization. Versioning becomes critical as well when certain builds depend on specific versions and combinations of tools that need to be considered when maintaining a custom builder image. It comes down to what works for the organization but the flexibility of the requirements of different teams can lead to optimal outcomes.
Managing the principle of least privilege for builds
In the previous chapter, we covered the underlying principle of least privilege for our build pipelines. While the example in the first section of this chapter leveraged the Cloud Build default service account, it was convenient, but depending on the type of pipeline or automation we want to run, we may not want to provide a service account that has the ability to manipulate both the network and compute. One way to achieve this is by separating our Cloud Build pipeline configurations – we can also minimize the impact of mistakes or the attack surface.
If you haven’t cloned the repo, go ahead and clone it (https://github.com/PacktPublishing/Cloud-Native-Automation-With-Google-Cloud-Build):
$ git clone https://github.com/PacktPublishing/Cloud-Native-Automation-With-Google-Cloud-Build
Navigate to this chapter’s example:
$ cd Cloud-Native-Automation-With-Google-Cloud-Build/chapter07/terraform
In the Cloud Build configuration, cloudbuild-multiple-network.yaml, we specify the specific serviceAccount that is to be used by this build:
$ serviceAccount: 'projects/${PROJECT_ID}/serviceAccounts/${CLOUDBUILD_NETWORK}@${PROJECT_ID}.iam.gserviceaccount.com'
We will first need to prepare the variables to be used by both our Cloud Build and Terraform configurations:
$ gcloud config set project ${PROJECT_ID}
$ export PROJECT_ID=$(gcloud config get-value project)
$ export CLOUDBUILD_NETWORK=cloudbuild-network
$ export CLOUDBUILD_COMPUTE=cloudbuild-compute
Create our two service accounts and assign the permissions to be used by the respective Terraform configurations. Create the account that will build out our VPC:
$ gcloud iam service-accounts create ${CLOUDBUILD_NETWORK}
--display-name="Cloud Build Network Admin"
$ gcloud projects add-iam-policy-binding ${PROJECT_ID}
--member=serviceAccount:${CLOUDBUILD_NETWORK}@${PROJECT_ID}.iam.gserviceaccount.com
--role=roles/compute.networkAdmin
$ gcloud projects add-iam-policy-binding ${PROJECT_ID}
--member=serviceAccount:${CLOUDBUILD_NETWORK}@${PROJECT_ID}.iam.gserviceaccount.com
--role=roles/iam.serviceAccountUser
$ gcloud projects add-iam-policy-binding ${PROJECT_ID}
--member=serviceAccount:${CLOUDBUILD_NETWORK}@${PROJECT_ID}.iam.gserviceaccount.com
--role=roles/logging.logWriter
$ gcloud projects add-iam-policy-binding ${PROJECT_ID}
--member=serviceAccount:${CLOUDBUILD_NETWORK}@${PROJECT_ID}.iam.gserviceaccount.com
--role=roles/storage.objectAdmin
Next, we create the account that will provision our GCE VM instance:
$ gcloud iam service-accounts create ${CLOUDBUILD_COMPUTE}
--display-name="Cloud Build Compute Admin"
$ gcloud projects add-iam-policy-binding ${PROJECT_ID}
--member=serviceAccount:${CLOUDBUILD_COMPUTE}@${PROJECT_ID}.iam.gserviceaccount.com
--role=roles/compute.instanceAdmin.v1
$ gcloud projects add-iam-policy-binding ${PROJECT_ID}
--member=serviceAccount:${CLOUDBUILD_COMPUTE}@${PROJECT_ID}.iam.gserviceaccount.com
--role=roles/iam.serviceAccountUser
$ gcloud projects add-iam-policy-binding ${PROJECT_ID}
--member=serviceAccount:${CLOUDBUILD_COMPUTE}@${PROJECT_ID}.iam.gserviceaccount.com
--role=roles/logging.logWriter
$ gcloud projects add-iam-policy-binding ${PROJECT_ID}
--member=serviceAccount:${CLOUDBUILD_COMPUTE}@${PROJECT_ID}.iam.gserviceaccount.com
--role=roles/storage.objectAdmin
Permissions may take a few moments to propagate – submit the build and see the following:
ERROR: (gcloud.builds.submit) INVALID_ARGUMENT: could not resolve source: googleapi: Error 403: cloudbuild-compute@**REDACTED_project_id**.iam.gserviceaccount.com does not have storage.objects.get access to the Google Cloud Storage object., forbidden
We will need to substitute a few variables in our Cloud Build configurations. In this example, we specify the service account in the configuration because we will manually be submitting this over the CLI. If you use a trigger, you will be able to specify the service account as part of the trigger as well:
$ envsubst < cloudbuild-multiple-network.yaml_tmpl > cloudbuild-multiple-network.yaml
$ envsubst < cloudbuild-multiple-compute.yaml_tmpl > cloudbuild-multiple-compute.yaml
$ envsubst < cloudbuild-multiple-network-destroy.yaml_tmpl > cloudbuild-multiple-network-destroy.yaml
$ envsubst < cloudbuild-multiple-compute-destroy.yaml_tmpl > cloudbuild-multiple-compute-destroy.yaml
Once the variables have been replaced, we should be ready to go with submitting our build configurations. Just as in the previous scenario where we submitted the network and compute builds separately, we will be doing it separately here too. The main difference in this scenario is we are using a service account that has the necessary privileges to perform the task at hand:
$ gcloud builds submit --region us-west1 --config cloudbuild-multiple-network.yaml
Note
Because we are using a user-specified service account and we specified it using CLOUD_LOGGING_ONLY, we won’t be able to see the logs stream in the terminal. At the time of writing, with gcloud beta, you could stream the logs in your terminal. Alternatively, the output from the gcloud command is an option to click a Logs are available at link to open the console to view it over the UI. If you have another terminal window open, you can view the logs using gcloud builds log YOUR_BUILD_ID.
Given that each service account has specific resource permissions, if you were to replace serviceAccount in the cloudbuild-multiple-compute.yaml configuration with the cloudbuild-network service account, it would not have the appropriate permissions to create a compute instance. We would end up with the following error:
Step #2 - "tf apply - compute": google_compute_instance.packt_instance: Creating...
Step #2 - "tf apply - compute": │
Step #2 - "tf apply - compute": │ Error: Error creating instance: googleapi: Error 403: Required 'compute.instances.create' permission for 'projects/**REDACTED-project_id**/zones/us-west1-a/instances/packt-m-instance'
Step #2 - "tf apply - compute": │ More details:
Step #2 - "tf apply - compute": │ Reason: forbidden, Message: Required 'compute.instances.create' permission for 'projects/**REDACTED-project_id**/zones/us-west1-a/instances/packt-m-instance'
Step #2 - "tf apply - compute": │ Reason: forbidden, Message: Required 'compute.disks.create' permission for 'projects/**REDACTED-project_id**/zones/us-west1-a/disks/packt-m-instance'
Leveraging the principle of least privilege helps determine which accounts are able to manipulate their respective resources, allowing for the life cycle of each account to be managed independently. As noted earlier, it can also reduce the attack surface by limiting permissions to specific resources.
Human-in-the-loop with manual approvals
Just as in code, when dealing with infrastructure-related builds, there may be a need to have a human intervene and approve it before a build can begin. By separating our resources into different build configurations as in the previous section, we can determine which resources would require approval before the build pipeline can execute.
Note
For this current section, we will walk through an example – it is not intended for you to copy and paste, as your setup and configurations may differ.
In this example, we will be using the publicly hosted GitHub repository that is connected to a GCP project. We need to do this because the approval mechanism is only available through triggers. Assuming you have already connected to your repository via the console (i.e., GitHub (Cloud Build GitHub App)) or a supported SCM provider of choice, you can use the following CLI to create a trigger.
This example is available at https://github.com/PacktPublishing/Cloud-Native-Automation-With-Google-Cloud-Build/tree/main/chapter07/terraform using the cloudbuild-multiple-network-approval.yaml Cloud Build configuration file. The following are the example commands for this section. The repository is provided as a starting point, but your fork or repository layout may be different:
$ gcloud beta builds triggers create github
--name=packt-cloudbuild-terraform-approval
--repo-name= Cloud-Native-Automation-With-Google-Cloud-Build
--repo-owner=PacktPublishing
--branch-pattern=^main$
--require-approval
--build-config=/chapter07/terraform/cloudbuild-multiple-network-approval.yaml
--service-account "projects/**REDACTED-project_id**/serviceAccounts/cloudbuild-network@**REDACTED-project_id**.iam.gserviceaccount.com"
The console is also available for creating triggers as well, as noted in a previous chapter.
Once the trigger has been created and a build has been triggered through an SCM commit or manually RUN in Cloud Build, the build will be in a wait status until it is approved or rejected. Note the APPROVE and REJECT options in this screenshot of the GCP Console UI:
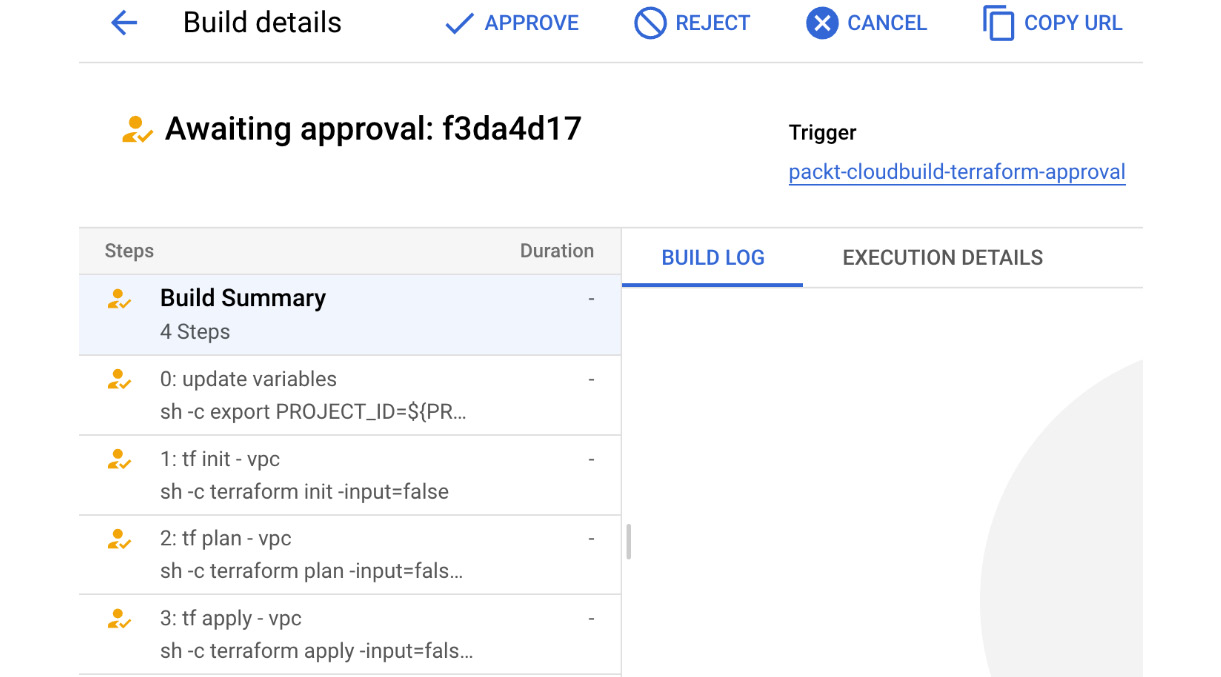
Figure 7.3 – A build awaiting approval
If the APPROVE option is selected, a dialog will prompt the user for approval confirmation.
Note
For a user to approve or reject the build, they must have the Cloud Build Approver role assigned to their account.
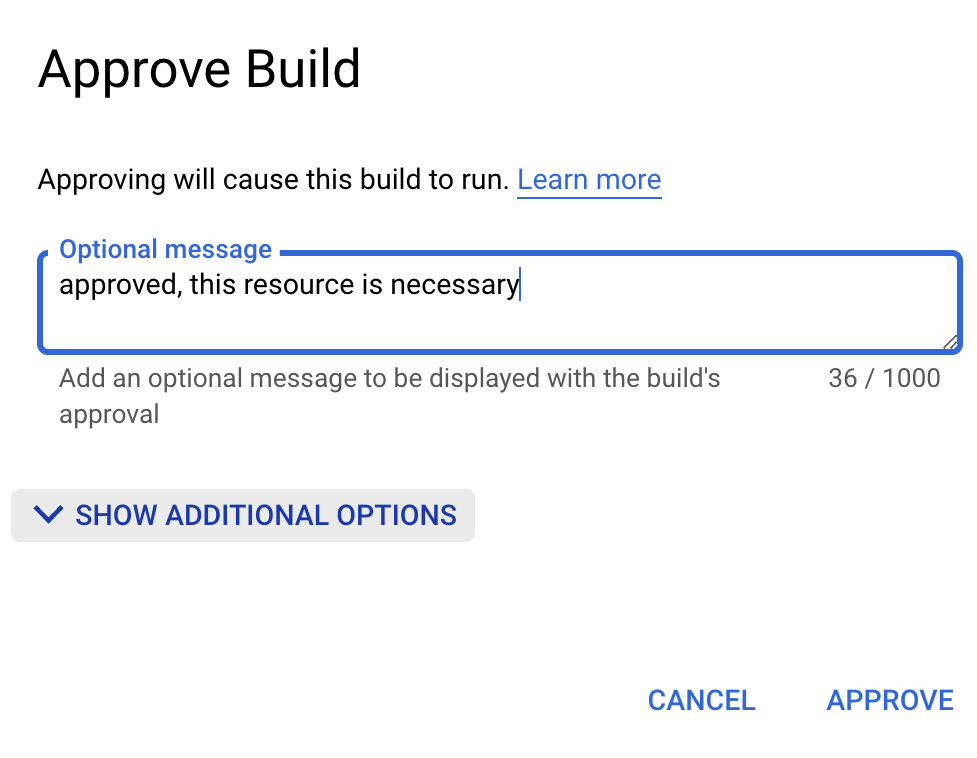
Figure 7.4 – The approval dialog
Once the APPROVE option has been selected in the preceding dialog, the build will begin. This can also be performed using the gcloud CLI. Using the CLI, the user will need to know the build ID to approve or reject:
$ gcloud alpha builds approve f3da4d17-d832-449a-b925-9ae95245f5b0
--project=**REDACTED-project_id**
This is a sample output when approval is performed using the CLI:
metadata:
'@type': type.googleapis.com/google.devtools.cloudbuild.v1.BuildOperationMetadata
...
result:
approvalTime: '2022-04-14T23:45:41.598449Z'
...
decision: APPROVED
state: APPROVED
Manual approval allows a human or service to intervene to determine whether or not a build should be executed. As time passes, it may become more viable to have a system validate and make a decision or eventually remove the approval requirement altogether. The intent is to provide a level of flexibility to the organization.
Summary
Cloud Build is not just for building and compiling services and applications. The flexibility of the platform, consisting of pre-built cloud builders, custom cloud builders, user-specified service accounts, and human approvals, can help automate tasks within an organization. In this chapter, leveraging Terraform, we were able to provision resources on GCP using IaC concepts.
In the next chapter, we will dive into the deep end of securing the delivery of your services within Google Kubernetes Engine (GKE).