
2
Configuring Cloud Build Workers
Having discussed a little about the context of automation in the industry and where Cloud Build fits into this, let’s dive into the implementation details of Cloud Build. We will start with Cloud Build workers—the machines that execute your builds.
The possibilities for what builds can automate and accomplish are numerous. They can define a series of steps that test source code and translate it into an executable binary. They can define a number of cloud infrastructure resources to be created, updated, or torn down. They can read from and write to various external systems, such as Git-based repositories or container registries. They can define workflows for data processing or machine learning (ML) pipelines.
When writing builds for Cloud Build, each step runs in a container, and that container image can be built and provided by you. As we discussed in the previous chapter, these container images that run a build step are called builders.
Given that the use cases for builds are many, it is important to understand how to configure the environment in which those builds run. These builds may have certain requirements for their execution environment, including the following:
- Specific amounts of central processing units (CPUs) and memory resources
- Network connectivity to resources running on a private network
- Locality to a specific region due to compliance or latency necessities
This execution environment runs on virtual machines (VMs) that are fully managed by Google, otherwise known as worker pools.
In this chapter, we will review the architecture of Cloud Build and the various ways you can configure workers to execute your builds, walking away with knowledge of the following topics:
- How worker pools can be configured in Cloud Build
- Prerequisites for running builds on worker pools
- Using the default pool
- Using private pools
Technical requirements
- Data center and infrastructure concepts
- Public cloud concepts
- Software build concepts
- Networking concepts
How worker pools can be configured in Cloud Build
The term managed service has done some heavy lifting in the software industry, with the term yielding varying definitions of what managed means, depending on the service. Thus, it is important when using any managed service to review the architecture where the boundaries lie between the provider and you, the user. Cloud Build is no different!
In Cloud Build, the architecture of where workers run depends on which type of worker pool your build executes in. There are two types of worker pools in Cloud Build, as outlined here:
- The default pool, which is the simplest way to run builds on fully managed workers
- Private pools, which are fully managed workers configured to a higher level, including connectivity to private Virtual Private Cloud (VPC) networks
Despite having various types of worker pools supported by Cloud Build, it is key to call out that the core user journey of having builds run in Cloud Build aims to be consistent regardless of which type of worker pool you utilize, for both authoring build definition and submitting build definitions to be executed. In the following diagram, we can see that the Cloud Build application programming interface (API) should be consistent across all worker pools:
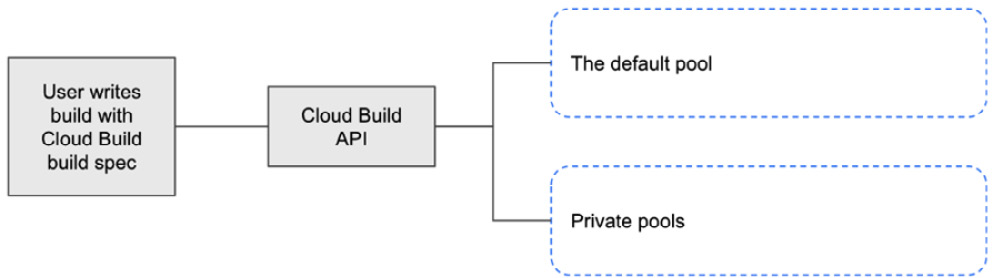
Figure 2.1 – Builds in Cloud Build can run on various worker pool types with minimal-to-no changes
This means that regardless of which type of worker pool executes your build, the method in which you specify what a build looks like remains the same. We will review in depth Cloud Build’s build specification in later chapters, but let’s first discuss the minimum requirements in a Google Cloud Platform (GCP) environment to get started with Cloud Build.
Prerequisites for running builds on worker pools
When beginning to work with Cloud Build, it’s important to understand how its resource hierarchy works in your Google Cloud environment. Cloud Build and all the various worker pools we will discuss are scoped to a Project.
Your Google Cloud project will be the top-level resource that contains resources that you will utilize when using Cloud Build. Within a Project, you can utilize Identity and Access Management (IAM) to create user accounts and service accounts that will grant you and others access to various resources within the Project. To ensure that you can proceed with Cloud Build and the following examples, ensure that you have the following roles associated with your user in IAM:
- Cloud Build Editor
- Network Admin
- Logging Admin
These roles will enable you to utilize Cloud Build and the services it integrates with in Google Cloud, as follows:
- Cloud Build, for creating builds
- VPC, for network connectivity for certain worker pools
- Cloud Logging, for accessing build logs
This is recommended for a sandbox environment only. In later chapters, we will review how to utilize IAM for Cloud Build while applying the principle of least privilege.
The resources used within a Project with Cloud Build are summarized in the following diagram:
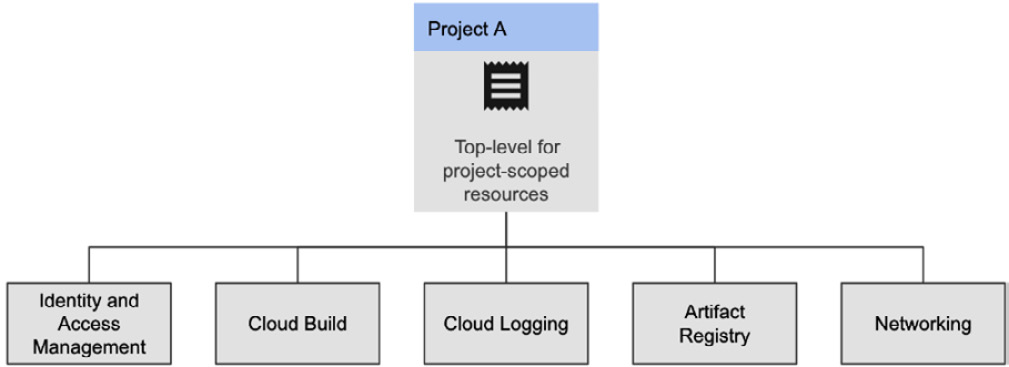
Figure 2.2 – Project-scoped services typically utilized when using Cloud Build
In later chapters, we will discuss how to apply the principle of least privilege to Cloud Build and its associated service, but for now, let’s continue forward.
In order to be able to spin up resources beyond Google Cloud’s free tier, you will also need a billing account associated with your project. This account can be associated with more than a single project. Costs for Cloud Build can be found at https://cloud.google.com/build/pricing. The pricing will vary depending on the machine types and worker pool being utilized; however, this generally follows the model of United States dollars (USD) $/build minute, in line with the expectation that these resources spin up and down dynamically based on the volume of builds running. The following diagram shows the relationship between projects and billing accounts:
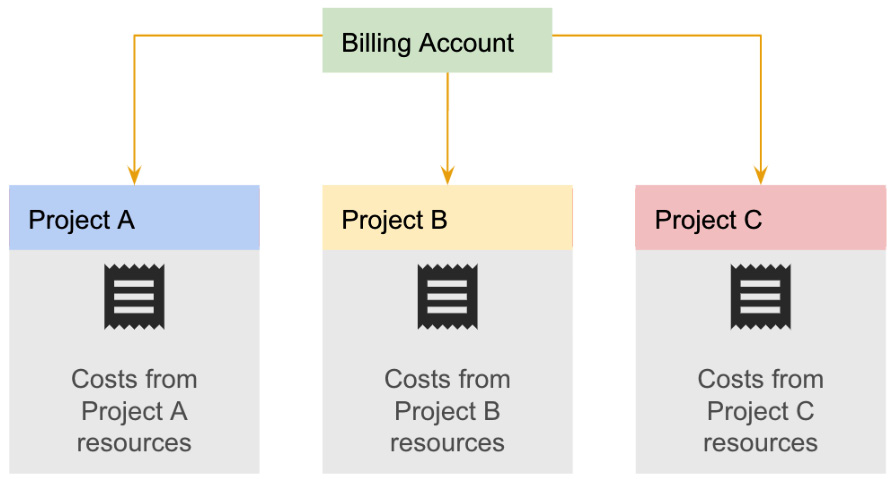
Figure 2.3 – Relationship between projects and billing accounts
Once you have a project, IAM, and a billing account sorted out, you will then need to enable the Cloud Build and Service Networking APIs in your Project.
For this and all following examples within this book, we will be utilizing Cloud Shell, a free and ephemeral developer workstation provided by Google Cloud. It runs a Debian machine with multiple tools already installed, including gcloud, which is the command-line interface (CLI) for utilizing Google Cloud services.
Open Cloud Shell (https://shell.cloud.google.com/) and authenticate with gcloud by running the following command and following the instructions in the response:
$ gcloud auth login
Once authenticated, run the following command to enable the required APIs to use Cloud Build and configure networking for private pool workers:
$ gcloud services enable cloudbuild.googleapis.com servicenetworking.googleapis.com
With your Google Cloud project set up, let’s now review the various ways worker pools can be configured!
Using the default pool
At its initial General Availability (GA) launch in 2017, Cloud Build was designed to provide users with a simple interface and fully managed experience in Google Cloud when building container images and other artifacts such as Go executables or Java archives.
Note
Cloud Build was initially launched under the name Container Builder in 2017, underscoring its simple and focused purpose to provide end users with a way to automate builds.
From its inception, Cloud Build has aimed to ensure the following:
- Users could create builds and triggers for builds by interacting with Google’s API or user interface (UI).
- Users would not need to create, patch, scale, or manage the worker machines that run builds.
- Users would have pre-built integration with logging and monitoring to introspect builds.
Cloud Build first accomplished this experience by providing users with the first mode for workers in Cloud Build: the default pool.
The default pool is naturally named as it is the default method for Cloud Build to provision workers to execute your builds. When submitting a build to Cloud Build, if you do not specify which type of worker pool should execute your build, it will be run in the default pool. This pool is available for you to use as soon as you enable the Cloud Build API and have permissions to execute builds.
This mode provides the simplest user experience (UX) among the various ways you can utilize Cloud Build. Consider the following flow diagram for when a user creates a build to run on a worker in the default pool:
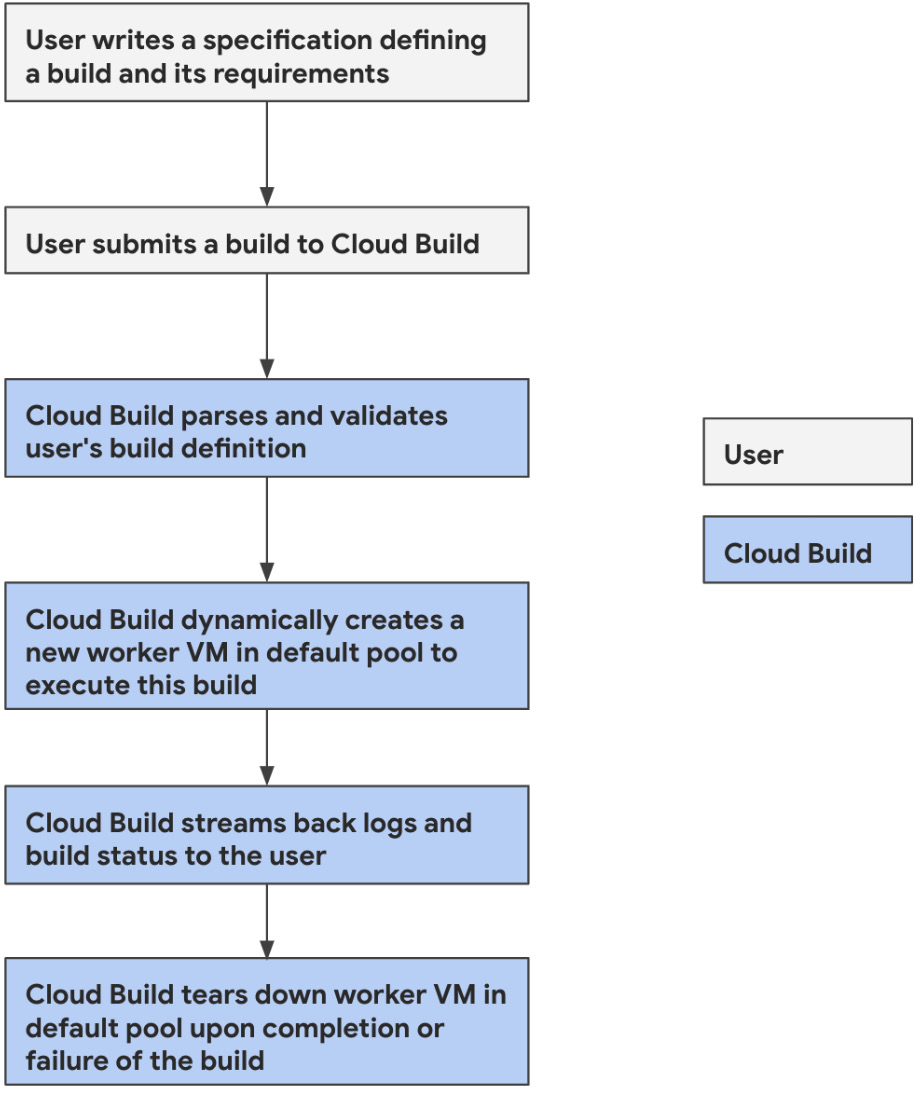
Figure 2.4 – Delineation between what users do and what Google does when utilizing the default pool
The user is primarily focused on their specific build steps and requirements, which ensures their time is spent only on the automation they seek to achieve and not on managing any of the infrastructure that will run their build.
Cloud Build enables this experience by ensuring that all of the infrastructure provisioned is created in a Google-owned environment where Google’s engineers can own the provisioning, securing, and management of the underlying build infrastructure.
Cloud Build provisions one dedicated worker for each build, created with a machine type according to that build’s specification for resource requirements. If no machine type is specified, the default machine type will be used, which utilizes one virtual CPU (vCPU) and 4 gigabytes (GB) of memory.
Note
Cloud Build has quotas and limits set at the project level around numerous dimensions of a build.
One of the most important limits is around concurrency, which is the number of builds that can be running at the same time. For the default pool, concurrency is set to 30 concurrent builds in a given project. For private pools, you can have up to 100 concurrent builds in a given private pool, and up to 10 private pools in a given project. This means that private pools have a much higher concurrency limit for running numerous builds simultaneously.
This is based on the default limitations set in a project; you can find a full list of quotas, limits, and possible exceptions here: https://cloud.google.com/build/quotas.
The default pool will have as many workers as there are builds running, ensuring each build has an isolated environment in which it can execute. If many builds are running at the same time with resource requirements, the single default pool may be running workers with multiple machine types. The following diagram shows the default pool architecture:
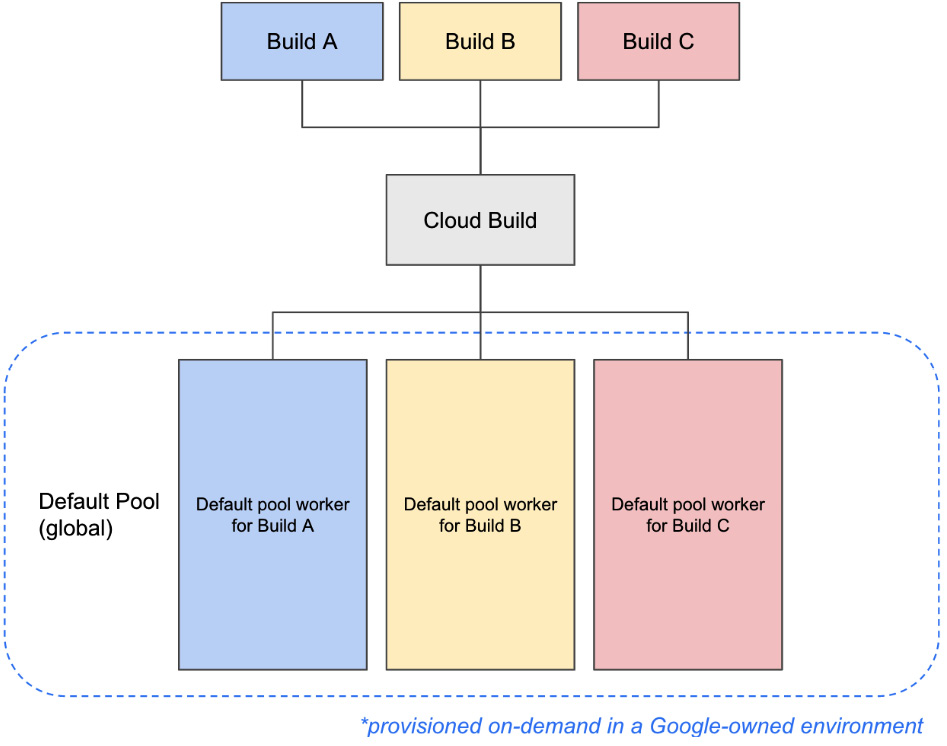
Figure 2.5 – Default pool architecture
Each worker is also provisioned with outbound access to the public internet. When you submit builds to execute in the default pool, you can configure the following:
- CPU and memory to be utilized by the build
- Storage to be available to all of the build steps in the build
You assign CPU and memory resources by specifying a machine type for the worker. Each machine type has a predetermined amount of CPU and memory; you can choose between these machine types based on the computing requirements of your build. The following machine types are available in the default pool, at publication time:
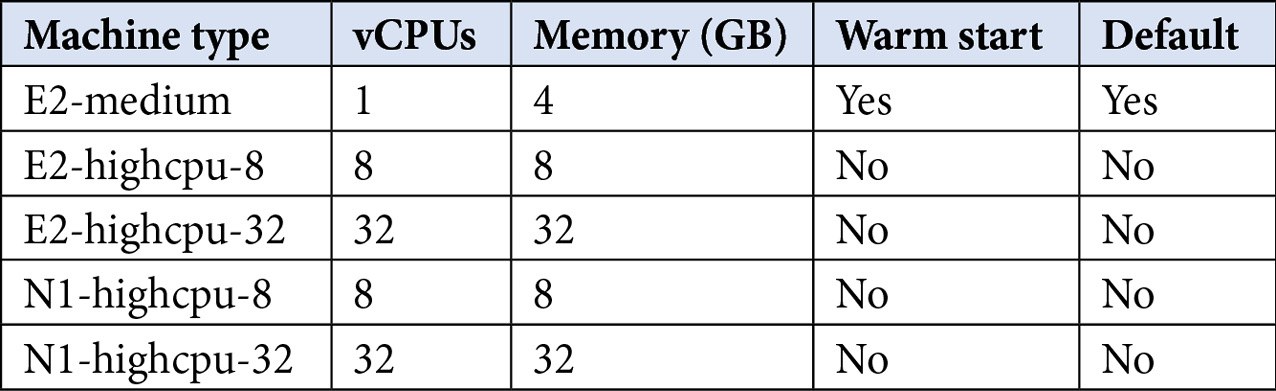
Table 2.1 – Default pool machine types and their respective resources
As for storage, each worker by default has 100 GB in network-attached solid-state drive (SSD) storage. Users can specify up to an additional 1,000 GB of network-attached SSD storage in their build configuration, which we will review in subsequent chapters.
Note
These workers do not have any access to your resources on machines within your private VPC network. With that said, Cloud Build workers do run with a specified service account that can be granted permissions to interact with resources in your project via Google APIs, such as managed artifact stores (for example, Container Registry and Artifact Registry).
To begin running builds on the Cloud Build default pool, there is no preparation required for users to create any resources. Rather, users merely need to submit the build definition to Cloud Build, which we will review in subsequent chapters.
Now, let’s move on to the concept of private pools in Cloud Build.
Using private pools
Private pools are similar to the default pool in that they are fully managed workers that live in a Google-managed environment. Designed for more complex sets of requirements from those looking to run fully managed builds, private pools help users who require the following:
- To run resources on a private VPC network that must be accessed from a build
- More optionality around machine types, such as high-memory machines
- To further secure the network perimeter of their build environment
Unlike the default pool, you can have multiple private pools in a single Google Cloud project. You create empty private pool resources that contain a definition of what a private pool worker should look like, with details such as their machine type and the network they should connect to. Google will then scale up these private pools from zero workers when builds are scheduled to run on them.
With that said, the workflow for end users submitting builds remains consistent, as we can see here:
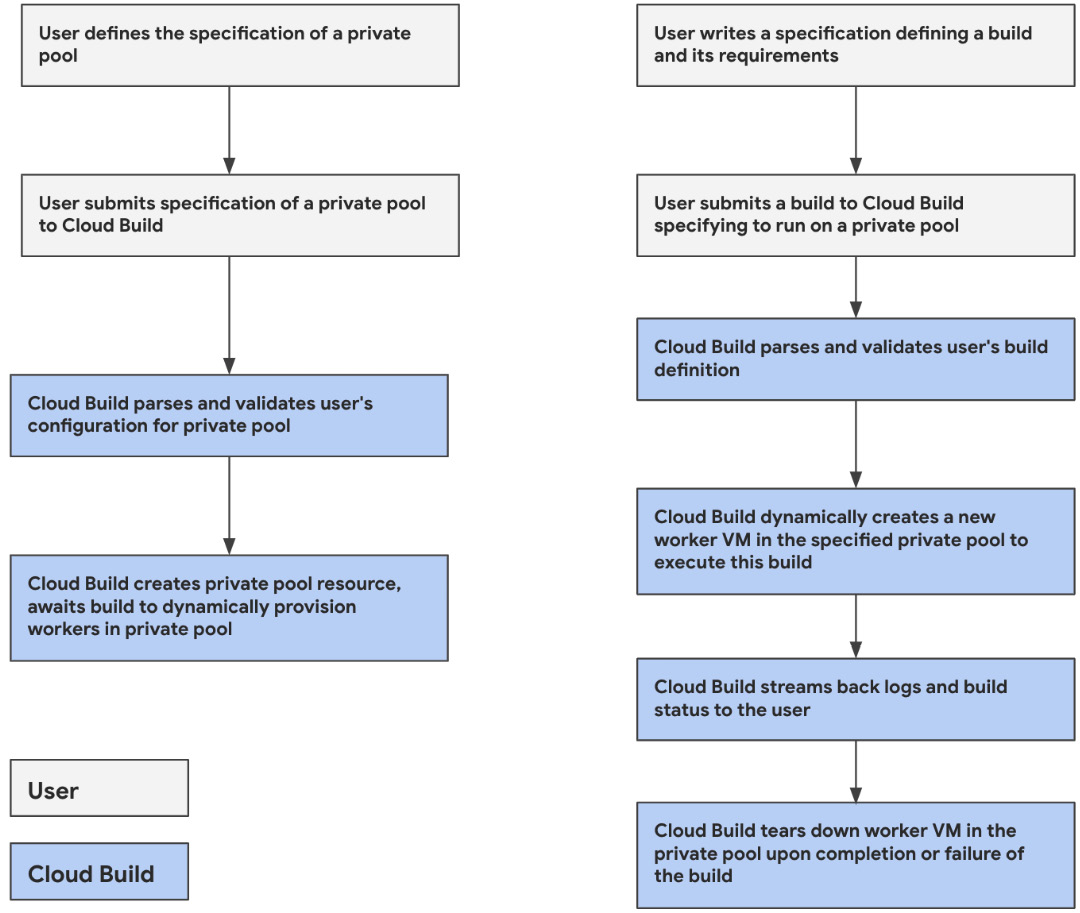
Figure 2.6 – Delineation between what users do and what Cloud Build does when using private pools
The architecture itself is slightly different from the default pool. As previously discussed, you can have multiple private pools in a single project, each with various configurations. What does remain the same is that a build is isolated to a single worker in the private pool it runs in. The following diagram shows the private pool architecture:
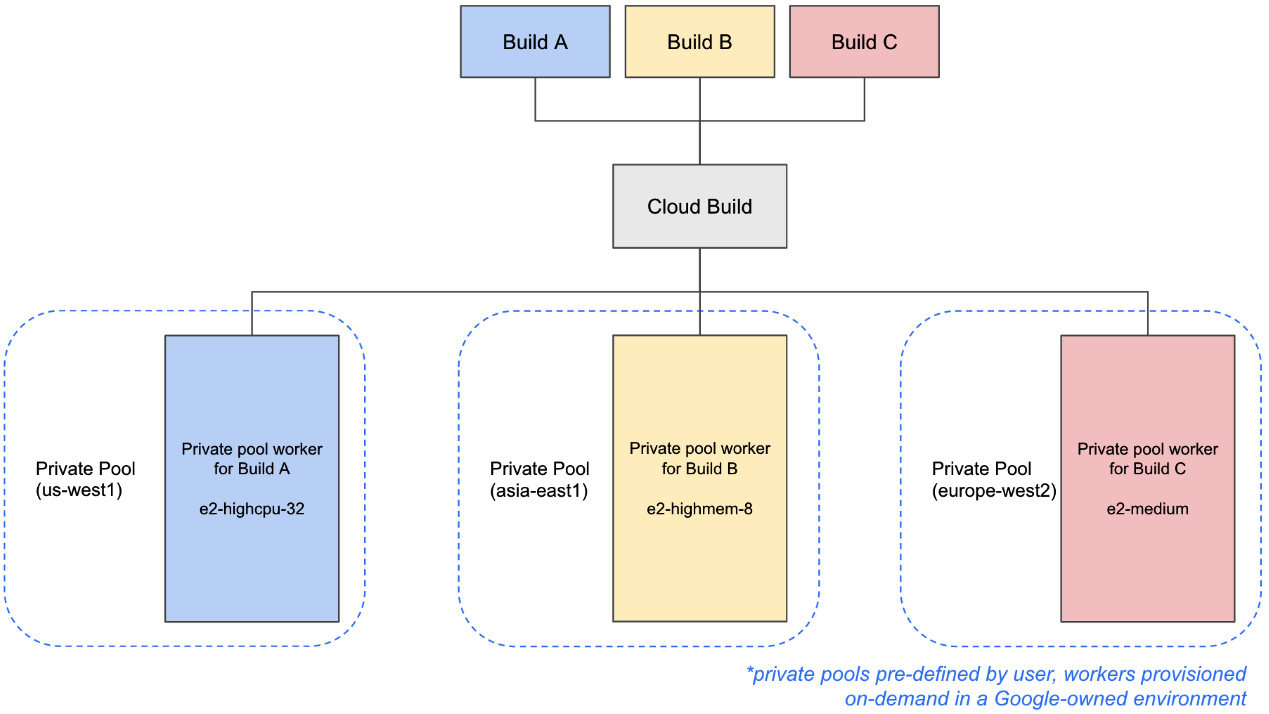
Figure 2.7 – Private pool architecture
One unique trait of the private pool architecture is that private pool workers can have connectivity to your own VPC networks in your Google Cloud Project. This network connectivity is made possible by the architecture of private pools, in which the Google-owned environment utilizes what is called a Service Producer network, where these workers are assigned internal Internet Protocol (IP) addresses.
You can utilize the Service Networking API to then create a peering between that Service Producer network and your own VPC, thus achieving network connectivity between workers and your private VPC-scoped resources, as illustrated in the following diagram:
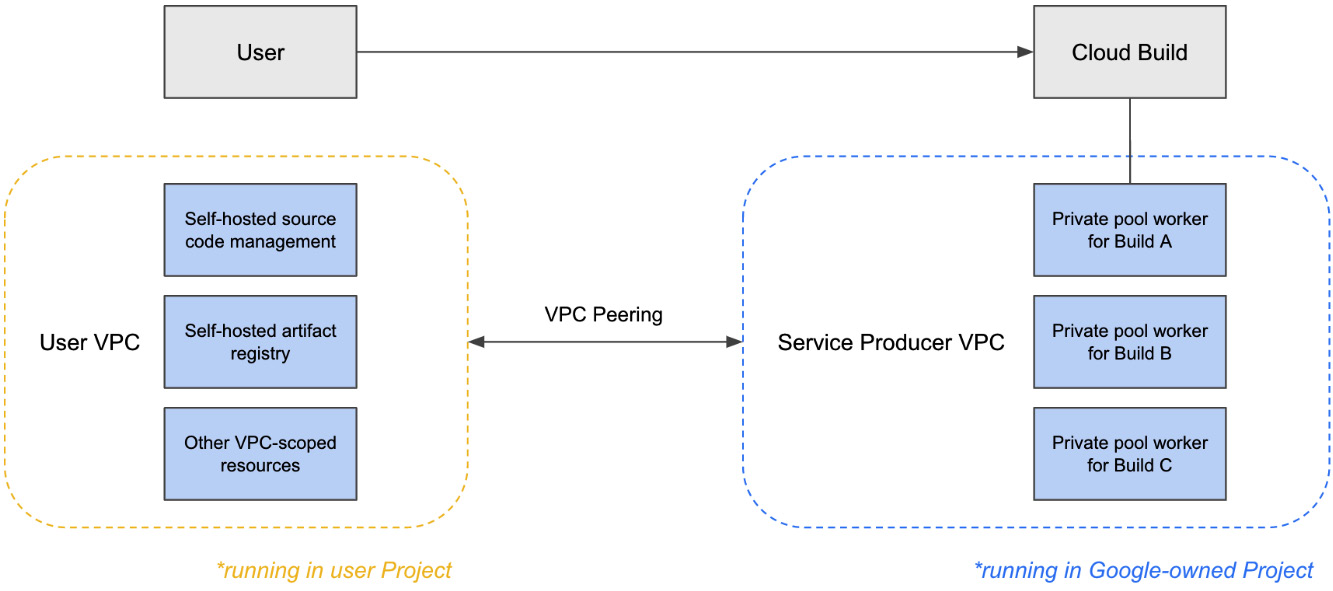
Figure 2.8 – Network architecture for private pools
With this networking functionality, not only can you access resources within your VPC, but also source code management systems and artifact registries that may reside on-premises connected to your VPC by a private connection such as a Virtual Private Network (VPN) tunnel or a Direct Interconnect.
In addition to configurable networking, private pools allow users to specify a specific Google Cloud region in which their private pool and workers will reside. This is in contrast to the default pool, which executes on a worker that can run in multiple regions around the globe, depending on resource availability.
Private pools can be created in the following regions, at the time of publication:
- Asia:
- asia-east1 (Taiwan)
- asia-east2 (Hong Kong)
- asia-northeast1 (Tokyo)
- asia-northeast2 (Osaka)
- asia-northeast3 (Seoul)
- asia-south1 (Mumbai)
- asia-south2 (Delhi)
- asia-southeast1 (Singapore)
- asia-southeast2 (Jakarta)
- Australia:
- australia-southeast1 (Sydney)
- australia-southeast2 (Melbourne)
- Europe:
- europe-central2 (Warsaw)
- europe-north1 (Finland)
- europe-west1 (Belgium)
- europe-west2 (London)
- europe-west3 (Frankfurt)
- europe-west4 (Netherlands)
- europe-west6 (Zurich)
- North America:
- northamerica-northeast1 (Quebec)
- northamerica-northeast2 (Toronto)
- us-central1 (Iowa)
- us-east1 (South Carolina)
- us-east4 (Virginia)
- us-west1 (Oregon)
- us-west2 (Los Angeles)
- us-west3 (Salt Lake City)
- us-west4 (Las Vegas)
- South America:
- southamerica-east1 (Sao Paolo)
- southamerica-west1 (Santiago)
Private pools also expand the available sets of machine types that you can specify for workers. The machine types available are as shown here:
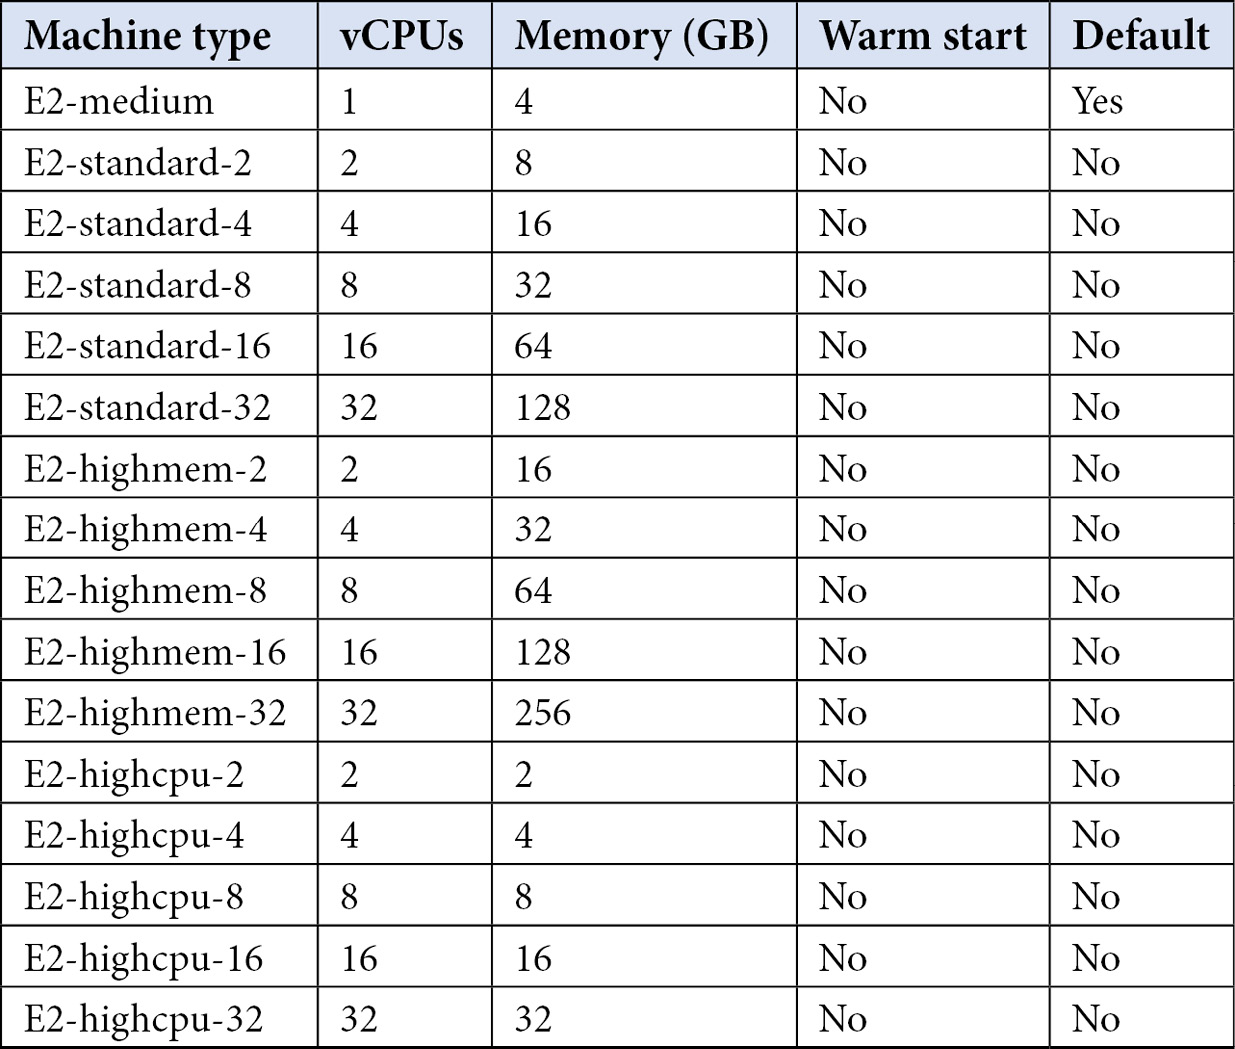
Table 2.2 – Private pool machine types and their respective resources
While private pools maintain the same fully managed experience that the default pool provides, a private pool must be created in advance of actual build execution. Let’s review how we might do this by creating a private pool.
First, in order to demonstrate some of the networking capabilities that private pools provide, we should create a sandbox VPC that we can use to peer with the Google-owned environment hosting your private pool. Here’s the code we’ll need in order to achieve this:
$ project_id=$(gcloud config get-value project)
$ vpc_name=packt-cloudbuild-sandbox-vpc
$ vpc_range_name=packt-cloudbuild-sandbox-vpc-peering-range
$ gcloud compute networks create $vpc_name --subnet-mode=custom
Once a VPC is created, next, create an IP range that does not overlap with any IP space in your VPC that can be used for the internal IPs of workers in your private pool. In the following example, you’ll be utilizing the 192.168.0.0/16 space, as defined in the addresses and prefix-length arguments. Note that the size of your range will determine how many workers you can have in this private pool:
$ gcloud compute addresses create packt-cloudbuild-sandbox-vpc-peering-range
      --global
      --purpose=VPC_PEERING
      --addresses=192.168.0.0
      --prefix-length=16
      --description="IP range for private pool workers"
      --network=$vpc_name
Finally, create VPC peering with the following gcloud command; this will reference that you want to peer your VPC with the service producer network VPC in which the private pool workers reside:
$ gcloud services vpc-peerings connect
    --service=servicenetworking.googleapis.com
    --ranges=$vpc_range_name
    --network=$vpc_name
    --project=$project_id
Now that we’ve configured a VPC that our private pool can connect to, let’s create a private pool itself. There are a few ways to do this currently, as outlined here:
- Via the Cloud console
- Via passing a YAML Ain’t Markup Language (YAML)-based configuration file to gcloud
- Via passing the configuration directly to gcloud
Some of the configurations available for private pools are similar to what you are able to configure in default pools—namely, the following:
- Machine type for each worker, albeit with more available machine types
- Network-attached SSD for each worker, up to 1,000 GB
However, you’ll notice a few new configuration options as well, as outlined here:
- Peered network, to specify which VPC the workers in the private pool will peer with
- Region, as a private pool and the workers in it are scoped to a single region
- Public egress, as you can specify whether or not workers in a private pool have public IP addresses
Let’s now demonstrate some of the functionality of private pools by creating a private pool using gcloud while passing the configuration directly. In this case, we will be creating a private pool of workers that have the e2-standard-2 machine type, with 100 GB of network-attached SSD, and located in us-west1. The code is illustrated in the following snippet:
$ gcloud builds worker-pools create packt-cloudbuild-privatepool
    --project=$project_id
    --region=us-west1
    --peered-network=projects/$project_id/global/networks/$vpc_name
    --worker-machine-type=e2-standard-2
    --worker-disk-size=100GB
    --no-public-egress
Once we have a private pool actually created, we can view it in the Cloud console, as shown in the following screenshot:
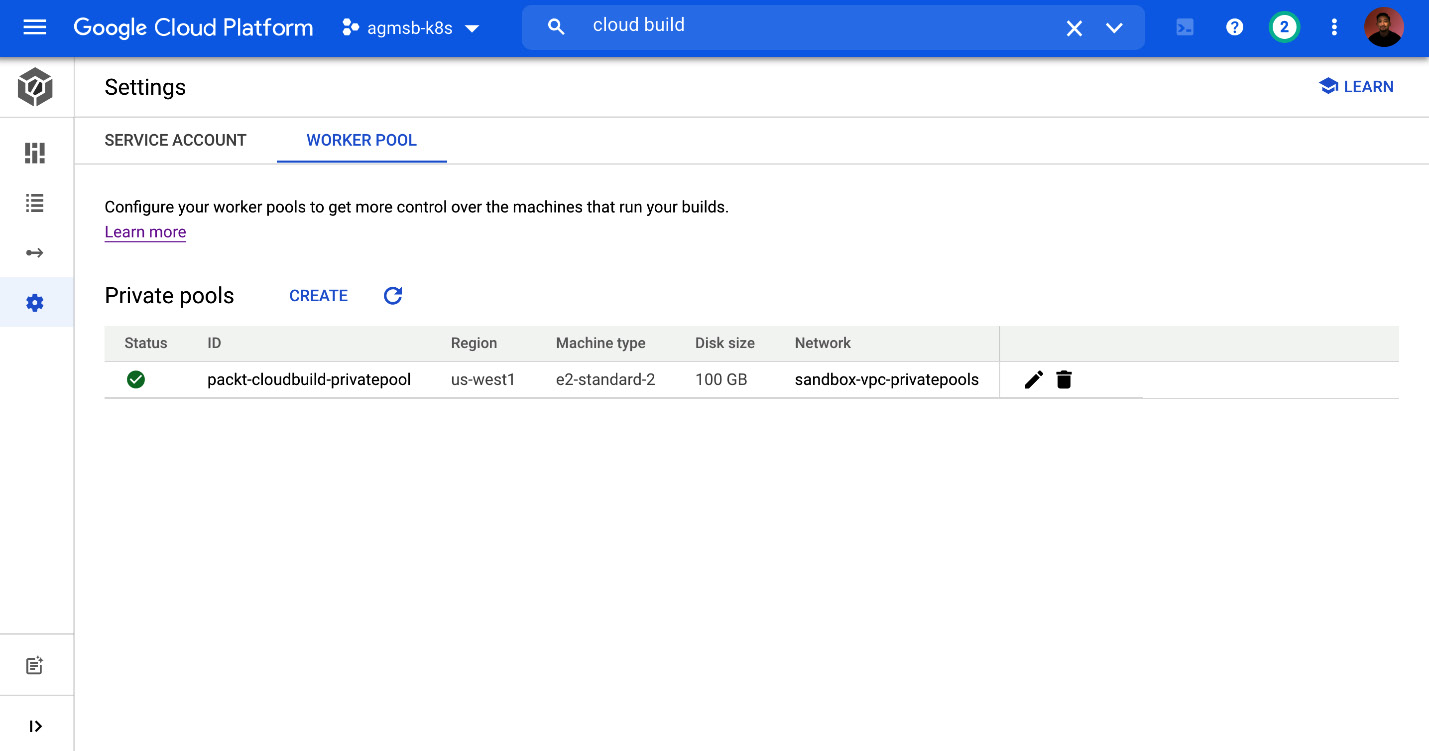
Figure 2.9 – Viewing the previously created private pool in the Cloud console
Once we have this created, we can begin to run builds on workers defined by the private pool.
Summary
In this chapter, we have discussed how to get started with enabling Cloud Build in your Google Cloud project and how to navigate the multiple ways in which you can create workers to execute your builds.
Specifically, we have reviewed the architecture of the default pool and private pools. We have also discussed the user requirements for creating private pools.
In the next chapter, we will proceed with reviewing the specification for builds in Cloud Build and run your first build!