
4
Build Configuration and Schema
We have discussed the versatility of the builds you can run in Cloud Build. As a user, you are able to define your own tasks that make up each build step in your build.
The way that you accomplish this is by writing build definitions according to a declarative schema that is specific to Cloud Build. This schema enables you to define not only individual build steps but also their sequence and relationship to one another, along with other specific build-wide configurations such as timeouts or permissions in the Cloud Build execution environment.
In this chapter, we will review the following topics:
- Defining the minimum configuration for build steps
- Adjusting the default configuration for the build steps
- Defining the relationships between individual build steps
- Configuring build-wide specifications
Defining the minimum configuration for build steps
In Cloud Build, builds are the primary resource you will deal with as a user. Typically, builds are defined via a configuration file written in YAML according to Cloud Build’s schema, though JSON is also supported. There are also minor exceptions for creating a build without providing a configuration file, which we will review in Chapter 9, Automating Serverless with Cloud Build.
Let’s review what these configuration files look like, starting with a build we are already familiar with to some degree.
Setting up your environment
In the previous chapter, we reviewed a build using a simplified version of the following cloudbuild.yaml config file, which can be found at https://github.com/GoogleCloudPlatform/cloud-build-samples/tree/main/basic-config.
This build configuration file defines three individual build steps that are carried out sequentially:
- Build a Docker container image.
- Push the Docker container image to Artifact Registry (https://cloud.google.com/artifact-registry).
- Create a Compute Engine (https://cloud.google.com/compute) VM and deploy the previously built container image to the newly created VM.
Additionally, we can look at a visual representation of the build here:
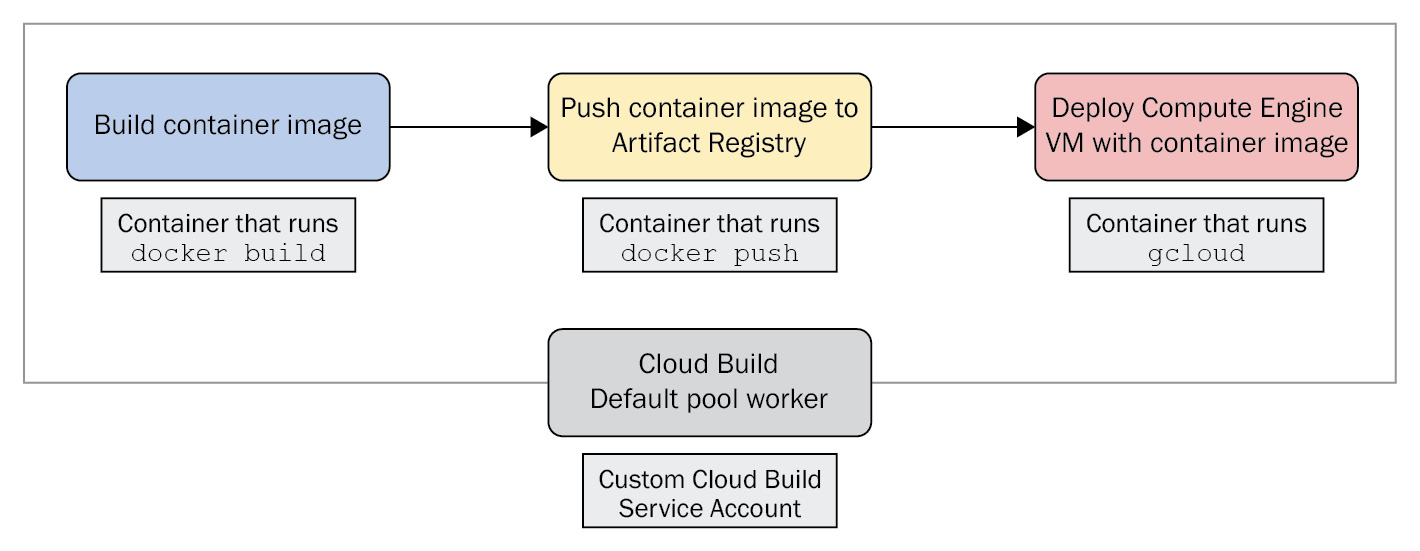
Figure 4.1 – A simple build that builds a container, pushes it to a registry, and runs it on a new VM
The contents in Google Cloud Platform’s GitHub repositories might change over time, so let’s create our own copy of the files needed to run the build exercises in this chapter. Let’s utilize Cloud Shell (shell.cloud.google.com), the ephemeral Linux workstation provided by Google Cloud.
It is highly recommended that you run these exercises in a sandbox or test Google Cloud project, as you will have full control not only to run the exercises but also to easily clean up any of the resources created.
Once you have a Terminal session open in Cloud Shell, set the environment variables that we’ll pass to our build configuration file:
$ PROJECT_ID=$(gcloud config get project)
$ SERVICE_ACCOUNT=packt-cloudbuild-chp4-sa
Next, create the working directory in which we will store the files for this chapter’s build exercises:
$ mkdir packt && cd packt &&
mkdir cloudbuild && cd cloudbuild &&
mkdir chapter4 && cd chapter4 &&
mkdir first-build && cd first-build
Create the first build configuration file from the aforementioned build, which will build a container image, push it to Artifact Registry, and create a VM to run the container image:
$ cat > cloudbuild.yaml <<EOF
steps:
- name: 'gcr.io/cloud-builders/docker'
args: ['build', '-t',
'us-central1-docker.pkg.dev/${PROJECT_ID}/my-docker-repo/myimage',
'.']
- name: 'gcr.io/cloud-builders/docker'
args: ['push',
'us-central1-docker.pkg.dev/${PROJECT_ID}/my-docker-repo/myimage']
- name: 'gcr.io/google.com/cloudsdktool/cloud-sdk'
entrypoint: 'gcloud'
timeout: 240s
args: ['compute', 'instances',
'create-with-container', 'my-vm-name',
'--container-image',
'us-central1-docker.pkg.dev/${PROJECT_ID}/my-docker-repo/myimage']
env:
- 'CLOUDSDK_COMPUTE_REGION=us-central1'
- 'CLOUDSDK_COMPUTE_ZONE=us-central1-a'
serviceAccount: 'projects/${PROJECT_ID}/serviceAccounts/${SERVICE_ACCOUNT} @${PROJECT_ID}.iam.gserviceaccount.com'
images: [us-central1-docker.pkg.dev/${PROJECT_ID}/my-docker-repo/myimage']
options:
logging: CLOUD_LOGGING_ONLY
EOF
Note
When working with container images, it is best practice to specify the images field with the image you are creating. This enables functionality such as build provenance, which we will discuss in Chapter 6, Managing Environment Security.
For simple builds that are okay with pushing the container image at the end of the build’s run, you can omit a distinct build step to build this image and just specify the images field instead. Doing so will prompt Cloud Build to push the image in the field at the end of the build’s run.
However, in this example, because we are creating a VM that runs our newly built container image, we still maintain a distinct build step.
Create the Dockerfile for the container image we will build in this build:
$ cat > Dockerfile <<EOF
FROM alpine
CMD ["echo", "Hello World!"]
EOF
Earlier in the book, we briefly noted that builds utilize a Service Account from Identity and Access Management (IAM) to perform certain actions that access Google Cloud APIs. For this chapter, we will create a temporary service account:
$ gcloud iam service-accounts create packt-cloudbuild-chp4-sa
--description="Temporary SA for chp 4 exercises"
--display-name="packt-cloudbuild-chp4-sa"
Now, let’s give the service account permissions that the builds will require in order to execute during this chapter’s exercises:
$ gcloud projects add-iam-policy-binding ${PROJECT_ID}
--member="serviceAccount:packt-cloudbuild-chp4-sa@${PROJECT_ID}.iam.gserviceaccount.com"
--role="roles/iam.serviceAccountUser"
--role="roles/cloudasset.owner"
--role="roles/storage.admin"
--role="roles/logging.logWriter"
--role="roles/artifactregistry.admin"
--role="roles/compute.admin
We now have the files and permissions necessary to work with in this chapter. Now, let’s create a repository in Artifact Registry for the container images that will be used in this chapter:
$ gcloud artifacts repositories create my-docker-repo
--repository-format=Docker
--location us-central1
Now, you can kick off our first build exercise:
$ gcloud builds submit . --region=us-central1
There will be opportunities to tweak the build file based on the concepts we review and rerun the build. However, because running gcloud to create a VM twice will result in a build failure since the VM already exists, run the following command before resubmitting this build to Cloud Build:
$ gcloud compute instances delete my-vm-name --zone=us-central1-a
Once you are done with this example, you can use the following command to delete the service account used:
$ gcloud iam service-accounts deletepackt-cloudbuild-chp4-sa @${PROJECT_ID}.iam.gserviceaccount.com
Now, with the setup done, let’s dive into the build configuration file. Each build step in this build runs in its own container, and all the build steps for a given build execute on the same Cloud Build worker.
Your builds might be more complex and contain a greater number of build steps than the provided example, but the way in which the build steps are defined remains consistent with this example. So, let’s break the build down bit by bit.
Defining your build step container image
Let’s start with the top-level field, steps. This field encompasses all the build steps that will make up a build. All three build steps in the example are defined by stanzas underneath the steps field.
Note
At the time of writing, the maximum number of build steps you can have in a single build is 100 build steps. You can find the most up-to-date limitations at https://cloud.google.com/build/quotas#resource_limits.
In any of these stanzas, we can see the fields that a user must define to specify a single build step. At a bare minimum, we need to define the following two fields:
- name
- args
Here, name is a field that references the specific image path to your builder image that will run your build step. When you specify your container image, your Cloud Build worker will pull this container image and run an instance of it using docker run.
In the preceding example, we can see that the first and second steps both utilize the gcr.io/cloud-builders/docker image and that the third step utilizes the gcr.io/google.com/cloudsdktool/cloud-sdk image.
Note that to run this build in the prior chapter, you actually did not have to build these images yourself. Rather, these images are a part of the pre-built container images provided and hosted by Google that contain common toolings such as docker or gcloud. These Google-provided publicly available images are called cloud builders (https://cloud.google.com/build/docs/cloud-builders).
At the time of writing, cloud builders provide pre-built images for the following tools:
- General purpose builders, such as wget, curl, and git
- Language-specific builders, such as dotnet, go, mvn, javac, npm, and yarn
- Google Cloud-specific builders, such as gcloud, gsutil, gcs-fetcher, and gke-deploy
- Container- and Kubernetes-specific builders, such as docker and kubectl
Because these cloud builders are made available publicly by Google, you can actually navigate to the image path and see all of the versions of the image that Google has published. For example, navigate to gcr.io/cloud-builders/docker in your browser:
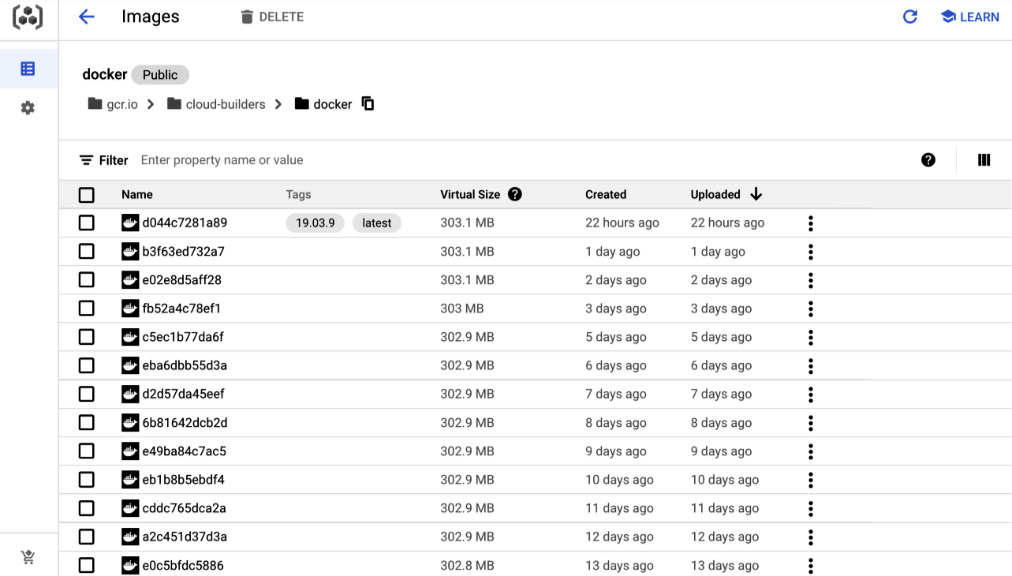
Figure 4.2 – Google-published container images for gcr.io/cloud-builders/docker
If you would like to customize these container images, you can view the provided source code (https://github.com/GoogleCloudPlatform/cloud-builders) and build your own variations of these images. For each builder, you can find a Dockerfile defining the container image for the cloud builder, along with a cloudbuild.yaml file to build your own version of the cloud builder.
If your use case for an individual build step is not covered by one of the provided cloud builder images, you can also turn to builders that are provided by the Cloud Build community (https://github.com/GoogleCloudPlatform/cloud-builders-community).
These are far greater in number and have varying cadences around the frequency of updates or required maintenance, as they are community owned. Some of the more commonly used community-contributed builders include the following:
- Container and Kubernetes builders, such as helm, kustomize, ko, and pack
- Infrastructure-as-code builders, such as terraform, pulumi, and terragrunt
- Mobile development builders, such as firebase and flutter
Similar to the official cloud builders, each of these community-contributed builders provides a Dockerfile, defining the builder container image, and a cloudbuild.yaml configuration file, to actually use Cloud Build to build the builder container image.
Note
If you are looking to either build your own variations of cloud builder images or build one of the community-provided builders, you will need to host these images inside your own repositories, such as Container Registry or Artifact Registry. You can even use third-party artifact stores such as JFrog’s Artifactory.
When doing so, it is a best practice that you are explicit about what version of a container you want to run for the build step using container image tags.
This will enable you to ensure that you understand how a specific version of a container image will run your build. Additionally, it will ensure that your build does not break due to unforeseen changes in upstream container images.
Finally, you can utilize publicly available container images hosted at Docker Hub for the build steps. We will add a build step to our example using an image hosted at Docker Hub later in the Adjusting the default configuration for the build steps section.
Now that we’ve reviewed how you can use name to define the container images you’ll use for a build step, let’s talk about how you can more explicitly identify each build step using the id field.
In our existing cloudbuild.yaml file, we do not have any identifiers for each build step outside of the builder image in which it executes. This can be problematic for debugging builds or filtering through build logs if we reuse the same builder image multiple times in a build.
If you navigate to console.cloud.google.com/cloud-build/builds and visit the build you executed, by default, you’ll see that each build step is identified by the builder image it uses:
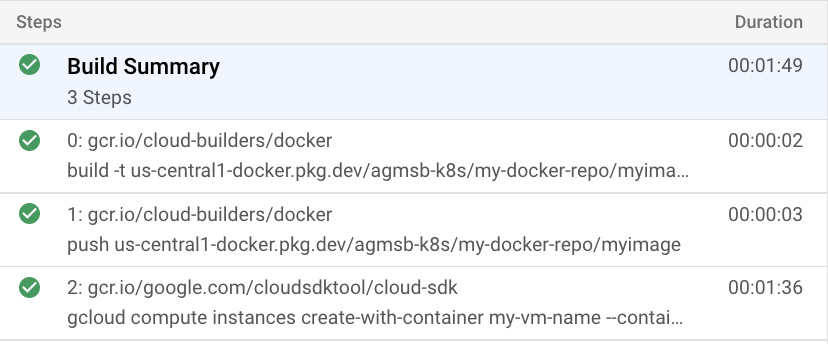
Figure 4.3 – Build steps when the ID field is not defined per build step
Utilizing the id field in conjunction with the name field allows us to separately provide a human-friendly identifier for a build step. Running the same build with build step IDs would look like this:
steps:
  - name: 'gcr.io/cloud-builders/docker'
    id: 'Docker Build'
    args: ['build', '-t',
           'us-central1-docker.pkg.dev/${PROJECT_ID}/my-docker-repo/myimage',
           '.']
  - name: 'gcr.io/cloud-builders/docker'
    id: 'Docker Push'
    args: ['push',
           'us-central1-docker.pkg.dev/${PROJECT_ID}/my-docker-repo/myimage']
  - name: 'gcr.io/google.com/cloudsdktool/cloud-sdk'
    id: 'Deploy container to VM'
    entrypoint: 'gcloud'
    timeout: 240s
    args: ['compute', 'instances',
           'create-with-container', 'my-vm-name',
           '--container-image',
           'us-central1-docker.pkg.dev/${PROJECT_ID}/my-docker-repo/myimage']
    env:
      - 'CLOUDSDK_COMPUTE_REGION=us-central1'
      - 'CLOUDSDK_COMPUTE_ZONE=us-central1-a'
If you would like to see this for yourself, feel free to tweak the cloudbuild.yaml example with different styles of defining IDs for each build step and rerun the build.
Now, you can utilize these build step IDs to more easily identify what each step is doing. Additionally, you can utilize them in a practical manner such as querying from Cloud Logging for logs from a specific build step across numerous runs of the build.
You can visit console.cloud.google.com/logs and enter a query, such as the following one, into the Logs Explorer to search for logs associated with a build step ID, filtering down to logs with the build step ID in their textPayload:
resource.type = "build"
textPayload =~ "Deploy container to VM"
Additionally, in the Cloud Build console, you can see that each build step is now referred to by its id field:
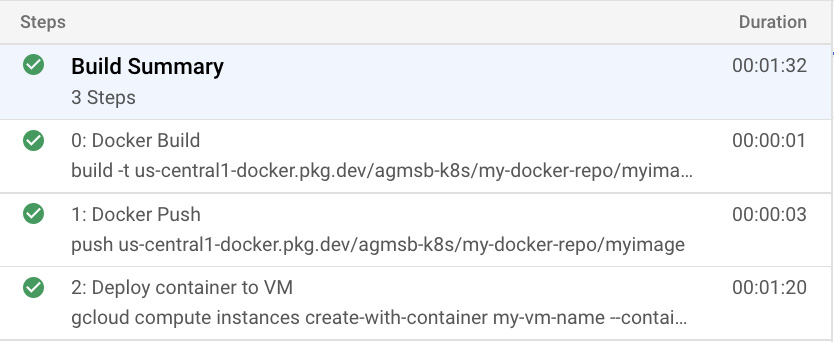
Figure 4.4 – Build steps when the ID field is defined per build step
Using the id field will also be critical for defining the relationships between the build steps when they need to run in complex patterns, such as running multiple build steps in a specific order. We will review this later in the Defining the relationships between individual build steps section.
Now that we have reviewed how to provide the image in which your build step will run in the name field, and how to better identify your build steps using the id field, let’s review the args field.
Defining your build step arguments
Here, args is the field in which you provide arguments to your cloud builder to use when carrying out tasks for a build step.
Note that args can be written in YAML using multiple styles:
- Flow style (https://yaml.org/spec/1.2.2/#flow-sequences)
- Block style (https://yaml.org/spec/1.2.2/#block-sequences)
In our example build configuration, the args field for each of the build steps is defined in flow style:
args: ['build',
'-t',
'us-central1-docker.pkg.dev/${PROJECT_ID}/my-docker-repo/myimage',
'.']
For smaller sets of arguments, flow style provides a simple and readable way to write args. You can also separate each item in flow style with a line break for additional readability.
However, for larger, more complex sets of arguments, utilizing block style might be easier to write. The same set of args fields from the previous example written in block style would look like the following:
args:
-'build'
-'-t'
-'us-central1-docker.pkg.dev/${PROJECT_ID}/my-docker-repo/myimage'
-'.'
Feel free to tweak the cloudbuild.yaml example with different styles of defining args and rerun the build.
Note
The maximum number of args you can provide to a build step is 100, with the sum of characters in a single args field capped at 4,000.
Regardless of which way you write your arguments, there are two ways to use args to kick off having a builder carry out tasks:
- If the cloud builder provides an entrypoint, the values in args will be utilized as arguments for that entrypoint.
- If the cloud builder does not provide an entrypoint, the first value in args will be utilized as the cloud builder’s entrypoint with the remaining values used as arguments.
Let’s take a look at the builder image for our first and second build steps. If we view the source Dockerfile (https://github.com/GoogleCloudPlatform/cloud-builders/tree/master/docker), we can see that the container image has an ENTRYPOINT already defined. Because the content in Google Cloud Platform’s GitHub repositories might change over time, we are also sharing the contents of the following Dockerfile:
FROM gcr.io/gcp-runtimes/ubuntu_20_0_4
ARG DOCKER_VERSION=5:19.03.9~3-0~ubuntu-focal
RUN apt-get -y update &&
  apt-get -y install
  apt-transport-https
  ca-certificates
  curl
  make
  software-properties-common &&
  curl -fsSL https://download.docker.com/linux/ubuntu/gpg | apt-key add - &&
  apt-key fingerprint 0EBFCD88 &&
  add-apt-repository
  "deb [arch=amd64] https://download.docker.com/linux/ubuntu
  $(lsb_release -cs)
  edge" &&
  apt-get -y update &&
  apt-get -y install docker-ce=${DOCKER_VERSION} docker-ce-cli=${DOCKER_VERSION}
ENTRYPOINT ["/usr/bin/docker"]
In the last line of the Dockerfile, we see ENTRYPOINT defined as ["/usr/bin/docker"], meaning the cloud builder will execute the Docker binary. Because this is the case, our first and second build steps provide arguments to instruct Docker to build a container image and push it to Artifact Registry.
However, this is not the case for the third build step in which we utilize the gcr.io/google.com/cloudsdktool/cloud-sdk builder. In this build step, we actually define the entrypoint using the entrypoint field in our cloudbuild.yaml. This is because the Dockerfile used to build the builder image does not define an entrypoint:
- name: 'gcr.io/google.com/cloudsdktool/cloud-sdk'
entrypoint: 'gcloud'
You can use the entrypoint field in your configuration file for two main reasons:
- Explicitly defining the entrypoint if the builder container image does not specify it
- Overriding the ENTRYPOINT defined in the builder container image
One of the most common use cases for defining an entrypoint in your configuration file is being able to define a shell as the entrypoint and then pass arbitrary commands to the shell.
You could run the following as an example of this, which uses block style YAML and passes in '-c' as the first argument and then pipes a multiline string to run the rest of the arbitrary commands.
This example takes the public Docker Hub image for Python 3.9 and runs it as a build step, overriding the default python3 CMD to change the entrypoint to bash, while running a few commands in the shell:
$ cd .. && mkdir arbitrary-commands && cd arbitrary-commands
$ cat > cloudbuild.yaml <<EOF
steps:
- name: 'python:3.9'
id: 'Arbitrary commands in bash'
entrypoint: 'bash'
args:
- '-c'
- |
pwd
ls
whoami
EOF
$ gcloud builds submit . --region=us-central1
Your output in the build logs should match the arbitrary commands defined in args:
/workspace
cloudbuild.yaml
root
This adds a layer of flexibility and configurability when running build steps have access to a shell.
Now that we have reviewed name, id, args, and entrypoint as the core functionality for how our build steps run, let’s dig into additional ways to configure these build steps.
Adjusting the default configuration for the build steps
In addition to defining the container image and arguments for a build step, there are other configurations you might need to customize in order to carry out the tasks in that step in a specific manner.
These might be variables you want to set in the execution environment, making specific secrets available to the build step, or writing to a specific directory on the worker carrying out your build step.
The build step stanza has additional fields that cover cases such as the following:
- env
- secretEnv
- timeout
- dir
Let’s start with the env field – this provides a way to set environment variables for the cloud builder in which your tasks execute. This provides a way for you to provide multiple environment variables that you might want to pass into the container that is running your tasks in a build step.
Note
Interestingly, env and secretEnv can be defined not only for an individual build step but also at a global level for all build steps in the build. While we will review configuring these globally in the Configuring build-wide specifications section, for any sensitive information, it is recommended that you configure these values at the individual build step.
In the third build step from our example, you can see that we define env to include two distinct variables:
- CLOUDSDK_COMPUTE_REGION=us-central1
- CLOUDSDK_COMPUTE_ZONE=us-central1-a
Given our entrypoint is running the gcloud CLI, defining these environment variables up front enables gcloud to bootstrap with these properties already defined. Specifically, with these already defined, the build step is able to create the VM that will run the container image in the us-central1-a zone.
This is representative of the typical use case for defining environment variables – preparing your environment for the build step to be able to carry out its tasks.
If we wanted to project a credential or a password into an environment variable, we would instead utilize secretEnv. We will review this in greater detail in Chapter 8, Securing Software Delivery to GKE with Cloud Build.
Not only do we see env defined in our build step stanza, but we also see timeout defined. This field is fairly straightforward; you define a period of time after which if the build step has not been completed, it will fail the entire build.
In the example we are working with, the build step that creates a VM has a timeout set to 240 seconds or 4 minutes. Timeouts are defined as a duration; the default unit is seconds if left unspecified. However, you can specify additional units via hours (h) and minutes (m).
Additionally, you have the ability to combine multiple units of time into a single timeout value. For example, timeout: 2h10m45s would be 2 hours, 10 minutes, and 45 seconds.
Note
At the time of publication, the maximum timeout for a build is 24 hours.
Timeouts are useful at the individual build step level if you have known build steps that depend on calling unreliable external systems or APIs, or when you are concerned about minimizing costs given that builds are priced per vCPU build minute utilized – especially when utilizing larger workers.
Similar to env and secretEnv, timeout can be defined not only for an individual build step but also at a global level for the entire build, which we will review in the Configuring build-wide specifications section.
Now, let’s move on to the dir field. When a build executes, by default, the current working directory is set to /workspace. This is backed by a Docker volume mounted at this path by default, with the same volume provided to each build step that runs:
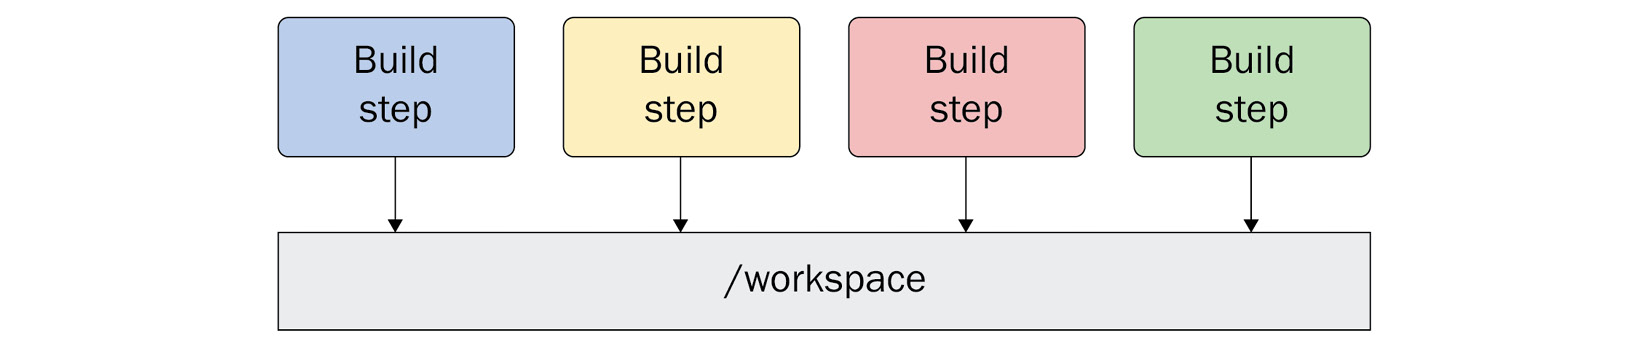
Figure 4.5 – Each build step will get access to the same volume mounted at /workspace
For many build steps, using /workspace as your working directory is sufficient. However, there are certain tools that need to run from a specific working directory, perhaps where certain configuration files are located that are passed to the tool.
There are a couple of examples of tools like this:
- Skaffold (https://skaffold.dev/) is a Kubernetes continuous development tool that is meant for Kubernetes users to run both in their local environment and further in their software delivery pipeline. To do this, users must execute the skaffold binary from the same directory in which there is a skaffold.yaml configuration file.
- Terraform (https://www.terraform.io/) is an infrastructure-as-code tool that is meant for users to utilize to create resources across multiple infrastructure providers using a consistent language. Usually, the terraform CLI should be executed from the working directory in which there are .tf configuration files, though it also has support for passing in --chdir as an argument that allows you to change the working directory.
For these scenarios, users can utilize the dir field to automatically set the working directory for a specific build step. There are two options in which you can use dir:
- Relative path
- Absolute path
Specifying dir as a relative path is the more common use case. Let’s create a build that continues the work we did in our prior build and runs a couple of build steps in a new cloudbuild.yaml file:
$ cd .. && mkdir generate-validate-terraform && cd generate-validate-terraform
$ PROJECT_ID=$(gcloud config get project)
$ ZONE=us-central1-a
$ cat > cloudbuild.yaml EOF<<
steps:
- name: 'gcr.io/google.com/cloudsdktool/cloud-sdk'
id: 'Generate terraform for existing VMs'
entrypoint: 'sh'
args:
- '-c'
- |
apt-get install google-cloud-sdk-config-connector
gcloud beta resource-config bulk-export
--resource-format=terraform
--resource-types=ComputeInstance
--project=$PROJECT_ID
--path=tf
- name: 'hashicorp/terraform:1.0.0'
id: 'Validate generated terraform'
entrypoint: 'sh'
args:
- '-c'
- |
terraform init
terraform validate
dir: 'tf/projects/agmsb-k8s/ComputeInstances/$ZONE'
serviceAccount: 'projects/${PROJECT_ID}/serviceAccounts/${SERVICE_ACCOUNT}'
EOF
$ gcloud builds submit . --region=us-central1
- First, we are utilizing the functionality provided by the Cloud Asset Inventory API to export the resource we just created into a valid Terraform configuration file. Specifically, by not defining dir, we are utilizing /workspace as our working directory and creating a directory called tf.
- Second, we change the working directory to be where the previous build step exported our terraform configuration: tf/projects/$PROJECT_ID/ComputeInstances/$ZONE. This is a relative path, so we expect this directory to be under workspace/. Running the build step from this directory makes it easier to write cleaner terraform commands when passing them into a shell.
Additionally, this build provides examples of how we can apply the concepts we discussed in this chapter. Here are a couple of notes:
- We are using a Google-provided image for the first step: gcr.io/google.com/cloudsdktool/cloud-sdk. However, we also have to define sh as our entrypoint so that we can install a package necessary to run the example. This would be a prime opportunity for us to either pin our build to this specific version of the builder or build our own custom image that performs this installation outside of the build.
- We are using a public image in Hashicorp’s registry in Docker Hub to utilize terraform. This is an opportunity to point out that Google does mirror the most popular images on Docker Hub to Container Registry. However, if pulling the image is too slow, we could also build our own builder using the community-provided terraform image.
Now that we have covered the other fields, we can configure to tweak our individual build steps, let’s move on to see how we coordinate tasks across build steps in the same build.
Defining the relationships between individual build steps
Build steps rarely live in a vacuum and must understand their relationships to the other build steps in the build. A build step might need to write to files that a subsequent build step needs to access. Multiple build steps might need to run in parallel, wait for other build steps to complete before beginning their task, or even kick off a separate build.
Let’s discuss two specific parameters that you could utilize to define these relationships between the build steps:
- volumes
- waitFor
volumes are the means by which data is persisted on the Cloud Build worker between build steps. We have already reviewed the default volume, workspace/, as the default working directory and the easiest place to persist files between build steps.
However, if your tooling needs to write files to a specific location, or expects files to be in a specific directory, you can also create your own volumes and mount them to persist files in your own custom locations.
An example of this might be when utilizing SSH keys in your build. Tooling, such as git, might expect SSH keys to be in /.ssh, which is under the home directory of the user that the container uses to run.
Specifying your own bespoke volumes to persist data between build steps would look like this:
steps:
- name: 'gcr.io/cloud-builders/git'
  secretEnv: ['SSH_KEY']
  entrypoint: 'bash'
  args:
  - -c
  - |
    echo "$$SSH_KEY" >> /root/.ssh/id_rsa
    chmod 400 /root/.ssh/id_rsa
    cp known_hosts.github /root/.ssh/known_hosts
  volumes:
  - name: 'ssh'
    path: /root/.ssh
# Clone the repository
- name: 'gcr.io/cloud-builders/git'
  args:
  - clone
  - --recurse-submodules
  - [email protected]:GIT_USERNAME/GIT_REPOSITORY
  volumes:
  - name: 'ssh'
    path: /root/.ssh
This means that you could use the ssh volume or the workspace volume to persist data between these two build steps. You can find a fully built-out tutorial for this example at https://cloud.google.com/build/docs/access-github-from-build.
Data might not be the only thing you want to orchestrate across build steps; you might want to have greater controls to orchestrate their execution, too.
This is where the waitFor field comes in handy. This field allows you to alter the default sequential execution of the build steps.
The waitFor field accepts two kinds of values:
- -: This means the build step will run immediately upon build execution.
- id: This means that the build step will wait for the build step with the specified id field to complete before executing. You can also specify multiple id fields if you want a build step to wait for more than one build step to complete.
This leads us to be able to make a more graph-like ordering of steps, where we can execute multiple build steps in a specific order, with the functionality to implement blocking at various stages in our build.
Here, we have a simple fan-in, fan-out pattern using the waitFor field for each build step:

Figure 4.6 – Using waitFor to fan out to concurrent build steps and then fan in
Now we can execute this build using simple bash builder images to demonstrate how Cloud Build handles the waitFor fields in each build step.
Keep in mind that while these steps can occur in parallel, it is not guaranteed. Rather, it is the ordering of build step execution that is respected:
$ cd .. && mkdir fan-out-fan-in && cd fan-out-fan-in
$ cat > cloudbuild.yaml <<EOF
steps:
- name: 'bash'
id: A
args:
- 'sleep'
- '10'
waitFor: ['-']
- name: 'bash'
id: B
args:
- 'sleep'
- '20'
waitFor: ['A']
- name: 'bash'
id: C
args:
- 'sleep'
- '20'
waitFor: ['A']
- name: 'bash'
id: D
args:
- 'sleep'
- '30'
waitFor: ['B', 'C']
EOF
$ gcloud builds submit . --region=us-central1
In this example, we have step A execute immediately, while both B and C wait for A to complete its execution. Upon completion, both start in parallel, while step D waits for both B and C to complete before execution.
Additionally, we can use this same functionality to execute preparation-like steps, such as grabbing files from multiple locations that a later build step might need to carry out a task. Removing blocking functionality by stating that A-1, A-2, and A-3 are allowed to run at the same time could potentially speed up the build and can also help cut costs by reducing the overall build minutes. However, while it is possible, there is no guarantee that they will all run in parallel:

Figure 4.7 – Using waitFor to run multiple build steps concurrently and immediately
Having now discussed sharing data between build steps and orchestrating the ordering of build steps, let’s now review global configurations that are not specific to any one build step.
Configuring build-wide specifications
Finally, there are sets of configurations that you might use to configure global settings that apply across all build steps. We have already discussed some of them prior to this chapter:
- timeout
- env
- secretEnv
The preceding fields behave the same as their counterparts defined at the individual build step level; the core difference is that defining them globally now makes them available to all build steps in the build.
However, there is an additional global field that you must specify when you are using secretEnv, regardless of whether it is at the individual build step level or the global level:
- availableSecrets
It is in this field where you declare the availableSecrets you would like to use at some point in your build, as well as where you are pulling them from. It is recommended that you utilize Secrets Manager to store sensitive credentials that you will be using in your builds; we will review this, in detail, in Chapter 8, Securing Software Delivery to GKE with Cloud Build.
You can find the full list of configuration fields for a build in Cloud Build at https://cloud.google.com/build/docs/build-config-file-schema. The full schema at publication time is outlined next:
steps:
- name: string
  args: [string, string, ...]
  env: [string, string, ...]
  dir: string
  id: string
  waitFor: [string, string, ...]
  entrypoint: string
  secretEnv: string
  volumes: object(Volume)
  timeout: string (Duration format)
- name: string
  ...
- name: string
  ...
timeout: string (Duration format)
queueTtl: string (Duration format)
logsBucket: string
options:
 env: [string, string, ...]
 secretEnv: string
 volumes: object(Volume)
 sourceProvenanceHash: enum(HashType)
 machineType: enum(MachineType)
 diskSizeGb: string (int64 format)
 substitutionOption: enum(SubstitutionOption)
 dynamicSubstitutions: boolean
 logStreamingOption: enum(LogStreamingOption)
 logging: enum(LoggingMode)
 pool: object(PoolOption)
 requestedVerifyOption: enum(RequestedVerifyOption)
substitutions: map (key: string, value: string)
tags: [string, string, ...]
serviceAccount: string
secrets: object(Secret)
availableSecrets: object(Secrets)
artifacts: object (Artifacts)
images:
- [string, string, ...]
While we did not review every single field in this schema, we will continue to cover the remainder of configurations in practical applications in Chapters 7, 8, 9, and 10.
Summary
The Cloud Build configuration schema provides an intuitive, flexible, and integrated method for defining build steps and builds. Whether you are looking to merely run simple and common tasks covered by cloud builders, or to build and run your own custom build steps for complex pipelines, there is much configurability in Cloud Build’s configuration.
Now that we can write fairly complex builds using the schema, let’s dive into how we can trigger the execution of these builds based on certain events, in Chapter 5, Triggering Builds.