5 Persisting and managing data in the cloud
- Understanding databases in a cloud native system
- Implementing data persistence with Spring Data JDBC
- Testing data persistence with Spring Boot and Testcontainers
- Managing databases in production with Flyway
In chapter 1, I distinguished between application services and data services in a cloud native system. So far, we have worked with application services, which should be stateless to play well in a cloud environment. However, most applications are useless if they don’t store any state or data somewhere. For example, the Catalog Service application we built in chapter 3 has no persistent storage mechanism, so you can’t really use it to manage a catalog of books. Once you shut it down, all the books you added to the catalog are gone. As a consequence of being stateful, you can’t even scale the application horizontally.
The state is everything that should be preserved when you shut down a service and spin up a new instance. Data services are the stateful components of a system. For example, they can be data stores like PostgreSQL, Cassandra, and Redis, or they can be messaging systems like RabbitMQ and Apache Kafka.
This chapter will introduce databases for cloud native systems and the main aspects of persisting data in the cloud. We’ll rely on Docker to run PostgreSQL in the local environment, but in production we’re going to replace it with a managed service offered by a cloud platform. Then we’ll add a data persistence layer to Catalog Service using Spring Data JDBC. Finally, I’ll cover some common concerns about managing and evolving databases in production with Flyway.
Note The source code for the examples in this chapter is available in the Chapter05/05-begin, Chapter05/05-intermediate, and Chapter05/05-end folders on GitHub, containing the initial, intermediate, and final states of the project (https://github.com/ThomasVitale/cloud-native-spring-in-action).
5.1 Databases for cloud native systems
Data can be stored in many ways. Traditionally you would probably use a single massive database server to save as much as possible, since getting a new one would be expensive and time-consuming. Depending on your organization’s processes, a task like that could take from a few days to several months. Not in the cloud.
The cloud offers elastic, self-service, and on-demand provisioning features—strong motivators for migrating your data services there. For each cloud native application you design, you should consider the most suitable storage type for the data it will produce. Then your cloud platform should let you provision it through an API or a graphical user interface. A task that used to be very time-consuming now requires only a few minutes. For example, deploying an instance of a PostgreSQL database server on Azure is as simple as running the az postgres server create command.
Cloud native applications are designed to be stateless because of the nature of the cloud itself. It’s a dynamic infrastructure where the computing nodes can spread across different clusters, geographical regions, and clouds. The problem of applications storing state is evident. How could the state survive such a distributed and dynamic environment? That’s why we want to keep applications stateless.
Yet, we need to achieve statefulness in the cloud. This section will present the challenges of data services and persistence management in the cloud and describe your options, depending on whether you want to manage a data service yourself or rely on one of the offerings from a cloud provider. Then I’ll guide you through setting up a PostgreSQL database instance as a container for your local environment.
5.1.1 Data services in the cloud
Data services are the components of a cloud native architecture designed to be stateful. By designing applications to be stateless, you can limit cloud storage challenges to those few components.
Traditionally, storage was handled by operations engineers and database administrators. But the cloud and DevOps practices enable developers to pick the data service that best fits the application’s requirements and deploy it with the same approach used for cloud native applications. Specialists like database administrators are consulted to make the most of the technology that developers have picked, addressing aspects like performance, security, and efficiency. However, the goal is to provide storage and data services on demand, just like you would for cloud native applications, and configure them in a self-service manner.
The difference between application and data services can also be visualized in terms of the three basic building blocks of cloud infrastructure: compute, storage, and network. As shown in figure 5.1, application services use computing and networking resources because they are stateless. On the other hand, data services are stateful and require storage to persist the state.
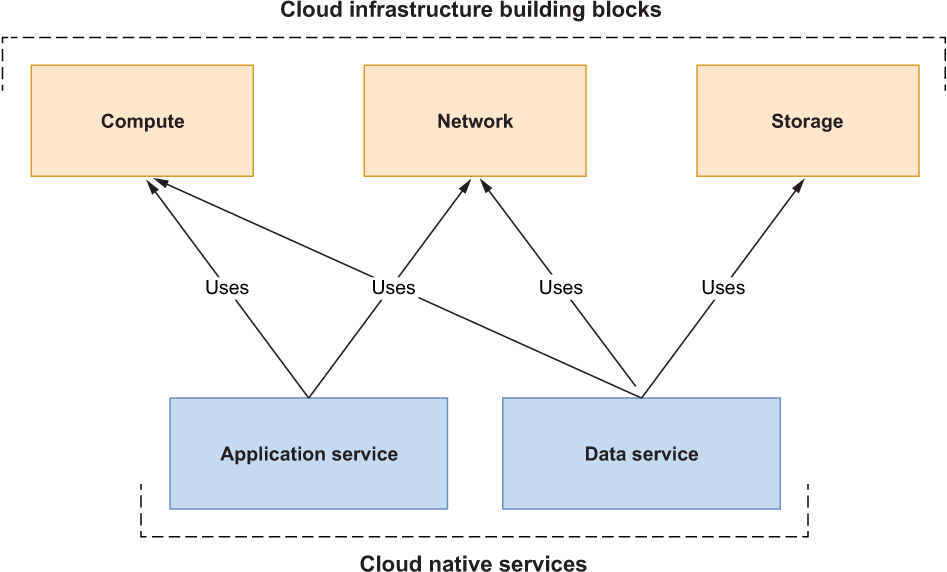
Figure 5.1 Application services (stateless) only use computing and networking resources in a cloud infrastructure. Data services (stateful) also need storage.
Let’s look at the challenges of data services in a cloud environment. We’ll also explore the main categories of data services, from which you can choose the most suitable solution for your applications.
Data services in a cloud native system are generally off-the-shelf components like databases and message brokers. There are a few properties you should consider to ensure you choose the most suitable technology.
-
Scalability—Cloud native applications can scale in and out dynamically. Data services are no different: they should scale to adapt to increasing or decreasing workloads. The new challenge is scaling while ensuring safe access to the data storage. The amount of data flying through a system in the cloud is larger than ever, and there can be sudden increments, so data services should support the likelihood of increasing workloads and be resilient.
-
Resilience—Much like cloud native applications, data services should be resilient to failures. The new aspect here is that the data persisted using a specific storage technology should also be resilient. One of the key strategies for ensuring your data is resilient and preventing data loss is duplication. Replicating data across different clusters and geographical zones makes it even more resilient, but this comes at a cost. Data services like relational databases allow replication while ensuring data consistency. Others, like some non-relational databases, provide a high level of resilience but can’t always guarantee data consistency (they offer what is referred to as eventual consistency).
-
Performance—The way data is duplicated can affect performance, which is also limited by the I/O access latency of the specific storage technology and the network latency. Where the storage is located compared to the data services relying on it becomes important—this is a concern that we haven’t encountered with cloud native applications.
-
Compliance—You might face compliance challenges with data services more than with cloud native applications. Persisted data is usually critical for businesses and often contains information protected by specific laws, regulations, or customer agreements regarding how it’s managed. For example, when dealing with personal and sensitive information, it’s vital that you manage data in accordance with privacy laws. In Europe, that would mean following the General Data Protection Regulation (GDPR). In California, there is the California Consumer Privacy Act (CCPA). In other domains, further laws apply. For example, health data in the United States should be handled in compliance with the Health Insurance Portability and Accountability Act (HIPAA). Both the cloud native storage and cloud provider should comply with whatever laws or agreements you are required to respect. Because of this challenge, some organizations dealing with very sensitive data, like health care providers and banks, prefer to use a type of cloud native storage on their premises so they have more control over data management and can ensure compliance with the applicable regulations.
Data services can be categorized based on who is responsible for them: the cloud provider or you. Cloud providers have multiple offerings for data services, addressing all the main challenges of cloud native storage.
You can find industry-standard services like PostgreSQL, Redis, and MariaDB. Some cloud providers even offer enhancements on top of them, optimized for scalability, availability, performance, and security. For example, should you need a relational database, you could use Amazon Relational Database Service (RDS), Azure Database, or Google Cloud SQL.
Cloud providers also offer new types of data services specifically built for the cloud and exposing their own unique APIs. For instance, Google BigQuery is a serverless data warehouse solution with a particular focus on high scalability. Another example is the extremely fast, non-relational database Cosmos DB offered by Azure.
The other option is to manage data services yourself, increasing the complexity for you, but giving you more control over the solution. You can choose to use a more traditional setup based on virtual machines, or you could use containers and take advantage of the lessons you’ve learned managing cloud native applications. Using containers will allow you to manage all the services in your system through a unified interface, such as Kubernetes, handling both compute and storage resources and reducing costs. Figure 5.2 illustrates these categories of data services for the cloud.
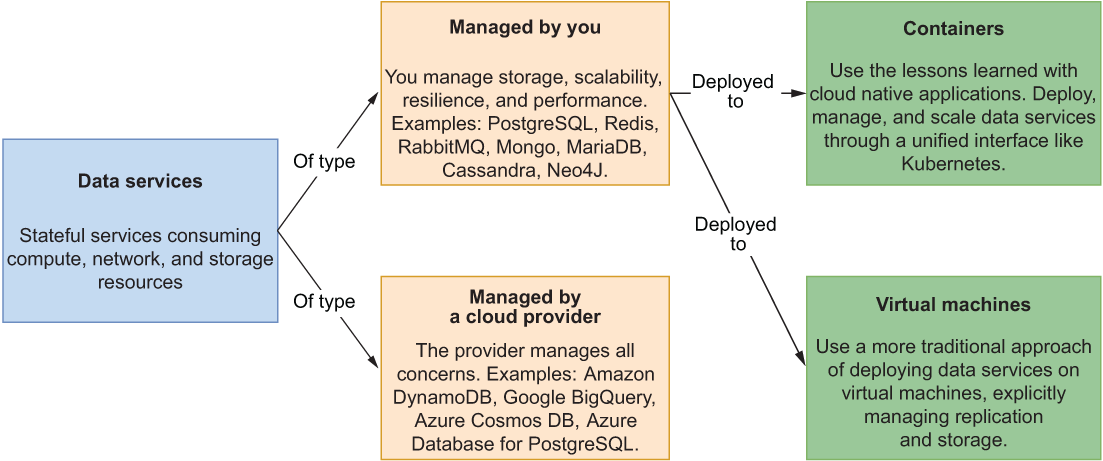
Figure 5.2 Data services can be managed by you (as containers or on virtual machines) or by the cloud provider. In the first case you can use more traditional services, and in the second, you can also access multiple services built specifically for the cloud by the provider.
Note When choosing to run and manage a data service by yourself (whether a virtual machine or a container on Kubernetes), another essential decision is what type of storage you’ll use. Local persistence storage? Remote persistence storage? The subject of cloud native storage is fascinating, but it’s out of scope for this book. If you’d like to learn more, I recommend checking out the Cloud Native Storage section in the CNCF Cloud Native Interactive Landscape (https://landscape.cncf.io).
The following section will focus on relational databases and will guide you through setting up a PostgreSQL container for your local environment.
5.1.2 Running PostgreSQL as a container
For the Catalog Service application, we’ll use a relational database, PostgreSQL, to store the data about the books in the catalog (www.postgresql.org). PostgreSQL is a popular open source database with strong reliability, robustness, and performance, supporting both relational and non-relational data. Most cloud providers offer PostgreSQL as a managed service, freeing you from dealing with issues like high availability, resilience, and persistent storage on your own. Examples are Azure Database for PostgreSQL, Amazon RDS for PostgreSQL, Google Cloud SQL for PostgreSQL, Alibaba Cloud ApsaraDB RDS for PostgreSQL, and DigitalOcean PostgreSQL.
Later in the book, we’ll deploy the Polar Bookshop system to a Kubernetes cluster managed by a cloud provider, and I’ll show you how to use their offerings for managed PostgreSQL. You’ll want to ensure environment parity, as recommended by the 15-Factor methodology, so you’ll use PostgreSQL in development as well. Docker makes running databases locally easier than ever, so I’ll show you how to run PostgreSQL as a container on your local machine.
In chapter 2, you gave Docker a first try with the Catalog Service application. Running PostgreSQL as a container is no different. Make sure your Docker Engine is up and running, open a Terminal window, and execute the following command:
$ docker run -d
    --name polar-postgres               ❶
    -e POSTGRES_USER=user               ❷
    -e POSTGRES_PASSWORD=password       ❸
    -e POSTGRES_DB=polardb_catalog      ❹
    -p 5432:5432                        ❺
postgres:14.4 ❻❷ Defines the username for the admin user
❸ Defines the password for the admin user
❹ Defines the name of the database to be created
❺ Exposes the database to port 5432 on your machine
❻ The PostgreSQL container image pulled by Docker Hub
Compared to how you ran the Catalog Service container, you’ll notice a few new elements. First, the Docker image from which you run a container (postgres:14.4) is not created by you—it’s pulled from the Docker Hub container registry (configured by default when you install Docker).
The second new thing is passing environment variables as arguments to the container. PostgreSQL accepts a few environment variables that are used during the container’s creation to configure a database.
Note In this book, I won’t cover how to configure storage in Docker (volumes). This means that all the data saved in your local PostgreSQL container will be lost once you remove the container. It might seem counterintuitive given the topic of this chapter, but any storage-related concern will be handled by the cloud provider in production, so you won’t have to deal with it yourself. If you need to add persistent storage to your local containers, though, you can read how to use volumes in the official Docker documentation (https://docs.docker.com).
In the next section, you’ll see how to add data persistence to a Spring Boot application using Spring Data JDBC and PostgreSQL.
Note If you need to, you can stop the container with docker stop polar-postgres and start it again with docker start polar-postgres. If you want to start over, you can remove the container with docker rm -fv polar-postgres and create it again with the previous docker run command.
5.2 Data persistence with Spring Data JDBC
Spring supports a wide variety of data persistence technologies through the Spring Data project, which contains specific modules dedicated to relational (JDBC, JPA, R2DBC) and non-relational databases (Cassandra, Redis, Neo4J, MongoDB, and so on). Spring Data provides common abstractions and patterns, making it straightforward to navigate the different modules. This section focuses on relational databases, but the key points of the interaction between an application using Spring Data and a database (shown in figure 5.3) apply to all of them.
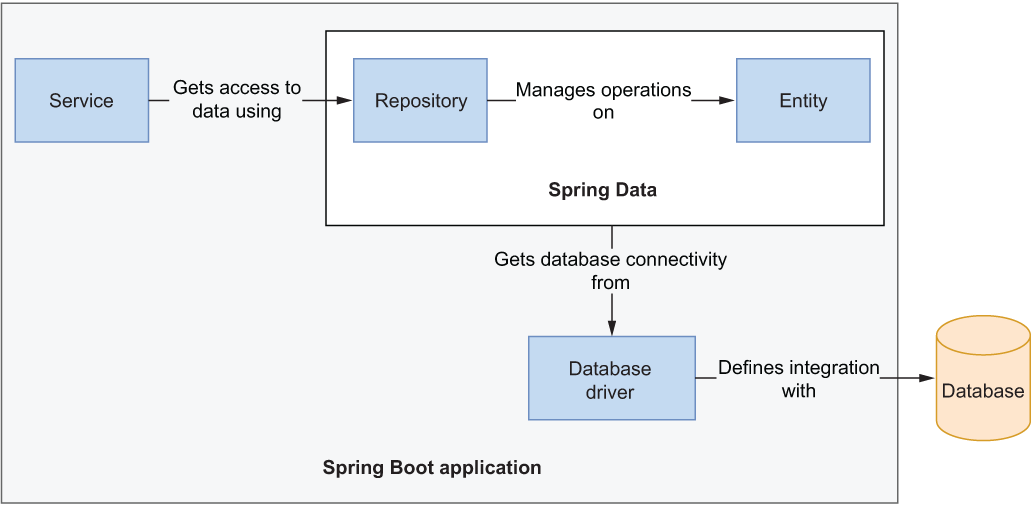
Figure 5.3 A driver configures the connection between the application and the database. Entities represent domain objects and can be stored and retrieved through a repository.
The main elements in the interaction shown in figure 5.3 are database drivers, entities, and repositories:
-
Database drivers—Components that provide integration with a specific database (through connection factories). For relational databases, you can use a JDBC driver (Java Database Connectivity API) in imperative/blocking applications or an R2DBC driver in reactive/non-blocking applications. For non-relational databases, each vendor has its own dedicated solution.
-
Entities—Domain objects that are persisted in a database. They must contain a field to uniquely identify each instance (a primary key) and can use dedicated annotations to configure the mapping between Java objects and database entries.
-
Repositories—The abstractions used for data storage and retrieval. Spring Data provides basic implementations, which are further extended by each module to provide features specific to the database in use.
This section will show you how to use Spring Data JDBC to add data persistence to a Spring Boot application like Catalog Service. You’ll configure a connection pool to interact with a PostgreSQL database through the JDBC driver, define entities to be persisted, use repositories to access data, and work with transactions. Figure 5.4 shows how the Polar Bookshop architecture will look by the end of this chapter.
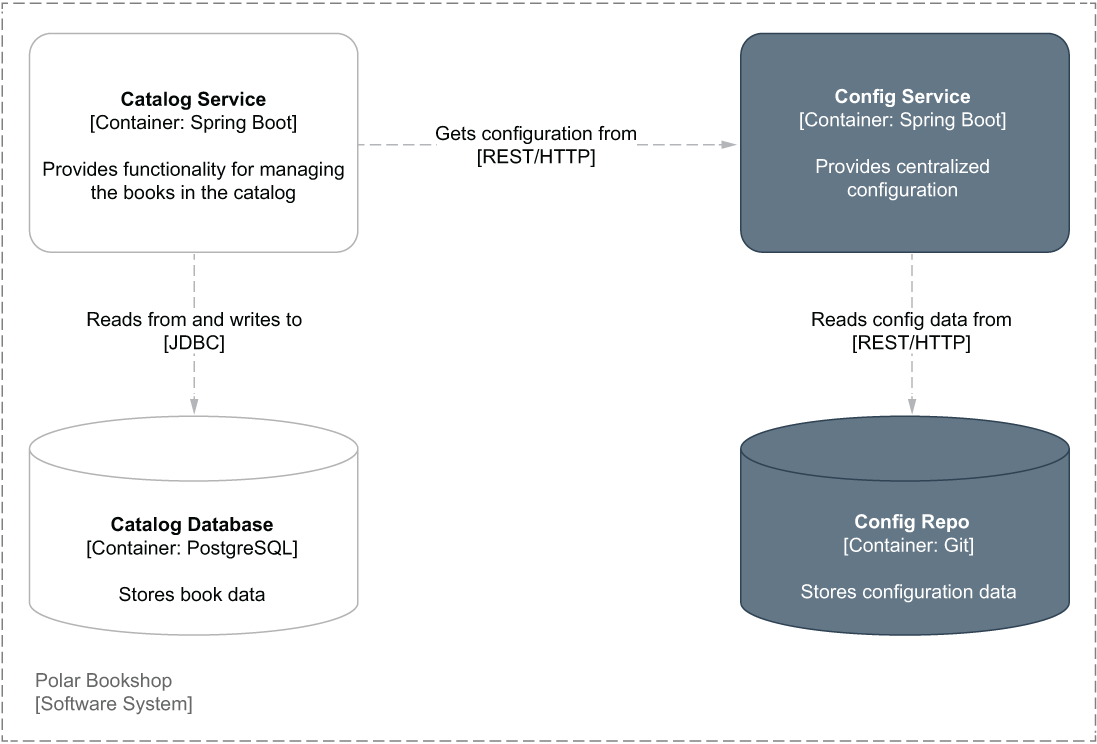
Figure 5.4 The Catalog Service application uses a PostgreSQL database to persist book data.
5.2.1 Connecting to a database with JDBC
Let’s start implementing the data persistence layer for the Catalog Service application. As a minimum, you’ll need to import the Spring Data module for the specific database you want to use and, if required, also the database driver. Since Spring Data JDBC supports different relational databases, you’ll need to explicitly declare a dependency on the specific database driver you want to use.
You can add the two new dependencies to the build.gradle file for the Catalog Service project (catalog-service). Remember to refresh or reimport the Gradle dependencies after the new addition.
Listing 5.1 Adding dependency for Spring Data JDBC in Catalog Service
dependencies {
  ...
  implementation 'org.springframework.boot:spring-boot-starter-data-jdbc'
  runtimeOnly 'org.postgresql:postgresql'
}
These are the main dependencies:
-
Spring Data JDBC (org.springframework.boot:spring-boot-starter-data-jdbc)—Provides the necessary libraries to persist data in relational databases using Spring Data and JDBC.
-
PostgreSQL (org.postgresql:postgresql)—Provides a JDBC driver that allows the application to connect to a PostgreSQL database.
The PostgreSQL database is a backing service to the Catalog Service application. As such, it should be handled as an attached resource according to the 15-factor methodology. The attachment is done through resource binding, which in the case of PostgreSQL, consists of the following:
-
A URL to define which driver to use, where to find the database server, and which database to connect the application to
-
Username and password to establish a connection with the specified database
Thanks to Spring Boot, you can provide those values as configuration properties. This means you can easily replace the attached database by changing the values for the resource binding.
Open the application.yml file for the Catalog Service project, and add the properties for configuring the connection with PostgreSQL. Those values are the ones you defined earlier as environment variables when creating the PostgreSQL container.
Listing 5.2 Configuring the connection to a database using JDBC
spring:
  datasource:            ❶
    username: user
    password: password
    url: jdbc:postgresql://localhost:5432/polardb_catalog
❶ The credentials for a user with privileges to access the given database and a JDBC URL to identify with which database you want to establish a connection
Opening and closing database connections are relatively expensive operations, so you don’t want to do that every time your application accesses data. The solution is connection pooling: the application establishes several connections with the database and reuses them, rather than creating new ones for each data access operation. This is a considerable performance optimization.
Spring Boot uses HikariCP for connection pooling, and you can configure it from the application.yml file. You want to configure at least a connection timeout (spring.datasource.hikari.connection-timeout) and a maximum number of connections in the pool (spring.datasource.hikari.maximum-pool-size), because these both affect application resilience and performance. As you saw for the Tomcat thread pool, multiple factors influence which values you should use. As a starting point, you can refer to the HikariCP analysis of pool sizing (https://github.com/brettwooldridge/HikariCP/wiki/About-Pool-Sizing).
Listing 5.3 Configuring the connection pool to interact with the database
spring:
  datasource:
    username: user
    password: password
    url: jdbc:postgresql://localhost:5432/polardb_catalog
    hikari:
      connection-timeout: 2000     ❶
      maximum-pool-size: 5         ❷
❶ The maximum time (ms) to spend waiting to get a connection from the pool
❷ The maximum number of connections HikariCP will keep in the pool
Now that you have connected a Spring Boot application to a PostgreSQL database, you can go ahead and define what data you want to persist.
5.2.2 Defining persistent entities with Spring Data
In Catalog Service, you already have a Book record representing a domain entity for the application. Depending on the business domain and its complexity, you might want to distinguish the domain entity from the persistent entity, making the domain layer utterly independent of the persistence layer. If you’d like to explore how to model that scenario, I recommend referring to domain-driven design and hexagonal architecture principles.
In this case, the business domain is quite simple, so we’ll update the Book record to also be a persistent entity.
Making a domain class persistent
Spring Data JDBC encourages working with immutable entities. Using Java records to model entities is an excellent choice, since they’re immutable by design and expose an all-args constructor that the framework can use to populate objects.
A persistent entity must have a field that acts as the identifier for the object, which will translate to the primary key in the database. You can mark a field as an identifier with the @Id annotation (from the org.springframework.data.annotation package). The database is responsible for generating a unique identifier for each created object automatically.
Note Books are uniquely identified by an ISBN, which we can call a natural key (or business key) for the domain entity. We could decide to use it also as the primary key or introduce a technical key (or surrogate key). There are pros and cons to both approaches. I chose to use a technical key to make it easier to manage and to decouple domain concerns from persistence implementation details.
That is enough to create and persist a Book in the database. It’s also OK when a single user updates an existing Book object in isolation. But what happens if the same entity is updated by multiple users concurrently? Spring Data JDBC supports optimistic locking to address that concern. Users can read data concurrently. When a user attempts an update operation, the application checks if there has been any change since the last read. If there was, the operation is not performed, and an exception is thrown. The check is based on a numeric field that starts counting from 0 and automatically increases at every update operation. You can mark such a field with the @Version annotation (from the org.springframework.data.annotation package).
When the @Id field is null and the @Version field is 0, Spring Data JDBC assumes it’s a new object. Consequently, it relies on the database to generate an identifier when inserting the new row in the table. When values are provided, it expects to find the object in the database already and to update it.
Let’s go ahead and add two new fields to the Book record for the identifier and the version number. Since both fields are populated and handled by Spring Data JDBC under the hood, using the all-args constructor might be too verbose for situations such as generating test data. For convenience, let’s add a static factory method to the Book record for building an object by passing only the business fields.
Listing 5.4 Defining identifier and version for Book objects
package com.polarbookshop.catalogservice.domain;

public record Book (

  @Id                                            ❶
  Long id,

  @NotBlank(message = "The book ISBN must be defined.")
  @Pattern(
    regexp = "^([0-9]{10}|[0-9]{13})$",
    message = "The ISBN format must be valid."
  )
  String isbn,

  @NotBlank(message = "The book title must be defined.")
  String title,

  @NotBlank(message = "The book author must be defined.")
  String author,

  @NotNull(message = "The book price must be defined.")
  @Positive(message = "The book price must be greater than zero.")
  Double price,

  @Version                                       ❷
  int version

){
  public static Book of(
    String isbn, String title, String author, Double price
  ) {
    return new Book(
      null, isbn, title, author, price, 0        ❸
    );
  }
}
❶ Identifies the field as the primary key for the entity
❷ The entity version number, which is used for optimistic locking
❸ An entity is considered new when the ID is null and the version is 0.
Note Spring Data JPA works with mutating objects, so you can’t use Java records. JPA entity classes must be marked with the @Entity annotation and expose a no-args constructor. JPA identifiers are annotated with @Id and @Version from the javax.persistence package instead of org.springframework.data.annotation.
After adding the new fields, we need to update a few classes using the Book constructor, which now requires passing values for id and version.
The BookService class contains the logic for updating books. Open it and change the editBookDetails() method to ensure the book identifiers and versions are correctly passed along when calling the data layer.
Listing 5.5 Including existing identifier and version on book updates
package com.polarbookshop.catalogservice.domain;

@Service
public class BookService {

  ...

  public Book editBookDetails(String isbn, Book book) {
    return bookRepository.findByIsbn(isbn)
      .map(existingBook -> {
        var bookToUpdate = new Book(
          existingBook.id(),               ❶
          existingBook.isbn(),
          book.title(),
          book.author(),
          book.price(),
          existingBook.version());         ❷
        return bookRepository.save(bookToUpdate);
      })
      .orElseGet(() -> addBookToCatalog(book));
  }
}
❶ Uses the identifier of the existing book
❷ Uses the version of the existing book, which will be increased automatically if the update operation succeeds
In BookDataLoader, we can use the new static factory method for building Book objects. The framework will take care of handling the id and version fields.
Listing 5.6 Using the static factory method when creating a book
package com.polarbookshop.catalogservice.demo;

@Component
@Profile("testdata")
public class BookDataLoader {

  ...

  @EventListener(ApplicationReadyEvent.class)
  public void loadBookTestData() {
    var book1 = Book.of("1234567891", "Northern Lights",
      "Lyra Silverstar", 9.90);                              ❶
    var book2 = Book.of("1234567892", "Polar Journey",
      "Iorek Polarson", 12.90);                              ❶
    bookRepository.save(book1);
    bookRepository.save(book2);
  }
}
❶ The framework takes care of assigning a value for the identifier and the version under the hood.
I’ll leave it to you to update the autotests similarly. You can also extend the tests in the BookJsonTests class to verify the serialization and deserialization of the new fields. As a reference, you can check Chapter05/05-intermediate/catalog-service in the code repository accompanying this book.
As a persistent entity, the Book record will be automatically mapped to relational resources. Class and field names are transformed into lowercase, and the camel case is translated into words joined by underscores. The Book record will result in the book table, the title field will result in the title column, the price field will result in the price column, and so on. Figure 5.5 shows the mapping between the Java object and the relational table.
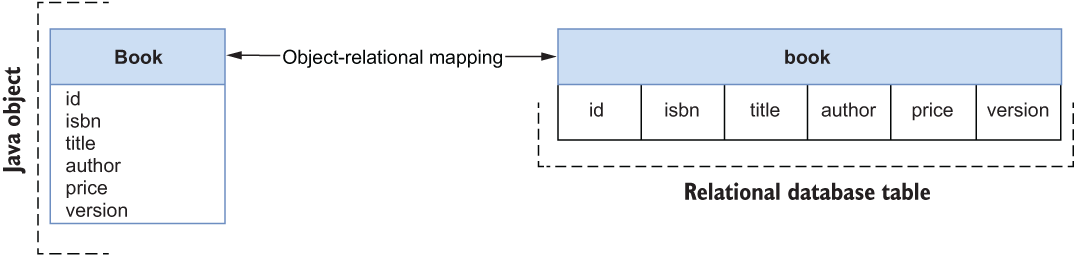
Figure 5.5 Java classes marked as persistent entities are automatically mapped by Spring Data JDBC to relational resources in the database.
The database must have a table defined (as shown in figure 5.5) for the mapping to work. Spring Data offers a feature to initialize a data source at startup time. By default, you can use a schema.sql file to create a schema and a data.sql file to insert data in the newly created tables. Such files should be placed in the src/main/resources folder.
That is a convenient feature, and it’s useful for demos and experiments. However, it’s too limited for use in production. As you’ll see later in the chapter, it’s better to create and evolve relational resources with a more sophisticated tool, like Flyway or Liquibase, which will let you version-control your database. For now we’ll use the built-in database initialization mechanism so that we can focus on the data layer implementation first.
Note Hibernate, the foundation for Spring Data JPA, offers an interesting feature for automatically generating schemas from the entities defined in Java. Once again, this is convenient for demos and experiments, but please think twice before using it in production.
In your Catalog Service project, add a new schema.sql file in the src/main/resources folder. Then write the SQL instructions to create the book table, which will be mapped to the Book record in Java.
Listing 5.7 Defining the SQL instructions to create the book table
DROP TABLE IF EXISTS book;                               ❶
CREATE TABLE book (
  id                  BIGSERIAL PRIMARY KEY NOT NULL,    ❷
  author              varchar(255) NOT NULL,
  isbn                varchar(255) UNIQUE NOT NULL,      ❸
  price               float8 NOT NULL,
  title               varchar(255) NOT NULL,             ❹
  version             integer NOT NULL                   ❺
);
❶ Drops the book table if it already exists
❷ The primary key for the table. The database will generate it as a sequence of numbers (bigserial type).
❸ The UNIQUE constraint ensures that a particular ISBN is assigned only to one book.
❹ The NOT NULL constraint ensures the related column is assigned a value.
❺ The entity version number, stored as an integer
By default, Spring Data loads the schema.sql file only when using an embedded, in-memory database. Since we’re using PostgreSQL, we need to enable the functionality explicitly. In the application.yml file for your Catalog Service project, add the following configuration to initialize the database schema from the schema.sql file.
Listing 5.8 Initializing the database schema from an SQL script
spring:
  sql:
    init:
      mode: always
At startup, Spring Data will read the file and execute the SQL instructions in the PostgreSQL database to create a new book table and make it possible to start inserting data.
In the next section, you’ll make it possible to capture audit events related to the persistent entities and keep track of when each row has been inserted into the table and modified most recently.
5.2.3 Enabling and configuring JDBC auditing
When persisting data, it’s useful to know the creation date for each row in a table and the date when it was updated last. After securing an application with authentication and authorization, you can even register who created each entity and recently updated it. All of that is called database auditing.
With Spring Data JDBC, you can enable auditing for all the persistent entities using the @EnableJdbcAuditing annotation on a configuration class. In the com .polarbookshop.catalogservice.config package, add a DataConfig class to gather JDBC-related configuration.
Listing 5.9 Enabling JDBC auditing via annotation configuration
package com.polarbookshop.catalogservice.config;

import org.springframework.context.annotation.Configuration;
import org.springframework.data.jdbc.repository.config.EnableJdbcAuditing;

@Configuration             ❶
@EnableJdbcAuditing        ❷
public class DataConfig {}
❶ Indicates a class as a source of Spring configuration
❷ Enables auditing for persistent entities
Note In Spring Data JPA, you would use the @EnableJpaAuditing annotation to enable JPA auditing, and you would annotate the entity class with @EntityListeners(AuditingEntityListener.class) to make it listen to audit events, which doesn’t happen automatically as in Spring Data JDBC.
When this feature is enabled, audit events are generated whenever data is created, updated, or deleted. Spring Data provides convenient annotations (listed in table 5.1) that we can use on dedicated fields to capture the information from such events (audit metadata) and store it in the database as part of the entity.
Table 5.1 When database auditing is enabled, these annotations can be used on entity fields to capture audit metadata.
In Catalog Service we can add the createdDate and lastModifiedDate fields to the Book record. In chapter 12, after introducing Spring Security, we’ll extend this object to also capture who created or updated the entity.
Open the Book record, add the two new fields, and update the static factory method accordingly. They can be null when instantiating a new object because they will be populated by Spring Data under the hood.
Listing 5.10 Adding fields to store audit metadata in a persistent entity
package com.polarbookshop.catalogservice.domain;

public record Book (

  @Id
  Long id,

  ...

  @CreatedDate             ❶
  Instant createdDate,

  @LastModifiedDate        ❷
  Instant lastModifiedDate,

  @Version
  int version

){
  public static Book of(
    String isbn, String title, String author, Double price
  ) {
    return new Book(null, isbn, title, author, price, null, null, 0);
  }
}
❷ When the entity was last modified
After extending the Book record, the BookService class needs to be updated one more time. Open it and change the editBookDetails() method to ensure the audit metadata is correctly passed along when calling the data layer.
Listing 5.11 Including the existing audit metadata when updating a book
package com.polarbookshop.catalogservice.domain;

@Service
public class BookService {

  ...

  public Book editBookDetails(String isbn, Book book) {
    return bookRepository.findByIsbn(isbn)
      .map(existingBook -> {
        var bookToUpdate = new Book(
          existingBook.id(),
          existingBook.isbn(),
          book.title(),
          book.author(),
          book.price(),
          existingBook.createdDate(),        ❶
          existingBook.lastModifiedDate(),   ❷
          existingBook.version());
        return bookRepository.save(bookToUpdate);
      })
      .orElseGet(() -> addBookToCatalog(book));
  }
}
❶ Uses the creation date of the existing book record
❷ Uses the last modified date of the existing book record. It will be updated automatically by Spring Data if the operation succeeds.
Next, let’s update the schema.sql file to add the columns for the new fields to the book table.
Listing 5.12 Adding columns for audit metadata to the book table
DROP TABLE IF EXISTS book;
CREATE TABLE book (
  id                  BIGSERIAL PRIMARY KEY NOT NULL,
  author              varchar(255) NOT NULL,
  isbn                varchar(255) UNIQUE NOT NULL,
  price               float8 NOT NULL,
  title               varchar(255) NOT NULL,
  created_date        timestamp NOT NULL,      ❶
  last_modified_date  timestamp NOT NULL,      ❷
  version             integer NOT NULL
);
❶ When the entity was created (stored as a timestamp)
❷ When the entity was last modified (stored as a timestamp)
I’ll leave it to you to update the autotests accordingly, when necessary. You can also extend the tests in BookJsonTests to verify the serialization and deserialization of the new fields. As a reference, you can check Chapter05/05-intermediate/catalog-service in the code repository accompanying this book.
So far, you have got everything in place to map your Java objects to relational objects in a database, including audit metadata. You still need a way to access data from the database, though. That’s the subject of the next section.
5.2.4 Data repositories with Spring Data
The repository pattern provides an abstraction for accessing data independently of its source. The BookRepository interface used by BookService is an example of a repository. The domain layer, which contains the business logic, doesn’t need to know where the data comes from, as long as it gets access. In chapter 3, we added an implementation of the repository interface to store data in memory. Now that we’re building the persistence layer, we’ll need a different implementation to access data from PostgreSQL.
The good news is that we can use Spring Data repositories, a technical solution that provides access to data from a data store independently of the specific persistence technology used. It’s one of the most valuable features of Spring Data, because we can use the same repository abstraction in any persistence scenario, whether relational or non-relational.
When using Spring Data repositories, your responsibility is limited to defining an interface. At startup time, Spring Data will generate an implementation for your interface on the fly. In the Catalog Service project (catalog-service), go ahead and delete the InMemoryBookRepository class.
Let’s now see how we can refactor the BookRepository interface from the Catalog Service project. First, it should extend one of the available Repository interfaces provided by Spring Data. Most Spring Data modules add Repository implementations specific to the data source supported. The Catalog Service application requires standard CRUD operations on Book objects, so you can make the BookRepository interface extend from CrudRepository.
CrudRepository provides methods to perform CRUD operations, including save() and findAll(), so you can remove their explicit declarations from your interface. The default methods defined by CrudRepository for Book objects are based on their @Id-annotated fields. Since the application needs to access books based on the ISBN, we must explicitly declare those operations.
Listing 5.13 Repository interface for accessing books
package com.polarbookshop.catalogservice.domain;

import java.util.Optional;
import org.springframework.data.jdbc.repository.query.Modifying;
import org.springframework.data.jdbc.repository.query.Query;
import org.springframework.data.repository.CrudRepository;

public interface BookRepository
    extends CrudRepository<Book,Long> {            ❶

  Optional<Book> findByIsbn(String isbn);          ❷
  boolean existsByIsbn(String isbn);

  @Modifying                                       ❸
  @Query("delete from Book where isbn = :isbn")    ❹
  void deleteByIsbn(String isbn);
}
❶ Extends a repository providing CRUD operations, specifying the type of managed entity (Book) and its primary key type (Long)
❷ Methods implemented by Spring Data at runtime
❸ Identifies an operation that will modify the database state
❹ Declares the query that Spring Data will use to implement the method
At startup time, Spring Data will provide an implementation for BookRepository with all the most common CRUD operations and the methods you declared in the interface. There are two main options for defining custom queries in Spring Data:
-
Using the @Query annotation to provide an SQL-like statement that will be executed by the method.
-
Defining query methods following a specific naming convention, as described in the official documentation (https://spring.io/projects/spring-data). Generally, you can build a method name by combining multiple pieces, as described in table 5.2. At the time of writing, Spring Data JDBC supports this option only for read operations. On the other hand, Spring Data JPA provides full support for it.
Table 5.2 You can add custom queries to a repository and have Spring Data generate implementations for you by following a specific naming convention comprising these building blocks.
|
findByTitleContaining, findByIsbnEndingWith, findByPriceLessThan | |
Using some of the methods provided by the CrudRepository interface and inherited by BookRepository, we can improve the BookDataLoader class so that we start with an empty database during development and create books with a single command.
Listing 5.14 Using Spring Data methods to delete and save books
package com.polarbookshop.catalogservice.demo;

@Component
@Profile("testdata")
public class BookDataLoader {
  private final BookRepository bookRepository;

  public BookDataLoader(BookRepository bookRepository) {
    this.bookRepository = bookRepository;
  }

  @EventListener(ApplicationReadyEvent.class)
  public void loadBookTestData() {
    bookRepository.deleteAll();                           ❶
    var book1 = Book.of("1234567891", "Northern Lights",
      "Lyra Silverstar", 9.90);
    var book2 = Book.of("1234567892", "Polar Journey",
      "Iorek Polarson", 12.90);
    bookRepository.saveAll(List.of(book1, book2));        ❷
  }
}
❶ Deletes all existing books, if any, to start from an empty database
❷ Saves multiple objects at once
Defining transactional contexts
The repositories provided by Spring Data come configured with transactional contexts for all the operations. For example, all methods in CrudRepository are transactional. That means you can safely call the saveAll() method, knowing that it will be executed in a transaction.
When you add your own query methods, as you did for BookRepository, it’s up to you to define which ones should be part of a transaction. You can rely on the declarative transaction management provided by the Spring Framework and use the @Transactional annotation (from the org.springframework.transaction.annotation package) on classes or methods to ensure they are executed as part of a single unit of work.
Among the custom methods you defined in BookRepository, deleteByIsbn() is a good candidate for being transactional, since it modifies the database state. You can ensure it runs in a transaction by applying the @Transactional annotation.
Listing 5.15 Defining transactional operations
package com.polarbookshop.catalogservice.domain;

import java.util.Optional;
import org.springframework.data.jdbc.repository.query.Modifying;
import org.springframework.data.jdbc.repository.query.Query;
import org.springframework.data.repository.CrudRepository;
import org.springframework.transaction.annotation.Transactional;

public interface BookRepository extends CrudRepository<Book,Long> {

  Optional<Book> findByIsbn(String isbn);
  boolean existsByIsbn(String isbn);

  @Modifying
  @Transactional                               ❶
  @Query("delete from Book where isbn = :isbn")
  void deleteByIsbn(String isbn);
}
❶ Identifies the method to be executed in a transaction
Note For more information about the declarative transaction management provided by Spring Framework, you can refer to the official documentation (https://spring.io/projects/spring-framework).
Great job! You successfully added data persistence capabilities to the Catalog Service application. Let’s verify that it works correctly. First of all, make sure the PostgreSQL container is still running. If not, run it as described at the beginning of this chapter. Then start the application (./gradlew bootRun), send HTTP requests to each REST endpoint, and ensure it works as expected. When you’re done, remove the database container (docker rm -fv polar-postgres) and stop the application (Ctrl-C).
Tip In the repository accompanying the book, you will find useful commands for querying the PostgreSQL database directly and verifying schemas and data generated by the application (Chapter05/05-intermediate/catalog-service/README.md).
Manual verification of data persistence is fine, but automated verification is better. That’s what the next section is all about.
5.3 Testing data persistence with Spring and Testcontainers
In the previous sections, we added data persistence functionality to an application by developing against a PostgreSQL database in a container, which is the same technology used in production. That was a good step toward the environment parity recommended by the 15-Factor methodology. Keeping all environments as similar as possible improves the quality of the project.
Data sources are one of the primary causes of differences across environments. It’s common practice to use an in-memory database while developing locally—something like H2 or HSQL. But that affects the predictability and robustness of your applications. Even if all relational databases speak the SQL language and Spring Data JDBC provides generic abstractions, each vendor has its own dialect and unique features that make it essential to use the same database in production that you use in development and testing. Otherwise, you may not catch errors that might happen only in production.
“What about testing?” you might ask. That is an excellent question. Another reason for using in-memory databases is to make integration tests more accessible. However, integration tests are also supposed to test the integration with your application’s external services. Using something like H2 makes those tests less reliable. Each commit should be a candidate for release when adopting a continuous delivery approach. Suppose the autotests run by the deployment pipeline are not using the same backing services used in production. In that case, you’ll need to do extra manual testing before deploying the application safely in production because you can’t be sure it will work correctly. Therefore, it’s essential to reduce the gap between environments.
Docker makes it easier to set up and develop applications with an actual database locally, as you experienced with PostgreSQL. In a similar way, Testcontainers (a Java library for testing) makes it easy to use backing services as containers in the context of integration tests.
This section will show you how to write slice tests for the data persistence layer using the @DataJdbcTest annotation and include a database in integration tests using the @SpringBootTest annotation. In both cases, you’ll rely on Testcontainers to run the autotests against an actual PostgreSQL database.
5.3.1 Configuring Testcontainers for PostgreSQL
Testcontainers (https://testcontainers.org) is a Java library for testing. It supports JUnit and provides lightweight, throwaway containers such as databases, message brokers, and web servers. It’s perfect for implementing integration tests with the actual backing services used in production. The result is more reliable and stable tests, which lead to higher-quality applications and favor continuous delivery practices.
You can configure a lightweight PostgreSQL container with Testcontainers and use it in your autotests involving a data persistence layer. Let’s see how it works.
First, you need to add a dependency on the Testcontainers module for PostgreSQL in the build.gradle file of your Catalog Service project. Remember to refresh or reimport the Gradle dependencies after the new addition.
Listing 5.16 Adding dependency on Testcontainers in Catalog Service
ext {
  ...
  set('testcontainersVersion', "1.17.3")                 ❶
}

dependencies {
  ...
  testImplementation 'org.testcontainers:postgresql'     ❷
}

dependencyManagement {
  imports {
    ...
    mavenBom "org.testcontainers:
    ➥ testcontainers-bom:${testcontainersVersion}"      ❸
  }
}
❶ Defines the Testcontainers version to use
❷ Provides container management features for PostgreSQL databases
❸ BOM (bill of materials) for Testcontainers dependency management
When running tests, we want the application to use a PostgreSQL instance provided by Testcontainers rather than the one we configured earlier via the spring.datasource .url property. We can overwrite that value in a new application-integration.yml file created under src/test/resources. Any property defined in this file will take precedence over the main one when the integration profile is enabled. In this case, we’ll overwrite the value for spring.datasource.url following a format defined by Testcontainers.
Create a new application-integration.yml file in src/test/resources, and add the following configuration.
Listing 5.17 Using a PostgreSQL data source provided by Testcontainers
spring:
  datasource:
    url: jdbc:tc:postgresql:14.4:///      ❶
❶ Identifies the PostgreSQL module in Testcontainers. “14.4” is the version of PostgreSQL to use.
That’s all we need to configure Testcontainers. When the integration profile is enabled, Spring Boot will use the PostgreSQL container instantiated by Testcontainers. We’re now ready to write autotests to verify the data persistence layer.
5.3.2 Testing data persistence with @DataJdbcTest and Testcontainers
As you might recall from chapter 3, Spring Boot allows you to run integration tests by loading only the Spring components used by a specific application slice (slice tests). In Catalog Service, we created tests for the MVC and the JSON slices. Now I’ll show you how to write tests for the data slice.
Create a BookRepositoryJdbcTests class, and mark it with the @DataJdbcTest annotation. That will trigger Spring Boot to include all Spring Data JDBC entities and repositories in the application context. It will also auto-configure JdbcAggregateTemplate, a lower-level object we can use to set up the context for each test case instead of using the repository (the object under testing).
Listing 5.18 Integration tests for the Data JDBC slice
package com.polarbookshop.catalogservice.domain;

import java.util.Optional;
import com.polarbookshop.catalogservice.config.DataConfig;
import org.junit.jupiter.api.Test;
import org.springframework.beans.factory.annotation.Autowired;
import org.springframework.boot.test.autoconfigure.data.jdbc.DataJdbcTest;
import org.springframework.boot.test.autoconfigure.jdbc
➥ .AutoConfigureTestDatabase;
import org.springframework.context.annotation.Import;
import org.springframework.data.jdbc.core.JdbcAggregateTemplate;
import org.springframework.test.context.ActiveProfiles;
import static org.assertj.core.api.Assertions.assertThat;

@DataJdbcTest                                                          ❶
@Import(DataConfig.class)                                              ❷
@AutoConfigureTestDatabase(                                            ❸
  replace = AutoConfigureTestDatabase.Replace.NONE
)
@ActiveProfiles("integration")                                         ❹
class BookRepositoryJdbcTests {

  @Autowired
  private BookRepository bookRepository;

  @Autowired
  private JdbcAggregateTemplate jdbcAggregateTemplate;                 ❺

  @Test
  void findBookByIsbnWhenExisting() {
    var bookIsbn = "1234561237";
    var book = Book.of(bookIsbn, "Title", "Author", 12.90);
    jdbcAggregateTemplate.insert(book);                                ❻
    Optional<Book> actualBook = bookRepository.findByIsbn(bookIsbn);

    assertThat(actualBook).isPresent();
    assertThat(actualBook.get().isbn()).isEqualTo(book.isbn());
  }
}
❶ Identifies a test class that focuses on Spring Data JDBC components
❷ Imports the data configuration (needed to enable auditing)
❸ Disables the default behavior of relying on an embedded test database since we want to use Testcontainers
❹ Enables the “integration” profile to load configuration from application-integration.yml
❺ A lower-level object to interact with the database
❻ JdbcAggregateTemplate is used to prepare the data targeted by the test.
The @DataJdbcTest annotation encapsulates handy features. For example, it makes each test method run in a transaction and rolls it back at its end, keeping the database clean. After running the test method in listing 5.18, the database will not contain the book created in findBookByIsbnWhenExisting() because the transaction is rolled back at the end of the method’s execution.
Let’s verify that the Testcontainers configuration works. First, make sure the Docker Engine is running in your local environment. Then open a Terminal window, navigate to the root folder of your Catalog Service project, and run the following command to ensure the tests are successful. Under the hood, Testcontainers will create a PostgreSQL container before the test’s execution and remove it at the end.
$ ./gradlew test --tests BookRepositoryJdbcTests
In the code repository accompanying the book, you can find more examples of unit and integration tests for the Catalog Service project. The following section will cover how to run full integration tests with Testcontainers.
5.3.3 Integration tests with @SpringBootTest and Testcontainers
In the Catalog Service application, we already have a CatalogServiceApplicationTests class annotated with @SpringBootTest and containing full integration tests. The Testcontainers configuration we defined earlier applies to all autotests for which the integration profile is enabled, so we need to add the profile configuration to the CatalogServiceApplicationTests class.
Listing 5.19 Enabling integration profile for the integration tests
package com.polarbookshop.catalogservice;

@SpringBootTest(webEnvironment = SpringBootTest.WebEnvironment.RANDOM_PORT)
@ActiveProfiles("integration")                                             ❶
class CatalogServiceApplicationTests {
  ...
}
❶ Enables the “integration” profile to load configuration from application-integration.yml
Open a Terminal window, navigate to the root folder of your Catalog Service project, and run the following command to ensure the tests are successful. Under the hood, Testcontainers will create a PostgreSQL container before the test’s execution and remove it at the end.
$ ./gradlew test --tests CatalogServiceApplicationTests
Good job! You have added data persistence to a Spring Boot application and written tests while ensuring environment parity. Let’s move on and complete this chapter by discussing how to manage schemas and data in production.
5.4 Managing databases in production with Flyway
It’s good practice to register any database changes, just like you do for your application source code through version control. You’ll need a deterministic and automated way to infer the database’s state, whether specific changes have already been applied, how to recreate a database from scratch, and how to migrate it in a controlled, repeatable, and reliable way. The continuous delivery approach encourages automating as much as possible, including database management.
In the Java ecosystem, the two most-used tools for tracking, versioning, and deploying database changes are Flyway (https://flywaydb.org) and Liquibase (https://liquibase.org). Both of them are fully integrated with Spring Boot. This section will show you how to use Flyway.
5.4.1 Understanding Flyway: Version control for your database
Flyway is a tool that provides version control for your database. It offers a single source of truth for the version of your database’s state and keeps track of any changes incrementally. It automates changes and lets you reproduce or roll back the state of a database. Flyway is highly reliable, safe to use in cluster environments, and supports several relational databases, including the cloud ones like Amazon RDS, Azure Database, and Google Cloud SQL.
Note In this section, I will introduce some features offered by Flyway, but I recommend you check the official documentation to discover all the powerful possibilities provided by this tool (https://flywaydb.org).
At its core, Flyway manages database changes. Any database change is called a migration, and migrations can be either versioned or repeatable. Versioned migrations are identified by a unique version number and are applied in order exactly once. For each regular versioned migration, you can also provide an optional undo migration to revert its effects (in case something goes wrong). They can be used to create, alter, or drop relational objects like schemas, tables, columns, and sequences or to correct data. On the other hand, repeatable migrations are applied every time their checksum changes. They can be used for creating or updating views, procedures, and packages.
Both types of migration can be defined in standard SQL scripts (useful for DDL changes) or Java classes (useful for DML changes, like data migrations). Flyway keeps track of which migrations have already been applied through a flyway_schema_history table automatically created in the database the first time it runs. You can picture migrations as commits in a Git repository and the schema history table as the repository log containing the list of all the commits applied over time (figure 5.6).

Figure 5.6 Flyway migrations represent database changes that can be pictured as commits in a Git repository.
Note A prerequisite for using Flyway is that both the database you want to manage and a user with the correct access privileges exist. Once you have a database and a user, Flyway can manage database changes for you. You shouldn’t use Flyway to manage users.
You can use Flyway in standalone mode or embedded in a Java application. Spring Boot provides auto-configuration for it, making it very convenient to include Flyway in your applications. When integrated with Spring Boot, Flyway will search for SQL migrations in the src/main/resources/db/migration folder and Java migrations in src/main/java/db/migration.
Running schema and data migrations is one of those administrative processes described by the 15-Factor methodology introduced in chapter 2. In this case, the strategy adopted for managing such a process was to embed it in the application itself. By default, it’s activated during the application startup phase. Let’s see how we can implement it for Catalog Service.
Open your Catalog Service project (catalog-service) and add a dependency on Flyway in the build.gradle file. Remember to refresh or reimport the Gradle dependencies after the addition.
Listing 5.20 Adding a dependency on Flyway in Catalog Service
dependencies {
  ...
  implementation 'org.flywaydb:flyway-core'
}
In the next section, you’ll learn how to create your first migration to initialize the database schema.
5.4.2 Initializing a database schema with Flyway
The first database change you’ll apply is usually to initialize the schema. So far we’ve been relying on the built-in data source initialization capabilities offered by Spring Boot and providing a schema.sql file with the SQL statements to run. Now we can initialize the schema using an SQL Flyway migration.
First, delete the schema.sql file and remove the spring.sql.init.mode property from the application.yml file in your Catalog Service project.
Next, create a src/main/resources/db/migration folder. That’s where Flyway will look for SQL migrations by default. Inside the folder, create a V1__Initial_schema.sql file, which will contain the SQL statement for initializing the database schema required by the Catalog Service application. Ensure you type two underscores after the version number.
Flyway expects SQL migration files to comply with a specific naming pattern. Regular versioned migrations should follow this structure:
In the V1__Initial_schema.sql migration script, you can include the SQL instructions to create a book table that Spring Boot JDBC will map to the Book persistent entity.
Listing 5.21 Flyway migration script for schema initialization
CREATE TABLE book (                                     ❶
  id                  BIGSERIAL PRIMARY KEY NOT NULL,   ❷
  author              varchar(255) NOT NULL,
  isbn                varchar(255) UNIQUE NOT NULL,     ❸
  price               float8 NOT NULL,
  title               varchar(255) NOT NULL,
  created_date        timestamp NOT NULL,
  last_modified_date  timestamp NOT NULL,
  version             integer NOT NULL
);
❶ Definition of the book table
❷ Declares the id field as the primary key
❸ Constrains the isbn field to be unique
When you let Flyway manage changes to the database schema, you gain all the benefits of version control. You can now start a new PostgreSQL container following the instructions provided in section 5.1.2 (if you still have the previous one running, remove it with docker rm -fv polar-postgres), run the application (./gradlew bootRun), and verify that everything works correctly.
Note In the repository accompanying the book, you can find useful commands to query the PostgreSQL database directly and verify the schemas and data generated by Flyway (Chapter05/05-end/catalog-service/README.md).
Your autotests will also use Flyway. Go ahead and run them; they should all succeed. Once you’re done, push your changes to your remote Git repository, and check the commit stage results from GitHub Actions. They should be successful as well. Finally, stop the application execution (Ctrl-C) and the PostgreSQL container (docker rm -fv polar-postgres).
In the final section, you’ll learn how to use Flyway migrations to evolve a database.
5.4.3 Evolving a database with Flyway
Imagine that you completed the Catalog Service application and deployed it to production. Employees of the bookshop have started adding books to the catalog and gathered feedback about the application. The result is a new requirement for the catalog’s functionality: it should provide information about the book publisher. How can you do that?
Since the application is already in production and some data has already been created, you can use Flyway to apply a new database change, altering the book table to add a new publisher column. Create a new V2__Add_publisher_column.sql file in the src/main/resources/db/migration folder of your Catalog Service project, and add the following SQL instruction to add the new column.
Listing 5.22 Flyway migration script for updating a table schema
ALTER TABLE book
ADD COLUMN publisher varchar(255);
Then update the Book Java record accordingly. The change should take into account that, in production, there are already books saved in the database without the publisher information, so it must be an optional field or the existing data will become invalid. You should also update the static factory method accordingly.
Listing 5.23 Adding a new optional field to an existing data entity
package com.polarbookshop.catalogservice.domain;

public record Book (
  @Id
  Long id,

  ...

  String publisher,      ❶

  @CreatedDate
  Instant createdDate,

  @LastModifiedDate
  Instant lastModifiedDate,

  @Version
  int version

){
  public static Book of(
    String isbn, String title, String author, Double price, String publisher
  ) {
    return new Book(
      null, isbn, title, author, price, publisher, null, null, 0
    );
  }
}Note After making this change, you must update the classes that call the static factory method and the Book() constructor to include a value for the publisher field. You can use either null (since it’s optional) or a string value like Polarsophia. Check the source code (Chapter05/05-end/catalog-service) to see the final result. In the end, check that both the autotests and the application run correctly.
When this new version of Catalog Service is deployed to production, Flyway will skip the V1__Initial_schema.sql migration because it’s already been applied, but it will execute the change described in V2__Add_publisher_column.sql. At this point, bookshop employees can start including the publisher name when adding new books to the catalog, and all the existing data will still be valid.
What if you need to make the publisher field mandatory? You can do that in a third version of Catalog Service, using an SQL migration to enforce the publisher column to be NON NULL and implementing a Java migration that adds a publisher to all the existing books in the database that don’t have one already.
This two-step approach is very common to ensure backward compatibility during an upgrade. As you’ll learn in a later chapter, there are usually multiple instances of the same application running. Deploying a new version is generally done through a rolling upgrade procedure consisting of updating one (or a few) instances at a time to ensure zero downtime. There will be both old and new versions of the application running during the upgrade, so it’s paramount that the old instances can still run correctly even after the database changes introduced in the latest version have been applied.
Summary
-
The state is everything that should be preserved when shutting down a service and spinning up a new instance.
-
Data services are the stateful components of a cloud native architecture, requiring storage technologies to persist the state.
-
Using data services in the cloud is challenging because it’s a dynamic environment.
-
Some issues to consider when choosing a data service are scalability, resilience, performance, and compliance with specific regulations and laws.
-
You can use data services that are offered and managed by your cloud provider or manage your own, either relying on virtual machines or containers.
-
Spring Data provides common abstractions and patterns for accessing data, making it straightforward to navigate the different modules dedicated to relational and non-relational databases.
-
The main elements in Spring Data are database drivers, entities, and repositories.
-
Spring Data JDBC is a framework that supports integrating Spring applications with relational databases relying on a JDBC driver.
-
Entities represent domain objects and can be managed by Spring Data JDBC as immutable objects. They must have the field hosting the primary key annotated with @Id.
-
Spring Data lets you capture audit metadata whenever an entity is created or updated. You can enable this feature with @EnableJdbcAuditing.
-
Data repositories grant access to entities from the database. You need to define an interface, and then Spring Data will generate the implementation for you.
-
Depending on your requirements, you can extend one of the available Repository interfaces provided by Spring Data, such as CrudRepository.
-
In Spring Data JDBC, all mutating custom operations (create, update, delete) should run in transactions.
-
Use the @Transactional annotation to run operations in a single unit of work.
-
You can run integration tests for the Spring Data JDBC slice using the @DataJdbcTest annotation.
-
Environment parity is essential for the quality and reliability of your tests and deployment pipeline.
-
You can test the integration between your application and backing services defined as containers by using the Testcontainers library. It lets you use lightweight, throwaway containers in your integration tests.
-
Database schemas are critical for applications. In production, you should use a tool like Flyway, which provides version control for your database.
-
Flyway should manage any database changes to ensure reproducibility, traceability, and reliability.