
12 Security: Authorization and auditing
- Authorization and roles with Spring Cloud Gateway and OAuth2
- Protecting APIs with Spring Security and OAuth2 (imperative)
- Protecting APIs with Spring Security and OAuth2 (reactive)
- Protecting and auditing data with Spring Security and Spring Data
In the previous chapter, I introduced access control systems for cloud native applications. You saw how to add authentication to Edge Service with Spring Security and OpenID Connect, manage the user session life cycle, and address CORS and CSRF concerns when integrating an Angular frontend with Spring Boot.
By delegating the authentication step to Keycloak, Edge Service is not affected by the specific authentication strategy. For example, we used the login form feature offered by Keycloak, but we could also enable social login via GitHub or rely on an existing Active Directory to authenticate users. Edge Service only needs to support OIDC to verify that the authentication happened correctly and get information about the user via an ID Token.
There are still a few issues we haven’t addressed. Polar Bookshop is a distributed system, and after a user authenticates successfully with Keycloak, Edge Service is supposed to interact with Catalog Service and Order Service on behalf of the user. How can we securely propagate the authentication context to the other system applications? This chapter will help you solve that problem using OAuth2 and Access Tokens.
After dealing with authentication, we will address the authorization step. Right now, both customers and employees of Polar Bookshop can perform any action on the system. This chapter will walk you through a few authorization scenarios handled with OAuth2, Spring Security, and Spring Data:
-
We’ll use a role-based access control (RBAC) strategy to protect the REST endpoints exposed by Spring Boot, depending on whether the user is a customer or an employee of the bookshop.
-
We’ll configure data auditing to keep track of which user made what changes.
-
We’ll enforce protection rules for data so that only its owner can access it.
Finally, you’ll explore how you can test those changes using Spring Boot, Spring Security, and Testcontainers.
Note The source code for the examples in this chapter is available in the Chapter12/12-begin and Chapter12/12-end folders, containing the initial and final states of the project (https://github.com/ThomasVitale/cloud-native-spring-in-action).
12.1 Authorization and roles with Spring Cloud Gateway and OAuth2
In the previous chapter, we added user authentication features to Polar Bookshop. Edge Service is the access point to the system, so it’s an excellent candidate for addressing cross-cutting concerns like security. For that reason, we made it responsible for authenticating users. Edge Service initiates the authentication flow but delegates the actual authentication step to Keycloak using the OpenID Connect protocol.
Once a user authenticates successfully with Keycloak, Edge Service receives an ID Token from Keycloak with information about the authentication event and initiates an authenticated session with the user’s browser. At the same time, Keycloak also issues an Access Token, which is used to grant Edge Service access to downstream applications on behalf of the user as per OAuth2.
OAuth2 is an authorization framework that enables an application (called a Client) to obtain limited access to a protected resource provided by another application (called a Resource Server) on behalf of a user. When a user authenticates with Edge Service and asks to access their book orders, OAuth2 provides a solution for Edge Service to retrieve orders from Order Service on behalf of that user. This solution relies on a trusted party (called an Authorization Server), which issues an Access Token to Edge Service and grants access to the user’s book orders from Order Service.
You might recognize some of these roles from the OIDC authentication flow we adopted in the previous chapter. As anticipated, OIDC is an identity layer built on top of OAuth2 and relies on the same basic concepts:
-
Authorization Server—The entity responsible for authenticating users and issuing, refreshing, and revoking Access Tokens. In Polar Bookshop, this is Keycloak.
-
User—Also called the Resource Owner, this is the human logging in with the Authorization Server to get authenticated access to the Client application. It’s also the human or service granting a Client access to the protected resources provided by a Resource Server. In Polar Bookshop, it’s either a customer or an employee.
-
Client—The application requiring the user to be authenticated and asking the user for authorization to access protected resources on their behalf. It can be a mobile application, a browser-based application, a server-side application, or even a smart TV application. In Polar Bookshop, it’s Edge Service.
-
Resource Server—This is the application hosting the protected resources a Client wants to access on the user’s behalf. In Polar Bookshop, Catalog Service and Order Service are Resource Servers. Dispatcher Service is decoupled from the other applications and won’t be accessed on behalf of the user. As a result, it won’t participate in the OAuth2 setup.
Figure 12.1 shows how the four actors are mapped into the Polar Bookshop architecture.

Figure 12.1 How the OIDC/OAuth2 roles are assigned to the entities in the Polar Bookshop architecture
Edge Service can access downstream applications on behalf of the user through an Access Token issued by Keycloak during the OIDC authentication phase. In this section, you’ll see how to configure Spring Cloud Gateway in Edge Service to use the Access Token whenever a request is routed to Catalog Service and Order Service.
In the previous chapter, we defined two users: Isabelle has both the employee and customer roles, while Bjorn has just the customer role. In this section, you’ll also learn how to include that information in both ID Tokens and Access Tokens so Spring Security can read it and set up a role-based access control (RBAC) mechanism.
Note In Polar Bookshop, the OAuth2 Client (Edge Service) and the OAuth2 Resource Servers (Catalog Service and Order Service) belong to the same system, but the same framework can be used when the OAuth2 Client is a third-party application. In fact, that was the original use case for OAuth2 and why it became so popular. Using OAuth2, services like GitHub or Twitter let you give third-party applications limited access to your account. For example, you could authorize a scheduling application to publish tweets on your behalf without exposing your Twitter credentials.
12.1.1 Token relay from Spring Cloud Gateway to other services
After a user successfully authenticates with Keycloak, Edge Service (the OAuth2 Client) receives an ID Token and an Access Token:
-
ID Token—This represents a successful authentication event and includes information about the authenticated user.
-
Access Token—This represents the authorization given to the OAuth2 Client to access protected data provided by an OAuth2 Resource Server on the user’s behalf.
In Edge Service, Spring Security uses the ID Token to extract information about the authenticated user, set up a context for the current user session, and make the data available through the OidcUser object. That’s what you saw in the previous chapter.
The Access Token grants Edge Service authorized access to Catalog Service and Order Service (the OAuth2 Resource Servers) on behalf of the user. After we secure both applications, Edge Service will have to include the Access Token in all requests routed to them as an Authorization HTTP header. Unlike ID Tokens, Edge Service doesn’t read the Access Token’s content because it’s not the intended audience. It stores the Access Token received from Keycloak and then includes it as-is in any request to a protected endpoint downstream.
This pattern is called token relay, and it’s supported by Spring Cloud Gateway as a built-in filter, so you don’t need to implement anything yourself. When the filter is enabled, the Access Token is included automatically in all requests sent to one of the downstream applications. Figure 12.2 illustrates how the token relay pattern works.
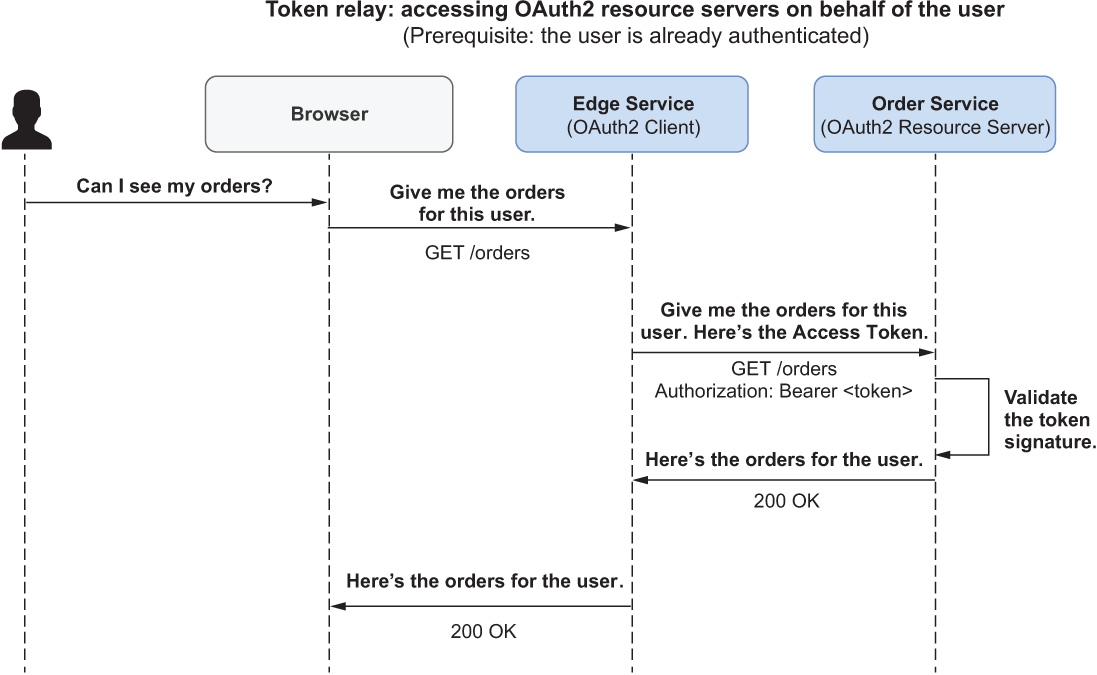
Figure 12.2 After a user is authenticated, Edge Service relays the Access Token to Order Service to call its protected endpoints on behalf of the user.
Let’s see how we can configure the Access Token relay in Edge Service.
Note An Access Token has a validity period configured in Keycloak, and it should be as short as possible to reduce the exploitation time window in case the token gets leaked. An acceptable length is 5 minutes. When the token expires, the OAuth2 Client can ask the Authorization Server for a new one using a third type of token called a Refresh Token (which also has a validity period). The refresh mechanism is handled by Spring Security transparently, and I won’t describe it further.
Adopting the token relay pattern in Spring Cloud Gateway
Spring Cloud Gateway implements the token relay pattern as a filter. In the Edge Service project (edge-service), open the application.yml file and add TokenRelay as a default filter, since we want it applied to all routes.
Listing 12.1 Enabling the token relay pattern in Spring Cloud Gateway
spring:
  cloud:
    gateway:
      default-filters:
        - SaveSession
        - TokenRelay      ❶
❶ Enables the propagation of the Access Token when calling a downstream service
With the filter enabled, Spring Cloud Gateway takes care of propagating the right Access Token as an Authorization header in all outgoing requests to Catalog Service and Order Service. For example:
GET /orders
Authorization: Bearer <access_token>
Note Unlike ID Tokens which are JWTs, the OAuth2 framework doesn’t enforce a data format for Access Tokens. They can be of any String-based form. The most popular format is JWT, though, so that’s how we’ll parse Access Tokens on the consumer side (Catalog Service and Order Service).
By default, Spring Security stores the Access Tokens for the currently authenticated users in memory. When you have multiple instances of Edge Service running (which is always true in a cloud production environment to ensure high availability), you will encounter issues due to the statefulness of the application. Cloud native applications should be stateless. Let’s fix that.
Storing Access Tokens in Redis
Spring Security stores Access Tokens in an OAuth2AuthorizedClient object that is accessible through a ServerOAuth2AuthorizedClientRepository bean. The default implementation for that repository adopts an in-memory strategy for persistence. That’s what makes Edge Service a stateful application. How can we keep it stateless and scalable?
A simple way to do that is to store OAuth2AuthorizedClient objects in the web session rather than in memory so that Spring Session will pick them up automatically and save them in Redis, just like it does with ID Tokens. Fortunately, the framework already provides an implementation of the ServerOAuth2AuthorizedClientRepository interface to save data in the web session: WebSessionServerOAuth2AuthorizedClientRepository. Figure 12.3 illustrates how all the mentioned objects are related to each other.
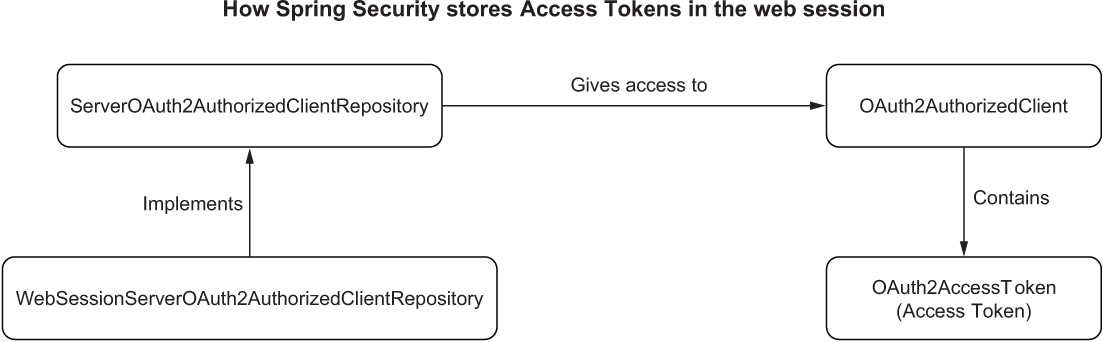
Figure 12.3 The main classes involved in storing an Access Token for the currently authenticated user in Spring Security
In the Edge Service project, open the SecurityConfig class and define a bean of type ServerOAuth2AuthorizedClientRepository using the implementation that stores Access Tokens in the web session.
Listing 12.2 Saving OAuth2AuthorizedClient objects in the web session
@EnableWebFluxSecurity
public class SecurityConfig {

  @Bean                         ❶
  ServerOAuth2AuthorizedClientRepository authorizedClientRepository() {
    return new WebSessionServerOAuth2AuthorizedClientRepository();
  }

  ...
}
❶ Defines a repository to store Access Tokens in the web session
Warning Access Tokens defined as JWTs should be handled with care. They are bearer tokens, meaning that any application can use them in an HTTP request and get access to an OAuth2 Resource Server. Handling the OIDC/ OAuth2 flow in the backend rather than in an SPA provides better security because we don’t expose any tokens to the browser. However, there might be other risks to manage, so carefully consider the trust boundaries of your system.
In the next section you’ll see how to enhance ID Tokens and Access Tokens to propagate information about user roles.
12.1.2 Customizing tokens and propagating user roles
Both ID Tokens and Access Tokens can include different information about the user, which is formatted as claims in the JWT. Claims are simple key/value pairs in JSON format. For example, OpenID Connect defines several standard claims to carry information about the user, like given_name, family_name, preferred_username, and email.
Access to such claims is controlled through scopes, a mechanism provided by OAuth2 to limit what data an OAuth2 Client can access. You can think of scopes as roles assigned to applications rather than to users. In the previous chapter, we used Spring Security to make Edge Service an OAuth2 Client and configured it with the openid scope. That scope grants Edge Service access to the authenticated user’s identity (provided in the sub claim).
Perhaps you have logged in to a third-party website using GitHub or Google (a social login based on OAuth2). If you did, you might have noticed that right after the authentication step, the service prompted you with a second request about what information from your GitHub or Google account you consented to allow the third party to access. That consent functionality is based on scopes, granting the third party (the OAuth2 Client) specific permissions depending on what scopes have been assigned.
Regarding Edge Service, we can decide upfront what scopes it should be granted. This section will show you how to configure a roles claim with the list of roles assigned to the authenticated user. Then you’ll use a roles scope to grant Edge Service access to that claim and instruct Keycloak to include it in both ID Tokens and Access Tokens.
Before moving on, you’ll need a Keycloak container up and running. Open a Terminal window, navigate to the folder where you keep your Docker Compose file, and run the following command:
$ docker-compose up -d polar-keycloak
If you haven’t followed along, you can refer to Chapter12/12-begin/polar-deployment/docker/docker-compose.yml in the accompanying repository.
Note Later I’ll provide you with a JSON file you can use to load the entire configuration when starting up the Keycloak container without being concerned with its persistence (as I did in the previous chapter). If you want to follow this second option directly, I still invite you to read through this section, since it provides the essential information you’ll need when moving on to the Spring Security part of the chapter.
Configuring access to user roles in Keycloak
Keycloak comes preconfigured with a roles scope you can use to give an application access to the user roles contained in a roles claim. However, the default representation of the roles list is not very convenient to use because it’s defined as a nested object. Let’s change that.
Once Keycloak is up and running, open a browser window, head to http://localhost:8080, log in to the administration console with the same credentials defined in the Docker Compose file (user/password), and choose the PolarBookshop realm. Then select Client Scopes from the left menu. On the new page (figure 12.4), you’ll find a list of all the preconfigured scopes in Keycloak, and you have the option to create new ones. In our case, we want to customize the existing roles scope, so click on it to open its settings.

Figure 12.4 Creating and managing client scopes
In the roles scope page, open the Mappers tab. That is where you can define the set of claims to which the given scope provides access (i.e., mappings). By default, Keycloak already has some mappers defined to map claims to the roles scope. We’re interested in the realm roles mapper, which maps the user realm roles (including employee and customer) to a JWT claim. Select that mapper.
The settings page for the realm roles mapper provides a few options for customization. We want to change two things:
-
The token claim name should be roles instead of realm_access.roles (so we will remove the nested object).
-
The roles claim should be included in both ID Token and Access Token, so we must ensure that both options are enabled. We need both because Edge Service reads the claims from the ID Token while Catalog Service and Order Service read the claims from the Access Token. Edge Service is not the intended audience for the Access Token, which is forwarded to downstream applications as-is.
Figure 12.5 shows the final settings. When you’re done, click Save.

Figure 12.5 Configuring the mapper to include the user’s realm roles in a roles JWT claim
Note In the source code repository accompanying the book, I included a JSON file you can use to load the entire configuration when starting up the Keycloak container in the future, including the latest changes regarding roles (Chapter12/12-end/polar-deployment/docker/keycloak/full-realm-config.json). I recommend updating your polar-keycloak container definition in Docker Compose to use this new JSON file.
Before moving on to the next section, stop any running containers (docker-compose down).
Configuring access to user roles in Spring Security
Keycloak is now configured to return the authenticated user roles in a roles claim included in both the ID Token and Access Token. However, the roles claim will only be returned if the OAuth2 Client (Edge Service) asks for the roles scope.
In the Edge Service project, open the application.yml file, and update the Client Registration configuration to include the roles scope.
Listing 12.3 Assigning the roles scope to Edge Service
spring:
  security:
    oauth2:
      client:
        registration:
          keycloak:
            client-id: edge-service
            client-secret: polar-keycloak-secret
            scope: openid,roles                     ❶
        provider:
          keycloak:
            issuer-uri: http://localhost:8080/realms/PolarBookshop
❶ Adds “roles” to the list of scopes so that Edge Service can get access to the user roles
Next you’ll see how to extract the roles for the currently authenticated user from the ID Token.
Extracting user roles from the ID Token
In the previous chapter, we hardcoded the list of user roles in the UserController class of the Edge Service project because we didn’t have them in the ID Token yet. Now that we do, let’s refactor the implementation to fetch the roles for the currently authenticated user from the OidcUser class, which gives us access to the claims in the ID Token, including the brand-new roles claim.
Listing 12.4 Extracting the user roles list from the ID Token via OidcUser
@RestController
public class UserController {

  @GetMapping("user")
  public Mono<User> getUser(@AuthenticationPrincipal OidcUser oidcUser) {
    var user = new User(
      oidcUser.getPreferredUsername(),
      oidcUser.getGivenName(),
      oidcUser.getFamilyName(),
      oidcUser.getClaimAsStringList("roles")    ❶
    );
    return Mono.just(user);
  }
}
❶ Gets the “roles” claim and extracts it as a list of strings
Finally, remember to update the test setup in UserControllerTests so that the mock ID Token contains a roles claim.
Listing 12.5 Adding roles list to the mock ID Token
@WebFluxTest(UserController.class)
@Import(SecurityConfig.class)
class UserControllerTests {

  ...

  private SecurityMockServerConfigurers.OidcLoginMutator
    configureMockOidcLogin(User expectedUser)
  {
    return mockOidcLogin().idToken(builder -> {
      builder.claim(StandardClaimNames.PREFERRED_USERNAME,
        expectedUser.username());
      builder.claim(StandardClaimNames.GIVEN_NAME,
        expectedUser.firstName());
      builder.claim(StandardClaimNames.FAMILY_NAME,
        expectedUser.lastName());
      builder.claim("roles", expectedUser.roles());    ❶
    });
  }
}
❶ Adds a “roles” claim to the mock ID Token
You can verify that the changes are correct by running the following command:
$ ./gradlew test --tests UserControllerTests
Note The roles claim configured in Keycloak will include our custom roles (employee and customer) together with a few extra roles managed and assigned by Keycloak itself.
So far, we’ve configured Keycloak to include the user roles in the tokens and updated Edge Service to relay the Access Token to the applications downstream. We’re now ready to start securing Catalog Service and Order Service with Spring Security and OAuth2.
12.2 Protecting APIs with Spring Security and OAuth2 (imperative)
When a user accesses the Polar Bookshop application, Edge Service initiates the OpenID Connect authentication flow through Keycloak and ultimately receives an Access Token granting it access to downstream services on behalf of that user.
In this section and the next one, you’ll see how to secure Catalog Service and Order Service by requiring a valid Access Token to access their protected endpoints. In the OAuth2 authorization framework, they play the role of OAuth2 Resource Servers: the applications hosting protected data that a user can access through a third party (Edge Service, in our example).
OAuth2 Resource Servers don’t deal with user authentication. They receive an Access Token in the Authorization header of each HTTP request. Then they verify the signature and authorize the request according to the content of the token. We have already configured Edge Service to send over an Access Token when routing a request downstream. Now you’ll see how to use that token on the receiver side. This section will guide you through securing Catalog Service, built on the imperative Spring stack. The next section will show you how to achieve the same result in Order Service, built on the reactive Spring stack.
12.2.1 Securing Spring Boot as an OAuth2 Resource Server
The first step in securing a Spring Boot application leveraging OAuth2 is to add a dependency on the dedicated Spring Boot starter that includes Spring Security and OAuth2 support for Resource Servers.
In the Catalog Service project (catalog-service), open the build.gradle file, and add the new dependency. Remember to refresh or reimport the Gradle dependencies after the new addition.
Listing 12.6 Adding dependency for Spring Security OAuth2 Resource Server
dependencies {
  ...
  implementation 'org.springframework.boot:
  ➥ spring-boot-starter-oauth2-resource-server'
}
Next, let’s configure the integration between Spring Security and Keycloak.
Configuring the integration between Spring Security and Keycloak
Spring Security supports protecting endpoints using two data formats for the Access Token: JWT and opaque tokens. We’ll work with Access Tokens defined as JWTs, similar to what we did for ID Tokens. With Access Tokens, Keycloak grants Edge Service access to downstream applications on behalf of the user. When the Access Token is a JWT, we can also include relevant information as claims about the authenticated user and propagate this context to Catalog Service and Order Service with ease. In contrast, opaque tokens would require the application downstream to contact Keycloak every time to fetch the information associated with the token.
Configuring Spring Security to integrate with Keycloak as an OAuth2 Resource Server is more straightforward than the OAuth2 Client scenario. When working with JWTs, the application will contact Keycloak mainly to fetch the public keys necessary to verify the token’s signature. Using the issuer-uri property, similar to what we did for Edge Service, we’ll let the application auto-discover the Keycloak endpoint where it can find the public keys.
The default behavior is for the application to fetch the public keys lazily upon the first received HTTP request rather than at startup, both for performance and coupling reasons (you don’t need Keycloak up and running when starting the application). OAuth2 Authorization Servers provide their public keys using the JSON Web Key (JWK) format. The collection of public keys is called a JWK Set. The endpoint where Keycloak exposes its public keys is called the JWK Set URI. Spring Security will automatically rotate the public keys whenever Keycloak makes new ones available.
For each incoming request containing an Access Token in the Authorization header, Spring Security will automatically validate the token’s signature using the public keys provided by Keycloak and decode its claims via a JwtDecoder object, which is auto-configured behind the scenes.
In the Catalog Service project (catalog-service), open the application.yml file, and add the following configuration.
Listing 12.7 Configuring Catalog Service as an OAuth2 Resource Server
spring:
  security:
    oauth2:
      resourceserver:
        jwt:                                     ❶
          issuer-uri:
➥http://localhost:8080/realms/PolarBookshop     ❷
❶ OAuth2 doesn’t enforce a data format for Access Tokens, so we must be explicit about our choice. In this case, we want to use JWT.
❷ The Keycloak URL providing information about all the relevant OAuth2 endpoints for the specific realm
Note Explaining the cryptographic algorithm used to sign the Access Token is out of scope for this book. If you’d like to learn more about cryptography, you might want to look up Real-World Cryptography by David Wong (Manning, 2021).
The integration between Catalog Service and Keycloak is now established. Next you’ll define some basic security policies to protect the application endpoints.
Defining security policies for JWT authentication
For the Catalog Service application, we want to enforce the following security policies:
-
GET requests to fetch books should be allowed without authentication.
-
The application should be configured as an OAuth2 Resource Server and use JWT authentication.
-
The flow for handling JWT authentication should be stateless.
Let’s expand on the last policy. Edge Service triggers the user authentication flow and leverages the web session to store data like ID Tokens and Access Tokens that would otherwise get lost at the end of each HTTP request, forcing a user to authenticate at each request. To make it possible for the application to scale, we used Spring Session to store the web session data in Redis and keep the application stateless.
Unlike Edge Service, Catalog Service only needs an Access Token to authenticate a request. Since the token is always provided in each HTTP request to a protected endpoint, Catalog Service doesn’t need to store any data between requests. We call this strategy stateless authentication or token-based authentication. We use JWTs as Access Tokens, so we can also refer to it as JWT authentication.
Now on to the code. In the Catalog Service project, create a new SecurityConfig class in the com.polarbookshop.catalogservice.config package. Similar to what we did for Edge Service, we can use the DSL provided by HttpSecurity to build a SecurityFilterChain configured with the required security policies.
Listing 12.8 Configuring security policies and JWT authentication
@EnableWebSecurity                                          ❶
public class SecurityConfig {

  @Bean
  SecurityFilterChain filterChain(HttpSecurity http) throws Exception {
    return http
      .authorizeHttpRequests(authorize -> authorize
        .mvcMatchers(HttpMethod.GET, "/", "/books/**")
          .permitAll()                                      ❷
        .anyRequest().authenticated()                       ❸
      )
      .oauth2ResourceServer(
       OAuth2ResourceServerConfigurer::jwt                  ❹
      )
      .sessionManagement(sessionManagement ->               ❺
        sessionManagement
          .sessionCreationPolicy(SessionCreationPolicy.STATELESS))
      .csrf(AbstractHttpConfigurer::disable)                ❻
      .build();
  }
}
❶ Enables Spring MVC support for Spring Security
❷ Allows users to fetch greetings and books without being authenticated
❸ Any other request requires authentication.
❹ Enables OAuth2 Resource Server support using the default configuration based on JWT (JWT authentication)
❺ Each request must include an Access Token, so there’s no need to keep a user session alive between requests. We want it to be stateless.
❻ Since the authentication strategy is stateless and doesn’t involve a browser-based client, we can safely disable the CSRF protection.
Let’s check if it works. First, the Polar UI, Keycloak, Redis, and PostgreSQL containers should be started. Open a Terminal window, navigate to the folder where you keep your Docker Compose configuration (polar-deployment/docker) and run the following:
$ docker-compose up -d polar-ui polar-keycloak polar-redis polar-postgres
Then run both Edge Service and Catalog Service (./gradlew bootRun from each project). Finally, open a browser window, and go to http://localhost:9000.
Ensure you can see the list of books in the catalog without being authenticated, but not add, update, or delete them. Then log in as Isabelle (isabelle/password). She is an employee of the bookshop, so she should be allowed to modify the books in the catalog. Next, log in as Bjorn (bjorn/password). He is a customer, so he shouldn’t be able to change anything in the catalog.
Under the hood, the Angular application fetches the user roles from the /user endpoint exposed by Edge Service and uses them to block pieces of functionality. That improves the user experience, but it’s not secure. The actual endpoints exposed by Catalog Service don’t take roles into account. We need to enforce role-based authorization. That’s the topic of the next section.
12.2.2 Role-based access control with Spring Security and JWT
So far, when talking about authorization, we referred to granting an OAuth2 Client (Edge Service) access to an OAuth2 Resource Server (like Catalog Service) on behalf of the user. Now we’ll move from application authorization to user authorization. What can an authenticated user do in the system?
Spring Security associates each authenticated user with a list of GrantedAuthority objects that model the authorities the user has been granted. Granted authorities can be used to represent fine-grained permissions, roles, or even scopes and come from different sources depending on the authentication strategy. The authorities are available through the Authentication object representing the authenticated user and stored in the SecurityContext.
Since Catalog Service is configured as an OAuth2 Resource Server and uses JWT authentication, Spring Security extracts the list of scopes from the scopes claim of the Access Token and uses them as granted authorities for the given user automatically. Each GrantedAuthority object built in this way will be named with the SCOPE_ prefix and the scope value.
The default behavior is acceptable in many scenarios where scopes are used to model permissions, but it doesn’t fit our case where we rely on user roles to know which privileges each user has. We want to set up a role-based access control (RBAC) strategy using the user roles provided in the roles claim of the Access Token (see figure 12.6). In this section, I’ll show you how to define a custom converter for the Access Token to build a list of GrantedAuthority objects using the values in the roles claim and the ROLE_ prefix. Then we’ll use those authorities to define authorization rules for the endpoints of Catalog Service.
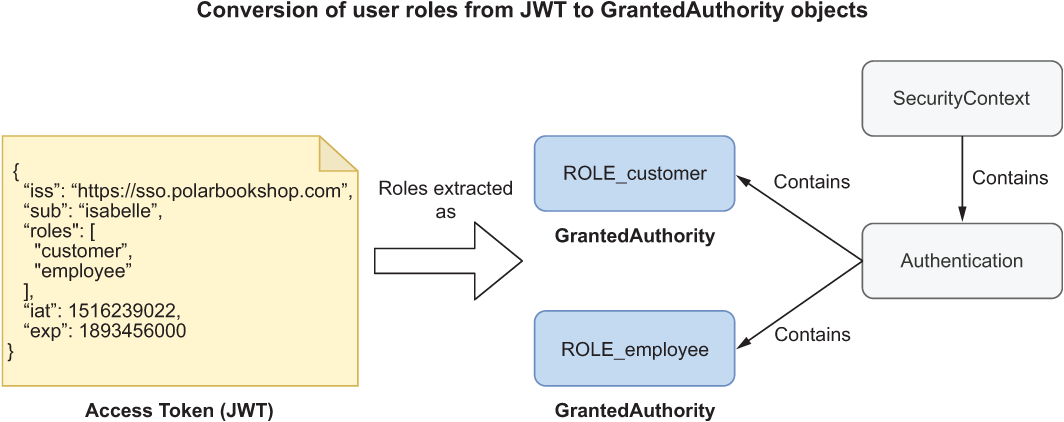
Figure 12.6 How the user roles listed in the Access Token (JWT) are converted into GrantedAuthority objects used by Spring Security for RBAC
Note You might be wondering why we’re using the SCOPE_ or ROLE_ prefix. Since granted authorities can be used to represent different items (roles, scopes, permissions), Spring Security uses prefixes to group them. We’ll rely on this default naming convention for the Polar Bookshop example, but it’s possible to use different prefixes or even no prefixes at all. For more information, refer to the Spring Security documentation (https://spring.io/projects/spring-security).
Extracting user roles from the Access Token
Spring Security provides a JwtAuthenticationConverter class we can use to define a custom strategy to extract information from a JWT. In our case, the JWT is an Access Token, and we want to configure how to build GrantedAuthority objects from the values in the roles claim. In the Catalog Service project (catalog-service), open the SecurityConfig class and define a new JwtAuthenticationConverter bean.
Listing 12.9 Mapping the roles from the JWT to granted authorities
@EnableWebSecurity
public class SecurityConfig {
  ...

  @Bean
  public JwtAuthenticationConverter jwtAuthenticationConverter() {
    var jwtGrantedAuthoritiesConverter =
      new JwtGrantedAuthoritiesConverter();     ❶
    jwtGrantedAuthoritiesConverter
      .setAuthorityPrefix("ROLE_");             ❷
    jwtGrantedAuthoritiesConverter
      .setAuthoritiesClaimName("roles");        ❸

    var jwtAuthenticationConverter =
      new JwtAuthenticationConverter();         ❹
    jwtAuthenticationConverter
      .setJwtGrantedAuthoritiesConverter(jwtGrantedAuthoritiesConverter);
    return jwtAuthenticationConverter;
  }
}
❶ Defines a converter to map claims to GrantedAuthority objects
❷ Applies the “ROLE_” prefix to each user role
❸ Extracts the list of roles from the roles claim
❹ Defines a strategy to convert a JWT. We’ll only customize how to build granted authorities out of it.
With this bean in place, Spring Security will associate a list of GrantedAuthority objects with each authenticated user, and we can use them to define authorization policies.
Defining authorization policies based on user roles
The Catalog Service endpoints should be protected according to the following policies:
-
All GET requests sent to the /,/books or /books/{isbn} endpoints should be allowed, even without authentication.
-
Any other request should require both user authentication and the employee role.
Spring Security provides an expression-based DSL for defining authorization policies. The most generic one is hasAuthority("ROLE_employee"), which you can use to check for any type of authority. In our case, authorities are roles, so we can use the most descriptive hasRole("employee") and drop the prefix (which is added by Spring Security under the hood).
Listing 12.10 Applying RBAC to limit write access to users with the employee role
@EnableWebSecurity
public class SecurityConfig {

  @Bean
  SecurityFilterChain filterChain(HttpSecurity http) throws Exception {
    return http
      .authorizeHttpRequests(authorize -> authorize
        .mvcMatchers(HttpMethod.GET, "/", "/books/**")
          .permitAll()                                    ❶
          .anyRequest().hasRole("employee")               ❷
      )
      .oauth2ResourceServer(OAuth2ResourceServerConfigurer::jwt)
      .sessionManagement(sessionManagement -> sessionManagement
        .sessionCreationPolicy(SessionCreationPolicy.STATELESS))
      .csrf(AbstractHttpConfigurer::disable)
      .build();
  }
  ...
}
❶ Allows users to fetch greetings and books without being authenticated
❷ Any other request requires not only authentication but also the employee role (which is the same as the ROLE_employee authority).
Now you can rebuild and run Catalog Service (./gradlew bootRun) and go through the same flows as before. This time Catalog Service will ensure that only the bookshop employees are allowed to add, update, and delete books.
Finally, stop the running applications (Ctrl-C) and containers (docker-compose down).
Note To learn more about the authorization architecture in Spring Security and the different strategies available for access control, you can refer to chapters 7 and 8 in Spring Security in Action by Laurenţiu Spilcǎ (Manning, 2020), where they are explained in great detail.
Next I’ll guide you through some techniques for testing security in an imperative Spring Boot application configured as an OAuth2 Resource Server.
12.2.3 Testing OAuth2 with Spring Security and Testcontainers
When it comes to security, writing autotests is usually challenging. Fortunately, Spring Security provides us with convenient utilities to verify the security setup in slice tests.
This section will show you how to write slice tests for the web slice using mock Access Tokens and full integration tests relying on an actual Keycloak container run via Testcontainers.
Before starting, we need to add new dependencies on Spring Security Test and Testcontainers Keycloak. Open the build.gradle file for the Catalog Service project (catalog-service), and update it as follows. Remember to refresh or reimport the Gradle dependencies after the new addition.
Listing 12.11 Adding dependencies to test Spring Security and Keycloak
ext {
  ...
  set('testKeycloakVersion', "2.3.0")                     ❶
}

dependencies {
  ...
  testImplementation 'org.springframework.security:spring-security-test'
  testImplementation 'org.testcontainers:junit-jupiter'
  testImplementation "com.github.dasniko:
  ➥ testcontainers-keycloak:${testKeycloakVersion}"      ❷
}
❶ The version of Testcontainers Keycloak
❷ Provides Keycloak testing utilities on top of Testcontainers
Testing secured REST controllers with @WebMvcTest and Spring Security
First, let’s update the BookControllerMvcTests class to cover the new scenarios, depending on the user authentication and authorization. For example, we could write test cases for DELETE operations in these situations:
Delete operations are only allowed to the bookshop employees, so only the first request will return a successful answer.
As part of the OAuth2 Access Token validation, Spring Security relies on the public keys provided by Keycloak to verify the JWT signature. Internally, the framework configures a JwtDecoder bean to decode and verify a JWT using those keys. In the context of a web slice test, we can provide a mock JwtDecoder bean so that Spring Security skips the interaction with Keycloak (which we’ll validate later in a full integration test).
Listing 12.12 Verifying security policies at the web layer with slice tests
@WebMvcTest(BookController.class)
@Import(SecurityConfig.class)                                     ❶
class BookControllerMvcTests {

  @Autowired
  MockMvc mockMvc;

  @MockBean
  JwtDecoder jwtDecoder;                                          ❷

  ...

  @Test
  void whenDeleteBookWithEmployeeRoleThenShouldReturn204()
    throws Exception
  {
    var isbn = "7373731394";
    mockMvc                                                       ❸
      .perform(MockMvcRequestBuilders.delete("/books/" + isbn)
        .with(SecurityMockMvcRequestPostProcessors.jwt()
           .authorities(new SimpleGrantedAuthority("ROLE_employee"))))
      .andExpect(MockMvcResultMatchers.status().isNoContent());
  }

  @Test
  void whenDeleteBookWithCustomerRoleThenShouldReturn403()
    throws Exception
  {
    var isbn = "7373731394";
    mockMvc                                                       ❹
      .perform(MockMvcRequestBuilders.delete("/books/" + isbn)
        .with(SecurityMockMvcRequestPostProcessors.jwt()
          .authorities(new SimpleGrantedAuthority("ROLE_customer"))))
      .andExpect(MockMvcResultMatchers.status().isForbidden());
  }

  @Test
  void whenDeleteBookNotAuthenticatedThenShouldReturn401()
    throws Exception
  {
    var isbn = "7373731394";
    mockMvc
      .perform(MockMvcRequestBuilders.delete("/books/" + isbn))
      .andExpect(MockMvcResultMatchers.status().isUnauthorized());
  }
}
❶ Imports the application’s security configuration
❷ Mocks the JwtDecoder so that the application doesn’t try to call Keycloak and get the public keys for decoding the Access Token
❸ Mutates the HTTP request with a mock JWT-formatted Access Token for a user with the “employee” role
❹ Mutates the HTTP request with a mock JWT-formatted Access Token for a user with the “customer” role
Open a Terminal window, navigate to the Catalog Service root folder, and run the newly added tests as follows:
$ ./gradlew test --tests BookControllerMvcTests
Feel free to add more web slice autotests to cover GET, POST, and PUT requests. For inspiration, you can refer to the source code accompanying the book (Chapter12/ 12-end/catalog-service).
Integration tests with @SpringBootTest, Spring Security, and Testcontainers
The integration tests we wrote in the previous chapters will not work anymore for two reasons. First, all POST, PUT, and DELETE requests will fail because we are not providing any valid OAuth2 Access Token. Even if we were, there is no Keycloak up and running, required by Spring Security to fetch the public keys used to validate the Access Tokens.
You can verify the failure by running the following command from the Catalog Service root folder:
$ ./gradlew test --tests CatalogServiceApplicationTests
We have already seen how to use Testcontainers to write integration tests against data services like a PostgreSQL database, making our tests more reliable and ensuring environment parity. In this section we’ll do the same for Keycloak.
Let’s start by configuring a Keycloak container via Testcontainers. Open the CatalogServiceApplicationTests class and add the following setup.
Listing 12.13 Setup for a Keycloak test container
@SpringBootTest(webEnvironment = SpringBootTest.WebEnvironment.RANDOM_PORT)
@ActiveProfiles("integration")
@Testcontainers                                                  ❶
class CatalogServiceApplicationTests {

  @Autowired
  private WebTestClient webTestClient;

  @Container                                                     ❷
  private static final KeycloakContainer keycloakContainer =
    new KeycloakContainer("quay.io/keycloak/keycloak:19.0")
      .withRealmImportFile("test-realm-config.json");

  @DynamicPropertySource                                         ❸
  static void dynamicProperties(DynamicPropertyRegistry registry) {
    registry.add("spring.security.oauth2.resourceserver.jwt.issuer-uri",
      () -> keycloakContainer.getAuthServerUrl() + "realms/PolarBookshop");
  }

  ...
}
❶ Activates automatic startup and cleanup of test containers
❷ Defines a Keycloak container for testing
❸ Overwrites the Keycloak Issuer URI configuration to point to the test Keycloak instance
The Keycloak test container is initialized via a configuration file I included in the code repository accompanying this book (Chapter12/12-end/catalog-service/src/test/resources/test-realm-config.json). Go ahead and copy it over to the src/test/resources folder of your Catalog Service project (catalog-service).
In production, we would call Catalog Service via Edge Service, which is responsible for authenticating users and relaying Access Tokens to the downstream applications. We now want to test Catalog Service in isolation and verify different authorization scenarios. Therefore, we need to generate some Access Tokens first, so that we can use them to call the Catalog Service endpoints under testing.
The Keycloak configuration I provided in the JSON file includes the definition of a test Client (polar-test) that we can use to authenticate users via a username and password directly, instead of going through the browser-based flow we implemented in Edge Service. In OAuth2, such a flow is called a Password Grant, and it’s not recommended for production use. In the following section, we’ll use it just for testing purposes.
Let’s set up CatalogServiceApplicationTests to authenticate with Keycloak as Isabelle and Bjorn so that we can obtain the Access Tokens we need to call the Catalog Service’s protected endpoints. Keep in mind that Isabelle is both a customer and employee, whereas Bjorn is only a customer.
Listing 12.14 Setup for obtaining test Access Tokens
@SpringBootTest(webEnvironment = SpringBootTest.WebEnvironment.RANDOM_PORT)
@ActiveProfiles("integration")
@Testcontainers
class CatalogServiceApplicationTests {
  private static KeycloakToken bjornTokens;
  private static KeycloakToken isabelleTokens;
  ...

  @BeforeAll
  static void generateAccessTokens() {
    WebClient webClient = WebClient.builder()                   ❶
      .baseUrl(keycloakContainer.getAuthServerUrl()
        + "realms/PolarBookshop/protocol/openid-connect/token")
      .defaultHeader(HttpHeaders.CONTENT_TYPE,
        MediaType.APPLICATION_FORM_URLENCODED_VALUE)
      .build();

      isabelleTokens = authenticateWith(                        ❷
        "isabelle", "password", webClient);
      bjornTokens = authenticateWith(                           ❸
        "bjorn", "password", webClient);
  }

  private static KeycloakToken authenticateWith(
    String username, String password, WebClient webClient
  ) {
    return webClient
      .post()
      .body(                                                    ❹
        BodyInserters.fromFormData("grant_type", "password")
        .with("client_id", "polar-test")
        .with("username", username)
        .with("password", password)
      )
      .retrieve()
      .bodyToMono(KeycloakToken.class)
      .block();                                                 ❺
  }

  private record KeycloakToken(String accessToken) {
    @JsonCreator                                                ❻
    private KeycloakToken(
      @JsonProperty("access_token") final String accessToken
    ) {
      this.accessToken = accessToken;
    }
  }
}
❶ A WebClient used to call Keycloak
❷ Authenticates as Isabelle and obtains an Access Token
❸ Authenticates as Bjorn and obtains an Access Token
❹ Uses the Password Grant flow to authenticate with Keycloak directly
❺ Blocks until a result is available. This is how we use WebClient imperatively rather than reactively.
❻ Instructs Jackson to use this constructor when deserializing JSON into KeycloakToken objects
Finally, we can update the test cases in CatalogServiceApplicationTests to cover several authentication and authorization scenarios. For example, we could write test cases for POST operations in these situations:
-
The user is authenticated and has the employee role (extending the existing test case).
-
The user is authenticated but doesn’t have the employee role (new test case).
Note In the context of an OAuth2 Resource Server, authentication means token authentication. In this case, it happens by providing an Access Token in the Authorization header of each HTTP request.
Create operations are only allowed to the bookshop employees, so only the first request will return a successful answer.
Listing 12.15 Verifying security scenarios in integration tests
@Test
void whenPostRequestThenBookCreated() {
  var expectedBook = Book.of("1231231231", "Title", "Author",
    9.90, "Polarsophia");

  webTestClient.post().uri("/books")
    .headers(headers ->                                     ❶
      headers.setBearerAuth(isabelleTokens.accessToken()))
    .bodyValue(expectedBook)
    .exchange()
    .expectStatus().isCreated()                             ❷
    .expectBody(Book.class).value(actualBook -> {
      assertThat(actualBook).isNotNull();
      assertThat(actualBook.isbn()).isEqualTo(expectedBook.isbn());
    });
}

 @Test
 void whenPostRequestUnauthorizedThen403() {
  var expectedBook = Book.of("1231231231", "Title", "Author",
    9.90, "Polarsophia");

  webTestClient.post().uri("/books")
    .headers(headers ->                                     ❸
      headers.setBearerAuth(bjornTokens.accessToken()))
    .bodyValue(expectedBook)
    .exchange()
    .expectStatus().isForbidden();                          ❹
}

@Test
void whenPostRequestUnauthenticatedThen401() {
  var expectedBook = Book.of("1231231231", "Title", "Author",
    9.90, "Polarsophia");

  webTestClient.post().uri("/books")                        ❺
    .bodyValue(expectedBook)
    .exchange()
    .expectStatus().isUnauthorized();                       ❻
}
❶ Sends a request to add a book to the catalog as an authenticated employee user (Isabelle)
❷ The book has been successfully created (201).
❸ Sends a request to add a book to the catalog as an authenticated customer user (Bjorn)
❹ The book has not been created because the user doesn’t have the correct authorization, no “employee” role (403).
❺ Sends a request to add a book to the catalog as an unauthenticated user
❻ The book has not been created because the user is not authenticated (401).
Open a Terminal window, navigate to the Catalog Service root folder, and run the newly added tests as follows:
$ ./gradlew test --tests CatalogServiceApplicationTests
There are still tests failing. Go ahead and update them by including the right Access Token (Isabelle’s or Bjorn’s) in any POST, PUT, or DELETE request, as you learned in the previous example. When you’re done, rerun the tests and verify that they are all successful. For inspiration, you can refer to the source code accompanying this book (Chapter12/12-end/catalog-service).
12.3 Protecting APIs with Spring Security and OAuth2 (reactive)
Securing reactive Spring Boot applications like Order Service is similar to what we did for Catalog Service. Spring Security provides intuitive and consistent abstractions across the two stacks, which makes it easy to move from one stack to the other.
In this section, I’ll guide you through configuring Order Service as an OAuth2 Resource Server, enabling JWT authentication, and defining security policies for the web endpoints.
12.3.1 Securing Spring Boot as an OAuth2 Resource Server
The Spring Boot starter dependency that includes Spring Security and OAuth2 support for Resource Servers is the same for both imperative and reactive applications. In the Order Service project (order-service), open the build.gradle file, and add the new dependency. Remember to refresh or reimport the Gradle dependencies after the new addition.
Listing 12.16 Adding dependency for Spring Security OAuth2 Resource Server
dependencies {
  ...
  implementation 'org.springframework.boot:
  ➥ spring-boot-starter-oauth2-resource-server'
}
Next we’ll configure the integration between Spring Security and Keycloak.
Configuring the integration between Spring Security and Keycloak
The strategy for integrating Spring Security with Keycloak will be similar to what we did in Catalog Service. Open the Order Service project (order-service), and update the application.yml file with the following configuration.
Listing 12.17 Configuring Order Service as an OAuth2 Resource Server
spring:
  security:
    oauth2:
      resourceserver:
        jwt:                                     ❶
          issuer-uri:
➥http://localhost:8080/realms/PolarBookshop     ❷
❶ OAuth2 doesn’t enforce a data format for Access Tokens, so we must be explicit about our choice. In this case, we want to use JWT.
❷ The Keycloak URL providing information about all the relevant OAuth2 endpoints for the specific realm
The integration between Order Service and Keycloak is now established. Next we’ll define the necessary security policies to protect the application endpoints.
Defining security policies for JWT authentication
For the Order Service application, we want to enforce the following security policies:
-
The application should be configured as an OAuth2 Resource Server and use JWT authentication.
-
The flow for handling JWT authentication should be stateless.
There are two main differences here from what we did in Catalog Service:
-
The reactive syntax is slightly different from its imperative counterpart, especially the part for enforcing JWT authentication (stateless).
-
We’re not extracting user roles from the Access Token because the endpoints don’t have special requirements depending on user roles.
In the Order Service project, create a SecurityConfig class in a new com.polarbookshop.orderservice.config package. Then use the DSL provided by ServerHttpSecurity to build a SecurityWebFilterChain configured with the required security policies.
Listing 12.18 Configuring security policies and JWT authentication for Order Service
@EnableWebFluxSecurity                                           ❶
public class SecurityConfig {

  @Bean
  SecurityWebFilterChain filterChain(ServerHttpSecurity http) {
    return http
      .authorizeExchange(exchange -> exchange
        .anyExchange().authenticated()                           ❷
      )
      .oauth2ResourceServer(                                     ❸
        ServerHttpSecurity.OAuth2ResourceServerSpec::jwt)
      .requestCache(requestCacheSpec ->                          ❹
        requestCacheSpec.requestCache(NoOpServerRequestCache.getInstance()))
      .csrf(ServerHttpSecurity.CsrfSpec::disable)                ❺
      .build();
  }
}
❶ Enables Spring WebFlux support for Spring Security
❷ All requests require authentication.
❸ Enables OAuth2 Resource Server support using the default configuration based on JWT (JWT authentication)
❹ Each request must include an Access Token, so there’s no need to keep a session cache alive between requests. We want it to be stateless.
❺ Since the authentication strategy is stateless and doesn’t involve a browser-based client, we can safely disable the CSRF protection.
Let’s check if this works. First, we need to run the backing services (Polar UI, Keycloak, Redis, RabbitMQ, and PostgreSQL). Open a Terminal window, navigate to the folder where you keep your Docker Compose configuration (polar-deployment/docker) and run the following:
$ docker-compose up -d polar-ui polar-keycloak polar-redis
    polar-rabbitmq polar-postgres
Then run Edge Service, Catalog Service, and Order Service on the JVM (./gradlew bootRun from each project). Finally, open a browser window, and go to http://localhost:9000.
Since Order Service doesn’t have particular requirements depending on the user’s role, you can log in with either Isabelle (isabelle/password) or Bjorn (bjorn/password). Then pick a book from the catalog, and submit an order for it. Since you’re authenticated, you’re allowed to create an order. When you’re done, you can visit the Orders page to check all the submitted orders.
“Wait a second! What do you mean, all the submitted orders?” I’m glad you asked. At the moment, each person can see the orders submitted by all users. Don’t worry! Later in the chapter, we’ll fix that.
Before we do, though, we need to discuss how to test the new Order Service security policies. Stop the running applications (Ctrl-C) and containers (docker-compose down). The next section will show you how to test security in a reactive application.
12.3.2 Testing OAuth2 with Spring Security and Testcontainers
Testing secured reactive Spring Boot applications is similar to testing imperative applications. Before starting, we need to add new dependencies on Spring Security Test and Testcontainers Keycloak. The dependency adding JUnit5 support for Testcontainers is already there. Open the build.gradle file and update it as follows. Remember to refresh and reimport the Gradle dependencies after the new addition.
Listing 12.19 Adding dependencies to test Spring Security and Keycloak
ext {
  ...
  set('testKeycloakVersion', "2.3.0")                       ❶
}

dependencies {
  ...
  testImplementation 'org.springframework.security:spring-security-test'
  testImplementation 'org.testcontainers:junit-jupiter'
  testImplementation "com.github.dasniko:
  ➥ testcontainers-keycloak:${testKeycloakVersion}"        ❷
}
❶ The version of Testcontainers Keycloak
❷ Provides Keycloak testing utilities on top of Testcontainers
We can implement full integration tests using @SpringBootTest and Testcontainers Keycloak. Since the setup is the same as for Catalog Service, I won’t cover those tests here, but you can find them in the repository accompanying the book (Chapter12/12-end/order-service/src/test). Make sure you update those integration tests, or the application build will fail.
In this section, we’ll test the web slice of a reactive application when the endpoints are secured, much like we did for Catalog Service.
Testing secured REST controllers with @WebFluxTest and Spring Security
We have already written autotests in OrderControllerWebFluxTests for the web slice using @WebFluxTest. Let’s see now how to update them to take security into account.
As part of the OAuth2 Access Token validation, Spring Security relies on the public keys provided by Keycloak to verify the JWT signature. Internally, the framework configures a ReactiveJwtDecoder bean to decode and verify a JWT using those keys. In the context of a web slice test, we can provide a mock ReactiveJwtDecoder bean so that Spring Security skips the interaction with Keycloak (which will be validated by full integration tests).
Listing 12.20 Verifying security policies at the web layer with slice tests
@WebFluxTest(OrderController.class)
@Import(SecurityConfig.class)                               ❶
class OrderControllerWebFluxTests {

  @Autowired
  WebTestClient webClient;

  @MockBean
  OrderService orderService;

  @MockBean
  ReactiveJwtDecoder reactiveJwtDecoder;                    ❷

  @Test
  void whenBookNotAvailableThenRejectOrder() {
    var orderRequest = new OrderRequest("1234567890", 3);
    var expectedOrder = OrderService.buildRejectedOrder(
     orderRequest.isbn(), orderRequest.quantity());
    given(orderService.submitOrder(
     orderRequest.isbn(), orderRequest.quantity()))
        .willReturn(Mono.just(expectedOrder));

    webClient
      .mutateWith(SecurityMockServerConfigurers
        .mockJwt()                                          ❸
        .authorities(new SimpleGrantedAuthority("ROLE_customer")))
      .post()
      .uri("/orders/")
      .bodyValue(orderRequest)
      .exchange()
      .expectStatus().is2xxSuccessful()
      .expectBody(Order.class).value(actualOrder -> {
        assertThat(actualOrder).isNotNull();
        assertThat(actualOrder.status()).isEqualTo(OrderStatus.REJECTED);
      });
   }
}
❶ Imports the application security configuration
❷ Mocks the ReactiveJwtDecoder so that the application doesn’t try to call Keycloak and get the public key for decoding the Access Token
❸ Mutates the HTTP request with a mock, JWT-formatted Access Token for a user with the “customer” role
Open a Terminal window, navigate to the Order Service root folder, and run the newly added tests as follows:
$ ./gradlew test --tests OrderControllerWebFluxTests
As always, you can find more test examples in the source code repository accompanying this book (Chapter12/12-end/order-service).
12.4 Protecting and auditing data with Spring Security and Spring Data
So far, we’ve looked at securing the APIs exposed by Spring Boot applications and handling concerns like authentication and authorization. What about data? Once you have Spring Security in place, you can also secure the business and data layers.
Regarding the business logic, you can enable the method security feature to check for user authentication or authorization directly on business methods, leveraging annotations like @PreAuthorize. In the Polar Bookshop system, the business layer is not complex enough to require additional security policies, so I won’t describe that.
Note To learn more about how to use method authentication and authorization, refer to chapter 8 of Spring Security in Action by Laurenţiu Spilcǎ (Manning, 2020), where those topics are explained in great detail.
On the other hand, the data layer requires some extra work to address two main concerns:
-
How can we tell which users created what data? Who changed it last?
-
How can we ensure that each user can only access their own book orders?
This section will address both concerns. First I’ll explain how to enable auditing for users’ actions on data in both Catalog Service and Order Service. Then I’ll walk you through the changes required by Order Service to keep the data private.
12.4.1 Auditing data with Spring Security and Spring Data JDBC
Let’s start by considering Catalog Service, where the data layer is implemented with Spring Data JDBC. In chapter 5, you learned how to enable JDBC data auditing, and you configured it to save both the creation date and last modified date for each data entity. Building on top of that, we can now extend the audit scope to include the usernames of the person who created the entity and the person who modified it last.
First we need to tell Spring Data where to get the information about the currently authenticated user. In the previous chapter, you learned that Spring Security stores information about authenticated users in an Authentication object, which is stored in a SecurityContext object available through the SecurityContextHolder. We can use that object hierarchy to specify how to extract the principal for Spring Data.
Defining an auditor to capture who created or updated a JDBC data entity
In the Catalog Service project (catalog-service), open the DataConfig class. That’s where we used the @EnableJdbcAuditing annotation to enable data auditing. Now, we’ll also define an AuditorAware bean that should return the principal—the currently authenticated user.
Listing 12.21 Configuring user auditing in Spring Data JDBC
@Configuration
@EnableJdbcAuditing                                      ❶
public class DataConfig {

  @Bean
  AuditorAware<String> auditorAware() {                  ❷
    return () -> Optional
      .ofNullable(SecurityContextHolder.getContext())    ❸
      .map(SecurityContext::getAuthentication)           ❹
      .filter(Authentication::isAuthenticated)           ❺
      .map(Authentication::getName);                     ❻
  }
}
❶ Enables entity auditing in Spring Data JDBC
❷ Returns the currently authenticated user for auditing purposes
❸ Extracts the SecurityContext object for the currently authenticated user from SecurityContextHolder
❹ Extracts the Authentication object for the currently authenticated user from SecurityContext
❺ Handles the case where a user is not authenticated, but is manipulating data. Since we protected all the endpoints, this case should never happen, but we’ll include it for completeness.
❻ Extracts the username for the currently authenticated user from the Authentication object
Adding audit metadata for users who created or updated a JDBC data entity
When an AuditorAware bean is defined and auditing is enabled, Spring Data will use it to extract the principal. In our case, it’s the username of the currently authenticated user, represented as a String. Then we can use @CreatedBy and @LastModifiedBy to annotate two new fields in the Book record. They will be populated by Spring Data automatically whenever a create or update operation is performed on the entity.
Listing 12.22 Fields to capture user audit metadata in a JDBC entity
public record Book (
  ...

  @CreatedBy              ❶
  String createdBy,

  @LastModifiedBy         ❷
  String lastModifiedBy,

){
  public static Book of(String isbn, String title, String author,
    Double price, String publisher
  ) {
    return new Book(null, isbn, title, author, price, publisher,
      null, null, null, null, 0);
  }
}
❷ Who modified the entity the last time
After adding the new fields, we need to update a few classes using the Book all-args constructor, which now requires passing values for createdBy and lastModifiedBy.
The BookService class contains the logic for updating books. Open it and change the editBookDetails() method to ensure the audit metadata is correctly passed along when calling the data layer.
Listing 12.23 Including the existing audit metadata when updating a book
@Service
public class BookService {
  ...

  public Book editBookDetails(String isbn, Book book) {
    return bookRepository.findByIsbn(isbn)
      .map(existingBook -> {
        var bookToUpdate = new Book(
          existingBook.id(),
          existingBook.isbn(),
          book.title(),
          book.author(),
          book.price(),
          book.publisher(),
          existingBook.createdDate(),
          existingBook.lastModifiedDate(),
          existingBook.createdBy(),           ❶
          existingBook.lastModifiedBy(),      ❷
          existingBook.version());
          return bookRepository.save(bookToUpdate);
      })
      .orElseGet(() -> addBookToCatalog(book));
  }
}I’ll leave it to you to update the autotests in a similar way. You can also extend the tests in BookJsonTests to verify the serialization and deserialization of the new fields. As a reference, you can check Chapter12/12-end/catalog-service in the code repository accompanying this book. Make sure you update the tests that use the Book() constructor, or else the application build will fail.
Writing a Flyway migration to add the new audit metadata to the schema
Since we changed the entity model, we need to update the database schema accordingly. Let’s assume that Catalog Service is already in production, so we need a Flyway migration to update the schema in the next release. In chapter 5, we introduced Flyway to add version control to our databases. Each change to a schema must be registered as a migration, ensuring robust schema evolution and reproducibility.
Any change to a database schema should also be backward compatible to support common deployment strategies for cloud native applications, like rolling upgrades, blue/green deployments, or canary releases (a subject we’ll cover in chapter 15). In this case, we need to add new columns to the book table. As long as we don’t make them mandatory, the change will be backward compatible. After we change the schema, any running instance of the previous release of Catalog Service will continue to work without errors, simply ignoring the new columns.
In the src/main/resources/db/migration folder for the Catalog Service project, create a new V3__Add_user_audit.sql migration script to add two new columns to the book table. Ensure you type two underscores after the version number.
Listing 12.24 Adding new audit metadata to the book table
ALTER TABLE book
  ADD COLUMN created_by varchar(255);          ❶
ALTER TABLE book
  ADD COLUMN last_modified_by varchar(255);    ❷
❶ Add a column to hold the username of who created the row.
❷ Add a column to hold the username of who last updated the row.
During the application’s startup, Flyway will automatically go through all the migration scripts and apply those not yet applied.
The tradeoff of enforcing backward-compatible changes is that we now have to treat as optional two fields that we need to have always filled in, and that may possibly fail validation if they’re not. That is a common problem that can be solved over two subsequent releases of the application:
-
In the first release, you add the new columns as optional and implement a data migration to fill in the new columns for all the existing data. For Catalog Service, you could use a conventional value to represent that we don’t know who created or updated the entity, such as unknown or anonymous.
-
In the second release, you can create a new migration to update the schema safely and make the new columns required.
I’ll leave that up to you if you’d like to do that. If you’re interested in implementing data migrations, I recommend that you check out Flyway’s official documentation (https://flywaydb.org).
In the next section, you’ll see how to test user-related auditing in Spring Data JDBC.
12.4.2 Testing data auditing with Spring Data and @WithMockUser
When we test security at the data layer, we’re not interested in which authentication strategy has been adopted. The only thing we need is to know whether the operation is performed in the context of an authenticated request.
The Spring Security Test project provides us with a handy @WithMockUser annotation we can use on test cases to make them run in an authenticated context. You can also add information about the mock user. Since we’re testing auditing, we want to define at least a username that can be used as the principal.
Let’s extend the BookRepositoryJdbcTests class with new test cases covering data auditing for users.
Listing 12.25 Testing data auditing when users are authenticated or not
@DataJdbcTest
@Import(DataConfig.class)
@AutoConfigureTestDatabase(replace = AutoConfigureTestDatabase.Replace.NONE)
@ActiveProfiles("integration")
class BookRepositoryJdbcTests {

  ...

  @Test                                                       ❶
  void whenCreateBookNotAuthenticatedThenNoAuditMetadata() {
    var bookToCreate = Book.of("1232343456", "Title",
      "Author", 12.90, "Polarsophia");
    var createdBook = bookRepository.save(bookToCreate);

    assertThat(createdBook.createdBy()).isNull();             ❷
    assertThat(createdBook.lastModifiedBy()).isNull();
  }

  @Test
  @WithMockUser("john")                                       ❸
  void whenCreateBookAuthenticatedThenAuditMetadata() {
    var bookToCreate = Book.of("1232343457", "Title",
      "Author", 12.90, "Polarsophia");
    var createdBook = bookRepository.save(bookToCreate);

    assertThat(createdBook.createdBy())
      .isEqualTo("john");                                     ❹
    assertThat(createdBook.lastModifiedBy())
      .isEqualTo("john");
  }
}
❶ This test case is executed in an unauthenticated context.
❷ No audit data when there is no authenticated user
❸ This test case is executed in an authenticated context for the user “john.”
❹ Audit data when there is an authenticated user
Open a Terminal window, navigate to the Catalog Service root folder, and run the newly added tests as follows:
$ ./gradlew test --tests BookRepositoryJdbcTests
If you experience any failures, it might be because you haven’t updated the test cases where the Book() constructor is used. We have added new fields to the domain model, so remember to update those test cases as well.
12.4.3 Protecting user data with Spring Security and Spring Data R2DBC
Similar to what we did in Catalog Service, this section will show you how to add data auditing for users in Order Service. Thanks to the abstractions provided by Spring Data and Spring Security, the implementation will not be much different, even though we’re using Spring Data R2DBC and reactive Spring.
Besides data auditing, Order Service has one additional critical requirement. Users should be able to access only their own orders. We need to ensure the privacy of all that data. This section will also walk you through the changes necessary to accomplish that result.
Defining an auditor to capture who created or updated an R2DBC data entity
Even in this case, we need to tell Spring Data where to get the information about the currently authenticated user. Since it’s a reactive application, this time we’ll get the SecurityContext object for the principal from the ReactiveSecurityContextHolder.
In the Order Service project (order-service), open the DataConfig class and add a ReactiveAuditorAware bean to return the username of the currently authenticated user.
Listing 12.26 Configuring user auditing in Spring Data R2DBC
@Configuration
@EnableR2dbcAuditing                                  ❶
public class DataConfig {

  @Bean
  ReactiveAuditorAware<String> auditorAware() {       ❷
    return () ->
      ReactiveSecurityContextHolder.getContext()      ❸
        .map(SecurityContext::getAuthentication)      ❹
        .filter(Authentication::isAuthenticated)      ❺
        .map(Authentication::getName);                ❻
  }
}
❶ Enables entity auditing in Spring Data R2DBC
❷ Returns the currently authenticated user for auditing purposes
❸ Extracts the SecurityContext object for the currently authenticated user from ReactiveSecurityContextHolder
❹ Extracts the Authentication object for the currently authenticated user from SecurityContext
❺ Handles the case where a user is not authenticated, but it is manipulating data. Since we protected all the endpoints, this case should never happen, but we’ll include it for completeness.
❻ Extracts the username of the currently authenticated user from the Authentication object
Adding audit metadata for users who created or updated an R2DBC data entity
When a ReactiveAuditorAware bean is defined and auditing is enabled, Spring Data will use it to extract the username of the currently authenticated user represented as a String. Even in this case, we can use @CreatedBy and @LastModifiedBy to annotate two new fields in the Order record. They will be populated by Spring Data automatically whenever a create or update operation is performed on the entity.
Listing 12.27 Fields to capture user audit metadata in an R2DBC entity
@Table("orders")
public record Order (
  ...

  @CreatedBy               ❶
  String createdBy,

  @LastModifiedBy          ❷
  String lastModifiedBy,

){
  public static Order of(String bookIsbn, String bookName,
    Double bookPrice, Integer quantity, OrderStatus status
  ) {
    return new Order(null, bookIsbn, bookName, bookPrice, quantity, status,
      null, null, null, null, 0);
  }
}❷ Who modified the entity the last time
After adding the new fields, we need to update a few classes using the Order all-args constructor, which now requires you to pass values for createdBy and lastModifiedBy.
The OrderService class contains the logic for updating dispatched orders. Open it and change the buildDispatchedOrder() method to ensure the audit metadata is correctly passed along when calling the data layer.
Listing 12.28 Including the existing audit metadata when updating an order
@Service
public class OrderService {
  ...

  private Order buildDispatchedOrder(Order existingOrder) {
    return new Order(
      existingOrder.id(),
      existingOrder.bookIsbn(),
      existingOrder.bookName(),
      existingOrder.bookPrice(),
      existingOrder.quantity(),
      OrderStatus.DISPATCHED,
      existingOrder.createdDate(),
      existingOrder.lastModifiedDate(),
      existingOrder.createdBy(),         ❶
      existingOrder.lastModifiedBy(),    ❷
      existingOrder.version()
    );
  }
}I’ll leave it to you to update the autotests in a similar way. You can also extend the tests in OrderJsonTests to verify the serialization of the new fields. As a reference, you can check Chapter12/12-end/order-service in the code repository accompanying this book. Ensure that you update the tests using the Order() constructor, or the application build will fail.
Writing a Flyway migration to add the new audit metadata to the schema
Similar to what we did for Catalog Service, we need to write a migration to update the database schema with the two new fields hosting the usernames of who created an entity and who modified it last.
In the src/main/resources/db/migration folder for the Order Service project, create a new V2__Add_user_audit.sql migration script to add two new columns to the orders table. Ensure you type two underscores after the version number.
Listing 12.29 Adding new audit metadata to the orders table
ALTER TABLE orders
  ADD COLUMN created_by varchar(255);        ❶
ALTER TABLE orders
  ADD COLUMN last_modified_by varchar(255);  ❷
❶ Add a column for the username of who created the row.
❷ Add a column for the username of who last updated the row.
There’s one last requirement we haven’t covered yet: ensuring that order data is only accessed by the users who created the orders. No user should be able to see the orders from another person.
There are a few different solutions for implementing this requirement in Spring. We’ll follow these steps:
-
Add a custom query to OrderRepository to filter orders based on the user who created them.
-
Update OrderService to use the new query instead of the default findAll().
-
Update OrderController to extract the username of the currently authenticated user from the security context and pass it to OrderService when asking for orders.
Warning We’ll rely on a specific solution that ensures each user can only access their own orders via the /orders endpoint. However, this won’t prevent developers from using the other methods exposed by OrderRepository in the future and leaking private data. If you’d like to know how to improve this solution, refer to chapter 17 of Spring Security in Action by Laurențiu Spilcă (Manning, 2020).
Let’s start with OrderRepository. Using the conventions you learned in chapter 5, define a method to find all orders created by the specified user. Spring Data will generate an implementation for it at runtime.
Listing 12.30 Defining a method returning orders created by a user
public interface OrderRepository
  extends ReactiveCrudRepository<Order,Long>
{
  Flux<Order> findAllByCreatedBy(String userId);     ❶
}
❶ Custom method to query only the orders created by the given user
Next we need to update the getAllOrders() method in OrderService to accept a username as input and use the new query method provided by OrderRepository.
Listing 12.31 Returning orders only for the specified user
@Service
public class OrderService {
  private final OrderRepository orderRepository;

  public Flux<Order> getAllOrders(String userId) {       ❶
    return orderRepository.findAllByCreatedBy(userId);
  }

  ...
}
❶ When requesting all orders, the response includes only those belonging to the given user.
Finally, let’s update the getAllOrders() method in OrderController. As you learned in the previous chapter, you can autowire an object representing the currently authenticated user through the @AuthenticationPrincipal annotation. In Edge Service, the object was of type OidcUser because it’s based on OpenID Connect authentication. Since Order Service is configured with JWT authentication, the principal will be of type Jwt. We can use the JWT (an Access Token) to read the sub claim containing the username for which the Access Token was generated (the subject).
Listing 12.32 Getting the username and returning only orders created by them
@RestController
@RequestMapping("orders")
public class OrderController {
  private final OrderService orderService;

  @GetMapping
  public Flux<Order> getAllOrders(
    @AuthenticationPrincipal Jwt jwt                       ❶
  ) {
    return orderService.getAllOrders(jwt.getSubject());    ❷
  }

  ...
}
❶ Autowires the JWT representing the currently authenticated user
❷ Extracts the subject of the JWT and uses it as the user identifier
That’s it for Order Service. In the next section, you’ll write some autotests to verify the data auditing and protection requirements.
12.4.4 Testing data auditing and protection with @WithMockUser and Spring Data R2DBC
In the previous section we configured data auditing for users and enforced a policy to return only the orders for the currently authenticated user. This section will show you how to test the data auditing as a slice test. To verify the data protection requirement, you can refer to the repository accompanying the book and check how it’s been covered by the integration tests in the OrderServiceApplicationTests class (Chapter12/12-end/order-service/src/test/java).
Data auditing is applied at the repository level. We can extend the OrderRepositoryR2dbcTests class with extra test cases covering the scenario where the user is authenticated and when it is not.
Similar to what we did in Catalog Service, we can use the @WithMockUser annotation from Spring Security to execute a test method in an authenticated context, relying on a mock user representation.
Listing 12.33 Testing data auditing when users are authenticated or not
@DataR2dbcTest
@Import(DataConfig.class)
@Testcontainers
class OrderRepositoryR2dbcTests {
  ...

  @Test
  void whenCreateOrderNotAuthenticatedThenNoAuditMetadata() {
    var rejectedOrder = OrderService.buildRejectedOrder( "1234567890", 3);
    StepVerifier.create(orderRepository.save(rejectedOrder))
      .expectNextMatches(order -> Objects.isNull(order.createdBy()) &&
        Objects.isNull(order.lastModifiedBy()))                           ❶
      .verifyComplete();
  }

  @Test
  @WithMockUser("marlena")
  void whenCreateOrderAuthenticatedThenAuditMetadata() {
    var rejectedOrder = OrderService.buildRejectedOrder( "1234567890", 3);
    StepVerifier.create(orderRepository.save(rejectedOrder))
      .expectNextMatches(order -> order.createdBy().equals("marlena") &&
        order.lastModifiedBy().equals("marlena"))                         ❷
      .verifyComplete();
  }
}
❶ When the user is not authenticated, no audit metadata is saved.
❷ When the user is authenticated, the information about who created or updated the entity is correctly included in the data.
Open a Terminal window, navigate to the Catalog Service root folder, and run the newly added tests as follows:
$ ./gradlew test --tests OrderRepositoryR2dbcTests
If you experience any failures, it might be because you haven’t updated the test cases where the Order() constructor is used. We have added new fields to the domain model, so remember to update those test cases as well.
That concludes our discussion of authentication, authorization, and auditing for both imperative and reactive cloud native applications using Spring Boot, Spring Security, Spring Data, and Keycloak.
Summary
-
In an OIDC/OAuth2 setup, the Client (Edge Service) is granted access to a Resource Server (Catalog Service and Order Service) on behalf of the user through an Access Token.
-
Spring Cloud Gateway provides a TokenRelay filter to add the Access Token to any request routed downstream automatically.
-
Following the JWT format, ID Tokens and Access Tokens can propagate relevant information as claims about the authenticated user. For example, you can add a roles claim and configure Spring Security with authorization policies depending on the user role.
-
Spring Boot applications can be configured as OAuth2 Resource Servers using Spring Security.
-
In an OAuth2 Resource Server, the strategy for authenticating users is entirely based on a valid Access Token provided in the Authorization header of each request. We call it JWT authentication.
-
In an OAuth2 Resource Server, security policies are still enforced through a SecurityFilterChain (imperative) or SecurityWebFilterChain (reactive) bean.
-
Spring Security represents permissions, roles, and scopes as GrantedAuthority objects.
-
You can provide a custom JwtAuthenticationConverter bean to define how to extract granted authorities from a JWT, for example, using the roles claim.
-
Granted authorities can be used to adopt an RBAC strategy and protect endpoints, depending on the user role.
-
The Spring Data libraries support auditing to track who created an entity and who updated it last. You can enable this feature in both Spring Data JDBC and Spring Data R2DBC by configuring an AuditorAware (or ReactiveAuditorAware) bean to return the username of the currently authenticated user.
-
When data auditing is enabled, you can use the @CreatedBy and @LastModifiedBy annotations to automatically inject the right values when a create or update operation occurs.
-
Testing security is challenging, but Spring Security provides convenient utilities to make that easier, including expressions that mutate HTTP requests to include a JWT Access Token (.with(jwt()) or .mutateWith(mockJwt())) or to run a test case in a specific security context for a given user (@WithMockUser).
-
Testcontainers can help write full integration tests by using an actual Keycloak container to verify the interactions with Spring Security.