
16 Serverless, GraalVM, and Knative
- Producing native images with Spring Native and GraalVM
- Building serverless applications with Spring Cloud Function
- Deploying serverless applications with Knative and Kubernetes
In the previous chapter, you completed a long journey from development to production. You’ve built cloud native applications using Spring and deployed them on a Kubernetes cluster in a public cloud. This final chapter aims to provide you with some additional tools to get even more out of your cloud native applications.
One significant benefit of cloud infrastructures is that you can increase or reduce resources on demand and pay only for what you use. Java applications have traditionally been very resource-intensive, resulting in higher CPU and memory consumption than other stacks like Go. Not anymore. Using GraalVM and Spring Native, you can compile your Spring Boot applications to native executables, which are more performant and efficient than their JVM counterparts. The first part of this chapter will guide you through taking advantage of this new technology.
The second part of the chapter will expand on serverless architectures. Compared to CaaS and PaaS infrastructures, serverless architectures move most operational tasks to the platform and let developers focus on the applications. Some applications are naturally event-driven and aren’t always busy processing requests. Or they might have sudden peaks that require more computational resources. Serverless platforms provide fully managed auto-scaling features and can scale application instances to zero so that you don’t have to pay anything if there’s nothing to process. You’ll learn more about the serverless model, and you’ll build a serverless application using Spring Native and Spring Cloud Function. Finally, you’ll see how to deploy applications using Knative, a Kubernetes-based serverless platform.
Note The source code for the examples in this chapter is available in the Chapter16/16-begin and Chapter16/16-end folders, containing the initial and final states of the project (https://github.com/ThomasVitale/cloud-native-spring-in-action).
16.1 Native images with Spring Native and GraalVM
One of the reasons why Java applications became widely popular was the common platform (the Java Runtime Environment, or JRE), allowing developers to “write them once, run them everywhere,” no matter the operating system. That comes from the way applications are compiled. Rather than compiling the application code directly into machine code (the code understood by operating systems), the Java compiler produces bytecode that a dedicated component (the Java Virtual Machine, or JVM) runs. During execution, the JRE interprets the bytecode into machine code dynamically, allowing the same application executable to run on any machine and OS where a JVM is available. This is called a just-in-time (JIT) compilation.
Applications running on the JVM are subject to startup and footprint costs. The startup phase used to be quite long for traditional applications, for which it could even take several minutes. Standard cloud native applications have a much faster startup phase: a few seconds rather than a few minutes. This is good enough for most scenarios, but it can become a serious issue for serverless workloads that are required to start almost instantaneously.
Standard Java applications also have a higher footprint cost than other stacks like Go. Cloud services are usually based on a pay-per-use model, so reducing CPU and memory footprint means cutting down costs. This section will show you how to address this issue using GraalVM and Spring Native.
16.1.1 Understanding GraalVM and native images
So far, you’ve used the JVM and tools provided by OpenJDK, which comes in many distributions, such as Eclipse Adoptium (previously known as AdoptOpenJDK), BellSoft Liberica JDK, and Microsoft OpenJDK. GraalVM is a newer distribution from Oracle based on OpenJDK and is “designed to accelerate the execution of applications written in Java and other JVM languages” (www.graalvm.org).
By replacing a standard OpenJDK distribution with GraalVM as the runtime environment for your Java applications, you can increase their performance and efficiency, thanks to a new optimized technology for performing JIT compilation (the GraalVM compiler). GraalVM also provides runtimes to execute code written in other languages like JavaScript, Python, and R. You can even write polyglot applications, including Python scripts in your Java code, for example.
GraalVM offers two primary operational modes. The JVM Runtime mode lets you run your Java applications like any other OpenJDK distribution while improving performance and efficiency thanks to the GraalVM compiler. What makes GraalVM so innovative and popular in the serverless context is the Native Image mode. Rather than compiling your Java code into bytecode and relying on a JVM to interpret it and convert it to machine code, GraalVM offers a new technology (the Native Image builder) that compiles Java applications directly into machine code, obtaining a native executable or native image that contains the whole machine code necessary for its execution.
Java applications compiled as native images have faster startup times, optimized memory consumption, and instant peak performance compared to the JVM options. GraalVM builds them by changing the way applications are compiled. Instead of a JIT-compiler optimizing and producing machine code at runtime, the Native Image mode is based on Ahead-Of-Time (AOT) compilation. Starting from the main() method, all classes and methods that are reachable during the application’s execution are statically analyzed at build time and compiled into a standalone binary executable, including any dependencies and libraries. Such an executable doesn’t run on a JVM but directly on the machine, just like C or C++ applications.
When using native images, much of the work that used to be performed at runtime by the JVM is now done at build time. As a result, building an application into a native executable takes longer and requires more computational resources than the JVM option. The GraalVM AOT compiler does not support some Java features out of the box. For example, reflection, dynamic proxies, serialization, and dynamic class loading require extra configuration to help the AOT compiler understand how to analyze them statically.
How can we adapt existing Java applications to run as native images? How much configuration is required to support frameworks and libraries? How can we provide the necessary configuration for the AOT compiler? That’s where Spring Native enters the scene.
16.1.2 Introducing GraalVM support for Spring Boot with Spring Native
Spring Native is a new project introduced to support compiling Spring Boot applications with GraalVM. The main goal of Spring Native is to make it possible to compile any Spring application into a native executable using GraalVM without any code changes. To achieve that goal, the project provides an AOT infrastructure (invoked from a dedicated Gradle/Maven plugin) that contributes all the required configurations for GraalVM to AOT-compile Spring classes. The project is one of the latest additions to the Spring portfolio and it’s currently in beta. At the time of writing, most Spring libraries are supported, as well as common libraries like Hibernate, Lombok, and gRPC.
For Spring libraries not yet supported, or for your own code, Spring Native offers helpful tools for configuring the GraalVM compiler. For example, if you use reflection or dynamic proxies in your code, GraalVM will require a dedicated configuration to know how to AOT-compile it. Spring Native offers convenient annotations like @NativeHints and @TypedHint to instruct the GraalVM compiler directly from your Java code, taking advantage of the IDE auto-completion features and type checks.
Note Spring Native will come out of the beta phase and become part of the core Spring libraries starting with Spring Framework 6 and Spring Boot 3, which are expected to be released in December 2022.
In this section, we’ll explore the features of Spring Native by building Quote Service, a web application that exposes an API to fetch quotes from books.
Bootstrapping a new project with Spring Native and Spring Reactive Web
You can initialize the Quote Service project from Spring Initializr (https://start.spring.io), store the result in a new quote-service Git repository, and push it to GitHub. The parameters for the initialization are shown in figure 16.1.
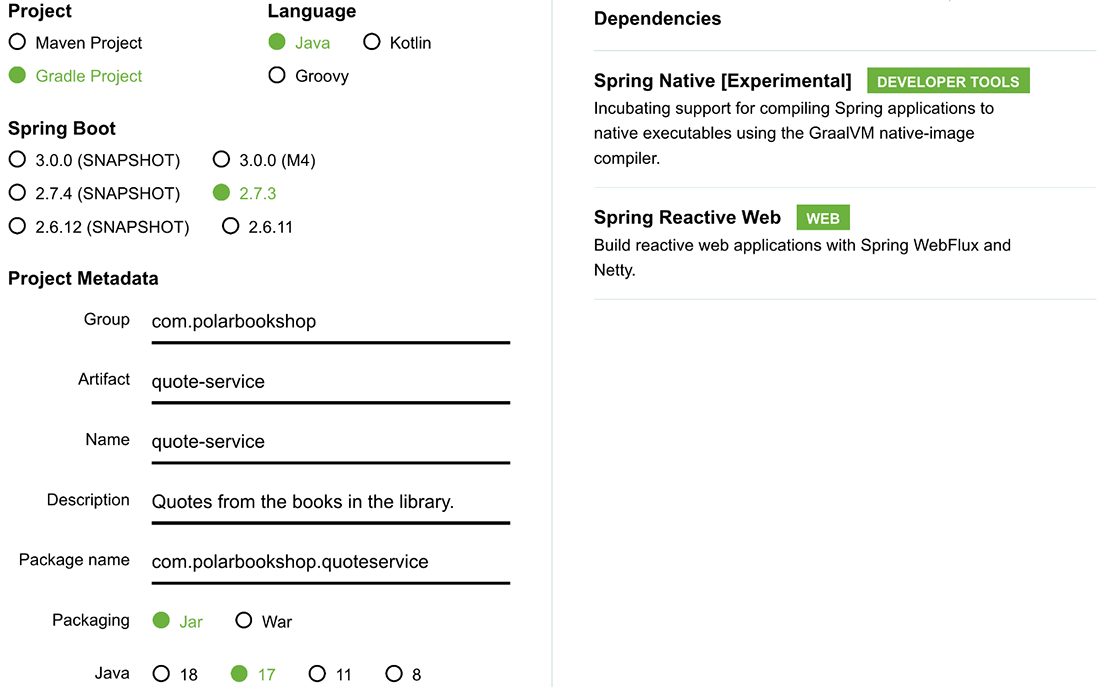
Figure 16.1 The parameters for initializing the Quote Service project
The project contains the following main dependencies:
-
Spring Reactive Web provides the necessary libraries for building reactive web applications with Spring WebFlux, and it includes Netty as the default embedded server.
-
Spring Native supports compiling Spring applications to native executables using the GraalVM native-image compiler.
The resulting dependencies section of the build.gradle file is as follows:
dependencies {
  implementation 'org.springframework.boot:spring-boot-starter-webflux'
  testImplementation 'org.springframework.boot:spring-boot-starter-test'
  testImplementation 'io.projectreactor:reactor-test'
}
At this point, you might ask: where is the Spring Native dependency? There isn’t one. Where is Spring Native? The answer can be found in the plugins sections of the build.gradle file:
plugins {
   id 'org.springframework.boot' version '2.7.3'
   id 'io.spring.dependency-management' version '1.0.13.RELEASE'
   id 'java'
   id 'org.springframework.experimental.aot' version '0.12.1'     ❶
}
❶ Spring AOT plugin provided by Spring Native
When you add Spring Native to a project, you’ll get the Spring AOT plugin, which provides the required configuration for GraalVM to compile the Spring classes as well as convenient functionality for building native executables from Gradle (or Maven).
If you bootstrap a new project from Spring Initializr, you’ll also get additional information in the HELP.md file about how to use Spring Native. Should you select any unsupported dependencies, you’ll find a message warning you about it. For example, Spring Cloud Stream is not fully supported at the time of writing. If you initialize a project with Spring Native and Spring Cloud Stream, the HELP.md file will show you a message like the following:
The following dependency is not known to work with Spring Native: 'Cloud Stream'. As a result, your application may not work as expected.
Note You can follow which Spring libraries are supported in the Spring Native official documentation (https://docs.spring.io/spring-native/docs/current/reference/htmlsingle).
Next, let’s implement the business logic for Quote Service.
Implementing the business logic
Quote Service will return random book quotes through a REST API. First, create a new com.polarbookshop.quoteservice.domain package and define a Quote record to model the domain entity.
Listing 16.1 Defining a domain entity for representing book quotes
public record Quote (
  String content,
  String author,
  Genre genre
){}
Quotes are categorized by the genre of the book from which they are extracted. Add a Genre enum to model this classification.
Listing 16.2 Defining an enumeration to represent book genres
public enum Genre {
  ADVENTURE,
  FANTASY,
  SCIENCE_FICTION
}
Finally, implement the business logic to retrieve book quotes in a new QuoteService class. Quotes will be defined and stored in a static in-memory list.
Listing 16.3 The business logic to query book quotes
@Service
public class QuoteService {
  private static final Random random = new Random();
  private static final List<Quote> quotes = List.of(      ❶
    new Quote("Content A", "Abigail", Genre.ADVENTURE),
    new Quote("Content B", "Beatrix", Genre.ADVENTURE),
    new Quote("Content C", "Casper", Genre.FANTASY),
    new Quote("Content D", "Dobby", Genre.FANTASY),
    new Quote("Content E", "Eileen", Genre.SCIENCE_FICTION),
    new Quote("Content F", "Flora", Genre.SCIENCE_FICTION)
  );

  public Flux<Quote> getAllQuotes() {
    return Flux.fromIterable(quotes);                     ❷
  }

  public Mono<Quote> getRandomQuote() {
    return Mono.just(quotes.get(random.nextInt(quotes.size() - 1)));
  }

  public Mono<Quote> getRandomQuoteByGenre(Genre genre) {
    var quotesForGenre = quotes.stream()
      .filter(q -> q.genre().equals(genre))
      .toList();
    return Mono.just(quotesForGenre.get(
     random.nextInt(quotesForGenre.size() - 1)));
  }
}
❶ Stores a list of quotes in memory
❷ Returns all quotes as a reactive data stream
Note Since the focus of this example is the native-image compilation with GraalVM and Spring Native, we’ll keep it simple and skip the persistence layer. Feel free to expand it on your own. For example, you could add Spring Data R2DBC and Spring Security, both supported by Spring Native.
That’s it for the business logic. Next we’ll expose the functionality through an HTTP API.
Implementing the web controller
Create a new com.polarbookshop.quoteservice.web package and add a QuoteController class to expose three endpoints for the following:
Listing 16.4 Defining handlers for HTTP endpoints
@RestController
public class QuoteController {
  private final QuoteService quoteService;

  public QuoteController(QuoteService quoteService) {
    this.quoteService = quoteService;
  }

  @GetMapping("/quotes")
  public Flux<Quote> getAllQuotes() {
    return quoteService.getAllQuotes();
  }

  @GetMapping("/quotes/random")
  public Mono<Quote> getRandomQuote() {
    return quoteService.getRandomQuote();
  }

  @GetMapping("/quotes/random/{genre}")
  public Mono<Quote> getRandomQuote(@PathVariable Genre genre) {
    return quoteService.getRandomQuoteByGenre(genre);
  }
}
Then configure the embedded Netty server to listen to port 9101, and define the application name. Open the application.yml file and add the following configuration.
Listing 16.5 Configuring the Netty server port and the application name
server:
  port: 9101

spring:
  application:
    name: quote-service
Finally, let’s write some integration tests using the same techniques you learned in chapter 8.
When we bootstrapped the project from Spring Initializr, we got an autogenerated QuoteServiceApplicationTests class. Let’s update it with a few integration tests to check the REST API exposed by Quote Service.
Listing 16.6 Integration tests for Quote Service
@SpringBootTest(webEnvironment = SpringBootTest.WebEnvironment.RANDOM_PORT)
class QuoteServiceApplicationTests {

  @Autowired
  WebTestClient webTestClient;

  @Test
  void whenAllQuotesThenReturn() {
    webTestClient.get().uri("/quotes")
      .exchange()
      .expectStatus().is2xxSuccessful()
      .expectBodyList(Quote.class);
  }

  @Test
  void whenRandomQuoteThenReturn() {
    webTestClient.get().uri("/quotes/random")
      .exchange()
      .expectStatus().is2xxSuccessful()
      .expectBody(Quote.class);
  }

  @Test
  void whenRandomQuoteByGenreThenReturn() {
    webTestClient.get().uri("/quotes/random/FANTASY")
      .exchange()
      .expectStatus().is2xxSuccessful()
      .expectBody(Quote.class)
      .value(quote -> assertThat(quote.genre()).isEqualTo(Genre.FANTASY));
  }
}
That’s it for the implementation. Next we’ll execute the auto-tests and run the application on the JVM.
Running and testing on the JVM
So far, Quote Service is a standard Spring Boot application, no different from any other applications we built in the previous chapters. For example, we can run the autotests with Gradle and ensure that it behaves correctly. Open a Terminal window, navigate to the project’s root folder, and execute the following command:
$ ./gradlew test
We can also run it on the JVM or package it as a JAR artifact. From the same Terminal window, execute the following command to run the application:
$ ./gradlew bootRun
Feel free to verify that the application works correctly by calling the endpoints exposed by Quote Service:
$ http :9101/quotes
$ http :9101/quotes/random
$ http :9101/quotes/random/FANTASY
When you’re done testing the application, stop the process with Ctrl-C.
How can we compile it to a native executable and take advantage of instant startup time, instant peak performance, and reduced memory consumption? That’s the topic of the next section.
16.1.3 Compiling Spring Boot applications as native images
There are two ways to compile your Spring Boot applications into native executables. The first option uses GraalVM explicitly and produces an OS-specific executable that runs directly on a machine. The second option relies on Cloud Native Buildpacks to containerize the native executable and run it on a container runtime like Docker. We’ll use both.
Compiling native executables with GraalVM
The first option requires the GraalVM runtime to be available on your machine. You can install it directly from the website (www.graalvm.org) or use a tool like sdkman. You can find instructions on how to install sdkman in section A.1 of appendix A.
For the examples in this chapter, I’ll be using the latest GraalVM 22.1 distribution available at the time of writing, based on OpenJDK 17. Using sdkman, you can install GraalVM as follows:
$ sdk install java 22.2.r17-grl
At the end of the installation procedure, sdkman will ask whether you want to make that distribution the default one. I recommend you say no, since we’re going to be explicit whenever we need to use GraalVM instead of the standard OpenJDK.
Then open a Terminal window, navigate to your Quote Service project (quote-service), configure the shell to use GraalVM, and install the native-image GraalVM component as follows:
$ sdk use java 22.2.r17-grl    ❶
$ gu install native-image      ❷
❶ Configures the current shell to use the specified Java runtime
❷ Uses the gu utility provided by GraalVM to install the native-image component
When you initialized the Quote Service project, the GraalVM Gradle/Maven official plugin was included automatically. That’s the one providing the functionality to compile applications using the GraalVM Native Image mode.
Note The following Gradle tasks require that GraalVM is the current Java runtime. When using sdkman, you can do that by running sdk use java 22.2.r17-grl in the Terminal window where you want to use GraalVM.
Take into account that the compilation step for GraalVM apps is more prolonged, taking several minutes depending on the computational resources available on your machine. That is one of the drawbacks of working with native images. Also, since Spring Native is still in an experimental phase, you might get several debug logs and warnings, but that should be fine if the process completes successfully.
From the same Terminal window where you switched to GraalVM as the current Java runtime, run the following command to compile the application to a native image:
$ ./gradlew nativeCompile
A standalone binary is the result of the command. Since it’s a native executable, it will be different on macOS, Linux, and Windows. You can run it on your machine natively, without the need for a JVM. In the case of Gradle, the native executable is generated in the build/native/nativeCompile folder. Go ahead and run it.
$ build/native/nativeCompile/quote-service
The first thing to notice is the startup time, usually less than 100 ms with Spring Native. It’s an impressive improvement compared to the JVM option, which takes a few seconds. The best part of this is that we didn’t have to write any code to make that happen! Let’s send a request to ensure that the application is running correctly:
$ http :9101/quotes/random
When you’re done testing the application, stop the process with Ctrl-C.
You can also run the autotests as native executables to make them even more reliable, since they will use the actual runtime environment used in production. However, the compilation step still takes longer than when running on the JVM:
$ ./gradlew nativeTest
Finally, you can run a Spring Boot application as a native image directly from Gradle/Maven:
$ ./gradlew nativeRun
Remember to stop the application process with Ctrl-C before moving to the next section, which will show you another option for compiling your Spring Boot applications to native executables. It won’t require having GraalVM installed on your computer, and it will produce a containerized native executable using Cloud Native Buildpacks.
Containerizing native images with Buildpacks
The second option for compiling Spring Boot applications to native executables relies on Cloud Native Buildpacks. Similar to how we packaged Spring Boot applications as container images in chapter 6, we can use Buildpacks to build a container image from the application native executable compiled by GraalVM. This approach benefits from not requiring GraalVM to be installed on your machine.
Spring Initializr didn’t just include the Spring AOT plugin when you bootstrapped the Quote Service project; it also provided additional configuration for the Buildpacks integration available in Spring Boot. If you check the build.gradle file again, you can see that the bootBuildImage task is configured to produce a containerized native image through the BP_NATIVE_IMAGE environment variable. While you’re there, configure the image name and the container registry authentication as we did for the other Polar Bookshop applications.
Listing 16.7 Configuration for containerizing Quote Service
tasks.named('bootBuildImage') {
  builder = 'paketobuildpacks/builder:tiny'    ❶
  environment = ['BP_NATIVE_IMAGE': 'true']    ❷
  imageName = "${project.name}"

  docker {
   publishRegistry {
     username = project.findProperty("registryUsername")
     password = project.findProperty("registryToken")
     url = project.findProperty("registryUrl")
   }
  }
}
❶ Uses the “tiny” version of Paketo Buildpacks to minimize the container image size
❷ Enables GraalVM support and produces a containerized native image
Note As you probably noticed when running the native image compilation process on your machine, it takes not only time but also more computational resources than usual. When using Buildpacks, make sure you have at least 16 GB of RAM on your computer. If you use Docker Desktop, configure the Docker virtual machine with at least 8 GB of RAM. On Windows, it’s recommended that you use Docker Desktop on WSL2 rather than Hyper-V. For more recommendations about the setup, refer to the Spring Native documentation (https://docs.spring.io/spring-native/docs/current/reference/htmlsingle).
The command to use Buildpacks and produce a containerized native image is the same that you’d use for JVM images. Open a Terminal window, navigate to your Quote Service project (quote-service), and run the following command:
$ ./gradlew bootBuildImage
When it’s done, try running the resulting container image:
$ docker run --rm -p 9101:9101 quote-service
The startup time should again be less than 100 ms. Go ahead and send a few requests to test whether the application is working correctly:
$ http :9101/quotes/random
When you’re done testing the application, stop the container process with Ctrl-C.
16.2 Serverless applications with Spring Cloud Function
As introduced in chapter 1, serverless is a further abstraction layer on top of virtual machines and containers, moving even more responsibilities from product teams to the platform. Following the serverless computing model, developers focus on implementing the business logic for their applications. Using an orchestrator like Kubernetes still requires infrastructure provisioning, capacity planning, and scaling. In contrast, a serverless platform takes care of setting up the underlying infrastructure needed by the applications to run, including virtual machines, containers, and dynamic scaling.
Serverless applications typically only run when there is an event to handle, such as an HTTP request (request-driven) or a message (event-driven). The event can be external or produced by another function. For example, whenever a message is added to a queue, a function might be triggered, process the message, and then exit the execution. When there is nothing to process, the platform shuts down all the resources involved with the function, so you can really pay for your actual usage.
In the other cloud native topologies like CaaS or PaaS, there is always a server involved running 24/7. Compared to traditional systems, you get the advantage of dynamic scalability, reducing the number of resources provisioned at any given time. Still, there is always something up and running that has a cost. In the serverless model, however, resources are provisioned only when necessary. If there is nothing to process, everything is shut down. That’s what we call scaling to zero, and it’s one of the main features offered by serverless platforms.
A consequence of scaling applications to zero is that when eventually there’s a request to handle, a new application instance is started, and it must be ready to process the request very quickly. Standard JVM applications are not suitable for serverless applications, since it’s hard to achieve a startup time lower than a few seconds. That’s why GraalVM native images became popular. Their instant startup time and reduced memory consumption make them perfect for the serverless model. The instant startup time is required for scaling. The reduced memory consumption helps reduce costs, which is one of the goals of serverless and cloud native in general.
Besides cost optimization, serverless technologies also move some extra responsibility from the application to the platform. That might be an advantage, since it allows developers to focus exclusively on the business logic. But it’s also essential to consider what degree of control you would like to have and how you will deal with vendor lock-in. Each serverless platform has its own features and APIs. Once you start writing functions for a specific platform, you can’t move them easily to another, as you would do with containers. You might compromise to gain responsibility and scope and lose on control and portability more than with any other approach. That’s why Knative became popular quickly: it’s built on Kubernetes, which means that you can easily move your serverless workloads between platforms and vendors.
This section will guide you through developing and deploying a serverless application. You’ll use Spring Native to compile it to a GraalVM native image and use Spring Cloud Function to implement the business logic as functions, which is an excellent choice, since serverless applications are event-driven.
16.2.1 Building serverless applications with Spring Cloud Function
You have already worked with Spring Cloud Function in chapter 10. As you learned there, it’s a project aimed at promoting business logic implementation via functions based on the standard interfaces introduced by Java 8: Supplier, Function, and Consumer.
Spring Cloud Function is very flexible. You have already seen how it integrates transparently with external messaging systems like RabbitMQ and Kafka, a handy feature for building serverless applications that are triggered by messages. In this section I’d like to show you one more feature offered by Spring Cloud Function that lets you expose functions as endpoints triggered by HTTP requests and CloudEvents, which is a specification standardizing the format and distribution of events in cloud architectures.
We’ll use the same requirements as those for the Quote Service application we built earlier, but this time we’ll implement the business logic as functions and let the framework deal with exposing them as HTTP endpoints.
Bootstrapping a new project with Spring Native and Spring Cloud Function
You can initialize the Quote Function project from Spring Initializr (https://start.spring.io), store the result in a new quote-function Git repository, and push it to GitHub. The parameters for the initialization are shown in figure 16.2.
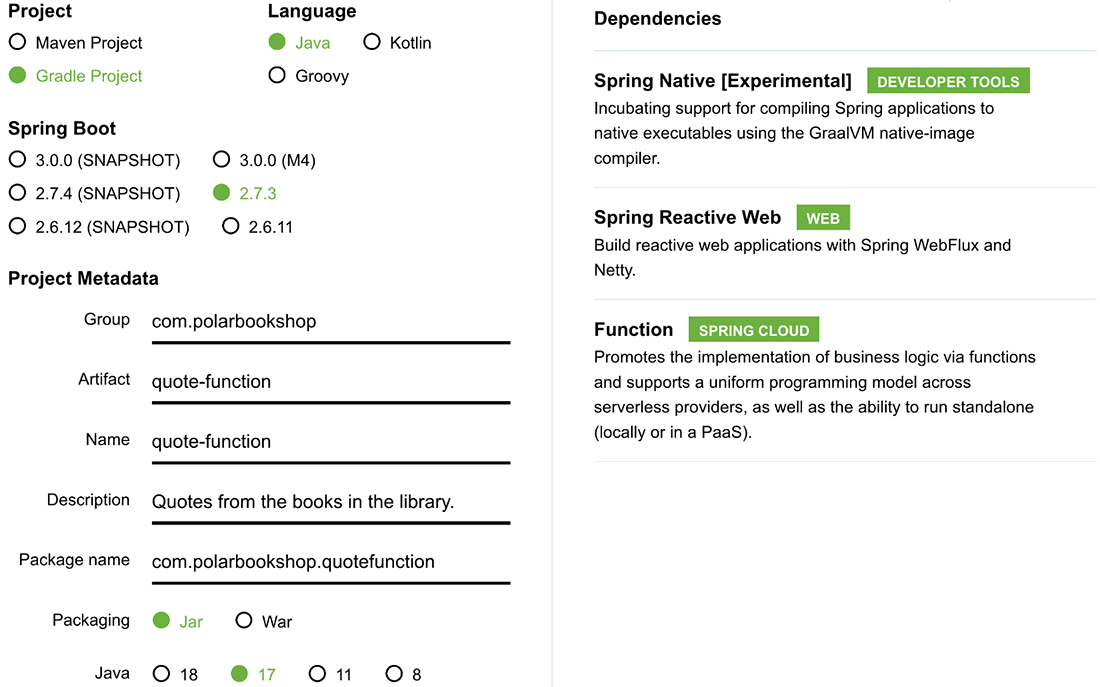
Figure 16.2 The parameters for initializing the Quote Function project
The project contains the following dependencies:
-
Spring Reactive Web provides the necessary libraries for building reactive web applications with Spring WebFlux, and it includes Netty as the default embedded server.
-
Spring Cloud Function provides the necessary libraries to support business logic implementation via functions, export them via several communication channels, and integrate them with serverless platforms.
-
Spring Native supports compiling Spring applications to native executables using the GraalVM native-image compiler.
The resulting dependencies section of the build.gradle file looks like the following.
dependencies {
  implementation 'org.springframework.boot:spring-boot-starter-webflux'
  implementation
➥'org.springframework.cloud:spring-cloud-starter-function-web'
  testImplementation 'org.springframework.boot:spring-boot-starter-test'
  testImplementation 'io.projectreactor:reactor-test'
}
Then you can update the Cloud Native Buildpacks configuration in build.gradle much like we did for Quote Service.
Listing 16.8 Configuration for containerizing Quote Function
tasks.named('bootBuildImage') {
  builder = 'paketobuildpacks/builder:tiny'    ❶
  environment = ['BP_NATIVE_IMAGE': 'true']    ❷
  imageName = "${project.name}"

  docker {
   publishRegistry {
     username = project.findProperty("registryUsername")
     password = project.findProperty("registryToken")
     url = project.findProperty("registryUrl")
   }
  }
}
❶ Uses the “tiny” version of Paketo Buildpacks to minimize the container image size
❷ Enables the GraalVM support and produces a containerized native image
Next, copy all the classes from the com.polarbookshop.quoteservice.domain package in Quote Service to a new com.polarbookshop.quotefunction.domain package in Quote Function. In the next section we’ll implement the business logic as functions.
Implementing the business logic as functions
As you learned in chapter 10, Spring Cloud Function enhances standard Java functions when they are registered as beans. Let’s start by adding a QuoteFunctions class in a new com.polarbookshop.quotefunction.functions package for the Quote Function project.
The application should expose similar functionality to Quote Service:
-
Returning all the quotes can be expressed as a Supplier, since it takes no input.
-
Returning a random quote can also be expressed as a Supplier, since it takes no input.
-
Returning a random quote for a given genre can be expressed as a Function, since it has both input and output.
-
Logging a quote to standard output can be expressed as a Consumer, since it has input but no output.
Listing 16.9 Implementing the business logic as functions
@Configuration                                           ❶
public class QuoteFunctions {
  private static final Logger log =
    LoggerFactory.getLogger(QuoteFunctions.class);       ❷

  @Bean                                                  ❸
  Supplier<Flux<Quote>> allQuotes(QuoteService quoteService) {
    return () -> {
      log.info("Getting all quotes");
      return Flux.fromIterable(quoteService.getAllQuotes())
        .delaySequence(Duration.ofSeconds(1));           ❹
    };
  }

  @Bean                                                  ❺
  Supplier<Quote> randomQuote(QuoteService quoteService) {
    return () -> {
      log.info("Getting random quote");
      return quoteService.getRandomQuote();
    };
  }

  @Bean                                                  ❻
  Consumer<Quote> logQuote() {
    return quote -> log.info("Quote: '{}' by {}",
      quote.content(), quote.author());
  }
}
❶ Functions are declared as beans in a Spring configuration class.
❷ A logger used by the functions
❸ A supplier producing all the quotes
❹ Quotes are streamed one at a time with a 1-second pause between them.
❺ A supplier producing a random quote
❻ A function logging the quote received as the input
Spring Cloud Function will automatically expose all the registered functions as HTTP endpoints when the Spring web dependencies are on the classpath. Each endpoint uses the same name as the function. In general, suppliers can be invoked through GET requests and functions and consumers as POST requests.
Quote Function contains the Spring Reactive Web dependency, so Netty will be the server to handle HTTP requests. Let’s make it listen to port 9102 and configure the application name. Open the application.yml file, and add the following configuration.
Listing 16.10 Configuring the Netty server port and application name
server:
  port: 9102

spring:
  application:
    name: quote-function
Then run the Quote Function application (./gradlew bootRun) and open a Terminal window. For starters, you can test the two suppliers by sending GET requests:
$ http :9102/allQuotes
$ http :9102/randomQuote
To get a random quote by genre, you need to provide a genre string in the body of a POST request:
$ echo 'FANTASY' | http :9102/genreQuote
When only one function is registered as a bean, Spring Cloud Function will automatically expose it through the root endpoint. In the case of multiple functions, you can choose the function through the spring.cloud.function.definition configuration property.
For example, we could expose the allQuotes function through the root endpoint. In the Quote Function project, open the application.yml file and update it as follows.
Listing 16.11 Defining the main function managed by Spring Cloud Function
server:
  port: 9102

spring:
  application:
    name: quote-function
  cloud:
    function:
      definition: allQuotes
Re-run the application and send a GET request to the root endpoint. Since the allQuotes function is a Supplier returning a Flux of Quote, you can leverage the streaming capabilities of Project Reactor and ask the application to return the quotes as they become available. That is done automatically when the Accept:text/event-stream header is used (for example, curl -H 'Accept:text/event-stream' localhost:9102). When using the httpie utility, you’ll also need to use the --stream argument to enable data streaming:
$ http :9102 Accept:text/event-stream --stream
Similar to what you did in chapter 10, you can build a pipeline by combining functions. When functions are exposed as HTTP endpoints, you can use the comma (,) character to compose functions on the fly. For example, you could combine the genreQuote function with logQuote as follows:
$ echo 'FANTASY' | http :9102/genreQuote,logQuote
Since logQuote is a consumer, the HTTP response has a 202 status with no body. If you check the application logs, you’ll see that the random quote by genre has been printed out instead.
Spring Cloud Function integrates with several communication channels. You have seen how you can expose functions through exchanges and queues leveraging Spring Cloud Stream and how to expose them as HTTP endpoints. The framework also supports RSocket, which is a binary reactive protocol, and CloudEvents, a specification standardizing the format and distribution of events in cloud architectures (https://cloudevents.io).
CloudEvents can be consumed over HTTP, messaging channels like AMPQ (RabbitMQ), and RSocket. They ensure a standard way of describing events, thus making them portable across a wide variety of technologies, including applications, messaging systems, build tools, and platforms.
Since Quote Function is already configured to expose functions as HTTP endpoints, you can make it consume CloudEvents without changing any code. Ensure the application is up and running, and then send an HTTP request with the additional headers defined by the CloudEvents specification:
$ echo 'FANTASY' | http :9102/genreQuote
    ce-specversion:1.0            ❶
    ce-type:quote                 ❷
    ce-id:394                      ❸
❶ The CloudEvents specification version
❷ The type of event (domain-specific)
When you’re done testing the application, stop the process with Ctrl-C.
Note You can refer to the Spring Cloud Function official documentation for more details on how HTTP, CloudEvents, and RSocket are supported (https://spring.io/projects/spring-cloud-function).
16.2.2 Deployment pipeline: Build and publish
Following the continuous delivery principles and techniques explained throughout the book, we can implement a deployment pipeline for Quote Service and Quote Function. Since the release candidate for those projects is a container image, most of the operations will be the same as for standard JVM applications.
When working locally, it’s convenient to run and test serverless applications on the JVM rather than using GraalVM due to the shorter build time and the less resource-demanding process. However, to achieve better quality and catch errors earlier, we should run and verify the applications in native mode as early in the delivery process as possible. The commit stage is where we compile and test our applications, so it might be a good place to add those additional steps.
In your Quote Function project (quote-function), add a new .github/workflows folder, and create a commit-stage.yml file. As a starting point, you can copy the implementation of the commit stage from one of the other applications we built in the previous chapters, such as Catalog Service. The commit stage workflow we have used so far is composed of two jobs: “Build & Test” and “Package and Publish.” We’ll reuse the implementation from the other applications, but we’ll add an intermediate job responsible for testing the native mode.
Listing 16.12 A job to build and test the application in native mode
name: Commit Stage
on: push

env:
  REGISTRY: ghcr.io                                    ❶
  IMAGE_NAME: <your_github_username>/quote-function    ❷
  VERSION: ${{ github.sha }}                           ❸

jobs:
  build:
    name: Build and Test
    ...

  native:                                              ❹
    name: Build and Test (Native)                      ❺
    runs-on: ubuntu-22.04                              ❻
    permissions:                                       ❼
      contents: read                                   ❽
    steps:
      - name: Checkout source code
        uses: actions/checkout@v3                      ❾
      - name: Set up GraalVM
        uses: graalvm/setup-graalvm@v1                 ❿
        with:
          version: '22.1.0'
          java-version: '17'
          components: 'native-image'
          github-token: ${{ secrets.GITHUB_TOKEN }}
      - name: Build, unit tests and integration tests (native)
        run: |
          chmod +x gradlew
          ./gradlew nativeBuild                        ⓫

package:
    name: Package and Publish
    if: ${{ github.ref == 'refs/heads/main' }}
    needs: [ build, native ]                           ⓬
    ...
❶ Uses the GitHub Container Registry
❷ The name of the image. Remember to add your GitHub username, all in lowercase.
❸ For simplicity, any new image will be tagged as “latest.”
❺ A human-friendly name for the job
❻ The type of machine where the job will run
❼ The permissions granted to the job
❽ Permission to check out the current Git repository
❾ Checks out the current Git repository (quote-function)
❿ Installs and configures GraalVM with Java 17 and the native image component
⓫ Compiles the application as a native executable and runs unit and integration tests
⓬ The “Package and Publish” job runs only if both of the previous jobs complete successfully.
Note In the source code repository accompanying the book, you can check the final result in the Chapter16/16-end/quote-function folder.
When you’re done, commit all your changes and push them to your GitHub quote-function repository to trigger the commit stage workflow. We’re going to use the container image published by that workflow later in the chapter, so make sure it runs successfully.
You’ll notice that the commit stage execution for Quote Function takes quite a bit longer than for the other applications throughout the book. In chapter 3 I wrote that the commit stage is supposed to be fast, possibly under five minutes, to provide developers with fast feedback about their changes and allow them to move on to the next task, in the spirit of continuous integration. The additional steps using GraalVM that we have just added might slow down the workflow too much. In that case, you might consider moving this check to the acceptance stage, where we allow the overall process to take longer.
The following section will cover some options for deploying serverless applications implemented with Spring Cloud Function.
16.2.3 Deploying serverless applications on the cloud
Applications using Spring Cloud Function can be deployed in a few different ways. First of all, since they’re still Spring Boot applications, you can package them as JAR artifacts or container images and deploy them on servers or container runtimes like Docker or Kubernetes, respectively, just like you did in the previous chapters.
Then, when Spring Native is included, you also have the option to compile them to native images and run them on servers or container runtimes. Thanks to instant startup time and reduced memory consumption, you can also seamlessly deploy such applications on serverless platforms. The next section covers how to use Knative to run your serverless workloads on Kubernetes.
Spring Cloud Function also supports deploying applications on vendor-specific FaaS platforms like AWS Lambda, Azure Functions, and Google Cloud Functions. Once you choose a platform, you can add the related adapter provided by the framework to accomplish the integration. Each adapter works in a slightly different way, depending on the specific platform and the configuration required to integrate the functions with the underlying infrastructure. The adapters provided by Spring Cloud Function don’t require any changes to your business logic, but they might need some additional code to configure the integration.
When you use one of those adapters, you must choose which function to integrate with the platform. If there’s only one function registered as a bean, that’s the one used. If there are more (like in Quote Function), you need to use the spring.cloud .function.definition property to declare which function the FaaS platform will manage.
Note You can refer to the Spring Cloud Function official documentation for more details on the Spring Cloud Function adapters for AWS Lambda, Azure Functions, and Google Cloud Functions (https://spring.io/projects/spring-cloud-function).
The following section will cover deploying a serverless application like Quote Function on a Kubernetes-based platform using Knative.
16.3 Deploying serverless applications with Knative
In the previous sections, you learned about Spring Native and how to use it with Spring Cloud Function to build serverless applications. This section will guide you through deploying Quote Function to a serverless platform on top of Kubernetes, using the Knative project.
Knative is a “Kubernetes-based platform to deploy and manage modern serverless workloads” (https://knative.dev). It’s a CNCF project that you can use to deploy standard containerized workloads and event-driven applications. The project offers a superior user experience to developers and higher abstractions that make it simpler to deploy applications on Kubernetes.
You can decide to run your own Knative platform on top of a Kubernetes cluster or choose a managed service offered by a cloud provider, such as VMware Tanzu Application Platform, Google Cloud Run, or Red Hat OpenShift Serverless. Since they are all based on open source software and standards, you could migrate from Google Cloud Run to VMware Tanzu Application Platform without changing your application code and with minimal changes to your deployment pipeline.
The Knative project consists of two main components: Serving and Eventing.
-
Knative Serving is for running serverless workloads on Kubernetes. It takes care of autoscaling, networking, revisions, and deployment strategies while letting engineers focus on the application business logic.
-
Knative Eventing provides management for integrating applications with event sources and sinks based on the CloudEvents specification, abstracting backends like RabbitMQ or Kafka.
Our focus will be on using Knative Serving to run serverless workloads while avoiding vendor lock-in.
Note Originally, Knative consisted of a third component called “Build” that subsequently became a standalone product, renamed Tekton (https://tekton.dev) and donated to the Continuous Delivery Foundation (https://cd.foundation). Tekton is a Kubernetes-native framework for building deployment pipelines that support continuous delivery. For example, you could use Tekton instead of GitHub Actions.
This section will show you how to set up a local development environment comprising both Kubernetes and Knative. Then I’ll introduce Knative manifests, which you can use to declare the desired state for serverless applications, and I’ll show you how to apply them to a Kubernetes cluster.
16.3.1 Setting up a local Knative platform
Since Knative runs on top of Kubernetes, we first need a cluster. Let’s create one with minikube following the same approach we’ve used throughout the book. Open a Terminal window and run the following command:
$ minikube start --profile knative
Next, we can install Knative. For simplicity, I have collected the necessary commands in a script that you’ll find in the source code repository accompanying the book. From the Chapter16/16-end/polar-deployment/kubernetes/development folder, copy the install-knative.sh file to the same path in your Polar Deployment repository (polar-deployment).
Then open a Terminal window, navigate to the folder where you just copied the script, and run the following command to install Knative on your local Kubernetes cluster:
$ ./install-knative.sh
Feel free to open the file and look at the instructions before running it. You can find more information about installing Knative on the project website (https://knative.dev/docs/install).
Note On macOS and Linux, you might need to make the script executable via the chmod +x install-knative.sh command.
The Knative project provides a convenient CLI tool that you can use to interact with Knative resources in a Kubernetes cluster. You can find instructions on how to install it in section A.4 of appendix A. In the next section I’ll show you how to deploy Quote Function using the Knative CLI.
16.3.2 Deploying applications with the Knative CLI
Knative provides a few different options for deploying applications. In production, we’ll want to stick to a declarative configuration as we did for standard Kubernetes deployments and rely on a GitOps flow to reconcile the desired state (in a Git repository) and actual state (in the Kubernetes cluster).
When experimenting or working locally, we can also take advantage of the Knative CLI to deploy applications in an imperative way. From a Terminal window, run the following command to deploy Quote Function. The container image is the one published by the commit stage workflow we defined before. Remember to replace <your_ github_username> with your GitHub username in lowercase:
$ kn service create quote-function
    --image ghcr.io/<your_github_username>/quote-function
    --port 9102
You can refer to figure 16.3 for a description of the command.
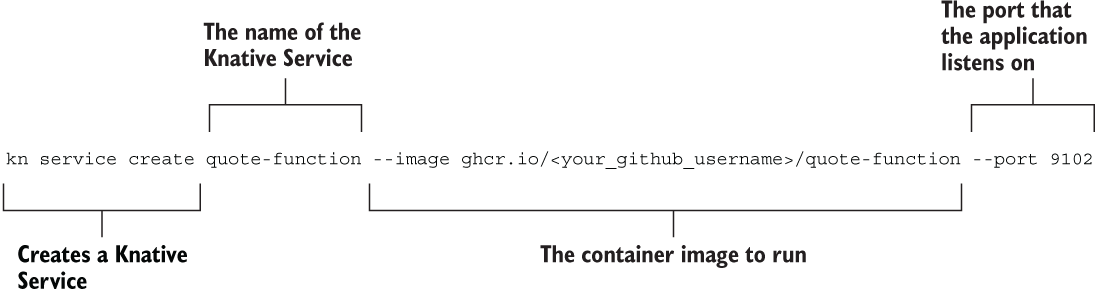
Figure 16.3 The Knative command for creating a Service from a container image. Knative will take care of creating all the resources necessary to deploy the applications on Kubernetes.
The command will initialize a new quote-function service in the default namespace on Kubernetes. It will return the public URL through which the application is exposed, in a message like the following:
Creating service 'quote-function' in namespace 'default':

  0.045s The Route is still working to reflect the latest desired
  ➥specification.
  0.096s Configuration "quote-function" is waiting for a Revision
  ➥to become ready.
  3.337s ...
  3.377s Ingress has not yet been reconciled.
  3.480s Waiting for load balancer to be ready
  3.660s Ready to serve.

Service 'quote-function' created to latest revision 'quote-function-00001'
➥is available at URL:
http://quote-function.default.127.0.0.1.sslip.io
Let’s test it out! First we need to open a tunnel to the cluster with minikube. The first time you run this command, you might be asked to input your machine password to authorize the tunneling to the cluster:
$ minikube tunnel --profile knative
Then open a new Terminal window and call the application at the root endpoint to fetch the complete list of quotes. The URL to call is the same one returned by the previous command (http:/ /quote-function.default.127.0.0.1.sslip.io), which is in the format <service-name>.<namespace>.<domain>:
$ http http://quote-function.default.127.0.0.1.sslip.io
Since we are working locally, I configured Knative to use sslip.io, a DNS service that “when queried with a hostname with an embedded IP address, returns that IP address.” For example, the 127.0.0.1.sslip.io hostname would be resolved to the 127.0.0.1 IP address. Since we opened a tunnel to the cluster, requests to 127.0.0.1 will be handled by the cluster, where Knative will route them to the right service.
Knative takes care of scaling the application without any further configuration. For each request, it determines whether more instances are required. When an instance stays idle for a specific time period (30 seconds, by default), Knative will shut it down. If no request is received for more than 30 seconds, Knative will scale the application to zero, meaning there will be no instances of Quote Function running.
When a new request is eventually received, Knative starts a new instance and uses it to handle the request. Thanks to Spring Native, the startup time of Quote Function is almost instantaneous, so users and clients won’t have to deal with long wait times, as would be the case with standard JVM applications. This powerful feature lets you optimize costs and pay only for what you use and need.
Using an open source platform like Knative has the advantage of letting you migrate your applications to another cloud provider without any code changes. But that’s not all! You can even use the same deployment pipeline as-is, or with minor modifications. The next section will show you how to define Knative Services in a declarative way via YAML manifests, which is the recommended approach for production scenarios.
Before moving on, make sure you have deleted the Quote Function instance you created previously:
$ kn service delete quote-function
16.3.3 Deploying applications with the Knative manifests
Kubernetes is an extensible system. Besides using built-in objects like Deployments and Pods, we can define our own objects via Custom Resource Definitions (CRDs). That is the strategy used by many tools built on top of Kubernetes, including Knative.
One of the benefits of using Knative is a better developer experience and the possibility to declare the desired state for our applications in a more straightforward and less verbose way. Rather than dealing with Deployments, Services, and Ingresses, we can work with a single type of resource: the Knative Service.
Note Throughout the book, I talked about applications as services. Knative offers a way to model an application in a single resource declaration: the Knative Service. At first, the naming might not be very clear, since there is already a Kubernetes built-in Service type. In reality, the Knative choice is very intuitive because it maps one-to-one the architectural concept with the deployment concept.
Let’s see what Knative Services look like. Open your Quote Function project (quote-function), and create a new “knative” folder. Then, define a new kservice.yml file inside to declare the desired state of the Knative Service for Quote Function. Remember to replace <your_github_username> with your GitHub username in lowercase.
Listing 16.13 Knative Service manifest for Quote Function
apiVersion: serving.knative.dev/v1           ❶
kind: Service                                ❷
metadata:
  name: quote-function                       ❸
spec:
  template:
    spec:
      containers:
        - name: quote-function               ❹
          image:                             ❺
➥ghcr.io/<your_github_username>/quote-function
          ports:
            - containerPort: 9102            ❻
          resources:                         ❼
            requests:
              cpu: '0.1'
              memory: '128Mi'
            limits:
              cpu: '2'
              memory: '512Mi'
❶ The API version for Knative Serving objects
❷ The type of object to create
❺ The image used to run the container. Remember to insert your GitHub username.
❻ The port exposed by the container
❼ CPU and memory configuration for the container
Like any other Kubernetes resource, you can apply a Knative Service manifest to a cluster with kubectl apply -f <manifest-file> or through an automated flow like we did with Argo CD in the previous chapter. For this example, we’ll use the Kubernetes CLI.
Open a Terminal window, navigate to your Quote Function project (quote-function), and run the following command to deploy Quote Function from the Knative Service manifest:
$ kubectl apply -f knative/kservice.yml
Using the Kubernetes CLI, you can get information about all the created Knative Services and their URLs by running the following command (the result displayed is partial, to fit on the page):
$ kubectl get ksvc

NAME             URL                                                READY
quote-function   http://quote-function.default.127.0.0.1.sslip.io   True
Let’s verify that the application is correctly deployed by sending an HTTP request to its root endpoint. If the tunnel you opened earlier is not active anymore, run minikube tunnel --profile knative before calling the application:
$ http http://quote-function.default.127.0.0.1.sslip.io
Knative provides an abstraction on top of Kubernetes. However, it still runs Deployments, ReplicaSets, Pods, Services, and Ingresses under the hood. This means you can use all the techniques you learned in the previous chapters. For example, you can configure Quote Function through ConfigMaps and Secrets:
$ kubectl get pod

NAME                                                  READY   STATUS
pod/quote-function-00001-deployment-c6978b588-llf9w   2/2     Running
If you wait for 30 seconds and then check for the running Pods in your local Kubernetes cluster, you’ll see there are none, because Knative scaled the application to zero due to inactivity:
$ kubectl get pod
No resources found in default namespace.
Now try sending a new request to the application on http http://quote-function.default.127.0.0.1.sslip.io. Knative will immediately spin up a new Pod for Quote Function to answer the request:
$ kubectl get pod

NAME                                              READY   STATUS
quote-function-00001-deployment-c6978b588-f49x8   2/2     Running
When you’re done testing the application, you can remove it with kubectl delete -f knative/kservice.yml. Finally, you can stop and delete the local cluster with the following command:
$ minikube stop --profile knative
$ minikube delete --profile knative
The Knative Service resource represents an application service in its entirety. Thanks to this abstraction, we no longer need to deal directly with Deployments, Services, and Ingresses. Knative takes care of all that. It creates and manages them under the hood while freeing us from dealing with those lower-level resources provided by Kubernetes. By default, Knative can even expose an application outside the cluster without the need to configure an Ingress resource, providing you directly with a URL to call the application.
Thanks to its features focused on developer experience and productivity, Knative can be used to run and manage any kind of workload on Kubernetes, limiting its scale-to-zero functionality only to the applications that provide support for it (for example, using Spring Native). We could easily run the entire Polar Bookshop system on Knative. We could use the autoscaling.knative.dev/minScale annotation to mark the applications we don’t want to be scaled to zero:
apiVersion: serving.knative.dev/v1
kind: Service
metadata:
  name: catalog-service
  annotations:
    autoscaling.knative.dev/minScale: "1"     ❶
...
❶ Ensures this Service is never scaled to zero
Knative offers such a great developer experience that it’s becoming the de facto abstraction when deploying workloads on Kubernetes, not only for serverless but also for more standard containerized applications. Whenever I provision a new Kubernetes cluster, Knative is the first thing I install. It’s also a foundational part of platforms like Tanzu Community Edition, Tanzu Application Platform, Red Hat OpenShift, and Google Cloud Run.
Note Tanzu Community Edition (https://tanzucommunityedition.io) is a Kubernetes platform that provides a great developer experience on top of Knative. It’s open source and free to use.
Another great feature offered by Knative is an intuitive and developer-friendly option for adopting deployment strategies like blue/green deployments, canary deployments, or A/B deployments, all via the same Knative Service resource. Implementing those strategies in plain Kubernetes would require a lot of manual work. Instead, Knative supports them out of the box.
Note To get more information about serverless applications and Knative, you can refer to the official documentation (https://knative.dev). Also, I recommend checking out a couple of books from the Manning catalog on this subject: Knative in Action by Jacques Chester (Manning, 2021; https://www.manning .com/books/knative-in-action) and Continuous Delivery for Kubernetes by Mauricio Salatino (www.manning.com/books/continuous-delivery-for-kubernetes).
Summary
-
By replacing a standard OpenJDK distribution with GraalVM as the runtime environment for your Java applications, you can increase their performance and efficiency, thanks to a new optimized technology for performing JIT compilation (the GraalVM compiler).
-
What makes GraalVM so innovative and popular in the serverless context is the Native Image mode.
-
Rather than compiling your Java code into bytecode and relying on a JVM to interpret it and convert it to machine code at runtime, GraalVM offers a new technology (the Native Image builder) to compile Java applications directly into machine code, obtaining a native executable or native image.
-
Java applications compiled as native images have faster startup times, optimized memory consumption, and instant peak performance, unlike the JVM options.
-
The main goal of Spring Native is to make it possible to compile any Spring application into a native executable using GraalVM without any code changes.
-
Spring Native provides an AOT infrastructure (invoked from a dedicated Gradle/ Maven plugin) for contributing all the required configurations for GraalVM to AOT-compile Spring classes.
-
There are two ways to compile your Spring Boot applications into native executables. The first option produces an OS-specific executable and runs the application directly on a machine. The second option relies on Buildpacks to containerize the native executable and run it on a container runtime like Docker.
-
Serverless is a further abstraction layer on top of virtual machines and containers, which moves even more responsibility from product teams to the platform.
-
Following the serverless computing model, developers focus on implementing the business logic for their applications.
-
Serverless applications are triggered by an incoming request or a specific event. We call such applications request-driven or event-driven.
-
Applications using Spring Cloud Function can be deployed in a few different ways.
-
When Spring Native is included, you can also compile applications to native images and run them on servers or container runtimes. Thanks to instant startup time and reduced memory consumption, you can seamlessly deploy such applications on Knative.
-
Knative is a “Kubernetes-based platform to deploy and manage modern serverless workloads” (https://knative.dev). You can use it to deploy standard containerized workloads and event-driven applications.
-
The Knative project offers a superior user experience to developers and higher abstractions that make it simpler to deploy applications on Kubernetes.
-
Knative offers such a great developer experience that it’s becoming the de facto abstraction when deploying workloads on Kubernetes, not only for serverless but also for more standard containerized applications.