Project 7
Happy Birthday
Real-world events like counting how many babies are born means collecting lots of data. Sometimes, this can take too long. Creating a simulation helps you to understand an event in less time. A simulation is a pretend version of the real event. In this project, you will create a maternity ward simulation — a model of a hospital room where babies are born and celebrate their “zero birthdays.”
Instead of taking nine months for a baby to arrive, this simulation makes a pretend newborn boy or girl by clicking a button. Then, using the repeat command, you can make hundreds of babies (or more) to represent all the births in a state or country. Using the simulation, you can quickly look at the distribution of births, meaning how many boys and girls are born in a large population of babies. Say “Happy Birthday!”
Brainstorm
The Happy Birthday simulation does not have to feature babies being born. Consider simulating the birth of any creature, particularly those that produce only one offspring at a time:
- Elephants
- Whales
- Hippos
- Gorillas
… or fantasy creatures you invent!
Also consider alternatives for where the “baby” is born:
- A meadow or forest
- A zoo or circus
- The ocean
- A space station!
You can even change the entire project to represent any other two-outcome scenario, such as flipping a coin (heads or tails), evaluating the state of a radioactive atom (decayed or not decayed), lighting a lamp (on or off), or monitoring the health of Schrödinger’s cat (dead or alive).
Start a New Project
Begin creating Happy Birthday by starting a new project as follows:
 Start MicroWorlds EX.
- From the yellow MicroWorlds EX startup screen, select Free Mode.
A new project opens.
- From the menu bar, choose File⇒New Project Size⇒Full Screen 640 x 480.
Apply a Hospital Theme to the Workspace
Because babies are often born in a maternity ward, apply a background to your simulation that conveys a hospital theme:
 From the toolbar, click the Hide/Show Painting/Clipart button.
The Painting/Clipart palette opens.
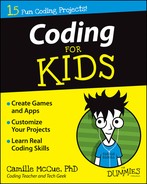
 Click the Backgrounds button to show the backgrounds, as shown in Figure 7-1.
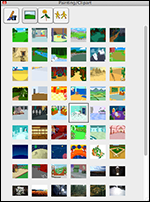
Figure 7-1
- Click on a background image you want to apply to your Happy Birthday simulation. (I used the hospital room background in the example.) Then click in the workspace to apply the background image.
- Right-click (Windows) or Ctrl-click (Mac) the background image. From the pop-up menu, select Stamp Full Page.
The image is stamped to fill the entire workspace.
 Switch to the Painting Tools. Use the Painting Tools to draw a filled rectangle at the bottom of the background.
This area will be used to feature the buttons of the graphical user interface (refer to the figure at the beginning of this project).
- Close the Painting/Clipart palette by clicking its X button.
Create a Title Text Box
Add a title to the page as follows:
 From the toolbar, click the Create a Text Box button; move into the workspace and draw a rectangle for the text box; type a title — Happy Birthday — in the white area of the text box.
- Select the text inside the text box. From the menu bar, select the Text menu options and format the text.
See Project 1 for details on formatting text.
- Right-click (Windows) or Ctrl-click (Mac) inside the text box and select Transparent from the pop-up menu.
 Text boxes can be resized at any time. Ctrl-click (Windows) or Command-click (Mac) an opaque text box. Sizing dots appear — click and drag any of them to resize the text box. Your can edit text only when the text box is opaque (not transparent). To change a text box from transparent to opaque, click the text; then right-click (Windows) or Ctrl-click (Mac) and select Opaque from the pop-up menu.
Create Boy and Girl Characters
The simulation requires only one turtle object. The turtle will represent the newborn baby. At each birth, the baby turtle will wear a shape indicating whether it is a girl baby or a boy baby. Create girl and boy characters for your simulation as follows:
 From the toolbar, click the Create a Turtle button. Move into the workspace and click to hatch a turtle.
- Drag the turtle to a position just above the hospital bed.
Your workspace now looks similar to Figure 7-2.
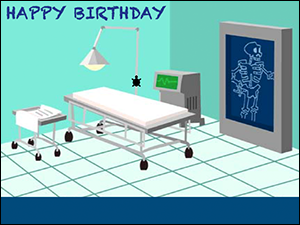
Figure 7-2
 Now you’re ready to paint shapes for the girl baby and the boy baby. Click the project Shapes tab (located in the lower-right corner of the window).
- On the Shapes pane, double-click a shape spot.
The Shape Editor opens.
- In the top-left corner, reduce the zoom to 500%. Then stretch the sizing dots on each side of the shape until the width is 135 pixels and the height is 125 pixels.
- Use the drawing tools in the Shape Editor to draw a newborn girl shape, as shown in Figure 7-3. You can draw any female baby you want — human, zombie, alien — anything!
Figure 7-3
- Name the girl shape pink (in the empty white field at the top of the Shape Editor) and then click OK.
Feel free to call the shape any name you want; just be sure to keep track of the name you use when coding procedures. It’s easiest to name the shape by its color.
The Shape Editor closes, and the pink shape appears in a spot on the project Shapes tab.
- Repeat Steps 4–6 to create a boy shape, as shown in Figure 7-4. Again, create any type of male baby you want.
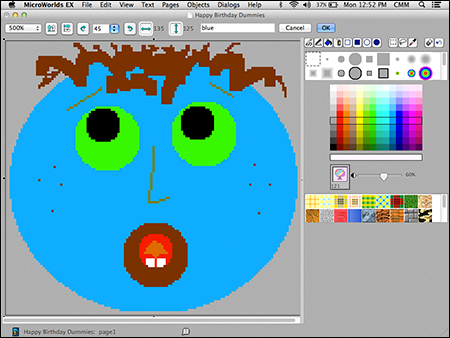
Figure 7-4
- Name this shape blue at the top of the Shape Editor and then click OK.
Again, call the shape any name you want; just keep track of the name you use when coding procedures.
The Shape Editor closes, and the blue shape appears in a spot on the project Shapes tab.
- Click either the pink or blue shape on the project Shapes tab and then move into the workspace and click the turtle.
The turtle now wears the shape.
If you accidentally click somewhere other than the turtle, the pink or blue shape will appear on the background — simply right-click (Windows) or Ctrl-click (Mac) the shape and select Remove from the pop-up menu to get rid of it.
Create Variables
The Happy Birthday simulation needs a way to show whether a newborn baby is a boy or a girl. It also needs a way to count how many total boys and how many girls are born in a large population. Variables will be used for all three of these.

Variables are quantities that can have different values at different times. You will probably first learn about variables in a pre-algebra course. Math often uses single letters like a or x for a variable — and sometimes coding does, too — but coding also uses a whole word like “gender” or “boys” or “girls” for a variable name.
Create a variable as follows:
- From the toolbar, click the Create a Text Box button; move into the workspace and draw a rectangle for the text box.
Now, instead of showing a title, this text box will be used to show the value of a variable.
- Right-click (Windows) or Ctrl-click (Mac) inside the text box and select Edit from the pop-up menu.
- Name the text box gender. The Show Name and Visible check boxes should be selected.
This text box will be used to show a discrete variable value — a value that can only be a certain number such as 0 (for a girl) or 1 (for a boy). Like flipping a coin, there is no “in-between” value — it’s either heads or tails, boy or girl.
Text boxes used as variables must remain opaque for the variable values to change. - Repeat Steps 1–3 to make two more text boxes to show variable values; name one girls and the other boys.
These will be counting variables or counters that count the total number of girls and the total number of boys. (Counting variable is not a formal mathematical term, just a description of how this variable is functioning in your program.)
To create a new text box with the same size and shape as an existing text box: Right-click (Windows) or Ctrl-click (Mac) inside the text box you want to duplicate and select Copy Box from the pop-up menu. Then right-click (Windows) or Ctrl-click (Mac) in the workspace and select Paste from the pop-up menu. A duplicate text box appears. - Drag the text boxes to where you want them positioned.
Your workspace should look similar to Figure 7-5.
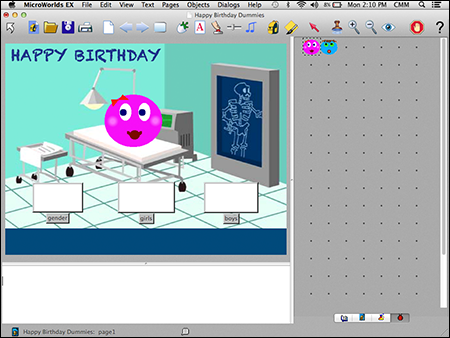
Figure 7-5
Write an Initialize Procedure and Make an Associated Button
Like any simulation, the maternity ward needs a starting point. A procedure is needed to start, or initialize, the model. The procedure represents starting a new shift at a hospital or starting a new day when the number of babies born is zero.
Follow these steps to write an initialize procedure and create a button to execute it:
 Click the project Procedures tab (located in the lower-right corner of the window).
- Type the initialize procedure as shown:
to initialize
setgirls 0
setboys 0
endThis procedure sets the value of the girls and boys variables to zero. Remember, each of these variables counts how many girls and how many boys are made with the model. Now that you have written the initialize procedure, MicroWorlds EX recognizes it as a new command that you can use!
- Next, you need to create a button to run the procedure. From the toolbar, click the Create a Button button. Then click anywhere in the workspace.
- In the Button dialog box, fill in the following information (as shown in Figure 7-6):
- Label: Type Initialize in the Label field to name the button.
- Instruction: Type initialize in the Instruction field.
- Do It: Select the Once radio button.
- Visible: Select this check box to leave the button visible.
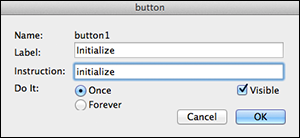
Figure 7-6
- Click OK to close the Button dialog box.
The Initialize button is added to the workspace.
- Drag the button to the lower-left corner of the workspace.
- Test your Initialize button by clicking it.
A zero should appear in the girls text box, and a zero should appear in the boys text box.

Programming languages often require you to set the initial value of a variable. That’s because you must know how much of a quantity you have initially (at the beginning) so that you can figure out how much you end up with when you add to the quantity, or subtract from the quantity.
Besides calling a procedure from a button, you can also add it to the rules of a turtle backpack, or embed it another procedure.
Write a Reproduce Procedure and Make an Associated Button
My students always ask me, “What does reproduce mean?” In our computer simulation, it means to make a new baby. (In biology, it means that, too, but I won’t explain those details. There may be a stork involved.)
You probably know from simple genetics that if a baby has certain genes, it’s a girl. If it has different genes, it’s a boy. Notice that I used the words if and then when writing those sentences. You will use the same structure to create IF-THEN commands in your program code. These commands let you show the gender of the newly made baby. Gender means boy or girl.
Write a procedure to make a baby and show its gender as follows:
- In the Procedures pane, type the reproduce procedure as shown:
to reproduce
setgender random 2
if gender = 0 [setsh "pink setgirls girls + 1]
if gender = 1 [setsh "blue setboys boys + 1]
endThis procedure sets the value of gender randomly to 0 or 1. The number 0 means that a girl is born, and the number 1 means that a boy is born. Each number has an equal probability of appearing, so there is a 50% chance of creating a girl and a 50% chance of creating a boy.
The procedure then uses two IF-THEN conditional statements. Each statement affects the shape worn by the turtle and a counter variable:
- The first IF-THEN says that if the gender variable value is 0, then set the turtle shape to pink (the girl baby shape) and add 1 to the current value of the girls variable.
- The second IF-THEN says that if the gender variable value is 1, then set the turtle shape to blue (the boy baby shape) and add 1 to the current value of the boys variable.
Here, the girls variable and the boys variable serve as counters by keeping track of the total number of girls and the total number of boys.
IF-THEN conditionals are logic statements that are common in coding. The general form is IF condition THEN consequence. However, different computer languages format IF-THEN conditionals in different ways. In MicroWorlds EX, the format is IF condition [consequence]. The commands in the consequence are executed when the condition is true; otherwise, the consequence is ignored. See Project 8 for additional information on IF-THEN conditionals.
- Create a button to run the procedure. From the toolbar, click the Create a Button button. Then click anywhere in the workspace.
- In the Button dialog box, fill in the following information (as shown in Figure 7-7):
- Label: Type Reproduce in the Label field to name the button.
- Instruction: Type reproduce in the Instruction field.
- Do It: Select the Once radio button.
- Visible: Select this check box.
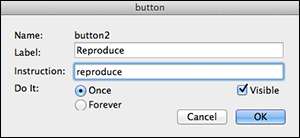
Figure 7-7
- Click OK to close the Button dialog box.
The Reproduce button is added to the workspace.
- Drag the button to the bottom of the workspace, to the right of the Initialize button.
- Test the Reproduce button by clicking it.
A 0 or 1 should appear in the gender text box, and the shape worn by the baby turtle object should change to match the gender. The associated girls or boys variable value should increase by 1.
If needed, you can resize a button (assuming it is not frozen) to better fit the labels it displays. Ctrl-click (Windows) or Command-click (Mac) a button. Sizing dots appear — click and drag any of them to resize the button.
Write a Make 10 Babies Procedure and Make an Associated Button
After you have written both the initialize procedure and the reproduce procedure, you can put them together in new ways. For example, you can combine these two procedures with a repeat command to write a procedure to make ten babies.
Follow these steps to write the make_10_babies procedure and make a button to execute it:
- In the Procedures pane, type the make_10_babies procedure as shown:
to make_10_babies
initialize
repeat 10 [reproduce]
endThis procedure might represent the births at a single hospital in a single day, assuming that ten births occur. It allows you to see each newborn baby appear — really fast — and count the total number of boys born and the total number of girls born.
Note that both the initialize procedure and the reproduce procedure are nested in the make_10_babies procedure.
- Next, create a button to run the procedure. From the toolbar, click the Create a Button button. Then click the workspace anywhere.
- In the Button dialog box, fill in the following information (as shown in Figure 7-8):
- Label: Type Make 10 Babies in the Label field to name the button.
- Instruction: Type make_10_babies in the Instruction field.
- Do It: Select the Once radio button.
- Visible: Select this check box.
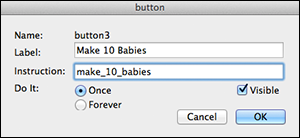
Figure 7-8
- Click OK to close the Button dialog box.
The Make 10 Babies button is added to the workspace.
- Drag the button to the bottom of the workspace to the right of the Reproduce button.
Each time you click the button, the make_10_babies procedure is executed. The girls and boys counters allow you to see the frequency distribution of gender in the baby population.
A frequency distribution describes how many of each possible outcome appears in a small sample or large population. Sometimes the Happy Birthday simulation produces 5 girls and 5 boys; other times, it makes 8 girls and 2 boys; and rarely, it produces 0 girls and 10 boys.
Save, Test, and Debug
Choose File⇒Save Project from the menu bar to save your simulation. Your finished simulation should look similar to the title figure, and your procedures should look similar to Figure 7-9. Note that this figure includes procedures suggested in the nearby “Enhance your simulation” sidebar.

Figure 7-9
Test each button to make sure it functions as you intend. Check for error messages in the Command Center to help you determine where any bugs may exist in your code. When you’re finished, run the simulation several times and evaluate how well you believe it models the real world.