Project 13
Rock, Paper, Scissors
Few recess games are as familiar or fast as Rock, Paper, Scissors. Using only your hands, you and an opponent randomly choose an object and reveal your choice at the same time. Based on the choices, one competitor wins, and one loses: Rock beats scissors, paper beats rock, and scissors beat paper. If both competitors choose the same object, the game is a draw (tie).
In this project, you build your own Rock, Paper, Scissors game with player versus computer. The game uses compound conditionals to determine the winner of each round. A compound conditional has an if-then plus conjunctions (and, or, not) in the code. This code format is used when more than one condition must be met in order for a consequence to happen. “If it is Monday and it is 8 a.m., then I ride the bus to school.” If the player chooses rock and the opponent chooses scissors, rock beats scissors (player wins).
Brainstorm
You can make rock, paper, scissors into any game in which players choose three objects for comparison. The key is that each object must be able to win against another object, and also lose against the third object. What will your game feature?
- Pop stars, such as Beyoncé, Justin Timberlake, and Selena Gomez
- Pokémon characters, such as Pikachu, Squirtle, and Snowball
The rules of rock, paper, scissors are shown in Figure 13-1. Remember that if both competitors choose the same object, the game is a draw.
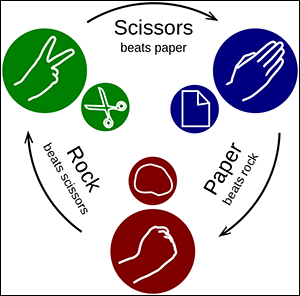
“Rock-paper-scissors” by Enzoklop - Own work. Licensed under Creative Commons Attribution-Share Alike 3.0 via Wikimedia Commons - http://commons.wikimedia.org/wiki/File:Rock-paper-scissors.svg#mediaviewer/File:Rock-paper-scissors.svg
Figure 13-1
Start a New Project
Begin creating your Rock, Paper, Scissors game by starting a new project as follows:
 Start MicroWorlds EX.
- From the yellow MicroWorlds EX startup screen, select Free Mode. A new project opens.
- From the menu bar, choose File⇒New Project Size⇒MicroWorlds Standard.
Paint the Game Page
The game page is where the player plays the game. On this page, the player will be able to select an object — rock, paper, or scissors — and then the computer will randomly show an object. Paint the game page as follows:
 On the toolbar, click the Hide/Show Painting/Clipart button.
The Painting/Clipart palette opens.
 Use the Painting Tools to paint your own background in the workspace. Include two large rectangular regions (as shown in Figure 13-2):
- One to show the player’s choice of rock, paper, or scissors
- One to show the computer’s choice
- When you’re finished, close the Painting/Clipart palette by clicking its X button.
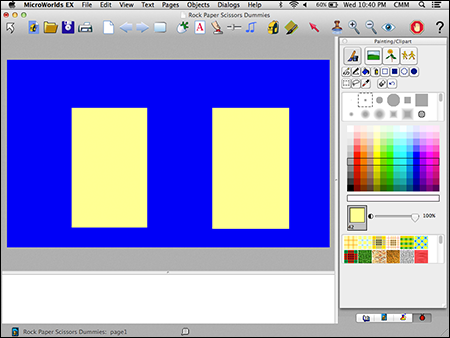
Figure 13-2
Add a Title and Text Labels to the Game Page
Add a title and text labels to the game page as follows:
 On the toolbar, click the Create a Text Box button; move into the workspace and draw a long rectangle for the text box; type the name of your game — Rock, Paper, Scissors — in the white area of the text box.
- Select the text inside the text box. From the menu bar, select the Text menu options and format the text.
See Project 1 for details on formatting text.
- Right-click (Windows) or Ctrl-click (Mac) inside the text box and select Transparent from the pop-up menu.
- Drag the text box title to the top of the workspace.
- Repeat Steps 1–3 to create a text box named CHOOSE! Drag this label into a position where the player buttons will be located.
- Repeat Steps 1–3 to create two text boxes: PLAYER and COMPUTER. Drag the PLAYER label into the left rectangle where the player’s choice will be located and drag the COMPUTER label into the right rectangle where the player’s choice will be located, as shown in Figure 13-3.
 To make sure that players don’t accidentally move your text labels, right-click (Windows) or Ctrl-click (Mac) any label and select Freeze from the pop-up menu to freeze it in place.
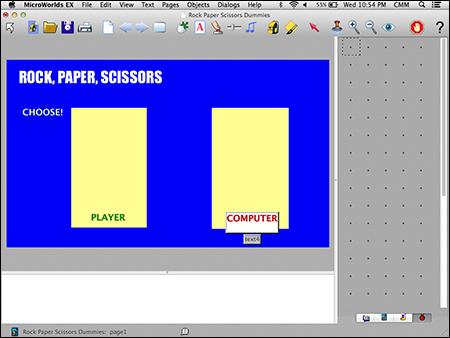
Figure 13-3
Create Rock, Paper, and Scissors Characters
You’ll need two turtle objects for the game: one player turtle and one computer turtle. Each turtle can appear as a rock, a piece of paper, or a pair of scissors. Create two turtle objects and the rock, paper, and scissors character shapes as follows:
 On the toolbar, click the Create a Turtle button. Move into the workspace and click to hatch a turtle.
- Next, name the turtle that will be your player’s object. Right-click (Windows) or Ctrl-click (Mac) the turtle and select Open Backpack from the pop-up menu.
- On the backpack State tab, click the Edit button. In the dialog box that appears, type player in the Name field, as shown in Figure 13-4. Then click OK to close the Name dialog box. Close the backpack by clicking its X button.
Figure 13-4
- Drag the player turtle to a position in the left box reserved for the player’s object.
- Repeat Steps 1–3 to create another turtle. Name this turtle computer (as shown in Figure 13-5) and drag it to a position in the right box reserved for the computer’s object.
Figure 13-5
Your game now looks something like Figure 13-6.

Figure 13-6
 Next, paint some shapes for the rock, paper, and scissors characters. Click the project Shapes tab (located in the lower-right corner of the window).
- On the project Shapes pane, double-click a shape spot.
The Shape Editor opens.
- Because you need to draw large shapes, it is helpful to resize the drawing area in the Shape Editor so that you have more room to draw. Click the Zoom tab and select 600%. Then drag the sizing dots of the drawing area until the Shape Dimension Indicators (width and height) each read 100 (see Figure 13-7).

Figure 13-7
- Use the drawing tools in the Shape Editor to draw a rock shape, as shown in Figure 13-8.
- Name the shape rock (in the empty white field at the top of the Shape Editor) and then click OK.
The Shape Editor closes, and the rock shape appears in a spot on the project Shapes pane.
- Repeat Steps 7–10 to create a paper shape and also a scissors shape.
Now, all three shapes appear in spots on the project Shapes pane, as shown in Figure 13-9.
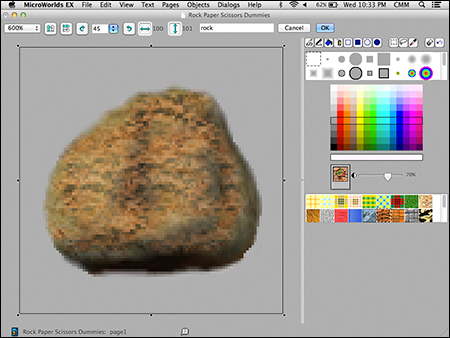
Figure 13-8

Figure 13-9
- Click any shape on the project Shapes pane and then move into the workspace and click the player turtle.
The turtle now wears the shape.
- Repeat Step 12 to place a shape on the computer turtle.
If you accidentally click somewhere other than the turtle, the shape will appear on the background — simply right-click (Windows) or Ctrl-click (Mac) the shape and select Remove from the pop-up menu to get rid of it.
- Even though you painted the shapes fairly large, you may still need to make some size adjustments once the shapes are applied to the turtles. Right-click (Windows) or Ctrl-click (Mac) the player turtle and select Open Backpack. On the backpack State tab, type in a number for the Size. Close the backpack.
Remember, the default size of a turtle is 40. The smallest size is 5, and the largest is 160.
- Repeat Step 14 for the computer turtle.
In Figure 13-10, the backpack shows a computer turtle size of 60.
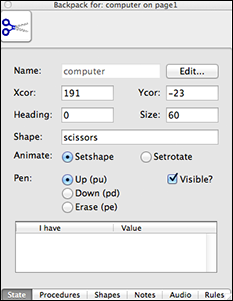
Figure 13-10
Make Rock, Paper, and Scissors Buttons
The player needs a way to make a choice of rock, paper, or scissors. You can do that by creating a button for each choice. The button will change the shape of the player’s turtle to show the choice. Then, the button will execute a procedure that makes the computer randomly select its own shape.
Follow these steps to make the rock, paper, and scissors buttons:
 On the toolbar, click the Create a Button button. Then click anywhere in the workspace.
- In the Button dialog box, fill in the following information, as shown in Figure 13-11:
- Label: Type Rock in the Label field to name the button.
- Instruction: Type player, setshape "rock wait 5 compchoose in the Instruction field.
The instruction tells the player turtle to set its shape to rock, then wait 5 (about half a second) to help pace the game so that an element of excitement is added regarding what the computer will choose and who will win the match! It then executes the nested compchoose procedure, which causes the computer to randomly make a choice. (See the next section, “Write a Compchoose Procedure.”)
- Do It: Select the Once radio button.
- Visible: Select this check box to leave the button visible.

Figure 13-11
- Click OK to close the Button dialog box.
The Rock button is added to the workspace of the game.
- Drag the Rock button to a position just below the CHOOSE! Label.
- Repeat Steps 1–4 to create a button for the player to choose Paper and then have the computer randomly make a choice. In the Instruction field, enter player, setshape "paper wait 5 compchoose, as shown in Figure 13-12.
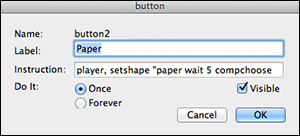
Figure 13-12
- Repeat Steps 1–4 to create a button for the player to choose Scissors and then have the computer randomly make a choice. In the Instruction field, enter player, setshape "scissors wait 5 compchoose, as shown in Figure 13-13.
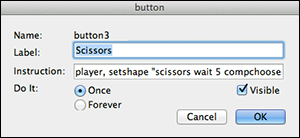
Figure 13-13
The game now looks like Figure 13-14.
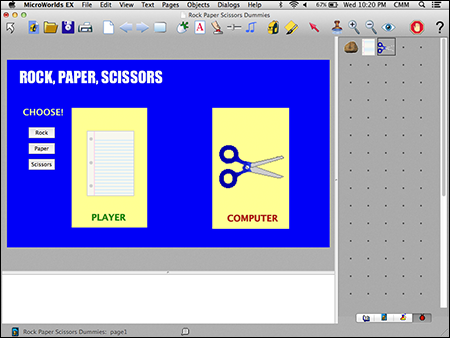
Figure 13-14
Write a Compchoose Procedure
![]() A compchoose procedure causes the computer to randomly make its choice of rock, paper, or scissors. Switch to the project Procedures pane, and write the compchoose procedure as follows:
A compchoose procedure causes the computer to randomly make its choice of rock, paper, or scissors. Switch to the project Procedures pane, and write the compchoose procedure as follows:
to compchoose
repeat 10 [computer, wait 1 setshape pick [rock paper scissors]]
checkwin
end
When writing procedures that have long lines of code, it is helpful to extend the width of the Procedures pane. Just grab the divider between the pane and the workspace and open up the pane as much as you need, as shown in Figure 13-15. Another way to see your code more clearly is to break up long commands over several lines by inserting your own lines breaks between parts of the command.
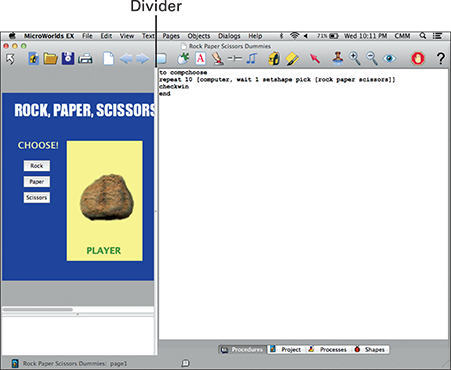
Figure 13-15
The compchoose procedure works like this:
- It repeats 10 times a process of telling the computer turtle to set its shape to one picked from three possibilities: rock, paper, and scissors. From the player’s view, the computer is “deciding” what object to reveal by picking a shape and then picking another shape over and over until it settles on a final choice. Here again, the coding is used merely to heighten the player experience. (See the nearby sidebar, “Picking — selecting with replacement,” for more on the pick command.)
- The wait 1 command simply slows down the process.
- The checkwin procedure (which you write in the next section) determines who wins the match.
Write a Checkwin Procedure
A checkwin procedure determines who wins the two-way match by comparing the player shape with the computer shape.
The checkwin procedure checks for all possible outcomes of a rock, paper, scissors game. What are those?
- The player and the computer choose the same object — this is a draw.
- The player chooses rock, and the computer picks paper or scissors.
- The player chooses paper, and the computer picks rock or scissors.
- The player chooses scissors, and the computer picks rock or paper.
On the Procedures pane, type the checkwin procedure (see Figure 13-16):
to checkwin
; check for draw
if (player's "shape) = (computer's "shape) [say [DRAW]]
; player chooses rock
if and (player's "shape) = "rock (computer's "shape) = "paper [say [PAPER COVERS ROCK] ]
if and (player's "shape) = "rock (computer's "shape) = "scissors [say [ROCK CRUSHES SCISSORS] ]
; player chooses paper
if and (player's "shape) = "paper (computer's "shape) = "rock [say [PAPER COVERS ROCK] ]
if and (player's "shape) = "paper (computer's "shape) = "scissors [say [SCISSORS CUT PAPER] ]
; player chooses scissors
if and (player's "shape) = "scissors (computer's "shape) = "rock [say [ROCK CRUSHES SCISSORS] ]
if and (player's "shape) = "scissors (computer's "shape) = "paper [say [SCISSORS CUT PAPER] ]
end
Note that each comparison begins with a comment line that is introduced by a semicolon symbol (;).
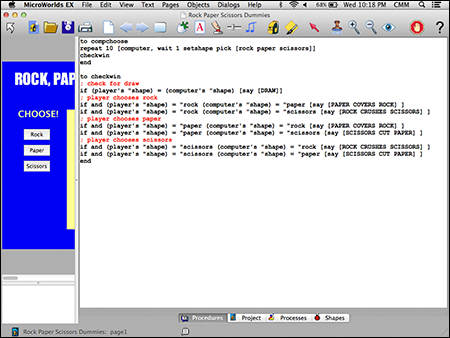
Figure 13-16
When using parentheses in writing MicroWorlds EX code, you can leave them off of single words such as "rock. Parentheses are needed only to eliminate confusion with double words such as contractions, for example, (player's "shape).

As you write longer and more complicated procedures, it’s a good idea to include comment lines in your code. Comment lines are notes about what each procedure or program section does. Comments help you remember the purpose of your code and are especially helpful to others who may read your code, or collaborators who may be coding with you on a team project. They are also ideal for keeping your program visually and structurally organized, and may be written to serve as a plan before creating any actual code. A semicolon symbol (;) usually starts a comment line. Comment lines are not executed. In Figure 13-16, the words in red are comments. Note that longer comments can wrap to additional lines, but you should not use a line break to split them as this will generate an error.
Following each comment is a compound conditional to compare the objects and say an outcome. Here is an example:
- Plain words: If the player’s shape is a rock, and the computer’s shape is paper, then say PAPER COVERS ROCK.
- MWEX code: if and (player's "shape) = "rock (computer's "shape) = "paper [say [PAPER COVERS ROCK] ]
In the compound “and” conditional, both conditions must be true for the consequence to be executed.
The checkwin procedure compares all possible combinations of player and computer choices and gives a consequence for each pair. checkwin uses the say command to inform the player of the outcome of each match. The say command uses your computer’s artificial voice to say the words in the square brackets.

One branch of mathematics where compound conditionals of all sorts appear is logic. From formal logic that forms the basis of argumentation and proofs (you’ll do these in geometry!) to puzzle logic — including classics such as Wolf, Sheep, and Cabbage (see www.plastelina.net) — you’ll find conditionals.
Save, Test, Debug, and Enhance
Chose File⇒Save Project from the menu bar to save your game. Test your game by playing it several times. Test out each button and make sure that each combination says the correct result. This will help you work out the bugs.