Project 12
Squid Ink
When you’re a simple, nonviolent squid, it can be hard to defend your ocean home. But armed with ink sacs, you can swim around safely, releasing a disorienting, black cloud whenever a nasty shark gets too close!
In Squid Ink, you build a shooter-style game. The squid’s motion is keyboard controlled, and the shark glides constantly in a direction towards the squid. Additionally, the squid carries hidden cargo — his ink cloud — that matches the squid’s x and y coordinates until it is shot at the shark. The touchedturtle commands in IF-THEN conditionals check whether the ink touches the shark, as well as whether the shark touches the squid. Recorded audio plays if either touching condition is met.
Brainstorm
Shooter games can be adapted to a wide variety of themes, including
- A shooting gallery at the fair in which the player aims a water gun at rubber ducks
- A humanitarian mission in which airplane flyovers drop food packages into refugee camps
- A Galaga- or Asteriods-style game in which the player navigates a spacecraft and shoots at incoming invaders or space debris
Start a New Project
Begin creating your Squid Ink game by starting a new project as follows:
 Start MicroWorlds EX.
- From the yellow MicroWorlds EX startup screen, select Free Mode.
A new project opens.
- From the menu bar, choose File⇒New Project Size⇒MicroWorlds Standard.
Add an Ocean-Themed Background
Follow these steps to add a background for your Squid Ink game that conveys an ocean theme:
 On the toolbar, click the Hide/Show Painting/Clipart button.
The Painting/Clipart palette opens.
 Click the Backgrounds button to show the backgrounds.
- Click on a background image you want to apply to your Squid Ink game. (Here, I selected the sea floor background.) Then click in the workspace to apply the background image.
- Right-click (Windows) or Ctrl-click (Mac) the background image. From the pop-up menu, select Stamp Full Page.
The image is stamped to fill the entire workspace.
 Switch to the Painting Tools on the Painting/Clipart palette. Use the Painting Tools to customize the background.
The completed background is shown in Figure 12-1.
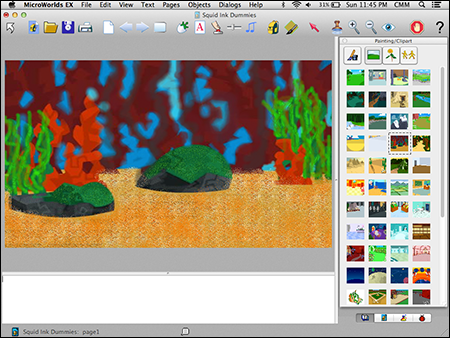
Figure 12-1
Leave the Painting/Clip Art palette open.
Create an Animated Squid Character
Create a squid character for your game as follows:
 On the toolbar, click the Create a Turtle button. Move into the workspace and click to hatch a turtle.
- Next, you need to name the turtle that will be your squid. Right-click (Windows) or Ctrl-click (Mac) on the turtle and select Open Backpack from the pop-up menu.
- On the backpack State tab, click the Edit button beside the Name field. In the dialog box that appears, type squid in the Name field, as shown in Figure 12-2. Click OK to close the Name dialog box.
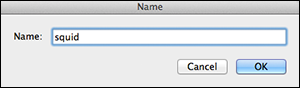
Figure 12-2
 With the Painting/Clipart palette still open, click the Animation button.
- Scroll down to the two pink squid shapes. Add the animated squid to the turtle as follows: Click the first squid shape. Hold down the Shift key on the keyboard and then click the second squid shape.
All the squid shapes are selected, as shown in Figure 12-3.

Figure 12-3
- Move into the workspace and click on the turtle.
The turtle now wears the animated sequence of squid, as shown in Figure 12-4.
- Close the Painting/Clipart palette by clicking its X button.

Figure 12-4
Create an Ink Cloud Character
Create an ink cloud character for your squid to shoot as follows:
- On the toolbar, click the Create a Turtle button. Move into the workspace and click to hatch a turtle.
- Next, name the turtle that will be your ink. Right-click (Windows) or Ctrl-click (Mac) on the turtle and select Open Backpack from the pop-up menu.
- On the backpack State tab, click the Edit button. In the dialog box that appears, type ink in the Name field, as shown in Figure 12-5. Click OK to close the Name dialog box.
Keep the ink turtle backpack open, but move it out of the way.
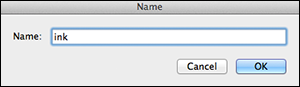
Figure 12-5
 Click the project Shapes tab (located in the lower-right corner of the window).
- On the project Shapes pane, double-click a shape spot.
The Shape Editor opens.
- Use the drawing tools in the Shape Editor to draw your own ink cloud, as shown in Figure 12-6. Click OK when you’re finished.
 To increase the size of the drawing space, decrease the zoom percentage and then pull the sizing dots.
It is always good coding practice to name all elements of your program. However, in this program, it is only necessary to name the objects (the turtles), not the shapes they wear. Only the elements of a program that are specifically referenced by name require names.

Figure 12-6
The completed ink cloud shape now appears on the project Shapes pane.
- Click the ink shape on the project Shapes pane and then move into the workspace and click on the turtle named ink.
The turtle now wears the shape, as shown in Figure 12-7.
If you accidentally click somewhere other than the turtle, the ink cloud shape will appear on the background — simply right-click (Windows) or Ctrl-click (Mac) the shape and select Remove from the pop-up menu to get rid of it.
Figure 12-7
Create an Animated Shark Character
A shark character roams the ocean scene and serves as a target where the squid shoots its ink. Create an animated shark character as follows:
- Follow Steps 1–3 in the preceding section to create and name a turtle. In the dialog box, type shark in the Name field, as shown in Figure 12-8.
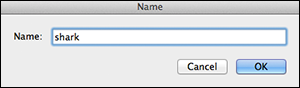
Figure 12-8
- On the Shapes pane, double-click a shape spot.
The Shape Editor opens.
- Use the drawing tools in the Shape Editor to draw your own shark, as shown in Figure 12-9. When you’re finished, click OK.
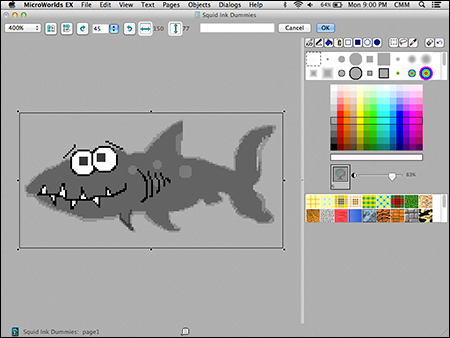
Figure 12-9
- Right-click (Windows) or Ctrl-click (Mac) the shark shape and then select Copy from the pop-up menu.
- Right-click (Windows) or Ctrl-click (Mac) an empty shape spot and then select Paste from the pop-up menu. Repeat so that you have three identical shark shapes.
- Double-click a shape spot containing a copy of the shark shape.
The Shape Editor opens.
- Using the Paint tools in the Shape Editor, add a little light shading to adjust the dorsal fin and the tail fin. Your goal is to make it appear that the shark has changed position slightly while swimming. When you’re finished, click OK.
- Repeat Steps 6–7 on the other copy of the shark shape to add a little dark shading to the fins.
Now, all three shark shapes appear in spots on the project Shapes pane, as shown in Figure 12-10.

Figure 12-10
- Next, add the animated shark shapes to the shark turtle. Click the first shark shape and then hold down the Shift key on the keyboard and then click the last shark shape.
All three shark shapes are selected.
- Move into the workspace and click the shark turtle.
The turtle now wears the animated sequence of sharks, as shown in Figure 12-11.

Figure 12-11
Write a Go Procedure and Make a Button
Your game will use a go procedure to start the game action. Write the go procedure and then make an associated Go button.
Write the go procedure
Follow these steps to write the go procedure:
 Click the project Procedures tab (located in the lower-right corner of the window).
- Type the following go procedure:
to go
everyone [setx random 740 clickon]
tto [squid shark] st
ink, ht
endThe go procedure instructs everyone — the squid turtle, the ink turtle, and the shark turtle — to set its x-coordinate to a random number up to 740, which is the width of the workspace. This has the effect of placing the turtles in random positions horizontally across the screen, with the objective being to separate the squid from the shark at the start of the game. (See Project 10 for an explanation regarding how this command scatters turtle objects into random positions.) The clickon portion of the everyone command then clicks on all three turtles. You will write instructions in the OnClick fields of each turtle so that they know what commands to perform when clicked on.
The procedure then talks to (tto) the squid and shark, instructing them to show turtle (st).
The command ink, ht tells the ink turtle to hide because the squid hasn’t shot the ink cloud at the shark — yet!
As an additional challenge, add a line of code to the go procedure to disperse the objects vertically as well. This helps further separate the squid and shark. Using only horizontal separation, there will be occasions when the shark and squid end up touching each other at the start of the game. Using both horizontal and vertical random positioning helps reduce the chance of an initial collision.
Create a Go button
After you have written the go procedure, MicroWorlds EX recognizes it as a new command that you can use. Follow these steps to create a Go button to run the procedure:
 On the toolbar, click the Create a Button button. Then click anywhere on the workspace.
- In the Button dialog box, fill in the following information (as shown in Figure 12-12):
- Label: Type Go in the Label field to name the button.
- Instruction: Type go in the Instruction field.
- Do It: Select the Once radio button.
- Visible: Select this check box to leave the button visible.

Figure 12-12
- Click OK to close the Button dialog box.
The Go button is added to the workspace.
- Drag the button to an out-of-the-way position in a corner of the workspace.
- Test the Go button to make sure it functions as expected. Note that the ink turtle should disappear because it is given the hide turtle command.
Write a Swimshoot Procedure and Add It to the Squid
A swim and shoot (swimshoot) procedure lets a player move the squid around the ocean and shoot ink by using the keyboard. Follow these steps to write the procedure and add it to the squid:
- On the project Procedures pane, write a swimshoot procedure.
For a Windows game:
to swimshoot
let [key readchar]
if (ascii :key) = 37 [seth 270 fd 10]
if (ascii :key) = 38 [seth 0 fd 10]
if (ascii :key) = 39 [seth 90 fd 10]
if (ascii :key) = 40 [seth 180 fd 10]
if (ascii :key) = 32 [shoot]
endFor a Mac game:
to swimshoot
let [key readchar]
if (ascii :key) = 28 [seth 270 fd 10]
if (ascii :key) = 30 [seth 0 fd 10]
if (ascii :key) = 29 [seth 90 fd 10]
if (ascii :key) = 31 [seth 180 fd 10]
if (ascii :key) = 32 [shoot]
endswimshoot begins with a basic keyboard-control procedure that allows the player to use the keyboard to move the squid around the ocean in four directions. It then extends the procedure by adding the execution of a shoot procedure whenever the spacebar is pressed: if (ascii :key) = 32 [shoot]. Don’t worry about the shoot procedure yet; you will write it in the next section.
- Next, you need to tell the squid turtle to use the swimshoot procedure. Right-click (Windows) or Ctrl-click (Mac) the squid turtle and select Open Backpack from the pop-up menu.
- On the backpack Rules tab, type swimshoot in the OnClick field and set it to Forever, as shown in Figure 12-13. Click OK to close the backpack.
After players click the Go button — a process that clicks on the squid — they can use the keyboard arrows to move the squid around the ocean, and press the spacebar to fire ink.
If you plan to distribute your game on both Windows and Mac platforms, you can put both sets of ASCII keyboard commands into the swimshoot procedure so that the game operates everywhere. Just follow the “if” line of code for Windows with the “if” line of code for Mac on the next line.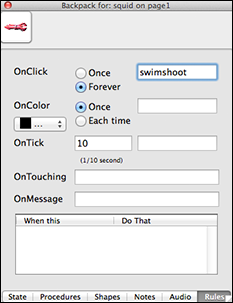
Figure 12-13
Write a Shoot Procedure
A shoot procedure allows the squid to suddenly reveal a secret weapon — a puff of ink! When shoot executes, the ink cloud changes from hidden to showing, and moves at a target in the direction the squid is headed.
Continue working on the project Procedures pane and write a shoot procedure as follows:
to shoot
tto [ink]
setx squid's "xcor
sety squid's "ycor
seth squid's "heading
st
glide 200 0.4
ht
tto [squid]
end
When a player is driving the squid around the ocean using the swimshoot procedure, the shark approaches. The player presses the spacebar to shoot at the squid. This action executes the shoot procedure, which works as follows:
- The ink turtle becomes the active object using tto [ink], meaning “talk to the ink turtle.”
- The ink turtle sets its x-coordinate (xcor), its y-coordinate (ycor), and its heading (heading) to match the squid’s coordinates and heading.
- Then the ink becomes visible (st). This makes it appear that the squid has been secretly carrying the ink as it swims around.
- The ink then moves away from the squid in the direction the squid is heading using the glide command. This looks like the ink is being fired. After the ink moves 200 pixels at a speed of 0.4, it hides (ht). The shoot procedure doesn’t address whether the ink hits the shark — that will occur in a different procedure.
glide is an alternative motion command for forward, and it is useful whenever you want to create smoother movement. To use the glide command, indicate both a distance and a speed, as in glide 200 0.4, which means move 200 pixels at a speed of 0.4. Tinker with the distance and speed to create the motion you desire.
- Finally, the shoot procedure transfers control back to the squid using tto [squid] so that the player can return to driving the squid. Note that while the ink approaches the shark, the squid cannot move … he’s exhausted from firing off his ink!
Record “Argh, Inked Again” and “Chomp” Sounds
Although squid and sharks don’t actually talk, you can guess what they might say if they did! If you have a microphone available on your computer, the audio recording feature of MicroWorlds EX allows you to record voices and sounds for inclusion in your programs. Create new recordings as follows:
- Choose Objects⇒New Record from the menu bar.
The Record dialog box opens.
- Select the Show Name and Embed into Project check boxes, and leave the Visible check box unchecked, as shown in Figure 12-14.

Figure 12-14
You want to see the name of the recorded sound when you look for it on the Project tab, but you don’t want the sound icon visible in the workspace. Also, embedding the sound into the project means you won’t have to worry about the location of the sound if you want to share your game file — the sound will be part of the file — although it does cause your file size to increase quite a bit.
- Click the Record button and speak into the microphone to record your sound. The first sound to record is what the shark would say when the squid inks him, something to effect of, “Argh, I’m inked!”
- Click Stop when you’re finished recording.
- Click the Play button to play back your recording. If you’re satisfied with your recorded sound, click OK to dismiss the dialog box. Otherwise, click Cancel and try again.
A Media dialog box appears, as shown in Figure 12-15.
- Type a short name for your sound, such as argh, and then click OK.
(The check boxes will already be checked according to the preferences you set previously.)
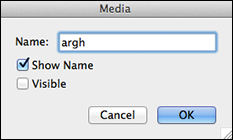
Figure 12-15
The argh sound is added to your project. The icon representing the sound does not appear in the workspace because the Visible check box was not selected.
- Repeat Steps 1–6 to record a chomp sound to play when the shark eats the squid.
 Click the Project tab (located in the lower-right corner of the window).
The Project tab opens and shows all pages and elements in your project.
- Click the arrow next to page1 to see all elements on page1 and verify that the argh sound and the chomp sound have been added to the project, as shown in Figure 12-16.
You can edit or show a project element that is hidden by right-clicking (Windows) or Ctrl-clicking (Mac) the element at the Project tab, and then selecting Edit or Show from the pop-up menu that appears.

Figure 12-16
Write a Geteaten Procedure and Add It to the Squid
If the shark touches the squid, it’s calamari time! A geteaten procedure is executed when the squid and shark are touching. Follow these steps to write the procedure and add it to the squid:
- On the Procedures pane, write a geteaten procedure as follows:
to geteaten
if touchedturtle = "shark [squid, ht chomp stopall]
endBecause this procedure will be placed in the squid backpack, the touchedturtle command evaluates whether the squid is touching the shark. If they do touch, the consequence of the IF-THEN statement is executed: [squid, ht chomp stopall]. The squid is instructed to hide (because he has been eaten!), and the chomp recorded sound plays. The game then halts via the stopall primitive.
- Next, you need to tell the squid turtle to use the geteaten procedure. Right-click (Windows) or Ctrl-click (Mac) the squid turtle and select Open Backpack from the pop-up menu.
- On the backpack Rules tab, type geteaten in the OnTouching field, as shown in Figure 12-17.
If the squid is touching the shark, the geteaten procedure is executed.

Figure 12-17
Commands used in the OnTouching field look for coordinate convergence, meaning two objects are in the same place at the same time. Coordinate convergence means that two objects have crashed, like a frog and a car; or one object has eaten another object, like a shark eats a squid! Coordinate convergence also occurs between the squid and its ink, but you don’t want there to be a consequence of the squid-ink convergence. You must specify in the OnTouching field that the only convergence resulting in a consequence is that of the squid-shark.
In MicroWorlds EX, the touchedturtle command allows you to program a turtle object to respond only to specific turtles it bumps into, while ignoring others. All programming languages allow you to specify the parameters of a collision and how participants will react in a collision.
- Close the squid backpack — it is no longer needed.
Freeze your squid and shark turtles to prevent the player from clicking and moving them during the game.
Write a Hit Procedure and Add It to the Ink
If the ink turtle touches the shark, he’s been inked! A hit procedure is executed to indicate a successful hit. The hit procedure will be placed inside the ink turtle’s backpack. Follow these steps to write the procedure and add it to the ink turtle:
- On the Procedures pane, write a hit procedure as follows:
to hit
if touchedturtle = "shark [ink, ht launch [argh]
shark, bk 10]
endBecause this procedure will be placed in the ink backpack, the touchedturtle command evaluates whether the ink is touching the shark. If they do touch, the consequence of the IF-THEN statement is executed: [ink, ht launch [argh] shark, bk 10]. The ink is instructed to hide (because it hit the shark), the argh recorded sound is launched for play (see the nearby “Launching a parallel process in a procedure” sidebar), and then the shark backs up (bk 10) as if recoiling from being hit.
- Next, you need to tell the ink turtle to use the hit procedure. The ink backpack should be open from creating the ink turtle. If you closed the ink backpack, open it by right-clicking (Windows) or Ctrl-clicking (Mac) the ink turtle and selecting Open Backpack from the pop-up menu.
If you closed the backpack earlier and the ink turtle is hidden, access it by opening the Project pane, expanding Page 1, and double-clicking on the ink turtle icon.
- On the backpack Rules tab, type hit in the OnTouching field, as shown in Figure 12-18.
If the ink touches the shark, the hit procedure is executed.

Figure 12-18
Write a Float Procedure and Add It to the Shark
Like all sharks, your game shark moves around the ocean looking for a tasty treat. A float procedure is executed so that the shark can move around. Float includes not only the speed at which the shark moves, but also the direction: He should always be headed towards the squid!
Follow these steps to write the float procedure and then place it inside the shark turtle’s backpack:
- On the Procedures tab, write a float procedure as follows:
to float
glide 3 0.01
towards "squid
endfloat consists of a simple glide command, followed by towards "squid. The towards command sets the heading of the shark to constantly point towards the squid. Feel free to change the parameters of the glide command to adjust the speed of the shark.
- Next, tell the shark turtle to use the float procedure. Right-click (Windows) or Ctrl-click (Mac) the shark turtle and select Open Backpack from the pop-up menu.
- On the backpack Rules tab, type float in the OnClick field and set it to Forever, as shown in Figure 12-19.

Figure 12-19
Save, Test, and Debug
Choose File⇒Save from the menu bar to save your game. Your finished game should look similar to Figure 12-20. (Note: I’ve moved the divider between the workspace and the project Procedures pane so that you can see all the procedures.)
Test your game by clicking the Go button to start the action. Use the arrow keys to swim the squid around the ocean, and press the spacebar to ink the shark. Play it repeatedly and ask friends to help test it as well. Remember to click the Stop All button if the game is glitchy and you want to stop and examine your code. This will help you work out the bugs and obtain a polished, playable game!
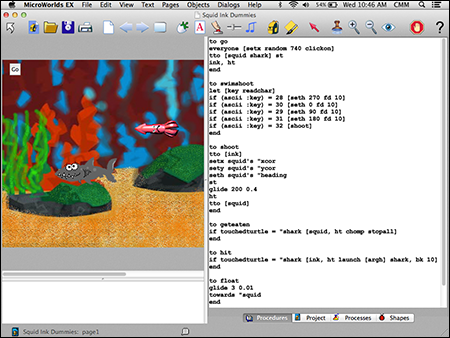
Figure 12-20