Project 0
Getting Started with Coding
Until the last few decades, education focused on skills called the three Rs — reading, writing, and arithmetic. (I know what you’re thinking … adults who believe all these words begin with the letter R need to return to kindergarten!) If you mastered the three Rs, you were considered an educated person. But now, technology has changed everything. In your personal life, in school, and in your parents’ jobs, technology is in constant use. And communicating with technology requires a new skill called coding, or computer programming.
In this chapter, I explain what coding is and describe the types of projects you can create. Then, I introduce you to MicroWorlds EX, which is the software that you will use to create the projects in this book, as well as connect you with additional resources for extending your learning.
Understanding What Coding Is
Coding means writing instructions that a piece of technology — usually a computer — understands so that the technology will perform a task. A computer programming language provides the vocabulary (words) and syntax (rules and punctuation) for communicating with a computer.
The instructions that you write and that the computer reads are a program. A computer program comprises code and communicates instructions about what is supposed to show on a computer screen and when it is supposed to happen. As you learn a computer programming language, you will be able to read and understand programs already written. Most importantly, you will be able to code — that is, design and write your own original programs.
Learning to understand and create code in a computer programming language allows you to communicate with technology. Just like there are tons of human languages, there are tons of computer programming languages. If you’re wondering which programming language you should learn, the answer is … any one of them! After you learn one programming language, there will be many similarities between that language and any other programming language you may need. Still, there are some programming languages that are much easier to start with and much more fun to learn if you’re a kid. And you are a kid, right?
Learning to Code with MicroWorlds EX
In general, to get started coding, you need only a computer, the programming language software, and an up-to-date version of a consumer-grade operating system (Windows or Mac OS). Some languages, such as Scratch, operate in a web browser, so you must also have a browser such as Firefox to work with those options.
The programming language software that you will use with this book is MicroWorlds EX (MWEX), which is my favorite computer programming language of all time.
Examining why MWEX is a good language to start with
MWEX is a perfect first language for many reasons:
- It uses natural language for commands — instructions the computer follows. Vocabulary such as IF, FORWARD, SETSHAPE, and STOP are written in standard English, and you know what they mean. Abbreviations such as FD (for FORWARD) and RT (for right turn) make sense. And MWEX isn’t picky about capitalization; for example, FD and fd are equivalent.
- It doesn’t go overboard with punctuation. Most of the punctuation makes good sense — some commas, quotation marks, parentheses, and square brackets. For example, if you want to command a UFO to fly, you type ufo,fly in your program. In more advanced programming languages, you need to master periods (.) and curly braces ( { } ), but MWEX keeps punctuation fairly simple.
- It has drag-and-drop palettes and also areas for writing new code. Some programming languages have only drag-and-drops. Although this makes program creation easy, it limits your ability to create entirely new code. On the other hand, programming languages that expect you to create all the code yourself are a bit scary — too much empty canvas and not enough paint-by-number. MWEX has a nice, balanced, interface: plenty of palettes and panes to access tools easily and develop program components quickly, and plenty of empty canvas to be inventive.
- It has built-in paint tools and a Shape Editor for painting original backgrounds and characters. Also, there’s a big collection of pre-made backgrounds and characters (including shapes that can be used for animation) in the MWEX library. You can even import graphics from the web and from graphics editing programs.
- It can import music and sound effects, as well as record audio. Best of all, there is a built-in music editor that allows you to create simple music in a variety of instruments. There’s even a say command that invokes synthesized speech.
- It has built-in error-checking and helpful troubleshooting assistance. Many programming languages have error-checking tools to catch errors or bugs in your code. MWEX has an interpreter that checks your code as it runs or executes: If there’s an error, MWEX displays a message indicating the problem and where it occurred. Then, you can revise your code accordingly.
Taking a look at what projects you can make
By working in MicroWorlds EX, you’ll sample important yet easy-to-understand programming paradigms that allow you to make cool projects now — and set the stage for more advanced coding in the future.
What kinds of things can you make? Everything! Up until now, you’ve probably been a user or consumer of technology. You play games, run a simulation or model for a science class, word-process a story, conduct web research, communicate with friends via social media, and order goods online. But by learning to code, you are now a maker of software, a producer in the world of technology!
In this book, you will make four different types of projects:
- Toys are things you play with that have no specific goal or scoring: for example, a spirograph drawing toy or Mad Libs.
- Games have a goal (and sometimes scoring) such as a search-and-find game that challenges you to find an object, or Frogger, where the goal is to get the frog across the road and to the pond without being struck by a number of objects. Games present challenges that can be won or lost.
- Animated scenes are little movies such as a winter snow scene with blinking holiday lights.
- Simulations (sims) are programs that are meant to mimic or model the real world — for example, a viral epidemic, or births of babies in a hospital.
Ultimately, the coding skills you learn in this book are just the beginning. I hope you create all sorts of exciting new programs that are wilder and wackier than anything contained in these pages. And I hope you level up and tackle learning new programming languages as you increase your skill level in the coming years.
Getting Started with MicroWorlds EX
Your purchase of this book comes with a 35-day, 90 saves-allowed trial of MicroWorlds EX, so you can work through all the projects at the rate of approximately one part each week! At any time, you can purchase MicroWorlds EX at a deep discount so you can continue developing your coding skills creating new projects to share with friends and family.
Downloading and installing the software
To download and install the trial version of MicroWorlds EX, navigate to www.dummies.com/go/microworlds. Then follow the onscreen download and installation instructions.
 For PCs, MicroWorlds EX is supported on Windows 7, Windows 8, and Windows 8.1. For Macs, MicroWorlds EX is supported on OS X Version 10.7 and later.
Starting a project
After you've installed it, follow these steps to start MicroWorlds EX:
 Click on the yellow backpack icon (shown in the margin).
The backpack serves as the icon for MWEX because objects in this programming language are called turtles, and every turtle totes a backpack carrying important information just like your backpack.
As MicroWorlds EX starts, you see the splash screen shown in Figure 0-1.
- Click on the splash screen to dismiss it.
A yellow Welcome to MicroWorlds EX screen opens and presents several options to you, as shown in Figure 0-2.

Figure 0-1

Figure 0-2
- Choose Free Mode to start a new project, or Open Project to open a saved project. (For additional guidance and other project examples in MWEX, choose Tutorials or Samples on the left, and then choose a specific project on the right.)
Upon choosing any option, you are presented with the MWEX interface. Free Mode presents a somewhat empty interface, as shown in Figure 0-3, because you haven’t created any code or graphics yet.
Getting to know the interface
Note the following key areas of the MicroWorlds EX interface, shown in Figure 0-3:

Figure 0-3
- Menu bar: Contains menus for opening and saving files, editing (copying and pasting), changing the view of the interface, formatting text, creating and naming new pages, creating new objects and dialogs, and help.
- Toolbar: Contains button versions of File items on the menu bar, as shown in Figure 0-4. A few buttons merit special mention:
- Regular Pointer: As you program, your mouse pointer will sometimes appear as a cursor (in places where you can type), sometimes as a pointer (for dragging a turtle, button, or other element), and sometimes as a hand for placing shapes in the workspace. If the mouse pointer is a hand, you can change it back to a pointer by clicking the Regular Pointer button. Another way to revert to a pointer is simply to click in the Command Center (discussed later in this list).
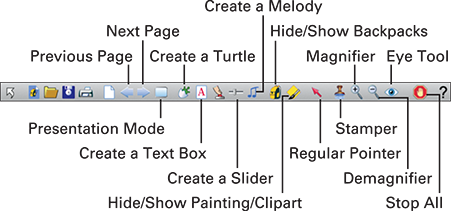
Figure 0-4
- Eye Tool: The Eye Tool button can open a turtle backpack, or a dialog box for a button, text box, slider, or sound. Just click it! This button is also useful for locating hidden objects (turtles) — just click the Eye Tool to reveal their locations.
- Stop All: This button is useful for stopping program execution. When characters are flying around the screen or the OnTimer function keeps ticking away, click Stop All to halt everything and take a breath.
- Presentation Mode: Use this button to view your project as an end user would see it. Clicking this button limits the view to the workspace only. Because this mode hides the other areas of the MWEX interface, it allows end users to experience a more polished presentation of your project. Press the Escape key (Esc) to return to the regular MWEX view. This is also how your project will be viewed by people seeing your project posted on the web.
- Regular Pointer: As you program, your mouse pointer will sometimes appear as a cursor (in places where you can type), sometimes as a pointer (for dragging a turtle, button, or other element), and sometimes as a hand for placing shapes in the workspace. If the mouse pointer is a hand, you can change it back to a pointer by clicking the Regular Pointer button. Another way to revert to a pointer is simply to click in the Command Center (discussed later in this list).
- Project title and page number: The project title appears at the top of the MWEX interface and also in the lower-left corner. This second location, called the status bar, also shows the page number of the current page within the project. If the page is named, this name appears instead of the default, for example, page1.
- Workspace: This is where you create the physical appearance of your project. Here, you can add a background and then create turtles, buttons, and other elements of your project. At the start of a new project, you can change the size of the workspace by choosing File⇒New Project Size, and then selecting one of these options: MicroWorlds Small, MicroWorlds Standard, Web Player, Full Screen 640 x 480, or Full Screen 800 x 600. Or you can create a project size of your own dimensions by typing newprojectsize [width height] in the Command Center (discussed next). Note that a project size can be changed only at the start of a project.
- Command Center: This region is used for several different purposes:
- You can try out a command or snippet of code and instantly see the results.
- You can issue a command that doesn’t need to be reused (so there’s no purpose in typing it more permanently into a procedure). For example, if you’ve created 50 fish and you want all of them to swim in the same direction, you can command everyone to head in a specific direction and be done with it.
- You can see any error messages. If MicroWorlds EX encounters a problem with your code, it will tell you in the Command Center. There are other uses for the Command Center that you will discover as you gain experience working in MWEX.
- Panes: The right side of the MWEX interface features four panes stacked on top of each other. Only one pane shows at a time, and you can move among panes by clicking these tabs at the bottom-right side of the interface:
- Procedures: For writing new commands
- Project: For viewing all pages and elements in a project
- Processes: For viewing program processes in detail as they execute and for adjusting the execution speed of your project
- Shapes: For creating shapes for objects and performing additional image editing functions
Detailed use of each pane will be discussed further in the projects.
 The divider bars separating the workspace, Command Center, and panes can be moved to increase or decrease your view of each area as needed.
Coming Up with Your Ideas, Your Projects
As you get started with the projects in this book, keep in mind that you can customize every project with your own personal creativity. Many video games have the same underlying structure, as do many toys. The coding of the gameplay is often the same for multiple games. Think about how many different forms a shooter game can take, all with the same code: a squid shooting ink at an approaching shark; a pig dropping water balloons on cows; a pea shooter aiming at targets in a carnival game; or a bomber dropping bombs on enemy battleships. If you remove the graphics and sound effects, you simply have an object shooting at another object, with target objects moving and some sort of lives and scoring system. Many simulations also involve the scattering or distribution of lots of objects in a region — the underlying code is the same whether these objects are walruses lounging on an ice floe, trees in a forest, or people walking around a mall.
I encourage you to invent new characters and new actions and make every project your own. Now get coding!