Objectives
On completion of this chapter, you should be able to
- Understand what is meant by an external dependency in a project
- Understand how to represent external dependency in an MS-Project schedule
- Understand the concept of master project and subproject
- Understand different ways of merging subprojects
- Understand the creation and use of resource pool
In earlier chapters, we discussed about managing a single project. However, a project may be very big, and may have several thousand tasks (activities), executed by hundreds of departments or subcontractors. In such cases, it is easier to organize and manage these projects as subprojects of a master project. At times, even though the project is not very big, some tasks may be dependent on several other projects that are external to the project organization. We discuss here about using MS-Project in such cases.
Types of Dependencies
Let us first understand what is meant by dependency as it is one of the most important elements of creating a project schedule network. Previously we discussed about four types of relationships between tasks. The relationship describes how tasks relate to each other (how start and finish of predecessor and successor tasks are related). Dependency determines the order of sequence or activity. It is subtly different from relationships. There are three primary types of dependencies:
- Mandatory Dependencies: These are dependencies that create firm relationships between two activities.
Example: Testing can start only after the coding is completed.
- Discretionary Dependencies: These types of dependencies enable the project manager to optimize the flow of work throughout the project life cycle and are also known as “soft logic.” This works as a tool that the project manager utilizes to create float in the schedule. This is a much more effective manner to drive the time line than hard coding dates into the schedule (or using constraints in MS-Project).
Examples: If a team is travelling to a foreign country for say beta testing at a customer location, a discretionary task prior to this task may be to train the team in the language and culture of that region.
- External Dependencies: These are dependencies that are outside the control of the project team. However, these must be reflected in the project schedule.
Example: A software development project may depend on the procurement of the hardware. Here the procurement of the hardware is outside the control of the project team and is outside the scope of the project.
Tasks or phases in one project, being dependent on the tasks in other (one or more) project is also a case of external dependency. There may be other reasons for dependencies between projects. If a task in a project uses resources that have been assigned to tasks of another project, then also you may have to delay the start of the task till the resources complete the first task.
You can show such dependencies by linking tasks between projects in MS-Office Project. External predecessor and successor tasks have grayed task names and Gantt bars. Such tasks are also referred to as Ghost tasks.
Example Problem: Creating an External Dependency
Let us consider a case in which a small project of software testing t has been planned. Let us say this particular project is also dependent on setting up the hardware. In this exercise, you link tasks in these two project plans, and you see the results in the two project plans. Copy Dependency subfolder to your working directory from Practice-Files/Ch09
- On the File tab, click Open. The Open dialog box appears.
- Navigate to the Dependency subfolder in your working directory and double click the Testing-project.mpp file. View the tasks in the Gantt Chart (Figure 9.1).
On the File tab, click Open. Navigate to the Dependency subfolder in your working directory, and double-click the hw-setup.mpp file. The tasks related to procurement and setting up of the hardware are displayed in the Gantt Chart as shown in Figure 9.2. Note that both the project files are open now.
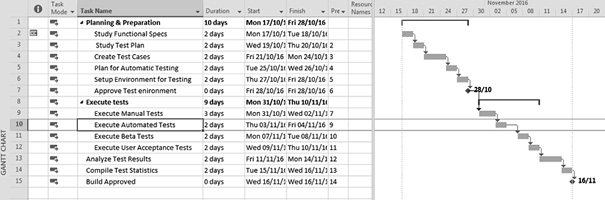
Figure 9.1 Gantt chart for testing

Figure 9.2 Gantt chart for hardware setup (hw-setup project)
- In hw-setup in the Task Name column, click on task 3 Install OS & setup the network.
You need to finish the task Install OS & setup the network before you begin the task Setup Environment for Testing in the Testing plan; so you will create a dependency between the two plans.
- On the View tab, in the Window group, click Switch Windows, and then select Testing-project. On the View tab, in the Task Views group, click Gantt Chart. The Gantt Chart view appears. Click the name of task 6, Setup Environment for Testing. On the Task tab, in the Editing group, click Scroll to Task. Project scrolls the Gantt Chart view to display task number six. The Predecessor column may not be visible. In the Gantt Chart view, drag the vertical divider bar of the entry table, to the right until the Predecessor column is visible. In the Predecessor field for task 6, click in the field so that the cursor appears directly after the existing predecessor, value 5.
An external predecessor link is created by entering the task in the following format: File NameTask ID. Directly after the existing predecessor value 5, type hw-setup3 (with no space between 5 and the comma and the subsequent text). Here hw-setup is located in the same directory. However, in case if the file is located in some other directory, you may have to specify the entire path (or command).
- Press Enter.
MS-Project inserts the external predecessor task named Install OS & setup the network into the project (in addition to existing predecessor Plan for Automatic Testing). The external task represents task 3 from the hw-setup project. The external task’s Gantt bar and the task name appear in gray as shown in Figure 9.3. If you point to the external task’s Gantt bar, MS-Project displays a Screen tip that contains information about the external task, including the full path of the external project plan in which the ghost task resides.

Figure 9.3 External predecessor is Install OS & setup the network is inserted in Testing project (displayed in Gray)
- Optionally, you can also look at the ghost task in the project plan as the plan window is open. On the View tab, in the Window group, click Switch Windows, click hw-setup in the Task Name column, and select the name of task, Install OS & setup the network. Adjust the chart portion of the Gantt Chart view to display the selected tasks. To do that on the View tab, in the Zoom group, click Selected Tasks.
You can see that task 3, Install OS & setup the network, is a predecessor for the external task Setup Environment for Testing. However, it has no effect on other tasks here as Setup Environment for Testing is a successor task with no other links to this project.
You have the option of breaking the link between these plans. There is bidirectional associativity. That means, deleting a task in the source plan or the ghost task in the destination plan deletes the corresponding task or ghost task in the other plan.
- Save all open files and Close the session.
Note: You may turn off the display of cross-project links using Project Options for the file. To do this, on the File tab, click Options. In the Project Options dialog box, on the Advanced tab, clear the Show External Successors and Show External Predecessors check-boxes.
Master Project and Subprojects
Before discussing how we can track multiple schedules by grouping together into a master in MS-Office Project, let us discuss about subprojects and the benefits of creating smaller projects in a software like MS-Project. Subprojects are usually areas of project that are either outsourced to a different department or to vendors. The vendor or the department may have specialized knowledge or technology. For example, if you are a contractor specialized in software product development, you may have outsourced the development of user interface design to a firm that specializes in the same.
In MS-Project, we can think of a master project as a collection of consolidated projects that show hierarchy among multiple related projects. In the master project, subprojects appear as summary tasks, which you can expand. (Please also see Figure 9.4 to understand the benefits of using subprojects.)
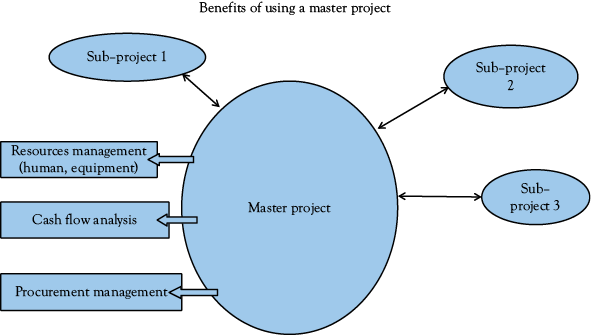
Figure 9.4 Benefits of using master project and subprojects
In MS-Project, we may be using subprojects for one or more of the following reasons:
- It is easier to independently plan, schedule, and control multiple projects (subprojects) than planning, scheduling, and controlling a single mega-project.
- It is helpful in overall corporate reporting and planning. It makes decision making easier in the company.
- You may be working on multiple projects, with same set of resources, simultaneously. Managing resource assignments is easier in such cases.
- The project is executed in different sites or departments. Your organization is not centralized. In a decentralized or distributed environment, a master project and subprojects give workers more control over their own work than one centralized project file does.
There are various ways of consolidating subprojects into a master project. Let us first try out the same without using a resource pool. For this, you require three files stored in the subfolder Files-for-consolidation.
Example Problem: Consolidating Multiple Projects
Let us consider a case in which there are two small software projects to be consolidated. For that, copy the folder Files-for-consolidation from Practice-files/Ch09 to your working directory. There are two subprojects namely AppDevelopment and Testing-project. Let us say these are managed by a single contractor (or company). These will utilize some common resources.
To get a hang of activities and resources associated with each of these subprojects you may have a look at Gantt Chart and Resource—Sheets of each of these. Double click and open all two files. Observe the Gantt Chart and Resource Sheet views of the files for each of these projects (Figures 9.5–9.8). You will notice that some resources are common between projects.
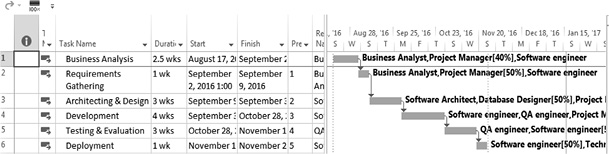
Figure 9.5 Gantt chart for AppDevelopment project
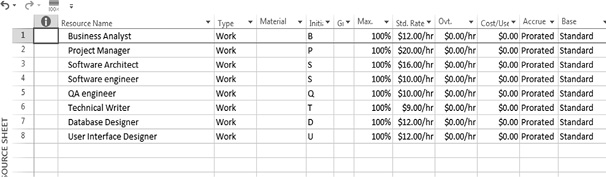
Figure 9.6 Resource sheet forAppDevelopment

Figure 9.7 Gantt chart for testing project

Figure 9.8 Resource sheet for testing project
Let us try consolidating these two files in to one master file using some options available in MS-Project. (Note: The users who are not in US, may receive an error message stating that “The files you are consolidating are of different currencies. ....” during the consolidation process. That is because the new master file you would create might have a different currency by default. That will not block the process of consolidation though. However, you may change the currency of the master project file as explained in Chapter 5.)
Using Copy/Paste for Creating a Master Project
An easier way to produce a master project is Copy/Paste. Here we create an empty master project to start with and populate it with copy/paste. (As mentioned earlier, copy the folder Files-for-consolidation from Practice-files/Ch09 to your working directory and rename it suitably.)
- Open a New file and save it as a Master.mpp in the same folder as the other two project files. Select Options from the File tab. Options dialog appears. In the Advanced options, select Show project summary task check-box, under Display Options for This Project.
(Note: (a) The same can also be done clicking on the Format tab, then selecting Summary Task and Project Summary Task check-boxes under the Show/Hide group. (b) This process of showing project summary task may have to be repeated for other subprojects too.)
By default the Project start date is current date and you may set it suitably. Now open AppDevelopment project. Click the expand/collapse arrow next to AppDevelopment’s project summary task to collapse the detail. This is a very important step. Click the ID 0 to highlight the whole summary and the whole project. Right click to get the contextual or pull-down menu and select Copy from there as shown in Figure 9.9. (Note: The same may be achieved using Copy and Paste buttons of the Clipboard group under the Task tab)

Figure 9.9 Copy the AppDevelopment project with shortcut menu
- Go to the master and select the next blank task. Click the Paste button. AppDevelopment should now appear in Master. Click the expand/collapse arrow next to AppDevelopment’s project summary task to collapse the detail. This is a very important step.
- Now click the next task cell. Here we have to copy Testing project using the same process. If you do not collapse the detail of AppDevelopment, when you paste Testing project, it will be indented under the last task of AppDevelopment. Also, you need not have to scroll down to find the last task if you collapse the subproject.
We created a master project as shown in Figure 9.10. However, you notice that all the subprojects start at the same project start date. You also find that the master project and subprojects are not associated in a dynamic way, which means that the changes made to the master project will not be reflected in the individual subprojects and vice versa. Close all open files using the File tab.

Figure 9.10 Master project created using Copy/Paste
Using Insert Project Without a Resource Pool
In the second method, we shall use the Insert Project feature to consolidate. Initially, we use this as it is and analyze the result. Subsequently, we shall improve upon the same using an additional file known as resource pool. Here are the steps required:
- Copy the folder Files-for-consolidation to your working directory again say as Files-for-consolidation-no-pool. Create a new master project. Select New from the File tab. Select the template Blank Project from the template list. This will create a new blank project. Save this as a Master-without-pool in the same folder as subprojects.
- Click in the first Task Name cell of the Master Project Gant Chart. From the Project tab, select Subproject in the Insert group (Figure 9.11). A File Selection dialog will pop up. From your appropriate directory, select AppDevelopment and click the Insert button at the bottom (Figure 9.12), or double click the project name. When you insert projects, to make sure the results are dynamic, we need to link them with the master. So when you select to insert AppDevelopment, make sure the link to the project box is checked. In the master project, subprojects appear as summary tasks that you can easily arrange in an outline.
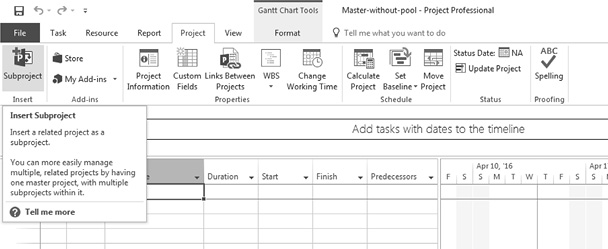
Figure 9.11 Using insert subproject option to create master project
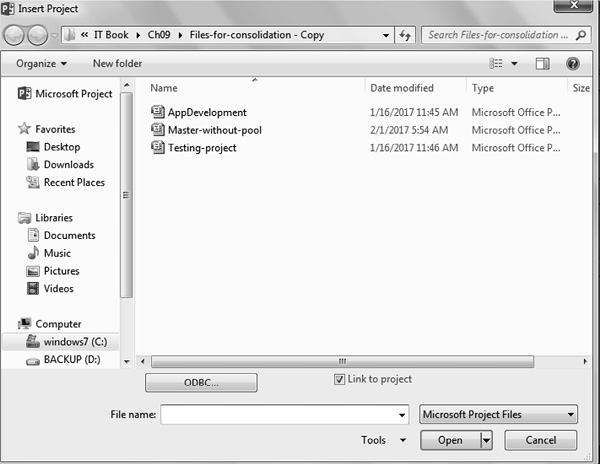
Figure 9.12 Navigate and select subproject for insertion
- Make sure AppDevelopment is collapsed (click on the expand/collapse arrow next to the task name if required). Now repeat the process for Testing-project subproject. When these get inserted, then expand all by clicking on both expand/collapse arrows as shown in Figure 9.13, and have a look at the Resource Sheet view. You will see that the resources have been repeated for all these and numbered separately, as shown in Figure 9.14. Let us understand why this happens.

Figure 9.13 Gantt Chart of the master project created with Insert subproject
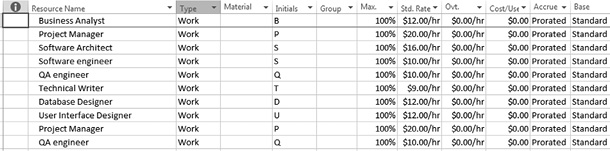
Figure 9.14 Resource Sheet of the master project, without pool (observe the duplicate resources)
When we used this method (inserting subprojects without resource pool) of consolidation, MS-Project consolidated resources and tasks from subprojects into one file. While doing so, the resources were aggregated as it is (Figure 9.15) and hence we find duplicate entries for resources like Project Manager and Labor in the Resource Sheet of the master file. The resource names should not repeat ( For example, though there are two different Project Managers working on these projects, there has to be only one entry for that resource in the resource sheet of the master project). The next method will take care of the problem. Close all open files using the File tab.

Figure 9.15 Master project without a resource pool (conceptual representation)
Using a Resource Pool for Consolidation
The earlier method of inserting subprojects had the problem of duplication of resources. The problem of duplicate resources appearing in the Resource Sheet of consolidated projects can be solved by using a resource pool. Let us first understand what it is. The project manager has a team of resources available (like analyst, coder, tester) but she or he does not know how many will be required, and whether she or he can even do the multiple projects with the resources available. We therefore need to set up a resource pool and associate each project with that pool, as shown in Figure 9.16. With a resource pool, all the resource information that resides in the pool appears in each project file that shares the pool, because the resource pool will be linked to the projects. The resource pool is nothing but a project file with only resources and no tasks.
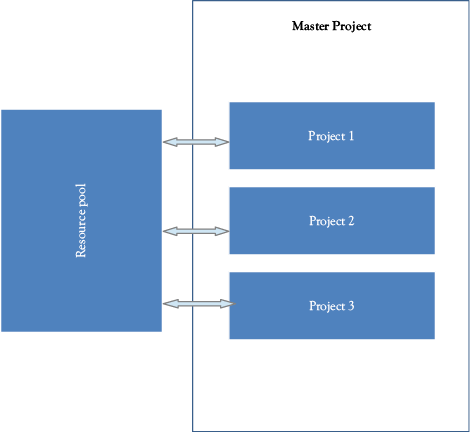
Figure 9.16 Master project with a shared resource pool (conceptual representation)
Now we shall do the consolidation exercise with a resource pool. Again you require subproject files.
- Copy the folder Files-for-consolidation (containing files) from Practice-files/Ch09 to your working directory, say as Files-for-consolidation-pool
- Create a new empty project file and select New from the File tab. Select Blank Project.
Save the file in the same folder with a representative name. Select Save As from the File tab. Navigate to the folder containing subprojects, that is, Files-for-consolidation-pool and save the file as Resources-pool.
Select Resource Sheet from Resource Views group of View Tab. This file is an empty project file and as of now does not contain any tasks and resources.
Since this file does not contain resources, it has to be populated with all the available resources. This can be done by opening each of the subproject file and sharing resources with the pool file. For this, we open all the subproject files by double clicking on each of those files. (You may also arrange all project plans within the MS-Project window. To do that, on the View tab, in the Window group, click Arrange All. This step is not a must; however, this will enable you to view changes in the Resource Sheet, as and when they occur.)
- You will see the Resource Sheet of the common pool file Resources-
pool.Click on the title bar of the AppDevelopment project plan. On the Resource tab, in the Assignments group, click on Resource Pool, and then select Share Resources as shown in Figure 9.17.
The Share Resources dialog box appears. Under Resources for AppDevelopment select the Use resources option, as shown in Figure 9.18. Any open project plan can be used as a resourcepool and the Use Resources From list contains all such project plans. (Note: In case the pull-down list is not active, toggle with Radio Buttons and come back). Select Resources-pool. Click OK to close the Share Resources dialog box. Under On conflict with calendar or resource information, make sure that the Pool takes precedence option is selected.
You will see that the resource information from the AppDevelopment project would appear in the Resources-pool file as shown in Figure 9.19. (Click on the Resource-pool file window and switch to Resource Sheet view to verify.)
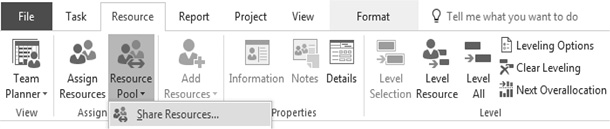
Figure 9.17 Click Share Resources in the Assignments group, to start linking with a resource pool
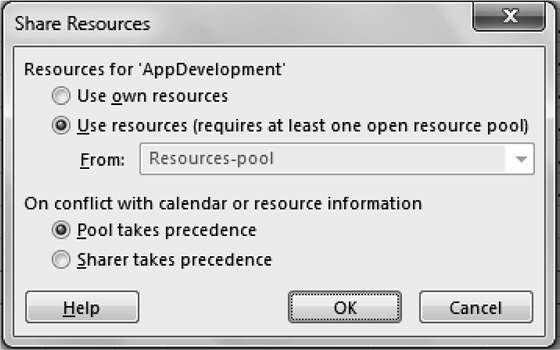
Figure 9.18 Share resources dialog

Figure 9.19 Resource sheet of the pool file gets populated as you share resources
- Similarly, you would have to set up Testing-project plans as a sharer plan with the same resource pool. With this, you are ready with a common resource pool file, which contains all resources of the three subprojects (without any duplication of resource names). This can be verified by going through the Resource Sheet of common pool file Resources pool.
- Now create a blank master file and insert three subprojects as discussed in the earlier case (when you select to insert subproject, make sure the link box is checked).
With this, we complete the third method of consolidating (Figure 9.20). The results are dynamic (with a kind of bidirectional associativity), in that any change to the master project will be reflected in the individual projects and vice versa. You can delete the master if you want to and the individual projects will retain the changes when you save them. Later you can always recreate the master, or another master with a different set of projects. Close all open files using the File tab,
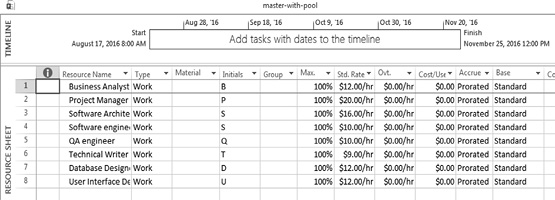
Figure 9.20 Resource sheet of master project (created with a resource pool)
To conclude, in this chapter, we did study various methods of consolidating projects in this project and also how a resource pool can aid the process. We also did discuss about creating an external dependency in a project in this chapter. MS-Project Professional, although not exclusively meant for managing multiple projects, allows you to create resource pools and thereby administer resources in a centralized fashion to a sufficient degree.