The gelatin tissue used for photogravure—also called pigment paper—consists of a thin layer of colored gelatin on a paper backing. It is very similar to the tissue used for carbon printing. Similar to other colloid-based photography such as carbon printing and gum bichromate, photogravure’s gelatin tissue is sensitized using a solution containing a dichromate salt. Exposure to ultraviolet light causes the sensitized gelatin to become less soluble (raising its melting point) relative to the degree of exposure. The tanning or hardening effect is called insolubilization. This photochemical process produces a layer of gelatin that contains a hardened contour representation of varying densities, which correspond to the tonalities of the positive. The more light the gelatin receives, the greater the depth of hardening. The less light that passes through the positive, the shallower the depth of hardening. The exposed side of the gelatin is then bonded to the copper plate. Finally, the paper backing and remaining soluble gelatin is removed with warm water. The resulting layer is a three-dimensional contour image that will act as a permeable membrane between the copper plate and the etching mordant (Figure 3-1).
The Gelatin Tissue
The gelatin tissue we use is Autotype Pigment Paper G35. Autotype is the only remaining supplier of gravure tissue we have found to date. Another alternative is to make your own gelatin/carbon tissue, as outlined in Chapter 11. (See Color Plate 8.) The care and storage of gelatin tissue is important if the roll is to remain in optimum condition. The manufacturer’s data sheets recommend that the tissue be stored at 20 to 22°C (68–71.5°F), and ideally at 60% relative humidity away from any possible contact with water, steam, or heat sources. If conditions are drier than the ideal, the tissue will curl more tightly as the relative humidity drops. As it reaches extremes—less than 25% relative humidity—there is a chance that the tissue may become too brittle to work with. Excessively high humidity will make the tissue tacky and prone to finger marks. It is important to keep the gelatin tissue away from chemicals it may react with including alum, photographic chemicals, free formaldehyde, and fumes from such sources as plywood, chipboard, and certain adhesive tapes.
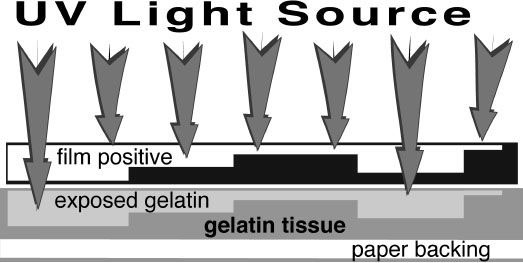
Figure 3-1 Cross section showing how light passes through the positive film and penetrates into the gelatin tissue in inverse proportion to positive density.
The Dichromate Sensitizer
Be aware that all dichromates are toxic and must be handled with extreme caution. The tissue is made light sensitive by soaking it in a solution of distilled water and potassium dichromate. The solution concentrations can be varied for contrast control. Normal contrast using G35 tissue is obtained with a 3.5% solution. The useful range of solutions is from 2.5 to 5%; the tissue manufacturer recommends 3%. The contrast will increase and the speed will decrease with lower solution concentrations, whereas the contrast will decrease and the speed will increase with higher concentrations.
Potassium dichromate is the sensitizer used most often for photogravure. Ammonium dichromate is also usable according to some sources, but requires a different dilution. “Identical concentrations of the two dichromates do not produce identical printing characteristics. A 3.5% potassium dichromate sensitizer actually has the same sensitivity, contrast and keeping qualities as a 2.5% ammonium dichromate sensitizer” (Crawford 1979, p. 184).
The dichromate sensitizer solution can be reused, but it is very important to keep a record of its age once used and how much tissue has gone through a given batch. It is recommended that the capacity should not exceed one square meter of tissue per liter of solution (de Zoete 1988, p. 37). If this level is exceeded, adverse effects include: 1) some tanning of the gelatin, which then peels off the plate during development or causes difficulty in adhering the tissue to the plate in the first place, 2) a seemingly fogged image due to overall hardening of the gelatin, which makes it difficult to peel the paper off the gelatin during development. These effects accelerate with time and use. As the solution is used, it picks up gelatin particles and becomes unusable over a prolonged storage time, even if it was not used to capacity. The solution should be stored in a cool environment, preferably a refrigerator. DO NOT STORE WITH FOOD. Be sure to keep the chemical secure and out of the reach of children because this toxic solution looks disturbingly like orange Kool-Aid. To avoid confusion, never store sensitizer in bottles once used for edibles. The maximum storage time for a partially used refrigerated solution is one month. Unused solutions should last indefinitely. Label clearly and store in a brown or light-proof container to avoid exposure to light. Do not pour used dichromate sensitizer down the drain. Bring it to a toxic waste disposal center.
The Drying Surface
After sensitizing, the wet gelatin tissue must be dried to an absolutely smooth and flawless surface. This is achieved by having the tissue dry in contact with a smooth methacrylate plastic surface such as Plexiglas, Perspex, Lucite, or chrome (as on a ferrotype plate). Do not use glass or Lexan because the tissue will stick and will be ruined. The Plexiglas support must be scratch free, cleaned, and degreased. Peel the protective paper off one side only, keeping the other side protected for later use. The Plexiglas must be several centimeters larger than the tissue. Have several sheets of a few standard sizes. Do not use these sheets for any other purpose.
Other Equipment
The sensitizing process should be done in a darkroom sink for chemical safety, water and light control, and access to basic darkroom supplies. Standard photographic supplies such as a timer, trays, funnel, stirring stick, graduated cylinder, and glass thermometer are required. You will also need a flawless stiff squeegee such as a screen printing squeegee or a good stiff photographic print squeegee or, alternatively, a wide soft rubber roller. Paper towels, paper coffee filters, a soft Hake-style brush, canned air, and sometimes ice packs are also needed. An accurate balance or electronic scale is needed to measure out the potassium dichromate. A bright safelight can be made using a 60-watt yellow bug light. A flat, nonmetallic surface is needed in the sink to support the Plexiglas while squeegeeing. The sink should be large enough to hold the trays and the squeegeeing surface to ensure that all dichromate splashes can be contained and washed away.
Mixing Potassium Dichromate Sensitizer
Prepare a 3.5% sensitizing solution by dissolving 35 grams of high grade potassium dichromate in 750 ml of distilled water at about 27.5°C (80°F). Stir constantly and then bring up the total volume to one liter after the dichromate salts are dissolved. Filter the solution through a coffee filter into a storage bottle to remove undissolved particles and impurities. Use distilled, rather than purified or deionized water. If minute air bubbles are a problem during subsequent steps, preboil the water in a clean pot and allow it to cool. This removes much of the air that is invariably dissolved in the water. The distilled water can be boiled in any metal container, but transfer the water to a glass or plastic darkroom graduated cylinder when mixing in the potassium dichromate. Dichromates should not come in contact with metal.

Dichromates are toxic and must be handled with caution. The inhalation of dichromate dust can be fatal. Wear a respirator or good dust mask, face shield or eye protection, gloves, and an apron when preparing the sensitizer solution. Skin and mucus membrane reactions can be long term and serious. Always wear gloves when working with the sensitizer solution or handling the sensitized tissue.
Cutting the Unsensitized Tissue
All cutting and handling of the tissue must be done carefully to prevent damage to its delicate surface. Cover all tabletops with newsprint or a clean self-healing cutting board. Be sure your hands are clean and dry when handling the tissue. You may even wish to wear cotton gloves. Make sure all straight-edges or rulers do not have burrs or tacky sections from old tape. Clean them beforehand with alcohol to remove any grease. Cut the tissue with a sharp blade cutter rather than scissors in order to prevent cracking and damage to the edges. Be careful not to crease or fold the tissue because all marks will become flaws in the resist and will ruin the plate. A second pair of hands is very useful to prevent the tissue from rolling up and getting away from you. You can also make little nonmarring weights to hold down the corners and edges as you cut. We use small bricks of zinc etching plate, each made up of four to six pieces of 5 cm × 10 cm × 0.2 cm (2″ × 4″ × 1/16″) zinc plate, stacked and covered with several layers of masking tape. We have about eight of them, and when it is dry out we could use even more (Figure 3-2).
After the tissue is rolled out, examine it carefully for creases, tears, or fingerprints. Cut around these areas when you lay out the pieces you need and discard the flawed tissue. It is counterproductive to work with damaged tissue. Use a clean, soft brush or compressed air to get rid of any visible dust or particles.
![]()
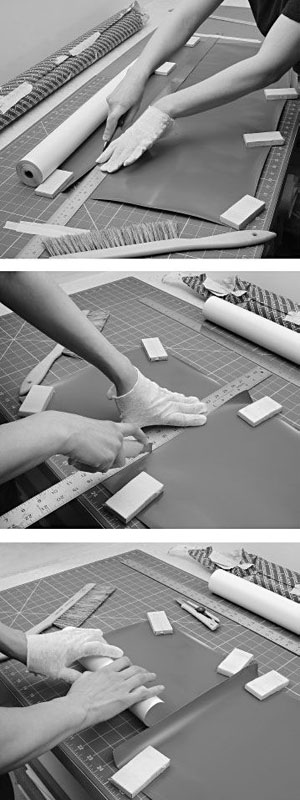
Figure 3-2 Hold down the gravure tissue carefully and cut it oversized for sensitizing.
When working with the tissue, be careful not to touch the gelatin surface because body heat can melt it and skin oil or moisture will ruin it. Even prolonged pressure from the back can cause a blemish. If you have warm or moist hands, wear cotton gloves. After the tissue is cut it will have a tendency to curl, especially in a dry environment. If you are sensitizing immediately, the pieces can simply be moved to the work area as rolled up tubes. Be careful that they do not get wet or dusty. It is advisable to give the newly cut tissue a chance to acclimatize to the room’s relative humidity. This is important because the leading edge of the tissue usually has a different moisture content than a few inches into the roll. This difference can affect absorption and cause the tissue to be unevenly sensitized (de Zoete 1988, pp. 32–33). If you unroll the tissue and hold it down with blocks or a metal straight-edge for an extended period of time, the area of contact should not be used because it will be of a different moisture content than the rest of the tissue and will sensitize differently.
Cut the tissue at least 3 to 5 cm (1.5–2 inches) larger than the final image. Include an additional allowance in one direction for the Stouffer Step Scale. It is important to cut the tissue larger than required to provide a handling edge and to allow for drying problems when sensitizing. Use only the central area of the tissue, trimming off any offending edges before exposure. This eliminates the frilly border and edge flaws and lessens the chance of creases during the lay-down.
After the sensitized tissue is dried, trim it to precisely fit the positive assembly. The final, trimmed size of the gelatin tissue should end up halfway between the image size and the edge of the copper plate. The copper plate should be at least 1 centimeter (0.5 inch) larger in each direction than the positive image chosen with a 2.5 cm (1 inch) allowance for the step scale. (For size relationships see Figure 5-3.)
For long-term storage, carefully wrap the cut pieces around the original roll. Rewrap the extra pieces around the remainder of the roll and hermetically seal it. Store in a cool place. We are forced to store ours at a lower humidity and are finding that the roll is becoming increasingly stiff and brittle as time goes on. So far, it still performs well, but it is hard to handle on dry days. Rehumidifying dry tissue is possible. Store it unwrapped and loosely rolled in a relatively humid environment for a period of time. This can be time consuming and tedious because you must readjust the roll constantly to ensure even rehumidification. Some sources recommend hanging the roll horizontally with weights attached to the bottom edge as it is unrolled. The exposed surface should be able to acclimatize evenly.
Plexiglas Plate Preparation
After the tissue has been sensitized, it must be dried against a Plexiglas support. The Plexiglas must be free of scratches or grease. Do not use oily cleaners such as Plexiglas cleaner. New Plexiglas should be initially degreased with TSP and water. See “Degreasing and Brightening the Plate” in Chapter 4 for the degreasing procedure. After that, and before each sensitizing session, it is sufficient to clean the Plexiglas with alcohol and dry with a paper towel. Just before use, position the Plexiglas on a firm elevated support in the darkroom sink next to the sensitizing tray. The support should be sturdy, level, and slightly higher than the sensitizing tray. This is done so that when you squeegee the tissue, the excess sensitizer is wiped back into the sensitizing tray.
The sensitizing process should take place under a yellow or red safelight or subdued incandescent light of low wattage that is bounced off a wall or ceiling. A bug light is excellent and provides enough light to see well. Put on rubber or nitrile gloves, a face shield, and a rubber apron for the entire process.
Find a clean, standard-sized photographic tray larger than the cut tissue. Ensure that the 3.5% solution of potassium dichromate sensitizer solution is stabilized at 10 to 13°C (50–55°F). This is easiest if you can store the solution in a non-food fridge. Alternatively, if the darkroom and water source are warm, float the tray in a larger tray of cold water with ice. You can even float a clean ice-pack in the solution to speed cooling. Remove the ice-pack when the temperature stabilizes. Never use it again for cooling food!
Note: The gelatin should never be submerged into any solution above 15°C (60°F) except during the final development stage.
Before sensitizing, inspect the tissue for flaws or creases and be sure that there is no dust or debris stuck to the surface. Be careful not to get the tissue wet. If it is not too curled, try to carefully dust with a clean sable brush or blow with dry compressed air. Set the timer for slightly more than 3 minutes and start it. Immerse the tissue face up, sliding it smoothly and quickly under the solution at the 3-minute mark. If it is tightly curled up, unroll and reroll it back and forth like a scroll until it begins to go limp and lay flat (Figure 3-3 and Color Plate 9). Be careful not to splash the solution.
After the initial submersion be sure the whole surface is flooded with sensitizer as soon as possible. Use a wide soft brush with no metal ferrule—such as a wide Japanese Hake brush—to hold down and push the tissue flat and to gently clear the surface of any clinging bubbles or particles. Hold down the corners with the brush and/or your gloved fingers until the backing and gelatin absorb enough water to allow the tissue to lie flat on its own. This should happen after about one minute; it may take more time if the tissue is very dry due to low relative humidity. Turn the tissue over in the sensitizing bath and allow it to soak, fully submerged, for the remainder of the time—a total of 3 minutes as recommended by the manufacturer—while gently rocking the tray. Brush the back of the tissue to release air bubbles as well. The temperature and time need to be kept constant for consistent results.
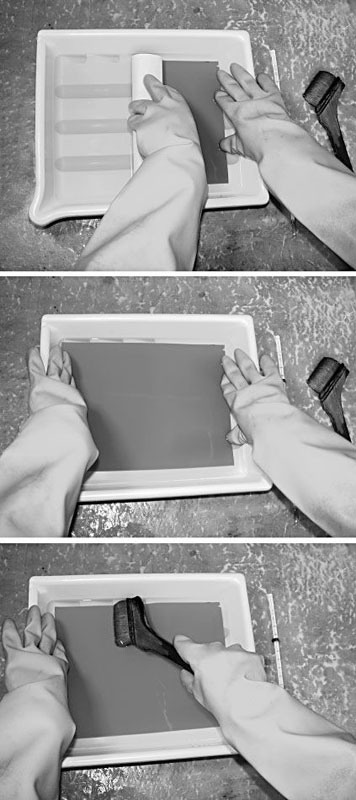
Figure 3-3 Hold the tissue under the solution, unrolling and rerolling until it begins to flatten out. Once almost flat, brush it to remove adhered bubbles and hold it gently under the solution until it is flat enough to turn over.
Adhering the Tissue to the Plexiglas
Gently lift the tissue out of the sensitizer and allow it to drain while holding it by one corner. Dribble a puddle of sensitizer on the center of the Plexiglas. Slide the tissue face down onto the surface of the Plexiglas in a continuous motion in the middle of the puddle of sensitizer. Be careful not to trap any air or dust particles under the tissue. Position (slide) the tissue to the center of the Plexiglas (Figure 3-4). Pin it in place along one edge and use a rubber squeegee to lightly stroke the back of the tissue, gently pushing out the excess liquid. Position the squeegee in the center of the tissue and stroke more firmly once in each of all four directions until there are no signs of lifting along the edges of the tissue. Do not use excessive pressure when squeegeeing. A screen printing squeegee is good because the edges are usually straight and sharp. A stiff photographic squeegee in new condition is also very good, but some photo squeegees may be too soft or flexible (Figure 3-5). If any serious problems occur, such as buckling or creasing, discard the tissue and begin again. A creased gelatin tissue cannot be salvaged. We recommend that an extra tissue be sensitized in the event that one is damaged or flawed. If it is not required it can be stored frozen in a hermetically sealed envelope or box and used at a later date.
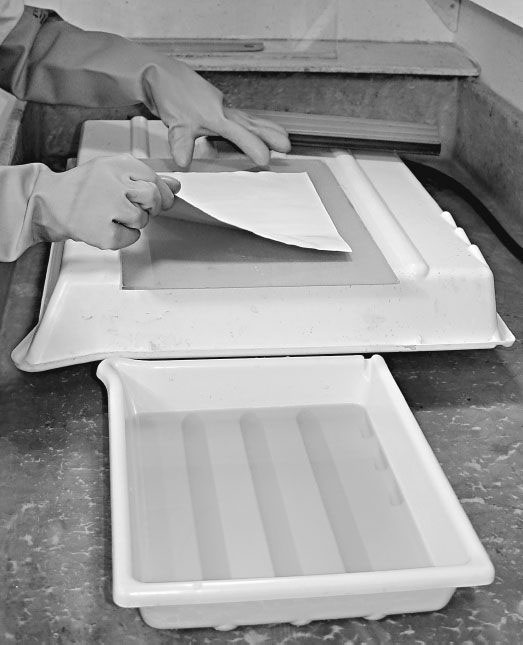
Figure 3-4 Center the tissue on a pool of sensitizer in the middle of the Plexiglas.
Immediately blot the back of the tissue with a wad of paper towels to remove any excess sensitizer. Be sure the edges and surface are free of any shiny wet areas. Wipe the edges of the Plexiglas and the back to remove any sensitizer solution (Figure 3-6).
All solutions that are to be stored and reused—such as the sensitizer—must be filtered after each session to remove hairs, dirt, or gelatin fragments. You do not want any gelatin particles to remain in the solution during storage because they will shorten its storage life. A No. 4 coffee filter and large funnel are ideal strainers (Figure 3-7).
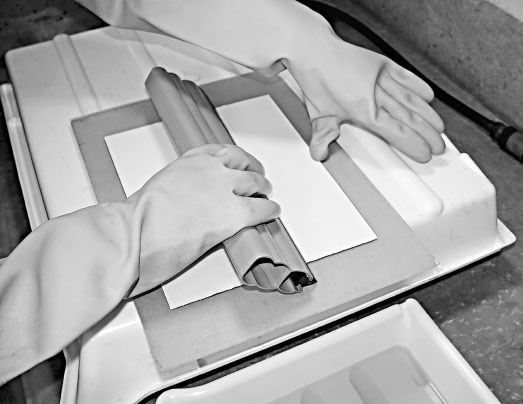
Figure 3-5 Squeegee the tissue from the center to each of the four sides.
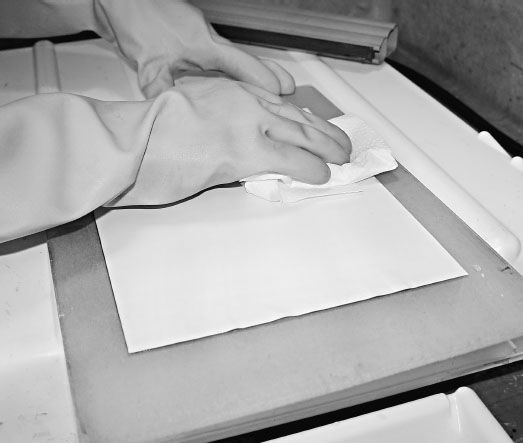
Figure 3-6 Soak up all excess solution by gently rubbing with a wad of paper towels. Wipe the edges and the back as well.
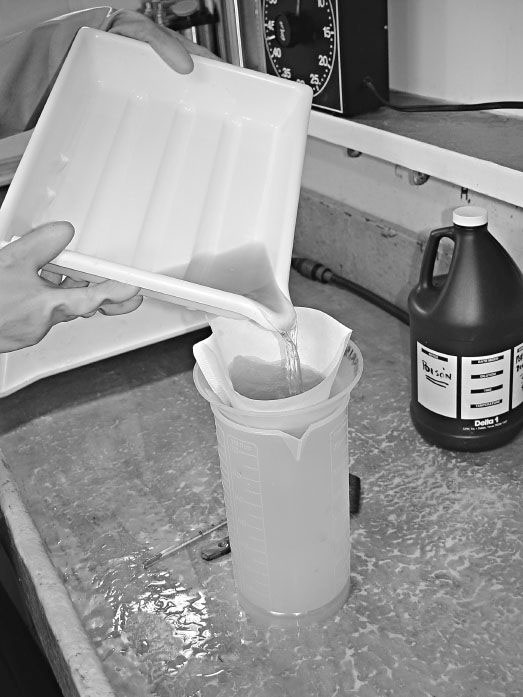
Figure 3-7 Filter the dichromate sensitizer solution through a coffee filter using a wide-mouthed funnel.
Drying the Sensitized Tissue
The tissue must dry evenly in order to prevent fractures and concentric rings from forming on the surface. If the tissue receives uneven air movements across its surface, the corners will dry before the center and begin to lift while the center is still stuck firmly to the Plexiglas. This will cause the tissue to form concentric fractures as it pops off the surface in small increments (see Figure 3-10). Ideally the tissue should pop or peel off the surface of the Plexiglas in one instant. Most sources mention the use of a fan to dry the tissues quickly. If the fan is large and the room is not too dry or hot, this method can work well. We have also experimented with stacking the wet tissues on Plexiglas between blotters. We have found that all of these methods presented various problems, some serious. Our solution, which seems to give us almost perfect results, is to allow the tissue to dry slowly and evenly while exposed to the still slightly humid air of an enclosed space. This prevents the edges from drying at a different rate than the middle of the sheet. To do this, it is best to leave the tissue uncovered while inside a dark cabinet or room for 8 to 14 hours. Stand the Plexiglas almost vertically on one edge (Figure 3-8). Because the tissue is now light sensitive, a dark cupboard is necessary if the room lights are to be on at any time while it is drying. If it is left in a darkroom to dry, examine it only by safelight (no white light) because it is now much more light sensitive than while it was wet. Do not leave any safelights on overnight while it is drying. Rotate the Plexiglas by 180° at least once while it is drying. Although most sources recommend 1.5 to 2 hours as the ideal time for drying by fan, Blaney (1895, p. 23) says to let it dry overnight, and the GTA Guide (Smeil 1975, p. 69) suggests a subsequent storage of 8 to 10 hours at room temperature to achieve uniformity.

Figure 3-8 Plexiglas standing in a darkroom as tissue dries overnight. Be sure all lights are off.
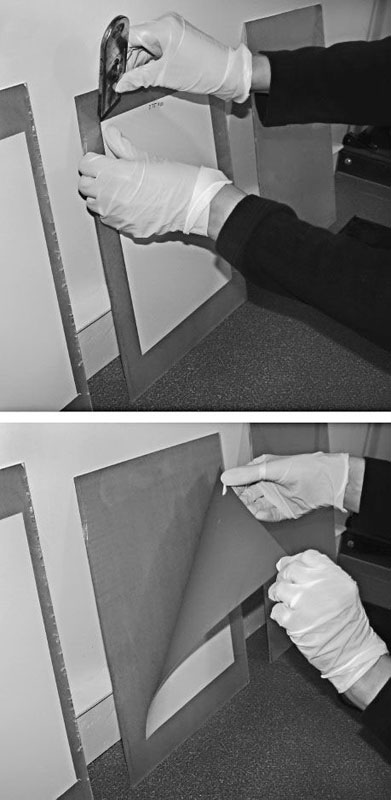
Figure 3-9 The tissue should peel off in one clean “woosh.”
The tissue should not over-dry to the point where you find it on the countertop in a tight little roll. It should be dried just to the point where you have to manually strip it from the Plexiglas (Figure 3-9). It will be flat and have a better moisture content at that point. Under safelight, inspect the tissue for flaws caused by scratched or pitted Plexiglas, air bubbles, dust, or uneven drying. If the flaws are extensive do not use that portion of the tissue. Place the sensitized tissue in a hermetically sealed light-safe bag until used or frozen for storage. Black plastic photographic paper bags are ideal. Overly dry tissue will cause contact problems later during exposure. It is possible to correct this by rehumidifying through storage in a confined space of higher relative humidity until the curl goes limp.
The sensitized tissue can be kept at room temperature for a limited time before exposure. The dark reaction, or dark effect, causes the tissue to progressively harden as if it were being fogged by light. During this time, there is an increase in its speed because of the loss of the threshold. Speed and threshold are photographic terms used to describe how film and paper initially react to light. Refer to photography resources for more information on this. De Zoete (1988, p. 35) says that light sensitivity increases during the first 24 hours after drying, at which point the dark effect begins. After a day or two it is supposed to be at its best (Blaney 1895, p. 18), but after about seven days the tissue may be so fogged and unpredictable that it must be discarded. We normally use a sheet of tissue during the day after it was sensitized but have found through testing that after three days freshly sensitized tissue stored at cool room temperature shows no visible evidence of the dark effect. After a week, however, there is some slight fogging and evidence of dark effect. This change will accelerate if the temperature increases. After two weeks, there is even more perceptible fogging. Tissue that has been frozen immediately after sensitizing and stored for up to eight weeks gives good results. Tissue that has been frozen for extended periods of time (four months) can show evidence of the dreaded dark effect. Tissue that has been frozen for one year failed to adhere because it had completely hardened. It is best to freeze it as soon as it is dry before it over-dries and curls up. Put the extra tissue in a light-safe, hermetically sealed bag. Place in a chest freezer, preferably not a frost-free refrigerator freezer. When needed, remove it from the freezer ahead of time and leave the sealed package unopened during a thawing out period. After opening, allow it to achieve equilibrium with the room before exposure. This will prevent irregularities in the resist and final image.
1. Mix a 3.5% solution of potassium dichromate and distilled water for the normal contrast Autotype G35 tissue (5% for the lower contrast Autotype G25 tissue). One liter of mixed solution can safely sensitize 1 square meter of tissue. Keep refrigerated if possible (not with food!!).
2. Cut a piece of gelatin tissue at least 3 cm (1¼ inch) larger than the image area (including room for the 21-Step Scale).
3. Immerse the tissue in sensitizer at 10 to 13°C (50–55°F).
4. After the tissue relaxes and begins to lie flat, brush lightly in all directions with a very soft, wide brush to remove air bubbles. Use the brush to hold the tissue down under the solution until the curl completely relaxes and it flattens out.
5. Leave the tissue face up for one and a half minutes and then flip over. Keep in the solution for a total of 3 minutes.
6. Have the degreased Plexiglas ready on a nearby firm support (cleaned in advance with 100% alcohol and then dusted with canned air).
7. Drain the tissue onto the Plexiglas to form a puddle.
8. Slide onto the Plexiglas and squeegee the tissue in place while holding one extreme edge. Repeat in all four directions from the center.
9. Pat the backing dry with paper towels to remove the excess sensitizer from the front and back of the Plexiglas.
10. Stand the Plexiglas vertically on a countertop in a not-too-dry, closed, light-safe (dark) area.
11. Rotate the Plexiglas after a few hours by 180 degrees, then allow to dry undisturbed overnight.
12. After the tissue pops off or peels off without resistance, it is ready for storage or use. Wrap well in a light-proof plastic bag or envelope like that which photographic paper comes in.
Concentric Fracture Lines Radiating Toward the Corners When the tissue dries too quickly, the edges and corners dry faster than the center and tend to release first. After the tissue is removed, there are concentric rings visible on the surface of the tissue, especially near the corners (Figure 3-10). Contrary to many older texts, we advise that you avoid a direct fan or warm air current on the tissue during the drying time. A still and slightly humid room is best for a slow overnight drying period. We use our darkroom, and when the relative humidity is very low we add water to the sink to raise the relative humidity and slow the drying. This is also important in order to prevent the tissue from over-drying and curling up.
Cupping and Edge Frilling When the tissue dries unevenly, it will not be flat. It may be cupped or domed, or it may have frilled or wavy edges. If there are problems with the edges frilling or drying faster than the center, sensitize a larger sheet than needed and simply trim off the wavy edges. This is particularly useful in dry climates (≤ 35% relative humidity). This problem can make the dry lay-down technique next to impossible.
Air Bubbles and Pinholes If you are getting a lot of tiny air bubbles from using the puddle method of adhesion, use water that has been preboiled and then cooled. If the problem persists, you can adhere the tissue to a submerged Plexiglas sheet using the adhesion to copper procedure described in Chapter 6 (“Adhering the Tissue to the Copper Plate: The Wet Lay-Down Method”).
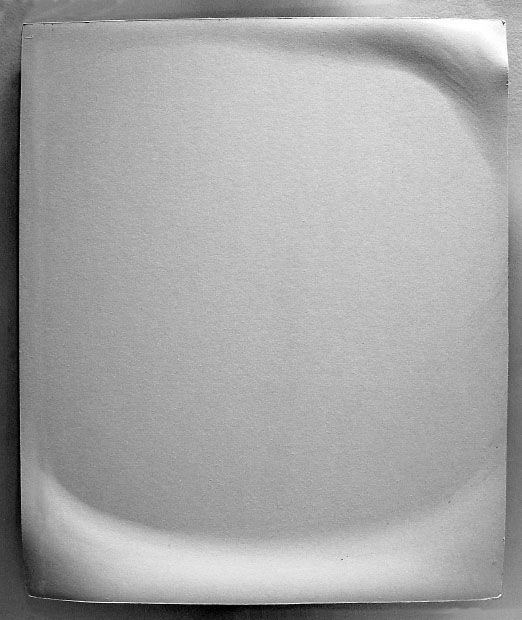
Figure 3-10 Concentric fractures resulted when the tissue let go in small increments, because the corners dried at a faster rate than the middle of the tissue.
Blemishes and Spots (water, air, grease) Areas on the Plexiglas that had a greasy smudge will cause a blemish or blister in the tissue during lay-down or become apparent during the etch. Clean the Plexiglas with 100% alcohol and paper towels immediately before adhesion. If you trap air under the tissue during lay-down, the blister formed prevents the gelatin from bonding to the Plexiglas. This area dries differently and causes a blemish.
Pits and Bumps, Scratches and Flaws If a scratch or pit mars the surface of the Plexiglas, it will leave a tiny bump on the surface of the newly sensitized gelatin tissue. This will cause a sunspot during exposure by holding the positive slightly away from direct contact with the tissue at this point, allowing the light to spread underneath. Be sure the surface of the Plexiglas is flawless (Figure 3-11).
Uneven Sensitizing (not apparent until the plate is etched) If the moisture content of the gelatin tissue is not even when immersed into the sensitizer, it may cause uneven absorption. Give the tissue time to acclimatize first. When the sensitizer is used beyond its capacity or the tissue is not submerged fully or agitated evenly during sensitizing, the tissue may acquire unpredictable areas of variable sensitivity. This will show in the etched plate as splotchy tones or coarse mottle. Take precautions to ensure that the sensitizer is not over-used or too old and that you keep the tissue fully submerged during sensitizing.
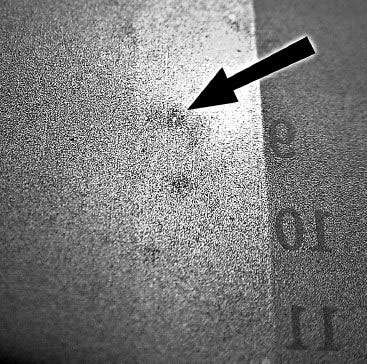
Figure 3-11 A bump in the gelatin resist caused by a pit in the Plexiglas used to sensitize the tissue. If etched, this will result in a sunspot. (See Figure 5-9.) This is a good indication that it is time to replace the Plexiglas.
Fingerprints The warmth of your fingers can actually melt the gelatin resist, especially when pressure is applied. Wear cotton gloves when cutting and trimming tissue. Be sure to wear rubber or nitrile gloves at all times when sensitizing the tissue and cool your gloved fingers in the bath as you are working. Don’t use a lot of pressure when handling the tissue. Avoid touching the surface of the gelatin.