Directions for the Home Manufacture of Carbon Tissue for Photogravure Printing |
The home manufacture of gelatin carbon tissue is not extraordinarily difficult, and with a little practice a very satisfactory gelatin tissue can be created. This chapter gives detailed instructions for the preparation of gelatin carbon tissue, which can be used to make photogravures.
First, a note about gelatins. Gelatin is extracted from many sources, including the hide, skin, white connective tissue, and bones of animals. It is useful in carbon photography and in gravure work because it absorbs water and swells with increased temperatures until it reaches a melting point, at which point it forms a colloid; when again cooled, this colloid will set, even at low concentrations, and the cycle can be repeated. Certain chemicals, including chrome alum, potassium alum, formalin, and the various dichromates (ammonium, potassium, and sodium) serve to either harden, reduce, or altogether eliminate the ability of gelatin to absorb water.
Most commercially available gelatins, including some edible gelatins, work reasonably well for making carbon tissue for gravure work. However, for consistent results I recommend the use of a gelatin with a Bloom index of between 175 and 250; the instructions in this chapter are designed for gelatins in this particular range.
When making tissue it is important to use a percent solution that allows time to evenly coat the tissue but that also sets within less than 2 minutes. It is almost impossible to perfectly level the plate glass on which the coating operation takes place. Therefore, if the pigment solution takes too long to set it will tend to settle in a thicker layer toward the low end of the carrier.
Although you can vary the amount of coating solution used to coat a carbon tissue of a specific size in order to adjust for working environments that are warmer or cooler than the norm, the following amounts should be considered standard for a room temperature of about 21°C (70°F) and relative humidity of 50 to 60%: 50 ml for a 20 cm × 25 cm (8″ × 10″) sheet, 100 ml for a 28 cm × 36 cm (11″ × 14″) sheet, and so on.
Distilled water: |
1000 ml |
Gelatin, 175–250 Bloom: |
80–100 grams |
Refined sugar: |
25 grams |
Pigment: |
10 grams Cal-Tint II colorant, Venetian Red (or substitute any good quality tube watercolor) |
One of the most interesting features of the carbon process is that virtually any color desired for the final image can be obtained by mixing pigments while making the carbon tissue. However, for photogravure work we have attempted to find a color that approximates the rust/brown color of commercial Autotype tissue; to my eye, Venetian Red appears to be such a color. For our tests we used the Venetian Red available in a line of Cal-Tint colorants; however, you should be able to substitute any good quality tube watercolor of the same color, although any substitution will require an adjustment in the amount of pigment needed to achieve the same amount of saturation.
PREPARING THE PIGMENTED GELATIN SOLUTION
1) Stir 80 grams of 175–250 Bloom gelatin into 900 ml of distilled water at about 21°C (70°F), and let the mixture stand for about an hour. During this period the gelatin will absorb water and form a gel.
2) After an hour, place the container of the above mixture in warm water at around 43 to 49°C (110–120°F) and allow the solution to liquefy completely.
3) When the gelatin solution has liquefied and reached a temperature of about 40.5 to 43°C (105–110°F), stir in 25 grams of plain white sugar, and allow to dissolve completely.
4) Now add the pigment. Pour 10 to 15 ml of the warm gelatin solution into a glass mortar and then add the required pigments. Grind with a pestle for a minute or so until the solution appears uniform. The amount of pigment added to the solution affects tissue contrast: A low contrast tissue is made by using enough pigment to produce a tissue coating that is just barely opaque. Adding more pigment to the solution results in higher contrast tissue.
5) Next, add the dispersed pigment in the mortar to the container of gelatin solution, and stir in enough water to make 1000 ml of pigmented gelatin solution. Stir gently for a couple of minutes to achieve maximum dispersion of the pigment.
6) Place the container of gelatin–pigment solution in water at about 38 to 43°C (100–110°F) and allow it to sit for about 2 hours, or until most of the air bubbles have dissipated.
7) The final step in tissue manufacture is coating a suitable paper base with the gelatin–pigment solution. The base should be relatively thin but must have good wet strength. A very good and inexpensive paper carrier is white, unpasted wallpaper, available in rolls 20.5 inches wide by about 14 yards in length. Many smooth drawing papers can also be used.
The temperature in the coating room should be at about 21°C (70°F). If much colder than 21°C (70°F), the gelatin will set very rapidly and it will be impossible to achieve a smooth coating, especially in larger sizes; if warmer than 22°C (72°F), the solution will take a very long time to set. The gelatin–pigment solution should be at about 38 to 43°C (100–110°F) when poured onto the carrier. Maintain the temperature of the coating solution throughout this operation. For coating you will need a plastic or wooden frame about an inch smaller in all dimensions than the paper base you plan to coat to serve as a dam to contain the coating solution and keep it from flowing off the paper.
1) Begin preparation for the coating operation by first leveling a piece of plate glass several inches larger on all sides than the largest tissue you intend to coat.
2) Soak the paper base in water for 2 to 3 minutes, then place it on the leveled coating surface, gently squeegee off all surface water, and blot off with a clean towel (Figures 11-1 and 11-2). Next, place the frame over the paper carrier.

Figure 11-1 Gently squeegee the surface water from the paper. Photo by Sam Wang.
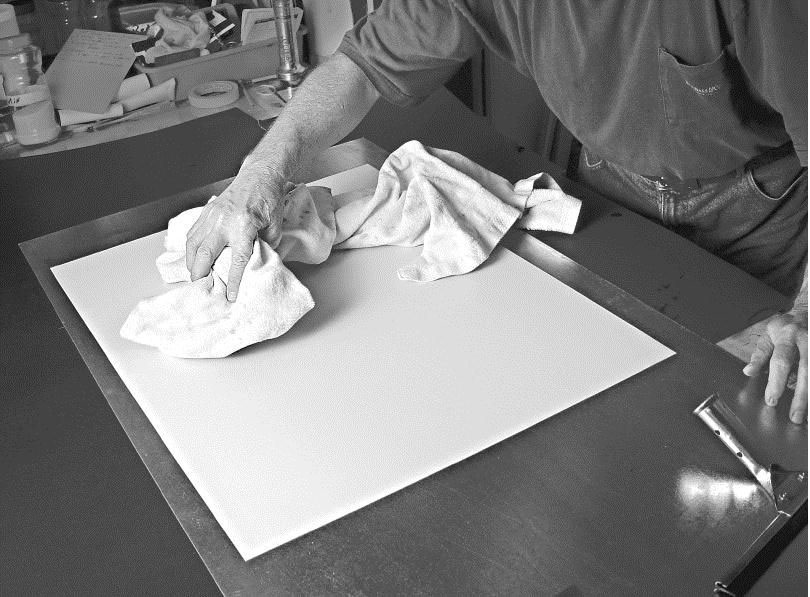
Figure 11-2 Blot the paper with a towel to remove more water. Photo by Sam Wang.
3) Pour the required quantity of pigmented gelatin solution into a small glass or plastic measurer: 20 ml for a 15 cm × 18 cm (5″ × 7″) tissue, 55 ml for a 20 cm × 25 cm (8″ × 10″) tissue, 100 ml for a 28 cm × 36 cm (11″ × 14″) tissue, and 205 ml for a 40 cm × 50 cm (16″ × 20″) tissue. Carefully pour the pigmented gelatin solution onto the paper base, starting in the center, and quickly spread it evenly on the carrier, using a comb or your fingers to even out the gelatin solution on the base (Figures 11-3 and 11-4).
4) If the coating operation creates air bubbles on the surface of the tissue these should be eliminated by immediately misting the surface of the tissue with a spray of alcohol. It is critical that the misting operation step be carried out while the gelatin is still flowing freely because once the gelatin starts to set the drops of alcohol from the misting will form small craters that will not disappear.
5) After you have finished smoothing out the coating, look over the surface carefully and remove air bubbles and any lint, hair, or other foreign particles that may have settled on the gelatin during the coating operation. You must work quickly because once the solution begins to set it should not be disturbed.

Figure 11-3 Pour the pigmented gelatin solution in the center of the paper. Photo by Sam Wang.
6) The gelatin should set in 10 minutes or less at a temperature of around 21°C (70°F). After it has set carefully remove the tissue from the plate glass and transfer it to a drying screen. Drying will take from 6 to 24 hours, depending on temperature and humidity, the type of carrier used, and the thickness of the tissue coating.
Frame of Magnetic Sign Material
An alternative to a wooden or plastic frame is magnetic sign material. Bob Nugent suggested the use of this material to me and the following information is adapted, with his permission, from a technical article that appears on the Bostick & Sullivan web site.
Magnetic sign material is available in a wide range of sizes up to approximately 0.032 inches in thickness. Use a razor to cut out a frame in the material slightly larger than the size tissue you wish to make. You will also need a sheet of steel. It is best to use galvanized steel for this application because plain steel plate will rust and cause all manner of problems. Place the steel sheet on a perfectly level surface. As in the previous directions, first soak your paper for 2 to 3 minutes, and then squeegee it to the steel sheet. Next place the magnetic sign material mask with the cutout over the paper. The magnetic material will stick to the steel through the thickness of the paper with enough force to keep the gelatin from oozing out underneath at the sides (as it tends to do when using other types of frames). For a tissue 25.5 cm by 30.5 cm (10″ × 12″) in size you will need about 65 to 75 ml of pigmented gelatin solution to achieve a wet coating height of 0.032″. This works out to be about the same as the amount of solution recommended earlier for coating with a wooden or plastic frame.
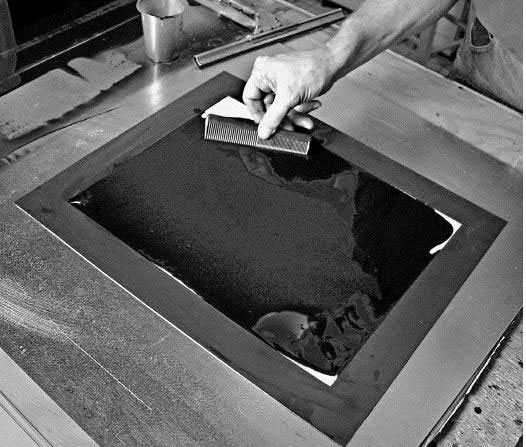
Figure 11-4 Use a comb or your fingers to quickly spread the gelatin evenly all over the paper. Photo by Sam Wang.
Pour the pigmented gelatin into the corners of the top side first, then let it all flow in, distributing it along the top of the sheet as you go. Using a round iron rod, preheated to about 54.5°C (130°F), squeegee the pigmented gelatin solution down across the paper. The rod needs to be fairly thick—about 3.2 cm (1.25″) in diameter appears to be about ideal—and long enough to completely cover the cutout in the frame. It is important that the rod be thick enough to prevent sagging because this would lead to tissue of uneven thickness. With practice you should be able to distribute the pigmented gelatin solution evenly with just two passages of the rod, one up and one down (Figure 11-5). The warm rod enables you to work slowly, which keeps the gelatin from piling up over the sides of the rod. The use of the warm rod eliminates another problem—bubbles—because it dissipates any bubbles on contact that may be on the surface of the pigmented gelatin solution. Done correctly, the surface of the tissue will be as smooth as glass after coating. When the gelatin sets, run a knife around the edges of the mask and transfer the tissue to a drying screen.
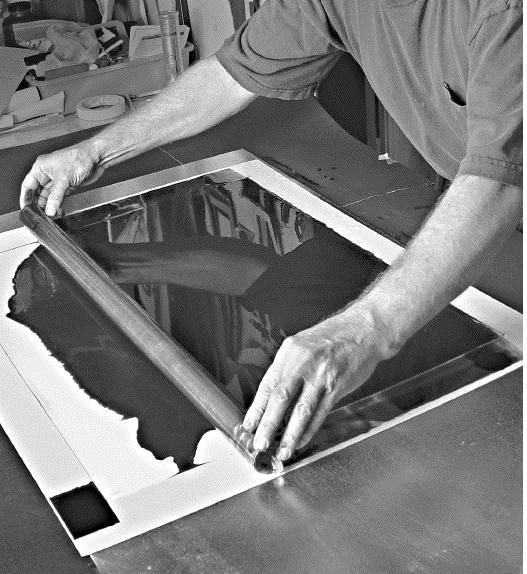
Figure 11-5 One or two passes of the warm rod evenly spreads the gelatin. Photo by Sam Wang.
See Appendix I page 191 for a suppliers list.