A unique aspect of the photogravure process is connected to the properties of ferric chloride, the mordant that penetrates the gelatin to etch the copper beneath. The correct chemical name is iron(III) chloride; however, in this text we will use the traditional term ferric chloride to avoid confusion and maintain consistency with other literature. In photogravure, a progression of ferric chloride solutions of varying densities are used to etch the copper. The densities of the solutions are measured on the Baumé scale using a Baumé hydrometer. See Appendix D for the chemical formulae of a ferric chloride solution and its various reactions.
Equipment and Supplies
Look for 40% weight by volume ferric chloride solution, previously called Rotogravure Iron 48 Degree Baumé (acid free). See Appendix G for the desired composition of this solution. Use distilled water to dilute this stock to make the other solutions. You will need six or seven plastic storage bottles, at least 2 liters (2 qts) each being ideal. You will need a set of three to five heavy plastic photography trays and a funnel. Use a glass thermometer and a glass Baumé hydrometer (39° Bé to 51° Bé) with a 250 ml (8 oz) graduated cylinder for the hydrometer. You can make a cylinder with a 31 cm × 3.5 cm (12″ × 1.25″) Plexiglas tube glued to a square of thick Plexiglas as a base. Gradations are unnecessary.
Working with Ferric Chloride
Even though reaction fumes are minimal, work in a well ventilated room. Ferric chloride is a strong irritant. If not rinsed off it will stain everything it touches, even some plastics. Be prepared to end up with a rust-red darkroom sink. Always wear long acid-resistant gloves, a rubber apron, and a face shield when working with ferric chloride. Splashing is unavoidable and eye contact is rather painful and dangerous. All plastic equipment such as funnels, beakers, trays, and stirring utensils must not be used for photographic chemicals after being used with ferric chloride. They are contaminated and must be dedicated for use solely with ferric chloride. Glassware is not a problem if well cleaned. Ferric chloride etches all metal including stainless steel, so metal utensils or thermometers must not come into contact with the ferric chloride. For obvious reasons, do not work in a stainless steel sink! Do not dump undiluted ferric chloride down the drain at any time. Ferric chloride spills that are not excessively diluted before being washed down the drain could eventually etch away metal pipes. When cleaning up after etching, be sure to flush the system well.

Use of the Hydrometer
Each mordant must be tested and maintained at a known Baumé. The Baumé of a solution refers to its density or saturation in comparison to water and is another form of specific gravity. See Table 7-1. A hydrometer that covers the range of Baumés from 39° to 51° is necessary. Test the Baumé by pouring the mordant into a dry 250 ml graduated cylinder (8 oz capacity). Fill to within a few centimeters (an inch) from the top. Slowly lower the dry hydrometer into the solution and release. Be sure that its position is in the middle of the cylinder rather than clinging to the side. Give the hydrometer a spin to dislodge air bubbles. Read the scale at the bottom of the meniscus (Figures 7-1 and 7-2). You can also pour the ferric chloride into the cylinder after placing the hydrometer in it first. It will bob up and down and come to rest at the actual Baumé reading. Test the Baumé levels at a stabilized working temperature somewhere between 20°C (68°F) and 24°C (75°F).
![]()
Table 7-1 Relations Between Baumé Degrees and Specific Gravity for Liquids Heavier Than Water at 60°F
Specific Gravity |
° Baumé |
1.465 |
46° |
1.450 |
45° |
1.436 |
44° |
1.422 |
43° |
1.408 |
42° |
1.394 |
41° |
1.381 |
40° |
1.368 |
39° |
1.355 |
38° |
1.343 |
37° |
1.330 |
36° |
1.318 |
35° |
1.306 |
34° |
1.295 |
33° |
CONVERTING SPECIFIC GRAVITY TO BAUMÉ DEGREES
If finding a Baumé hydrometer is difficult, it may be easier to access equipment that reads specific gravity. The following formula (Smeil 1975, p. 88) converts one reading to the other:
![]()
For example: A solution reads 1.307 specific gravity, therefore:
145 − (145 ÷ 1.307) = 145 − 110.941 = 34° Bé
The chart shown in Table 7-1 might be a useful guide.
Mixing the Ferric Chloride Solutions from Stock 48° Baumé
Start with one bottle 3/4 full of 48° Baumé (Bé) solution and keep it asis. This is the conditioning bath. Fill a second bottle a little less than 3/4 full with 48° Bé stock and reduce the Baumé by adding a measured amount of distilled water. Start with 75 ml of water to 1500 ml of 48° Bé solution. Mix the solution and pour into the graduated cylinder. Measure the Baumé to see how much it has lowered. Extrapolate from this to determine how much more water is required, if any. Label each bottle clearly.
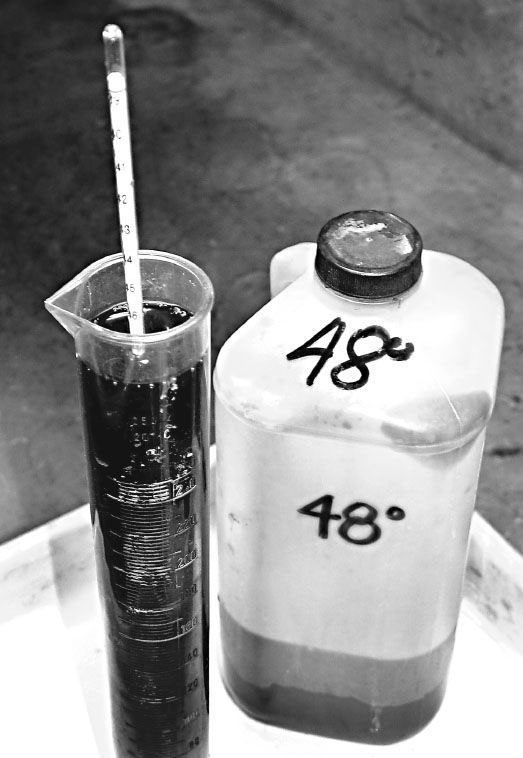
Figure 7-1 The hydrometer and graduated cylinder. Measure the Baumé of the ferric chloride by reading the bottom of the meniscus on the hydrometer.
Repeat until you have at least five bottles of mordant at 48° Bé, 45° Bé, 43° Bé, 41° Bé, and 39° Bé. We have also found that a bottle of 40° Bé and 42° Bé can be useful. Various sources give a usable range of 45° Bé to 30° Bé stating that above 45° Bé will not etch the plate, and below 30° Bé will etch everything at once. Measure the Baumé of all mixes at the same temperature. It will be necessary to readjust after a rest period, usually overnight.
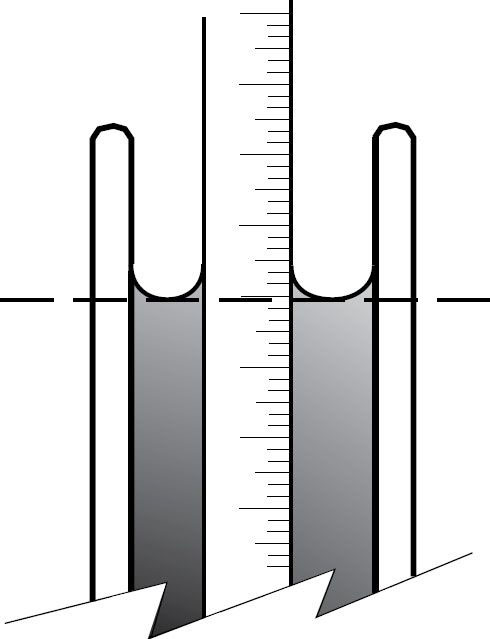
Figure 7-2 Diagram showing how to use the bottom of the meniscus to obtain the correct reading on the Baumé scale.
Ridding Solutions of “Free Acid”
It is vitally important that the mordant is almost, but not completely, “acid free.” It must be free of excess H3O+ (aq), a byproduct of dilution with water. The resulting hyperactivity can cause devils and overactive etching. One method of removing this acid is through the addition of ferric hydroxide sludge, properly known as Iron(III) Hydroxide. Producing the sludge is a messy and tedious process, and in our experience it is best left to laboratory technicians. See Appendix D for an abbreviated step-by-step description of the procedure and for the chemistry of free acid. You can also take the edge off a fresh bath by dropping thin copper strips into the bottled solution as an alternate to the ferric hydroxide. Even when using top-quality, acid-free ferric chloride it is still necessary to reduce the free acid level of the diluted solution by using either ferric hydroxide or copper strips. Regularly using the solution to etch the copper plates has the same effect as adding strips of copper: it conditions the mordant and controls its hyperactivity. After the baths are well seasoned, further treatment will rarely be required.
Adjusting the Ferric Chloride Working Solutions
After the initial mixing and after normal use, the ferric chloride baths will shift their Baumé readings. As the solutions sit in open trays, some water evaporates and thereby lowers the Baumé. When etching, the movement back and forth from one Baumé bath to another carries with it enough of the other baths to affect each other. Check each Baumé every time you etch.
If the Baumé of a given working solution is lower or higher than required, it should be adjusted. The Baumé reading can be lowered by adding distilled water or, preferably, a quantity of a lower Baumé solution. It can be elevated by adding a quantity of solution already at a higher Baumé. When adding water to ferric chloride, other problems are introduced. The addition of water to the ferric chloride solution encourages the formation of free acid (H3O+ (aq)), which in turn has to be mostly neutralized. When the Baumé of a given solution is adjusted by adding a quantity of mordant of greater or lesser Baumé, it should not adversely affect the working solution because no additional foreign material was added to the solution. This is the case only when the added mordant is in good working condition itself.
When making fresh stock or major adjustments to the Baumés, do so 24 hours before use to allow time for any reaction to be completed. Minor adjustments made by inter-mixing various existing Baumés do not normally need a rest period before use. Older, established mordants work in a more consistent, if slightly slower, manner. Therefore, once the working Baumés have been mixed, they can be used for an extended period of time with only minor adjustments. At all times, avoid the introduction of water to the solutions.
When fresh, ferric chloride is a translucent reddish chocolate-cola color. As it is used it becomes darker and more opaque, and when exhausted it has a scummy green cast from an excess of copper(II) chloride (cupric chloride). Monitor the color change and rejuvenate with fresh ferric chloride or replace as needed.
The addition of anhydrous ferric chloride powder effectively raises the Baumé without adding any water to the solution. Remember that adding dry ferric chloride creates an exothermic reaction and therefore causes heat. There is a delayed reaction, which requires retesting after a period of rest time. The addition of hydrous ferric chloride powder adds water ions to the solution along with the potential of more free acid. It also requires a lot more hydrous than anhydrous ferric chloride to raise any appreciable amount of solution one degree of Baumé. We strongly recommend that the 48° Bé is used rather than using dry chemical to raise Baumés. There are serious safety issues associated with the use of dry ferric chloride.
1. Start with 8 to 10 liters (2 gallons) of the stock ferric chloride at about 22°C (71.6°F).
2. Clean five to seven plastic 1.5- to 2-liter bottles.
3. Starting with 48° Bé, fill one bottle 3/4 full and mark “48 Bé”.
4. Fill a second bottle less than 3/4 full with 48° Bé stock and reduce the Baumé by adding a measured amount of water. Measure the Baumé to see how much it has lowered. Extrapolate from this to determine how much more water is required.
5. Repeat Step 4 until you have five bottles of mordant at 48°, 45°, 43°, 41°, and 39° Bé. You might also want to have a 40° Bé and a 42° Bé. Measure the Baumé of all mixes at the same temperature.
6. Add small measured quantities of ferric hydroxide sludge to each of the Baumés where a lot of water was added or if there is suspicion of excessive free acid. Adding small fragments of copper will also help to reduce free acid and season the bath.
7. After a rest period of 24 hours or more, check the Baumé readings at 22°C (71.6°F) again. Readjust if necessary by inter-mixing.
Before submersion in the ferric chloride, the edges and back of the plate must be protected to prevent etching. Only the image area and the step scale should be left unobstructed so that they come in contact with the ferric chloride. Traditionally, liquid stop-out varnishes or asphaltum were used to stage plates. These materials are messy and require time to dry. We find it easier and cleaner to use adhesive plastics like shelf lining and magic tape.
Equipment and Supplies
You will need 3M Magic tape; self-adhesive plastic shelf lining (Mactac); a burnisher; masking or packing tape; a ruler, triangle, or square; and a fine-tipped Staedtler Lumocolor Waterfast Permanent Black pen. Be sure to use this particular brand and color because some other brands of marker have proven not to be resistant to the ferric chloride. There are also problems with other colors of Lumocolor; even black is not totally resistant.
Procedure
The gelatin resist is very moisture sensitive and cannot be touched at all. Even the moisture from your breath can cause severe problems, so avoid breathing on its surface. Use a face mask or shield when working close to its surface. Keep the plate well away from the potential of accidental splashes or gusts of humid air and never touch its surface with your fingers.
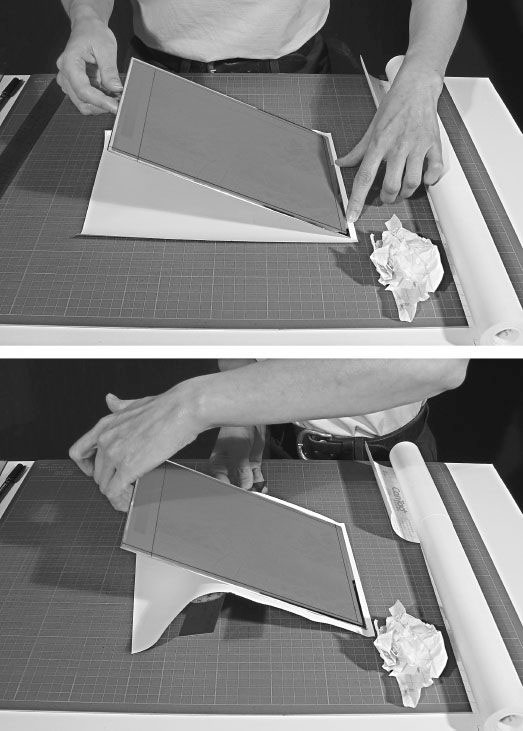
Figure 7-3 Lower one edge of the plate onto the sticky side of a piece of over-sized self-adhesive shelf-linear. Use a ruler to push the plastic up against the back of the plate to prevent the formation of a large air pocket.
The back of the plate can be quickly masked with several layers of packing tape or a sheet of self-adhesive plastic shelf lining. Figure 7-3 shows how to apply a sheet of Mactac to the back of the plate without turning it face down. Remember to be very careful when handling the plate. Do not place it face down in contact with any surface other than clean dry paper.
Next, outline the image and Stouffer Step-Scale with the permanent pen. This provides a visual guide for the strips of magic tape. Cover the plate outside the image and Stouffer Step-Scale with 3M Magic tape. Be sure to just cover the pen line with the tape. Lightly burnish the tape to ensure a sharp edge and a complete seal (Figure 7-4). Lay more lapped strips of tape down to cover all the borders from the edge of the image to beyond the edge of the plate onto the Mactac backing. When burnishing the very edge of the tape, be careful not to rub the exposed gelatin surface. Use the tip of the burnisher to also seal the little air-space created when one layer of tape crosses over another. This will etch as a line if ferric chloride seeps into it. You can also use a bone folder as a burnisher. It is smooth and light and has a fine tip.
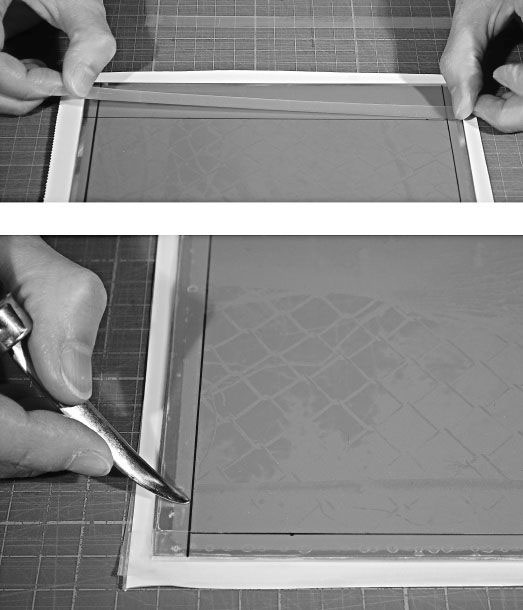
Figure 7-4 Protect the nonimage background with strips of Magic tape placed along the permanent marker pen line drawn along the edge of the image. Use a printmaker’s burnisher to seal the edge of the tape. The darkening line makes the outline of the image clearly visible. Be careful not to go beyond the edge and scratch the gelatin.
You can use the fine-tipped permanent black Lumocolor pen to spot out small pinholes and flaws. View the plate angled to a bright light to see tiny areas of shiny copper (Figure 7-5). Be careful not to rest your hand on the surface of the gelatin. Use a magnifying visor if that helps. Spot lightly with a tiny dot of ink (Figure 7-6). This will leave a little white dot when etched and can be easily retouched on the plate. It is much easier to retouch an unetched area of copper than it is to try to fix a deeply etched pit.
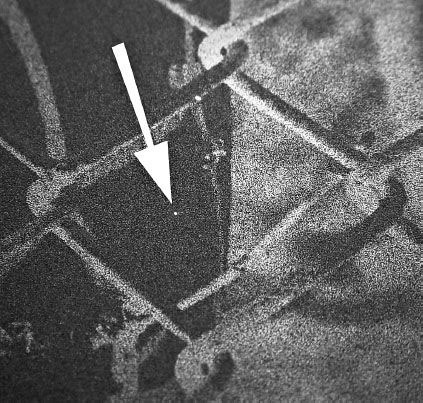
Figure 7-5 A shiny reflection is a clear indication of a pinhole in the resist. This will cause a deep devil if not blocked before the etching sequence.
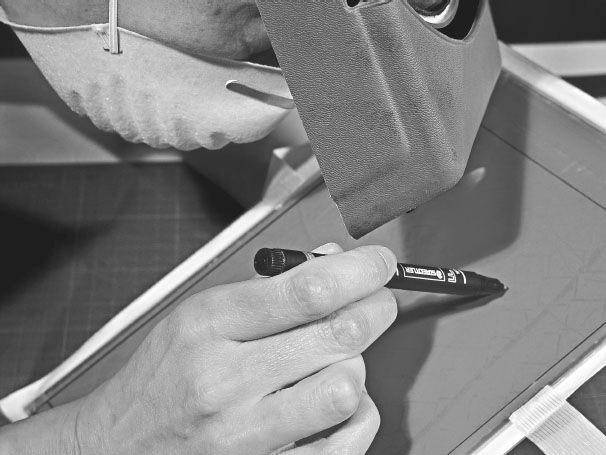
Figure 7-6 A tiny dot of ink from the permanent marker will resist the etchant long enough to prevent a deep pit from being etched. Note the use of a face mask and magnifying glasses, and remember that the hand is never in contact with the gelatin resist.

Figure 7-7 Apply a tape handle using strong fiberglass packing tape. Fold it over onto itself and onto the edge of the taped plate to provide a pair of firmly attached, nonsticky handles.
Now attach a tape sling to the back of the plate. Cut a 2 cm (3/4″)-wide piece of fiberglass-reinforced packing tape or masking tape about twice the length of the width of the plate or 60 cm (24″), whichever is greater, and lay it face up on a counter. Center the plate onto the tape and drop into place. Fold the tape over itself up to the edge of the image (Figure 7-7). This will leave two tabs on either side of the plate that will make it easy to handle and agitate the plate while in the ferric chloride bath. The location of the tabs should allow you to lift the plate and maintain horizontal balance. These tape handles are necessary because physical contact with the wet resist causes serious damage. If you use masking tape, be sure to apply several layers so that the tabs do not tear off in mid-etch. Use fiberglass packing tape for heavier plates. After the plate is prepared, store it where the relative humidity is stable and there is no danger of dirt or moisture getting onto the gelatin surface.
1. Cut a piece of Mactac about 2.5 cm (1″) larger than the plate. Peel off the backing and spread out face up on the countertop. Carefully center and drop the plate onto it (face up of course). Alternatively, use a ruler under the Mactac to bring it up in contact with the back of the plate in a smooth progression from one end to the other (Figure 7-3).
2. Define the image and step scale edge with a fine-tipped, permanent black Lumocolor pen. Be careful not to mark the image surface beyond this line.
3. Use long strips of 3M Magic tape to cover the area outside the image. Cover the pen line with the tape. Surround the step scale. Extend the tape over the edge and overlap the Mactac backing by about 1.5 cm (1/2″).
4. Burnish the edge of the tape with a burnisher or a bone folder. Pay special attention to the intersection where tape overlaps tape.
5. Spot out pinholes and tiny flaws with the permanent marker.
6. Attach tape handles across the back.
7. Put the plate aside, far away from any risk of being splashed while you prepare the etch.