Chapter 8. OpenGL Layer
In This Chapter
• Rendering Video in a CAOpenGLLayer
• Rendering Multiple Video Channels
Using Core Animation’s OpenGL layer, CAOpenGLLayer, you can gain more control over movie playback with everything from using Core Image filters on the video frame to compositing multiple video streams in the same context.
This chapter shows you how to render a video channel in a CAOpenGLLayer and duplicate the functionality from QuickTime layers, as shown in Chapter 7, “QuickTime Layers.” Following that, we take a look at compositing multiple video channels in a grid layout on the CAOpenGLLayer, similar to what you might see in a video wall. This demonstrates just how much functionality and power you have at your disposal when using the CAOpenGLLayer.
Rendering Video in a CAOpenGLLayer
As discussed in Chapter 7, simple playback of video is typically handled by QTMovieView and QTMovieLayer. However, if you want to alter your current frame before rendering it, you are better off using OpenGL. As a first step, we look at how to simply display the frames unaltered in a CAOpenGLLayer. This mimics the functionality implemented in a QTMovieLayer in Chapter 7.
To take advantage of a CAOpenGLLayer, you need to subclass it—it cannot be used directly. The API for creating OpenGL content in a CAOpenGLLayer has been greatly simplified compared to what you had to do prior to Core Animation. In an NSOpenGLView, you had to set up everything yourself, but in the CAOpenGLLayer, you get the following for free.
• Preconfigured OpenGL Context
• Viewport automatically set to the CAOpenGLLayer’s frame
• Preconfigured pixel format object
NOTE
If you are new to OpenGL, you might not understand what having all this set up for you really means. The bottom line is that you gain a great deal of functionality without having to painstakingly write out the code yourself. Core Animation does all the heavy lifting for you, so you can focus on your OpenGL rendering code.
The setup code is so simplified that you need to be concerned with only two functions. The first function checks to see if the frame for the next time should be rendered, and the second function renders the content depending upon whether the first returned YES or NO. If you have a good understanding of these two functions, you have a very good understanding of how the CAOpenGLLayer works and, more important, how to use it. These functions are shown in Listing 8-1.
LISTING 8-1 CAOpenGLLayer Delegate Rendering Functions
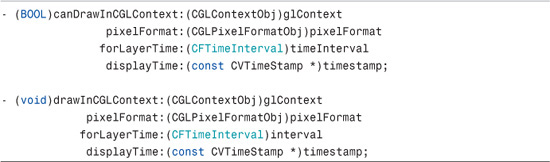
The function -canDrawInCGLContext gets called only if you have set the layer’s asynchronous property to YES. You can do so with the following call in your CAOpenGLLayer derived layer’s init method:
[self setAsynchronous:YES];
You don’t need to set this if you plan to update the content manually or according to some other scheme, such as a timer. In that case you simply need to call –setNeedsDisplay:YES on the layer whenever you want the content to be refreshed.
In our case, however, we want –canDrawInCGLContext to be called periodically because we are going to be constantly checking for a new frame to be ready while the movie is playing. To pull this off, set the asynchronous property to YES.
The function –drawInCGLContext gets called only if –canDrawInCGLContext returned YES. After it is called, it takes the responsibility for rendering your OpenGL content into a rendering context.
Layer Timing
Notice in both –canDrawInCGLContext and –drawInCGLContext, two fields relate to time:
• forLayerTime, which is a CFTimeInterval
• displayTime, which is a CVTimeStamp
We won’t focus on forLayerTime because we won’t be using it with CAOpenGLLayer; however, displayTime is important for this exercise.
Playing back movies correctly with a display’s refresh rate and in-sync with the movie’s sound can be tricky. However, Apple has achieved stable movie playback in the Mac OS using what they refer to as a display link. Here is how Apple defines a display link in the Core Video Programming Guide:1
1Apple’s Core Video Programming Guide (p. 10): http://developer.apple.com/mac/library/documentation/GraphicsImaging/Conceptual/CoreVideo/CoreVideo.pdf.
To simplify synchronization of video with a display’s refresh rate, Core Video provides a special timer called a display link. The display link runs as a separate high priority thread, which is not affected by interactions within your application process.
In the past, synchronizing your video frames with the display’s refresh rate was often a problem, especially if you also had audio. You could make only simple guesses for when to output a frame (by using a timer, for example), which didn’t take into account possible latency from user interactions, CPU loading, window compositing, and so on. The Core Video display link can make intelligent estimates for when a frame needs to be output, based on display type and latencies.
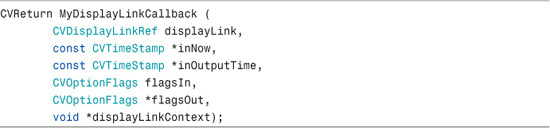
In essence this means that you must set up a callback that will get called periodically, at which point you can check to see if a new frame is available for display at the time specified in the callback’s inOutputTime CVTimeStamp field. The display link callback signature is in Listing 8-2.
LISTING 8-2 Display Link Callback Signature
In a CAOpenGLLayer, however, setting up and using a display link callback is completely unnecessary as this is provided for you in both –canDrawInCGLContext and –drawInCGLContext. The time you use to check to see if a new frame is ready is provided in the parameter called displayTime.
So, to render a movie into the CAOpenGLLayer, in the –canDrawInCGLContext:
1. Check to see if the movie is playing back; if not, return NO.
2. If the movie is playing back, check to see if the context for the movie has been set up yet. If not, set it up with a call to –setupVisualContext.
3. Check to see if a new frame is ready.
4. If so, copy the current image into the image buffer.
5. If everything is successful, return YES.
6. If –canDrawInCGLContext returned YES, -drawInCGLContext gets called. Inside of that method, draw the OpenGL quads for the movie’s current texture images.
The implementation of –canDrawInCGLContext is in Listing 8-3.
LISTING 8-3 Implementation of Delegate -canDrawInCGLContext

Before you can draw anything on an OpenGL context, you must first set up the visual context for the QuickTime movie. The call to –setupVisualContext is shown in Listing 8-4.
LISTING 8-4 Implementation of QuickTime Visual Context

Inside this call to –setupVisualContext, the movie is associated with the OpenGL context of the CAOpenGLLayer. That way, when –drawInCGLContext gets called, we will have everything set up to make the OpenGL calls, as shown in Listing 8-5.
LISTING 8-5 Implementation of drawInCGLContext
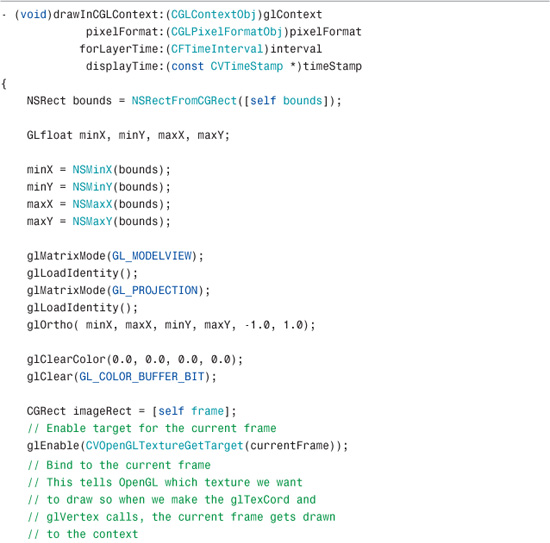
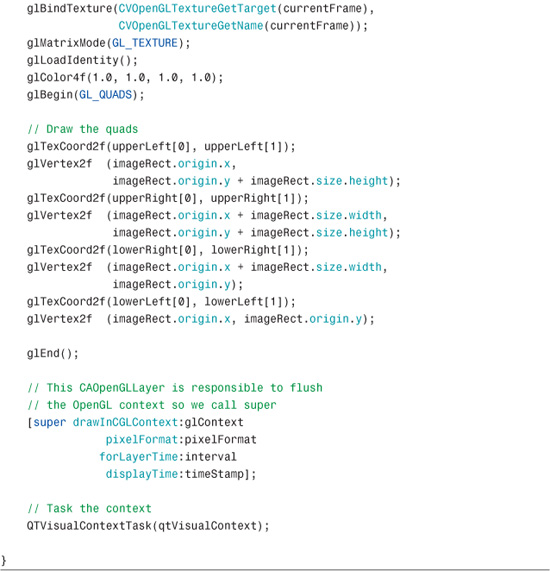
To understand all of this code, you likely need to understand OpenGL, which is beyond the scope of this book. However, take a look at these two lines from Listing 8-5:

These two lines tell OpenGL to enable and bind the drawing texture to the currentFrame (CVImageBufferRef) that we saved off in our call to –canDrawInCGLContext. In other words, this is how we tell OpenGL what to draw.
Rendering Multiple Video Channels
The final goal for this chapter is to demonstrate how to render multiple QuickTime video streams in a single CAOpenGLLayer. As noted in the sidebar, the primary reason for using OpenGL here instead of QTMovieLayer boils down to performance. Performance degrades quickly when you load and playback multiple QTMovies using multiple QTMovieLayers. To improve performance, we instead get the current frame of each movie playing back and composite them all together in the same OpenGL context.
To achieve this is not much different from what we did in the previous section to render a single QuickTime movie using OpenGL. We create an image buffer for each QuickTime movie and check each of them periodically to see if the next frame is ready in the call to –canDrawInCGLContext. We also need to set up a way to display the movies in a grid by setting a drawing rectangle for each movie as they are initialized.
We could use copy and paste and simply duplicate the code we wrote in the previous section, but the code quickly becomes unwieldy and cumbersome to navigate. Instead we use an object-oriented approach and create the OpenGL-derived layer (called OpenGLVidGridLayer), a VideoChannel object that represents one video stream, and a VideoChannelController object that provides an interface for playback and rendering. Here is what each object does:
• OpenGLVidGridLayer
This object initializes the layer so that it runs asynchronously, sets the frame, sets the background color to black, sets the video paths array from what was passed in, initializes the VideoChannel and the VideoChannelController objects, calls –canDrawInCGLContext and –drawInCGLContext, and acts as a proxy to start playback of all the movies that were assigned to VideoChannel objects.
• VideoChannel
This object represents each video on the grid. It stores the rectangle that will be used to composite the video in the parent rectangle, checks to see if its assigned video is ready to draw the next frame, initializes the visual context using the width and height specified by the rectangle it was initialized with, draws the video assigned to it using OpenGL calls, and provides a proxy method for video playback.
• VideoChannelController
This object takes an array of VideoChannel objects, each initialized with a movie and rectangle, to be used to render in the grid. It provides a proxy function that instructs all VideoChannels to start or stop playback on their movies, provides a proxy function to see if all VideoChannels are ready to draw their next frame, provides a proxy function to tell all VideoChannels to set up their visual contexts, calls initial OpenGL drawing code that is common for all VideoChannels, and provides a proxy function to tell all VideoChannels to render their movies in their respective compositing rectangles.
This object-oriented approach is a double-edged sword. Although it enables us to organize things in a cleaner fashion, it makes it necessary to think about everything in terms of objects, so study theses descriptions so that you know where to look in the project code to figure out what is going on. The VideoChannelController object provides control for each of the VideoChannels and is probably the best place to start to see how things work. The OpenGLVidGridLayer only does initialization and provides the functionality to decide whether we should draw at the current time.
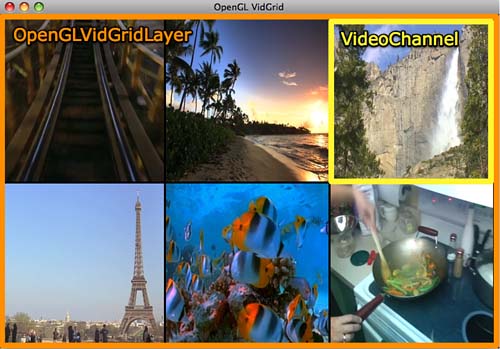
FIGURE 8-1 depicts the demo application, OpenGL VidGrid. The full display area in the window is the CAOpenGLLayer-derived class, called OpenGLVidGridLayer. Each of the individual movie clips displaying on the screen are represented in code by the VideoChannel class.
Implementing the CAOpenGLLayer-Derived OpenGLVidGridLayer
The CAOpenGLLayer derived class, OpenGLVidGridLayer, provides the entry point for drawing all the video channels to the same OpenGL context. The initialization code accepts a list of QTMovie objects for which it calculates the display rectangle. It creates a VideoChannel object for each of the QTMovies and adds them to an array. The VideoChannelController object is then instantiated, and the array of VideoChannel objects is assigned to it. The implementation code is shown in Listing 8-6.
LISTING 8-6 Implementing OpenGLVidGridLayer Initialization Code
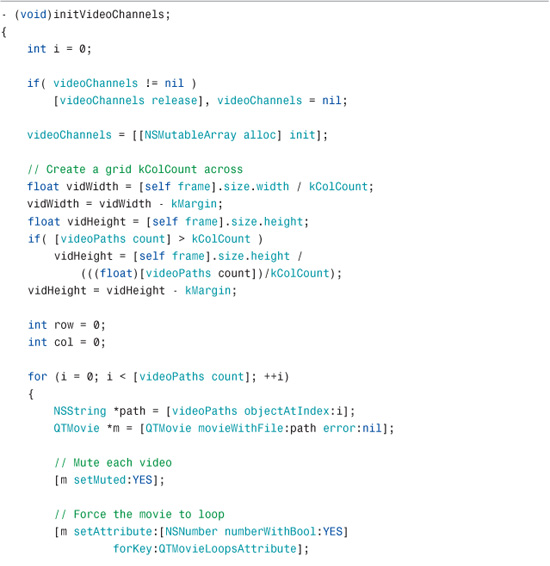
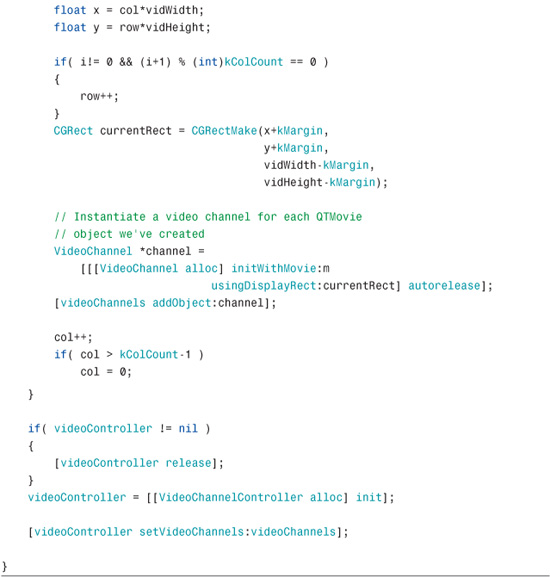
Previously in this chapter, we looked at how to render a single video clip in an OpenGL context. We have taken that code and placed it into classes that encapsulate that functionality. The VideoChannelController class holds the VideoChannel objects so that they can be controlled. It passes the OpenGL context to each VideoChannel object and tells them to draw their content (the movies) to that context.
In the AppDelegate for this project, we instantiate a CAOpenGLLayer-derived layer called OpenGLVidGridLayer and pass it an array of NSStrings containing movie paths, as shown in Listing 8-7.
LISTING 8-7 Initializing the OpenGLVidGridLayer in the AppDelegate
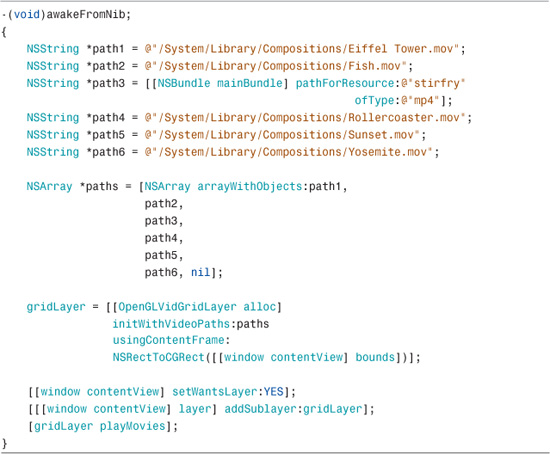
When OpenGLVidGridLayer is allocated, we pass it the array of movie file paths and the content frame in which each movie will render.
NOTE
Most of the paths specified point to movies that are on your system, assuming you have installed the Xcode Tools. The one called stirfry.mp4 is located in the main bundle of the example project.
When the root layer of the window’s content view is made layer-backed using [[window contentView] setWantsLayer:YES], add the OpenGLVidGridLayer to the root layer as a sublayer, and then call –playMovies, which simply calls [videoController togglePlaybackAll]. This function iterates through each of the VideoChannel objects inside the VideoChannelController and instructs them to start playing back each movie in their designated container.
Listing 8-8 shows how we have overridden the calls to –canDrawInCGLContext and –drawInCGLContext in the OpenGLVideGridLayer.
LISTING 8-8 Implementation of Drawing Functions
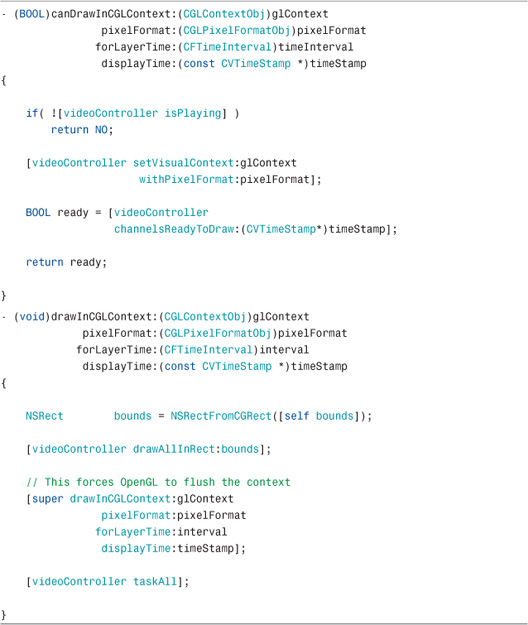
These functions are fairly simple because we have offloaded the majority of the work to the VideoChannelController object. The VideoChannelController then instructs all the VideoChannel objects to do their work, and the call to –canDrawInCGLContext checks to see if the movies are running. If not, we don’t need to render, and NO is returned. In that case, -drawInCGLContext won’t be called either. When the movies are running, however, the visual context for rendering the QuickTime videos are set up before checking to see if the current image buffer for each of the VideoChannels is ready to draw into using a call to –channelsReadyToDraw in the VideoChannelController object. You can see how it is implemented Listing 8-9.
LISTING 8-9 Implementing channelsReadyToDraw Function
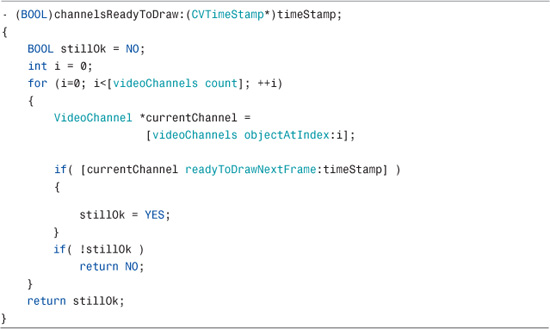
The code iterates through the list of VideoChannel objects and checks each to see if they are ready to draw. If any of them fail readiness, NO is returned for the current call to -canDrawInCGLContext. Listing 8-10 shows an implementation of the call to the VideoChannel’s -readyToDrawNextFrame function.
LISTING 8-10 Implementing readyToDrawNextFrame Function
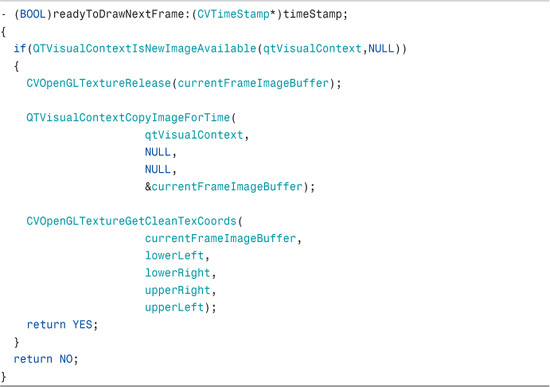
If you look closely, you see that this code is similar to the code used in Listing 8-3 to render a single video channel. This function checks to see if a new image is available for the visual context using the specified timeStamp. If it is available, the previous image buffer is released, the current image is copied to the image buffer, the texture coordinates are reset, and YES is returned; otherwise NO is returned.
This result bubbles back up the call stack to the CAOpenGLLayer-derived class, OpenGLVidGridLayer’s –canDrawInCGLContext. If all the channels are ready to draw, YES is returned and –drawInCGLContext is called.
NOTE
Look back at the call to –drawInCGLContext in Listing 8-8. It is also greatly simplified as we have offloaded most of the work to the VideoChannelController and VideoChannel objects.
When –drawInCGLContext is called, we pass the main rectangle of the window to the video controller with a call to [videoController drawAllInRect:bounds], where bounds is the rectangle, as shown in Listing 8-11.
LISTING 8-11 Implementing drawAllInRect
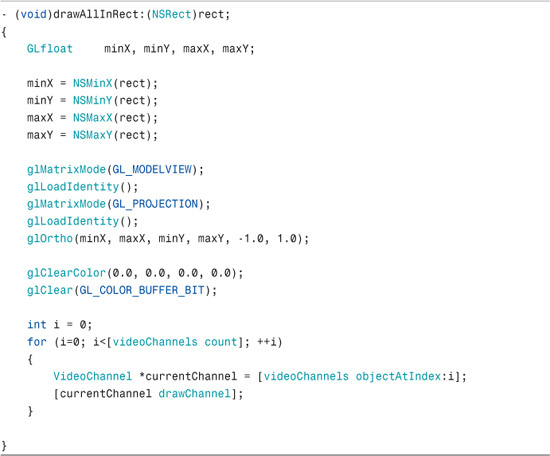
If you compare Listing 8-11 with Listing 8-5, you can see some clear similarities. The OpenGL calls we make here are setup calls to draw the quads properly. When those setup calls are made, we iterate through the list of VideoChannel objects and tell each of them to draw their current frame instead of doing all the drawing code as we did in Listing 8-5.
Keep in mind that the rectangles for each of the VideoChannels to draw in were set when the VideoChannels were initially created (see –initVideoChannels in Listing 8-6, previously in this chapter).
When we iterate through the VideoChannel objects, we call –drawChannel, as shown in Listing 8-12.
LISTING 8-12 Implementing the VideoChannel drawChannel
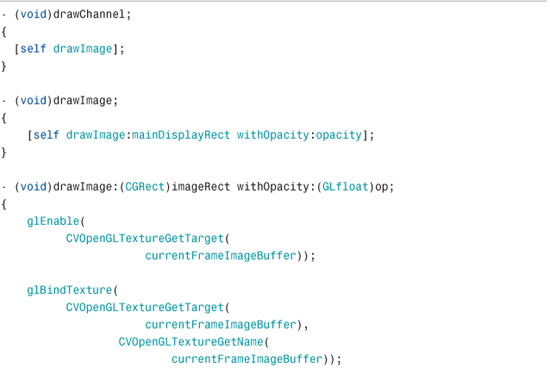
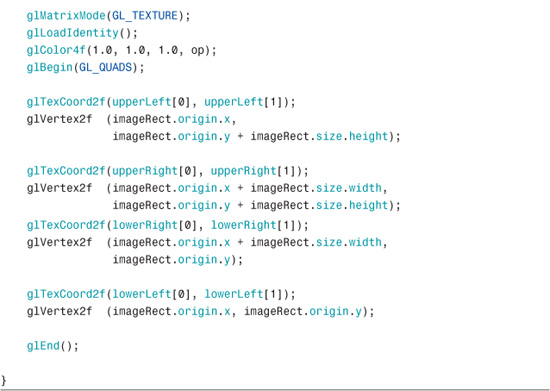
The –drawChannel method calls the default implementation of another function, –drawImage, which simply calls another function with the same name that takes two parameters:
• displayRect, which is passed mainDisplayRect for the main window rectangle
• opacity, which receives the value 1.0 for full opacity
This might seem like more levels of indirection than necessary, but it gives you the flexibility to alter this call and give it a different opacity if you want the video to render with some level of transparency rather than fully opaque.
We have shown the core code you need to render multiple video channels in this section, but you need to run the example project, OpenGLVidGrid, to see how it all works.
Summary
Core Animation provides such a powerful abstraction for many of Apple’s technologies. Harnessing the power of OpenGL while not having to understand all the underlying concepts is helpful to programmers who need to use it but who don’t want to or have the time to become experts. As we have seen in this chapter, rendering to an OpenGL context is within the realm of what most Cocoa programmers can attain. It also helps to introduce you to OpenGL concepts so that you can go to that next level if you want. Regardless of where you are in your programming efforts, the CAOpenGLLayer gives you what you need to harness the power of OpenGL in your applications.