
Chapter 10. Web Programming: CGI and WSGI
[The] benefits of WSGI are primarily for Web framework authors and Web server authors, not Web application authors. This is not an application API, it’s a framework-to-server glue API.
—Phillip J. Eby, August 2004
In this chapter...
• Helping Web Servers Process Client Data
10.1. Introduction
This introductory chapter on Web programming will give you a quick and broad overview of the kinds of things you can do with Python on the Internet, from Web surfing to creating user feedback forms, from recognizing URLs to generating dynamic Web page output. We’ll first explore the common gateway interface (CGI) then discuss the web server gateway interface (WSGI).
10.2. Helping Web Servers Process Client Data
In this section, we’ll introduce you to CGI, what it means, why it exists, and how it works in relation to Web servers. We’ll then show you how to use Python to create CGI applications.
10.2.1. Introduction to CGI
The Web was initially developed to be a global online repository or archive of documents (mostly educational and research-oriented). Such pieces of information generally come in the form of static text and usually in HTML.
HTML is not as much a language as it is a text formatter, indicating changes in font types, sizes, and styles. The main feature of HTML is in its hypertext capability. This refers to the ability to designate certain text (usually highlighted in some fashion) or even graphic elements as links that point to other “documents” or locations on the Internet and Web that are related in context to the original. Such a document can be accessed by a simple mouse click or other user selection mechanism. These (static) HTML documents live on the Web server and are sent to clients when requested.
As the Internet and Web services evolved, there grew a need to process user input. Online retailers needed to be able to take individual orders, and online banks and search engine portals needed to create accounts for individual users. Thus fill-out forms were invented; they were the only way a Web site could get specific information from users (until Java applets came along). This, in turn, required that the HTML be generated on the fly, for each client submitting user-specific data.
But, Web servers are only really good at one thing: getting a user request for a file and returning that file (i.e., an HTML file) to the client. They do not have the “brains” to be able to deal with user-specific data such as those which come from fields. Given this is not their responsibility, Web servers farm out such requests to external applications which create the dynamically generated HTML that is returned to the client.
The entire process begins when the Web server receives a client request (i.e., GET or POST) and calls the appropriate application. It then waits for the resulting HTML—meanwhile, the client also waits. Once the application has completed, it passes the dynamically generated HTML back to the server, which then (finally) forwards it back to the user. This process of the server receiving a form, contacting an external application, and receiving and returning the HTML takes place through the CGI. An overview of how CGI works is presented in Figure 10-1, which shows you the execution and data flow, step-by-step, from when a user submits a form until the resulting Web page is returned.
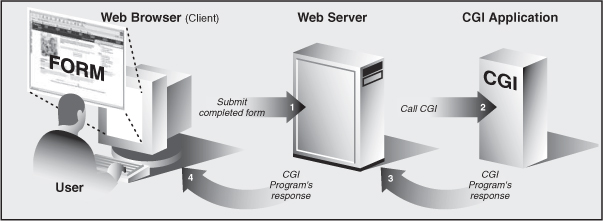
Figure 10-1. Overview of how CGI works. CGI represents the interaction between a Web server and the application that is required to process a user’s form and generate the dynamic HTML that is eventually returned.
Forms input on the client and sent to a Web server can include processing and perhaps some form of storage in a back-end database. Just keep in mind that any time a Web page contains items that require user input (text fields, radio buttons, etc.) and/or a Submit button or image, it most likely involves some sort of CGI activity.
CGI applications that create the HTML are usually written in one of many higher-level programming languages that have the ability to accept user data, process it, and then return HTML back to the server. Before we take a look at CGI, we have to issue the caveat that the typical production Web application is no longer being implemented in CGI.
Because of its significant limitations and limited ability to allow Web servers to process an abundant number of simultaneous clients, CGI is a dinosaur. Mission-critical Web services rely on compiled languages like C/C++ to scale. A modern-day Web server is typically composed of Apache and integrated components for database access (MySQL or PostgreSQL), Java (Tomcat), PHP, and various modules for dynamic languages such as Python or Ruby, and secure sockets layer (SSL)/security. However, if you are working on small personal Web sites or those of small organizations and do not need the power and complexity required by mission critical Web services, CGI is a quick way to get started. It can also be used for testing.
Furthermore, there are a good number of Web application development frameworks out there as well as content management systems, all of which make building CGI a relic of past. However, beneath all the fluff and abstraction, they must still, in the end, follow the same model that CGI originally provided, and that is being able to take user input, execute code based on that input, and then provide valid HTML as its final output for the client. Therefore, the exercise in learning CGI is well worth it in terms of understanding the fundamentals required to develop effective Web services.
In this next section, we will look at how to create CGI applications in Python, with the help of the cgi module.
10.2.2. CGI Applications
A CGI application is slightly different from a typical program. The primary differences are in the input, output, and user interaction aspects of a computer program. When a CGI script starts, it needs to retrieve the user-supplied form data, but it has to obtain this data from the Web client, not a user on the server computer or a disk file. This is usually known as the request.
The output differs in that any data sent to standard output will be sent back to the connected Web client rather than to the screen, GUI window, or disk file. This is known as the response. The data sent back must be a set of valid headers followed by HTML-tagged data. If it is not and the Web client is a browser, an error (specifically, an Internal Server Error) will occur because Web clients understand only valid HTTP data (i.e., MIME headers and HTML).
Finally, as you can probably guess, there is no user interaction with the script. All communication occurs among the Web client (on behalf of a user), the Web server, and the CGI application.
10.2.3. The cgi Module
There is one primary class in the cgi module that does all the work: the FieldStorage class. This class reads in all the pertinent user information from the Web client (via the Web server); thus, it should be instantiated when a Python CGI script begins. Once it has been instantiated, it will consist of a dictionary-like object that contains a set of key-value pairs. The keys are the names of the input items that were passed in via the form. The values contain the corresponding data.
Values can be one of three objects. The first are FieldStorage objects (instances). The second are instances of a similar class called MiniField Storage, which is used in cases for which no file uploads or multiple-part form data is involved. MiniFieldStorage instances contain only the key-value pair of the name and the data. Lastly, they can be a list of such objects. This occurs when a form contains more than one input item with the same field name.
For simple Web forms, you will usually find all MiniFieldStorage instances. All of our examples that follow pertain only to this general case.
10.2.4. The cgitb Module
As we mentioned earlier, a valid response back to the Web server (which would then forward it to the user/browser) must contain valid HTTP headers and HTML-tagged data. Have you thought about the returned data if your CGI application crashes? What happens when you run a Python script that results in an error? That’s right: a traceback occurs. Would the text of a traceback be considered as valid HTTP headers or HTML? No.
A Web server receiving a response it doesn’t understand will just throw up its hands and give up, returning a “500 error.” The 500 is an HTTP response code that means an internal Web server error has occurred, most likely from the application that is being executed. The output on the browser doesn’t aid the developer either, as the screen is either blank or shows “Internal Server Error,” or something similar.
When our Python programs were running on the command-line or in an integrated development environment (IDE), errors resulted in a traceback, upon which we could take action. Not so in the browser. What we really want is to see the Web application’s traceback on the browser screen, not “Internal Server Error.” This is where the cgitb module comes in.
To enable a dump of tracebacks, all we need to do is to insert the following import and call in our CGI applications:
import cgitb
cgitb.enable()
You’ll have plenty of opportunity as we explore CGI for the first half of this chapter. For now, just leave these two lines out as we undertake some simple examples. First, I want you to see the “Internal Server Error” messages and debug them the hard way. Once you realize how the server’s not throwing you a bone, you’ll add these two lines religiously, on your own.
10.3. Building CGI Applications
In this section of the chapter, we go hands-on, showing you how to set up a Web server, followed by a step-by-step breakdown of how to create a CGI application in Python. We start with a simple script, then build on it incrementally. The practices you learn here can be used for developing applications using any Web framework.
10.3.1. Setting Up a Web Server
To experiment with CGI development in Python, you need to first install a Web server, configure it for handling Python CGI requests, and then give the Web server access to your CGI scripts. Some of these tasks might require assistance from your system administrator.
Production Servers
If you want a real Web server, you will likely download and install Apache, ligHTTPD, or thttpd. For Apache, there are various plug-ins or modules for handling Python CGI, but they are not required for our examples. You might want to install those if you are planning on “going live” to the world with your service. But even this might be overkill.
Developer Servers
For learning purposes or for simple Web sites, it might suffice to use the Web servers that come with Python. In Chapter 9, “Web Clients and Servers,” you were exposed to creating and configuring simple Python-based Web servers. Our examples in this chapter are simpler, use only Python’s CGI Web server.
If you want to start up this most basic Web server, execute it directly in Python 2.x, as follows:
$ python -m CGIHTTPServer [port]
This won’t work as easily in Python 3 because all three Web servers and their handlers have been merged into a single module (http.server), with one base server and three request handler classes (BaseHTTPRequestHandler, SimpleHTTPRequestHandler, and CGIHTTPRequestHandler).
If you don’t provide the optional port number for the server, it starts at port 8000 by default. Also, the -m option is new in version 2.4. If you are using an older version of Python or want to see alternative ways of running it, here are your options:
• Executing the module from a command shell
This method is somewhat troublesome because you need to know where the CGIHTTPServer.py file is physically located. On Windows-based PCs, this is easier because the typical installation folder is C:Python2X:
C:>python C:Python27LibCGIHTTPServer.py
Serving HTTP on 0.0.0.0 port 8000 ...
On POSIX systems, you need to do a bit more sleuthing:
>>> import sys, CGIHTTPServer
>>> sys.modules['CGIHTTPServer']
<module 'CGIHTTPServer' from '/usr/local/lib/python2.7/
CGIHTTPServer.py'>
>>>^D
$ python /usr/local/lib/python2.7/CGIHTTPServer.py
Serving HTTP on 0.0.0.0 port 8000 ...
• Use the -c option
Using the -c option you can run a string consisting of Python statements. Therefore, import CGIHTTPServer and execute the test() function, use the following:
$ python -c "import CGIHTTPServer; CGIHTTPServer.test()"
Serving HTTP on 0.0.0.0 port 8000 ...
Because CGIHTTPServer is merged into http.server in version 3.x, you can issue the equivalent call (by using, for example, Python 3.2) as the following:
$ python3.2 -c "from http.server import
CGIHTTPRequestHandler,test;test(CGIHTTPRequestHandler)"
Take the import and test() call from the previous option and insert it into an arbitrary file, say cgihttpd.py file (Python 2 or 3). For Python 3, because there is no CGIHTTPServer.py module to execute, the only way to get your server to start from the command-line on a port other than 8000 is to use this script:
$ python3.2 cgihttpd.py 8080
Serving HTTP on 0.0.0.0 port 8080 ...
Any of these four techniques will start a Web server on port 8000 (or whatever you chose) on your current computer from the current directory. Then you can just create a cgi-bin directory right under the directory from which you started the server and put your Python CGI scripts there. Put some HTML files in that directory and perhaps some .py CGI scripts in cgi-bin, and you are ready to “surf” directly to this Web site with addresses looking something like these:
http://localhost:8000/friends.htm
http://localhost:8080/cgi-bin/friendsB.py
Be sure to start up your server where there is a cgi-bin directory and ensure that your .py files are there; otherwise, the development server will return your Python files as static text rather than executing them.
10.3.2. Creating the Form Page
In Example 10-1, we present the code for a simple Web form, friends.htm. As you can see in the HTML, the form contains two input variables: person and howmany. The values of these two fields will be passed to our CGI script, friendsA.py.
You will notice in our example that we install our CGI script into the default cgi-bin directory (see the ACTION link) on the local host. (If this information does not correspond with your development environment, update the form action before attempting to test the Web page and CGI script.) Also, because a METHOD subtag is missing from the form action, all requests will be of the default type, GET. We choose the GET method because we do not have very many form fields, and also, we want our query string to show up in the Location (a.k.a. “Address,” “Go To”) bar so that you can see what URL is sent to the server.
Example 10-1. Static Form Web Page (friends.htm)
This HTML file presents a form to the user with an empty field for the user’s name and a set of radio buttons from which the user can choose.
1 <HTML><HEAD><TITLE>
2 Friends CGI Demo (static screen)
3 </TITLE></HEAD>
4 <BODY><H3>Friends list for: <I>NEW USER</I></H3>
5 <FORM ACTION="/cgi-bin/friendsA.py">
6 <B>Enter your Name:</B>
7 <INPUT TYPE=text NAME=person VALUE="NEW USER" SIZE=15>
8 <P><B>How many friends do you have?</B>
9 <INPUT TYPE=radio NAME=howmany VALUE="0" CHECKED> 0
10 <INPUT TYPE=radio NAME=howmany VALUE="10"> 10
11 <INPUT TYPE=radio NAME=howmany VALUE="25"> 25
12 <INPUT TYPE=radio NAME=howmany VALUE="50"> 50
13 <INPUT TYPE=radio NAME=howmany VALUE="100"> 100
14 <P><INPUT TYPE=submit></FORM></BODY></HTML>
Figure 10-2 and 10-3 show the screen that is rendered by friends.htm in clients running on both Mac and Windows.
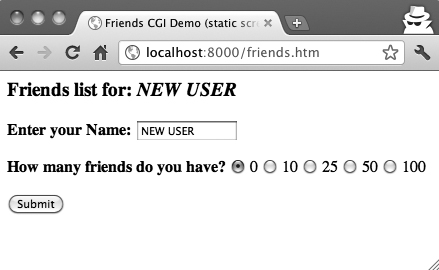
Figure 10-2. The Friends form page in Chrome “incognito mode,” on Mac OS X.

Figure 10-3. The Friends form page in Firefox 6 on Windows.
10.3.3. Generating the Results Page
The input is entered by the user when the Submit button is clicked. (Alternatively, the user can also press the Return or Enter key within the text field to invoke the same action.) When this occurs, the script in Example 10-2, friendsA.py, is executed via CGI.
Example 10-2. Results Screen CGI code (friendsA.py)
This CGI script grabs the person and howmany fields from the form and uses that data to create the dynamically generated results screen. Add parentheses to the print statement on line 17 for the Python 3 version, friendsA3.py (not displayed here). Both are available at corepython.com.
1 #!/usr/bin/env python
2
3 import cgi
4
5 reshtml = '''Content-Type: text/html
6 <HTML><HEAD><TITLE>
7 Friends CGI Demo (dynamic screen)
8 </TITLE></HEAD>
9 <BODY><H3>Friends list for: <I>%s</I></H3>
10 Your name is: <B>%s</B><P>
11 You have <B>%s</B> friends.
12 </BODY></HTML>'''
13
14 form = cgi.FieldStorage()
15 who = form['person'].value
16 howmany = form['howmany'].value
17 print reshtml % (who, who, howmany)
This script contains all the programming power to read the form input and process it as well as return the resulting HTML page back to the user. All the “real” work in this script takes place in only four lines of Python code (lines 14–17).
The form variable is our FieldStorage instance, containing the values of the person and howmany fields. We read these into the Python who and howmany variables, respectively. The reshtml variable contains the general body of HTML text to return, with a few fields filled in dynamically, using the data just read in from the form.
![]() Core Tip: HTTP headers separate from HTML
Core Tip: HTTP headers separate from HTML
Here’s something that always catches beginners: when sending results back via a CGI script, the CGI script must return the appropriate HTTP headers first before any HTML. Furthermore, to distinguish between these headers and the resulting HTML, there must be one blank line (a pair of NEWLINE characters) inserted between both sets of data, as in line 5 of our friendsA.py example (one explicit
plus the implicit one at the end of line 5). You’ll notice this in the other examples, too.
One possible resulting screen appears in Figure 10-4, (assuming the user typed in “Annalee Lenday” as the name and clicked the “25 friends” radio button).
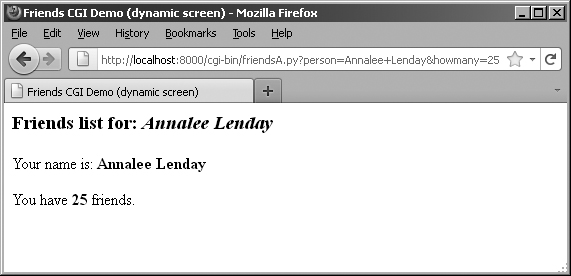
Figure 10-4. The Friends results page after the name and number of friends has been submitted.
If you are a Web site producer, you might be thinking, “Gee, wouldn’t it be nice if I could automatically capitalize this person’s name, especially if she forgot?” With Python CGI, you can accomplish this easily. (And we shall do so soon!)
Notice how on a GET request that our form variables and their values are added to the form action URL in the Address bar. Also, did you observe that the title for the friends.htm page has the word “static” in it, whereas the output screen from friends.py has the word “dynamic” in its title? We did that for a reason: to indicate that the friends.htm file is a static text file while the results page is dynamically generated. In other words, the HTML for the results page did not exist on disk as a text file; rather, it was generated by our CGI script, which returned it as if it were a local file.
In our next example, we bypass static files altogether by updating our CGI script to be somewhat more multifaceted.
10.3.4. Generating Form and Results Pages
We obsolete friends.html and merge it into friendsB.py. The script will now generate both the form page as well as the results page. But how can we tell which page to generate? Well, if there is form data being sent to us, that means that we should be creating a results page. If we do not get any information at all, that tells us that we should generate a form page for the user to enter his data. Our new friendsB.py script is presented in Example 10-3.
Example 10-3. Generating Form and Results Pages (friendsB.py)
Both friends.htm and friendsA.py are merged into friendsB.py. The resulting script can now output both form and results pages as dynamically generated HTML and has the smarts to know which page to output. To port this to the Python 3 version, friendsB3.py, you need to add parentheses to both print statements and change the form action to friendsB3.py.
1 #!/usr/bin/env python
2
3 import cgi
4
5 header = 'Content-Type: text/html
'
6
7 formhtml = '''<HTML><HEAD><TITLE>
8 Friends CGI Demo</TITLE></HEAD>
9 <BODY><H3>Friends list for: <I>NEW USER</I></H3>
10 <FORM ACTION="/cgi-bin/friendsB.py">
11 <B>Enter your Name:</B>
12 <INPUT TYPE=hidden NAME=action VALUE=edit>
13 <INPUT TYPE=text NAME=person VALUE="NEW USER" SIZE=15>
14 <P><B>How many friends do you have?</B>
15 %s
16 <P><INPUT TYPE=submit></FORM></BODY></HTML>'''
17
18 fradio = '<INPUT TYPE=radio NAME=howmany VALUE="%s" %s> %s
'
19
20 def showForm():
21 friends = []
22 for i in (0, 10, 25, 50, 100):
23 checked = ''
24 if i == 0:
25 checked = 'CHECKED'
26 friends.append(fradio % (str(i), checked, str(i)))
27
28 print '%s%s' % (header, formhtml % ''.join(friends))
29
30 reshtml = '''<HTML><HEAD><TITLE>
31 Friends CGI Demo</TITLE></HEAD>
32 <BODY><H3>Friends list for: <I>%s</I></H3>
33 Your name is: <B>%s</B><P>
34 You have <B>%s</B> friends.
35 </BODY></HTML>'''
36
37 def doResults(who, howmany):
38 print header + reshtml % (who, who, howmany)
39
40 def process():
41 form = cgi.FieldStorage()
42 if 'person' in form:
43 who = form['person'].value
44 else:
45 who = 'NEW USER'
46
47 if 'howmany' in form:
48 howmany = form['howmany'].value
49 else:
50 howmany = 0
51
52 if 'action' in form:
53 doResults(who, howmany)
54 else:
55 showForm()
56
57 if __name__ == '__main__':
58 process()
Line-by-Line Explanation
Lines 1–5
In addition to the usual startup and module import lines, we separate the HTTP MIME header from the rest of the HTML body because we will use it for both types of pages (form page and results page) returned and we don’t want to duplicate the text. We will add this header string to the corresponding HTML body when it’s time for output to occur.
Lines 7–28
All of this code is related to the now-integrated friends.htm form page in our CGI script. We have a variable for the form page text, formhtml, and we also have a string to build the list of radio buttons, fradio. We could have duplicated this radio button HTML text as it is in friends.htm, but we wanted to show how we could use Python to generate more dynamic output—see the for loop in lines 22–26.
The showForm() function has the responsibility of generating a form for user input. It builds a set of text for the radio buttons, merges those lines of HTML into the main body of formhtml, prepends the header to the form, and then returns the entire collection of data back to the client by sending the entire string to standard output.
There are a couple of interesting things to note about this code. The first is the “hidden” variable in the form called action, containing the value edit on line 12. This field is the only way we can tell which screen to display (i.e., the form page or the results page). We will see this field come into play in lines 53–56.
Also, observe that we set the 0 radio button as the default by “checking” it within the loop that generates all the buttons. This will also allow us to update the layout of the radio buttons and/or their values on a single line of code (line 18) rather than over multiple lines of text. It will also offer some more flexibility in letting the logic determine which radio button is checked—see the next update to our script, friendsC.py, coming up.
Now you might be thinking, “Why do we need an action variable when I could just as well be checking for the presence of person or howmany?” That is a valid question, because yes, you could have just used person or howmany in this situation.
However, the action variable is a more conspicuous presence, insofar as its name as well as what it does—the code is easier to understand. The person and howmany variables are used for their values, whereas the action variable is used as a flag.
The other reason for creating action is that we will be using it again to help us determine which page to generate. In particular, we will need to display a form with the presence of a person variable (rather than a results page). This will break your code if you are solely relying on there being a person variable.
Lines 30–38
The code to display the results page is practically identical to that of friendsA.py.
Lines 40–55
Because there are different pages that can result from this one script, we created an overall process() function to get the form data and decide which action to take. The main portion of process() will also look familiar to the main body of code in friendsA.py. There are two major differences, however.
Because the script might or might not be getting the expected fields (invoking the script the first time to generate a form page, for example, will not pass any fields to the server), we need to “bracket” our retrieval of the form fields with if statements to check if they are even there. Also, we mentioned the action field above, which helps us decide which page to bring up. The code that performs this determination is in lines 52–55.
Figure 10-5 illustrates that the auto-generated form looks identical to the static form presented in Figure 10-2; however, instead of a link ending in .html, it ends in .py. If we enter “Cynthia Gilbert” for the name and select 50 friends, clicking the Submit button results in what is shown in Figure 10-6.
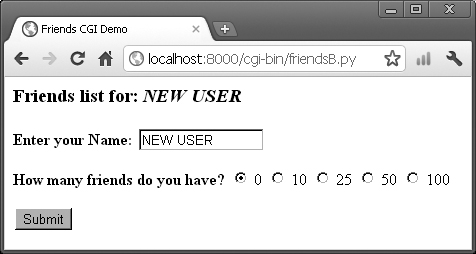
Figure 10-5. The autogenerated Friends form page in Chrome on Windows.
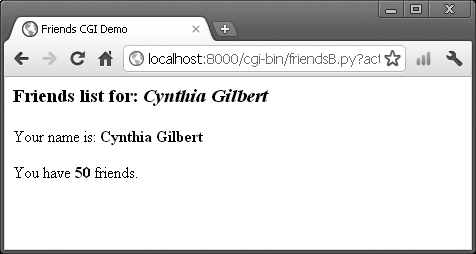
Figure 10-6. The Friends results page after submitting the name and friend count.
Note that a static friends.htm does not show up in the URL because friendsB.py is responsible for both the form and results pages.
10.3.5. Fully Interactive Web Sites
Our final example will complete the circle. As in the past, a user enters her information from the form page. We then process the data and output a results page. This time, however, we will add a link to the results page that will allow the user to go back to the form page, but rather than presenting a blank form, we will fill in the data that the user has already provided. We will also add some error processing to give you an example of how it can be accomplished. The new friendsC.py is shown in Example 10-4.
Example 10-4. Full User Interaction and Error Processing (friendsC.py)
By adding a link to return to the form page with information already provided, we have come full circle, giving the user a fully interactive Web surfing experience. Our application also now performs simple error checking, which notifies the user if no radio button was selected.
1 #!/usr/bin/env python
2
3 import cgi
4 from urllib import quote_plus
5
6 header = 'Content-Type: text/html
'
7 url = '/cgi-bin/friendsC.py'
8
9 errhtml = '''<HTML><HEAD><TITLE>
10 Friends CGI Demo</TITLE></HEAD>
11 <BODY><H3>ERROR</H3>
12 <B>%s</B><P>
13 <FORM><INPUT TYPE=button VALUE=Back
14 ONCLICK="window.history.back()"></FORM>
15 </BODY></HTML>'''
16
17 def showError(error_str):
18 print header + errhtml % error_str
19
20 formhtml = '''<HTML><HEAD><TITLE>
21 Friends CGI Demo</TITLE></HEAD>
22 <BODY><H3>Friends list for: <I>%s</I></H3>
23 <FORM ACTION="%s">
24 <B>Enter your Name:</B>
25 <INPUT TYPE=hidden NAME=action VALUE=edit>
26 <INPUT TYPE=text NAME=person VALUE="%s" SIZE=15>
27 <P><B>How many friends do you have?</B>
28 %s
29 <P><INPUT TYPE=submit></FORM></BODY></HTML>'''
30
31 fradio = '<INPUT TYPE=radio NAME=howmany VALUE="%s" %s> %s
'
32
33 def showForm(who, howmany):
34 friends = []
35 for i in (0, 10, 25, 50, 100):
36 checked = ''
37 if str(i) == howmany:
38 checked = 'CHECKED'
39 friends.append(fradio % (str(i), checked, str(i)))
40 print '%s%s' % (header, formhtml % (
41 who, url, who, ''.join(friends)))
42
43 reshtml = '''<HTML><HEAD><TITLE>
44 Friends CGI Demo</TITLE></HEAD>
45 <BODY><H3>Friends list for: <I>%s</I></H3>
46 Your name is: <B>%s</B><P>
47 You have <B>%s</B> friends.
48 <P>Click <A HREF="%s">here</A> to edit your data again.
49 </BODY></HTML>'''
50
51 def doResults(who, howmany):
52 newurl = url + '?action=reedit&person=%s&howmany=%s'%
53 (quote_plus(who), howmany)
54 print header + reshtml % (who, who, howmany, newurl)
55
56 def process():
57 error = ''
58 form = cgi.FieldStorage()
59
60 if 'person' in form:
61 who = form['person'].value.title()
62 else:
63 who = 'NEW USER'
64
65 if 'howmany' in form:
66 howmany = form['howmany'].value
67 else:
68 if 'action' in form and
69 form['action'].value == 'edit':
70 error = 'Please select number of friends.'
71 else:
72 howmany = 0
73
74 if not error:
75 if 'action' in form and
76 form['action'].value != 'reedit':
77 doResults(who, howmany)
78 else:
79 showForm(who, howmany)
80 else:
81 showError(error)
82
83 if __name__ == '__main__':
84 process()
friendsC.py is not too unlike friendsB.py. We invite you to compare the differences; we present a brief summary of the major changes for you here.
Abridged Line-by-Line Explanation
Line 7
We take the URL out of the form because we now need it in two places, the results page being the new customer in addition to the user input form.
Lines 9–18, 68–70, 74–81
All of these lines deal with the new feature of having an error screen. If the user does not select a radio button indicating the number of friends, the howmany field is not passed to the server. In such a case, the showError() function returns the error page to the user.
The error page also features a JavaScript “Back” button. Because buttons are input types, we need a form, but no action is needed because we are just going back one page in the browsing history. Although our script currently supports (a.k.a. tests for) only one type of error, we still use a generic error variable in case we want to continue development of this script to add more error detection in the future.
Lines 26–28, 37–40, 47, and 51–54
One goal for this script is to create a meaningful link back to the form page from the results page. This is implemented as a link to give the user the ability to return to a form page to update or edit the data he entered. The new form page makes sense only if it contains information pertaining to the data that has already been entered by the user. (It is frustrating for users to re-enter their information from scratch!)
To accomplish this, we need to embed the current values into the updated form. In line 26, we add a value for the name. This value will be inserted into the name field, if given. Obviously, it will be blank on the initial form page. In Lines 37–38, we set the radio box corresponding to the number of friends currently chosen. Finally, on lines 48 and the updated doResults() function on lines 52–54, we create the link with all the existing information, which returns the user to our modified form page.
Line 61
Finally, we added a simple feature that we thought would be a nice aesthetic touch. In the screens for friendsA.py and friendsB.py, the text entered by the user as her name is taken verbatim. If you look at the equivalent line in friendsA.py and friendsB.py, you’ll notice that we leave the names alone from form to display. This means that if users enter names in all lowercase, they will show up in all lowercase, etc. So, we added a call to str.title() to automatically capitalize a user’s name. The title() string method titlecases the passed-in string. This might or might not be a desired feature, but we thought that we would share it with you so that you know that such functionality exists.
Figures 10-7 through 10-10 show the progression of user interaction with this CGI form and script.
In Figure 10-7, we invoke friendsC.py to bring up the form page. We enter a name “foo bar,” but deliberately avoid checking any of the radio buttons. The resulting error after submitting the form can be seen in Figure 10-8.
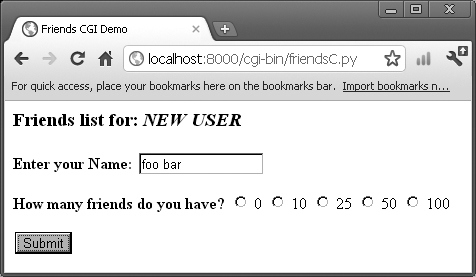
Figure 10-7. The Friends initial form page without friends selection.
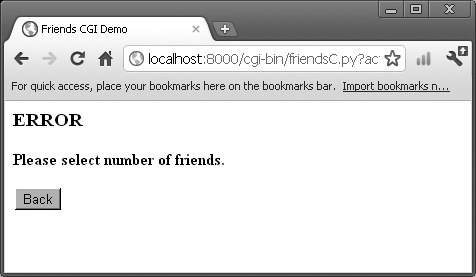
Figure 10-8. An error page appears due to invalid user input.
We click the Back button, click the 50 radio button, and then resubmit our form. The results page, shown in Figure 10-9, is also familiar, but now has an extra link at the bottom, which will take us back to the form page. The only difference between the new form page and our original is that all the data filled in by the user is now set as the default settings, meaning that the values are already available in the form. (Hopefully you’ll notice the automatic name capitalization too.) We can see this in Figure 10-10.
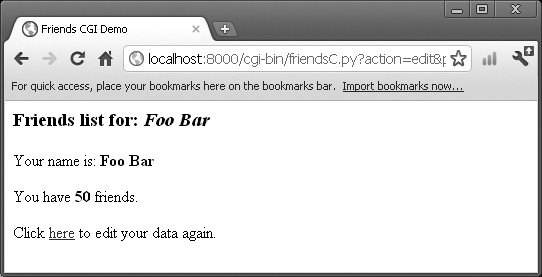
Figure 10-9. The Friends results page with valid input.

Figure 10-10. The Friends form page redux.
Now the user is able to make changes to either of the fields and resubmit her form.
As the developer, however, you will no doubt begin to notice that as our forms and data become more complicated, so does the generated HTML, especially for complex results pages. If you ever get to a point where generating the HTML text is interfering with your application, you might consider trying Python packages, such as HTMLgen, xist, or HSC. These third-party tools specialize in HTML generation directly from Python objects.
Finally, in Example 10-5, we want to show you the Python 3 equivalent, friendsC3.py.
Example 10-5. Python 3 port of friendsC.py (friendsC3.py)
The equivalent of friendsC.py in Python 3. What are the differences?
1 #!/usr/bin/env python
2
3 import cgi
4 from urllib.parse import quote_plus
5
6 header = 'Content-Type: text/html
'
7 url = '/cgi-bin/friendsC3.py'
8
9 errhtml = '''<HTML><HEAD><TITLE>
10 Friends CGI Demo</TITLE></HEAD>
11 <BODY><H3>ERROR</H3>
12 <B>%s</B><P>
13 <FORM><INPUT TYPE=button VALUE=Back
14 ONCLICK="window.history.back()"></FORM>
15 </BODY></HTML>'''
16
17 def showError(error_str):
18 print(header + errhtml % (error_str))
19
20 formhtml = '''<HTML><HEAD><TITLE>
21 Friends CGI Demo</TITLE></HEAD>
22 <BODY><H3>Friends list for: <I>%s</I></H3>
23 <FORM ACTION="%s">
24 <B>Enter your Name:</B>
25 <INPUT TYPE=hidden NAME=action VALUE=edit>
26 <INPUT TYPE=text NAME=person VALUE="%s" SIZE=15>
27 <P><B>How many friends do you have?</B>
28 %s
29 <P><INPUT TYPE=submit></FORM></BODY></HTML>'''
30
31 fradio = '<INPUT TYPE=radio NAME=howmany VALUE="%s" %s> %s
'
32
33 def showForm(who, howmany):
34 friends = []
35 for i in (0, 10, 25, 50, 100):
36 checked = ''
37 if str(i) == howmany:
38 checked = 'CHECKED'
39 friends.append(fradio % (str(i), checked, str(i)))
40 print('%s%s' % (header, formhtml % (
41 who, url, who, ''.join(friends))))
42
43 reshtml = '''<HTML><HEAD><TITLE>
44 Friends CGI Demo</TITLE></HEAD>
45 <BODY><H3>Friends list for: <I>%s</I></H3>
46 Your name is: <B>%s</B><P>
47 You have <B>%s</B> friends.
48 <P>Click <A HREF="%s">here</A> to edit your data again.
49 </BODY></HTML>'''
50
51 def doResults(who, howmany):
52 newurl = url + '?action=reedit&person=%s&howmany=%s' % (
53 quote_plus(who), howmany)
54 print(header + reshtml % (who, who, howmany, newurl))
55
56 def process():
57 error = ''
58 form = cgi.FieldStorage()
59
60 if 'person' in form:
61 who = form['person'].value.title()
62 else:
63 who = 'NEW USER'
64
65 if 'howmany' in form:
66 howmany = form['howmany'].value
67 else:
68 if 'action' in form and
69 form['action'].value == 'edit':
70 error = 'Please select number of friends.'
71 else:
72 howmany = 0
73
74 if not error:
75 if 'action' in form and
76 form['action'].value != 'reedit':
77 doResults(who, howmany)
78 else:
79 showForm(who, howmany)
80 else:
81 showError(error)
82
83 if __name__ == '__main__':
84 process()
10.4. Using Unicode with CGI
In the “Sequences” chapter of Core Python Programming or Core Python Language Fundamentals, we introduced the use of Unicode strings. In one particular section, we gave a simple example of a script that takes a Unicode string, writes it out to a file, and then reads it back in. Here, we’ll demonstrate a similar CGI script that produces Unicode output. We’ll show you how to give your browser enough clues to be able to render the characters properly. The one requirement is that you must have East Asian fonts installed on your computer so that the browser can display them.
To see Unicode in action, we will build a CGI script to generate a multilingual Web page. First, we define the message in a Unicode string. We assume that your text editor can only enter ASCII. Therefore, the non-ASCII characters are input by using the u escape. In practice, the message can also be read from a file or database.
# Greeting in English, Spanish,
# Chinese and Japanese.
UNICODE_HELLO = u"""
Hello!
u00A1Hola!
u4F60u597D!
u3053u3093u306Bu3061u306F!
"""
The first output generated by the CGI is the content-type HTTP header. It is very important to declare here that the content is transmitted in the UTF-8 encoding so that the browser can correctly interpret it.
print 'Content-type: text/html; charset=UTF-8
'
print '
'
Then, output the actual message. Use the string’s encode() method to translate the string into UTF-8 sequences first.
print UNICODE_HELLO.encode('UTF-8')
You can look through the code in Example 10-6, whose output will look like the browser window shown in Figure 10-11.
Example 10-6. Simple Unicode CGI Example (uniCGI.py)
This script outputs Unicode strings to your Web browser.
1 #!/usr/bin/env python
2
3 CODEC = 'UTF-8'
4 UNICODE_HELLO = u'''
5 Hello!
6 u00A1Hola!
7 u4F60u597D!
8 u3053u3093u306Bu3061u306F!
9 '''
10
11 print 'Content-Type: text/html; charset=%s
' % CODEC
12 print '
'
13 print '<HTML><HEAD><TITLE>Unicode CGI Demo</TITLE></HEAD>'
14 print '<BODY>'
15 print UNICODE_HELLO.encode(CODEC)
16 print '</BODY></HTML>'
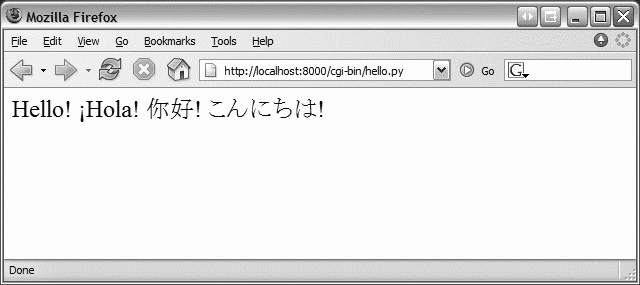
Figure 10-11. A simple Simple Unicode CGI demonstration output in Firefox.
10.5. Advanced CGI
We will now take a look at some of the more advanced aspects of CGI programming. These include the use of cookies (cached data saved on the client side), multiple values for the same CGI field, and file upload using multipart form submissions. To save space, we show you all three of these features with a single application. Let’s take a look at multipart submissions first.
10.5.1. Multipart Form Submission and File Uploading
Currently, the CGI specifications only allow two types of form encodings: “application/x-www-form-urlencoded” and “multipart/form-data.” Because the former is the default, there is never a need to state the encoding in the FORM tag like this:
<FORM enctype="application/x-www-form-urlencoded" ...>
But for multipart forms, you must explicitly give the encoding as:
<FORM enctype="multipart/form-data" ...>
You can use either type of encoding for form submissions, but at this time, file uploads can only be performed with the multipart encoding. Multipart encoding was invented by Netscape in the early days of the Web but has since been adopted by all major browsers today.
File uploads are accomplished by using the file input type:
<INPUT type=file name=...>
This directive presents an empty text field with a button on the side which allows you to browse your file directory structure for a file to upload. When using multipart, your Web client’s form submission to the server will look amazingly like (multipart) e-mail messages with attachments. A separate encoding was needed because it would not be wise to “urlencode” a file, especially a binary file. The information still gets to the server, but it is just packaged in a different way.
Regardless of whether you use the default encoding or the multipart, the cgi module will process them in the same manner, providing keys and corresponding values in the form submission. You will simply access the data through your FieldStorage instance, as before.
10.5.2. Multivalued Fields
In addition to file uploads, we are going to show you how to process fields with multiple values. The most common case is when you provide checkboxes for a user to select from various choices. Each of the checkboxes is labeled with the same field name, but to differentiate them, each will have a different value associated with a particular checkbox.
As you know, the data from the user is sent to the server in key-value pairs during form submission. When more than one checkbox is submitted, you will have multiple values associated with the same key. In these cases, rather than being given a single MiniFieldStorage instance for your data, the cgi module will create a list of such instances that you will iterate over to obtain the different values. Not too painful at all.
10.5.3. Cookies
Finally, we will use cookies in our example. If you are not familiar with cookies, they are just bits of data information which a server at a Web site will request to be saved on the client side (the browser).
Because HTTP is a stateless protocol, information that has to be carried from one page to another can be accomplished by using key-value pairs in the request, as you have seen in the GET requests and screens earlier in this chapter. Another way of doing it, as we have also seen before, is by using hidden form fields such as the action variable in some of the later friends*.py scripts. These variables and their values are managed by the server because the pages they return to the client must embed these in generated pages.
One alternative to maintaining persistency in state across multiple page views is to save the data on the client side, instead. This is where cookies come in. Rather than embedding data to be saved in the returned Web pages, a server will make a request to the client to save a cookie. The cookie is linked to the domain of the originating server (so a server cannot set or override cookies from other Web sites) and has an expiration date (so your browser doesn’t become cluttered with cookies).
These two characteristics are tied to a cookie along with the key-value pair representing the data item of interest. There are other attributes of cookies such as a domain subpath or a request that a cookie should only be delivered in a secure environment.
By using cookies, we no longer have to pass the data from page to page to track a user. Although they have been subject to a good amount of controversy with regard to privacy, most Web sites use cookies responsibly. To prepare you for the code, a Web server requests that a client store a cookie by sending the “Set-Cookie” header immediately before the requested file.
Once cookies are set on the client side, requests to the server will automatically have those cookies sent to the server using the HTTP_COOKIE environment variable. The cookies are delimited by semicolons (;), and each key-value pair is separated by equal signs (=). All your application needs to do to access the data values is to split the string several times (i.e., using str.split() or manual parsing).
Like multipart encoding, cookies originated from Netscape, which wrote up the first specification that is still mostly valid today. You can access this document at the following Web site:
http://www.netscape.com/newsref/std/cookie_spec.html
Once cookies are standardized and this document finally made obsolete, you will be able to get more current information from Request for Comment documents (RFCs). The first published on cookies was RFC 2109 in 1997. It was then replaced by RFC 2965 a few years later in 2000. The most recent one (which supersedes the other two) at the time of this writing is RFC 6265, published in April 2011.
10.5.4. Cookies and File Upload
We now present our CGI application, advcgi.py, which has code and functionality not too unlike the friendsC.py script earlier in this chapter. The default first page is a user fill-out form consisting of four main parts: user-set cookie string, name field, checkbox list of programming languages, and file submission box. Figure 10-12 presents an image of this screen along with some sample input.
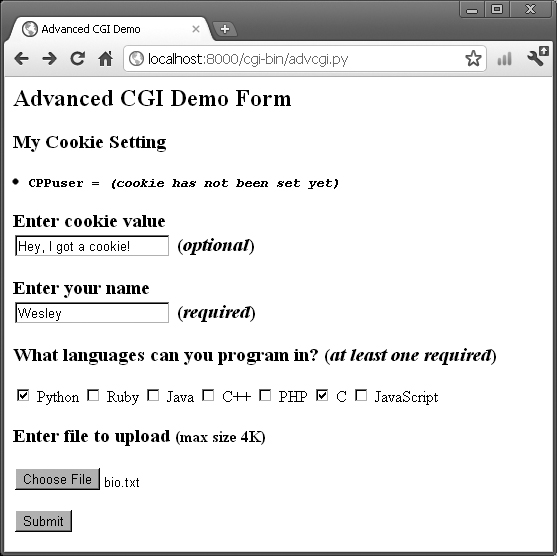
Figure 10-12. An advanced CGI cookie, upload, and multivalue form page.
All of the data is submitted to the server using multipart encoding, and retrieved in the same manner on the server side using the FieldStorage instance. The only tricky part is in retrieving the uploaded file. In our application, we choose to iterate over the file, reading it line by line. It is also possible to read in the entire contents of the file if you are not wary of its size.
Because this is the first occasion data is received by the server, it is at this time, when returning the results page back to the client, that we use the “Set-Cookie:” header to cache our data in browser cookies.
In Figure 10-13, you will see the results after submitting our form data. All the fields the user entered are shown on the page. The given file in the final dialog box was uploaded to the server and displayed, as well.
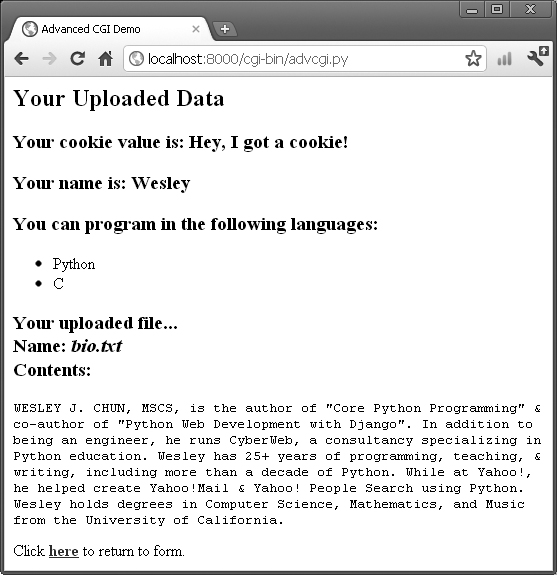
Figure 10-13. Our advanced CGI application results page.
You will also notice the link at the bottom of the results page, which returns us to the form page, again using the same CGI script.
If we click that link at the bottom, no form data is submitted to our script, causing a form page to be displayed. Yet, as you can see from Figure 10-14, what shows up is anything but an empty form; information previously entered by the user is already present. How did we accomplish this with no form data (either hidden or as query arguments in the URL)? The secret is that the data is stored on the client side in cookies—two of them, in fact.
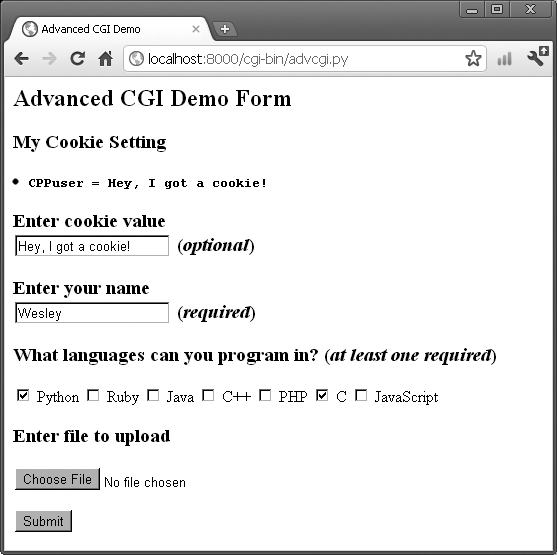
Figure 10-14. The new form page with data loaded from cookies, except the uploaded file.
The user cookie holds the string of data typed in by the user in the “Enter cookie value” form field, and the user’s name, languages he is familiar with, and uploaded files are stored in the information cookie.
When the script detects no form data, it shows the form page, but before the form page has been created, it grabs the cookies from the client (which are automatically transmitted by the client when the user clicks the link) and fills out the form accordingly. So when the form is finally displayed, all the previously entered information appears to the user like magic.
We are certain you are eager to take a look at this application, so take a look at it in Example 10-7.
Example 10-7. Advanced CGI Application (advcgi.py)
This script has one main class that does a bit more, AdvCGI.py. It has methods to show either form, error, or results pages, as well as those that read or write cookies from/to the client (a Web browser).
1 #!/usr/bin/env python
2
3 from cgi import FieldStorage
4 from os import environ
5 from cStringIO import StringIO
6 from urllib import quote, unquote
7
8 class AdvCGI(object):
9 header = 'Content-Type: text/html
'
10 url = '/cgi-bin/advcgi.py'
11
12 formhtml = '''<HTML><HEAD><TITLE>
13 Advanced CGI Demo</TITLE></HEAD>
14 <BODY><H2>Advanced CGI Demo Form</H2>
15 <FORM METHOD=post ACTION="%s" ENCTYPE="multipart/form-data">
16 <H3>My Cookie Setting</H3>
17 <LI> <CODE><B>CPPuser = %s</B></CODE>
18 <H3>Enter cookie value<BR>
19 <INPUT NAME=cookie value="%s"> (<I>optional</I>)</H3>
20 <H3>Enter your name<BR>
21 <INPUT NAME=person VALUE="%s"> (<I>required</I>)</H3>
22 <H3>What languages can you program in?
23 (<I>at least one required</I>)</H3>
24 %s
25 <H3>Enter file to upload <SMALL>(max size 4K)</SMALL></H3>
26 <INPUT TYPE=file NAME=upfile VALUE="%s" SIZE=45>
27 <P><INPUT TYPE=submit>
28 </FORM></BODY></HTML>'''
29
30 langSet = ('Python', 'Ruby', 'Java', 'C++', 'PHP', 'C',
'JavaScript')
31 langItem = '<INPUT TYPE=checkbox NAME=lang VALUE="%s"%s> %s
'
32
33 def getCPPCookies(self): # reads cookies from client
34 if 'HTTP_COOKIE' in environ:
35 cookies = [x.strip() for x in environ['HTTP_
COOKIE'].split(';')]
36 for eachCookie in cookies:
37 if len(eachCookie)>6 and eachCookie[:3]=='CPP':
38 tag = eachCookie[3:7]
39 try:
40 self.cookies[tag] = eval(unquote(
eachCookie[8:]))
41 except (NameError, SyntaxError):
42 self.cookies[tag] = unquote(
eachCookie[8:])
43 if 'info' not in self.cookies:
44 self.cookies['info'] = ''
45 if 'user' not in self.cookies:
46 self.cookies['user'] = ''
47 else:
48 self.cookies['info'] = self.cookies['user'] = ''
49
50 if self.cookies['info'] != '':
51 self.who, langStr, self.fn = self.cookies['info'].split(':')
52 self.langs = langStr.split(',')
53 else:
54 self.who = self.fn = ' '
55 self.langs = ['Python']
56
57 def showForm(self):
58 self.getCPPCookies()
59
60 # put together language checkboxes
61 langStr = []
62 for eachLang in AdvCGI.langSet:
63 langStr.append(AdvCGI.langItem % (eachLang,
64 ' CHECKED' if eachLang in self.langs else '',
65 eachLang))
66
67 # see if user cookie set up yet
68 if not ('user' in self.cookies and self.cookies['user']):
69 cookStatus = '<I>(cookie has not been set yet)</I>'
70 userCook = ''
71 else:
72 userCook = cookStatus = self.cookies['user']
73
74 print '%s%s' % (AdvCGI.header, AdvCGI.formhtml % (
75 AdvCGI.url, cookStatus, userCook, self.who,
76 ''.join(langStr), self.fn))
77
78 errhtml = '''<HTML><HEAD><TITLE>
79 Advanced CGI Demo</TITLE></HEAD>
80 <BODY><H3>ERROR</H3>
81 <B>%s</B><P>
82 <FORM><INPUT TYPE=button VALUE=Back
83 ONCLICK="window.history.back()"></FORM>
84 </BODY></HTML>'''
85
86 def showError(self):
87 print AdvCGI.header + AdvCGI.errhtml % (self.error)
88
89 reshtml = '''<HTML><HEAD><TITLE>
90 Advanced CGI Demo</TITLE></HEAD>
91 <BODY><H2>Your Uploaded Data</H2>
92 <H3>Your cookie value is: <B>%s</B></H3>
93 <H3>Your name is: <B>%s</B></H3>
94 <H3>You can program in the following languages:</H3>
95 <UL>%s</UL>
96 <H3>Your uploaded file...<BR>
97 Name: <I>%s</I><BR>
98 Contents:</H3>
99 <PRE>%s</PRE>
100 Click <A HREF="%s"><B>here</B></A> to return to form.
101 </BODY></HTML>'''
102
103 def setCPPCookies(self):# tell client to store cookies
104 for eachCookie in self.cookies.keys():
105 print 'Set-Cookie: CPP%s=%s; path=/' %
106 (eachCookie, quote(self.cookies[eachCookie]))
107
108 def doResults(self):# display results page
109 MAXBYTES = 4096
110 langList = ''.join(
111 '<LI>%s<BR>' % eachLang for eachLang in self.langs)
112 filedata = self.fp.read(MAXBYTES)
113 if len(filedata) == MAXBYTES and f.read():
114 filedata = '%s%s' % (filedata,
115 '... <B><I>(file truncated due to size)</I></B>')
116 self.fp.close()
117 if filedata == '':
118 filedata = <B><I>(file not given or upload error)</I></B>'
119 filename = self.fn
120
121 # see if user cookie set up yet
122 if not ('user' in self.cookies and self.cookies['user']):
123 cookStatus = '<I>(cookie has not been set yet)</I>'
124 userCook = ''
125 else:
126 userCook = cookStatus = self.cookies['user']
127
128 # set cookies
129 self.cookies['info'] = ':'.join(
130 (self.who, ','.join(self.langs, ','), filename))
131 self.setCPPCookies()
132
133 print '%s%s' % (AdvCGI.header, AdvCGI.reshtml % (
134 cookStatus, self.who, langList,
135 filename, filedata, AdvCGI.url)
136
137 def go(self): # determine which page to return
138 self.cookies = {}
139 self.error = ''
140 form = FieldStorage()
141 if not form.keys():
142 self.showForm()
143 return
144
145 if 'person' in form:
146 self.who = form['person'].value.strip().title()
147 if self.who == '':
148 self.error = 'Your name is required. (blank)'
149 else:
150 self.error = 'Your name is required. (missing)'
151
152 self.cookies['user'] = unquote(form['cookie'].value.strip()) if
'cookie' in form else ''
153 if 'lang' in form:
154 langData = form['lang']
155 if isinstance(langData, list):
156 self.langs = [eachLang.value for eachLang in langData]
157 else:
158 self.langs = [langData.value]
159 else:
160 self.error = 'At least one language required.'
161
162 if 'upfile' in form:
163 upfile = form['upfile']
164 self.fn = upfile.filename or ''
165 if upfile.file:
166 self.fp = upfile.file
167 else:
168 self.fp = StringIO('(no data)')
169 else:
170 self.fp = StringIO('(no file)')
171 self.fn = ''
172
173 if not self.error:
174 self.doResults()
175 else:
176 self.showError()
177
178 if __name__ == '__main__':
179 page = AdvCGI()
180 page.go()
advcgi.py looks strikingly similar to our friendsC.py CGI scripts seen earlier in this chapter. It has a form, results, and error pages to return. In addition to all of the advanced CGI features that are part of our new script, we are also infusing more of an object-oriented feel to our script by using a class with methods instead of just a set of functions. The HTML text for our pages is now static data for our class, meaning that they will remain constant across all instances—even though there is actually only one instance in our case.
Line-by-Line Explanation
Lines 1–6
The usual startup and import lines appear here. If you’re not familiar with the StringIO class, it’s is a file-like data structure whose core element is a string—think in-memory text stream.
For Python 2, this class is found in either the StringIO module or its C-equivalent, cStringIO. In Python 3, it has been moved into the io package. Similarly, the Python 2 urllib.quote() and urllib.unquote() functions have been moved into the urllib.parse package for Python 3.
Lines 8–28
After the AdvCGI class is declared, the header and url (static class) variables are created for use by the methods displaying all the different pages. The static text form HTML comes next, followed by the programming language set and HTML element for each language.
Lines 33–55
This example uses cookies. Somewhere further down in this application is the setCPPCookies() method, which our application calls to send cookies (from the Web server) back to the browser and store them there.
The getCPPCookies() method does the opposite. When a browser makes subsequent calls to the application, it sends those same cookies back to the server via HTTP headers. By the time our application executes, those values are available to us (the application) via the HTTP_COOKIE environment variable.
This method parses the cookies, specifically seeking those that start with the CPP string (line 37). In our application, we’re only looking for cookies named “CPPuser” and “CPPinfo.” The keys 'user' and 'info' are extracted as the tag on line 38, the equal sign at index 7 skipped, and the value starting at index 8 unquoted and evaluated into a Python object occurs on lines 39–42. The exception handler looks for cookie payloads that are not valid Python objects and just saves the string value. If either of the cookies are missing, they are assigned to the empty string (lines 43–48). The getCPPCookies() method is only called from showForm().
We parse the cookies ourselves in this simple example, but if things get more complex, you will likely use the Cookie module (renamed to http.cookies in Python 3) to perform this task.
Similarly, if you’re writing Web clients and need to manage all the cookies stored in the browser (a cookie jar) and communication to Web servers, you’ll likely use the cookielib module (renamed to http.cookiejar in Python 3).
Lines 57–76
The checkUserCookie() method is used by both showForm() and doResults() to check whether the user-supplied cookie value has been set. Both the form and results HTML templates display this value.
The showForm() method’s only purpose is to display the form to the user. It relies on getCPPCookies() to retrieve cookies from previous requests (if any) and format the form as appropriate.
Lines 78–87
This block of code is responsible for the error page.
Lines 89–101
This is just the HTML template for the results page. It is used in doResults(), which fills in all the required data.
Lines 102–135
The results page is created by using these blocks of code. The setCPPCookies() method requests that a client store the cookies for our application, and the doResults() method puts together all the data and sends the output back to the client.
The latter, called from the go() method, does all the heavy lifting to put together the output. In the first block of this method (lines 109–119), we process the user input: the set of programming languages chosen (at least one required—see the go() method), any uploaded file and the user-supplied cookie value, both of which are optional.
The final steps of doResults() (lines 128–135) cram all this data into a single “CPPinfo” cookie for use later, and then renders the results template with all the data.
Lines 137–180
The script begins by instantiating an AdvCGI page object and then calling its go() method to start the ball rolling. The go() method contains the logic that reads all incoming data and decides which page to show.
The error page will be displayed if no name was given or if no languages were checked. The showForm() method is called to output the form if no input data was received; otherwise, the doResults() method is invoked to display the results page. Error situations are created by setting the self.error variable, which serves two purposes. It lets you set an error reason as a string and also serves as a flag to indicate that an error has occurred. If this value is not blank, the user will be forwarded to the error page.
Handling the person field (lines 145–150) is the same as we have seen in the past: a single key-value pair. However, collecting the language information (lines 153–160) is a bit trickier because we must check for either a (Mini)FieldStorage instance or a list of such instances. We will employ the familiar isinstance() built-in function for this purpose. In the end, we will have a list of a single language name or many, depending on the user’s selections.
The use of cookies to contain data illustrates how they can be used to avoid using any kind of CGI field pass-through. In our previous examples in this chapter, we passed such values as CGI variables. Now we are only using cookies. You will notice in the code that obtains such data that no CGI processing is invoked, meaning that the data does not come from the FieldStorage object. The data is passed to us by the Web client with each request and the values (user’s chosen data as well as information to fill in a succeeding form with pre-existing information) are obtained from cookies.
Because the showResults() method receives the new input from the user, it has the responsibility of setting the cookies, for example, by calling setCPPCookies(). However, showForm(), must read in the cookies’ values in order to display a form page with the current user selections. This is done by its invocation of the getCPPCookies() method.
Finally, we get to the file upload processing (lines 162–171). Regardless of whether a file was actually uploaded, FieldStorage is given a file handle in the file attribute. On line 171, if there was no filename given, then we just set it to a blank string. As a better alternative, you can access the file pointer—the file attribute—and perhaps read only one line at a time or other kind of slower processing.
In our case, file uploads are only part of user submissions, so we simply pass on the file pointer to the doResults() function to extract the data from the file. doResults() will display only the first 4KB (as set on line 112) of the file for space reasons and to show you that it is not necessary (or necessarily productive or useful) to display a 4GB binary file.
Existing Core Python readers will notice that we have refactored this code significantly from previous editions of this book. The original was over a decade old and did not reflect contemporary Python practices. It is likely this incarnation of advcgi.py will not run in Python older than version 2.5. However, you can still access the code from earlier editions of this script from the book’s Web site as well as the equivalent Python 3 version.
10.6. Introduction to WSGI
This section of the chapter introduces you to everything you need to know about WSGI, starting with the motivation and background. The second half of this section covers how to write Web applications without having to worry about how they will be executed.
10.6.1. Motivation (CGI Alternatives)
Okay, now you have a good understanding of what CGI does and why something like it is needed: servers cannot create dynamic content; they don’t have knowledge of user-specific application information data, such as authentication, bank accounts, online purchases, etc. Web servers must communicate with an outside process to do this custom work.
In the first two-thirds of this chapter, we discussed how CGI solves this problem and taught you how it works. We also mentioned that it is woefully inadequate because it does not scale; CGI processes (like Python interpreters) are created per-request then thrown away. If your application receives thousands of requests, spawning of a like-number of language interpreters will quickly bring your servers to a halt. Two widely-used methods to combat this performance issue are: server integration and external processes. Let’s briefly discuss each of these.
10.6.2. Server Integration
Server integration is also known as a server API. These include proprietary solutions like the Netscape Server Application Programming Interface (NSAPI) and Microsoft’s Internet Server Application Programming Interface (ISAPI). The most widely-user server solution today (since the mid-1990s) is the Apache HTTP Web server, an open-source solution. Apache as it is commonly called, has a server API, as well, and uses the term module to describe compiled plug-in components that extend its functionality and capability.
All three of these and similar solutions address the CGI performance problem by integrating the gateway into the server. In other words, instead of the server forking off a separate language interpreter to handle a request, it merely makes a function call, running any application code and coming up with the response in-process. These servers may process their work via a set of pre-created processes or threads, depending on its API. Most can be adjusted to suit the requirements of the supported applications. General features that servers also provide include compression, security, proxying, and virtual hosting, to name a few.
Of course, no solution is without its downsides, and for server APIs, this includes a variety of issues such as buggy code affecting server performance, language implementations that are not-fully compatible, requiring the API developer to have to code in the same programming language as the Web server implementation, integration into a proprietary solution (if not using an open-source server API), requiring that applications must be thread-safe, etc.
10.6.3. External Processes
Another solution is an external process. These are CGI applications that permanently run outside of the server. When a request comes in, the server passes it off to such a process. They scale better than pure CGI because these processes are long-lived as opposed to being spawned for individual requests then terminated. The most well-known external process solution is FastCGI. With external processes, you get the benefits of server APIs but not as many of the drawbacks because, for instance, you get to run outside the server, they can be implemented in your language of choice, application defects might not affect the Web server, you’re not forced to code against a proprietary source, etc.
Naturally, there is a Python implementation of FastCGI, as well as a variety of Python modules for Apache (PyApache, mod_snake, mod_python, etc.), some of which are no longer being maintained. All these plus the original pure CGI solution make up the gamut of Web server API gateway solutions to calling Python Web applications.
Because of these different invocation mechanisms, an additional burden has been placed on the developer. You not only need to build your application, but you must also decide on integration with these Web servers. In fact, when you write your application, you need to know exactly in which one of these mechanisms it will execute and code it that way.
This problem is more acute for Web framework developers, because you want to give your users the most flexibility. If you don’t want to force them to create multiple versions of their applications, you’ll need to provide interfaces to all server solutions in order to promote adoption of your framework. This dilemma certainly doesn’t sound like it lends itself to being Pythonic, thus it has led to the creation of the Web Server Gateway Interface (WSGI) standard.
10.6.4. Introducing WSGI
It’s not a server, an API you program against, or an actual piece of code, but it does define an interface. The WSGI specification was created as PEP 333 in 2003 to address the wide proliferation of disparate Web frameworks, Web servers, and various invocation styles just discussed (pure CGI, server API, external process).
The goal was to reduce this type of interoperability and fragmentation with a standard that targets a common API between the Web server and Web framework layers. Since its creation, WSGI adoption has become commonplace. Nearly all of the Python-based Web servers are WSGI-compliant. Having WSGI as a standard is advantageous to application developers, framework creators, and the community as a whole.
A WSGI application is defined as a callable which (always) takes the following parameters: a dictionary containing the server environment variables, and another callable that initializes the response with an HTTP status code and HTTP headers to return back to the client. This callable must return an iterable which makes up the payload.
In the sample “Hello World” WSGI application that follows, these variables are named environ and start_response(), respectively:
def simple_wsgi_app(environ, start_response):
status = '200 OK'
headers = [('Content-type', 'text/plain')]
start_response(status, headers)
return ['Hello world!']
The environ variable contains familiar environment variables, such as HTTP_HOST, HTTP_USER_AGENT, SERVER_PROTOCOL, etc. The start_response() callable that must be executed within the application to prepare the response that will eventually be sent back to the client. The response must include an HTTP return code (200, 300, etc.) as well as HTTP response headers.
In this first version of the WSGI standard, start_response() should also return a write() function in order to support legacy servers that stream results back. It is recommended against using it and returning just an iterable to let the Web server manage returning the data back to the client (instead of having the application do so as that is not in its realm of expertise). Because of this, most applications just drop the return value from start_response() or don’t use or save it otherwise.
In the previous example, you can see that a 200 status code is set as well as the Content-Type header. Both are passed into start_response() to formally begin the response. Everything else that comes after should be some iterable, such as, list, generator, etc. that make up the actual response payload. In this example, we’re only returning a list containing a single string, but you can certainly imagine a lot more data going back. It can also be any iterable not just a list; a generator or callable instance are great alternatives.
The last thing we wanted to say about start_response() is the third and optional exception information parameter, usually known by its abbreviation, exc_info. If an application has set the headers to say “200 OK” (but has not actually sent them) and encounters problems during execution, it’s possible to change the headers to something else, like “403 Forbidden” or “500 Internal Server Error,” if desired.
To make this happen, we can assume that the application called start_response() with the regular pair of parameters at the beginning of execution. When errors occur, start_response() can be called again, but with exc_info passed in along with the new status and headers that will replace the existing ones.
It is an error to call start_response() a second time without exc_info. Again, this must all happen before any HTTP headers are sent. If the headers have already been sent, an exception must be raised, such as, raise exc_info[0], exc_info[1], or exc_info[2'].
For more information on the start_response() callable, refer to PEP 333 at http://www.python.org/dev/peps/pep-0333/#the-start-response-callable.
10.6.5. WSGI servers
On the server side, we need to call the application (as we discussed previously), pass in the environment and start_response() callable, and then wait for the application to complete. When it does, we should get an iterable as the return value and return this data back to the client. In the following script, we present a simplistic and limited example of what a WSGI Web server would look like:
import StringIO
import sys
def run_wsgi_app(app, environ):
body = StringIO.StringIO()
def start_response(status, headers):
body.write('Status: %s
' % status)
for header in headers:
body.write('%s: %s
' % header)
return body.write
iterable = app(environ, start_response)
try:
if not body.getvalue():
raise RuntimeError("start_response() not called by app!")
body.write('
%s
' % '
'.join(line for line in iterable))
finally:
if hasattr(iterable, 'close') and callable(iterable.close):
iterable.close()
sys.stdout.write(body.getvalue())
sys.stdout.flush()
The underlying server/gateway will take the application as provided by the developer and put it together the with environ dictionary with the contents of os.environ() plus the WSGI-specified wsgi.* environment variables (see the PEP, but expect elements, such as wsgi.input, wsgi.errors, wsgi.version, etc.) as well as any framework or middleware environment variables. (More on middleware coming soon.) With both of these items, it will then call run_wsgi_app(), which returns the response back to the client.
In reality as an application developer, you wouldn’t be interested in minutia such as this. Creating servers is for those wanting to provide, with WSGI specifications, a consistent execution framework for applications. You can see from the preceding example that WSGI provides a clean break between the application side and the server side. Any application can be passed to the server described above (or any other WSGI server). Similarly, in any application, you don’t care what kind of server is calling you; all you care about is the environment you’re given and the start_response() callable that you need to execute before returning data to the client.
10.6.6. Reference Server
As we just mentioned, application developers shouldn’t be forced to write servers too, so rather than having to create and manage code like run_wsgi_app(), you should be able to choose any WSGI server you want, and if none are handy, Python provides a simple reference server in the standard library: wsgiref.simple_server.WSGIServer.
You can build one using the class directly; however, the wsgiref package itself features a convenience function called make_server() that you can employ for simple access to the reference server. Let’s do so with our sample application, simple_wsgi_app():
#!/usr/bin/env python
from wsgiref.simple_server import make_server
httpd = make_server('', 8000, simple_wsgi_app)
print "Started app serving on port 8000..."
httpd.serve_forever()
This takes the application we created earlier, simple_wsgi_app(), wraps it in a server running on port 8000, and starts the server loop. If you visit http://localhost:8000 in a browser (or whatever [host, port] pair you’re using), you should see the plain text output of “Hello World!”
For the truly lazy, you don’t have to write the application or the server. The wsgiref module also has a demonstration application, wsgiref.simple_ server.demo_app(). The demo_app() is nearly identical to simple_wsgi_ app(), except that in addition, it displays the environment variables. Here’s the code for running the demonstration application with the reference server:
#!/usr/bin/env python
from wsgiref.simple_server import make_server, demo_app
httpd = make_server('', 8000, demo_app)
print "Started app serving on port 8000..."
httpd.serve_forever()
Start up a CGI server, and then browse to the application; you should see the “Hello World!” output along with the environment variable dump.
This is just the reference model for a WSGI-compliant server. It is not full-featured or intended to serve in production use. However, server creators can take a page from this to design their own products and make them WSGI-compliant. The same is true for demo_app() as a reference WSGI-compliant application for application developers.
10.6.7. Sample WSGI Applications
As mentioned earlier, WSGI is now the standard, and nearly all Python Web frameworks support it, even if it doesn’t look like it. For example, an Google App Engine handler class, given the usual imports, might contain code that looks something like this:
class MainHandler(webapp.RequestHandler):
def get(self):
self.response.out.write('Hello world!')
application = webapp.WSGIApplication([
('/', MainHandler)], debug=True)
run_wsgi_app(application)
Not all frameworks will have an exact match as far as code goes, but you can clearly see the WSGI reference. For a much closer comparison, you can go one level lower and take a look at the run_bare_wsgi_app() function found in the util.py module of the webapp subpackage of the App Engine Python SDK. You’ll find this code looks much more like a derivative of simple_wsgi_app().
10.6.8. Middleware and Wrapping WSGI Applications
There might be situations in which you want to let the application run as-is, but you want to inject pre or post-processing before (the request) or after the application executes (the response). This is commonly known as middleware, which is additional functionality that sits between the Web server and the Web application. You’re either massaging the data coming from the user before passing it to the application, or you need to do some final tweaks to the results from the application before returning the payload back to the user. This is commonly referred to as a middleware onion, indicating the application is at the heart, with additional layers in between.
Preprocessing can include activities, such as intercepting the request parameters; modifying them; adding or removing them; altering the environment (including any user-submitted form [CGI] variables); using the URL path to dispatch application functionality; forwarding or redirecting requests; load-balancing based on network traffic via the inbound client IP address; delegating to altered functionality (e.g., using the User-Agent header to send mobile users to a simplified UI/app); etc.
Examples of post-processing primarily involves manipulating the output from the application. The following script is an example, similar to the timestamp server that we created in Chapter 2, “Network Programming”: for each line from the application’s results, we’re going to prepend it with a timestamp. In practice of course, this is much more complicated, but this is an example similar to others you can find online that capitalize or lowercase application output. Here, we’ll wrap our call to simple_wsgi_app() with ts_simple_wsgi_app() and install the latter as the application that the server registers:
#!/usr/bin/env python
from time import ctime
from wsgiref.simple_server import make_server
def ts_simple_wsgi_app(environ, start_response):
return ('[%s] %s' % (ctime(), x) for x in
simple_wsgi_app(environ, start_response))
httpd = make_server('', 8000, ts_simple_wsgi_app)
print "Started app serving on port 8000..."
httpd.serve_forever()
For those of you with more of an object bent, you can use a class wrapper instead of a function wrapper. On top of this, we can reduce environ and start_response() into a single variable argument tuple (see stuff in the example that follows) to shorten the code a bit because we added some with the inclusion of a class and definition of a pair of methods:
class Ts_ci_wrapp(object):
def __init__(self, app):
self.orig_app = app
def __call__(self, *stuff):
return ('[%s] %s' % (ctime(), x) for x in
self.orig_app(*stuff))
httpd = make_server('', 8000, Ts_ci_wrapp(simple_wsgi_app))
print "Started app serving on port 8000..."
httpd.serve_forever()
We’ve named the class Ts_ci_wrapp, which is short for “timestamp callable instance wrapped application” that is instantiated when we create the server. The initializer takes the original application and caches it for use later. When the server executes the application, it still passes in the environ dict and start_response() callable, as before. With this change, the instance itself will be called (hence the __call__() method definition). Both environ and start_response() are passed to the original application via stuff.
Although we used a callable instance here and a function earlier, keep in mind that any callable will work. Also note that none of these last few examples modify simple_wsgi_app() in any way. The main point is that WSGI provides a clean break between the Web application and the Web server. This helps compartmentalize development, allow teams to more easily divide the work, and gives a consistent and flexible way to allow Web application’s to run with any type of WSGI-compliant back-end. It also frees the Web server creator from having to incorporate any custom or specific hooks for users who choose to run applications by using their (Web) server software.
10.6.9. Updates to WSGI in Python 3
PEP 333 defined the WSGI standard for Python 2. PEP 3333 offers enhances to PEP 333 to bring the standard to Python 3. Specifically, it calls out that the network traffic is all done in bytes. While such strings are native to Python 2, native Python 3 strings are Unicode to emphasize that they represent text data while the original ASCII strings were renamed to the bytes type.
Specifically, PEP 3333 clarifies that “native” strings—the data type named str, regardless of whether you’re using Python 2 or 3—are those used for all HTTP headers and corresponding metadata. It also states that “byte” strings are those which are used for the HTTP payloads (requests/responses, GET/POST/PUT input data, HTML output, etc.). For more information on PEP 333, take a look at its definition, which you can find at www.python.org/dev/peps/pep-3333/.
Independent of PEP 3333, there are other related proposals that will make for good reading. One is PEP 444, which is a first attempt to define a “WSGI 2,” if such a thing takes on that name. The community generally regards PEP 3333 as a “WSGI 1.0.1,” an enhancement to the original PEP 333 specification, whereas PEP 444 is a consideration for WSGI’s next generation.
10.7. Real-World Web Development
CGI was the way things used to work, and the concepts it brought still apply in Web programming today; hence, the reason why we spent so much time looking at it. The introduction to WSGI brought you one step closer to reality.
Today, new Python Web programmers have a wealth of choices, and while the big names in the Web framework space are still Django, Pyramid, and Google App Engine, there are plenty more options for users to choose from—perhaps a mind-numbing selection, actually. Frameworks aren’t even necessary: you could go straight down to a WSGI-compliant Web server without any of the extra “fluff” or framework features. However, the chances are more likely that you will go with a framework because of the convenience of having the rest of the Web stack available to you.
A modern Web execution environment will likely consist of either a multithreaded or multiprocess server model, signed/secure cookies, basic user authentication, and session management. Many of these things regular application developers already know; authentication represents user registration with a login name and password, and cookies are ways of maintaining user information, sometimes session information, as well. We also know that in order to scale, Web servers need to be able to handle requests from multiple users; hence, the use of threads or processes. However, one thing that hasn’t been covered is the need for sessions.
If you look at all the application code in this entire chapter that runs on Web servers, it might take a while for you to know that aside from the obvious differences from scripts that run from beginning to end or server loops which just run forever, Web applications (or servlets in Java parlance) are executed for every request. There’s no state saved within the code, and we already mentioned that HTTP is stateless, as well. In other words, don’t expect data to be saved in variables, global or otherwise. Think of a request like a single transaction. It comes in, does its business, and finishes, leaving nothing behind in the codebase.
This is why session management—saving of a user’s state across one or more requests within a well-defined duration of time—is needed. Generally, this is accomplished by using some sort of persistent storage, such as memcache, flat (or not-so-flat) files, and even databases. Developers can certainly roll their own, especially when writing lower-level code, as we’ve seen in this chapter. But without question this wheel has already been (re)invented several times, which is why many of the larger, more well-known Web frameworks, including Django, come with their own session management software. (This leads directly into our next chapter.)
10.8. Related Modules
In Table 10-1, we present a list of modules that you might find useful for Web development. You might also take a look at Chapter 3, “Internet Client Programming,” and Chapter 13, “Web Services,” for other useful Web application modules.
Table 10-1. Web Programming Related Modules
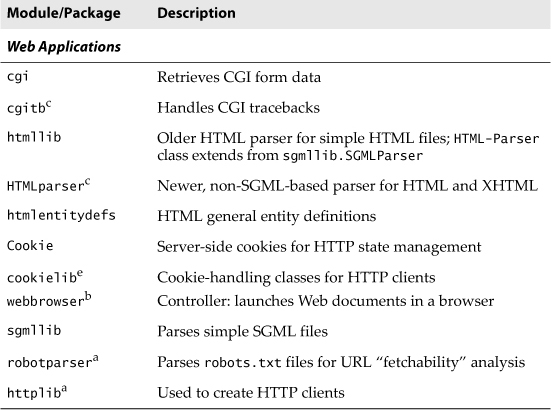
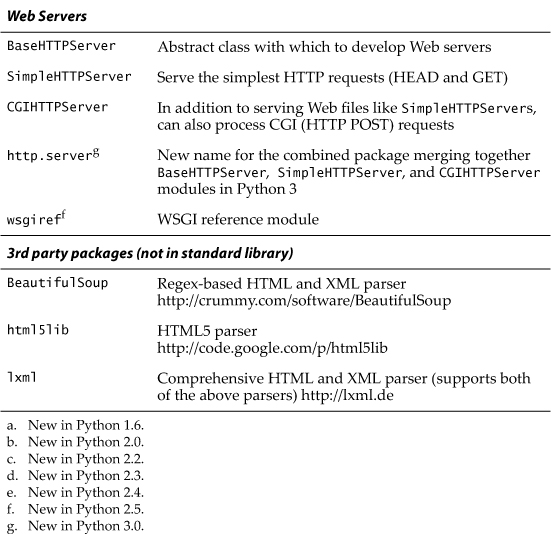
10.9. Exercises
CGI and Web Applications
10-1. urllib Module and Files. Update the friendsC.py script so that it stores names and corresponding number of friends into a two-column text file on disk and continues to add names each time the script is run.
Extra Credit: Add code to dump the contents of such a file to the Web browser (in HTML format). Additional Extra Credit: Create a link that clears all the names in this file.
10-2. Error Checking. The friendsC.py script reports an error if no radio button was selected to indicate the number of friends. Update the CGI script to also report an error if no name (e.g., blank or whitespace) is entered.
Extra Credit: We have so far explored only server-side error checking. Explore JavaScript programming and implement client-side error checking by creating JavaScript code to check for both error situations so that these errors are stopped before they reach the server.
10-3. Simple CGI. Create a “Comments” or “Feedback” page for a Web site. Take user feedback via a form, process the data in your script, and then return a “thank you” screen.
10-4. Simple CGI. Create a Web guestbook. Accept a name, an e-mail address, and a journal entry from a user, and then log it to a file (format of your choice). Like Exercise 10-3, return a “thanks for filling out a guestbook entry” page. Also provide a link so that users can view guestbooks.
10-5. Web Browser Cookies and Web Site Registration. Create a user authentication service for a Web site. Manager user names and passwords in an encrypted way. You may have done a plain text version of this exercise in either Core Python Programming or Core Python Language Fundamentals and can use parts of that solution if you wish.
Extra Credit: Familiarize yourself with setting Web browser cookies and maintain a login session for four hours from the last successful login.
Extra Credit: Allow for federated authentication via OpenID, allowing users to log in via Google, Yahoo!, AOL, Word-Press, or even proprietary authentication systems such as “Facebook Connect” or “sign in with Twitter.” You can also use the Google Identity Toolkit that you can download from http://code.google.com/apis/identitytoolkit.
10-6. Errors. What happens when a CGI script crashes? How can the cgitb module be helpful?
10-7. CGI, File Updates, and Zip Files. Create a CGI application that not only saves files to the server’s disk, but also intelligently unpacks Zip files (or other archive) into a subdirectory named after the archive file.
10-8. Web Database Application. Think of a database schema that you want to provide as part of a Web database application. For this multi-user application, you want to grant everyone read access to the entire contents of the database, but perhaps only write access to each individual. One example might be an address book for your family and relatives. Each family member, once successfully logged in, is presented with a Web page with several options, add an entry, view my entry, update my entry, remove or delete my entry, and view all entries (entire database).
Design a UserEntry class and create a database entry for each instance of this class. You can use any solution created for any previous problem to implement the registration framework. Finally, you can use any type of storage mechanism for your database, either a relational database such as MySQL or some of the simpler Python persistent storage modules such as anydbm or shelve.
10-9. Electronic Commerce Engine. Create an e-commerce/online shopping Web service that is generic and can be “reskinned” for multiple clients. Add your own authentication system as well as classes for users and shopping carts (If you have Core Python Programming or Core Python Language Fundamentals, you can use the classes created for your solutions to Exercises 4 and 11 in the Object-Oriented Programming chapter.) Don’t forget that you will also need code to manage your products, whether they are hard goods or services. You might want to connect to a payment system such as those offered by PayPal or Google. After reading the next few chapters, port this temporary CGI solution to Django, Pyramid, or Google App Engine.
10-10. Python 3. Examine the differences between friendsC.py and friendsC3.py. Describe each change.
10-11. Python 3, Unicode/Text vs. Data/Bytes. Port the Unicode example, uniCGI.py, to Python 3.
WSGI
10-12. Background. What is WSGI and what were some of the reasons behind its creation?
10-13. Background. What are/were some of the techniques used to get around the scalability issue of CGI?
10-14. Background. Name some well-known frameworks that are WSGI-compliant, and do some research to find some that are not.
10-15. Background. What is the difference between WSGI and CGI?
10-16. WSGI Applications. WSGI applications can be what kind(s) of Python object(s)?
10-17. WSGI Applications. What are the two required arguments for a WSGI application? Go into more detail about the second one.
10-18. WSGI Applications. What is (are) the possible return type(s) of a WSGI application?
10-19. WSGI Applications. Solutions to Exercises 10-1 through 10-11 only work if/when your server processes form data in the same manner as CGI. Choose one of them to port to WSGI, where it will work regardless of which WSGI-compliant server you choose, with perhaps only slight modifications.
10-20. WSGI Servers. The WSGI servers presented in Section 10.6.5 featured a sample run_wsgi_app() server function which executes a WSGI application.
a. The run_wsgi_app() function currently does not feature the optional third parameter exc_info. Study PEPs 333 and 3333 and add support for exc_info.
b. Create a Python 3 port of this function.
10-21. Case Study. Compare and contrast the WSGI implementations of the following Python Web frameworks: Werkzeug, WebOb, Django, Google App Engine’s webapp.
10-22. Standards. While PEP 3333 includes clarifications and enhancements to PEP 333 for Python 3, PEP 444 is something else. Describe what PEP 444 is all about and how it relates to the existing PEPs.