
Chapter 9. Web Clients and Servers
If you have a browser from CERN’s WWW project (World Wide Web, a distributed hypertext system) you can browse a WWW hypertext version of the manual.
—Guido van Rossum, November 1992
(first mention of the Web on the Python mailing list)
In this chapter...
9.1. Introduction
Because the universe of Web applications is so expansive, we’ve (re)organized this book in a way that allows readers to focus specifically on multiple aspects of Web development via a set of chapters that cover individual topics.
Before getting into the nitty-gritty, this introductory chapter on Web programming will start you off by again focusing on client/server architecture, but this time the perspective of the Web. It provides a solid foundation for the material in the remaining chapters of the book.
9.1.1. Web Surfing: Client/Server Computing
Web surfing falls under the same client/server architecture umbrella that we have seen repeatedly. This time, however, Web clients are browsers, which, of course, are applications that allow users to view documents on the World Wide Web. On the other side are Web servers, which are processes that run on an information provider’s host computers. These servers wait for clients and their document requests, process them, and then return the requested data. As with most servers in a client/server system, Web servers are designed to run indefinitely. The Web surfing experience is best illustrated by Figure 9-1. Here, a user runs a Web client program, such as a browser, and makes a connection to a Web server elsewhere on the Internet to obtain information.
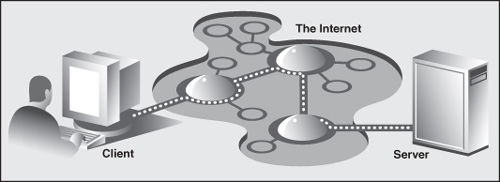
Figure 9-1. A Web client and Web server on the Internet. A client sends a request out over the Internet to the server, which then responds by sending the requested data back to the client.
Clients can issue a variety of requests to Web servers. Such requests might include obtaining a Web page for viewing or submitting a form with data for processing. The request is then serviced by the Web server (and possibly other systems), and the reply comes back to the client in a special format for display purposes.
The language that is spoken by Web clients and servers, the standard protocol used for Web communication, is called HyperText Transfer Protocol (HTTP). HTTP is written on top of the TCP and IP protocol suite, meaning that it relies on TCP and IP to carry out its lower-level communication needs. Its responsibility is not to route or deliver messages—TCP and IP handle that—but to respond to client requests (by sending and receiving HTTP messages).
HTTP is known as a stateless protocol because it does not keep track of information from one client request to the next, similar to the client/server architecture we have seen so far. The server stays running, but client interactions are singular events structured in such a way that once a client request is serviced, it quits. New requests can always be sent, but they are considered separate service requests. Because of the lack of context per request, you might notice that some URLs have a long set of variables and values chained as part of the request to provide some sort of state information. Another alternative is the use of cookies—static data stored on the client side that generally contain state information, as well. In later parts of this chapter, we will look at how to use both long URLs and cookies to maintain state information.
9.1.2. The Internet
The Internet is a moving and fluctuating “cloud” or “pond” of interconnected clients and servers scattered around the globe. Metaphorically speaking, communication from client to server consists of a series of connections from one lily pad on the pond to another, with the last step connecting to the server. As a client user, all this detail is kept hidden from your view. The abstraction is to have a direct connection between you (the client) and the server you are visiting, but the underlying HTTP, TCP, and IP protocols are hidden underneath, doing all of the dirty work. Information regarding the intermediate nodes is of no concern or consequence to the general user, anyway, so it’s good that the implementation is hidden. Figure 9-2 shows an expanded view of the Internet.

Figure 9-2. A grand view of the Internet. The left side illustrates where you would find Web clients; the right side hints as to where Web servers are typically located.
It’s worth mentioning that with all of the data moving around the Internet, there might be some that is more sensitive. There is no encryption service available by default, so standard protocols just transmit the data as they’re sent from applications. An additional level of security has been added to ordinary sockets, called the secure socket layer (SSL), to encrypt all transmission going across a socket created with this additional level. Now developers can determine whether they want this additional security or not.
Where the Clients and Servers Are
As you can see from Figure 9-2, the Internet is made up of multiple, interconnected networks, all working with some sense of (perhaps disjointed) harmony. The left half of the diagram is focused on the Web clients—users who are either at home, connected via their ISP, or at work on their company’s LAN. Missing from the diagram are special-purpose (and popular) devices such as firewalls and proxy servers.
Firewalls help fight against unauthorized access to a corporate (or home) network by blocking known entry points, configurable on a per-network basis. Without one of these, computers that have servers might allow intruders to enter an unprotected port and gain system access. Network administrators reduce the chances of hacking by locking everything out and only opening up ports for well-known services like Web servers and secure shell (SSH) access, the latter based on the aforementioned SSL.
Proxy servers are another useful tool that can work alongside firewalls (or not). Network administrators might prefer that only a certain number of computers have Internet access, perhaps to better monitor traffic in and out of their networks. Another useful feature is if the proxy can cache data. As an example, if Linda accesses a Web page which is proxy-cached, when her co-worker Heather visits the same page later, she’ll experience a faster loading time. Her browser did not need to go all the way to the Web server; instead, it got everything it needed from the proxy. Furthermore, the IT staff at their company now knows that at least two employees visited that Web site and when (and likely who). Such servers are also known as forward proxies, based on what they do.
A similar type of computer is a reverse proxy. These do (sort-of) the opposite of the forward proxy. (In actuality, you can configure a single computer to perform as both a forward and reverse proxy.) A reverse proxy acts like a server with which clients can connect. They will likely access hit a back-end server to obtain the information for which the clients are requesting. Reverse proxies can also cache such server data and return it directly back to the client as if they were one of the back-ends.
As you can surmise, instead of caching on their behalf, “living closer to,” and serving clients, reverse proxies live closer to (back-end) servers. They act on the behalf of servers, possibly caching for them, load balancing, etc. You can also use reverse proxies as firewalls or to encrypt data (SSL, HTTPS, Secure FTP (SFTP), etc.). They’re very useful, and it’s highly likely that you’ll come across more than one reverse proxy during daily Web surfing. Now let’s talk about where some of those back-end Web servers are.
The right side of Figure 9-2 concentrates more on Web servers and where they can be found. Corporations with larger Web sites will typically have an entire Web server farm located at their ISPs. Such physical placement is called co-location, meaning that a company’s servers reside at an ISP along with computers from other corporate customers. These servers are either all providing different data to clients or are part of a redundant system with duplicated information designed for heavy demand (high number of clients). Smaller corporate Web sites might not require as much hardware and networking gear, and hence, might only have one or several co-located servers at their ISP.
In either case, most co-located servers are stored with a larger ISP sitting on a network backbone, meaning that they have a “fatter” (read wider) and presumably faster connection to the Internet—closer to the core of the Internet, if you will. This permits clients to access the servers quickly—being on a backbone means clients do not have to hop across as many networks to access a server, thus allowing more clients to be serviced within a given time period.
Internet Protocols
You should also keep in mind that although Web surfing is the most common Internet application, it is not the only one and is certainly not the oldest. The Internet predates the Web by almost three decades. Before the Web, the Internet was mainly used for educational and research purposes, and many of the original Internet protocols, such as FTP, SMTP, and NNTP are still around today.
Since Python was initially known for Internet programming, you will find support for all of the protocols discussed above in addition to many others. We differentiate between “Internet programming” and “Web programming” by stating that the latter pertains only to applications developed specifically for the Web, such as Web clients and servers, which are the focus for this chapter.
Internet programming covers a wider range of applications, including applications that use some of the Internet protocols we previously mentioned, plus network and socket programming in general, all of which are covered in previous chapters in this book.
9.2. Python Web Client Tools
One thing to keep in mind is that a browser is only one type of Web client. Any application that makes a request for data from a Web server is considered a client. Yes, it is possible to create other clients that retrieve documents or data from the Internet. One important reason to do this is that a browser provides only limited capacity; it is used primarily for viewing and interacting with Web sites. A client program, on the other hand, has the ability to do more—not only can it download data, but it can also store it, manipulate it, or perhaps even transmit it to another location or application.
Applications that use the urllib module to download or access information on the Web (using either urllib.urlopen() or urllib.urlretrieve()) can be considered a simple Web client. All you need to do is provide a valid Web address.
9.2.1. Uniform Resource Locators
Simple Web surfing involves using Web addresses called Uniform Resource Locators (URLs). Such addresses are used to locate a document on the Web or to call a CGI program to generate a document for your client. URLs are part of a larger set of identifiers known as Uniform Resource Identifiers (URIs). This superset was created in anticipation of other naming conventions that have yet to be developed. A URL is simply a URI that uses an existing protocol or scheme (i.e., http, ftp, etc.) as part of its addressing. To complete this picture, we’ll add that non-URL URIs are sometimes known as Uniform Resource Names (URNs), but because URLs are the only URIs in use today, you really don’t hear much about URIs or URNs, save for perhaps XML identifiers.
Like street addresses, Web addresses have some structure. An American street address usually is of the form “number/street designation,” for example, 123 Main Street. It can differ from other countries, which might have their own rules. A URL uses the format:
prot_sch://net_loc/path;params?query#frag
Table 9-1 describes each of the components.
Table 9-1. Web Address Components
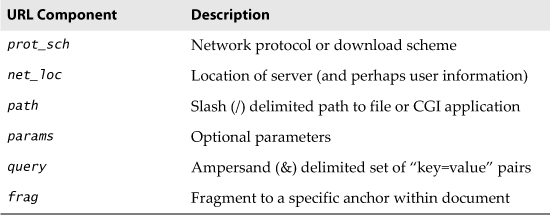
net_loc can be broken down into several more components, some required, others optional. The net_loc string looks like this:
user:passwd@host:port
These individual components are described in Table 9-2.
Table 9-2. Network Location Components
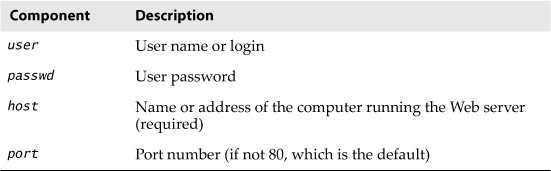
Of the four, the host name is the most important. The port number is necessary only if the Web server is running on a different port number from the default. (If you aren’t sure what a port number is, read Chapter 2, “Network Programming.”)
User names and perhaps passwords are used only when making FTP connections, and even then they usually aren’t necessary because the majority of such connections are anonymous.
Python supplies two different modules, each dealing with URLs in completely different functionality and capacities. One is urlparse, and the other is urllib. We will briefly introduce some of their functions here.
9.2.2. The urlparse Module
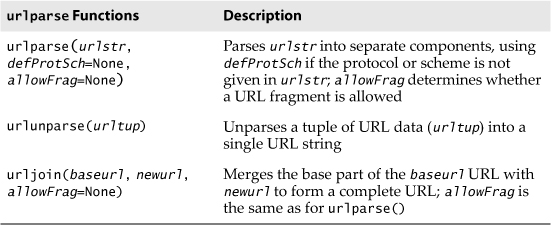
The urlparse module provides basic functionality with which to manipulate URL strings. These functions include urlparse(), urlunparse(), and urljoin().
urlparse.urlparse()
urlparse() breaks up a URL string into some of the major components described earlier. It has the following syntax:
urlparse(urlstr, defProtSch=None, allowFrag=None)
urlparse() parses urlstr into a 6-tuple (prot_sch, net_loc, path, params, query, frag). Each of these components has been described earlier. defProtSch specifies a default network protocol or download scheme in case one is not provided in urlstr. allowFrag is a flag that signals whether a fragment part of a URL is allowed. Here is what urlparse() outputs when given a URL:
>>> urlparse.urlparse('http://www.python.org/doc/FAQ.html')
('http', 'www.python.org', '/doc/FAQ.html', '', '', '')
urlparse.urlunparse()
urlunparse() does the exact opposite of urlparse()—it merges a 6-tuple (prot_sch, net_loc, path, params, query, frag)—urltup, which could be the output of urlparse(), into a single URL string and returns it. Accordingly, we state the following equivalence:
urlunparse(urlparse(urlstr)) ≡ urlstr
You might have already surmised that the syntax of urlunparse() is as follows:
urlunparse(urltup)
urlparse.urljoin()
The urljoin() function is useful in cases for which many related URLs are needed, for example, the URLs for a set of pages to be generated for a Web site. The syntax for urljoin() is:
urljoin(baseurl, newurl, allowFrag=None)
urljoin() takes baseurl and joins its base path (net_loc plus the full path up to, but not including, a file at the end) with newurl. For example:
>>> urlparse.urljoin('http://www.python.org/doc/FAQ.html',
... 'current/lib/lib.htm')
'http://www.python.org/doc/current/lib/lib.html'
A summary of the functions in urlparse can be found in Table 9-3.
Table 9-3. Core urlparse Module Functions
9.2.3. urllib Module/Package
Core Module: urllib in Python 2 and Python 3
Unless you are planning on writing a more lower-level network client, the urllib module provides all the functionality you need. urllib provides a high-level Web communication library, supporting the basic Web protocols, HTTP, FTP, and Gopher, as well as providing access to local files. Specifically, the functions of the urllib module are designed to download data (from the Internet, local network, or local host) using the aforementioned protocols. Use of this module generally obviates the need for using the httplib, ftplib, and gopherlib modules unless you desire their lower-level functionality. In those cases, such modules can be considered as alternatives. (Note: most modules named *lib are generally for developing clients of the corresponding protocols. This is not always the case, however, as perhaps urllib should then be renamed “internetlib” or something similar!)
With urllib, urlparse, urllib2, and others in Python 2, a step was taken in Python 3 to streamline all of these related modules under a single package named urllib, so you’ll find pieces of urllib and urllib2 unified into the urllib.request module and urlparse turned into urllib.parse. The urllib package in Python 3 also includes the response, error, and robotparser submodules. Keep these changes in mind as you read this chapter and try the examples or exercises.
The urllib module provides functions to download data from given URLs as well as encoding and decoding strings to make them suitable for including as part of valid URL strings. The functions we will be looking at in the upcoming section include urlopen(), urlretrieve(), quote(), unquote(), quote_plus(), unquote_plus(), and urlencode(). We will also look at some of the methods available to the file-like object returned by urlopen().
urllib.urlopen()
urlopen() opens a Web connection to the given URL string and returns a file-like object. It has the following syntax:
urlopen(urlstr, postQueryData=None)
urlopen() opens the URL pointed to by urlstr. If no protocol or download scheme is given, or if a “file” scheme is passed in, urlopen() will open a local file.
For all HTTP requests, the normal request type is GET. In these cases, the query string provided to the Web server (key-value pairs encoded or quoted, such as the string output of the urlencode() function), should be given as part of urlstr.
If the POST request method is desired, then the query string (again encoded) should be placed in the postQueryData variable. (We’ll discuss GET and POST some more later in the chapter, but such HTTP commands are general to Web programming and HTTP itself, not tied specifically to Python.)
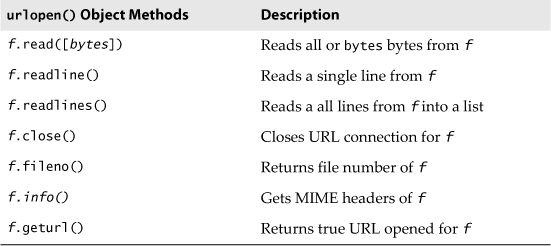
When a successful connection is made, urlopen() returns a file-like object, as if the destination was a file opened in read mode. If our file object is f, for example, then our “handle” would support the expected read methods such as f.read(), f.readline(), f.readlines(), f.close(), and f.fileno().
In addition, a f.info() method is available which returns the Multipurpose Internet Mail Extension (MIME) headers. Such headers give the browser information regarding which application can view returned file types. For example, the browser itself can view HTML, plain text files, and render PNG (Portable Network Graphics) and JPEG (Joint Photographic Experts Group) or the old GIF (Graphics Interchange Format) graphics files. Other files, such as multimedia or specific document types, require external applications in order to view.
Finally, a geturl() method exists to obtain the true URL of the final opened destination, taking into consideration any redirection that might have occurred. A summary of these file-like object methods is given in Table 9-4.
Table 9-4. urllib.urlopen() File-like Object Methods
If you expect to be accessing more complex URLs or want to be able to handle more complex situations, such as basic and digest authentication, redirections, cookies, etc., then we suggest using the urllib2 module. It too, has a urlopen() function, but it also provides other functions and classes for opening a variety of URLs.
If you’re staying with version 2.x for now, we strongly recommend that you use urllib2.urlopen(), instead, because it deprecates the original one in urllib starting in version 2.6; the old one is removed in version 3.0. As you read in the Core Module sidebar earlier, the functionality for both modules are merged into urllib.request in Python 3. This is just another way of saying that the version 3.x urllib.request.urlopen() function is ported directly from version 2.x urllib2.urlopen() (and not urllib.urlopen()).
urllib.urlretrieve()
Rather than opening a URL and letting you access it like a file, urlretrieve() just downloads the entire HTML and saves it as a file. Here is the syntax for urlretrieve():
urlretrieve(url, filename=None, reporthook=None, data=None)
Rather than reading from the URL like urlopen() does, urlretrieve() simply downloads the entire HTML file located at urlstr to your local disk. It stores the downloaded data into localfile, if given, or a temporary file if not. If the file has already been copied from the Internet or if the file is local, no subsequent downloading will occur.
The downloadStatusHook, if provided, is a function that is called after each block of data has been downloaded and delivered. It is called with the following three arguments: number of blocks read so far, the block size in bytes, and the total (byte) size of the file. This is very useful if you are implementing download status information to the user in a text-based or graphical display.
urlretrieve() returns a 2-tuple (filename, mime_hdrs). filename is the name of the local file containing the downloaded data. mime_hdrs is the set of MIME headers returned by the responding Web server. For more information, see the Message class of the mimetools module. mime_hdrs is None for local files.
urllib.quote() and urllib.quote_plus()
The quote*() functions take URL data and encode it so that it is fit for inclusion as part of a URL string. In particular, certain special characters that are unprintable or cannot be part of valid URLs to a Web server must be converted. This is what the quote*() functions do for you. Both quote*() functions have the following syntax:
quote(urldata, safe='/')
Characters that are never converted include commas, underscores, periods, and dashes, as well as alphanumerics. All others are subject to conversion. In particular, the disallowed characters are changed to their hexadecimal ordinal equivalents, prepended with a percent sign (%), for example, %xx, where xx is the hexadecimal representation of a character’s ASCII value. When calling quote*(), the urldata string is converted to an equivalent string that can be part of a URL string. The safe string should contain a set of characters that should also not be converted. The default is the slash (/).
quote_plus() is similar to quote(), except that it also encodes spaces to plus signs (+). Here is an example using quote() versus quote_plus():
>>> name = 'joe mama'
>>> number = 6
>>> base = 'http://www/~foo/cgi-bin/s.py'
>>> final = '%s?name=%s&num=%d' % (base, name, number)
>>> final
'http://www/~foo/cgi-bin/s.py?name=joe mama&num=6'
>>>
>>> urllib.quote(final)
'http:%3a//www/%7efoo/cgi-bin/s.py%3fname%3djoe%20mama%26num%3d6'
>>>
>>> urllib.quote_plus(final)
'http%3a//www/%7efoo/cgi-bin/s.py%3fname%3djoe+mama%26num%3d6'
urllib.unquote() and urllib.unquote_plus()
As you have probably guessed, the unquote*() functions do the exact opposite of the quote*() functions—they convert all characters encoded in the %xx fashion to their ASCII equivalents. The syntax of unquote*() is as follows:
unquote*(urldata)
Calling unquote() will decode all URL-encoded characters in urldata and return the resulting string. unquote_plus() will also convert plus signs back to space characters.
urllib.urlencode()
urlencode() takes a dictionary of key-value pairs and encodes them to be included as part of a query in a CGI request URL string. The pairs are in key=value format and are delimited by ampersands (&). Furthermore, the keys and their values are sent to quote_plus() for proper encoding. Here is an example output from urlencode():
>>> aDict = { 'name': 'Georgina Garcia', 'hmdir': '~ggarcia' }
>>> urllib.urlencode(aDict)
'name=Georgina+Garcia&hmdir=%7eggarcia'
There are other functions in urllib and urlparse that we don’t have the opportunity to cover here. Refer to the documentation for more information.
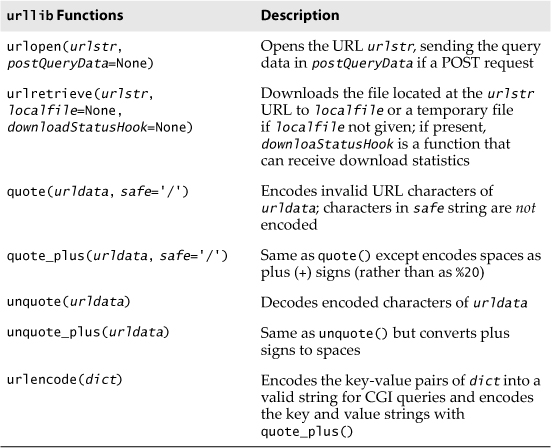
A summary of the urllib functions discussed in this section can be found in Table 9-5.
Table 9-5. Core urllib Module Functions
SSL Support
Before wrapping up our discussion on urllib and looking at some examples, we want to mention that it supports opening HTTP connections using the SSL. (The core change to add SSL is implemented in the socket module.) The httplib module supports URLs using the “https” connection scheme. In addition to those two modules, other protocol client modules with SSL support include: imaplib, poplib, and smtplib.
9.2.4. An Example of urllib2 HTTP Authentication
As mentioned in the previous subsection, urllib2 can handle more complex URL opening. One example is for Web sites with basic authentication (login and password) requirements. The most straightforward solution to getting past security is to use the extended net_loc URL component, as described earlier in this chapter, for example, http://username:passwd@ www.python.org. The problem with this solution is that it is not programmatic. Using urllib2, however, we can tackle this problem in two different ways.
We can create a basic authentication handler (urllib2.HTTPBasicAuth Handler) and register a login password given the base URL and realm, meaning a string defining the secure area of the Web site. Once you have a handler, you build an opener with it and install a URL-opener with it so that all URLs opened will use our handler.
The realm comes from the defined .htaccess file for the secure part of the Web site. One example of such a file appears here:
AuthType basic
AuthName "Secure Archive"
AuthUserFile /www/htdocs/.htpasswd
require valid-user
For this part of the Web site, the string listed for AuthName is the realm. The username and (encrypted) password are created by using the htpasswd command (and installed in the .htpasswd file). For more on realms and Web authentication, see RFC 2617 (HTTP Authentication: Basic and Digest Access Authentication) as well as the WikiPedia page at http://en.wikipedia.org/wiki/Basic_access_authentication.
The alternative to creating an opener with a authentication handler is to simulate a user typing the username and password when prompted by a browser; that is, to send an HTTP client request with the appropriate authorization headers. In Example 9-1, we demonstrate these two methods.
Example 9-1. Basic HTTP Authentication (urlopen_auth.py)
This script uses both techniques described earlier for basic HTTP authentication. You must use urllib2 because this functionality isn’t in urllib.
1 #!/usr/bin/env python
2
3 import urllib2
4
5 LOGIN = 'wesley'
6 PASSWD = "you'llNeverGuess"
7 URL = 'http://localhost'
8 REALM = 'Secure Archive'
9
10 def handler_version(url):
11 from urlparse import urlparse
12 hdlr = urllib2.HTTPBasicAuthHandler()
13 hdlr.add_password(REALM,
14 urlparse(url)[1], LOGIN, PASSWD)
15 opener = urllib2.build_opener(hdlr)
16 urllib2.install_opener(opener)
17 return url
18
19 def request_version(url):
20 from base64 import encodestring
21 req = urllib2.Request(url)
22 b64str = encodestring('%s:%s' % (LOGIN, PASSWD))[:-1]
23 req.add_header("Authorization", "Basic %s" % b64str)
24 return req
25
26 for funcType in ('handler', 'request'):
27 print '*** Using %s:' % funcType.upper()
28 url = eval('%s_version' % funcType)(URL)
29 f = urllib2.urlopen(url)
30 print f.readline()
31 f.close()
Line-by-Line Explanation
Lines 1–8
This is the usual, expected setup plus some constants for the rest of the script to use. We don’t need to remind you that sensitive information should come from a secure database, or at least from environment variables or pre-compiled .pyc files rather than being hardcoded in plain text in a source file.
Lines 10–17
The “handler” version of the code allocates a basic handler class as described earlier, and then adds the authentication information. The handler is then used to create a URL-opener that is subsequently installed so that all URLs opened will use the given authentication. This code was adapted from the official Python documentation for the urllib2 module.
Lines 19–24
The “request” version of our code just builds a Request object and adds the simple base64-encoded authentication header into our HTTP request. This request is then used to substitute the URL string when calling urlopen() upon returning back to “main.” Note that the original URL was “baked into” the urllib2.Request object, hence the reason why it was not a problem to replace it in the subsequent call to urllib2.urlopen(). This code was inspired by Michael Foord’s and Lee Harr’s recipes in the Python Cookbook, which you can obtain at:
http://aspn.activestate.com/ASPN/Cookbook/Python/Recipe/305288
http://aspn.activestate.com/ASPN/Cookbook/Python/Recipe/267197
It would have been great to have been able to use Harr’s HTTPRealm Finder class so that we do not need to hard-code it in our example.
Lines 26–31
The rest of this script just opens the given URL by using both techniques and displays the first line (dumping the others) of the resulting HTML page returned by the server once authentication has been validated. Note that an HTTP error (and no HTML) would be returned if the authentication information is invalid.
The output should look something like this:
$ python urlopen_auth.py
*** Using HANDLER:
<html>
*** Using REQUEST:
<html>
In addition to the official Python documentation for urllib2, you may find this companion piece useful:
http://www.voidspace.org.uk/python/articles/urllib2.shtml.
9.2.5. Porting the HTTP Authentication Example to Python 3
At the time of this writing, porting this application requires a bit more work than just using the 2to3 tool. Of course, it does the heavy lifting, but it does require a softer (or is that “software”?) touch afterwards. Let’s take our urlauth_open.py script and run the tool on it:
$ 2to3 -w urlopen_auth.py
. . .
You would use a similar command on PCs, but as you might have already seen from earlier chapters, the output shows the differences that were changed between the Python 2 and Python 3 versions of the script, and the original file is overridden with the Python 3 version, whereas the Python 2 version was backed up automatically.
Rename the new file from urlopen_auth.py urlopen_auth3.py and the backup from urlopen_auth.py.bak to urlopen_auth.py. On a POSIX system, execute these file rename commands (and on PCs, you would do it from Windows or use the ren DOS command):
$ mv urlopen_auth.py urlopen_auth3.py
$ mv urlopen_auth.py.bak urlopen_auth.py
This keeps with our naming strategy to help recognize our code that’s in Python 2 versus those ported to Python 3. Anyway, running the tool is just the beginning. If we’re optimistic that it will run the first time, our hopes are dashed quickly:
$ python3 urlopen_auth3.py
*** Using HANDLER:
b'<HTML>
'
*** Using REQUEST:
Traceback (most recent call last):
File "urlopen_auth3.py", line 28, in <module>
url = eval('%s_version' % funcType)(URL)
File "urlopen_auth3.py", line 22, in request_version
b64str = encodestring('%s:%s' % (LOGIN, PASSWD))[:-1]
File "/Library/Frameworks/Python.framework/Versions/3.2/lib/
python3.2/base64.py", line 353, in encodestring
return encodebytes(s)
File "/Library/Frameworks/Python.framework/Versions/3.2/lib/
python3.2/base64.py", line 341, in encodebytes
raise TypeError("expected bytes, not %s" % s.__class__.__name__)
TypeError: expected bytes, not str
Going with our gut instinct, change the string in line 22 to a bytes string by adding a leading “b” before the opening quote, as in b'%s:%s' % (LOGIN, PASSWD). Now if we run it again, we get another error—welcome to the Python 3 porting club!
$ python3 urlopen_auth3.py
*** Using HANDLER:
b'<HTML>
'
*** Using REQUEST:
Traceback (most recent call last):
File "urlopen_auth3.py", line 28, in <module>
url = eval('%s_version' % funcType)(URL)
File "urlopen_auth3.py", line 22, in request_version
b64str = encodestring(b'%s:%s' % (LOGIN, PASSWD))[:-1]
TypeError: unsupported operand type(s) for %: 'bytes' and 'tuple'
Apparently, bytes objects do not support the string format operator because, technically, you’re not supposed to use them as strings. Instead, we need to format the string as (Unicode) text, and then convert the whole thing into a bytes object: bytes('%s:%s' % (LOGIN, PASSWD), 'utf-8')). The output after this change is much closer to what we want:
$ python3 urlopen_auth3.py
*** Using HANDLER:
b'<HTML>
'
*** Using REQUEST:
b'<HTML>
'
It’s still slightly off because we’re seeing the designation of the bytes objects (leading “b”, quotes, etc.) instead of just the text in which we’re interested. Change the print() call to this: print(str(f.readline(), 'utf-8')). Now the output of the Python 3 version is identical to that of the Python 2 script:
$ python3 urlopen_auth3.py
*** Using HANDLER:
<html>
*** Using REQUEST:
<html>
As you can see, porting requires a bit of handholding, but it’s not impossible. Again, as we noted earlier, urllib, urllib2, and urlparse are all merged together under the urllib package umbrella in Python 3. Because of how the 2to3 tool works, an import of urllib.parse already exists at the top. It is thus is superfluous in the definition of handler_version() and removed. You’ll find that change along with the others in Example 9-2.
Example 9-2. Python 3 HTTP Authentication Script (urlopen_auth3.py)
This represents the Python 3 version to our urlopen_auth.py script.
1 #!/usr/bin/env python3
2
3 import urllib.request, urllib.error, urllib.parse
4
5 LOGIN = 'wesley'
6 PASSWD = "you'llNeverGuess"
7 URL = 'http://localhost'
8 REALM = 'Secure Archive'
9
10 def handler_version(url):
11 hdlr = urllib.request.HTTPBasicAuthHandler()
12 hdlr.add_password(REALM,
13 urllib.parse.urlparse(url)[1], LOGIN, PASSWD)
14 opener = urllib.request.build_opener(hdlr)
15 urllib.request.install_opener(opener)
16 return url
17
18 def request_version(url):
19 from base64 import encodestring
20 req = urllib.request.Request(url)
21 b64str = encodestring(
22 bytes('%s:%s' % (LOGIN, PASSWD), 'utf-8'))[:-1]
23 req.add_header("Authorization", "Basic %s" % b64str)
24 return req
25
26 for funcType in ('handler', 'request'):
27 print('*** Using %s:' % funcType.upper())
28 url = eval('%s_version' % funcType)(URL)
29 f = urllib.request.urlopen(url)
30 print(str(f.readline(), 'utf-8')
31 f.close()
Let’s now turn our attention to slightly more advanced Web clients.
9.3. Web Clients
Web browsers are basic Web clients. They are used primarily for searching and downloading documents from the Web. You can also create Web clients that do more than that, though. We’ll take a look at several in this section.
9.3.1. A Simple Web Crawler/Spider/Bot
One example of a slightly more complex Web client is a crawler (a.k.a. spider, [ro]bot). These are programs that explore and download pages from the Internet for a variety of reasons, some of which include:
• Indexing into a large search engine such as Google or Yahoo!
• Offline browsing—downloading documents onto a local hard disk and rearranging hyperlinks to create almost a mirror image for local browsing
• Downloading and storing for historical or archival purposes, or
• Web page caching to save superfluous downloading time on Web site revisits.
The crawler in Example 9-3, crawl.py, takes a starting Web address (URL), downloads that page and all other pages whose links appear in succeeding pages, but only those that are in the same domain as the starting page. Without such limitations, you will run out of disk space.
Example 9-3. Web Crawler (crawl.py)
The crawler consists of two classes: one to manage the entire crawling process (Crawler), and one to retrieve and parse each downloaded Web page (Retriever). (Refactored from earlier editions of this book.)
1 #!/usr/bin/env python
2
3 import cStringIO
4 import formatter
5 from htmllib import HTMLParser
6 import httplib
7 import os
8 import sys
9 import urllib
10 import urlparse
11
12 class Retriever(object):
13 __slots__ = ('url', 'file')
14 def __init__(self, url):
15 self.url, self.file = self.get_file(url)
16
17 def get_file(self, url, default='index.html'):
18 'Create usable local filename from URL'
19 parsed = urlparse.urlparse(url)
20 host = parsed.netloc.split('@')[-1].split(':')[0]
21 filepath = '%s%s' % (host, parsed.path)
22 if not os.path.splitext(parsed.path)[1]:
23 filepath = os.path.join(filepath, default)
24 linkdir = os.path.dirname(filepath)
25 if not os.path.isdir(linkdir):
26 if os.path.exists(linkdir):
27 os.unlink(linkdir)
28 os.makedirs(linkdir)
29 return url, filepath
30
31 def download(self):
32 'Download URL to specific named file'
33 try:
34 retval = urllib.urlretrieve(self.url, self.file)
35 except (IOError, httplib.InvalidURL) as e:
36 retval = (('*** ERROR: bad URL "%s": %s' % (
37 self.url, e)),)
38 return retval
39
40 def parse_links(self):
41 'Parse out the links found in downloaded HTML file'
42 f = open(self.file, 'r')
43 data = f.read()
44 f.close()
45 parser = HTMLParser(formatter.AbstractFormatter(
46 formatter.DumbWriter(cStringIO.StringIO())))
47 parser.feed(data)
48 parser.close()
49 return parser.anchorlist
50
51 class Crawler(object):
52 count = 0
53
54 def __init__(self, url):
55 self.q = [url]
56 self.seen = set()
57 parsed = urlparse.urlparse(url)
58 host = parsed.netloc.split('@')[-1].split(':')[0]
59 self.dom = '.'.join(host.split('.')[-2:])
60
61 def get_page(self, url, media=False):
62 'Download page & parse links, add to queue if nec'
63 r = Retriever(url)
64 fname = r.download()[0]
65 if fname[0] == '*':
66 print fname, '... skipping parse'
67 return
68 Crawler.count += 1
69 print '
(', Crawler.count, ')'
70 print 'URL:', url
71 print 'FILE:', fname
72 self.seen.add(url)
73 ftype = os.path.splitext(fname)[1]
74 if ftype not in ('.htm', '.html'):
75 return
76
77 for link in r.parse_links():
78 if link.startswith('mailto:'):
79 print '... discarded, mailto link'
80 continue
81 if not media:
82 ftype = os.path.splitext(link)[1]
83 if ftype in ('.mp3', '.mp4', '.m4v', '.wav'):
84 print '... discarded, media file'
85 continue
86 if not link.startswith('http://'):
87 link = urlparse.urljoin(url, link)
88 print '*', link,
89 if link not in self.seen:
90 if self.dom not in link:
91 print '... discarded, not in domain'
92 else:
93 if link not in self.q:
94 self.q.append(link)
95 print '... new, added to Q'
96 else:
97 print '... discarded, already in Q'
98 else:
99 print '... discarded, already processed'
100
101 def go(self, media=False):
102 'Process next page in queue (if any)'
103 while self.q:
104 url = self.q.pop()
105 self.get_page(url, media)
106
107 def main():
108 if len(sys.argv) > 1:
109 url = sys.argv[1]
110 else:
111 try:
112 url = raw_input('Enter starting URL: ')
113 except (KeyboardInterrupt, EOFError):
114 url = ''
115 if not url:
116 return
117 if not url.startswith('http://') and
118 not url.startswith('ftp://'):
119 url = 'http://%s/' % url
120 robot = Crawler(url)
121 robot.go()
122
123 if __name__ == '__main__':
124 main()
Line-by-Line (Class-by-Class) Explanation
Lines 1–10
The top part of the script consists of the standard Python Unix startup line and the import of the modules/packages to be used. Here are some brief explanations:
• cStringIO, formatter, htmllib We use various classes in these modules for parsing HTML.
• httplib We only need an exception from this module.
• os This provides various file system functions.
• sys We are just using argv for command-line arguments.
• urllib We only need the urlretrieve() function for downloading Web pages.
• urlparse We use the urlparse() and urljoin() functions for URL manipulation.
Lines 12–29
The Retriever class has the responsibility of downloading pages from the Web and parsing the links located within each document, adding them to the “to-do” queue, if necessary. A Retriever instance object is created for each page that is downloaded from the Internet. Retriever consists of several methods to aid in its functionality: a constructor (__init__()), get_file(), download(), and parse_links().
Skipping ahead momentarily, the get_file() method takes the given URL and comes up with a safe and sane corresponding filename to store the file locally—we are downloading this file from the Web. Basically, it works by removing the http:// prefix from the URL, getting rid of any extras such as username, password, and port number in order to arrive at the hostname (line 20).
URLs without trailing file extensions will be given the default filename index.html and can be overridden by the caller. You can see how this works as well as the final filepath created on lines 21–23.
We then pull out the final destination directory (line 24) and check if it is already a directory—if so, we leave it alone and return the URL-filepath pair. If we enter this if clause, this means the directory either doesn’t exist or is a plain file. In the case it is the latter, so it will be erased. Finally, the target directory and any parents are created by using os.makedirs() in line 28.
Now let’s go back up to the initializer __init__(). A Retriever object is created and stores both the URL (str) and the corresponding filename returned by get_file() as (instance) attributes. In our current design, instances are created for every file downloaded. In the case of a Web site with many, many files, a small instance like this can cause additional memory usage. To help minimize consumed resources, we create a __slots__ variable, indicating that the only attributes that instances can have are self.url and self.file.
Lines 31–49
We’ll see the crawler momentarily, but this is a heads-up that it creates Retriever objects for each downloaded file. The download() method, as you can imagine, actually goes out to the Internet to download the page with the given link (line 34). It calls urllib.urlretrieve() with the URL and saves it to the filename (the one returned by get_file()).
If the download was successful, the filename is returned (line 34), but if there’s an error, an error string prefixed with *** is returned instead (lines 35–36). The crawler checks this return value and calls parse_links() to parse links out of the just-downloaded page only if all went well.
The more serious method in this part of our application is the parse_links() method. Yes, the job of a crawler is to download Web pages, but a recursive crawler (like ours) looks for additional links in each downloaded page and processes them, too. It first opens up the downloaded Web page and extracts the entire HTML content as a single string (lines 42–44).
The magic you see in lines 45–49 is a well-known recipe that uses the htmllib.HTMLParser class. We would like to say something to the effect that this is a recipe that’s been passed down by Python programmers from generation to generation, but we would just be lying to you. Anyway, we digress.
The main point of how it works is that the parser class doesn’t do I/O, so it takes a formatter object to handle that. Formatter objects—Python only has one real formatter: formatter.AbstractFormatter—parse the data and use a writer object to dispatch its output. Similarly, Python only has one useful writer object: formatter.DumbWriter. It optionally takes a file object to which to write the output. If you omit it, it writes to standard output, which is probably undesirable. To that effect, we instantiate a cStringIO. StringIO object to absorb this output (think /dev/null, if you know what that is.) You can search online for any of the class names and find similar code snippets in many places along with additional commentary.
Because htmllib.HTMLParser is fairly long in the tooth and deprecated starting in version 2.6, a smaller example demonstrating some of the more contemporary tools comes in the next subsection. We leave it in this example because it is/was such a common recipe and still can be the right tool for this job.
Anyway, all the complexity in creating the parser is entirely contained in a single call (lines 45–46). The rest of this block consists of passing in the HTML, closing the parser, and then returning a list of parsed links/anchors.
Lines 51–59
The Crawler class is the star of the show, managing the entire crawling process for one Web site. If we added threading to our application, we would create separate instances for each site crawled. The Crawler consists of three items stored by the constructor during the instantiation phase, the first of which is self.q, a queue of links to download. Such a list will fluctuate during execution, shrinking as each page is processed and expanding as new links are discovered within each downloaded page.
The other two data values for the Crawler include self.seen, a set containing all the links that we have seen (downloaded) already. And finally, we store the domain name for the main link, self.dom, and use that value to determine whether any succeeding links are part of the same domain. All three values are created in the initializer method __init__() in lines 54–59.
Note that we parse the domain by using urlparse.urlparse() (line 58) in the same way that we grab the hostname out of the URL in the Retriever. The domain name comes by just taking the final two parts of the hostname. Note that because we don’t use the host for anything else, you can make your code harder to read by combining lines 58 and 59 like this:
self.dom = '.'.join(urlparse.urlparse(
url).netloc.split('@')[-1].split(':')[0].split('.')[-2:])
Right above __init__(), the Crawler also has a static data item named count. The purpose of this counter is just to keep track of the number of objects we have downloaded from the Internet. It is incremented for every successfully downloaded page.
Lines 61-105
Crawler has a pair of other methods in addition to its constructor: get_page() and go(). go() is simply the method that is used to start the Crawler. It is called from the main body of code. go() consists of a loop that will continue to execute as long as there are new links in the queue that need to be downloaded. The workhorse of this class, though, is the get_page() method.
get_page() instantiates a Retriever object with the first link and lets it go off to the races. If the page was downloaded successfully, the counter is incremented (otherwise, links that error-out are skipped [lines 65–67]) and the link added to the “already seen” set (line 72). We use a set because order doesn’t matter and its lookup is much faster than using a list.
get_page() looks at all the links featured inside each downloaded page (skipping all non-Web pages [lines 73–75]) and determines whether any more links should be added to the queue (lines 77–99). The main loop in go() will continue to process links until the queue is empty, at which time victory is declared (lines 103–105).
Links that are a part of another domain (lines 90–91), or have already been downloaded (lines 98–99), are already in the queue waiting to be processed (lines 96–97), or are mailto: links are ignored and not added to the queue (lines 78–80). The same applies for media files (lines 81–85).
Lines 107–124
main() needs a URL to begin processing. If one is entered on the command line (for example, when this script is invoked directly; lines 108–109), it will just go with the one given. Otherwise, the script enters interactive mode, prompting the user for a starting URL (line 112). With a starting link in hand, the Crawler is instantiated, and away we go (lines 120–121).
One sample invocation of crawl.py might look like this:
$ crawl.py
Enter starting URL: http://www.null.com/home/index.html
( 1 )
URL: http://www.null.com/home/index.html
FILE: www.null.com/home/index.html
* http://www.null.com/home/overview.html ... new, added to Q
* http://www.null.com/home/synopsis.html ... new, added to Q
* http://www.null.com/home/order.html ... new, added to Q
* mailto:[email protected] ... discarded, mailto link
* http://www.null.com/home/overview.html ... discarded, already in Q
* http://www.null.com/home/synopsis.html ... discarded, already in Q
* http://www.null.com/home/order.html ... discarded, already in Q
* mailto:[email protected] ... discarded, mailto link
* http://bogus.com/index.html ... discarded, not in domain
( 2 )
URL: http://www.null.com/home/order.html
FILE: www.null.com/home/order.html
* mailto:[email protected] ... discarded, mailto link
* http://www.null.com/home/index.html ... discarded, already processed
* http://www.null.com/home/synopsis.html ... discarded, already in Q
* http://www.null.com/home/overview.html ... discarded, already in Q
( 3 )
URL: http://www.null.com/home/synopsis.html
FILE: www.null.com/home/synopsis.html
* http://www.null.com/home/index.html ... discarded, already processed
* http://www.null.com/home/order.html ... discarded, already processed
* http://www.null.com/home/overview.html ... discarded, already in Q
( 4 )
URL: http://www.null.com/home/overview.html
FILE: www.null.com/home/overview.html
* http://www.null.com/home/synopsis.html ... discarded, already
processed
* http://www.null.com/home/index.html ... discarded, already processed
* http://www.null.com/home/synopsis.html ... discarded, already
processed
* http://www.null.com/home/order.html ... discarded, already processed
After execution, a www.null.com directory would be created in the local file system, with a home subdirectory. You will find all the processed files within home.
If after reviewing the code you’re still wondering where writing a crawler in Python can get you, you might be surprised to learn that the original Google Web crawlers were written in Python. For more information, see http://infolab.stanford.edu/~backrub/google.html.
9.3.2. Parsing Web Content
In the previous subsection, we took a look at a crawler Web client. Part of the spidering process involved parsing of links, or anchors as they’re officially called. For a long while, the well-known recipe htmllib.HTMLParser was employed for parsing Web pages; however, newer and improved modules and packages have come along. We’ll be demonstrating some of these in this subsection.
In Example 9-4, we explore one standard library tool, the HTMLParser class in the HTMLParser module (added in version 2.2). HTMLParser.HTMLParser was supposed to replace htmllib.HTMLParser because it was simpler, provided a lower-level view of the content, and handled XHTML, whereas the latter was older and more complex because it was based on the sgmllib module (meaning it had to understand the intricacies of Standard Generalized Markup Language [SGML]). The official documentation is fairly sparse when describing how to use HTMLParser.HTMLParser, so hopefully we’ll give a more useful example here.
We’ll also demonstrate the use of two of the other three most popular Web parsers, BeautifulSoup and html5lib, which are available as separate downloads outside of the standard library. You can access them both at the Cheeseshop, or from http://pypi.python.org. For a less stressful installation, you can also use the easy_install or pip tools to get either one.
The one we skipped was lxml; we’ll leave that as an exercise for you to undertake. You’ll find more exercises at the end of the chapter that will help you learn these more thoroughly by substituting them for htmllib. HTMLParser in the crawler.
The parse_links.py script in Example 9-4 only consists of parsing anchors out of any input data. Given a URL, it will extract all links, attempt to make any necessary adjustments to make them full URLs, sort, and display them to the user. It runs each URL through all three parsers. For BeautifulSoup in particular, we provide two different solutions: the first one is simpler, parsing all tags then looking for all the anchor tags; the second requires the use of the SoupStrainer class, which specifically targets anchor tags and only parses those.
Example 9-4. Link Parser (parse_links.py)
This script uses three different parsers to extract links from HTML anchor tags. It features the HTMLParser standard library module as well as the third-party BeautifulSoup and html5lib packages.
1 #!/usr/bin/env python
2
3 from HTMLParser import HTMLParser
4 from cStringIO import StringIO
5 from urllib2 import urlopen
6 from urlparse import urljoin
7
8 from BeautifulSoup import BeautifulSoup, SoupStrainer
9 from html5lib import parse, treebuilders
10
11 URLs = (
12 'http://python.org',
13 'http://google.com',
14 )
15
16 def output(x):
17 print '
'.join(sorted(set(x)))
18
19 def simpleBS(url, f):
20 'simpleBS() - use BeautifulSoup to parse all tags to get anchors'
21 output(urljoin(url, x['href']) for x in BeautifulSoup(
22 f).findAll('a'))
23
24 def fasterBS(url, f):
25 'fasterBS() - use BeautifulSoup to parse only anchor tags'
26 output(urljoin(url, x['href']) for x in BeautifulSoup(
27 f, parseOnlyThese=SoupStrainer('a')))
28
29 def htmlparser(url, f):
30 'htmlparser() - use HTMLParser to parse anchor tags'
31 class AnchorParser(HTMLParser):
32 def handle_starttag(self, tag, attrs):
33 if tag != 'a':
34 return
35 if not hasattr(self, 'data'):
36 self.data = []
37 for attr in attrs:
38 if attr[0] == 'href':
39 self.data.append(attr[1])
40 parser = AnchorParser()
41 parser.feed(f.read())
42 output(urljoin(url, x) for x in parser.data)
43
44 def html5libparse(url, f):
45 'html5libparse() - use html5lib to parse anchor tags'
46 output(urljoin(url, x.attributes['href'])
47 for x in parse(f) if isinstance(x,
48 treebuilders.simpletree.Element) and
49 x.name == 'a')
50
51 def process(url, data):
52 print '
*** simple BS'
53 simpleBS(url, data)
54 data.seek(0)
55 print '
*** faster BS'
56 fasterBS(url, data)
57 data.seek(0)
58 print '
*** HTMLParser'
59 htmlparser(url, data)
60 data.seek(0)
61 print '
*** HTML5lib'
62 html5libparse(url, data)
63
64 def main():
65 for url in URLs:
66 f = urlopen(url)
67 data = StringIO(f.read())
68 f.close()
69 process(url, data)
70
71 if __name__ == '__main__':
72 main()
Line-by-Line Explanation
Lines 1–9
In this script, we use four modules from the standard library. HTMLParser is one of the parsers; the other three are for general use throughout. The second group of imports are of third-party (non-standard library) modules/packages. This ordering is the generally accepted standard for imports: standard library modules/packages first, followed by third-party installations, and finally, any modules/packages local to the application.
Lines 11–17
The URLs variable contains the Web pages to parse; feel free to add, change, or remove URLs here. The output() function takes an iterable of links, removes duplicates by putting them all into a set, sorts them in lexicographic order, and then merges them into a NEWLINE-delimited string that is displayed to the user.
Lines 19–27
We highlight the use of BeautifulSoup in the simpleBS() and fasterBS() functions. In simpleBS(), the parsing happens when you instantiate BeautifulSoup with the file handle. In the following short snippet, we do exactly that, using an already downloaded page from the PyCon Web site as pycon.html.
>>> from BeautifulSoup import BeautifulSoup as BS
>>> f = open('pycon.html')
>>> bs = BS(f)
When you get the instance and call its findAll() method requesting anchor (‘a’) tags, it returns a list of tags, as shown here:
>>> type(bs)
<class 'BeautifulSoup.BeautifulSoup'>
>>> tags = bs.findAll('a')
>>> type(tags)
<type 'list'>
>>> len(tags)
19
>>> tag = tags[0]
>>> tag
<a href="/2011/">PyCon 2011 Atlanta</a>
>>> type(tag)
<class 'BeautifulSoup.Tag'>
>>> tag['href']
u'/2011/'
Because the Tag object is an anchor, it should have an 'href' tag, so we ask for it. We then call urlparse.urljoin() and pass along the head URL along with the link to get the full URL. Here’s our continuing example (assuming the PyCon URL):
>>> from urlparse import urljoin
>>> url = 'http://us.pycon.org'
>>> urljoin(url, tag['href'])
u'http://us.pycon.org/2011/'
The generator expression iterates over all the final links created by urlparse.urljoin() from all of the anchor tags and sends them to output(), which processes them as just described. If the code is slightly more difficult to understand because of the use of the generator expression, we can expand out the code to the equivalent:
def simpleBS(url, f):
parsed = BeautifulSoup(f)
tags = parsed.findAll('a')
links = [urljoin(url, tag['href']) for tag in tags]
output(links)
For readability purposes, this wins over our single line version, and we would recommend that when developing open-source, work, or group collaborative projects, you always consider this over a more cryptic one-liner.
Although the simpleBS() function is fairly easy to understand, one of its drawbacks is that the way we’re processing it isn’t as efficient as it can be. We use BeautifulSoup to parse all the tags in this document and then look for the anchors. It would be quicker if we could just filter only the anchor tags (and ignore the rest).
This is what fasterBS() does, accomplishing what we just described by using the SoupStrainer helper class (and passing that request to filter only anchor tags as the parseOnlyThese parameter). By using SoupStrainer, you can tell BeautifulSoup to skip all the elements it isn’t interested in when building the parse tree, so it saves time as well as memory. Also, once parsing has completed, only the anchors make up the parse tree, so there’s no need to use the findAll() method before iterating.
Lines 29–42
In htmlparser(), we use the standard library class HTMLParser.HTMLParser to do the parsing. You can see why BeautifulSoup is a popular parser; code is shorter and less complex than using HTMLParser. Our use of HTMLParser is also slower here because you have to manually build a list, that is, create an empty list and repeatedly call its append() method.
You can also tell that HTMLParser is lower level than BeautifulSoup. You subclass it and have to create a method called handle_starttag() that’s called every time a new tag is encountered in the file stream (lines 31–39). We skip all non-anchor tags (lines 33–34), and then add all anchor links to self.data (lines 37–39), initializing self.data when necessary (lines 35–36).
To use your new parser, you instantiate and feed it (lines 40–41). The results, as you know, are placed into parser.data, and we create the full URLs and display them (line 42) as in our previous BeautifulSoup example.
Lines 44–49
The final example uses html5lib, a parser for HTML documents that follow the HTML5 specification. The simplest way of using html5lib is to call its parse() function with the payload (line 47). It builds and outputs a tree in its custom simpletree format.
You can also choose to use any of a variety of popular tree formats, including minidom, ElementTree, lxml, or BeautifulSoup. To choose an alternative tree format, just pass the name of the desired format in to parse() as the treebuilder argument:
import html5lib
f = open("pycon.html")
tree = html5lib.parse(f, treebuilder="lxml")
f.close()
Unless you need a specific tree, usually simpletree is good enough. If you were to perform a trial run and parse a generic document, you’d see output looking something like this:
>>> import html5lib
>>> f = open("pycon.html")
>>> tree = html5lib.parse(f)
>>> f.close()
>>> for x in data:
... print x, type(x)
...
<html> <class 'html5lib.treebuilders.simpletree.DocumentType'>
<html> <class 'html5lib.treebuilders.simpletree.Element'>
<head> <class 'html5lib.treebuilders.simpletree.Element'>
<None> <class 'html5lib.treebuilders.simpletree.TextNode'>
<meta> <class 'html5lib.treebuilders.simpletree.Element'>
<None> <class 'html5lib.treebuilders.simpletree.TextNode'>
<title> <class 'html5lib.treebuilders.simpletree.Element'>
<None> <class 'html5lib.treebuilders.simpletree.TextNode'>
<None> <class 'html5lib.treebuilders.simpletree.CommentNode'>
. . .
<img> <class 'html5lib.treebuilders.simpletree.Element'>
<None> <class 'html5lib.treebuilders.simpletree.TextNode'>
<h1> <class 'html5lib.treebuilders.simpletree.Element'>
<a> <class 'html5lib.treebuilders.simpletree.Element'>
<None> <class 'html5lib.treebuilders.simpletree.TextNode'>
<h2> <class 'html5lib.treebuilders.simpletree.Element'>
<None> <class 'html5lib.treebuilders.simpletree.TextNode'>
. . .
Most of the traversed items are either Element or TextNode objects. We don’t really care about TextNode objects in our example here; we’re only concerned with one specific type of Element object, the anchor. To filter these out, we have two checks in the if clause of the generator expression: only look at Elements, and of those, only anchors (lines 47–49). For those that meet this criteria, we pull out their 'href' attribute, merge into a complete URL, and output that as before (line 46).
Lines 51–72
The drivers of this application are the main() function, which process each of links found on lines 11–14. It makes one call to download the Web page and immediately sticks the data into a StringIO object (lines 65–68) so that we can iterate over them using each of the parsers (line 69) via a call to process().
The process() function (lines 51–62) takes the target URL and the StringIO object, and then calls on each parser to perform its duty and output its result. With every successive parse (after the first), process() must also reset the StringIO object back to the beginning (lines 54, 57, and 60) for the next parser.
Once you’re satisfied with the code and have it working, you can run it and see how each parser outputs all links (sorted in alphabetical order) found in anchor tags within the Web page’s URL. Note that at the time of this writing, there is a preliminary port of BeautifulSoup to Python 3 but not html5lib.
9.3.3. Programmatic Web Browsing
In this final section on Web clients, we’ll present a slightly different example that uses a third-party tool, Mechanize (based on a similarly-named tool written for Perl), which is designed to simulate a browser. It also spawned off a Ruby version.
In the previous example (parse_links.py), BeautifulSoup was one of the parsers we used to decipher Web page content. We’ll use that again here.
If you wish to play along, you’ll need to have both Mechanize and BeautifulSoup installed on your system. Again, you can obtain and install them separately, or you can use a tool like easy_install or pip.
Example 9-5 presents the mech.py script, which is very much of a script or batch-style application. There are no classes or functions. The whole thing is just one large main() broken up into seven parts, each of which explores one page of the Web site we’re examining today: the PyCon conference Web site from 2011. We chose this because the site is not likely to change over time (more recent conferences will get their own customized application).
If it does change, however, there are many Web sites to which you can adapt this example, such as logging in to any Web-based e-mail service you subscribe to or some tech news or blog site you frequent. By going over mech.py and what it does, you should have a good enough understanding of how it works to easily port the sample code to work elsewhere.
Example 9-5. Programmatic Web Browsing (mech.py)
In a very batch-like, straightforward script, we employ the Mechanize third-party tool to explore the PyCon 2011 Web site, parsing it with another non-standard tool, BeautifulSoup.
1 #!/usr/bin/env python
2
3 from BeautifulSoup import BeautifulSoup, SoupStrainer
4 from mechanize import Browser
5
6 br = Browser()
7
8 # home page
9 rsp = br.open('http://us.pycon.org/2011/home/')
10 print '
***', rsp.geturl()
11 print "Confirm home page has 'Log in' link; click it"
12 page = rsp.read()
13 assert 'Log in' in page, 'Log in not in page'
14 rsp = br.follow_link(text_regex='Log in')
15
16 # login page
17 print '
***', rsp.geturl()
18 print 'Confirm at least a login form; submit invalid creds'
19 assert len(list(br.forms())) > 1, 'no forms on this page'
20 br.select_form(nr=0)
21 br.form['username'] = 'xxx' # wrong login
22 br.form['password'] = 'xxx' # wrong passwd
23 rsp = br.submit()
24
25 # login page, with error
26 print '
***', rsp.geturl()
27 print 'Error due to invalid creds; resubmit w/valid creds'
28 assert rsp.geturl() == 'http://us.pycon.org/2011/account/login/',
rsp.geturl()
29 page = rsp.read()
30 err = str(BS(page).find("div",
31 {"id": "errorMsg"}).find('ul').find('li').string)
32 assert err == 'The username and/or password you specified are not cor-
rect.', err
33 br.select_form(nr=0)
34 br.form['username'] = YOUR_LOGIN
35 br.form['password'] = YOUR_PASSWD
36 rsp = br.submit()
37
38 # login successful, home page redirect
39 print '
***', rsp.geturl()
40 print 'Logged in properly on home page; click Account link'
41 assert rsp.geturl() == 'http://us.pycon.org/2011/home/',
rsp.geturl()
42 page = rsp.read()
43 assert 'Logout' in page, 'Logout not in page'
44 rsp = br.follow_link(text_regex='Account')
45
46 # account page
47 print '
***', rsp.geturl()
48 print 'Email address parseable on Account page; go back'
49 assert rsp.geturl() == 'http://us.pycon.org/2011/account/email/',
rsp.geturl()
50 page = rsp.read()
51 assert 'Email Addresses' in page, 'Missing email addresses'
52 print ' Primary e-mail: %r' % str(
53 BS(page).find('table').find('tr').find('td').find('b').string)
54 rsp = br.back()
55
56 # back to home page
57 print '
***', rsp.geturl()
58 print 'Back works, on home page again; click Logout link'
59 assert rsp.geturl() == 'http://us.pycon.org/2011/home/', rsp.geturl()
60 rsp = br.follow_link(url_regex='logout')
61
62 # logout page
63 print '
***', rsp.geturl()
64 print 'Confirm on Logout page and Log in link at the top'
65 assert rsp.geturl() == 'http://us.pycon.org/2011/account/logout/',
rsp.geturl()
66 page = rsp.read()
67 assert 'Log in' in page, 'Log in not in page'
68 print '
*** DONE'
Line-by-Line Explanation
Lines 1–6
This script is fairly simplistic. In fact, we don’t use any standard library packages/modules, so all you see here are the imports of the Mechanize.Browser and BeautifulSoup.BeautifulSoup classes.
Lines 8–14
The first place we visit on the PyCon 2011 Web site is the home page. We display the URL to the user as a confirmation (line 10). Note that this is the final URL that is visited because the original link might have redirected the user elsewhere. The last part of this section (lines 12–14) confirms that the user is not logged in by looking for the 'Log in' link and following it.
Lines 16–23
Once we’ve confirmed that we’re on a login page (that has at least one form on it), we select the first (and only) form, fill in the authentication fields with erroneous data (unless, unfortunately, your login and password are both 'xxx'), and submit it.
Lines 25–36
Upon confirmation of a login error on the login page (lines 28–32), we fill in the fields with the correct credentials (which the reader must supply [YOUR_LOGIN, YOUR_PASSWD]) and resubmit.
Lines 38–44
Once authentication has been validated, you are directed back to the home page. This is confirmed (on lines 41–43) by checking for a “Logout” link (which wouldn’t be there if you had not successfully logged in). We then click the Account link.
Lines 46–54
You must register by using an e-mail address. You can have more than one, but there must be a single primary address. Your e-mail addresses are the first tab that you arrive at when visiting this page for your Account information. We use BeautifulSoup to parse and display the e-mail address table and peek into the first cell of the first row of the table (lines 52–53). The next step is to click the “click on the back button” to return to the home page.
Lines 56–60
This is the shortest of all the sections; we really don’t do much here except confirm that we’re back on the home page (lines 59), then follow the “Logout” link.
Lines 62–68
The last section confirms we’re on the logout page and that you’re not logged in. This is accomplished by checking to see if there’s a “Log in” link on this page (lines 66–67).
This application demonstrates that, using Mechanize.Browser is fairly straightforward. You just need to mentally map user activity in a browser to the right method calls. Ultimately, the primary concern is whether the underlying Web page or application will be altered by its developers, potentially rendering our script out-of-date. Note that at the time of this writing, there is no Python 3 port of Mechanize yet.
Summary
This concludes our look at various types of Web clients. We can now turn our attention to Web servers.
9.4. Web (HTTP) Servers
Until now, we have been discussing the use of Python in creating Web clients and performing tasks to aid Web servers in request processing. We know (and saw earlier in this chapter) that Python can be used to create both simple and complex Web clients.
However, we have yet to explore the creation of Web servers, and that is the focus of this section. If Google Chrome, Mozilla Firefox, Microsoft Internet Explorer, and Opera are among the most popular Web clients, then what are the most common Web servers? They are Apache, ligHTTPD, Microsoft IIS, LiteSpeed Technologies LiteSpeed, and ACME Laboratories thttpd. For situations in which these servers might be overkill for your desired application, Python can be used to create simple yet useful Web servers.
Note that although these servers are simplistic and not meant for production, they can be very useful in providing development servers for your users. Both the Django and Google App Engine development servers are based on the BaseHTTPServer module described in the next section.
9.4.1. Simple Web Servers in Python
The base code needed is already available in the Python standard library—you just need to customize it for your needs. To create a Web server, a base server and a handler are required.
The base Web server is a boilerplate item—a must-have. Its role is to perform the necessary HTTP communication between client and server. The base server class is (appropriately) named HTTPServer and is found in the BaseHTTPServer module.
The handler is the piece of software that does the majority of the Web serving. It processes the client request and returns the appropriate file, whether static or dynamically generated. The complexity of the handler determines the complexity of your Web server. The Python Standard Library provides three different handlers.
The most basic, plain, vanilla handler, BaseHTTPRequestHandler, is found in the BaseHTTPServer module, along with the base Web server. Other than taking a client request, no other handling is implemented at all, so you have to do it all yourself, such as in our myhttpd.py server coming up.
The SimpleHTTPRequestHandler, available in the SimpleHTTP-Server module, builds on BaseHTTPRequestHandler by implementing the standard GET and HEAD requests in a fairly straightforward manner. Still nothing sexy, but it gets the simple jobs done.
Finally, we have the CGIHTTPRequestHandler, available in the CGIHTTPServer module, which takes the SimpleHTTPRequestHandler and adds support for POST requests. It has the ability to call common gateway interface (CGI) scripts to perform the requested processing and can send the generated HTML back to the client. In this chapter, we’re only going to explore a CGI-processing server; the next chapter will describe to you why CGI is no longer the way the world of the Web works, but you still need to know the concepts.
To simplify the user experience, consistency, and code maintenance, these modules (actually their classes) have been combined into a single module named server.py and installed as part of the http package in Python 3. (Similarly, the Python 2 httplib [HTTP client] module has been renamed to http.client in Python 3.) The three modules, their classes, and the Python 3 http.server umbrella package are summarized in Table 9-6.
Table 9-6. Web Server Modules and Classes

Implementing a Simple Base Web server
To be able to understand how the more advanced handlers found in the SimpleHTTPServer and CGIHTTPServer modules work, we will implement simple GET processing for a BaseHTTPRequestHandler. In Example 9-6, we present the code for a fully working Web server, myhttpd.py.
Example 9-6. Simple Web Server (myhttpd.py)
This simple Web server can read GET requests, fetch a Web page (.html file), and return it to the calling client. It uses the BaseHTTPRequestHandler found in BaseHTTPServer and implements the do_GET() method to enable processing of GET requests.
1 #!/usr/bin/env python
2
3 from BaseHTTPServer import
4 BaseHTTPRequestHandler, HTTPServer
5
6 class MyHandler(BaseHTTPRequestHandler):
7 def do_GET(self):
8 try:
9 f = open(self.path[1:], 'r')
10 self.send_response(200)
11 self.send_header('Content-type', 'text/html')
12 self.end_headers()
13 self.wfile.write(f.read())
14 f.close()
15 except IOError:
16 self.send_error(404,
17 'File Not Found: %s' % self.path)
18
19 def main():
20 try:
21 server = HTTPServer(('', 80), MyHandler)
22 print 'Welcome to the machine...',
23 print 'Press ^C once or twice to quit.'
24 server.serve_forever()
25 except KeyboardInterrupt:
26 print '^C received, shutting down server'
27 server.socket.close()
28
29 if __name__ == '__main__':
30 main()
This server derives from BaseHTTPRequestHandler and consists of a single do_GET() method (lines 6–7), which is called when the base server receives a GET request. We attempt to open the path (removing the leading ‘/’) passed in by the client (line 9), and if all goes well, return an “OK” status (200) and forward the downloaded Web page to the user (line 13) via the wfile pipe. If the file was not found, it returns a 404 status (lines 15–17).
The main() function simply instantiates our Web server class and invokes it to run our familiar infinite server loop, shutting it down if interrupted by Ctrl+C or similar keystroke. If you have appropriate access and can run this server, you will notice that it displays loggable output, which will look something like this:
# myhttpd.py
Welcome to the machine... Press ^C once or twice to quit
localhost - - [26/Aug/2000 03:01:35] "GET /index.html HTTP/1.0" 200 -
localhost - - [26/Aug/2000 03:01:29] code 404, message File Not Found:
x.html
localhost - - [26/Aug/2000 03:01:29] "GET /dummy.html HTTP/1.0" 404 -
localhost - - [26/Aug/2000 03:02:03] "GET /hotlist.htm HTTP/1.0" 200 -
Of course, our simple little Web server is so simple, it cannot even process plain text files. We leave that as an exercise for you to undertake (see Exercise 9-10 at the end of this chapter).
More Power, Less Code: A Simple CGI Web Server
The previous example is also weak in that it cannot process CGI requests. BaseHTTPServer is as basic as it gets. One step higher, we have the SimpleHTTPServer. It provides the do_HEAD() and do_GET() methods on your behalf, so you don’t have to create either, such as we did with the BaseHTTPServer.
The highest-level (take that with a grain of salt) server provided in the standard library is CGIHTTPServer. In addition to do_HEAD() and do_GET(), it defines do_POST(), with which you can process form data. Because of these amenities, a CGI-capable development server can be created with just two real lines of code (so short we’re not even bothering making it a code example in this chapter, because you can just recreate it by typing it up on your computer now):
#!/usr/bin/env python
import CGIHTTPServer
CGIHTTPServer.test()
Note that we left off the check to quit the server by using Ctrl+C and other fancy output, taking whatever the CGIHTTPServer.test() function gives us, which is a lot. You start the server by just invoking it from your shell. Below is an example of running this code on a PC—it’s quite similar to what you’ll experience on a POSIX machine:
C:py>python cgihttpd.py
Serving HTTP on 0.0.0.0 port 8000 ...
It starts a server by default on port 8000 (but you can change that at runtime by providing a port number as a command-line argument:
C:py>python cgihttpd.py 8080
Serving HTTP on 0.0.0.0 port 8080 ...
To test it out, just make sure that a cgi-bin folder exists (with some CGI Python scripts) at the same level as the script. There’s no point in setting up Apache, setting CGI handler prefixes, and all that extra stuff when you just want to test a simple script. We’ll show you how to write CGI scripts in Chapter 10, “Web Programming: CGI and WSGI,” as well as tell you why you should avoid doing so.
As you can see, it doesn’t take much to have a Web server up and running in pure Python. Again, you shouldn’t be writing servers all the time. Generally you’re creating Web applications that run on Web servers. These server modules are meant only to create servers that are useful during development, regardless of whether you develop applications or Web frameworks.
In production, your live service will instead be using servers that are production-worthy such as Apache, ligHTTPD, or any of the others listed at the beginning of this section. However, we hope this section will have enlightened you such that you realize doing complex tasks can be simplified with the power that Python gives you.
9.5. Related Modules
In Table 9-7, we present a list of modules, some of which are covered in this chapter (and others not), that you might find useful for Web development.
Table 9-7. Web Programming Related Modules
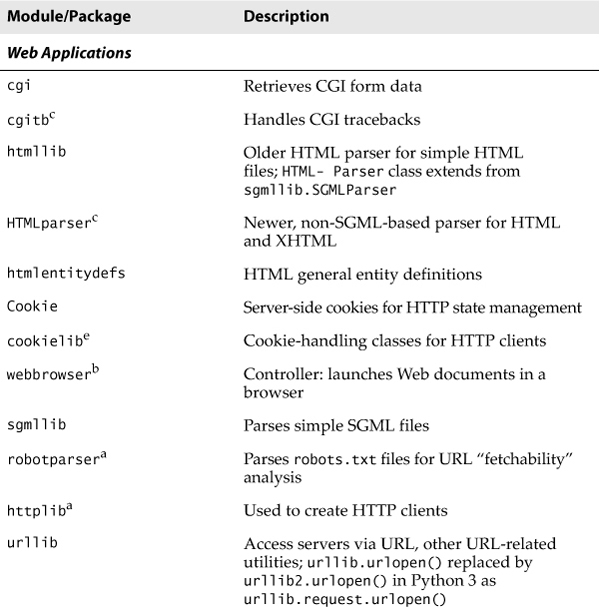
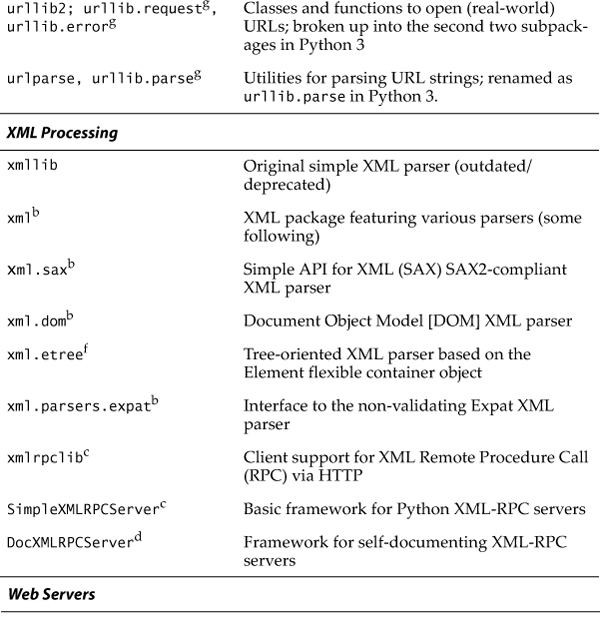
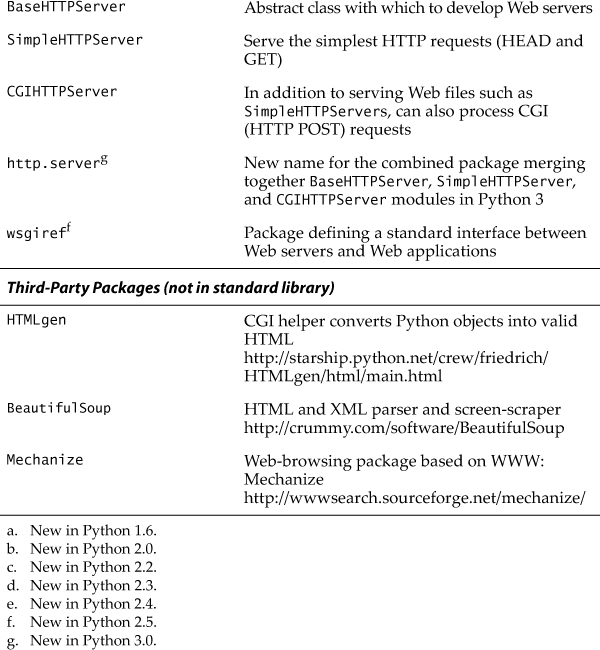
9.6. Exercises
9-1. urllib Module. Write a program that takes a user-input URL (either a Web page or an FTP file such as http://python.org or ftp://ftp.python.org/pub/python/README), and downloads it to your computer with the same filename (or modified name similar to the original if it is invalid on your system). Web pages (HTTP) should be saved as .htm or .html files, and FTP’d files should retain their extension.
9-2. urllib Module. Rewrite the grabWeb.py script of Example 11-4 of Core Python Programming or Core Python Language Fundamentals, which downloads a Web page and displays the first and last non-blank lines of the resulting HTML file so that you use urlopen() instead of urlretrieve() to process the data directly (as opposed to downloading the entire file first before processing it).
9-3. URLs and Regular Expressions. Your browser can save your favorite Web site URLs as a bookmarks HTML file (Mozilla-flavored browsers do this) or as a set of .url files in a “favorites” directory (Internet Explorer does this). Find your browser’s method of recording your “hot links” and the location of where and how they are stored. Without altering any of the files, strip the URLs and names of the corresponding Web sites (if given) and produce a two-column list of names and links as output, and then store this data into a disk file. Truncate site names or URLs to keep each line of output within 80 characters in length.
9-4. URLs, urllib Module, Exceptions, and Regular Expressions. As a follow-up problem to Exercise 9-3, add code to your script to test each of your favorite links. Report back a list of dead links (and their names) such as Web sites that are no longer active or a Web page that has been removed. Only output and save to disk the still-valid links.
Exercises 9-5 to 9-8 below pertain to Web server access log files and regular expressions. Web servers (and their administrators) generally have to maintain an access log file (usually logs/access_log from the main Web, server directory) which tracks requests. Over a period of time, such files become large and either need to be stored or truncated. Why not save only the pertinent information and delete the files to conserve disk space? The exercises below are designed to give you some exercise with regular expressions and how they can be used to help archive and analyze Web server data.
9-5. Count how many of each type of request (GET versus POST) exist in the log file.
9-6. Count the successful page/data downloads. Display all links that resulted in a return code of 200 (OK [no error]) and how many times each link was accessed.
9-7. Count the errors: Show all links that resulted in errors (return codes in the 400s or 500s) and how many times each link was accessed.
9-8. Track IP addresses: for each IP address, output a list of each page/data downloaded and how many times that link was accessed.
9-9. Web Browser Cookies and Web Site Registration. The user login registration database you worked on in various chapters (7, 9, 13) of Core Python Programming or Core Python Language Fundamentals had you creating a pure text-based, menu-driven script. Port it to the Web so that your user-password information should now be site authentication system.
Extra Credit: Familiarize yourself with setting Web browser cookies and maintain a login session for four hours from the last successful login.
9-10. Creating Web Servers. Our code for myhttpd.py (Example 9-6) is only able to read HTML files and return them to the calling client. Add support for plain text files with the .txt ending. Be sure that you return the correct MIME type of “text/plain.”
Extra Credit: Add support for JPEG files ending with either .jpg or .jpeg and having a MIME type of “image/jpeg.”
Exercises 9-11 through 9-14 require you to update Example 9-3, crawl.py, the Web crawler.
9-11. Web Clients. Port crawl.py so that it uses either HTMLParser, BeautifulSoup, html5lib, or lxml parsing systems.
9-12. Web Clients. URLs given as input to crawl.py must have the leading “http://” protocol indicator and top-level URLs must contain a trailing slash, for example, http://www.prenhallprofessional.com/. Make crawl.py more robust by allowing the user to input just the hostname (without the protocol part [make it assume HTTP]) and also make the trailing slash optional. For example, www.prenhallprofessional.com should now be acceptable input.
9-13. Web Clients. Update the crawl.py script to also download links that use the ftp: scheme. All mailto: links are ignored by crawl.py. Add support to ensure that it also ignores telnet:, news:, gopher:, and about: links.
9-14. Web Clients. The crawl.py script only downloads .html files via links found in Web pages at the same site and does not handle/save images that are also valid “files” for those pages. It also does not handle servers that are susceptible to URLs that are missing the trailing slash (/). Add a pair of classes to crawl.py to deal with these problems.
A My404UrlOpener class should subclass urllib.Fancy URLOpener and consist of a single method, http_error_404() which determines if a 404 error was reached because of a URL without a trailing slash. If so, it adds the slash and retries the request again (and only once). If it still fails, return a real 404 error. You must set urllib._urlopener with an instance of this class so that urllib uses it.
Create another class called LinkImageParser, which derives from htmllib.HTMLParser. This class should contain a constructor to call the base class constructor as well as initialize a list for the image files parsed from Web pages. The handle_ image() method should be overridden to add image filenames to the image list (instead of discarding them like the current base class method does).
The final set of exercises pertain to the parse_links.py file, shown earlier in this chapter as Example 9-4.
9-15. Command-line Arguments. Add command-line arguments to let the user see output from one or more parsers (instead of just all of them [which could be the default]).
9-16. lxml Parser. Download and install lxml, and then add support for lxml to parse_links.py.
9-17. Markup Parsers. Subsitute each parser into the crawler replacing htmllib.HTMLParser.
a. HTMLParser.HTMLParser
c. BeaufifulSoup
d. lxml
9-18. Refactoring. Change the output() function to be able to support other forms of output.
a. Writing to a file
b. Sending to another process (i.e., writing to a socket)
9-19. Pythonic Coding. In the Line-by-Line Explanation of parse_links.py, we expanded simpleBS() from a less-readable one-liner to a block of properly formatted Python code. Do the same thing with fasterBS() and html5libparse().
9-20. Performance and Profiling. Earlier, we described how fasterBS() performs better than simpleBS(). Use timeit to show it runs faster, and then find a Python memory tool online to show it saves memory. Describe what the memory profiler tool is and where you found it. Do any of the three standard library profilers (profile, hotshot, cProfile) show memory usage information?
9-21. Best Practices. In htmlparser(), suppose that we didn’t like the thought of having to create a blank list and having to call its append() method repeatedly to build the list; instead, you wanted to use a list comprehension to replace lines 35–39 with the following single line of code:
self.data = [v for k, v in attrs if k == 'href']
Is this a valid substitution? In other words, could we make this change and still have it all execute correctly? Why (or why not)?
9-22. Data Manipulation. In parse_links.py, we sort the URLs alphabetically (actually lexicographically). However, this might not be the best way to organize links:
http://roundup.sourceforge.net/
http://sourceforge.net/projects/mysql-python
http://twistedmatrix.com/trac/
http://wiki.python.org/moin/CgiScripts
Instead, a sort by domain name might make more sense:
http://wiki.python.org/moin/CgiScripts
http://roundup.sourceforge.net/
http://sourceforge.net/projects/mysql-python
http://twistedmatrix.com/trac/
Give your script the ability to sort by domain in addition to the alpha/lexicographic sort.