Chapter 11. Web Frameworks: Django
Python: the only language with more Web frameworks than keywords.
—Harald Armin Massa, December 2005
In this chapter...
• Your “Hello World” Application (A Blog)
• Creating a Model to Add Database Service
• The Python Application Shell
• The Django Administration App
• Creating the Blog’s User Interface
• *An Intermediate Django App: The TweetApprover
11.1. Introduction
In this chapter, we’ll go outside the Python Standard Library and explore one popular Web framework for Python: Django. We’ll first go over Web frameworks in general, and then expose you to developing applications by using Django. This discussion starts with the basics and a “Hello World” application then takes you beyond that with other areas that you’ll likely come across when developing a real application. This roadmap essentially defines the structure of this chapter: a solid introduction followed by an intermediate application involving Twitter, e-mail, and OAuth, which is an open protocol for authorization to gain access to data via application programming interfaces (APIs).
The goal is to introduce you to a real tool that Python developers use every day to get their jobs done. We’ll give you the skills and provide enough knowledge for you to build more complex applications via Django. You can also take these skills and jump to any of the other Python Web frameworks. To get started, let’s define the topic.
11.2. Web Frameworks
We hope that you gained a greater understanding of Web development from the material presented in Chapter 10, “Web Programming: CGI and WSGI.” Rather than doing everything by hand, you can take advantage of the significant body of work done by others to make your life easier. These Web development environments are generically called Web frameworks, and their goal is to help you to perform your job by pushing common tasks “under the hood” and/or providing resources for you to create, update, execute, and scale applications with a minimal amount of work.
Also, we explained earlier, using CGI is no longer an option, due to scalability limitations. So, people in the Python community look to more powerful Web server solutions such as Apache, ligHTTPD (pronounced as “lighty”), or nginx. Some servers, such as Pylons and CherryPy, have their own framework ecosystem around them. However, serving content is only one aspect of creating Web applications. You still need to worry about ancillary tools such as a JavaScript framework, an object-relational mapper (ORM) or lower-level database adapter, a web templating system, and orthogonal but necessary for any type of development: a unit-testing and/or continuous integration framework. Python Web frameworks are either individual (or multiple) subcomponents or complete full-stack systems.
The term full-stack means that you can develop code for all phases and levels of a Web application. Frameworks that are considered as such will provide all related services, such as a Web server, database ORM, templating, and all necessary middleware hooks. Some even provide a JavaScript library. Django is arguably one of the most well-known Web frameworks on the market today; many consider it as Python’s answer to Ruby on Rails. It includes all of the services mentioned above as a single, all-in-one solution (except for a built-in JavaScript library, because you can use whichever one you like). We’ll see in Chapter 12, “Cloud Computing: Google App Engine,” that Google App Engine also provides many of these components but is geared more specifically for scalability and fast request/response Web and non-Web applications hosted by the Internet giant.
Although Django was created as a single entity by one engineering team, not all frameworks follow in this philosophy. TurboGears, for example, is a best-of-breed full-stack system, built by a scattered team of developers, serving as glue code that ties together well-known individual components in the stack, such as ToscaWidgets (high-level Web widgets that can utilize a variety of JavaScript frameworks, such as Ex1tJS, jQuery, etc.), SQLAlchemy (ORM), Pylons (Web server), and Genshi (templating). Frameworks that follow this architectural style provide greater flexibility in that users can choose from a variety of templating systems, JS libraries, tools to generate raw SQL, and multiple Web servers. You only need to sacrifice a bit of consistency and any peace of mind that comes with using only one tool. However, that might not be that different from what you’re used to.
Pyramid is also very popular and is the successor to both repoze.bfg (or “BFG” for short) and the Pylons Web frameworks. Its approach is even simpler: it only provides with you the basics, such as URL dispatch, templating, security, and resources. If you need anything else, you must add those capabilities yourself. Its minimalistic approach along with its strong sense of testing and documentation, plus its inheritance of users from both the Pylons and BFG communities, make it a strong contender in today’s set of Web frameworks available for Python.
If you’re new to Python, you might be coming from Rails or perhaps PHP, which has significantly expanded from its original intention as an HTML-embedded scripting language to its own large monolithic universe. One benefit you gain from Python is that you’re not locked to a “single language, single framework” type of scenario. There are many frameworks out there from which to choose; hence, the quote at the beginning of this chapter. Web framework popularity was accelerated by the creation of the web server gateway interface (WSGI) standard, defined by PEP 333 at http://python.org/dev/peps/pep-0333.
If you don’t already know about WSGI, it’s not really code or an API as much as it is an interface definition that frees the Web framework developer from having to create a custom Web server for the framework, which in turn frees application developers from having to use that server when perhaps they would prefer something else. With WSGI, it’s easy for application developers to swap between WSGI-compliant servers (or develop new ones) without worrying about being forced to change application code. For more on WSGI, take a look back at Chapter 10.
I don’t know if it’s a good thing to say this (especially in print), but when passionate Python developers become dissatisfied with the choices out there, they’ll just come up with a new framework. After all, there are more Web frameworks than keywords in Python, right? Other frameworks you’ll undoubtedly hear about at some point will include web2py, web.py, Tornado, Diesel, and Zope. One good resource is the wiki page on the Python Web site at http://wiki.python.org/moin/WebFrameworks.
Okay, enough idle chatter, let’s engage our Web development knowledge and take a look at Django.
11.3. Introduction to Django
Django bills itself as “the Web framework for perfectionists with deadlines.” It originated in the early 2000s, created by Web developers at the online presence of the Lawrence Journal-World newspaper, which introduced it to the world in 2005 as a way of “developing code with journalism deadlines.” We’ll put ourselves on a deadline and see how fast we can produce a very simple blog by using Django, and later do the same with Google App Engine. (You’ll have to work on your perfectionist side on your own.) Although we’re going to blast through this example, we’ll still give you enough in the way of explanation so that you know what’s going on. However, if you would like to explore a full treatment of this exact example, you’ll find it in Chapter 2 of Python Web Development with Django (Addison-Wesley, 2009), written by my esteemed colleagues, Jeff Forcier (lead developer of Fabric) and Paul Bissex (creator of dpaste), plus yours truly.
![]() Core Tip: Python 3 availability forthcoming
Core Tip: Python 3 availability forthcoming
At the time of this writing, Django is not available for Python 3, so all of the examples in this chapter are Python 2.x only. However, because the Python 3 port currently passes all tests (at the time of this writing), a release will be forthcoming once the documentation is ready. When this occurs, look for Python 3 versions of the code from this chapter on the book’s Web site. I strongly believe that Python 3 adoption will definitely experience a significant uptick once large frameworks like Django, along with other infrastructure libraries such as database adapters, become available on that next generation platform.
11.3.1. Installation
Before jumping into Django development, we first need to install the necessary components, which include installation of the prerequisites followed by Django itself.
Prerequisites
Before you install Django, Python must already be installed. Because you’re more than knee-deep in a Python book, we’re going to assume that’s already been taken care of. Also, most POSIX-compliant (Mac OS X, Linux, *BSD) operating systems already come with Python installed. Microsoft Windows users are typically the only ones that need to download and install Python.
Apache is the king of Web servers, so this is what most deployments use. The Django team recommends the mod_wsgi Apache module and provides simple instructions at http://docs.djangoproject.com/en/dev/topics/install/#install-apache-and-mod-wsgi as well as a more comprehensive document at http://docs.djangoproject.com/en/dev/howto/deployment/modwsgi/. Another great document for more complex installations—those that host multiple Django Web sites (projects) using only one instance of Apache—can be found at http://forum.webfaction.com/viewtopic.php?id=3646. If you’re wondering about mod_python, it’s mostly found in older installations or part of operating system distributions before mod_wsgi became the standard. Support for mod_python is now officially deprecated (and in fact removed in Django 1.5).
As we close our discussion of Web servers,1 it’s good to remind you that you don’t need to use Apache for your production server. As just mentioned there are other options, as well, with many of them lighter in memory footprint and faster; perhaps one of those might be a better fit for your application. You can find out more about some of the possible Web server arrangements at http://code.djangoproject.com/wiki/ServerArrangements.
Django does require a database. The standard version of Django (currently) only runs on SQL-based relational database management systems (RDBMSs). The four main databases employed by users are PostgreSQL, MySQL, Oracle, and SQLite. By far, the easiest to set up is SQLite. Furthermore, SQLite is the only one of the four that does not require running a database server, so it’s also the simplest. Of course, that doesn’t make it a toy; it performs admirably against its more well-known brethren.
Why is it easy to set up? The SQLite database adapter comes bundled in all versions of Python, starting with version 2.5. Be aware that we’re only talking about the adapter here. Some distributions come bundled with SQLite, others link to the system-installed SQLite, and everyone else will need to download and install it manually.
SQLite is just one RDBMS supported by Django, so don’t feel you’re stuck with that, especially if your company is already using one of the server-based databases. You can read more about Django and database installation at http://docs.djangoproject.com/en/dev/topics/install/#database-installation.
We have also seen a recent rapid proliferation of non-relational (NoSQL) databases. Presumably this is due to the additional scalability offered by such systems in the face of an ever-increasing amount of data. If you’re talking about the volume of data on the scale of Facebook, Twitter, or similar services, a relational database usually requires manual partitioning, also known as sharding. If you wish to develop for NoSQL databases such as MongoDB or Google App Engine’s native datastore, try Django-nonrel so that users have the option of using either relational or non-relational databases, as opposed to just one type. (As an FYI, Google App Engine also has a relational [MySQL-compatible] database option, Google Cloud SQL.)
You can download Django-nonrel from http://www.allbuttonspressed.com/projects/django-nonrel followed by one of the adapters, https://github.com/FlaPer87/django-mongodb-engine (Django with MongoDB), or http://www.allbuttonspressed.com/projects/djangoappengine (Django on Google App Engine’s datastore). Because Django-nonrel is (at the time of this writing) a fork of Django, you can just install it instead of a stock Django package. The main reason for doing that is because you want to use the same version for both development and production. As stated at http://www.allbuttonspressed.com/projects/django-nonrel, “the modifications to Django are minimal (maybe less than 100 lines).” Django-nonrel is available as a Zip file, so you would just unzip it, go into the folder, and issue the following command:
$ sudo python setup.py install
These are the same instructions as if you went to download the stock Django tarball (see below), so you can completely skip the next subsection (Installing Django) to the start of the tutorial.
Installing Django
There are several ways of installing Django on your system, which are listed here in increasing order of effort and/or complexity:
• Python package manager
• Operating system package manager
• Standard release tarball
• Source code repository
The simplest download and installation process takes advantage of Python package management tools like easy_install from Setuptools (http://packages.python.org/distribute/easy_install.html) or pip (http://pip.openplans.org), both of which are available for all platforms. For Windows users with Setuptools, the easy_install.exe file should be installed in the Scripts folder in which your Python distribution is located. You only need to issue a single command; this is the command you would use from a DOS Command window:
C:WINDOWSsystem32>easy_install django
Searching for django
Reading http://pypi.python.org/simple/django/
Reading http://www.djangoproject.com/
Best match: Django 1.2.7
Downloading http://media.djangoproject.com/releases/1.2/Django-
1.2.7.tar.gz
Processing Django-1.2.7.tar.gz
. . .
Adding django 1.2.7 to easy-install.pth file
Installing django-admin.py script to c:python27Scripts
Installed c:python27libsite-packagesdjango-1.2.7-py2.7.egg
Processing dependencies for django
Finished processing dependencies for django
To avoid having to type in the full path of easy_install.exe, we recommend that you add C:Python2xScripts to your PATH environment variable,2 depending on which Python 2.x you have installed. If you’re on a POSIX system, easy_install will be installed in a well-known path such as /usr/bin or /usr/local/bin, so you don’t have to worry about adding a new directory to your PATH, but you will probably need to use the sudo command to install it the typical system directories such as /usr/local. Your command will look something like
$ sudo easy_install django
or, like this:
$ sudo pip install django
Using sudo is only necessary if you’re installing in a location for which superuser access is required; if installing in user-land then it isn’t necessary. We also encourage you to consider “container” environments such as virtualenv. Using virtualenv gives you the ability to have multiple installations with multiple versions of Python and/or Django, different databases, etc. Each environment runs in its own container and can be created, managed, executed, and destroyed at your convenience. You can find out more about virtualenv at http://pypi.python.org/pypi/virtualenv.
Another way to install Django is by using your operating system’s package manager, if your system has one. These are generally confined to POSIX computers (Linux and Mac OS X). You’ll issue a command similar to the following:
For Linux, COMMAND is your distribution’s package manager, for example, apt-get, yum, aptitude, etc. You can find instructions for installing from distributions at http://docs.djangoproject.com/en/dev/misc/distributions.
In addition to the methods just described, you can simply download and install the original release tarball from the Django Web site. Once you unzip it, you can run the usual installation command:
$ sudo python setup.py install
You can find more specific instructions at http://docs.djangoproject.com/en/dev/topics/install/#installing-an-official-release
Hardcore developers might prefer to get the latest from the Subversion source tree itself. You can find the instructions at http://docs.djangoproject.com/en/dev/topics/install/#installing-the-development-version
Finally, here are the overall installation instructions:
http://docs.djangoproject.com/en/dev/topics/install/#install-the-django-code
The next step is to bring up a server and confirm that everything installed properly and is working correctly. But first, let’s talk about some basic Django concepts: projects and apps.
11.4. Projects and Apps
What are projects and apps in Django? Simply put, you can consider a project as the set of all files necessary to create and run an entire Web site. Within a project folder are a set of one or more subdirectories that have specific functionality; these are called apps, although apps don’t necessarily need to be inside the project folder. Apps can be specific to the project, or they can be reusable components that you can take from project to project. Apps are the individual subcomponents of functionality, the sum of which form an entire Web experience. You can have apps that solicit and manage user/reader feedback, update real-time information, process feed data, aggregate data from other sites, etc.
One of the more well-known set of reusable Django apps can be found in a platform called Pinax. Such apps include (but are not limited to) authentication (OpenID support, password management, etc.), messaging (e-mail verification, notifications, user-to-user contact, interest groups, threaded discussions, etc.), and more stand-alone features, such as project management, blogging, tagging, and contact import. You can read more about Pinax at http://pinaxproject.com.
The concept of projects and apps makes this type of plug-n-play functionality feasible and gives the added bonus of strongly encouraging agile design and code reuse. Okay, now that you know what projects and apps are, let’s create a project!
11.4.1. Creating a Project in Django
Django comes with a utility called django-admin.py that can streamline tasks such as the creation of the aforementioned project directories. On POSIX platforms, it will usually be installed into directories such as /usr/local/bin, /usr/bin, etc.; if you’re on a Windows-based computer, it goes into the Scripts folder, which is directly in your Python installation folder, e.g., C:Python27Scripts. For either POSIX computers or Windows computers, you should make sure that django-admin.py is in your PATH environment variable so that it can be executed from the command-line (unless you like calling interpreters by using full pathnames).
For Windows computers, you will likely have to manually add c:python27 and c:python27scripts to your system PATH variable for everything to work well (or whatever directory you installed Python in). You do this by opening the Control Panel and then clicking System, or you can right-click My Computer, and then choose Properties. From here, select the Advanced tab, and then click the Environment Variables button. You can choose to edit the PATH entry either for a single user (the top listbox) or for all users (the bottom listbox), and then add ;c:python27;c: python27scripts after any text in the Variable value textbox. Some of what you see appears in Figure 11-1.
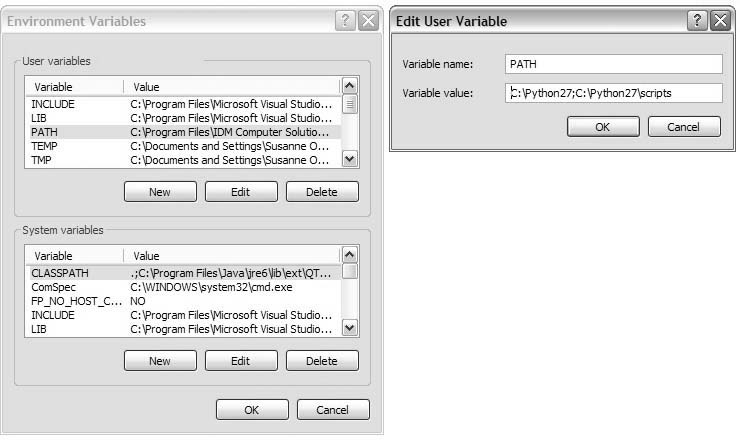
Figure 11-1. Adding Python to the Windows PATH variable.
Once your PATH is set (on either type of platform), you should be able to run python and get an interactive interpreter and Django’s djangoadmin.py command to see its usage. You can test this by opening up a Unix shell or DOS Command window and issuing those command names. Once you’ve confirmed that everything is working, we can proceed.
The next step is to go to a directory or folder in which you want to place your code. To create the project in the current working directory, issue the following command (we’ll use a generic project name such as mysite, but you can call it anything you wish):
$ django-admin.py startproject mysite
Note that if you’re on a Windows PC, you’ll first need to open a DOS Command window first. Of course, your prompt will look more like C:WINDOWSsystem32> as a (shell) prompt instead of the POSIX dollar sign ($) or percent symbol (%) for the old-timers.
Now let’s take a look at the contents of the directory to see what this command has created for you. It should look something like the following on a POSIX computer:
$ cd mysite
$ ls -l
total 32
-rw-r--r-- 1 wesley admin 0 Dec 7 17:13 __init__.py
-rw-r--r-- 1 wesley admin 546 Dec 7 17:13 manage.py
-rw-r--r-- 1 wesley admin 4778 Dec 7 17:13 settings.py
-rw-r--r-- 1 wesley admin 482 Dec 7 17:13 urls.py
If you are developing in Windows, opening an Explorer window to that folder will appear similar to Figure 11-2, if we had earlier created a folder named C:pydjango with the intention of putting our project there.

Figure 11-2. The mysite folder on a Windows-based PC.
In Django, a barebones project consists of the four files, __init__.py, manage.py, settings.py, and urls.py (you will add your applications later). Table 11-1 explains the purpose of each file.
Table 11-1. Django Project Files

You’ll notice that every file created by the startproject command is Python source code—there are no .ini files, XML data, or funky configuration syntax. Django pursues a “pure Python” philosophy wherever possible. This gives you a lot of flexibility without adding complexity to the framework as well as the ability to have your settings file import additional settings from some other file, based on the current configuration, or calculate a value instead of having it hardcoded. There is no barrier, it’s just Python. We’re sure you’ve also figured out that django-admin.py is a Python script, too. It serves as a command-line interface between you and your project. You’ll use manage.py in similar way to manage your apps. (Both commands have a Help option with which you can get more information on how to use each.)
11.4.2. Running the Development Server
At this point, you haven’t created an app yet, but nonetheless, there are some Django conveniences in place for your use. One of the handiest is Django’s built-in Web server. It’s a server designed for the development phase that runs on your local computer. Note that we strongly recommend against using it for deploying public sites because it is not a production-worthy server.
Why does the development server exist? Here are some of the reasons:
1. You can use it to run your project (and apps) without requiring a full production environment just to test some code.
2. It automatically detects when you make changes to your Python source files and reloads those modules. This saves time and is convenient over systems that require you to manually restart every time you edit your code.
3. The development server knows how to find and display static media files for the Django Administration (or “admin”) application so that you can get started working with that right away. (You will meet the admin soon. For now, just don’t get it confused with the django-admin.py script.)
Running the development server is as simple as issuing the following single command from your project’s manage.py utility:
If you’re using a POSIX system and assign your script execute permission, that is, $ chmod 755 manage.py, you won’t need to explicitly call python, for example, $ ./manage.py runserver. The same is true in a DOS Command window, if Python is correctly installed in your Windows registry.
Once the server has started, you should see output similar to that in the following example (Windows uses a different quit key combination):
Validating models...
0 errors found.
Django version 1.2, using settings 'mysite.settings'
Development server is running at http://127.0.0.1:8000/
Quit the server with CONTROL-C.
Open that link (http://127.0.0.1:8000/ or http://localhost:8000/) in your browser, and you should see Django’s “It Worked!” screen, as shown in Figure 11-3.

Figure 11-3. Django’s initial “It worked!” screen.
Note that if you want to run your server on a different port, you can specify that on the command-line. For example, if you want to run it on port 8080, instead, issue this command: $ python ./manage.py runserver 8080. You can find all of the runserver options at http://docs.djangoproject.com/en/dev/ref/django-admin/#django-admin-runserver.
If you’re seeing the “It worked!” screen in Figure 11-3, then everything is in great shape. Meanwhile, if you look in your terminal session, you’ll see that the development server has logged your GET request:
[11/Dec/2010 14:15:51] "GET / HTTP/1.1" 200 2051
The four sections of the log line are, from left to right, the timestamp, request, HTTP response code, and byte count (yours might be slightly different). The “It Worked!” page is Django’s friendly way of telling you that the development server is working, and that you can create applications now. If your server isn’t working at this point, retrace your steps. Be ruthless! It’s probably easier to delete your entire project and start from scratch than it is to debug at this point.
When the server is running successfully, we can move on to setting up your first Django application.
11.5. Your “Hello World” Application (A Blog)
Now that we have a project, we can create apps within it. To create our blog application, use manage.py again:
$ ./manage.py startapp blog
As with your project, you can call your application blog as we did or anything else that you prefer. It’s just as simple as starting a project. Now we have a blog directory inside our project directory. Here’s what’s in it, first in POSIX format, then in a screenshot of the folder in Windows (Figure 11-4):
$ ls -l blog
total 24
-rw-r--r-- 1 wesley admin 0 Dec 8 18:08 __init__.py
-rw-r--r-- 1 wesley admin 175 Dec 10 18:30 models.py
-rw-r--r-- 1 wesley admin 514 Dec 8 18:08 tests.py
-rw-r--r-- 1 wesley admin 26 Dec 8 18:08 views.py

Figure 11-4. The blog folder on a Windows-based PC.
Descriptions of the app-level files are given in Table 11-2.

As with your project, your app is a Python package, too, but in this case, the models.py and views.py files have no real code in them (yet); they’re merely placeholders for you to put your stuff into. The unit tests that go into tests.py haven’t been written yet and are waiting for your input there, as well. Similarly, even though you can use your project’s URLconf to direct all the traffic, one for a local app isn’t automatically created for you. You’ll need to do it yourself, and then use the include() directive from the project’s URLconf to have requests routed to an app’s URLconf.
To inform Django that this new app is part of your project, you need to edit settings.py (which we can also refer to as your settings file). Open it in your editor and find the INSTALLED_APPS tuple near the bottom. Add your app name (blog) as a member of that tuple (usually toward the bottom), so that it looks like this:
INSTALLED_APPS = (
. . .
'blog',
)
Although it isn’t necessary, we add a trailing comma so that if we want to add more to this tuple, we wouldn’t then need to add it. Django uses INSTALLED_APPS to determine the configuration of various parts of the system, including the automatic administration application and the testing framework.
11.6. Creating a Model to Add Database Service
We’ve now arrived at the core of your Django-based blog application: the models.py file. This is where we’ll define the data structures of the blog. Following the principle of Don’t Repeat Yourself (DRY), Django gets a lot of mileage out of the model information you provide for your application. Let’s create a basic model and then see all the stuff Django does for us using that information.
The data model represents the type of data that will be stored per record in the database. Django provides a variety of fields to help you map your data into your app. We’ll use three different field types in our app (see the code sample that follows).
Open models.py in your editor and add the following model class directly after the import statement already present in the file:
# models.py
from django.db import models
class BlogPost(models.Model):
title = models.CharField(max_length=150)
body = models.TextField()
timestamp = models.DateTimeField()
That’s a complete model, representing a “blog post” object with three fields. (To be accurate, it has four fields—Django automatically creates an auto-incrementing, unique ID field for each model, by default). You can see that our newly minted class, BlogPost, is a subclass of django.db.models. Model. That’s Django’s standard base class for data models, which is the core of Django’s powerful ORM. The fields are defined like regular class attributes, with each one being an instance of a particular field class, where an instance of the composite is equivalent to a single database record.
For our app, we chose the CharField for the blog post title, limiting the field to a maximum length. A CharField is appropriate for short, single lines of text. For larger chunks of text, such as the body of blog post, we picked the TextField type. Finally, the timestamp is a DateTimeField. A DateTimeField is represented by a Python datetime.datetime object.
Those field classes are also defined in django.db.models, and there are many more types than the three we’re using here, from BooleanField to XMLField. For a comprehensive list of all that are available, read the official documentation at http://docs.djangoproject.com/en/dev/ref/models/fields/#field-types.
11.6.1. Setting Up the Database
If you don’t have a database server installed and running, we recommend SQLite as the easiest way to get going. It’s fast, widely available, and stores its database as a single file in the file system. Access controls are simply file permissions. If you do have a database server—MySQL, PostgreSQL, Oracle—and want to use it rather than SQLite, then use your database’s administration tools to create a new database for your Django project. In the examples here, our database is called mysite.db, but you can call it whatever you like.
Using MySQL
With your (empty) database in place, all that remains is to instruct Django on how to use it. This is where your project’s settings.py file comes in (again). There are six potentially relevant settings here (though you might need only two): ENGINE, NAME, HOST, PORT, USER, and PASSWORD. Their names render their respective purposes pretty obvious. Just plug in the correct values corresponding to the database server you’ll be using with Django. For example, settings for MySQL will look something like the following:
DATABASES = {
'default': {
'ENGINE': 'django.db.backends.mysql',
'NAME': 'testdb',
'USER': 'wesley',
'PASSWORD': 's3Cr3T',
'HOST': '',
'PORT': '',
}
}
Note that if you’re using an older version of Django, then instead of everything being in a single dictionary, you’ll find these as stand-alone, module-level variables.)
We haven’t specified PORT because that’s only needed if your database server is running on a non-standard port. For example, MySQL’s server uses port 3306 by default. Unless you’ve changed the setup, you don’t need to specify PORT. HOST was left blank to indicate that the database server is running on the current computer that runs our application. Be sure that you’ve already executed CREATE DATABASE testdb or whatever you named your database and that the user (and its password) already exist before you continue with Django. Using PostgreSQL is more like the setup to MySQL than is Oracle.
For details on setting up new databases, users, and your settings, see the Django documentation at http://docs.djangoproject.com/en/dev/intro/tutorial01/#database-setup and http://docs.djangoproject.com/en/dev/ref/settings/#std:setting-DATABASES as well as Appendix B of Python Web Development with Django, if you have the book.
Using SQLite
SQLite is a popular choice for testing. It’s even a good candidate for deployment in scenarios for which there isn’t a great deal of simultaneous writing going on. No host, port, user, or password information is needed because SQLite uses the local file system for storage and the native file system permissions for access control—you can also choose a pure in-memory database. This is why our DATABASES configuration in settings.py shown in the following code only has ENGINE and NAME when directing Django to use your SQLite database.
DATABASES = {
'default': {
'ENGINE': 'django.db.backends.sqlite3',
'NAME': '/tmp/mysite.db', # use full pathname to avoid confusion
}
}
When using SQLite with a real Web server like Apache, you’ll need to ensure that the account that owns the Web server process has write access both for the database file itself and the directory containing that database file. When working with the development server as we are here, permissions are typically not an issue because the user running the development server (you) also owns the project files and directories.
SQLite is also one of the most popular choices on Windows-based PCs because it comes included with the Python distribution (starting with version 2.5). Given that we have already created a C:pydjango folder with our project (and application), let’s create a db directory, as well, and specify the name of the database file that will be created later:
DATABASES = {
'default': {
'ENGINE': 'django.db.backends.sqlite3',
'NAME': r'C:pydjangodbmysite.db', # full pathname
}
}
If you’ve been working with Python for some time, you’re probably aware that the r before the folder name designates this is a Python raw string. This just means to take each string character verbatim and to not translate special characters, meaning that “
” should be interpreted as a backslash () followed by the letter “n” instead of a single NEWLINE character. DOS file pathnames and regular expressions are two of the most common use cases for Python raw strings because they often include the backslash character, which in Python is a special escape character. See the section on strings in the Sequences chapter of Core Python Programming or Core Python Language Fundamentals for more details.
11.6.2. Creating the Tables
Now we need to instruct Django to use the connection information you’ve given it to connect to the database and set up the tables that your application needs. You’ll use manage.py and its syncdb command, as demonstrated in the following sample execution:
$ ./manage.py syncdb
Creating tables ...
Creating table auth_permission
Creating table auth_group_permissions
Creating table auth_group
Creating table auth_user_user_permissions
Creating table auth_user_groups
Creating table auth_user
Creating table auth_message
Creating table django_content_type
Creating table django_session
Creating table django_site
Creating table blog_blogpost
When you issue the syncdb command, Django looks for a models.py file in each of your INSTALLED_APPS. For each model it finds, it creates a database table. (There are exceptions to this rule but it’s true for the most part.) If you are using SQLite, you will also notice that the mysite.db database file is created exactly where you specified in your settings.
The other items in INSTALLED_APPS—the items that were there by default—all have models, too. The output from manage.py syncdb confirms this; you can see Django is creating one or more tables for each of those apps. That’s not all the output from the syncdb command, though. There are also some interactive queries related to the django.contrib.auth app (see the following example). We recommend you create a superuser, because we’ll need one soon. Here’s how this process works from the tail end of the syncdb command:
You just installed Django's auth system, which means you don't have
any superusers defined.
Would you like to create one now? (yes/no): yes
Username (Leave blank to use 'wesley'):
E-mail address: ****@****.com
Password:
Password (again):
Superuser created successfully.
Installing custom SQL ...
Installing indexes ...
No fixtures found.
Now you have one superuser (hopefully yourself) in the auth system. This will come in handy in a moment, when we add in Django’s automatic admin application.
Finally, the setup process wraps up with a line relating to a feature called fixtures, which represent serialized, pre-existing contents of a database. You can use fixtures to pre-load this type of data in any newly created applications. Your initial database setup is now complete. The next time you run the syncdb command on this project (which you’ll do any time you add an application or model), you’ll see a bit less output, because it doesn’t need to set up any of those tables a second time or prompt you to create a superuser.
At this point we’ve completed the data model portion of our app. It’s ready to accept user input; however, we don’t have any way of doing this, yet. If you subscribe to the model-view controller (MVC) pattern of Web application design, you’ll recognize that only the model is done. There is no view (user-facing HTML, templating, etc.) or controller (application logic) yet.
The Django community uses an alternate representation of the MVC pattern. In Django, it’s called model-template-view or MTV. The data model remains the same, but the view is known as the template in Django because templates are used to define what the users see. Finally, the “view” in Django represents view functions, the sum of which form all of the logic of the controller. It’s all the same, but just a different interpretation of the roles. To read more about Django’s philosophy with regard to this matter, check out the FAQ answer at http://docs.djangoproject.com/en/dev/faq/general/#django-appears-to-be-amvc-framework-but-you-call-the-controller-the-view-and-the-view-the-template-how-come-you-don-t-use-the-standard-names.
11.7. The Python Application Shell
Python programmers know how useful the interactive interpreter is. The creators of Django know this as well, and have integrated it to aid in everyday Django development. In these subsections, we’ll explore how to use the Python shell to perform low-level data introspection and manipulation when such things are not so easily accomplished with Web application development.
11.7.1. Using the Python Shell in Django
Even without the template (view) or view (controller), we can still test out our data model by adding some BlogPost entries. If your app is backed by an RDBMS, as most Django apps are, you would be adding rows to a table per blog entry. If you end up using a NoSQL database such as MongoDB or Google App Engine’s datastore, you would be adding objects, documents, or entities into the database, instead.
How do we do this? Django provides a Python application shell that you can use to instantiate your models and otherwise interact with your app. Python users will recognize the familiar interactive interpreter startup and prompt when using the shell command of the manage.py script:
$ python2.5 ./manage.py shell
Python 2.5.1 (r251:54863, Feb 9 2009, 18:49:36)
[GCC 4.0.1 (Apple Inc. build 5465)] on darwin
Type "help", "copyright", "credits" or "license" for more information.
(InteractiveConsole)
>>>
The difference between this Django shell and the standard Python interactive interpreter is that in addition to the latter, the shell is much more aware of your Django project’s environment. You can interact with your view functions and your data models because the shell automatically sets up environment variables, including your sys.path, that give it access to the modules and packages in both Django and your project that you would otherwise need to manually configure. In addition to the standard shell, there are a couple of alternative interactive interpreters that you can consider, some of which we cover in Chapter 1 of Core Python Programming or Core Python Language Fundamentals.
Rich shells such as IPython and bpython are actually preferred by Django because they provide extremely useful functionality on top of the vanilla interpreter. When you run the shell command, Django searches first for a rich shell, employing the first one it finds or reverting to the standard interpreter if none are available.
In the previous example, we used a Python 2.5 interpreter without a rich shell; hence, the reason the standard interpreter came up. Now when we execute manage.py shell, in which one (IPython) is available, it comes up, instead:
$ ./manage.py shell
Python 2.7.1 (r271:86882M, Nov 30 2010, 09:39:13)
[GCC 4.0.1 (Apple Inc. build 5494)] on darwin
Type "copyright", "credits" or "license" for more information.
IPython 0.10.1 -- An enhanced Interactive Python.
? -> Introduction and overview of IPython's features.
%quickref -> Quick reference.
help -> Python's own help system.
object? -> Details about 'object'. ?object also works, ?? prints
more.
In [1]:
You can also use the --plain option to force a vanilla interpreter:
$ ./manage.py shell --plain
Python 2.7.1 (r271:86882M, Nov 30 2010, 09:39:13)
[GCC 4.0.1 (Apple Inc. build 5494)] on darwin
Type "help", "copyright", "credits" or "license" for more information.
(InteractiveConsole)
>>>
Note that having a rich shell or not has nothing to do with the version of Python you have installed, as in the preceding example; it just so happens I have IPython available only for the version 2.7 installation on my computer but not for version 2.5.
If you want to install a rich shell, just use easy_install or pip, as explained earlier when we described the different methods for installing Django. Here’s what it looks like for Windows PC users to install IPython on their system:
C:WINDOWSsystem32>python27Scriptseasy_install ipython
Searching for ipython
Reading http://pypi.python.org/simple/ipython/
Reading http://ipython.scipy.org
Reading http://ipython.scipy.org/dist/0.10
Reading http://ipython.scipy.org/dist/0.9.1
. . .
Installing ipengine-script.py script to c:python27Scripts
Installing ipengine.exe script to c:python27Scripts
Installed c:python27libsite-packagesipython-0.10.1-py2.7.egg
Processing dependencies for ipython
Finished processing dependencies for ipython
11.7.2. Experimenting with Our Data Model
Now that we know how to start a Python shell, let’s play around with our application and its data model by starting IPython and giving a few Python or IPython commands:
In [1]: from datetime import datetime
In [2]: from blog.models import BlogPost
In [3]: BlogPost.objects.all() # no objects saved yet!
Out[3]: []
In [4]: bp = BlogPost(title='test cmd-line entry', body='''
....: yo, my 1st blog post...
....: it's even multilined!''',
....: timestamp=datetime.now())
In [5]: bp
Out[5]: <BlogPost: BlogPost object>
In [6]: bp.save()
In [7]: BlogPost.objects.count()
Out[7]: 1
In [8]: exec _i3 # repeat cmd #3; should have 1 object now
Out[8]: [<BlogPost: BlogPost object>]
In [9]: bp = BlogPost.objects.all()[0]
In [10]: print bp.title
test cmd-line entry
In [11]: print bp.body # yes an extra
in front, see above
yo, my 1st blog post...
it's even multilined!
In [12]: bp.timestamp.ctime()
Out[12]: 'Sat Dec 11 16:38:37 2010'
The first couple of commands just bring in the objects we need. Step #3 queries the database for BlogPost objects, of which there are none, so in step #4, we add the first one to our database by instantiating a BlogPost object, passing in its attributes that were defined earlier (title, body, and timestamp). Once our object is created, we need to write it to the database (step #6) with the BlogPost.save() method.
When that’s done, we can confirm the object count in the database has gone from 0 to 1 by using BlogPost.objects.count() method (step #7). In step #8, we take advantage of the IPython command to repeat step #3 to get a list of all the BlogPost objects stored in the database—we could have just retyped BlogPost.objects.all(), but we wanted to demonstrate a rich shell feature. The last steps involve grabbing the first (and only) element of the list of all BlogPost objects (step #9) and dumping out all the data to show that we were able to successfully retrieve the data we just stored moments ago.
The preceding is just a sampling of what you can do with an interactive interpreter tied to your app. You can read more about the shell’s features at http://docs.djangoproject.com/en/dev/intro/tutorial01/#playing-with-the-api. These Python shells are great developer tools. In addition to the standard command-line tool you get bundled with Python, you’ll find them incorporated into integrated development environments (IDEs) as well as augmented with even more functionality in third-party developed interactive interpreters such as IPython and bpython.
Almost all users and many developers prefer a web-based create, read, update, delete (CRUD) tool instead, and this is true for every web app that’s developed. But do developers really want to create such an administration Web console for every single app they create? Seems like you’d always want to have one, and that’s where the Django admin app comes in.
11.8. The Django Administration App
The automatic back-end administration application, or admin for short, has been described as Django’s crown jewel. For anyone who has tired of creating simple CRUD interfaces for Web applications, it’s a godsend. Admin is an app that every Web site needs. Why? Well, you might want to confirm your app’s ability to insert a new record as well as update or delete it. You understand that, but if your app hasn’t been completed yet, that makes this a bit more difficult. The admin app solves this problem for you by giving developers the ability to validate their data manipulation code before the full UI has been completed.
11.8.1. Setting Up the Admin
Although the admin app comes free with Django, it’s still optional, so you’ll need to explicitly enable it by specifying this in your configuration settings, just like you did with your own blog application. Open settings.py and let’s zoom down to the INSTALLED_APPS tuple again. You added 'blog', earlier, but you probably overlooked the four lines right above it:
INSTALLED_APPS = (
. . .
# Uncomment the next line to enable the admin:
# 'django.contrib.admin',
# Uncomment the next line to enable admin documentation:
# 'django.contrib.admindocs',
'blog',
)
The one we care about is the first commented-out entry, 'django.contrib.admin'. Remove the hash character (#)—a.k.a. the octothorpe, pound sign, or comment symbol—at the beginning of the line to enable it. The second one is optional, representing the Django admin documentation generator. The admindocs app auto-generates documents for your project by extracting Python documentation strings (“docstrings”) and makes those available to the admin. If you want to enable it, that’s fine, but we won’t be using it in our example here.
Every time you add a new application to your project, you should perform a syncdb to ensure that the tables it needs have been created in your database. Here we can see that adding the admin app to INSTALLED_APPS and running syncdb triggers the creation of one more table in our database:
$ ./manage.py syncdb
Creating tables ...
Creating table django_admin_log
Installing custom SQL ...
Installing indexes ...
No fixtures found.
Now that the app is set up, all we need to do is give it a URL so that we can get to it. In the automatically generated (project) urls.py, you’ll notice these lines near the top:
# Uncomment the next two lines to enable the admin:
# from django.contrib import admin
# admin.autodiscover()
You’ll also see this 2-tuple commented out near the bottom of the urlpatterns global variable:
# Uncomment the next line to enable the admin:
# (r'^admin/', include(admin.site.urls)),
Uncomment all three real lines of code and save the file. You’ve just directed Django to load up the default admin site when visitors to the Web site hit the URL http://localhost:8000/admin.
Finally, your applications need to specify to Django which models should show up for editing in the admin screens. To do so, you simply need to register your BlogPost model with it. Create blog/admin.py with the following lines:
# admin.py
from django.contrib import admin
from blog import models
admin.site.register(models.BlogPost)
The first two lines import the admin and our data model(s). They are followed by the line that registers our BlogPost class with the admin. This enables the admin to manage objects of this type in the database (in addition to the others already registered).
11.8.2. Trying Out the Admin
Now that we’ve registered our model with the admin, let’s take it out for a spin. Issue the manage.py runserver command again, and then go to the same link as earlier (either http://127.0.0.1:8000 or http://localhost:8000). What do you get? Hopefully, you actually get an error. Specifically, you should get a 404 error that looks similar to the one depicted in Figure 11-5.

Figure 11-5. The admin login screen.
Why do you get this error? It’s because you haven’t defined an action for the '/' URL yet. The only one that you’ve enabled for your app is /admin, so you need to go directly to that URL, instead; that is, you need to go to http://127.0.0.1:8000/admin, or http://localhost:8000/admin, or just add /admin to the existing path in your browser.
In fact, if you look carefully at the error screen, Django itself informs you that only /admin is available because it tries them all before it gives up. Note that the “It Worked!” page is a special case for which you have no URLs set for your app. (If it weren’t for that special case, you would’ve received a 404 error, as well.)
When you do arrive at the admin safely, you’ll be prompted to login with a nice, friendly screen, as shown in Figure 11-6.

Figure 11-6. The admin login screen.
Type in the superuser username and password that you created earlier. Once you’ve logged in, you’ll see the admin home page, as shown in Figure 11-7.

Figure 11-7. The admin home page.
What you’ll see is the set of all classes that have registered with the admin app. Because the admin allows you to manipulate all of these classes which live in the database, including Users, this means that you can add standard, “staff,” or other superusers (and from a friendly Web interface, not a command-line or a shell environment).
![]() Core Tip: My class isn’t there!
Core Tip: My class isn’t there!
Sometimes, your class might not appear in the list. The three most common causes for “my app’s data doesn’t show up in the admin” issues include:
1. Forgetting to register your model class with admin.site.register()
2. Errors in the app’s models.py file
3. Forgetting to add the app to the INSTALLED_APPS tuple in your settings.py file.
Now, let’s explore the real power of the admin: the ability to manipulate your data. If you click the “Blog posts” link, you’ll go to a page listing all of the BlogPost objects in the database (see Figure 11-8)—so far, we only have the one that we entered from the shell, earlier.

Figure 11-8. Our solitary BlogPost object.
Notice in the figure that it’s identified with a very generic tag of “BlogPost object.” Why is the post given such an awkward name? Django is designed to flexibly handle an infinite variety of content types, so it doesn’t take guesses about what field might be the best handle for a given piece of content. As a result, it’s direct and not so interesting.
Because you are fairly certain that this post represents the data you entered earlier, and you’re not going to confuse this entry with other BlogPost objects, no additional information about this object is needed. Go ahead and click it to enter the edit screen shown in Figure 11-9.

Figure 11-9. Web view of our command-line BlogPost entry.
Feel free to make any changes you desire (or none at all), and then click Save and add another so that we can experiment with adding an entry from a Web form (instead of from the shell). Figure 11-10 illustrates how the form is identical to that in which you edited the previous post a moment ago.
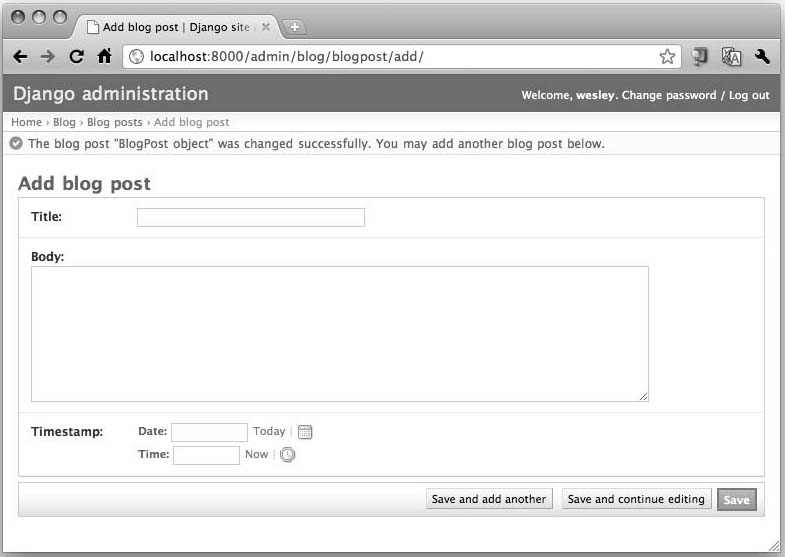
Figure 11-10. With the previous post saved, we’re ready to add a new one.
What’s a new BlogPost without content? Give your post a title and someand some scintillating content, perhaps similar to what you see in Figure 11-11. For the timestamp, you can click the Today and Now shortcut links to fill in the current date and time. You can also click the calendar and clock icons to pull up handy date and time pickers. When you’re done writing your masterpiece, click the Save button.
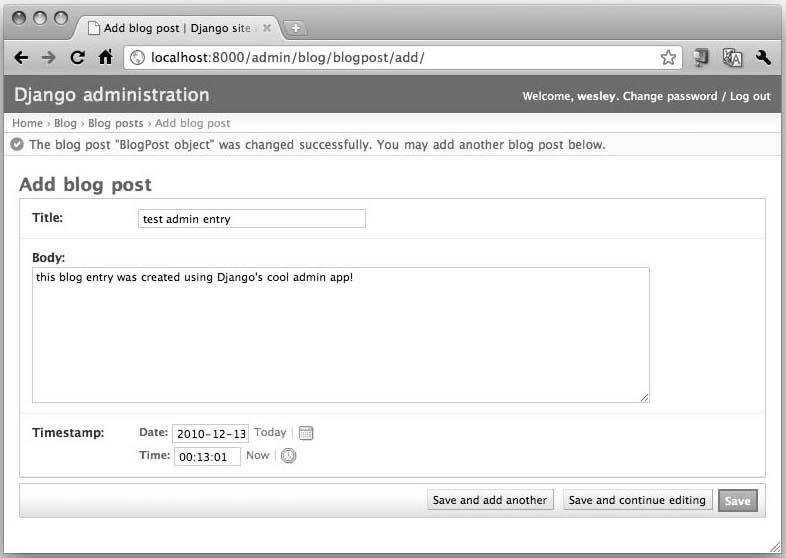
Figure 11-11. Adding a new post directly from the admin.
After your post has been saved to the database, a screen pops up that displays a confirmation message (The blog post “BlogPost object” was added successfully.) along with a list of all your blog posts, as shown in Figure 11-12.

Figure 11-12. The new BlogPost has been saved. Now we have a pair of posts, but there’s no way to tell them apart.
Note that this output has not improved any—in fact, it has become worse because we now have two BlogPost objects, but there’s no way to distinguish between them. You just aren’t going to feel satisfied seeing all the entries generically labeled as “BlogPost object.” You’re certainly not alone if you’re thinking, “There has got to be a way to make it look more useful!” Well, Django gives you the power to do just that.
Earlier, we enabled the admin tool with the bare minimum configuration, namely registering our model with the admin app all by itself. However, with an extra two lines of code and a modification of the registration call, we can make the presentation of the listing much nicer and more useful. Update your blog/admin.py file with a new BlogPostAdmin class, and add it to the registration line so that it now looks like this:
# admin.py
from django.contrib import admin
from blog import models
class BlogPostAdmin(admin.ModelAdmin):
list_display = ('title', 'timestamp')
admin.site.register(models.BlogPost, BlogPostAdmin)
Note that because we define BlogPostAdmin here, we do not prepend it as an attribute of our blog/models.py module; that is, we don’t register models.BlogPostAdmin. If you refresh the admin page for BlogPost objects (see Figure 11-13), you will now see much more useful output, based on the new list_display variable you added to your BlogPostAdmin class:
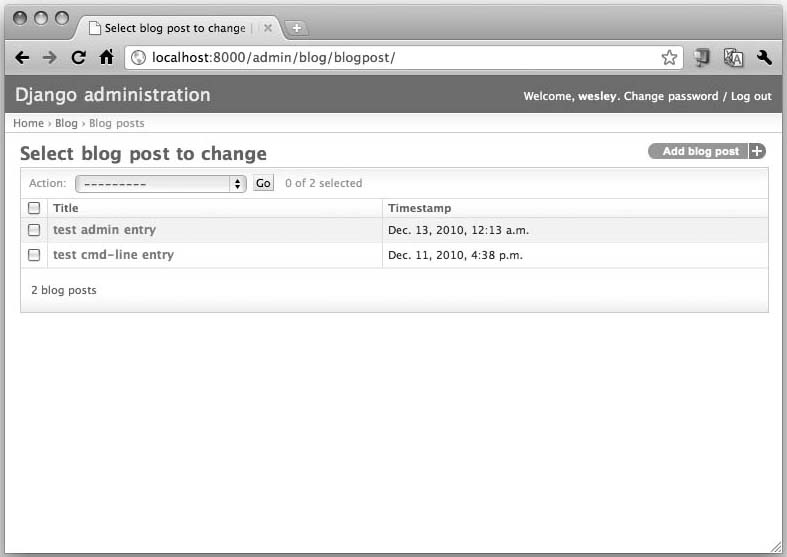
Figure 11-13. Much better!
The image in Figure 11-13 must seem like a breath of fresh air as we’re no longer looking at a pair of BlogPost objects. To a developer new to Django, it might surprise you that adding two lines and editing a third is all it takes to change the output to something much more relevant.
Try clicking the Title and Timestamp column headers that have appeared—each one affects how your items are sorted. For example, click the Title column head once to sort in ascending order by title; click it a second time to change to descending order. Also try sorting by timestamp order. Yes, these features are already built-in to the admin! You didn’t have to roll your own like in the good ’ol days.
The admin has many other useful features that can be activated with just a line or two of code: searching, custom ordering, filters, and more. We’ve barely touched the features in the admin, but hopefully, we’ve given you enough of a taste to whet your appetite.
11.9. Creating the Blog’s User Interface
Everything that we have just done was strictly for you, the developer, right? Users of your app will not be using the Django shell and probably not the admin tool either. We now need to build the public-facing side of your app. From Django’s perspective, a Web page has the following three typical components:
• A template that displays information passed to it (via a Python dictionary-like object).
• A view function or “view” that performs the core logic for a request. It will likely fetch (and format) the information to be displayed, typically from a database.
• A URL pattern that matches an incoming request with the corresponding view, optionally passing parameters to the view, as well.
When you think about it, you can see how when Django processes a request, it processes the request bottom-up: it starts by finding the matching URL pattern. It then calls the corresponding view function which then returns the data rendered into a template back to the user.
We’re going to build our app in a slightly different order:
1. A basic template comes first because we need to be able to see stuff.
2. Design a quick URL pattern so that Django can access our app right away.
3. Prototype and then iterate as we develop the view function.
The main reason for this order is that your template and URL pattern aren’t going to change very much. The heart and soul of your application will be in the view, so we want to employ an agile way of building it. By creating the view steps at a time, we’re more in-line with the test-driven development (TDD) model.
11.9.1. Creating a Template
Django’s template language is easy enough to read that we can jump right in to example code. This is a simple template for displaying a single blog post (based on the attributes of our BlogPost object):
<h2>{{ post.title }}</h2>
<p>{{ post.timestamp }}</p>
<p>{{ post.body }}</p>
You probably noticed that’s it’s just HTML (though Django templates can be used for any kind of textual output) plus special tags in curly braces: {{ ... }}. These tags are called variable tags. They display the contents of the object within the braces. Inside a variable tag, you can use Python-style dot-notation to access attributes of these variables. The values can be pure data or callables—if they’re the latter, they will automatically be called without requiring you to include “()” to indicate a function/method call.
There are also special functions that you can use in variable tags called filters. These are functions that you can apply immediately to a variable while inside the tag. All you need to do is to insert a pipe symbol (|) right after the variable, followed by the filter name. For example, if we wanted to titlecase the BlogPost title, you would simply call the title() filter like this:
<h2>{{ post.title|title }}</h2>
This means that when the template encounters our post.title of “test admin entry,” the final HTML output will be <h2>Test Admin Entry</h2>.
Variables are passed to the template in the form of a special Python dictionary called a context. In the preceding example, we’re assuming a BlogPost object called “post” has been passed in via the context. The three lines of the template fetch the BlogPost object’s title, body, and timestamp fields, respectively. Now let’s enhance the template a bit to make it a bit more useful, such as passing in all blog posts via the context so that we can loop through and display them:
<!-- archive.html -->
{% for post in posts %}
<h2>{{ post.title }}</h2>
<p>{{ post.timestamp }}</p>
<p>{{ post.body }}</p>
<hr>
{% endfor %}
The original three lines are unchanged; we’ve simply wrapped this core functionality with a loop over all posts. In doing so, we’ve introduced another construct of Django’s templating language: block tags. Whereas variable tags are delimited by using pairs of curly braces, block tags use braces and percent symbols as enclosing pairs: {% ... %}. They are used to embed logic such as loops and conditionals into your HTML template.
Save the HTML template code above into a simple template in a file called archive.html and put it in a directory called templates, inside your app’s folder; thus, the path to your template file should be mysite/blog/templates/archive.html. The name of the template itself is arbitrary (we could have called it foo.html), but the templates directory name is mandatory. By default, when searching for templates, Django will look for a templates directory inside each of your installed applications.
To learn more about templates and tags, check out the official documents page at http://docs.djangoproject.com/en/dev/ref/templates/api/#basics.
The next step is to prepare for the creation of the view function that users are eventually going to execute to see the output from our brand new template. Before we create the view, let’s approach this from the user’s point of view.
11.9.2. Creating a URL Pattern
In this next section, we’re going to discuss how the pathnames of URLs in your users’ browsers are mapped to various parts of your app. When users issue a client request from their browsers, the Internet magic of mapping hostnames to IP addresses happens, followed by the client making a connection to the server’s address and at port 80 or other designated port (the Django development server uses 8000 by default).
The Project’s URLconf
The server, through the magic of WSGI, will end up calling the endpoint of Django, which passes the request down the line. The type of request (GET, POST, etc.) and path (the remainder of the URL beyond the protocol, host, and port) are accepted and arrives at the project URLconf (mysite/urls.py) file. Here, there must be a valid (regular expression) match on the path that resolves the request; otherwise, the server will return a 404 error just like the one we encountered earlier in the “Trying Out the Admin” subsection, because we did not define a handler for '/'.
We could create the needed URL pattern directly inside mysite/urls.py, but that makes for a messy coupling between our project and our app. However, we might want to use our blog app somewhere else, so it would be nice if it were responsible for its own URLs. This falls in line with code reuse principles, DRY, debugging the same code in one place, etc. To keep our project and app appropriately compartmentalized, we’ll define the URL mapping in two simple steps and create two URLconfs: one for the project, and one for the app.
The first step is much like enabling the admin that you saw earlier. In mysite/urls.py, there’s an autogenerated, commented-out example line that is almost what we need. It appears near the top of your urlpatterns variable:
urlpatterns = patterns('',
# Example:
# (r'^mysite/', include('mysite.foo.urls')),
. . .
Edit out the comment and make the necessary name changes so that it points to our app’s URLconf:
(r'^blog/', include('blog.urls')),
The include() function defers taking action here to another URLconf (the app’s URLconf, naturally). In our example here, we’re catching requests that begin with blog/ and passing them on to the mysite/blog/urls.py that we’re about to create. (More on include() coming up soon.)
Along with setting up the admin app that we did earlier, now your entire project URLconf should look like this:
# mysite/urls.py
from django.conf.urls.defaults import *
from django.contrib import admin
admin.autodiscover()
urlpatterns = patterns('',
(r'^blog/', include('blog.urls')),
(r'^admin/', include(admin.site.urls)),
)
The patterns() function takes a group of 2-tuples (URL regular expression, destination). The regex is straightforward, but what is the destination? It’s either directly a view function that’s called for URLs that match the pattern, or it’s a call to include() another URLconf file.
When include() is used, the current URL path head is removed, and the remainder of the path is passed to the patterns() function of the downwind URLconf. For example, when the URL http://localhost:8000/blog/foo/bar is entered into the client browser, the project’s URLconf receives blog/foo/bar. It matches the '^blog' regex and finds an include() function (as opposed to a view function), so it passes foo/bar down to the matching URL handler in mysite/blog/urls.py.
You can see this in the parameter to include(): 'blog.urls'. A similar scenario exists for http://localhost:8000/admin/xxx/yyy/zzz; the xxx/yyy/zzz would be passed to admin/site/urls.py as specified by include (admin.site.urls). Now, if your eyes are sharp enough, you might notice something odd in the code snippet—something small and perhaps missing? It is nearly an optical illusion. Take a careful look at the calls to the include() function.
Do you see how the reference to blog.urls is in quotes, but not admin.site.urls? Nope, it’s not a typo. Both patterns() and include() accept strings or objects. Generally strings are used, but some developers prefer the more concrete use of passing in objects. The only thing you need to remember when passing in objects is to ensure that they are imported. In the preceding example, the import of django.contrib.admin does the job.
Another example of this usage is coming up in the next subsection. To read more about strings versus objects, take a look at the documents page on this topic at http://docs.djangoproject.com/en/dev/topics/http/urls/#passing-callable-objects-instead-of-strings.
The App’s URLconf
With the include() of blog.urls, we’re on the hook to define URLs to match remaining path elements inside the blog application package itself. Create a new file, mysite/blog/urls.py, that contains these lines:
# urls.py
from django.conf.urls.defaults import *
import blog.views
urlpatterns = patterns('',
(r'^$', blog.views.archive),
)
It looks quite similar to our project URLconf. First, let’s remind you that the head (blog/) part of the request URL on which our root URLconf was matching, has been stripped, so we only need to match the empty string, which is handled by the regex ^$. Our blog application is now reusable and shouldn’t care if it’s mounted at blog/ or news/ or what/i/had/for/lunch/. The only mystery here is the archive() view function to which our request is sent.
Incorporating new view functions as part of your app is as simple as adding individual lines to your URLconf, not adding ten lines here, editing another five lines of some complex XML file there, etc. In other words, if you were to add view functions foo() and bar(), your updated urlpatterns would just have to be changed to the following (but don’t really make these changes to yours):
urlpatterns = patterns('',
(r'^$', blog.views.archive),
(r'foo/', blog.views.foo),
(r'bar/', blog.views.bar),
)
So that’s great, but if you continue to develop in Django and come back to look at this file again and again, you’ll begin to notice a lot of repetition here, violating DRY, of course. Do you see all the references to blog.views to get to the view functions? This is a good indicator that we should use a feature in patterns(), namely the first argument, which has been an empty string all this time.
That parameter is a prefix for the views, so we can move blog.views up there, remove the repetition, and tweak the import so that it doesn’t NameError-out. Here’s what the modified URLconf would look like:
from django.conf.urls.defaults import *
from blog.views import *
urlpatterns = patterns('blog.views',
(r'^$', archive),
(r'foo/', foo),
(r'bar/', bar),
)
Based on the import statement, all three functions are expected to be in blog.views, meaning mysite/blog/views.py. From the earlier discussion, you know that because we imported it, we can pass in the objects as we just did in the preceding example (archive, foo, bar). But, would it be so bad of us to be even lazier and just not even have that import statement?
As described in the previous subsection, Django supports strings in addition to objects so that you don’t even need that import. If you remove it and put quotes around your view names, that’s fine, too:
from django.conf.urls.defaults import *
urlpatterns = patterns('blog.views',
(r'^$', 'archive'),
(r'foo/', 'foo'),
(r'bar/', 'bar'),
)
Okay, we know that foo() and bar() don’t exist in our example application, but you can expect that real projects will have multiple views in your app’s URLconf. We were just showing you how to do to basic cleanup. You can find more information on reducing the clutter in URLconf files in the Django documentation at http://docs.djangoproject.com/en/dev/intro/tutorial03/#simplifying-the-urlconfs.
The final piece of our puzzle is the controller, the view function, which is called upon seeing a matching URL path.
11.9.3. Creating a View Function
In this section, we focus on the view function, the core functionality of your app. The development process can take some time, so we’ll first show you how to get started quickly for those who are impatient, and then go into more detail so that you know how to do it right in practice.
“Hello World” Fake View
So, you want to debug your HTML template and URLconf right away without having to create your complete and entire view at this early stage of development? Let’s do this! Blow up a fake BlogPost and render it into the template immediately. Create this “Hello World” mysite/blog/views.py six-statement file now:
# views.py
from datetime import datetime
from django.shortcuts import render_to_response
from blog.models import BlogPost
def archive(request):
post = BlogPost(title='mocktitle', body='mockbody',
timestamp=datetime.now())
return render_to_response('archive.html', {'posts': [post]})
We know the view needs to be called archive() because of its designation in the URLconf, so that’s easy. The code creates a fake blog post and passes it to the template as a single-element posts list. (Don’t call post.save() because... well, guess why not?!?)
We’ll come back to render_to_response() shortly, but if you just use your imagination and guess that it takes a template (archive.html, found in mysite/blog/templates) and a context dictionary, merges them together, and spits back the generated HTML to the user, then your imagination would be correct.
Bring up your development server (or run it live by using a real Web server). Work through any errors you have in your URLconf or template, and then when you’ve got it working, you’ll see something similar to that shown in Figure 11-14.

Figure 11-14. The output from our fake “view.”
Coming up with a fake view with semi-mocked data is the fastest way to get instant gratification and validation that your basic setup is okay. This iterative process is agile, and when things are good, it signals to you that it’s safe to begin the real work.
The Real View
Now we’re going to create the real thing, a simple view function (actually twice) that will fetch all of our blog posts from the database and display them to users by employing our template. First, we’re going to do it the “formal” way, which means strict adherence to the following steps, from obtaining the data to returning the HTTP response back to the client:
• Query the database for all blog entries
• Load the template file
• Create the context dictionary for the template
• Pass the context to the template
• Render the template into HTML
• Return the HTML via the HTTP response
Open blog/views.py and enter the following lines of code, exactly as shown. This will execute our preceding recipe—it pretty much replaces all of your earlier fake views.py file:
# views.py
from django.http import HttpResponse
from django.template import loader, Context
from blog.models import BlogPost
def archive(request):
posts = BlogPost.objects.all()
t = loader.get_template("archive.html")
c = Context({'posts': posts})
return HttpResponse(t.render(c))
Check the development (or real Web) server, then go to the app again in your browser. You should see a simple, bare-bones rendering (with real data) of any blog posts that you have entered, complete with title, timestamp, and post body, separated by a horizontal rule (<hr>), similar to what you see in Figure 11-15 (if you created the first and only pair of posts that we made earlier).

Figure 11-15. The user’s view of blogposts.
That’s great! But in keeping with the tradition of not repeating yourself, the developers of Django noticed that this was an extremely common pattern (get data, render in template, return response), so they created a shortcut when rendering a template from a simple view function. This is where we run into our friend, render_to_response(), once again.
We saw render_to_response() earlier in our fake view, but let’s roll that into our real view now. Add its import from django.shortcuts, remove the now-superfluous imports of loader, Context, and HttpResponse, and replace those last three lines of your view. You should be left with this:
# views.py
from django.shortcuts import render_to_response
from blog.models import BlogPost
def archive(request):
posts = BlogPost.objects.all()
return render_to_response('archive.html', {'posts': posts})
If you refresh your browser, nothing will change because you’ve only shortened your code and haven’t changed any real functionality. To read more about using render_to_response(), check out these pages from the official documentation:
• http://docs.djangoproject.com/en/dev/intro/tutorial03/#a-shortcut-render-to-response
• http://docs.djangoproject.com/en/dev/topics/http/shortcuts/#render-to-response
Shortcuts are just the beginning. There are other, special types of view functions that we’ll discuss later called generic views, which are even more hands-off than render_to_response(). With a generic view, for example, you wouldn’t even need to write a view function—you’d just use a pre-made generic view that Django provides and map to it directly from the URLconf. That is one of the main goals of generic views if you can believe it: not having to write any code at all!
11.10. Improving the Output
That’s it! You did the three steps it takes to get a working app to the point where we now have a user-facing interface (and don’t have to rely on the Admin for CRUD of data). So now what? We’ve got a simple blog working. It responds to client requests, extracts the information from the database, and displays all posts to the user. This is good but we can certainly make some useful improvements to exhibit more realistic behavior.
One logical direction to take is to show the posts in reverse chronological order; it makes sense to see the most recent posts first. Another is to limit the output. If you have any more than 10 (or even 5) posts showing on the page, it is certainly too long for users. First, let’s tackle reverse-chronological order.
It’s easy for us to tell Django to do that. In fact, we have a choice as to where we want to tell it to do so. We can either add a default ordering to our model, or we can add it to the query in our view code. We’ll do the latter first because it’s the simplest to explain.
11.10.1. Query Change
Taking a quick step back, BlogPost is your data model class. The objects attribute is a model Manager class, and it has an all() method to give you a QuerySet. You can think of a QuerySet as objects that represent the rows of data returned from the database. That’s about as far as you should go because they’re not the actual rows because QuerySets perform “lazy iteration.”
The database isn’t actually hit until the QuerySet is evaluated. In other words, you can do all kinds of QuerySet manipulation without touching the data at all. To find out when a QuerySet is evaluated, check out the official documentation at http://docs.djangoproject.com/en/dev/ref/models/querysets/.
Now we have the background out of the way. We could have simply told you to add a call to the order_by() method and provide a sort parameter. In our case, we want to sort newest first, which means reverse order by timestamp. It’s as simple as changing your query statement to the following:
posts = BlogPost.objects.all().order_by('-timestamp')
By prepending the minus sign (–) to timestamp, we are specifying a descending chronological sort. For normal ascending order, remove the minus sign.
To test reading in the top ten posts, we need more than just two BlogPost entries in the database, so here’s a great place to whip up a few lines of code using the Django shell (plain one this time; we don’t need the power of IPython or bpython) and auto-generate a bunch of records in the database:
$ ./manage.py shell --plain
Python 2.7.1 (r271:86882M, Nov 30 2010, 09:39:13)
[GCC 4.0.1 (Apple Inc. build 5494)] on darwin
Type "help", "copyright", "credits" or "license" for more information.
(InteractiveConsole)
>>> from datetime import datetime as dt
>>> from blog.models import BlogPost
>>> for i in range(10):
... bp = BlogPost(title='post #%d' % i,
... body='body of post #%d' % i, timestamp=dt.now())
... bp.save()
...
Figure 11-16 shows the change reflected in the browser when you perform a refresh.
The shell can also be used to test the change that we just made as well as the new query we want to use:
>>> posts = BlogPost.objects.all().order_by('-timestamp')
>>> for p in posts:
... print p.timestamp.ctime(), p.title
...
Fri Dec 17 15:59:37 2010 post #9
Fri Dec 17 15:59:37 2010 post #8
Fri Dec 17 15:59:37 2010 post #7
Fri Dec 17 15:59:37 2010 post #6
Fri Dec 17 15:59:37 2010 post #5
Fri Dec 17 15:59:37 2010 post #4
Fri Dec 17 15:59:37 2010 post #3
Fri Dec 17 15:59:37 2010 post #2
Fri Dec 17 15:59:37 2010 post #1
Fri Dec 17 15:59:37 2010 post #0
Mon Dec 13 00:13:01 2010 test admin entry
Sat Dec 11 16:38:37 2010 test cmd-line entry

Figure 11-16. The original pair of blog entries, plus ten more.
This gives us some degree of certainty that when the core bits are copied to the view function, things should pretty much work right away.
Furthermore, the output can be limited to only the top 10 by using Python’s friendly slice syntax ([:10]), so add that, too. Take these changes and update your blog/views.py file so that it looks like the following:
# views.py
from django.shortcuts import render_to_response
from blog.models import BlogPost
def archive(request):
posts = BlogPost.objects.all().order_by('-timestamp')[:10]
return render_to_response('archive.html', {'posts': posts})
Save the change and refresh your browser again. You should see two changes: the blogs post in reverse-chronological order, and only the ten most recent posts show up—in other words, of 12 total entries, you should no longer see either of the two original posts, as demonstrated in Figure 11-17.
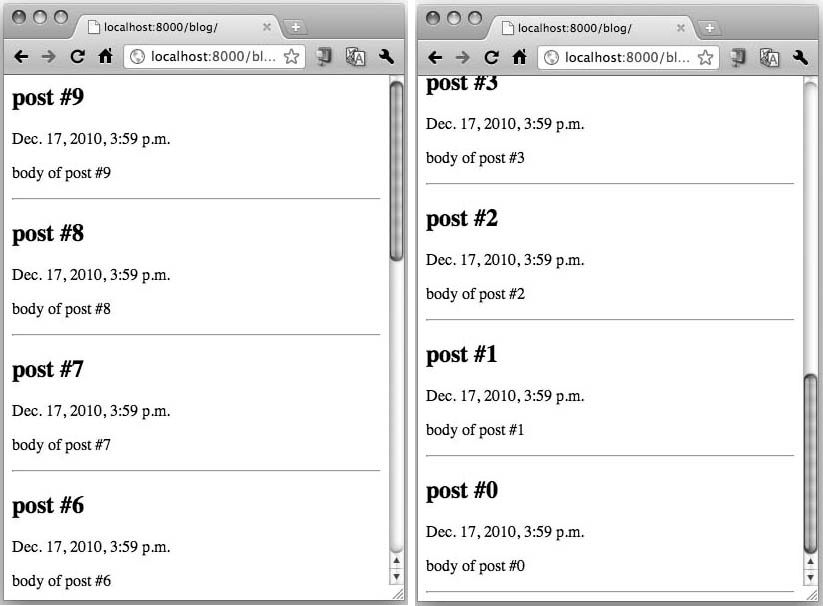
Figure 11-17. Only the ten newest blog posts appear here.
So changing the query is fairly straightforward, but for our particular case, setting a default ordering in the model is a more logical option because this (most recent, top N posts) is pretty much the only type of ordering that makes sense for a blog.
Setting the Model Default Ordering
If we set our preferred ordering in the model, any other Django-based app or project that accesses our data will use that ordering. To set default ordering for your model, give it an inner class called Meta and set the ordering attribute in that class:
class Meta:
ordering = ('-timestamp',)
This effectively moves order_by('-timestamp') from the query to the model. Make these changes to both files, and you should be left with code shown in the following:
# models.py
from django.db import models
class BlogPost(models.Model):
title = models.CharField(max_length=150)
body = models.TextField()
timestamp = models.DateTimeField()
class Meta:
ordering = ('-timestamp',)
# views.py
from django.shortcuts import render_to_response
from blog.models import BlogPost
def archive(request):
posts = BlogPost.objects.all()[:10]
return render_to_response('archive.html', {'posts': posts})
![]() Core Tip (Hacker’s Corner): Reducing
Core Tip (Hacker’s Corner): Reducing archive() down to one (long) line of Python
It’s possible to reduce archive() down to a single line if you feel comfortable using lambda:
archive = lambda req: render_to_response('archive.html',
{'posts': BlogPost.objects.all()[:10]})
Readability is one of the hallmarks of having a Pythonic piece of code. Another goal of expressive languages such as Python, is to help reduce the number of lines of code to attain such readability. Although this does reduce the number of lines, I can’t say that it helps with making it easier to read; hence, why it’s in this Hacker’s Corner.
Other differences to the original: the request variable was reduced to just req, and we do save a tiny bit of memory without having the posts variable. If you’re new to Python, we recommend you check out the Functions chapter of Core Python Programming or Core Python Language Fundamentals which covers lambda.
If you refresh your Web browser, you should see no changes at all, as it should be. Now that we’ve spent some time improving data retrieval from the database, we’re going to suggest that you minimize database interaction.
11.11. Working with User Input
So now our app is complete, right? You’re able to add blog posts via the shell or admin... check. You can view the data with our user-facing data dumper... check. Are we really done? Not so fast!
Maybe you will be satisfied entering data by creating objects in the shell or through the more user-friendly admin, but your users probably don’t know what a Python shell is, much less how to use it, and do you really want to give people access to your project’s admin app? No way!
If you’ve understood the material in Chapter 10 pretty well, and include what you’ve learned so far in this chapter, you might be wise enough to realize that it’s still the same three-step process:
• Add an HTML form in which the user can enter data
• Insert the (URL, view) URLconf entry
• Create the view to handle the user input
We’ll take these on in the same order as our first view, earlier.
11.11.1. The Template: Adding an HTML Form
The first step is pretty simple: create a form for users. To make it easier for us during development, just add the following HTML to the top of blog/templates/archive.html (above the BlogPost object display) for now; we can split it off to another file later.
<!-- archive.html -->
<form action="/blog/create/" method="post">
Title:
<input type=text name=title><br>
Body:
<textarea name=body rows=3 cols=60></textarea><br>
<input type=submit>
</form>
<hr>
{% for post in posts %}
. . .
The reason why we’re putting in the same template during development is that it’s helpful to have both the user input and the blog post(s) display on a single page. In other words, you won’t need to click and flip back-and-forth between a separate form entry page and the BlogPost listing display.
11.11.2. Adding the URLconf Entry
The next step is to add our URLconf entry. Using the preceding HTML, we’re going to use a path of /blog/create/, so we need to hook that up to a view function we’re going to write that will save the entry to the database. Let’s call our view create_blogpost(); add the appropriate 2-tuple to urlpatterns in your app’s URLconf so that it looks like this:
# urls.py
from django.conf.urls.defaults import *
urlpatterns = patterns('blog.views',
(r'^$', 'archive'),
(r'^create/', 'create_blogpost'),
)
The remaining task is to come up with the code for create_blogpost().
11.11.3. The View: Processing User Input
Processing Web forms in Django looks quite similar to handling the common gateway interface (CGI) variables that you saw in Chapter 10: you just need to do the Django equivalent. You can do a casual flip-through of the Django documentation to get enough knowledge to whip up the snippets of code to add to blog/views.py. First you’ll need some new imports, as shown in the following:
from datetime import datetime
from django.http import HttpResponseRedirect
The actual view function then would look something like this:
def create_blogpost(request):
if request.method == 'POST':
BlogPost(
title=request.POST.get('title'),
body=request.POST.get('body'),
timestamp=datetime.now(),
).save()
return HttpResponseRedirect('/blog/')
Like the archive() view function, the request is automatically passed in. The form input is coming in via a POST, so we need to check for that. Next, we create a new BlogPost entry with the form data plus the current time as the timestamp, and then save() it to the database. Then we’re going to redirect back to /blog to see our newest post (as well as another blank form at the top for the next blog entry).
Again, double-check either your development or real Web server and visit your app’s page. You’ll now see the form on top of the data dump (see Figure 11-18), enabling us to test drive your new feature.

Figure 11-18. Our first user form (followed by previous entries).
11.11.4. Cross-Site Request Forgery
Not so fast! If you were able to debug your app so that you get a form and submit, you’ll see that your browser does try to access the /blog/create/ URL, but it’s getting stopped by the error shown in Figure 11-19.

Figure 11-19. The CSRF error screen.
Django comes with a data-preserving feature that disallows POSTs which are not secure against cross-site request forgery (CSRF) attacks. Explanations of CSRF are beyond the scope of this book, but you can read more about them here:
• http://docs.djangoproject.com/en/dev/intro/tutorial04/#write-a-simple-form
• http://docs.djangoproject.com/en/dev/ref/contrib/csrf/
For your simple app, there are two fixes, both of which involve adding minor snippets of code to what you already have:
1. Add a CSRF token ({% csrf_token %}) to forms that POST back to your site
2. Send the request context instance to the token via the template
A request context is exactly what it sounds like: a dictionary that contains information about the request. If you go to the CSRF documentation sites that we just provided, you’ll find out that django.template.Request Context is always processed in a way that includes built-in CSRF protection.
The first step is accomplished by adding the token to the form. Edit the <FORM> header line in mysite/blog/templates/archive.html, adding the CSRF token inside the form so that it looks like this:
<form action="/blog/create/" method=post>{% csrf_token %}
The second part involves editing mysite/blog/views.py. Alter the return line in your archive() view function by adding the RequestContext instance, as shown here:
return render_to_response('archive.html', {'posts': posts,},
RequestContext(request))
Don’t forget to import django.template.RequestContext:
from django.template import RequestContext
Once you save these changes, you’ll be able to submit data to your application from a form (not the admin or the shell). CSRF errors will cease and you’ll experience a successful BlogPost entry submission.
11.12. Forms and Model Forms
In the previous section, we demonstrated how to work with user input by showing you the steps to create an HTML form. Now, we will show you how Django simplifies the effort required to accept user data (Django Forms), especially forms containing the exact fields that makes up a data model (Django Model Forms).
11.12.1. Introducing Django Forms
Discounting the one-time additional work required to handle CSRFs, the three earlier steps to integrate a simple input form frankly look too laborious and repetitious. After all, this is Django, virtuous student of the DRY principle.
The most suspiciously repetitious parts of our app involve seeing our data model embedded everywhere. In the form, we see the name and title:
Title: <input type=text name=title><br>
Body: <textarea name=body rows=3 cols=60></textarea><br>
And in the create_blogpost() view, we see pretty much the same:
BlogPost(
title=request.POST.get('title'),
body=request.POST.get('body'),
timestamp=datetime.now(),
).save()
The point is that once you’ve defined the data model, it should be the only place where you see title, body, and perhaps timestamp (although the last is a special case because we do not ask the user to input this value). Based on the data model alone, isn’t it straightforward to expect the Web framework to come up with the form fields? Why should the developer have to write this in addition to the data model? This is where Django forms come in.
First, let’s create a Django form for our input data:
from django import forms
class BlogPostForm(forms.Form):
title = forms.CharField(max_length=150)
body = forms.CharField(widget=forms.Textarea)
timestamp = forms.DateTimeField()
Okay, that’s not quite complete. In our HTML form, we specified the HTML textarea element to have three rows and a width of sixty characters. Because we’re replacing the raw HTML by writing code that automatically generates it, we need to find a way to specify these requirements, and in this case, the solution is to pass these attributes directly:
body = forms.CharField(
widget=forms.Textarea(attrs={'rows':3, 'cols':60})
)
11.12.2. The Case for Model Forms
Aside from the minor blip regarding specifying attributes, did you do a double-take when looking at the BlogPostForm definition? I mean, wasn’t it repetitious too? As you can see in the following, it looks nearly identical to the data model:
class BlogPost(models.Model):
title = models.CharField(max_length=150)
body = models.TextField()
timestamp = models.DateTimeField()
Yes, you would be correct: they look almost like fraternal twins. This is far too much duplication for any self-respecting Django script. What we did previously by creating a stand-alone Form object is fine if we wanted to create a form for a Web page from scratch without a data model backing it.
However, if the form fields are an exact match with a data model, then a Form isn’t what we’re looking for; instead, you would really do better with a Django ModelForm, as demonstrated here:
class BlogPostForm(forms.ModelForm):
class Meta:
model = BlogPost
Much better—now that’s the laziness we’re looking for. By switching from a Form to a ModelForm, we can define a Meta class that designates on which data model the form should be based. When the HTML form is generated, it will have fields for all attributes of the data model.
In our case though, we don’t trust the user to enter the correct timestamp, and instead, we want our app to add that content programmatically, per post entry. Not a problem, we only need to add one more attribute named exclude to remove form items from the generated HTML. Integrate the import as well as the full BlogPostForm class presented in the following example to the bottom of your blog/models.py file, following your definition of BlogPost:
# blog/models.py
from django.db import models
from django import forms
class BlogPost(models.Model):
. . .
class BlogPostForm(forms.ModelForm):
class Meta:
model = BlogPost
exclude = ('timestamp',)
11.12.3. Using the ModelForm to Generate the HTML Form
What does this buy us? Well, right off the bat we can just cut out the fields in our form. Thus, change the code at the top of mysite/blog/templates/archive.html to:
<form action="/blog/create/" method=post>{% csrf_token %}
<table>{{ form }}</table><br>
<input type=submit>
</form>
Yeah, you need to leave the submit button in there. Also, as you can see, the form defaults to the innards of a table. Want some proof? Just go into the Django shell, make a BlogPostForm, and then mess around with it a little. It’s as easy as this:
>>> from blog.models import BlogPostForm
>>> form = BlogPostForm()
>>> form
<blog.models.BlogPostForm object at 0x12d32d0>
>>> str(form)
'<tr><th><label for="id_title">Title:</label></th><td><input
id="id_title" type="text" name="title" maxlength="150" /></td></
tr>
<tr><th><label for="id_body">Body:</label></th><td><textarea
id="id_body" rows="10" cols="40" name="body"></textarea></td></tr>'
That’s all the HTML that you didn’t have to write. (Again, note that due to our exclude, the timestamp is left out of the form. For fun, you can temporarily comment it out and see the additional timestamp field in the generated HTML.)
If you want output different from HTML table rows and cells, you can request it by using the as_*() methods: {{ form.as_p }} for <p>...</p> delimited text, {{ form.as_ul }} for a bulleted list with <li> elements, etc.
The URLconf stays the same, so the last modification necessary is updating the view function to send the ModelForm over to the template. To do this, you instantiate it and pass it as an additional key-value pair of the context dictionary. So, change the final line of archive() in blog/views.py to the following:
return render_to_response('archive.html', {'posts': posts,
'form': BlogPostForm()}, RequestContext(request))
Don’t forget to add the import for both your data and form models at the top of views.py:
from blog.models import BlogPost, BlogPostForm
11.12.4. Processing the ModelForm Data
The changes we just made were to create the ModelForm and have it generate the HTML to present to the user. What about after the user has submitted her information? We still see duplication in the create_blogpost() view which, as you know, is also in blog/views.py. Similar to how we defined the Meta class for BlogPostForm to instruct it to take its fields from BlogPost, we shouldn’t have to create our object like this in create_blogpost():
def create_blogpost(request):
if request.method == 'POST':
BlogPost(
title=request.POST.get('title'),
body=request.POST.get('body'),
timestamp=datetime.now(),
).save()
return HttpResponseRedirect('/blog/')
There should be no need to mention title, body, etc., because they’re in the data model. We should be able to shorten this view to the following:
def create_blogpost(request):
if request.method == 'POST':
form = BlogPostForm(request.POST)
if form.is_valid():
form.save()
return HttpResponseRedirect('/blog/')
Unfortunately, we can’t do this because of the timestamp. We had to make an exception in the preceding HTML form generation, so we need to do likewise here. Here is the if clause that we need to use:
if form.is_valid():
post = form.save(commit=False)
post.timestamp=datetime.now()
post.save()
As you can see, we have to add the timestamp to our data and then manually save the object to get our desired result. Note that this is the form save(), not the model save(), which returns an instance of the Blog model, but because commit=False, no data is written to the database until post.save() is called. Once these changes are in place, you can start using the form normally, as illustrated in Figure 11-20.
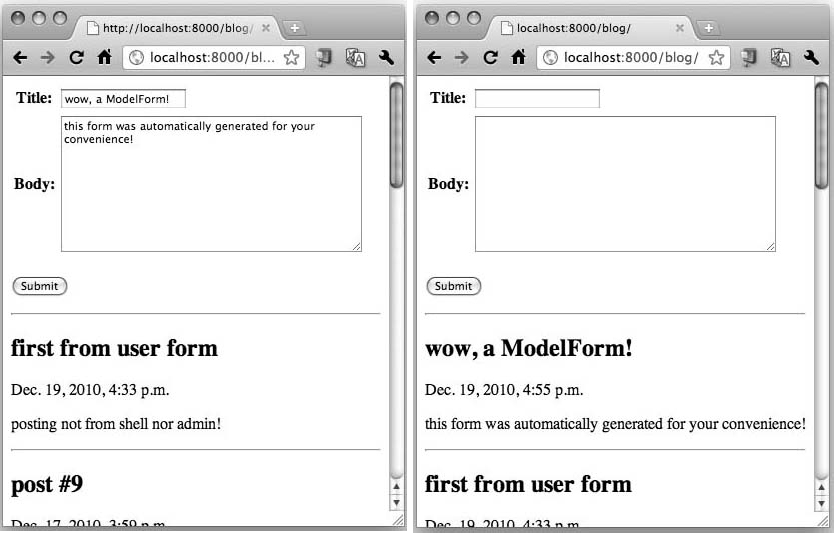
Figure 11-20. The automatically generated user form.
11.13. More About Views
The final most important thing that we need to discuss is a topic that no Django book should omit: generic views. So far, when you’ve needed a controller or logic for your app, you’ve rolled your own custom view. However, you know that Django likes to stick with DRY, hence the reason why you were exposed to shortcuts such as render_to_response().
Generic views are so powerful yet so simple of an abstraction, that when you’re able to employ them, you won’t have to write a view at all. You’ll just link to them directly from your URLconf, pass in a few pieces of required data, and not even need to edit/create any code in views.py. We just need to give you enough background to lead you there. We’ll begin our journey by going back to a short discussion about CSRF without really talking about it. What do I mean by this?
11.13.1. Semi-Generic Views
Since CSRF is something for which you need to be vigilante in any application that posts back to your app, this renders passing the request context instance extremely repetitious. It’s also not very user-friendly to beginners. This is where we can start to play with a generic view without really using it as such. We’re going to tweak our custom view to use a generic view to do the heavy lifting. This is called a semi-generic view.
Bring up mysite/blog/views.py in your editor, and then replace this final line of archive():
return render_to_response('archive.html', {'posts': posts,
'form': BlogPostForm()}, RequestContext(request))
Add the new import that follows (and remove the one for render_to_ response()):
from django.views.generic.simple import direct_to_template
Modify the final line to match the following:
return direct_to_template(request, 'archive.html',
{'posts': posts, 'form': BlogPostForm()})
Wait... what was that all about? Yes, Django does make your life easier by reducing the amount of code you need to write, but we only dropped the request context instance. Are there any other gains to be had here? Not yet. This was just seed-planting. Because we didn’t really use direct_to_ template() as a generic view in this example, we did convert our custom view to a semi-generic view now, because of its use.
Again, pure generic view usage means we call it directly from the URLconf and wouldn’t need any code here in view.py. Generic views are often-reused views that are fairly basic but that you still wouldn’t want to create or re-create each time you needed the same functionality. Examples include directing users to static pages, providing a generic output for objects, etc.
Really Using a Generic View
Although we employed a generic view function in the previous subsection, we didn’t really use it as a pure generic view. Let’s do the real thing now. Go to your project URLconf (mysite/urls.py). Do you remember the 404 error we got when going to http://localhost:8000/ in the “Trying Out the Admin” subsection earlier in the chapter?
We explained that Django could only handle paths for which there is a matching regular expression. Well, '/' matches neither '/blog/' nor /admin/, so we forced users to visit only those links to get access to your app. This is a disappointment if you want to provide your users some convenience by letting them visit the top-level '/' path and then have your app automatically redirect to '/blog/'.
Here is the perfect opportunity to use the redirect_to() generic view in the proper environment. All you need to do is add a single line to your urlpatterns, as shown in the following:
urlpatterns = patterns('',
(r'^$', 'django.views.generic.simple.redirect_to',
{'url': '/blog/'}),
(r'^blog/', include('blog.urls')),
(r'^admin/', include(admin.site.urls)),
)
Okay, maybe it’s two lines, but it’s all part of a single statement. Also, no import is necessary here as we’ve used a string instead of an object. Now when users visit '/', they’ll be redirected to '/blog/', which is exactly what you want. No modifications were needed in view.py, and all you did was call it from an URLconf file (project or app). That’s a generic view! (If you’re looking for something more substantial, we understand—you’ll have a more complex generic view exercise at the end of the chapter to get you fully up to speed.)
So far, we’ve seen direct_to_template() and redirect_to() generic views, but there are others that you’ll likely use fairly often. These include object_list() and object_detail() as well as time-oriented generic views such as archive_{day,week,month,year,today,index}(). And finally, there are CRUD generic views such as {create,update,delete}_object().
Finally, we would be remiss if we didn’t inform that the trend is moving toward class-based generic views, a new feature introduced in Django 1.3. As powerful as generic views are, converting them to class-based generic views makes them even more so. (The reasons are similar to why exceptions switched from plain strings to classes back in Python 1.5.)
You can read more about plain ’ol generic views as well as class-based generic views from the official documentation at http://docs.djangoproject.com/en/dev/topics/generic-views/ and http://docs.djangoproject.com/en/dev/topics/class-based-views.
The remaining subsections aren’t as critical but they do contain useful information that you can come back to at a later time. If you want to move further ahead, either skip to the intermediate Django app or jump all the way to Chapter 12.
11.14. *Look-and-Feel Improvements
From this point, there are a couple of things you can do to improve the way your app works and to give your site a more consistent look-and-feel:
1. Create a Cascading Style Sheets (CSS) file
2. Create a base template and use template inheritance
The CSS is fairly straightforward, so we won’t go over it here, but let’s take a look at a really short example of template inheritance:
<!-- base.html -->
Generic welcome to your web page [Login - Help - FAQ]
<h1>Blog Central</h1>
{% block content %}
{% endblock %}
© 2011 your company [About - Contact]
</body>
</html>
It’s not very fancy, but it’ll do. Put the common header material, such as corporate logo, sign-in/sign-out and other links, etc., at the top; at the bottom, you’ll have items such as a copyright notice, some links, etc. However, the detail to notice is the {% block ... %} tag in the middle. This defines a named area that subtemplates will control.
To use this new base template, you must extend it and define the block that is dropped into the base template. For example, if we wanted to have our user-facing blog app page use this template, just add the appropriate boilerplate, and you’re good to go. To avoid confusion with archive.html, we’ll call it index.html, generically:
<!-- index.html -->
{% extends "base.html" %}
{% block content %}
{% for post in posts %}
<h2>{{ post.title }}</h2>
<p>{{ post.timestamp }}</p>
<p>{{ post.body }}</p>
<hr>
{% endfor %}
{% endblock %}
The {% extends ... %} tag instructs Django to look for a template named base.html and plug the content of any named blocks in this template into the corresponding blocks in that template. If you do decide to try template inheritance, be sure to change your view to use index.html as the template file instead of the original archive.html.
11.15. *Unit Testing
Testing is something that we shouldn’t even need to remind developers to do. You should eat, live, and breathe testing for every app you write. Like so many other aspects of programming, Django offers testing in the form of extending the Python stock unit-testing module that comes with the version of Python you’re using. Django can also test documentation strings (or docstrings for short). Perhaps not a surprise, these are called doctests, and you can read about them in the Django documents page on testing, so we won’t cover them here. More important are unit tests.
Unit tests can be simple to create. Django attempts to motivate you by auto-generating a tests.py file for you when you create your application. Replace mysite/blog/tests.py with the contents of Example 11-1.
Example 11-1. The blog Application Unit-Testing Module (tests.py)
1 # tests.py
2 from datetime import datetime
3 from django.test import TestCase
4 from django.test.client import Client
5 from blog.models import BlogPost
6
7 class BlogPostTest(TestCase):
8 def test_obj_create(self):
9 BlogPost.objects.create(title='raw title',
10 body='raw body', timestamp=datetime.now())
11 self.assertEqual(1, BlogPost.objects.count())
12 self.assertEqual('raw title',
13 BlogPost.objects.get(id=1).title)
14
15 def test_home(self):
16 response = self.client.get('/blog/')
17 self.failUnlessEqual(response.status_code, 200)
18
19 def test_slash(self):
20 response = self.client.get('/')
21 self.assertIn(response.status_code, (301, 302))
22
23 def test_empty_create(self):
24 response = self.client.get('/blog/create/')
25 self.assertIn(response.status_code, (301, 302))
26
27 def test_post_create(self):
28 response = self.client.post('/blog/create/', {
29 'title': 'post title',
30 'body': 'post body',
31 })
32 self.assertIn(response.status_code, (301, 302))
33 self.assertEqual(1, BlogPost.objects.count())
34 self.assertEqual('post title',
35 BlogPost.objects.get(id=1).title)
Line-by-Line Explanation
Lines 1–5
Here we’re importing datetime for post timestamps, the main test class, django.test.TestCase, the test Web client django.test.client.Client, and finally, our BlogPost class.
Lines 8–13
There are no naming restrictions for your test methods other than they must begin with test_. The test_obj_create() method does nothing more than test to ensure that the object was created successfully and affirms the title. The assertEqual() method ensures that both arguments equate or it fails this test. Here, we assert both the object count as well as the data entered. This is a very basic test, and with a bit of imagination, we can probably make it more useful than it stands. You might also consider testing the ModelForm, too.
Lines 15–21
The next pair of test methods checks the user interface—they make Web calls, as opposed to the first method, which just tests object creation. The test_home() method calls the main page for our app at '/blog/' and ensures an HTTP “error” code of 200 is received; test_slash() is practically the same, but confirms that our URLconf redirection that uses the redirect_to() generic view does work. The assertion here is slightly different because we’re expecting a redirect response code such as 301 or 302. We’re really expecting a 301 here, but don’t fail the test if it returns a 302 as a demonstration of the assertIn() test method as well as reusing this assertion for the final two test methods, both of which should result in 302 responses. In lines 16 and 20, you might be wondering where self.client came from. If you subclass from django.test.TestCase, you get an instance of a Django test client automatically for free by referring to it direct as self.client.
Lines 23–35
These last two methods both test the view for '/blog/create/', create_blogpost(). The first, test_empty_create(), tests for the situation in which someone erroneously makes a GET request without any data. Our code should ignore the request and redirect to '/blog/'. The second, test_post_create(), simulates a true user request for which real data is sent via POST, the entry created, and the user redirected to '/blog/'. We assert all three: 302 redirect, adding of the new post, and data validation.
Okay, let’s try it out by running the following command and observing the output:
$ manage.py test
Creating test database 'default'...
.....................................................................
.....................................................................
..........
---------------------------------------------------------------------
Ran 288 tests in 7.061s
OK
Destroying test database 'default'...
By default, the system creates a separate in-memory database (called default) just for testing. This is so you don’t panic that you’re going to damage your production data. Each dot (.) means a passing test. Unsuccessful tests are denoted by “E” for error and “F” for failure. To learn more about testing in Django, check out the documentation at http://docs.djangoproject.com/en/dev/topics/testing.
11.15.1. Blog Application Code Review
Let’s take a look at all the final versions of our application code at the same time (plus __init__.py [empty] and tests.py [see Example 11-1]). The comments have been left out here, but you can download either these stripped versions or versions with more documentation on this book’s Web site.
Although not officially part of our blog application, the first file we look at in Example 11-2 is the project-level URLconf file, mysite/urls.py.
Example 11-2. The mysite Project URLconf (urls.py)
1 # urls.py
2 from django.conf.urls.defaults import *
3 from django.contrib import admin
4 admin.autodiscover()
5
6 urlpatterns = patterns('',
7 (r'^$', 'django.views.generic.simple.redirect_to',
8 {'url': '/blog/'}),
9 (r'^blog/', include('blog.urls')),
10 (r'^admin/', include(admin.site.urls)),
11 )
Line-by-Line Explanation
Lines 1–4
The setup lines import the stuff necessary for the project URLconf plus the admin-enabling code. Not all apps will employ the admin, so the second and third lines can be omitted if you’re not using it.
Lines 6–11
The urlpatterns designate actions and directives to either generic views or any of your project’s apps. The first pattern is for '/', which redirects to the handler for '/blog/' by using the redirect_to() generic view; the second pattern, for '/blog/', sends all requests to the blog app’s URLconf (coming up next); and the last one is for admin requests.
The next file we look at in Example 11-3 is the app’s URLconf, mysite/blog/urls.py.
Example 11-3. The blog App’s URLconf (urls.py)
The blog app’s URLconf file. URLs should be processed here calling view functions (or class methods).
1 # urls.py
2 from django.conf.urls.defaults import *
3
4 urlpatterns = patterns('blog.views',
5 (r'^$', 'archive'),
6 (r'^create/', 'create_blogpost'),
7 )
Line-by-Line Explanation
Lines 4–7
The core of urls.py is the definition of the URL mappings (urlpatterns). When users visit '/blog/', they are handled by the blog.views.archive(). Recall that the '/blog' is stripped off by the project URLconf, so by the time we get here, the URL path is only '/'. A call to '/blog/create/' should only come from POSTing the form and its data; this request is handled by the blog.views.create_blogpost() view function.
In Example 11-4, we take a look at the data model for the blog app, mysite/blog/models.py. It also contains the form class, as well.
Example 11-4. The blog App Data and Form Models File (models.py)
The data models live here, but the latter group can be split off into their own file.
1 # models.py
2 from django.db import models
3 from django import forms
4
5 class BlogPost(models.Model):
6 title = models.CharField(max_length=150)
7 body = models.TextField()
8 timestamp = models.DateTimeField()
9 class Meta:
10 ordering = ('-timestamp',)
11
12 class BlogPostForm(forms.ModelForm):
13 class Meta:
14 model = BlogPost
15 exclude = ('timestamp',)
Line-by-Line Explanation
Lines 1–3
We import the classes required to define models and forms. We include both classes together in this simple app. If you had more models and/or forms, you might want to split out the forms into a separate forms.py file.
Lines 5–10
This is the definition of our BlogPost model. It includes its data attributes as well as requests that all database queries sort the objects in reverse order according to each row’s timestamp field (via the Meta inner class).
Lines 12–15
Here, we create the BlogPostForm object, a form version of the data model. The Meta.model attribute specifies on which data model it should be based, and the Meta.exclude variable requests that this data field be absent from the automatically generated forms. It is expected that the developer fills in this field (if required) before the BlogPost instance is saved to the database.
The mysite/blog/admin.py file in Example 11-5 is only used if you enable the admin for your application. This file contains the classes you’re registering for use in the admin as well as any specific admin classes.
Example 11-5. The blog Application Admin Configuration File (admin.py)
1 # admin.py
2 from django.contrib import admin
3 from blog import models
4
5 class BlogPostAdmin(admin.ModelAdmin):
6 list_display = ('title', 'timestamp')
7
8 admin.site.register(models.BlogPost, BlogPostAdmin)
Line-by-Line Explanation
Lines 5–8
Purely for the optional Django admin, the list_display attribute of the BlogPostAdmin class gives the admin direction as to which fields to display in the admin console to help viewers differentiate each data record. There are many other attributes we didn’t get a chance to cover; however, we encourage you to read the documentation at http://docs.djangoproject.com/en/dev/ref/contrib/admin/#modeladmin-options. Without this designation, you’ll just see the generic object names for every row, making it nearly impossible to differentiate instances from one another. The last thing we do (on line 8) is to register both the data and admin models with the admin app.
Example 11-6 presents the core of our app, which is in mysite/blog/views.py. This is where all of our views go; it is the equivalent of the controller code for most Web apps. The ironic thing about Django, its adherence to DRY, and the power of generic views is that the goal is to have an empty views file. (However, there are those who feel that they hide too much, making the source code harder to read and understand.) Hopefully any custom or semi-generic views you do create in this file are short, easy-to-read, maximize code reuse, etc.—in other words, as Pythonic as possible. Creating good tests and documentation also goes without saying.
Example 11-6. The blog Views File (views.py)
All of your app’s logic lives in the views.py file, its components called via URLconf.
1 # views.py
2 from datetime import datetime
3 from django.http import HttpResponseRedirect
4 from django.views.generic.simple import direct_to_template
5 from blog.models import BlogPost, BlogPostForm
6
7 def archive(request):
8 posts = BlogPost.objects.all()[:10]
9 return direct_to_template(request, 'archive.html',
10 {'posts': posts, 'form': BlogPostForm()})
11
12 def create_blogpost(request):
13 if request.method == 'POST':
14 form = BlogPostForm(request.POST)
15 if form.is_valid():
16 post = form.save(commit=False)
17 post.timestamp=datetime.now()
18 post.save()
19 return HttpResponseRedirect('/blog/')
Line-by-Line Explanation
Lines 1–5
There are many imports here, so it’s time to share another best practice: organize your imports by order of proximity to your app. That means access all standard library modules (datetime) and packages first. Those are likely to be dependencies of your framework modules and packages—these are the second set (django.*). Finally, your app’s own imports come last (blog.models). Doing your imports in this order avoids the most obvious dependency issues.
Lines 7–11
The blog.views.archive() function is the primary view of our app. It extracts the ten most recent BlogPost objects from the database, and then bundles that data as well as creates an input form for users. It then passes both as the context to give to the archive.html template. The shortcut function render_to_response() was replaced by the direct_to_template() generic view (turning archive() into a semi-generic view in the process).
Originally, render_to_response() not only took the template name and context, but it also passed the RequestContext object required for the CSRF verification and the resulting response is returned back to the client. When we converted to using direct_to_template(), we didn’t need to pass in the request context instance because all of this stuff was pushed down to the generic view to handle, leaving only core app matters for the developer to deal with, a shortcut to the (original) shortcut, if you will.
Lines 12–19
The blog.views.create_blogpost() function is intimately tied to the form action in template/archive.html because the URLconf directs all POSTs to this view. If the request was indeed a POST, then the BlogPostForm object is created to extract the form fields filled in by the user. After successful validation on line 16, we call the form.save() method to return the instance of BlogPost that was created.
As mentioned earlier, the commit=False flag instructs save() to not store the instance in the database yet (because we need to fill in the timestamp). This requires us to explicitly call the instance’s post.save() method to actually persist it. If is_valid() comes back False, we skip saving the data; the same applies if the request was a GET, which is what happens when a user enters this URL directly into the address bar.
The last file we’ll look at the template file myblog/apps/templates/archive.html, which we present in Example 11-7.
Example 11-7. The blog App’s Main Page Template File (archive.html)
The template file features HTML plus logic to programmatically control the output.
1 <!-- archive.html -->
2 <form action="/blog/create/" method=post>{% csrf_token %}
3 <table>{{ form }}</table><br>
4 <input type=submit>
5 </form>
6 <hr>
7
8 {% for post in posts %}
9 <h2>{{ post.title }}</h2>
10 <p>{{ post.timestamp }}</p>
11 <p>{{ post.body }}</p>
12 <hr>
13 {% endfor %}
Line-by-Line Explanation
Lines 1–6
The first half of our template represents the user input form. Upon submission, the server executes your create_blogpost() view function we discussed a moment ago to create a new BlogPost entry in the database. The form variable in line 2 comes from an instance of BlogPostForm, which is the form that is based on your data model (in a tabular format). As we mentioned earlier, you can choose from other options. We also explained that the csrf_token on line 1 is used to protect against CSRF—it is also the reason that you must provide the RequestContext in the archive() view function so that the template can use it here.
Lines 8–13
The latter half of the template simply takes the set of (at most) ten (most recent) BlogPost objects and loops through them, emitting individual post details for the user. In between each (as well as just prior to this loop) are horizontal rules to visually segregate the data.
11.15.2. Blog App Summary
Of course, we could continue adding features to our blog app ad nauseam (many people do), but hopefully we’ve given you enough of a taste of the power of Django. (Check the exercises at the end of the chapter for additional challenges.) In the course of building this skeletal blog app, you’ve seen a number of Django’s elegant, labor-saving features. These include the following:
• The built-in development server, which makes your development work more self-contained, and which automatically reloads your code if you edit it.
• The pure-Python approach to data model creation, which saves you from having to write or maintain SQL code or XML description files.
• The automatic admin application, which provides full-fledged content-editing features even for non-technical users.
• The template system, which can be used to produce HTML, CSS, JavaScript, or any textual output format.
• Template filters, which can alter the presentation of your data (such as dates) without interfering with your application’s business logic.
• The URLconf system, which gives you great flexibility in URL design while keeping application-specific portions of URLs in the application, where they belong.
• ModelForm objects give you a simple way of creating form data based on your data model with little effort on your part.
Finally, we encourage you to stage your app on a real server connected to the Internet and stop using the development server. By getting off of localhost/127.0.0.1, you can really confirm that your app will work in a production environment.
If you enjoyed this example, you’ll find an extended version of it along with four other similar training apps of differing variety in Python Web Development with Django. Now that you’ve got your feet wet, let’s do a larger, more ambitious real-world project: a Django app that handles e-mail, talks to Twitter, performs OAuth, and is a launch point for something even bigger.
11.16. *An Intermediate Django App: The TweetApprover
Now that you have seen the basics of Django, let’s create a more realistic application that does something useful. This second half of our treatment on Django will show you how to perform the following tasks:
1. Segment a larger Web app (project) in Django
2. Use third-party libraries
3. Use Django’s permissions system
4. Send e-mails from Django
This application will solve an increasingly common use case: a company has a Twitter account and wants regular employees to post updates to it about sales, new products, etc. However, there is some business logic involved, too, and a manager must approve all tweets before they are posted.
When a reviewer approves a tweet, it is then automatically posted to the company’s Twitter account, but when the reviewer rejects a tweet, it is sent back to the author with a note indicating why and/or suggestions to improve if resubmission is desired or intended. You can see this workflow illustrated in Figure 11-21.

Figure 11-21. A target TweetApprover workflow.
It would take considerable effort to write this app from scratch. We’d have to build the data model, write code to connect to the database to read and write data, map data entities to Python classes, write code to handle Web requests, dress up the data in HTML before it’s returned to the user, and so on. With Django, all of this become easy. And even though Django doesn’t have built-in functionality for communicating with Twitter, there are Python libraries available that can do the job.
11.16.1. Creating the Project File Structure
When designing a new Django application, the app structure is a good place to start. With Django, you can split up a project into separate applications. In our blog example, we only had one app (blog) in our project, but as we mentioned early on in the chapter, you’re not restricted to just one. Whenever you are writing a non-trivial application, it is easier to manage multiple small applications as opposed to a large, single, monolithic application.
“TweetApprover” has two faces: one for regular employees (who post tweets), and one for managers (who approve tweets). We will build one Django app for each within the TweetApprover project; the apps will be called poster and approver.
First, let’s create the Django project. From the command-line, run the django-admin.py startproject command, similar to what we did earlier with our mysite project.
$ django-admin.py startproject myproject
To distinguish this project from our mysite project earlier, we’ll call it “myproject,” instead—yeah... we’re not exactly pushing the limits of creativity here. :-) Anyway, this creates the myproject directory along with the standard boilerplate files, about which you already know.
From the command line, jump into the myproject folder, in which we can create the two apps, poster and approver:
$ manage.py startapp poster approver
This creates the directories poster and approver within myproject, with those standard app boilerplate files in each. Your barebones file structure should now look like this:
$ ls -l *
-rw-r--r-- 1 wesley admin 0 Jan 11 10:13 __init__.py
-rwxr-xr-x 1 wesley admin 546 Jan 11 10:13 manage.py
-rw-r--r-- 1 wesley admin 4790 Jan 11 10:13 settings.py
-rw-r--r-- 1 wesley admin 494 Jan 11 10:13 urls.py
approver:
total 24
-rw-r--r-- 1 wesley admin 0 Jan 11 10:14 __init__.py
-rw-r--r-- 1 wesley admin 57 Jan 11 10:14 models.py
-rw-r--r-- 1 wesley admin 514 Jan 11 10:14 tests.py
-rw-r--r-- 1 wesley admin 26 Jan 11 10:14 views.py
poster:
total 24
-rw-r--r-- 1 wesley admin 0 Jan 11 10:14 __init__.py
-rw-r--r-- 1 wesley admin 57 Jan 11 10:14 models.py
-rw-r--r-- 1 wesley admin 514 Jan 11 10:14 tests.py
-rw-r--r-- 1 wesley admin 26 Jan 11 10:14 views.py
The Settings File
After you have created a new Django project, you usually open the settings.py file and edit it for your installation. For TweetApprover, we need to add a few settings that aren’t in the file by default. First, add a new setting to specify who should be notified when new tweets are submitted and need to be reviewed.
TWEET_APPROVER_EMAIL = '[email protected]'
Note that this is not a standard Django setting, but something only our app needs. As the settings file is a standard Python file, we are free to add our own settings. However, rather than putting this information in each of the two apps, it’s simpler to have a single place for this setting at the project level. Be sure to replace the example value above with the real e-mail address of the manager assigned to review tweets.
Similarly, we need to instruct Django how to send e-mail. These settings are read by Django, but they are not included in the settings file by default, so we need to add them.
EMAIL_HOST = 'smtp.mydomain.com'
EMAIL_HOST_USER = 'username'
EMAIL_HOST_PASSWORD = 'password'
DEFAULT_FROM_EMAIL = '[email protected]'
SERVER_EMAIL = '[email protected]'
Replace the example values above with valid ones for your e-mail server. If you don’t have access to a mail server, feel free to skip these five e-mail settings and comment out the code in TweetApprover that sends e-mails. I’ll remind you when we get to that part. For details on all of Django’s settings, visit http://docs.djangoproject.com/en/dev/ref/settings.
TweetApprover will publish tweets by using Twitter’s public API. To do that, the application needs to supply OAuth credentials. (We’ll explain more about OAuth in the sidebar that’s coming up.) OAuth credentials are similar to regular usernames and passwords, except that one pair of credentials is needed for the application (called “consumer” in OAuth) and one pair is needed for the user.
All four pieces of data must be sent to Twitter for the API calls to work. Just like TWEET_APPROVER_EMAIL in our first example in this subsection, these settings are not standard Django settings but are custom to the TweetApprover application.
TWITTER_CONSUMER_KEY = '. . .'
TWITTER_CONSUMER_SECRET = '. . .'
TWITTER_OAUTH_TOKEN = '. . .'
TWITTER_OAUTH_TOKEN_SECRET = '. . .'
Fortunately Twitter makes it easy to obtain these four values. Go to http://dev.twitter.com, sign in, and then click Your Apps. Next, click Register New App if you don’t have an app yet, or select the app if you have one. For creating a new app, fill out the form to match that shown in Figure 11-22. It does not matter what you put in the Application Website field. Note that in our illustrations for this chapter, we are using the Tweet-Approver name, which is obviously taken already, so you will need to create your own application name.
Figure 11-22. Registering a new application with Twitter.
After you have filled out the form and clicked Save Application, click the Application Details button. On the details page, look for the OAuth 1.0a Settings. From that section, copy the Consumer Key and Consumer Secret values into the variables TWITTER_CONSUMER_KEY and TWITTER_CONSUMER_SECRET variables, respectively, in your settings file.
Finally, we need the values for TWITTER_OAUTH_TOKEN and TWITTER_ OAUTH_TOKEN_SECRET. Click the My Access Token button and you will see a page similar to that depicted in Figure 11-23 that has these values.

Figure 11-23. Getting the OAuth token and OAuth token secret from Twitter.
![]() Core Note: OAuth and Authorization vs. Authentication
Core Note: OAuth and Authorization vs. Authentication
OAuth is an open authorization protocol that provides for a safe and secure way of letting applications access data on your behalf via an API. Not only does it allow you to grant access to applications without revealing your username and password, it also allows you to revoke access easily. An increasing number of Web APIs are using OAuth, just like Twitter. You can read more about how OAuth works at the following locations:
http://en.wikipedia.org/wiki/Oauth
Note that OAuth is an example of an authorization protocol, which is different from a protocol such as OpenID, which is an authentication protocol. Rather than data access, the purpose of authentication is identity, such as a username and password pair. An example in which both play a part is an app that requires a user to authenticate via Twitter but (the user) authorizes that app to (be able to) post a status update to his Twitter stream.
As usual, you should edit the DATABASES variable to point to the database in which TweetApprover will store its data. In our simple blog app, we used SQLite, but recall that we did suggest you can use any supported database. If you want to stick with SQLite, then just copy the appropriate settings from your blog app. Don’t forget to run manage.py syncdb as you did before.
Also, as we saw earlier, it’s usually a good idea to enable Django’s admin for easy CRUD data access. Earlier in our blog app, we mostly ran the admin with the development server where the images and stylesheets for the admin pages are served automatically. If you are running on an actual Web server, like Apache, you need to ensure that the ADMIN_ MEDIA_PREFIX variable points to the Web directory in which these files reside. You can find more details on this at http://docs.djangoproject.com/en/dev/howto/deployment/modwsgi/#serving-the-admin-files
You can also specify to Django where to look for HTML templates for Web pages if they are not in the normal place, which would be a templates directory under each app. For example, if you want to create a single unified place for them like we would for this app, then you need to explicitly call this out in your settings.py file.
For TweetApprover, we want to consolidate to a single templates folder in the myproject directory. To do this, edit settings.py and ensure that the TEMPLATE_DIRS variable points to that physical directory. On a POSIX computer, it would look similar to this:
TEMPLATES_DIRS = (
'/home/username/myproject/templates',
)
On a Windows-based PC, your directory path would look a little different because of the DOS filepath names. If we were to add the project to our existing C:pydjango folder, the path would look like this:
r'c:pydjangomyproject emplates',
Recall that the leading “r” is to indicate a Python raw string, which is preferable here over requiring multiple backslashes.
Finally, you need to inform Django about the two apps (poster and approver) you created. You do this by adding 'myproject.approver' and 'myproject.poster' to the INSTALLED_APPS variable in the settings file.
11.16.2. Installing the Twython Library
The TweetApprove app will publish tweets to the world by using Twitter’s public API. Fortunately, there are a couple of good libraries that make it really easy to call this API. Twitter maintains a list of the most popular ones at http://dev.twitter.com/pages/libraries#python. The upcoming Web Services chapter features both the Twython and Tweepy libraries.
For this application, we will use the Twython library to facilitate communication between our app and Twitter. We’ll get it by using easy_install. (You can also install it by using pip.) easy_install will install twython as well as its dependencies, oauth2, httplib2, and simplejson. Unfortunately, due to naming conventions, although Python 2.6 and later comes with simplejson, it’s named as json, so easy_install will still install all three of these libraries, which twython is dependent on, as you can see from the following output:
$ sudo easy_install twython
Password: ***********
Searching for twython
. . .
Processing twython-1.3.4.tar.gz
Running twython-1.3.4/setup.py -q bdist_egg --dist-dir /tmp/
easy_install-QrkR6M/twython-1.3.4/egg-dist-tmp-PpJhMK
. . .
Adding twython 1.3.4 to easy-install.pth file
. . .
Processing dependencies for twython
Searching for oauth2
. . .
Processing oauth2-1.2.0.tar.gz
Running oauth2-1.2.0/setup.py -q bdist_egg --dist-dir /tmp/
easy_install-br8On8/oauth2-1.2.0/egg-dist-tmp-cx3yEm
Adding oauth2 1.2.0 to easy-install.pth file
. . .
Searching for simplejson
. . .
Processing simplejson-2.1.2.tar.gz
Running simplejson-2.1.2/setup.py -q bdist_egg --dist-dir /tmp/
easy_install-ZiTOri/simplejson-2.1.2/egg-dist-tmp-FWOza6
Adding simplejson 2.1.2 to easy-install.pth file
. . .
Searching for httplib2
. . .
Processing httplib2-0.6.0.zip
Running httplib2-0.6.0/setup.py -q bdist_egg --dist-dir /tmp/
easy_install-rafDWd/httplib2-0.6.0/egg-dist-tmp-zqPmmT
Adding httplib2 0.6.0 to easy-install.pth file
. . .
Finished processing dependencies for twython
![]() Core Tip: Troubleshooting your installation
Core Tip: Troubleshooting your installation
Your installation of version 2.6 might not go as smoothly as we portray. Here are a couple of examples of what can go wrong:
1. I ran into a situation installing simplejson on Python 2.5 on a Mac in which easy_install just could not get it right, complained, and quit, leaving me hanging. In this case, I resorted to doing it the old-fashioned way:
• Find and downloaded the tarball (in my case, simplejson)
• Untar/unzip the distribution and go into the top-level directory
• Run python setup.py install
2. Another reader discovered a problem when compiling the optional simplejson speedups component. In this case, because it is a Python extension, it requires you to have all the necessary tools to build Python extensions, which includes Python.h, etc., accessible by your compiler. On a Linux system, you would just install the python-dev package.
We’re sure that there are other caveats out there, but if you run into similar issues, hopefully this helps. Small incompatibilities are everywhere; don’t get discouraged if it affects you. There is plenty of help out there!
Once everything has been successfully installed, it’s time to decide which URLs TweetApprover will use and how they will map to different user actions.
11.16.3. URL Structure
To create a consistent URI strategy, we’re going to name all functionality for the poster app with URLs that start with /post, and for the approver app, URLs that start with /approve. This means that if your copy of Tweet-Approver runs in your domain example.com, the poster URLs would start with http://example.com/post, and the approver URLs would start with http://example.com/approve.
Now let’s go into more detail about the pages under /post that are used to propose new tweets. We will need a page for submitting a brand new tweet; let’s take the user to that page when we receive the URL /post without anything after it. Once the user has submitted a tweet, we’ll need a page that acknowledges the submission; let’s put that at /post/thankyou. Finally, we will need a URL that takes the user to an existing tweet that needs to be edited; let’s put that under /post/edit/X, where X is the ID of the tweet that should be edited.
The pages for the manager are under /approve; let’s display a list of pending and published tweets when the user accesses that URL. We will also need a page for reviewing one particular tweet and leaving feedback on it; let’s put that under /approve/review/X, where X is the ID of the tweet.
Finally, we have to decide what page is displayed when the user goes to the bare URL (example.com/). As most users of TweetApprover will be employees proposing new tweets, let’s make the bare URL point to the same page as /post.
We have seen that Django uses configuration files to map URLs to code. At the project level, in the myproject directory, you will find the urls.py file that directs Django to which application in the project to route requests. Example 11-8 presents the file that implements the preceding URL structure:
Example 11-8. The Project URLconf file (myproject/urls.py)
As with the previous example, this project URLconf also goes to either our app or the admin site.
1 # urls.py
2 from django.conf.urls.defaults import *
3 from django.contrib import admin
4 admin.autodiscover()
5
6 urlpatterns = patterns('',
7 (r'^post/', include('myproject.poster.urls')),
8 (r'^$', include('myproject.poster.urls')),
9 (r'^approve/', include('myproject.approver.urls')),
10 (r'^admin/', include(admin.site.urls)),
11 (r'^login', 'django.contrib.auth.views.login',
12 {'template_name': 'login.html'}),
13 (r'^logout', 'django.contrib.auth.views.logout'),
14 )
Line-by-Line Explanation
Lines 1–4
The first few lines represent boilerplate that always seem to show up in URLconf files: the proper imports as well as the admin for development. (When you’re done with development and/or don’t want the admin, it’s easy to get rid of it.)
Lines 6–14
Things become interesting when we get to the urlpatterns variable. Line 7 instructs Django that for any URL that starts with post/ (after the domain name) it should consult the URL configuration myproject.poster.urls. This configuration is in the file myproject/poster/urls.py. The next line (line 8) says that any empty URL (after the domain name) should also be handled per the poster application’s configuration. Line 9 directs Django to route URLs starting with approve/ to the approver application.
Finally, the file includes directives for URLs leading to the admin (line 10) and login and logout pages (lines 11 and 12). A lot of this functionality is part of Django, so you will not need to write code for it. As yet, we haven’t discussed authentication, but here it is as simple as including a few more 2-tuples in your URLconf. Django provides its own authentication system, but you can create your own, as well. In Chapter 12, you’ll find that Google App Engine offers two authentication options: Google Accounts, or federated login using OpenID.
To recap, the complete URL dispatching looks like what you see in Table 11-3.
Table 11-3. The URLs Handled by This Project and Corresponding Actions

As you can see in Table 11-3, the main purpose of a project’s URLconf is to route requests to the appropriate apps and their handlers, so we’re going to continue our journey by looking at the app-level urls.py files. We will start with the poster application.
As we just saw in the project’s URLconf, the URLs that match /post/ or “/” will be redirected to the poster application’s URLconf, myproject/poster/urls.py. The job of this file in Example 11-9 is to map the rest of the URL to actual code that will be executed within the poster application.
Example 11-9. The poster Application’s urls.py URLconf file
The URLconf for the poster app processes a poster’s actions.
1 from django.conf.urls.defaults import *
2
3 urlpatterns = patterns('myproject.poster.views',
4 (r'^$', 'post_tweet'),
5 (r'^thankyou', 'thank_you'),
6 (r'^edit/(?P<tweet_id>d+)', 'post_tweet'),
7 )
The regular expressions in this file only see the part of the URL that follows after /post/, and based on the first parameter to patterns(), you can see that all view functions will be in myproject/poster/views.py. For the first URL pattern, if it’s empty (meaning the original request was either /post/ or “/”), the post_tweet() view is called. If that part is thankyou, then thank_you() is called. Finally, if that part of the URL is edit/X, where X is a number, then post_tweet() is called and X is passed as the tweet_id parameter to the method. Pretty nifty, isn’t it? If you’re unfamiliar with this regular expression syntax assigning matches to variable names instead of integers (the default), flip back to Chapter 1, “Regular Expressions,” for more information.
Because we’ve segregated our project into two distinct applications, the URLconf and view function files are kept to a minimum. They are also simpler to digest and easier to reuse. Now that we’re done looking at the setup for the poster application, let’s do the same for the approver application.
By the same token as our analysis of the poster URLconf, the file myproject/approver/urls.py shown in Example 11-10 is consulted when Django sees a request for a URL that starts with /approve/. It calls list_tweets() if the path doesn’t continue beyond /approve/, and review_tweet(tweet_id=X) if the URL path matches /approve/review/X.
Example 11-10. The approver Application’s urls.py URLconf file
The URLconf for the approver app processes an approver’s actions
1 from django.conf.urls.defaults import *
2
3 urlpatterns = patterns('myproject.approver.views',
4 (r'^$', 'list_tweets'),
5 (r'^review/(?P<tweet_id>d+)$', 'review_tweet'),
6 )
This URLconf is shorter because the approver app consists of fewer actions. At this point, we know exactly where to direct users based on the inbound URL path. Now we need to cover the details about the data model used for our project.
11.16.4. The Data Model
TweetApprover needs to store tweets in the database. When managers review tweets, they need to be able to annotate them, so each tweet can have multiple comments. Both tweets and comments need some data fields, as illustrated in Figure 11-24.

Figure 11-24. The data model for TweetApprover.
The state field will be used to store where in the life cycle each tweet is. Figure 11-25 demonstrates that there are three different states, and Django can help us to ensure that no tweets end up in any other states.

Figure 11-25. The state model for tweets in TweetApprover.
As we have seen, Django makes it really easy to create the right tables in the database and to read and write Tweet and Comment objects. In this case, the data model can go in either myproject/poster/models.py or in myproject/approver/models.py. As shown in Example 11-11, we chose, somewhat arbitrarily, to put it in the first place. Not to worry, the approver app will still be able to access the data model.
Example 11-11. The models.py Data Models File for the poster app
The data model’s file for the poster app contains classes for posts (Tweet) as well as feedback (Comment).
1 from django.db import models
2
3 class Tweet(models.Model):
4 text = models.CharField(max_length=140)
5 author_email = models.CharField(max_length=200)
6 created_at = models.DateTimeField(auto_now_add=True)
7 published_at = models.DateTimeField(null=True)
8 STATE_CHOICES = (
9 ('pending', 'pending'),
10 ('published', 'published'),
11 ('rejected', 'rejected'),
12 )
13 state = models.CharField(max_length=15, choices=STATE_CHOICES)
14
15 def __unicode__(self):
16 return self.text
17
18 class Meta:
19 permissions = (
20 ("can_approve_or_reject_tweet",
21 "Can approve or reject tweets"),
22 )
23
24 class Comment(models.Model):
25 tweet = models.ForeignKey(Tweet)
26 text = models.CharField(max_length=300)
27 created_at = models.DateTimeField(auto_now_add=True)
28
29 def __unicode__(self):
30 return self.text
The first data model is the Tweet class. This represents the message, commonly called a post or tweet, that authors are trying to submit to the Twitter service, and the ones which the administrator or manager must approve. Tweet objects can be commented on by administrators/managers, so Comment objects are meant to represent the zero or more comments a Tweet can have. Let’s go into some detail about these classes and their attributes.
The text field and author_email field of the Tweet class are limited to 140 and 200 characters, respectively. Tweets are limited to the maximum length of short message service [SMS] or text messages on mobile phones, and most regular e-mail addresses are shorter than 200 characters long.
For the created_at field, we use Django’s handy auto_now_add feature. This means that whenever we create a new tweet and save it to the database, the created_at field will contain the current date and time, unless we explicitly set it. Another DateTimeField, published_at, is allowed to have a null value. This will be used for tweets that haven’t been published to Twitter yet.
After that, we see an enumeration of states and a definition of the state field. By calling out the states like this and binding the state variable to them, Django will not allow Tweet objects to have any other but one of the three allowed states. The definition of the __unicode__() method instructs Django to display each Tweet object’s text attribute in the administration Web site—remember earlier in this chapter how BlogPost object wasn’t very useful? Well, neither is Tweet object, especially when there are more than one listed with the exact same label.
We were introduced to the Meta inner class earlier, but as a reminder, you can use it to inform Django about other special requirements on a data entity. In this case, it is used to alert Django about a new permission flag. By default, Django creates permission flags for adding, changing, and deleting all entities in the data model. The application can check if the currently logged-in user has permission to add a Tweet object; with the Django admin, the site administrator can assign permissions to registered users.
This is all fine, but the TweetApprover app needs a special permission flag for publishing a tweet to Twitter. This is slightly different from adding, changing, or deleting Tweet objects. By adding this flag to the Meta class, Django will create the appropriate flags in the database. We will see later how to read this flag to ensure that only managers can approve or reject tweets.
The Comment class is secondary but worth discussing anyway. It has a ForeignKey field that points to the Tweet class. This directs Django to create a one-to-many relationship between Tweet and Comment objects in the database. Like Tweet objects, Comment records also have text and created_at fields, which have identical meanings as their Tweet brethren.
Once the model file is in place, we can run the syncdb command to create the tables in the database and create a super-user login:
$ ./manage.py syncdb
Finally, as presented in Example 11-12, we need to add the myproject/poster/admin.py file to instruct Django to allow editing of Tweet and Comment objects within the admin.
Example 11-12. Register Models with the Admin (admin.py)
The URLconf for the poster app processes a poster’s actions
1 from django.contrib import admin
2 from models import *
3
4 admin.site.register(Tweet)
5 admin.site.register(Comment)
All the pieces are now in place for Django to auto-generate an administration Web site for this application. If you want to try the admin Web site right now, before you have written the approver and poster views, you need to temporarily comment out lines 6–8 in Example 11-13 (myproject/urls.py) that reference these views. Then you can access the admin Web site (see Figure 11-26) with the /admin URL. Remember to uncomment these lines again once you have created poster/views.py and approver/views.py.

Figure 11-26. The built-in Django administration site.
Example 11-13. The (Temporary) Project URLconf File (myproject/urls.py)
References to views we haven’t written yet have been taken out, so we can try out Django’s admin Web site.
1 from django.conf.urls.defaults import *
2 from django.contrib import admin
3 admin.autodiscover()
4
5 urlpatterns = patterns('',
6 #(r'^post/', include('myproject.poster.urls')),
7 #(r'^$', include('myproject.poster.urls')),
8 #(r'^approve/', include('myproject.approver.urls')),
9 (r'^admin/', include(admin.site.urls)),
10 (r'^login', 'django.contrib.auth.views.login',
11 {'template_name': 'login.html'}),
12 (r'^logout', 'django.contrib.auth.views.logout'),
13 )
Figure 11-27 shows that when you create a new user, you see the custom permission flag for Can approve or reject tweets. Create a user and grant the new user this permission; you will need it when testing out Tweet-Approver later. After you create a new user, you will be able to edit the user’s profile and set custom permissions. (You won’t be able to set those permissions while you’re creating the new user.)

Figure 11-27. Assigning our custom permission for a new user.
![]() Core Note: Minimizing the amount of code
Core Note: Minimizing the amount of code
So far we’ve done a lot of configuration and very little actual programming. One of the advantages of Django is that if you do the configuration correctly, you don’t have to write a lot of code. Yes, it’s somewhat ironic to think that developing code is discouraged. However, you need to keep in mind that Django was created at a company where the majority of users were journalists, not Web developers. Empowering writers and other newspaper staff who know how to use a computer is great because now you’re giving them some Web development skills, but not to the point of overwhelming them and trying to change their careers. This (non-developer) user-friendliness is the approach employed by Django.
11.16.5. Submitting New Tweets for Review
When you created the poster application, Django generated the near-empty file views.py in that application’s directory. This is where the methods referenced in the URL configuration files should be defined. Example 11-14 represents what our complete myproject/poster/views.py file should look like.
Example 11-14. The poster Application View Functions (views.py)
The core logic for the poster app resides here.
1 # poster/views.py
2 from django import forms
3 from django.forms import ModelForm
4 from django.core.mail import send_mail
5 from django.db.models import Count
6 from django.http import HttpResponseRedirect
7 from django.shortcuts import get_object_or_404
8 from django.views.generic.simple import direct_to_template
9 from myproject import settings
10 from models import Tweet
11
12 class TweetForm(forms.ModelForm):
13 class Meta:
14 model = Tweet
15 fields = ('text', 'author_email')
16 widgets = {
17 'text': forms.Textarea(attrs={'cols': 50, 'rows': 3}),
18 }
19
20 def post_tweet(request, tweet_id=None):
21 tweet = None
22 if tweet_id:
23 tweet = get_object_or_404(Tweet, id=tweet_id)
24 if request.method == 'POST':
25 form = TweetForm(request.POST, instance=tweet)
26 if form.is_valid():
27 new_tweet = form.save(commit=False)
28 new_tweet.state = 'pending'
29 new_tweet.save()
30 send_review_email()
31 return HttpResponseRedirect('/post/thankyou')
32 else:
33 form = TweetForm(instance=tweet)
34 return direct_to_template(request, 'post_tweet.html',
35 {'form': TweetForm(instance=tweet)})
36
37 def send_review_email():
38 subject = 'Action required: review tweet'
39 body = ('A new tweet has been submitted for approval. '
40 'Please review it as soon as possible.')
41 send_mail(subject, body, settings.DEFAULT_FROM_EMAIL,
42 [settings.TWEET_APPROVER_EMAIL])
43
44 def thank_you(request):
45 tweets_in_queue = Tweet.objects.filter(
46 state='pending').aggregate(Count('id')).values()[0]
47 return direct_to_template(request, 'thank_you.html',
48 {'tweets_in_queue': tweets_in_queue})
Line-by-Line Explanation
Lines 1–10
These are nothing more than the normal import statements with which we bring in the needed Django functionality.
Lines 12–18
After all the import statements, a TweetForm is defined, based on the Tweet entity. The TweetForm is defined as containing only the fields text and author_email, as the rest are not visible to users. It also specifies that the text field should be displayed as an HTML textarea (multi-line text box) widget instead of a long, single text field. This form definition will be used in the post_tweet() method.
Lines 20–36
The post_tweet() method is called when the URL /post or /post/edit/X is accessed. This behavior was defined in the previous URL configuration files. The method does one of four things, as is depicted in Figure 11-28.
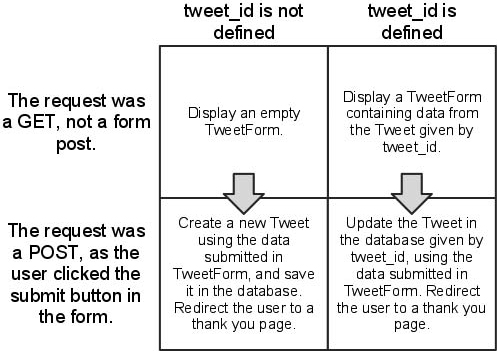
Figure 11-28. The behavior of the post_tweet() method.
The user starts in one of the top boxes and then moves to the box below by clicking the form’s submit button. This use case and this pattern of if statements is common in Django view methods that deal with forms. When all the main processing is done in this method, it calls the post_tweet.html template and passes it a TweetForm instance. Also, note that an e-mail is sent to the reviewer by calling the send_review_email() method. Remove this line if you don’t have access to a mail server and didn’t enter any mail server details in the settings file.
This block of code also features a new function that we haven’t seen before, the get_object_or_404() shortcut. There are some who might think there’s too much magic going on here, but it really is a convenience that developers often need. It takes a data model class and a primary key and attempts to fetch an object of that type with the given ID. If the object is found, it’s assigned to the tweet variable. Otherwise, an HTTP 404 error (not found) is thrown. We want this behavior to control unruly users who manipulate the URL by hand—users should get this error in the browser in such cases, whether malicious or otherwise.
Lines 38–42
The send_review_email() method is a simple helper that’s used to send an e-mail to the manager when a new tweet has been submitted for review or if an existing tweet has been updated. It uses Django’s send_mail() method, which sends e-mail by using the server and credentials you provided in the settings files.
Lines 44–48
The thank_you() method shown in Example 11-16 is called when the user is redirected to /post/thankyou/ after submitting the TweetForm. The method uses Django’s built-in data access functionality to query the database for the number of Tweet objects that are currently in the pending state. Those of you who come from a relational database background will no doubt recognize that the Django ORM will issue SQL a command that might look something like: SELECT COUNT(id) FROM Tweet WHERE state= "pending". The great thing about an ORM is that those who do not know SQL can just come up with object-flavored chained method calls such as the code you see here; the ORM magically issues the SQL on the developer’s behalf.
Once the number of pending posts is obtained, the app then calls up the thank_you.html template and sends that total to it. As shown in Figure 11-30, this template displays one message if there are several pending tweets, and another if there is only one. Example 11-15 and 11-16 display the template files used by the poster app.
Example 11-15. Template with the Submission Form (post_tweet.html)
The submission form for the poster app seems bare because all of the goods are handled by the TweetForm model.
1 <html>
2 <body>
3 <form action="" method="post">{% csrf_token %}
4 <table>{{ form }}</table>
5 <input type="submit" value="Submit" />
6 </form>
7 </body>
8 </html>
Example 11-16. The thank_you() Template After Submission (thank_you.html)
The “thank you” form for the poster app features logic to tell the user where they stand.
1 <html>
2 <body>
3 Thank you for your tweet submission. An email has been sent
4 to the assigned approver.
5 <hr>
6 {% if tweets_in_queue > 1 %}
7 There are currently {{ tweets_in_queue }} tweets waiting
8 for approval.
9 {% else %}
10 Your tweet is the only one waiting for approval.
11 {% endif %}
12 </body>
13 </html>
The post_tweet.html template is simple: it only displays the form in an HTML table and adds a submit button below it. Compare the template in Example 11-15 to the form we used in our blog application earlier; you could almost reuse this. I know we’re always encouraging code reuse, but sharing HTML goes above and beyond the call of duty.
Figure 11-29 shows the template output, which presents the input form for users intending on making a post/tweet. Now we’ll look at the template generating the “thanks for your submission” page that the users sees afterward, which is depicted in Figure 11-30.

Figure 11-29. The form for submitting new tweets, available at /post.

Figure 11-30. The thank you page, as seen after submitting a new tweet.
11.16.6. Reviewing Tweets
Now that we have gone through the poster application, it’s time for the approver application. The file myproject/approver/urls.py calls the methods list_tweets() and review_tweet() in myproject/approver/views.py. You can see the entire file in Example 11-17.
Example 11-17. The approver App View Functions (views.py)
The core functionality for the approver app includes the form, displays posts pending review, and helps process decisions.
1 # approver/views.py
2 from datetime import datetime
3 from django import forms
4 from django.core.mail import send_mail
5 from django.core.urlresolvers import reverse
6 from django.contrib.auth.decorators import permission_required
7 from django.http import HttpResponseRedirect
8 from django.shortcuts import get_object_or_404
9 from django.views.generic.simple import direct_to_template
10 from twython import Twython
11 from myproject import settings
12 from myproject.poster.views import *
13 from myproject.poster.models import Tweet, Comment
14
15 @permission_required('poster.can_approve_or_reject_tweet',
16 login_url='/login')
17 def list_tweets(request):
18 pending_tweets = Tweet.objects.filter(state=
19 'pending').order_by('created_at')
20 published_tweets = Tweet.objects.filter(state=
21 'published').order_by('-published_at')
22 return direct_to_template(request, 'list_tweets.html',
23 {'pending_tweets': pending_tweets,
24 'published_tweets': published_tweets})
25
26 class ReviewForm(forms.Form):
27 new_comment = forms.CharField(max_length=300,
28 widget=forms.Textarea(attrs={'cols': 50, 'rows': 6}),
29 required=False)
30 APPROVAL_CHOICES = (
31 ('approve', 'Approve this tweet and post it to Twitter'),
32 ('reject',
33 'Reject this tweet and send it back to the author with your
comment'),
34 )
35 approval = forms.ChoiceField(
36 choices=APPROVAL_CHOICES, widget=forms.RadioSelect)
37
38 @permission_required('poster.can_approve_or_reject_tweet',
39 login_url='/login')
40 def review_tweet(request, tweet_id):
41 reviewed_tweet = get_object_or_404(Tweet, id=tweet_id)
42 if request.method == 'POST':
43 form = ReviewForm(request.POST)
44 if form.is_valid():
45 new_comment = form.cleaned_data['new_comment']
46 if form.cleaned_data['approval'] == 'approve':
47 publish_tweet(reviewed_tweet)
48 send_approval_email(reviewed_tweet, new_comment)
49 reviewed_tweet.published_at = datetime.now()
50 reviewed_tweet.state = 'published'
51 else:
52 link = request.build_absolute_uri(
53 reverse(post_tweet, args=[reviewed_tweet.id]))
54 send_rejection_email(reviewed_tweet, new_comment,
55 link)
56 reviewed_tweet.state = 'rejected'
57 reviewed_tweet.save()
58 if new_comment:
59 c = Comment(tweet=reviewed_tweet, text=new_comment)
60 c.save()
61 return HttpResponseRedirect('/approve/')
62 else:
63 form = ReviewForm()
64 return direct_to_template(request, 'review_tweet.html', {
65 'form': form, 'tweet': reviewed_tweet,
66 'comments': reviewed_tweet.comment_set.all()})
67
68 def send_approval_email(tweet, new_comment):
69 body = ['Your tweet (%r) was approved & published on Twitter.'
70 % tweet.text]
71 if new_comment:
72 body.append(
73 'The reviewer gave this feedback: %r.' % new_comment)
74 send_mail('Tweet published', '%s
' % ' '.join(
75 body), settings.DEFAULT_FROM_EMAIL, [tweet.author_email])
76
77 def send_rejection_email(tweet, new_comment, link):
78 body = ['Your tweet (%r) was rejected.' % tweet.text]
79 if new_comment:
80 body.append(
81 'The reviewer gave this feedback: %r.' % new_comment)
82 body.append('To edit your proposed tweet, go to %s.' % link)
83 send_mail('Tweet rejected', '%s
' % (' '.join(
84 body), settings.DEFAULT_FROM_EMAIL, [tweet.author_email]))
85
86 def publish_tweet(tweet):
87 twitter = Twython(
88 twitter_token=settings.TWITTER_CONSUMER_KEY,
89 twitter_secret=settings.TWITTER_CONSUMER_SECRET,
90 oauth_token=settings.TWITTER_OAUTH_TOKEN,
91 oauth_token_secret=settings.TWITTER_OAUTH_TOKEN_SECRET,
92 )
93 twitter.updateStatus(status=tweet.text.encode("utf-8"))
Line-by-Line Explanation
Lines 1–24
After all the imports, the first method we come across is list_tweet(). Its job is to return a list of pending and published tweets to the user. Right above the method header is the decorator @permission_required. This informs Django that only logged-in users with the permission poster.can_approve_ or_reject_tweet are allowed to access the method. This is the custom permission we declared in myproject/poster/models.py. Users who are not logged in or who are logged in but don’t have the correct permission are sent to /login. (If you’ve forgotten what decorators are, you can review them in the Functions chapter of Core Python Programming or Core Python Language Fundamentals.)
If the user has the proper permission, the method executes. It uses Django data access functionality to pull out a list of all tweets pending approval and a list of all published tweets. Then it hands off those two lists to the list_tweets.html template and lets that template render the result. See the following for more details on this template file.
Lines 26–36
Next, in myproject/approver/views.py, we notice the definition of Review-Form. There are two ways to define forms in Django. In myproject/poster/views.py, a TweetForm was defined on the basis of the Tweet entity. Here, a form is defined as a collection of fields, instead, without any underlying data entity. The form will be used by managers to approve or reject pending tweets, and there is no data entity that represents a review decision. The form uses a choice collection to define the approve/reject choice that the reviewer needs to make and represents it as a list of radio buttons.
Line 38–66
After that comes the review_tweet() method (see Figure 11-31 for the flow). It is similar to the form-handling method in myproject/poster/views.py, but it assumes tweet_id is always defined. There is no use case that involves reviewing a non-existing tweet.
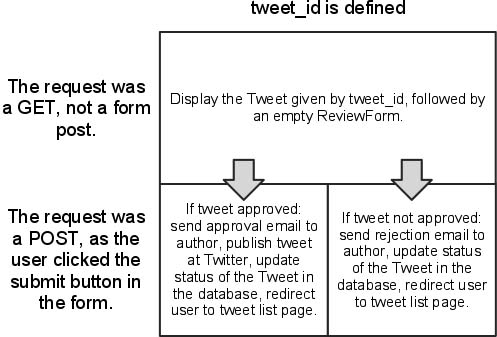
Figure 11-31. Form handling in the review_tweet() method.
The code needs to read what data the user submitted in the form. With Django, you can do that by using the form.cleaned_data[] array, which will contain the values submitted through the form by the user, converted to Python data types.
Notice how the build_absolute_uri() method is called on the request object in the review_tweet() view function. This method is called to get the link to the form for editing the tweet. This link will be sent in the rejection e-mail to the author so that he can take note of the manager’s feedback and reword the tweet. The build_absolute_uri() method returns the URL that corresponds to a specific method, in this case, post_tweet(). We know this URL is /poster/edit/X, where X is the tweet’s ID. Why not simply use a string containing that URL?
Well, if we ever decide that this URL should change to /poster/change/X, we would have to remember all the places where we hardcoded the URL pattern /poster/edit/X and update them to the new URL. This breaks the DRY principle behind Django. You can read more about DRY and other Django design principles at http://docs.djangoproject.com/en/dev/misc/design-philosophies.
This situation just described is different from hardcoding a flat URL without any variable component, as in /post/thankyou, where 1) there aren’t many of them, 2) they aren’t likely to change, and 3) there’s no view function necessarily associated with it. To help us not hardcode a URL for our situation, we use another tool, django.core.urlresolvers.reverse() in place of a hardcoded URL. What does this do? Well, we usually start off with a URL and find a view function to which to dispatch the request. In this case, we know what view function we want but desire to build a URL from it, hence the tool’s name. A view function is passed to reverse() along with any arguments, and a URL is returned. You can find another example by using reverse() in the Django tutorial at https://docs.djangoproject.com/en/dev/intro/tutorial04/#write-a-simple-form.
Lines 68–84
The two helper methods, send_approval_email() and send_rejection_email(), send e-mails to the tweet’s author by using Django’s send_mail() function. Again, remove the calls to these methods from review_tweet() if you are running this example without access to a mail server.
Lines 86–93
The method publish_tweet() is also a helper. It calls the updateStatus() method found in the Twython package to publish a new tweet to Twitter. Note that it uses the four Twitter credentials you added earlier in the settings.py file. Also, note that it encodes the tweet by using the UTF-8 character encoding, because that is the way Twitter wants it.
Now we can look at the template files. We’ll start with the status page first, followed by the login because the former is surely more interesting than the latter. Example 11-18 shows the template used for the status page. The output page itself is divided into two main sections for the user: the set of posts that are awaiting a decision as well as those which have been approved and published.
Example 11-18. Template Used to Display Post Status (list_tweets.html)
The template for the poster app’s status page features two main sections: pending and published posts.
1 <html>
2 <head>
3 <title>
4 Pending and published tweets
5 </title>
6 <style type=text/css>
7 tr.evenrow {
8 background: #FFFFFF;
9 }
10 tr.oddrow {
11 background: #DDDDDD;
12 }
13 </style>
14 </head>
15 <table>
16 <tr>
17 <td colspan=2 align=center>
18 <b>Pending tweets</b>
19 </td>
20 </tr>
21 <tr>
22 <td>
23 Tweet text
24 </td>
25 <td>
26 Submitted
27 </td>
28 </tr>
29 {% for tweet in pending_tweets %}
30 <tr class="{% cycle 'oddrow' 'evenrow' %}">
31 <td>
32 <a href="/approve/review/{{ tweet.id }}">{{ tweet.text }}</a>
33 </td>
34 <td>
35 {{ tweet.created_at|timesince }} ago
36 </td>
37 </tr>
38 {% endfor %}
39 </table>
40 <hr>
41 <table>
42 <tr>
43 <td colspan=2 align=center>
44 <b>Published tweets</b>
45 </td>
46 </tr>
47 <tr>
48 <td>
49 Tweet text
50 </td>
51 <td>
52 Published
53 </td>
54 </tr>
55 {% for tweet in published_tweets %}
56 <tr class="{% cycle 'oddrow' 'evenrow' %}">
57 <td>
58 {{ tweet.text }}
59 </td>
60 <td>
61 {{ tweet.published_at|timesince }} ago
62 </td>
63 </tr>
64 {% endfor %}
65 </table>
66 </html>
This template is interesting in that it is the first one we have seen that contains a loop. It iterates over the collection pending_tweets and then published_tweets. It then renders a table row for each tweet, using the cycle construct to give every other row a gray background, as illustrated in Figure 11-32. It also makes the text of each pending tweet a link to the page /approve/review/X, where X is the tweet’s ID. Finally, it uses Django’s timesince filter to display the time elapsed since the tweet was created, rather than displaying the raw date and time. This makes the list a little easier to read and it makes more sense for users who might be spread out over multiple time zones.

Figure 11-32. A list of pending and published tweets.
Once the approver selects a potential post on which to make a decision, they’ll see an isolated view of that post in question, as shown in Figure 11-33.
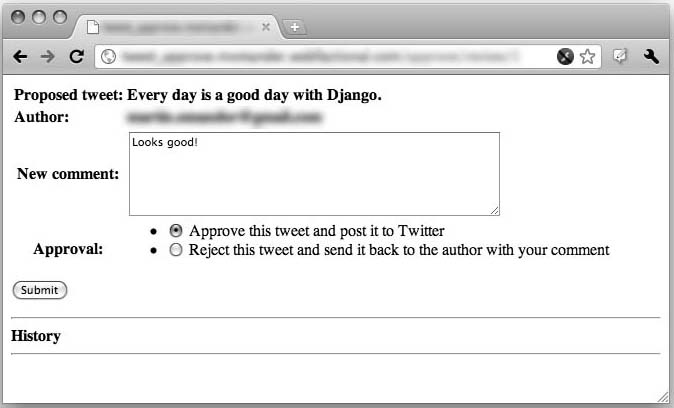
Figure 11-33. Approving a pending tweet.
The template that renders the pending tweet form is review_tweet.html, which is presented in Example 11-19.
Example 11-19. myproject/templates/review_tweet.html
The template for the poster app’s tweet review page.
1 <html>
2 <body>
3 <form action="" method="post">{% csrf_token %}
4 <table>
5 <tr>
6 <td>
7 <b>Proposed tweet:</b>
8 </td>
9 <td>
10 <b>{{ tweet.text }}</b>
11 </td>
12 </tr>
13 <tr>
14 <td>
15 <b>Author:</b>
16 </td>
17 <td>
18 <b>{{ tweet.author_email }}</b>
19 </td>
20 </tr>
21 {{ form.as_table }}
22 </table>
23 <input type="submit" value="Submit" />
24 </form>
25 <hr>
26 <b>History</b>
27 <hr>
28 {% for comment in comments %}
29 <i>{{ comment.created_at|timesince }} ago:</i>
30 {{ comment.text }}
31 <hr>
32 {% endfor %}
33 </body>
34 </html>
What about the login/ URL that users are sent to if they aren’t logged in or don’t have the appropriate permission? In myproject/urls.py, Django was instructed to run the code in the method django.contrib. auth.views.login, which comes with Django and handles logging in so that we don’t have to. All we have to do is write the login.html template. Example 11-20 presents the simple one used in this application. To find out more about Django’s authentication system, check the documentation at https://docs.djangoproject.com/en/dev/topics/auth/.
Example 11-20. myproject/templates/login.html
The template for the poster app’s login page takes advantage of Django’s authentication system.
1 <html>
2 {% if form.errors %}
3 Your username and password didn't match. Please try again.
4 {% endif %}
5
6 <form method="post"
7 action="{% url django.contrib.auth.views.login %}">
8 {% csrf_token %}
9 <table>
10 <tr>
11 <td>{{ form.username.label_tag }}</td>
12 <td>{{ form.username }}</td>
13 </tr>
14 <tr>
15 <td>{{ form.password.label_tag }}</td>
16 <td>{{ form.password }}</td>
17 </tr>
18 </table>
19
20 <input type="submit" value="login" />
21 <input type="hidden" name="next" value="{{ next }}" />
22 </form>
23 </html>
Take TweetApprover for a Spin
Now that all the pieces are in place, go back to your URLconf and uncomment all the action you just added. If you haven’t created a user with permission “Can approve or reject tweets” yet, do so now. Go to /post (within your domain) with your Web browser, and then enter a new tweet. Finally, go to /approve and reject or accept the tweet. After you have accepted a tweet, go to Twitter’s Web site and verify that the tweet was published.
You can download the complete project source code at this book’s Web site at http://corepython.com.
11.17. Resources
Table 11-4 presents a variety of resources for topics and projects covered in this chapter.
Table 11-4. Additional Web Framework Resources

11.18. Conclusion
You’ve just touched the tip of the Django iceberg. The Web development universe is quite large when paired with Python. There is plenty to explore, so we recommend that you read the excellent Django documentation—especially the tutorial—found at http://docs.djangoproject.com/en/dev/intro/tutorial01. You can also start exploring those reusable plug-in apps that come with Pinax.
In addition, you can benefit from a more in-depth treatment of the framework in Python Web Development with Django. You’re also now able to explore other Python Web frameworks, such as Pyramid, TurboGears, web2py, or more minimal frameworks, such as Bottle, Flask, and Tipfy. Another direction you can take is to begin exploring cloud computing. We take this journey with you in Chapter 12.
11.19. Exercises
Web Frameworks
11-1. Review Terminology. What do CGI and WSGI mean?
11-2. Review Terminology. What is the main problem with pure CGI, and why isn’t it used more for production Web services today?
11-3. Review Terminology. What problem(s) do(es) WSGI solve?
11-4. Web Frameworks. What is the purpose of a Web framework?
11-5. Web Frameworks. Web development using frameworks typically follows the model-view controller (MVC) pattern. Describe each of these components.
11-6. Web Frameworks. Name some of Python’s full-stack Web frameworks. Create a simple “Hello World” application by using each of them. Write down any development and execution differences between each of them.
11-7. Web Frameworks. Do some research on the various available Python templating systems. Create a grid or spreadsheet that compares and contrasts them. Be sure to have syntax entries for (at least) the directives to: a) display data variables, b) call functions or methods, c) embed pure Python code, d) perform loops, e) if-elseif-else conditionals, and f) template inheritance.
Django
11-8. Background. When and where was the Django framework created? What are some of the main goals of its existence?
11-9. Terminology. What is the difference between a Django project and a Django app?
11-10. Terminology. Instead of MVC, Django uses model-template-view (MTV). Compare and contrast MTV with MVC.
11-11. Configuration. Where do Django developers create their database settings?
11-12. Configuration. Django can run on top of:
a. relational databases
b. non-relational databases
c. both a and b
d. neither, it runs on the power of ponies
11-13. Configuration. Go to http://djangoproject.com then download and install the Django Web framework (and SQLite if you are not using a Windows-based PC, because it comes for free with Python 2.5+ for Windows).
a. Execute ‘django-admin.py startproject helloworld’ to start your project, and then ‘cd helloworld; python ./manage.py startapp hello’ to start your app.
b. Edit helloworld/hello/views.py to include this code:
from django.http import HttpResponse
def index(request):
return HttpResponse('Hello world!')
c. In helloworld/settings.py, add 'hello', to the INSTALLED_APPS variable (in any position of the tuple).
d. In helloworld/urls.py, replace the commented-out line
# (r'helloworld/', include('helloworld.foo.urls')),
with this (uncommented) line:
# (r'^$', 'hello.views.index'),
e. Execute ‘python ./manage.py runserver’ and visit http://localhost:8000 to confirm that your code works and “Hello world!” does show up on your browser. Change the output to something other than “Hello world!”.
11-14. Configuration. What is a URLconf, and where would you typically find one?
11-15. Tutorial. Do all four parts of the Django tutorial found starting at http://docs.djangoproject.com/en/dev/intro/tutorial01. Warning: do not merely copy the code you find there. I expect to see you modify the app to do something slightly different than what’s offered, and/or add new functionality that isn’t present.
11-16. Tools. What is the Django admin app? How do you enable it? Why is the admin useful?
11-17. Tools. Is there a way to test your app’s code without bringing up the admin or even a Web server?
11-18. Terminology. What does CSRF mean, and why does Django contain security mechanisms to thwart such attempts?
11-19. Models. Name the top five model types you think you’ll be using and what type of data would typically be used with those models.
11-20. Templates. In Django templates, what is a tag? Furthermore, what is the difference between a block tag and a variable tag? How can you distinguish between the two types of tags?
11-21. Templates. Describe how you would implement template inheritance by using Django.
11-22. Templates. In Django templates, what is a filter?
11-23. Views. What are generic views? Why would you want to use them? Are there any situations in which you don’t want to have a generic view?
11-24. Forms. Describe forms in Django, how they work, where they live in code (from the data model to the HTML template).
11-25. Forms. Discuss model forms and what their benefits are.
Django Blog App
11-26. Templates. In the archive.html template of your BlogPost application, it loops through each post and displays them to the user. Add a test for the special case where no posts have been added yet and display a special message in such cases.
11-27. Models. In our application, we’re still doing too much extra work for the timestamp. There is a way to instruct Django to automatically add the timestamp upon creation of our BlogPost object. Find out what that is and make the necessary changes to make that happen and remove the explicit setting of the timestamp in blog.views.create_blogpost() and blog.tests.BlogPostTest.test_obj_create(). Do we also need to change blog.tests.BlogPostTest.test_post_create() in a similar way? Hint: You can take a peek of how Google App Engine does it elsewhere in this chapter.
11-28. Generic views. Deprecate your archive() view function and its use of render_to_response() and convert your app to use a generic view. You will just remove archive() completely from blog/views.py and also move blog/templates/archive.html into blog/templates/blogpost/blogpost_ list.html. Read up on the list_detail.object_list() generic view and call it directly from your app’s URLconf. You will need to create a dictionary with a ‘queryset’ as well as ‘extra_context’ to pass your automatically generated BlogPostForm() object plus all the blog entries to the template via the generic view.
11-29. Templates. Earlier we introduced you to Django template filters (and gave an example using upper()). Take the archive.html (or blogpost_list.html) template for your BlogPost app and add another line to display the total number of blog posts in the database using a filter before showing the ten most recent ones.
11-30. Forms. By having the form object created automatically using ModelForm, we’ve lost the ability to specify the rows and cols attributes of the body textarea (rows = 3, cols = 60), as we did with just the Form and specifying the HTML widget for forms.CharField. Instead, it defaulted to rows = 10 and cols = 40, as shown in Figure 11-20. How can we specify 3 rows and 60 cols? Hint: See the docs at http://docs.djangoproject.com/en/dev/topics/forms/modelforms/#overriding-the-default-field-types-or-widgets
11-31. Templates. Create a base template for your blog app, and modify all existing templates to use template inheritance.
11-32. Templates. Read the Django documentation on using static files (HTML, CSS, JS, etc.) and improve the look of your blog app. If it’s hard for you to get started, try these minor settings until you can think of something more contemporary:
<style type="text/css">
body { color: #efd; background: #453; padding: 0 5em; margin: 0 }
h1 { padding: 2em 1em; background: #675 }
h2 { color: #bf8; border-top: 1px dotted #fff; margin-top: 2em }
p { margin: 1em 0 }
</style>
11-33. CRUD. Give users the ability to edit and delete posts. You can consider adding an additional timestamp field for time edited if you wish the existing timestamp to remain representing creation time. If not, then change the existing timestamp when a post has been edited or deleted.
11-34. Cursors and Pagination. Showing the ten most recent posts is good, but letting users paginate through older posts is even better. Use cursors and add pagination to your app.
11-35. Caching. In the Google App Engine blog, we employed the use of Memcache to cache objects so that we don’t have to go to the datastore again for similar requests. Do we need to do this with our Django app? Why or why not?
11-36. Users. Support multiple blogs on your site. Each individual user should get a set of blog pages.
11-37. Communication. Add another feature to your app such that whenever a new blog entry is made, both the admin of the Web site as well as the owner of the blog receive an e-mail message with the details.
11-38. Business Logic. In addition to the previous exercise where an e-mail message is sent, take a page from the Twitter app, and require admin approval of a blog entry before it is actually posted to the blog itself.
Django Twitter App
11-39. Templates. The build_absolute_uri() method was used to eliminate hardcoded URLs outside the URL configuration files. But there are still some hardcoded URL paths in the HTML templates. Where are they? How can these hardcoded URLs be removed? Hint: Read up on http://docs.djangoproject.com/en/dev/ref/templates/builtins/#std:templatetag-url.
11-40. Templates. Make the TweetApprover application pretty by adding a CSS file and referencing it from the HTML templates.
11-41. Users. Right now, any user can post new tweets without logging in. Modify the app so that users can’t post new tweets without logging in and having the permission “add tweet” set for their user account.
11-42. Users. After forcing users to log in to propose new tweets, pre-populate the Author email field with the logged-in user’s e-mail address, if the user’s profile has one. Hint: Read http://docs.djangoproject.com/en/1.2/topics/auth.
11-43. Caching. Cache the list of tweets shown when the user visits /approve. Once a user has approved or rejected a tweet, she is sent back to that page again; when she arrives there, ensure that she sees a fresh, non-cached version of the page.
11-44. Logging and Reporting. Create an audit trail for tweets by adding new Comments to a post whenever it changes state. For example, when a tweet is rejected, add a Comment to it indicating that it was rejected and at what time. Whenever the text is updated, add another Comment. Whenever it is published, add another Comment saying when it was published and who approved it.
11-45. CRUD. Add a third option on the tweet review page that lets the reviewer delete a submitted tweet, besides accepting or rejecting it. You can delete an object from the database by calling the delete() method on it, like so: reviewed_tweet.delete()
11-46. Communication. When an employee proposes a new tweet, an e-mail is sent to the manager. But the e-mail just says there is a tweet to approve. Make that e-mail friendlier by adding the text of the new tweet to it, as well as a link that the manager can click to go directly to the Web page for approving or rejecting that tweet. You can compare with how e-mails are sent in myproject/approver/views.py.