Chapter 12. Cloud Computing: Google App Engine
Our industry is going through quite a wave of invention and it has been powered by... one major phenomenon... the Cloud. And nobody knows what this is or what it means, exactly.
—Steve Ballmer, October 2010
In this chapter...
• The Sandbox and the App Engine SDK
• Choosing an App Engine Framework
• Morphing “Hello World” into a Simple Blog
• Lightning Round (with Python Code)
• Sending Instant Messages by Using XMPP
• Task Queues (Unscheduled Tasks)
• Lightning Round (without Python Code)
12.1. Introduction
The next development system we’ll explore is Google App Engine. While App Engine does not provide a full-stack framework like Django (although you can run Django on App Engine as we’ll find out later in this chapter), it is a development platform, initially focused for Web applications (it comes with its own micro framework, webapp, or its replacement, the new webapp2), but it can and is certainly used for building general applications and services, as well.
In using the term “general,” we don’t mean any application can be created for or ported to App Engine; rather, we mean networked applications that need only an HTTP endpoint to be reached. This includes, but is not limited to, Web applications. One popular non-Web use case is a back-end service for user-facing mobile clients. App Engine belongs to the category of cloud computing focused on providing a platform for developers to build and host applications or service back-ends. Before we actually go into the platform’s details, we first need to introduce the cloud computing ecosphere so that we can better define where App Engine fits into this picture.
12.2. What Is Cloud Computing?
Whereas Django, Pyramid, or Turbogears applications are served by your favorite provider or even on your own computers, Google App Engine applications are hosted by Google and are a part of a larger class of services, collectively bundled under the cloud computing umbrella. The main premise behind these services is for its users to offload or outsource part of a company’s (or an individual’s) computing infrastructure, whether it is actual hardware, application development and execution, or software hosting. If you are using cloud computing, you’re delegating the computing, hosting, and/or serving of your application to a corporate entity other than your own.
Such services are only available on the Internet, and their exact physical location might or might not be known. This includes everything from the raw hardware1 all the way to applications, and all other possible services in between, such as operating systems, databases, files and raw disk storage, computation, messaging, e-mail, instant messaging, virtual machines, caching (multiple levels, from Memcached to content delivery networks [CDNs]), etc. There is a lot of activity in this industry, and new services are continually being introduced by providers. Payment for services usually comes under some sort of subscription or pay-per-usage model.
Cost is usually one of the main reasons why companies deploy cloud computing services. However, the requirements differ enough that every firm needs to do their own research to determine whether it’s the right decision for them. Do you own a startup company and are unable to afford all that hardware (nor do you want to lease a data center or co-location facility for those computers)? No problem, rent one computer or a thousand from Amazon or use a very large disk from Google. Gone are the days when founders of small startups would have to bootstrap their operations by investing in infrastructure like this—usually on their credit cards. Now, they can focus on their applications and the problem(s) they’re trying to solve.
The situation is slightly different when looking at large enterprises or Fortune 500 companies that have enough horsepower but discover it’s not being utilized to its fullest potential. You don’t have to create a cloud business the likes of which Amazon did (more about this in the next section), but you can create an in-house or private cloud to provide cloud services internally, or perhaps you can form a hybrid cloud and host some of your infrastructure internally, perhaps the part that handles sensitive data, and then outsource other parts (computing, applications, storage, etc.) to a public cloud such as Google or Amazon.
Firms that employ cloud services are often concerned with physical location, security, a service-level agreement (SLA), and compliance; depending on their industry or governing jurisdiction, they might be compelled to do so. Obviously when outsourcing applications, data, etc., companies want guarantees that their intellectual property is safe and secure, is available from a physical location that is geographically permitted by their governing bodies (if any), and that access to such resources is available at any time. Once these requirements are met, the next decision would be to determine the appropriate level(s) of cloud computing they need.
12.2.1. Levels of Cloud Computing Service
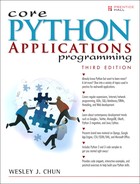
Cloud computing is available in three levels of service. Figure 12-1 presents a view of each service layer as well as some representative products at each respective level. The lowest layer, known as Infrastructure-as-a-Service (IaaS), provides bare computing power such as the computers themselves (physical or virtual), storage (usually disk), and compute or computation. Amazon Web Services (AWS) provides their Elastic Compute Cloud (EC2) and Simple Storage System (S3) services at the IaaS level. Google also provides an IaaS storage service called Google Cloud Storage.
Google App Engine operates at the middle level of cloud computing known as Platform-as-a-Service, or PaaS. This level provides users with an execution platform for their applications. The highest layer is Software-as-a-Service (SaaS). At this level, users simply access applications that are native to and only accessible via the Internet. Examples of SaaS include web-based e-mail services such as Gmail, Yahoo! Mail, and Hotmail.
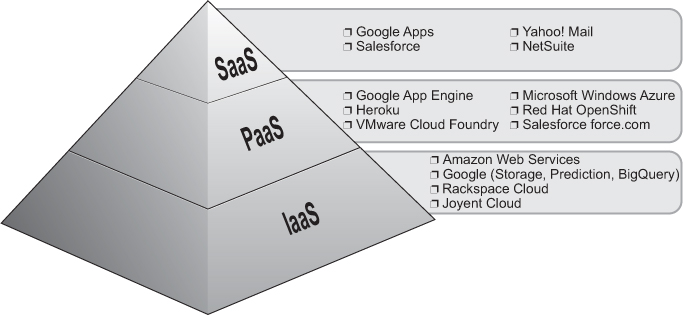
Figure 12-1. The three cloud computing service levels.
Source: Gartner AADI Summit Dec 2009
Of these three levels, IaaS and SaaS are the most well-known while PaaS doesn’t bask in the limelight as often as its brethren. This might be changing, however, as PaaS is perhaps the most powerful of them all. With PaaS, you get IaaS for free, but it includes many services that are extremely costly and the most cumbersome to maintain yourself. These can include anything at the IaaS level and beyond, such as the operating system, databases, software licensing, networking and load-balancing, servers (Web and otherwise), software patches and upgrades, monitoring, alerting, security fixes, system administration, etc. A key benefit to using this service level versus maintaining your own equipment is there won’t be “idle capacity” because you bought more computer firepower than you actually needed, based on the Web traffic you originally forecast. There is nothing more frustrating than sitting on an expensive investment that you know is not being properly utilized or amortized.
Although the concept of cloud computing has been around for a long time—John Gage of Sun Microsystems coined the memorable slogan, The Network is the Computer, in 1984—it has only been commercialized in the mid-2000s, specifically in early 2006 when Amazon introduced AWS. It was the issue of idle capacity that led them down this path. Amazon had to purchase enough computing resources to power their online retail business to withstand the traffic and demand of the holiday shopping season.
According to their whitepaper,2 Amazon claims that “[by] 2005, [they] had spent over a decade and hundreds of millions of dollars building and managing the large-scale, reliable, and efficient IT infrastructure that powered the operation of one of the world’s largest online retail platforms.”
However, with all that capacity and computing power, guess what most of those devices are doing the rest of the year? Frankly, a whole lot of nothing, so why not rent out this additional CPU and storage capacity like a utility service? And that’s exactly what they did. Since then, several other large technology companies have joined this trend: Google, Salesforce, Microsoft, RackSpace, Joyent, VMware, and many, many others who have all jumped on the cloud bandwagon.
While Amazon’s EC2 and S3 services are clearly situated at the infrastructure level, a new market began to open up for those desiring to outsource their applications, specifically being able to write custom software systems that take advantage of corporate Salesforce (customer relationship) data. This is what led Salesforce to create force.com, the first platform service to do just that. Of course, not everyone wants a Salesforce application written in yet another proprietary programming language, so Google developed a more general PaaS service called App Engine, which burst onto the scene in April 2008.
12.2.2. What Is App Engine?
What is App Engine doing in a Python book? Is it a core part of the language or a core third-party package? Although not really either, its release and existence have had a profound impact in the Python community and in the market; so much so, in fact, that there was strong encouragement from multiple sources to add a section on Google App Engine here. (The same thing happened with Python Web Development with Django, the book I wrote with my esteemed colleagues, Jeff Forcier and Paul Bissex.)
While the various web frameworks have the expected similarities and differences, App Engine is a remarkable departure from them all because not only is it a development platform but it also comes with application hosting services, which is the main reason why you would even want to create applications with App Engine. Users now have a much simpler alternative to developing an application and finding somewhere to host it—or worse, building their own infrastructure to support their application. All this additional work involves much more than just designing, coding, and testing an application.
Instead of having to deal with an ISP or self-hosting, developers upload their applications to Google, which will take care of all the logistics of maintaining them online. The regular Web developer now shares the same resources as all of Google, running in the same data centers and on the same hardware that powers the Internet giant itself. In fact, through App Engine and its other cloud services, Google is actually providing a public API to the stack it uses to run itself. This includes App Engine APIs, such as Datastore (Megastore, Bigtable), Blobstore, Image (Picasa), Email (GMail), Channel (GTalk), etc. In addition, now the developer no longer has to worry about computers, networking, operating systems, power, cooling, load-balancing, etc.
That’s all well and good, but where does Python fit into this picture?
When App Engine originally launched in 2008, the only language runtime supported was Python. Java eventually came a year later, but Python holds a special place because it was App Engine’s first supported runtime. Current Python programmers already know that it’s the ease-of-use king, encourages group collaboration, allows for extremely rapid development, and does not require its users to necessarily have a computer science degree in order to use it as an effective tool. This approach is more welcoming of developers of all backgrounds and persuasions. The creator of Python himself is an engineer on the App Engine team, not to mention yours truly. Because of its ground-breaking nature and close ties to the Python community, I’m excited to help you get started with it!
There are four main components of App Engine that make up the entire system: the language runtimes, the scalable hardware infrastructure, the web-based administration console, and the software development kit (SDK) which gives users the tools they need: a development server and access to App Engine’s APIs.
Language Runtimes
With regard to language runtimes, we’re (obviously) going to spend the rest of the time on Python, but please be aware that at the time of this writing, Java and Go are also available. Also, due to the Java support, developers can code in languages that have an appropriate interpreter capable of running in a Java virtual machine (JVM), such as Ruby, PHP, JavaScript, and Python, executed by JRuby, Quercus, Rhino, and Jython, respectively, plus Scala and Groovy. Python via Jython is the most intriguing; some people are perplexed as to why users would want to run a Jython application when they can just use the native Python support. The primary reason involves users who want to develop new projects in Python but already have existing Java packages. Understandably, they want to take advantage of their existing packages but cannot afford or want to port those libraries to Python.
Hardware Infrastructure
The hardware infrastructure is really a black box for users: you don’t know much about any of the hardware on which your code runs. You’ll likely conclude it has some flavor of Linux and that the boxes sit in data centers attached to the global network. You might have even heard of Bigtable, the non-relational database system that App Engine uses for its datastore. For most people, this is as much as they actually need to know: remember, with cloud computing, it’s not your headache anymore. The extremely difficult work and details to maintain and make such infrastructure available for users to take advantage of is pushed behind the curtains, out of sight.
Web-Based Administration and System Status
In the remaining sections of this chapter, we’ll look at various features of the Python application programming interface (API). Be aware that in production, your applications are not going to be running full versions of the Python (or Java) interpreters. Because your application shares resources with other users’ applications, it makes sense that for security reasons, all applications must execute in a sandbox, which is a restricted environment. Yes, you’re losing some level of control in exchange for extremely difficult-to-build components and scalability.
In exchange, App Engine provides a web-based administration console (called admin console for short) that gives developers an insight into their application, its traffic, data, logging, billing, settings, usage, quotas, etc. Figure 12-2, presents a screenshot of an application’s admin console.

Figure 12-2. The Google App Engine application’s administration console. (Image courtesy of Google)
There is also a system-wide status page (see Figure 12-3) with which you can monitor how App Engine is doing as a whole across all applications.
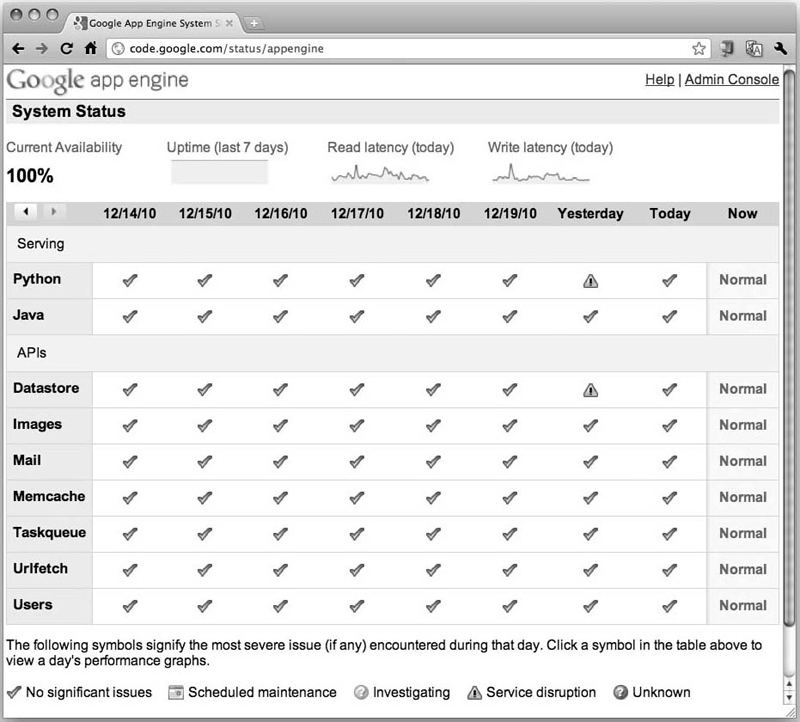
Figure 12-3. Google App Engine application’s System Status page. (Image courtesy of Google)
Keep in mind that “across all applications” really means just that. As of winter 2010, Google App Engine serves more than one billion Web pages daily. Once you create and deploy your application, you’ll be adding to this total. Although that’s exciting to think about, again, keep in mind that because App Engine is shared among all developers, you need to learn how to live in the sandbox. It’s not as bad as it sounds because App Engine provides many services and APIs for developers.
12.3. The Sandbox and the App Engine SDK
It is a no-brainer that developers would not want other applications to be able to access their own applications’ source code nor their data, so it’s only fair that you respect other applications and the associated data, as well. There are certain restrictions from within the sandbox that cannot be circumvented. (From time to time, Google will lift such restrictions if and when it is safe to do so.) Verboten actions include (but are not limited to) the following:
• You cannot create a local disk file, but you can create a distributed one using the Files API.
• You cannot open an inbound network socket connection.
• You cannot fork new processes.
• You cannot make (operating) system calls.
• You cannot upload any non-Python source code.
Because of these limitations, the App Engine SDK comes with higher-level APIs to make up for any loss functionality due to the restrictions.
Furthermore, because the version of Python that App Engine executes (currently versions 2.5 and 2.7) is a subset of the full distribution, you don’t have access to all of Python’s features, especially those which are compiled in C. Some of the C-compiled Python modules and packages are available. Version 2.7 does support significantly more C libraries, however, including some of the more well-known external packages, such as NumPy, lxml, and PIL. In fact, while the version 2.5 support for C libraries is in the form of a “whitelist,” version 2.7 has made available so many more of these, that the list there is actually a “blacklist.”
The Python 2.5 allowed/whitelisted and the Python 2.7 disallowed/blacklisted C-libraries are outlined at http://code.google.com/appengine/kb/libraries.html (there is a similar list for Java classes). However, if you want to use any third-party Python packages, you’re welcome to bundle them with your source as long as they are pure Python (For instance, no executables, .so or .dll files, etc.) and don’t use modules/packages that are not in the whitelist.
Keep in mind that there is limit to the total number of files (currently 10,000) that you can upload, another limit on the total size of all files uploaded (currently 150MB)—this includes application files or static assets such as HTML, CSS, JavaScript, etc.—as well as a per-file size limit (currently 32MB). To see the list of current size limitations, go to http://code.google.com/appengine/docs/python/runtime.html#Quotas_and_Limits as the team tries hard to raise limits wherever and whenever possible. Still, there are several workarounds that help ease the pain of these restrictions.
If your application serves media files that exceed the per-file size limit, you can store them in the App Engine Blobstore (see Table 12-1) where you can store a file that’s arbitrary in size, that is, there is no size limitation for each file (blob). If you’re concerned about the total number of .py files, you can store them in a Zip file and upload that, instead. Regardless of how many .py files you’ve archived, you only pay the penalty of a single Zip file. Of course that Zip file must also be below the per-file size limit, but at least you don’t have to worry as much about the number of files. You can read more about using Zip files in the article located at http://docs.djangoproject.com/en/dev/ref/settings (pay attention to the note at the top of the article).
File limitations aside, let’s go back to the execution restrictions (no sockets, files, processes, or system calls). Without these building blocks, it doesn’t sound like you can have a very useful application. Don’t despair; help is available!
12.3.1. Services and APIs
To help you get your work done, Google gives you an ever-increasing number of building blocks to work with that make up for those core restrictions. For example, why would you want to open a network socket? Do you want to communicate with other servers? In that case, use the URLfetch API. What about sending or receiving e-mail? The Email API was created just for that purpose. Similarly, use the XMPP (eXtensible Messaging and Presence Protocol, or simply: Jabber) API for sending or receiving instant messages (IMs). The stories are similar for accessing a network-based secondary cache (Memcache API), employing reverse AJAX or browser push (Channel API), accessing a database (Datastore API), etc. Table 12-1 lists all the services and APIs that are available to App Engine developers at the time of this writing.
Table 12-1. Google App Engine Services and APIs (Some Experimental)


Okay, sounds exciting, but enough talk already—let’s get started! The first thing you need to do is to select a framework with which to build your applications.
12.4. Choosing an App Engine Framework
If you’re writing an application that’s not user-facing—meaning other applications will just make calls to your application for service—choosing a framework is less important. Currently there are several options from which to choose, which we present in Table 12-2.
Table 12-2. Frameworks for Development with Google App Engine

Most beginners to App Engine will just start with webapp or webapp2 to see how far they can get because that’s the one you get with App Engine. That’s a great approach, because although webapp is fairly simplistic, it provides the basic tools you need to create useful applications. However, there is a class of veteran Python Web developers who have used Django for a long time and prefer that approach, instead. Because of App Engine’s restricted environment, by default you don’t have access to all of Django’s features. However, App Engine does have somewhat of a relationship with Django.
Some components of Django have been integrated into App Engine, and Google provides some versions of Django (albeit somewhat older) on App Engine servers so that users do not have to upload the entire Django installation along with their applications. These include the 0.96, 1.2, and 1.3 releases of Django (at the time of this writing; new versions could have been added by the time you read this). However, there several critical pieces of Django that have not been brought over to App Engine, the most important being its Object-Relational Mapper (ORM) which has traditionally relied on having a SQL relational database foundation.
I use the word traditionally because there are multiple ongoing efforts to get Django to support non-relational (NoSQL) databases, too. However, at the time of this writing, none of those projects have been integrated into the Django distribution yet. Perhaps by the time you read this, the world will have changed to the point where Django can do either relational or non-relational. In addition to proposals for Django 1.3 and 1.4, one of the other well-known projects is called Django-non-rel. This is a branch of Django that comes with adapters for Google App Engine as well as MongoDB (plus several more on the way). There is also some work to bring JOINs to the NoSQL adapters, but that is also in development at this time. If there is any material relevant for Django non-relational developers, we’ll mention them along our journey.
Tipfy is a lightweight framework developed specifically for App Engine. You can think of it as a webapp++ or “webapp 2.0” as it consists of features representing functionality that is notably absent from webapp. The feature-set includes (but is not limited to) internationalization, session management, alternative forms of authentication (Facebook, FriendFeed, Twitter, etc.), access to Adobe Flash (AMF protocol access plus Flash messages), ACLs (access control lists), and additional templating engines (Jinja2, Mako, Genshi). It is based on WSGI and hooks into the Werkzeug utility set that form the foundation of any WSGI-compliant application. You can find out more about Tipfy from its Web page and wiki at http://tipfy.org.
web2py is one of the four well-known full-stack Web frameworks for Python (in addition to Django, TurboGears, and Pyramid). It is the second that is compatible with Google App Engine. web2py focuses on letting developers create fast, scalable, secure, and portable Web applications that rely on a database system, whether it be relational or Google App Engine’s non-relational datastore, and it works with a wide variety of databases. A database abstraction layer (DAL) transposes ORM requests in SQL in real time and uses that as its interface to database. Naturally, for App Engine applications, you’re still restricted to the relational limitations presented by the Datastore (i.e., no JOINs). It also supports a variety of Web servers such as Apache, ligHTTPD, or any WSGI-compliant server. Using web2py is a natural route for existing web2py developers who want to migrate their applications to App Engine.
You can choose any one of these frameworks to develop your applications. Alternatively, any WSGI-compliant framework will work. Here, we use the lowest common denominator (webapp); we encourage you to at least move forward and do all the examples by using webapp2.
A bit of history: one passionate App Engine developer wasn’t satisfied with his framework selection, which motivated him to create tipfy. He then wanted to improve webapp, dropped tipfy, and built webapp2, which turned out so good that Google integrated it as part of the version 2.7 runtime SDK (thus, the quote at the beginning of Chapter 11, “Web Frameworks: Django”).
12.4.1. Frameworks: webapp then Django
In Chapter 11, we covered Django and how to create a blog by using that framework. Here, we’re going to do the same thing but use the webapp default, instead. We’ll show you how to build almost the same thing by using App Engine, running it by using the App Engine development environment, just like in our Django example. Users can also optionally create a Google Account or other OpenID identification (or use an existing one) and set up an application to run on the live App Engine production environment. We’ll show you how to do that, as well, but it’s not necessary nor is there any obligation to do so. No credit card is required to set up an application online, but you will need a mobile phone with text messaging or short message service (SMS) capability.
To wrap up this chapter, we’ll port this application to Django and run that on App Engine, too (development or production environments). The concepts and features of App Engine are enough to warrant a book on its own, so although we won’t be giving it a full treatment here, our material should be able to get you started and comfortable with multiple aspects of the App Engine product.
Downloading and Installing the App Engine SDK
To get started, you need to get the App Engine SDK for your development platform. There are a variety of files available to download, so you need to be aware of the correct ones for your system. Visit the Google App Engine home page located at http://code.google.com/appengine, and then click the Downloads link. From there, you can find the appropriate files for your system. Files are also available for Java developers, but for our purposes here, we’ll focus only on Python.
Linux or *BSD users should download the Zip file, unzip the archive, and install that folder (google_appengine) in your favorite place, such as /usr/local, and drop a link to the dev_appserver.py and appcfg.py commands in a place similar to /usr/local/bin. Alternatively, you can just add /usr/local/google_appengine to your path. (You can skip the rest of this section as well as the next one on using the Launcher and go straight to the section, “Creating ‘Hello World’ manually.”)
Windows PC users should download the .msi file; Mac users should grab the .dmg file. Once you’ve located the appropriate file, double-click or launch it to install the App Engine SDK. This process will also install the Google App Engine Launcher. The Launcher can be used to manage your App Engine applications you have on your development computer as well as to help you upload them to Google for running live in production.
Using the Launcher to Create “Hello World” (Windows and Mac Users Only)
Once you start up the Launcher, you’ll see a control panel similar to those depicted in Figure 12-4 and Figure 12-5.

Figure 12-4. The App Engine Launcher for Mac.

Figure 12-5. The App Engine Launcher for Windows.
There are various buttons that will bring up (and take down) your development server (Run); view your logs (Logs); browse your development admin console (SDK console); edit configuration settings (Edit); upload your application to App Engine production servers (Deploy); or go to your live application’s admin console (Dashboard). Let’s get started and create a new application. We’ll visit several of the Launcher buttons throughout the course of developing our application.
To do this, go to the menu and pull down the selection to create a new application. Give it some sort of unique name; “helloworld” has probably already been taken. You can provide a few other options, as well, such as the folder in which to create the new boilerplate files as well as the server’s port number. Once that’s done, you’ll see your application in the Launcher’s main panel, which means it’s ready to run. Before we do that however, let’s just take a quick look at the three files that were created for you, app.yaml, index.yaml, and main.py.
The App Engine Default Files
The app.yaml file represents your configuration settings. The default file that’s generated for you looks like that shown in Example 12-1.
Example 12-1. A Default Configuration File (app.yaml)
1 application: APP_ID
2 version: 1
3 runtime: python
4 api_version: 1
5
6 handlers:
7 - url: .*
8 script: main.py
You’ll get the idea that a YAML (yet another markup language) file is made up of mappings (key-value pairs) and sequences. For more information on this file type, you can go to both http://yaml.org and http://en.wikipedia.org/wiki/Yaml.
Line-by-Line Explanation
Lines 1–4
The first section is pure configuration, assigning a name to your App Engine application (APP_ID) followed by its version number. For development, you can pick any name you like, for example, blog. If you intend to upload to the App Engine live production environment, you’ll need to be more creative and come up with a name that hasn’t been chosen yet. A quick note about names, about which you should be aware: names cannot be transferred, and names are never recycled; once a name is taken it’s gone, even if an application is deleted, so choose carefully.
The version number is a unique string that you can set. It’s up to you to determine how you want to implement versioning. You can go with the traditional 0.8, 1.0, 1.1, 1.1.2, 1.2, etc., or you can use another naming convention such as v1.6 or 1.3beta. It’s just a string, but you’re restricted to alphanumeric characters plus hyphens. You can create up to ten versions of your application (major or minor makes no difference). After that, you won’t be able to upload any more until you delete at least one version.
Below the version number is the runtime type. Here, it’s Python and version 1 of that API. You can also use app.yaml for Java and JRuby by inserting “Go,” between Java and JRuby, and other runtimes for the JVM; the app.yaml file is used in turn to generate the web.xml and appengineweb.xml files that are actually needed for your servlet(s).
Lines 6–8
The final few lines specify your handlers. Just as with a Django URLconf file, you need to specify a regular expression to match against client requests as well as provide a corresponding handler. In Django, these handler url-script pairs correspond to the project-level URLconf file, which forwards requests to an application-level URLconf. Similarly in app.yaml, the script directive sends the request to the given Python script, which contains more specific URLs and maps them to handler classes, in the same way that a Django app’s URLconf points to a view function.
To learn more about configuring your application, read the documentation at http://code.google.com/appengine/docs/python/config/appconfig.html.
Now let’s look at the index.yaml file:
indexes:
# AUTOGENERATED
# This index.yaml is automatically updated whenever the dev_appserver
. . .
The index.yaml file is needed when you need to create custom indexes for your application. To make App Engine query the datastore faster, you need to have a corresponding index for each query. (Indexes for simple queries are created automatically—you don’t need to do so.) You generally won’t need to consider this until your queries become more complex. To read more about using indexes, view the official documentation at http://code.google.com/appengine/docs/python/config/indexconfig.html.
The last file that is automatically generated by the Launcher on your behalf is the main application file (main.py), as shown in Example 12-2.
Example 12-2. The Main Application File (main.py)
1 from google.appengine.ext import webapp
2 from google.appengine.ext.webapp import util
3
4 class MainHandler(webapp.RequestHandler):
5 def get(self):
6 self.response.out.write('Hello world!')
7
8 def main():
9 application = webapp.WSGIApplication([('/', MainHandler)],
10 debug=True)
11 util.run_wsgi_app(application)
12
13 if __name__ == '__main__':
14 main()
Line-by-Line Explanation
Lines 1–2
The first two lines import the webapp framework as well as bring in its run_wsgi_app() utility function.
Lines 4–6
After these introductory lines, you’ll find the MainHandler class. This is the core functionality of this example. It defines a get() method to process HTTP GET requests; hence its name. A handler instance will have attributes for both the request and the response. In our example, we’re only writing out the HTML/text to return to the user via the response.out file.
Lines 8–11
Next comes the main() function, which spawns an instance of an application and then runs it. Within the call to instantiate webapp.WSGIApplication, you’ll find pairs (or 2-tuples)—well, just one so far, that determine which handler(s) process which requests. In our case, the only URL our application handles at the moment is '/', and these requests will be handled by the MainHandler class that we just described.
Lines 13–14
Finally, we have the familiar lines for determining execution based on whether this Python source file was imported or executed directly as a script. If you’re not familiar with this code, we recommend you flip back and review Chapter 3, “Internet Client Programming,” and Chapter 12, in Core Python.
All of the code should be fairly straightforward, even if you’re seeing some of this for the very first time. From this point forward, we’re going to make continuous changes to the application—iterating as it were—to improve it or add new functionality.
Minor Code Cleanup
Before we start adding to the application, let’s make a few cosmetic changes to main.py that don’t affect execution at all, as shown in Example 12-3.
Example 12-3. Housekeeping and Cleanup of the Main Application File (main.py)
1 from google.appengine.ext import webapp
2 from google.appengine.ext.webapp.util import run_wsgi_app
3
4 class MainHandler(webapp.RequestHandler):
5 def get(self):
6 self.response.out.write('Hello world!')
7
8 application = webapp.WSGIApplication([
9 ('/', MainHandler),
10 ], debug=True)
11
12 def main():
13 run_wsgi_app(application)
14
15 if __name__ == '__main__':
16 main()
What We Did and Why
1. We don’t want WSGIApplication to be instantiated each time this application is run. By moving it out of main() into the global code block, we instantiate this class only once instead of on a per-request basis. We get a minor performance benefit—it’s not very big, but this is just a simple optimization that you would do in any similar Python application, regardless of whether it’s App Engine or not. The only (minor) penalty is that application is now a global variable versus a local.
2. Because we’re only using one function from webapp.util, we can simplify the import by just bringing in that one name to (barely) speed up (lookup to) the call to run_wsgi_app(). Calling util.run_wsgi_app() versus run_wsgi_app() doesn’t matter if you’re doing it once or twice, but it can add up over millions of requests to your application.
3. Having the handlers pairs on separate line(s) makes it easier to add new handlers; for example:
('/', MainHandler),
('/this', DoThis),
('/that', DoThat),
. . .
Okay, that’s all we could think of at this time. It gives it more of “Djangish” kind of feel, if there’s such a word.
12.5. Python 2.7 Support
The original Python release of Google App Engine supported version 2.5 (specifically 2.5.2 on the server). Google recently released a new version 2.7 runtime (specifically 2.7.2 on the server). Support for version 2.7 is still experimental at the time of this writing, so we’re going to leave all the remaining code examples in version 2.5—you can use version 2.6 or 2.7 for development, however. But, with this new runtime, there are a few changes that you need to be aware of. We’ll also show you some code differences so that you can tweak the code in the rest of the chapter to version 2.7, should you prefer that runtime instead of version 2.5.
12.5.1. General Differences
The first and one of the more critical of the differences is that the version 2.7 runtime supports concurrency. With App Engine’s pricing model, you’re charged based on the number of instances of your application that are serving traffic. Because the version 2.5 runtime is not concurrent, new instances must be spawned if your running instances aren’t able to cope with the traffic that you’re getting. This can lead to increased costs. With concurrency, your application can respond in an asynchronous manner and significantly reduce the need for additional instances.
Next, highly desired and previously forbidden C libraries are now available. These include PIL, lxml, NumPy, and simplejson (named as json). Version 2.7 support also comes with Jinja2 templating system along with Django templates. To see all of the differences between the version 2.5 and 2.7 runtimes, check out the official documentation at http://code.google.com/appengine/docs/python/python27/newin27.html.
12.5.2. Variations in the Code
There are also some slight code differences, so let’s take a look at them because these are the changes you’ll be making with your code in this chapter to execute your application on the version 2.7 runtime. The app.yaml file sees a change to the runtime field. In addition, you will probably want to turn on concurrency via the threadsafe directive. The other major change is moving to pure WSGI—rather than specifying a script to execute, you’ll point to an object (the application object), instead. All the necessary differences are shown in italics in Example 12-4.
Example 12-4. Sample Python 2.7 Configuration file (app.yaml)
1 application: APP_ID
2 version: 1
3 runtime: python27
4 api_version: 1
5 threadsafe: true
6
7 handlers:
8 - url: .*
9 script: main.application
The version 2.7 runtime features a new and improved webapp framework named webapp2. Because we’re using WSGI instead of CGI, we can remove the previously superfluous “main()” at the bottom. All changes to main.py are reflected in Example 12-5, which, as you can see, is shorter and easier to read.
Example 12-5. Sample Python 2.7 Main Application file (main.py)
1 from google.appengine.ext import webapp2
2
3 class MainHandler(webapp2.RequestHandler):
4 def get(self):
5 self.response.out.write('Hello world!')
6
7 application = webapp2.WSGIApplication([
8 ('/', MainHandler),
9 ])
Note that the application object in main.py is the main.application that is referred to in the app.yaml file. You can find more about the differences between the main.py used with versions 2.5 and 2.7 at http://code.google.com/appengine/docs/python/tools/webapp/overview.html.
To read more about using the version 2.7 runtime time and see more information about the changes just shown, check the documentation at http://code.google.com/appengine/docs/python/python27/using27.html.
12.6. Comparisons to Django
App Engine does not structure a Web site as a project made up of one or more applications. Instead, everything combined is a single application. We mentioned that the app.yaml file bears some similarity to Django’s project-level urls.py because it maps URLs to handlers. It also has elements of settings.py because it is a configuration file.
The main.py file serves as a combination of a Django app’s urls.py plus views.py. When creating the WSGI application, you have one or more handlers that designate the class whose instance will handle those requests. The class definitions as well as their corresponding get() or post() handlers are created in this file, as well. Those handlers would be the closest thing to a view function.
Throughout Chapter 11, we were able to test our application by using the development server. App Engine has its own development server, and we’ll be using it as we progress.
12.6.1. Starting “Hello World”
There are two ways to start up an application on the development server. If you’re in the Launcher, select the application’s row, and then click the Run button. After a few seconds, you’ll see the icon turn green. You can then click the Browse button to start a Web browser that opens to your application.
To start your application via the command-line, ensure that the dev_appserver.py file is in your path, and then issue the following command:
$ dev_appserver.py DIR.
DIR is the application’s folder name (that contains the app.yaml and main.py files). And yes, if you’re in the same directory as both files, you can just use the following:
$ dev_appserver.py.
It’s a little bit different from Django, which uses a project-based command-line tool (manage.py) versus a common command installed for all App Engine applications. Another minor difference is that Django’s development server starts on port 8080, whereas App Engine uses 8000. This just means your URL must change to http://localhost:8080/ or http://127.0.0.1:8080. If using one of the Launchers, when you create a new application, it will automatically assign it a unique port number, so you might need to use that, as well, or you can change it.
12.6.2. Creating “Hello World” Manually (Zip File Users)
If you aren’t using the Launcher, then you probably do not need any assistance in typing in the code shown earlier. Because the index.yaml file is optional at this time, you really only need a skeletal app.yaml and main.py file. You can type them in manually or go to this book’s Web site and download them from the Chapter 12 folder. Once you have both files there, you can start up the development server by using the same command that was just described (dev_appserver.py).
*Uploading Your Application Live to Google
It might be somewhat premature, but if you want, you can choose to go beyond running your application on the development server. You can also upload it to Google and run it live in production, making your simple “Hello World” application available to... well, the world (except for places in which Google service is not available). This is completely optional, so if this isn’t of interest to you, then skip to the next section to continue building your blog.
App Engine provides a free service tier, in which you can develop simple low-trafficked applications without any cost to you. You’ll need a mobile phone that supports SMS as well as a Google Account, but a credit card isn’t necessary unless you plan on exceeding the free quota available to all applications. Visit http://appengine.google.com and sign-in to create your App Engine account.
To upload your application (and its static files, if any), you can either use one of the Launchers (Windows or Mac only), or you can use the command-line tool, appcfg.py. You’ll send the update command as well as pass in the top-level directory where your app.yaml file is located. The following is an example execution of appcfg.py in the current directory. Note that you’ll need to enter the credentials (valid e-mail address and password) of a developer for that application, as demonstrated in the following:
$ appcfg.py update .
Application: APP_ID; version: 1.
Server: appengine.google.com.
Scanning files on local disk.
Initiating update.
Email: YOUR_EMAIL
Password for YOUR_EMAIL: *****
Cloning 2 static files.
Cloning 3 application files.
Uploading 2 files and blobs.
Uploaded 2 files and blobs
Precompilation starting.
Precompilation completed.
Deploying new version.
Checking if new version is ready to serve.
Will check again in 1 seconds.
Checking if new version is ready to serve.
Will check again in 2 seconds.
Checking if new version is ready to serve.
Closing update: new version is ready to start serving.
Uploading index definitions.
It can take up to a minute to upload your application (generally not more than that). The preceding example uploaded in just over 3 seconds.
Give it another few seconds after the upload has completed, and then you (and everyone else on the planet) should be able to visit http://12-X. appspot.com to see your “Hello World!” output—how exciting!
![]() Core Tip: Choose your application name carefully
Core Tip: Choose your application name carefully
Before you upload the source and static files for your application, be sure to choose a unique name (specified in app.yaml) that hasn’t already been used—application names are permanent and cannot be reused or transferred, even if the application is disabled and/or deleted.
12.7. Morphing “Hello World” into a Simple Blog
Now that you’ve been able to successfully create and run a simple “Hello World” application, you should be able to bring up a browser and go to your Web site. From the Launcher, you can just click the Browse button, and if you’re not using it, just point any Web browser at http://localhost:8080. You should see something similar to that shown in Figure 12-6.
Figure 12-6. Hello World from Google App Engine.
The next step is to start modifying the application into something more desirable. We’re going to replicate our Django example by turning this simple “Hello World” into a blog. The reason why we’re doing this is to give you the opportunity to compare and contrast developing in Django and App Engine’s webapp framework.
12.7.1. Seeing Changes Quickly: Plain Text to HTML in 30 Seconds
First, confirm that you only need to update your code to see the changes reflected in the application on the development server. To do so, add an <H1> tag to the output line and close it off. Change the text to something like “The Greatest Blog” if you have no better ideas; thus, <h1>The Greatest Blog</h1>. Again, you save your change (or after any modifications to your source), confirm that you can go back to your browser, refresh the page, and then confirm the changes, which are displayed in Figure 12-7.

Figure 12-7. The changes to “Hello World 2,” reflected immediately in the updated browser page.
12.7.2. Adding a Form
Now let’s take a more significant step in your application’s development: add the ability to accept user input. We’ll insert a form with fields with which users can create new blog posts. The two fields are the post title and the post contents or body. Your modified MainHandler.get() method should now look similar to this:
class MainHandler(webapp.RequestHandler):
def get(self):
self.response.out.write('''
<h1>The Greatest Blog</h1>
<form action="/post" method=post>
Title:
<br><input type=text name=title>
<br>Body:
<br><textarea name=body rows=3 cols=60></textarea>
<br><input type=submit value="Post">
</form>
<hr>
''')
The entire method consists of the Web form. Yes, if this were a real application, all of the HTML would be in a template.
Figure 12-8 shows the refreshed screen and the new input fields.
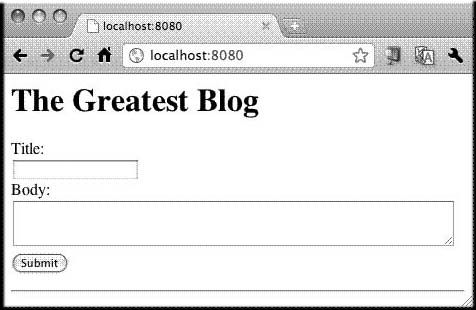
Figure 12-8. Adding form fields to the Blog application.
Now you can fill in the fields as desired, as illustrated in Figure 12-9.

Figure 12-9. Filling in the blog application form fields.
Like our Django example earlier, we’re not quite able to process this data yet. When the user fills out and submits the form at this point, our controller has no way of handling that data, so if you to try to submit, you’ll either prompt an error or see a blank screen. We need to add a POST handler to deal with new blog posts, so let’s do that now by creating a new BlogEntry class and a post() method:
class BlogEntry(webapp.RequestHandler):
def post(self):
self.response.out.write('<b>%s</b><br><hr>%s' % (
self.request.get('title'),
self.request.get('body'))
)
Note that the name of our method is post() (as opposed to get()). This is because the form submits a POST request. If you also want to support GET, you’ll need another method named get(). So the class and its method are great, but your application cannot reach the handler if it (the URL-class pair) has not been specified when creating the application object. Here is what it should look like:
application = webapp.WSGIApplication([
('/', MainHandler),
('/post', BlogEntry),
], debug=True)
With this addition, you are now able to fill in the form fields and submit it to your application. The output you see (Figure 12-10) matches exactly what our post() handler specifies; it displays the BlogPost title followed by its contents:

Figure 12-10. The form submission results.
12.7.3. Adding Datastore Service
Seeing output is great, but this application is totally useless as a blog—you’re not saving anything. This is one place where we’ve taken a departure from Django. In Django, we had to set up a database, and the first bit of code we wrote was the data model. App Engine takes more of an application approach—we started creating our application before we even had a data model. In fact, you don’t even need a database; you can just use a cache, store your data in the Blobstore, or somewhere else in the cloud.
App Engine’s data storage mechanism is its datastore. Google clearly wanted to distinguish it from a database, which explains the slightly different terminology. It’s to help drive the point that this is no relational database management system (RDBMS); it is built on top of Google’s Bigtable3 and provides distributed, scalable, non-relational persistent data storage. It also uses Google’s Megastore4 technology to provide strong consistency and high availability.
Keep in mind that this datastore is only used when you deploy your application live to App Engine’s production environment. When running the development server, you can store your data in a binary format (the default) or request storage in SQLite by using the --use_sqlite flag when running dev_appserver.py.
Now it’s time to create our data model. Analyze and compare the model class in Django versus App Engine and notice the extreme similarities here:
# Django
class BlogPost(models.Model):
title = models.CharField(max_length=150)
body = models.TextField()
timestamp = models.DateTimeField()
# App Engine
class BlogPost(db.Model):
title = db.StringProperty()
body = db.TextProperty()
timestamp = db.DateTimeProperty(auto_now_add=True)
For App Engine applications, you would add this model to your existing main.py file: there’s no equivalent models.py file unless you create it explicitly for yourself. Don’t forget to add the datastore service by using the following import:
from google.appengine.ext import db
If you are a Django-nonrel user, meaning that you prefer to run your Django app on App Engine, you would leave your class the way it was defined originally (for Django) instead of using the App Engine data models.
Regardless of which classes you choose or whether live or in development, you can now request to persist your data with the underlying persistent storage mechanism. Creating the class is the first step. Storing actual data requires the same steps as those we did in Django: create instances, fill in the user data, and then save. For our application, we’ll need to replace the code in the post() method. The way it stands now, all it does is output the input, which is neither very useful nor persistent.
The title and body are simple: after creating the instance, extract them from the submitted form data and assign them as attributes. The timestamp is optional because we selected to have it be set automatically when the instance was created. Once the object is “complete,” we save it to the App Engine Datastore by calling the data instance’s put() method, and then redirect the user to the main page for our application, just like in the Django version we did earlier.
The following is the new BlogEntry.post() method, which embodies all of the changes just discussed:
class BlogEntry(webapp.RequestHandler):
def post(self):
post = BlogPost()
post.title = self.request.get('title')
post.body = self.request.get('body')
post.put()
self.redirect('/')
Note that we have completely replaced our original post() method which just regurgitated what the user entered. In that earlier example, no data was saved to persistent storage. This completely changed with the preceding modifications, saving all post information to the datastore. Likewise, we need to make a similar corresponding change to our GET handler.
Specifically, we should display earlier blog posts to show that yes, we have started to persist user data. In our simple example, we’ll choose to display the form followed by a dump of any existing BlogPost objects. Make the following changes to our MainHandler.get() method:
class MainHandler(webapp.RequestHandler):
def get(self):
self.response.out.write('''
<h1>The Greatest Blog</h1>
<form action="/post" method=post>
Title:
<br><input type=text name=title>
<br>Body:
<br><textarea name=body rows=3 cols=60></textarea>
<br><input type=submit value="Post">
</form>
<hr>
''')
#posts = db.GqlQuery("SELECT * FROM BlogEntry")
posts = BlogPost.all()
for post in posts:
self.response.out.write('''<hr>
<strong>%s</strong><br>%s
<blockquote>%s</blockquote>''' % (
post.title, post.timestamp, post.body)
)
The code emitting the HTML form to the client stays as is. Below it, we add the code to fetch the results from the datastore to display to the user. App Engine provides two ways to query your data.
Doing things the “object” way is the closest to Django’s query mechanism, requesting BlogPost.all() (as opposed to Django’s BlogPost.objects.all()). App Engine also provides an alternative to those more comfortable with SQL: a stripped down query-language syntax known as GQL.
Because you don’t have all of SQL at your disposal (nor JOINs) and it’s less Pythonic, we strongly recommend that you use the native object approach. However, if you absolutely can’t live without it, the commented out line right above our BlogPost.all() call provides the equivalent in GQL. Finally, the loop at the end just cycles through each entity and displays the appropriate data per post.
With these changes made, re-entering the same blog entry, we now see something different, as depicted in Figure 12-11.

Figure 12-11. Form submission results (saved to datastore).
Figure 12-12 and Figure 12-13 demonstrate that we can continue to add blog entries now that we’re confident we’re storing user data.
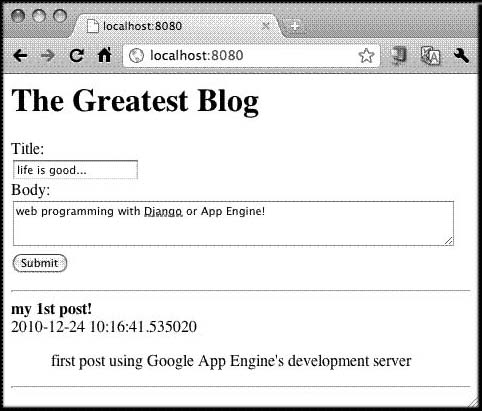
Figure 12-12. Filling out the form for a second BlogPost.
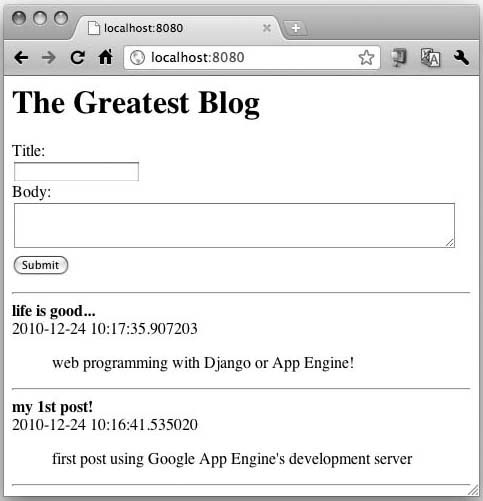
Figure 12-13. Second BlogPost object, saved and displayed.
12.7.4. Iterative Improvements
Similar to our Django example, let’s make our blog more useful by reversing all the entries chronologically and also only show the 10 most recent of them. Here are the changes we need to make to the query line (and the equivalent GQL tweaks):
#post = db.GqlQuery("SELECT * FROM BlogEntry ORDER BY timestamp
DESC LIMIT 10")
posts = BlogPost.all().order('-timestamp').fetch(10)
Compare the query to Django’s to see the similarities:
posts = BlogPost.objects.all().order_by('-timestamp')[:10]
Everything else remains the same. To read more about making queries in Google App Engine, go to the documentation page at http://code.google.com/appengine/docs/python/datastore/creatinggettinganddeletingdata.html
12.7.5. The Development/SDK Console
The Datastore Viewer
While it pales in comparison to Django’s admin application, App Engine does come with a development console. You can bring it up in the Launcher by clicking the SDK Console button. If you don’t have the Launcher, you will need to manually enter the special URL, http://localhost:8080/_ah/admin/datastore. When you arrive, you’ll be at the Datastore Viewer, as shown in Figure 12-14.
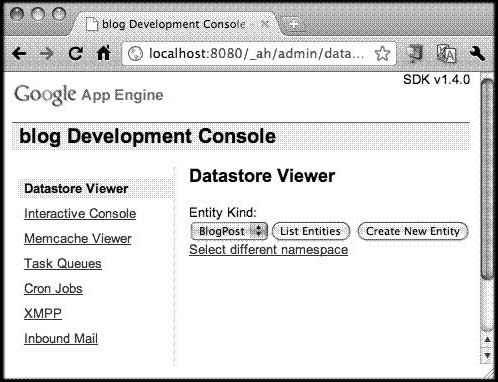
Figure 12-14. The Datastore Viewer in App Engine’s SDK Console.
Here you can create a new instance of any of the entities that you’ve defined for your application. In our case, we only have BlogPost. You can also view the contents of objects in the datastore, as well. Figure 12-15 shows the original two posts that we created earlier.

Figure 12-15. Viewing the existing BlogPost objects.
The Interactive Console
We saw earlier how Django provides access to a Python shell during development. Although App Engine doesn’t have this exact feature, you do get similar access. Click the Interactive Console link located on the left in the navigation links in the SDK Console; you’ll be brought to a Web page that has a coding pane to the left and output to the right. From here, you can enter arbitrary Python commands and watch them execute. An example execution is provided in Figure 12-16.

Figure 12-16. Executing code in the Interactive Console.
The code it runs is quite simple, as shown in the following script:
from main import BlogPost
print '#posts: ', BlogPost.all(keys_only=True).count()
posts = BlogPost.all()
for post in posts:
print post.title
This snippet is fairly simple. What might be of particular interest to you, however, is the initial print statement, which displays the current total number of BlogPost objects in the (local) datastore. You might have thought to use BlogPost.all(), but it returns a Query object which is not a sequence, and it doesn’t override __len__(), so you cannot call len() on it. The only option for you is the count() method, which you can obtain at the following:
http://code.google.com/appengine/docs/python/datastore/queryclass.html#Query_count
A simple click of the Run Program button is all it takes to get some instant gratification.
![]() Core Note: Counting (or the lack thereof)
Core Note: Counting (or the lack thereof)
Even though counting using Django and a relational database is fairly straightforward, App Engine admittedly doesn’t count well because it’s really meant for large-scale distributed storage. There aren’t any tables, and there is no SQL, which means that you can’t execute a command like, SELECT COUNT(*) from BlogPost. Many developers who do require a count for their application create a transactional counter, or if you have many transactions, you can create a “sharded counter.” For more information, go to the following sites:
http://code.google.com/appengine/articles/sharding_counters.html
http://code.google.com/appengine/docs/python/datastore/queriesandindexes.html#Query_Cursors
http://googleappengine.blogspot.com/2010/08/multi-tenancy-support-high-performance_17.html
Counting has been worse in the past than it is today, so be happy with that. There used to be a 1,000 entity limit on fetches and counting, which was restrictive. With the addition of cursors in the 1.3.1 release, this limitation was removed so that whether you’re performing a fetch, iterating, or using a cursor, there are no limits on the number of results. However, that restriction was still in effect for counting and offsets, meaning that you still had to use cursors to iterate through your dataset in order to count your entities. It wasn’t until release 1.3.6 that this barrier was removed.
Now, a call to count() on Query objects will either give you the exact number of entities or time out doing so. As specified in the documentation for count(), you shouldn’t be using it to count a large number of entities: “It’s best to only use count() in cases where the count is expected to be small, or specify a limit. count() has no maximum limit. If you don’t specify a limit, the datastore continues counting until it finishes counting or times out.” Again, it might not be everything that you want, but it is certainly a remarkable improvement over what was available to App Engine developers before early 2010.
Again, as far as best practices go, don’t get into the habit of wanting to count things, and if you do, maintain a counter. You just have to tweak your way of thinking when it comes to the App Engine datastore. In exchange for some functionality which you might have been used to, you’re getting replication and scalability, two very expensive features to build.
One additional tip if you do need to count: go for “keys-only” counting. In other words, when you create your query object, pass in the key_only flag set to True so that you’re not having to fetch full entities from the datastore, such as BlogPost.all(keys_only=True). The following are some links to help you with this:
http://code.google.com/appengine/docs/python/datastore/queryclass.html#Query
http://code.google.com/appengine/docs/python/datastore/modelclass.html#Model_all
http://code.google.com/appengine/docs/python/datastore/queriesandindexes.html#Queries_on_Keys
Finally, the App Engine team has created a series of articles to help you master the datastore. You can find them at:
http://code.google.com/appengine/articles/datastore/overview.html
Another thing to be aware of is that the code you execute within the interactive console has direct access to your local datastore. Like our Django blog example, you can use a snippet of Python to autogenerate more entities, as you can see in the following code for Figure 12-17:
from datetime import datetime
from main import BlogPost
for i in xrange(10):
BlogPost(
title='post #%d' % i,
body='body of post #%d' % i,
timestamp=datetime.now()
).put()
print 'created post #%d' % i

Figure 12-17. Creating more entities by using Python.
Figure 12-18 demonstrates that now we can sort in reverse order by timestamp and see the original two BlogPost objects as well as the ten we just generated in Figure 12-17.
from main import BlogPost
print '#posts: ', BlogPost.all(
keys_only=True).count()
posts = BlogPost.all().order(
'-timestamp')
for post in posts:
print post.title

Figure 12-18. The new and old entities together.
You can even flip back to the Datastore Viewer to see more specifics about each entity, as shown in Figure 12-19.

Figure 12-19. Changing the entity display order by using the interactive console.
If you don’t wish to pollute your data with these fake BlogPost entries, you can just as easily remove them with this snippet, shown executed in Figure 12-20 (after going back to the Interactive Console):
from google.appengine.ext import db
from main import BlogPost
posts = BlogPost.all(keys_only=True
).order('-timestamp').fetch(10)
db.delete(posts)
print 'DELETED newest 10 posts'
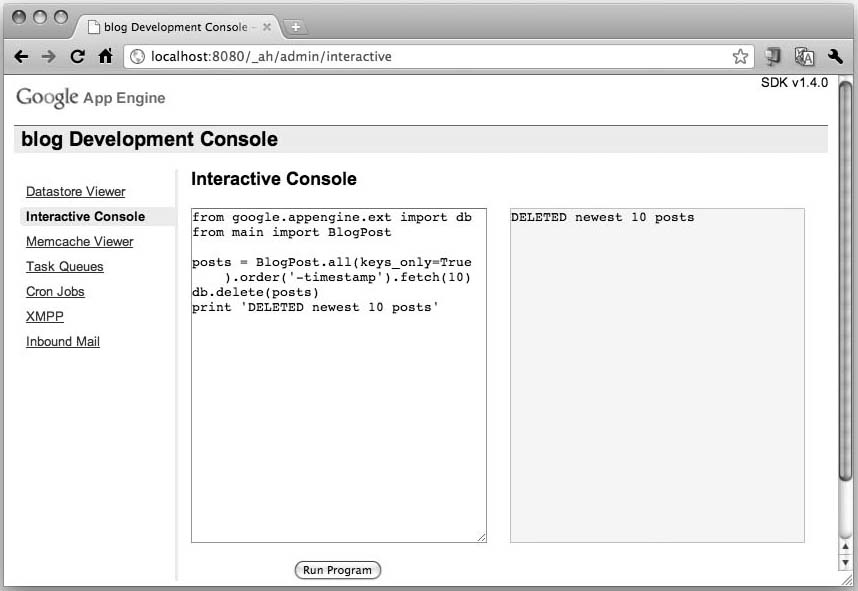
Figure 12-20. Deleting BlogPosts.
If you cut and paste the “data dump” snippet, you can then confirm that the deletion did work.
Okay, that’s all well and good that we can do this in development. At some point, you’ll want similar functionality in a live application and production datastore. There are two similar tools you can use there.
In the live production environment, you can get a shell to your application by using the remote API (you’ll find out more in the section “Remote API Shell”). You can also achieve bulk deletes or bulk copying of entities to another App Engine application if you enable the Datastore Admin for your Admin Console.
Okay, so that was a quick introduction to the SDK console. It’s certainly not as fully-featured as its cousin the (live) Admin Console, but it is a useful development tool. We’ll come back to it again soon. First, let’s add another service to our application: caching.
12.8. Adding Memcache Service
New users to App Engine often remark that its database access is slow. Well, that is a relative term, but you will contend that you’re experiencing a decline in performance compared to using a standard relational database. However, keep in mind that you’re making a significant trade off: in exchange for distributed, scalable, replicated storage in the cloud, you take a slight hit because as we all know, you can’t get something for nothing. One of the ways to improve the speed of queries is to bring the data “closer” to your application by caching instead of going to the datastore.
High-traffic sites are rarely limited in their performance by how fast the Web server can send data to the client. The bottleneck is almost always in the generation of that data; the database might not be able to answer queries quickly enough, or the server’s CPU might be bogged down executing the same code over and over for every request. It’s also a waste of resources to retrieve or compute the same data payloads for multiple requests.
By placing the data at a higher-level and closer to the request, less effort is required by the database or code that generates returned results. An intermediary cache is a great place to temporarily store retrieved data. That way, for identical requests, clients can be sent the same data over and over without the need to refetch or recompute for the purposes of serving to different users. This is especially important for App Engine users if you find your application fetching the same entities over and over again for different queries.
The general pattern for object caching (in App Engine or otherwise) is represented by the following: check if the cache contains the desired data. If yes, return it; otherwise, perform the retrieval and cache it
If you were to write the above in pseudocode, it would look something like the following snippet for some constant KEY which we use to store the cached data:
data = cache.get(KEY)
if not data:
data = QUERY()
cache.set(KEY, data)
return data
Not surprisingly, this is pretty much the solution in Python. We’re only missing a value for the KEY, a database QUERY, and this import of App Engine’s low-level Memcache-compatible API:
from google.appengine.api import memcache
In our application code, we add a few lines to our MainHandler.get() method that surrounds the fetching of the data, only going to the datastore if we have not cached the dataset:
Before
. . .
posts = BlogPost.all().order('-timestamp').fetch(10)
for post in posts:
. . .
After
. . .
posts = memcache.get(KEY) # check cache first
if not posts:
posts = BlogPost.all().order('-timestamp').fetch(10)
memcache.add(KEY, posts) # cache this object
for post in posts:
. . .
Don’t forget to set the key for your cache, that is, KEY = 'posts'.
With the add() call, we’ve effectively cached the object until we either explicitly delete it (see below), or it is evicted to make room for more recently-accessed data Just as a point of interest, the Memcache API employs an LRU (least recently used) algorithm. A third alternative is to cache an object with an expiration. For example, if we wanted to cache this object for one minute, we’d change our call to:
memcache.add(KEY, posts, 60)
The final piece of the puzzle is to invalidate the cache when a new blog post entry comes in. To make this happen, we flush the cache whenever a new entry is sent to the datastore in our code for BlogEntry.post():
. . .
post.put()
memcache.delete(KEY)
self.redirect('/')
Once these changes are made, you are certainly welcome to try it out in your browser, but because of our small dataset, it’s difficult to determine whether you’re getting your data from memcache or the datastore. The easiest way to do it is to take a look at the Memcache Viewer in the SDK Console (see Figure 12-21).
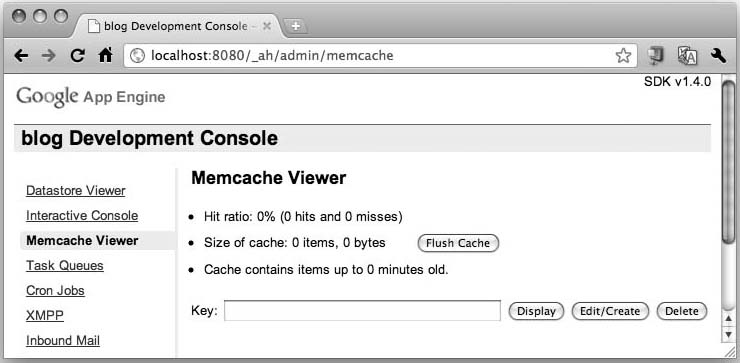
Figure 12-21. The Memcache Viewer, which here is showing empty.
To see it in action, you’ll need a pair of browser windows, one open to your application, and the other to the Memcache Viewer in the SDK Console. Ensure that you have some BlogPost objects in your application, and then refresh the main page of the application several times. Now refresh the Memcache Viewer page to see memcache utilization. I did this myself so you can see my usage results, which are shown in Figure 12-22.

Figure 12-22. The Memcache Viewer now registers some usage.
You should have registered one cache miss but an increasing number of hits each successive pass, meaning that the datastore was only accessed the first time, helping to improve the performance for users after the initial data acquisition. To read more about using App Engine’s Memcache API, read the documentation page at http://code.google.com/appengine/docs/python/memcache.
In Chapter 11, we did not get a chance to talk about caching. Django has many levels of caching service, including object caching, as we’ve just done here, plus QuerySet caching, which helps push lower-level object caching further under the covers. You can find out more about the various types of caching Django has to offer in Chapter 12 of Python Web Development with Django.
Object-level caching is just one way to prevent the server from having to do extra work to get your data to you. Data doesn’t always come from the database, however. Serving Web pages usually includes many static files, as well. App Engine provides various optimizations for developers there, too, such as requesting upstream caching by using HTTP Cache-Control headers in appropriate places. If you can cache on the edge or via proxies, this will allow some of your assets to be served directly to clients without even using your App Engine application.
12.9. Static Files
Web pages often include static elements that go along with any dynamic data. This includes images, CSS, text (XML, JSON, or other markup), and JavaScript files. Rather than requiring that the developer come up with handlers to serve that data, you can specify a static file directory in your app.yaml configuration to direct App Engine to return that data as is. What you need to do is to add a specific handler in the handlers section of your app.yaml. It will look something like this:
handlers:
- url: /static
static_dir: static
- url: .*
script: main.py
We place our static handler first so that matches of /static path requests will be processed first. All other paths will be taken care of by the handlers in main.py. This means that you don’t need to execute application code in order to serve up static files.
In fact, why don’t you just find some random .js, .css, or whatever static content you have, let’s say it’s main.css, create a folder named “static” right at the top-level directory (where your app.yaml and main.py file are located), update your app.yaml as described above, start your development server, and then point a browser to http://localhost:8080/static/main.css. This will work in production in the same way it does in development. App Engine serves your static data without requiring assistance from your application’s handlers.
12.10. Adding Users Service
In Chapter 11, for our Django blog, we didn’t add any authentication (users, passwords, accounts, etc.), but we did use Django’s own authentication system in the TweetApprove application. Similarly, let’s do authentication in this blog by using Google Accounts. This sure beats giving any user who visits your page the ability to add new blog posts; if we did, it would then be a guestbook right? Having authentication here shouldn’t be a shocker. Let’s assume that you wanted to create the next industry blog, like TechCrunch, Engadget, etc. The blog needs to support multiple authors, and you want them to be the only ones who can post to the blog, not just any ’ol John or Jane.
12.10.1. Google Accounts Authentication
When you create your App Engine application, the authentication that’s used by default is Google Accounts. However, if you don’t add any authentication mechanism, either in the configuration settings or in the actual application code, it’s the same as not having authentication at all: anyone can post to your blog. Let’s add in authentication checking by inserting a couple of lines at the very beginning of MainHandler.get() so that it looks like this:
. . .
from google.appengine.api import users
. . .
class MainHandler(webapp.RequestHandler):
def get(self):
user = users.get_current_user()
if user:
self.response.out.write('Hello %s' % user.nickname())
else:
self.response.out.write('Hello World! [<a href=%s>sign
in</a>]' % (
users.create_login_url(self.request.uri)))
self.response.out.write('<h1>The Greatest Blog</h1>')
if user:
self.response.out.write('''
<form action="/post" method=post>
Title:
<br><input type=text name=title>
<br>Body:
<br><textarea name=body rows=3 cols=60></textarea>
<br><input type=submit value="Post">
</form>
<hr>
''')
posts = memcache.get(KEY)
if not posts:
posts = BlogPost.all().order('-timestamp').fetch(10)
memcache.add(KEY, posts)
for post in posts:
self.response.out.write(
'<hr><strong>%s</strong><br>%s
<blockquote>%s</blockquote>' % (
post.title, post.timestamp, post.body
))
If you don’t want to add specific code to ask users to login like we’ve just done, you can force it at the app.yaml configuration level. Just add a login: required directive; any URL that accesses that handler will force the user to login before she can access your application or its content. Here’s an example of how to use that directive to block out all access to our main handler without a valid Google accounts login:
- url: .*
script: main.py
login: required
Another alternative is login: admin which requires a logged-in administrator of the application to access this handler, such as for critical user, app, or data access or manipulation. Users who are not administrators will get an error page which states that administrator access is required. You can read more about these directives at http://code.google.com/appengine/docs/python/config/appconfig.html#Requiring_Login_or_Administrator_Status.
12.10.2. Federated Authentication
If you’re uncomfortable with either creating your own authentication or do not wish to require that all of your users have a Google Account, you will probably want federated login with OpenID. With OpenID, you can allow users to sign in to your application by using accounts they created at a variety of providers, including (but not limited to) Yahoo!, Flickr, Word-Press, Blogger, LiveJournal, AOL, MyOpenID, MySpace, and even Google.
If you’re using federated login, you’ll need to make a minor adjustment to your call that creates login links by adding a federated_identity parameter such as users.create_login_url(federated_identity=URL), where URL is any of the OpenID vendors (gmail.com [Google], yahoo.com, myspace.com, aol.com, etc). Future support for federated authentication will be integrated with the new Google Identity Toolkit (GIT).
For more on users, the GIT, and OpenID, go to the following links:
• http://code.google.com/appengine/docs/python/users/overview.html
• http://code.google.com/appengine/articles/openid.html
• http://code.google.com/apis/identitytoolkit/
12.11. Remote API Shell
To use the remote API shell, you need to add the following entry into your app.yaml file, just above the handlers to your application, as shown in the following:
- url: /remote_api
script: $PYTHON_LIB/google/appengine/ext/remote_api/handler.py
login: admin
- url: .*
script: main.py
If you have another section in there for static files as we did in the previous section, it doesn’t matter what the ordering is when creating the handler setup for the remote API. The important thing is that they’re both above the main handler. In the preceding example, we’ve left out the static file stuff and added an explicit administrator login, because we’re pretty sure you wouldn’t want any other user to access your production datastore.
You’ll need a local version of your application’s data model(s). When you’re in the right directory, issue the following command (substituting in the ID for your live production application) and provide the proper credentials:
$ remote_api_shell.py APP_ID
Email: YOUR_EMAIL
Password: *****
App Engine remote_api shell
Python 2.5.1 (r251:54863, Feb 9 2009, 18:49:36)
[GCC 4.0.1 (Apple Inc. build 5465)]
The db, users, urlfetch, and memcache modules are imported.
APP_ID> import sys
APP_ID> sys.path.append('.')
APP_ID> from main import *
APP_ID> print Greeting.all(keys_only=True).count()
24
The remote API shell just gives you a Python interactive interpreter to your live running application. There are many other uses of the remote API itself, most notably, the mass uploading and downloading of data to and from your application’s datastore. For more on using the remote API, check out the official documentation at http://code.google.com/appengine/articles/remote_api.html.
12.11.1. The Datastore Admin
The datastore admin is a recent feature that adds a component to your live application’s administration console (not the SDK development server console). It gives you the ability to mass delete specific types of entities (or all of them) as well as the ability to copy entities to another live application. The one caveat is that your application must be in read-only mode during the copy. To enable the datastore admin, add the following section to your app.yaml file:
builtins:
- datastore_admin: on
You don’t have to necessarily memorize this because all you need to do is to click the Datastore Admin link in your Admin Console. If you haven’t enabled it yet, it’ll alert you that you’re missing this configuration in your app.yaml file.
Once you turn it on, clicking it will prompt you with a login screen (or two), and then you should see something such as that illustrated in Figure 12-23.

Figure 12-23. An example of an App Engine Datastore Admin screen.
To see an example app.yaml file with the datastore admin turned on as well as the appengine_config.py file necessary to allow another application to copy entities to the current application, visit the code sample repository at http://code.google.com/p/google-app-engine-samples/source/browse/#svn%2Ftrunk%2Fdatastore_admin.
You can read more about the datastore admin and its features at:
• http://code.google.com/appengine/docs/adminconsole/datastoreadmin.html
• http://googleappengine.blogspot.com/2010/10/new-app-engine-sdk-138-includes-new.html
12.12. Lightning Round (with Python Code)
Given all the features and scope of the entire App Engine platform, it’s not a surprise that you can write an entire book on the subject. But as our goal is to give you a high-level introduction and then let you take the wheel, we’ll end it here. Before we leave, though, the “lightning round” that follows is meant to give you some quick code samples that you can use right away without necessarily integrating those features into our blog application. Of course, these will be featured in the chapter exercises coming up.
12.12.1. Sending E-Mail
In our Twitter/Django application from Chapter 11, you saw how to use Django’s e-mail service. Sending e-mail in App Engine is just as easy. All you need to do is import the mail.send_mail() function and use it. Its basic usage is very straightforward: mail.send_mail(FROM, TO, SUBJECT, BODY) where:
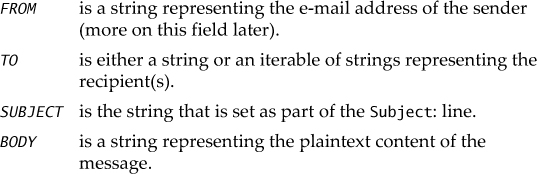
There are other message fields that you can pass to send_mail(); you can find out more about them at http://code.google.com/appengine/docs/python/mail/emailmessagefields.html.
To continue discouraging the sending of unsolicited e-mail, the From: address is restricted. It must be one of the following:
• The e-mail address of a registered administrator (developer) of the application
• The current user, if they are logged in
• Any valid receiving e-mail address for the application (of the form xxx@APP_ID.appspotmail.com)
Following is a snippet of code that includes the import and one possible call to send_mail():
from google.appengine.api import mail
. . .
mail.send_mail(
user and user.email() or 'admin@APP_ID.appspotmail.com', # from
'[email protected]', # to
'Erratum for Core Python 3rd edition!' # subject
"Hi, I found a typo recently. It's...", # body
)
The mail API also features additional functions to send e-mail only to the administrator(s) of the application, to validate e-mail addresses, etc., plus an EmailMessage class. You can also have attachments in outbound e-mail, but the attachment file types are limited to only the most popular formats that are recognized as not insecure, these include .doc, .pdf, .rss, .css, .xls, .ppt, .mp3/.mp4/.m4a, .gif, .jpg/.jpeg, .png, .tif/.tiff, .htm/.html, .txt, etc. You can find the latest group of valid attachment types at http://code.google.com/appengine/docs/python/mail/overview.html#Attachments.
Finally, inbound or outbound messages have a size limitation (at the time of this writing) of 10MB. You can read the latest about the quotas and limitations of the e-mail service at:
http://code.google.com/appengine/docs/quotas.html#Mail
http://code.google.com/appengine/docs/python/mail/overview.html#Quotas_and_Limits
More general information about sending e-mail at:
http://code.google.com/appengine/docs/python/mail/overview.html#Sending_Mail_in_Python
http://code.google.com/appengine/docs/python/mail/overview.html#Sending_Mail
http://code.google.com/appengine/docs/python/mail/sendingmail.html
12.12.2. Receiving E-Mail
What’s sending without receiving? Yes, your application can handle incoming e-mail, as well. It’s slightly more complicated than sending e-mail but it’s not that much additional work.
Setup
In addition to writing code to handle inbound e-mail, you need to add a couple of things to your app.yaml configuration file, with the most important being enabling the service. By default, the receipt of inbound e-mail is disabled. To turn it on, you’ll need to enable it in the inbound_services: section of the app.yaml (or add one if that section doesn’t exist).
Also, earlier we mentioned that one of the valid addresses from which you can send email is a valid receiving e-mail address for the application, meaning of the form xxx@APP_ID.appspotmail.com. You can have one handler for all possible e-mail addresses or different handlers for specific ones. This is done by creating one or more additional handlers in your app.yaml file. To figure out how to create the handlers, we need to tell you that all inbound e-mail will be POSTed to a URL of this form: /_ah/mail/EMAIL_ADDRESS.
Here are the relevant sections of the app.yaml that we need to add:
inbound_services:
- mail
handlers:
. . .
- url: /_ah/mail/.+
script: handle_incoming_email.py
login: admin
. . .
The first two lines enable incoming e-mail. The inbound_services: section is also the place to enable receiving XMPP messages (more on this in Section 12.13), Warming Requests, and other future services that you can read about in the official documents page for application configuration and the app.yaml file at http://code.google.com/appengine/docs/python/config/appconfig.html#Inbound_Services.
The second set of lines comprise an inbound e-mail handler that goes in the handlers: section. The regular expression /_ah/mail/.+ matches all e-mail addresses; however, there’s nothing wrong with creating separate handlers for different e-mail addresses:
- url: /_ah/mail/sales@.+
script: handle_sales_email.py
login: admin
- url: /_ah/mail/support@.+
script: handle_support_email.py
login: admin
- url: /_ah/mail/.+
script: handle_other_email.py
login: admin
You can block malicious applications and users from accessing your e-mail handler by using the login: admin directive. When App Engine receives an e-mail message, it generates requests and POSTs them to your application, resulting in a call to your handler as an “admin.”
Handling Inbound E-Mail
You can handle e-mail by using the default method, which involves writing your handler in much the same way you create a standard Web handler and have an instance of mail.InboundEmailMessage:
from google.appengine.api import mail
. . .
class EmailHandler(webapp.RequestHandler):
def post(self):
. . .
message = mail.InboundEmailMessage(self.request.body)
. . .
Of course, you would still have to install this handler when creating your WSGIApplication:
application = webapp.WSGIApplication([
. . .
('/_ah/email/+.', EmailHandler),
. . .
], debug=True)
An alternative is to use the predefined helper class, InboundMailHandler, found in google.appengine.ext.webapp.mail_handlers:
from google.appengine.ext.webapp import mail_handlers
. . .
class EmailHandler(mail_handlers.InboundMailHandler):
def receive(self, msg):
. . .
Instead of having to extract the e-mail message from the request, this is handled automatically, so all you need to do is implement a receive() method which is called with the message. You also get a shortcut mapping() class method that autogenerates the 2-tuple which directs mail to your handler. You would use it like this:
application = webapp.WSGIApplication([
. . .
EmailHandler.mapping(),
. . .
], debug=True)
Once you have the message, you’re welcome to check out the main body of the e-mail, whether it is in plain text or HTML (or both), and you can also access any attachments or other message fields, such as the sender, subject, etc. You can find more general information about receiving e-mail found at:
http://code.google.com/appengine/docs/python/mail/overview.html#Receiving_Mail_in_Python
http://code.google.com/appengine/docs/python/mail/overview.html#Receiving_Mail
http://code.google.com/appengine/docs/python/mail/receivingmail.html
12.13. Sending Instant Messages by Using XMPP
Similar to sending e-mail, your application can also send instant messages (IMs) with App Engine’s XMPP API. XMPP stands for eXtensible Messaging and Presence Protocol, but it was originally called the Jabber protocol, named after its open-source community and created in the late 1990s. With App Engine’s XMPP API, in addition to sending, you can also receive an IM, check to see if a user is available to chat, or you can send a user a chat invitation. Your application cannot communicate with a user unless she has received and accepted an invitation from it.
Below is a snippet of pseudocode that sends a chat invitation to a user, assuming that you’ve correctly filled in a valid IM username (or Jabber ID) for USER_JID:
from google.appengine.api import xmpp
. . .
xmpp.send_invite(USER_JID)
self.response.out.write('invite sent')
. . .
Here’s another piece of sample code that sends an IM (the MESSAGE string) to a user once he has accepted your invitation. Again, replace USER_JID with the user’s Jabber ID:
. . .
if xmpp.get_presence(USER_JID):
xmpp.send_message(USER_JID, MESSAGE)
self.response.out.write('IM sent')
. . .
The third XMPP function is get_presence(), function which returns True if the user is online and available, and False if the user is away, not online, or she has not accepted your application’s invitation yet. You can read more about these three functions as well as the XMPP API at:
http://code.google.com/appengine/docs/python/xmpp/overview.html
http://code.google.com/appengine/docs/python/xmpp/functions.html
12.13.1. Receiving Instant Messages
Receiving IMs is set up just like e-mail, that is, in the inbound_services: section of your app.yaml file:
inbound_services:
- xmpp_message
Also like receiving e-mail, messages that come to the system are POSTed by App Engine to your application. The URL path used is /_ah/xmpp/message/chat. Here is an example of how to receive chat messages in your application:
class XMPPHandler(webapp.RequestHandler):
def post(self):
. . .
msg_obj = xmpp.Message(self.request.POST)
msg_obj.reply("Thanks for your msg: '%s'" % msg_obj.body)
. . .
Of course, we have to register our handler:
application = webapp.WSGIApplication([
. . .
('/_ah/xmpp/message/chat/', XMPPHandler),
. . .
], debug=True)
12.14. Processing Images
App Engine has an Images API with which you can manipulate an image by performing simple transformations such as rotate, flip, resize, and crop. The images can be POSTed by a user or extracted from the datastore or Blobstore.
Here’s a snippet of HTML with which users can upload an image file:
<form action="/pic" method=post enctype="multipart/form-data">
Upload an image:
<input type=file name=pic>
<input type=submit>
</form>
The following sample piece of code creates a thumbnail for the image by calling the Image API’s resize() function and returns it back to the browser:
from google.appengine.api import images
class Thumbnailer(webapp.RequestHandler):
def post(self):
thumb = images.resize(self.request.get('pic'), width=100)
self.response.headers['Content-Type'] = 'image/png'
self.response.out.write(thumb)
Here is the corresponding handler entry:
application = webapp.WSGIApplication([
. . .
('/pic', Thumbnailer),
. . .
], debug=True)
You can read all about the images API at http://code.google.com/appengine/docs/python/images/usingimages.html.
12.15. Task Queues (Unscheduled Tasks)
Tasks in App Engine are used for additional work which might need to be done as part of your application but that is not required in generating the response that is sent back to the user. This ancillary work can include actions such as logging, creating or updating datastore entities, sending notifications, etc.
App Engine supports two different types of tasks. The first are called Push Queues, which are jobs that your application creates to be executed as quickly and concurrently as possible. They do not allow for external influence. The second type are Pull Queues, which are a bit more flexible. They’re created by your App Engine application, as well; however, they can be consumed or “leased” by your App Engine or an external application via a representational state transfer application programmers interface (REST API). We’ll spend most of the upcoming section discussing Push Queues, and then conclude with a brief word on Pull Queues.
12.15.1. Creating Tasks
Tasks can be started by the handler of a user-facing request, or they can be created by another task. An example of the latter is when all the work managed by the first task was not able to be completed in a timely fashion (think of a 30-second or 10-minute deadline), so the work the first task was created to do has not been completed yet.
Tasks are added to task queues. Queues are named and can have different execution rates, replenishment or burstiness rates, and retry parameters. Users get one default queue but must specify others if more are desired (more on this later). Adding a task to the default queue is straightforward and requires only one simple call once you’ve imported the taskqueue API:
from google.appengine.api import taskqueue
taskqueue.add()
All queue requests will be POSTed to URL, and thus a handler. If a custom URL is not created by the user, requests will go to a default URL based on the name of the queue: /_ah/queue/QUEUE_NAME. So for the default queue, that would be /_ah/queue/default. This means that you should provide a handler setting for it when creating your WSGIApplication:
def main():
run_wsgi_app(webapp.WSGIApplication([
. . .
('/_ah/queue/default', DoSomething),
. . .
]))
Of course, you need the code for the actual task, too; for example, the DoSomething handler we just defined:
class DoSomething(webapp.RequestHandler):
def post(self):
# do the task here
. . .
logging.info('completed task')
We added a quick log entry at the end to confirm the task had actually executed. Obviously, you don’t have to log anything if you don’t want to, but it can also be a great way to confirm that the task did complete. In fact, you can even use the log entry as a placeholder if you haven’t completed the code to perform the actual task’s work. (Of course, if you do choose to log something, ensure that you have an import logging statement somewhere up above.)
Configuring app.yaml
With regard to configuration, you could leave your app.yaml alone with a default handler for all URLs:
handlers:
- url: .*
script: main.py
This setting will direct normal application URLs to main.py but the pattern also matches /_ah/queue/default, meaning task queue requests will be sent there, as well, which might be what you want. However, the problem with this setup is that anyone can go to your /_ah/queue/default URL externally, even if they were not created as a task.
The best practice is to lock down this URL to task-only requests by adding a login: admin directive as we did earlier when configuring your application to receive e-mail. You will have to split off this special URL from all the others, like this modified app.yaml:
handlers:
- url: /_ah/queue/default
script: main.py
login: admin
- url: .*
script: main.py
Additional Task Creation and Configuration Options
Earlier we showed you the simplest way of creating a task by using taskqueue.add(). Of course, there are plenty more options to let you create a task destined for a different (not default) queue, time delay till execution desired, the ability to pass in parameters to the task, etc. The list that follows shows a few of these options, of which a user can choose one or more:
1. taskqueue.add(url='/task')
2. taskqueue.add(countdown=300)
3. taskqueue.add(url='/send_email', params={'groupID': 1})
4. taskqueue.add(url='/send_email?groupID=1', method='GET')
5. taskqueue.add(queue_name='send-newsletter')
In the first call, a specific URL is passed in. This is for times when you prefer to use a custom URL, as opposed to the default one. In the second case, a countdown parameter is given to delay execution of the task until at least a certain number of seconds have passed. The third call shows an example of both a custom URL as well as passing in task handler parameters. The fourth example is the same as the third, except that the user has asked for a GET request rather than the default POST. The final example we’re going to look at is when you’ve defined a custom task queue instead of using the default.
These are just a few of the parameters that taskqueue.add() supports. You can read about the rest at http://code.google.com/appengine/docs/python/taskqueue/functions.html.
So far, all of our previous examples have been using the default queue. You can create other queues, too; as of this writing, you can have up to ten additional queues for free applications and a hundred for those with billing enabled (subject to change, however). To do so, you’ll configure them in a file named queue.yaml in a format that looks like the following:
queue:
- name: default
rate: 1/s
bucket_size: 10
- name: send-newsletter
rate: 1/d
The default is normally created on its own, but if you want to choose different parameters for it, you can specify those in queue.yaml, as we just did, overriding the default rate of 5/s and bucket_size of 5. (The rate is how fast tasks are processed, and the bucket_size controls how quickly a queue can process succeeding tasks.) The send-newsletter queue is for a once-a-day, opt-in e-mail newsletter. You can read more about all the configuration parameters for queues at http://code.google.com/appengine/docs/python/config/queue.html.
The final word on tasks is that there is another kind of queue that gives developers more flexibility in terms of how and when tasks are created as well as consumed and completed. The types of task queues discussed in this section are Push Queues, which means that your application generates tasks on demand, pushing the work to queues as necessary.
We mentioned that App Engine has an alternative task interface by which jobs can be created in Pull Queues. These queues can be accessed directly by App Engine (creating or consuming work) or accessed from external applications via a REST interface. This means that work can originate from an App Engine application and be executed or processed elsewhere, if desired. Because of this, there is a more flexible execution timeline. More information on pull queues is available in the documentation at http://code.google.com/appengine/docs/python/taskqueue/overviewpull.html.
Sending E-Mail as a Task
In an earlier example, we presented an example of how to send e-mail from your application. If you’re only sending a single message, perhaps to the administrator of your application whenever someone makes a blog post entry, it’s not that big of a deal to also send the e-mail as part of the handling of that request. However, if you need to send e-mail to thousands of customers, it’s probably less of a good idea.
Instead, the work of sending all this e-mail is a great candidate for a task. Rather than sending the e-mail, the handler will create the task, pass in the parameters (such as all the e-mail addresses or a group ID of the group of users to receive the message), and then return the response back to the user while the task sends the e-mail on its own time (not that of the users).
Suppose that we have a Web template that lets a user configure an e-mail message and recipient group. When users submit the form to the /submit URL, it’s handled by the FormHandler class, for which part of it might look like this:
class FormHandler(webapp.RequestHandler):
def post(self): # should run at most 1/s
groupID = self.request.get('group')
taskqueue.add(params={'groupID': groupID})
. . .
The FormHandler.post() method makes a call to taskqueue.add(), which adds a task on the default queue, passing in the ID of the group that will be receiving the e-mail newsletter. When the task is executed by App Engine, it issues a POST to /_ah/queue/default for which we need to define another handler class for the task.
Because we’re using the default queue here, we’ll take the app.yaml as defined in the previous subsection with the additional security lock of login: admin. Now our main handler (main.py), can specify the handlers for the form (in the previous example) as well as for the upcoming task handler we’re going to create:
def main():
run_wsgi_app(webapp.WSGIApplication([
. . .
('/submit', FormHandler),
('/_ah/queue/default', SendNewsletter),
. . .
]))
Now let’s define the task handler, SendNewsletter, which will receive an inbound request along with the group ID, as sent from form handler. We’ll then forward it to a generalized function to carry out the distribution of the newsletter e-mail messages. Here’s one way you can create the SendNewsletter class:
class SendNewsletter(webapp.RequestHandler):
def post(self): # should run at most 1/s
groupID = self.request.get('group')
send_group_email(groupID)
. . .
This, of course, presumes that you’ve created a nice send_group_email() function to handle the task of taking a group ID, pulling in all the member e-mail addresses (possibly extracting them from the datastore), constructing the message body (from the datastore, auto-generated, pulled from another server, etc.), and of course, making the actual call to mail. send_mail(). Here’s what some of that code might look like:
from datetime import date
from google.appengine.api import mail
. . .
def send_group_email(groupID):
group_emails = . . . # get addresses for groupID members
msg_body = . . . # get custom msg for groupID members
mail.send_mail('noreply@APP_ID.appspotmail.com', group_emails,
'%s Newsletter' % date.today().strftime("%B %Y"), msg_body)
Why did we create a separate send_group_email() function? Couldn’t we have just rolled these lines of code into our handler to avoid an additional function call? This is a valid argument; however, we feel that code reuse is an even nobler goal. A separate function gives you the option to use the same function elsewhere, perhaps a command-line tool, a special administrator screen/function, or even another application. If you roll this code into our handler here, you’d have to cut and paste it out or eventually split it up into two functions anyway, so we might as well do it now.
It’s clear that it’s not too difficult to create tasks to perform non-user-facing application work. Tasks are very popular with App Engine users; we invite you to give them a try. But before you do, we also recommend that you consider a convenience package if your needs are simpler than those of others: the deferred library.
The deferred Package
As you read in the previous subsection, App Engine’s tasks queues are a great way to delegate additional work. This work is typically not user-facing, and typically, developers don’t want such activities to impact the time it takes to respond back to their users. However, although tasks offer the App Engine developer flexibility in terms of customizing the creation and execution of tasks, it still seems like a bit of work required to just run some simple tasks. This is where deferred comes in.
The deferred package is a convenience tool that hides much of the effort in setting up and executing tasks: you have to adjust your form handler to create tasks, you have to extract and provide the appropriate task parameters and execution guidelines, you have to create and configure separate task handlers, etc. Why can’t I just delegate that to a task? That’s pretty much exactly what deferred offers.
You’re only presented with a single function, deferred.defer(), that you’ll use to create a deferred task. It can be as simple as a logging call, such as the following:
from google.appengine.ext import deferred
deferred.defer(logging.info, "Called a deferred task")
Other than configuring your application to use the deferred library, there’s nothing else for you to do. Deferred tasks run (by default) on the default queue, and as you read earlier, you don’t need to do anything special to set that up, unless you want to change the default characteristics of the default queue. You also don’t need to specify a handler in your application to handle the deferred task—the deferred library implements all of this. As you can see from the preceding short example, you only need to pass deferred.defer() a Python callable and any arguments and/or keyword arguments.
In addition, you can also pass in task arguments, too (such as the ones described in the last section), but you need to disguise them somewhat to prevent them from being mixed up with the arguments to your deferred callable. To do so, you need to prepend them with a single underscore, which precludes mistaking them for the parameters for your executable. For example, to make the same call as above, but delayed by (at least) 5 seconds, you would use this, instead:
deferred.defer(logging.info,
"Called a delayed deferred task", _countdown=5)
We can easily convert out e-mail distribution example to this equivalent code:
class SendNewsletter(webapp.RequestHandler):
def post(self):
groupID = self.request.get('group')
deferred.defer(send_group_email, groupID)
. . .
Deferred tasks can call functions, methods, and generally any object that is callable or that have __call__ defined. From the documentation in the code, these are the callables that can be used as deferred tasks:
1. Functions defined in the top level of a module
2. Classes defined in the top level of a module
a. Instances of those classes that implement __call__
b. Instance methods of objects of those classes
c. Class methods of those classes
3. Built-in functions
4. Built-in methods
However, the following are not permitted (also documented in the code):
• Nested functions or closures
• Nested classes or objects of them
• Lambda functions
• Static methods
Furthermore, all the parameters of the callable used must be “pickleable,” meaning just your basic Python objects, such as constants, numbers, strings, sequences, and hashing types. For a full list, you can consult the official Python documentation at http://docs.python.org/release/2.5.4/lib/node317.html (Python 2.5) or http://docs.python.org/library/pickle.html#what-can-be-pickled-and-unpickled (latest Python version).
The only other restriction with our example is that send_group_email() needs to be in a different module and an import added to our main handler. The reason for this is because at the time you “defer” your task and it’s “serialized,” it records that your code belongs to the __main__ module, but when the deferred package executes your callable after receiving it from the POST request that is created by the task, the deferred module is what is executing (hence it’s [also] __main__, which means it won’t be able to find your code). You’ll receive an error that looks like the following if your deferred function were called foo():
Traceback (most recent call last):
File "/usr/local/google_appengine/google/appengine/ext/deferred/
deferred.py", line 258, in post
run(self.request.body)
File "/usr/local/google_appengine/google/appengine/ext/deferred/
deferred.py", line 122, in run
raise PermanentTaskFailure(e)
PermanentTaskFailure: 'module' object has no attribute 'foo'
However, by placing it outside of main.py (or whatever Python module contains your main handler), you will avoid this confusion and have your code be imported and execute properly. If you would like a quick refresher on __main__, read the chapter on modules in Core Python. To find more about deferred, check out the original article at http://code.google.com/appengine/articles/deferred.html.
12.16. Profiling with Appstats
Being able to profile how well your application performs is important in App Engine. To help you do that, you can use Appstats, which is a tool in the SDK with which users can optimize the performance of their applications. Beyond just a normal “code profiler,” Appstats traces the various API calls made by your application, measures the time it takes to complete roundtrips to back-end services via remote procedure calls (RPCs), and provides a web-based interface for you to observe your application’s behavior.
Configuring Appstats to record events is straightforward. You simply create an appengine_config.py file in the root directory of your application (or append to it if it already exists) by using the following function:
def webapp_add_wsgi_middleware(app):
from google.appengine.ext.appstats import recording
app = recording.appstats_wsgi_middleware(app)
return app
There are additional features that you can install here, which you can read about in the documentation. Once you’ve installed this code, Appstats will begin to record events from your application’s activity. The recorder is fairly lightweight, so you should not experience any appreciable degradation in performance.
The final step is to set up the administrative interface through which you can access the metrics that Appstats records. You can you do this in one of three ways:
1. Add a standard handler in app.yaml
2. Add a custom Admin Console page
3. Enable the interface as a built-in
12.16.1. Adding a Standard Handler in app.yaml
To add a standard handler in app.yaml (in the handlers: section naturally), use the following:
- url: /stats.*
script: $PYTHON_LIB/google/appengine/ext/appstats/ui.py
12.16.2. Adding a Custom Admin Console page
If you want to add the Appstats UI as a custom Admin Console page, you can do so in the admin_console: section of app.yaml, as shown here:
admin_console:
pages:
- name: Appstats UI
url: /stats
12.16.3. Enabling the Interface as a Built-In
You can enable the Appstats UI as a built-in by turning it on in the builtins: section of app.yaml, as demonstrated here:
builtins:
- appstats: on
Enabling it this way configures the UI to default to the /_ah/stats path.
You can see all the magic that Appstats provides for you at the following links:
http://code.google.com/appengine/docs/python/tools/appstats.html
http://googleappengine.blogspot.com/2010/03/easy-performance-profiling-with.html
http://www.youtube.com/watch?v=bvp7CuBWVgA
12.17. The URLfetch Service
One restriction that you need to take into consideration when working with App Engine is that you cannot create network sockets. This can practically render most applications useless; however, the SDK does provide for higher-level functionality as a proxy. One of the main use cases of being able to create and use sockets is to communicate with other applications on the Internet. To this end, App Engine provides a URLfetch service whereby your application can make HTTP requests (GET, POST, HEAD, PUT, DELETE) to other servers online. Here’s a short example of how to use it:
from google.appengine.api import urlfetch
. . .
res = urlfetch.fetch('http://google.com')
if res.status_code == 200:
self.response.out.write(
'First 100 bytes of google.com:<p>%s</p>' %
res.content[:100])
. . .
In addition to App Engine’s urlfetch module, you can also use the standard library urllib, urllib2, and httplib modules, modified to communicate through App Engine’s URL fetch service (which naturally runs on Google’s scalable infrastructure).
There are some caveats about which you should be aware, however, such as communicating to servers via HTTPS as well as request headers that cannot be modified or set. You can read more about these restrictions as well as find an overview of how to use the URLfetch service in the documentation at http://code.google.com/appengine/docs/python/urlfetch/overview.html.
Finally, because some payloads have a high latency, an asynchronous URLfetch service is also available. You also have the option of polling to see if the request has completed or provide a callback. You can read more about asynchronous URLfetch at http://code.google.com/appengine/docs/python/urlfetch/asynchronousrequests.html.
12.18. Lightning Round (without Python Code)
This is another “lightning round” section in which we will introduce features that are configured. This section does not feature source code.
12.18.1. Cron Service (Scheduled Tasks/Jobs)
A cronjob is a task that is executed at scheduled times and originated on POSIX computers. App Engine provides a cron-type service for its users. There is actually no Python code involved, except for the handler that is executed at the appropriate time.
To use the cron service, you need to create a cron.yaml file that contains contents such as the following:
cron:
- url: /task/roll_logs
schedule: every day
- url: /task/weekly_report
schedule: every friday 17:00
You can also specify description: and timezone: fields, as appropriate. The schedule format is fairly flexible. You can read more about cron jobs in App Engine from the documentation at http://code.google.com/appengine/docs/python/config/cron.html.
12.18.2. Warming Requests
The goal of warming requests is to reduce the latency that users of your application experience when new instances need to be “spun up” to serve yet more users. Let’s assume that you’re doing a good job of serving your application from a single instance. But if it is suddenly Slashdotted or Tweeted, it can experience a sudden rush of traffic. When the running instance can no longer support this load, new instances must be brought online to serve all the requests.
Without the warming feature, the first user to access your application on the new instance would have to wait longer for a response than it would if he accessed the already-running instance. The additional delay is caused by the need to wait for the new instance to be loaded before it can service the user’s request. Now if we could just “warm up” the new instance by preloading your application before it gets any traffic, then users wouldn’t have to suffer this delay. That’s exactly what warming requests do.
Similar to other App Engine features, warming requests are not enabled by default. To turn them on, add a line in the inbound_services: section of your app.yaml file:
inbound_services:
- warmup
Furthermore, when a new instance comes online, App Engine will issue a GET request to /_ah/warmup. If you create a handler for this, you can preload any data in your application, as well. Just keep in mind that if your application isn’t getting any traffic and all, and there are no instances of it running, the very first request will still trigger a loading request for that unfortunate user (even if warming is enabled).
If you think about it, the reason is quite obvious: a warming request won’t do any good, and in fact, would actually add to the latency because the loading request must already happen. You don’t want to pay the penalty of issuing a warming request in addition to the loading request before your application can respond to this first user. Warming requests are really only useful if there are already servers handling traffic to your application so that App Engine can warm up new instances.
This feature is a configuration which also doesn’t require any Python code. You can read more about warming requests at:
http://code.google.com/appengine/docs/adminconsole/instances.html#Warming_Requests
http://code.google.com/appengine/docs/python/config/appconfig.html#Inbound_Services
12.18.3. Denial-of-Service Protection
App Engine offers a simplistic form of protection against systematic Denial-of-Service (DoS) abuse against your application. It requires you to create a dos.yaml file with a blacklist: section, as in this short example:
blacklist:
- subnet: 89.212.115.11
description: block DoS offender
- subnet: 72.14.194.1/15
description: block offending subnet
You can blacklist individual IP addresses or subnets for both IPv4 and IPv6. Once you upload the dos.yaml file, requests coming from the specified addresses and subnets will be filtered from reaching your application code. You will not be charged for any resources incurred from blocking computers sending traffic from these blacklisted addresses and networks.
The official documentation for the DoS protect can be found at http://code.google.com/appengine/docs/python/config/dos.html.
12.19. Vendor Lock-In
The last discussion we’ll have before we let you take flight to the clouds is about vendor lock-in. Lock-in generally refers to systems that inherently make it very difficult or impossible to migrate data and/or logic to other similar or competitive systems. Throughout its short lifetime, App Engine has been consistently dogged by the reputation that it “forces users” to use Google’s API to access App Engine with no easy way to port applications away from the platform.
While Google does strongly recommend you use their APIs to take full advantage of the system, users must understand that there is a tradeoff. It seems to be fair that in exchange for being able to take advantage of Google’s scalable infrastructure (whose management is solely the company’s), that you should be using their APIs to write your code. Again, you can’t get something for nothing, right? And building such scalability is one of the most difficult and expensive things to do. However, Google does try to fight lock-in as much as it can while still allowing users to take advantage of App Engine.
For example, while App Engine does come with the webapp (or webapp2) framework, you’re free to use others that are open source and compatible with App Engine. Some of these include Django, web2py, Tipfy, Flask, or Bottle. With regard to the Datastore API, you can completely bypass it if you use the Django-non-rel system along with djangoappengine. These libraries allow you to run pure Django apps directly on top of App Engine, so you’re free to move your apps between App Engine and any traditional hosting that supports Django. Furthermore, this isn’t limited to Python as on the Java side; the App Engine team has tried hard to make its APIs as compliant with the Java Specification Request (JSR) standards as possible. If you know how to write a Java servlet, your knowledge is easily transferred to App Engine.
Finally, there are two open-source back-end systems that claim to be compatible with the App Engine client: AppScale and TyphoonAE. The latter is maintained as a more traditional open-source project, whereas the former is actively developed at the University of California, Santa Barbara. You can find out more about both projects at their respective home pages at http://appscale.cs.ucsb.edu and http://code.google.com/p/typhoonae. If you want full control of your application and don’t want to run it within a Google datacenter, you can host your own platform with either of these systems.
12.20. Resources
You can write an entire book on App Engine (and people have); unfortunately, we have no choice but to leave many details out of this chapter. However, if you would like to delve deeper into it, the following are some features and references that you might find useful.
• Blobstore Lets users serve data objects (blobs) which are too large for the Datastore, (e.g., media files)
http://code.google.com/appengine/docs/python/blobstore/overview.html
• Capabilities
http://code.google.com/appengine/docs/python/howto/maintenance.html
• Channel Service that lets your application push data directly to the browser, a.k.a. Reverse Ajax, browser push, Comet
http://googleappengine.blogspot.com/2010/12/happy-holidays-from-app-engine-team-140.html
http://blog.myblive.com/2010/12/multiuser-chatroom-with-app-engine.html
http://code.google.com/p/channel-tac-toe/
• High-replication datastore
http://googleappengine.blogspot.com/2011/01/announcing-high-replication-datastore.html
http://code.google.com/appengine/docs/python/datastore/hr/overview.html
• Mapper First segment of a MapReduce service lets users iterate over user-persistent data
http://googleappengine.blogspot.com/2010/07/introducing-mapper-api.html
http://code.google.com/p/appengine-mapreduce/
• Matcher Highly scalable real-time matching infrastructure: register queries to match against an object stream
http://www.onebigfluke.com/2010/10/magical-api-from-future-app-engines.html
http://groups.google.com/group/google-appengine/browse_thread/thread/5462e14c31f44bef
http://code.google.com/p/google-app-engine-samples/wiki/AppEngineMatcherService
• Namespaces Lets you create multi-tenant applications by compartmentalizing your Google App Engine data
http://googleappengine.blogspot.com/2010/08/multi-tenancy-support-high-performance_17.html
http://code.google.com/appengine/docs/python/multitenancy/overview.html
http://code.google.com/appengine/docs/python/multitenancy/multitenancy.html
• OAuth Federated authorization service that allows third-party access to applications and data without credential exchange
http://code.google.com/appengine/docs/python/oauth/overview.html
• Pipeline Manage multiple long-running tasks/workflows and collate their results (See also Fantasm, another simpler workflow manager written by a third-party)
http://code.google.com/p/appengine-pipeline/wiki/GettingStarted
http://code.google.com/p/appengine-pipeline/
http://news.ycombinator.com/item?id=2013133
http://googleappengine.blogspot.com/2011/03/implementing-workflows-on-app-engine.html
Table 12-3 lists Web addresses for many of the development frameworks presented in this chapter.
Table 12-3. Frameworks for Development with Google App Engine
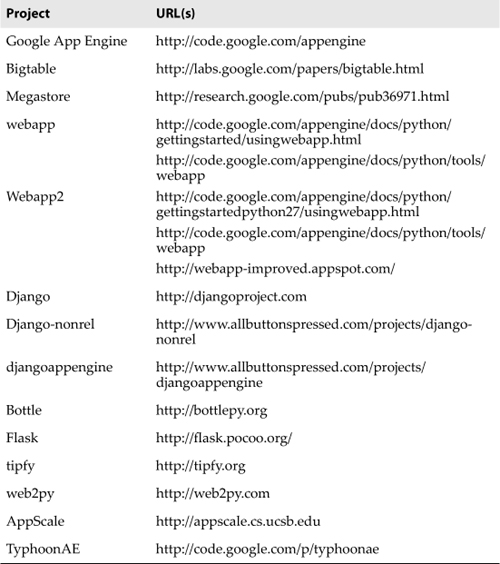
12.21. Conclusion
As we’ve seen from all the rich material in this chapter and Chapter 11, Django and Google App Engine are two of the most powerful and flexible Web frameworks in the Python community today. Add in all the others (TurboGears, Pyramid, web2py, web.py, etc.), which are quite formidable themselves, and you’ve got a great ecosphere of frameworks and an ample number of choices for anyone writing Web applications in Python. Even more important, all of the Python Web frameworks have a dedicated set of developers and devoted followers.
Programmers who are jacks-of-all-trades might even switch between frameworks from time-to-time, depending on whether they’re the right tool for the job. It’s good that the community has rallied around some of these larger, more well-known frameworks, because although the quote at the beginning of the chapter is a bit tongue-in-cheek, there is a grain of truth behind it, and the world would be much worse off if everyone had to write their own Web framework.
One final note: none of the examples in this chapter are available in Python 3 because neither framework supports it yet. Rest assured that when that time arrives, we’ll provide that source for you online as well as in future editions of this book.
12.22. Exercises
Google App Engine
12-1. Background. What does Python have to do with Google App Engine?
12-2. Background. What makes Google App Engine different from other development environments?
12-3. Configuration. What are some differences between Django and App Engine configuration files?
12-4. Configuration. Name the places where Django applications perform URL-to-handler mapping. Do the same for App Engine applications.
12-5. Configuration. How do you get Django applications to run (mostly) unmodified on Google App Engine?
12-6. Configuration. For this exercise, go to http://code.google.com/appengine, and then download and install the latest Google App Engine SDK for your platform.
a. Use the Launcher application if on a Windows-based PC or Mac and create an application called “helloworld.” On other platforms, create the following pair of files, with the following content:
i. The first file is: app.yaml
application: helloworld
version: 1
runtime: python
api_version: 1
handlers:
- url: .*
script: main.py
ii. The second file is: main.py
from google.appengine.ext import webapp
from google.appengine.ext.webapp.util import run_wsgi_app
class MainHandler(webapp.RequestHandler):
def get(self):
self.response.out.write('Hello world!')
application = webapp.WSGIApplication([
('/', MainHandler),
], debug=True)
def main():
run_wsgi_app(application)
if __name__ == '__main__':
main()
b. Start your application by using the Launcher or executing ‘dev_appserver.py DIR’, where DIR is the directory in which both app.yaml and main.py are located, and then visit http://localhost:8080 (or the appropriate port number) to confirm your code works and “Hello world!” does show up on your browser. Change the output to something other than “Hello world!”.
12-7. Tutorial. Complete the entire Getting Started tutorial found at http://code.google.com/appengine/docs/python/gettingstarted. Warning: do not simply copy the code you find there. I expect to see you modify the application to do something slightly different than what’s offered, and/or add new functionality that isn’t present.
12-8. Communication. E-mail is a critical application feature. In an earlier exercise, you added e-mail distribution when a new blog entry is made. Do the same with your App Engine blog application.
12-9. Images. Allow users to submit one photo or picture per blog entry and create a suitably tasteful display of blog posts.
12-10. Cursors and Pagination. Like the Django blog application, showing the ten most recent posts is good, but letting users paginate through older posts is even better. Use cursors and add pagination to your application.
12-11. Communication. Allow users to communicate with your application by using IMs. Create a menu of commands to post blog entries, retrieve the most recent entries and any other feature that you think would be “cool.”
Development with Django or App Engine
12-12. User Cloud Data Management System. Build a weather monitoring system. Allow multiple users in your system, using whichever form of authentication you prefer. Every user should have a set of locations (postal or ZIP code, airport code, [city, state], [city, country], etc.). The user should be presented a grid of all the locations they’re interested in, along with the current forecast and an extended 3–5 day forecast. There are various online weather APIs you can use.
12-13. Financial Management System. Create a stock/equity portfolio management system. This includes normal stocks (on any exchange), mutual funds, exchange-traded funds (ETFs), American depositary receipts (ADRs), stock exchange indices, or anything that has a ticker symbol by which you can perform lookups. If you do not live in the United States, adopt your solution to the trading vehicles used in your country.
12-14. Sports Statistics Application. You’re an avid participant in the global sport of bowling. Sure, it’s easy to make an application that manages your scores, gives you averages, etc., but you should do more than that. Show trending, moving-day averages, and also allow users to enter the number of open frames along with the scores. This way they can verify whether they really had a good game or whether they got lucky by hitting Brooklyns all evening long. Also, include a check box that can be selected to indicate whether a game is sanctioned or not, and allow links to video clips be tied to specific games. Live and breathe your sport—away from your bowling alley. Create a network server that allows you to access this data over the Internet when you’re out of town or from your mobile phone.
12-15. Course Logistics and Social Management System. Implement a secondary or collegiate course management system. It should support users being able to login, have a chat room for live conversation, forums for offline Out-of-Band (OoB) communication, and a place to submit homework and get grades. Similarly for teachers, they should be able to add new and grade existing assignments, participate in chats and forums along with students, post course announcements, static files, and send messages to students. Choose either Django or Google App Engine to implement your solution, or better yet, use Django-non-rel to create a Django app that can run in a traditional hosted environment or by Google on App Engine.
12-16. Recipe Manager. Develop an application to manage a virtual collection of cooking recipes. This is slightly different from managing, for instance, a music collection for which you have all your MP3 or other sound files locally. These food recipes only exist online. When users enter recipe URLs, your application should allow them to be placed in multiple categories (but the actual URL should only be saved once). Also, the user should be alerted when a link no longer works by e-mail, IM/XMPP, or even by SMS if you can find an appropriate e-mail-to-SMS gateway (see http://en.wikipedia.org/wiki/List_of_SMS_gateways) if you are not running your own SMS service. Create a mini-crawler so that when listing recipes, you’ll also display a thumbnail of an image found on the same page as the recipe URL (if one is available). You should also allow your users to browse by category/cuisine.