2. Objective-C
If you want to develop native iOS applications, you must learn Objective-C. For many, this is an intimidating task with a steep learning curve. Objective-C mixes a wide range of C-language constructs with a layer of object-oriented design. In addition, iOS applications leverage a wide range of design patterns. While these patterns provide both flexibility and power, they can often confuse beginners.
This chapter presents a thorough overview of the Objective-C features needed to successfully develop iOS applications, as well as an explanation of new technologies that tame Objective-C’s more complex aspects. This will help reduce the learning curve to a gentle speed bump.
The Objective-C Language
Objective-C is a small, elegant, object-oriented extension to the C language. Strictly speaking, it is a superset of C. You can use any valid C code in an Objective-C project. This gives us access to numerous third-party libraries, in addition to the Objective-C and C frameworks. Objective-C borrows much of its object syntax from Smalltalk. Smalltalk, one of the earliest object-oriented languages, was designed to be simple—both easy to implement and easy to learn. Despite its age, Smalltalk remains one of the most innovative program languages on the market. Many modern languages are just now rediscovering techniques originally developed in Smalltalk. And Objective-C gains a lot from this heritage: a highly dynamic, very expressive foundation upon which everything else is built.
As a dynamic language, Objective-C binds methods and arguments at runtime instead of compile time. You don’t need to know the object’s class. You can send any object any message. This often greatly simplifies your code; however, if you send an object a message that it doesn’t understand, you will crash your program at runtime.
Fortunately, Xcode warns you about undeclared messages. Furthermore, you can declare static types for your objects, which increases the compiler’s ability to analyze the code and produce warnings. Objective-C is also a highly reflective language—it can observe and modify itself. We can examine any class at runtime, getting access to its methods, instance variables, and more. We can modify classes, adding our own methods using categories or extension, or even dynamically redefining methods at runtime.
Finally, Objective-C—and in particular the Cocoa and Cocoa Touch frameworks—utilize a number of design patterns to reduce the binding between the different sections of our code. Loosely bound code is easier to modify and maintain. Changes to one part of the program do not affect any other parts of your code. However, if you are not familiar with these patterns, they can make the code hard to follow.
These patterns include using a Model-View-Controller (MVC) framework for our programs, using delegates instead of subclassing, enabling key-value coding (KVC) for highly dynamic access to an object’s instance variables, using key-value observing (KVO) to monitor any changes to those variables, and providing our applications with an extensive notifications framework.
As you master Objective-C, you will find that you can often solve complex problems with considerably less code than you would need in more traditional programming languages, like C++ or Java. We can more carefully tailor our solution to fit the problem, rather than trying to hammer a square peg into a round hole.
Apple has made good use of this flexibility when designing both the Cocoa Touch frameworks and Xcode’s developer tools. These tools make common tasks easy to accomplish without a lot of repetitive boilerplate, while still making it possible to work outside the box when necessary.
The rest of this chapter describes the Objective-C programming language. It is not meant to be all-inclusive; you could easily write an entire book on Objective-C. In fact, several people have. You might want to check them out. Or read The Objective-C Programming Language in Apple’s documentation. The guide provides all the details you will ever need. Instead, this chapter is the “vital parts” version. It provides enough information to get started, while pointing out many of the key features and common mistakes.
While previous experience with objective-oriented programming is not necessary, I assume you have a basic understanding of other C-like programming languages (e.g., C, C++, or Java). If the following example leaves you completely baffled, you may want to brush up your C skills before proceeding. If you can correctly predict the output1, you should be fine.
#include <stdio.h>
int main (int argc, const char * argv[]) {
int total = 0;
int count = 0;
for (int y = 0; y < 10; y++) {
count++;
total += y;
}
printf("Total = %d, Count = %d, Average = %1.1f",
total,
count,
(float)total / (float)count);
return 0;
}
Nine Fundamental Building Blocks
I won’t kid you. Previous versions of Objective-C had a steep learning curve. Some aspects, like memory management, were only practicable by robotically following a strict set of rules. Even then, you could easily slip up and get things wrong, leading to bugs, errors, and crashes. Fortunately, Apple continues to improve the Objective-C language and reduce its complexity. As a result, we spend less time shepherding the programming language and more time solving real problems.
Still, if you haven’t done any object-oriented programming before, it can be a bit much to wrap your head around. There are many new concepts to master: classes, objects, subclasses, superclasses, overriding methods, and more.
On the other hand, experience with other object-oriented programs might not help as much as you expect. Objective-C handles objects somewhat differently than languages like Java and C++. Leaning too heavily on your previous experience may lead you astray.
With all that said, there are really only nine key elements that you need to understand. These are the foundation upon which everything else is built: standard C data types, structures, enums, functions, operators, objects, methods, protocols, and categories/extensions. Once you understand these (and—most importantly—the differences between them), you are 90 percent home.
In general, these elements can be divided into two categories: data and procedures. Data (C types, structures, enums, and objects) represent the information that we are processing. If you compare Objective-C code to an English sentence, the data is the nouns. Procedures (C operators, functions, and methods), on the other hand, are processes that manipulate or transform the data. They are our verbs. Our programs are basically a list of steps that define data and then manipulate it.
C Data Types
Objective-C is built upon the C programming language. As a result, the C data types are some of the most primitive building blocks available. All other data structures are just advanced techniques for combining C types in increasingly complex ways.
All C data types are, at their root, fixed-length strings of 1s and 0s either 8, 16, 32, or 64 bits long. The different data types simply define how we interpret those bits. To begin with, we can divide the data types into two main categories: integer values and floating-point values (Table 2.1).
Table 2.1 Common C Data Types for iOS

Integer values are used for storing discrete information. This most often means positive and negative whole numbers, but could represent other symbolic information (e.g., BOOLs are used to represent YES and NO values, while chars are used to represent ASCII characters). The integer types include BOOL, char, short, int, long, and long long data types. The main difference between them is the number of bits used to represent each value. The more bits, the wider the range of possible values—however, the data also takes up more space. Discrete values also come in signed and unsigned variants. This determines how the numbers are interpreted. Signed data types can be both positive and negative numbers, while unsigned data types are always zero or greater.
Note

The exact size of the data type can vary depending on both the compiler that you are using and the target platform. For example, int values could be either 32 or 64 bits long. As a result, your program shouldn’t make assumptions about either the number of bits or the minimum and maximum values of each data type. Instead, use the sizeof() function and the macros defined in limits.h and float.h to determine these values at runtime.
Floating-point values (float and double) are used to approximate continuous numbers—basically, any number with a decimal point. I won’t go too deep into the theory and practice of floating-point numbers here—you can find all the eye-bleeding detail in any introductory computer science book. Suffice it to say, floating-point numbers are only approximations. Two mathematical formulas that are identical on paper may produce very different results. However, unless you are doing scientific calculations, you will probably only run into problems when comparing values. For example, you may be expecting 3.274 but your expression returns 3.2739999999999999. While the values aren’t equal, they are usually close enough. Any difference you see is probably the result of rounding errors. Because of this, you will often want to check to see if your value falls within a given range (3.2739 < x < 3.2741) rather than looking for strict equality.
C has two types of floating-point values: float and double. As the name suggests, a double is twice as big as a float. The additional size improves both the range and the precision of its values. For this reason, it is tempting to always use doubles instead of floats. In some programming languages, this is idiomatically correct. I could probably count the number of times I used floats in Java on one hand. In Objective-C, however, floats are much more common.
In fact, despite the wide range of available C data types, we will typically only use BOOL, int, and floats. However, it often feels like we are using a much broader range of data types, since the core framework frequently uses typedef to create alternative names for int and float (and occasionally other data types). Sometimes this is done to provide consistency and to increase portability across multiple platforms. For example, CGFloat and NSInteger are both defined so that their size matches the target processor’s integer size (either 32 or 64 bits). All else being equal, these values should be the most efficient data type for that particular processor. Other types are defined to better communicate their intent, like NSTimeInterval.
You can use the documentation to see how these types are defined. For example, in Xcode, open the documentation by selecting Documentation and API Reference from the Help menu. You might have to search around a bit, but you will find NSTimeInterval described under Reference > Foundation Data Type Reference > NSTimeInterval. The actual definition is shown as:
typedef double NSTimeInterval;
As you can see, NSTimeInterval is just an alias for double.
C Data Structures
Simple data types are all fine and good, but we often need to organize our data into more complex structures. These structures fall into three main categories: pointers, arrays, and structs.
Pointers
The pointer is the simplest structure—at least in concept. Basically, it is a variable that points to the memory address of another value. This allows indirect access and modification of those values.
You declare a pointer by placing an asterisk between the type declaration and the variable name. You also use the asterisk before the variable name to dereference the pointer (to set or read the value at that address space). Likewise, placing an ampersand before a normal variable will give you that variable’s address. You can even do crazy things like creating pointers to pointers, for an additional layer of indirection.
int a = 10; // Creates the variable a.
int* b = &a; // Creates the pointer, b, that points to the
// address of a.
*b = 15; // Changes the value of variable a to 15.
int** c; // Creates a pointer to a pointer to an int.
Note
When you declare a pointer, the compiler does not request memory space for the underlying values. It requests only enough space to store the memory address. You must either use the pointer to refer to an existing variable (as we did in the example above) or manually manage its memory on the heap. We will explore this issue in more depth when we discuss memory management later in this chapter.
By themselves, pointers are not very interesting; however, they form the backbone of many more-complex data structures. Additionally, while pointers are conceptually quite simple, they are difficult to master. Pointers remain a common source of bugs in programs, and these bugs are often very hard to find and fix. A full description of pointers is beyond the scope of this chapter. Fortunately, we will normally use pointers only when referencing Objective-C objects, and these objects largely have their own syntax.
Arrays
Arrays allow us to define a fixed-length series of values. All of these values must be of the same type. For example, if we want a list of ten integers, we would simply define it as shown here:
int integerList[10]; // Declares an array to hold ten integers.
We can then access the individual members of the list by placing the desired index in the brackets. Note, however, that arrays are zero-indexed. The first item is 0, not 1.
integerList[0] = 150; // Sets the first item in the array.
integerList[9] = -23; // Sets the last item in the array.
int a = integerList[0]; // Sets a to 150.
We can also use the C literal array syntax to declare short arrays with a static set of initial values. We write literal arrays as a pair of curly braces surrounding a comma-separated list of values.
int intList2[] = {15, 42, 9}; // Implicitly declares an array
// to hold three integers,
// then sets their values
// using the literal array.
As this example shows, we do not even need to define the length of intList2. Instead, its size is automatically set equal to the literal array. Alternatively, you could explicitly set intList2’s size, but it must be equal to or longer than the literal array.
Arrays are also used to represent C-style strings. For example, if you want to store someone’s name in C, you usually store it as an array of chars.
char firstName[255];
Since they are based on arrays, C-style strings have a fixed size. This leads to a very common source of bugs. Yes, 254 characters should be enough to store most people’s first name, but eventually you will run into a client that needs 255 characters (not to mention international character sets).
As this example implies, the string does not need to use up the entire array, but it must fit within the allocated memory space. Actually, the array’s size must equal or exceed the number of characters in the string + 1. C-style strings always end with a null character.
String values can be assigned using literal strings—anything within double quotes. C will append the null value automatically. In this example, s1 and s2 are identical.
char s1[5] = "test";
char s2[5] = {'t', 'e', 's', 't', '�'};
Note
‘A’ and “A” are completely different data types. In C, single quotes are used to represent char values. Therefore, ‘A’ is a char with the value of 65 (the ASCII value for the uppercase letter A). On the other hand, “A” is an array of chars with the values {‘A’, ‘�’}.
Like pointers, arrays can become quite complex—particularly when passing them into or returning them from functions, and we haven’t even begun talking about advanced topics like multidimensional arrays and dynamic arrays. Fortunately, unless you are calling a C library, we will almost never use arrays in Objective-C. Instead, we will use one of Objective-C’s collection classes (NSArray, NSSet, or NSDictionary). For strings, we will use NSString.
Structs
Structs are the most flexible C data type. While arrays allow us to declare an indexed list of identical types, the struct lets us combine different types of data and lets us access that data using named fields. Also, unlike C-style arrays, Cocoa Touch makes heavy use of C structures. In particular, many of the core frameworks are written in pure C, allowing them to be used in both Cocoa (Objective-C) and Carbon (pure C) projects (Carbon is an older technology that is sometimes still used for applications on the Mac OS X desktop).
To see a typical struct, look up CGPoint in Xcode’s documentation. You will see that it is declared as shown here:
struct CGPoint {
CGFloat x;
CGFloat y;
};
typedef struct CGPoint CGPoint;
First, the framework creates a structure called CGPoint. This structure has two fields, x and y. In this case, both fields happen to be the same data type (CGFloat).
Next, we use typedef to define a type named CGPoint. This is an alias for the CGPoint struct. That may seem odd, but it is actually quite helpful. If we didn’t have the typedef, we would constantly have to refer to this entity as “struct CGPoint” in our code. Now, however, we can drop the struct keyword and treat it like any other data type.
You access the fields as shown:
CGPoint pixelA; // Creates the CGPoint variable.
pixelA.x = 23.5; // Sets the x field.
pixelA.y = 32.6; // Sets the y field.
int x = pixelA.x; // Reads the value from the x field.
Apple’s frameworks often provide both the data structures and a number of functions to manipulate them. The documentation tries to group related structures and methods together wherever possible. For any struct type, Apple provides a convenience method for creating the struct, a method for comparing structs, and methods to perform common operations with the struct. For CGPoint, these include CGPointMake(), CGPointEqualToPoint(), and CGRectContainsPoint().
These methods become more important as the structures grow increasingly complex. Take, for example, the CGRect struct. This also has just two fields: origin and size; however, these fields are each structs in their own right. Origin is a CGPoint, while size is a CGSize.
The following code shows three different approaches to creating a CGRect. All three approaches are equivalent.
CGRect r1;
r1.origin.x = 5;
r1.origin.y = 10;
r1.size.width = 10;
r1.size.height = 20;
CGRect r2 = CGRectMake(5, 10, 10, 20);
CGRect r3 = {{5, 10}, {10, 20}};
In particular, notice how we created r3 using a struct literal. Conceptually, these are simple. Each pair of curly braces represents a struct (just like the curly braces that represented literal arrays earlier). The enclosed comma-separated list represents the fields in the order they were declared.
So, the outer braces represent the CGRect structure. The first inner pair of braces is the origin and the second is the size. Finally we have the actual fields inside the two inner structures. A CGRect still isn’t too complicated, but as our structures get more complex, the literal struct construction becomes harder and harder to understand. In general, I only use literal structs for simple data structures and arrays. Instead, I use the helper function (as shown for r2) to quickly make structures, and I use direct assignment (as shown for r1) when I need additional flexibility. Still, you will undoubtedly run into third-party code that uses struct literals, so you should be able to recognize them.
Note
If you are compiling an application with Automated Reference Counting (ARC)—and we will use ARC for all applications in this book—you cannot store Objective-C objects inside a struct. Instead, you need to use an Objective-C class to manage the data. This is one of the few rules we must follow to enable automatic memory management. We will discuss this in more detail in the “Memory Management” section later this chapter.
Enumerations
Let’s say we want to represent the days of the week in our code. We could use strings and spell out the words. While this approach works, it has several problems. First, it requires extra memory and computational effort just to store and compare days. Furthermore, string comparison is tricky. Do Saturday, saturday, and SATURDAY all represent the same day? What if you misspell the name of a day? What if you enter a string that doesn’t correspond to any valid day? One alternative is to manually assign an unsigned char value for each day. In this example, the const keyword tells the compiler that these values cannot be changed after they have been initialized.
const unsigned char SUNDAY = 0;
const unsigned char MONDAY = 1;
const unsigned char TUESDAY = 2;
const unsigned char WEDNESDAY = 3;
const unsigned char THURSDAY = 4;
const unsigned char FRIDAY = 5;
const unsigned char SATURDAY = 6;
const unsigned char HUMPDAY = WEDNESDAY;
This works, but there’s no way to refer to the set of days as a group. For example, you cannot specify that a function’s argument needs to be a day of the week. That brings us to enumerations. Enumerations provide a concise, elegant method for defining a discrete set of values. For example, our days of the week could be:
typedef enum {
SUNDAY,
MONDAY,
TUESDAY,
WEDNESDAY,
THURSDAY,
FRIDAY,
SATURDAY
} DAY;
const DAY HUMPDAY = WEDNESDAY;
Just as in the earlier struct example, we use a typedef to declare a type for our enum. In this example, we nest the enum declaration inside the typdef. Both styles are perfectly valid C code. Additionally, we could give the enum a name (e.g., typedef enum DAY { ... } DAY;), but since we will always access it through the type’s name, that seems redundant.
Now, this isn’t exactly the same as the unsigned char example. The enums take up a little more memory. However, they sure save on typing. More importantly, the enum better communicates our intent. When we define HUMPDAY as a const unsigned char, we are implicitly saying that it should have a value between 0 and 255. In the enum example, we are explicitly stating that HUMPDAY should only be set equal to one of our DAY constants. Of course, nothing will stop you from setting an invalid value.
const DAY HUMPDAY = 143; // While this will compile fine,
// it is just wrong.
Stylistically, it is best to always use the named constants when assigning values to enum types. And while the compiler won’t catch assignment errors, it can help in other areas—especially when combining enums and switch statements.
By default, the enum assigns 0 to the first constant, and the values increase by 1 as we step down the list. Alternatively, you can assign explicit values to one or more of the named constants. You can even assign multiple constants to the same value—making them aliases of each other.
typedef enum {
BOLD = 1;
ITALIC = 2;
UNDERLINE = 4;
ALL_CAPS = 8;
SUBSCRIPT = 16;
STRONG = BOLD
} STYLE;
Cocoa Touch makes extensive use of enumerations. As you look through the iOS SDK, you will find two common usage patterns. First, it uses enums for mutually exclusive options. Here, you must select one and only one option from a limited set of choices. Our DAY enum is set up this way. Any DAY variable or argument can take one and only one DAY value.
Other times, the enums represent flags that you can combine to form more-complex values. Our STYLE enum works this way. The constant’s values were chosen so that each value represents a single, unique bit. You can combine the constants using the bitwise OR operator. You can likewise pull them apart using the bitwise AND operator. This allows you to store any combination of styles in a single variable.
STYLE header = BOLD | ITALIC | ALL_CAPS; // Sets the style to bold,
// italic, and all caps.
if ((header & BOLD) == BOLD) { // Checks to see if the
// Process bold text here // BOLD bit is set.
}
Operators
Operators are a predefined set of procedural units in C. You use operators to build expressions—sets of commands that the computer will execute. For example, the expression a = 5 uses the assignment operator to set the value of a variable equal to the literal value 5. In this example, = is the operator, while a and 5 are the operands (the things that get operated upon).
Operators perform a wide variety of tasks; however, most operators can be grouped into a few broad categories: assignment (=, +=, -=, *=, etc.), arithmetic (+, -, *, /, %, etc.), comparison (==, <, >, !=, etc.), logical (&&, ||, !), bitwise (&, |, ^), and membership ([], *, &).
You can also categorize operators by the number of operands they take. Unitary operators take a single operand. The operator can be placed either before or after the operand—depending on the operator.
a++ // Increment the value of variable a by 1.
-b // The opposite of b. If b equals 5, -b equals -5.
!c // Boolean NOT. If c is true, !c is false.
Binary operators take two operands and are usually placed between the operands.
a + b // Adds the two values together.
a <= b // Returns true if a is less than or equal to b.
a[b] // Access the value at index b in array a.
Finally, C has only one ternary operator, the ternary conditional operator.
a ? b : c // If a is true, return b. Otherwise return c.
Note
In several cases, two different operators use the same symbol. For example, the multiply and indirection operators both use a single asterisk. The compiler will select the correct operator based on the number of operands. In the example *a = b * c, the first asterisk is the indirection operator (unitary operator), allowing us to set the value at the memory location pointed to by a. The second asterisk is multiplication (binary operator).
Order of Precedence
Each operator has an order of precedence determining its priority relative to the other operators. Operators with a high precedence are executed before those with a lower precedence. This should be familiar to most people from elementary math classes. Multiplication and division have a higher order of precedence than addition and subtraction.
Whenever an expression has more than one operator (and most expressions have more than one operator), you must take into account the order of precedence. Take a simple expression like a = b + c. The addition (+) occurs first, and then the sum is assigned (=) to the variable a.
For the most part, the order of precedence makes logical sense; however, there are a lot of rules, and some of them can be quite surprising. You can force the expression to execute in any arbitrary order by using parentheses. Anything inside the parentheses is automatically executed first. Therefore, when in doubt use parentheses.
When an expression is evaluated, the computer takes the operand with the highest precedence and determines its value. It then replaces the operator and its operands with that value, forming a new expression. This is then evaluated until we reduce the expression to a single value.
5 + 6 / 3 * (2 + 5) // Initial expression.
5 + 6 / 3 * 7 // Operand in parentheses evaluated first.
5 + 2 * 7 // When two operators have the same precedence,
// evaluate from left to right.
5 + 14 // Perform multiplication before addition.
19 // Final value.
Here are a couple of rules of thumb: Any expressions inside a function’s or method’s arguments are evaluated before the function call or method call is performed. Similarly, any expression inside an array’s subscript is performed before looking up the value. Function calls, method calls, and array indexing all occur before most other operators. Assignment occurs after most (but not all) other operators. Some examples are given here:
a = 2 * max(2 + 5, 3); // max() returns the largest value among its
//arguments. Variable a is set to 14.
a[2 + 3] = (6 + 3) * (10 - 7); // The value at index 5 is set to 27.
a = ((1 + 2) * (3 + 4)) > ((5 + 6) * (7 + 8)); // Variable a is set
// to false.
Functions
Functions are the primary procedural workhorse for the C programming language. A C program largely consists of defining data structures and then writing functions to manipulate those structures.
We will typically use functions in conjunction with structs, especially when dealing with the lower-level frameworks. However, you will find some functions that are explicitly designed to work with Objective-C objects. In fact, we saw a function like this in Chapter 1: UIApplicationMain().
Unlike operators, functions can be defined by the programmer. This allows us to encapsulate a series of procedural steps so that those steps can be easily repeated.
Functions are defined in an implementation file (filename ending in .m). It starts with the function signature. This defines the function’s name, the return value, and the function’s arguments. Arguments will appear as a comma-separated list surrounded by parentheses. Inside the list, each argument declares a data type and a name.
A pair of curly brackets follows the function signature. We can place any number of expressions inside these brackets. When the function is called, these expressions are executed in the order in which they appear.
CGFloat calculateDistance(CGPoint p1, CGPoint p2) {
CGFloat xDist = p1.x - p2.x;
CGFloat yDist = p1.y - p2.y;
// Calculate the distance using the Pythagorean theorem.
return sqrt(xDist * xDist + yDist * yDist);
}
In the above example, reading left to right, CGFloat is the return value, calculateDistance is the function name, and CGPoint p1 and CGPoint p2 are the function’s two arguments.
Inside the function, we first create two local variables. These variables are stored on the stack and will be automatically deleted when the method returns. We assign the difference between our point’s x- and y-coordinates to these variables.
The next line is blank. Whitespace is ignored by the compiler and should be used to organize your code, making it easier to follow and understand. Then we have a comment. The compiler will ignore anything after // until the end of the line. It will also ignore anything between /* and */, allowing us to create comments spanning several lines.
Finally, we reach the return keyword. This evaluates the expression to its right and then exits the function, returning the expression’s value (if any) to the caller. The calculateDistance() function calculates the distance between two points using the Pythagorean theorem. Here we square the x and y distances using the multiply operator. We add them together. Then we pass that value to the C math library’s sqrt() function and return the result.
You would call the function by using its name followed by parentheses containing a comma-separated list of values. These can be literal values, variables, or even other expressions. However, the value’s type must match its corresponding argument. C can convert some of the basic data types. For example, you can pass an int to a function that requires a double. If the function returns a value, we will usually assign the return value to a variable or otherwise use it in an expression.
Not all functions return values. Some functions create side effects (they create some sort of lasting change in the application—either outputting data to the screen or altering some aspect of our data structures). For example, the printf() function can be used to print a message to the console.
CGPoint a = {1, 3};
CGPoint b = {-3, 7};
CGFloat distance = calculateDistance(a, b);
printf("The distance between (%2.1f, %2.1f) and (%2.1f, %2.1f) is %5.4f
",
a.x, a.y,
b.x, b.y,
distance);
In this sample, we first create our two point structs. Then we call our calculateDistance() function, passing in a for argument p1 and b for argument p2. We then assign the return value to the distance variable. Finally, we call the printf() function, passing in a format string and our data.
The printf() function constructs its message from a variable-length list of arguments. The first argument is a format string, followed by a comma-separated list of values. The printf() function will scan through the string, looking for any placeholders (a percentage symbol followed by one or more characters). In this example, we use the %2.1f conversion specifier. This tells printf() to insert a floating-point value at least two digits long with exactly one digit after the decimal point. The %5.4f conversion specifier indicates a five-digit number with four of these digits after the decimal point. Then, printf() replaces the conversion specifiers using the list of values in order.
If you run this code, it prints the following message to the console: “The distance between (1.0, 3.0) and (-3.0, 7.0) is 5.6569”.
Finally, in C you must define the function before it is used. Most of the time we simply place a function declaration in a corresponding header file (filename ending in .h). The function declaration is just the function signature followed by a semicolon.
CGFloat calculateDistance(CGPoint p1, CGPoint p2);
We can then import the header file before using the function anywhere else in our application.
Pass by Value
In C, all functions pass their arguments by value. This means the compiler makes local copies of the arguments. Those copies are used within the function and are removed from memory when the function returns. In general, this means you can do whatever you want to the local copy, and the original value will remain unchanged. That is a very good thing. Check out the following examples.
void inner(int innerValue) {
printf("innerValue = %d
", innerValue);
innerValue += 20;
printf("innerValue = %d
", innerValue);
}
void outer() {
int outerValue = 10;
printf("outerValue = %d
", outerValue);
inner(outerValue);
printf("outerValue = %d
", outerValue);
}
Here, printf() will replace the %d specifiers with an int value. Calling outer() prints the following series of messages to the console:
outerValue = 10
innerValue = 10
innerValue = 30
outerValue = 10
As you can see, the value of outerValue does not change when we modify innerValue. However, this is only half of the story. Consider the following code:
void inner(int* innerPointer) {
printf("innerValue = %d
", *innerPointer);
*innerPointer += 20;
printf("innerValue = %d
", *innerPointer);
}
void outer() {
int buffer = 10;
int* outerPointer = &buffer;
printf("outerValue = %d
", *outerPointer);
inner(outerPointer);
printf("outerValue = %d
", *outerPointer);
}
Superficially, this looks very similar to the earlier code. However, there are some important differences. First, we create a buffer variable and set its value to 10. We then create a pointer to this buffer and pass that pointer into the inner() function. Then, inner() modifies the value pointed at by its innerPointer argument. This time, we get the following output:
outerValue = 10
innerValue = 10
innerValue = 30
outerValue = 30
Here, both the innerValue and the outerValue change. We’re still passing our argument by value. However, this time the value is the address of the buffer variable. The inner() function receives a copy of this address—but the address still points to the same piece of data in memory. When we dereference the pointer (either to modify it or to print out its value), we are actually accessing the buffer’s value.
Bottom line, functions can modify the values pointed to by pointer arguments. This is important since both Objective-C objects and C-style arrays are passed as pointers. Whenever you are using these data types, you must avoid accidentally modifying the underlying data.
Return values are also passed by value, but this has an additional complication, since the original value is deleted when the function returns. Consider the following method:
int* getPointer() {
int buffer = 100;
int* pointer = &buffer;
return pointer;
}
When it is called, we create a local variable named buffer and then create a pointer to our buffer. Our function then returns the pointer. As we discussed earlier, the pointer is copied, but that simply makes a copy of buffer’s address. The new pointer still points at buffer. However, when the function ends, buffer is deleted. This leaves us with a pointer that now points to an undefined piece of memory.
Objects
All the language features we’ve discussed so far come from C. However, with the introduction of objects, we leave C behind and enter the world of Objective-C.
Superficially, an object combines the data management of structs with a set of related functions (though in this case we call them methods). Under the hood, that’s exactly how they are implemented; however, objects give us several advantages over generic C code.
Encapsulation
Encapsulation is one of the main advantages of object-oriented code. Objects should hide away much of their complexity, only exposing those functions and values that a developer needs to use them effectively.
To put it another way, objects function as black boxes. They have a public interface, which describes all the methods and values that can be accessed from the outside. The actual implementation of the object may include any number of private instance variables and methods; however, you shouldn’t need to know anything about these details in order to use the object in your code.
Since Objective-C is a highly dynamic, reflexive programming language, the public interface is more of a suggestion than a strict rule of law. You can always gain access to hidden instance variables and methods, but doing so breaks encapsulation. This is bad. Sure, it may make things easier in the short term, but you’re probably setting yourself up for long-term pain.
In an ideal world, an object’s interface should remain static and unchanging. You can add new methods over time, but you shouldn’t remove or alter any existing methods. The interior details, however, are fair game. The object’s developer may completely redesign the implementation from one build to the next, and as long as the rest of your code only interacts with the object through its interface, everything will continue to function properly.
Of course, we live in the real world, and we often need to alter an object’s interface, especially during early development. This isn’t a big deal if you’re the only one using the object—but if other people depend on your classes, you will need some way of coordinating these changes with them.
Apple, for example, will occasionally mark methods as deprecated. These methods will continue to operate as normal; however, developers should stop using them, because they will disappear in some future release. This gives developers an opportunity to redesign their applications before these changes take effect.
Inheritance
Inheritance is the second main benefit of object-oriented code. One class can inherit the instance variables and methods of another—and can then modify those methods or add new methods and instance variables to further specialize the new class. Most importantly, we can still use the subclasses wherever we could have used the superclasses.
Say, for example, we have a class called Vehicle. This contains all the common features of a vehicle: methods to allow you to set or retrieve the driver, passengers, cargo, current location, destination, and so on. You might even have some methods to query the vehicle’s capabilities: canOperateOnLand, canOperateOnWater, canFly, cruiseSpeed, and so on.
We could then create subclasses that all inherit from Vehicle—Boat, Airplane, and Car. The Boat subclass would override the canOperateOnWater method to return YES. Airplane would similarly override canFly.
Finally, we might make Maserati and Yugo subclasses of Car. Maserati’s cruise speed would return 150 MPH, while Yugo’s would return 15 MPH (or something close to that, I’m sure).
Then let’s say we have a function that consumes vehicles: canVehicleReachLocationInTime(Vehicle* vehicle, Location* location, Time* deadline). We could pass any instance of Boat, Airplane, Car, Maserati, or Yugo to this function. Similarly, we could pass any Car, Maserati, or Yugo object to the estimatedTimeToFinishIndy500(Car* sampleCar) function.
We will frequently run into inheritance and class hierarchies when we interact with Cocoa Touch view objects (Figure 2.1). UIView inherits from UIResponder, which inherits from NSObject. NSObject is a root class—almost all other objects inherit from it. There are a few exceptions (e.g., NSProxy) but these are unusual corner cases.
Figure 2.1 Part of the UIView class hierarchy
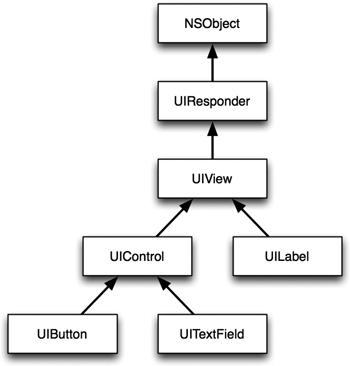
The NSObject root class ensures that all objects have a basic set of methods (memory management, testing for equality, testing for class membership, and the like). Next, UIResponder adds an interface for objects that respond to motion and touch events, allowing them to participate in the responder chain. Finally, UIView adds support for managing and displaying rectangular regions on the screen.
Figure 2.1 also shows a few subclasses of UIView. As you can see, some screen elements (like UILabel) inherit directly from UIView. Others (UIButton and UITextField) inherit from UIControl, which adds support for registering targets for events, and for dispatching action messages when the events occur.
Let’s look at a concrete example. UIView has a method called addSubview:. This lets you add another UIVew to be displayed inside the current view. Since UILabel, UIButton, and UITextField all inherit from UIView (either directly or indirectly), they can all be added using the addSubview: method. In addition, they also inherit addSubview:. In theory, you could add a subview to your button or text field (though it’s hard to imagine a situation where this would be useful). More practically, the subclasses also inherit the UIView’s frame property. This allows you to set its size and position within the superview’s coordinate system. Everything that inherits from UIView (either directly or indirectly) has a frame.
Instantiating an Object
Objective-C uses two-step creation of objects. First you allocate memory on the heap. Next, you initialize that memory region with the object’s initial values. The first step is done with the alloc class method. The second is done with init or one of its siblings.
For example, the following line will create an empty NSString object:
NSString* myString = [[NSString alloc] init];
There are a few key points worth noting here. First, we declare our NSString variable as a pointer. It will point to the memory address where the object’s data is stored on the heap.
As we will see shortly, Objective-C methods are called using square brackets. Here, we are nesting the alloc method inside the init method. This is important, since many classes are implemented using class clusters. Here the API describes a single class, but the actual implementation uses two or more variations on the class. Different versions are created and used under different circumstances, often to improve performance. However, all that complexity is hidden from the developer.
Since init (and friends) may return a new object, it is vitally important that you save the value returned by init, not the value returned by alloc. Nesting the init and alloc methods ensures that you will save the proper object.
It turns out that NSString is actually a class cluster. We can see this by breaking up the steps as shown:
// Create an empty string
NSString* allocString = [NSString alloc];
NSLog(@"allocString: pointer = %p, class = %@",
allocString, allocString.class);
NSString* initString = [allocString init];
NSLog(@"initString: pointer = %p, class = %@",
initString, initString.class);
NSLog() works very similarly to printf(). The first argument is a literal NSString. As we saw earlier, double quotes create C-style strings. By adding the @ before the first double quote, we tell the compiler to generate an NSString instead.
Next, NSLog scans through that string looking for placeholders. For the most part, these placeholders are identical to those used by printf(). There are some small changes, however. For example, %@ is used to display objects.
Basically, this code prints the value of the class’s pointer and the class name to the console after both alloc and init. If you run this code, it will produce the following output (note that the actual pointer values will undoubtedly change):
allocString: pointer = 0x4e032a0, class = NSPlaceholderString
initString: pointer = 0x1cb334, class = NSCFString
As you can see, both the pointer and the class change after init is called. Furthermore, our NSString is actually a member of the NSCFString subclass.
Multiple Initialization Methods
An object may have more than one initialization method. NSString has several: init, initWithString:, initWithFormat:, initWithContentsOfFile:encoding:error:, and more. Each of these provides alternate ways for setting the string’s initial value. The complete list can be found in the NSString class reference.
In addition, NSString has a number of convenience methods—class methods that typically start with the word string: string, stringWithString:, stringWithFormat:, stringWithContentsOfFile:encoding:error:, and others. They combine the allocation and initialization steps into a single method.
While [NSString string] and [[NSString alloc] init] may seem similar, there is a subtle but significant difference in how the system manages the resulting object’s memory. In the past, we had to carefully use each method correctly. Fortunately, if you are compiling your applications with ARC, these differences disappear and you can freely use whichever method best fits your application and programming style.
Defining a Class
We define a class in two steps: the interface and the implementation. The interface is ordinarily declared in the class’s header file (filename ending in .h). This allows us to easily import our class declaration into any other part of our project. The interface should define all the information needed to effectively use the class—this includes the public methods (methods that can be called from outside the class) as well as the class’s superclass and possibly its instance variables.
This may seem a bit odd. After all, one of the main uses of objects is encapsulation. Shouldn’t the instance variables be hidden inside the implementation?
Well, yes. In an ideal world they would be. However, earlier versions of the compiler needed this information to lay out the memory of any subclasses. With Objective-C 2.0, we can use properties to help get around this limitation. When you’re developing for iOS or 64-bit applications for Mac OS X 10.5 and later, you can automatically synthesize the instance variables for your properties. We will discuss properties in more depth in the next section. Just be aware that the instance variables declared in the interface may not tell the whole story.
The interface starts with an @interface keyword and ends with @end. The format is shown here:
@interface ClassName : SuperClassName {
// Declare instance variables here.
// These are optional in iOS if properties are used.
}
// Declare public methods and properties here.
@end
Every class in your application needs a unique class name. If you’re building a library that will be used in other projects, you will want to prefix your class names to ensure that they won’t conflict with other libraries and frameworks. Apple’s frameworks follow this advice, typically beginning their class names with either NS or UI.
Each class also has one and only one superclass. You will usually use NSObject, unless you are explicitly subclassing another class. The instance variables are defined within the curly brackets, and the instance methods are defined after the brackets.
The actual code is stored in the implementation file (filename ending in .m). Like the interface, the implementation begins with an @implementation keyword and ends with @end. It will contain only the method and property definitions.
@implementation ClassName
// Define methods and properties here.
@end
We will discuss methods and properties in more detail in the next section.
Methods
Once all the bells and whistles are stripped away, an Objective-C method is simply a C function. Therefore, everything we learned about functions applies equally to methods. There is one important difference, however. When we call a C function, the function and its arguments are connected at compile time (static binding). In contrast, in Objective-C we are not actually calling the method; we are sending a message to the object, asking it to call the method. The object then uses the method name to select the actual function. This connection of selector, function, and arguments is done at runtime (dynamic binding).
This has a number of practical implications. First and foremost, you can send any method to any object. After all, we may dynamically add the method’s implementation at runtime, or we may forward the method to another object altogether.
More commonly, we use this feature along with the object identifier type id, which can refer to any object (including Class objects). Notice that we do not use an asterisk when declaring id variables. The id type is already defined as a pointer to an object.
id myString = @"This is a string"; // This is an NSString.
id myStringClass = [myString class]; // This is a class object.
The one-two punch of id types and dynamic binding lets us avoid a lot of the complex, verbose constructions that statically bound languages ordinarily require, but it’s not just about running around naked and free; as developers, we typically know more about our application than the compiler does.
For example, if we put only NSString objects into an array, we know that all the objects in that array will respond to the length message. In C++ or Java, we would need to convince the compiler to let us make that call (usually by casting the object). Objective-C (for the most part) trusts that we know what we’re doing.
Still, it’s not all Wild West shooting from the hip. Xcode’s compiler and static analyzer do an excellent job of analyzing our code and finding common errors (like misspelled method names), even when writing highly dynamic code.
Sending Messages to Nil
In Objective-C it is perfectly legal to send messages to nil. This often comes as a shock to people from a Java background. In Java, if you call a method on null (null and nil are identical, a pointer with a value of 0—basically a pointer that points to nothing), your application will crash. In Objective-C, the method simply returns 0 or nil (depending on the return type).
Newcomers to Objective-C often argue that this hides errors. By crashing immediately, Java prevents the program from continuing in a bad state and possibly producing faulty output or crashing inexplicably at some later point in the application. There is a grain of truth to this. However, once you accept the fact that you can send messages to nil, you can use it to produce simple, elegant algorithms.
Let’s look at one of the more common design patterns. Imagine an RSS reader that must download a hundred different feeds. First you call a method to download the XML file. Then you parse the XML. Due to potential networking problems, the first method is likely to be highly unreliable. In Java, we would need to check and make sure that we received a valid result.
XML xml = RSS.getXMLforURL(myURL);
// Make sure we have a valid xml object.
if (xml != null) {
xml. parse();
...
}
In Objective-C, those checks are unnecessary. If the XML is nil, the method call simply does nothing.
XML* xml = [RSS getXMLforURL:myURL];
[xml parse];
...
Also, let’s face it, null pointers are a common source of bugs in Java applications. Java’s null pointer violates the language’s otherwise strict static typing. If you can assign it to an object variable, you should be able to treat it just like any other object. That includes calling instance methods and receiving reasonable results.
Calling Methods
Objective-C methods are called using square brackets. Inside the brackets, we have the receiver and the message. The receiver can be any variable that evaluates to an object (including self), the super keyword, or a class name (for class methods). The message is the name of the method and any arguments.
[receiver message]
In C, the method’s arguments are all grouped together in parentheses after the function’s name. Objective-C handles them somewhat differently. If the method doesn’t take any arguments, the method name is simply a single word (usually a camel-case word with a lowercase first letter).
[myObject myFunctionWithNoArguments];
If the method takes a single argument, the name ends in a colon (:) and the argument immediately follows it.
[myObject myFunctionWithOneArgument:myArgument];
Multiple arguments are spread throughout the method name. Usually, the method name will give a clue about the type of argument expected in each position.
[myObject myFunctionWithFirstArgument:first
secondArgument:second
thirdArgument:third];
When referring to the method, we typically concatenate all the parts of its name without spaces or arguments. For example, the above method is named myFunctionWithFirstArgument:secondArgument:thirdArgument:.
While this style may seem awkward at first, it can be a great aid when coding. It’s almost impossible to accidentally place the arguments in the wrong order (something I do all the time in C-like languages). Interleaving the method name and arguments also encourages the use of longer, more expressive method names, and—for my money—that’s always a good thing.
Methods are normally declared in the class’s @interface block and defined in the @implementation block. Like C functions, the declaration is simply the method signature followed by a semicolon. The definition is the method signature followed by a block of code within curly brackets.
Method signatures start with either a + or – character. The – is used for instance methods, while the + is used for class methods. Next we have the return type in parentheses, and then the method name. Arguments are defined in place within the name. Simply follow the colon with the argument type in parentheses and the argument’s name.
- (void)simple; // No arguments, no return
// value.
- (int)count; // No arguments, returns an
// integer.
- (NSString*) nameForID:(int)id; // Takes an integer argument.
// Returns a string object.
// Class method with multiple
// arguments.
+ (NSString*) fullNameGivenFirstName:(NSString*)first
middleName:(NSString*)middle
lastName:(NSString*)last;
Objective-C methods always have two hidden arguments: self and _cmd. The self argument refers to the method’s receiver and can be used to access properties or call other instance methods. The _cmd argument is the method’s selector.
The selector is a unique identifier of type SEL that is used to look up methods at runtime. You can create a SEL from a method’s name using @selector(). You can also get the string representation of a SEL using NSStringFromSelector().
The connection between C functions and Objective-C methods really becomes clear when you start dynamically adding methods to an object, as shown:
// Defined before the @implementation block.
void myFunction(id self, SEL _cmd) {
NSLog(@"Executing my method %@ on %@",
NSStringFromSelector(_cmd),
self);
}
// Defined inside the @implementation block.
+ (void)addMethod {
SEL selector = @selector(myMethod);
class_addMethod(self, selector, (IMP)myFunction, "v@:");
}
Running the class method addMethod will add myMethod to the current class at runtime. You can then call [myObject myMethod], and it will call the function myFunction(myObject, @selector(myMethod)).
Initializers
We’ve already discussed an object’s two-step instantiation. Now let’s look at the initializer methods themselves. These are just methods like any other method we may write; however, there are a few conventions we need to follow to get everything right.
First, there’s the name. All the initializers traditionally start with init. Do yourself (and anyone who might maintain your code in the future) a huge favor and always follow this naming convention.
Next, there are two methods that require special attention: the class’s designated initializer and the superclass’s designated initializer.
Each class should have a designated initializer, a single method responsible for performing all of the object’s setup and initialization. Typically, this is the initializer with the largest number of arguments. All the other initializers should call the designated initializer—letting it do all the heavy lifting.
Similarly, your designated initializer needs to call your superclass’s designated initializer. By chaining our class hierarchy together, designated initializer to designated initializer, we guarantee that the object gets initialized properly all the way up the class hierarchy.
Finally, your class should always override its superclass’s designated initializer. This will re-route any calls to any of the superclass’s initializers (or any initializer anywhere in the class hierarchy) back through your designated initializer and then up the class hierarchy.
Let’s take a concrete example. Imagine we are making an Employee class. This will be a subclass of NSObject. NSObject has only one initializer, init. This is (by default) its designated initializer. Our Employee class, on the other hand, will have three instance variables: _firstName, _lastName, and _id. Its designated initializer will set all three values.
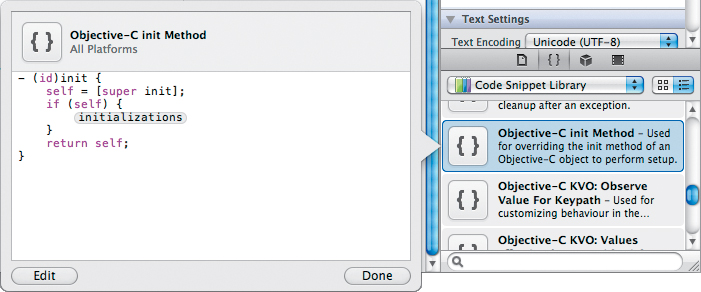
Let’s start by pulling a blank init method from the Code Snippet library. At the bottom of the Utilities area, click the Code Snippet tab (it looks like a pair of curly braces) and then scroll down until you find the Objective-C init method (Figure 2.2). You can click and drag this out into your implementation block.
Figure 2.2 The init method code snippet
Modify the template as shown here. You will also need to copy the method’s signature into the Employee class’s interface block.
// Designated initializer.
- (id)initWithFirstName:(NSString *)firstName
lastName:(NSString *)lastName
id:(int)id {
self = [super init];
if (self) {
_firstName = [firstName retain];
_lastName = [lastName retain];
_id = id;
}
return self;
}
Usually, when we call a method on an object, the object first searches for a matching method defined in the object’s class. If it cannot find a match, it moves to the superclass and continues searching up the class hierarchy. The super keyword allows us to explicitly start searching for methods defined in self’s superclass. Often when you override an existing method, you still want to call the original implementation. The super keyword lets you access that version of the method.
So, this method starts by assigning the return value of [super init] to the self variable. This method call will ignore the current implementation of init and begin searching up the class hierarchy for an older implementation.
Assigning the return value to self may seem odd, but it is really just a variation on an issue we’ve seen before. Remember that when we discussed initializing objects, we always nested the init and alloc calls, because init might return a different object than alloc. This code deals with the same basic problem. The self argument contains the value returned by alloc. However, [super init] may return a different value. We need to make sure our code initializes and returns the value returned by [super init].
New Objective-C programmers often feel uncomfortable assigning new values to self, but remember, it is one of our method’s hidden arguments. This means it is just a local variable. There’s nothing magical about it—we can assign new values to it, just like we would any other variable.
Next, the if statement checks to see if [super init] returned nil. As long as we have a valid object, we perform our initialization—assigning the method’s arguments to the object’s instance variables. Finally, our initializer returns self.
So far, so good. We have a designated initializer that calls our superclass’s designated initializer. Now we just need to override our superclass’s designated initializer.
// Override superclass's designated initializer.
- (id) init {
// This must go through our designated initializer.
return [self initWithFirstName:@"John" lastName:@"Doe" id:-1];
}
This method must call our object’s designated initializer. Here, we simply pass in reasonable default values. If we make any other initializers, they must also follow this pattern and call initWithfirstName:lastName:id: to actually set our instance variables.
Note

At the risk of repeating myself, let me just emphasize that you should only set instance variables in the default initializer. All other initializers should go through the default initializer. They should not set any variables or do any other initialization themselves.
Convenience Methods
Many classes have convenience methods that instantiate objects with a single method call. Most often, these methods mirror the initializer methods.
For example, our Employee class may have a method employeeWithFirstName:lastName:id. This acts as a thin wrapper around our designated initializer. Other convenience methods may involve more-complex computations, either before or after calling the designated initializer—but the basic ideas remain the same.
+ (id) employeeWithFirstName:(NSString *)firstName
lastName:(NSString *)lastName
id:(int)id {
return [[self alloc] initWithFirstName:firstName
lastName:lastName
id:id];
}
There is an important convention in this sample code: We use [self alloc] and not [Employee alloc] in this method. Remember, self refers to the message’s receiver. Since this is a class method, self should be set to the Employee class. However, let’s say we create a subclass called PartTimeEmployee. We could call employeeWithFirstName:lastName:id on PartTimeEmployee and everything will still work as expected. By calling [self alloc], our implementation correctly allocates and initializes a PartTimeEmployee object. If, however, we had hard-coded the class, it would always return Employee objects.
// Returns an Employee object.
id firstPerson = [Employee employeeWithFirstName:@"Mary"
lastName:@"Smith"
id:10];
// Returns a PartTimeEmployee object.
id secondPerson = [PartTimeEmployee employeeWithFirstName:@"John"
lastName:@"Jones"
id:11];
Properties
By default, an object’s instance variables are not accessible outside the object’s implementation block. You could declare these variables as @public, but that is not recommended. Instead, if you want to let outside code access these values, you should write accessor methods.
Historically, accessor methods were largely boring boilerplate code that just passed values into and out of your class. Thanks to manual memory management, they were often tedious to write and maintain. Fortunately, with Objective-C 2.0, Apple has provided a tool for automating the creation of accessors: properties.
We declare a property in the class’s interface, as shown:
@property (attributes) variableType propertyName;
The attributes determine how our accessors are implemented. The most common attributes are described in the Common Property Attributes table (Table 2.2). For a full list, see The Objective-C Programming Language, Declared Properties, in Apple’s documentation.
Table 2.2 Common Property Attributes
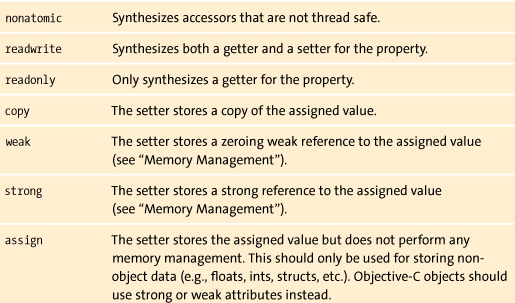
Properties are assign and readwrite by default. Also, for whatever reason, there is no explicit atomic attribute. Any attribute that does not have the nonatomic attribute will be constructed using synchronized, thread-safe getters and setters. Of course, this synchronization comes with a slight performance cost.
Note
Before iOS 5.0, properties often used retain attributes to handle manual memory management. However, retain attributes are no longer valid when compiling under ARC. See the “Memory Management” section, later in this chapter, for more information.
The @property declaration automatically defines the accessor methods, as shown here:
// This property
@property (nonatomic, copy) NSString* firstName;
// declares these methods
- (NSString*)firstName;
- (void)setFirstName:(NSString*)firstName;
The getter simply uses the property’s name and returns the instance variable’s current value. The setter adds set to the front of the property name and will assign the argument (or a copy of the argument) to the instance variable.
Now, we need to tell the compiler to implement these methods. Typically, we will add a @synthesize directive in the class’s @implementation block.
@synthesize firstName;
This generates the requested methods (if they are not already implemented—you can still choose to create manual versions if you wish). By default, the accessor methods will get and set the value stored in the class’s firstName instance variable. If you have already declared this variable in the @interface block, the accessors will use it. Otherwise, @synthesize will create the instance variable for you.
Alternatively, we can specify a different name for our instance variables. The following code will use _firstName instead of firstName.
@synthesize firstName = _firstName;
I always rename my instance variables as shown above. The underscore, by convention, labels the instance variable as a private value that should not be accessed directly. This is exactly what we want. In general, you should access your instance variables through their properties—even within the class’s @implementation block. If you use the default instance variable name, it’s too easy to forget and directly access the variable by mistake.
You can use properties either by calling the generated methods directly or by using the dot notation, as shown:
// These are identical
NSString* name = [myClass firstName];
NSString* name = myClass.firstName;
// These are also identical
[myClass setFirstName:@"Bob"];
myClass.firstName = @"Bob";
You can also access the property from within the class’s instance method definitions, using the self variable.
// These are identical
NSString* name = [self firstName];
NSString* name = self.firstName;
// These are also identical
[self setFirstName:@"Bob"];
self.firstName = @"Bob";
Using the properties helps produce clean, consistent code. More importantly, it ensures that techniques like key-value observing work properly. There is, however, one place where you should access the instance variables directly: inside your class’s designated initializer.
Note
Many old-school Objective-C programmers seem to hate the dot notation with a fury usually reserved for telemarketers. They think it is unnecessary and confusing. Personally, I like the fact that it mirrors the way we get and set values in C-style structs. This makes a clear distinction between accessors and other methods. However, your mileage may vary, and you should use whichever notation feels the most comfortable.
In general, your initializers should avoid doing anything that might generate errors, call external methods, or otherwise eat up computational time. Admittedly, your properties should be relatively straightforward assignments without any unexpected side effects, so using the properties probably won’t kill you. Still, there’s always the chance that someone will eventually add a custom setter to one of the properties, inadvertently making your initialization method unstable. So direct assignment’s not a bad idea.
Protocols
Some object-oriented languages (most notably C++ and Python) allow multiple inheritance, where a class can inherit behaviors from more than one superclass. This can create problems, especially when both parents define identical methods. This may sound like a rare corner case—but it accidentally happens all the time. If the classes share a common ancestor (and all classes share a root ancestor), both superclasses will have copies of the common ancestor’s methods. If you override one of these methods anywhere in either of the superclasses’ hierarchies, your subclass will inherit multiple implementations for that method.
Other languages (like Java and Objective-C) do not allow multiple inheritance, largely because of these added complexities. However, there are times when you still want to capture common behaviors across a number of otherwise unrelated classes. This is particularly true in static, strongly typed languages like Java.
Let’s say you want to have an array of objects, and you want to iterate over each object, calling its makeNoise() method. One approach would be to make a NoisyObject superclass and have all the objects in your array inherit from that class. While this sounds good in theory, it is not always possible. Sometimes your objects must inherit from another, existing class hierarchy. In C++, no problem. Your class could inherit from both. In Java, we can simulate multiple inheritances using a Noisy interface. Any class implementing this interface must also implement the makeNoise() method.
In Objective-C, this is somewhat less of a concern. We don’t have Java’s strict static typing (and all the extra convolutions that come with it). After all, we can already send any message to any object. So, this is really a matter of communicating our intent. You could just make sure all the objects in the array implement the makeNoise method and you’re good to go. However, we often want to explicitly capture these requirements. In this case, protocols fill a similar role to Java’s interfaces—but they have other uses as well.
A protocol declares a number of methods. By default, these methods are required. Any class adopting the protocol must implement all of the required methods. However, we can also declare methods as optional. The adopting class may implement optional methods, but they are not required.
At first glance, optional methods may seem a bit odd. After all, any object can implement any method; we don’t need the protocol’s permission. However, it’s important to remember that Objective-C’s protocols are really about communicating developer intent. Developers most often use optional methods when developing protocols for delegates. Here they document the methods that the delegate could override to monitor or modify the delegating class’s behavior. We will examine this topic in more depth when we discuss delegates later in this chapter.
Adopting Protocols
To adopt a protocol, simply add a comma-separated list of protocols inside angled brackets after the superclass declaration in your class’s @interface block.
@interface ClassName : SuperClassName
<list, of, protocols, to, adopt> {
...
@end
You must also implement any required methods that have not already been implemented. Notice that you do not need to declare these methods in the @interface block. The protocol takes care of that for you.
Declaring Protocols
Protocol declarations look a lot like class declarations, only without the block for instance variables. Like the class’s @interface block, protocol declarations are normally placed in a header file—either their own header file or the header file of a closely related class (e.g., delegate protocols are often declared in the delegating class’s header).
@protocol ProtocolName
// Declare required methods here.
// Protocol methods are required by default.
@optional
// Declare optional methods here.
// All methods declared after the @optional keyword are
// optional.
@required
// Declare additional required methods here.
// All methods declared after the @required keyword are required
// again.
@end
As you can see, you can use the @optional and @required keywords to partition your methods as you see fit. All methods after an @optional keyword (until the next @required keyword) are optional. All methods after a @required keyword (until the next @optional keyword) are required. Methods are required by default.
One protocol can also incorporate other protocols. You simply list these in angled brackets after the protocol name. Any class that adopts a protocol also adopts all the protocols it incorporates.
@protocol ProtocolName <additional, protocols, to, incorporate>
...
@end
Categories and Extensions
Categories allow you to add new methods to existing classes—even classes from libraries or frameworks whose source code you otherwise cannot access. There are a number of uses for categories. First, we can extend a class’s behavior without resorting to rampant subclassing. This is often useful when you just want to add one or two helper functions to an existing class—for example, adding push: and pop methods to an NSMutableArray.
You can also add methods to classes farther up the class hierarchy. These methods are then inherited down the class hierarchy just like any other methods. You can even modify NSObject or other root classes—adding behaviors to every object in your application. In general, however, you should avoid making such broad changes to the language. They may have unintended consequences. At the very least, they will undoubtedly make the code somewhat confusing to anyone else who has to work with it.
Lastly, you can use categories to break large, complex classes into more manageable chunks, where each category contains a set of related methods. The Cocoa Touch frameworks often do this, declaring specialized helper methods in their own categories.
Creating Categories
We create categories much like we create new classes. The @interface block looks almost identical to its class counterpart. There are only two differences. First, instead of declaring a superclass, we provide the category name in parentheses. This can, optionally, be followed by a list of new protocols adopted by the category. Second, there is no block for declaring instance variables. You cannot add instance variables with a category. If you need additional instance variables, you must make a subclass instead.
@interface ClassName (CategoryName) <new protocols>
// Declare methods here.
@end
The @implementation block is even closer to the class version. The only change is the addition of the category name in parentheses.
@implementation ClassName (CategoryName)
// Implement the extensions methods here.
}
Here is a simple Stack category on the NSMutableArray class.
// In Stack.h
#import <Foundation/Foundation.h>
@interface NSMutableArray (Stack)
- (void)push:(id)object;
- (id)pop;
@end
// In Stack.m
#import "Stack.h"
@implementation NSMutableArray (Stack)
- (void)push:(id)object {
[self addObject:object];
}
- (id)pop {
// Return nil if the stack is empty.
if (self.count == 0) return nil;
// Remove the last object from the array and return it.
id object = [self lastObject];
[self removeLastObject];
return object;
}
@end
An extension is very similar to a category, with two significant differences. First, it does not have a name. Second, the methods declared in the extension must be implemented in the class’s main @implementation block. Extensions are most often used to declare private methods. They are placed in the class’s main implementation file above the @implementation block.
@interface ClassName ()
// Declare private methods here.
@end
Since the extension is declared before the @synthesize call, you can declare new properties in an extension. As with other properties, we do not need to declare the instance variable in the header—the @synthesize call will create it for us. This allows us to hide private instance variables from the public interface.
You can even declare a property as readonly in the public interface, and redeclare it as readwrite in the extension. This will generate public getter and private setter methods.
Note
When redeclaring properties, you can only change the readwrite/readonly attributes. All other attributes must match exactly. This sometimes leads to somewhat strange attribute combinations. For example, @property (readonly, copy) NSString* id.
Memory Management
I’m not going to lie to you. Before iOS 5.0, memory management was undoubtedly the most difficult part of iOS development. Here’s the problem in a nutshell. Whenever you create a variable, you set aside some space in memory. For local variables, you typically use memory on the stack. This memory is managed automatically. When a function returns, any local variables defined within that function are automatically removed from memory.
This sounds great, but the stack has two important limitations. First, it has a very limited amount of space, and if you run out of memory your application will crash. Second, it is hard to share these variables. Remember, functions pass their arguments and returns by value. That means everything going into or out of a function gets copied. This isn’t too bad if you are just tossing around a few ints or doubles. But what happens when you start moving around large, complex data structures? Pass an argument from function to function, and you find yourself copying the copy of a copy. This can quickly waste a lot of time and memory.
Alternatively, we can declare variables on the heap and use a pointer to refer to the memory space. This has several advantages. We have considerably more space available on the heap, and we can pass pointers around freely; only the pointer gets copied, not the entire data structure.
However, whenever we use the heap we must manually manage its memory. When we want a new variable, we must request enough space on the heap. Then, when we’re done, we must free up that space, allowing it to be reused. This leads to two common memory-related bugs.
First off, you may free the memory but accidentally continue using it. This is called a dangling pointer. These bugs can be difficult to find. Freeing a variable does not necessarily change the actual value stored on the stack. It simply tells the OS that the memory can be used again. This means that pointers to freed memory can appear to work fine. You only get into trouble when the system finally reuses the memory, writing over the old values.
This can cause very strange errors in completely unrelated sections of code. Imagine this: You free Object A’s memory from the heap but accidentally continue to use its pointer. Meanwhile, an entirely unrelated section of code requests a new object, Object B, on the heap. It is given a section of memory that partially overwrites Object A. Now you change a value on Object A. This saves new data somewhere inside Object B—putting B into an invalid state. The next time you try to read from Object B, you get errors (or possibly very, very strange results).
The second common memory error occurs when you forget to free up memory. This is called a memory leak, and it can cause your application to grab more and more memory as it continues to run.
On the one hand, this isn’t necessarily all that bad. All the memory will be freed when the application exits. I’ve even heard of server software that deliberately leaks all its memory. After all, if you’re running thousands of copies of the server anyway, it may be easier to periodically kill and respawn individual copies than to risk crashes from dangling pointers.
However, on the iOS we do not have that luxury. All iOS devices have extremely limited memory. Use too much and your app will shut down. Correct and effective memory management is therefore a vital skill.
For us, our main concern is objects. All objects are created on the heap. Yes, you can create variables for C data types or structs on the heap as well, but this is very rare (consult a good book on C programming for more details). For the most part, iOS memory management means managing the lifecycle of our objects.
Objects and Retain Counts
One of the biggest problems is simply determining which portion of the code should have responsibility for freeing up an object’s memory. In simple examples, the solution always appears trivial. However, once you start passing objects around, saving them in other objects’ instance variables or placing them in collections, things get murky fast.
To get around this problem, Objective-C programmers traditionally used reference counting. When we created an object, it started with a reference count of 1. We could increase the reference count by calling retain on the object. Similarly, we could decrease the reference count by calling release. When the reference count hit 0, the system deleted the object from memory.
This made it possible to pass objects around without worrying about ownership. If you wanted to hold onto an object, you retained it. When you were done, you released it. As long as you got all the retains and releases correct (not to mention autoreleases and autorelease pools), you could avoid both dangling pointers and memory leaks.
Of course, getting it right was never as simple as it seemed. Objective-C’s memory management conventions had a lot of rules and odd corner cases. Furthermore, as developers, we had to get it right 100 percent of the time. So we often resorted to following a robotic set of steps every time we created a new variable. This was tedious. It created a lot of boilerplate code, much of which wasn’t strictly necessary, but if we didn’t follow every step every single time, we ran the risk of forgetting something when it was really important.
Of course, Apple tried to help. Instruments has a number of tools to track allocations and deallocations and to search for memory leaks. In recent versions of Xcode, the static analyzer has gotten better and better at analyzing our code and finding memory management errors.
Which raises the question: If the static analyzer could find these errors, why couldn’t it just fix them? After all, memory management is a tedious, detail-oriented task that follows a strict set of rules—exactly the sort of task that compilers excel at. Apple took their compiler and analyzer technologies and applied them to this task. The result is a brand new technology for managing memory: Automatic Reference Counting (ARC).
Introducing ARC
ARC is a compiler feature that provides automated memory management for Objective-C objects. Conceptually, ARC follows the retain and release memory management conventions (see Apple’s Memory Management Programming Guide for more information). As your project compiles, ARC analyzes the code and automatically adds the necessary retain, release, and autorelease method calls.
For developers, this is very good news. We no longer need to worry about managing the memory ourselves. Instead, we can focus our time and attention on the truly interesting parts of our application, like implementing new features, streamlining the user interface, or improving stability and performance.
In addition, Apple has worked to improve the performance of memory management under ARC. For example, ARC’s automated retain and release calls are 2.5 times faster than their manual memory management equivalents. The new @autoreleasepool blocks are 6 times faster than the old NSAutoReleasePool objects, and even objc_msgSend() is 33 percent faster. This last is particularly important, since objc_msgSend() is used to dispatch every single Objective-C method call in your application.
All in all, ARC makes Objective-C easier to learn, more productive, simpler to maintain, safer, more stable, and faster. That’s what I call a win-win-win-win-win-win situation. For the most part, we don’t need to even think about memory management. We just write our code, creating and using our objects. ARC handles all the messy details for us.
Finding and Preventing Memory Cycles
While ARC represents a huge step forward in memory management, it doesn’t completely free developers from thinking about memory issues. It’s still possible to create memory leaks under ARC—ARC is still susceptible to retain cycles.
To understand this problem, we have to peek a bit under the hood. By default, all variables in ARC use strong references. When you assign an object to a strong reference, the system automatically retains the object. When you remove the object from the reference (by assigning a new object to the variable or by assigning a nil value to the variable), the system releases the object.
A retain cycle occurs when two objects directly or indirectly refer to each other using strong references. This often happens in parent/child hierarchies, when the child object holds a reference back to the parent.
Imagine I have a person object defined as shown here:
@interface Person : NSObject
@property (nonatomic, strong) Person* parent;
@property (nonatomic, strong) Person* child;
+ (void)myMethod;
@end
And myMethod is implemented as shown:
+ (void)myMethod {
Person* parent = [[Person alloc] init];
Person* child = [[Person alloc] init];
parent.child = child;
// Do something useful with the parent and child.
}
In this example, when we call myMethod, two Person objects are created. Each of them starts with a retain count of 1. We then assign the child object to the parent’s child property. This increases the child’s retain count to 2.
ARC automatically inserts release calls at the end of our method. These drop the parent’s retain count to 0 and the child’s retain count to 1. Since the parent’s retain count now equals 0, it is deallocated. Again, ARC automatically releases all of parent’s properties. So, the child object’s retain count also drops to 0 and it is deallocated as well. By the end of the method, all our memory is released, just as we expected.
Now, let’s add a retain cycle. Change myMethod as shown here:
+ (void)myMethod {
Person* parent = [[Person alloc] init];
Person* child = [[Person alloc] init]
;
4 parent.child = child;
child.parent = parent;
// Do something useful with the parent and child.
}
As before, we create our parent and child objects, each with a reference count of 1. This time, the parent gets a reference to the child, and the child gets a reference to the parent, increasing both reference counts to 2. At the end of our method, ARC automatically releases our objects, dropping both reference counts back to 1. Since neither reference count has been reduced to 0, neither object gets deallocated, and our retain cycle creates a memory leak.
Fortunately, ARC has a solution for us. We simply need to redefine the parent property so that it uses a zeroing weak reference. Basically, this means changing the property attribute from strong to weak.
@interface Person : NSObject
@property (nonatomic, weak) Person* parent;
@property (nonatomic, strong) Person* child;
+ (void)myMethod;
@end
Zeroing weak references provide two key advantages. First, they do not increment the object’s retain count—therefore they do not extend the lifetime of the object. Second, the system automatically sets them back to nil whenever the objects they point to are deallocated. This prevents dangling pointers.
Applications typically have object graphs that branch out from a single root object. We will usually use zeroing weak references when referring to objects back up the graph (anything closer to the graph’s root). Additionally, we should use zeroing weak references for all our delegates and data sources (see the “Delegates” section later in this chapter). This is a standard convention in Objective-C, since it helps prevent inadvertent retain cycles.
So far, the cycles we have seen have all been somewhat obvious, but this is not always the case. A retain cycle can include any number of objects—as long as it eventually loops back on itself. Once you get beyond three or four levels of references, tracking possible cycles becomes nearly impossible. Fortunately, our developer tools come to the rescue again.
With Xcode 4.2, Instruments now has the ability to search for retain cycles, and it will even display the retain cycle graphically.
Simply profile your application. Select Product > Profile from the main menu. Select the Leaks template in Instrument’s pop-up window and click Profile (Figure 2.3). This will launch both Instruments and your app.
Figure 2.3 Selecting the Leaks profile

Instruments will start up with two diagnostic tools. Allocations tracks memory allocations and deallocations, while Leaks looks for leaked memory. Leaks will appear as red bars in the Leaks instrument. Select the Leaks instrument row, and the details will appear below. In the jump bar, change the detail view from Leaks to Cycles, and Instruments will display your retain cycles (Figure 2.4). You can now double-click the offending reference, and Xcode will automatically navigate to it. Fix it (either by changing it to a zeroing weak reference, or by restructuring the flow of our application), and test again. We will discuss Instruments in more detail in Bonus Chapter B (www.freelancemadscience.com/book).
Figure 2.4 Finding and displaying retain cycles
Rules of the Road
It’s incredibly easy to use ARC. Most of the time, we don’t need to do anything. All of Xcode 4.2’s project templates use ARC by default—though we can enable manual memory management on a per-file basis, if necessary. This lets us freely mix ARC and non-ARC code. ARC can be used on any projects targeting iOS 4.0 and above (with some limitations). And Xcode even has tools for converting non-ARC applications (choose Edit > Refactor > Convert to Objective-C ARC).
For ARC to work properly, the compiler must be able to correctly interpret our intent. This requires a few additional rules to help remove any ambiguity. Don’t worry if you don’t understand what many of these rules refer to—most rarely occur during day-to-day coding. The important thing is that the compiler will enforce all of these rules, and breaking them will generate errors. This makes the problems easy to find and fix.
All the rules are listed here.
• Don’t use object pointers in C structs. Instead, create an Objective-C class to hold the data.
• Don’t create a property with a name that begins with “new.”
• Don’t call the dealloc, retain, release, retainCount, or autorelease methods.
• Don’t implement your own retain, release, retainCount, or autorelease methods. You can implement dealloc, but it’s usually not necessary.
• When implementing dealloc in ARC, don’t call [super dealloc]. The compiler handles this automatically.
• Don’t use NSAutoreleasePool objects. Use the new @autoreleasepool{} blocks instead.
• In general, don’t cast between id and void*. You must use augmented casts or macros when moving data between Objective-C objects and Core Foundation types (see the next section).
• Don’t use NSAllocateObject or NSDeallocateObject.
• Don’t use memory zones or NSZone.
ARC and Toll-Free Bridging
First, it’s important to realize that ARC applies only to Objective-C objects. If you are allocating memory for any C data structures on the heap, you must still manage that memory yourself.
Real problems start to crop up when using Core Foundation data types. Core Foundation is a low-level C API that provides a number of basic data management and OS services. There is also a similar Objective-C framework named Foundation (are you confused yet?). Not surprisingly, Foundation and Core Foundation are closely related. In fact, Foundation provides Objective-C interfaces for many Core Foundation services and data types.
Now here’s the cool part. Many Foundation and Core Foundation data types are actually interchangeable. Under the skin, NSString and CFString are identical. We can freely pass a CFString reference to an Objective-C method expecting an NSString—or pass an NSString to a Core Foundation function expecting a CFString. This interoperability is referred to as toll-free bridging (see Apple’s Cocoa Fundamentals Guide > Cocoa Objects > Toll-Free Bridging for more information).
Unfortunately, when casting back and forth, memory management quickly becomes confusing. Who is responsible for managing which data? Will we manually manage the memory using CFRetain() and CFRelease(), or will we let ARC take care of it?
There are three basic scenarios we need to be aware of: Core Foundation data returned by Objective-C methods, code that uses Core Foundation memory management functions, and code that transfers data to and from Core Foundation without using any memory management functions.
The first case is easy. If we get access to a Core Foundation object by calling an Objective-C method, we don’t need to do anything at all. We can freely cast the data, and the compiler won’t generate any errors.
This works because Objective-C methods all follow Objective-C memory management conventions (see Apple’s Memory Management Programming Guide for more information). ARC understands these conventions, correctly interprets the data’s ownership, and does the right thing.
UIImage* myImage = [UIImage imageNamed:@"myPhoto"];
id myCGImage = (id)[myImage CGImage];
[photoArray addObject:myCGImage];
In this sample, we call UIImage’s CGImage property. This returns a CGImageRef. Then we cast the C data to an Objective-C id and place it in an array. Because we used an Objective-C method to access the C data, the compiler allows the simple cast, and ARC handles the rest.
Next, if we call any Core Foundation memory management functions, we need to let ARC know about it. These functions include CFRetain(), CFRelease(), and any function that has the words Create or Copy embedded in its name (see Apple’s Memory Management Programming Guide for Core Foundation for more information).
If the Core Foundation function retains the data (CFRetain, Create, or Copy), then we need to cast it using the __bridge_transfer annotation. If Core Foundation releases the data (CFRelease), then we use the __bridge_retain annotation. Examples of both are shown here.
// The Core Foundation function retains the data.
// We need to tell ARC to release it when we're done.
NSString* myString =
(__bridge_transfer NSString*)CFStringCreateMutableCopy(NULL, 0,
myCFString);
...now do something useful with myString
// This time, our Core Foundation code will release the object.
// We need to tell ARC to retain it.
CFStringRef myCFString = (__bridge_retain NSString*)[myString copy];
...now do something useful with myCFString
CFRelease(myCFString);
Finally, if we get the Core Foundation data in some other way (not a Create or Copy function and not an Objective-C method), and we don’t call either CFRetain() or CFRelease() on it, we simply need to add the __bridge annotation to the cast, as shown here. ARC will then manage the memory for us, as normal.
// From Objective-C to Core Foundation
CFStringRef myCFString = (__bridge CFStringRef) myString;
CFShow(myCFString);
...
// From Core Foundation to Objective-C
myLabel.text = (__bridge NSString*)myCFString;
Important Design Patterns
We’ve covered most of the basic features of Objective-C, but there are a number of common design patterns that are often used throughout the iOS SDK. It’s worth taking a little bit of time to go over these patterns so you will understand them when you see them.
Model-View-Controller
Model-View-Controller (MVC) is a common architectural pattern for building applications with a graphical user interface (GUI). This pattern divides the application into three sections. The model maintains the application’s state. This typically includes both managing the state during runtime and saving and loading the state (archiving objects to file, persisting the data to an SQL database, or using frameworks like Core Data).
As the name suggests, the view is responsible for displaying application information, possibly in an interactive manner. Most of the time this means displaying the information using a GUI. However, it could include printing documents and generating other logs and reports.
The controller sits between the two. It responds to events (usually from the view) and then sends commands to the model (to change its state). It must also update the view whenever the model changes. An application’s business logic may be implemented in either the controller or the model, depending on the needs of the application. However, you should really pick one approach and stick with it throughout the entire application.
The ideal MVC components should be very loosely bound. For example, any number of views could observe the controller, triggering controller events and responding to any change notifications. One might display information in the GUI. One might save data to a log file. The controller doesn’t know or care about the details. On the other end, the model and the controller should be similarly loosely bound.
In practice, the different layers are often more tightly bound than this, sacrificing a bit of idealism for pragmatics. Cocoa Touch is no exception. Typically, the views are more tightly bound to their controllers. Each scene has a custom controller tailored toward managing that scene (see the “Examining the Storyboard” section in Chapter 1 for more information on the relationship between scenes and view controllers). On the model side, there’s a lot more wiggle room. In the simplest applications, the model might be implemented directly in the controllers. For the most part, though, we want to keep these areas as cleanly separated as possible.
Cocoa Touch uses UIView subclasses for the view, and UIViewController subclasses for the controller. Communication between the model and the view generally uses target/action connections.
On the model side, we can implement our models using a number of different techniques: custom classes, SQLite, or Core Data. In many cases, models and controllers communicate directly with each other—though we can create more-loosely bound connections using notifications and delegates (see the data sources discussion in the next section for more information).
Delegates
Delegates allow you to extend or modify an object’s behavior without having to subclass the object. You can even change the object’s behavior at runtime by swapping delegates—though in practice, this is somewhat rare.
We have already seen delegates in action. For example, instead of subclassing the UIApplication class within each project, we use a generic UIApplication and implement a custom UIApplicationDelegate. The application delegate protocol defines more than 20 optional methods that we can override to both monitor and alter the application’s behavior.
Any class that uses a delegate usually has a property named (not surprisingly) delegate. By convention, delegate properties should always use weak references. This helps avoid retain loops. However, we need to make sure we have a strong reference to our delegate object somewhere else in our application—otherwise ARC will deallocate it.
@property (nonatomic, weak) IBOutlet id<DelegateProtocol> delegate;
As this example shows, we typically declare a protocol that our delegate must implement. This defines the interface between the delegating class and our delegate. Note that the delegating class is the active partner in this relationship. It calls these methods on the delegate. Some of them pass information to the delegate; others query the delegate. In this way, we pass information back and forth between the two objects.
A delegate’s methods usually have a somewhat formulaic name. By convention, the names start with an identifier that describes the delegating object. For example, all the UIApplicationDelegate methods start with the word application.
In many cases, the method passes a reference to the delegating object back as its first argument. UITableViewDelegate does this. This means that you could use a single UITableViewDelegate to manage multiple UITableViews (though this is rarely done). More importantly, you can avoid saving the delegating class in an instance variable, since the delegate can always access its delegating class through this argument.
Additionally, the delegate’s methods often have will, did, or should in their names. In all three cases, the system calls these methods in response to some change. Will methods are called before the change occurs. Did methods are called after the change. Should methods, like will methods, are called before the change, but they are expected to return a YES or NO value. If they return YES, the change should proceed as normal. If they return NO, the change should be canceled.
Finally, delegate methods are almost always optional. As a result, the delegating class must first check to make sure the delegate has implemented the method before calling it. This code shows a typical hypothetical implementation:
- (void) doSomething {
BOOL shouldDoSomething = YES;
// Ask if we should do it.
if ([self.delegate
respondsToSelector:
@selector(someObjectShouldDoSomething:)]) {
shouldDoSomething =
[self.delegate someObjectShouldDoSomething:self];
}
// Abort this method if the delegate returns NO.
if (!shouldDoSomething) return;
// Tell the delegate that we will do it.
if ([self.delegate
respondsToSelector:
@selector(someObjectWillDoSomething:)]) {
[self.delegate someObjectWillDoSomething:self];
}
// Just do it.
[self.model doSomething];
// Tell the delegate that we did it.
if ([self.delegate
respondsToSelector:
@selector(someObjectDidDoSomething:)]) {
[self.delegate someObjectDidDoSomething:self];
}
}
Delegates are easy to implement. Simply create a new class and have it adopt the protocol. Then implement all the required methods (if any), as well as any optional methods that interest you. Then in your code, create an instance of your delegate class and assign it to the main object’s delegate property. Many of UIAppKit’s view subclasses can take delegates. This means you will often connect views and delegates using Interface Builder (hence the IBOutlet tag in our @property declaration).
Note
Optional protocol methods were introduced with Objective-C 2.0. Before this, most delegates were implemented using informal protocols. This convention involved declaring categories on the NSObject class; however, the methods were left undefined. While this worked, the IDE and compiler could not provide much support. Over time, Apple has slowly replaced most of the informal protocols with actual protocols; however, you may still run into them on occasion.
Some view subclasses also require data sources. Data sources are closely related to delegates. However, delegates are used to monitor and change an object’s behavior, while data sources are specifically geared toward providing data for the object. Other differences flow from this distinction. For example, delegates are usually optional; the delegating object should function perfectly without one. Data sources, on the other hand, are often required for the main class to function properly. As a result, data sources often have one or more required methods declared in their protocol.
Otherwise, data sources act just like delegates. The naming convention is similar, and just like the delegate, the main class should have a weak reference to its data source.
Notifications
Notifications allow objects to communicate without tightly coupling them. In iOS, notifications are managed using a notification center. Objects that wish to receive notifications must register with the notification center. Meanwhile, objects that wish to broadcast notifications simply post them to the center. The notification center will then filter notifications by both the sending object and the notification name—forwarding each notification to the proper receivers.
Notifications are easy to implement. Usually you will start by creating an NSString constant for your notification’s name in a common header file. Both the sending and receiving objects need access to this constant.
static NSString* const MyNotification = @"My Notification";
Next, objects can register to receive notifications. You can specify the sender and the notification names that you are interested in. In addition, you can pass nil for either of these values. If you pass nil for the name, you will receive all the notifications sent by the specified object. If you pass nil for the sender, you will receive all notifications that match the notification name. If you pass nil for both, you will receive all notifications sent to that notification center.
NSNotificationCenter* center = [NSNotificationCenter defaultCenter];
[center addObserver:self
selector:@selector(receiveNotification:)
name:MyNotification
object:nil];
Here we get a reference to the default notification center and then add ourselves as an observer. We register to receive all notifications from any objects whose name matches the MyNotification constant. We also specify the selector that the notification center will call when a matching notification is found.
Next, we need to implement the method for our selector. This method should accept a single NSNotification object as an argument.
- (void)receiveNotification:(NSNotification*)notification {
NSLog(@"Notification Received");
// Now do something useful in response.
}
Finally, it’s important to remove the observer before it (or any object mentioned in addObserver:selector:name:object:) is deallocated. Otherwise, the notification center will contain dangling pointers. Often this should be done in the observing object’s dealloc method.
- (void)dealloc {
NSNotificationCenter* center =
[NSNotificationCenter defaultCenter];
// Remove all entries for the given observer.
[center removeObserver:self];
}
Sending a notification is even simpler. Our sending object just needs to get a pointer to the default notification center and then post the desired method.
NSNotificationCenter* center = [NSNotificationCenter defaultCenter];
[center postNotificationName:MyNotification object:self];
Notifications are posted synchronously. This means that the call to postNotificationName will not return until after the notification center has finished calling all the specified selectors for all matching observers. This could take a considerable amount of time, especially if there are a large number of observers or the responding methods are slow.
Alternatively, we can send asynchronous notifications using NSNotificationQueue. Notification queues basically delay a notification until the current event loop ends (or possibly until the event loop is completely idle). The queue can also coalesce duplicate messages into a single notification.
The following sample code delays the notification until the run loop is idle:
NSNotification* notification =
[NSNotification notificationWithName:MyNotification
object:self];
NSNotificationQueue* queue = [NSNotificationQueue defaultQueue];
[queue enqueueNotification:notification
postingStyle:NSPostWhenIdle];
Key-Value Coding
Key-value coding is a technique for getting and setting an object’s instance variables indirectly using strings. The NSKeyValueCoding protocol defines a number of methods for accessing or setting these values. The simplest examples are valueForKey: and setValue:forKey:.
NSString* oldName = [emp valueForKey:@"firstName"];
[emp setValue:@"Bob" forKey:@"firstName"];
For this to work, your objects must be KVC compliant. Basically, the valueForKey: method will look for an accessor named <key> or is<key>. If it cannot find a valid accessor, it will look for an instance variable named <key> or _<key>. On the other hand, setValue:forKey: looks for a set<key>: method and then looks for the instance variables.
Fortunately, any properties you define for your instance variables are automatically KVC compliant.
KVC methods can also use key paths. These are dot-separated lists of keys. Basically, the getter or setter will work its way down the list of keys. The first key is applied to the receiving object. Each subsequent key is then used on the value returned from the previous key. This allows you to dig down through the object graph to get to the value you want.
// Will return the company name, assuming all intermediate values
// are KVC compliant.
NSString* companyName =
[emp valueforKey:@"department.company.name"];
While KVC can be used to produce highly dynamic, very loosely bound code, it is a somewhat specialized technique. You may never end up using KVC code directly. However, it enables a number of interesting technologies (for example, key-value observing).
Key-Value Observing
Key-value observing allows one object to observe any changes to another object’s instance variables. While this superficially resembles notifications, there are some important differences. First, there is no centralized control layer for KVO. One object directly observes another. Second, the object being observed generally does not need to do anything to send these notifications. As long as their instance variables are KVC compliant, notifications are automatically sent whenever your application uses either the instance variable’s setter or KVC to change the instance variable’s value.
Unfortunately, if you are changing the value of an instance variable directly, the observed object must manually call willChangeValueForKey: before the change and didChangeValueForKey: after the change. This is yet another argument for always accessing instance values through a property.
To register as an observer, call addObserver:forKeyPath:options:context:. The observer is the object that will receive the KVO notification. Key path is the dot-separated list of keys used to identify the value that will be observed. The options argument determines what information is returned in the notification, and the context lets you pass arbitrary data that will be added to the notification.
// You will receive notifications whenever this employee's
// last name changes.
[emp addObserver:self
forKeyPath:@"lastName"
options:NSKeyValueObservingOptionNew |
NSKeyValueObservingOptionOld
context:nil];
As with notification centers, it’s important to remove an observer before it is deallocated. While the NSNotificationCenter had a convenience method that would remove all the notifications for a given observer, in KVO you must release each addObserver call separately.
[emp removeObserver:self forKeyPath:@"lastName"];
Next, to receive the notification, you must override the observeValueForKeyPath:ofObject:change:context: method. The object argument will identify the object you were observing. The keyPath argument indicates the particular property that changed. The change argument holds a dictionary containing the values requested when registering as an observer. Finally, the context argument simply contains the context data provided when registering as an observer.
- (void)observeValueForKeyPath:(NSString *)keyPath
ofObject:(id)object
change:(NSDictionary *)change
context:(void *)context {
if ([keyPath isEqualToString:@"lastName"]) {
NSString* oldName =
[change objectForKey:NSKeyValueChangeOldKey];
NSString* newName =
[change objectForKey:NSKeyValueChangeNewKey];
NSLog(@"%@'s last name changed from %@ to %@",
object, oldName, newName];
}
}
Singletons
In its most basic concept, a singleton is a class that will only ever have a single object instantiated from it. Whenever you request a new object of that class, you gain a pointer back to the original.
Singletons are typically used to represent objects where only a single version exists. The UIApplication class is a good example. Each application has one and only one application object. Furthermore, you can access that application anywhere through the [UIApplication sharedApplication] method.
Of course, singletons are a constant source of Internet debates. Some argue that they are the spawn of all that is evil and that they should be avoided like the plague. If you use singletons, the terrorists win. Or, somewhat more rationally, a singleton is nothing more than an over-engineered global variable with good PR.
There is some truth to these complaints. When developers first encounter the singleton pattern, they often overdo it. Too many singletons can make your code very hard to follow. Singletons are also deceptively hard to write correctly (and there are different ideas about what “correctly” means). However, they can be incredibly useful when used appropriately. Most importantly, Cocoa Touch uses a number of singleton classes—so you should at least understand the basics, even if you never write your own.
The following is a typical, relatively safe implementation. In the class’s header file, declare a class method to access your shared instance:
+ (SampleSingleton*)sharedSampleSingleton;
Then open the implementation file and add an extension to your class. This extension will declare a private designated initializer.
@interface SampleSingleton()
- (id)initSharedInstance;
@end
Remember, we can call any method on any object—declaring the initializer as private only communicates our intent. Developers should only call methods that are declared in the header file—in this case, the developers should only access the shared object through the sharedSampleSingleton method.
Finally, in the @implementation block, implement the following methods:
+ (SampleSingleton*)sharedSampleSingleton {
static SampleSingleton* sharedSingleton;
static dispatch_once_t onceToken;
dispatch_once(&onceToken, ^{
sharedSingleton = [[SampleSingleton alloc]
initSharedInstance];
});
return sharedSingleton;
}
// Private Designated Initializer.
- (id)initSharedInstance {
self = [super init];
if (self) {
// Do initialization here.
}
return self;
}
// Override the superclass's designated initializer to prevent
// its use.
// Calling this method will throw an exception.
- (id)init {
[self doesNotRecognizeSelector:_cmd];
return nil;
}
This code uses lazy initialization to create our shared instance (we don’t actually allocate the instance until sharedSampleSingleton is called). Within sharedSampleSingleton, we use a dispatch_once block to protect our shared instance. The dispatch_once block is a thread-safe way to ensure that a block of code is only executed once during an application’s lifetime.
Note
Before ARC, many singleton implementations would override a number of additional methods: allocWithZone:, copyWithZone:, mutableCopyWithZone:, and release were all common candidates. Locking these down helped prevent developers from accidentally creating additional copies of the singleton. However, these methods either cannot be overridden when compiling under ARC or are simply unnecessary. Apple currently recommends using a simpler singleton and relying on convention and communication to prevent duplicates.
We also override the superclass’s designated initializer, causing it to throw an exception if called. Hiding our designated initializer, and disabling the superclass’s designated initializer, prevents developers from accidentally creating copies (e.g., by calling [[SampleSingleton alloc] init]).
Note that copy and mutableCopy are also disabled by default. Since we did not implement copyWithZone: or mutableCopyWithZone:, these methods will automatically throw exceptions.
This implementation doesn’t deal with the tricky issue of loading or saving your singleton from disk. How you implement the archiving code depends a lot on what loading and saving the singleton means in your application. Do you load the singleton once from disk when it is first created? Or does loading the singleton simply change the value stored in the singleton? For example, your application may have a GameState singleton. You will only ever have the one GameState object—but the state values may change as the user loads and saves games.
For an even more advanced twist, some of Cocoa Touch’s singletons let you specify the singleton’s class in the application’s info.plist file. This allows you to create a subclass of the singleton class yet still ensure the proper version is loaded at runtime. If you need this sort of support, modify your code as shown here:
+ (SampleSingleton*)sharedSampleSingleton {
static SampleSingleton* sharedSingleton;
static dispatch_once_t onceToken;
dispatch_once(&onceToken, ^{
NSBundle* main = [NSBundle mainBundle];
NSDictionary* info = [main infoDictionary];
NSString* className =
[info objectForKey:@"SampleSingleton"];
Class singletonClass = NSClassFromString(className);
if (!singletonClass) {
singletonClass = self;
}
sharedSingleton =
[[singletonClass alloc] initSharedInstance];
});
return sharedSingleton;
}
This code accesses the info.plist file and looks for a key named SampleSingleton. If it finds one, it interprets the corresponding value as a class name and attempts to look up the corresponding class object. If that succeeds, it uses that class to create the singleton object. Otherwise, it just uses the default singleton class.
Blocks
Blocks are, hands down, my favorite addition to Objective-C 2.0. They are only available for iOS 4.0 or later. However, unless you are targeting really old devices, blocks can greatly simplify many algorithms.
For example, the UIView class has a number of methods for animating views using blocks. These methods provide a much more concise, much more elegant solution than the older animation API.
Blocks are somewhat similar to methods and functions in that they are a way of bundling up a number of expressions for later execution. Blocks, however, can be stored as variables and passed as arguments. We can create block variables as shown:
returnType (^blockName)(argument, types);
For example, let’s declare a block variable named sum that returns an integer and takes two integer arguments:
int (^sum)(int, int);
You can define a literal block starting with the caret (^) and then declaring the arguments in parentheses and the actual code in curly brackets.
sum = ^(int a, int b){return a + b;};
Once a block variable is assigned, you can call it just like any other function.
NSLog(@"The sum of %d and %d is %d", 5, 6, sum(5, 6));
It’s important to note that blocks can capture any data that is in scope when the block is defined. For example, in this sample, addToOffset will take a single argument and add the offset variable to it.
int offset = 5;
int (^addToOffset)(int) = ^(int value){return offset + value;};
Note
When a block captures a local variable stored on the stack, it treats this variable as a const value. You can read the value but not modify it. If you need to mutate a local variable, you must declare it using the __block storage type modifier. Generally, this only applies to local C types and structs. You can already mutate objects, instance variables, and anything else allocated on the heap.
Usually, however, we don’t create or call block variables. Instead, we pass literal blocks to methods and functions as arguments. For example, NSArray has a method, enumerateObjectsUsingBlock:, that takes a single block. This method will iterate through all the objects in the array. For each object, it calls the block, passing in the object, the object’s index, and a reference to a stop value.
The stop value is only used as output from the block. Setting it to YES halts enumerateObjectsUsingBlock:. Here is a simple example using this method:
NSArray* array = [NSArray arrayWithObjects:@"Bill", @"Anne",
@"Jim", nil];
[array enumerateObjectsUsingBlock:
^(id obj, NSUInteger idx, BOOL *stop) {
NSLog(@"Person %d: %@", idx, obj);
}];
This returns the following output to the console:
Person 0: Bill
Person 1: Anne
Person 2: Jim
Notice that we could duplicate the functionality of enumerateObjectsUsingBlock: by passing in a selector and having our enumeration method call the selector for each item in the array. We start by creating a category on NSArray.
@implementation NSArray (EnumerateWithSelector)
- (void)enumerateObjectsUsingTarget:(id)target
selector:(SEL)selector {
for (int i = 0; i < [self count]; i++) {
[target performSelector:selector
withObject:[self objectAtIndex:i]
withObject:[NSNumber numberWithInt:i]];
}
}
Then, to use this enumerator, we need to implement our callback method:
- (void)printName:(NSString*)name index:(NSNumber*)index {
NSLog(@"Person %d: %@", [index intValue], name);
}
Then we can call our method, passing in the selector:
[array enumerateObjectsUsingTarget:self
selector:@selector(printName:index:)];
That’s arguably a little chunkier than our block example—but it’s not too bad. Still, that’s not the point. What happens if we want to change the enumerator’s behavior? Say we want to add a stop value—when the value is reached, we stop enumerating.
Well, we could add a stop parameter both to our enumerateObjectsUsingTarget:Selector: method and to our printName:index: method. Sure, that’s not a ton of work, but the changes get scattered around our project. Worse yet, if we have to do it more than once—well, the complexity adds up fast. We may soon find ourselves juggling multiple enumeration methods, each handling slightly different cases.
Alternatively, we could create an instance variable to hold the stop name and just access it in the printName:index: method. That avoids changing the enumeration method, but it’s somewhat sloppy. The stop name really shouldn’t be part of our class—we’re just adding it as a sneaky way to avoid extra parameters. And what happens if we need several different behaviors? How many instance variables are we willing to add?
Fortunately, blocks don’t have any of these problems. We can modify the enumerateObjectsUsingBlock: method’s behavior locally.
NSString* stopName = @"Anne";
[array enumerateObjectsUsingBlock:
^(id obj, NSUInteger idx, BOOL *stop) {
NSLog(@"Person %d: %@", idx, obj);
*stop = [obj isEqualToString:stopName];
}];
Notice that we did not need to alter the implementation of enumerateObjectsUsingBlock: at all. We also didn’t need any instance variables. Most importantly, everything is kept nicely in one place.
Best of all, the solution is scalable. If we want different behaviors somewhere else—no problem. We write a new block, capture all the local variables we need, and then call our generic enumeration method. A single generic method handles all our needs.
Note
Before ARC, we had to be a little careful with blocks. By default, blocks were built on the stack, and they were destroyed once they went out of scope. To store a block in an instance variable for later execution, we had to copy the block to the heap. Then we had to release it once we were done. Fortunately, ARC has simplified things yet again. We can create blocks, store them, use them, and even return them. We don’t need to worry about whether they’re on the heap or on the stack. ARC handles all the copying and memory management details for us.
Wrapping Up
Whew. This chapter has covered a lot of ground. Don’t worry if you didn’t catch it all on the first pass. We will get a lot of practice using Objective-C in future chapters. And, unfortunately, this chapter really only scratches the surface. Many of these topics are quite deep. If you have any questions, be sure to check out Apple’s documentation. In particular, I recommend the following: The Objective-C Programming Language, Programming with ARC Release Notes, Key-Value Observing Programming Guide, and Block Programming Topics.
Next up, let’s start applying what we’ve learned and build a productivity application from scratch.