1. Hello iPhone
Before you can master any skill, you must first become comfortable with the tools. In this chapter, we will learn how to use Xcode, the primary development tool for iOS applications. We will start by using Xcode to create a new project from the Utility Application project template. We will then examine the files produced by this template, studying how the different pieces of a typical iOS application fit together. Once we are familiar with the template, we will expand it, using Xcode’s graphical interface editor to add controls and to draw connections between these controls and their actions. This exercise will provide a solid foundation for working on the more complex projects in later chapters.
An Introduction to iOS
If this is your first exposure to iOS development, welcome to an exciting new world. The iOS lineup provides several great devices for you to explore. The iPhone, in particular, brings together a wide range of exciting technologies, including always-on Internet, location awareness, motion sensing, and a camera. In the not so distant past, developers had to either build custom hardware or pay tens of thousands of dollars just to experiment with these technologies. Now you can fit the entire package in your pocket and carry it with you wherever you go.
The iPhone’s hardware opens up previously unimaginable opportunities. Revolutionary new social networking applications lead the charge, and location-aware apps have become a growing part of our digital lifestyle. Even augmented reality, once little more than a gimmick, is maturing into a useful tool (or at least an amusing source of entertainment). Most importantly, there’s no sign that this flurry of innovation will slow down any time soon. We have just begun to scratch the surface of what these devices can do; the best ideas are yet to come.
Meanwhile, Apple has created a rich and vibrant marketplace for our applications. At the 2011 World Wide Developer’s Conference, Steve Jobs announced that Apple had sold over 200 million iOS devices, with over 225 million registered iTunes customers, each only one click away. These customers have downloaded over 14 billion apps so far, resulting in over $2.5 billion paid to iOS developers over the last three years.
This provides exciting opportunities for large and small development teams alike. For larger corporations, it opens a specialized, focused channel for interacting with your customers. A well-built, tightly focused application not only enhances your customers’ experiences, it becomes a powerful public relations tool. Your app will help build brand loyalty with existing customers, while improving brand awareness among potential customers.
On the other end of the spectrum, the App Store makes it much easier for one- or two-person development teams to get their products in front of millions of potential customers. You don’t have to build and maintain your own online store. You don’t need to collect money or process credit card transactions. Apple handles all of those details for you. You can focus on the part you love—building great applications.
While the App Store is the 800-pound gorilla in the room, don’t let it distract you. It’s not all about producing commercial software. A growing number of developers use iOS devices as platforms for any number of personal or educational projects. You can find iOS-based experiments in everything from middle school science fairs to robotics labs.
Finally, Apple has given us a set of high-quality development tools. Xcode 4 represents a significant improvement over previous versions. It is a full-featured integrated development environment with a wide range of utilities for testing, analyzing, and debugging your code. In particular, the Instruments utility can monitor and analyze CPU usage, memory allocation, network and file access, and much more.
Apple also provides a top-notch programming language with an excellent set of frameworks. I know, I know...a lot of new iOS programmers balk at learning Objective-C, and I admit that the learning curve can feel quite steep, especially when you’re struggling to get started. Still, once you begin to get comfortable with the language, you will quickly grow to love it. Besides, it’s always good to learn a new programming language. It will make you a better developer, even if you never use it for production code.
Objective-C is a dynamic, incredibly flexible programming language. It provides a number of features that will (if used properly) help you overcome many difficult programming challenges. Likewise, the iOS software development kit (SDK) provides a wide range of excellent frameworks to help us build our apps.
Frameworks are one of the most difficult pieces of software to design. Ideally, they should make it simple for developers to perform common tasks while still giving us enough freedom to strike out into uncharted territory. By those metrics, the Cocoa Touch frameworks are some of the best that I’ve ever worked with. Indeed, if you feel like you have to write a lot of code just to do a common task, you are almost certainly doing something wrong.
I hope that this book will provide a gentle introduction to the world of iOS development. While it’s not possible to cover every aspect or explore every framework, this book should give you a strong foundation to build on, and the tools and skills to continue on your own.
Additionally, while most of the book focuses on developing for the iPhone, the concepts and techniques generally apply to any iOS device: iPod touch, iPad, and iWhateverMayCome. Specific differences will be noted as they occur. The iPad, in particular, has a few unique user interface elements, and iPad-specific development issues will be covered in depth in Bonus Chapter A at the book’s website (www.freelancemadscience.com/book).
For now, let’s jump right in to our first project. Let’s begin by building an iPhone utility application that will display a simple, one-line message. Don’t worry if you don’t understand the code the first time through. We will cover the Objective-C programming language in more depth in Chapter 2, “Objective-C.” For now, use this as an opportunity to familiarize yourself with the development environment.
Getting Started
Ask any craftsman—if you want to succeed, you must have the right tools for the job. For iOS development, this means having a Macintosh running OS X 10.7 or later and a copy of Xcode 4.2. If you want to run your programs on an actual iOS device, you will also need a compatible device (iPhone, iPod touch, or iPad) and the appropriate developer/provisioning profiles. We’ll talk more about provisioning profiles in Chapter 3, “Productivity Application Architecture.” For now, begin by downloading the latest version of Xcode from the Mac App Store. This is a free download for anyone running OS X Lion and is by far the easiest way to keep all your development tools up to date.
You will eventually need to join the iOS Developer Program to test your application on iOS devices or submit them to the iTunes App Store. For now, we can use Xcode to build and test our applications in the simulator. This is a great way to get started.
Xcode is an integrated development environment (IDE) specifically designed for programming both Mac OS X and iOS. As the name suggests, an IDE is more than just a text editor. It is an interconnected suite of tools that helps you organize, edit, debug, and otherwise manage all the resources that will go into your final program. Through Xcode you can visually lay out the user interface, test run your program in an iOS simulator, step through your code one command at a time, analyze your application’s performance, and more.
Note

The projects in this book were developed using Xcode 4.2 and iOS SDK 5.0. Later versions will undoubtedly vary somewhat from what is shown. Menu options and project templates may change. More rarely, updates to the SDK can affect how your projects compile and run. If you are using a newer version of either Xcode or the SDK, everything should still work, but be prepared to do a little digging and exploration on your own.
Once you have downloaded and installed Xcode (at almost 4 GB, this will require a bit of patience), launch it and let’s get started.
Creating the Workspace
We will start by creating a new workspace. In Xcode 4, a workspace is a virtual box for organizing related projects. The workspace contains schemes for building and launching those projects, along with other related data. Xcode will allow you to search through all files in the workspace, and it will support workspace-wide indexing of those files. This allows features such as code completion, Jump to Definition, and refactoring to work smoothly across the entire workspace.
Workspaces simply let us organize our projects. They do not define where or how the individual projects are stored. Each workspace can have any number of projects, and each project can exist in any number of workspaces. This gives developers a lot of flexibility in organizing their work. You can even create specialized workspaces that focus on one particular task. For example, you may create one workspace for unit tests, another for debugging, and yet another for performance testing.
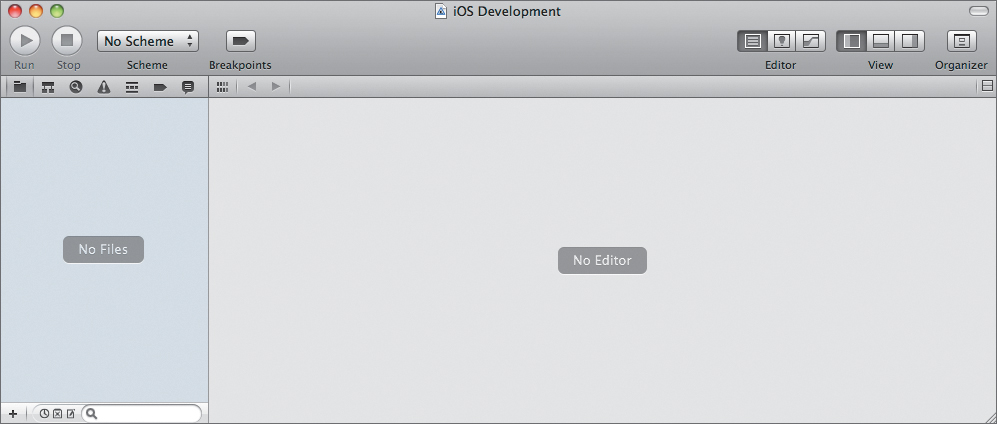
You don’t need to create a workspace; you could simply start with a freestanding project. Nevertheless, it’s a nice way to keep everything tidy. Let’s build a workspace that will contain all the projects in this book. In Xcode, select File > New > New Workspace. Name the workspace iOS Development, choose a location for it, and click Save. Xcode will then open a window that shows your empty workspace: no files, no editor, and no scheme (Figure 1.1).
Figure 1.1 Our empty workspace
Creating the Project
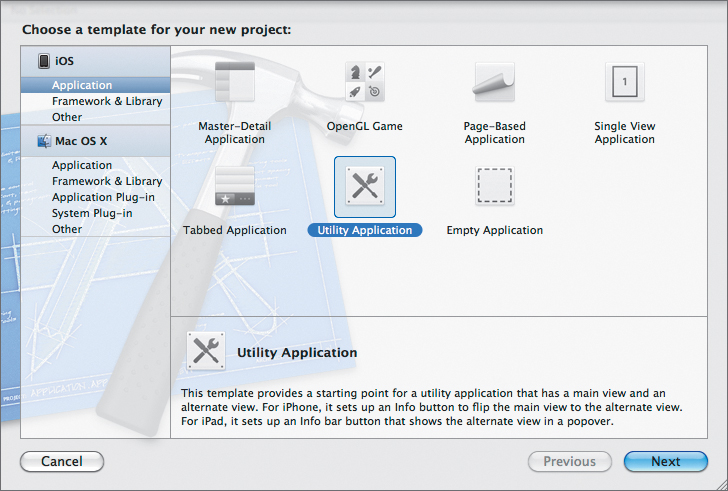
With the workspace open, create a new project. In Xcode, select File > New > New Project. This will open the project template sheet (Figure 1.2). Xcode provides a wide range of templates for new projects. In the left-hand column, select iOS > Application. Then, select the icon for Utility Application and click Next.
Figure 1.2 Selecting the iOS Utility Application template
We’re now ready to choose the options for our project (Figure 1.3). Enter Hello World in the Product Name field. The company identifier should be a unique string that identifies your company. In most cases, we will use the company’s domain name, with the levels reversed. Start with the top-level domain and work toward the second- and third-level domains. For example, I would use the reversed domain name from my blog: com.freelancemadscience.
Figure 1.3 Selecting the project options
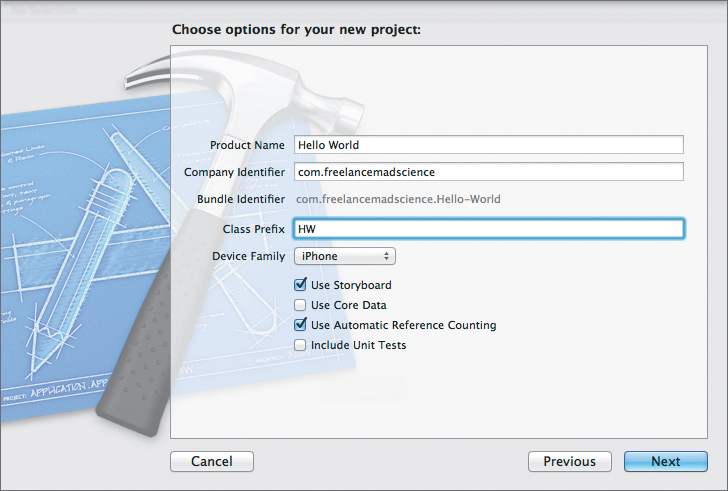
Next, we have the class prefix. This prefix is automatically added to all the class names generated by the template. You can use any prefix you like. Just try to make it unique (e.g., avoid NS or UI since they are already used by Apple’s frameworks). Typically, I select an abbreviation based on the project’s name. In this case, enter HW.
Note
If you are writing a framework or library, you should prefix all your classes. This lets other developers use your code without worrying about possible naming conflicts. It also makes it easier to identify where a class comes from. For example, all classes starting with “RGS” come from my ReallyGreatStuff framework. If, however, you are simply writing an application, prefixes are not necessary, and I find that they often make the code harder to read. Still, I often let Xcode prefix the auto-generated files, just to make them easy to distinguish from our hand-crafted classes.
Make sure that iPhone is selected in the Device Family pop-up menu and that the Use Storyboard checkbox is selected. The Use Core Data checkbox should be unselected. Next, make sure the Use Automatic Reference Counting option is selected. We will discuss Automatic Reference Counting in the section “Introducing ARC” in Chapter 2. For now, just understand that it makes it easier to write code. We will almost always want to use Automatic Reference Counting in new projects.
Finally, we typically want to include unit tests with our project. We will discuss unit tests in Bonus Chapter B (also at www.freelancemadscience.com/book), but for now just leave the Include Unit Tests checkbox unselected as well. Click the Next button. We need to select a location for our app (Figure 1.4). Select whatever location works best. I usually put it in the same folder as the primary workspace. By default, Xcode will create a new folder using the project’s name.
Figure 1.4 Selecting the project’s location
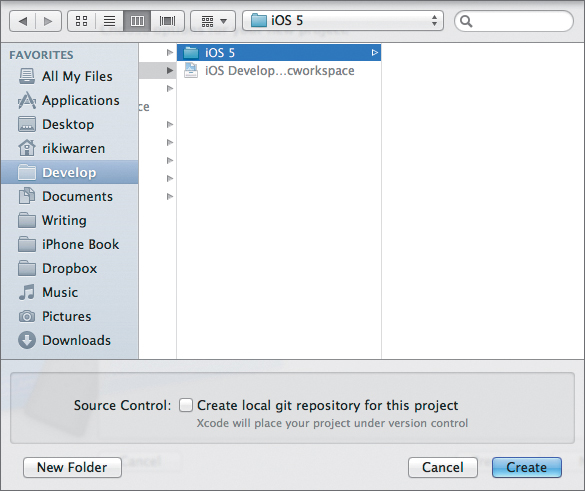
You can also create a git repository for this project. Like unit tests, source control is a very good idea and should be included in all your projects. We will begin using source control in Chapter 3, and we will cover its use in more detail in the section “Managing Source Code” in Bonus Chapter B. However, for now, leave the “Create local git repository for this project” checkbox unselected.
That’s it. Click Create and Xcode will set up our project.
Taking a Look Around
Utility applications should provide easy access to a single screen of information, with a backside view for modifying the preferences. The iPhone’s Weather app is a representative example. The main screen shows simple weather forecasts for the next week (though you can page through multiple cities). The flipside view allows you to edit the list of cities, as well as change between Fahrenheit and Celsius.
The Utility Application template creates the basic skeleton for this type of application. The template is, by itself, a fully functional app—it will build and run. Of course, it won’t do anything interesting, but we will fix that in a bit. For now, let’s look at what we get for free.
Running the Application
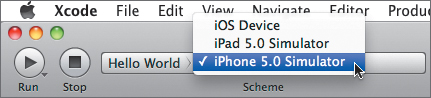
First, we need to tell Xcode to use the simulator. Click the Scheme button in the Xcode toolbar and select iPhone 5.0 Simulator (Figure 1.5). Then click the Run button. Xcode will build the application and launch it in the simulator.
Figure 1.5 Building for the iPhone simulator
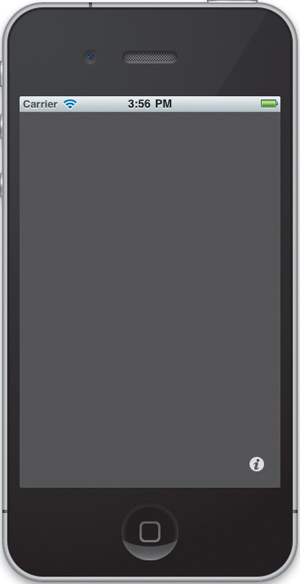
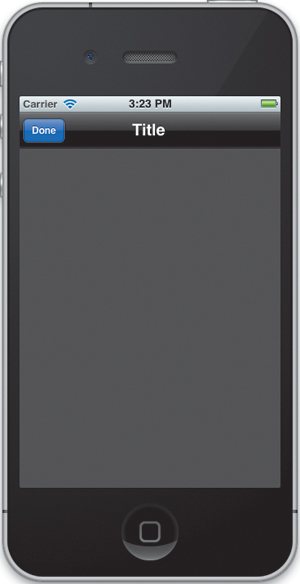
As you can see, the application has a gray main view with an info button in the lower-right corner (Figure 1.6). If you touch the info button, the screen flips over to show the flipside view with a title bar and a blue Done button (Figure 1.7). Touch the Done button and you flip back to the main view.
Examining the Files
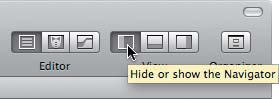
Now let’s look at the files that the template created for us. The Navigator area should be visible by default. If not, make sure the Navigator’s View button is depressed (Figure 1.8).
Figure 1.8 Enabling the Navigator area
The Navigator area will appear on the left side of Xcode’s main window. It is bound on the top by the navigator selector bar, and along the bottom by the filter bar (Figure 1.9).
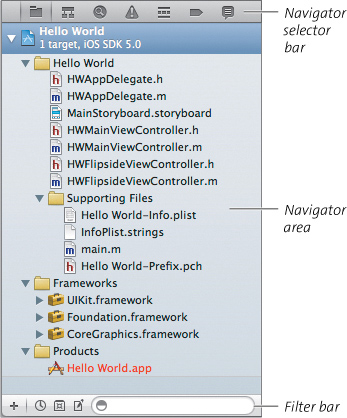
We will use the navigator to sift through and organize a wide range of information, including files, classes, compilation errors, debugging information, breakpoints, and the log. You can change the navigator type by selecting icons from the navigator selector bar. The Project navigator should be selected by default. If not, select the icon that looks like a manila folder (leftmost icon in the navigator selector bar).
The Project navigator will show several groups of resources. The Hello World group contains the header (.h) and implementation (.m) files for all our Objective-C classes. This is where we will do most of our actual coding. It also contains the MainStoryBoard.storyboard resource file. This defines the different scenes in our application and the segues between them.
The Supporting Files subgroup contains a variety of secondary files. Initially, this group contains the application’s Hello World-Info.plist, InfoPlist.strings, main.m, and Prefix.pch files.
The Hello World-Info.plist file contains a number of key-value pairs used to configure our application. The InfoPlist.strings file contains localized versions of the Hello World-Info.plist file’s keys. This can be useful when localizing your application, though the file is initially empty. The main.m file contains the main() function, the initial function that is executed when your application launches. The Prefix.pch file is the application’s precompiled header.
To help large projects compile faster, Xcode allows us to create a precompiled prefix header file containing a number of #import, #include, and #define directives common across much of our code. For example, in a typical iOS project, most classes need to access the UIKit and Foundation frameworks. By including the #import statements for these frameworks in our prefix header, Xcode knows to preprocess those files and include the results in all of our source files. This prevents the compiler from processing common files multiple times during each build.
This may not make a lot of sense right now, and that’s OK. We will not be touching the Prefix.pch file in this project. For more information, check out Apple’s documentation: Xcode Build System Guidelines; Reducing Build Times; and Using a Precompiled Prefix Header.
Finally, the Frameworks group contains any iOS frameworks used by this project, while the Products group contains the end results—in this case, our compiled application. Again, we won’t be touching any of these in this project.
Note
Much like Xcode’s workspaces, the navigator’s groups represent a virtual organization—they exist only within Xcode. These groups do not necessarily have any relationship with how or where the actual resources are stored, or even with what type of files they contain. You are free to place any resource in any group and to add or remove groups or subgroups as needed.
Walking Through the Project
When I first started writing Cocoa applications, I did not really understand how all the pieces of my applications fit together. Sure, I understood the individual parts. I had a view and a view controller. They worked together to manage the user interface. Still, many of these objects seemed to magically appear at runtime. I had no idea where they came from.
Let me reassure you that there is nothing supernatural going on here. I’ve checked. Still, it’s worth taking a few minutes to walk through all the connections, just to see what is happening. Don’t worry about memorizing all the details. Instead, focus on how we trace the connections from one object to the next. That way, you will be able to trace through your own applications later on.
Let’s start exactly where our application starts. Click main.m in the navigator (you may need to expand the Supporting Files group if the file isn’t already visible). This file is actually very short. It imports the UIKit and our application delegate, and it then defines the main() function.
#import <UIKit/UIKit.h>
#import "HWAppDelegate.h"
int main(int argc, char *argv[])
{
@autoreleasepool {
return UIApplicationMain(argc, argv, nil,
NSStringFromClass([HWAppDelegate class]));
}
}
Basically, this creates an autorelease block. Inside the block, we launch our Objective-C application. We will discuss autorelease blocks in the “Memory Management” section of Chapter 2.
The real work happens in the UIApplicationMain() function. This function takes four arguments. The first two handle our application’s command line arguments: argc gives the number of arguments, while argv contains the actual arguments themselves as an array of C-style strings. These arguments are largely a holdover from Unix command-line applications. In iOS, our apps typically have only a single argument, the name of our application’s executable file. We almost never use these arguments directly.
The next two arguments define our application and our application delegate, respectively. Each takes a string that corresponds to the desired class name. If the third argument is nil, we will use the default UIApplication class. If the fourth argument is nil, we will load our UIApplicationDelegate from our main nib file.
However, as of iOS 5.0, applications will generally use storyboards instead of nibs. This means we need to manually set our application delegate’s name. We want to use our custom HWAppDelegate class. Unfortunately, we cannot use it directly. Instead, we call HWAppDelegate’s class method to get the class object for our delegate. Then we pass that object into the NSStringFromClass() function. This produces the correct string for our class.
Most applications will follow this pattern. Instead of subclassing the UIApplication, we typically use a standard UIApplication object but provide a custom application delegate.
Note
You will rarely change anything in this file. In fact, unless you are doing something very unusual, you should never touch it. Even if you’re convinced that you really need to make a change or two, please take a step back and think things through one more time. There is almost always a better solution.
Examining the Storyboard
So far so good. The main() function calls UIApplicationMain(). This function instantiates the application and our custom HWAppDelegate class. Then it sets up the main event loop and begins processing events. If the application’s info.plist file defines a main storyboard, it then loads the initial view controller and view from the storyboard.
But, what is a storyboard?
Storyboards allow us to graphically design our scenes and draw the segues that connect them. This represents the latest step in Xcode’s interface development technologies.
Previous versions of Xcode used Interface Builder to graphically design our user interface. Interface Builder saved our designs as nib files. Xcode could then include the nibs in our application, loading them at runtime.
In Xcode 4, Interface Builder was incorporated into Xcode itself. This allows us to edit the interface and any related code side by side. With iOS 5, storyboards allow us to encapsulate a number of nibs, which lets us not only define a single scene’s worth of information, but also draw the transitions between scenes.
As you will see throughout the rest of this chapter, our storyboards contain a lot more than just views and controls. They also contain controller objects, as well as the connections between the various controls, views, and controllers. We will get some experience drawing these connections as we expand our Hello World app in the “Modifying the Template” section, later this chapter. Additionally, we will discuss nibs, the underlying technology behind storyboards, in more detail in the Chapter 3 sidebar “The Secret Life of Nibs.”
Note

Originally, Interface Builder saved nib archives as binary files, with a .nib extension. As of Xcode 3.0, Interface Builder allowed storing the nib files in an intermediate XML format with a .xib extension. This allowed greater compatibility with source control and other development tools. The .xib files are then compiled into binary .nib files when the application is built. For simplicity’s sake, both versions are typically referred to as “nib files.” In Xcode 4.2, storyboards are also stored as XML files with a .storyboard extension. These files are automatically compiled into one or more nib files. The system then loads these nibs as needed at runtime.
How does UIApplicationMain() know which storyboard file to open? As we saw earlier, the name of the main storyboard is stored in our configuration file. Click Hello World-Info.plist in the Supporting Files group. You should see a list of key-value pairs. Look for the Main storyboard file base name key. It should be set to MainStoryboard. This means UIApplicationMain() will automatically load the MainStoryboard.storyboard file.
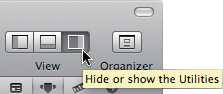
Let’s open this file. Click MainStoryboard.storyboard in the Project navigator. This will open the storyboard file in Xcode’s Editor area. You will probably want to close the Navigator area to give the editor as much space as possible. You will also want to make sure the Utilities area is open along the right-hand side of the screen. Make sure the Utilities area View button is depressed (Figure 1.10).
Figure 1.10 Enabling the Utilities area
The Storyboard editor consists of two separate regions. On the left, we have our scene list. This shows us all the scenes in our storyboard, as well as every object within each scene. On the right, we have the Interface Builder. This lets us view and design the actual user interface for our scenes, as well as the flow of control among the scenes (Figure 1.11).
Figure 1.11 The Storyboard editor
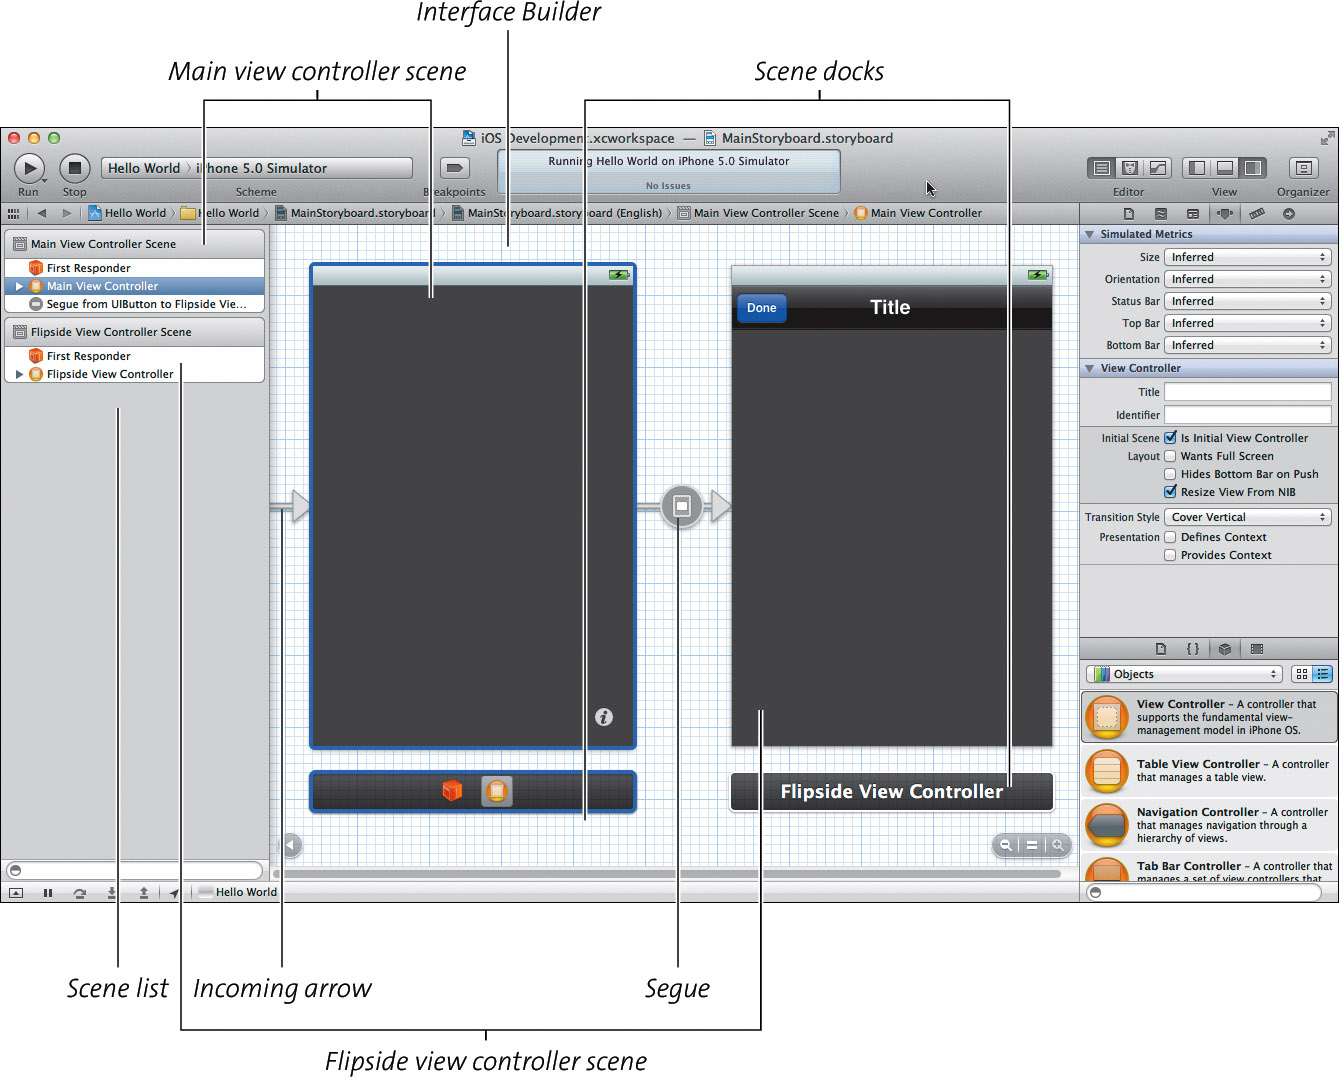
Our project starts out with two scenes. If you look at the scene list, you will see that each scene has at least two top-level objects: the first responder and the scene’s view controller. Let’s start with the first responder. This is, in many ways, a very unusual object. Or rather, it’s not an object at all—it’s a proxy. The system never creates an instance of the first responder. Instead, it sets the first responder at runtime.
The first responder represents the first object in our application’s responder chain. It can act as a target for any actions that must be sent to the responder chain. For example, a copy action should target the currently selected text, regardless of which control that text may be in. We don’t want to hard-wire the action to a single control—instead, we want to route the action to the currently active control. By targeting the first responder, our message is automatically passed to the correct control at runtime.
Having said that, we rarely need to interact with the first responder directly in iOS.
Next, look at the view controller. Each scene has its own view controller—an instance of UIViewController or (more likely) one of its subclasses. We will talk about controllers in more depth when we discuss the Model-View-Controller pattern in Chapter 2. For now, just think of the controller as the link between the scene and the rest of our code.
Each view controller contains a view. This view may, in turn, contain any number of subviews and controls (which may contain their own subviews and controls). We often refer to the entire graph of views and subviews as the view hierarchy. Xcode lets us easily examine and manipulate both the view hierarchy and the view’s actual appearance. The scene list shows us the hierarchy, while the Interface Builder shows us its visual layout.
Our scenes may also have other top-level objects. For example, the main view controller scene has a segue—the transition between the main view and the flipside view. Scenes may also include gesture recognizers, views, or even data objects as top-level objects.
All of these top-level objects (except the segues) also appear in the scene’s dock in the Interface Builder area. This makes it easier to draw connections between the scene’s interface elements and these top-level objects, especially when the list of scenes begins to grow. Segues, on the other hand, appear between the views they connect. Like the dock, this helps keep them nearby. Even more importantly, it graphically displays the flow of control through our application, giving us a feel for how everything connects.
Each storyboard designates a single scene as its initial scene. This scene’s view controller is returned when you instantiate the initial scene from the storyboard. In our case, it is the scene that UIApplicationMain() loads when the application first launches.
The initial scene appears in the Interface Builder area with an incoming arrow pointing at it. Unlike segues and other relationships, this arrow doesn’t have a scene on the other end. By default, the incoming arrow starts at the left edge of Interface Builder. The initial scene is the first scene, with additional scenes branching out as we move to the right.
We can change the initial scene by selecting a different view controller and selecting its “is Initial View Controller” attribute. Only one view controller at a time can have this attribute enabled. If you enable it in a new view controller, Interface Builder will automatically disable it for the old controller.
In our case, the main view controller scene is our initial scene. This is exactly what we want. Make sure we are zoomed in on the main scene. Double-clicking the background will toggle the zoom between an overview of the entire storyboard and the actual-size view.
Let’s start by clicking each object in the main scene and examining its class. In the inspector selector bar, make sure the Identity inspector is selected (third icon from the left at the top of the Utilities area). Then click on the main view controller. Not surprisingly, it is an instance of the HWMainViewController class (Figure 1.12).
Figure 1.12 Inspecting the main view controller’s class
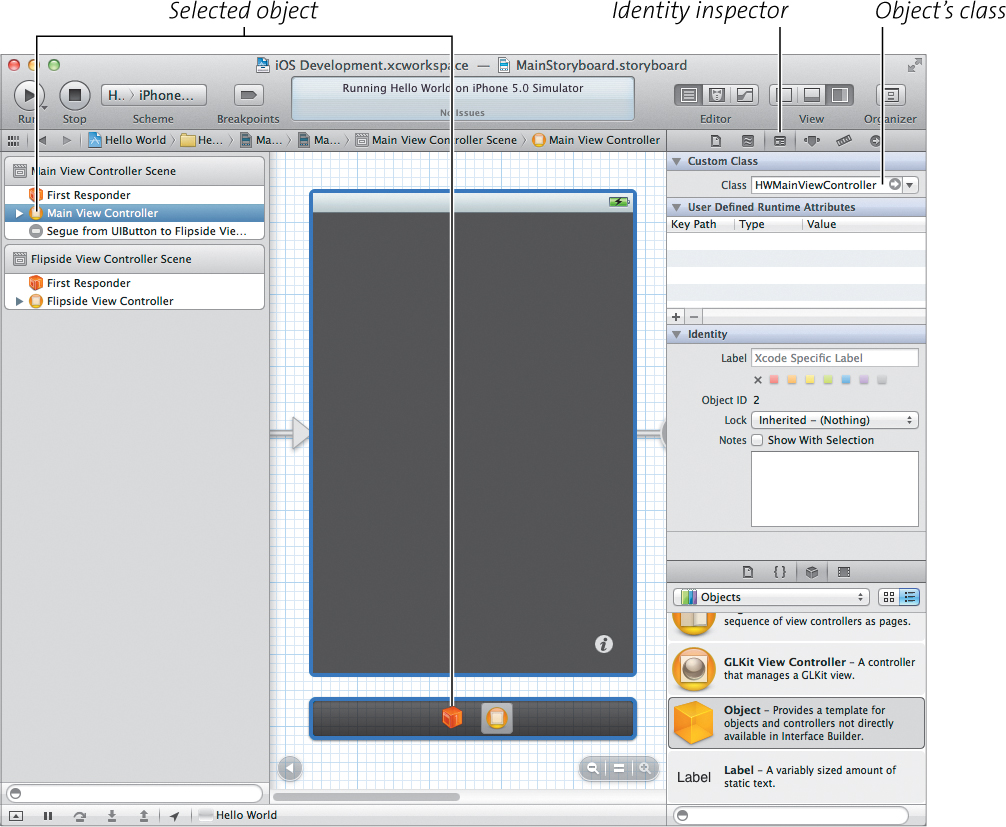
As we check the rest of the objects, you should see that our view is a generic UIView. Inside that, we have a UIButton (the info button at the lower-right corner). Finally, the segue doesn’t display any information in the Identity inspector.
Moving on to the flipside view controller scene, we have a HWFlipsideView Controller. Inside this, we have another UIView; however, at the top of this view we have a UINavigation bar, with a UINavigationItem. Inside that, we have our Done button—a UIBarButtonItem.
Now switch to the Connection inspector (far right icon at the top of the Utilities area). This lets us view and edit the connections between objects. While it can appear somewhat complex, this inspector only shows five connection types: outlets, actions, events, segues, and relationships.
The first three are used to define connections within a single scene. Outlets are variables that can store a pointer to an object. They define the relationships between objects in our graph. Actions, on the other hand, are methods that we can connect to events. When an event occurs, the system automatically calls its corresponding action. Controls define a set of common events that occur when the user interacts with the control.
Next, segues and relationships define the connections between scenes. Segues act as transitions. When the application triggers a segue, it transitions to the next scene using the specified animation. Relationships look a lot like segues, but they are used to show ownership. Container controllers (like tab view controllers) will use relationships to connect to the views they manage.
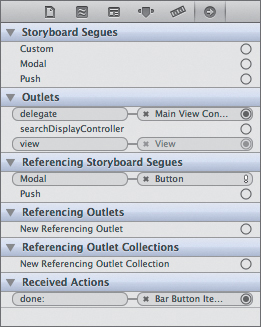
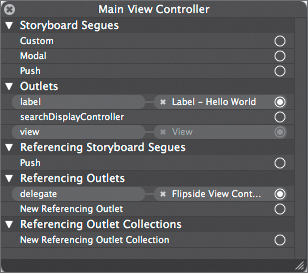
If we look at the main view controller, we can see that it has a view outlet pointing to the contained view object. This means we can refer to this view object in our controller’s code. We also have a referencing outlet from the flipside view controller. This simply means that the flipside view controller has an outlet pointing back to our main view controller—we will see this in a second (Figure 1.13). There’s only one other connection in this scene. Click the info button; as you can see, it has a modal storyboard segue connecting its performSegueWithIdentifier:sender: method to the flipside view controller. The system will call this method automatically whenever our info button is pressed, triggering the segue to our flipside view.
Figure 1.13 The main view controller’s connections
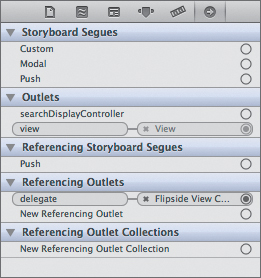
Now let’s look at the flipside view controller (Figure 1.14). As we saw earlier, we have a delegate outlet that points back to our main view controller. This allows our flipside view controller to call methods on the main view controller. Specifically, since the main view controller is the flipside view controller’s delegate, the flipside view will expect the main view to implement specific methods to modify or control the flipside view’s behavior. The flipside view controller also has a second outlet connecting it to its view. As you can probably guess, this is a general pattern. All view controllers have an outlet connecting to their view.
Figure 1.14 The flipside view controller’s connections
The flipside view controller also has two incoming connections. One is the info button’s segue that we saw previously. Another represents an incoming action from the Done button. We will see this in a second.
There are only two other connections in this scene. The navigator item refers to the Done button in its leftBarButtonItem outlet. This positions the bar button correctly in the navigation bar. Additionally, we see the action connection from our Done button to the flipside view controller’s done: method. This method will be called when the Done button is pressed.
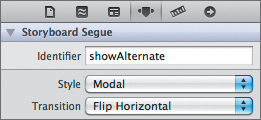
Finally, select the Attributes inspector (third icon from the right), and select the segue. This shows our segue’s details (Figure 1.15). The Identifier field lets us identify this segue in our code. The Style pop-up menu allows us to define how the new view will be displayed, while the Transition pop-up menu allows us to define the animation sequence used to move from one view to the next. In our case, the segue is named showAlternate. We will present our new scene as a modal view, flipping our old view over horizontally to reveal the new view on its back.
Figure 1.15 Inspecting the segue’s attributes
In most graphical user interfaces, a modal view is a view that must be dismissed (usually by clicking an OK or Cancel button) before the user can perform any other actions in the application. This forces the user to focus on whatever is inside the modal view—they must finish dealing with it before they can move on. On desktop applications, we generally use modal view to display things like Save or Print dialogs. On the iPhone, modal views cover the entire screen (though the iPad has a few additional options).
So, what does this all mean? Well, we’re tracing through how the objects in our application get created. The UIApplicationMain() method creates an instance of the UIApplication and of our HWAppDelegate class.
Next, UIApplicationMain() looks up the main storyboard in our application’s info.plist file. It then loads the storyboard’s initial scene, displaying our main view controller’s view in our application’s window. Our application is then ready for user input.
If the user touches the info button, our segue launches. This loads the flipside view controller and displays it as a modal view. When the user presses the Done button, it calls flipside view controller’s done: action. We know this dismisses the flipside view, but we don’t yet know how this works. To see that, we have to examine the application’s code.
Examining the Code
While the storyboard gives us a good overview of our application, to really understand it we will need to dig into the code. Don’t worry if it doesn’t all make sense yet, we will go over Objective-C in more detail in Chapter 2. For now, we just want to get a feel for where things are and what they do.
Let’s start with HWAppDelegate.h. This declares the interface for the HWApp Delegate class. You won’t find anything terribly surprising here. HWAppDelegate implements the UIApplicationDelegate protocol—which allows it to act as an application delegate.
A delegate is an object that acts on behalf of, or in coordination with, another object. The delegate typically acts as an assistant to the main, delegating object. The main object will call predefined methods on the delegate in response to specified events. The delegate then uses those methods to monitor and control the delegating object. This allows us to alter the delegating object’s behavior without changing the object itself.
We also declare the window property. As our application loads our storyboard, it instantiates a window object and assigns it to this property. Usually, iOS applications have a single window that fills the entire screen. This window acts as the root for our view hierarchy. It both creates a space where other views can be displayed and distributes events to the proper views or subviews.
#import <UIKit/UIKit.h>
@interface HWAppDelegate : UIResponder <UIApplicationDelegate>
@property (strong, nonatomic) UIWindow *window;
@end
The UIApplicationDelegate protocol defines a wide range of optional methods that we can implement to modify our application’s behavior. These include methods that respond to changes to the application’s state, as well as local, remote, and system notifications. You can find a complete list of these methods in the developer documentation.
Clicking the word UIApplicationDelegate in the editor will bring up a brief description of the protocol in the Quick Help inspector (the top half of the Utilities area). This technique lets us get a quick description of any classes, methods, or functions. Additionally, the Quick Help inspector contains hyperlinks to additional resources. Click the hyperlink version of the protocol’s name, and Xcode will open a full description from the developer’s documentation. Scroll down to the Tasks section to see a full list of methods.
If you open the HWAppDelegate.m file, you can see that we defined several of these methods—but none of them do anything. Right now, they are simply method stubs—holding spaces, waiting for us to fill in the details.
#import "HWAppDelegate.h"
@implementation HWAppDelegate
@synthesize window = _window;
- (BOOL)application:(UIApplication *)application
didFinishLaunchingWithOptions:(NSDictionary *)launchOptions
{
// Override point for customization after application launch.
return YES;
}
- (void)applicationWillResignActive:(UIApplication *)application
{
/*
Sent when the application is about to move from active to
inactive state. This can occur for certain types of
temporary interruptions (such as an incoming phone call or
SMS message) or when the user quits the application and it
begins the transition to the background state.
Use this method to pause ongoing tasks, disable timers, and
throttle down OpenGL ES frame rates. Games should use this
method to pause the game.
*/
}
- (void)applicationDidEnterBackground:(UIApplication *)application
{
/*
Use this method to release shared resources, save user data,
invalidate timers, and store enough application state
information to restore your application to its current state
in case it is terminated later.
If your application supports background execution, this method
is called instead of applicationWillTerminate: when the
user quits.
*/
}
- (void)applicationWillEnterForeground:(UIApplication *)application
{
/*
Called as part of the transition from the background to the
inactive state; here you can undo many of the changes made
on entering the background.
*/
}
- (void)applicationDidBecomeActive:(UIApplication *)application
{
/*
Restart any tasks that were paused (or not yet started) while
the application was inactive. If the application was
previously in the background, optionally refresh the user
interface.
*/
}
- (void)applicationWillTerminate:(UIApplication *)application
{
/*
Called when the application is about to terminate.
Save data if appropriate.
See also applicationDidEnterBackground:.
*/
}
@end
These methods respond to changes in our application’s state. They are called when our application first loads, becomes active or inactive, goes into or out of the background, or prepares to terminate. We will discuss these (and other) methods in more detail in the Chapter 3 sidebar “Tasks Every Application Should Perform.” For now, read the comments in these method stubs. They should give you a good overview of their intended use.
Next, look at HWMainViewController.h. This is even simpler than the app delegate’s interface declaration. We define our class as a subclass of UIViewController. It also adopts a custom protocol, HWFlipsideViewControllerDelegate. That’s it.
#import "HWFlipsideViewController.h"
@interface HWMainViewController : UIViewController
<HWFlipsideViewControllerDelegate>
@end
Look at the implementation by selecting HWMainViewController.m. Much like the app delegate, the UIViewController class has a number of methods that we can override to monitor our view. In particular, this includes any method with will or did in its name. The will methods are called just before the event takes place. The did methods are called just after.
Look up UIViewController in the developer documentation to see the complete list (click it to open the Quick Help inspector, and then click the name link to open the full description). If you scan through this file, you will see that it includes a number of these as method stubs. Most have default implementations that don’t do anything; they just call the superclass’s implementation.
There are only three methods containing functional code: shouldAutorotateToInterfaceOrientation:, flipsideViewControllerDidFinish:, and prepareForSegue:sender:.
- (BOOL)shouldAutorotateToInterfaceOrientation:
(UIInterfaceOrientation)interfaceOrientation
{
// Return YES for supported orientations.
return (interfaceOrientation !=
UIInterfaceOrientationPortraitUpsideDown);
}
#pragma mark - Flipside View
- (void)flipsideViewControllerDidFinish:
(HWFlipsideViewController *)controller
{
[self dismissModalViewControllerAnimated:YES];
}
- (void)prepareForSegue:(UIStoryboardSegue *)segue sender:(id)sender
{
if ([[segue identifier] isEqualToString:@"showAlternate"]) {
[[segue destinationViewController] setDelegate:self];
}
}
Let’s take these in order. The shouldAutorotateToInterfaceOrientation: method is called whenever the user rotates the device to a new orientation. If it returns YES, the view will automatically rotate to match that orientation. Otherwise, the view will remain in its current orientation. The current implementation allows our main view to rotate into any orientation except the portrait upside-down orientation (landscape left, landscape right, and portrait are all OK).
The flipsideViewControllerDidFinish: method is a delegate method for our flipside view controller. As you might guess from the name, the flipside view controller will call this method when it is finished. Our current implementation simply dismisses the current modal view. Remember that when we examined the segue, we saw that it displayed our flipside view controller as a modal view. Therefore, this method simply removes our flipside view, using the same transition (horizontal flipping) to return to the main view.
Finally, prepareForSegue:sender: is called whenever a segue is triggered from the current scene. Although the implementation looks a little complex, it simply checks to make sure our segue’s id matches the expected value, showAlternate. If it does, we assign our main view controller as the destination’s delegate.
It’s always a good idea to check the segue’s identifier before doing anything in the prepareForSegue:sender: method. Right now it’s not strictly necessary. We only have one segue, so we know the identifier will always match. However, checking the identifier helps future-proof our code. We won’t suddenly have odd bugs just because we added a new segue.
Also, if you remember, the showAlternate segue connects our main view controller scene with our flipside view controller scene. This means the destinationViewController will be our HWFlipsideViewController.
So, the user presses the info button, triggering our segue. The system instantiates a copy of our HWFlipsideViewController, then calls the HWMainViewController’s prepareForSegue:sender:. Here, HWMainViewController assigns itself as HWFlipsideViewController’s delegate. The transition occurs, and our view flips over horizontally, revealing the flipside view. When the flipside view is finished (which we will see in a minute), the flipside view controller calls flipsideViewControllerDidFinish: on its delegate, HWMainViewController. HWMainViewController then dismisses the flipside view controller and our views flip back over, revealing the main view again.
It’s important to realize that this pattern demonstrates the preferred technique for passing data from scene to scene across a segue. When passing data from the originating view controller to the destination view controller, we override the originating view controller’s prepareForSegue:sender: method and pass the data along. To pass the data back, we make the originating view a delegate of the destination view and then call the appropriate delegate methods. Of course, these methods need to be declared in the delegate’s protocol. We’ll see the HWFlipsideViewControllerDelegate’s protocol next.
Open HWFlipsideViewController.h. Here, we start by declaring our HWFlipsideViewControllerDelegate protocol. This only has a single method, which we have already seen, flipsideViewControllerDidFinish:. Next, we declare the HWFlipsideViewController class itself. This is also simple, containing only two items: the delegate outlet property and the done: action.
We’ve seen both of these before. We just discussed the delegate property in relationship to our HWMainViewController, and we saw the done: action back when we were exploring our storyboard. It is connected to the Done button in the navigation bar. Pressing that button will trigger this method.
#import <UIKit/UIKit.h>
@class HWFlipsideViewController;
@protocol HWFlipsideViewControllerDelegate
- (void)flipsideViewControllerDidFinish:
(HWFlipsideViewController *)controller;
@end
@interface HWFlipsideViewController : UIViewController
@property (weak, nonatomic) IBOutlet id
<HWFlipsideViewControllerDelegate>
delegate;
- (IBAction)done:(id)sender;
@end
Note
Observant readers may remember that the delegate outlet was also connected to the HWMainViewController in the storyboard. This means it has been connected twice—once in code and once in Interface Builder. Turns out, the connection in Interface Builder doesn’t actually do anything. Deleting it won’t affect the app—you won’t even be allowed to draw it again. However, commenting out our prepareForSegue:sender: method breaks the connection, and the HWFlipsideViewController’s delegate property is never set. You will still transition to the flipside view when the info button is pressed, but pressing the Done button no longer flips us back.
Now open HWFlipsideViewController.m. Much like HWMainViewController.m, this largely contains method stubs. However, at the bottom we have the implementation for our done: action.
- (IBAction)done:(id)sender
{
[self.delegate flipsideViewControllerDidFinish:self];
}
This simply calls the delegate’s flipsideViewControllerDidFinish: method. Which brings us around full circle. When the user presses the Done button, the event triggers the done: action. This then calls HWMainViewController’s flipsideViewControllerDidFinish:, which dismisses the flipside view controller scene. Everything is now connected.
Figure 1.16 The full object graph
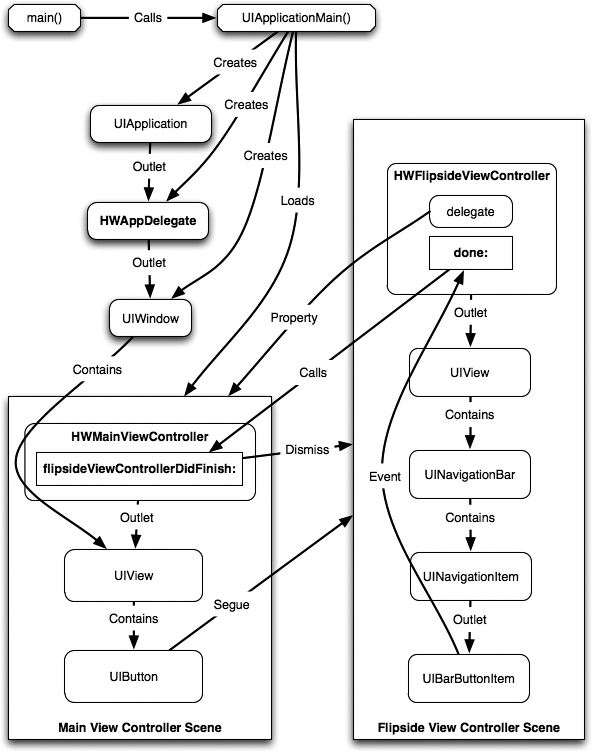
Again, there is nothing supernatural going on here. If you ever feel lost in a new project, start with the main storyboard file (as defined in the project’s info.plist file) and walk your way through. You should be able to trace a series of connections from the UIApplication object to any object in your project. Some may be defined in code and some in the storyboard, but with a little patience, you will be able to track everything down.
Modifying the Template
OK, enough chatter. Let’s start building something new. We’re going to add a label to the main view that will display a short message. We will also add a text box to the flipside view, letting the user change this message. So, let’s get started.
Modifying the Main View
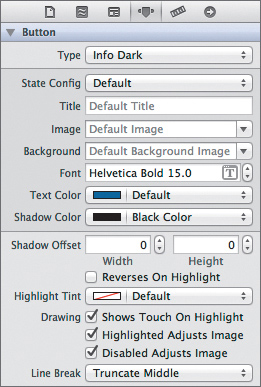
Open MainStoryboard.storyboard again, and zoom in on the main view controller scene. The background is a little too dark for my taste. Select the View object, and then switch to the Attributes inspector. Change the Background attribute to Light Gray Color (Figure 1.17). Next, select the info button and change its Type setting to Info Dark (Figure 1.18).
Figure 1.17 Setting the Background attribute

Figure 1.18 Setting the Type attribute
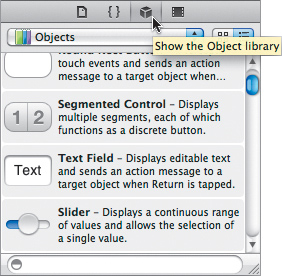
Now we need to add a label. Xcode makes it easy to add user interface objects. Just drag the desired object from the Library pane (the bottom half of the Utilities area) and drop it onto the scene. Make sure the Object library is displayed (cube icon second from the right in the library selector bar) (Figure 1.19), and scroll so the Label object is visible. Click the Label object and drag it from the Library pane to the main view controller scene’s view.
Figure 1.19 Selecting the Object library
Xcode will help you correctly place the control. As you drag the label across the Editor area, it highlights and labels the current view. It also adds blue guidelines to help properly position your objects. Drag the label until it is centered vertically and aligned with the view’s left margin, as shown in Figure 1.20.
Figure 1.20 Aligning the label with the view’s left margin

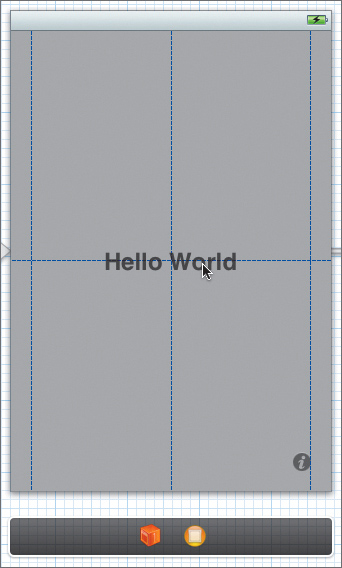
When you release the label, it will appear surrounded by eight blue dots. You can click and drag these anchor points to resize the label. Grab the right side and stretch it until you hit the right-margin guide. Next, make it about half as tall as the enclosing view. Now, with the label still selected, let’s change its appearance.
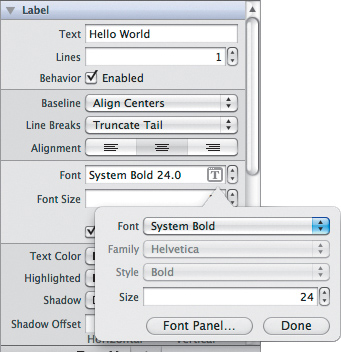
Open the Attributes inspector. In the Alignment attribute, click the button for centered text. Then click the ![]() icon at the far right side of the Font attribute’s text field. This will open a pop-up window. Change the Font setting to System Bold and the Size setting to 24 (Figure 1.21). Now let’s change the text itself. You can either modify the label’s Text attribute, or you can double-click the label and modify it directly. Replace “Label” with Hello World.
icon at the far right side of the Font attribute’s text field. This will open a pop-up window. Change the Font setting to System Bold and the Size setting to 24 (Figure 1.21). Now let’s change the text itself. You can either modify the label’s Text attribute, or you can double-click the label and modify it directly. Replace “Label” with Hello World.
Figure 1.21 Setting the label’s font
Finally, click and drag the label until it is centered both horizontally and vertically (if you cannot move the label, try clicking the view to clear the selection, then click and drag the label again). If you’ve done everything correctly, the left and right margin guidelines should appear as well (Figure 1.22).
Figure 1.22 Centering the label
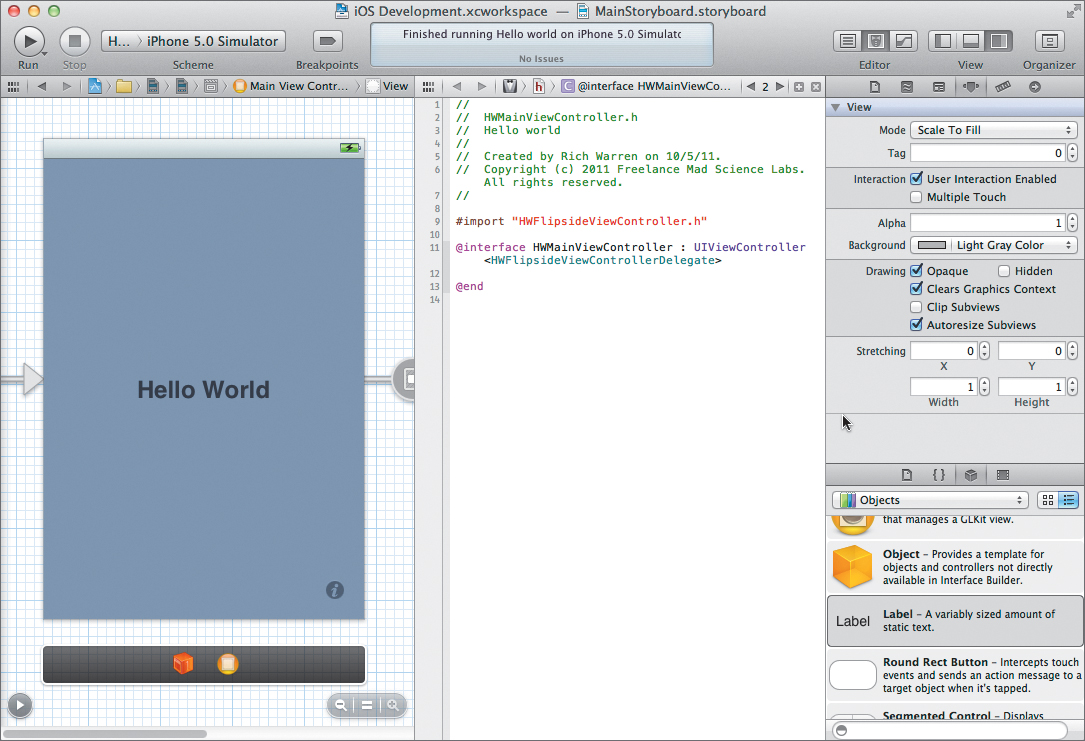
Run the application. Our changes should appear on the main view.
Adding an Outlet
If we want to change the label’s text during runtime, we need a way to access it in our code. The easiest way is to add an outlet to the view’s controller. In the pre-Xcode 4.0 days, this meant jumping back and forth between Xcode and Interface Builder as we modified our code by hand. Now there’s a much simpler way.
First, we should probably collapse the scene list. Click the round, gray disclosure button in the lower-left corner of the Editor area. Next, click the Assistant Editor button (Figure 1.23).
Figure 1.23 The Assistant Editor button

This will display two Editor areas side by side. The leftmost area contains the selected file, while the rightmost contains a closely related file. For example, if you select the HWMainViewController.h header file, the right editor should display the HWMainViewController.m implementation file. In our case, the left editor shows the storyboard, while the right editor shows the controller’s header file (Figure 1.24).
Figure 1.24 Side-by-side editing of the storyboard and the header file
Control-click the label and drag it to the header file. You will see a blue line stretching from the label to your cursor. Place the cursor just above the @end directive, as shown in Figure 1.25, and then release the mouse.
Figure 1.25 Creating an outlet
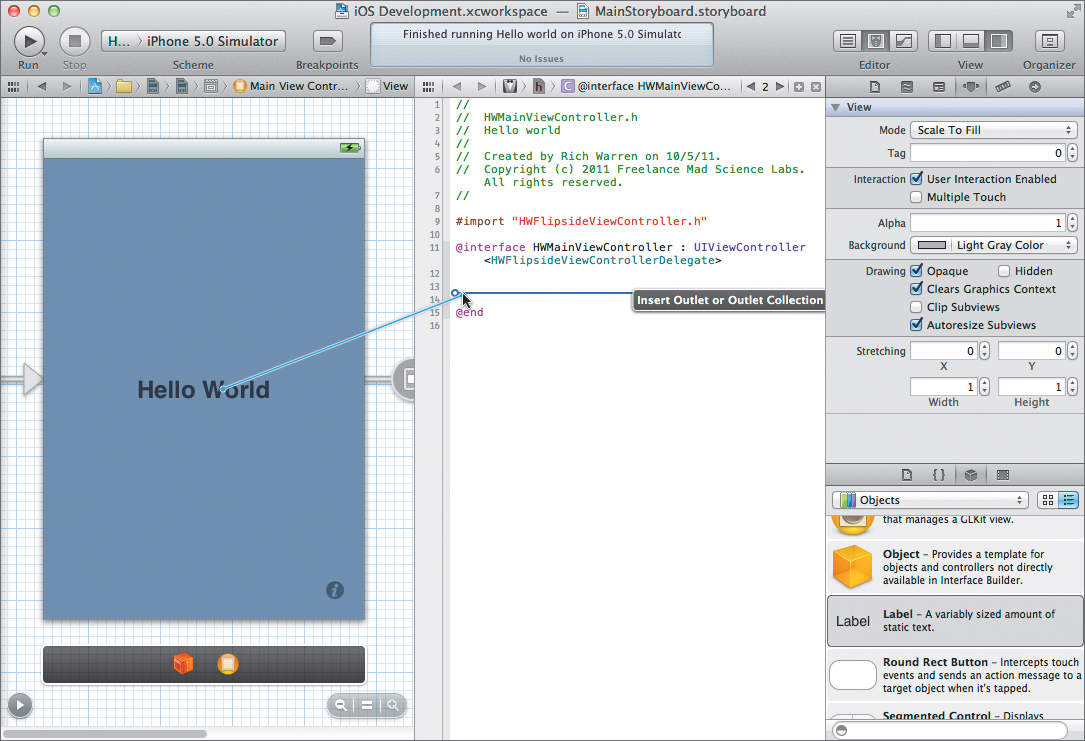
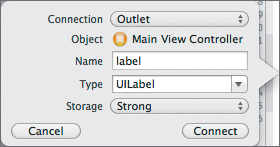
A pop-up dialog will now allow you to configure the outlet. Make sure the Connection setting is set to Outlet. In the Name field, enter label. The Type should be UILabel, and the Storage should be Strong (Figure 1.26). Click Connect to continue.
Figure 1.26 Configuring the outlet
Note
Although Xcode generally does a great job auto-selecting the correct companion file, there may be times when it does not work properly or when you want to select a different file instead. You can do this in the jump bar. Selecting the leaf item will let you choose an alternate file based on the same general selection rules. Selecting the root item will allow you to choose different selection rules. Xcode provides a number of different, context-specific selection rules. You can also choose to manually select the companion file, if necessary.
Xcode will make several changes to HWMainViewController.h, HWMainViewController.m, and MainStoryboard.storyboard. In the header file, it declares our label’s property.
#import "HWFlipsideViewController.h"
@interface HWMainViewController : UIViewController
<HWFlipsideViewControllerDelegate>
@property (strong, nonatomic) IBOutlet UILabel *label;
@end
In the implementation file, Xcode synthesizes our property and sets it to nil when the view is unloaded. This helps free up unneeded memory.
#import "HWMainViewController.h"
@implementation HWMainViewController
@synthesize label;
....
- (void)viewDidUnload
{
[self setLabel:nil];
[super viewDidUnload];
// Release any retained subviews of the main view.
// For example, self.myOutlet = nil;.
}
In the storyboard file, Xcode connects the label and the newly created outlet. You can view this using the Connection inspector. Alternatively, Control-click the Main View Controller icon to bring up a Connections dialog (Figure 1.27).
Figure 1.27 Main View Controller’s connections
Adding the Text Field
The first few steps almost exactly repeat what we did for the main view, only we use a Text Field control, not a Label object. Make sure MainStoryboard.storyboard is open and zoom in on the flipside view controller. Now, drag a Text Field control from the Library pane. Resize it so that it fills the view from margin to margin.
This time we don’t need to change the height or the attributes. Just create an outlet for the text field by Control-dragging it to a point just above the delegate property. Name the outlet labelText. Finally, position it in the top half of the flipside view; otherwise, it may be covered by the keyboard.
Whenever we want to change the label’s text, we just need to get the text value from our labelText outlet and copy it into our label outlet. The simplest solution is to change the label only when the user dismisses the flipside view. Open HWMainViewController.m and find the flipsideViewControllerDidFinish: method.
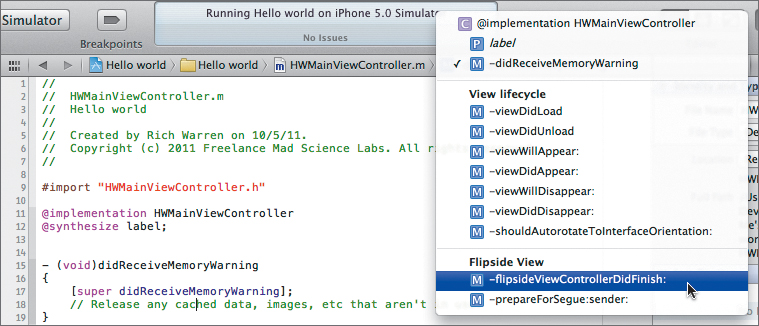
Currently our files are not very long. You can probably find the method by just scanning through the file. Still, it is often easier to use the editor’s jump bar (Figure 1.28).
The bar across the top of the Editor area shows you the item that you are editing. Click the rightmost item and select the flipsideViewControllerDidFinish: method (Figure 1.29). The editor will select the method and scroll so it is visible.
Figure 1.29 Selecting a method
Now, modify the flipsideViewControllerDidFinish: method as shown here.
- (void)flipsideViewControllerDidFinish:
(HWFlipsideViewController *)controller
{
self.label.text = controller.labelText.text;
[self dismissModalViewControllerAnimated:YES];
}
As we discussed earlier, this line simply copies the text value from the flipside view’s text field to the main view’s label using our outlets and properties.
That’s it. Run the application again. It should display the default Hello World message when it launches. Click the info button, and type new text into the text field. Click the Done button. The label should now show your new text.
Refining the Interface
Functionally, everything’s OK, but it’s not the most polished (or, for that matter, useful) app in the world. Let’s make it a little bit better. When the flipside view appears, let’s fill the text field with the label’s current value. Additionally, let’s go ahead and dismiss the flipside view when the user taps the Return key.
Let’s start by passing the text from our main view’s label to our flipside view. Ideally, we would like to set this value in our prepareForSegue:sender: method. This should be the reverse of the code in flipsideViewControllerDidFinish:; we copy the value from our main view’s label directly to our flipside view’s text field. Unfortunately, because of the way views are loaded, the text field may not exist yet. There are a couple of ways around this. Let’s add a property to our HWFlipsideViewController class and use that to hold our text until we’re sure the view is ready to go.
Open HWFlipsideViewController.h and add the following line just after the other properties:
@property (nonatomic, strong) NSString* startingText;
In HWFlipsideViewController.m, we need to synthesize this property (see the “Properties” section of Chapter 2 for more information). Add the following line at the beginning of the @implementation block:
@synthesize startingText = _startingText;
Now, scroll down to the viewWillLoad: method and modify it as shown below:
- (void)viewWillAppear:(BOOL)animated
{
self.labelText.text = self.startingText;
[super viewWillAppear:animated];
}
This method is called every time the flipside view appears. Here, we’re just assigning the value stored in our startingText property to the text field. Next, open HWMainViewController.m again. Modify prepareForSegue:sender: as shown:
- (void)prepareForSegue:(UIStoryboardSegue *)segue sender:(id)sender
{
if ([[segue identifier] isEqualToString:@"showAlternate"])
{
id flipsideViewController =
[segue destinationViewController];
[flipsideViewController setDelegate:self];
[flipsideViewController setStartingText:self.label.text];
}
}
Since we’re setting multiple properties, we start by getting a generic reference to our HWFlipsideViewController. We then use that reference to set the delegate, just as we did before. Finally, we grab the string from our main view’s label and save it in our startingText property.
One improvement down, one more to go. Open the assistant editor again, with the storyboard on the left and HWFlipsideViewController.h on the right. We want to connect the text field’s Did End On Exit event with the controller’s done: method. There are several ways to draw connections. For example, we could Control-click and drag from the text field to the done: method. Unfortunately, this does not allow us to select the event, and it will connect the Editing Did End event, not the Did End On Exit event.
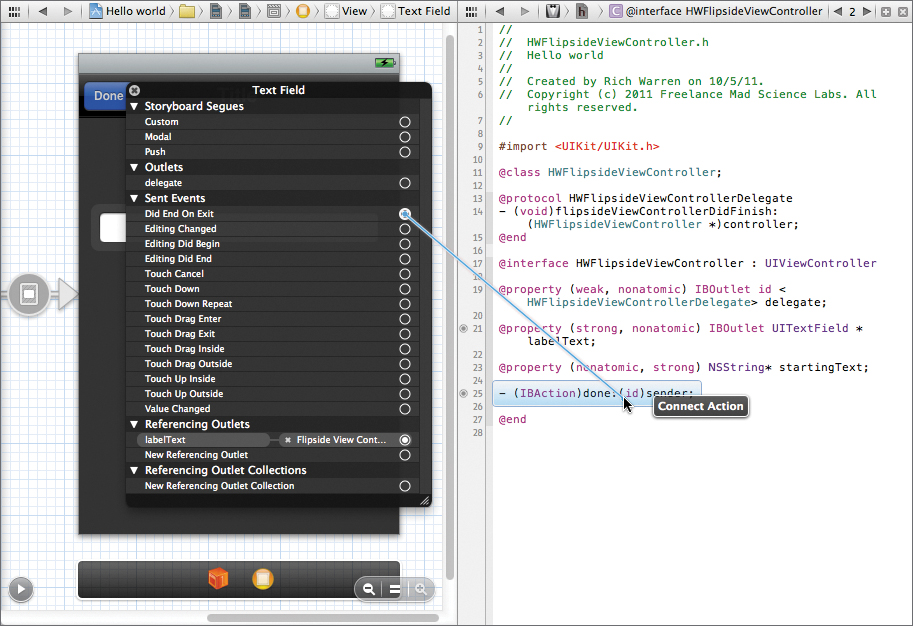
Instead, Control-click the text field to bring up the Connections dialog. Click and drag from the circle that is to the right of the Did End On Exit event to the done: method, as shown in Figure 1.30.
Figure 1.30 Drawing a connection from the Connections dialog
There are several other equally valid alternatives. You can Control-click the HWFlipsideViewController icon in the scene’s dock, and then drag from the done: action to the text field. Xcode will then prompt you for the correct event. You can also use the Connection inspector in the Utilities area, instead of using the pop-up dialogs. Most of these approaches are equivalent. Feel free to experiment with the different approaches and see which one works best for you.
Each event can be connected to only one action, but a single action can connect to multiple events. In this case, we have both the text field and the Done button connected to the done: action.
While we’re at it, let’s change the appearance of the keyboard’s Return key. Select the text field and open the Attributes inspector. Set the Return Key attribute to Done. While this doesn’t change the keyboard’s functionality, it helps communicate our intent.
You may also want to set the Clear Button attribute to “Appears while editing.” After all, using the backspace to delete large amounts of text gets tedious very quickly.
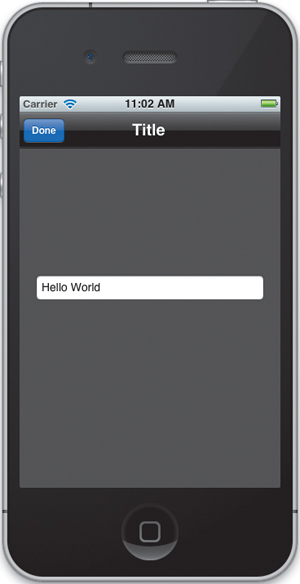
That’s it. Run the application. It should appear as shown in Figures 1.31 and 1.32.
Figure 1.31 The complete main view
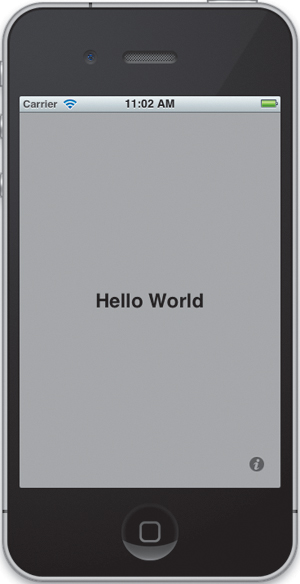
Figure 1.32 The complete flipside view
Wrapping Up
And that’s it for our Hello World app. In this chapter, we’ve examined how iOS applications are pieced together. We’ve built and modified our own (albeit incredibly simple) application, and we’ve gotten some hands-on experience using the development tools. This should give you a good jump-off point for the rest of the book.
In Chapter 2, we will dig into Objective-C. We will look at the different building blocks used in the language, as well as some of the common design patterns found throughout Cocoa Touch. Then, in Chapter 3, we will take everything we’ve learned so far and start building a more complex, real-world application.