
6. Loading and Saving Data
This chapter will focus on loading and saving data. We will begin with a brief discussion of iOS’s local file system and then look at how documents can be shared across multiple devices using iCloud. We will then expand Health Beat to save and load application data and our user preferences to the cloud. Finally, we will add a custom preferences page to the Settings app, letting us view and change Health Beat’s default settings.
The iOS File System
Always remember, iOS is not a desktop operating system. Some of the things we take for granted on desktop machines are impossible, inappropriate, or at least very difficult in iOS. The file system is a great example of this. Where the desktop often displays dialog boxes to open and save files, forcing the user to search through a forest of directories, iOS goes to great lengths to hide the underlying file system, both from the user and from the applications themselves.
This provides two main benefits. For the user, this greatly simplifies the experience. You don’t need to worry about where files are stored or how to find them. Your application handles all of this transparently. For the applications, limiting access to the file system greatly improves system security. Each application is limited to its own sandbox. The application can freely open and save files within this sandbox, but it cannot touch anything outside these carefully defined boundaries. This protects both your data and the system files from accidental (or worse yet, malicious) alterations. Unfortunately, it also makes sharing files between applications somewhat difficult. The communication channels between applications are few and tightly controlled.
Generating Directory Paths
Within the application sandbox, iOS sets aside specific directories for different types of use. These include the Document, Temporary, Caches, and Application Support directories.
The Document directory stores our application’s documents—basically, any user-generated data. When writing a text editor, this is where we save the user’s text files. When designing a game, this is where we store the saved game files. For Health Beat, this is where we save our WeightHistory.
The Temporary directory provides a handy location for storing information that does not need to survive past the current session. This often includes the scratch space needed for large calculations and similar transient uses. It’s best to actively delete these files when they are no longer needed; however, the system will periodically clear out the Temporary directory when our application is not running.
The Caches directory also stores temporary information; however, this directory focuses on caching data to improve performance. Most of the time this means saving information that we may need to reuse, especially information that takes a long time or a lot of computational effort to re-create.
You are probably familiar with caches from Web browsers. The browser caches a page after downloading it. The next time you try to view that page, it simply loads the file from disk instead of downloading it again.
Caches also differ from temporary files in one other important way—caches typically persist beyond the current session. After all, a Web browser doesn’t clear out its cache each time it launches. However, this data may be automatically deleted if the device is running out of disk space, so we cannot depend on the contents of this directory staying around forever.
Last, we have the Application Support directory. This is essentially used to hold everything else. This can include data files that the application needs to run, modifiable copies of resources from our application bundle, or even additional content from in-app purchases. It should not be used to store anything that more properly belongs in the Document, Caches, or Temporary folders.
It’s important to remember that your application can both read and write to the Application Support directory. If you just need to read a resource file, then you should probably load it directly from the application bundle (see the “Reading Resource Files” sidebar for more information).
On the other hand, the Application Support directory and the application bundle often work in tandem. The application checks to see if the support directory has a desired data file. If it does, the application loads the file and proceeds as normal. However, if it does not, the application copies the default data file from the application bundle and then loads it. The application can then modify the version in the Application Support directory, but the original copy in the application bundle remains untouched. This is a great way to handle user-modifiable templates and similar resources.
To be a good iOS citizen, our application should try to respect these categories and save our files in the proper locations. Of course, to do this we need either a path or a URL that points to the correct directory.
While iOS provides a number of ways to programmatically generate these paths. Apple recommends using the NSTemporaryDirectory() function for temporary files and either the NSSearchPathForDirectoriesInDomains() function or one of NSFileManager’s URL-based methods (URLsForDirectory:inDomains: or URLForDirectory:inDomain:appropriateForURL:create:error:) for persistent data.
NSTemporaryDirectory() simply returns an NSString containing the path to your application’s Temporary directory. On the device, this will have the following format:
/private/var/mobile/Applications/8BE8C8F8-D259-4E35-A515-1F5DE7E0E411/tmp/
On the simulator, the path points to something like the following:
/var/folders/30/30GdsGkgF6mT1duyW7yCsk+++TI/-Tmp-/
NSSearchPathForDirectoriesInDomains(), on the other hand, takes three arguments—an NSSearchPathDirectory, an NSSearchPathDomainName, and a BOOL. It then returns an NSArray of NSString paths matching your arguments.
The NSSearchPathDirectory specifies the type of directory that you are looking for. The NSSearchPathDomainName value describes where you should look (system files, user files, etc.). The BOOL determines whether the tilde (~) in the returned paths is expanded.
In Mac OS X (and most UNIX systems), the tilde represents the current user’s home directory. On iOS, it refers to the application’s sandboxed directory.
Remember, these methods were originally developed for Mac OS X on the desktop, which has a much more open and much richer file system. As a result, there are a large number of legal arguments that sound intriguing but that, quite honestly, don’t do anything useful on iOS.
Additionally, the desktop version often finds multiple matching directories (particularly when searching across all domains). Because of this, NSSearchPathForDirectoriesInDomains() returns an NSArray of NSStrings. In iOS, there is usually only one possible path for each directory, so we simply grab the first path (or equivalently the last path) from the list.
The bottom line is that, of all the possible domain and directory combinations, we really only use three search path directories when developing iOS applications: NSDocumentDirectory, NSCachesDirectory, and NSApplicationSupportDirectory. As you might guess, these correspond to our Document, Caches, and Application Support directories. In all three cases, NSSearchPathForDirectoriesInDomains() must use the NSUserDomainMask, as shown below:
// Document Directory
NSArray* documentPaths =
NSSearchPathForDirectoriesInDomains(NSDocumentDirectory,
NSUserDomainMask,
NO);
NSString* documentPath = [documentPaths objectAtIndex:0];
// Caches Directory
NSArray* cachePaths =
NSSearchPathForDirectoriesInDomains(NSCachesDirectory,
NSUserDomainMask,
NO);
NSString* cachePath = [cachePaths objectAtIndex:0];
// Application Support Directory
NSArray* supportPaths =
NSSearchPathForDirectoriesInDomains(NSApplicationSupportDirectory,
NSUserDomainMask,
NO);
NSString* supportPath = [supportPaths objectAtIndex:0];
These return the following path strings:
~/Documents
~/Library/Caches
~/Library/Application Support
The tilde expands to the application’s directory. In the simulator, this would return a string similar to the following:
/Users/rich/Library/Application Support/iPhone Simulator/4.3/Applications/B928F481-FAE4-4A11-965D-82DCF6799060
On the device, it expands to look like this:
/var/mobile/Applications/8BE8C8F8-D259-4E35-A515-1F5DE7E0E411
Using Paths
So once you have the path to a file or directory, what can you do with it?
Well, NSString has a number of methods for manipulating paths. For example, stringByAppendingPathComponent: adds a subdirectory or filename to an existing path. stringByDeletingLastPathComponent: lets us move back up the directory tree. NSURL has a parallel set of path manipulation methods, letting us easily manipulate URLs as well.
NSFileManager also provides a number of useful methods for querying and manipulating the file system. For example, the following code explores a given path. If it points to a file, it will print out information about that file. If it points to a directory, it will get a list of the entire directory’s contents and then recursively explore each item in the list.
- (void)explorePath:(NSString*)path {
// Access singleton file manager.
NSFileManager* fileManager = [NSFileManager defaultManager];
BOOL isDirectory;
// If the file doesn't exist, display an error
// message and return.
if (![fileManager fileExistsAtPath:path
isDirectory:&isDirectory]) {
NSLog(@"%@ does not exist", path);
return;
}
// If it's not a directory, print out some information
// about it.
if (!isDirectory) {
NSString* fileName = [path lastPathComponent];
NSMutableString* permissions =
[[NSMutableString alloc] init];
if ([fileManager isReadableFileAtPath:path]) {
[permissions appendString:@"readable "];
}
if ([fileManager isWritableFileAtPath:path]) {
[permissions appendString:@"writable "];
}
if ([fileManager isExecutableFileAtPath:path]) {
[permissions appendString:@"executable "];
}
if ([fileManager isDeletableFileAtPath:path]) {
[permissions appendString:@"deletable"];
}
if ([permissions length] == 0) {
[permissions appendString:@"none"];
}
NSLog(@"File: %@ Permissions: %@", fileName, permissions);
return;
}
// If it is a directory, print out the full path and then
// recurse over all its children.
NSLog(@"Directory: %@", path);
NSArray* childPaths =
[fileManager contentsOfDirectoryAtPath:path error:nil];
for (NSString* childPath in childPaths) {
[self explorePath:
[path stringByAppendingPathComponent:childPath]];
}
}
We start by getting a reference to the default file manager. Then we check to see if a file or directory exists at the provided path. If we have a regular file, we extract the filename from the path and then query the file manager about the file’s permissions: Can we read, write, execute, or delete the file? Once we’re done, we print out this information.
If it’s a directory, we call contentsOfDirectoryAtPath:error: to get an array containing the directory’s contents. This performs a shallow search. It gives us the names of all the subdirectories, files, and symbolic links within the provided directory; however, it does not return the contents of those subdirectories, traverse the links, or return the current (“.”) or parent (“..”) directories.
We then iterate over this array, recursively calling explorePath: on each entry. Note that the strings in the array represent just the file and directory names, not the complete path. We must append these names to our path to create a new valid path.
We can use this method to explore our entire application’s sandbox by calling it as shown below:
[self explorePath:[@"~" stringByExpandingTildeInPath]];
Here, we start with the tilde, which represents the root directory of our application’s sandbox. However, many of NSFileManager’s methods require the fully expanded path. We can get that by calling NSString’s stringByExpandingTildeInPath method.
I highly recommend reading through the full documentation for NSfileManager before doing any serious file system work. There are a wide range of methods to help you move, delete, and even create files, links, and directories.
Note

While explorePath: demonstrates a number of NSFileManager and NSString methods, it is not really the best way to iterate over a deep set of nested directories. For production code, I recommend instead using enumeratorAtPath: or enumeratorAtURL:includingPropertiesForKeys:options:errorHandler:.
While all this path manipulation and exploration is fun, ultimately we need to save or load our data. Cocoa provides a number of options for us. Many classes have methods both for initializing objects from a file and for saving objects directly to a file. This includes NSString (for text files) and UIImage (for image files), as well as many of the collection classes (for collections of supported objects) and even NSData (for raw access to a file’s bytes).
These methods are often useful for quick tasks; however, saving an entire application’s state may require something a bit more robust. Here, we could use one of NSCoder’s subclasses to save and load entire hierarchies of objects. Our only restriction is that all the objects in the hierarchy must adopt the NSCoding protocol. Typically this means using the NSKeyedArchiver and NSKeyedUnarchiver classes to perform our serialization, while adding the initWithCoder: and encodeWithCoder: methods to our custom classes.
Alternatively, we can use database technologies, such as SQLite or Core Data with an SQLite-based store, to persist our application’s data. While NSCoding forces us to save and load an entire file at a time, SQLite and Core Data let us work with smaller, discrete chunks of data. Of course, this comes at a cost. These technologies tend to be a bit more complex. Still, we will look at Core Data in more depth in Chapter 7.
Managing User Preferences
Preferences are a special type of data. They define how an application operates. How large are the fonts? How responsive is the gyroscope? How loud is the background music? While the users often change these values, the application needs some sort of default to start out with. As a result, we often refer to preferences as defaults (or user defaults).
Typically, applications save their preferences separately from the rest of their data. You can change the background music volume without affecting your saved games—and when you switch from one saved game to another, the background music volume probably shouldn’t change.
Furthermore, preferences may represent both the explicit and the implicit settings for our application. Explicit preferences are exposed to the user, either in the Settings app or within the application itself. We display a set of options and let the user make their own selections. If the user wants to change the background music volume, we present a slider and let them adjust it.
Implicit preferences, on the other hand, are inferred from the user’s actions. In most cases, we simply watch what the user is doing and record it. This could include recording the last site visited in a Web view or the last page read in an e-book reader. Implicit preferences could even include the state of the user interface: What tab did the user have open? What views are currently stored in their navigation controller’s stack? (See “Saving Health Beat’s State” for more information about the interface’s state.)
Like any other data, iOS has a specific directory for saving user preferences. In this case, it’s the Library/Preferences directory. However, we should never need to touch this path directly. Instead, we should use the NSUserDefaults class (or, alternatively, Core Foundation’s CFPreferences API).
NSUserDefaults gives us programmatic access to the user’s defaults database. This stores information in key-value pairs. To use this class, simply access the shared object using the standardUserDefaults class method. Then you can call a variety of methods to set and retrieve values for the specified keys. All of the changes are cached locally to improve performance.
You can call the synchronize method to force updates. This both writes local changes to disk and updates the local values from disk. However, the system will automatically synchronize itself periodically, so you only need to call synchronize when you want to programmatically force an update.
But wait, there’s more. This NSUserDefaults interface is only the beginning. We can also add a Settings.bundle to our application. This allows us to configure a custom preferences page in the device’s Settings application. This page uses the same defaults database as the NSUserDefaults class, allowing us to freely mix both in-app and Settings-based user defaults.
The Settings application provides a convenient, centralized location for many preferences. In many ways, it is better than designing your own in-application settings. You don’t need to build the interface or find a way to fit it into the application’s workflow. You just configure the Settings.bundle’s .plist file, and iOS handles the rest.
Unfortunately, Settings pages have a serious drawback: They aren’t part of the actual application, so it’s easy to forget about them. I can only speak for myself, but I’d like to think I’m reasonably technically savvy. Still, I rarely remember to check Settings after installing a new app. When I do remember, it’s only after I’ve spent hours searching for an in-app way to change the default behavior.
General wisdom says that the Settings app should be used for settings that the user makes once and then largely leaves alone. In-app settings should be used for things the user often changes while working with the app. However, there’s no clear dividing line between these two. In practice, the Settings app has a relatively limited range of controls. This may force the decision for us. In addition, in-app settings can be a lot more intuitive and easier to find. Of course, that relies on your ability to add them to your application’s interface in a manner that is both unobtrusive and helpful. That’s a lot easier said than done.
We will look at both using NSUserDefaults and using a Settings.bundle in “Saving User Defaults,” later this chapter.
Saving to iCloud
With the release of iOS 5, Apple has given us a new way to store our document’s data. Instead of stashing the information in our device’s local file system, we can share it using iCloud.
iCloud is a new set of services and APIs that enable automatically sharing data among different devices. It provides a local directory, the iCloud container, where our device can read and write its data. The system then automatically syncs all the data in our container with our iCloud storage area. The truth is in the cloud—the system keeps the most current version in our iCloud storage, pushing updates back to our devices as needed.
This has several benefits. First, all our data is safely backed up remotely. If something bad happens to the local copy (for example, you accidentally drop your phone in the toilet), we can simply download the file again from the cloud.
Our data is also available on all our devices. Create a file on your Mac at home. Edit it on your iPad while sitting at a café. Show it to your friends on your iPhone. You can even access it from your PC at work. Your data is everywhere.
Enabling this ubiquitous access requires shuffling around a fair number of bits. Fortunately, iCloud uses several techniques for minimizing bandwidth usage. First, it stores both the file itself as well as metadata about the file. When a file is created, the system uploads both the metadata and the file to the cloud. iCloud then pushes the updated metadata to all devices associated with that iCloud account—alerting them to the change. The actual file is only pulled down to a device when it is actually needed. Most of the time this happens transparently, though iCloud provides API calls to both monitor and trigger the download of non-local files.
iCloud also tries to minimize the amount of data it needs to upload and download. It will automatically break your application’s data into chunks and—when possible—only upload and download the chunks that actually change. iCloud will also transmit data peer-to-peer across the local Wi-Fi network whenever possible. Still, as developers, we need to be careful about what we store and how often we perform updates.
Finally, it’s important to note that iCloud is not a general communication channel. We can share containers among a relatively small suite of related applications. For example, we probably want to share data between the lite and pro versions of our app. We can also publish URLs that allow others to copy data from our iCloud containers. However, we cannot create a communal container for other, third-party developers to access. We also cannot share cloud data across multiple users. iCloud is designed to allow a closely related set of applications to share their data and preferences across all the devices associated with a single account. That’s all. Don’t try to force it to do things that it cannot.
iCloud’s APIs can be broken into two general categories: iCloud document storage and iCloud key-value storage.
iCloud Document Storage
We should primarily use iCloud document storage to store any user-created documents. We may also use it to store other internal application data—but we have to be a little careful here. We want to minimize the amount of data we’re uploading and downloading to the cloud. That means we should avoid uploading cached data or anything that the application could easily re-create.
iCloud document storage supports both files and packages and is only limited by the amount of available memory in the user’s iCloud account. To enable document storage, we first have to add an entitlements file and then set our ubiquity container identifiers. These define the different iCloud containers available to our application. We need at least one application-specific container, but we may include additional shared containers.
Then, early in our application, we need to call NSFileManager’s URLForUbiquityContainerIdentifier: method to determine if iCloud is enabled. It’s true that everyone using iOS 5 has a free 5 GB iCloud account; however, that doesn’t mean that the user actually set up their account. Some users might not understand iCloud. They may have skipped those steps when setting up their device. Others may deliberately disable their account—especially if they’re worried about incurring additional bandwidth costs or increasing the drain on the battery. Bottom line, we cannot assume that iCloud is enabled. We must always check.
URLForUbiquityContainerIdentifier: also has a secondary purpose. It extends our application’s sandbox to the specified container. Until this method is called, we cannot read or write into the container. Therefore, we must call URLForUbiquityContainerIdentifier: before using any other iCloud APIs.
Next, we need to access our file. If we’re creating a new file, we start by saving it in our application’s sandbox and then using NSFileManager’s setUbiquitous:itemAtURL:destinationURL:error: to move it to the cloud. If we want to open an existing file, we search for its current URL using NSMetadataQuery. We shouldn’t store and reuse the iCloud URLs in our app, since the file’s location may change.
We also have to be careful how we access our file. We must use an NSFileCoordinator to read or write any files in our iCloud container. The coordinator manages access to our data, ensuring that no process is trying to read our data while another is modifying it. However, within a coordinated block, our iCloud containers can be treated just like any other directory. We can read, write, create, delete, move, or rename files and directories using regular NSFileManager methods.
Finally, we need to make sure we receive notifications about the changes to our files. Any class that allows users to view or edit things inside the iCloud container must also implement the NSFilePresenter protocol. This protocol allows us to monitor the data’s state and respond to changes as needed. This includes loading a new version of the data when changes are made remotely, or managing conflicting versions as they are detected. NSFilePresenters also work hand in hand with the NSCoordinators to ensure that all running copies of your application have the correct, up-to-date version of the file when they need it. For example, an NSCoordinator may ask another process’s NSFilePresenter to save its changes before it creates a coordinated block.
As you can see, working with iCloud documents can get quite complex. Fortunately, iOS 5 also provides the UIDocument abstract class. While this doesn’t make using iCloud simple, it does manage many of the details for us.
The UIDocument Abstract Class
The UIDocument automates many of the tedious and complex details in managing a document’s data. For example, it automatically saves and loads data on a background thread. This prevents our user interface from locking up whenever it has to access large files.
The UIDocument uses a saveless user model. Users never need to explicitly save their documents. Instead, as developers, we let the document know whenever its data has changes. UIDocument caches these changes, waiting for an opportunity to write them back to disk. If possible, it takes advantage of lulls in the application, writing its data during idle moments. However, UIDocument will also save all its changes before the application goes into the background.
We can use UIDocument for both standard files and iCloud storage. It adopts the NSFilePresenter protocol and will automatically reload the document’s data whenever it detects a remote update. It also wraps its reading/writing code in NSFileCoordinators, ensuring safe access to our data.
Despite all this, there are still a few tasks we need to perform on our own. For example, we must tell the document how to save and load its data. We also need to monitor the document’s state and respond to version conflicts and other errors. As we will see, these are not trivial tasks. Still, without UIDocument we’d have a lot more work on our hands.
To use UIDocument, we need to create a subclass and implement two methods: contentsForType:error: and loadFromContents:ofType:error:. The contentsForType:error: method takes a snapshot of our document’s model and returns it as either an NSData or NSFileWrapper object—allowing us to support saving to either files or packages, respectively. The UIDocument will then atomically save this data on a background thread. Similarly, when loading new data UIDocument reads our information on a background thread, then calls loadFromContents:ofType:error:. Again, we may receive either an NSData or an NSFileWrapper. We use this method to update our document’s model and then refresh the user interface, if necessary. Both of these methods take an NSString argument indicating the document’s Uniform Type Identifier. This allows us to read and write multiple formats.
Next, in our application we need to alert the document to any changes in our model. There are two ways to do this. Most simply, we can call the document’s updateChangeCount method. This lets the document know that it has unsaved changes. Alternatively, we could register an undo action with UIDocument’s built-in NSUndoManager. While this is a little more complicated, it also enables full undo/redo support. For this reason, we should use the undo manager whenever possible.
We will get more experience both subclassing and using UIDocument later this chapter.
iCloud Key-Value Storage
iCloud key-value storage provides a simpler interface for saving data in the cloud. Unfortunately, it is also more restricted. Key-value storage is intended for non-critical configuration data. In many ways, it parallels the NSUserDefaults. It can only store a limited amount of data—up to 64 kilobytes per app—and can only store simple property-list data types: numbers, dates, strings, arrays, dictionaries, and so on. Finally, it does not have any conflict resolution—the last save always wins.
As in iCloud document storage, we need to set up the key-value store identifier in our application’s entitlements. Once that is done, we simply access the shared NSUbiquitousKeyValueStore. We then call the store’s instance methods to read and write our data. All changes are initially cached in memory. We must call synchronize to save these changes to disk. The system will then automatically sync the data from our local container with iCloud.
Note

Syncing the NSUbiquitousKeyValueStore does not force the system to upload its changes to iCloud immediately. Indeed, the system may deliberately delay uploading, especially when our application makes frequent changes. The more frequent the updates, the longer the delay.
In general, we should not use iCloud key-value storage to save user-generated data. It’s really intended for syncing user preferences. In fact, we shouldn’t use it to replace NSUserDefaults. Instead, our applications should still use NSUserDefaults to manage their preferences locally. We simply use key-value storage to sync these preferences across multiple devices.
We will see how NSUserDefaults and iCloud key-value storage work hand in hand in the “Saving User Defaults” section, later this chapter.
Saving Health Beat’s State
When we talk about saving the state of the application, we are really talking about two things. The first is saving the application’s data. In well-designed MVC applications, this means saving the model.
However, we can also talk about saving the state of the interface. For example, which tab did the user have open? Which page did they navigate to last? What views are currently stored in their navigation controller’s stack?
Desktop applications often ignore the interface’s state, focusing entirely on the application’s data. However, the same is not true for iOS. Most users expect well-designed, polished applications to provide a smooth, seamless interaction. We should be able to leave the application to do other work. When we come back, everything should still be exactly where we left it.
Admittedly, this was somewhat more important before multitasking and fast task-switching. Before iOS 4.0, if you wanted to let your users jump quickly between two applications, you needed to both save your interface’s state and optimize your application to load quickly. Now, this is largely handled automatically. When you switch tasks, your application goes into the background. As long as it isn’t terminated (e.g., due to a low memory warning), everything will remain the same once the app resumes. Still, saving the interface’s state can add a nice bit of polish and consistency to your app.
On the other hand, robotically saving your application’s state isn’t always the best option. You should think about how your users will use your application, and try to make their experience as streamlined and intuitive as possible. Additionally, make sure you aren’t saving bad information. For example, if a document-based application crashes while trying to open a file, you don’t want it to try to open the same file the next time you launch. This would render your application unusable, forcing your user to delete the entire application and reinstall—losing all their information.
Note
Once we decide to save our interface’s state, we still need to determine where and how to save it. In most cases, we shouldn’t mix the user interface data with our application’s model. Instead, we could create a second file inside the Application Support directory and store the interface state there. Alternatively, we could just treat the interface data as an implicit user preference. It’s not something we want to expose in the Settings app, but it can be a nice fit for NSUserDefaults.
In Health Beat, the user will generally open the application and enter a new weight. We want to make this as quick and easy as possible. Therefore, instead of saving and restoring the user’s last position, we should always open to the enter weight view. Fortunately, this means we don’t need to save our interface’s state; we can focus on our model.
Unfortunately, before we can do that, we have to prepare our application to support iCloud.
Preparing the Application
Before we begin using iCloud storage, we have to make sure our provisioning profile has iCloud support enabled. In most cases, Xcode will handle this automatically. Since the iOS 5 release, the generic app id (and therefore the default provisioning profile created by Xcode) will have iCloud enabled. However, if you set up your development tools prior to the iOS 5 release, you may need to refresh your provisioning profile.
Next, we need to set the entitlements for our application. As mentioned previously, we need an entitlements file with two iCloud identifiers. The first is for document storage, the second for key-value storage. The entitlements provide a measure of security for your application, ensuring that your documents are only accessible by your own apps. Additionally, the system uses the entitlements to identify your application’s documents and distinguish them from other documents within iCloud storage.
The entitlements file contains a number of key-value pairs. For document storage, the com.apple.developer.ubiquity-container-identifiers key should contain an array of strings representing bundle identifiers for applications created by our team. All bundle identifiers use the following format: <DEVELOPER_ID>.<BUNDLE_IDENTIFIER>. Here <DEVELOPER_ID> is the unique ten-character identifier associated with your individual or team account. You can find this by viewing your account information at Apple’s Developer Member Center (http://developer.apple.com/membercenter). <BUNDLE_IDENTIFIER> is the target application’s identifier.
We do not have to use the bundle identifier for our current application. For example, a lite app may use the pro app’s bundle identifier, guaranteeing continued access to the files after the user upgrades. We can also use multiple identifiers, giving us access to a number of different containers. While the first bundle identifier must be explicitly defined, any secondary identifiers can use wildcards. This lets us implicitly refer to a number of applications without having to list them individually.
For key-value storage, we need to define the com.apple.developer.ubiquity-kvstore-identifier key. This takes a single bundle identifier—we cannot use multiple containers. Most of the time this should match our primary document storage key.
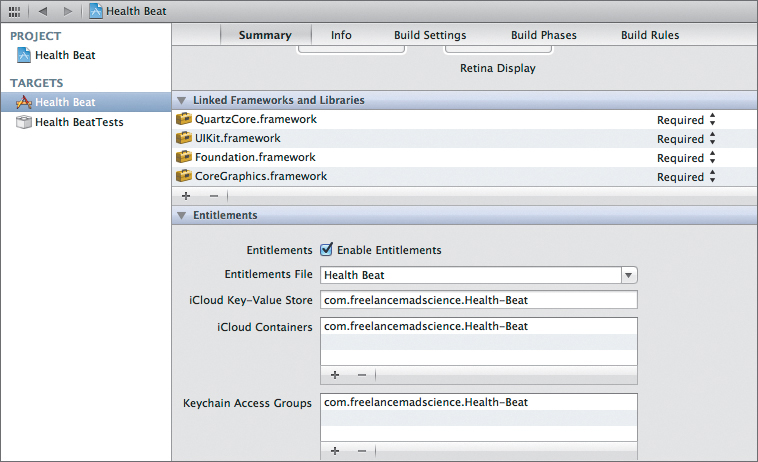
As you can see, finding and setting the bundle identifiers can require a bit of work. Fortunately, there’s a very easy way to automatically generate your Entitlements file and set up both document and key-value storage. In the Project navigator, select the Health Beat application icon. Then, in the Editor area, make sure that both the Health Beat target and the Summary tab are selected. Scroll down until you find the Entitlements settings, and select the Enable Entitlements checkbox. This will automatically fill in the iCloud Key-Value Store and iCloud Containers settings with the bundle identifier for the current target (Figure 6.1).
Figure 6.1 Setting the entitlements
Next, we want to set up the document types and exported Uniform Type Identifiers (UTIs). This lets us to define a unique UTI for our application. Unfortunately, this won’t do much for us right now. However, it will let us properly label our application’s iCloud data when we submit the application using iTunes Connect.
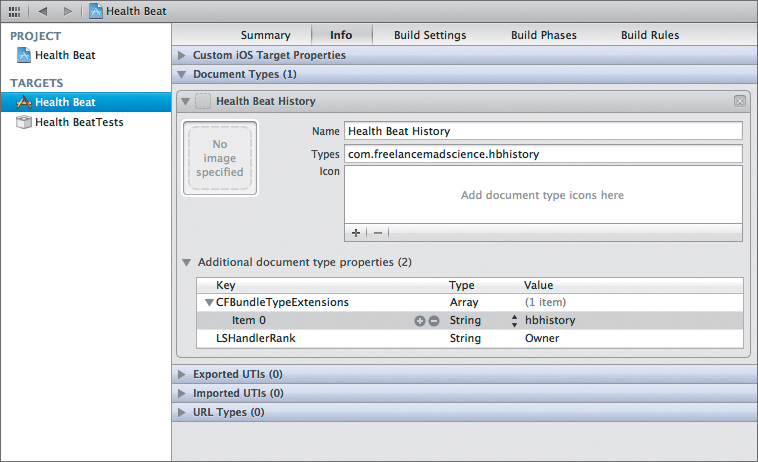
With the application icon and Health Beat target still selected, click the Info tab. Now, click the Add icon and select Add Document Type from the pop-up menu. This will create a single untitled document type. Expand the document type and make the following changes. Enter Health Beat History in the Name field. Enter com.freelancemadscience.hbhistory in the Types field. Next, expand “Additional document type properties,” add a CFBundleTypeExtensions key, and set its Type to Array. Next, add an LSHandlerRank key and set its Value to Owner. Finally, expand CFBundleTypeExtensions and add a single string sub-item named hbhistory.
We don’t need to worry about creating document icons. iOS will automatically create our icons based on our application icons (see Chapter 9). If you want additional information on creating document-specific icons, check out the section “Custom Icon and Image Creation Guidelines” in Apple’s iOS Human Interface Guidelines.
The entry should now match Figure 6.2.
Figure 6.2 Setting the document type
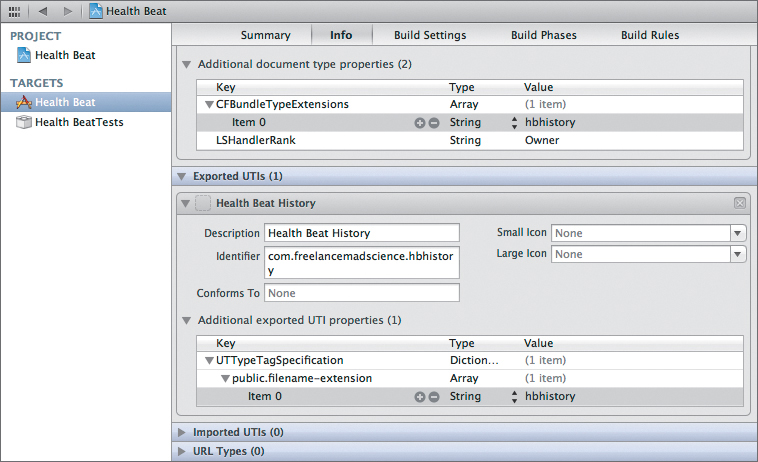
Since we’ve defined a custom document type, we must now export it. Click the Add button again and select Add Exported UTI. Then expand the untitled UTI. Type Health Beat History in the Description field and com.freelancemadscience.hbhistory in the Identifier field. Now expand “Additional exported UTI properties,” add a UTTypeTagSpecification key, and set its Type to Dictionary. Expand the dictionary, add a public.filename-extension sub-key, and set its Type to Array. Finally, expand the array and add a single item to it. Set this item’s Value to hbhistory. The exported UTI should now match Figure 6.3.
Figure 6.3 Setting the exported UTI
We will still need to create an iCloud display set before we can submit our app to the iTunes Store. This will define how our documents appear when users view them in the Settings app. Unfortunately, this is beyond the scope of this book, but for more information, check out “iCloud Display Sets” in the iTunes Connect Developer Guide.
For now, let’s move on and create our UIDocument subclass.
Creating a UIDocument Subclass
In our case, saving our model really means saving our WeightHistory object. Obviously, we want to take advantage of iCloud storage—and the easiest way to do that is to use a UIDocument. Fortunately, we can make WeightHistory a subclass of UIDocument with a minimum of fuss.
Open WeightHistory.h and modify our interface declaration as shown:
@interface WeightHistory : UIDocument
Here, we just change our WeightHistory’s subclass from NSObject to UIDocument. While we’re at it, go ahead and remove the defaultUnits property. After all, we’re going to move that to NSUserDefaults eventually. That’s it. Of course, the implementation file will take a bit more work.
Open WeightHistory.m and clean things up a bit. We need to remove all traces of our defaultUnits property. Delete the line to @synthesize defaultUnits as well as deleting the entire setDefaultUnits: method.
We also need to replace the init method with a new designated initializer:
#pragma mark - initialization
- (id)initWithFileURL:(NSURL *)url
{
self = [super initWithFileURL:url];
if (self) {
_weightHistory = [[NSMutableArray alloc] init];
}
return self;
}
We’re still overriding our superclass’s designated initializer. The name has changed and it takes an argument—but since we just pass the argument on to the superclass, it doesn’t affect our implementation. Also, we’ve deleted the code that initialized our _defaultUnits property. Other than that, everything’s the same.
Now we just need to implement a few required features. Specifically, we need to override the UIDocument methods to save and load our data. We need to change our weightHistory accessors, letting us alert the superclass whenever a change is made. Finally, we need to deal with version conflicts whenever they arise.
Saving and Loading the Document
The easiest way to save and load our UIDocument is to simply convert our model into an NSData instance. This isn’t absolutely required. UIDocument has a number of methods we could override to more fully customize our saving and loading code—but we should try to use simple NSData or NSFileWrapper objects whenever possible.
Currently, our WeightHistory class has a single instance variable: our weightHistory mutable array. So how do we convert an array into an NSData object? A quick glance at the class references for NSMutableArray and NSData doesn’t reveal any obvious methods for converting one into the other; however, NSMutableArray does adopt the NSCoding protocol. This means we can load and save our array using a keyed archiver—and keyed archivers can read and write to NSData objects (or directly to files, for that matter).
There’s just one catch: All the objects in our array must also adopt the NSCoding protocol. Unfortunately, our WeightEntry class does not. Fortunately, this is easy to fix. Let’s start by adding the protocol to WeightEntry’s interface:
@interface WeightEntry : NSObject <NSCoding>
Then open the implementation file and define the keys that we will need. Place these before the @implementation block.
static NSString* const WeightKey = @"WeightHistoryWeightInLbs";
static NSString* const DateKey = @"WeightHistoryDate";
Now we need to implement NSCoding’s required methods. First, let’s implement the encodeWithCoder: method.
#pragma mark - NSCoding Methods
- (void)encodeWithCoder:(NSCoder *)encoder {
[encoder encodeFloat:self.weightInLbs forKey:WeightInLbsKey];
[encoder encodeObject:self.date forKey:DateKey];
}
This is relatively straightforward. When saving an object hierarchy, each object’s encodeWithCoder: method is called in turn. The object is responsible for saving all of its non-transient internal data. In our case, we simply save our data using our WeightInLbsKey and DateKey.
Next, implement the initWithCoder: method.
- (id)initWithCoder:(NSCoder *)decoder {
self = [super init];
if (self) {
_weightInLbs = [decoder decodeFloatForKey:WeightInLbsKey];
_date = [[decoder decodeObjectForKey:DateKey] retain];
}
return self;
}
We actually saw initWithCoder: in “Building a Custom View” in Chapter 5. GraphView used it when loading from a nib file. As it turns out, the system uses NSCoding to store and load nibs.
In many ways, initWithCoder: mirrors our designated initializer. If the superclass adopts the NSCoding, we should call the superclass’s initWithCoder: method. Just like our designated initializer, we assign the return value from the superclass’s initWithCoder: method to self. As long as self is a valid object (not equal to nil), we decode the rest of our data using our keys and assign those values to our instance variables. Then we return self.
In WeightEntry, our superclass (NSObject) does not adopt NSCoding. As a result, we cannot call [super initWithCoder: decoder]. Instead, we call the superclass’s designated initializer.
In both cases, this bypasses our class’s designated initializer. Therefore, we need to make sure our initWithCoder: class duplicates any of the setup and configuration steps performed in the designated initializer. initWithWeight:units:forDate: sets both the _weightInLbs and _date instance variables, so we do the same thing here. In fact, initWithCoder: is a bit simpler. We know that the weights are always saved in pounds, so we don’t need the extra logic to convert from kilograms.
If you look at our GraphView class, you will see a similar relationship. Both initWithFrame: and initWithCoder: call [self setDefaults]. Again, initWithCoder: duplicates our designated initializer’s configuration steps.
With that out of the way, we can now override UIDocument’s contentsForType:error: and loadFromContents:ofType:error: methods.
#pragma mark - iCloud Methods
- (id)contentsForType:(NSString *)typeName
error:(NSError **)outError {
return [NSKeyedArchiver archivedDataWithRootObject:
self.weightHistory];
}
Here, we simply call the NSKeyedArchiver’s archivedDataWithRootObject: method to create our NSData object. The keyed archiver does all the hard work for us.
- (BOOL)loadFromContents:(id)contents
ofType:(NSString *)typeName
error:(NSError **)outError {
self.weightHistory =
[NSKeyedUnarchiver unarchiveObjectWithData:contents];
// Clear the undo stack.
[self.undoManager removeAllActions];
return YES;
}
This is almost as simple. We call NSKeyedUnarchiver’s unarchiveObjectWithData: method to convert the NSData object back into our history array. In addition, we clear all the undo actions from our undo stack (we will look at undo support in the “Enabling Undo Support” section), and we return YES to indicate that we have successfully loaded our data.
Note
While we use NSKeyedArchiver and NSKeyedUnarchiver in this example, NSCoder also has an older set of concrete subclasses: NSArchiver and NSUnarchiver. These archives do not use keys to save and load their objects and values. Instead, they must load the data in the same order they saved it. In general, you should avoid using these whenever possible. They have been replaced by the keyed archives for iOS and all versions of Mac OS X 10.2 and later.
We could add additional error checking to these methods (e.g., catching the NSKeyedUnarchiver’s NSInvalidArchiveOperationException), but to be honest, all the error-prone operations are already managed by the UIDocument class. If we have any problems in these methods, it’s undoubtedly due to an error on our part—and that’s something we should detect and fix during development.
Next up, we need to alert our UIDocument superclass whenever our model changes.
Tracking Changes
UIDocument uses a saveless model. This means we never ask the document to save. Instead, we let the document know whenever our model changes. The document then automatically saves itself as needed. Furthermore, the best way to alert the UIDocument to changes is to register an undo action with the document’s undo manager.
When we register an undo action, we need to tell our application how to undo the change we just made. In Health Beat, we are only adding and deleting entries from the history. This means that our undo actions may need to know both the WeightEntry involved in the change and its index in our history array. Let’s create an object to encapsulate that data.
Since we’re only going to use this data inside our WeightHistory class, let’s declare it as a private class. With WeightHistory.m still open, add the following code before the @implementation block:
// Private class, used to store undo information.
@interface UndoInfo : NSObject
@property (strong, nonatomic) WeightEntry* weight;
@property (assign, nonatomic) NSUInteger index;
@end
@implementation UndoInfo
@synthesize weight = _weight;
@synthesize index = _index;
@end
This simply creates a new class, UndoInfo, with two parameters: our WeightEntry and our index. Now let’s look at the methods that actually modify our model. Let’s start with the addWeight: method.
- (void)addWeight:(WeightEntry*)weight {
// Manually send KVO messages.
[self willChange:NSKeyValueChangeInsertion
valuesAtIndexes:[NSIndexSet indexSetWithIndex:0]
forKey:KVOWeightChangeKey];
// Add to the front of the list.
[self.weightHistory insertObject:weight atIndex:0];
// Manually send KVO messages.
[self didChange:NSKeyValueChangeInsertion
valuesAtIndexes:[NSIndexSet indexSetWithIndex:0]
forKey:KVOWeightChangeKey];
// Now set the undo settings...this will also trigger
// UIDocument's autosave.
UndoInfo* info = [[UndoInfo alloc] init];
info.weight = weight;
info.index = 0;
[self.undoManager
registerUndoWithTarget:self
selector:@selector(undoAddWeight:)
object:info];
NSString* name =
[NSString stringWithFormat:@"Remove the %@ entry?",
[weight stringForWeightInUnit:getDefaultUnits()]];
[self.undoManager setActionName:name];
}
Here, we instantiate an UndoInfo object and set its weight and index properties. We’re adding the weight object at index 0, so we will want to remove it from the same location. Next, we register our undo action. We tell the system to call the undoAddWeight: method and pass in our info object. Then we create a name for our undo action and set the undo manager’s action name.
Setting an action name labels the action at the top of the undo stack (i.e., the next action to be undone). The Mac OS X desktop uses this string at the top of the Edit menu in the Undo, Redo, and Repeat menu items. For example, my Edit menu currently says Undo Typing and Repeat Typing. My current action name is therefore Typing.
Unlike the desktop version, iOS does not have a built-in use for the action names. Instead, we will hijack these names to pass message strings back to our undo method.
There are two problems with this code. Both the undoAddWeight: method and the getDefaultUnits() function are undefined. We’ll add undoAddWeight: later this section, but getDefaultUnits() will have to wait until the “Saving User Defaults” section.
Next, make similar changes to removeWeightAtIndex:.
- (void)removeWeightAtIndex:(NSUInteger)weightIndex {
// Grab a reference to the weight before we delete it.
WeightEntry* weight =
[self.weightHistory objectAtIndex:weightIndex];
// Manually send KVO messages.
[self willChange:NSKeyValueChangeRemoval
valuesAtIndexes:[NSIndexSet indexSetWithIndex:weightIndex]
forKey:KVOWeightChangeKey];
// Remove the weight.
[self.weightHistory removeObjectAtIndex:weightIndex];
// Manually send KVO messages
[self didChange:NSKeyValueChangeRemoval
valuesAtIndexes:[NSIndexSet indexSetWithIndex:weightIndex]
forKey:KVOWeightChangeKey];
// Now set the undo settings...this will also trigger
// UIDocument's autosave.
UndoInfo* info = [[UndoInfo alloc] init];
info.weight = weight;
info.index = weightIndex;
[self.undoManager
registerUndoWithTarget:self
selector:@selector(undoRemoveWeight:)
object:info];
NSString* name =
[NSString stringWithFormat:@"restore the %@ entry?",
[weight stringForWeightInUnit: getDefaultUnits()]];
[self.undoManager setActionName:name];
}
Here we grab a reference to the weight entry that we’re going to delete before we actually remove it. We use the undoRemoveWeight: selector instead of undoAddWeight:, and we use a slightly different action name, but otherwise the steps are the same.
Now we need to implement the missing methods for our actions. Let’s start by declaring them in our class extension.
@interface WeightHistory()
@property (nonatomic, strong) NSMutableArray* weightHistory;
- (void) undoAddWeight:(UndoInfo*)info;
- (void)undoRemoveWeight:(UndoInfo*)info;
@end
Now we can implement them, starting with undoAddWeight:.
#pragma mark - Undo Methods
- (void) undoAddWeight:(UndoInfo*)info {
// Manually send KVO messages.
[self willChange:NSKeyValueChangeRemoval
valuesAtIndexes:[NSIndexSet indexSetWithIndex:info.index]
forKey:KVOWeightChangeKey];
// Add to the front of the list.
[self.weightHistory removeObjectAtIndex:info.index];
// Manually send KVO messages.
[self didChange:NSKeyValueChangeRemoval
valuesAtIndexes:[NSIndexSet indexSetWithIndex:info.index]
forKey:KVOWeightChangeKey];
}
Here we simply remove the object that we added. Of course, we have to bracket this change with the proper KVO messages. As you can see, this is simply the inverse of the addWeight: method. Actually, it’s even simpler, since we don’t need to tell our document about this change.
The undoRemoveWeight: method is similar.
- (void)undoRemoveWeight:(UndoInfo*)info {
// Manually send KVO messages.
[self willChange:NSKeyValueChangeInsertion
valuesAtIndexes:[NSIndexSet indexSetWithIndex:info.index]
forKey:KVOWeightChangeKey];
// Add to the front of the list.
[self.weightHistory insertObject:info.weight
atIndex:info.index];
// Manually send KVO messages.
[self didChange:NSKeyValueChangeInsertion
valuesAtIndexes:[NSIndexSet indexSetWithIndex:info.index]
forKey:KVOWeightChangeKey];
}
Note
You can limit the size of the undo stack by calling the NSUndoManager’s setLevelsOfUndo: method. This is a great way to reduce the memory footprint while still adding undo support. For example, calling [self.managedObjectContext.undoManager setLevelsOfUndo:1] will only allow us to undo the last action—but it will greatly reduce the amount of memory used by our system.
Again, we simply insert the object back at its previous index, bracketing the change with KVO notifications.
So far, we’ve just added actions to our undo queue. We haven’t actually triggered any of these undo actions. That will have to wait until the “Enabling Undo Support” section. For now, this is sufficient. Adding these actions to the undo queue will alert our document to the changes. Our document will then save itself at the next opportune moment.
Merging Conflicting Versions
There’s a simple rule. If you’re using iCloud storage, then you must be prepared to handle conflicts. Conflicts occur when the cloud storage receives contradicting updates. This typically happens when one device saves a change, and then a second device saves a different change before receiving the first update.
In most cases, this should rarely occur. Sure, I want to have the same data on my iPhone, my iPad, and my Mac—however, I’m probably not going to run the same application on two different devices at the same time. If I make a change on my phone, there should be plenty of time for the update to reach my Mac before I open the file there.
However, remember how iCloud works. Each application saves and reads to a local file. The system then syncs this file with the cloud. There may be times when the system is unable to sync these changes—for example, if the device is in Airplane mode or if it’s located in the Wi-Fi–less sub-basement of an office building. In both cases, the user can still access and edit any documents on their device. Any changes they make will be saved locally but won’t be synced to the cloud. Furthermore, devices can be shut off. They can run out of power. There are any number of reasons why an update may be delayed, creating potential for conflicts.
Most importantly, if it can happen, it will happen—guaranteed. We have to be prepared to handle it.
There are three basic approaches to managing conflicts. The simplest is to let the last change win. From a developer’s standpoint, this is by far the easiest solution to implement. We just mark all the conflicting versions as resolved and then delete them. Done and done. However, it has a rather large downside. While this may work fine in many cases, we risk accidentally deleting some of our user’s data. And that would be a bad thing.
The second approach is to show the user the different versions and let them select the one to use. This has one major advantage—the user is in complete control. They get to decide exactly what happens to their data. However, it has several problems as well. First, it’s much harder to design. In some cases, it may be extremely difficult to display the differences between versions in any meaningful way. Also, it requires user intervention, and that means that instead of using your app to get work done, they’re forced to waste their time solving conflicts. Finally, we still risk losing user data. Anytime we pick one version over another, something may get lost.
The best approach is to merge all the conflicting versions. Unfortunately, this may not be possible for all documents in all situations—but if you can do it, you probably should. In our case, merging is relatively easy. We can simply take the union of all the entries across all versions. Yes, this may cause a deleted weight entry to reappear—but we’re not going to lose any information. The user can always delete it again if they really want to.
Unfortunately, as we will soon see, relatively easy is not the same as actually easy.
To start with, we need to monitor changes in our document’s state. In particular, we are looking for a UIDocumentStateInConflict flag. Let’s start by registering our subclass for notifications. Add the following code to initWithFileURL:.
// Set an initial defaults.
_weightHistory = [[NSMutableArray alloc] init];
// Monitor document state.
[[NSNotificationCenter defaultCenter]
addObserver:self
selector:@selector(documentStateChanged:)
name:UIDocumentStateChangedNotification
object:self];
Here, we register to receive UIDocumentStateChangeNotifications, calling documentStateChanged: whenever any occur. Of course, whenever we register for notifications, we also need to unregister. We can override our class’s dealloc method to unregister before our WeightHistory instance is deleted.
- (void)dealloc {
// Unregister for notifications.
[[NSNotificationCenter defaultCenter]
removeObserver:self
name:UIDocumentStateChangedNotification
object:self];
}
Next, we have to create the documentStateChanged: method. Again, declare it in WeightHistory’s class extension. Actually, we’re going to need four different methods before we’re done. We may as well declare them all.
@interface WeightHistory()
@property (nonatomic, strong) NSMutableArray* weightHistory;
- (void) undoAddWeight:(UndoInfo*)info;
- (void)undoRemoveWeight:(UndoInfo*)info;
- (void)documentStateChanged:(NSNotification*)notification;
- (void)resolveConflictsWithCurrentURL:(NSURL*)currentURL
coordinator:(NSFileCoordinator*)coordinator;
- (void)mergeCurrentHistory:(NSMutableArray*)currentHistory
withConflictingVersion:(NSFileVersion*)version
coordinator:(NSFileCoordinator*)coordinator;
- (void)saveMergedHistory:(NSArray*)currentHistory
ToURL:(NSURL*)url
coordinator:(NSFileCoordinator*)coordinator
oldVersions:(NSArray*)oldVersions;
@end
Now, let’s implement documentStateChanged:.
#pragma mark - Resolve Conflicts
- (void)documentStateChanged:(NSNotification*)notification {
UIDocumentState state = self.documentState;
if (state & UIDocumentStateInConflict) {
NSURL* url = self.fileURL;
NSURL* currentURL =
[[NSFileVersion currentVersionOfItemAtURL:url] URL];
NSFileCoordinator* coordinator =
[[NSFileCoordinator alloc] initWithFilePresenter:self];
dispatch_queue_t backgroundQueue =
dispatch_get_global_queue(DISPATCH_QUEUE_PRIORITY_DEFAULT,
0);
dispatch_async(backgroundQueue, ^{
[self resolveConflictsWithCurrentURL:currentURL
coordinator:coordinator];
});
}
}
It’s important to note that UIDocument represents its states using a bit field. Multiple state bits can be turned on at one time. Therefore, we need to use a bitwise AND operator to check for the state we’re interested in. If the UIDocumentStateInConflict flag is set, we move on to resolve the conflict.
We start by using NSFileVersion to get access to the URL of our current version. Then we create an NSFileCoordinator. You may remember that UIDocument automatically creates NSFileCoordinators for all the regular file loads and saves—but we need to do a bit of digital bushwhacking here, so we have to handle the file coordination ourselves.
We pass our WeightHistory object as the file presenter. This means our Weight History class won’t receive any notifications about changes made during our coordinated blocks. In general, this is exactly what we want—but it also means we may need to update the UI manually once we’re done.
Finally, we call the resolveConflictsWithCurrentURL:coordinator: method on a background queue. It’s very important to use a background thread here. Obviously, from a performance standpoint, we never want to do any file input/output operations in the main thread—that could dramatically hurt our user interface’s performance. Instead, we should always read and write data in the background. More pragmatically, however, creating coordination blocks on the main thread can cause the application to deadlock. We definitely don’t want that.
Next, let’s look at resolveConflictsWithCurrentURL:coordinator:.
- (void)resolveConflictsWithCurrentURL:(NSURL*)currentURL
coordinator:(NSFileCoordinator*)coordinator {
NSError* error;
[coordinator
coordinateReadingItemAtURL:currentURL
options:0
writingItemAtURL:currentURL
options:NSFileCoordinatorWritingForMerging
error:&error
byAccessor:^(NSURL *inputURL, NSURL *outputURL) {
// Load our data.
NSData* data =
[NSData dataWithContentsOfURL:inputURL];
NSMutableArray* currentHistory =
[NSKeyedUnarchiver unarchiveObjectWithData:data];
// Read in all the old versions.
NSArray* unresolvedVersions =
[NSFileVersion
unresolvedConflictVersionsOfItemAtURL:inputURL];
// Merge the histories.
for (NSFileVersion* version in unresolvedVersions) {
[self mergeCurrentHistory:currentHistory
withConflictingVersion:version
coordinator:coordinator];
}
// Sort the current history.
NSSortDescriptor* sortByDate =
[NSSortDescriptor sortDescriptorWithKey:@"date"
ascending:NO];
[currentHistory sortUsingDescriptors:
[NSArray arrayWithObject:sortByDate]];
// Save the changes.
[self saveMergedHistory:currentHistory
ToURL:outputURL
coordinator:coordinator
oldVersions:unresolvedVersions];
}]; // Current File Read/Write block.
if (error != nil) {
NSLog(@"*** Error: Unable to perform a coordinated "
@"read/write on our current history! %@ ***",
[error localizedDescription]);
}
}
Here, we start by creating a coordinated block for both reading and writing from the current URL. All the coordinated block methods work similarly. We pass in a URL and set some options that define the type of read or write operation we’re going to perform, and then we pass it a block. The coordinator makes sure the system is in a good state. This may involve asking file presenters in other processes to perform their own read or write operations. For example, the NSFileCoordinatorWritingForMerging option forces all relevant file presenters to save their changes before the coordinated write operation can begin. This helps ensure we have the most recent version of our file before we begin making changes.
Next, the coordinator tries to get a lock on the file. The system usually allows multiple concurrent read operations, while write operations require exclusive access to the file. This means a write operation will block until all the currently executing read or write operations are finished. Then, once the write block starts running, no other read or write operation can begin until it’s done.
Unlike many block-based APIs, the system executes all the coordinated block operations synchronously. This means it will execute our block argument before the method returns. This makes it much easier to chain together a series of read and write operations. Also note that we provide a URL when creating our coordinated block. The system then passes a URL argument to our block. We should always use the block’s URL argument when accessing our files. After all, the file may move as part of another file presenter’s write operation. So, our original URL may no longer be valid by the time our block runs.
Note
We only need to coordinate our reads and writes with the other processes on our device. We’re not coordinating between devices. Typically, for iOS devices we just need to coordinate with our local iCloud sync service. Therefore, creating a coordinated block on my iPhone may force the phone’s iCloud service to write its changes to disk (possibly forcing it to download an updated copy of the file), but it won’t affect any of the processes running on my iPad.
Even among the coordinated blocks, coordinateReadingItemAtURL:options:writingItemAtURL:options:error:byAccessor: is somewhat odd. This requests a read operation that needs to coordinate with a write operation. In our case, we want to read the current document, update it, and then write it again. Despite the name, it is really just an intelligent read block. We cannot perform write operations directly inside it. Instead, we must create a nested write block and perform our write operations there.
In our code, we load the history array from our current version. Then we get a list of all the conflicting versions. We iterate over these versions, calling mergeCurrentHistory:withConflictingVersion:coordinator: with each of the conflicting versions. As we will see shortly, this will make sure our current version contains all the entries from all the conflicting versions.
Unfortunately, the merge process may leave our history array out of order. So, we sort it by date. We create a sort descriptor, which uses key-value coding to access our weight entries’ date property and sorts them in descending order.
Finally, we call saveMergedHistory:toURL:coordinator:oldVersions: to save our new, merged history and then clean up all the old, conflicted versions. Note that internally, this method will create the nested coordinated write block.
Now let’s look at mergeCurrentHistory:withConflictingVersion:coordinator:.
- (void)mergeCurrentHistory:(NSMutableArray*)currentHistory
withConflictingVersion:(NSFileVersion*)version
coordinator:(NSFileCoordinator*)coordinator {
NSError* readError;
[coordinator
coordinateReadingItemAtURL:version.URL
options:0
error:&readError
byAccessor:^(NSURL *oldVersionURL) {
NSData* oldData =
[NSData dataWithContentsOfURL:oldVersionURL];
NSArray* oldHistory =
[NSKeyedUnarchiver unarchiveObjectWithData:oldData];
[currentHistory unionWith: oldHistory];
}];
if (readError) {
NSLog(@"*** Error: Unable to perform a coordinated read "
@"on a previous version! %@ ***",
[readError localizedDescription]);
}
}
While this looks somewhat complex, really we’re just creating another coordinated read block. Inside that block, we read the data from the specified conflicted version. We then call NSMutableArray’s unionWith: method to combine the two history arrays.
There’s only one tiny catch. NSMutableArray doesn’t have a unionWith: method. No problem. We’ll just add one.
In the Project navigator, right-click the Model group and select New File. In the template panel, select iOS > Cocoa Touch > Objective-C Category. Name it Union, and make sure it’s a category on the NSMutableArray.
Next, open NSMutableArray+Union.h, and define our unionWith: method.
#import <Foundation/Foundation.h>
@interface NSMutableArray (Union)
- (void)unionWith:(NSArray*)array;
@end
Switch to the implementation file, and add the method as shown:
- (void)unionWith:(NSArray*)array {
NSMutableArray* toAdd =
[[NSMutableArray alloc] initWithCapacity:[array count]];
for (id entry in array) {
if (![self containsObject:entry]) {
[toAdd addObject:entry];
}
}
for (id entry in toAdd) {
[self addObject:entry];
}
}
Here our mutable array iterates over all the items in the incoming array. We check to see if the mutable array contains each item. If it doesn’t, we save a reference to the item, then add it to the mutable array.
Again, there’s one small catch. Our WeightEntry’s default implementation will simply compare the object pointers. However, since our arrays were loaded from disk, we will undoubtedly have different WeightEntry instances that actually contain the same value (same data and weightInLbs). We need to override the default isEqual: method and provide an implementation that performs a deep comparison.
Switch to the WeightEntry.m file and add a new isEqual: method.
#pragma mark - Equality
- (BOOL)isEqual:(id)object {
if (![object isKindOfClass:[WeightEntry class]]) return NO;
return [self.date isEqual:[object date]] &&
(self.weightInLbs == [object weightInLbs]);
}
We start by verifying that our incoming object argument belongs to the WeightEntry class. If it does, we simply compare the date and weightInLbs properties. If they are both the same, we return YES. Otherwise, we return NO.
That’s simple enough. However, whenever we override the isEqual: method we also need to override the hash method.
- (NSUInteger)hash {
size_t size = sizeof(NSUInteger);
NSUInteger weight = (int)self.weightInLbs * 100;
return [self.date hash] ^ (weight << (size / 2));
}
The hash method returns an integer. We use these values as the object’s address in a hash table or similar collection. Ideally, each unique object should return a unique hash value. More importantly, if two objects are equal they must return the same hash value.
Our calculation simply converts our weight value to an integer and shifts it over by half the integer’s size. We then combine it with the date’s hash using the bitwise XOR operator. This should provide a reasonably good hash value. Our weight values should be (relatively speaking) low values—so shifting it won’t lose any information.
I don’t know how NSDate implements its hash method. A simple implementation would just convert the internal NSTimeInterval to a hash value. This means the lowest bits may be the most important—we shouldn’t alter them. However, a more thorough implementation would create more-random hash values (ensuring that date objects get more evenly spread over the available hash space). In that case, it doesn’t really matter which bits we alter.
Either way, we don’t need high-performance hashing, so this implementation will work fine. OK, let’s get back to WeightHistory.m. First things first, we need to import our new category.
#import "NSMutableArray+Union.h"
Now we still have to save our merged data. This gets a bit long, so let’s take it one step at a time.
- (void)saveMergedHistory:(NSArray*)currentHistory
ToURL:(NSURL*)url
coordinator:(NSFileCoordinator*)coordinator
oldVersions:(NSArray*)oldVersions {
NSError* writeError;
[coordinator
coordinateWritingItemAtURL:url
options:NSFileCoordinatorWritingForMerging
error:&writeError
byAccessor:^(NSURL *outputURL) {
NSData* dataToSave =
[NSKeyedArchiver
archivedDataWithRootObject:currentHistory];
NSError* innerWriteError;
BOOL success = [dataToSave
writeToURL:outputURL
options:NSDataWritingAtomic
error:&innerWriteError];
Here, we create our coordinated write block and save our currentHistory array. We do this as a two-step process. First, we use an NSKeyedArchiver to create an NSData object from our array. Then we save the NSData to disk. We could have used the keyed archiver to perform this in one step—but doing it this way gives us more-informative error messages.
if (success) {
// Mark the conflicting versions as resolved.
for (NSFileVersion* version in oldVersions) {
version.resolved = YES;
}
// Remove old versions.
NSError* removeError;
BOOL removed =
[NSFileVersion
removeOtherVersionsOfItemAtURL:outputURL
error:&removeError];
if (!removed) {
NSLog(@"*** Error: Could not erase outdated "
@"versions! %@",
[removeError localizedDescription]);
}
If we successfully save the merged data, we mark all the conflicting versions as resolved. This means they will no longer appear in any future reports about conflicts. Then we remove the old versions. It’s important to note that removing old versions must be performed within a coordinated write block. We also deliberately delay modifying the conflicting versions until we’re sure the conflict is completely resolved.
// And reload our document.
NSError* reloadError;
BOOL reloaded = [self readFromURL:self.fileURL
error:&reloadError];
if (!reloaded) {
NSLog(@"*** Error: Unable to reload our "
@"UIDocument! %@ ***",
[reloadError localizedDescription]);
}
Now, we force our UIDocument to reload itself. In the normal day-to-day operations of a UIDocument subclass, we never call readFromURL:error: directly. Instead, the system calls this method whenever it needs to load our document. This is, however, a somewhat exceptional situation. So far, we’ve been reading and writing our data directly to disk—we haven’t involved the UIDocument at all. As a result, it doesn’t know anything about the changes we’ve made. By calling readFromURL:error: here, we force our document to update itself.
Also note that we don’t need a coordinated read block here. We’re still inside our original read block. Yes, we’re using the write block’s URL, but this should be the most up-to-date URL pointing back to our original file. So we should be good to go.
} else {
NSLog(@"*** Error: Unable to save our merged "
@"history! %@ ***",
[innerWriteError localizedDescription]);
}
}];
if (writeError != nil) {
NSLog(@"*** Error: Unable to perform a coordinated write "
@"on our merged version: %@ ***",
[writeError localizedDescription]);
}
}
The rest of this is simply error handling. Honestly, we’re not doing much, just logging the error to the console. Still, if we do run into any problems, the conflicts will simply linger. The next time our file is modified, it will trigger the conflict notification again, and we can try one more time to merge everything.
That’s it. We’ve implemented all of our WeightHistory’s basic features. Next, let’s look at the procedures involved in creating and opening our document.
Loading iCloud Documents
Health Beat is a single-document application. This makes managing our files a little complicated. When the application launches, we need to search for any existing documents. If we find an existing document, we open it. If not, we create a new document and save it to disk.
Note
In this version of Health Beat, we automatically upload the file to iCloud if we can. However, this isn’t the best design. Each user only has 5 GB of free iCloud document storage. We really should ask the user before using up some of that space. Furthermore, they should be able to change their mind later on, moving their files back and forth as necessary. Unfortunately, this makes the application a lot more complex. I will leave that as an extra-credit assignment for the truly determined reader.
To further complicate things, documents may be stored either in the local sandbox or in iCloud storage. We need a slightly different procedure for searching, opening, and saving at each location. In fact, all the possible permutations can get quite complex. Figure 6.4 shows the basic steps we need to follow.
Figure 6.4 Opening the document

OK, I have some good news and some bad news. The good news is that we can hide all this complexity behind a single WeightHistory convenience method. This will allow us to open (or create if necessary) our file with a single method call. The bad news is that we still have to write all this code.
Well, there’s no sense in delaying the inevitable. Let’s jump right in.
Let’s start by creating a few helper methods. Still working in the WeightHistory implementation file, declare a string constant to hold our filename. Be sure to place this before the @implementation block.
static NSString* const FileName = @"health_beat.hbhistory";
Now find the WeightHistory class extension, and declare three private helper methods.
+ (NSURL*)localURL;
+ (NSURL*)cloudURL;
+ (BOOL)isCloudAvailable;
Then implement the methods as shown:
#pragma mark - Convenience Methods
+ (NSURL*)localURL {
static NSURL* sharedLocalURL;
static dispatch_once_t onceToken;
dispatch_once(&onceToken, ^{
NSError* error;
NSURL* documentDirectory =
[[NSFileManager defaultManager]
URLForDirectory:NSDocumentDirectory
inDomain:NSUserDomainMask
appropriateForURL:nil
create:NO
error:&error];
if (documentDirectory == nil) {
[NSException
raise:NSInternalInconsistencyException
format:@"Unable to locate the local document "
@"directory, %@",
[error localizedDescription]];
}
sharedLocalURL = [documentDirectory
URLByAppendingPathComponent:FileName];
});
return sharedLocalURL;
}
This method calculates the URL for a locally stored data file; however, there’s a little bit of fancy footwork going on here. The dispatch_once() block is guaranteed to only run one time. This will calculate the local URL and assign it to the static sharedLocalURL variable. The next time through, our method will simply use the version previously stored in sharedLocalURL.
To calculate the directory, we call NSFileManager’s URLForDirectory:inDomain:appropriateForURL:create:error: method and request the URL for our application’s Document directory. We then calculate the sharedLocalURL by appending our filename to the end of our directory URL.
There’s no good reason why this request should fail. If it returns an error, we’ve almost certainly made a mistake somewhere in our code. Therefore, we simply throw an exception. This will help us find the mistake during development, making sure we fix it.
+ (NSURL*)cloudURL {
static NSURL* sharedCloudURL;
static dispatch_once_t onceToken;
dispatch_once(&onceToken, ^{
NSFileManager* fileManager =
[NSFileManager defaultManager];
NSURL* containerURL =
[fileManager URLForUbiquityContainerIdentifier:nil];
if (containerURL) {
NSURL* documentURL =
[containerURL URLByAppendingPathComponent:@"Documents"];
sharedCloudURL =
[documentURL URLByAppendingPathComponent:FileName];
} else {
sharedCloudURL = nil;
}
});
return sharedCloudURL;
}
This method returns the default URL for our document in the iCloud storage container. In many ways, this mirrors our localURL method. The difference is that we get the container URL by calling URLForUbiquityContainerIdentifier:.
URLForUbiquityContainerIdentifier: takes a string argument, which needs to match the ID of the container we wish to access. Alternatively, by passing in nil, we’re telling the system to automatically use the first ID from the list of iCloud storage IDs in our entitlements. Therefore, unless we are actively using multiple containers, we can always just pass nil.
URLForUbiquityContainerIdentifier: returns the URL for the requested container. Actually, it performs three very important functions. First, it checks to see if iCloud support is available. If the user never set up their iCloud account, or if they deliberately disabled Documents & Data support, this method will return nil. Next, it extends the document’s app sandbox to include the requested container. This lets us read and write into the container. Finally, once everything else is done, it returns our container’s URL.
Note
Remember, we need to make sure we call URLForUbiquityContainerIdentifier: early in our application’s life cycle to trigger these secondary effects. If we don’t extend the application’s sandbox, all other attempts to access iCloud data will fail.
We then create a URL that points to the Documents folder inside the container, and finally a URL that points to our file inside the Documents folder. Remember, all the files inside the iCloud container’s Documents folders are shown as individual files. The user can manage these files inside the Settings app (iCloud > Storage & Backup > Manage Storage). They can see the file’s name and the file size, and they can delete individual files if they wish.
Anything saved directly into the container (not in the Documents folder) is hidden. The user can only see the total memory usage and must delete all the data at once.
In our case, it doesn’t make a huge difference. We will only ever have a single data file. However, it’s usually best to save documents into the Documents folder.
Finally, this method will return nil if iCloud support is disabled.
Note
We will only use the cloudURL to move documents into iCloud storage. Never use it to access iCloud files directly. After all, even if we know the file’s in the cloud, it might not have downloaded to this particular device. Furthermore, other processes may move the file, changing its URL. Therefore, when opening files from within iCloud, we must always use NSMetadataQuery to search for the document’s current location.
+ (BOOL)isCloudAvailable {
return [self cloudURL] != nil;
}
Finally, isCloudAvailable simply calls cloudURL and checks to see if it returns nil. If it did, iCloud support is not available and this method returns NO. Otherwise, this method returns YES.
Now let’s create our accessWeightHistory: convenience method. Open WeightHistory.h and declare the method as shown:
+ (void)accessWeightHistory:(historyAccessHandler)completionHandler;
We also need to define the historyAccessHandler type. This will be a callback block that takes two arguments: a BOOL value indicating the access operation’s success or failure, and a WeightHistory object. We’re going to create a number of functions that use historyAccessHandler blocks. So explicitly creating a block type will simplify our code and make it easier to read.
Add the following code before WeightHistory’s @interface block:
@class WeightHistory;
typedef void (^historyAccessHandler)
(BOOL success, WeightHistory* weightHistory);
The WeightHistory forward declaration lets us get around a chicken-and-egg problem here. The typedef line defines our historyAccessHandler block type. However, the block type refers to the WeightHistory class; therefore, the class needs to be defined first. On the other hand, our WeightHistory class also refers to the historyAccessHandler type; therefore, historyAccessHandler must also be defined first. Fortunately, the forward declaration lets us have it both ways.
Now, go back to WeightHistory.m. We will also need to declare a number of private helper methods. Add the following lines to the WeightHistory class extension.
+ (void)queryForCloudHistory:(historyAccessHandler)accessHandler;
+ (void)processQuery:(NSMetadataQuery*)query
thenCall:(historyAccessHandler)accessHandler;
+ (void)createCloudDocumentAtURL:(NSURL*)url
thenCall:(historyAccessHandler) accesshandler;
+ (void)loadCloudDocumentAtURL:(NSURL*)url
thenCall:(historyAccessHandler)accessHandler;
Now let’s start implementing our methods:
+ (void)accessWeightHistory:(historyAccessHandler)accessHandler {
NSURL* url;
if ([self isCloudAvailable]) {
[self queryForCloudHistory:accessHandler];
} else {
NSFileManager* fileManager =
[NSFileManager defaultManager];
url = [self localURL];
WeightHistory* history = [[self alloc] initWithFileURL:url];
if ([fileManager fileExistsAtPath:[url path]]) {
[history openWithCompletionHandler:^(BOOL success) {
accessHandler(success, history);
}];
} else {
[history saveToURL:url
forSaveOperation:UIDocumentSaveForCreating
completionHandler:^(BOOL success) {
accessHandler(success, history);
}];
}
}
}
This method will asynchronously create our WeightHistory object. If we can find a health_beat.hbhistory file, we should load our data from that file. Otherwise, we should create a new health_beat.hbhistory file. Additionally, instead of returning our newly initialized WeightHistory, we will pass the result back using our historyAccessHandler block. This gives us a lot of flexibility when creating our WeightHistory. We can pass the block from method to method until either we successfully create our WeightHistory or we run into an error and the operation fails. At which point, we call the historyAccessorBlock and pass in our results.
If we had any errors while opening or creating our file, we will pass NO as the success argument. Otherwise, we will pass YES for success and pass a reference to our fully instantiated WeightHistory object for the weightHistory argument.
Of course, the devil’s in the details. We start by calling isCloudAvailable. As mentioned, this checks to see if the device supports iCloud storage. If it does, this method call will also prepare the iCloud container for use.
If we have access to iCloud storage, we need to search for our file. This procedure can get a little bit complicated, so we’ll move it into its own method. For now, just call queryForCloudHistory: to kick off the search, and pass in our historyAccessHandler.
If iCloud is not available, we can create our WeightHistory object immediately. Then we check to see if the history file already exists in our local sandbox. If we find the file, we call openWithCompletionHandler: to open it. Otherwise, we call saveToURL:forSaveOperation:completionHandler: to create a new file.
These are the standard UIDocument methods for opening and creating files. For our save operation, we want to pass in the UIDocumentSaveForCreating argument. This makes sure that the system creates the proper NSFileCoordinator blocks before it performs its save operation. Alternatively, we would use UIDocumentSaveForOverwriting if we wanted to force our document to save its changes.
In both cases, when the file access operation is finished, the UIDocument method will call its completion handler block. Inside this block we call our historyAccessHandler, passing in the success argument from our completion handler and our completely initialized WeightHistory object.
Now let’s implement queryForCloudHistory:. This is a little bit long, so let’s look at it a step at a time.
+ (void)queryForCloudHistory:(historyAccessHandler)accessHandler {
// Search for the file in the cloud.
NSMetadataQuery* query = [[NSMetadataQuery alloc] init];
[query setSearchScopes:
[NSArray arrayWithObject:
NSMetadataQueryUbiquitousDocumentsScope]];
// Get all files.
[query setPredicate:[NSPredicate predicateWithFormat:
@"%K like %@",
NSMetadataItemFSNameKey,
FileName]];
Here, we instantiate an NSMetadataQuery object. We will use this to search our iCloud storage for files. We start by setting the search scope. There are two possible scopes: NSMetadataQueryUbiquitousDocumentsScope and NSMetadataQueryUbiquitousDataScope. The first searches inside our iCloud container’s Documents folder. The second searches through everything else in the container.
Next, we set the search’s predicate. In our case, we’re searching for any files named health_beat.hbhistory. Note that the predicate’s LIKE string comparison can also accept wildcards. For example, using @"%K like '*.hbhistory'" for our format would match any files ending in .hbhistory.
Note
When we enter a string value directly into a predicate format, we need to wrap it in quotes. Both single and double quotes are acceptable. However, when we pass in a string using substitution and the %@ placeholder, the system automatically quotes the string for us. Importantly, strings passed into a %K placeholder are not quoted—which is why we use %K for passing in key names instead of %@.
Additionally, we could use some of the other predicate string comparisons, including BEGINSWITH and ENDSWITH (but not CONTAINS or MATCHES). For more information, check out “String Comparisons” in the Predicates Programming Guide.
[[NSNotificationCenter defaultCenter]
addObserverForName
NSMetadataQueryDidFinishGatheringNotification
object:query
queue:nil
usingBlock:^(NSNotification* notification) {
[query disableUpdates];
[[NSNotificationCenter defaultCenter]
removeObserver:self
name:NSMetadataQueryDidFinishGatheringNotification
object:query];
[self processQuery:query
thenCall:accessHandler];
[query stopQuery];
}];
[query startQuery];
}
Next, we register for notifications from our query object. Queries typically operate over two distinct phases. During the initial search phase, they will gather all the information on documents currently in the iCloud container. Remember, our device will have metadata on all the files in the container; however, the actual files may not be on the device yet.
These results may be returned in batches. The query will post an NSMetadataQueryGatheringProgressNotification with each batch. Once the entire search is completed, it posts NSMetadataQueryDidFinishGatheringNotification and the query enters its live-update phase. In this phase, the query will continue to monitor our iCloud storage container and will post NSMetadataQueryDidUpdateNotification notifications whenever it detects a change.
In our case, we know there’s only a single file, so we simply wait for the initial search to complete. However, if an application may have a large number of files, it will be better to process each batch as it arrives.
Once we receive the notification, our system will run our block. Here, we disable updates. Then we remove ourselves as an observer. We call processQuery:thenCall: to actually process the query results, and then we shut down our query. Always remember to shut down your queries. You don’t want to leave them running any longer than necessary.
Finally, after we’re finished registering for notifications, we start our query. Remember, the code is not executed in the order it appears on the screen. This often happens with block-based API. The startQuery method is executed well before the notification block. This can be confusing. Just remember that blocks are often called asynchronously—which means the code inside them may be called at some undefined point in the future.
Now let’s process the query results.
+ (void)processQuery:(NSMetadataQuery*)query
thenCall:(historyAccessHandler)completionHandler {
NSUInteger count = [query resultCount];
id result;
NSURL* url;
switch (count) {
case 0:
NSLog(@"Creating a cloud document");
url = [self cloudURL];
[self createCloudDocumentAtURL:url
thenCall:completionHandler];
break;
case 1:
NSLog(@"Loading a cloud document");
result = [query resultAtIndex:0];
url =
[result valueForAttribute:NSMetadataItemURLKey];
[self loadCloudDocumentAtURL:url
thenCall:completionHandler];
break;
default:
// We should never have more than 1 file. If this
// occurs, it's due to a bug in our code that needs
// to be fixed.
[NSException
raise:NSInternalInconsistencyException
format:@"NSMetadata should only find a single "
@"file, found %d',
count];
break;
}
}
Here, we start by checking the number of results returned by our query. If we don’t have any results, we simply call createCloudDocumentAtURL:thenCall: to create a new iCloud document.
If our query finds a single match, we open it. We start by accessing the first (and only) result in our query. Then we call valueForAttribute: and pass in NSMetadataItemURLKey to get the file’s URL. Finally, we call loadCloudDocumentAtURL:thenCall: to load the document.
Finally, as a sanity check, if our query finds more than one match we throw an exception. Again, this should never occur during Health Beat’s regular operations. If we trigger this notification, it undoubtedly means we made a mistake somewhere else in our code.
We’re finally getting to the methods that create and load our iCloud documents. Let’s start with createCloudDocumentAtURL:thenCall:. Again, let’s take this in steps.
+ (void)createCloudDocumentAtURL:(NSURL*)url
thenCall:(historyAccessHandler)accessHandler{
WeightHistory* history =
[[WeightHistory alloc] initWithFileURL:url];
// First create a local copy.
[history saveToURL:[self localURL]
forSaveOperation:UIDocumentSaveForCreating
completionHandler:^(BOOL success) {
Here, we instantiate our WeightHistory object. It doesn’t really matter which URL we give it, since we will be moving it shortly. For now, we will use the provided iCloud URL. Then, we save a local copy to our local URL. The rest of this method is executed asynchronously in saveToURL:forSaveOperation:completionHandler:’s completion handler.
if (!success) {
accessHandler(success, history);
return;
}
// Now move it to the cloud in a background thread.
dispatch_queue_t backgroundQueue =
dispatch_get_global_queue(DISPATCH_QUEUE_PRIORITY_DEFAULT,
0);
If the save operation is not successful, we simply call our accessHandler and return. Otherwise, we request a background queue that we will use to move our file into the iCloud container. It’s important to always move files into iCloud storage on a background thread, otherwise we might cause a deadlock. If you remember, we ran into a similar situation when creating our own file coordination block while resolving conflicts.
dispatch_async(backgroundQueue, ^{
NSFileManager* manager =
[NSFileManager defaultManager];
NSError* error;
BOOL moved = [manager setUbiquitous:YES
itemAtURL:[self localURL]
destinationURL:url
error:&error];
if (!moved) {
NSLog(@"Error moving document to the cloud: %@",
[error localizedDescription]);
}
accessHandler(moved, history);
});
}];
}
Here, we call NSFileManager’s setUbiquitous:itemAtURL:destinationURL:error: method to move our file into iCloud storage.
setUbiquitous:itemAtURL:destinationURL:error: can be used to move files both into and out of iCloud storage. If the setUbiquitous: argument is YES, we’re moving into the cloud. If it is NO, we’re moving back to the local sandbox. Similarly, itemAtURL: must contain our file’s current URL—in our case, the URL in the local sandbox. destinationURL: holds the target URL—in our case, the URL in our iCloud container.
After moving the file, we check for errors. If we had an error, we log it. Then we call our accessHandler, passing in our results.
Apple highly recommends using this general procedure when creating new iCloud documents. First save the document into the local sandbox, and then move it into the cloud. Things get a little complicated because of all the asynchronous callbacks and background queues. But at its heart, that’s all we did. Save it locally, and then move it to the cloud.
Finally, we come to our last method. If we find a document in iCloud storage, we load it.
+ (void)loadCloudDocumentAtURL:(NSURL*)url
thenCall:(historyAccessHandler)accessHandler {
WeightHistory* history =
[[WeightHistory alloc] initWithFileURL:url];
[history openWithCompletionHandler:^(BOOL success) {
accessHandler(success, history);
}];
}
This time we create a WeightHistory object using the URL returned by our metadata query. We then call openWithCompletionHandler: to load our data file. In the completion handler, we simply call our accessHandler, passing along the completion handler’s results.
Asynchronously Accessing the Model
With all that work out of the way, we have a single method that we can call to correctly create our model object. On the surface, it’s quite easy to use our new document-based model. Open TabViewController.m and navigate to the viewDidLoad method. Modify it as shown:
- (void)viewDidLoad {
[super viewDidLoad];
[WeightHistory accessWeightHistory:
^(BOOL success, WeightHistory *weightHistory) {
if (!success) {
// An error occurred while instantiating our
// history. This probably indicates a catastrophic
// failure (e.g., the device's hard drive is out of
// space). We should really alert the user and tell
// them to take appropriate action. For now, just
// throw an exception.
[NSException
raise:NSInternalInconsistencyException
format:@"An error occurred while trying to "
@"instantiate our history"];
}
self.weightHistory = weightHistory;
// Create a stack, and load it with the view
// controllers from our tabs.
NSMutableArray* stack =
[NSMutableArray arrayWithArray:self.viewControllers];
// While we still have items on our stack,
while ([stack count] > 0) {
// pop the last item off the stack.
id controller = [stack lastObject];
[stack removeLastObject];
// If it is a container object, add its view
// controllers to the stack.
if ([controller
respondsToSelector:@selector(viewControllers)]) {
[stack addObjectsFromArray:
[controller viewControllers]];
}
// If it responds to setWeightHistory, set the
// weight history.
if ([controller
respondsToSelector:@selector(setWeightHistory:)]) {
[controller setWeightHistory:
self.weightHistory];
}
}
}];
}
Here, we call our accessWeightHistory: convenience method, passing it a block of code that will be executed once our WeightHistory object is properly created. Inside the block, we first check to see if accessWeightHistory: succeeded. If it didn’t, we throw an exception.
As the comments suggest, we really should implement more-robust error handling here. There are a number of reasons we might run into errors. Unfortunately, almost all of them are serious issues that probably need some action by the user.
For example, maybe we’ve released an update to our application that changes the data format, and the user has upgraded the software on some—but not all—of their devices. They might get an error when trying to open the new file format with the old software. Fortunately, the fix is easy. They just need to update the software on all their devices.
Alternatively, their device might be running out of memory, and there simply isn’t space to save the iCloud document locally. This can be more complicated. The user will need to delete some of the content off their device, freeing up more space.
In both cases, the best we can do is to try to detect the problem, alert the user, and provide some reasonable suggestions for how they can fix it. We cannot do anything for them directly.
On the other hand, if accessWeightHistory: succeeds, we simply assign our new model object to the weightHistory property. Then we forward the model object to our other view controllers.
The code that forwards our model is exactly the same as before—however, there’s an important difference in timing. In the original version, our model object was created and forwarded synchronously. The system created our WeightHistory object and forwarded it to the other view controllers during TabViewController’s viewDidLoad method.
Our code relied on the fact that the containing view controller’s viewDidLoad method would execute before the viewDidLoad method of the controllers it managed. This means that by the time our content controller’s viewDidLoad method executed, the content controller already had a valid object stored in its weightHistory property.
Unfortunately, now the code runs asynchronously. This means our content view controller’s viewDidLoad method may run before we pass it a valid model object. We need to make sure they consider this possibility.
For our EnterWeightViewController, we just need to make sure the user doesn’t try to add a new weight entry until after we receive the WeightHistory object. Actually, we will deal with this issue a little bit later. Our EnterWeightViewController also needs to monitor our document’s state and disable the text field whenever document editing is disabled. We will simply use the same code to disable the text field until we have a valid WeightHistory object as well.
For our GraphViewController, we can’t set ourselves as a key-value observer in the viewDidLoad method anymore. Open the implementation file and delete both of the addObserver:forKeyPath:options:context: method calls. Similarly, in viewDidUnload, delete both of the removeObserver:forKeyPath: method calls.
Instead, let’s implement a custom setWeightHistory: accessor. This will be called whenever a new WeightHistory object is assigned to the graph view’s weightHistory property. We can both set up and tear down our WeightHistory observations here.
#pragma mark - Custom Accessor
- (void)setWeightHistory:(WeightHistory *)weightHistory {
// If we're assigning the same history, don't do anything.
if ([_weightHistory isEqual:weightHistory]) {
return;
}
// Clear any notifications for the old history, if any.
if (_weightHistory != nil) {
[_weightHistory removeObserver:self forKeyPath:WeightKey];
}
_weightHistory = weightHistory;
// Add new notifications for the new history, if any,
// and set the view's values.
if (_weightHistory != nil) {
[_weightHistory addObserver:self
forKeyPath:WeightKey
options:NSKeyValueObservingOptionNew
context:nil];
// If the view is loaded, we need to update it.
if (self.isViewLoaded) {
id graphView = self.view;
[graphView setWeightEntries:_weightHistory.weights
andUnits:getDefaultUnits()];
}
}
}
We start with a little sanity checking. If we’re just reassigning the same history object, we don’t need to do anything. We just return.
Next, if our old history object is not nil, we need to unregister from any KVO notifications. Currently, this should only happen as our application shuts down, so it’s not vital. Still, having this code in place could prevent future problems as our application grows and changes.
Finally, as long as we’re not assigning a nil-value object, we register for KVO notifications. Then, we check to see if our view has loaded. If it has, we update the view.
It’s important to check and see if the view has loaded before we modify it. Otherwise, we may force our view to load as soon as we assign the WeightHistory. This would short-circuit the normal lazy-initialization of our view and could waste memory.
Additionally, we’ve removed the code that previously tracked our default weight units, and we’ve added another call to the mysterious getDefaultUnits() method. We’ll deal with both of these issues later, in the section “Saving User Defaults.”
While we’re at it, we no longer need the UnitsKey string constant at the top of the file. Let’s delete that. Additionally, our observeValueForKeyPath:ofObject:change:context: method only needs to worry about the WeightKey. We’ll provide an entirely new method for tracking default unit changes in a bit. In the meantime, we can clean up this method.
- (void)observeValueForKeyPath:(NSString *)keyPath
ofObject:(id)object
change:(NSDictionary *)change
context:(void *)context {
if ([keyPath isEqualToString:WeightKey]) {
id graphView = self.view;
[graphView setWeightEntries:self.weightHistory.weights
andUnits:getDefaultUnits()];
}
}
Next, we need to make similar changes to our HistoryViewController. Start by deleting the notification method calls in both viewDidLoad and viewDidUnload.
- (void)viewDidLoad
{
[super viewDidLoad];
self.navigationItem.rightBarButtonItem = self.editButtonItem;
}
- (void)viewDidUnload
{
[super viewDidUnload];
}
And add our custom accessor.
#pragma mark - Custom Accessor
- (void)setWeightHistory:(WeightHistory *)weightHistory {
// If we're assigning the same history, don't do anything.
if ([_weightHistory isEqual:weightHistory]) {
return;
}
// Clear any notifications for the old history, if any.
if (_weightHistory != nil) {
[_weightHistory removeObserver:self
forKeyPath:KVOWeightChangeKey];
[[NSNotificationCenter defaultCenter] removeObserver:self];
}
_weightHistory = weightHistory;
// Add new notifications for the new history, if any.
if (_weightHistory != nil) {
// Register to receive kvo messages when the weight
// history changes.
[_weightHistory addObserver:self
forKeyPath:KVOWeightChangeKey
options:NSKeyValueObservingOptionNew
context:nil];
// If the view is loaded, we need to update it.
if (self.isViewLoaded) {
[self.tableView reloadData];
}
}
}
The general structure is the same; only the details have changed.
Here, we don’t need to modify observeValueForKeyPath:ofObject:change:context:. It already only listens to changes to our WeightHistory. However, we have a different problem to fix.
Whenever our WeightHistory class receives notification of an updated file in iCloud storage, it will download the new file. This causes it to replace its current weightHistory array with an entirely new array. We will receive the notification that this has happened—but we won’t process it properly. Our previous implementation of HistoryVewController never had to deal with this type of change. We only worried about additions and deletions.
Let’s fix that. Navigate to the weightHistoryChanged: method, and scroll down until you find the NSKeyValueChangeSetting: case. Our current implementation simply ignores this method. Instead, we need to reload our table view. Change the case statement as shown:
case NSKeyValueChangeSetting:
[self.tableView reloadData];
break;
OK, now let’s make sure our EnterWeightViewController reacts properly to changes in the document state.
Other Document State Changes
UIDocument has four unique state flags, UIDocumentStateClosed, UIDocumentStateInConflict, UIDocumentStateSavingError, and UIDocumentStateEditingDisabled, plus UIDocumentStateNormal—which simply means none of the other flags are set.
We’ve already added support for the UIDocumentStateInConflict to our WeightHistory class—but this is really just the bare minimum we need to make sure our app functions properly. Ideally, we should also alert users whenever we have trouble saving their changes or whenever the document editing is disabled. Document editing, in particular, will be disabled temporarily whenever the application receives an update from iCloud.
In our case, we want to inform the user of these state changes whenever they have the EnterWeightViewController view open. The EnterWeightViewController is our primary interface for modifying our weight history. Ideally, the other views should respond to these notifications as well (e.g., disabling the edit button in the history view whenever document editing is disabled would be nice), but I will leave that as homework.
Let’s start by adding a new label to our enter weight scene. Open MainStoryboard.storyboard and zoom in on our enter weight view controller. Drag a label out and position it below the text field. Stretch it until it fills the view from margin to margin, and then set the text attributes to center-aligned, 15-point System Bold font with red text color. Next, change the autosizing settings so that it’s locked to the left, right, and top and stretches horizontally. Finally, change the text to Unable to Save Changes. It should now match Figure 6.5.
Figure 6.5 Creating a warning for the save error state
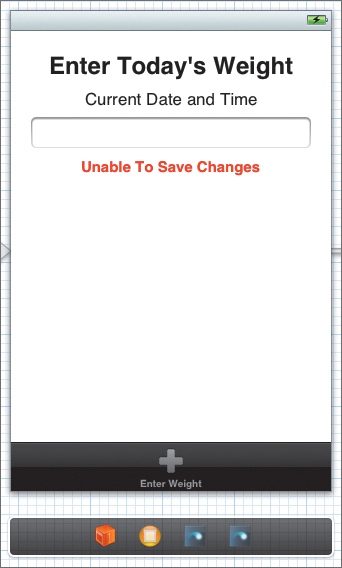
Most of the time, we will hide this label, only displaying it when the document enters a UIDocumentStateSavingError state. However, before we can make it appear and disappear, we need access to it in our code. This means we have to link it to an outlet.
Switch to the Assistant editor and make sure the right editor shows EnterWeightViewController.h. Right-click and drag from the label to a space just below the properties. In the pop-up window, make sure it’s a strong UILabel outlet, and then set the name to saveWarningLabel.
Now switch back to the Standard editor, and open EnterWeightViewController.m. We need to make several changes here. Let’s start by hiding our warning label. Navigate down to the viewDidLoad method, and add the following line to the bottom:
self.saveWarningLabel.alpha = 0.0f;
Next, we want to add a custom setWeightHistory: accessor, just as we did for the graph and history view controllers.
#pragma mark - Custom Accessor
- (void)setWeightHistory:(WeightHistory *)weightHistory {
NSNotificationCenter* notificationCenter =
[NSNotificationCenter defaultCenter];
// If we're assiging the same history, don't do anything.
if ([_weightHistory isEqual:weightHistory]) {
return;
}
// Clear any notifications for the old history, if any.
if (_weightHistory != nil) {
[notificationCenter
removeObserver:self
forKeyPath:UIDocumentStateChangedNotification];
}
_weightHistory = weightHistory;
// Add new notifications for the new history, if any,
// and set the view's values.
if (_weightHistory != nil) {
// Register for notifications.
[notificationCenter
addObserver:self
selector:@selector(updateSaveAndEditStatus)
name:UIDocumentStateChangedNotification
object:_weightHistory];
// Update our save and edit status.
[self updateSaveAndEditStatus];
}
}
This time we’re registering and unregistering for the document’s UIDocumentStateChangedNotification. When we receive this notification, we call our class’s updateSaveAndEditStatus method. We also call this method upon receiving a new WeightHistory instance—letting us respond to the document’s initial state.
Of course, the updateSaveAndEditStatus method doesn’t exist yet. Let’s start by declaring it in our EnterWeightViewController’s class extension.
- (void)updateSaveAndEditStatus;
Now, lets walk through the method’s implementation a step at a time.
#pragma mark - Private Methods
- (void)updateSaveAndEditStatus {
if (self.weightHistory == nil) {
// Disable editing.
[self.weightTextField resignFirstResponder];
self.weightTextField.enabled = NO;
return;
}
Here, we check to see if we have a nil-valued weightHistory property. This typically happens when our enter weight scene appears onscreen before our document loads. This happens almost every time the app launches.
We simply make sure our text field is not the first responder, and then we disable the text field. This prevents the user from making any changes until after our WeightHistory document is ready to go.
UIDocumentState state =
self.weightHistory.documentState;
if (state & UIDocumentStateSavingError) {
// Display save warning.
[UIView
animateWithDuration:0.25f
animations:^{
self.saveWarningLabel.alpha = 1.0f;
}];
} else {
// Hide save warning.
[UIView
animateWithDuration:0.25f
animations:^{
Saving Health Beat's State 345
self.saveWarningLabel.alpha = 0.0f;
}];
}
Now we check the document’s UIDocumentStateSavingError flag. This flag will be set whenever an error occurs that prevents the document from saving its state. If the flag is set, we use Core Animation to display our warning label. If it is not set, we hide the label.
if (state & UIDocumentStateEditingDisabled) {
// Disable editing.
[self.weightTextField resignFirstResponder];
self.weightTextField.enabled = NO;
} else {
// Enable editing.
self.weightTextField.enabled = YES;
[self.weightTextField becomeFirstResponder];
// Sets the current time and date.
self.currentDate = [NSDate date];
self.dateLabel.text =
[NSDateFormatter
localizedStringFromDate:self.currentDate
dateStyle:NSDateFormatterLongStyle
timeStyle:NSDateFormatterShortStyle];
}
}
Finally, we check the document’s UIDocumentStateEditingDisabled flag. This is set whenever the document is in a state where editing the document is no longer safe. Typically, this happens when the document is loading a remote update, but other events may trigger it as well.
If the flag is turned on, we have our text field resign first responder status, hiding the keyboard. We also disable the text field, preventing the user from making any changes. If the flag is turned off, we enable the text field and set it as the first responder. This causes the keyboard to reappear. We also update our currentDate property and the user interface’s date label. This helps ensure that our weight entries remain in sequential order.
That wraps up our work with the document; however, we still need to save the user defaults. Fortunately, as you will see, this is much, much easier. Still, this is a good place to take a break. Stretch for a bit, and (as always) commit your changes.
Saving User Defaults
We’re going to start by storing the default weight units using NSUserDefaults. First, let’s define a few functions to simplify our code.
We are just going to write C functions, but we still want them to have full access to our Objective-C classes. So, we need the file to be compiled as if it were Objective-C. The easiest way to do this is to create a new NSObject class and then delete both the class interface and its implementation.
Right-click the Model group and create a new NSObject named WeightUnits. Then open up both the header and implementation file and delete everything except the #import directives. We can even move the Foundation import directive from the header to the implementation file.
Now, in WeightUnits.h, add the following code:
typedef enum {
LBS,
KG
} WeightUnit;
WeightUnit getDefaultUnits(void);
void setDefaultUnits(WeightUnit value);
Here, we’re just defining our WeightUnit enum and declaring two accessor functions for our default weights.
Next, switch to the implementation file.
#import "WeightUnits.h"
#import <Foundation/Foundation.h>
static NSString* const WeightUnitKey = @"weight_unit";
WeightUnit getDefaultUnits(void) {
return [[NSUserDefaults standardUserDefaults]
integerForKey:WeightUnitKey];
}
void setDefaultUnits(WeightUnit value) {
[[NSUserDefaults standardUserDefaults]
setInteger:value forKey:WeightUnitKey];
}
NSUserDefaults stores values using keys, so we start by defining a static string to use as our key. The getDefaultUnits() function simply accesses the standard user defaults and returns the value associated with our key. setDefaultUnits() saves a new value into the standard user defaults, also using our key.
We will be using these functions in several places throughout our application. So, let’s add an #import directive to our precompiled prefix header file. Open Health Beat-Prefix.pch and modify it as shown.
#import <Availability.h>
#ifndef __IPHONE_5_0
#warning "This project uses features only available in iOS SDK 5.0 and later."
#endif
#ifdef __OBJC__
#import <UIKit/UIKit.h>
#import <Foundation/Foundation.h>
#import "WeightUnits.h"
#endif
This automatically imports WeightUnits.h into every class in our project, making our accessor functions available everywhere.
Now we need to go through our project and replace every instance of self.weightHistory.defaultUnits with one of our two accessor functions. To start, switch to the Search navigator (the icon that looks like a magnifying glass in the navigator selector bar) and perform a search for self.weightHistory.defaultUnits (Figure 6.6).
Figure 6.6 Searching for the defaultUnits property

Our search has found seven matches. Select each one in turn. If the code is getting the default unit value, replace it with a call to getDefaultUnits().
WeightUnit unit = getDefaultUnits();
If the matching code is setting a new default unit value, replace it with a call to setDefaultUnits().
setDefaultUnits(unit);
We also need to delete the WeightUnit typedef from the top of WeightEntry.h. We’ve already copied it over to WeightUnits.h, and having a duplicate will just cause compilation errors.
Finally, we need to update our UI whenever our default units change. Fortunately, the NSUserDefaults posts an NSUserDefaultsDidChangeNotification whenever its notification changes. We just need to listen for this notification.
In EnterWeightViewController.m, navigate to the viewDidLoad method and add the following code to the bottom of the method.
[[NSNotificationCenter defaultCenter]
addObserverForName:NSUserDefaultsDidChangeNotification
object:[NSUserDefaults standardUserDefaults]
queue:nil
usingBlock:^(NSNotification *note) {
NSString* title = [WeightEntry stringForUnit:
getDefaultUnits()];
[self.unitsButton setTitle:title
forState:UIControlStateNormal];
}];
Then, in the viewDidUnload method, we need to unregister our self.
[[NSNotificationCenter defaultCenter]
removeObserver:self];
In GraphViewController’s viewDidLoad method, register for a similar notification. Remember to unregister in the viewDidUnload method as well.
// Register to receive notifications when the default unit changes.
[[NSNotificationCenter defaultCenter]
addObserverForName:NSUserDefaultsDidChangeNotification
object:[NSUserDefaults standardUserDefaults]
queue:nil
usingBlock:^(NSNotification *note) {
[graphView
setWeightEntries:self.weightHistory.weights
andUnits:getDefaultUnits()];
}];
We also want to register our HistoryViewController for notifications as well. Again, add the following to its viewDidLoad method. As always, remember to unregister in the viewDidUnload method.
// Register to receive notifications when the user
// defaults change.
[[NSNotificationCenter defaultCenter]
addObserver:self
selector:@selector(reloadTableData)
name:NSUserDefaultsDidChangeNotification
object:[NSUserDefaults standardUserDefaults]];
Finally, we want to make sure our EnterWeightController view starts with the correct units. Open EnterWeightViewController.m and navigate to the viewWillAppear: method. Add the following code.
- (void)viewWillAppear:(BOOL)animated {
// Sets the current time and date.
self.currentDate = [NSDate date];
self.dateLabel.text =
[NSDateFormatter
localizedStringFromDate:self.currentDate
dateStyle:NSDateFormatterLongStyle
timeStyle:NSDateFormatterShortStyle];
// Clear the text field.
self.weightTextField.text = @"";
[self.weightTextField becomeFirstResponder];
[self.unitsButton
setTitle:[WeightEntry stringForUnit:getDefaultUnits()]
forState:UIControlStateNormal];
[super viewWillAppear:animated];
}
The project should now build without any errors. Try running it. Add a few weights. Change the default units. Now send the app to the background, and then stop it. Run it again. It should remember both the weight entries and the changed units.
Note
Sending the app to the background forces the application to save any pending changes. On the other hand, pressing the Stop button in Xcode will immediately kill the app without giving it a chance to save its state. When testing any document-based project, it’s always best to send the app to the background before stopping it.
Try running the app on two devices. Add a new weight to one device, and then send the app to the background. You should see the new entry show up on the second device within about 30 seconds.
Try adding a new weight to both simultaneously. Send both apps to the background, and then bring them back to the foreground. Both apps should initially appear with their own unique set of weights. Then one app will resolve the conflict, changing to display the merged set of weights. A minute or so later, the other app will also change over. The conflict is now resolved.
Note that both copies of our app are successfully syncing their weight history, but they’re not syncing the default units. Let’s fix that.
Implementing iCloud Key-Value Storage
We want to continue to use the NSUserDefaults to store our preferences locally; however, we can use iCloud key-value storage to sync these defaults between machines. The procedure is simple. We register for notifications about changes to our iCloud key-value storage. If a change occurs, we modify our user defaults to match. Similarly, we monitor our user defaults. If they change, we update the iCloud key-value storage. Furthermore, we can do all of this in our application delegate. Our view controllers already respond to any changes we make to our user defaults.
Open HBAppDelegate.m. At the top of the file, we need to import our WeightEntry class. We also want to define a key to use with iCloud key-value storage.
#import "WeightEntry.h"
static NSString* const UbiquitousWeightUnitDefaultKey =
@"UbiquitousWeightUnitDefaultKey";
Next, let’s modify application:didFinishLaunchingWithOptions: to register for our notifications. Let’s examine this one chunk at a time.
- (BOOL)application:(UIApplication *)application
didFinishLaunchingWithOptions:(NSDictionary *)launchOptions {
// Since the delegate lasts throughout the life of the app,
// we don't need to unregister these notifications.
NSUbiquitousKeyValueStore* store =
[NSUbiquitousKeyValueStore defaultStore];
NSNotificationCenter* notificationCenter =
[NSNotificationCenter defaultCenter];
So far, we’re just getting reference to the default notification center and the default iCloud key-value store.
[notificationCenter
addObserverForName:
NSUbiquitousKeyValueStoreDidChangeExternallyNotification
object:store
queue:nil
usingBlock:^(NSNotification *note) {
WeightUnit value =
(WeightUnit)[store longLongForKey:
UbiquitousWeightUnitDefaultKey];
setDefaultUnits(value);
}];
Next, we register for notifications from the iCloud key-value store. When we receive a notification, we grab the value for our key and use it to update our user defaults.
Notice that NSKeyValueUbiquitousStore looks similar to NSUserDefaults, but it does not support the same range of data types. Specifically, the only integer type it supports is the long long. That’s a bit of overkill when it comes to storing our WeightUnit values—but it’s the only option available. Also, we have to explicitly cast the long long back to our WeightUnit type. This lets the compiler know that we (hopefully) know what we’re doing and keeps it from complaining about possible data loss.
[notificationCenter
addObserverForName:NSUserDefaultsDidChangeNotification
object:[NSUserDefaults standardUserDefaults]
queue:nil
usingBlock:^(NSNotification *note) {
int value = getDefaultUnits();
NSLog(@"Setting iCloud Value: %@",
[WeightEntry stringForUnit:value]);
[store setLongLong:value forKey:
UbiquitousWeightUnitDefaultKey];
}];
[store synchronize];
return YES;
}
Now, we register for notifications about changes to our NSUserDefaults. When a change occurs, we get the current default value and use it to update the value in the cloud.
Finally, once both notifications are set up, we synchronize our cloud storage. This forces the system to post notifications about any changes that might have occurred while the application was turned off. We don’t have to synchronize NSUserDefaults, since it already automatically posts those notifications.
Similarly, we need to synchronize the iCloud key-value storage whenever our application enters or leaves the background and before our application terminates. Add the following line of code to applicationDidEnterBackground:, applicationWillEnterForeground:, and applicationWillTerminate:. Again, our user defaults handle these synchronizations for us automatically.
[[NSUbiquitousKeyValueStore defaultStore] synchronize];
That’s it. We’re now syncing our defaults across the cloud. Unfortunately, it can be a bit difficult to test. Remember, when we sync the iCloud key-value storage, we’re only saving data to the local container. The system decides when and how this data will be uploaded to iCloud. To preserve bandwidth, it throttles these changes, delaying updates. The more rapidly we make our changes, the longer the delays become.
In my own testing, I could usually observe one or two changes before the delays became too long and the system seemed to become unresponsive. If I checked again later in the day, both devices would have synced up again. Unfortunately, this is not something that we can easily test in real time during development.
Now we just need to link our user defaults into the system settings.
Adding System Settings Support
Adding a custom preferences page to the Systems application is actually not too difficult. Right-click the Supporting Files group and select New File. Under iOS > Resource, select Settings Bundle and click Next (Figure 6.7). Name the file Settings, and click Create.
Figure 6.7 Adding the settings bundle
This adds the Settings.bundle file to your application. If you expand this bundle, you will see that it contains an empty English-language localization folder (en.lproj) and a file named Root.plist (Figure 6.8).
Figure 6.8 The contents of the Settings.bundle file
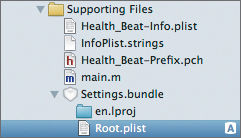
We’ve brushed up against property lists (or plists) a few times now. Basically, these files store key-value pairs. However, since the values can include arrays and dictionaries, we can create rather complex data structures. Property list files are commonly used to configure applications in both iOS and Mac OS X.
Xcode displays property lists using a property list editor. Under the surface, however, plists are simply XML files—albeit XML files with a structure designed to be easy to transport, store, or access while still remaining as efficient as possible. For more information, check out Apple’s Property List Programming Guide.
The default Root.plist defines a sample preferences page. If you expand all the elements, you will see that it has a single group of settings, somewhat simplistically named Group. Inside this group we have three controls: a text field titled Name, a toggle switch titled Enabled, and an untitled slider. Each of these controls also has an identifier field (name_preference, enabled_preference, and slider_preference). This value corresponds to the key used to access these values from NSUserDefaults (Figure 6.9).
Figure 6.9 The default Root.plist file
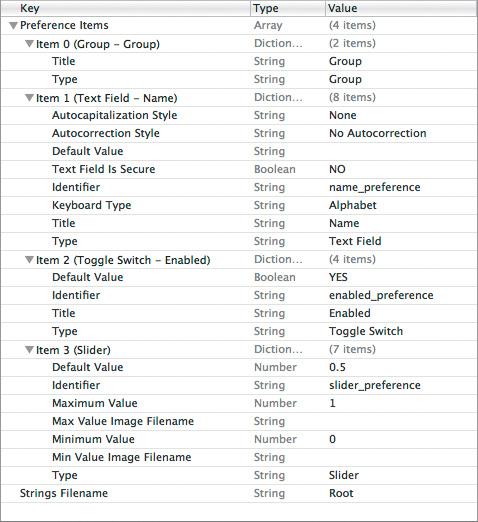
Let’s see this preferences sheet in action. Run the application. This will compile a new copy of your app that includes the Settings.bundle and then upload it to the simulator or device. Once the application launches, go ahead and stop it. Switch to the Systems app. You should now see an entry for Health Beat’s settings (Figure 6.10).
Figure 6.10 Simulator showing Health Beat’s settings
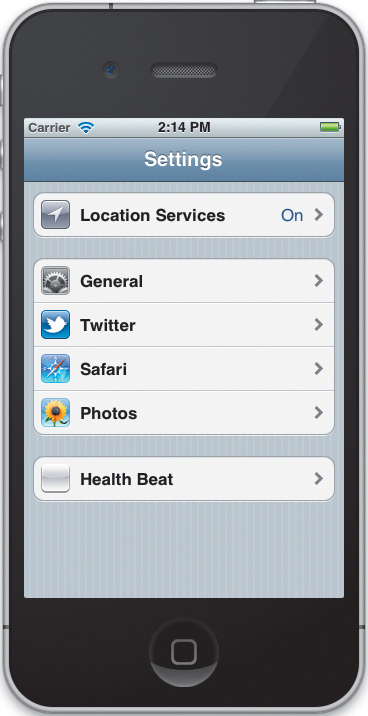
Tap the Health Beat row and it opens the custom preferences page. It has a single group with three controls, just as we expected (Figure 6.11).
Figure 6.11 Default custom preferences page
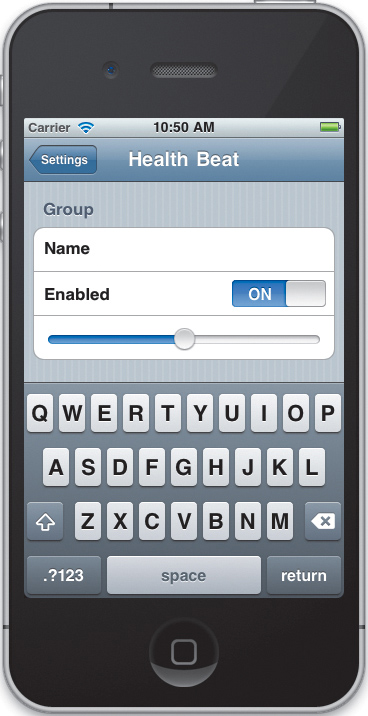
Of course, this isn’t what we want. We really need a single group named Units, with a single multi-value item that will allow us to choose between pounds and kilograms. Edit the property list file so that it matches the settings shown in Figure 6.12.
Figure 6.12 Health Beat’s Root.plist file
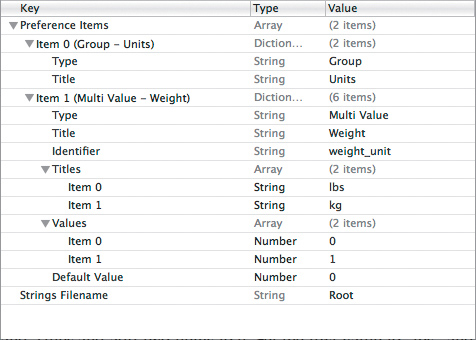
I find it easiest to just delete the four existing items and start fresh. Select the Preference Items key. Plus and minus buttons will appear next to the key name. Press the plus button twice. This will add two new items to the Preference Items array. Expand Item 0. Change the Type entry to Group, and change the Title entry to Units.
Next, expand Item 1. Change the Type entry to Multi Value, the Title entry to Weight, and the Identifier entry to weight_unit. For this to work correctly, the Identifier entry must match the key we use to access our NSUserDefaults values. In our case, it must match the WeightUnitKey constant we defined at the top of WeightUnits.m. Also, set the Default value to 0.
Now select the Identifier row, and press the plus button twice. For the first one, select Titles. For the second, select Values. Titles will contain an array of strings. These represent the options that are displayed onscreen. Expand Titles and add two items to it. Set the first value to lbs and the second to kg.
Now expand Values. These hold the actual values returned when a corresponding title is selected. Again, add two items. Change their Type entries to Number, and set the first to 0 and the second to 1.
Note
Changing preferences in the Settings application does not automatically change the settings in iCloud key-value storage. The user must launch the Health Beat app to force an update to the cloud.
The Settings.bundle property files can get quite complex. Check out Apple’s documentation for all the sticky details. In particular, I recommend looking over the Settings Application Schema Reference and reading “Creating and Modifying the Settings Bundle” in the Preferences and Settings Programming Guide.
Run the application again. From the enter weight screen, set the Units value to kilograms. Now put the app in the background and open the Settings app. Navigate to the Health Beat settings. Change the weight back to pounds. Move back to the Health Beat application. The units should have automatically changed to match the value in our Settings app.
There’s only one last thread to tie up. We’ve already registered an undo action every time we add or delete a weight entry. Now we need to finish setting up our undo support.
Enabling Undo Support
Start by opening WeightHistory’s header file. The class should adopt the UIAlertViewDelegate protocol. We also need to declare an undo method.
@interface WeightHistory : UIDocument <UIAlertViewDelegate>
// This is a virtual property.
@property (nonatomic, readonly) NSArray* weights;
- (void)addWeight:(WeightEntry*)weight;
- (void)removeWeightAtIndex:(NSUInteger)index;
- (void)undo;
+ (void)accessWeightHistory:(historyAccessHandler)completionHandler;
@end
Now, switch to WeightHistory.m and implement the undo method as shown:
- (void)undo {
if ([self.managedObjectContext.undoManager canUndo]) {
NSString* title = @"Confirm Undo";
NSString* message =
[self.managedObjectContext.undoManager undoActionName];
UIAlertView* alert = [[UIAlertView alloc]
initWithTitle:title
message:message
delegate:self
cancelButtonTitle:@"Cancel"
otherButtonTitles:@"Undo",
nil];
[alert show];
[alert release];
}
else {
NSString* title = @"Cannot Undo";
NSString* message = @"There are no changes that "
@"can be undone at this time.";
UIAlertView* alert = [[UIAlertView alloc]
initWithTitle:title
message:message
delegate:nil
cancelButtonTitle:@"OK"
otherButtonTitles:nil];
[alert show];
[alert release];
}
}
iOS typically uses the shake gesture to trigger undo commands; however, it’s very easy to accidentally trigger shake gestures. Therefore, we should have the user confirm the undo command before we actually perform it.
This method handles that for us. If we have an undo action available, it creates an alert message using the action name. Otherwise, it displays a message letting the user know that it cannot undo anything at this time.
Note that our code doesn’t actually do anything until the user taps the Undo button. We catch this in the alertView:didDismissWithButtonIndex: method.
# pragma mark - alert view delegate methods
- (void)alertView:(UIAlertView *)alertView
didDismissWithButtonIndex:(NSInteger)buttonIndex {
// Undo the last action if it is confirmed.
if (buttonIndex == 1) {
[self.undoManager undo];
}
}
If the user dismisses an alert view by tapping the second button (which we have previously defined as the Undo button), then we call our undo manager’s undo method. That will trigger the undo action currently at the top of the stack.
Finally, we can improve our application’s memory management by clearing out the undo stack if we receive a memory warning. Simply implement the applicationDidReceiveMemoryWarning: method.
- (void)applicationDidReceiveMemoryWarning:(UIApplication *)
application {
// Clear the undo manager.
[self.undoManager removeAllActions];
}
Now, let’s modify the HistoryViewController so that it responds to the shake gesture. When this gesture occurs, we’ll undo our last action. Fortunately, UIResponder provides support for motion events using the motionBegan:withEvent:, motionEnded:withEvent:, and motionCanceled:withEvent: methods. Our HistoryViewController, as a UIResponder subclass, inherits these methods.
In general, I prefer to respond to shake events in the motionEnded:withEvent: method. This will occur after the user stops shaking the device—provided the shaking motion was sufficient to trigger an event. This helps prevent accidental shakes.
Implement the method as shown:
#pragma mark - Responder Events
- (void)motionEnded:(UIEventSubtype)motion
withEvent:(UIEvent *)event {
// Only respond to shake events.
if (event.type == UIEventSubtypeMotionShake) {
[self.undoManager undo];
}
}
Here, we check to make sure we have a motion shake event, and then we trigger our document’s undo method. Currently, UIEventSubtypeMotionShake is iOS’s only motion event, so the check doesn’t actually do anything. Still, it helps future-proof our code. Apple may add new motion events to future releases.
This seems too simple to be true, and it is. Run the app, add a new weight entry, and then after it navigates to the history view, shake your phone. Nothing happens. It turns out that motion events are only sent to the first responder. So, we just need to set our controller as the first responder.
First, we have to tell the system that our controller can become first responder, by overriding the canBecomeFirstResponder method. Here, we just need to return YES.
- (BOOL)canBecomeFirstResponder {
return YES;
}
Next, we need to set our controller as the first responder when the history view appears and release the first responder when it disappears. We can do this in our viewDidAppear: and viewWillDisappear: methods.
- (void)viewDidAppear:(BOOL)animated
{
[super viewDidAppear:animated];
[self becomeFirstResponder];
}
- (void)viewWillDisappear:(BOOL)animated
{
[super viewWillDisappear:animated];
[self resignFirstResponder];
}
That’s it. Run the application. Try adding and deleting weights. Navigate to the history view and shake to undo. Everything should work as expected. Don’t forget to commit all your changes.
Wrapping Up
We’ve covered a lot of important ground in this chapter. iCloud is, without a doubt, one of the most important new features in iOS 5. As you’ve seen, it is also somewhat complicated to implement correctly. In this chapter, we covered the steps needed to implement a UIDocument subclass. We looked at techniques for creating new documents and opening existing documents. We also modified our application to respond to notifications from our document and to merge any conflicts as they arise. We added undo support and autosaving. And we synced our user preferences using iCloud key-value storage.
Our Health Beat application is now functionally complete. We can add and remove weight entries. These entries are saved and synced to all our devices. We can view our history and graph our progress. While the application can undoubtedly be improved, there are no major pieces left to implement.
Next chapter, we will take a step back and replace our application’s model with Core Data. As you will see, UIManagedDocument and the Core Data model automatically handle many tedious document management tasks for us.