8. Designing Custom Controls
This chapter covers a broad range of advanced topics that focus on creating an immersive custom user interface. We start by building a view hierarchy that divides our dynamic and static elements into separate layers, allowing us to rapidly redraw the interface as changes occur. We also create a custom UIView Controller container to manage our subviews, while using Core Animation to control the transition between these views. Next, we respond to user input using gesture recognizers to track different touch-based commands and Core Motion to monitor the device’s rotation. Finally, we will use Core Location to geotag images, then export those images by saving them to the photo library, attaching them to email, or tweeting them using the new integrated Twitter API.
Introducing GravityScribbler
This chapter is going to be somewhat different from the rest of the book. We’re going to take a break from our Health Beat application to examine a number of advanced topics: from custom view hierarchies and animation to motion detection and geotagging. Since most of these topics cannot be easily shoehorned into our existing application, we will look at a new, immersive application: GravityScribbler.
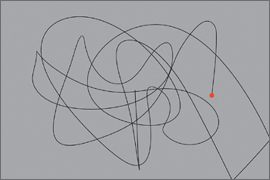
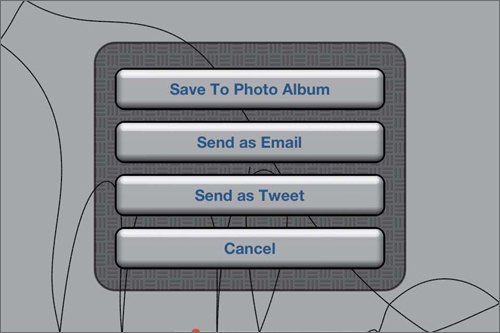
GravityScribbler is a simple drawing application (Figure 8.1). It begins with a cursor in the center of the screen, and the user can direct the cursor by tipping and tilting their phone. The cursor will roll downhill, drawing a line behind it. The user can also utilize an assortment of gestures to control the application. A single-finger horizontal pan will control the cursor’s speed. A two-finger touch will pause and restart the application, while a three-finger swipe will drag out the export menu. Finally, shaking the phone clears the current drawing, letting the user start over.
Figure 8.1 GravityScribbler in action
Unlike what we’ve done thus far, we won’t go through a step-by-step walkthrough and build the entire application from scratch. There is just too much ground to cover. Instead, we will focus more tightly on the individual topics. If you want to see how these topics integrate into a completed application, check out the complete source code from http://freelancemadscience.com/source.
Additionally, since GravityScribbler depends so strongly on touch gestures and device motion, we cannot effectively test it in the simulator. You must run it on the device itself. This means you must have a valid iOS Developer Program membership, as well as the proper provisioning profiles for your device. We examined this in detail in the section “Running and Testing on iOS Devices” in Chapter 3.
Let’s start by looking at techniques for creating a truly custom dynamic user interface.
Customizing the Interface’s Appearance
Often the standard user interface elements work just fine. They’re reasonably attractive. Users recognize them and understand them. They know exactly what they do and how to use them. But let’s face it: If you just use Apple’s default controls, your application may begin to look somewhat bland. Sometimes it’s important to color outside the lines.
How radical should your interface be? The answer depends on a number of things. What kind of application are you building? How comfortable are your users with new interfaces? How clearly can you communicate its intended use? While I can’t answer these questions for you, I can show you some techniques to help you when you start striking out on your own.
Right off the bat, our GravityScribbler app needs to make two important changes to the default application behavior. As an immersive app, we want to seize control of the entire screen, hiding the device’s status bar. This isn’t something we should do lightly. The status bar contains vital information, including the time and the battery status. Hiding the status bar means your users won’t have access to that information while using your app. Still, in many cases it’s necessary to hide the status bar. If you’re trying to build an immersive application, it can be a real distraction. Nobody wants to see the status bar while watching movies. Similarly, we don’t want it to appear in GravityScribbler.
We also want to disable the system’s idle timer. Again, the idle timer usually performs a vital role. If the application doesn’t detect any user touches for a short period, it will dim the screen and then put the device to sleep. This helps save battery power when the device is not in use. Unfortunately, in our case, the user may use the device for long periods without ever touching the screen. Instead, they control the cursor using the accelerometer, and we don’t want our application to go to sleep while someone is using it.
Both of these changes are incredibly easy to make. Add the following lines of code to the application delegate’s application:didFinishLaunchingWithOptions: method.
UIApplication* app = [UIApplication sharedApplication];
[app setStatusBarHidden:YES];
[app setIdleTimerDisabled:YES];
Separating Dynamic and Static Views
We looked at drawing custom views in Chapter 5. However, that chapter focused on drawing a single, static view. Now we need to create a dynamic view. Our view needs to change over time—ideally, we would like to update it at 60 frames per second. That means we need to update it frequently, and each time we update it, we need to redraw it quickly.
Fortunately, not everything changes. At any given time, most of our view remains static, and only a small section changes. We need to update our cursor’s position, and we need to draw a line from our old position to our new one. Other than that, everything else remains untouched.
We will create a new UIView subclass, Canvas, to handle our custom drawing. However, we will actually split the drawing into three sections: the background, the line, and the cursor. The background will remain static. It won’t change at all. Our line will change. We continue to add new segments to it, but the existing portions remain untouched. We simply accumulate new line segments as time passes. Finally, the cursor will change its location but not its appearance as it moves about the screen.
Let’s start by looking at the Canvas class and its companion CanvasView Controller. View and view controller pairs are typically created in one of two ways. They are either loaded from a nib (possibly as part of a storyboard) or created in code. In this case, we will do everything in code.
We instantiate our view controller by calling its designated initializer, initWithNibName:bundle:. Now, when we pass a nil-valued nib name, the system expects that we will either provide a nib file whose name matches our view controller (in this case, CanvasViewController.nib) or override the controller’s loadView method. In our case, we simply use loadView to instantiate our Canvas view and set its background color.
// Implement loadView to create a view hierarchy programmatically,
// without using a nib.
- (void)loadView
{
self.view = [[Canvas alloc] init];
self.view.backgroundColor = [UIColor lightGrayColor];
}
Here, the background color acts as our static background. As we saw in the “Performing Custom Drawing” section of Chapter 5, the system automatically draws the background color before calling drawRect:.
Note

You must either provide a nib file or override loadView, but not both. If you provide a nib, you cannot override loadView.
Drawing the Line Segments
For our Canvas class, we have a slight problem. We want to incrementally draw our line over time. Every frame, we will add a new line segment to our image. Drawing the new segment is easy enough. We just calculate the bounds around the line segment, and call setNeedsDisplayInRect: to redraw those bounds. The problem is, any old line segments that also intersect any part of our bounding box also need to be redrawn or they will be erased.
Now, we could simply keep a list of all our line segments, then iterate over our list and redraw any that might be affected by the bounds. This works well enough at first but quickly bogs down as our drawing gets more and more complex. After a minute or so, the application becomes noticeably sluggish. Instead, we need a way to save and access subsections of our entire line in constant time.
We’ll do this by creating an offscreen context and then drawing our new line to this context. We can then convert the context to an image and use the image to update only the region of the screen that has changed.
Our offscreen context needs to be the same size as our screen—so let’s set it whenever our Canvas view’s frame size changes. Override its setFrame: accessor as shown:
- (void)setFrame:(CGRect)frame {
// If the frame is the same, do nothing.
if (CGRectEqualToRect(self.frame, frame)) return;
// If the frame size has changed, generate a new image context.
if (!CGSizeEqualToSize(self.frame.size, frame.size)) {
UIGraphicsBeginImageContextWithOptions (
frame.size, NO, 0.0f);
[[UIColor blackColor] setStroke];
CGContextRef context = UIGraphicsGetCurrentContext();
NSAssert(context != nil, @"Created a nil context");
CGContextSetLineWidth(context, 1.0f);
dispatch_sync(self.serialQueue, ^{
self.imageContext = context;
});
UIGraphicsEndImageContext();
}
[super setFrame:frame];
}
We could use the Core Graphics function CGBitmapContextCreate() to create our offscreen context; however, setting up a correctly formatted bitmap context is not trivial. We also want to make sure our context’s coordinates and scale match our main screen. The easiest way to do this is to call UIKit’s UIGraphics BeginImageContextWithOptions() function.
UIGraphicsBeginImageContextWithOptions() takes just three parameters. The first is the desired size—we pass in our view’s frame size. The second determines whether the context is opaque. By passing in NO, we create a transparent context. Finally, the third parameter determines the context’s scale. By passing in 0.0f, we set the scale equal to our device’s main view (2.0 for a Retina display, 1.0 for older iPhones).
This function will create a correctly formatted context and set it as our current context. We can then set the stroke color, grab a reference to the context, and set the line width. Finally, we use a property to store this context, and we clean up after ourselves by calling UIGraphicsEndImageContext().
OK, if you were paying attention, you may have noticed that I just skimmed over something sort of important. What the heck is the whole dispatch_sync() function doing in there?
Here’s the problem. We will add new line segments to our image context on a background thread. However, we will update our view using the image context in the main thread. As a result, we need to synchronize these reads and writes.
Traditionally, we would do this using a mutex to block access to critical sections. In Objective-C, we could do this by adding the @synchronized directive. However, starting with iOS 4.0, we have a better way.
iOS 4.0 brought Grand Central Dispatch (GCD) to iOS. GCD is a block-based technology that lets us manage concurrency without explicitly using threads. It is highly optimized, and it can automatically balance access to system resources based on your system’s capabilities. For example, it will automatically split a concurrent task among more threads when running on a 12-core Mac Pro than it does when running on an iPhone 4.
For more information, check out the Grand Central Dispatch Reference and the Concurrency Programming Guide in Apple’s documentation. In this chapter, we simply use GCD to place tasks on a background queue or to move tasks back to the main thread. We will also use it here, to protect critical sections.
We start by creating a dispatch queue in Canvas’s initWithFrame: method.
_serialQueue = dispatch_queue_create(
"com.freelancemadscience.GravityScribbler.canvas",
DISPATCH_QUEUE_SERIAL);
The dispatch_queue_create() function takes two arguments. The label can be used to identify our queue in the debugger and in crash reports. We use reverse DNS-style naming to guarantee that we have a unique label for our queue. Next, the DISPATCH_QUEUE_SERIAL attribute defines our queue as a serial queue.
Note
While GCD greatly simplifies concurrent programming, it doesn’t protect us from all the ugly, underlying details. For example, we can still create deadlocks by nesting dispatch_sync() calls (e.g., dispatch_sync(queue, ^{dispatch_sync(queue ^{[self myMethod]})});). The primary advantage of using dispatch_sync() over block-based threading is simply performance. GCD code will run significantly faster than its block-based equivalent.
All GCD queues operate in strict FIFO order—the first block in is the first block out. Serial queues also guarantee that only one block will run at a time. Concurrent queues may process multiple blocks at once, splitting them across two or more threads, depending on system resources.
Now back to our previous code, dispatch_sync() simply dispatches a block to the specified queue and then waits until the block is finished. Since our serial queue will only process one block at a time, we can wrap our critical sections in dispatch_sync() blocks, serializing access to our image context.
Now let’s look at the actual drawing. When our cursor moves, the view controller will call Canvas’s addLineToPoint: method.
// Returns the bounds of the line.
- (CGRect)addLineToPoint:(CGPoint)endPoint {
CGFloat xdist = endPoint.x - self.currentDrawPoint.x;
CGFloat ydist = endPoint.y - self.currentDrawPoint.y;
// Just ignore any tiny movements.
if (((xdist * xdist) + (ydist * ydist)) < self.minDistance)
return CGRectZero;
__block CGRect bounds;
dispatch_sync(self.serialQueue, ^{
CGContextBeginPath(self.imageContext);
CGContextMoveToPoint(self.imageContext,
self.currentDrawPoint.x,
self.currentDrawPoint.y);
CGContextAddLineToPoint(self.imageContext,
endPoint.x,
endPoint.y);
bounds = CGContextGetPathBoundingBox(self.imageContext);
CGContextStrokePath(self.imageContext);
});
bounds = CGRectInset(bounds, -1.0f, -1.0f);
NSAssert2(CGRectContainsPoint(bounds, self.currentDrawPoint),
@"%@ does not contain starting point %@",
NSStringFromCGRect(bounds),
NSStringFromCGPoint(self.currentDrawPoint));
NSAssert2(CGRectContainsPoint(bounds, endPoint),
@"%@ does not contain ending point %@",
NSStringFromCGRect(bounds),
NSStringFromCGPoint(endPoint));
// Update the invalid rectangle.
if (CGRectEqualToRect(self.invalidRect, CGRectZero)) {
self.invalidRect = bounds;
} else {
self.invalidRect = CGRectUnion(self.invalidRect, bounds);
}
// Update the current drawing point.
self.currentDrawPoint = endPoint;
return self.invalidRect;
}
We start by calculating the distance between our current cursor position, self.current DrawPoint, and our new end point. If this distance is below our preset minimum, we just skip the update.
Next, we use dispatch_sync() to wrap our drawing code—again, protecting access to our image context. The drawing code simply creates a path from our old draw point to our new end point. We store a copy of the path’s bounds (the __block storage type modifier lets us access the value of bounds outside the dispatch_sync() block). Then we draw the actual path.
We then expand the size of the bounding box by 1 pixel on all sides, just to make sure the entire line segment gets updated, including any joins and line caps. Then we update our invalidRect property. If we don’t have an invalid rectangle, we just assign our current bounds. Otherwise, we combine the bounds by storing the union of the two rectangles.
This is important because our line-segment drawing and our view-updating code run on two different threads. If our updates from the accelerometer get ahead of the screen updates, we could add two or more new line segments between each screen update. We want to make sure all of them are drawn correctly.
Once we’ve added the line segment, our view controller will call updateCanvasUI on the main thread.
// Should be called on the main thread.
-(void)updateCanvasUI {
self.cursor.center = self.currentDrawPoint;
// As long as we have a non-zero bounds, redraw the screen.
if (!CGRectEqualToRect(self.invalidRect,CGRectZero)) {
[self setNeedsDisplayInRect:self.invalidRect];
self.invalidRect = CGRectZero;
}
}
This simply updates our cursor’s position, then calls setNeedsDisplayInRect: and clears our invalid rectangle. Next time through the run loop, the system will call drawRect:.
- (void)drawRect:(CGRect)rect
{
CGContextRef context = UIGraphicsGetCurrentContext();
[self drawSketchToContext:context];
}
- (void)drawSketchToContext:(CGContextRef)context {
// Draw the changed region of the image context.
__block CGImageRef fullImage;
dispatch_sync(self.serialQueue, ^{
fullImage = CGBitmapContextCreateImage(self.imageContext);
});
// Need to adjust the coordinates to draw the image.
CGContextSaveGState(context);
CGContextTranslateCTM(context, 0.0f, self.bounds.size.height);
CGContextScaleCTM(context, 1.0f, -1.0f);
CGContextDrawImage(context, self.bounds, fullImage);
CGContextRestoreGState(context);
CGImageRelease(fullImage);
}
Our drawRect: method is fairly simple. We just grab a reference to the current context, then call drawSketchToContext:. We’re breaking out the actual drawing code so that we can reuse it later when we export our images.
In drawSketchToContext: we create an image from our image context (again, protected by a dispatch_sync block). Then we just want to draw our image to our context. The context will already have a clipping path set to the rect argument—so we don’t need to do any additional clipping. CGContextDrawImage() is smart enough to only copy the data inside the clipping path.
However, we have a problem. If we just call CGContextDrawImage(), our image will appear upside down (flipped vertically, not just rotated 180 degrees). The problem comes from the difference in coordinate systems. By default, iOS uses a coordinate system with the origin at the upper-left corner, with positive numbers going down and to the right. Mac OS X has the coordinate system in the lower-left corner, with the coordinates going up and to the right. Core Graphics (and some other technologies, like Core Text) are based on the original OS X coordinate system.
Usually this isn’t a problem, since the graphics contexts are typically inverted and offset before we perform any drawing. For example, in Chapter 5 we freely mixed UIKit and Core Graphics methods with no coordinate problems. However, we will occasionally find some rough patches in odd corners of the framework. CGContextDrawImage() is a prime example. This method places the image in the correct position for our graphics context, but internally it flips the image contents.
In our case, this can be particularly confusing, since the drawing rectangle will be on the opposite side of the screen from the new line segment. So, unless this rectangle happens to lie over a previously drawn section of line, we will simply be copying a transparent rectangle to the screen—making it appear that our app is not drawing at all.
To compensate for this, we temporarily flip the coordinate system and then offset it by the image’s height (which also happens to be our screen height). This will then draw the image correctly.
Note

Flipping and translating the coordinate system is not the only solution to the flipped image problem. We could simply convert the CGImageRef to a UIImage using [UIImage imageWithCGImage:fullImage] and then draw the image using UIImage’s drawInRect: method. When profiled, the UIImage approach actually appears to be slightly (though largely insignificantly) faster than using Core Graphics directly. However, if I had used that approach here, I wouldn’t have had an excuse for talking about the flipped-coordinate problem.
Drawing the Cursor
That’s two of our three layers. All that’s left is our cursor. Here, we will create a subview to hold our cursor, and then move the subview around the screen.
We start by creating a separate UIView subclass named Cursor. This is a very simple class. We don’t even create a view controller for it. Rather, it will be managed by our CanvasViewController as part of its view hierarchy. Cursor only has two methods, one of which is its designated initializer. The other is drawRect:.
- (id)initWithFrame:(CGRect)frame
{
self = [super initWithFrame:frame];
if (self) {
self.opaque = NO;
}
return self;
}
- (void)drawRect:(CGRect)rect {
// Draw the dot.
[[UIColor redColor] setFill];
UIBezierPath* dot =
[UIBezierPath bezierPathWithOvalInRect:self.bounds];
[dot fill];
}
The designated initializer simply sets our Cursor view’s opaque property to NO, while drawRect: simply draws a round circle to fill the provided frame.
Note
Our Cursor class will call drawRect: once, when the view is first created. The result is then cached and reused. This means we can move our cursor without triggering any additional drawing calls.
Additionally, having our cursor separated from the lines and background means we don’t need to delete the old position from the image context. We simply change the cursor’s center property, and UIKit handles the rest.
Then, we instantiate our Cursor object during our Canvas class’s designated initializer.
CGRect dotFrame = CGRectMake(0.0f, 0.0f, 8.0f, 8.0f);
_cursor = [[Cursor alloc] initWithFrame:dotFrame];
[self addSubview:_cursor];
We also add a method to center the cursor in the screen. We then call this whenever the view is reset (e.g., in the CanvasViewController’s viewDidAppear: method).
-(void)centerCursor {
self.cursor.center = self.center;
self.currentDrawPoint = self.center;
}
We’ve already seen how the cursor’s position is updated to the current draw point in Canvas’s updateCanvasUI method. That’s all we need to support our cursor layer.
Note
We explicitly do not use Core Animation to animate the cursor’s motion. The cursor’s position is already updated every frame. The motion should therefore appear smooth without needing Core Animation support. In fact, the time period between frames is too short to effectively use Core Animation. Core Animation is intended for animating changes over longer intervals (usually a quarter second or longer).
Creating a UIViewController Container
There are two basic types of view controllers: content view controllers and container view controllers. A content view is a view controller created to present some sort of data. Most of the view controllers we’ve created so far have been content view controllers. However, iOS also uses container view controllers. These controllers manage one or more other view controllers.
UINavigationController, UITabBarController, and UIPageViewController are all examples of container view controllers. In addition, any view controller can act as a temporary container by calling presentViewController:animated: completion: to present a modal view.
On the iPhone, each content view controller typically fills most, if not all, of the screen. We call methods on the container to swap one controller view for another, animating the transition between them. The iPad, however, gives us a little more flexibility. The UISplitViewController lets us display two content views simultaneously, while the UIPopoverController lets us layer a view controller over part of the current user interface without taking over the entire screen. Even modal views don’t necessarily take over the entire screen—instead, the iPad’s UIViewController supports several different modal presentation styles.
Before iOS 5, there was no good way to create custom container classes. Developers were strongly encouraged to use only the containers provided by Apple—but often, they didn’t quite fit the application’s needs. To get around this, developers often faked a container view controller by grabbing a child view controller’s view property and shoving it directly to an existing view hierarchy.
While this more or less works, it creates a few problems. First and foremost, iOS expects both the views and the view controllers to be in well-formed hierarchies. The system uses the view controller hierarchy to pass along a number of appearance and rotation messages, including viewWillAppear:, viewDidAppear:, viewWill disappear:, viewDidDisappear:, willRotateToInterfaceOrientation:duration:, willAnimateRotationToInterfaceOrientation:duration:, and didRotateFrom InterfaceOrientation:.
Having an invalid controller hierarchy usually doesn’t create an immediately obvious problem. Rather, issues begin to crop up much later in the development cycle. At that point, the bugs can be very difficult to resolve.
In iOS 5, Apple deals with this issue by providing an enhanced UIViewController class, letting us subclass it to make our own view controller containers. They have also formalized the timing of method calls when views appear and disappear, as well as explicitly defining their expectations for view and view controller hierarchies.
When creating a view controller container, we must perform all of the following steps to add a new child view controller.
1. Add the subview controller to the container by calling addChildView Controller:. This will automatically trigger a call to the child view controller’s willMoveToParentController: method.
2. In general, the container view should set the subview’s frame to define where it should appear, how large it should be, and so on.
3. Add the subview to the container’s view by calling addSubview:. This will automatically trigger the calls to viewWillAppear: (before adding the view) and viewDidAppear: (after adding).
4. Perform any animation accompanying the view’s appearance.
5. When done, call the subview controller’s didMoveToParentViewController: method. The subview controller is now properly attached to the container.
Removing the child controller follows a similar series of steps:
1. Call the subview controller’s willMoveToParentViewController: method, passing in nil as an argument.
2. Perform any animation accompanying the view’s disappearance.
3. Remove the subview from the container’s view by calling the subview’s removeFromSuperview method. This will trigger viewWillDisappear: and viewDidDisappear: before and after the view is actually removed from the view hierarchy.
4. Remove the subview controller from the container by calling the subview controller’s removeFromParentViewController: method. This will automatically call the subview controller’s didMoveToParentViewController: method, passing in nil as an argument.
As we will see, UIView’s transition... methods can be used to combine some of these steps (particularly adding a new view, removing an old view, and any state change animations). However, in general, you must follow all of the above steps to create a valid view controller hierarchy.
Note
Some of these methods should only be called within our container controller subclass. In particular, addChildViewController: and removeFrom Superview should only be called internally within our container. We must provide our own wrapper methods to add and remove the subview controller as necessary. As a corollary, we should never call addChild ViewController: on another view controller—as it is undoubtedly not prepared to handle the new view controller appropriately.
Apple still recommends using their pre-built container view controllers whenever possible. However, custom containers provide an excellent method for customizing an application’s flow. In GravityScribbler, we will use a custom container to display pop-up messages in response to different gestures from the user.
We will start by creating a UIViewController subclass, GSRootViewController. As the name suggests, this will act as the root view for our application. It will contain both our canvas and our pop-ups as child view controllers.
Managing the CanvasViewController
Let’s start by creating a property to hold our CanvasViewController. We’ll then write a custom setter to properly set up our canvas.
#pragma mark - Background View Controller
- (void)setCanvasViewController:(CanvasViewController *)
canvasViewController {
// If we are passing in the same background view, do nothing.
if ([canvasViewController isEqual:_canvasViewController])
return;
// Make it the same size as our current view.
canvasViewController.view.frame = self.view.bounds;
// Then swap views.
[self addChildViewController:canvasViewController];
[self.canvasViewController willMoveToParentViewController:nil];
[self
transitionFromViewController:_canvasViewController
toViewController:canvasViewController
duration:1.0f
options:UIViewAnimationOptionTransitionCurlUp
animations:^() {/* Do nothing */ }
completion:^(BOOL finished)
{
[canvasViewController didMoveToParentViewController:self];
[_canvasViewController removeFromParentViewController];
_canvasViewController = canvasViewController;
}];
}
Here, we start with a quick sanity check. If the new canvas controller is the same as our current canvas controller, we don’t have to do anything. We just return. Next, we make sure the new controller’s view fills our root view’s bounds completely. Then we swap in our new controller.
We start by adding the new controller as a child controller and letting the current canvas view know that it’s about to be removed. Then we call transitionFromViewController:toViewController:duration:options:animations:completion: to animate the swap. This automatically adds our new controller’s view to our view hierarchy, removes the old controller’s view, and animates the transition between views.
We have a number of pre-bottled transition animations we could choose from: cross fade, flips for different orientations, and a page curl. Alternatively, we could use the animation block to change any of our view’s animatable properties. Here, we simply use the page curl animation. Whenever we add a new canvas view controller, our old view will peel off, revealing the new view underneath. Then, in the completion block, we finish adding our new controller, remove the old controller, and assign our new canvas view controller to our instance variable.
Note
To call transitionFromViewController:toViewController: duration:options:animations:completion:, both controllers must be children of the same container controller. This means we must add the new controller using addChildViewController: before we initiate the transition, but we cannot call removeFromParentViewController on the old controller until after the transition has started. It doesn’t have to be called in the transition’s completion block, as long as it occurs after the call to transitionFromViewController:....
We’ll use this method to reset our canvas, as shown:
- (void)reset {
self.canvasViewController = [[CanvasViewController alloc] init];
}
We’ll then attach this method to a shake gesture. Whenever the user shakes their phone, we’ll swap in a new canvas controller, peeling away their old drawing and giving them a fresh new canvas to draw on (Figure 8.2).
Figure 8.2 Resetting the canvas

Our reset method looks deceptively simple, but this hides a subtle feature. When we instantiate our new CanvasViewController, we are not calling the designated initializer. Instead, we’re calling the generic init method. This will then call [self initWithNibName:nil bundle:nil]. When the system goes to create our view hierarchy, it will call our controller’s loadView method. Since we passed in a nil value for the nib name, the default implementation would normally look for a nib file named CanvasViewController.xib. However, as we saw earlier, we’ve overridden loadView to programmatically create our view hierarchy instead.
Creating Pop-Up Views
GSRootViewController will also be able to display pop-up views over the top of our canvas. We will use this to display a number of support views, including custom alert messages, a pause indicator, our acceleration control, and an export menu. GSRootViewController will also provide different animation options for when the view appears. It could slide in from the sides (with an animated bounce at the end), drop down from the top (also with a bounce), or simply fade in and out.
The pop-ups themselves consist of view and controller combinations. All of them use the same UIView subclass, PopupView. This is a simple, non-opaque view that draws a semi-transparent, rounded-rectangle backdrop, on which we will place our labels and other controls.
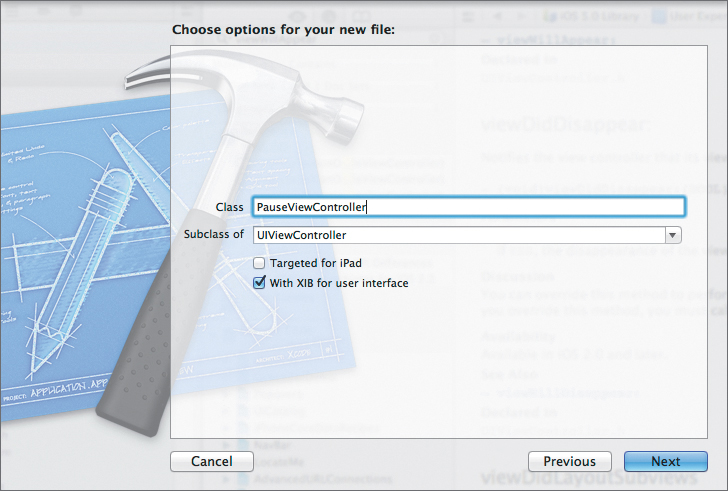
To create a pop-up view, add a new UIViewController subclass to the project. In the options panel, make sure the “With XIB for user interface” check box is selected (Figure 8.3). This will create our class header, an implementation file, and an initial nib file.
Figure 8.3 Creating a nib-based view controller
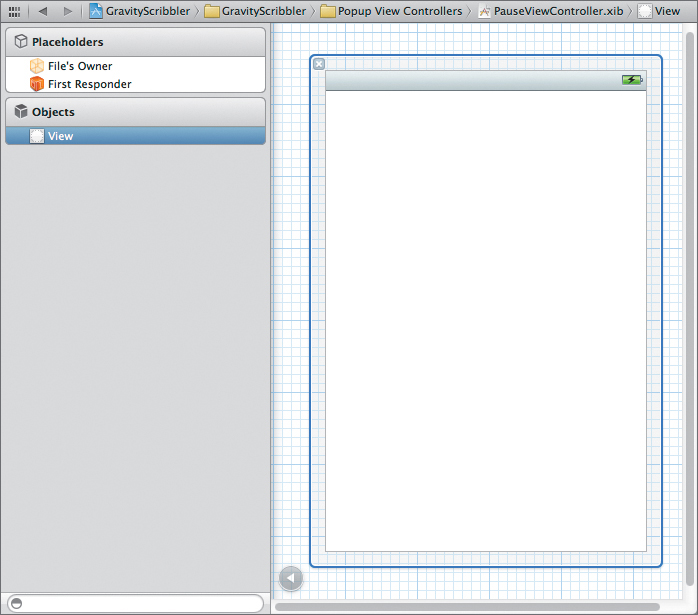
Then open PauseViewController.xib. Working with a nib is almost the same as working with a storyboard. However, we will find a few differences. The scene list is gone, as is the scene dock. Instead, we have a single dock that holds the top-level objects for the entire nib. Meanwhile, the Interface Builder area simply displays our top-level views.
Our nib starts with three top-level objects: the File’s Owner, the first responder, and our view (Figure 8.4). Of the three, only the File’s Owner is new. Like the first responder, it is a placeholder (also sometimes called a proxy object). The system does not instantiate the placeholders when we load the nib. Instead, we instantiate an instance of the File’s Owner in our code and then pass it to the nib-loading method. This is implicitly handled for us when we call UIViewController’s initWithNibName:bundle: method. Our newly instantiated controller will be passed to the nib-loading code, which will in turn set up and configure our controller. The File’s Owner represents the main link between the nib and the rest of your application. In our case, the File’s Owner is our PauseViewController instance.
Within the nib file, I typically set the view’s Status Bar attribute to None. This is one of the simulated metrics attributes; that means it doesn’t actually affect the nib at runtime—it just modifies how the nib appears within Interface Builder. Specifically, it removes the status bar from our view, just leaving us a blank white rectangle. Since our pop-up view won’t fill the entire screen, we don’t need to worry about leaving space for any of the system elements.
We also need to change the view’s class to PopupView and set its size (200 × 216 points for the PauseViewController). GSRootViewController will set the view’s position, centering it in the screen. However, it will respect the size that we set in the nib.
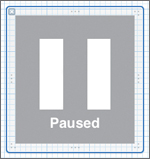
Eventually, we will also want to set the view’s background color to clear—but since we will be placing white controls on the view, they can be somewhat hard to see. Therefore, I use a gray background color while designing the interface, and I change it back when I’m done. We can then drag out whatever controls we need, drawing connections back to the File’s Owner as necessary. Our pause view is relatively simple. We just add an image view to hold the pause.png image and a label saying “Paused” (Figure 8.5).
Figure 8.5 Laying out the pause view
Most of our views are relatively simple, especially our pause indicator and our acceleration control. In many ways, they could be more easily managed by the CanvasViewController directly, without requiring either a container or their own view controllers. Creating child view controllers really starts to make sense when we begin adding more complex views. For example, the export menu controller not only dynamically sets the content for its views based on your device’s capabilities, it also coordinates the actual creation and export of our images. We really don’t want to add these features directly to our CanvasViewController class.
Managing Pop-Up Views
We need to build support for adding our pop-up views to our container class. To start with, lets create an enum for our different animation sequences.
typedef enum {
GSPopupFade,
GSPopupDropDown,
GSPopupSlideFromHomeButton,
GSPopupSlideTowardsHomeButton,
} GSPopupAnimationType;
Now we can define a method to show a pop-up. This is a bit long, so let’s look at it in chunks.
#pragma mark - Popup View Animation Methods
- (void)showPopupController:(UIViewController*)controller
animationType:(GSPopupAnimationType)type
withCompletionHandler:(void (^)(BOOL finished))completion {
NSAssert(controller != nil, @"Trying to show a nil controller");
// Add to the controller hierarchy.
[self addChildViewController:controller];
This starts simply enough. We perform a quick sanity check, just to make sure we’re not trying to add a nil pop-up view controller. Then we add the controller to our container class.
switch (type) {
case GSPopupDropDown:
[self initialPositionForDropDown:controller.view];
break;
case GSPopupSlideTowardsHomeButton:
[self initialPositionForSlideTowardsHome:
controller.view];
break;
case GSPopupSlideFromHomeButton:
[self initialPositionForSlideFromHome:controller.view];
break;
case GSPopupFade:
[self initialPositionForFade:controller.view];
break;
default:
[NSException
raise:@"Invalid value"
format:@"%d is not a recognized GSPopupAnimationType",
type];
break;
}
Next, we call a method that sets the pop-up view’s initial state. Each of our animation variations has its own initialPosition... method.
// Rotate the view.
CGFloat rotation = 0.0f;
switch (self.bestSubviewOrientation) {
case UIDeviceOrientationLandscapeLeft:
rotation = M_PI_2;
break;
case UIDeviceOrientationLandscapeRight:
rotation = -M_PI_2;
break;
default:
[NSException
raise:@"Illegal Orientation"
format:@"Invalid best subview orientation: %d",
self.bestSubviewOrientation];
break;
};
controller.view.transform =
CGAffineTransformMakeRotation(rotation);
[self.view addSubview:controller.view];
Here, we determine the correct orientation for our pop-up view and rotate it as needed. We’ll talk more about view rotations in a bit. For now, just be aware that we’re not using UIKit’s autorotations. Our root view and canvas are always kept in portrait orientation—this simplifies the motion detection and drawing code. However, users will typically hold the device in one of the two landscape orientations. If we want our pop-up views to appear properly, we have to monitor the device’s position and set the pop-up rotations by hand.
Here, we simply calculate the correct rotation angle. Then we create an affine transform to rotate our pop-up view, and assign it to the pop-up view’s transform property.
We then add the pop-up to our view hierarchy.
// Now animate its appearance.
switch (type) {
case GSPopupDropDown:
[self animateAppearDropDown:controller
withCompletionHandler:completion];
break;
case GSPopupSlideTowardsHomeButton:
[self animateAppearSlideTowardsHome:controller
withCompletionHandler:completion];
break;
case GSPopupSlideFromHomeButton:
[self animateAppearSlideFromHome:controller
withCompletionHandler:completion];
break;
case GSPopupFade:
[self animateAppearFade:controller
withCompletionHandler:completion];
break;
default:
[NSException
raise:@"Invalid value"
format:@"%d is not a recognized GSPopupAnimationType",
type];
break;
}
}
Finally, we start the animation. Again, each of our animation sequences has its own animateAppear... method.
Let’s look at the initialPosition... methods. We’ll start with initialPositionFor DropDown:.
- (void)initialPositionForDropDown:(UIView*)view {
view.center = self.view.center;
CGRect frame = view.frame;
switch (self.bestSubviewOrientation) {
case UIDeviceOrientationLandscapeRight:
frame.origin.x = -frame.size.width;
break;
case UIDeviceOrientationLandscapeLeft:
frame.origin.x = self.view.frame.size.width;
break;
default:
[NSException
raise:@"Illegal Orientation"
format:@"Invalid best subview orientation: %d",
self.bestSubviewOrientation];
break;
};
view.frame = frame;
view.alpha = 1.0f;
}
This is conceptually straightforward. We want the pop-up view to be centered horizontally, but positioned off the top of our screen. Again, the definition of “top of the screen” will change depending on whether the device is held landscape left or landscape right.
Here, we center the pop-up view in our root view. Then we offset its x-coordinates based on the best device orientation. Finally, we set the frame and set our alpha value.
The ...SlideTowardsHome: and ...SlideFromHome: methods use a very similar logic—they’re even simpler since they don’t need to check the device orientation and can just offset the y-coordinate. So, let’s skip them and look at initialPositionForFade:.
- (void)initialPositionForFade:(UIView*)view {
// Center the view.
view.center = self.view.center;
// And make it invisible.
view.alpha = 0.0f;
}
This is even simpler. We just center our pop-up view and then set its alpha property to 0.0f. This will make the view completely transparent.
Now we just need to animate our views’ appearance. We’ll use Core Animation to do this. I won’t lie to you: Core Animation is a rich, complex framework. Entire books have been written on this topic. There are lots of little knobs to tweak. However, for most common use cases it is easy to use.
To give you the most basic explanation, all UIViews have a number of animatable properties. These include frame, bounds, center, transform, alpha, backgroundColor, and contentStretch. To animate our view, we create an animation block. Inside the block, we change one of these properties. Core Animation will then calculate the interpolated values for that property for each frame over the block’s duration—and will smoothly animate the view’s transition.
If I want to move the view, I just change the frame. If I want to scale or rotate the view, I change the transform. If I want it to fade in or fade out, I change the alpha. Everything else is just bells and whistles.
Let’s look at our fade animation, since it is the simplest.
- (void)animateAppearFade:(UIViewController*)controller
withCompletionHandler:(void (^)(BOOL finished))completion {
[UIView animateWithDuration:0.25f
animations:^()
{
controller.view.alpha = 1.0f;
} completion:^(BOOL finished)
{
[controller didMoveToParentViewController:self];
if (completion != nil) {
completion(finished);
}
}];
}
Here, we just call animateWithDuration:animations:completion:. We set the duration argument to a quarter second. Inside the animation block, we simply set our alpha property to 1.0f. Core Animation will therefore animate the transition from 0.0f alpha (completely transparent) to 1.0f alpha (completely opaque), causing our view to fade in.
The completion block runs once the animation is done. Its finished argument is set to YES if the animation ran to completion and to NO if it stopped prematurely. In this block, we simply call didMoveToParentViewController to completely add our subview controller. Then we call our provided completion handler, if any.
For the drop down and slide animations, we want to add a little bounce at the end. To do this, we’ll chain together several animation sequences. animateAppear DropDown:withCompletionHandler:, animateAppearSlideTowardsHome: withCompletionHandler:, and animateAppearSlideFromHome:withCompletion Handler: all calculate the horizontal or vertical bounce offset and then call animateWithBounce:verticalBounce:horizontalBounce:withCompletionHandler:.
This is where the real work is done. Basically, animateWithBounce:... defines three separate animation blocks. The first block’s completion handler will call the second block, and the second block’s completion handler will then call the third block. However, it’s easiest to define these blocks in reverse order. Let’s look at the method, one block at a time.
- (void)animateWithBounce:(UIViewController*)controller
verticalBounce:(CGFloat)vBounce
horizontalBounce:(CGFloat)hBounce
withCompletionHandler:(void (^)(BOOL finished))completion {
CGPoint center = self.view.center;
// Chaining together animation blocks,
// declare the bounce down animation block.
void (^bounceDown)(BOOL) = ^(BOOL notUsed) {
[UIView
animateWithDuration:0.15f
delay:0.0f
options:UIViewAnimationCurveEaseIn
animations:^{
controller.view.center = center;
}
completion:^(BOOL finished) {
[controller
didMoveToParentViewController:self];
if (completion != nil) {
completion(finished);
}
}];
};
We start by creating a local variable, center, that contains the coordinate of our root view’s center. Next, we define our bounceDown block. This is the final animation sequence in our chain.
Much like animationAppearFade:..., this method simply sets the final position for our view (centered in the root view) and then calls didMoveToParentView Controller: and any provided completion handler when the animation finishes. There are two important changes. First, we’re only using a 0.15-second duration. Second, we added the UIViewAnimationCurveEaseIn option.
By default, Core Animation will interpolate the animations evenly over the duration. This makes the animation appear at a constant duration. UIViewAnimation CurveEaseIn causes the animation to begin slowly, then speed up over the animation’s duration.
// Declare the bounce up animation block.
// This will call bounce down when completed.
void (^bounceUp)(BOOL) = ^(BOOL notUsed) {
[UIView animateWithDuration:0.15f
delay:0.0f
options:UIViewAnimationCurveEaseOut
animations:^{
controller.view.center =
CGPointMake(center.x + vBounce,
center.y + hBounce)
}
completion:bounceDown];
};
Here, we define our bounceUp block. Again, we’re using a 0.15-second duration; however, this time we use UIViewAnimationCurveEaseOut. The animation will start quickly and slow down over the duration. In the animation block, we simply move the view to the top of its bounce position (defined by the vertical and horizontal bounce offsets). When this animation is finished, we call our bounceDown block.
// Initial movement onto the screen.
// This will call bounce up when completed.
[UIView animateWithDuration:0.5f
delay:0.0f
options:UIViewAnimationCurveEaseIn
animations:^{
controller.view.center = center;
controller.view.alpha = 1.0f;
}
completion:bounceUp];
}
Finally, we have the initial animation block. This takes a half second, with a UIViewAnimationCurveEaseIn animation curve. Again, this will cause the view to start moving slowly, but it will accelerate over the duration of the sequence.
This simply centers our pop-up view. We also set the alpha value to 1.0f, just in case. After all, it is possible to both move and fade-in our view at the same time. When the animation sequence is done, we call our bounceUp method.
This isn’t a physically realistic bounce animation, but for most uses it’s probably close enough. If you want to more accurately duplicate a bouncing object, you could calculate your own animation curve by using CAMediaTimingFunction’s functionWithControlPoints: method. For even more precise timing, use a CAKeyFrameAnimation object and an array of CAMediaTimingFunctions. A word of warning, however: Using these functions means we leave the relative comfort of UIView’s convenience methods and trudge deep into the weeds of raw Core Animation.
To hide our pop-up views, we create a similar set of methods, starting with the hidePopupController:animationType: method and then delegating out to the various animateDisappear... methods for the actual changes.
- (void)hidePopupController:(UIViewController*)controller
animationType:(GSPopupAnimationType)type {
[controller willMoveToParentViewController:nil];
[UIView animateWithDuration:0.25f
animations:^()
{
switch (type) {
case GSPopupDropDown:
[self animateDisappearDropDown:controller.view];
break;
case GSPopupSlideTowardsHomeButton:
[self animateDisappearSlideTowardsHome:
controller.view];
break;
case GSPopupSlideFromHomeButton:
[self animateDisappearSlideFromHome:
controller.view];
break;
case GSPopupFade:
[self animateDisappearFade:controller.view];
break;
default:
[NSException
raise:@"Invalid value"
format:@"%d is not a recognized "
@"GSPopupAnimationType", type];
break;
}
} completion:^(BOOL finished)
{
[controller.view removeFromSuperview];
[controller removeFromParentViewController];
}];
}
Here, we call willMoveToParentViewController: before we start the animations. This lets our controller know that it’s about to be removed. Inside the animation block, we call the appropriate animateDisappear... method to change our animatable properties. animateDisappearFade: just sets the view’s alpha to 0.0f, while the others change the frame, moving the view off the screen. Finally, when the animation is complete, we remove the view from its superview and call removeFromParentViewController to complete our child view controller’s removal.
Customizing UIKit Controls
The default appearance for iOS’s controls looks pretty sharp, but sometimes we need something a little different. Maybe we want to use a default color scheme for our app. We don’t need to go full bore and build our own custom controls—we just want to tweak the appearance a bit.
Fortunately, with iOS 5, UIKit lets us easily customize the appearance of many of the built-in controls. In this section, we’ll look at using the new UIAppearance protocol, as well as using resizable and tiled images for buttons and view backgrounds.
Introducing the UIAppearance Proxy
iOS 5 added a number of methods to its views and controls that let us modify their appearance. In this app, we will be modifying the color scheme used by the UIProgressView in our acceleration pop-up.
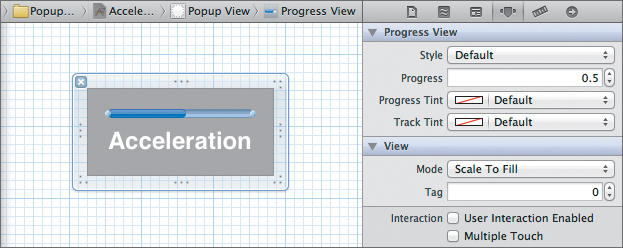
By default, the UIProgressView shows a white track with a blue progress bar (Figure 8.6). However, the class has four new properties that can modify this appearance: progressTintColor, progressImage, trackTintColor, and trackTintImage. The tint color methods will allow you to set a base color for the specified part of the interface. The system won’t necessarily use this color directly. Instead, it will take this color and modify it (e.g., adding highlights or shadows) before displaying the view. The image methods let us assign a resizable image which will be used to draw the track and progress bar—giving us even more control over our interface’s appearance.
Figure 8.6 Our acceleration pop-up with the default UIProgressView
There are several different ways in which we can use these methods. Most obviously, we can call them directly in our code to modify our view’s appearance. For example, to change the acceleration pop-up, we could add the following to our AccelerationViewController’s viewDidLoad method:
self.progressBar.progressTintColor = [UIColor colorWithRed:0.5
green:0.0
blue:0.0
alpha:1.0];
self.progressBar.trackTintColor = [UIColor colorWithRed:0.5
green:0.3
blue:0.3
alpha:1.0];
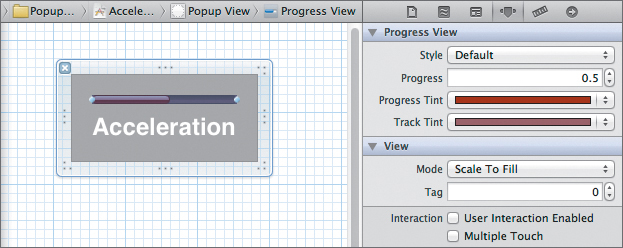
Alternatively, we can set the tint values (but not the images) directly in Interface Builder (Figure 8.7).
Figure 8.7 Our custom UIProgressView
Unfortunately, both of these approaches only let us modify one particular instance of UIProgressView. What if we wanted to change the appearance of all the UIProgressViews throughout our entire application?
Ah, this is where things get interesting. iOS 5 also adds a UIAppearance protocol. This allows us to modify the adopting class’s appearance proxy—modifying all instances of that class.
To set the appearance for all our progress views, just call the following code:
UIProgressView* proxy = [UIProgressView appearance];
proxy.progressTintColor = [UIColor colorWithRed:0.5
green:0.0
blue:0.0
alpha:1.0];
proxy.trackTintColor = [UIColor colorWithRed:0.5
green:0.3
blue:0.3
alpha:1.0];
Or, if we want to be more selective, we can use appearanceWhenContainedIn: to limit our modifications to those instances contained in the specified class. For example, this will modify the appearance of all UIProgressView instances in any PopupView classes.
UIProgressView* proxy =
[UIProgressView appearanceWhenContainedIn:[PopupView class], nil];
proxy.progressTintColor = [UIColor colorWithRed:0.5
green:0.0
blue:0.0
alpha:1.0];
proxy.trackTintColor = [UIColor colorWithRed:0.5
green:0.3
blue:0.3
alpha:1.0];
However, since we only have a single UIProgressView instance in this application, setting the tint colors in the nib is probably the path of least resistance.
Resizable and Tiled Images
Often, we want to modify a view or control by adding a custom background image. The naive approach is to simply create an image that is the exact size needed by our interface. This, however, has two problems. First, it wastes a lot of memory, since we need to load all these full-size images into memory. Second, it limits our flexibility. If we want to resize the control, we need to redesign our background image as well.
Fortunately, iOS offers a solution: We can use resizable or tiled images. Admittedly, iOS has supported stretchable and tiled images since iOS 2.0; however, the old stretchableImageWithLeftCapWidth:topCapHeight: method has been deprecated and replaced with the new resizableImageWithCapInsets: method. Resizable images give us a greater range of options than their older, stretchable cousins.
Let’s start with tiled images. We’ll create two different versions of our background image. The first will be a 24 × 24 pixel image named tile.png. The system will use this for lower-resolution screens. The second will be a 48 × 48 pixel version named [email protected] for devices with Retina displays (Figure 8.8).
Figure 8.8 Low- and high-resolution background images

Now we load the tile image using UIImage’s imageNamed: convenience method. This will automatically load the correct tile image, based on the current device’s screen scale.
self.tileImage = [UIImage imageNamed:TileImageName];
To draw our tiled background, we simply create a UIColor using the image as a pattern. We can then set this as our fill color, and fill in any closed path. In this application, we use it in PopupView’s drawRect: method to draw the view’s background.
- (void)drawRect:(CGRect)rect
{
// Draw the background with rounded corners and a tiled body.
UIColor* border = [[UIColor blackColor]
colorWithAlphaComponent:0.75f];
[border setStroke];
UIColor* fill = [UIColor colorWithPatternImage:self.tileImage];
[fill setFill];
UIBezierPath* path =
[UIBezierPath
bezierPathWithRoundedRect:
CGRectInset(self.bounds, 1.0f, 1.0f)
byRoundingCorners:UIRectCornerAllCorners
cornerRadii:CGSizeMake(20.0f, 20.0f)];
path.lineWidth = 2.0f;
[path fill];
[path stroke];
// Not strictly necessary since we're subclassing
// UIView directly
[super drawRect:rect];
}
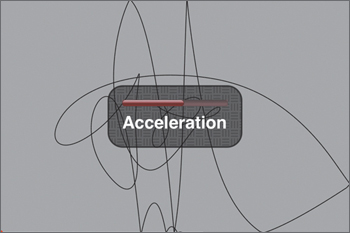
UIKit will draw repeated copies of our image pattern both vertically and horizontally to fill the entire path. In this case, we’re filling in the rounded rectangle and then drawing a 2-point-wide border around it. Notice that we inset our rounded rectangle by half our line width. This gives us enough space to draw our entire line, while still filling the view. This is then used as the background for our pop-ups, like our acceleration control, giving us a nice tessellated background (Figure 8.9).
Figure 8.9 Our tiled background in action
Next, let’s look at creating resizable images. We will use these for the buttons in our export menu. Just like the tile image, we need to create two versions, one for low-resolution screens, the other for Retina displays (Figure 8.10). This time they will be 20 × 20 pixels and 40 × 40 pixels.
Figure 8.10 Low- and high-resolution resizable images

To make a resizable image, we take a normal UIImage and call its resizableImage WithCapInsets: method. This takes a single argument, a UIEdgeInsets structure holding the value of the cap insets on the top, left, bottom, and right.
When this image is resized, the areas covered by the cap insets are drawn normally. Areas between the cap insets are tiled to fill in the remaining space both horizontally and vertically. In our application, we create resizable images for our buttons during the ExportViewController’s tableView:cellForRowAtIndexPath: method.
UIImage* button = [UIImage imageNamed:@"Button"];
UIEdgeInsets insets =
UIEdgeInsetsMake(10.0f, 10.0f, 9.0f, 9.0f);
UIImage* resizableButton =
[button resizableImageWithCapInsets:insets];
[cell.button setBackgroundImage:resizableButton
forState:UIControlStateNormal];
Again, we load the correct image by calling imageNamed:. We then define our insets. In our case, we are leaving only a single point both vertically and horizontally. When the image is stretched horizontally, the column of pixels at x = 10 will be used to fill in the extra width. Similarly, when stretched vertically, the row at y = 10 will be used. On a regular display, both of these are a single pixel wide, so that pixel will be used for the entire width (or height). On a Retina display, these regions are actually two pixels wide, so the rows (or columns) will be tiled to fill the extra space. We can see the resizable images in action by opening our application’s export menu using a horizontal three-finger swipe (Figure 8.11).
Figure 8.11 Resizable images in action
Both tiled images and resizable images allow us to create visually interesting backgrounds while minimizing the memory requirements and size of our final application. Of course, you have to design your images carefully so they will work well as either tiled or stretched images. You cannot simply stretch any image and expect it to look good.
Note
In this example, the interiors of our resizable images are filled with a solid color, since we are tiling a single pixel (or, in the case of a Retina display, two pixels with identical colors). However, by increasing the size of the area between the inset regions, we can create patterns that will then be tiled to fill the entire area covered by the image. It takes additional effort to make sure the tiled areas match well with the inset designs, but when done properly it can produce resizable images based on tessellated patterns.
Responding to User Input
Customizing the appearance is nice, but it’s not much of a control if we cannot respond to user input. Again, UIKit’s controls cover most of the common interactions, but sometimes we need to respond to taps, swipes, pinches, tilts, or shakes in ways that the built-in controls simply don’t allow.
Please note that when I’m talking about controls, I don’t necessarily mean literal subclasses of UIControl. Rather, I am referring to any objects that respond to user input. Many of these will be simple subclasses of UIView, or, in the more complex situations, UIView and delegate pairs.
This often becomes a real stumbling block for many new iOS developers. When we start thinking about creating custom controls, we often assume that we must shoehorn our idea into the target/action pattern used by the more common UIKit controls. Unfortunately, when we try to subclass UIControl ourselves, we quickly find a lack of guidance in the documentation. It’s easy to feel overwhelmed and frustrated. Fortunately, it is also unnecessary.
The harsh truth is that the narrow range of UIControlEvents heavily constrains the target/action pattern’s usefulness. UIControl subclasses work well when they closely match these events—largely limiting us to monitoring touches and drags. Some of the more general events (e.g., the value changed and editing events) can be used to model a broader range of interactions, but they give us a relatively weak interface between the control and its view controller. For more complex controls, we typically need to create a delegate. This delegate may work in tandem with UIControlEvents (e.g., UITextField), or it may stand on its own (e.g., UITextView).
Bottom line, we should not feel like we need to use UIControls. Even in UIKit itself, most of the more complex controls don’t bother subclassing UIControl. Instead, classes like UITextView, UITableView, and UIPickerView prefer to use delegates and data sources over target/action pairs. This allows them to define a much richer interface between the control and its view controller.
For this reason, we won’t spend much time on the relatively narrow topic of subclassing UIControl. Instead, we’re going to focus on the broader task of responding to user input. In particular, we will look at using gesture recognizers to easily detect a wide range of multi-touch commands. We will also look at using the Core Motion framework to monitor changes to the device’s orientation—in our case, letting the user control the cursor by tilting their phone.
Gesture Recognizers
Gesture recognizers were added with iOS 3.2. They greatly simplify the detection of common touch-based commands, like taps, swipes, drags, pinches, rotations, and long presses. In many ways, the gesture recognizers allow us to abstract away the ugly details involved in tracking and analyzing individual touches, letting us define our interactions at a high level. Say we want to detect a two-finger triple tap. No problem. We simply create an instance of UITapGestureRecognizer and set the desired number of taps and touches. That’s it. We don’t need to worry about monitoring the individual touch locations, the number of touches detected, how long each one lasted, or even the duration between the different sets of touches. The gesture recognizer handles all of those details for us, and it handles them in a way that will be consistent across all applications.
Note
While the existing UIGestureRecognizer subclasses cover all the common multi-touch gestures, we can create our own subclass to recognize custom gestures. For more information, check out “Creating Custom Gesture Recognizers” in Apple’s Event Handling Guide for iOS.
Gesture recognizers come in two basic flavors: discrete and continuous. This determines the type of action messages that the recognizer sends. A discrete gesture recognizer will send a single action message once the gesture is complete. These are used for quick gestures that mark a single point in time: taps and swipes.
Continuous gesture recognizers, on the other hand, track the gesture over time. They will continue to send multiple action messages until the gesture ends. Pinches, pans, rotations, and long presses are all modeled using continuous gesture recognizers.
In particular, look at the difference between a swipe and a pan gesture. Superficially, they appear quite similar. Both involve dragging a finger across the screen. However, for a swipe, we’re just interested in triggering a single action. Once the swipe is detected, we call our action and we’re done. It’s a discrete, single event. For the pan, we actually want to track the user’s finger as it moves. The location of the finger, how far it has moved, which direction it has moved—all of these details may be important. As a result, we might use a swipe gesture to trigger a move from one page to another, while we’d use a pan gesture to fast forward through a video or change the app’s volume.
We use a number of different gestures in GravityScribbler. A single-finger pan adjusts the app’s acceleration rate (basically, the responsiveness of the gravity cursor). A two-finger tap pauses the app. Finally, a three-finger horizontal swipe will bring up our export menu.
Note
Instead of attaching the gesture recognizers to individual control elements (e.g., a pause button), we’re attaching them directly to the root view. This means we can perform the gestures anywhere on the screen. In effect, the entire view is our control, and the pop-up views are simply our way of visualizing the user interaction.
Creating Gesture Recognizers
Let’s start with the simplest, our pause gesture. We’ll begin by creating our gesture recognizer in GSRootViewController’s viewDidLoad method.
// Add 2-finger tap to pause.
UITapGestureRecognizer* pauseGesture =
[[UITapGestureRecognizer alloc]
initWithTarget:self
action:@selector(pauseGesture:)];
pauseGesture.numberOfTapsRequired = 1;
pauseGesture.numberOfTouchesRequired = 2;
[self.view addGestureRecognizer:pauseGesture];
Here, we instantiate a UITapGestureRecognizer object, setting its target and selector. Every time this gesture recognizer identifies a tap gesture, it will call our view controller’s pauseGesture: method. Next, we set the number of taps and the number of touches. In our case, we must tap with two fingers at the same time—but we only require a single tap (not a double or triple tap). Finally, we add our gesture recognizer to our root view. It is now active.
Next, we define the pauseGesture: method.
- (void)pauseGesture:(UIGestureRecognizer*)gestureRecognizer {
if (self.canvasViewController.running) {
[self showPopupController:self.pauseController
animationType:GSPopupDropDown
withCompletionHandler:nil];
} else {
[self hidePopupController:self.pauseController
animationType:GSPopupDropDown];
}
self.canvasViewController.running =
!self.canvasViewController.running;
}
UITapGestureRecognizer is a discrete gesture recognizer. This means our pauseGesture: method will only be called once for each tap gesture that it detects. If our canvas view is currently running, we display our pause pop-up; otherwise, we hide it. Then we toggle the canvas view’s running property. Note that we also receive a UIGestureRecognizer argument. While we’re not using it in this method, we could use it to monitor the gesture recognizer’s state or determine the location of our tap gesture. We’ll see examples of this in later gesture recognizers.
Next, let’s do the three-finger swipe. Like our tap gesture, this is a discrete gesture. The action method will be called once the entire gesture has been recognized.
// Add 3-finger swipe to export--we will add twice
// because we want to distinguish the different directions.
UISwipeGestureRecognizer* swipeToExportDown =
[[UISwipeGestureRecognizer alloc]
initWithTarget:self
action:@selector(exportGesture:)];
swipeToExportDown.numberOfTouchesRequired = 3;
swipeToExportDown.direction =
UISwipeGestureRecognizerDirectionDown;
[self.view addGestureRecognizer:swipeToExportDown];
UISwipeGestureRecognizer* swipeToExportUp =
[[UISwipeGestureRecognizer alloc]
initWithTarget:self
action:@selector(exportGesture:)];
swipeToExportUp.numberOfTouchesRequired = 3;
swipeToExportUp.direction = UISwipeGestureRecognizerDirectionUp;
[self.view addGestureRecognizer:swipeToExportUp];
This is superficially similar to our tap gesture recognizer. We instantiate a UISwipeGestureRecognizer, giving it a target/action pair. Next, we set the number of required touches to three, and we set the required swipe direction. Finally, we add the swipe to our view. However, there are a couple of key points worth mentioning.
First, we want to detect horizontal swipes. Now remember, we are keeping our view locked in portrait orientation; however, we assume users will hold it in either landscape left or landscape right. This means the horizontal swipes will actually be detected using UISwipeGestureRecognizerDirectionUp and UISwipeGestureRecognizerDirectionDown.
Second, we’re actually creating two swipe recognizers—one for each direction. We could have easily combined the two directions into a single bitmask and used it to detect either horizontal swipe, but then we’d have no way to determine which direction the user had swiped. In the animation sequence, we want our view’s motions to match the direction of our swipe. By using two separate gesture recognizers, we can easily identify the swipe direction.
- (void)exportGesture:(UIGestureRecognizer*)gestureRecognizer {
self.exportSwipeDirection =
[(UISwipeGestureRecognizer*)gestureRecognizer direction];
GSPopupAnimationType animation;
switch (self.exportSwipeDirection) {
case UISwipeGestureRecognizerDirectionDown:
animation = GSPopupSlideTowardsHomeButton;
break;
case UISwipeGestureRecognizerDirectionUp:
animation = GSPopupSlideFromHomeButton;
break;
default:
[NSException
raise:@"Invalid Swipe Direction"
format:@"Should only recognize swipes up or "
@"down, however this swipe was %d",
self.exportSwipeDirection];
break;
}
// Don't process export gestures if paused.
if (!self.canvasViewController.running) return;
// Pause the view.
self.canvasViewController.running = NO;
// Pass the image snapshot to the export controller.
self.exportController.imageToExport =
[self.canvasViewController snapshotOfCanvas];
self.exportController.deviceOrientation =
self.bestSubviewOrientation;
// And show the export options.
[self showPopupController:self.exportController
animationType:animation
withCompletionHandler:nil];
}
This method starts by accessing the gesture recognizer’s direction property. Note that this is not the direction of the swipe. It is a bitmask indicating the directions permitted by the recognizer. However, since we created two recognizers, each with their own direction value, we can use this property to distinguish between them.
Once we determine the direction of the swipe, we use that information to set the animation type. Specifically, we select an animation sequence that will slide our view in from the side, making sure its motion follows the direction of our swipe.
Next, we check to see if our canvas view is currently paused. If it is, we simply return. We don’t want to display any other pop-up views while our application is paused. Once this check is passed, we pause our canvas, grab a snapshot of our current drawing, and pass both the snapshot and our current best orientation to the export view. Finally, we display the pop-up view, using the showPopupController: animationType:withCompletionHandler: method we developed in the first part of this chapter.
Unlike what we did with the pause menu, we do not provide any code for dismissing the pop-up view and restarting the canvas here. Our export menu must handle those tasks when an export item is selected.
Now let’s add the one-finger pan gesture for our acceleration control. Add the following code to our viewDidLoad method, after the code that creates our swipe gestures.
// Add 1-finger pan for acceleration.
UIPanGestureRecognizer* accelerationGesture =
[[UIPanGestureRecognizer alloc]
initWithTarget:self
action:@selector(accelerationGesture:)];
accelerationGesture.maximumNumberOfTouches = 1;
// This can only succeed if we definitely don't have a swipe.
[accelerationGesture requireGestureRecognizerToFail:
swipeToExportDown];
[accelerationGesture requireGestureRecognizerToFail:
swipeToExportUp];
[self.view addGestureRecognizer:accelerationGesture];
Here, we create a pan gesture recognizer and then set it for a singe touch. Next, we create a dependency between our pan recognizer and our swipe recognizers. Both swipe recognizers must fail before a pan gesture can be recognized.
Unlike the others, pans are continuous gestures. There is no difference when the recognizer is created, but we have to design our accelerationGesture: method to handle multiple calls. Not surprisingly, the method is more complicated than our previous examples. Let’s step through it.
- (void)accelerationGesture:(UIGestureRecognizer *)gestureRecognizer {
// Don't process acceleration gestures if paused.
if (!self.canvasViewController.running) return;
CGPoint motion =
[(UIPanGestureRecognizer*)gestureRecognizer
translationInView:self.view];
[(UIPanGestureRecognizer*)gestureRecognizer
setTranslation:CGPointZero inView:self.view];
Just like before, we check to see if the canvas view is running before we proceed. We don’t show the acceleration control if the canvas is paused.
Then we calculate the distance that the user’s finger has moved since the last update. UIPanGestureRecognizer has three methods to help track the pan gesture: translationInView:, velocityInView:, and setTranslation:inView:. translation InView: tracks the touch’s change in position in the given view’s coordinates. This is the cumulative distance moved—by default, it gives the offset from the gesture’s starting position. Similarly, velocityInView: gives the gesture’s current velocity using the given view’s coordinate system. The velocity is broken into both vertical and horizontal components. Finally, setTranslation:inView: lets us reset the reference point for translationInView: and resets the velocity.
Since we’re only concerned with the position, not the velocity, we only need to use translationInView:. However, we want the change in position for each update. To calculate this, we simply reset the translation by calling setTranslation:inView: and passing in CGPointZero—effectively assigning a new starting point for the next iteration.
// Update the value in the gesture recognizer screen.
CGFloat min = logf(0.05f);
CGFloat max = logf(10.0f);
CGFloat range = max - min;
CGFloat current =
logf(self.canvasViewController.accelerationRate);
CGFloat change = motion.y;
// If we're landscape left, reverse the acceleration changes.
if (self.bestSubviewOrientation ==
UIDeviceOrientationLandscapeRight) {
change *= -1;
}
current += range / self.view.bounds.size.height * 4.0f / 3.0f *
change;
if (current < min) current = min;
if (current > max) current = max;
self.canvasViewController.accelerationRate = expf(current);
[self.accelerationController.progressBar
setProgress:(current - min) / range
animated:YES];
Next, we calculate the acceleration value. We will use this value to scale the results from Core Motion in the next section. The larger the value, the more quickly the cursor responds when tilting the phone. Here, we’re going to scale the value from 0.05 to 10.0. The exact math isn’t too important. However, there are two points worth noting. First, a linear change in the gesture’s location results in an exponential change in the cursor’s responsiveness. Second, we’ve set the scale so that you only need to pan three-quarters of the way across the screen to go from the lowest setting to the highest.
Once the acceleration value is calculated, we assign it. We set the canvas’s accelerationRate property to the exponential value. However, we use the linear value to set our acceleration control’s progress bar. This means that the minimum value will correspond to 0.0f on the progress bar (a completely empty bar), while the maximum value will correspond to 1.0f (a completely filled bar).
switch (gestureRecognizer.state) {
case UIGestureRecognizerStateBegan:
[self showPopupController:self.accelerationController
animationType:GSPopupFade
withCompletionHandler:nil];
break;
case UIGestureRecognizerStateChanged:
// Do nothing.
break;
case UIGestureRecognizerStateEnded:
[self hidePopupController:self.accelerationController
animationType:GSPopupFade];
break;
case UIGestureRecognizerStateCancelled:
NSLog(@"Acceleration Gesture Canceled");
break;
case UIGestureRecognizerStateFailed:
NSLog(@"Acceleration Gesture Failed");
break;
case UIGestureRecognizerStatePossible:
NSLog(@"Acceleration Gesture Possible");
break;
}
}
Finally, we check and respond to the gesture recognizer’s state. Since this is a continuous recognizer, we’re really only worried about the ...Began, ...Changed, and ...Ended states. We’re already recalculating the acceleration values for each update. So, all we really need to do here is display our acceleration view in the ...Began state, and hide it in the ...Ended state. We don’t pause the canvas, since the user might want to see how the cursor’s behavior changes as they adjust the cursor acceleration.
Core Motion
The gestures give us access to all our ancillary controls, but we still haven’t dealt with our device’s main control; we want the user to steer the cursor by tipping and tilting their device. To do this, we must dig into the Core Motion framework.
Core Motion lets us access data from a variety of sensors on the device. The CMMotionManager class acts as the gateway to all our motion data. It provides access to our device’s accelerometer, gyroscopes, and magnetometer, as well as the processed device motion data.
Device motion combines data from all the sensors using a sensor fusion algorithm. This produces more accurate motion estimates but comes at a somewhat higher computational cost. Device motion also provides some features that individual sensors cannot perform on their own. For example, it automatically separates acceleration from the device’s motion, and acceleration from gravity.
Unfortunately, not all devices have the same set of sensors. In particular, iPhone 4 and iPad 2 both have access to all the sensors. iPhone 3GS and the original iPad only have the accelerometer and the magnetometer. The 4th generation iPod touch has both the accelerometer and gyroscopes, but no magnetometer. The 3rd generation iPod touch only has the accelerometer. And the simulator doesn’t support any of these sensors. Fortunately, Core Motion provides methods to check and make sure a feature is supported before you attempt to use it.
Note
Device motion is only available on devices that have both the accelerometer and the gyroscopes. If you have a magnetometer, that will be used to improve accuracy, but it is not necessary. Unfortunately, this means the iPhone 3GS, the original iPad, and the 3rd generation iPod touch do not support device motion.
Core Motion also provides both push and pull approaches to accessing the data. In the push approach, Core Motion runs on its own operation queue. We set the interval, and we provide a block of code to execute. Core Motion will then sample the sensors and call this block at every interval.
In the pull approach, Core Motion updates the motion data in the background, and we sample it whenever we need to. In general, the pull approach is recommended for most applications. It is more efficient and typically requires less code. The push data should only be used for applications that focus on data collection, where we want to make sure we don’t accidentally miss any samples.
Games are an interesting case. We want accurate motion results, which implies that we might want to use push data—but most of the time, games already have a run loop running at the game’s frame rate (usually around 60 frames per second). Since we are already updating the game state in each frame, it makes sense to use the pull approach and access the sensors at that time as well. This way, the motion updates are synced with the frame rate.
While we could do this for GravityScribbler, it would require creating a separate timer to run our game loop. Instead, we will use the push approach and let Core Motion’s updates drive the game loop for us.
We will use Core Motion directly in our CanvasViewController class. Let’s start with our init method. Here, we set up the needed infrastructure.
- (id)init {
self = [super initWithNibName:nil bundle:nil];
if (self) {
_motionManager = [[CMMotionManager alloc] init];
_updateQueue = [[NSOperationQueue alloc] init];
// Set the rate to 60 frames per second.
if (_motionManager.deviceMotionAvailable) {
_motionManager.deviceMotionUpdateInterval = 1.0 / 60.0;
} else {
_motionManager.accelerometerUpdateInterval = 1.0 / 60.0;
}
// Set the queue to only 1 concurrent thread.
[_updateQueue setMaxConcurrentOperationCount:1];
}
return self;
}
We start by instantiating both our Core Motion manager and an operation queue. Our motion manager will use the operation queue to run the push updates.
Once this is in place, we check to see if our device supports device motion. If it does, we set the device motion update interval to 60 updates per second. If not, we will just have to use the accelerometer alone, so we set its update interval instead.
Finally, we ensure that our operation queue will only execute one operation at a time—essentially making it a serial operation queue.
Next, let’s add a method to start motion updates. We’ll take this method in steps.
#pragma mark - Gravity Updates
- (void) startGravityUpdates {
if (self.motionManager.deviceMotionAvailable) {
[self.motionManager
startDeviceMotionUpdatesToQueue:self.updateQueue
withHandler:^(CMDeviceMotion *motion, NSError *error) {
CGPoint location =
[self addAcceleration:motion.gravity];
[self.canvas addLineToPoint:location];
dispatch_async(dispatch_get_main_queue(), ^{
[self.canvas updateCanvasUI];
});
}];
Here we check to see if the device supports device motion. If it does, we start the motion updates.
Here we’re primarily interested in the acceleration data. Typically, accelerometers register both the pull of gravity as well as the actual acceleration of the device. Often, we need to separate these two signals, using a low-pass filter to focus on the pull of gravity, and a high-pass filter for device motion. Fortunately, the device motion sensor fusion algorithm uses additional information from the gyros and (if present) the magnetometer to automatically separate the device’s total acceleration into its gravity and user acceleration components.
Here, we simply grab the gravity vector (the direction of gravity given the phone’s reference frame) and pass it to our addAcceleration: method. Then we update the canvas UI. Note that the motion update block runs in our operation queue’s thread. Therefore, we need to dispatch the UI updates back to the main thread.
As you can see, using device motion is simple, short, and sweet. Unfortunately, if we’re running the app on an iPhone 3GS, an original iPad, or a 3rd generation iPod touch, we only have access to the raw accelerometer data. This means we have to pull out the gravity signal ourselves.
} else {
CGFloat filterFactor = 0.1f;
__block CGFloat xAccel = 0.0f;
__block CGFloat yAccel = 0.0f;
[self.motionManager
startAccelerometerUpdatesToQueue:self.updateQueue
withHandler:^(CMAccelerometerData* motion, NSError *error) {
xAccel = (xAccel * (1.0f - filterFactor)) +
((CGFloat)motion.acceleration.x * filterFactor);
yAccel = (yAccel * (1.0f - filterFactor)) +
((CGFloat)motion.acceleration.y * filterFactor);
CMAcceleration gravity;
gravity.x = xAccel;
gravity.y = yAccel;
gravity.z = 0.0f;
CGPoint location = [self addAcceleration:gravity];
[self.canvas addLineToPoint:location];
dispatch_async(dispatch_get_main_queue(), ^{
[self.canvas updateCanvasUI];
});
}];
}
}
This code uses a simple low-pass filter to pull out the gravity signal. Each update step, we nudge the current gravity value slightly based on our current acceleration information. High-frequency changes (like shaking the phone) tend to cancel themselves out before they can accumulate enough to have much of an effect. Gravity, on the other hand, provides a constant pull that changes relatively slowly compared to user-imparted motion. This lets the pull of gravity accumulate rapidly, producing a relatively accurate gravity vector.
Note that we only need the x- and y-components of our gravity vector. Therefore, we don’t even bother to calculate the z-component. Instead, we simply set it to 0.0f. This saves us a little computation time on each update.
Once we have calculated our gravity vector, the steps are the same as before. We pass it to addAcceleration: and update our UI.
Next, let’s look at the addAcceleration: method.
- (CGPoint)addAcceleration:(CMAcceleration)acceleration {
// Update velocity.
CGPoint velocity = self.velocity;
velocity.x += (CGFloat)acceleration.x * self.accelerationRate;
velocity.y -= (CGFloat)acceleration.y * self.accelerationRate;
// Update location.
CGPoint location = self.canvas.currentDrawPoint;
location.x += velocity.x;
location.y += velocity.y;
self.velocity = velocity;
We start by updating our cursor’s velocity based on the x- and y-components of the gravity vector. We multiply this by our accelerationRate parameter, letting us scale the device’s responsiveness.
It’s worth noting that Core Motion can use a number of different reference frames. Here, our gravity vector is given in the device’s reference frame. If you’re holding the phone in front of you in portrait orientation, x points to the right, y points up, and z points straight ahead through the phone’s screen.
The CMDeviceMotion’s attitude works somewhat differently. It gives the device’s orientation in a fixed reference frame. We can select the desired reference frame when starting motion updates. This is particularly useful for augmented reality applications. For example, CMAttitudeReferenceFrameXMagneticNorthZVertical defines a reference frame where the z-axis is vertical and the x-axis points toward magnetic north. This lets you determine the device’s orientation in the real world (assuming, of course, your device has a magnetometer).
However, for our motion updates, we just need to realize that our gravity’s reference frame is different from our view coordinates. In our view, the y-axis points down the screen. In gravity, it points up. We therefore reverse the gravity’s y-component when calculating our velocity.
Once we have the current velocity, we simply calculate our cursor’s next location.
// Get the max bounds.
CGRect bounds = self.view.bounds;
// Make sure the cursor cannot leave the screen.
if (location.x < 0) {
location.x = 0;
velocity.x *= -0.5f;
}
if (location.y < 0) {
location.y = 0;
velocity.y *= -0.5f;
}
if (location.x >= bounds.size.width) {
location.x = bounds.size.width;
velocity.x *= -0.5f; }
if (location.y >= bounds.size.height) {
location.y = bounds.size.height;
velocity.y *= -0.5f;
}
self.velocity = velocity;
return location;
}
In the second part of the addAcceleration: method, we check to make sure our cursor remains within the screen’s bounds. If either the x- or y-component is out of bounds, we set it to the screen’s edge and reverse the velocity along that axis. We also reduce the velocity by half. This gives our cursor a nice little bounce when it hits the edge of the screen.
Finally, we assign our new velocity and return the updated cursor location.
Now we just need a method to turn off motion updates.
- (void)stopGravityUpdates {
// Turn off gravity updates.
if (self.motionManager.deviceMotionAvailable) {
[self.motionManager stopDeviceMotionUpdates];
}
else {
[self.motionManager stopAccelerometerUpdates];
}
}
Here, we just check to see which type of motion updates we’re using and then stop the appropriate one.
Device Orientation
As mentioned earlier, we keep our canvas view locked in portrait orientation. There are a couple of reasons for this. First, it’s easier. As we just saw, our gravity vector comes in the device’s reference frame. Keeping the view orientation constant makes it easy to translate our gravity coordinates to the view coordinates; we just need to invert our y-coordinate. However, if we allowed the view to rotate to different orientations, we would have to convert the gravity coordinates separately for each orientation.
The biggest problem, however, is simply usability. The user will be tilting and tipping their phone as they steer the cursor about the screen. We don’t want to accidentally rotate the view just because they tilted the phone too far in one direction or another.
However, this gives us a problem. How do we orient our pop-up views when we display them? There are two main approaches. The easiest is to simply pick an orientation and stick with it. We could, for example, decide that the interface will always be used in landscape mode with the home button to the right, and display all our pop-ups appropriately.
This has a few advantages. It’s easy. It’s consistent. And it works particularly well when the UI gives the user some indication of the correct orientation from the beginning, so they aren’t surprised when a pop-up view appears. However, it can cause problems. It’s always a little annoying to launch an app and find out that it thinks you’re holding your phone wrong. I don’t mind changing from portrait to landscape or from landscape to portrait—but having to change from landscape right to landscape left always bothers me.
This is even worse with the iPad. I find that many iPad cases make it easier to hold the device in one particular orientation. What’s worse, the natural orientation can vary from case to case (or even from person to person). Running an app that forces the user to hold their device in an uncomfortable position won’t win you any friends.
If you’re developing an app that is likely to run while the phone is mounted—for example, running music or GPS apps while the phone is placed in a car mount—then we probably need to let our app support all possible orientations. After all, some mounts may hold the phone in landscape mode. Some will hold it in portrait mode. We can’t expect the user to pop the phone out of its mount and rotate it around just to use our app.
So, we probably want to support both landscape orientations. This means that we need to try to predict the device’s correct orientation and then use that. In our case, we will track orientation changes and record the last landscape orientation. This will be our best guess for the current user orientation. We won’t get it right 100 percent of the time, but since users typically tilt the phone more vertically before using the gesture controls, it works most of the time.
Now, we could use our current motion updates and the gravity vector to determine our interface’s current orientation—but there’s a better way. Let’s step out of Core Motion and use a higher-level interface. The UIDevice class can generate orientation notifications for us. Here, UIDevice will monitor the device’s motion and determine the most likely orientation. These calculations already filter the motion data and apply a hysteresis to avoid unexpected changes and rapid flip-flopping between orientations. We simply need to register to receive the notifications and then turn the notifications on. This is done in GSRootViewController’s viewDidLoad method.
// Catch device orientation changes.
[[NSNotificationCenter defaultCenter]
addObserverForName:UIDeviceOrientationDidChangeNotification
object:[UIDevice currentDevice]
queue:nil
usingBlock:^(NSNotification *note) {
UIDeviceOrientation orientation =
[[UIDevice currentDevice] orientation];
switch (orientation) {
case UIDeviceOrientationLandscapeLeft:
case UIDeviceOrientationLandscapeRight:
self.bestSubviewOrientation = orientation;
break;
default:
// Ignore anything else.
break;
}
}];
[[UIDevice currentDevice]
beginGeneratingDeviceOrientationNotifications];
Here, when we receive the orientation did change notification, we simply check to see if the current orientation is one of the two landscape modes. If it is, we assign it to our bestSubviewOrientation property. Otherwise, we ignore it. We can then use the bestSubviewOrientation to manually rotate our pop-up views as needed.
Exporting Images
There’s one last set of features we should explore before leaving GravityScribbler. We want to let the user export and share their drawings. Now, we’ve already seen the first half of this. We know how to create an image from a graphics context. So how do we get that image off our device?
We’ll look at four different options. These are hardly exclusive. There are dozens of online photo sharing services, and many of them already produce Objective-C frameworks that can be easily added to your applications. However, our list of export options will focus on methods that are included in the iOS SDK. These include saving the image to your phone’s photo library, sending it as an MMS message, attaching it to an email message, or sending it in a tweet.
Saving to the Photo Library
There’s an easy way to save images to the photo library. Simply call UIImageWrite ToSavedPhotosAlbum(). That’s it. We’re done here. Move along.
OK, so there’s a bit more to it than that. UIImageWriteToSavedPhotosAlbum() is fine, but it doesn’t give us a lot of control. In our case, it has two problems. First, we cannot set the image’s orientation. If we just create an image from our graphics context, the resulting UIImage will be a portrait snapshot of the screen. We want it to be landscape.
While we’re at it, it would be nice if we could geotag the image. The phone has a GPS unit, after all. Why not add a rough location to the image while saving it?
Fortunately, the Assets Library framework gives us low-level access to all the videos and photos managed by our photo library. In our case, it lets us add metadata to an image, letting us both change its orientation and add geotagging.
However, before we can do this, we need to learn how to use Core Location.
Using Core Location
Core Location lets us determine the location and heading of the iOS device. In some ways, it is the complement to Core Motion. Core Location tells us about large motions—the location of the phone on a map. Core Motion tells us about the phone’s orientation and the small-scale motions.
At its base, Core Location provides us with the latitude, longitude, altitude, and heading of our iOS device, along with the accuracy estimates. However, it has a number of helper functions that can provide a range of additional information. We can calculate the distance between two locations. We can use geocoding to look up the latitude and longitude of an address, or use reverse geocoding to get the address from the location data. We can even calculate our device’s current speed.
Core Location also supports two specialized tracking techniques. The first, significant location change monitoring, is an ultra low power tracking method. It is not as accurate as standard tracking, and it only returns updates when the device has moved a significant distance. Next, region monitoring lets us define geographic regions and receive notifications when our iOS device enters or leaves those regions. You can find more information in Apple’s Core Location Framework Reference.
Core Location uses four techniques when determining an iOS device’s location. First, it can triangulate its location using cell towers. This provides a very fast rough estimate. It is the quickest approach and uses the least amount of battery power, but it has the lowest accuracy.
Next, the device scans for wireless hotspots and uses them to calculate a more accurate location estimate. This requires a bit more time and—since it requires turning on extra radios—a bit more energy, but it can drastically improve our location estimates.
For the greatest accuracy, the device can use GPS. Of course, this approach is the most expensive, both in terms of time and battery power.
Finally, Core Location can access the magnetometer to determine the device’s heading.
Unfortunately, as with Core Motion, not all iOS devices have all the required sensors. For the more specialized tracking techniques (heading, region monitoring, and significant change monitoring), we need to check the feature’s availability before we try to use it. Fortunately, for standard location tracking the difference between devices is largely abstracted away. We simply set the desired accuracy, and Core Location will do what it can to meet our expectations. It may provide an initial rough estimate and then improve it as additional data comes in.
Of course, Core Location creates a number of privacy concerns. To help avoid problems, the system will ask the user for permission the first time an application attempts to use Core Location. No matter what the application is, some users will undoubtedly say no. Our application needs to check and see if it’s authorized to use location services, and react reasonably if authorization is denied.
Conceptually, Core Location is simple. We create an instance of CLLocation Manager. We provide a CLLocationManagerDelegate that will respond to our location events. We set the desired properties—in particular, we should always set the desiredAccuracy and distanceFilter based on our application’s needs, since these can have a significant impact on our application’s performance. Then we call startUpdatingLocation to begin generating location updates. When we’re done, we call stopUpdatingLocation.
In GravityScribbler, we don’t need super accuracy, and we’re not going to be tracking the user as they move. Instead, we really want a quick snapshot of their general location. To simplify this, we’ll create a wrapper class, CurrentLocationManager. This will also act as our CCLocationManagerDelegate. This class will provide three methods: startNewSearch, cancelSearch, and getLocationWithCompletionHandler:.
We’ll call startNewSearch as soon as our export menu is displayed. This will let us begin generating location updates in the background. Likewise, we’ll call cancelSearch when the pop-up is dismissed. If the user exports an image, we can get our best location estimate by calling getLocationWithCompletionHandler:.
- (void)startNewSearch {
self.location = nil;
self.callbackBlock = nil;
self.done = NO;
// Check on our location authorization status.
switch ([CLLocationManager authorizationStatus]) {
case kCLAuthorizationStatusNotDetermined:
case kCLAuthorizationStatusAuthorized:
// If we have permission, or if we haven't yet asked,
// start checking for location (will ask if necessary).
self.manager = [[CLLocationManager alloc] init];
self.manager.delegate = self;
self.manager.distanceFilter = 10.0f;
self.manager.desiredAccuracy =
kCLLocationAccuracyNearestTenMeters;
self.manager.purpose =
@"Location data is used to geotag"
@" images when they are exported.";
[self.manager startUpdatingLocation];
default:
// If permission has been denied, we're done.
// We will return a nil location. No need to do
// anything more.
self.done = YES;
break;
}
}
We start by clearing a few properties, and then we check to see if our application is authorized to use location services. If we’re authorized, authorizationStatus will return kCLAuthorizationStatusAuthorized. If our application has not yet asked for permission, it will return kCLAuthorizationStatusNotDetermined. Otherwise, it will return one of the failure constants, depending on whether permission was denied, or whether permission cannot be granted (e.g., due to parental controls).
If we explicitly don’t have permission, we don’t bother setting up our location manager. We just set the done property to YES and leave our location property as nil. Otherwise, we go ahead and try to set up our location manager. The system will automatically ask the user for permission to use location services, if it hasn’t done so already.
We still need to set three properties. First is the distance filter. This is the distance (in meters) that the device must move before generating a new location update. Setting this to kCLDistanceFilterNone will produce update notifications for any motion at all. In our case, we only want updates if the user moves a significant distance, so we set this value to 10 meters.
Next, we set the desired accuracy. Core Location sets a number of constants that we can use here. In our case, speed is more important than accuracy, so we set it to the nearest 10 meters. That should be good enough. In fact, if it’s not fast enough, you may want to lower the accuracy even more. Be sure to test your application in a variety of environments, including indoors and in areas with little or no GPS reception (basement parking garages are good for this).
Finally, we need to set the location manager’s purpose property. This is our chance to explain to the user why our application needs access to location services. It will be displayed when the system asks the user for permission to use location services.
Note
When using location services, the initial update may not have the desired accuracy. This is particularly true when requesting high-accuracy data. Core Location will calculate an initial estimate as quickly as possible and then refine the estimate as additional information comes in.
Once everything is configured properly, we start generating location updates.
- (void)cancelSearch {
[self.manager stopUpdatingLocation];
self.done = YES;
}
By comparison, our cancel method is dead simple. We turn off location updates, and then we set our done property to YES.
- (void)getLocationWithCompletionHandler:
(void (^)(CLLocation* location))completionHandler {
self.callbackBlock = completionHandler;
// If we've already found a location (or an error).
if (self.done) {
[self dispatchCallbackAndStopSearching];
}
}
This should also be relatively straightforward. If we already have a location update, we’ll call our callback immediately. To do this, we start by saving a reference to our callback block. If we’re done, we go ahead and call dispatchCallbackAnd StopSearching. If not, we keep waiting.
- (void)dispatchCallbackAndStopSearching {
[self.manager stopUpdatingLocation];
// Make local copies that will be captured by the block.
void (^callback)(CLLocation* location) = self.callbackBlock;
CLLocation* location = self.location;
// This will be added to the end of the main queue.
dispatch_async(dispatch_get_main_queue(), ^{
callback(location);
});
// Clear the originals.
self.callbackBlock = nil;
self.location = nil;
self.done = NO;
}
This method stops our updates and then calls our callback block. However, our location updates may arrive on a background thread, and we want to make sure our completion handler is always run on the main thread. Therefore, this method dispatches our callback back to the main thread, passing in our most recent location estimate.
Of course, there’s a bit of subtlety here. We start by making local copies of both our location data and our callback block. Then we dispatch the callback block to the main queue, and clear our properties. If we didn’t make local copies, our dispatch block would capture the properties, but they would be set to nil before the dispatch block executed. By saving the properties as local variables, we ensure that the current values are captured by the local block and that they’re not affected when we clear the properties.
Now we simply need to implement the delegate methods.
- (void)locationManager:(CLLocationManager *)manager
didUpdateToLocation:(CLLocation *)newLocation
fromLocation:(CLLocation *)oldLocation {
NSDate* timestamp = newLocation.timestamp;
NSTimeInterval age =
[timestamp timeIntervalSinceNow];
// If our location is more than
// 10 minutes old, ignore it.
if (age < - 600.0) return;
self.location = newLocation;
self.done = YES;
// If we have a callback waiting, call it.
if (self.callbackBlock != nil) {
[self dispatchCallbackAndStopSearching];
}
}
This method is called whenever we receive a location update. We start by checking to see if our location data is old. If it’s more than 10 minutes old, we ignore it and wait for the next update. Otherwise, we simply save a reference to the new location and set the done property to YES. If we already have a callback block, we dispatch it immediately. If not, we wait, allowing us to receive any additional updates that may come in, and then as soon as getLocationWithCompletionHandler: is called, the completion handler will be dispatched immediately.
- (void)locationManager:(CLLocationManager *)manager
didFailWithError:(NSError *)error {
self.done = YES;
// If we have a callback waiting, call it.
if (self.callbackBlock != nil) {
[self dispatchCallbackAndStopSearching];
}
}
Finally, we have to respond to any errors. There are two basic types of errors. First, we have transient errors. These occur when Core Location cannot correctly determine your location. For example, you might be trying to use location services from the basement of a parking garage. In that case, the system will continue to work, and you may start receiving updates once you have a clear signal. The second type of error is terminal errors—these won’t go away. Most commonly, terminal errors come from having the user decline when prompted for permission to use location services.
This implementation will work for either case. Just like a successful update, set the done property to YES. Then we check to see if we have a callback block yet. If we do, we dispatch it immediately. If we don’t, we wait for a call to getLocationWithCompletionHandler:.
If we haven’t already received a successful update, the location property will be set to nil. The dispatch method will then pass that value back to the completion block. However, we can still receive additional updates, so if we get a clear signal we may still get a valid location before the callback is dispatched.
Using the Assets Library Framework
The ExportViewController receives a snapshot of the screen when the pop-up is displayed. We simply need to create an instance of the assets library and save it.
- (void)saveToPhotoAlbum {
[self.currentLocationManager
getLocationWithCompletionHandler:^(CLLocation *location) {
ALAssetsLibrary* library = [[ALAssetsLibrary alloc] init];
NSDictionary* metadata =
[self generateMetadataForLocation:location];
[library
writeImageToSavedPhotosAlbum:[self.imageToExport CGImage]
metadata:metadata
completionBlock:
^(NSURL *assetURL, NSError *error) {
[self.delegate exportController:self
sendMessage:@"Image Saved"];
}]; // write image block ends
}]; // location completion handler ends
[self.delegate exportControllerFinished:self];
}
The first thing we do is call getLocationWithCompletionHandler:. Then, inside the completion handler block, we instantiate our assets library and call the generate MetadataForLocation: helper function to generate the required metadata. Then we write the image to the photo library.
writeImageToSavedPhotosAlbum:metadata:completionBlock: takes a CGImage, not a UIImage, but other than that, we simply pass in our image and metadata. In the completion block, we display a quick pop-up message to let the user know that the file has saved successfully.
The message pop-ups are just like the pop-ups we’ve seen previously. The only difference is that they fade in and then automatically fade out again after a few seconds. Still, I’ll leave exploring their implementation as an optional homework assignment.
Finally, the last line of code dismisses our export menu. Even though this is the last line in the method, it will be called before any of the blocks. This means that the export menu will disappear immediately once the button is pressed. Then, after the image saves (which could take a while, depending on Core Location), a brief notification is flashed on the screen.
This has two key effects. First, the app seems very responsive, since something happens the second they tap the button. Next, the user is informed when the image saves, so they aren’t left worried and unsure.
There’s also another key design point at play here. We use a temporary pop-up to alert the user—not an alert view. Alert views are great if you have a question that needs to be answered. The problem is they bring the app to a complete halt. If you’re displaying an alert view with a single OK button, then you’re probably using it wrong. Instead, try to find another way to alert the user without interrupting the application’s flow.
That seems simple enough. Of course, the real work is done in generateMetadata ForLocation:. Our image property metadata is represented by an NSDictionary. This dictionary may also contain sub-dictionaries. In our case, we will set the orientation property in the main dictionary and then add a location dictionary, which will hold the latitude, longitude, altitude, accuracy, and time stamp. Additional information on the available keys can be found in the CGImageProperties Reference.
This is a long method, so let’s look at it in chunks.
- (NSDictionary*)generateMetadataForLocation:
(CLLocation*)location {
NSMutableDictionary* metadata =
[[NSMutableDictionary alloc] initWithCapacity:1];
// Set Orientation.
NSNumber* orientation;
switch (self.deviceOrientation) {
case UIDeviceOrientationLandscapeLeft:
orientation = [NSNumber numberWithInt:8];
break;
case UIDeviceOrientationLandscapeRight:
orientation = [NSNumber numberWithInt:6];
break;
default:
[NSException raise:@"Illegal Orientation"
format:@"Invalid best subview"
@" orientation: %d",
self.deviceOrientation];
break;
}
[metadata setObject:orientation
forKey:(NSString*)kCGImagePropertyOrientation];
In this section of code, we instantiate an NSMutableDictionary. We then check the deviceOrientation property. This value was passed to our export pop-up when it was displayed. We then set the orientation value in our dictionary.
// Set Location -- if we have a valid location.
if (location) {
CLLocationDegrees lat = location.coordinate.latitude;
CLLocationDegrees lon = location.coordinate.longitude;
NSString *latRef = @"N";
NSString *lngRef = @"E";
if (lat < 0.0) {
lat *= -1.0f;
latRef = @"S";
}
if (lon < 0.0) {
lon *= -1.0f;
lngRef = @"W";
}
Here we check to make sure we have valid location data. Remember, our location completion handler may have a nil-valued location if Core Location is not available or if it experiences errors. If we have a valid location, we add it to the image.
We also need to massage our latitude and longitude values. Core Location returns a latitude value from –90.0 to 90.0. The image preferences expect a value from 0.0 to 90, with either an “N” or “S” reference. Similarly, our longitude value starts from –180.0 to 180.0. It should be from 0.0 to 180.0 with a “W” or “E” reference.
// Create location sub-dictionary and add it to our
// metadata dictionary.
NSMutableDictionary *locationMetadata =
[[NSMutableDictionary alloc] init];
[metadata setObject:locationMetadata
forKey:(NSString*)kCGImagePropertyGPSDictionary];
// Fill the sub-dictionary.
[locationMetadata setObject:[NSNumber numberWithFloat:lat]
forKey:(NSString*)kCGImagePropertyGPSLatitude];
[locationMetadata setObject:latRef
forKey:(NSString*)kCGImagePropertyGPSLatitudeRef];
[locationMetadata setObject:[NSNumber numberWithFloat:lon]
forKey:(NSString*)kCGImagePropertyGPSLongitude];
[locationMetadata setObject:lngRef
forKey:(NSString*)kCGImagePropertyGPSLongitudeRef];
[locationMetadata
setObject:[NSNumber numberWithFloat:
location.horizontalAccuracy]
forKey:(NSString*)kCGImagePropertyGPSDOP];
[locationMetadata
setObject:[NSNumber numberWithFloat:location.altitude]
forKey:(NSString*)kCGImagePropertyGPSAltitude];
[locationMetadata
setObject:location.timestamp
forKey:(NSString*)kCGImagePropertyGPSTimeStamp];
}
return metadata;
}
Here, we instantiate a sub-dictionary and fill it with our location information. We then add it to our main dictionary. That’s it. We return the main dictionary and we’re done.
There are many, many other image properties that you might want to add to your application. I’ll also leave that as an optional homework assignment.
Sending MMS Messages
OK, I have some good news and some bad news. First the good news: The MessageUI framework has excellent support for sending SMS messages. You can use the MFMessageComposeViewController class to display the standard interface for creating SMS messages. We can even set the initial recipients and message text. With iOS 5, this support has been expanded to automatically use iMessage instead of SMS whenever possible.
Unfortunately, the MessageUI only supports text messages. We cannot use the framework to programmatically attach images or video.
However, this doesn’t mean the user cannot send their image as an MMS. It just means that they have to do it on their own. If they save the image to their photo library, they can then attach it to their own MMS messages. It’s not ideal, but right now it’s one of the few options available.
Alternatively, we could programmatically copy the image to the pasteboard. This would let the user paste it into an SMS message. This will be difficult to clearly communicate to the user, however.
Sending Email Attachments
Email attachments also use the MessageUI framework. However, unlike SMS messages, the email composer lets us set the sender, the subject, and the message body, and (most importantly) it lets us add attachments.
In theory, to send an email message we just need to instantiate our message composition view, set a few parameters, and display it for the user. We cannot send the message ourselves. We can prepare the message for the user, but they have to press the send button.
Unfortunately, we cannot attach a UIImage directly. Rather, we must attach an NSData object holding the contents of the file we wish to attach. Also, we would typically want to check and make sure the device supported email before creating the compose view. In this case, however, we performed that check when the export menu was created. If the device does not support email, then the email button will not appear in our menu.
Again, this is a long method, so let’s break it into several sections.
- (void)sendAsEmail {
[self.delegate exportControllerFinished:self];
[self.delegate exportControllerWaitingForModalView:self];
[self.currentLocationManager
getLocationWithCompletionHandler:
^(CLLocation *location) {
So far, this is just setup. We call a few of the ExportViewControllerDelegate methods. The delegate will use these calls to dismiss our export menu and display a “loading...” message pop-up, letting the user know we are loading another view. Then we get the current location—the rest of the view setup takes place in the completion handler.
// Create our email composer view on a background thread.
dispatch_queue_t queue =
dispatch_get_global_queue(DISPATCH_QUEUE_PRIORITY_DEFAULT, 0);
dispatch_async(queue, ^(void) {
The completion handler runs on the main thread, but saving our image to a temporary file might take a bit of time. We’re going to be writing it to memory, not to disk, so it should be fast. Still, it’s not a bad idea to do this on a background thread, freeing up our main thread.
// Create Image Data.
NSMutableData* imageData = [[NSMutableData alloc] init];
CGImageDestinationRef destination =
CGImageDestinationCreateWithData(
(__bridge CFMutableDataRef)imageData,
(CFStringRef)@"public.jpeg", 1, nil);
NSDictionary* metadata =
[self generateMetadataForLocation:location];
CGImageDestinationAddImage(
destination,
self.imageToExport.CGImage,
(__bridge CFDictionaryRef)metadata);
CGImageDestinationFinalize(destination);
CFRelease(destination);
Here, we’re going to use a CGImageDestination to write out our image data as a JPEG file in memory. Image destinations abstract the task of writing images in various formats. A single image destination can save one or more images, including thumbnails.
There are simpler ways to generate image file data. UIImageJPEGRepresentation() and UIImagePNGRepresentation() both return an NSData containing the raw data for their respective image file formats. However, these methods don’t let us add our image metadata.
Using an image destination takes three steps. First, we create our CGImage DestinationRef, passing in the NSMutableData to hold our file contents, a uniform type identifier for the image type, and the number of images. The final argument, options, doesn’t yet do anything, but it is reserved for future use. Next, we add the images—including our metadata—to the destination. Finally, we finalize the destination. This will write the image files to our NSData.
// Open email compose window & set initial values.
MFMailComposeViewController* composer =
[[MFMailComposeViewController alloc] init];
[composer setSubject:@"My GravityScribbler drawing"];
[composer setMessageBody:@"Here's a drawing I created"
@" using GravityScribbler." isHTML:NO];
[composer addAttachmentData:imageData
mimeType:@"image/jpeg"
fileName:@"GravityScribbler.jpg"];
composer.mailComposeDelegate = self;
Here we instantiate our MFMailComposeViewController. We set the subject and message body and then add our attachment. Finally, we set our ExportView Controller as the mail composer’s delegate. As the delegate, we will be informed if the message is sent, saved, or canceled or if it fails.
// Present the view on the main thread.
dispatch_async(dispatch_get_main_queue(), ^(void) {
[self.delegate exportControllerWillShowModalView:
self];
[self.rootViewController presentViewController:
composer
animated:YES
completion:nil];
});
});
}];
}
Last but not least, we want to display our mail composer as a modal view (Figure 8.12). There are two key points here. First, we dispatch this back to the main thread. Second, we need to create a rootViewController property to hold a reference to our export menu’s parent view controller—we assign this property each time our export view is displayed. This allows us to use that controller to display our modal view.
Figure 8.12 Exporting our image using email
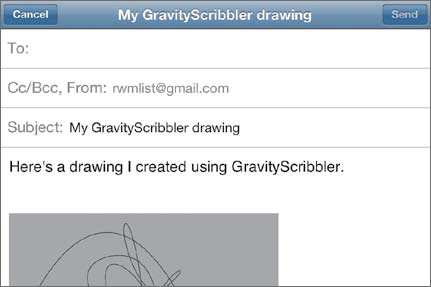
// Save the parent view controller.
self.rootViewController = self.parentViewController;
This is a bit unusual. Typically with iOS 5, you can simply use any child view to present a modal view. The system will work its way back up the view controller hierarchy and find the root view controller (or the first controller whose defines PresentationContext property is set to YES). That view then presents our modal view. This is important, since the child controller’s view may not fill the entire screen. We want to make sure we move back through our hierarchy until we find a controller whose view does.
However, this won’t work in our case. We dismiss our child view as soon as the user presses any of the menu buttons. This makes our app feel very responsive, but it also removes our controller from the view controller hierarchy. Therefore, we have to store and use our own reference back to the root view controller.
Now we just need to dismiss the modal view when we’re done. We can do this by implementing the mailComposeController:didFinishWithResult:error: delegate method.
- (void)mailComposeController:
(MFMailComposeViewController*)controller
didFinishWithResult:(MFMailComposeResult)result
error:(NSError*)error {
[self.rootViewController.modalViewController
dismissViewControllerAnimated:YES
completion:^{
switch (result) {
case MFMailComposeResultFailed:
[self.delegate
exportController:self
sendMessage:@"Send Mail Failed!"];
break;
default:
// Do nothing
break;
}
}];
}
Here, we dismiss the view, and then in the completion block we check to see if we had an error. If we did, we display a quick warning to the user. Otherwise, we don’t do anything. Sent mail messages already have a distinct audio cue, and we really don’t need to alert the user when they save or cancel the message.
Note
UIKit provides a number of views that follow the same general pattern. We instantiate the controller and display it as a modal view. The view communicates back to the main application either through a delegate or by using a block-based API. Most are also designed for single use. We create the view, use it, and dispose of it. If we need it again, we just create a new instance. Obviously, the MessageUI compose views follow this pattern, as does the Twitter view. But there are other examples. UIImagePicker Controller (which lets us select pictures from the photo library or take pictures with the camera) follows the same general pattern.
Sending Messages Using the Twitter API
iOS 5 includes integrated Twitter support. This comes at two different levels. If we just want to let the user send a quick tweet using the system’s Twitter account, then we just need to create, configure, and display a TWTweetComposeViewController. However, there is additional support for sending HTTP requests, directly accessing the Twitter API. The TWRequest class assists in properly formatting GET, POST, and DELETE requests, and it can even manage authorization using any of the accounts from the account framework. You can learn more about the Twitter API at http://dev.twitter.com/docs.
For our purposes, the default Twitter compose view is sufficient. Of course, there are a couple of catches. Unlike our other export features, the Twitter controller allows us to add UIImages directly. Unfortunately, this means we cannot add our metadata to the image. This means we must use Core Image to rotate the image to its proper orientation.
Additionally, we cannot programmatically add location data to the tweet. However, the compose window does include a check box to let the user manually set the location.
Much like the mail composer view, we merely set up the initial values. The user then decides if they want to modify it, cancel it, or send it as is. They are, ultimately, in complete control.
OK, let’s step through the sendAsTweet message.
- (void)sendAsTweet {
// We cannot add location directly;
// user must do that from the tweet sheet.
// Start by canceling the location lookup
// and dismissing the controller.
[self.currentLocationManager cancelSearch];
[self.delegate exportControllerFinished:self];
[self.delegate exportControllerWaitingForModalView:self];
// Now do the rest on a background thread.
dispatch_queue_t queue =
dispatch_get_global_queue(DISPATCH_QUEUE_PRIORITY_DEFAULT, 0);
dispatch_async(queue, ^(void) {
The initial code simply cancels our Core Location updates, and it then removes the menu view and has the delegate display a “loading...” message while we instantiate and configure the compose view. The rest of the method is then dispatched onto a background thread to avoid blocking the main thread.
TWTweetComposeViewController* controller =
[[TWTweetComposeViewController alloc] init];
[controller setInitialText:
@"Check out my latest masterpiece."
@" #GravityScribbler"];
Here, we create our tweet composer and set the initial text. Note that the TWTweet ComposeViewController methods to modify the tweet’s contents all return BOOL values. Typically we would want to check these values to make sure our message will fit within the allotted 140 characters; however, with only a 32-character message and a single image, we’re at no risk of running over.
// We cannot set the image's orientation.
// Instead, use Core Image to rotate the image.
CIImage* image =
[CIImage imageWithCGImage:self.imageToExport.CGImage];
This code creates a CIImage from our imageToExport property. A CIImage object represents an image in the Core Image framework.
Core Image is an image manipulation framework. It lets us change an image’s appearance by scaling, cropping, rotating, or adding filters to the image. The CIImage object is really more of an image recipe. It contains a set of instructions, but the framework does not actually create the final image until the CIImage is rendered onto a context. In our case, the CIImage’s instructions will include our input image and our rotation matrix.
This is a rather simplistic example of Core Image’s capabilities. The Core Image framework comes with a rich set of filters that can be combined in an almost unlimited number of ways to produce a wide range of visual effects. You can find a lot more information in the Core Image Programming Guide.
CGFloat rotation;
switch (self.deviceOrientation) {
case UIDeviceOrientationLandscapeLeft:
rotation = M_PI_2;
break;
case UIDeviceOrientationLandscapeRight:
rotation = -M_PI_2;
break;
default:
[NSException
raise:@"Illegal Orientation"
format:@"Invalid best subview orientation: %d",
self.deviceOrientation];
break;
}
CGAffineTransform transform =
CGAffineTransformMakeRotation(rotation);
Here, we simply create our rotation matrix, based on the device’s orientation. Remember, our image will appear in a portrait orientation by default. We want to rotate it into one of the two landscape orientations.
image = [image imageByApplyingTransform:transform];
CIContext* context = [CIContext contextWithOptions:nil];
UIImage* rotatedImage =
[UIImage imageWithCGImage:
[context createCGImage:image
fromRect:image.extent]];
// Add the rotated image to our tweet sheet.
[controller addImage:rotatedImage];
Next, we apply the rotation to our image, and then we create a Core Image context. We can then render a CGImageRef using the context. The CGImageRef is in turn used to instantiate our new UIImage.
controller.completionHandler =
^(TWTweetComposeViewControllerResult result) {
[self.rootViewController.modalViewController
dismissViewControllerAnimated:YES
completion:nil];
};
// Now present it on the main thread.
dispatch_async(dispatch_get_main_queue(), ^(void) {
[self.delegate exportControllerWillShowModalView:self];
[self.rootViewController presentViewController:controller
animated:YES
completion:nil];
});
});
}
Now we create a completion handler that dismisses our tweet composer. This block will be executed once the tweet is either canceled or sent. Unlike the mail message, there’s no failure result here. The system handles that for us.
Finally, we display the tweet composer on the main thread, and we’re done (Figure 8.13).
Figure 8.13 Exporting our image using Twitter
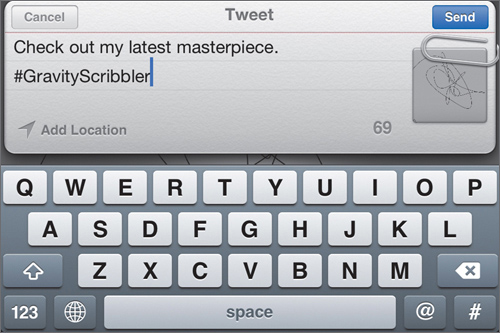
Wrapping Up
This chapter has covered a grab bag of topics. The first two-thirds largely focused on creating custom controls. In this context, a control is any UI element that responds to user input. This task can be split into two parts: displaying the control and capturing the user’s input.
We handled the first part by creating a custom UIViewController container and a series of pop-up views and then using Core Animation to animate our pop-ups’ appearances and disappearances. We also looked at techniques for customizing UIKit controls. For user input, we explored techniques for detecting touches using gesture recognizers, as well as techniques for tracking the device’s motion using Core Motion.
The last third of the chapter rounded out our discussion, as we exported the drawings we created with our custom controls. This let us explore some advanced image handling techniques, including the Asset Library framework, image destinations, and Core Image. We also got a chance to get our hands dirty with Core Location and iOS’s built-in support for both email and Twitter.
Most of these topics are quite deep, and we’ve barely scratched their surfaces. Please use this chapter as a starting point for exploring these topics in more detail. All of these topics are covered extensively in Apple’s documentation.
Our last chapter will discuss the last mile. Here we will polish our app before submitting it to the App Store. This includes everything from setting the startup image and icons, to localization and accessibility.