Landscapes and Post-Processing
Understanding Digital Workflow
Most people who take up landscape photography do so—at least partly—because they enjoy being outdoors in the landscape. For some, it is therefore a sad day when the fact slowly dawns that to get the most out of their digital landscape work they need to spend a fair amount of time working at the computer using the digital darkroom—perhaps more time than they actually spend photographing in the field.
I'm all for getting the best results one possibly can in the camera. But almost without exception every photo that you've admired in books and magazines has been improved in post-processing. Digital photography is a hybrid discipline: the photography part involves cameras, and the digital part means using computers. What you can do after you've taken the photo should inform how you proceed when you make the capture.
While the combination of computers and cameras is very exciting to me, there's no doubt that—compared to film cameras—digital photography has introduced so many options and ways to create images that the whole process can be overwhelming. Having a good digital workflow can help manage the complexity.
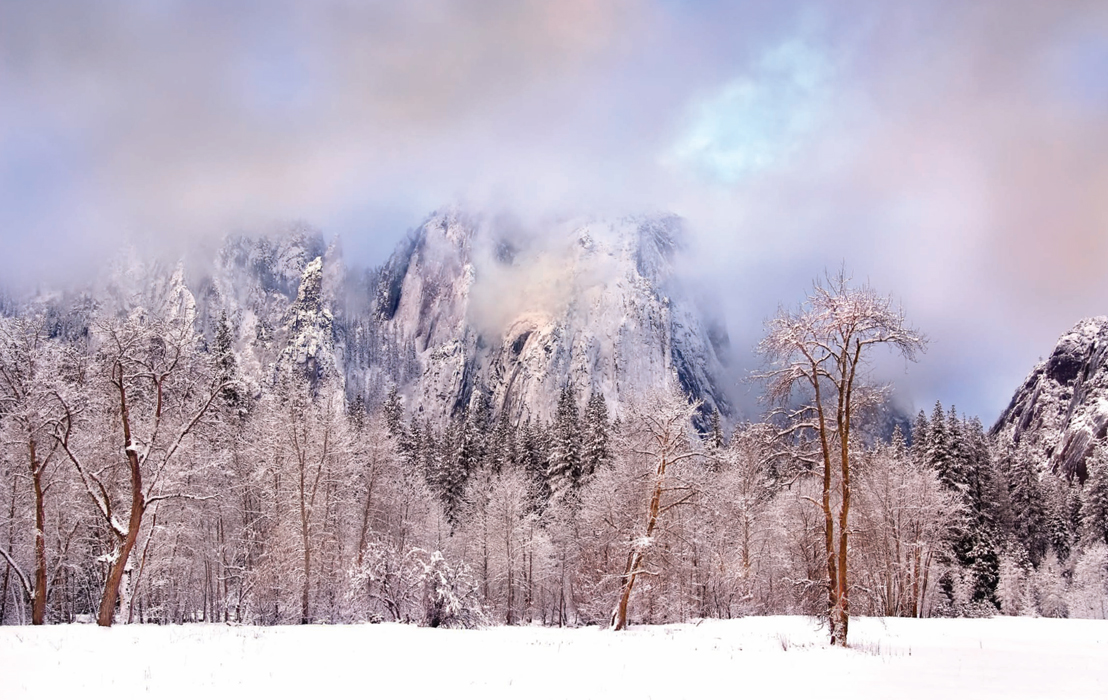
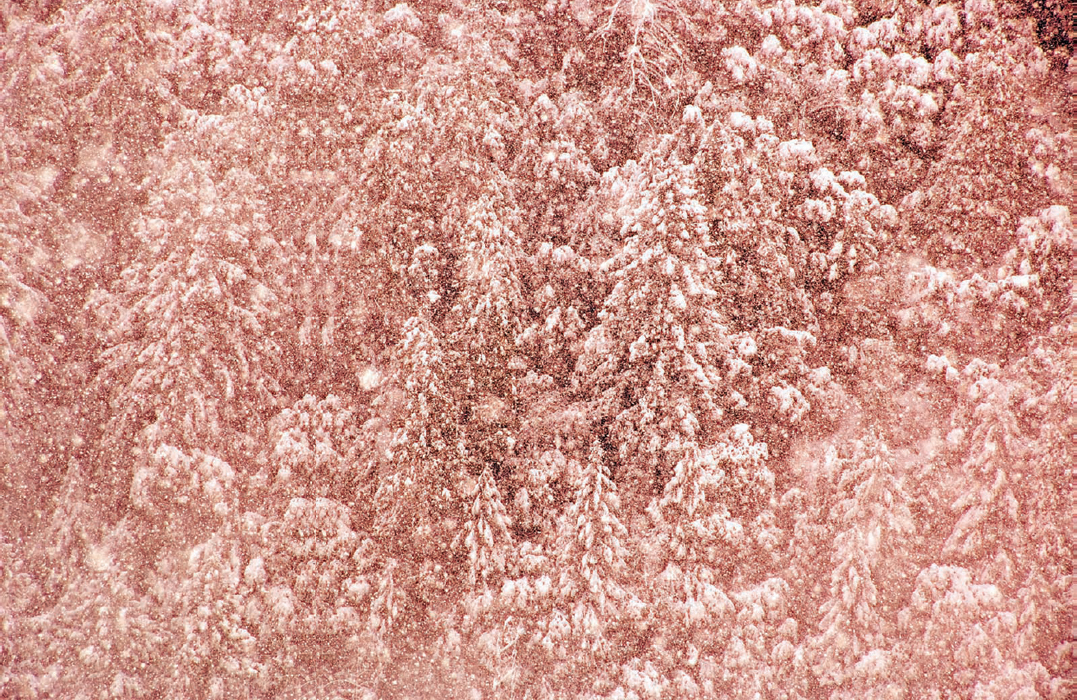
- In the Merced Canyon below Yosemite Valley, California, snow blew thickly in all directions. My idea with this shot was to create a textural image in which the snow and trees merged to form a pattern. The biggest problem was to protect my gear from the very wet snow and high winds—so I made sure to periodically retreat to my dry car, where I could backup the captures I had already made.
200mm, 1/500 of a second at f/10 and ISO 200, tripod mounted
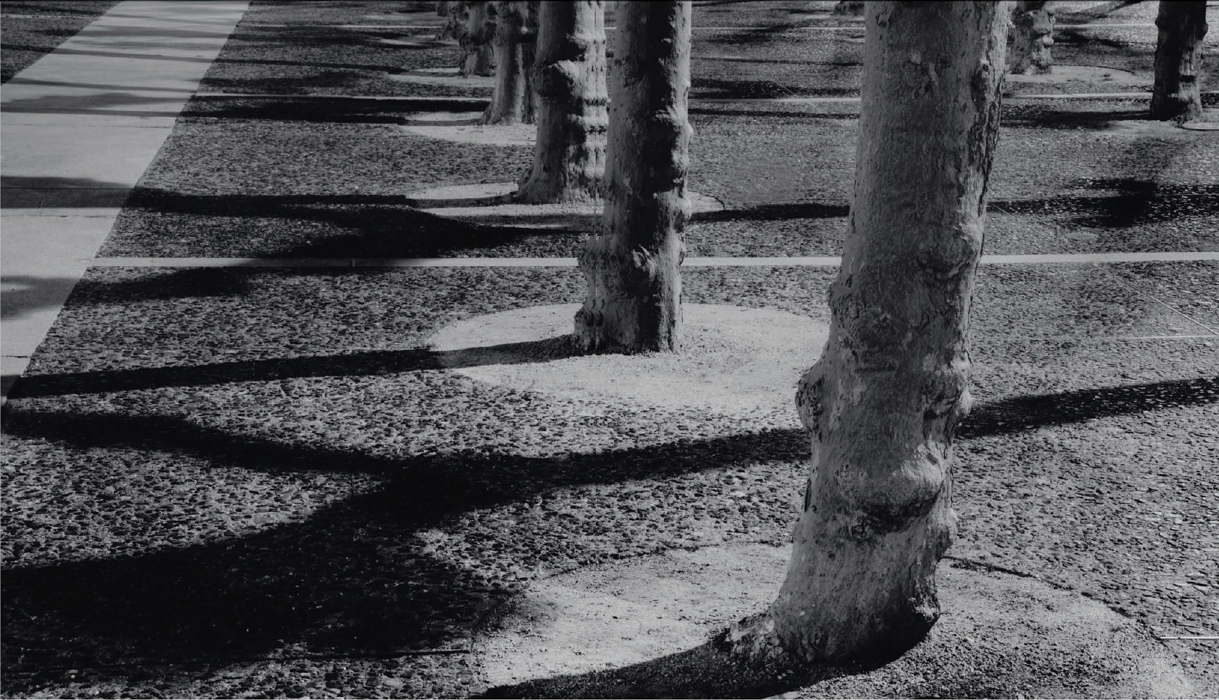
- Pages 194–195: In this night shot of trees symmetrically arranged near San Francisco's City Hall, street lights cast shadows in a direction—and with a relative intensity—that you wouldn't see during the day. Since the ambient light levels were low, the relatively dim lights cast big shadows, making for an interesting composition that wouldn't be possible during the day.
To bring out and emphasize the composition that the shadows made, I converted the photo to monochrome, starting from the RAW capture (see pages 218–221 for more about monochromatic conversion techniques).
44mm, 30 seconds at f/29 and ISO 100, tripod mounted
The field of workflow in its entirety is way beyond the scope of this book, but you should know that it includes these tasks:
- Setting the camera correctly
- Making your capture
- Transferring your photo files from camera to computer
- Processing the photos on your computer
- Generating versions of your image for various uses
- Archiving your images so they can be retrieved
- Insuring the safety of your imagery at all steps of this operation
- Anything else relating to making, processing, storing, and finding your photos
The piece of workflow that involves storing, archiving, retrieving, and making sure files are safe is generally called Digital Asset Management (DAM, for short). As I've noted, the entire topic of DAM will not fit in the scope of a book about landscape photography. However, there are some special considerations regarding asset management in the field that you should bear in mind before you head out in woolly weather to the wilds with your camera.
Protecting Digital Assets in the Field
Good landscape photography often implies travel to remote places and being outside in rough weather (see page 142 for a discussion of why some of the best landscape photos precede or immediately follow stormy weather). Both remoteness and bad weather mean that you should take precautions to protect your delicate electronic equipment as well as your digital assets:
- Know what you are getting into. An important part of being prepared is doing your homework about what the possibilities are—you can then plan to keep things safe under all conditions you are likely to meet. This level of preparation seems obvious, but it is amazing how many photographers fail to be diligent about studying possible weather conditions in a planned shooting location. See page 144 for more about planning tools.

- Cameras, memory cards, and other electronics are vulnerable to weather conditions such as heat, sand, moisture, and cold. It's wise to take precautions to protect your gear, perhaps by sealing equipment in plastic bags or other water-and-airtight containers. On the other hand, upper-end DSLRs tend to be well sealed, and if you never take your camera out in bad weather you will miss many opportunities.
- Carry a clean cotton cloth for drying equipment that gets wet, as well as a lens-cleaning kit.
- You should never rely on a single copy of any digital file. This implies backing your memory cards up as soon as possible. If you have a laptop in the field, you can burn DVDs as backups. In situations where I cannot bring a laptop computer, I use a digital wallet device such as the Wolverine, www.wolverine.com, for backing up my valuable image files. An empty memory card has little value, but it is priceless once it has the only copies of your images on it.
- Electronic devices require power even in the field. Depending on the situation, you may need to bring power supplies for recharging batteries—and for running your cameras and laptop on AC power.
On a related point, my wife insists that I carry an insurance policy on my photography gear. Her reasoning: “If your camera blows over a cliff in a strong wind, I don't want you even thinking about going down after it!”
- Panoramic and other kinds of composite imagery are easy to create in the digital darkroom. To make this image of the San Francisco skyline, in Photoshop I combined eight images with the camera carefully rotated horizontally on the tripod between each capture. Of course, when your image consists of multiple captures, you need to keep track of the exposures that will make up your final image—and this adds to the complexity of asset management in the digital world.
Eight captures merged in Photoshop, each exposure at 42mm, 1/6 of a second at f/4.5 and ISO 100, tripod mounted
The RAW Advantage
As you probably know, depending upon your camera you can save your capture files in JPEG or RAW file formats, or with many cameras in both file formats for each capture. (In addition, some cameras allow you to save files in the TIFF format.)
Without getting into technical file format details, the RAW advantage boils down to the fact that it is the only format that retains all the data actually created when you make a photo. So if you are serious about your landscape photography, you should make sure to save and archive your photos as RAW files.
There's no such thing as a RAW file format that everyone uses—each camera manufacturer has their own “flavor” of RAW that is proprietary and tuned to their own sensor arrays and processing algorithms.
- Below is a JPEG that my camera saved at the same time as I made a RAW capture. The JPEG doesn't show nearly the lightness of color that I was able to tease out of the RAW file (on the right).
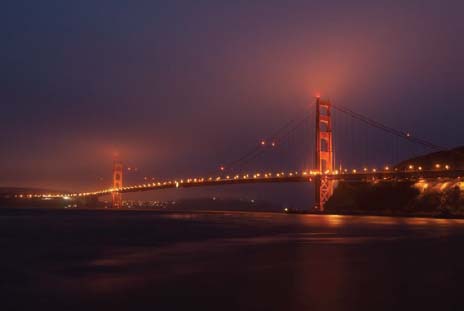
- From Fort Baker, I watched the fog blow in from the Pacific across the towers of the Golden Gate Bridge. I shot a longish (30 second) exposure to increase the apparent luminance and smoothness of the fog clouds.
Both: 24mm, 30 seconds at f/8 and ISO 100, tripod mounted

The table below shows some of the most common RAW file formats.
| Manufacturer | File extensions, comments |
| Adobe | DNG |
| Canon | CRW, CR2 |
| Nikon | NEF, NRW |
| Olympus | ORF |
| Pentax | PEF |
| Sigma | X3F |
| Sony | SRF, SR2, ARW |
In point of fact, there are a few downsides to shooting in RAW. For one thing, RAW files take up more space on your memory cards than JPEG files (which are saved in highly compressed form). More significantly, you can't do anything right away with a RAW file—you can't display it on your computer or make a print from it. First, the file will need to be processed.
But if you save your files as JPEGs, you are accepting the camera's interpretation of the image data. Believe me, as a human being with eyes and a brain, you can do a great deal better than the teeny-weeny computer in your camera! As you'll see in this section of Creative Landscapes (see particularly pages 200–207) you'll get a lot of mileage by taking advantage of the potentialities—the numerous possibilities—inherent in any RAW file.
For example, there is a huge range of potential exposures within each and every RAW file—about 4 f-stops in either direction from your base exposure, although the entire range isn't usable because of noise considerations—and the exposure you choose to use isn't “baked into” your photo until you process the RAW file and save the results.
By the way, when you process and save a RAW file, a copy of it is saved in a format such as JPEG, PSD, or TIFF. The original RAW file remains untouched as a RAW file.
As you'll see shortly, the best part about this is that you aren't stuck with only one overall exposure value for an image because you can multiply process a RAW file with different values for different areas in your photo.
Multi-RAW Processing
As I've already mentioned, one of the most powerful aspects of processing your own RAW files is that you can process the files more than once—and combine what you come up with to take only the best parts of each!
Landscape photography in particular is a rich field for multiple RAW processing because there are often very different levels of light—requiring very different exposure values—in a photo that includes both a relatively bright sky and the much darker earth. In the olden days, before digital post-processing, this common landscape dilemma could be solved in the shooting process using a split, or a graduated, neutral density filter—an optical setup that allowed for the differing light levels in the landscape and the sky. Nowadays you don't need to use a split neutral density filter; you can just multi-RAW process after the fact.
To multi-RAW process your photos, you will need software that can process RAW photos such as Adobe Camera RAW (ACR), Adobe Lightroom, Aperture, Nikon Capture NX (for Nikon), or the software that shipped with your camera. ACR is the most commonly used RAW processing engine (it also powers Lightroom's RAW processing), so in the examples in this book I'll use ACR.
Besides processing a single image more than once (with different settings) you also need a way to combine the different versions. Combining the images can be accomplished using layers and masking in Adobe Photoshop Elements or Adobe Photoshop.
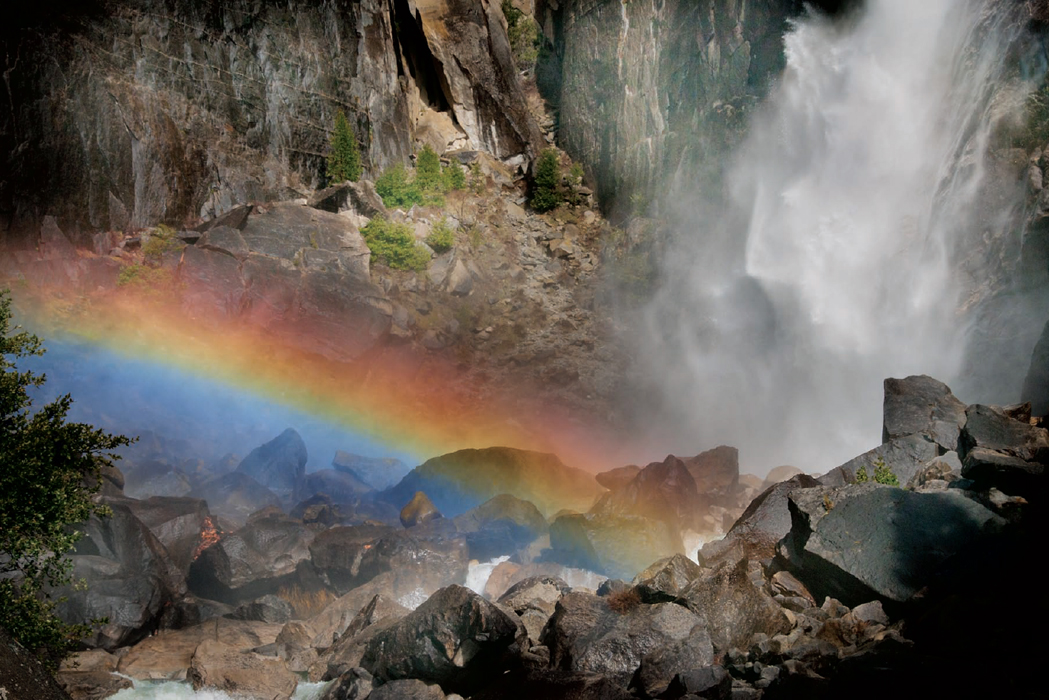
I think that this will all seem clearer following a concrete example. Consider the shot of lower Yosemite Falls and a rainbow shown finished on pages 206–207.
When I took the image, I knew that the combination of darkness and light would be hard to render in a final photo without processing different portions of the photo depending upon their characteristics. In particular, I purposely underexposed the image by about 2½ f-stops (compared to an average overall light meter reading) because I didn't want to blow out the highlights, and I knew I could recover the light areas using multiple RAW processing.
Adobe's Digital Negative Format
Adobe's Digital Negative (DNG) format was created to provide a universal RAW file format. This is a laudable goal, but not entirely practical since each manufacturer claims a proprietary advantage in how they process the data from their particular sensor. The upshot is that the DNG specification includes a “cloaked” proprietary area for each camera vendor's “secret sauce” —and your takeaway should be that it is fine to archive your work as DNG files; but if you do, also archive the original RAW files.
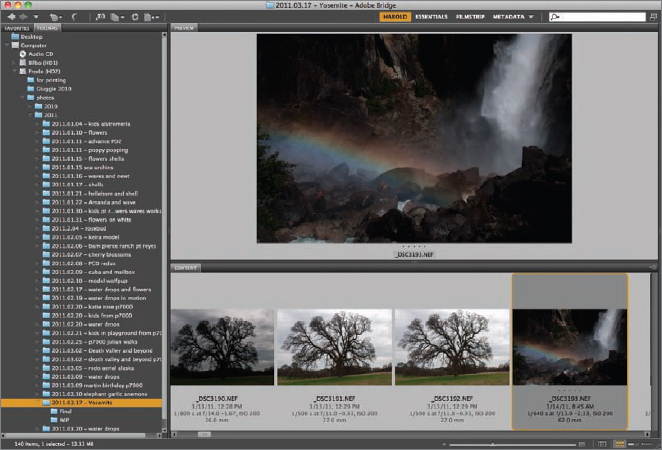
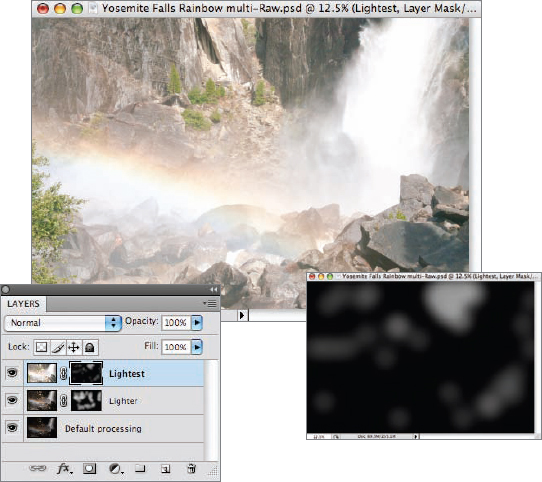
- Step 1: When I looked at the capture in Adobe Bridge, it was quite dark overall–as I had expected since I “underexposed” the image (see text). I double-clicked on the image to start processing it in Adobe Camera RAW (ACR).
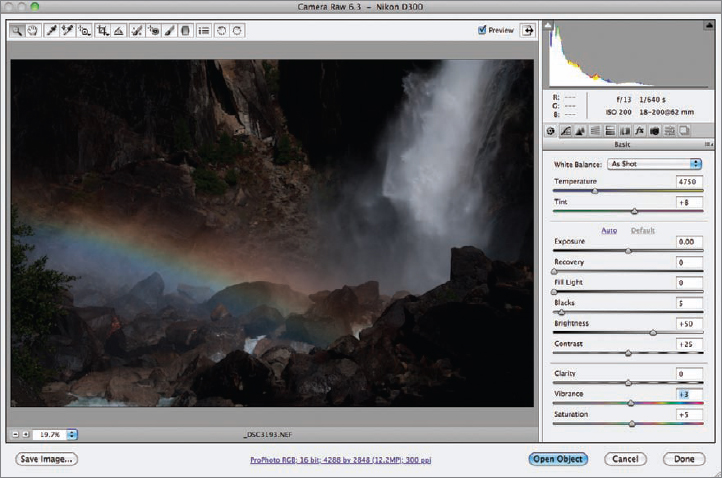
- Step 2: For my first RAW conversion, I processed the image essentially using the default settings in Adobe Camera RAW (ACR), adjusting Saturation and Vibrance slightly.
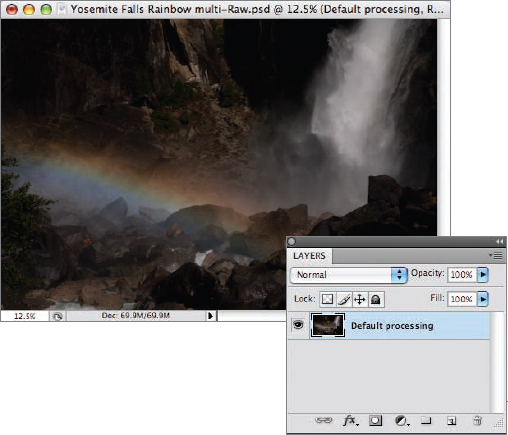
- Step 3: After conversion, the initial RAW processing of the image was very dark. The challenge was to selectively lighten the image in the areas that needed it. I named the layer “Default processing.”
So I decided to use this conversion as the bottom layer and use ACR to convert the RAW capture again two more times to add successively lighter layers on top.
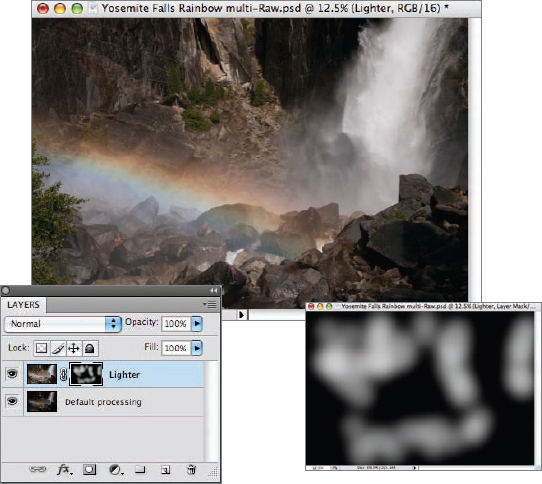
- Step 4: I converted the original RAW capture for the second time in ACR, setting the Exposure, Contrast, and Vibrance sliders to create a lighter version with good midtones.
In Photoshop, I held down the Shift key and used the Move Tool to drag the new version ontop of the “Default processing” layer. (See Step 5 on page 213 for more about this dragging technique.) I named this new layer “Lighter.”
- Step 5: I then combined the two layers by adding a black Hide All layer mask to the “Lighter” layer and painting in the lighter areas I wanted using the Brush Tool with whiteselected as the Foreground Color.
- Step 6: Using ACR, I converted the original RAW capture one last time, using the Exposure slider to create a version for the highlights. I added this conversion to the layer stack in Photoshop, and then named this layer “Lightest.”
After adding a black Hide All layer mask to the “Lightest” layer, I used the Brush Tool to paint in highlights. Turn to pages 206–207 to see the results of this multi-RAW processing.
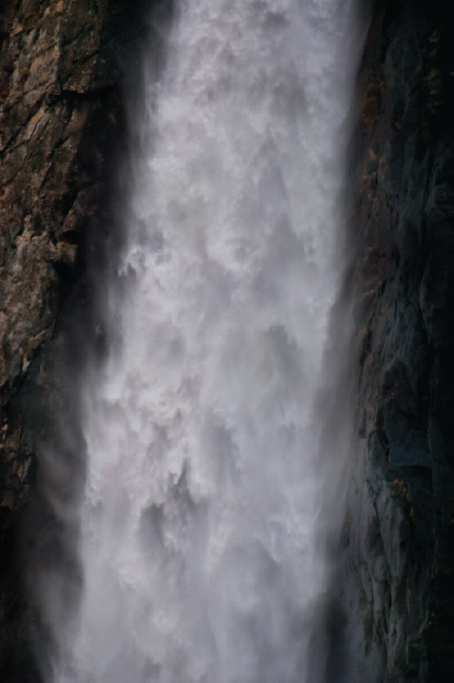
- At Yosemite Falls early in the morning, there was darkness and light. Parts of the landscape were in deep shadows, and other parts were intermittently lit by sunlight. I was ready when the rainbow came out with my polarizer already on my lens. I used a fast shutter speed to stop the motion of the water, and underexposed by more than 2 f-stops to emphasize the chiaroscuro effect (see page 205 for details).
Later, at my computer, I was able to use multiple RAW processing to recreate the effect of the chiaroscuro light in the final image. Processing this capture only once would have led to an overall flat and undramatic final image.
62mm, circular polarizer, 1/640 of a second at f/13 and ISO 200, hand held
Understanding HDR
Don't get caught up in worries that HDR—High Dynamic Range—imaging is something arcane and complex that you'll never understand. The core idea is simplicity itself.
Think about the apparatus we humans have for seeing. If you look at a room with bright sunlight coming in from a window, but dark shadows in one corner, after a little squinting and adjusting you'll probably be able to make out details in both the light and dark areas of the room.
This is emphatically not the case for a single film or digital capture with default rendering of the same scene. Detail will be lost in the shadow areas or in thesunlit areas—or, most likely, in both dark and light areas.
HDR, or extending the dynamic range—the range from dark to light that is rendered in an image—simply means using technology to get more exposure information than one can in a single capture processed at default settings. Arguably, multi-RAW processing(see pages 200-207) should be considered a form of HDR. But the rubber really meets the road when you use more than one exposure to create composite HDR imagery—because the range of possible exposures is greater than you can obtain from any single exposure.
You can use software to automate the blending of a sequence of bracketed images shot to create an HDR composite (see sidebar). But I often prefer to create my HDR composites by hand as shown on pages 210-217. That way, I can create HDR imagery that appears naturalistic, without the startling grunge effect that you see so often in aggressive HDR imagery. My goal when I create a hand-HDR landscape is often to be unobtrusive about what I am doing, so that someone looking at my image doesn't even consciously realize that the image's dynamic range has been extended.
Automated HDR software involves a two-step dance. First, the software combines the images. Then, since this high bit-depth combination cannot be displayed accurately on standard monitors, a “tone curve” is applied using various settings you choose. The final HDR image is rendered as a 16-bit image that can be viewed on a standard monitor and printed.
Depending on the HDR software, you can access it as a plugin for Aperture, Adobe Lightroom, or Adobe Photoshop, or run it in standalone mode. If you already have Adobe Photoshop, it ships with its own HDR capabilities. To use the HDR built into Photoshop, choose File ![]() Automate and then select Merge to HDR (CS4 and earlier) or Merge to HDR Pro (CS5 and later).
Automate and then select Merge to HDR (CS4 and earlier) or Merge to HDR Pro (CS5 and later).
The leading automated HDR programs in addition to Photoshop are:
- HDR Efex Pro, from Nik Software, www.niksoftware.com
- Photomatix from HDRsoft, www.hdrsoft.com
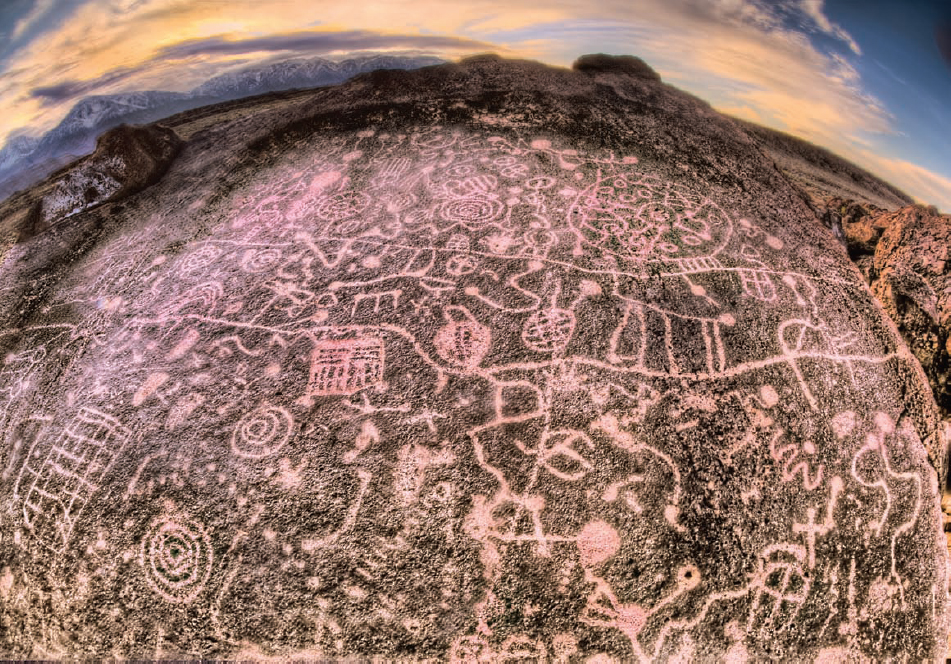
- The foreground was deep in shadow but the clouds in the background were very bright in this image of Native American petroglyphs in eastern California. I shot a sequence of bracketed images with HDR in mind, and back at my computer blended the bracketed sequence using Photomatix for HDR processing and Photoshop to enhance the results.
10.5mm digital fisheye, eight exposures at shutter speeds between 1 second and 1/30 of a second, exposures combined using Photomatix, each exposure at f/22 and ISO 100, tripod mounted
It's worth noting that shooting for HDR—whether automated or hand-HDR—requires some special considerations. HDR techniques work best when the subject is not moving and the camera is on a tripod so it doesn't move. You should plan to bracket exposures to encompass the entire dynamic range from lightest light to darkest dark in your subject. This is likely to involve greater exposure bracketing than one might expect.
It may also work better to bracket using the shutter speed setting ratherthan your aperture—because changing aperture can change the depth-of-field (see pages 106–113 for more about aperture and depth-of-field) in your separate captures.
HDR imaging fits particularly well with landscape photography because landscape photography often does not involve capturing movement, and landscapes tend to have a large difference between bright areas—such as the sky—and dark areas in shadow.
Hand-HDR
If I see a landscape where I know the dynamic range—the range from dark to bright in the scene—will cause me problems in a single capture, I almost always shoot for HDR. This means making sure my camera is solidly on my tripod so it won't move at all, and bracketing extensively using shutter speed as the changing variable in the exposure. By the way, I usually do my bracketing with my camera set to expose manually by changing the shutter speed setting myself, rather than use the camera's bracketing function. I make sure to capture the entire exposure range from darkness to light in the scene before me—with some range to spare in case I need it. Usually this means at least an order of magnitude difference from shortest to longest exposure duration, for example from 1/200 of a second to 1/20 of a second, and sometimes a far greater spread, for instance from 1/200 of a second to 1/2 of a second.
My process for combining hand-HDR imagery is pretty simple. I look through the RAW captures, see which images have the best areas, and then change the exposure and color values to settings that look best for that area, not worrying about the image as a whole.
Next, I combine the separately processed RAW images in Photoshop as layers, using the techniques I explained for combining different versions of multi-RAW processed images on pages 200-207.
For example, I can use hand-HDR techniques to “rescue” landscapes captured with apparently flat and dull light, such as this sequence I shot in Yosemite Valley, California.
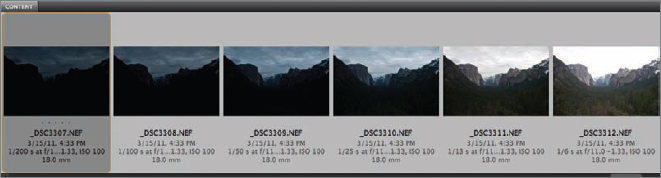
- In Adobe Bridge, this sequence of images I shot in Yosemite Valley, California, looks flat and grey; the dark captures were exposed for the sky, and the lighter versions for the forested valley.
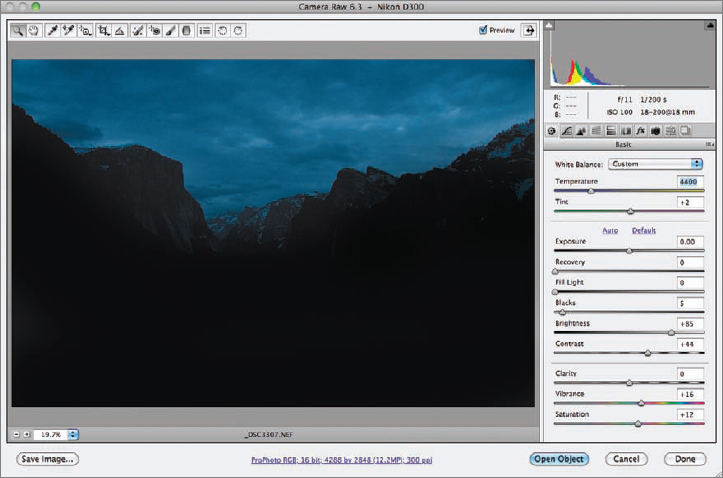
- Step 1: Process this version of Yosemite Valley in ACR to create a dark sky with a blue cast (don't worry that you can't see the foreground). Then, click Open Object to open the image in Photoshop.
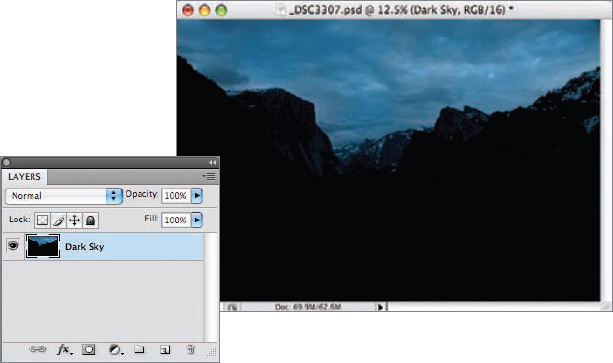
- Step 2: Select Layer
 New Layer from Background and rename the layer “Dark Sky.”
I know you can't see any of the foreground in the image (yet), but just wait. It will appear in a few moments.

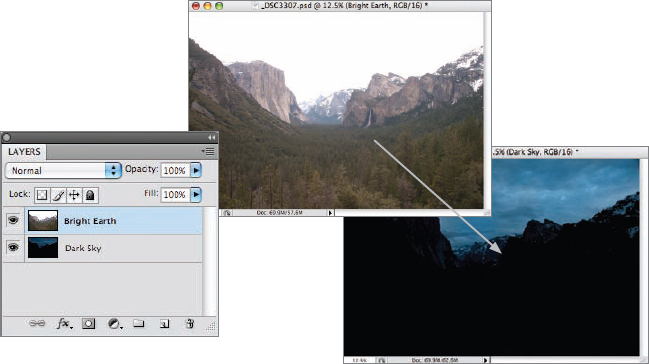
- Step 3: Next, process this lighter view in ACR to show details of the trees covering the forest floor and the mountains behind. Don't worry that the sky is blown out—only concentrate on getting the trees and mountains to where you like them. Then, click Open Object to open this image in Photoshop.
- Step 4: Select Layer New Layer from Background and rename the layer “Bright Earth.”
You now have two images open in Photoshop.

- Step 5: Hold down the Shift key and use the Move Tool to drag the “Bright Earth” image from its window on top of the “Dark Sky” image. Don't let go of the Shift key until you release the mouse button. Otherwise, the two images won't be exactly aligned.
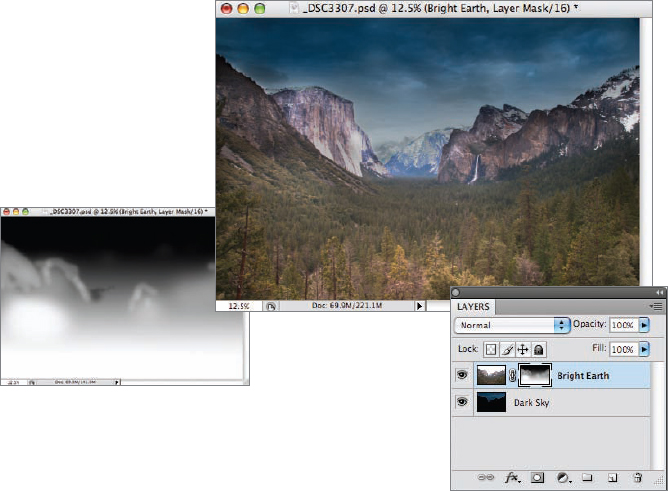
- Step 6: With the “Bright Earth” layer selected in the Layers palette, select Layer Layer Mask Hide All to add a black layer mask that hides the “Bright Earth” layer.
- Step 7: Make sure the layer mask on the “Bright Earth” layer is selected. Then, use the Brush Tool with white selected as the Foreground Color to paint in the trees on the valley floor and the mountains behind.
- Pages 214-215: Standing at Tunnel View in Yosemite Valley, the scene looked flat and gray. I shot eight exposures with HDR in mind. At my computer, I hand processed each image to bring out colors in specific areas, and then combined the versions using layers and masking. The result is a pleasing and unusual composite of an often-photographed view—created from some initially unpromising elements.
18mm, circular polarizer, eight exposures with shutter speeds from 1/500 of a second to 0.8 of a second, exposures combined in Photoshop, each exposure at f/11 and ISO 100, tripod mounted
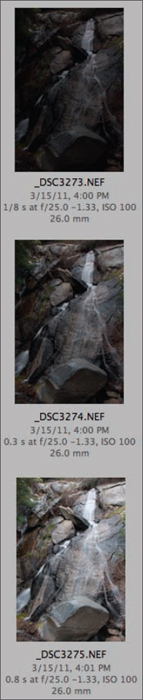
- By the side of the road near Yosemite, California, I shot three different captures of this waterfall at shutter speeds ranging from 0.1 of a second to 0.8 of a second.
Once I returned home, I saved the RAW files on my computer, and then processed the images in ACR, adjusting Exposure, Contrast, Blacks, and Vibrance.
After processing the images, I opened each one in Photoshop. So I had three different captures open in three different windows at the same time.
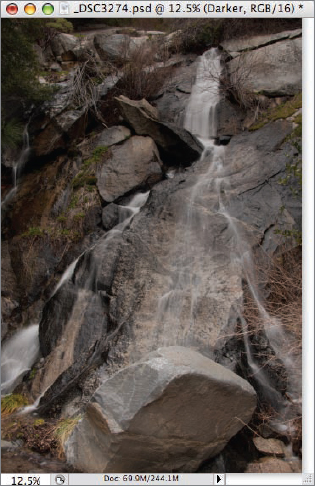
- I combined the three captures in Photoshop using the same dragging technique described in Step 5 on page 213.
Next, I added black Hide All layer masks to the “Lighter” and “Darker” layers.
Finally, I used the Brush and Gradient Tools with white set as the Foreground Color to paint in midtones, highlights, and detail.

- Coming into Yosemite Valley, California, near the intersections of Routes 120 and 140, I saw a roadside pull out where a bulldozer was parked. Down the slope from the bulldozer was this creek, apparently nameless and forgotten. I was intrigued by the sculptural aspects of this small waterfall, but realized that a single capture could never do justice to the entire dynamic range of the lighting from top to bottom, so I planned multiple captures that I later combined in post-processing.
26mm, three exposures with shutter speeds of 0.1 of a second, 0.3 of a second, and 0.8 of a second; exposures combined in Photoshop, each exposure at f/25 and ISO 100, tripod mounted

Monochromatic Conversions
On pages 60-63 I talked about what works in monochromatic landscape photography, and gave some advice about what to look for when you are trying to “see” photographically in black and white. I also explained that the best practice in digital photography is to shoot in color, then convert to monochrome in post-processing.
The full details of the best ways to convert color photos to monochrome are beyond the scope of this book, although as I noted earlier, the subject is covered in detail in another book of mine, Creative Black & White: Digital Tips & Techniques (Wiley).
In this section, I'll provide an overview of how you might go about processing a photo from color to monochrome in the context of two images. These two photos arevery different—but what they have in common is that both started life as a color image that even initially was pretty close to monochrome. There wasn't much color in the scene in front of me, which always makes me consider black and white.
Starting with an image that I think is a likely candidate for monochromatic conversion, my usual workflow is to start by doing the RAW conversion as though the image were a color photo. I don't want to lose a single iota of the information contained in the RAW file, even if the color looks mostly grayscale. It is crucial to have the full color information available when you convert your images to monochrome.
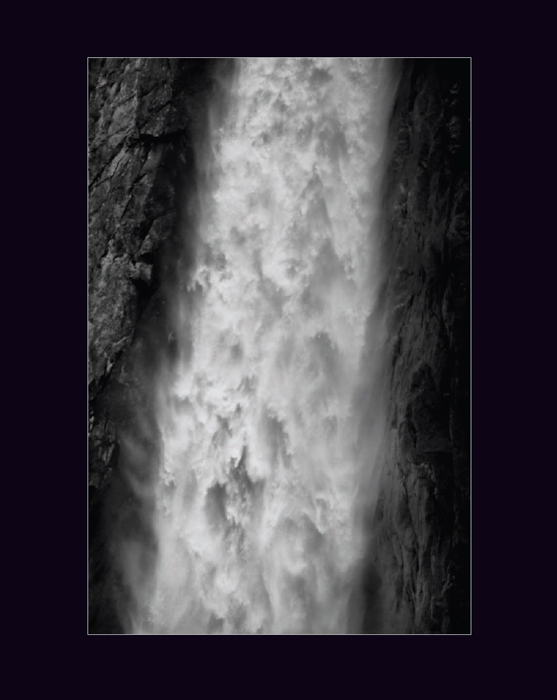
- It was clear to me when I shot this image of lower Yosemite Falls that there wasn't much in the photo in terms of colors besides blacks and whites. When there is not much color in an image anyway, a monochromatic presentation will often work well.
200mm, circular polarizer, 1/640 of a second at f/5.6 and ISO 400, hand held
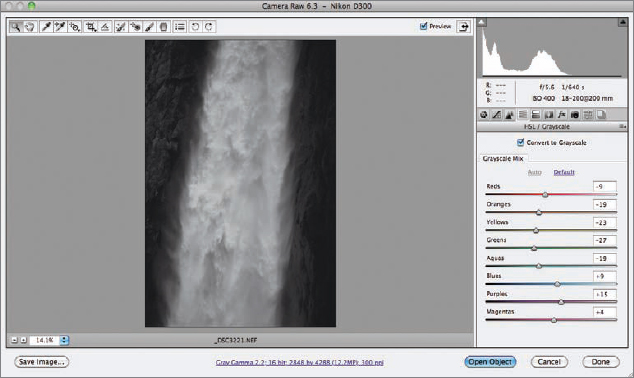
- One way I could have gone about converting the RAW file to monochrome would have been to check the Convert to Grayscale box on the HSL/Grayscale tab of Adobe Camera RAW. I could then have used the color sliders to determine the precise mixture of colors used to create the grayscale (monochromatic) image.
This does take advantage of the color information in the RAW file when making the monochromatic conversion, but it's usually my preference to fully process the file first from the RAW to a color image. There are then a number of ways I can go about converting the file to black and white.
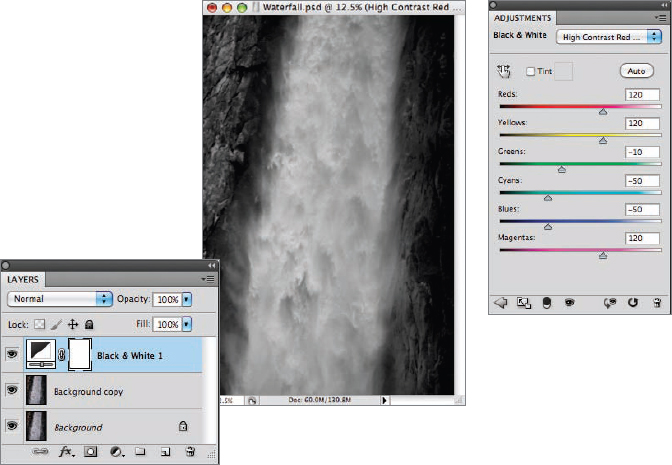
- Adding a Black & White adjustment layer in Photoshop allows me (as with the HSL/Grayscale tab) to use color values to determine how the monochromatic conversion will appear. The preset filters that are part of the Black & White adjustment layer feature set are a very helpful starting place. (The High Contrast Red filter preset is selected as you can see from the drop-down list shown at the top of the Adjustments window.)
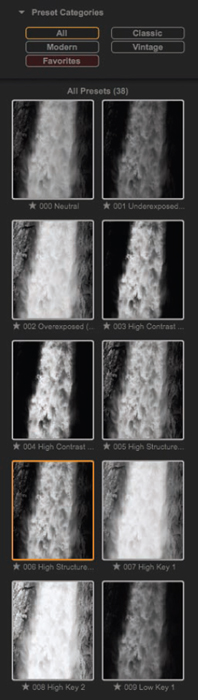
- Nik Silver Efex Pro 2, www.niksoftware.com, is a Lightroom and Photoshop plugin that provides an elegant, powerful, and flexible way to apply a variety of preset monochromatic conversions. Just a few of the many conversion possibilities are shown here.
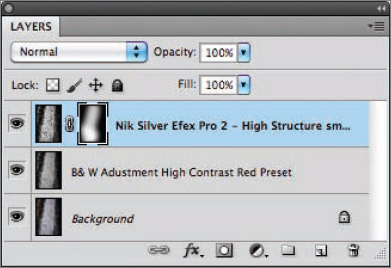
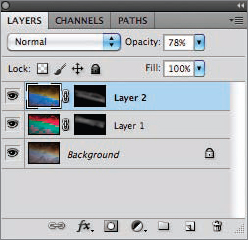
- As I noted with RAW file conversion (pages 200-207), you don't have to process different areas of an image in an identical fashion. The same idea applies to monochromatic conversions. Using layers and masking, different parts of an image can be converted using different color settings, and different presets. In fact, as shown in the Layers palette below, there's no reason not to combine several monochromatic processing programs—for example, one area can be processed using Photoshop's own Black & White adjustments layers, and another can be processed using the Nik Silver Efex Pro 2 plugin.
This flexibility makes it possible to have wonderful monochromatic landscapes with a great tonal range—far beyond what is possible using a single monochromatic conversion technique.
- This monochromatic shot of lower Yosemite Falls started life as a color image that was essentially black and white—and I never bothered to enhance what little color was to befound in the image. However, in other photos, conversion to monochrome can essentially mean a black and white round trip: the image starts as something that seems like it would be good in monochrome because of high contrast and the relative absence of colors. Next, I manipulate the image so that it is highly colorful. Finally, using the colors that have been enhanced, I return the image to monochrome.
200mm, circular polarizer, 1/640 of a second at f/5.6 and ISO 400, hand held
Understanding LAB Color
A color space, or color model, is a structure for referencing and notating color values. As you likely know, the RGB color space is a color space with three channels—Red, Green, and Blue—commonly used in LCDs and monitors. CMYK is a four-channel color space—the color channels are Cyan, Magenta, Yellow, and Black—used to describe the color values in images that will be printed in books and magazines.
LAB is a three-channel color model—I'll explain how the channels work in a moment. Unlike RGB and CMYK, LAB is a theoretical model in the sense that you can't save a LAB image as a JPEG for display on the web, and there are no reproduction processes that use LAB to print things. But LAB has a couple of features that make it excellent for manipulating colors. Once you get the hang of it, it is easy to use LAB colors to make your landscapes go from drab to fab!
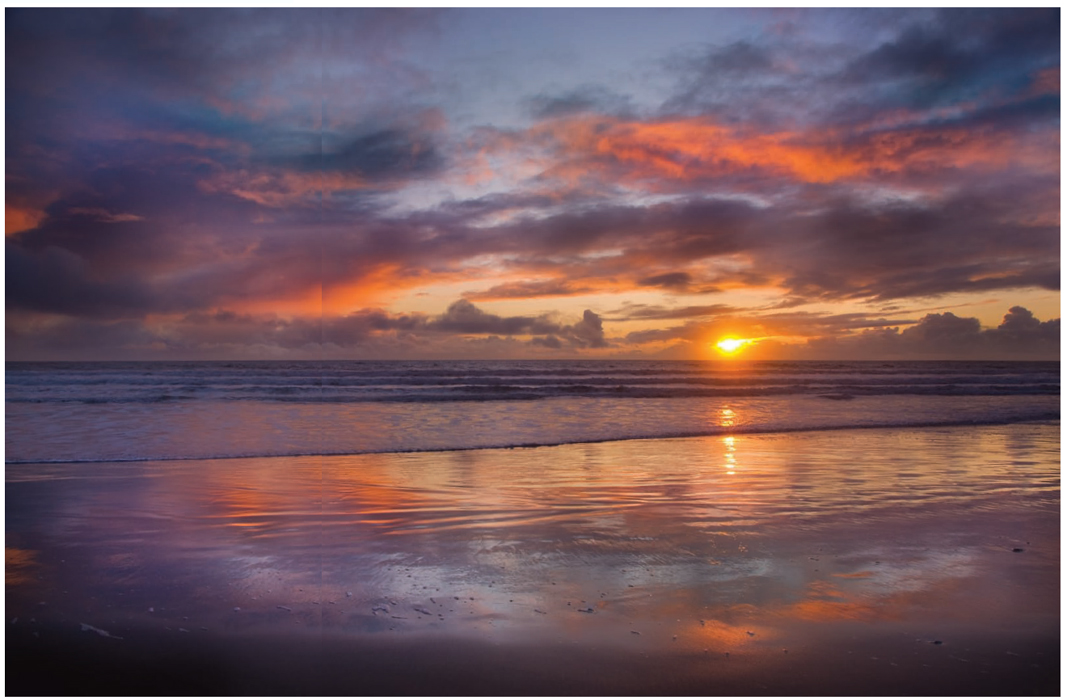
- As the sun set to the west of Stinson Beach, California, I marveled at the glory of the colors reflected in the nearly still waters of the Pacific Ocean. But when I looked at the capture on my computer, it seemed dull and lifeless (check out the initial version of the photo, above). To recreate the vibrant colors as they seemed to me in the time and place I shot the photo, I first multi-RAW processed the image and then used LAB color adjustments.
18mm, 1/50 of a second at f/9 and ISO 100, tripod mounted
In Photoshop, to work in LAB you have to convert your image into the LAB color space. Once you are finished working in LAB, if you want to actually do anything with your photo, you need to convert it back to RGB or CMYK.
The two features that make LAB particularly powerful for working with color are that it separates grayscale information completely from color information, and that each of the color channels are color opponent, meaning they include information both about a color and its opposite color. The ways these features work in Photoshop are shown in the figure below.
You have to work with LAB for a while to understand just how much these facets of LAB can be used to improve your landscape photos; a good example is the next case in which I'll show you how to use these LAB features to make the colors of a rainbow bolder and brighter.
LAB Color and Tonal Adjustments
I've told you that LAB is fabulous for working on color, now let's take a look at how you can use it practically.
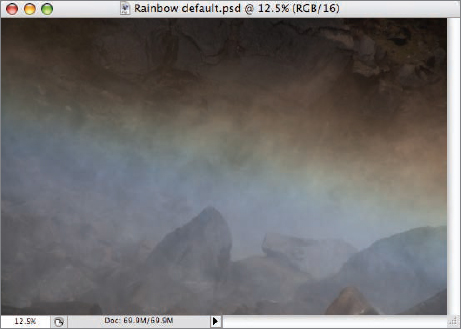
The diffuse mist under Yosemite Falls lent itself to a rainbow when the sun peeked through the clouds. But looking at the image on my computer, I was surprised by how dull the colors were. This would not do!
There are two ways to convert to LAB color in Photoshop. You can select Image ![]() Mode
Mode ![]() LAB Color. Or you can choose Edit
LAB Color. Or you can choose Edit ![]() Convert to Profile, select Lab Color from the Destination Space drop-down list, and then click OK.
Convert to Profile, select Lab Color from the Destination Space drop-down list, and then click OK.
To convert an image back from LAB color, use one of two methods: select Image ![]() Mode
Mode ![]() RGB or CMYK; or choose Edit
RGB or CMYK; or choose Edit ![]() Convert to Profile, then select RGB or CMYK from the Destination Space drop-down list, and then click OK.
Convert to Profile, then select RGB or CMYK from the Destination Space drop-down list, and then click OK.

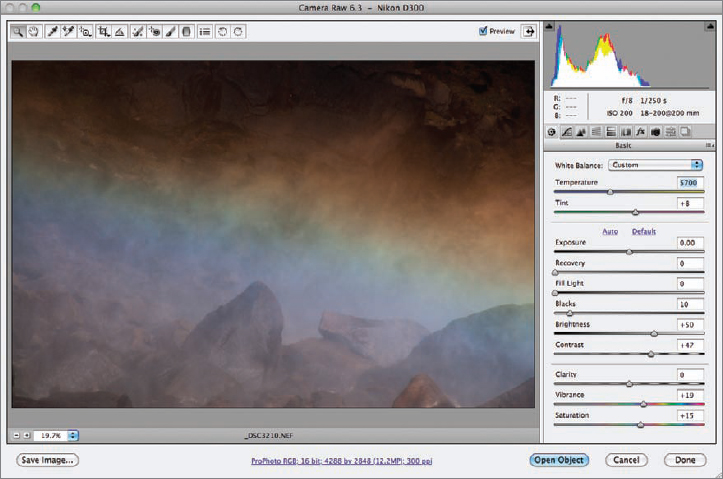
- At the bottom of Yosemite Falls, the mist creates a lovely rainbow. I was able to capture this lovely prismatic effect, but at home on my computer, the colors did not shine as brightly as they had in the field. So, instead of accepting the “As Shot” defaults, you can get a little bounce in color and saturation by pushing the Saturation and Vibrance sliders to the right in ACR, and also by slightly raising the color Temperature (see the settings above in the ACR dialog).
- However, even following multi-RAW processing this image doesn't begin to have the kind of sparkle and color that I'd like to see. The answer: selective painting with LAB color adjustments to enhance the colors of the rainbow. By the way, selective painting with LAB has one big advantage over simply painting in colors: the LAB adjustments already have the underlying shape of the elements of the photo, so you don't have to worry much about precision when you apply the color.
- With LAB color I can quickly create “color palettes” that I can use to paint in the shades of the rainbow.
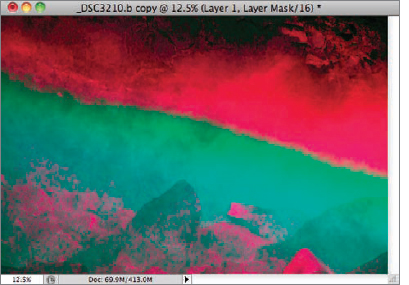
- To make this green and magenta version, I converted the rainbow photo to LAB color. Then I duplicated the image by selecting Image Duplicate.
After selecting the A channel in the Channels palette, I applied an Equalization adjustment by selecting Image
Adjustments Equalize. This maximizes the greens and magentas in the duplicate image.
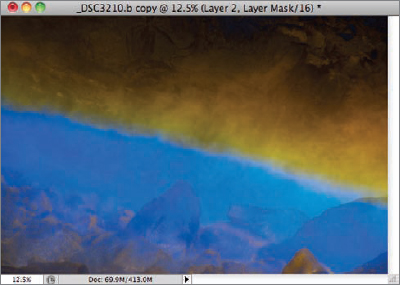
- To make this blue and yellow version, I again duplicated the original image by selecting Image Duplicate.
I made sure the B channel in the Channels palette was selected, and then I applied an Equalization adjustment to that channel by selecting Image
Adjustments Equalize. This maximizes the blues and yellows in the second duplicate image.
- Then I selected all the channels in the Channels palette and applied an Equalization adjustment by selecting Image Adjustments Equalize.
The equalization to the left looks pretty odd, but it can be used to attractively expand the grayscale tonal range of the image. To do so, drag the image onto the original image as shown in Step 5 on page 213. Then using the Layers palette, set the layer's Blending mode to Overlay or Soft Light, and lower the opacity of the new layer to 10-20%.
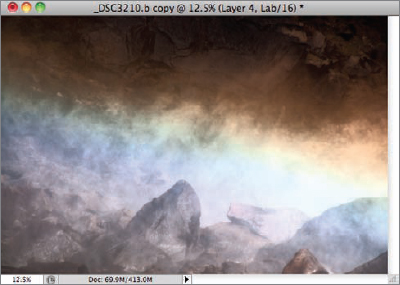

- After dragging the two equalized “color palettes” (the top and middle images on the previous page) onto the original image using the technique shown in Step 5 on page 213, I added a black Hide All layer mask to each layer, and then painted in the rainbow's colors using the Brush Tool with white selected as the Foreground Color.
This final version is much closer to the vibrant colors that I saw when I captured the rainbow at Yosemite Falls.
200mm, circular polarizer, 1/250 of a second at f/8 and ISO 200, hand held
Selective Sharpening in LAB
We're not through with LAB color yet! But before I show you how to sharpen with LAB, let me explain the general concept of selective sharpening in the context of landscape photography.
When someone looks at a photo, their eye naturally goes to bright areas, and areas of the image that are sharp. Of course, there are a number of techniques you can use when you are taking a photo to create images that are selectively sharp, but it also turns out to be very effective to use the digital darkroom to add sharpness to specific areas of a photo. If this isn't overdone, the result will be that the viewer's eye is drawn to the areas that you've selectively sharpened—perhaps without the viewer knowing why those areas are so appealing. Even without this effect, selective sharpening almost always adds interest to a composition by creating a greater range of contrasts, again with the caveat that you need to be careful about overdoing the effect.
You don't need LAB color to selectively sharpen. You can simply choose your favorite sharpening tool such as Photoshop's Smart Sharpen filter, work on a duplicate layer, mask out the sharpened layer, and paint in the areas you want selectively sharpened.
This is exactly the technique I use with selective LAB sharpening, but with a twist. The benefit of using LAB to sharpen is that you can sharpen the grayscale information without doing a thing to the color information in your image. This tends to create a very pleasing effect.
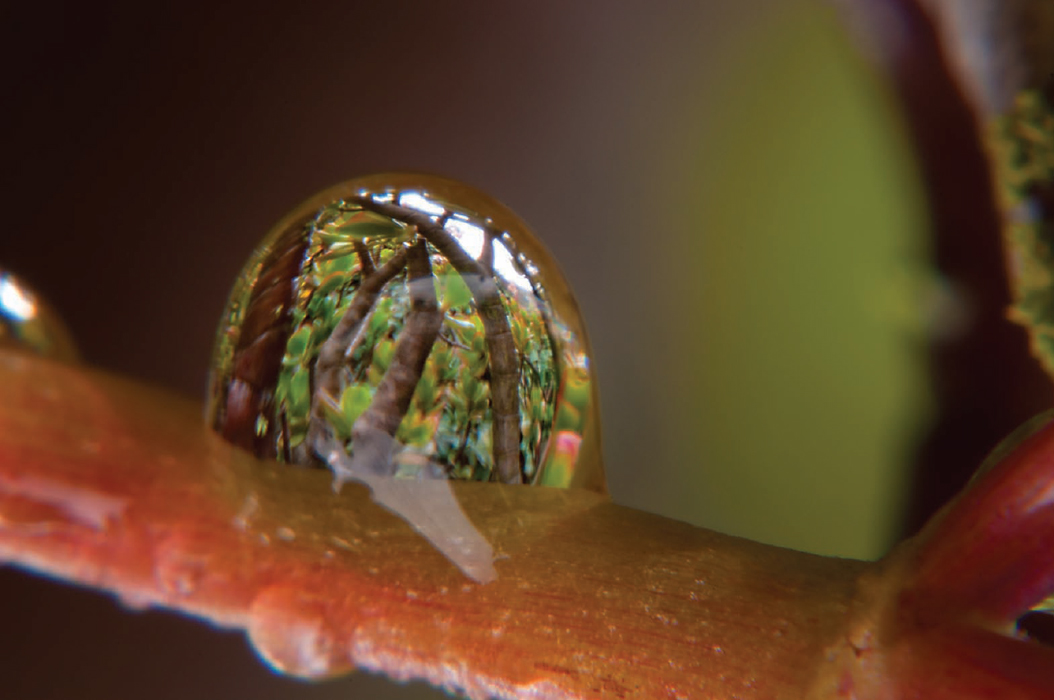
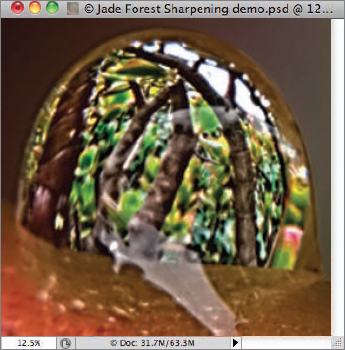
- This intimate landscape shows the stems of a jade plant refracted through a water drop; these stems look rather like a forest one could walk through even though they are miniature. Selective LAB sharpening draws the eye into the world in the waterdrop, subtly helping to emphasize its importance to the image.
200mm macro, 36mm extension tube, +4 close-up filter, 2/5 of a second at f/40 and ISO 200, tripod mounted
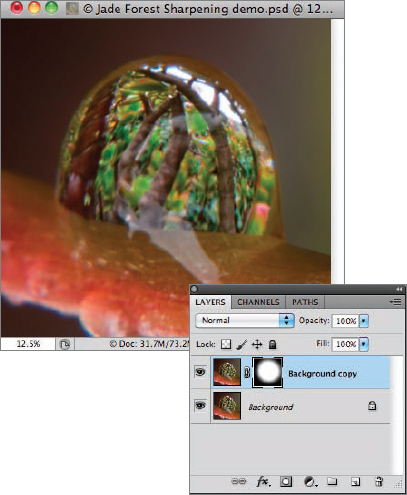
- Step 1: Convert your image to LAB color by selecting Image Mode LAB Color.
Then duplicate the “Background” layer in the image by choosing Layer
Duplicate Layer. A “Background copy” layer will appear in the Layers palette.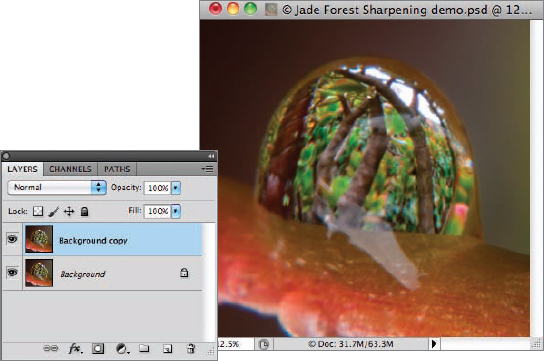
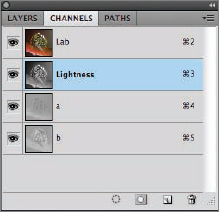
- Step 2: Make sure the “Background copy” layer is selected in the Layers palette. Next, make sure the Lightness (L) channel is selected in the Channels palette. Even though the Lightness channel is selected, all three channels should still be visible.
- Step 3: To sharpen the L channel, choose Filters Sharpen Unsharp Mask. This opens the UnSharp Mask filter dialog.
I like to use the good, old-fashioned Unsharp Mask filter on the grayscale in my images I am selectively sharpening, because the Unsharp Mask is particularly effective with edges.
You'll have to experiment with the Unsharp Mask filter to find the right settings for your particular image. The settings shown—Amount at 50%, Radius at 4.2 pixels, and Threshold at 9 levels—are a good starting place. The higher the Radius setting, the more sharpening; and the lower the Threshold setting, the sharper the results. Remember not to overdo the effect (I promise, this is the last time I'll make this reminder!).

- If you look closely at the waterdrop, you can see that sharpening the L channel in LAB has a potentially huge effect—not only on sharpness but also on the contrast levels in the details of the image.
Don't you hate it in a book when someone says “Look at this” and you can't see what they are talking about? So for that reason, the sharpening shown to the right is definitely overdone—I exaggerated the effect so you can see it clearly.
- Step 4: Once you are satisfied with the sharpening settings in the Unsharp Mask dialog, click OK to apply the sharpening to the Lightness channel.
To apply the sharpening to your image, add a black Hide All layer mask to the sharpened duplicate layer by choosing Layer
Layer Mask Hide All. On the black Hide All layer mask, use the Brush Tool with the Foreground Color set to white to paint in the areas you want to sharpen. Make sure the Brush Tool is set to 100% Opacity and 0% Hardness.
- Step 5: When you are finished painting in the sharpened areas, select Layer Flatten Image to collapse the layers.
Next, convert the image from LAB color to the RGB or CMYK color space.
And that's it! You are done with LAB selective sharpening. As you can seein the finished image on pages 228–229, the effect draws the viewer's eye to the waterdrop and away from its surroundings—as well as increases the visual distinction between the waterdrop world and the rest of the image.