
Tools and Techniques

Choosing a Camera
“I like to carry a camera,” quips photographer Jay Maisel, “because it's hard to take a photograph without one.” In a world in which most mobile phones come with a camera-on-a-chip, this sentiment isn't quite as true as it used to be. There's nothing wrong with iPhone photos—I've seen some very cool iPhone creations—but in this book I'm going to assume that you, like me, are serious enough about your landscape photography to use a dedicated camera rather then the one built into your phone.
That said, when it comes to landscape photography, my list of minimum requirements is pretty basic. Here's what I look for in a landscape photography camera:
- Manual exposure controls
- The ability to save RAW captures
- A way to connect the camera to a tripod
- A provision for using a release for remote exposures
Most compact digital cameras that have the features that I mentioned also provide a zoom lens with a decent range of focal lengths from moderate wide-angle to moderate telephoto. These focal lengths are the ones most commonly used in landscape photography.
To have the maximum flexibility in lens choice however, nothing beats a Digital Single Lens Reflex (DSLR). For more on lenses and landscape photography, see pages 82–93.
Besides the ability to change lenses, the larger sensor size and professional-level controls of a DSLR make this the camera type of choice for most serious landscape photographers. The downside is that carrying a DSLR plus extra lenses and a tripod around can get heavy. When I'm feeling sorry for myself because I'm carrying a heavy backpack over rough terrain, I remind myself that digital equipment is not nearly as heavy as the large format film cameras schlepped around by photographers such as Ansel Adams—or that I sometimes used to use.
- This shot shows a somewhat out-of-focus reflection of Half Dome in Mirror Lake in Yosemite Valley, California. Early spring is in the background, with intricate green vegetation partially in the water in the foreground. To make the photo, I didn't worry too much about photographic craft. I simply hand held the camera and framed the composition in a way that pleased me, letting programmed autoexposure do the rest.
1/50 of a second at f/4.5 and ISO 200, hand held
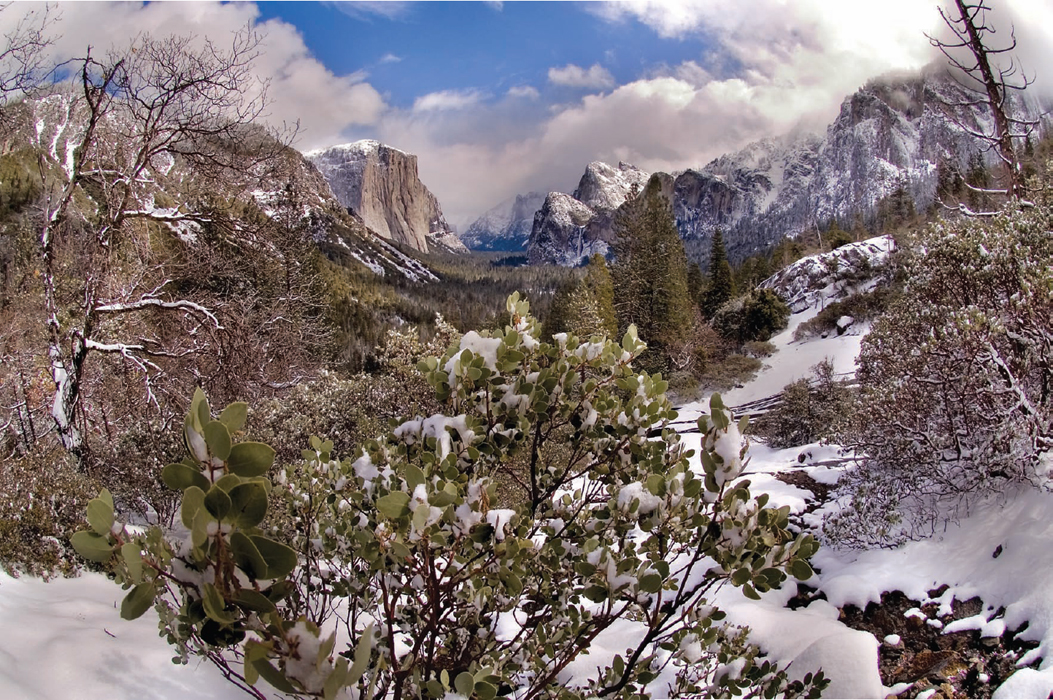
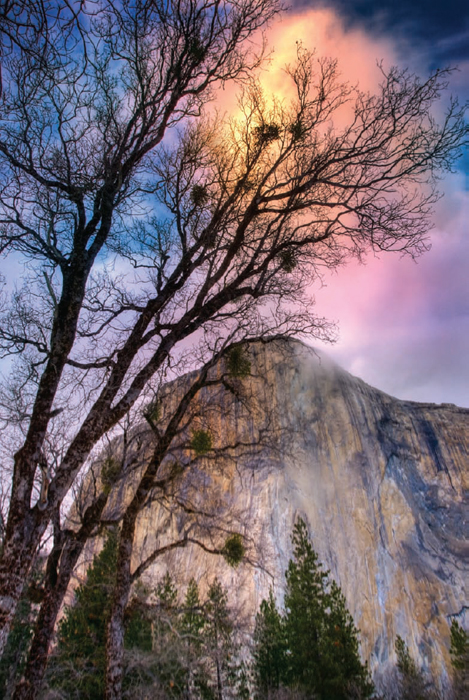
- Pages 76–77: I woke before dawn to the blackness and chill of a winter morning in Yosemite Valley, California. Hoping that the sun might break through the cloud cover, I pulled on my warm clothing and headed out into the darkness.
By the time sunrise came I was cold, but happy because in addition to the sun glinting on the mountain tops, I could see breaks in the swirling clouds. With my camera on my tripod set in the snow, I stopped the lens all the way down (to f/22) so I could use as long an exposure as possible (1/30 of a second) to exaggerate the soft effect created by the gently swirling cloud cover.
18mm, 1/30 of a second at f/22 and ISO 100, tripod mounted

Essentially, the choice of camera is up to you. I won't think less of you if you shoot your landscapes on a camera in your mobile phone. On the other hand, don't expect to be able to blow these shots up for critical uses, or to make luscious, large-size prints from them—one thing most people would like to do with their landscape photos.
Getting the right equipment for the job is always a good idea. In the case of landscape photography, you'll need to do a little soul searching about the job you want to do. Taking a snapshot to remember a place simply requires different equipment from making an image that can be used for fine art printing.
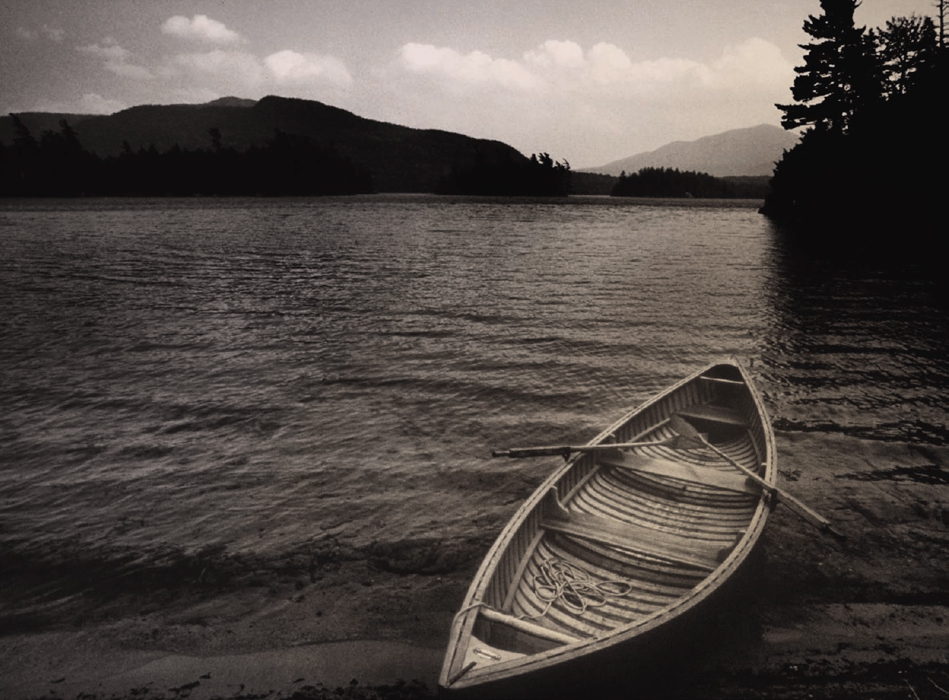
- A while back I had an assignment that involved tracing the steps of Seneca Ray Stoddard, a nineteenth-century photographer of the Adirondacks in upstate New York, and replicating some of his work. I used a variety of equipment to fulfill the assignment, including the heavy large format field view camera that I shot this image with.
The wood boat shown is typical of a style used in the Adirondacks for hundreds of years, and the swoop of the lake in the background gives a sense of the vastness of this immense wilderness landscape.
Shot with a field view camera, 135mm Schneider lens, and 4x5 sheet film, scanned from a print
Lenses
Personally, I prefer to do most of my landscape work alone or with a good friend who is also interested in photography. That way, I can concentrate best on the landscape rather than the other people. But sometimes I do photograph landscapes with a group; for example, when I am teaching a workshop. What really amazes me is that no matter how close together the group is when they take their photos, everyone's photos come out very differently.
One of the main reasons for this is the practically infinite ways that photographers can use their lenses. A lens controls the way a photographer can render the world. It is the primary interface with the scenery around one, and the basic tool of the craft of taking photos, in much the same way that a painter's brush is key to fine art painting. A lens is a basic tool for the photographer just as a brush is essential to the painter.
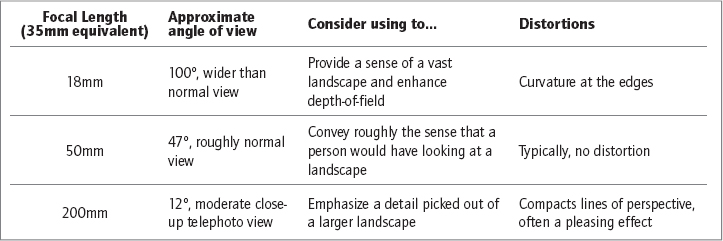
Depending on the lens and focal length one uses, you can magnify a distant scene by using a telephoto lens, portray a landscape with roughly the angle of view that a person would see it (using a so-called “normal” lens), or use a wide-angle lens and focal length to present the landscape as a broad vista, with the foreground especially prominent (see chart on page 84).
Most—but not all—landscape photos are taken within this range from moderate wide-angle to moderate telephoto. The 35mm equivalent focal lengths (see page 235 for an explanation of 35mm focal-length equivalency) and rough angle of view resulting from this range are shown in the table below.
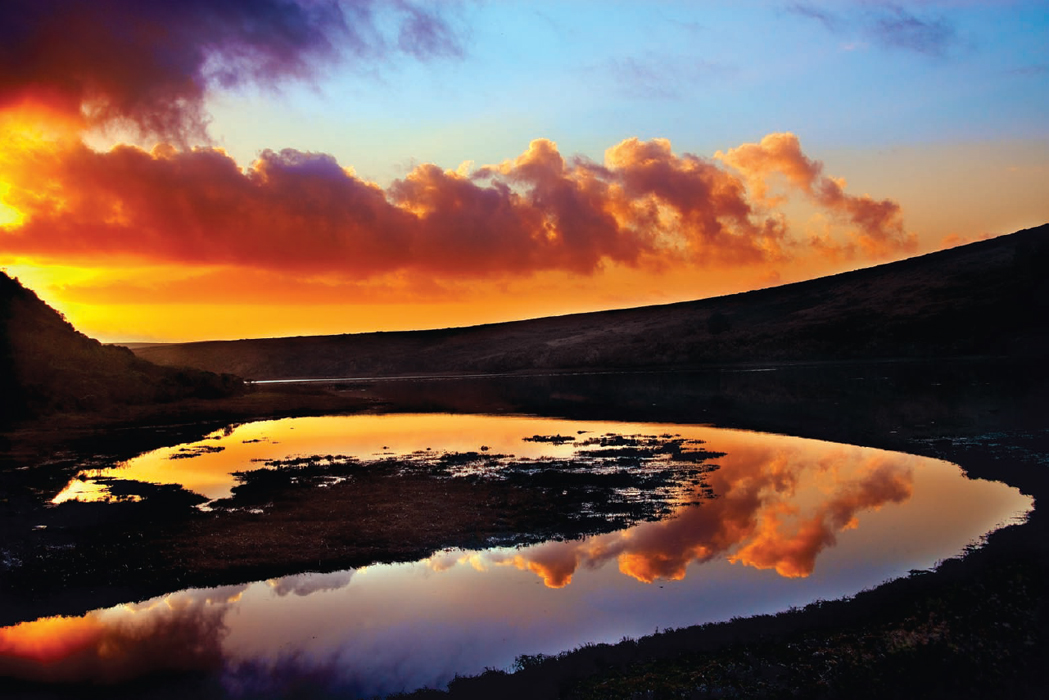
- During a late afternoon hike in Point Reyes, California, I noticed the light of the late afternoon sun reflected in the estuarial waters of Drakes Bay. I used a slightly wide angle focal length (35mm) to emphasize the expansiveness of the scene, at the same time using a polarizing filter to bring out the clarity and colors in the reflections of the clouds.
35mm, circular polarizer, 1/160 of a second at f/6.3 and ISO 100, hand held
A zoom lens is a lens that provides a variable—and continuous—range of focal lengths. With modern photo equipment most of us choose to use zoom lenses rather than fixed focal length optics, so we get to decide precisely what focal length we want to use. The fact that you can choose anywhere from a focal length range is a great aid in creative composition, and adds to the variety of possibilities when you use a photo to frame a piece of the landscape that is the world around us.
It is a fact that modern optical design has produced zoom lenses that are essentially as sharp as fixed focal-length lenses, so the argument against using these lenses has been greatly diminished, particularly considering how convenient they can be.
Speaking of sharpness, it is important to understand that each lens encapsulates pieces of polished and shaped glass crystal. With the best quality controls in the world, there can be differences even between lenses of the same make and model— and of course different models of lenses can be quite different from one another even if they include the same focal length.
Since your lenses provide an important part of how your photos will be rendered, it is important that you get to know your specific lenses. Every lens will perform differently depending upon the aperture—particularly in regards to sharpness—and these differences can be particularly important in landscape photography.
When portions of a photo are out of focus, lens performance is also important. Out-of-focus areas are called bokeh (![]() ), and pleasing bokeh can be very attractive indeed. The characteristics of bokeh depend upon the optical glass, lens design, diaphragm construction, lighting conditions, and your choice of aperture. Getting to know what kind of bokeh rendering you can expect can make a big difference in selective focus landscapes.
), and pleasing bokeh can be very attractive indeed. The characteristics of bokeh depend upon the optical glass, lens design, diaphragm construction, lighting conditions, and your choice of aperture. Getting to know what kind of bokeh rendering you can expect can make a big difference in selective focus landscapes.
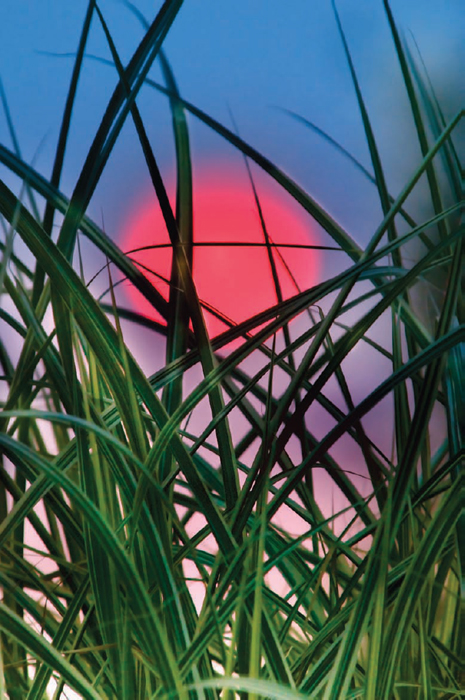
- My thought with this photo was to create an image of a big, red ball of the sun setting behind some grass. This is an unusual effect in the sense that the scene wouldn't look this way to the naked eye. By using a long telephoto lens (400mm) and focusing on the grass with a wide open aperture (f/7.1) for low depth-of-field, I was able to make the comparative size of the setting out-of-focus sun seem much larger than it would to a human observer of the scene.
400mm, 1/320 of a second at f/7.1 and ISO 320, tripod mounted
To generalize, most lenses are optically sharpest in a mid-range of apertures when they are neither fully wide open nor fully stopped down, typically at f/8 or f/11.
Optical sharpness is not the same thing as depth-of-field, which is the range of distances in front of and behind the subject that is in focus. Depth-of-field plays a crucial role in landscape photography, and is discussed in its role with aperture on pages 106–113.
For now, you should bear in mind that depth-of-field is often visually confused with sharpness, and that the wider the angle of the lens, the greater the inherent depth-of-field. Conversely, the more your lens is a telephoto with a longer focal length, the less inherent depth-of-field. Note that if you are focused at infinity, everything beyond infinity is automatically in focus no matter what your choice of aperture.
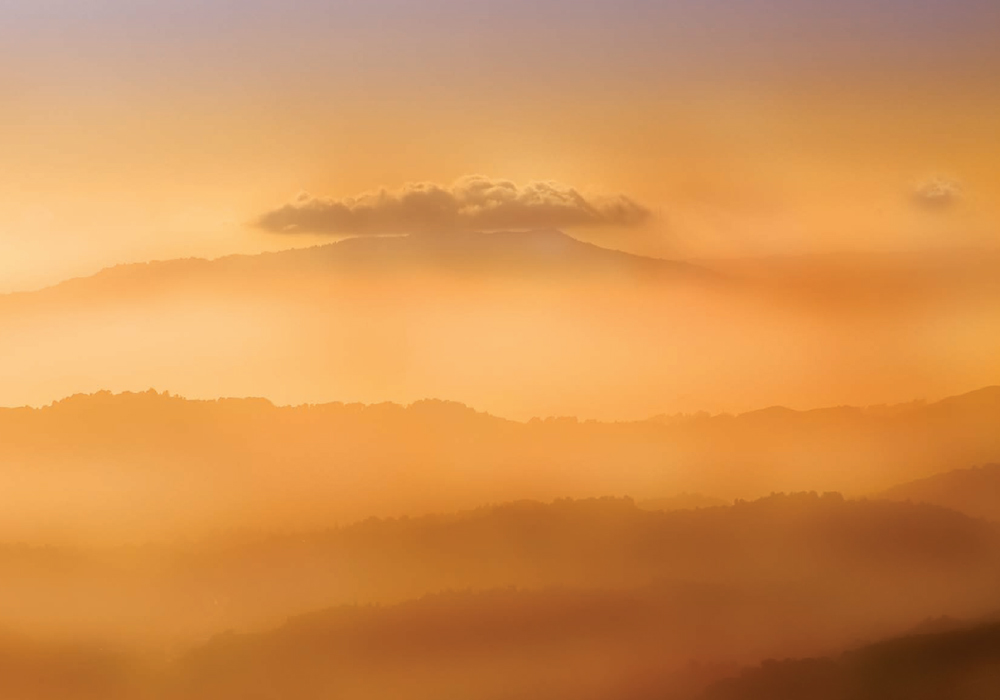
- This is the top of Mount Tamalpais seen from the summit of Mount Diablo in the San Francisco region of California. I used a long focal length lens (200mm) to isolate the mountain summit with its decorative cloud, and to create an effect almost like that seen in some Chinese brush paintings.
Atmospheric haze, like seen in this photo, can sometimes be a detriment to landscape images because it obscures details. However, you can also take advantage of haze to create mysterious, painterly effects, as in this image.
200mm, 1/1500 of a second at f/11 and ISO 100, hand held
It's sometimes really fun to have specialty lenses in your kit. For example, I enjoy the obvious distortions—along with the high depth-of-field—of extremely wide angle fisheye lenses. Both my 10.5mm digital fisheye lens and the fisheye optic for the Lensbaby provide an angle of view of about 160 degrees.
Extreme telephoto lenses can also produce interesting landscape distortions—magnifying some elements in a composition while bringing others in much closer, at the same time apparently compacting the space between the elements in the photo.
It's important to get to know your lenses so you can better understand your choices when you are in the field and deciding how best to capture the wonderful landscape around you!
- This is a shot from near the top of Angel's Landing in Zion National Park, Utah. I chose a wide angle lens (12mm) so I could capture both the manzanita shrub in the left foreground and the river on the floor of the canyon. My idea in this shot was to have the twisting shapes of the river and the shrub echo one another.
12mm, 3 blended exposures from 0.5 of a second to 1.3 of a second, each exposure at f/22 and ISO 100, tripod mounted

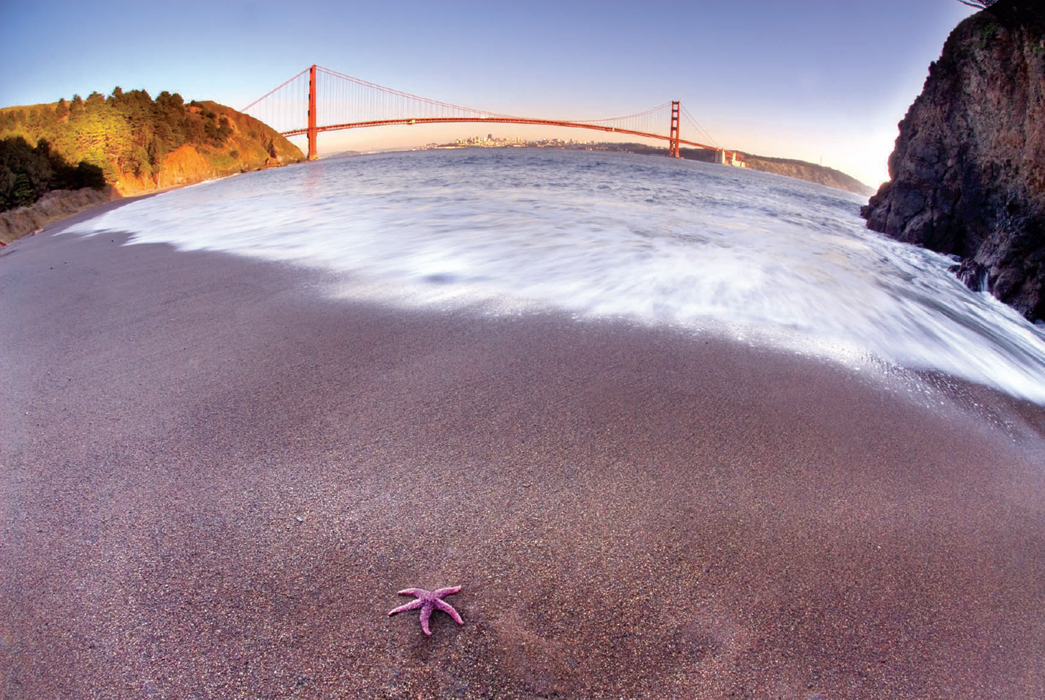
- When I descended the trail to Kirby Cove in the Marin Headlands near the Golden Gate Bridge, I found a starfish marooned in the intertidal zone. I carefully planted my tripod in the wet sand, moving it when a wave threatened. Finally, I was able to make an exposure without having to interrupt it because of a wave.
I used a fisheye lens to capture both the starfish and the Golden Gate Bridge—which gives the bridge a somewhat curved effect at the horizon.
No starfish were harmed in the making of this photo. After my shot, I carefully placed the starfish back in deeper water so it wouldn't dry out.
10.5mm digital fisheye, 1/5 of a second at f/22 and ISO 100, tripod mounted
- This is a shot of San Francisco City Hall with a row of pollarded trees in front. Pollarding is a form of pruning that cuts trees way back to help preserve their long-term health. I was particularly struck by the interesting shapes made by the severely pruned trees.
I took this photo at twilight, as you can tell by the lights just starting to come on.
I used a Lensbaby fisheye lens attachment, which creates an intentional vignetting effect (the dark and rounded corners). The placement of this vignetting is completely under the control of the photographer.
There should be no doubt in the viewer's mind that they are looking at this photo through an unusual lens combination.
Lensbaby Composer, fisheye attachment, 1.6 seconds and ISO 100, tripod mounted

Using a Tripod
More often than not, I use a tripod when I make my landscape photos. In fact, serious photographers do tend to use tripods pretty consistently for their landscape work—for a number of reasons.
Technical concerns lead this list of reasons to use a tripod. If you are photographing people, it is often not practical to use a tripod because your subjects may be shifting their positions so quickly. This kind of motion is less common in a landscape—although trees can move in the wind, and water may flow swiftly (see pages 118–123 for more about capturing motion in landscapes).
Without a quickly moving subject, putting your camera on a tripod becomes a straightforward way to minimize camera movement—a leading cause of blur and apparent unsharpness in photos. Furthermore, there's often a need in landscape compositions to capture a broad range of the view in focus. As I explain on pages 106–113, this implies using a smaller aperture—which leads to slower shutter speeds and an increased need for a tripod.
Certainly, concern about blurring an image due to slight motions of the camera is amplified when it comes to macro and close-up work—which is why almost all good macro photography is accomplished using a tripod.
In addition, the longer the focal length of the lens, the harder it becomes to shoot without a tripod at a given shutter speed without introducing offensive blurring from camera motion.
Some special effects can only be achieved using a camera on a tripod—for example, showing the course of moving water as a white motion blur while the rest of the landscape is still and crisp—because these effects require long shutter speeds.
It's a good idea to shoot bracketed exposures for HDR landscapes (see pages 208–217) while the camera is on the tripod so the frames that are going to be combined will contain the same content.
Personally, I like to use a tripod for compositional reasons as well as these technical considerations. Using a tripod forces you to stop and think about your landscape photo, and means you need to slow down and take your time. You are more likely to compose your photo as you've pre-visualized it, and take the time to correct compositional flaws such as a crooked horizon line.
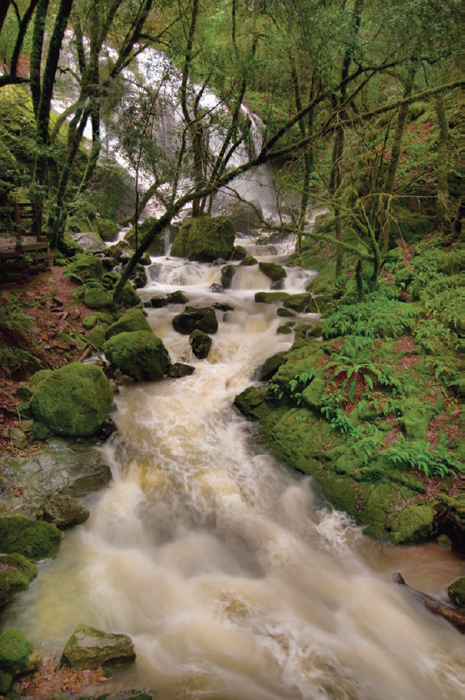
- It had been raining for several days in torrential gusts, as happens from time to time in the spring in coastal California. I hiked through the dripping forest on the slopes of Mount Tamalpais, to Cataract Falls. The creek was rushing past in a muddy torrent. I set up my tripod and was able to expose long enough (3/5 of a second) to make the flow of the cascading water attractive and soft.
19mm, 3/5 of a second at f/22 and ISO 100, tripod mounted
It's worthwhile buying a good tripod—you will probably have it longer than your camera. The key things to look for in a tripod are that it should be sturdy, light weight, and maneuverable so that you can position your camera to make your image work. You may have to compromise on some of these issues. For example, a tripod that is light enough to carry into the wilderness with ease may not open to the full height you'd like in some situations.
The best arrangement is to buy tripod legs separate from the tripod head. Carbon fiber is a good material for tripod legs because it is extremely strong, light weight, and does not conduct cold temperatures (surprisingly important in winter landscape photography). However, carbon fiber tripod legs can be quite expensive.
The tripod head screws onto the tripod legs. For most landscape work, I suggest a ball head such as the ones available from Kirk Enterprises, www.kirkphoto.com, or Really Right Stuff, www.reallyrightstuff.com. These vendors also make brackets to attach your camera to the ball head.
Your camera attaches to this ball head using a quick-release plate, or bracket, which the ball head holds firmly in place. I recommend an L-shaped bracket designed for your specific camera model because you can then easily switch back and forth between vertical and horizontal orientations.
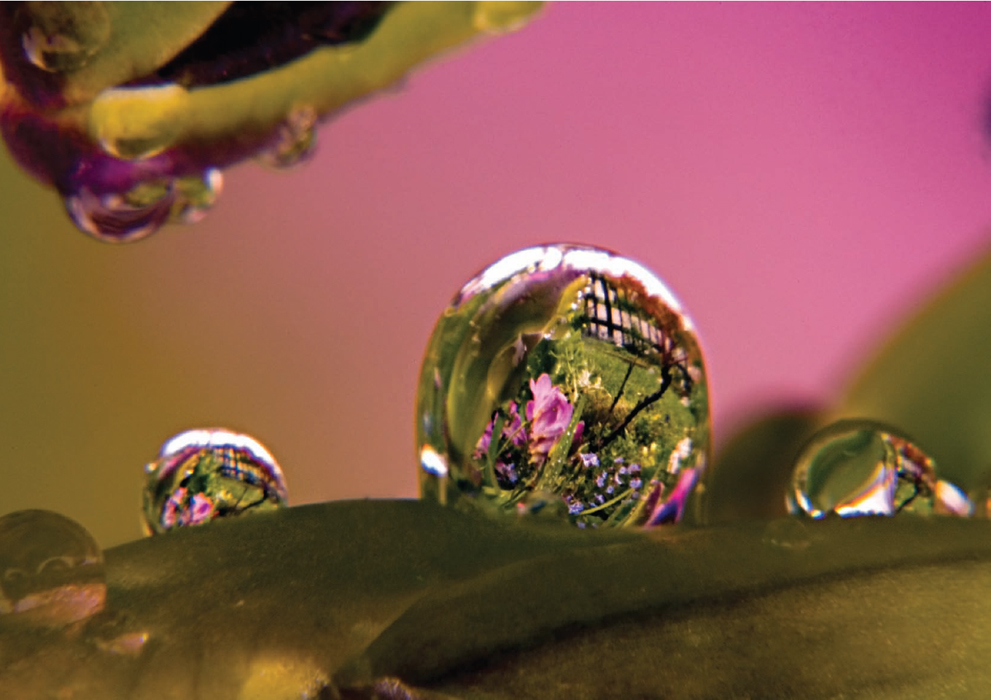
- Close to this water drop on a spring plant, I could see the flowers and fence of the garden reflected and refracted. The closer one gets, the more motion from camera shake is exaggerated—so I needed to use a tripod to capture this miniature landscape with clarity.
200mm macro, 2/5 of a second at f/36 and ISO 200, tripod mounted
Exposure and Landscapes
Imagine looking at a vast landscape. One corner of the scene is lit by the late afternoon soon, but the rest of the landscape is in deep shadow. Alternatively, it is just after sunset, you are facing the comparatively bright sky left behind by the setting sun, and the earth and sky are glowing with the subtle colors of this magical time of day.
These are two of the scenarios that can lead to great landscape photos. But in neither case will using automatic exposure get you the results you'd like. To cut to the chase, for most landscape photography to get the best results you need to use manual exposure modes. Doing this effectively requires an understanding of exposure generally.
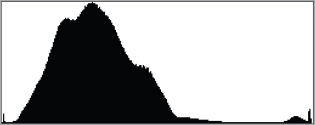
- This is the exposure histogram for the image to the right. The small spike at the right of the histogram represents the bright sunlight in the upper right of the image, while the spike on the left is created by the few almost black spots in the upper portions of the photo. The vast majority of the landscape is in somewhat dark, left-biased shade as represented by the large “mountain” shape in the histogram.
- As the day turned to late afternoon at the Wave, in the Coyote Buttes Wilderness on the Utah-Arizona border, I noticed an interesting complementary pattern to the striations in the rock. The line between the sunlight and shadow on the rock created a fascinating and variable line.
To show this pattern along with the pattern of the rock itself, I exposed for the sunlight. This meant underexposing the rock in the shade, which I was able to correct in post-processing.
170mm, 1/15 of a second at f/36 and ISO 100, tripod mounted

As you probably already know, your exposure settings determine how much of the light that hits the lens is let in through the opening in the lens. The shutter speed setting controls the duration of time during which light is let in. Obviously, the longer the duration, the more light that gets in. For more about shutter speed, see pages 118–123.
The aperture setting controls the diameter of the opening in the lens that light passes through. The smaller the hole, the less light that passes through. Aperture is explained in detail on pages 106–113.
A third control, ISO, determines how sensitive to light your sensor is. You can take photos in darker places with a higher ISO, but there are some potential downsides to raising the ISO (see page 114–117 for more about ISO).
Aperture, shutter speed, ISO—these variables control the way incoming light is rendered by creating an exposure. It's problematic to let the camera choose the values for these settings for you because the camera doesn't really know what you want to capture in your exposure. For example, when there's a slice of light in a landscape otherwise filled with shadow, the camera is likely to choose an average exposure, which will render neither area satisfactorily.
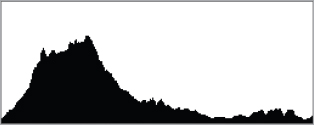
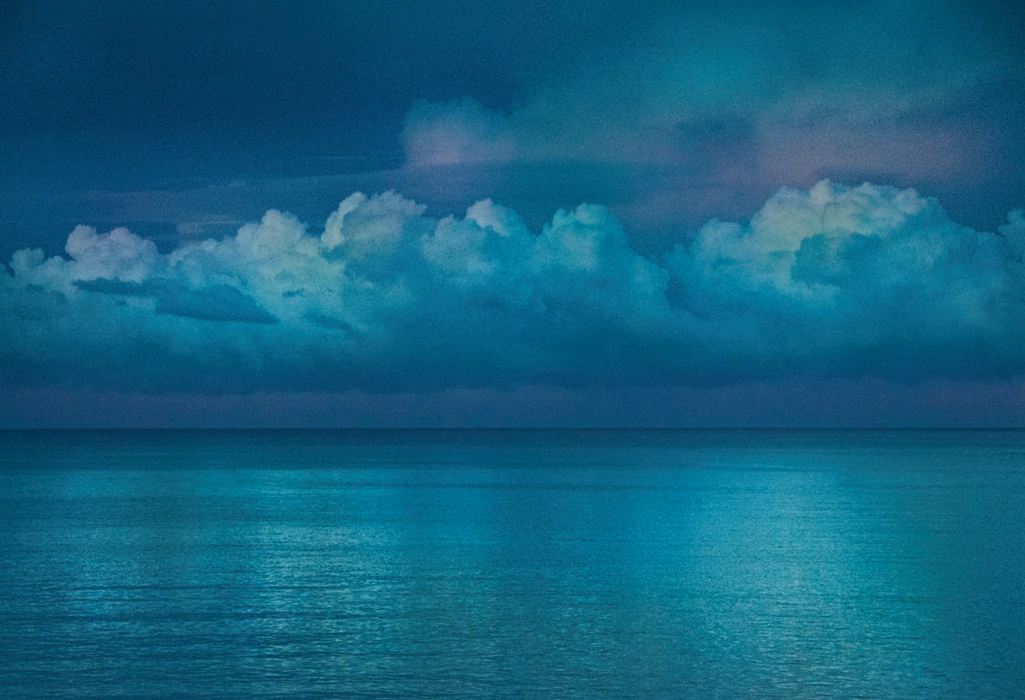
- This is the exposure histogram for the image to the right. The histogram shows a fairly normal distribution of values with the darker areas of cloud and ocean represented by the “mountain” at the left side of the histogram.
- This is a shot using a telephoto lens (200mm) of one of the Farallon Islands off the coast of San Francisco, California. These fog-bound islands are home to birds and great white sharks. Until modern times, the islands have been extremely hazardous for passing ships, and it is rare to see them so clearly.
The trick here was to expose for the interesting and saturating clouds, allowing the island and ocean in the foreground to silhouette against the sky.
200mm, 1/1250 of a second at f/3.2 and ISO 200, tripod mounted
As I've already explained (see pages 14–19), the term “landscape” is a bit of a misnomer. Most landscape photographs contain more than just “land”; for example, water, ocean, sky, clouds, plants, buildings, and roads. With the exception of landscape as pattern or texture (see pages 52–59), it is the boundary of the land with elements besides land that make the landscape interesting. Furthermore, most of the best landscapes are taken at a boundary time of day: when night turns to day, towards sunset, or when there is an unusual weather condition.
Taken together, these circumstances mean that boundaries in time and space play a big role in landscape photography—and in the art of exposing landscapes creatively. You have to decide what portions of the landscape you are capturing you want to expose for, and also determine whether there is a strategy that will let you make an effective exposure for all the areas in the landscape that are important to you.
I rely on my exposure histogram to help me understand the exposure values in what I am seeing. A histogram is a graph showing a distribution of values, and an exposure histogram shows the distribution of lights and darks in a photo you are making. If the exposure histogram is biased towards the left, then the image tends towards darkness and underexposure, while if the histogram is right-leaning then the image is bright and tends toward overexposure (see diagrams on page 104).
As you can see in the actual histograms that accompany the examples in this section, your exposure histogram should depend upon the range and distribution of exposure values in your photo. For example, if the point of my photo is the contrast between a small light area and the darker landscape, then the histogram will show mostly dark values—and this is in line with the photo I want to make. So it is important to understand that exposure histograms should be read in the context of the image you've pre-visualized.
When it comes to photographing landscapes, I often look for a slightly left-biased histogram. My thinking is that this helps make colors richer, and I can process my RAW files to recover areas that are too dark more easily (see pages 200–207) than I can recover bright areas. Once a bright area “blows out,” it becomes essentially impossible to recover in the digital darkroom.
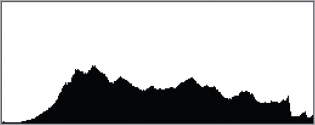
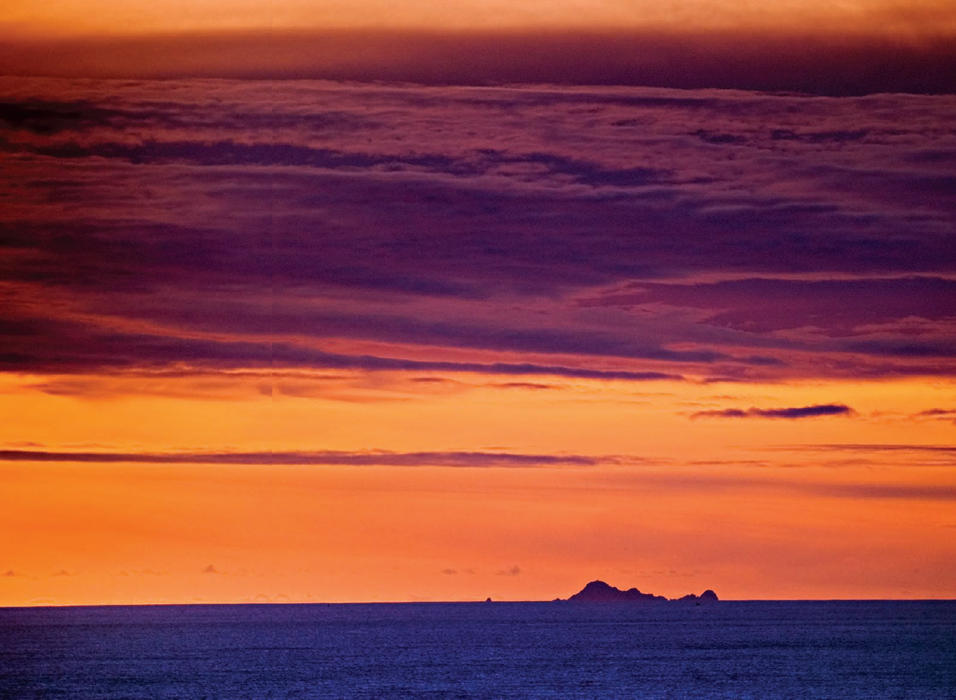
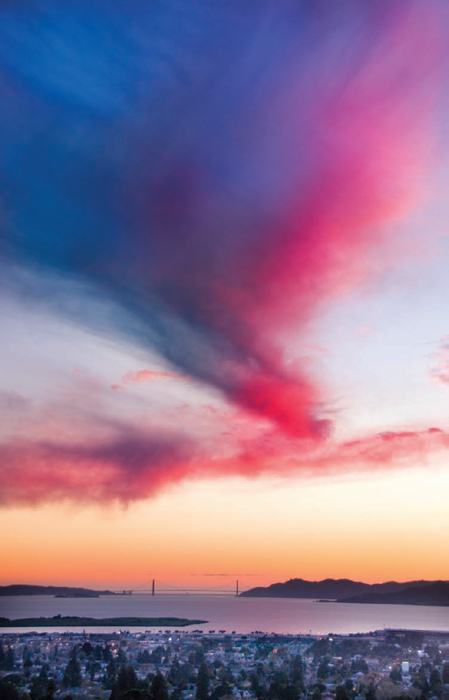
- This is the exposure histogram for the photo to the right. The histogram shows a pretty good overall distribution of values with a slight left bias, but no really underexposed areas—which corresponds nicely to the actual image.
- Sinking below the horizon, the setting sun lit the edge of the cloud you can see in this photo with a magnificent crimson glow. I was careful to expose so the colors remained highly saturated, which meant underexposing the sky slightly. Fortunately, I was able to bring out the foreground in post-processing (see pages 200–207).
44mm, 1/100 of a second at f/5 and ISO 200, hand held

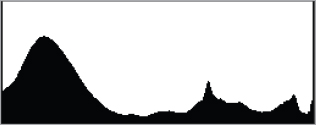
- This histogram shows an exposure that is bunched to the left, meaning that the image it represents is probably underexposed. However, since a histogram graphs the light–to–dark values in a capture, if what you are photographing is predominantly black (for example, a very dark landscape), then it is possible that this graph may, in fact, represent the exposure you want.
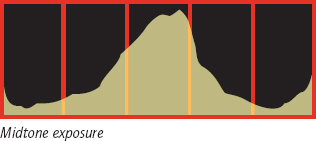
- This histogram shows a roughly normal distribution of exposures, provided that the subject being captured includes a full range of lights and darks. Of course, the actual histogram will depend upon the lights and darks in the subject, as well as your exposure settings. You can see in this fairly middle-of-the-road histogram that there are some black values and some white values, with the bulk of the exposure values in the midtone (the center of the graph).
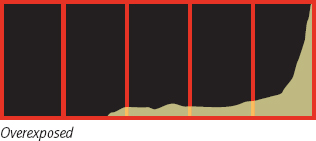
- This histogram shows an exposure that is likely to be overexposed—you can tell because the exposure values are bunched to the right. However, if your subject includes a great deal of very bright or white tonality (for example, clouds in the sun), this may be the histogram you get—and it may be perfect for the capture you want to make.
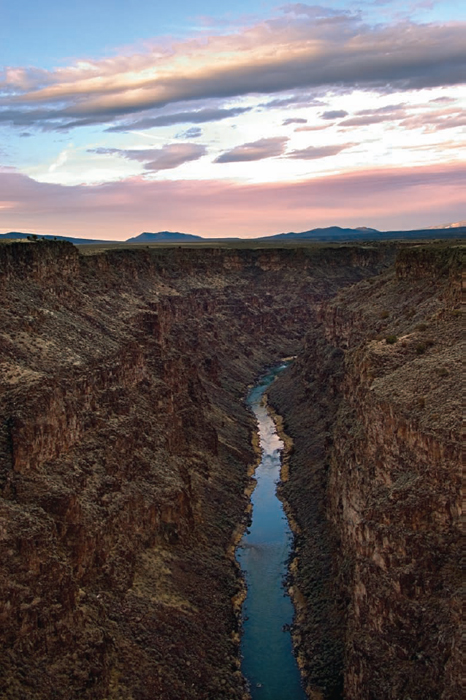
- This is the exposure histogram for the photo to the right. The histogram shows the prevailing darkness of the canyon walls (on the left) as well as the spike on the right that represents brightness in the clouds.
- From an old cast iron bridge spanning the Rio Grande Gorge near Taos, New Mexico, I shot down on the water to make an image that showed the sky reflected in the river and the dark walls of the canyon.
26mm, 1/60 of a second at f/6.3 and ISO 200, hand held
Aperture and Depth-of-Field
Setting your aperture is one of the most important creative controls in landscape photography. With a given lens and focal length, where you set the aperture determines the resulting depth-of-field. In conjunction with where you've decided to focus, this setting ultimately makes a huge difference in the final results you'll get.
Of course, if you change your aperture you'll also need to make a corresponding change in either your shutter speed or your ISO if you want to keep the same overall exposure values. One of the tricky aspects of the craft of photography is that each choice you make impacts the other choices available to you.
Aperture is referred to using f-stop notation, for example, f/8. In this example, 8 is called the f-number. The larger the f-number, the smaller the opening in the lens—you can see this in the diagram of apertures shown on page 108. f/36 means a much, much smaller opening than f/2.8.
When a lens aperture is set as small as possible, the lens is stopped down. A lens set to the maximum aperture is wide open.
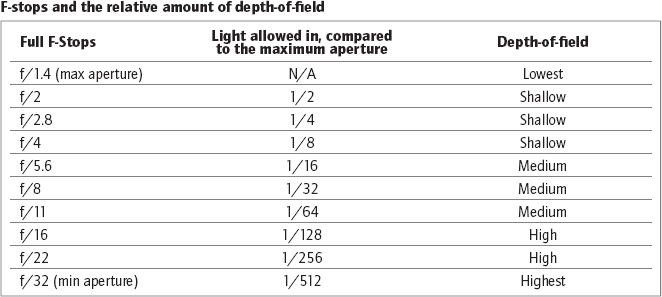
F-stops and the relative amount of depth-of-field
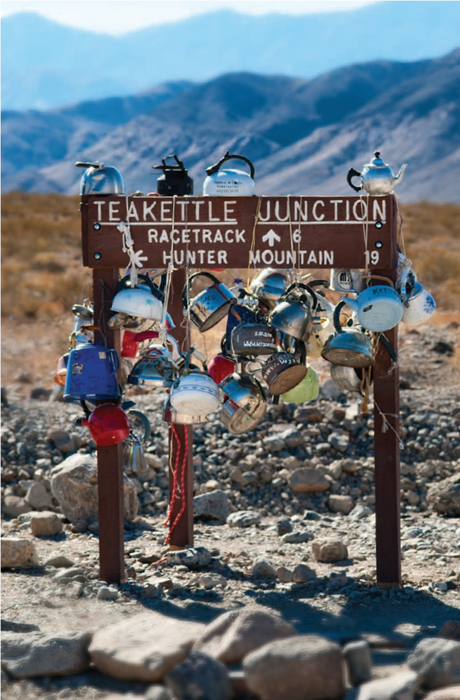
- Visiting the museum at Manzanar, the internment camp in Owens Valley used for Japanese-Americans during the Second World War, I was struck by one man's story. “If I ever get out of here,” he wrote poignantly, “I'm going to hang my kettle on the sign at Teakettle Junction.”
Two dirt roads, designated as 4-wheel drive trails, meet at Teakettle Junction, halfway between the Sierra Nevada Mountains and Death Valley. It's been a tradition for years to hang tea cups and kettles on the sign marking the junction.
I used a moderately long telephoto lens (105mm) with a fairly wide open aperture (f/7.1) and focused on the Teakettle Junction sign itself to isolate the sign from the surrounding landscape, which is slightly out of focus.
105mm, 1/1000 of a second at f/7.1 and ISO 200, hand held
As I've mentioned, the range of focus provided in a photo by an aperture setting is called depth-of-field. When you stop your lens down you have more depth-of-field, and when you open the lens up you get less depth-of-field. The general relationship between f-stops and the amount of depth-of-field is shown in the chart on page 106.
Where you focus is also important to depth-of-field. You should try to keep your camera parallel to your subject, and if depth-of-field is important to an image try a variety of possible places to focus. You can visually check the impact of the aperture and focus points you've selected either using your DSLR's depth-of-field preview button, using the Live View feature if it is available, or in the LCD after you've made your photo.
Everything further away from the camera than the infinity point (marked on the lens using the ∞ symbol) is in focus when the lens is focused at infinity, even at the maximum lens aperture. In a photo focused at infinity, if the entire subject is at infinity or beyond—as is often the case in landscape photos—then everything will be in focus no matter what aperture you choose, and you can no longer use aperture to control depth-of-field creatively.
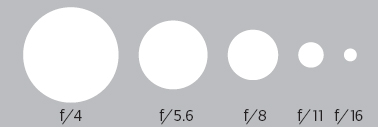
- F-stops (shown in relative scale). The larger the f-number, the smaller the opening in the lens.
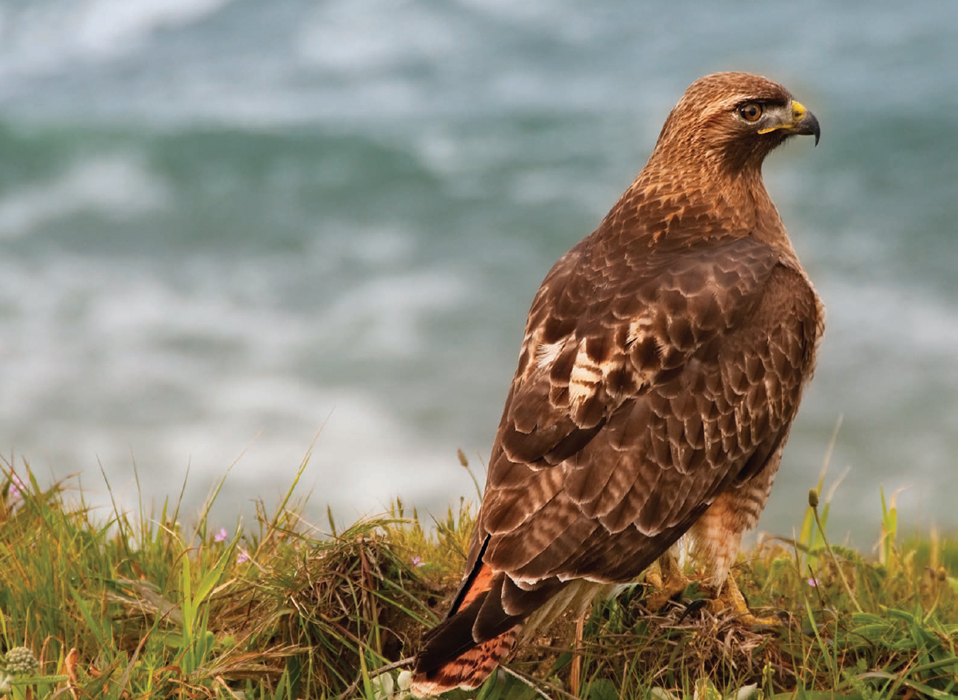
- I got as close as I could to this red tail hawk, and then used the longest lens I had with me (200mm) to bring the bird even closer. A moderate aperture (f/8) helped make the bird seem crisp against the out-of-focus Pacific Ocean in the background.
200mm, 1/250 of a second at f/8 and ISO 200, hand held
There are many landscape situations where I do need to think about how aperture interacts as a creative control because the landscape is not entirely focused at infinity. For example, suppose I want to make a photo where an element—such as a bird, or signage—is in focus but the rest of the landscape is not. This strategy gives the in-focus element more importance than the rest of the landscape, and also isolates it. I can achieve this result by focusing on the element I want to “isolate,” making sure to use a wide enough aperture so that other elements in the landscape are not in focus.
On the other hand, suppose I want to make a photo in which a flowering shrub in the foreground is in focus, but you can also clearly see the details of a landscape in the background. This kind of image requires as much depth-of-field as I can get, and means stopping the lens all the way down to the smallest aperture.
- To capture both the lupine along the trail and the landscape of Point Reyes, California in the background, I stopped my fisheye lens down to its smallest aperture (f/22) for maximum depth-of-field.
10.5mm digital fisheye, 1/5 of a second at f/22 and ISO 100, tripod mounted
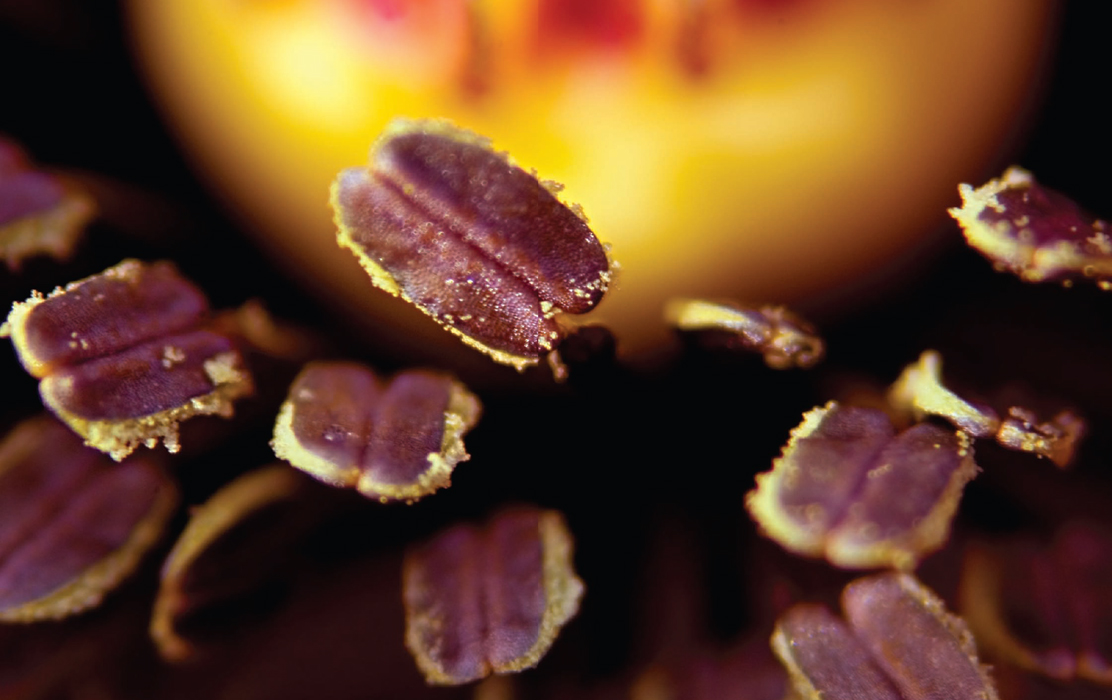
- Pages 112–113: In this macro shot of a poppy, I wanted to create a visual reference to landscape photography in which the core of the flower seems to be like the sun. Following this visual metaphor, the stamens shown in the foreground are “basking” in the “sunlight.”
I used a telephoto macro lens (105mm) and focused on the stamens, using a shallow aperture (f/5.6) to achieve the focus effect that I desired.
105mm macro, 1/40 of a second at f/5.6 and ISO 200, tripod mounted
ISO
The ISO setting on your camera controls the light sensitivity of your sensor. It's a great gift to digital photographers that we can dial-up (or dial down) how sensitive to light our camera is on a per-capture basis—it's a lot more convenient than having to finish a roll of film to change the sensitivity of the capture material.
But why not just dial your camera up to its maximum ISO for the most light sensitivity, and leave it there? You probably already know the answer. Increasing the ISO too far compromises the quality of the photos you create by introducing noise (see the sidebar below for more about noise).
The lower the ISO you use, the less noise you'll get. Usually, you don't want to see noise in landscape photos. Therefore, most of the time I shoot with as low an ISO as my camera allows, or near to it—this means shooting at ISO 100 or ISO 200. One situation in which I'll certainly shoot at as low an ISO as possible is when I want the exposure to use as long a shutter speed as possible—for example, in certain kinds of water fall captures as explained on pages 118–123.
Noise and Landscape Photography
You can think of digital noise as static on the line—similar in nature to the static one sometimes hears in an audio broadcast. Some digital noise is inevitable, although camera sensors are getting a great deal better about their noise levels, and post-processing software is improving in how it can handle noise as well.
From the viewpoint of the landscape photographer, the three leading causes of preventable noise are using a high ISO (discussed in this section), underexposing, and making exposures that are longer than about 8 seconds in duration. The combination of two or three of these factors in the same photo can make the image unusable.
Although I recommend slightly underexposing in landscape photos, particularly in images that contain very bright areas, such as the sky at sunset, be careful about too much underexposure because of the noise issue. If you really do need to substantially underexpose an overall image to avoid blowing out the brighter parts of the landscape, consider shooting bracketed exposures for HDR (explained on pages 208–217) to get around this issue.
Regarding long exposures, excessive noise can often be reduced by turning on in-camera long exposure noise reduction. This setting causes the camera to shoot a “dark frame” immediately following your long exposure; it can use the dark frame to cancel the noise generated by the sensor during your long exposure.
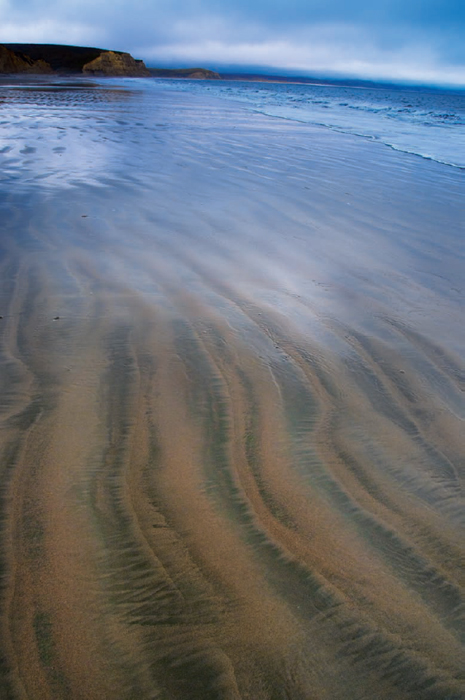
- I decided not to carry my gear bag and tripod onto the rain-swept beach. A little later, as the sun began to come out, I began to wish I had my tripod—but made up for its omission by increasing my ISO substantially (to ISO 640).
18mm, 1/320 of a second at f/9 and ISO 640, hand held
Getting back to using a high ISO, in some circumstances when I know I can't use a tripod—for example, because it is raining too hard to keep my camera out—I'll boost the ISO so I can hand hold without worrying about camera movement. In these situations if I've boosted the ISO (generally into the 400–1,000 range), I'll also use the higher ISO to freeze motion with a faster shutter speed.
There are some special situations where using an extremely high ISO (2,000 and above) makes sense in landscape photography. One of these is when you are trying to create an intentionally pixelated image. Images that are created this way can have an almost impressionistic effect—and be very attractive, despite the generally bad reputation that noise has!
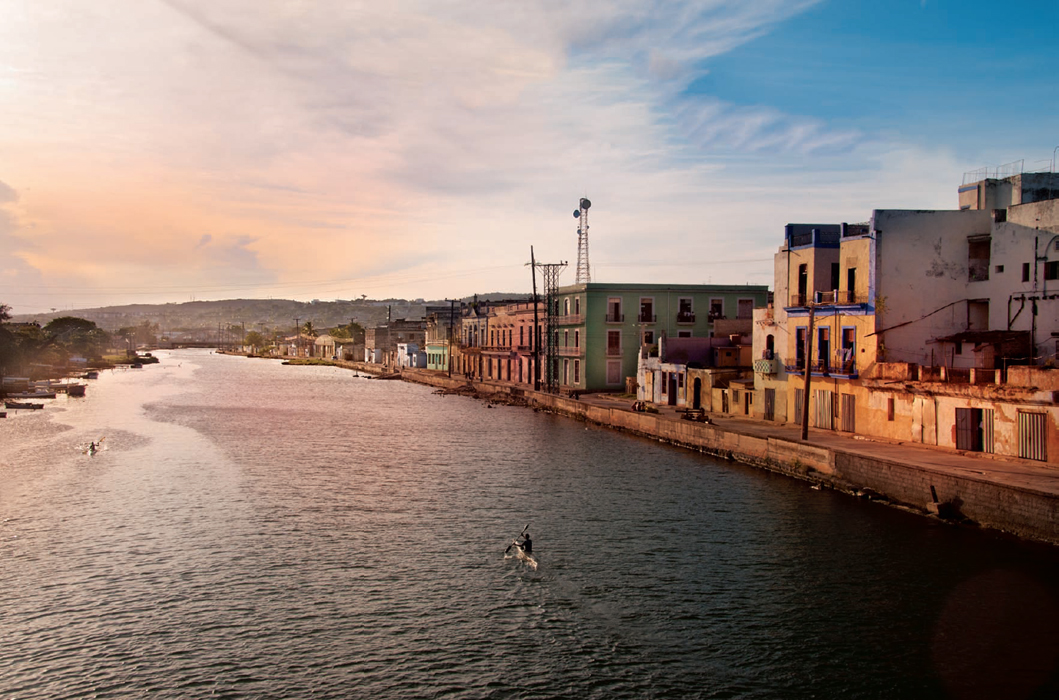
- I watched the delicate clouds over the Straits of Florida from the waterfront in Cojimar, Cuba, a small fishing village that Hemingway wrote about in The Old Man and the Sea.
As I pre-visualized this photo, I decided to try to create an image with visible “dots”—much like an impressionist or pointillist painting. I boosted the ISO substantially (to ISO 2000), with the plan of using the noise caused by the increased ISO for the pointillist effect.
45mm, 1/20 of a second at f/4.5 and ISO 2000, tripod mounted
Capturing Motion
The earth moves around the sun, and the stars describe an apparent arc in the heavens. All the world around us is in motion, some movement so slow as to be imperceptible, some so fast—like falling water—that it whizzes right by us. Shutter speed is the creative control that photographers use to control how all this motion is rendered.
I've already explained that setting the shutter speed is actually setting a duration of time. As long as you bear in mind that shutter speed is not a speed but rather an interval, this setting is pretty straightforward and should not confuse you. A shutter speed of 1/1000 of a second is twice as long as a shutter speed of 1/2000 of a second. A shutter speed of one second is 1000 times as long as 1/1000 of a second. And so on.
Shutter speed is your creative control over motion, but as with the aperture setting, if you change the shutter speed setting you'll need to change either aperture or ISO to keep the exposure value the same. Once again, an exposure is an issue of balance—and you can't change one setting without changing the others unless you are prepared to change the overall exposure.
If you have a subject in motion—falling water is the classic landscape example—then there is a huge difference in how your photo will look depending upon the shutter speed you use. Fast shutter speeds will stop the movement of the water crisply, while long shutter speeds will create an interesting motion blur. The longer the shutter speed, the softer and more pronounced the blur. Shutter speeds of about 1/250 of a second or faster create crisp trails of water, apparently stopping in its tracks. Shutter speeds of about 1/10 of a second or longer turn flowing water into long, delicate white tendrils, and shutter speeds of one or two seconds or longer will totally blur water—often quite poetically.
Of course, falling water isn't the only thing that moves in landscape photography. Grass blows in the wind, as does sand and surf. If you have cars in your landscape, they will be moving as well. Clouds move, birds move, everything moves. So it is important to learn how your choice of shutter speed will change the way these moving subjects are rendered. Armed with this insight, you can better pre-visualize your photos—and choose the shutter speed that will enable you to achieve the results you have pre-visualized!
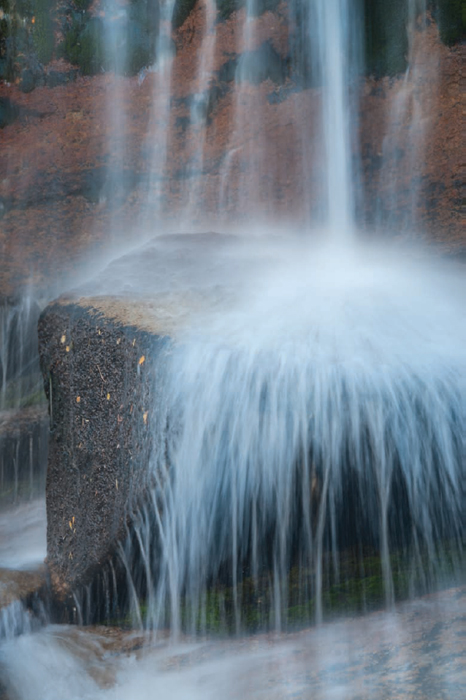
- Crouching beside this waterfall, I knew I wanted to use a long exposure to turn the falling water into a silken abstraction. My idea was that this flowing effect would contrast nicely with the hard edge of the rock that the water was falling against. To create this effect, I stopped the lens all the way down (to f/25), and used a neutral density filter to make the exposure as long as possible (2 seconds).
90mm, neutral density filter, 2 seconds at f/25 and ISO 100, tripod mounted
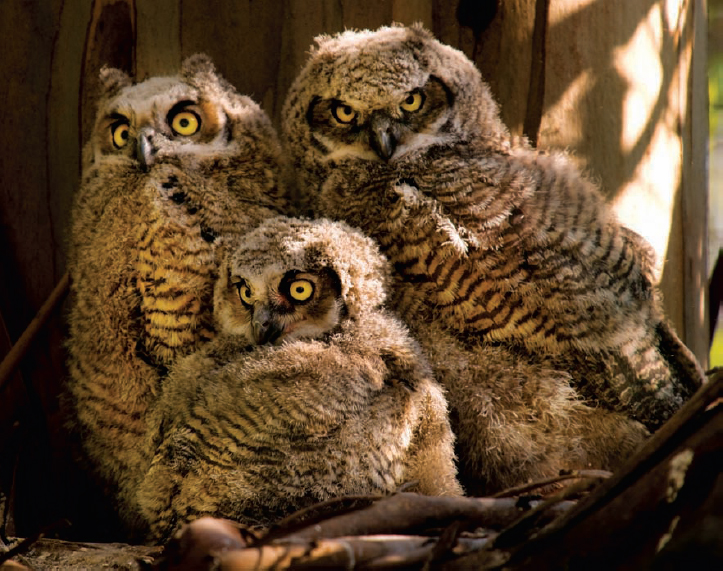
- In this photo, these great horned owl chicks look almost as if they are stuffed and not in motion. In fact, I observed this nest for hours and these birds were constantly moving—grooming each other, snapping over food bits, and calling to their parents.
The only way that I was able to get a shot showing them relatively still was to wait patiently for a moment of calm and then use a reasonably fast shutter speed (1/250 of a second).
400mm, 1/250 of a second at f/6.3 and ISO 320, tripod mounted
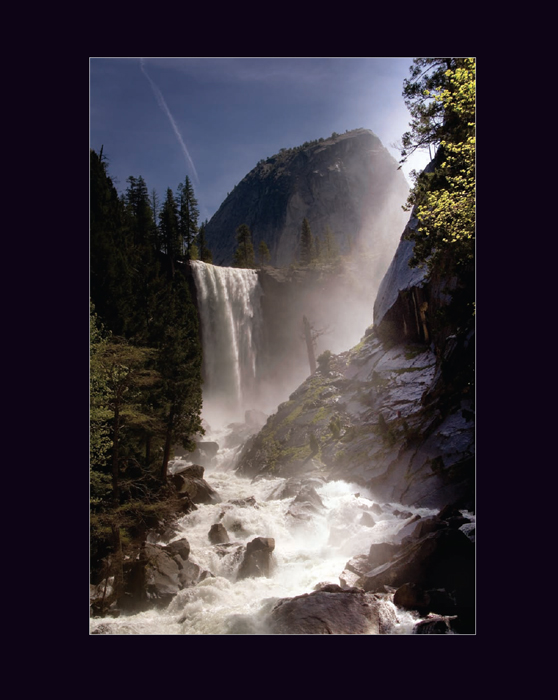
- To capture the motion of the water flowing over Vernal Falls in Yosemite Valley, California on a windy spring day, I used a fast shutter speed (1/320 of a second).
44mm, 1/320 of a second at f/9 and ISO 100, tripod mounted
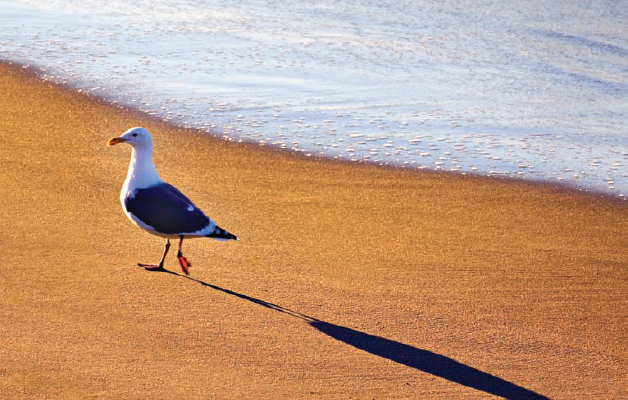
- A shutter speed of 1/200 of a second was sufficient to render this seagull, the bird's shadow, and the beach crisply—even though the composition involves quite a bit of motion.
200mm, 1/200 of a second at f/9 and ISO 200, hand held
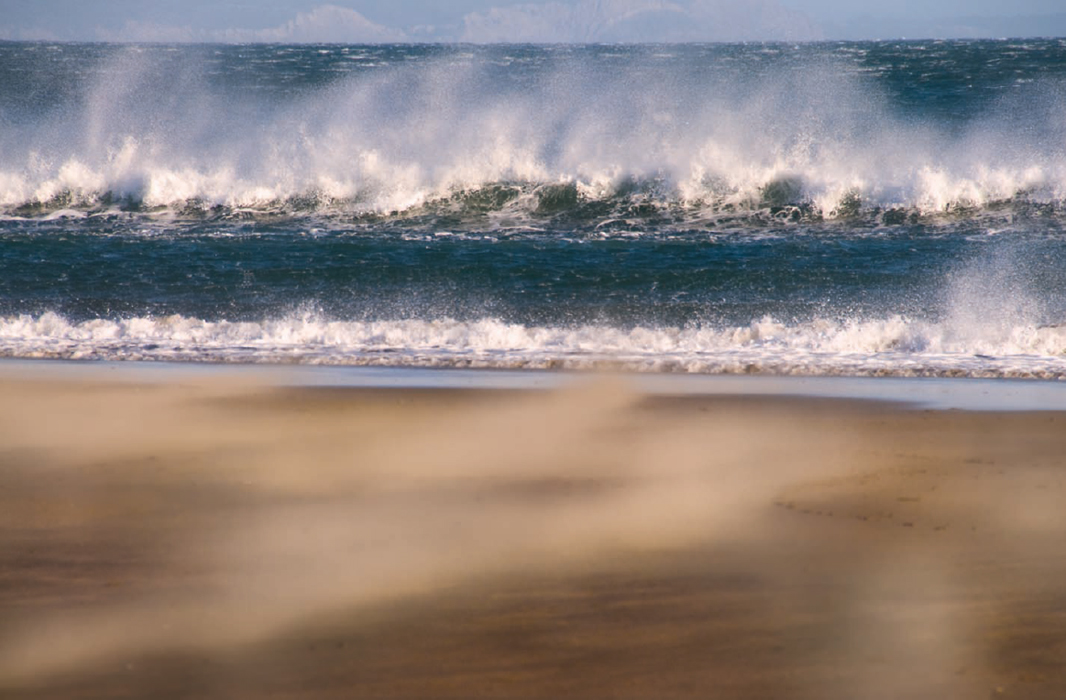
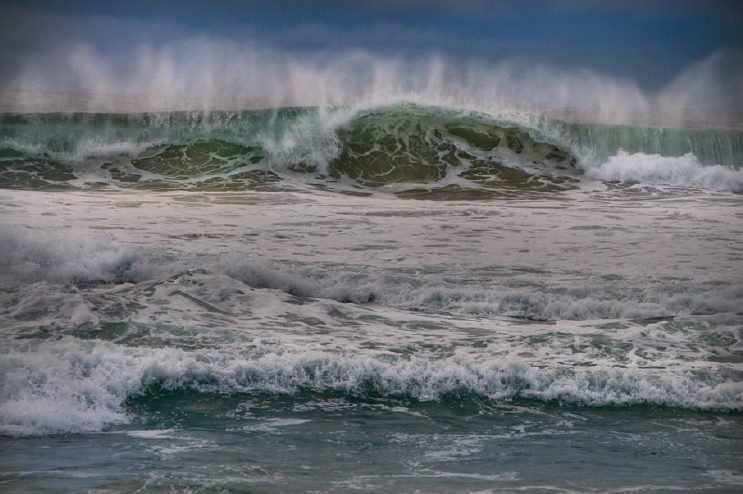
- On this violent day at the beach, a scouring wind blew straight offshore into the line of approaching waves. A fast shutter speed (1/400 of a second) was sufficient to stop the motion of the waves with crispness, but the sand on the beach was blowing so fast that it blurred even when the ocean spray did not.
200mm, 1/400 of a second at f/10 and ISO 200, hand held
Composition and Landscape
Why be normal? If a landscape composition seems like it is something you've seen before, then it probably is trite. Why not put your own new twist on it? The main challenge in composing landscape photos is to grab the attention of your viewers. If people think a landscape image is just “the same old same old,” then you've lost the battle before it is even truly begun.
Artists have been composing landscapes as paintings or photos for ages, so being original is not as easy as it might seem. In the process of creating all this landscape work, compositional principles have arisen, such as the well known “rule of thirds.” As the rule of thirds would have it, you should divide your composition using a grid into vertical and horizontal thirds. Key elements of the composition should then be placed at the intersections of the vertical and horizontal lines. In other words, at the positions that are 1/3 or 2/3 of the way up or across the composition.
This composition placement makes some visual sense in many landscape photos, and you should be aware of the rule of thirds, but no one should take a precept like the rule of thirds and follow it blindly.
The primary insight you should derive is that photographic composition is the craft of taking the three-dimensional world and projecting it in interesting and intriguing ways into a two-dimensional space that is “framed”—meaning placed within the border of the photo. This frame is inherently artificial, and signals to the viewer that there is something special within the frame that is worth paying attention to. Of course, this kind of frame has nothing to do with a picture frame.
As a matter of general principles, good photographic composition in landscape photos:
- Starts with an acknowledgement of the two-dimensionality of the landscape photo despite the three-dimensionality of the world; this implies recognizing and working with the artifice involved in artistic composition.
- Creates some kind of dramatic, visual movement to draw the viewer in.
- Emphasizes the most important elements in the scene.
- Is aware of the human desire for balance and symmetry and either plays to these desires or intrigues by denying them.
- Considers the relationship of the image to its framing.
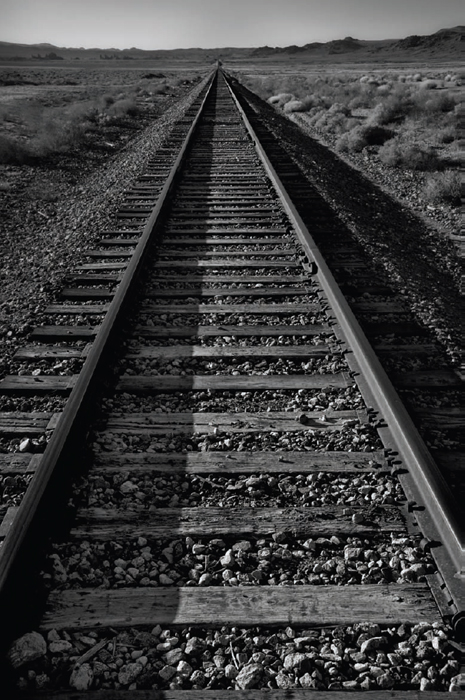
- Near the old mining town of Trona, California, I came upon these nearly abandoned railroad tracks in a harsh desert landscape. The composition I made is meant to emphasize the parallel lines leading the viewer on towards the horizon in an otherwise empty landscape.
28mm, 1/400 of a second at f/10 and ISO 200, tripod mounted
Here are some ideas about how you might achieve these goals in the context of landscape photography:
- Create an image with parallel lines that seems to stretch with no end towards the horizon. This draws the viewer in and makes them think about the edges of the photo (the frame).
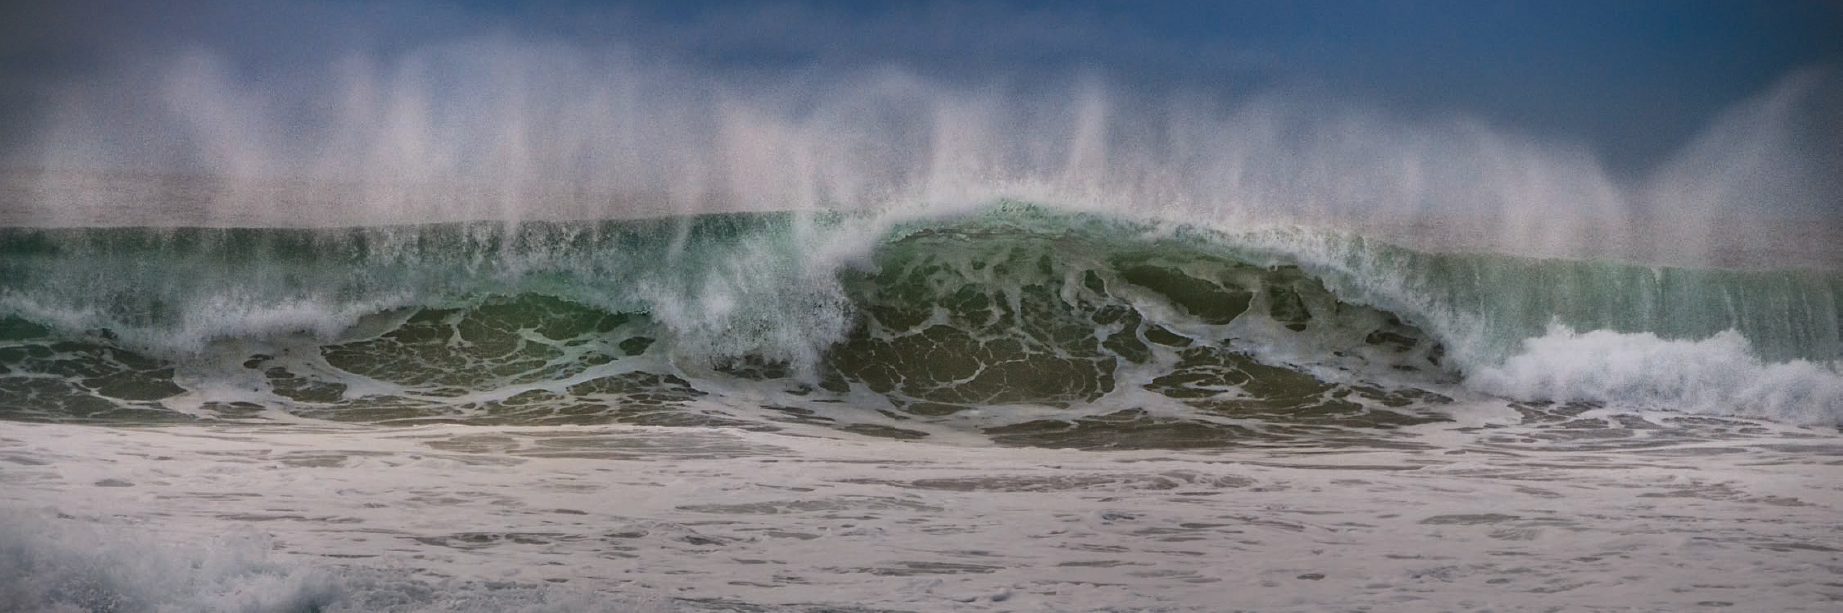
- Crop an image unusually showing the key compositional element—for example, a breaking wave or the crest of mountains—rather than the extraneous details of the landscape surrounding the key element. This heightens the sense of drama in the image, and makes the viewer focus on what is really important in the composition.
Above and right: I shot the rough winter surf coming into the great South Beach of Point Reyes, California with a long lens (200mm).
- Looking at the composition (right) I decided that the real point was the crashing wave with its mantle of foam.
- So I cropped the photo into a panoramic format (above).
Actually, the image works both ways. But it is important to realize that you are not obligated to present a landscape composition in the format that it comes from the camera in.
Both: 112mm, 1/640 of a second at f/6.3 and ISO 200, tripod mounted
- Balance a long, receding perspective with a different kind of visual element on the other side of the composition.
- Use a path, road, or other element to draw the viewer into the heart of the composition.
- Bisect the composition with a horizontal line, and then offset the horizontality with a vertical element that seems to cut across the first line. In other words, the key elements of the composition form a kind of cross. In this scenario, the vertical and horizontal elements could of course be reversed.
- Use reflections to mirror the key element in the composition around a central axis, creating a sense of balance and symmetry.
- Matanzas is sometimes called the Venice of Cuba because of the rivers and bridges that bisect the place.
Walking across a bridge over the Matanzas River in the late afternoon, I made sure to frame my composition so that it included a kayaker—to balance the long receding lines of buildings on the right-hand side of the photo.
In my mind's eye, I pre-visualized this composition as a Canaletto painting. Canaletto was a great painter of landscapes of Venice, and the lighting and lines of perspective are similar, as well as the theme of a city of water and bridges.
27mm, 1/320 of a second at f/9 and ISO 200, hand held
- Matanzas is sometimes called the Venice of Cuba because of the rivers and bridges that bisect the place.
- Place an unusual or unexpected element in the foreground of an otherwise conventional landscape.
As you work with landscape compositions, you'll find many ideas for adding interest to your photos. Some of these are to include an element that repeats, to look for patterns, to see the world through an internal frame—such as a window. There are many ways to arrive at intriguing landscape compositions, so never feel that you have to follow only a single path.
I do find that the world is full of noise, color, and distractions. Sometimes, however, simplicity is the key to good compositions. To help me see things in a simpler way, I try to eliminate extraneous elements. An excellent technique for improving compositional skills is to work monochromatically. Without color to distract, and to attractively cloak the composition, the bones of your photos are much clearer—and it is harder to get away with boring compositions.
- For an unusual view of Yosemite Valley from Inspiration Point, I included a snow-covered manzanita bush in the foreground—an important part of the composition.
10.5mm digital fisheye, 1/400 of a second at f/11 and ISO 200, hand held
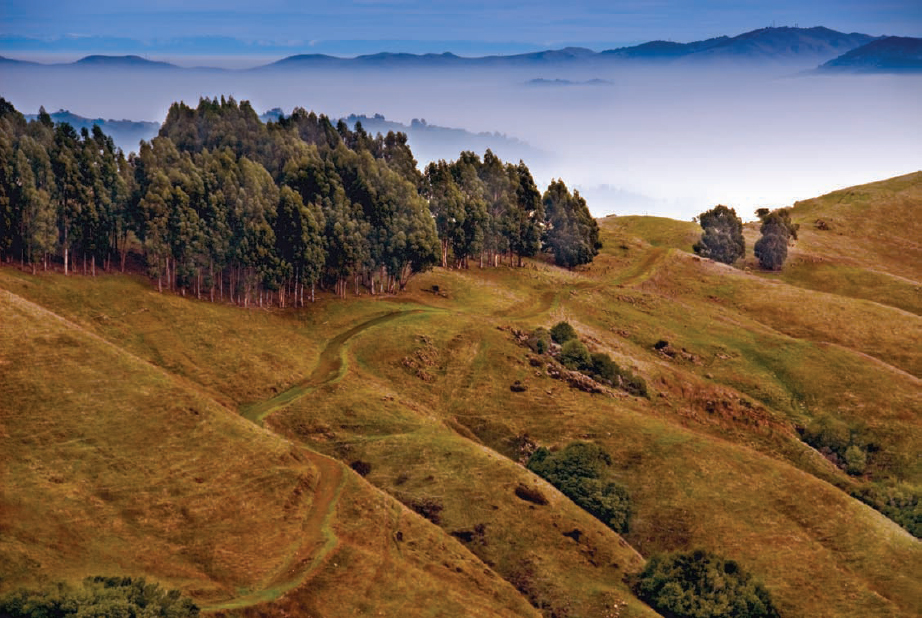
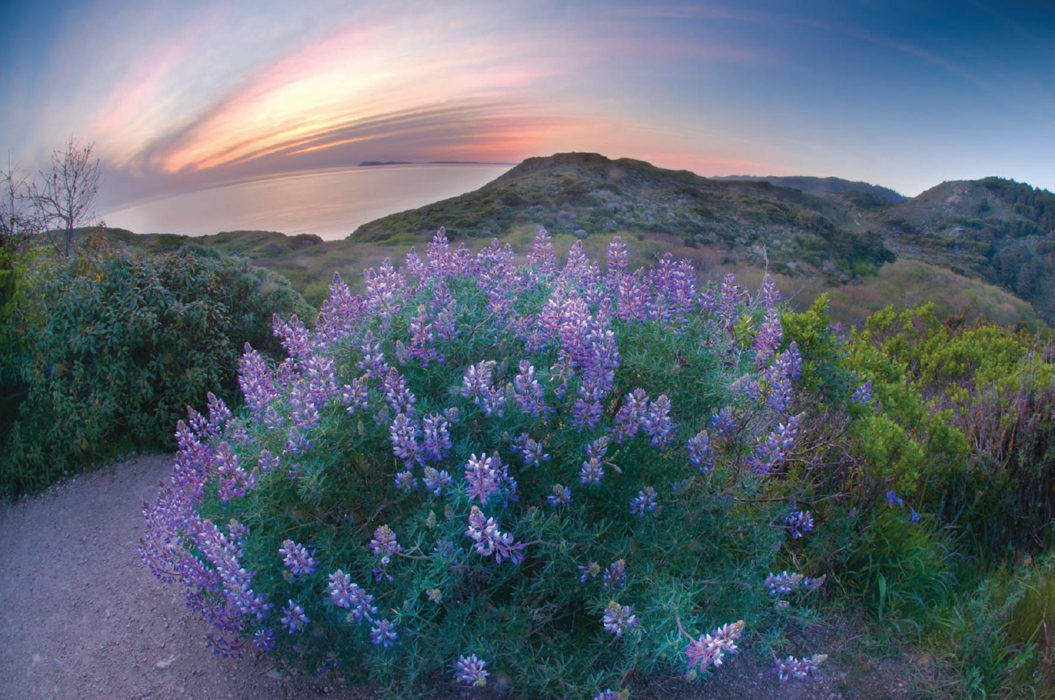
- This photo features strong diagonal lines (the folds in the hills) that meet a horizontal element (the mountains in the distance). But neither of these elements would be sufficient to create a compelling composition without the winding footpath that leads the eye across the gently sculpted hills towards the fog-bound landscape in the distance.
105mm, 1/250 of a second at f/8 and ISO 200, hand held
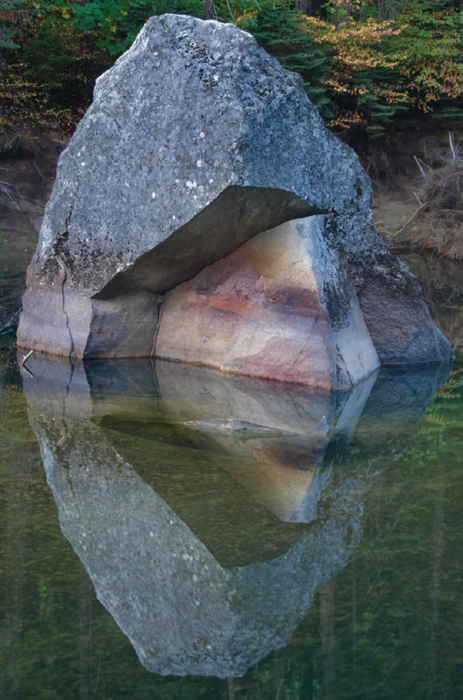
- This rock and its perfect reflection in the Merced River form an abstract composition—almost as if the rock had been planned and installed as sculpture.
For this kind of composition to work, the reflection should be very strong—which can often be achieved if other conditions are right by using a polarizing filter.
50mm, circular polarizer, 6 seconds at f/32 and ISO 100, tripod mounted
Landscapes and Lighting
As opposed to some other kinds of photography— such as still life and studio portraits—landscape photos are made almost exclusively using light that the photographer doesn't supply. This kind of lighting is sometimes called available or ambient.
When working with available light, the role of the photographer is more passive than in cases where the photographer actively sets up lighting. Essentially, this role consists of being in the right place at the right time, ready to shoot. If this sounds trivial or easy, anyone who shoots landscapes extensively will quickly tell you that it is not.
The very lack of control over lighting means that your ability to plan your shots is crucial (see page 144 for some information about planning tools). You need to have a good sense of how weather moves, and its impact on lighting (working with weather is discussed on page 142). In many cases, you must be able to move very quickly to achieve great landscape imagery. Pause, or blink, for a second and the shot may be gone.
Most of all, you need an instinctive sense for lighting. This means understanding the direction, intensity, and quality of the light you have to work with. A slight change in camera position, lens, or exposure setting can hugely impact the way the lighting works in your photo, and transform a mundane shot into a masterful landscape.
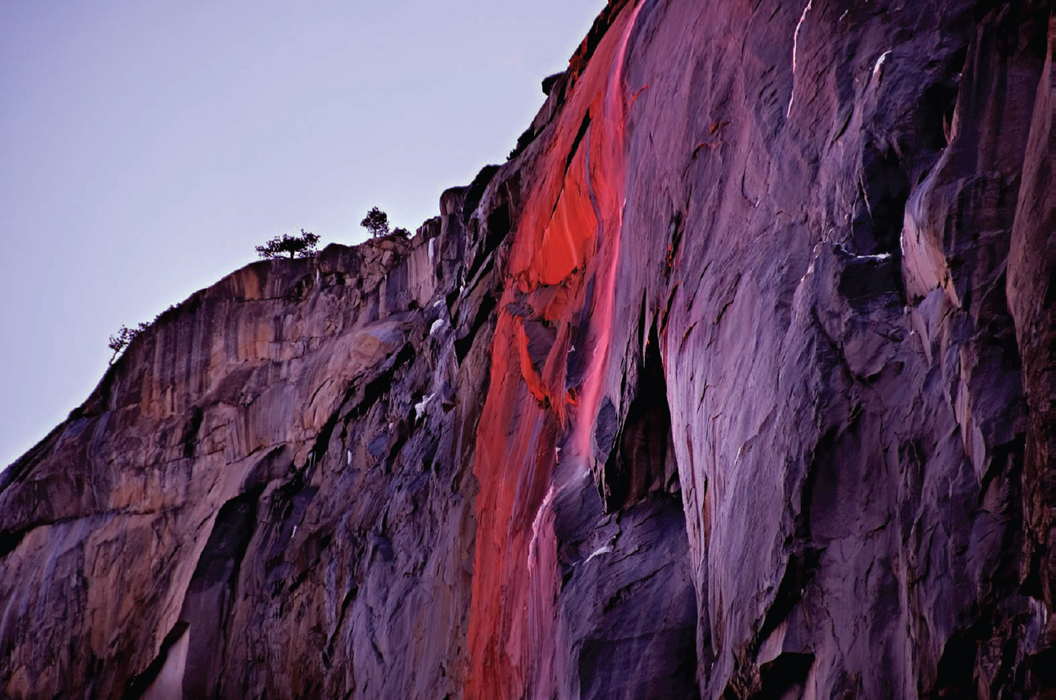
- This is a shot of Horse Tail Falls in Yosemite Valley, California, lit by the sun after it has set, in a phenomenon sometimes called alpenglow. Famous landscape photographer Galen Rowell first captured the event, which occurs towards the end of February when weather conditions are right and snowmelt is sufficient for water to plunge over the upper slopes of El Capitan.
These days, many photographers make a pilgrimage to photograph this lighting phenomenon, and I have been there on a number of different years. This shot is from my initial visit. Like most of the other photographers, I had already packed my bags when the lighting started to glow. I turned around and was able to snap this image— with the take-away that photographers (including myself) are often too hasty and not patient enough to wait for the best lighting.
200mm, 1/13 of a second at f/5.6 and ISO 200, tripod mounted
All this takes patience, and the practice of close observation of lighting conditions. This kind of mindfulness can be learned. While there is no substitute for spending a great deal of time in the field observing, practicing, and photographing, here are a few general thoughts that usually hold true in landscape photography:
- Many landscape photos can only be made during the so-called “golden hours”—the period of time that extends from shortly before to shortly after sunset or sunrise. Golden hour lighting is beautiful lighting. You should aim to be in position for landscape photography during golden hour at dawn and at sunset (sunrise is usually shorter than the one at sunset). It's okay to sleep the middle of the day away!
- Bright, cloudless skies in the middle of the day usually result in landscapes with boring and harsh lighting. But bear in mind that harsh lighting works for some kinds of landscape compositions (see example on page 66).
- The beginning or end of a massive storm often generates great lighting for landscapes. But be careful: storms can be dangerous, and being in the right place to get the shot can take luck and timing.
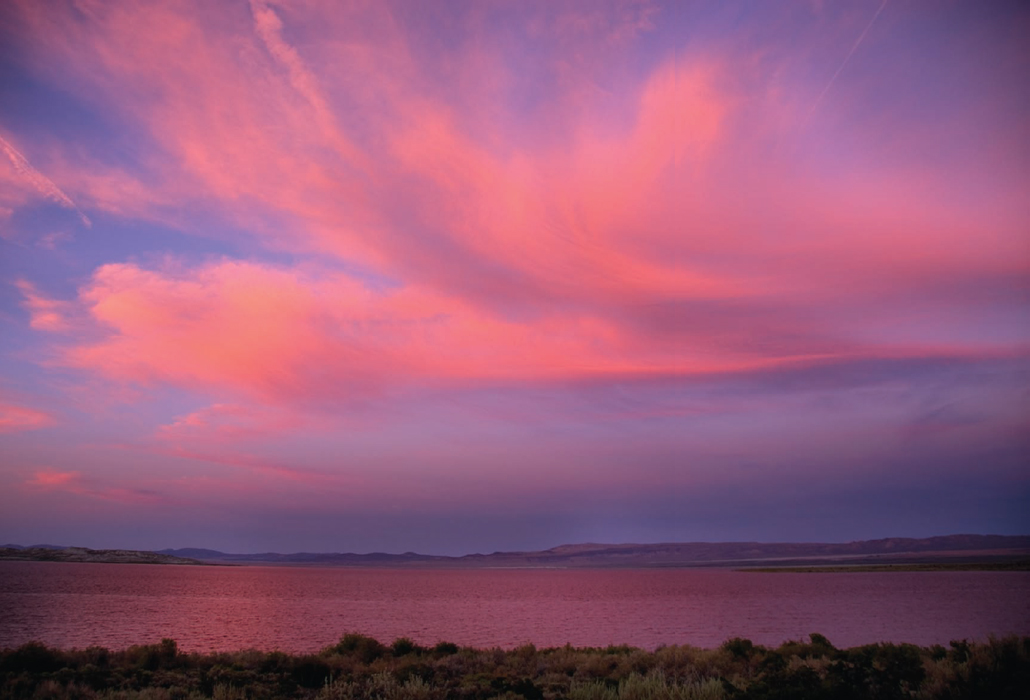
- For a brief instant, the sunset lit this cloud above Mono Lake in eastern California. I was in position and ready, and swiftly made my exposure.
18mm, 1/20 of a second at f/3.5 and ISO 100, tripod mounted
Be patient! It's easy to leave a scene too soon and miss the best lighting, which can sometimes take longer to develop than one might think.
Be patient! It's easy to leave a scene too soon and miss the best lighting, which can sometimes take longer to develop than one might think.
Getting a landscape photo with the right lighting can seem easy, and sometimes it is just a matter of luck. But consistently producing good landscape photos takes a great deal more than luck. It requires hard work, persistence, planning, and a great eye for lighting.
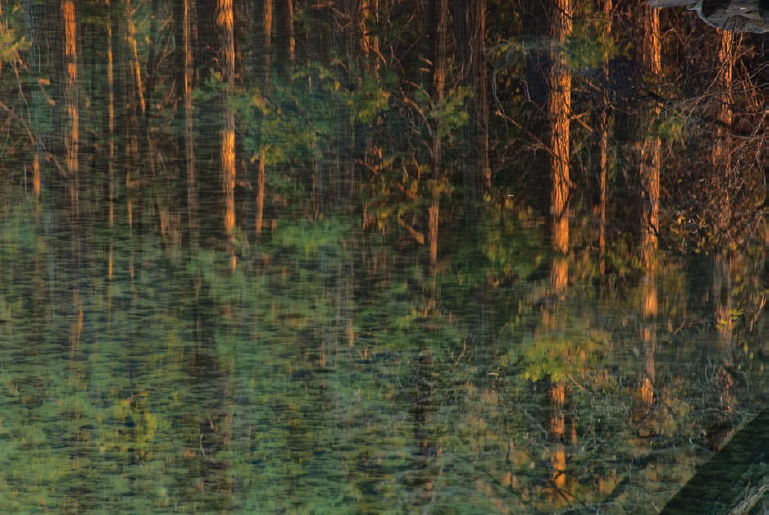
- Looking down at the Merced River from Stoneman Bridge in Yosemite Valley, California, I saw that the reflections of the forest on the valley floor had taken on beautiful colors. There was no wind, and the water was still, so I made a long exposure (1 second) that captured the glorious lighting that I was observing.
170mm, circular polarizer, 1 second at f/22 and ISO 100, tripod mounted
- I wanted to create an image showing the beautiful light in the clouds while also showing some details in the foreground. I knew I couldn't do this in a single exposure, so I bracketed my shutter speed across a number of exposures, and combined the results in the digital darkroom (see pages 200–207).
18mm, circular polarizer, ten exposures ranging in exposure time from 1/10 of a second to 1/200 of a second, each exposure at f/11 and ISO 200, tripod mounted
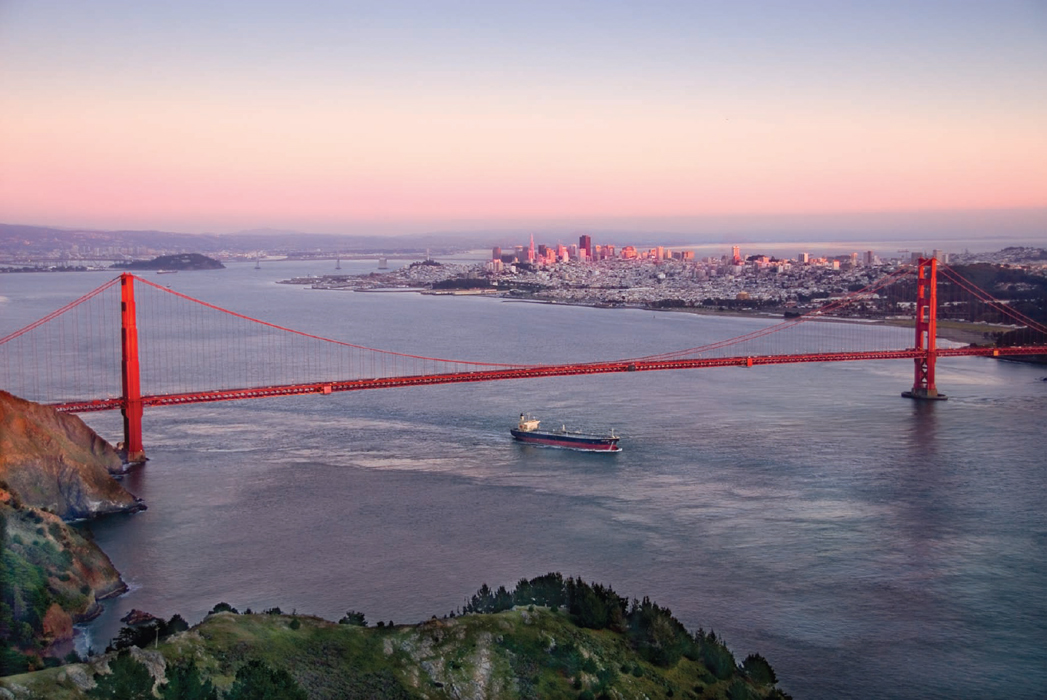
- In this sunset view of the Golden Gate Bridge and San Francisco, California, the large container ship adds to the composition by moving the eye in a contrasting direction to the other, prevailing lines in the landscape.
I was in position on Hawk Hill in the Marin Headlands long before sunset. For a long time, I thought the light would be too dull to create an interesting landscape image. Then, shortly after sunset, glorious light caressed the tops of the buildings in downtown San Francisco. I snapped my photo, and then in an instant the light was gone.
32mm, 1/80 of a second at f/4.2 and ISO 100, tripod mounted
Working with Weather
If you never venture out in bad weather, then you'll never be there when the bad weather ends—often one of the best times for landscape photography. Does this mean that if it starts to rain you should pick up your camera and tripod and head for your favorite landscape? Well, no.
It pays to be thoughtful about the weather. If it is raining solidly for a week, there's probably no point in visiting the world's most magnificent landscapes. Today's tools—such as weather information on the Internet—help give you an idea of what you can expect in terms of both duration and intensity.
I also believe that good, old-fashioned intuition and common sense about the weather play a role. If I am going to be actively photographing in an area, I like to try to form an understanding of how the weather systems in the area operate. Weather maps help one track the progress of storm fronts. I particularly like to be in a location as the storm front is breaking up.
If you are going to be photographing during bad weather, it is vital to keep yourself warm and dry. You cannot expect to do good work if you aren't comfortable. Furthermore, it is a not-so-well-known fact that the majority of hypothermia deaths occur at comparatively warm temperatures. Wet weather when the mercury is in the low 50s Fahrenheit can be extremely dangerous because the cold can sneak up on you. Breathable, waterproof layers are the answer.
Of course, you also need to keep your camera equipment dry in snow or rainy conditions. I recommend a waterproof covering for your camera bag. Some camera backpacks come with this kind of waterproof covering in a special pocket, and you can pull it out when you need it. Otherwise, invest in a separate, fully waterproof cover.
Taking your camera out in the rain is the tricky part. It is best to go light on gear in these kinds of conditions. It's easier to protect a single camera and lens than it is to deal with more complicated equipment. If things are really wet, I'll sometimes even forgo the tripod, and boost my ISO so I can get the shots I want (see pages 114–115 for an example).
If you do need to have your camera out in wet weather, it should be protected. I find that a simple plastic bag, or a shower cap, works as well as any covering that is specially designed for this situation.
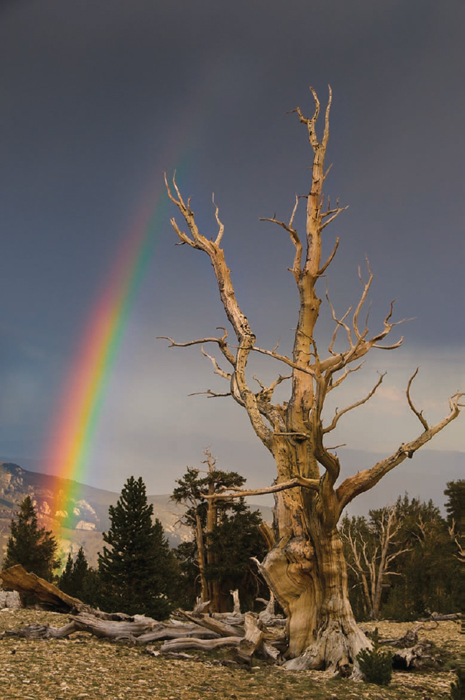
- I drove the long dirt road to the Patriarch Grove of bristlecone pines in the White Mountains of eastern California. These trees are the world's oldest living things. As I progressed, storm clouds gathered. Rain began to fall. By the time I reached these trees, I feared the trip would be washed-out. Then the sun broke through the clouds, and I set my camera up just in time to capture this rainbow.
58mm, circular polarizer, 1/40 of a second at f/11 and ISO 200, tripod mounted
Planning Tools
Fortune favors the prepared mind! As I've mentioned, you may have only a very short amount of time to get the perfect shot. It therefore pays to do as much advance planning as possible, particularly if you have a specific shot in mind.
I've already explained the importance of learning as much as you can about likely weather conditions (see page 142). What you may not know is that mobile devices such as iPhones and iPads are great for planning landscape shoots. The fact that these devices are wireless means that you can use them in the field—no more trying to plan a lengthy and complex series of landscape photography sessions with insufficient real-time data.
The apps I use to plan my shoots include tideApp (tide tables for anywhere), VisiMoon (advanced moon phase calculator), and particularly The Photographer's Ephemeris (TPE).
With TPE, you pick a location and date and you can learn when the sun and moon rise and set, when there will be daylight, and when twilight ends. The application will also tell you what the precise direction of the sun and moon are when they set (from this you can figure out the direction of the lighting). An advanced feature is the ability to add inclination to the data, so you can figure out (for example) when the moon will rise over a particular mountain.
TPE and other mobile tools are great, and make the process of planning landscape photography a little less hit-or-miss. The only danger is getting so caught up in real-time planning that one forgets to photograph!
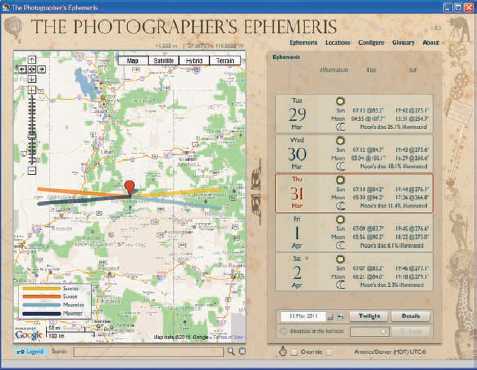
- The Photographer's Ephemeris is a great planning tool for landscape photography. Using it, you can determine in advance for any location the time and direction of phenomena including moon rise and set, and sun rise and set.
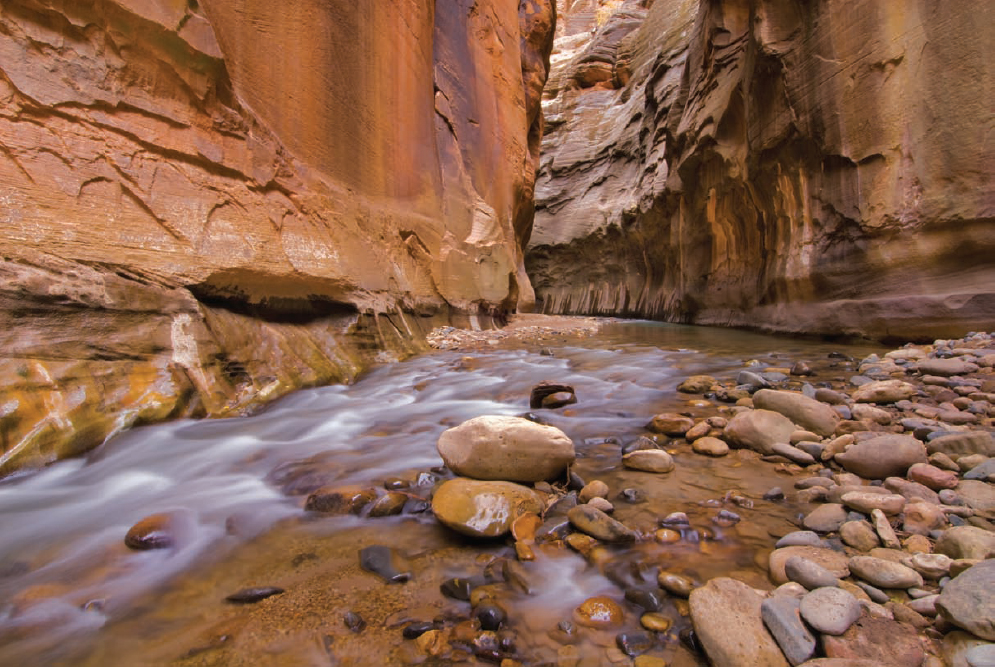
- The trek up the Virgin River through the Virgin Narrows in Zion National Park, Utah is always wonderful—and very, very wet. For safety reasons, it is important to check weather conditions to make sure there is no chance of thunder storms falling upstream to produce dangerous flash flooding conditions.
12mm, 2.5 seconds at f/22 and ISO 100, tripod mounted