Workflow means the process of creating a digital photograph from the moment the shutter is pressed to the final use for your image. It also includes the important topic—beyond the scope of this book—of how you store and preserve your images.
One thing that's clear to anyone who creates many portraits using digital cameras is that a great deal of the artistry is in the digital darkroom, which mostly means Adobe Photoshop. Furthermore, to get the best advantage of digital photography you need to save your captures as RAW files.
Most cameras will save photos as JPEGs or in RAW. While camera manufacturers have their own versions of RAW, they all have in common the idea of preserving all the data obtained by your camera when you made the capture. This is in distinction to saving your files as JPEGs, in which most of the data is thrown away—with the camera and not you choosing a single interpretation of the information that your camera's sensor captured.
Ansel Adams said that his negative was the score and his print was the performance. To bring the Ansel Adams metaphor into modern times, the RAW file is the score, and what you do with it in Lightroom, Photoshop, or some other software program is the performance. A great deal of the artistry in digital photography has to do with rendering an image after the capture.
When it comes to portraits, how much retouching should you do? This is a good question, and the answer largely depends upon the context.
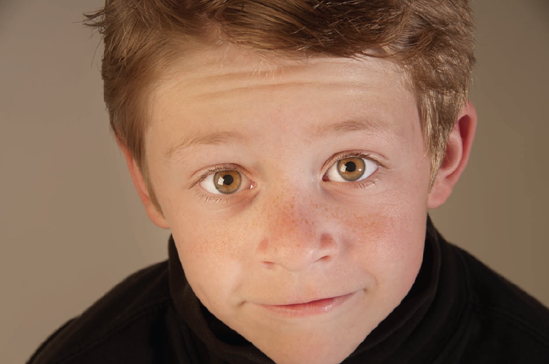
For example, I rarely perform extensive retouching on portraits of children. Sure, sometimes I'll clean up messy faces—but only if the mess doesn't help tell my story. As far as that goes, children's skin—unlike most adults—usually doesn't need work in the first place.
On the other hand, glamour portraits of models almost always require extensive retouching, and leaving anything that is perceived as a flaw is inappropriate.
Sometimes our flaws are our characters, and to remove the flaw is to water down the character. Yes, with four kids and a life in photography I've earned my wrinkles.
So the upshot of the question of how much you should retouch is that it depends—upon whom you are photographing, the point of the photo, and how it will be used.
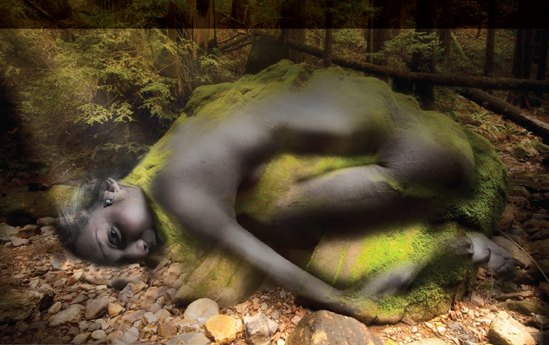
Pages 196-197: To create this photo composite, I flipped the black and white shot of the model shown on pages 122-123 horizontally and combined it with a forest landscape. My idea was to show a portrait of a woman rising—or waking up in kind of a birth ritual—from the forest floor. So I worked in Photoshop to add an interesting lighting effect that conveyed my intention.
Model shot: 31mm, 1/125 of a second at f/6.3 and ISO 100, hand held; Forest landscape: 12mm, 8 seconds at f/22 and ISO 100, tripod mounted. Images combined as layers in Photoshop with lighting effects added using the Mystical Lighting plugin from Auto FX software.
One of the most important reasons for shooting in RAW as opposed (or in addition) to JPEG is because you can alter the exposure and white balance of the image after the fact when converting the RAW file. While there are some practical limits how far over and under the "as shot" exposure you can take an image using multi-RAW, there's a great deal of exposure latitude after the photo has been taken because you have access to all the data made at the time of exposure.
This story keeps getting better. You can also process different portions of the image individually, in a process known as multi-RAW processing. Using multi-RAW processing techniques, you don't have to process an image uniformly. If part of your image is too bright, part too dark, and part just right, you can keep the "just right" part, and adjust for both over and under exposure as I'll show you in a moment.
The example I'll show you uses a portrait that is apparently too bright on the right and too dark on the left. The technique shown for adjusting these issues uses Adobe Camera RAW (ACR) and Photoshop. It's equally effective to multi-process photos in Adobe Lightroom, followed by Photoshop. For more details about both multi-RAW processing techniques, see my Photoshop Darkroom books (listed in the Resources section on page 234).
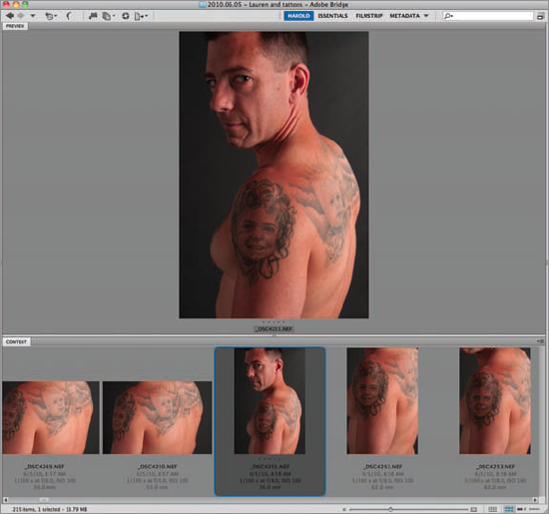
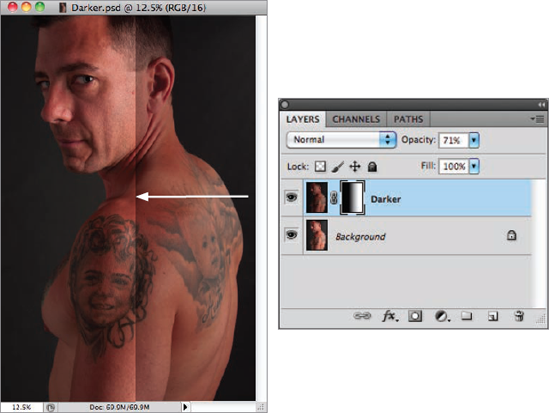
Looking at the captures in Adobe Bridge, I could see right away that the right side of the portrait of Scott with his tattoos was too bright, and the left side was too dark.
I knew I would need to process a lighter version to get the detail on the left side of the image—parts of Scott's face, chest, and his left arm. I would also need a darker version to tone down the brighter areas on Scott's back.
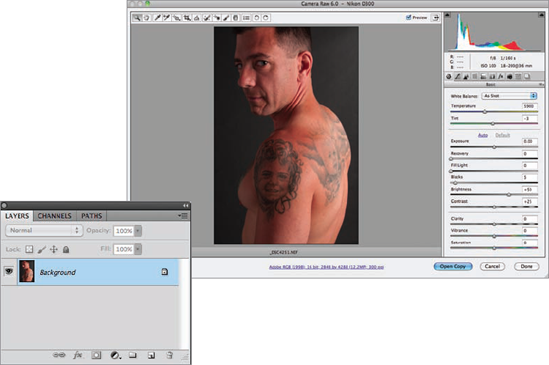
Step 1: Open the RAW capture in ACR.
Leaving the default "As Shot" settings, hold down the Alt key and click Open Copy to open this "As Shot" version in Photoshop.
It will appear in the layers palette as a "Background" layer. This version will be used as the basis for a multi-processed layer stack in Photoshop.
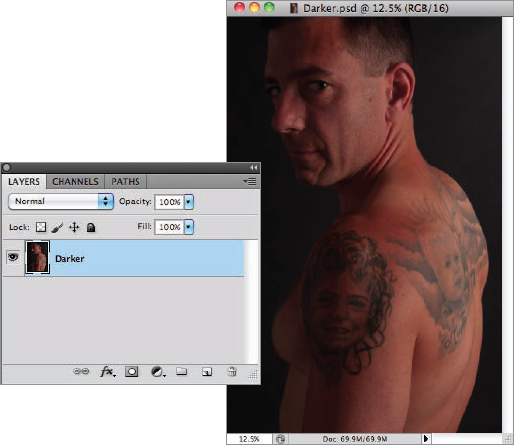
Step 2: Open the RAW capture again in ACR. Move the Exposure slider to the left, the Black slider to the right, and the Brightness slider to the left to make this version of the image darker and expose Scott's back correctly.
Hold down the Alt key and click Open Copy to open this darker version in Photoshop. It will appear in the Layers palette as a "Background" layer.
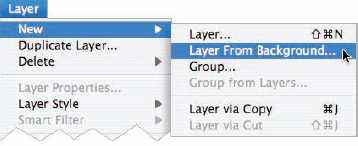
Step 3: Choose Layer

You now have two versions — the Background version and the darker version — of the same image open in Photoshop.
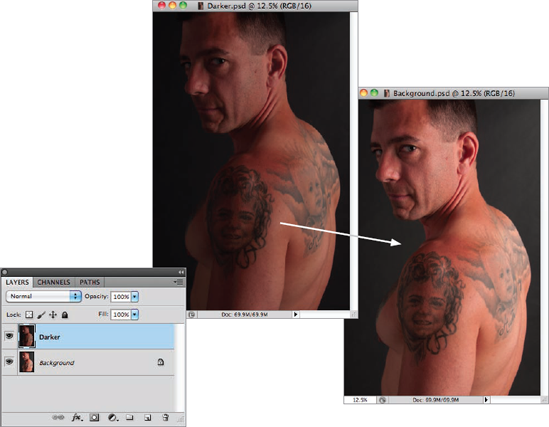
Step 4: Hold down the Shift key and use the Move Tool to drag the darker version from its window onto the Background version's window. Release the mouse before you release the Shift key. This will perfectly align the layers on top of each other.
There are now two layers in the Layers palette: "Darker" and "Background."
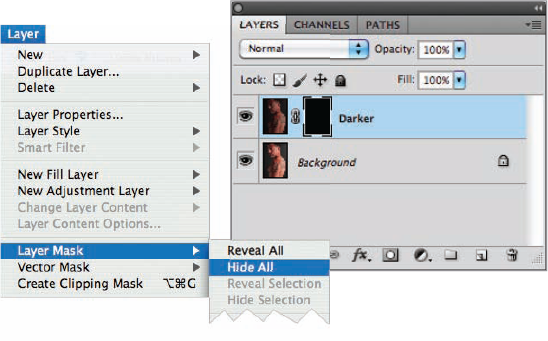
Step 5: With the "Darker" layer selected in the Layers palette, choose Layer
The Hide All layer mask hides the layer it is associated with (in this case the "Darker" layer). So all you will see in the image window right now is the "Background" layer. The layer mask appears as a black thumbnail in the Layers palette.
Step 6: In the Layers palette, make sure the layer mask on the "Darker" layer is selected.
Select the Gradient Tool from the Toolbox and drag a white-to-black gradient from the right-hand side of the window to the left-hand side of the window. This darkens the area across Scott's back.
You can see the gradient on the layer mask thumbnail in the Layers palette.
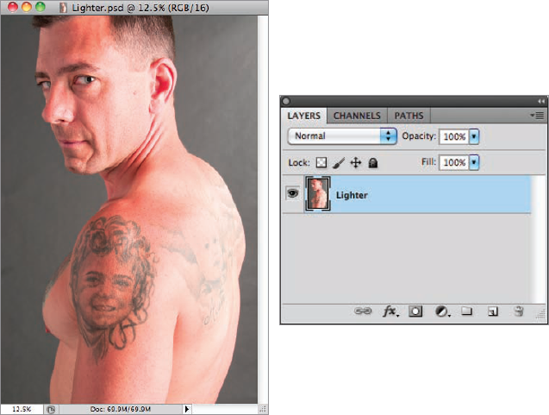
Step 7: Go back to the original RAW capture and open it again in ACR. This time, you are going to create a lighter version that is exposed correctly for Scott's face, chest, and left arm.
Move the Exposure slider to the right, the Black slider to the left, the Fill slider to the right, and the Brightness slider to the right.
Hold down the Alt key and click Open Copy to open this lighter version in Photoshop. It will appear in the Layers palette as a "Background" layer.
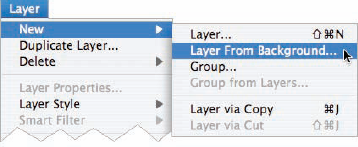
Step 8: Choose Layer
Step 9: Hold down the Shift key and use the Move Tool to drag the lighter version from its window onto the window you've been working on that contains the two layers—"Background" and "Darker"—and the gradient on the layer mask. Release the mouse before you release the Shift key. This will perfectly align the layers on top of each other.
There are now three layers in the Layers palette: "Lighter," "Darker," and "Background."

Step 10: With the "Lighter" layer selected in the Layers palette, choose Layer
The Hide All layer mask will hide the "Lighter" layer. So all you will see in the image window right now are the combined "Darker" and "Background" layers. The layer mask will appear as a black thumbnail in the Layers palette.
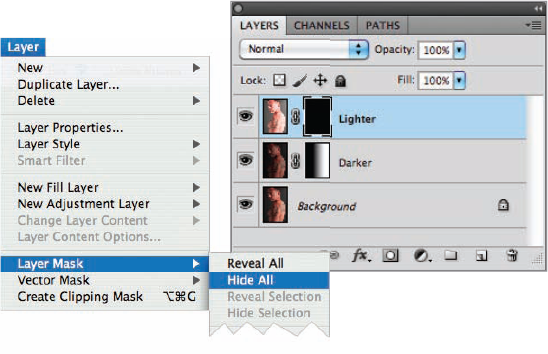
Step 11: The final step for this image is to lighten the left side.
The Gradient Tool won't work to blend the "Lighter" layer into the other layers in this situation because you don't want the lightness extending all the way to the left edge of the image. You only want to make some areas of Scott's body lighter.
So for this step, make sure the layer mask on the "Lighter" layer is selected in the Layers palette and then select the Brush Tool from the Toolbox. Set the Foreground color to white, and set the Brush Tool to an Opacity of 50% and a Hardness of 0%.
Selectively paint in parts of Scott's face, chest, and arm. As you paint, the layer mask thumbnail in the Layers palette shows you the areas you've painted.
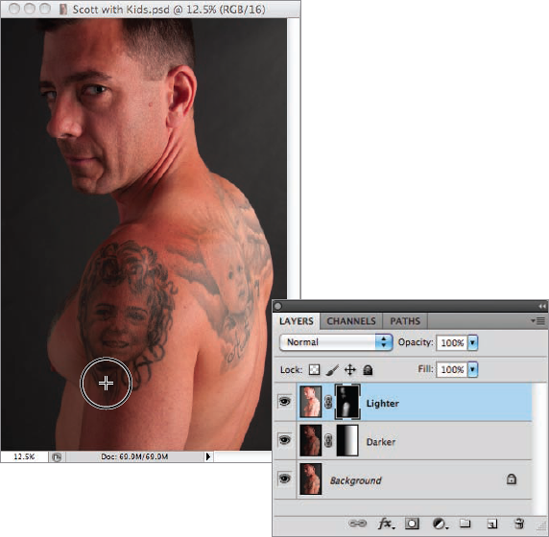
Scott works as an intensive care nurse. He wears his heart on his skin—a tattoo of each of his four kids as they looked when they were two years old. These wonderful portraits cannot have been easy to make.
I photographed Scott on a black seamless background with a soft box to his right. A large fill card to Scott's left helped bounce some light into the deep shadow areas. However, as seen on the computer monitor Scott's back was still too bright, and his left-hand side was too dark—so I'm happy that I was able to adjust the image using multi-RAW processing.
36mm, 1/160 of a second at f/8 and ISO 100, hand held

As I've previously noted, you don't always want to fix flaws. The amount of retouching I am prepared to undertake depends upon the character of my portrait subject and the context of the portrait. But some portraits, and some flaws, cry out for fixing. And in some cases, the vanity of your portrait subject makes them insist on a "digital makeover."
For example, you seldom want reality to intrude on a glamorous portrait of a beautiful woman. After all, that's why cosmetics and make-up are used in our physical world—and digital make-up isn't so different conceptually. By the way, makeovers don't only apply to faces. I've spent a great deal of time on occasion providing virtual manicures and pedicures, among other things.
The first line of defense when it comes to fixing flaws is the destructive—but fantastically useful—Clone Stamp Tool.
The Clone Stamp Tool uses the colors from a sampled area from an image as "paint." When you use the Clone Stamp Tool, the pixels in the area you are working on are replaced with those from the sampled area.
The Healing Brush Tool and Patch Tool are very useful variations on the Clone Stamp Tool. They also take a sample from an area that you choose and let you apply that color and texture to areas that need work, automatically blending and smoothing the colors from the surrounding area.
But before I pull out the tools in my quiver, the first step I take is to do a close scrutiny of the image so I know what needs fixing. As I find the areas that need work, I figure out my game plan. In other words, I make an inventory of problems—and in glamour shots there are always some.
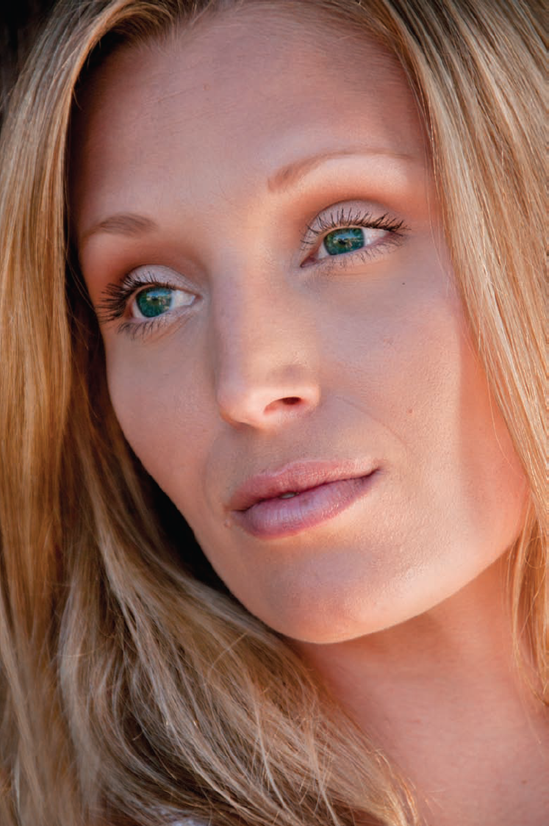
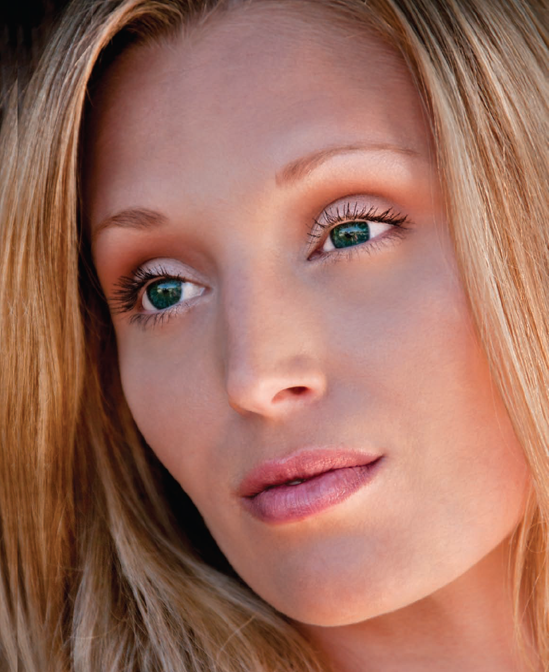
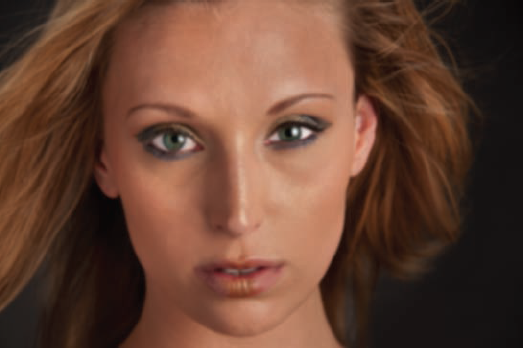
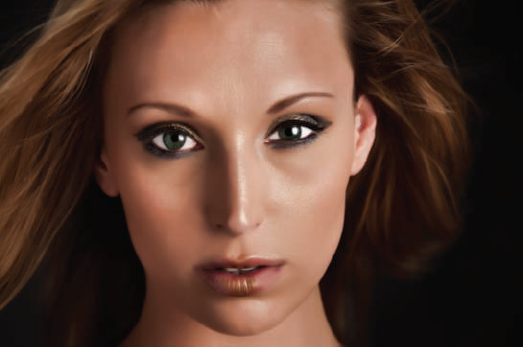
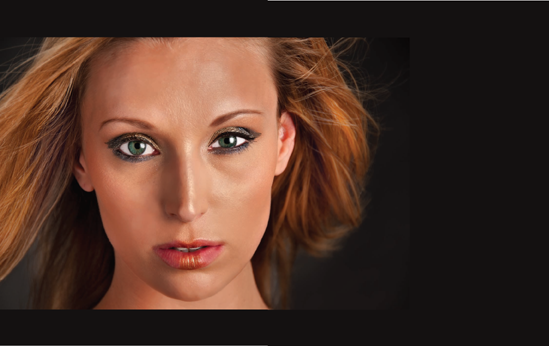
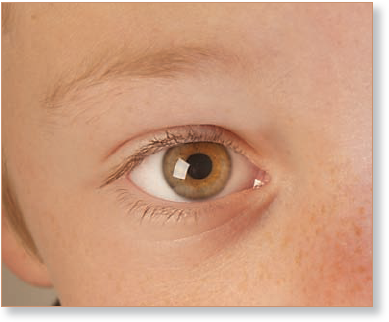
For example, take the natural light headshot shown to the right. There are a number of skin flaws—these are inevitable in anyone, even a gorgeous model—and I've circled a couple of them in the close-up below. In addition, there are some issues with the lip lines, the smile lines above the lips, and a few areas with slightly blown-out highlights. Also, the model's hair is casting a somewhat awkward shadow on her cheek at the middle right of the image.
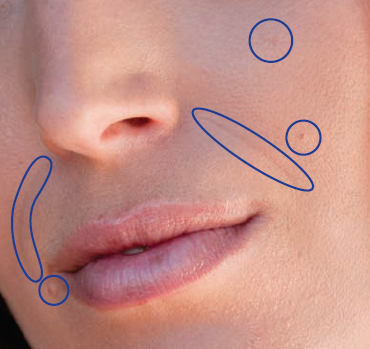
Even beautiful models need some help with their skin. In the areas that I've circled, you can see the lines and bumps that need work.
Step 1: Select Layer
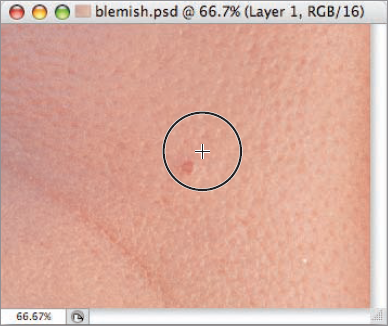
Step 2: Zoom in so you can really see what you are doing.
Step 3: Choose the Clone Stamp Tool from the Toolbox.
Step 4: On the Options Bar set the Clone Stamp Tool to sample all layers at 100% opacity and 0% Hardness. Set the size of the tool slightly larger than the size of the blemish you need to fix.
Step 5: Hold down the Alt key and click over the area you want to use as a sample to replace the blemish. Take care to click on an area that is similar in color and tone to the area you want to replace.
Step 6: Click and/or stroke with the tool to remove the blemish.
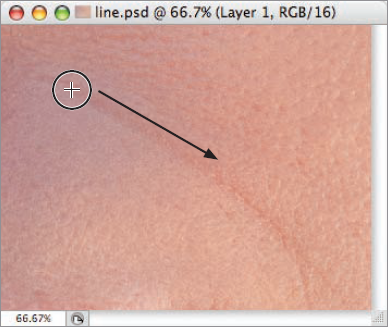
Step 1: Make sure you are working on a duplicate layer and zoom in so you can see what you are doing.
Step 2: Choose the Healing Brush Tool from the Toolbox.
Step 3: On the Options Bar set the Source to Sampled and select Sample All Layers. Set the Hardness to 0% and set the size of the tool slightly wider than the line you are going to conceal.
Step 4: Hold down the Alt key and click over the area you want to use as the sample. Take care to click on an area of pixels that is similar in color and tone to the area you want to replace.
Step 5: Stroke on the line with the tool. Photoshop will automatically blend in the tone and texture of the area.
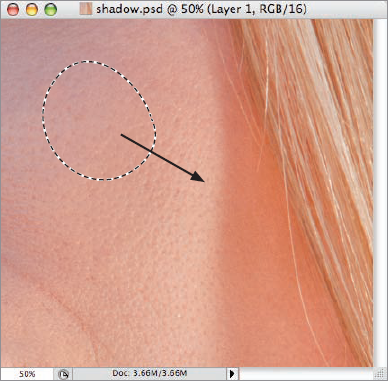
Step 1: Work on a duplicate layer and zoom in so you can see what you are doing.
Step 2: Choose the Patch Tool from the Toolbox.
Step 3: On the Options Bar set the Patch to Destination.
Step 4: Hold down the mouse and marquee select the area that you want to use to conceal the shadow. Be careful to sample from an area that is similar in color and tone to the area you want to replace.
Step 5: Drag the selected area over to the shadow you want to remove. Photoshop automatically uses the surrounding pixels to blend in tone and texture.
You can enhance skin by painting at partial opacity over areas that have problems, first getting a good sample of the color of skin tones from a surrounding area. Used carefully, this is a technique that can be very effective. However, it can be a tedious and time consuming process, particularly when there are a number of Photoshop plugin filters that essentially "fix" skin—and sometimes creatively enhance skin—as a kind of batch process.
Before you apply one of these filters, you should fix all the obvious flaws that can easily be repaired. If there's a red mark—for example, a blemish—the best that a filter will do is show you a smooth, creatively enhanced blemish. You want to remove it before you apply overall filters.
Be sure to work on a duplicate layer when you apply an overall filter to modify the appearance of skin. This has two benefits. First, if you like the effect but think it is a bit too strong you can dial it back by taking down the opacity of the layer it is on. Second—and this is a very significant extension to the concept of applying an overall filter—once the filter has been applied to a layer you can use a mask to selectively use the filter. This means that some areas can have the filter applied while others do not. For example, you might wish to apply a skin filter to a model's cheeks, but not to her hair. Furthermore, the application doesn't have to be the same strength in all areas.
There are a great many possible filters and third-party products you can use to enhance skin—and not all of them are labeled specifically for that usage. In this section, I'll show you the impact of some of my top choices for enhancing skin tones and the overall look of a glamour portrait. Don't kid yourself: in digital portrait photography with a dramatic or glamorous look, a great deal of the craft and art comes from how you process the image after the photo has been taken. Being good in the digital darkroom is every bit as important as being good behind the camera.
It's worth experimenting with as many of these as you can get your hands on—and realize that you can mix and match, apply one filter treatment to one part of an image, and another to other portions of the image—and combine filters in an endless array of settings and possibilities. Essentially, this is a matter of your vision. There is no right, and no wrong—only the choices you make in the context of the way the final portrait comes out.
You'll find web addresses for the software tools I show in this section on page 235. In almost all cases, a working trial version is available for free download.
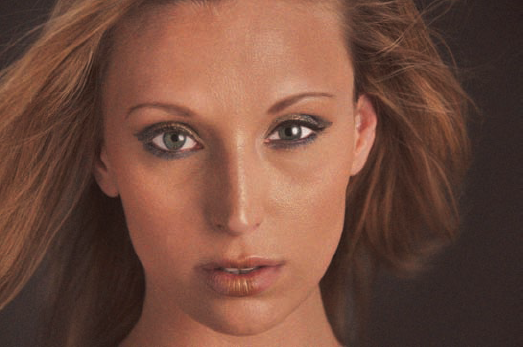
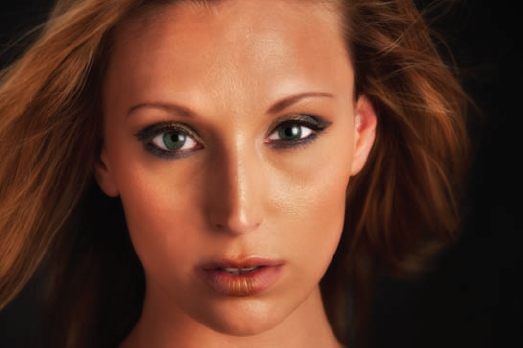
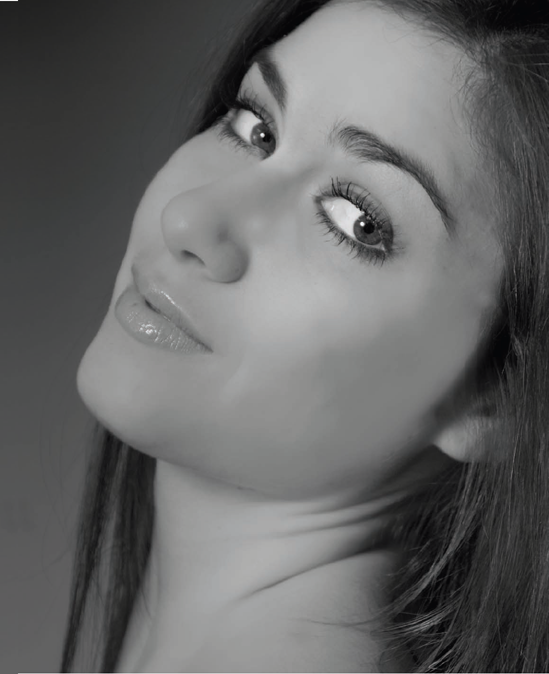
At this stage, major flaws have been corrected, but no filters or special effects have been added. The two eyes are shaped somewhat differently, but that's part of what makes this portrait human, and I decided not to make them the same size.
The examples on pages 212-217 will show you a few tools and plugins you can use to enhance portraits.
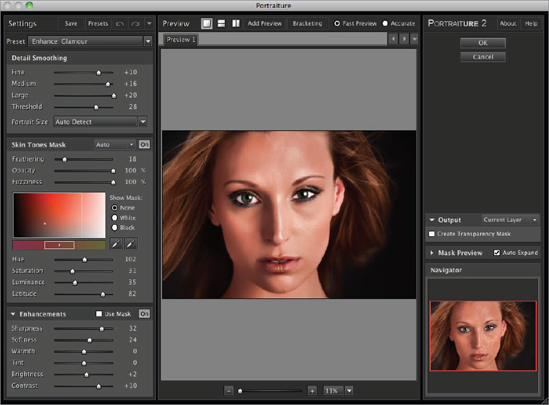
Imagenomic's Portraiture Photoshop plugin contains a number of presets that you can use to adjust an image. These presets are intended specifically for use with portraits. The filters range from those that add glamour and lighting effects (above) to those that smooth and enhance skin (right).
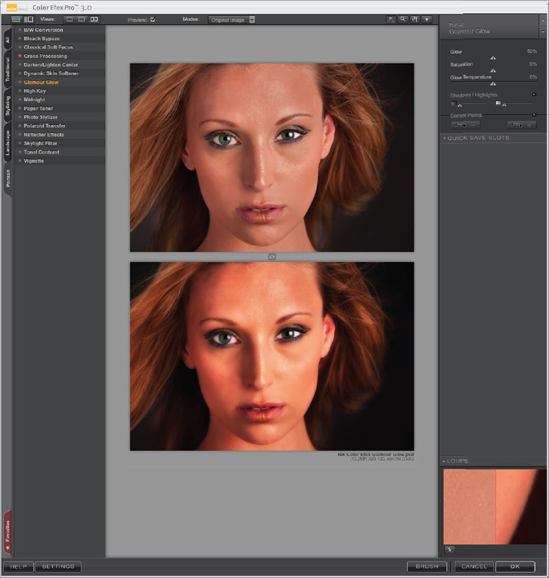
Nik's Color Efex Pro 3.0 filter pack is one of the most extensive third-party filter add-ons for Photoshop. This product also works with Lightroom and Nikon Capture NX. I use Color Efex almost every day in my creative Photoshop work. While this collection of filters is designed for a great deal more than portraiture, there are a number of filters included that work well with portraits—for example, the Glamour Glow filter shown here.
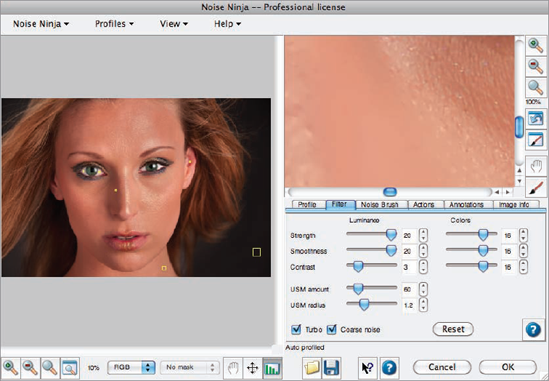
PictureCode's Noise Ninja can be used at extreme settings (like the ones shown here) to remove noise in order to smooth skin, though you don't want to apply the smoothing to an entire image because details such as eyes and eyebrows will lose sharpness. There's an attractive naturalness to smoothing with Noise Ninja that is hard to get with other options.
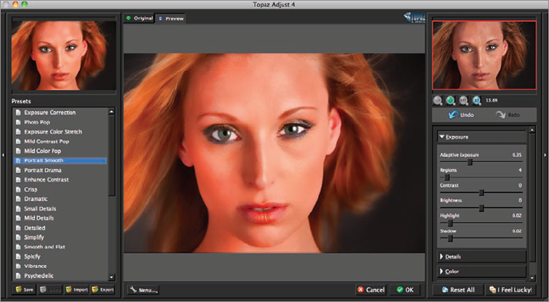
The Adjust 4 Photoshop plugin by Topaz includes many useful filters and presets that you can customize and save, including several intended specifically for use with portraits.
Adding a blur can be an effective way of rendering soft skin without a great deal of effort. I chose Filter
Usually, I use layers, masking, and the Brush Tool to paint in areas to create a selective focus effect rather than treating an entire image with Gaussian Blur.
It sometimes surprises people to learn that adding noise can improve some portraits by increasing definition in areas such as cheeks. To add the noise shown in this example, I chose Noise
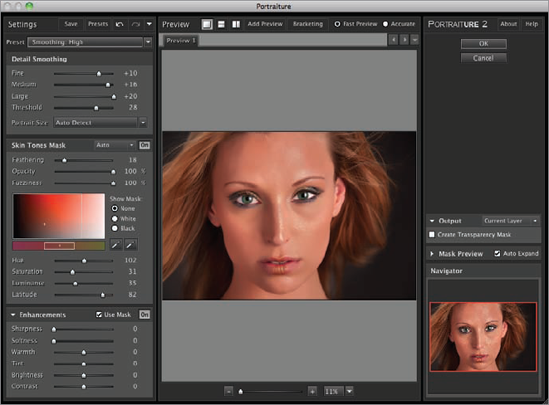
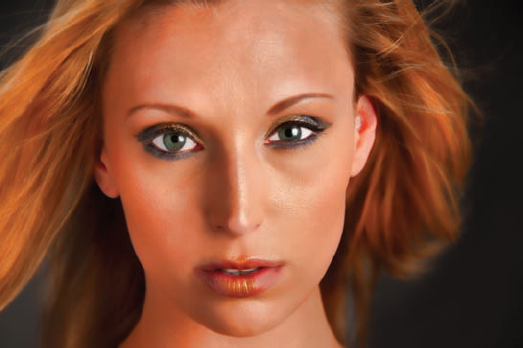
This example shows Imagenomic's Photoshop Portraiture plugin at work using the Smoothing High preset. You can see that it does indeed smooth the entire portrait, including the skin and hair.
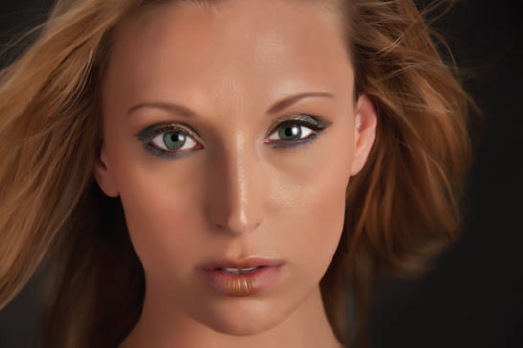

This example shows the Enhance Glamour preset from Imagenomic's Photoshop Portraiture plugin. This preset smooths while evening out skin tones to create a more uniform look.
The Glamour Glow filter in Nik's Color Efex Pro 3.0 filter pack is one of my favorite portrait enhancements, but it needs to be used in moderation, usually at about 25% opacity. This filter smooths while also increasing the contrast between lights and darks in the portrait.
Removing noise often serves to smooth flesh areas in a portrait as shown here using PictureCode's Noise Ninja. However, this is generally not a good effect to apply uniformly to a photo, because you'll lose sharpness and details. So when I use noise removal for smoothing, I always apply it selectively using layer masks and the Brush Tool.
The Topaz Labs Adjust plugin provides a number of useful filters and presets, including the Portrait Smooth filter shown here. This filter adds softening around the edges, picks up the highlights, and adds a warmer tone to the entire image.
The Portrait Drama filter from Topaz Labs adds an edgy quality to an image. Highlights and shine are increased while the overall image is slightly desaturated.
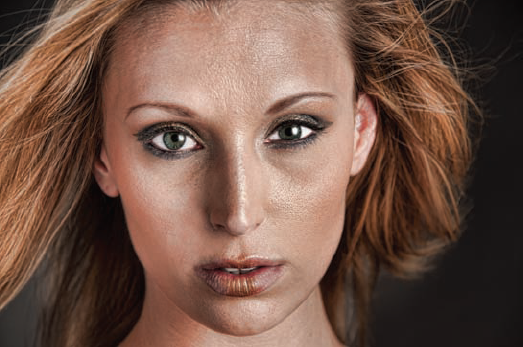
The Smooth and Flat filter from Topaz Labs softens the area around the face with blurring, smooths out skin tones, and reduces highlights.

From the very beginning of this book I've made it clear that eyes have a special place in portraiture. If you get the eyes right, probably everything else will fall into place. Therefore, you need to pay special attention to eyes when you are post-processing your photos, particularly in images where the primary impact is glamorous.
Here's the checklist of things to observe for possible work, along with some suggestions about how to proceed.
Make sure the iris of the eye appears colorful and translucent—however, the pupil can stay black and opaque. You can lighten the iris by blending a Photoshop layer with itself in Screen blending mode, adding a layer mask, then carefully partially painting in the areas that should be brighter.
Beware of eye whites that show too much red. This can be highly unattractive. The best approach to fixing this problem is to paint over the eye whites with your color set to white and a partly opaque brush. There's a balancing act here: some red veins are normal and you don't want to remove them all, but eyes that are too red seem tired and unattractive.
Even the most well applied make-up can show flaws up close. Pay particular attention to mascara and eye-liner. Correct these cosmetic problems using cloning.
Contact lenses are fine, but you don't want them to show in your portrait. Contact lenses often leave a small circular line in the eye whites around the iris. You may have to look hard to see this line in the eyes on top to the right. Paint out this line with a white brush, or use the Clone Tool.
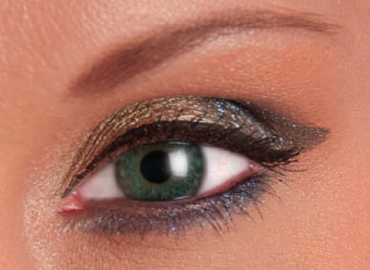
One other point: the catch lights, or highlight reflections, in an eye are often what gives an eye sparkle and interest. I sometimes use a white paint brush to add a little more life to a catch light. While this effect can be overdone, in moderation it can enhance portraits a great deal.
Lauren's right eye after retouching but before the catch light has been adjusted.
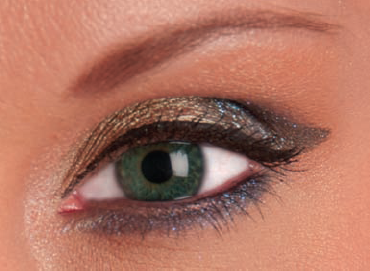
The eye after the catch light has been painted using white with a brush at a low opacity setting.
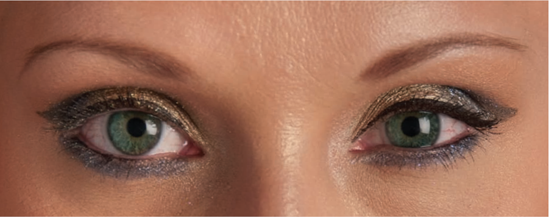
Before starting work on Lauren's eyes, the whites were bloodshot and the edges of her contact lenses showed. Also, the eyes lacked a sparkly luster.
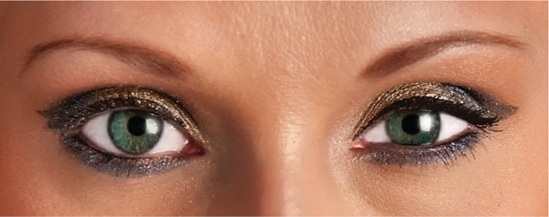
After working on Lauren's eyes, the whites are clear, the contact lens edges are gone, and the catch light from the studio soft box in each eye has been brightened by painting in with additional white at about 20% opacity.
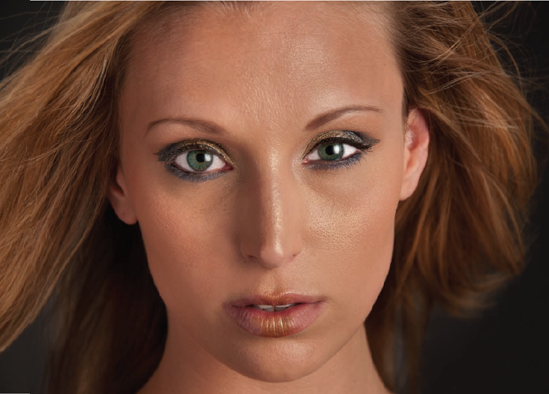
Pages 220-221: To enhance this studio shot, I first removed flaws as explained on pages 206-209. Next, I enhanced the model's eyes. Finally, I applied a variety of effects to help improve the skin and the drama of the image. I used Noise Ninja applied selectively to smooth the skin in a flattering way. Nik Color Efex Pro's Glamour Glow at about 20% and Topaz Adjust's Portrait Smooth filter at about 30% were the finishing touches.
120mm, 1/160 of a second at f/7.1 and ISO 100, hand held
There are many techniques for sharpening photos that work quite well. For example, you'll find five different sharpening filters on the Photoshop Filter menu alone. In addition, recent versions of Adobe Camera RAW (ACR) provide very effective sharpening.
However, when it comes to portraiture, I like to do sharpening a little differently. Before I explain, let me note that there are two kinds of sharpening, done either:
To appropriately prepare an image for a specific output device or printer so that the photo will look its best.
To enhance the visual appeal of an image without regard to output devices.
This discussion applies to the second of these goals, enhancing the visual appeal of a photo, and not sharpening for output.
Whatever method of sharpening you use—and Photoshop's Smart Sharpen is not bad—the most important thing is to apply the sharpening selectively. This means applying the sharpening effect to a duplicate layer, adding a layer mask, and painting in the areas you want to sharpen. When it comes to portraits, I suggest sharpening the eyes and maybe a few strands of hair—and leaving the rest of the portrait alone.
My preferred sharpening method that I'll show you here is to use the LAB color space to only sharpen monochromatic information. I believe that leaving the color information alone leads to sharpening that seems pleasing—and doesn't look artificially over-sharpened. Here's how it works.
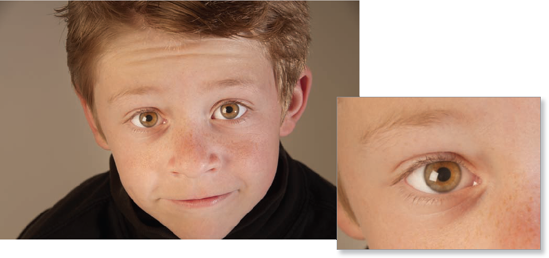
This portrait of Nicky is pretty sharp and the eyes seem to be in focus. But if you look at an enlarged view of one of his eyes (below), you'll see that the portrait would benefit from selective sharpening of his eyes.
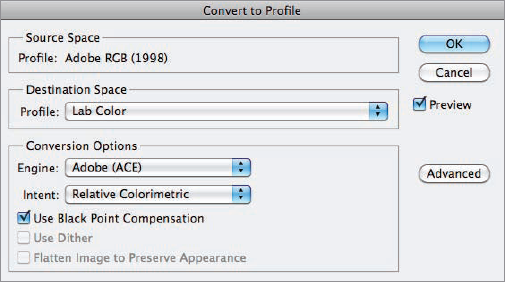
Step 1: Convert the image to LAB color by selecting Edit
In the Convert to Profile dialog choose LAB Color as the Destination Space. Make sure the Engine is set to Adobe (ACE), the Intent is set to Relative Colormetric, and Use Black Point Compensation is checked. Then, click OK.
Note: Once you have selected the conversion settings in this dialog box, you won't need to set them again. In the future you'll be able to quickly convert to LAB by choosing Image
Step 2: Choose Layer
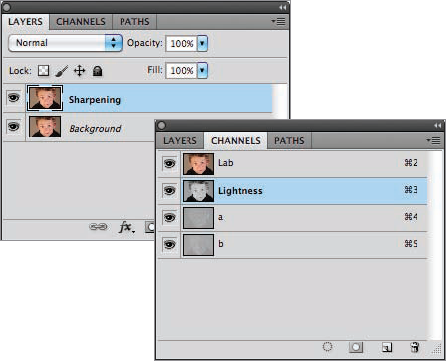
Step 3: In the Channels palette, click the Lightness channel to select it.
The Lightness channel contains the monochromatic information in the image, and no color information. All the channels should be visible (as shown by the eyeball icons in the left-hand column), but only the Lightness channel should be selected.
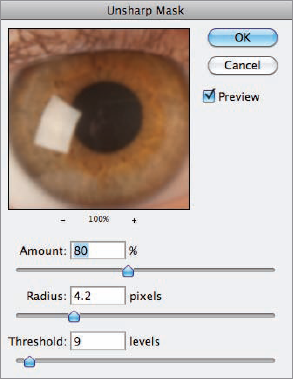
Step 4: Make sure the "Sharpening" layer in the Layers palette is selected, and then choose Filter
For eyes in portraits, I suggest starting by first setting the Threshold to 9 levels and the Radius to 4.2 pixels. Then, play with the Amount slider; I usually set it between 50% and 100%.
Trial and error will show you what works best. The Unsharp Mask is a relatively old sharpening technique that primarily works on the lines that are at the edges of shapes, and creates very attractive sharpening when applied—not too heavily—to the Lightness channel.
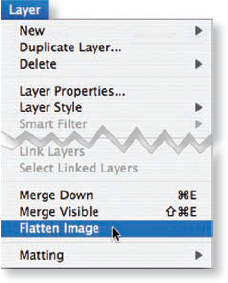
Step 5: Choose Layer
The Hide All layer mask will hide the "Sharpening" layer. The layer mask will appear as a black thumbnail in the Layers palette.

Step 6: Select the Brush Tool from the Toolbox and use the Options Bar to set the brush to 100% Opacity and 100% Flow. Then set the Foreground color to white.
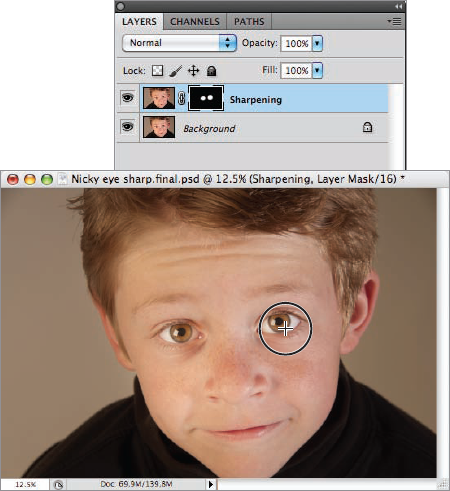
Step 7: With the layer mask selected in the Layers palette, use the Brush Tool to paint in the eyes. As you paint, the thumbnail on the Layers palette will show what you have painted.
Step 8: Choose Layer
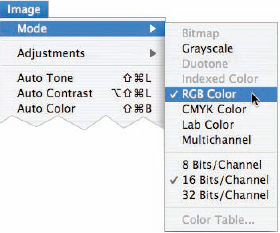
Step 9: Select Image
The most prominent feature in this studio portrait of Nicky is his eyes. Therefore, I used selective sharpening of the Lightness channel to emphasize the visual appeal and impact of Nicky's eyes.
If you compare the enlarged view of Nicky's sharpened eye (left) with the enlarged view shown on page 222, you'll see that the LAB sharpening has really made his eye look crisp.
95mm, 1/160 of a second at f/11 and ISO 100, hand held
Black and white photography is a great art form that is intertwined with the history of photography, dating from a time in which monochrome was all there was. Today, the situation is different. Photographers choose digital black and white as a matter of conviction and for artistic reasons, not because they have to.
There are a number of consequences of the changing role of monochromatic photography. No longer do you have to shoot solely in black and white. But you do need to know how to see in monochrome, when to use monochrome as a creative expression, and how to use the software that is available to convert color images to monochrome. High-quality digital monochromatic photos start as RAW files, are processed using the full color information in the files, and then converted with energy and subtlety to monochrome.
Each of these topics is important, and covered extensively in my book Creative Black & White: Digital Photography Tips & Techniques (Wiley, 2010).
When thinking about monochrome in the context of portraiture bear in mind that black and white imparts a certain gravitas. The intentional choice of a medium associated with the history of photography and art carries some weight. In an age of point-and-shoot digital cameras, not all photos work well with this treatment. For example, it doesn't make sense in most cases to present family snapshots monochromatically.
For the most part, monochromatic photos are simulations, being actually RGB or CMYK files that have been made to look as if they were monochrome. This is an exciting state of affairs—but one with some risk. If you are presenting a number of monochromatic images, many of the treatments that can easily be applied, such as simulating toning, can clash with other monochromatic treatments. You may have better results applying the same finishing touches to all monochromatic photos in a group.
Ultimately, black and white can be very satisfying, because it reduces compositions to the basic elements of lines, and the spectrum from light to dark. In portraiture, without color you see the facial planes clearly and are not distracted by color. Even so, there should be an aesthetic justification for the choice of monochrome—since in today's digital world it is an intentional choice.
To create this monochromatic portrait, I started with the RAW file. Prior to converting the image, I adjusted the exposure, fixed the flaws, and worked on the skin. To convert the photo to black and white, in Photoshop I used two Black & White adjustment layers. The bottom half of the image was converted using the High Contrast Red Filter preset, and the top half using the Green Filter preset. The two layers were combined using a layer mask and a gradient.
150mm, 1/160 of a second at f/7.1 and ISO 100, tripod mounted
The color version of this shot is on page 13. Since the version on page 13 doesn't have much color range in any case, and because I planned to soften the image in a monochromatic conversion, I thought this image was a great candidate for monochrome. It's a very cool thing about digital photography that you can process a single image in multiple ways. There's no longer a choice of either color or monochrome because you can have it both ways.
200mm, 1/160 of a second at f/11 and ISO 100, hand held
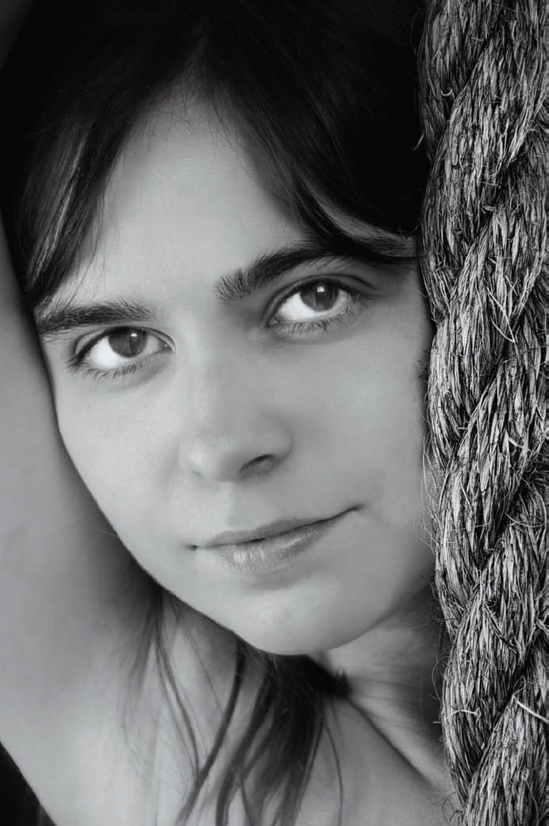
When I processed this photo, my goal was to create a monochromatic image that showed the contrast between the highly textured rope on the right and the portrait on the left. My strategy was both to smooth out the portrait and increase the contrast in the rope.
To start with, while still working in color I added a selectively applied layer using Imagenomic's Portraiture set to Smoothing High. This created a more even texture in the facial structure. Next, I applied the Psychedelic filter from Topaz Adjust to the rope area of the photo at about 35% opacity.
To convert to monochrome I used a layered approach by combining the filters within Nik Silver Efex. The bottom layer is Antique Plate; next Soft Skin is applied selectively to flesh areas; next the Neutral filter is applied at about 40% opacity; and finally, on the top of the layer stack, I applied High Structure to the rope (but not the face).
As a final step, I used Silver Efex to add some virtual selenium toning and a small amount of pseudo film grain.
200mm, 1/125 of a second at f/8 and ISO 100, hand held
There are many ways to apply special effects in Photoshop. It's fun to experiment with the many filters that come with Photoshop—and there are also a great many third-party filters. For more information about third-party filters specifically designed for use with portraiture, see the samples on pages 210-217 and page 235 in the Resources section.
Personally, when it comes to special effects, I often like to go back to basics. There's a great deal you can do in Photoshop using simple concepts like color spaces, channels, and adjustments. One of my favorite techniques—shown in the examples here—is to invert a channel in LAB color. Sometimes this is an easy way to create fantastic special effects—and it is all up to your own creativity when using these simple techniques, not the pre-packaged visual ideas from a software vendor.
Using a special effect in portrait photography is not for everybody, or for every photo. Sometimes straightforward is best. But when you are in the mood to reverse colors and create fantastic creatures where before there were only humans, consider playing with some of the myriad options available in Photoshop—and specifically with the creative color control that the LAB color space gives you.
You'll find complete information about creatively using LAB color in my Photoshop Darkroom books (see page 234).
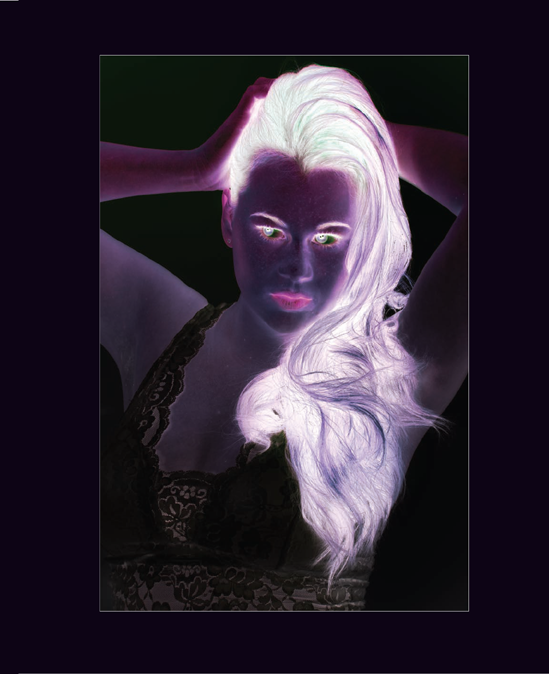
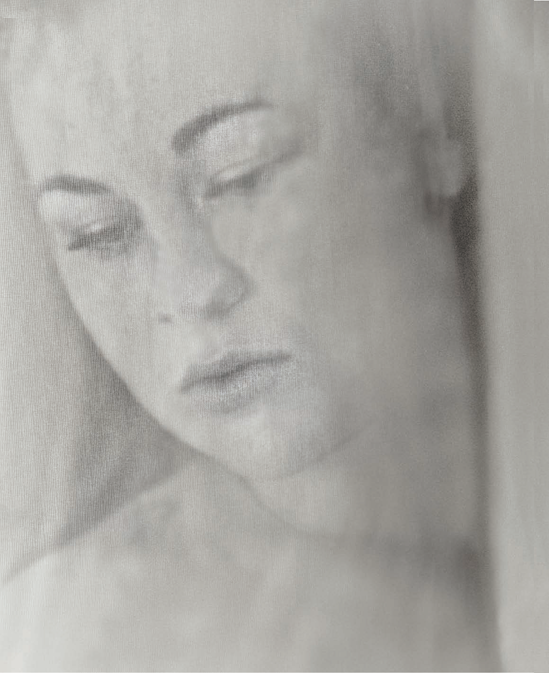
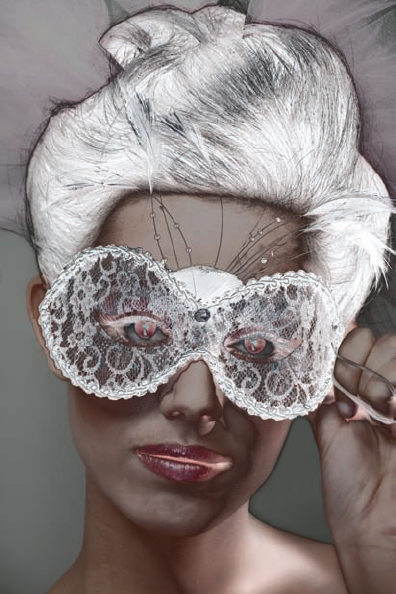
I created this special effect by using LAB color to invert the luminance information contained in the photo. Essentially, this means swapping white for black, and black for white—with truly neutral gray staying gray. You can see the original version of the photo before the effect was applied on page 6.
135mm, 1/160 of a second at f/8 and ISO 100, hand held
This was a pretty typical studio shot of a model dressed in a white camisole on a white background. In Photoshop, I used LAB color to invert the L channel to create the special effect you see. Black has become white, and white has become black. The world of a gorgeous model is now strange and eerie.
200mm, 1/160 of a second at f/9 and ISO 100, hand held