
At a fundamental level, photography is about light—light reflected off surfaces, the ambient light in an environment, the way light makes things look. Without light there is no photograph. This is true no matter what the subject—you need light to illuminate a capture of a still life or mountain landscape just as surely as you need light to capture a portrait of a person.
And not just any old light! The difference between a just plain vanilla snapshot and a unique and wonderful portrait of someone is at least partially in the lighting.
Sure, it helps to have an interesting or attractive person to start with (pages 10-55), posed in a dynamic way (pages 110-119), and placed in front of a complementary background (pages 120-123). But without good lighting your portrait will not rise above the mundane.
A photographer can work with light actively or passively. In passive mode, the photographer observes the light, changes position relative to the subject, moves the subject if possible, waits—and when the moment is right makes the photo.
In active mode, the photographer sets up the lighting using a variety of possible light sources. But it's worth being clear that even when a photographer actively arranges the lighting, the passive skill of light observation is crucial. The usual procedure is to work by successive approximation: the light is arranged and then observed. Perhaps a test shot is made and inspected in the LCD. Depending upon the results, the light is adjusted, and the process iterated.
Therefore, in either active or passive mode, observation of light is a crucial skill. When planning a creative portrait you also need to know the possible light sources available, as well as some basic ideas about lighting portraits.
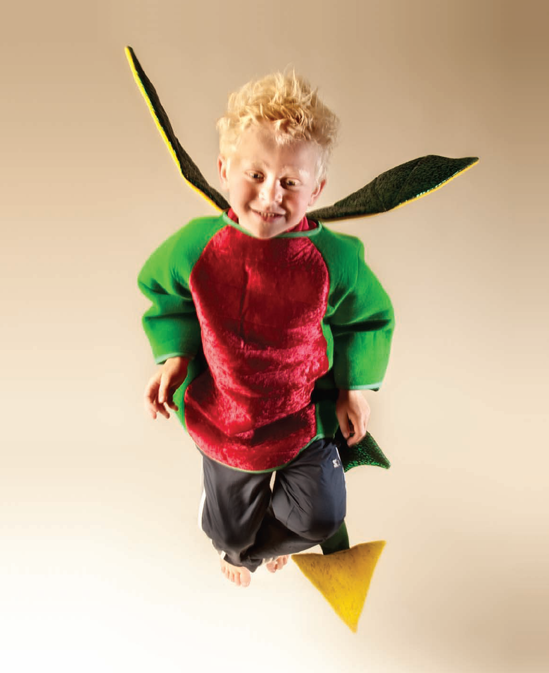
I set this shot up with a large strobe-driven soft box to the left of Mathew the "flying dragon."
I asked Mathew to jump and my lighting assistant followed Mathew's movement with a second strobe. I used the magic of studio lighting—actually, the short duration of a studio strobe—to stop Mathew's motion in midair. It took quite a number of shots to get this effect right.
27mm, 1/160 of a second at f/11 and ISO 100, hand held
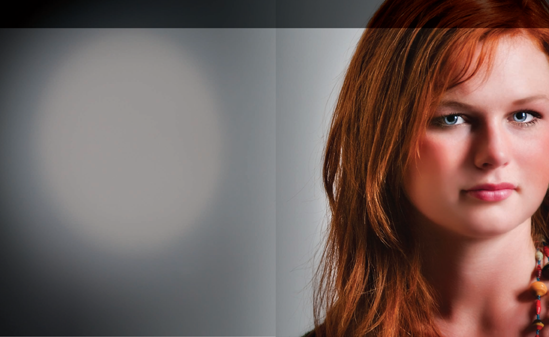
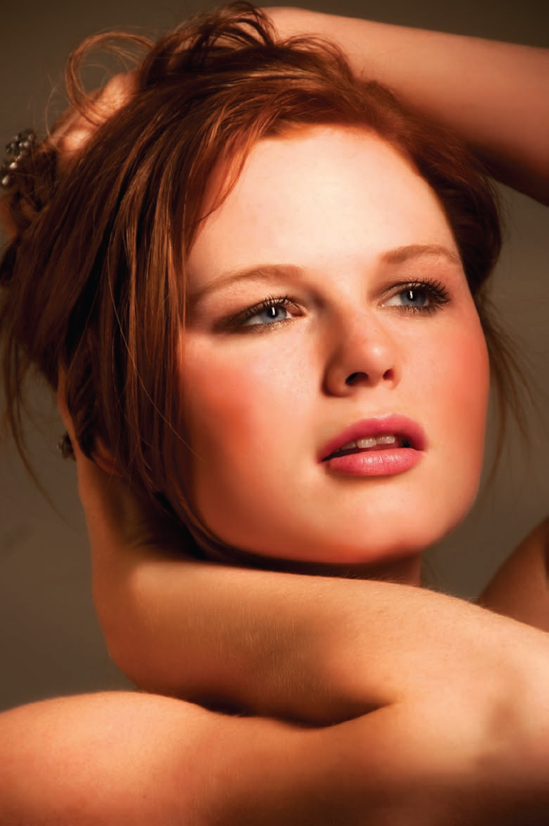
Pages 140-141: In this shot, the red-haired model is lit using a single strobe-powered soft box, a diffused light source. The soft box diffuser is shaped as a rectangular light strip, positioned above the model and to her left.
The white circle to the model's right is created using an ellipsoidal spotlight aimed on a white wall. The ellipsoidal spotlight can vary both the size and focus of the spot, with the focus controlling whether the spot of light has sharp or soft edges. For a lighting diagram of this photo, see page 164.
Although the wall is white, it is comparatively darker than the model because the strobe doesn't reach the wall—which makes the light thrown by the ellipsoidal spot seem like a white circle in a black background.
200mm, 1/160 of a second at f/6.3 and ISO 200, hand held
Understanding light from the viewpoint of a pragmatic photographer means recognizing that light has three general characteristics:
Intensity
Direction
Quality
Intensity of a light source simply means the strength of the light. Generally, care needs to be taken to make sure that a light source is strong enough to illuminate the areas you want to show, but not so strong as to cause highlight blowouts. In other words, overall light shouldn't be too high in contrast. However, this is not an absolute rule: sometimes—particularly in monochromatic portraiture—high contrast light makes a powerful and creative statement.
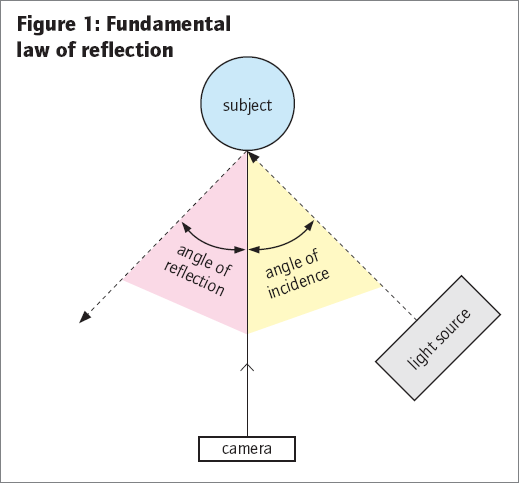
Direction refers to the direction from the light source to the subject that is illuminated. In this regard, it is worth keeping in mind the law of reflection, which states that the angle of incidence equals the angle of reflection.
Here's why the well-known law of reflection matters: when you are photographing someone you are not photographing the way the person is lit. Rather, you are photographing the light reflected off the surfaces the person presents. The law of reflection lets you know that the light coming off the person (the reflected light) does so at the same angle as the light directed onto the person (the incident light). This relationship is shown in Figure 1 below.
The law of reflection is important because you don't want light coming directly back at the camera. At best, this is unattractive and at worst it leads to lens flares. That's why most portrait lighting sources are placed so that the light is reflected off the subject at an angle to the camera (the angle of reflection). Light that is captured at an angle tends to be softer and more attractive than direct lighting.
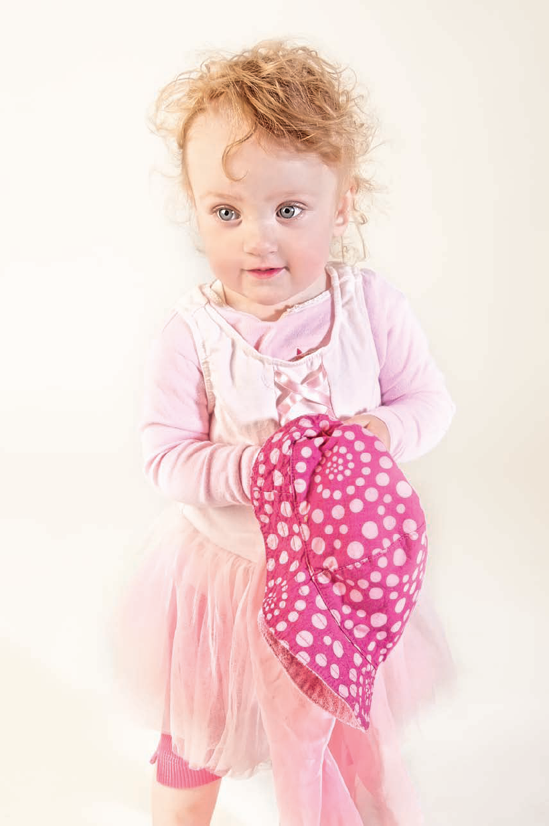
My daughter Katie Rose is always in motion, as is typical for toddlers (unless they are asleep). Katie wandered around the studio, off and on the seamless paper background. I tracked her motion with my camera, and captured her in this high-key portrait, intentionally post-processing the image to make the background seem slightly overexposed.
This portrait was lit from two directions as you can see from the reflected highlights in Katie's eyes.
The primary lighting source was a large soft box to Katie's right, which helps give the lighting in the portrait a nice glowing feel.
52mm, 1/160 of a second at f/13 and ISO 100, hand held
The quality of light is the hardest characteristic of light to pin down, and in practice is to some extent subjective and elusive. It's not at all obvious why natural sunlight has such a wonderful quality, or how one would go about describing that quality. But it's nonetheless true that often natural light has a quality that can't be beat. By the way, you likely know that there's no such thing as natural light in a vacuum. Daylight is constantly changing with characteristics that differ due to position, atmospheric conditions, time of day, and so on.
Many great photographers—for example, Ansel Adams and Edward Weston—have preferred to create portraits using only natural light, sometimes augmented by using devices such as fill cards and diffusers.
There are two important factors that help define the quality of light. One is color temperature. It can be measured. The other factor is where the light is on the scale from harsh to diffuse. This is a subjective matter but is still important to consider.
Harsh lighting is high contrast light, whereas diffuse light is soft and almost caresses. Both qualities of light have their place in portraiture, although soft lighting is probably used more often.
Color temperature just refers to the frequency of the light waves emitted by the light source. Usually, color temperature is expressed in degrees Kelvin, on a scale going from light we perceive as blue to light we perceive as red.
Your camera's rendering of color temperature is controlled by its white balance setting. Usually, Auto white balance works pretty well, although I prefer to set my camera to Flash white balance in the studio.
The advent of digital controls over white balance makes this light characteristic easier to manipulate than it used to be with film. In particular, if you are saving the RAW data provided by your camera rather than shooting JPEG (see pages 196–197), you can always adjust white balance after the fact.
Color temperature becomes a serious issue that is difficult to control in situations where there are multiple light sources, each putting out light with a different color temperature. When this happens, usually your best bet is to set your camera's white balance to the predominant (or most attractive) color temperature, and adjust the effect later in the digital darkroom.
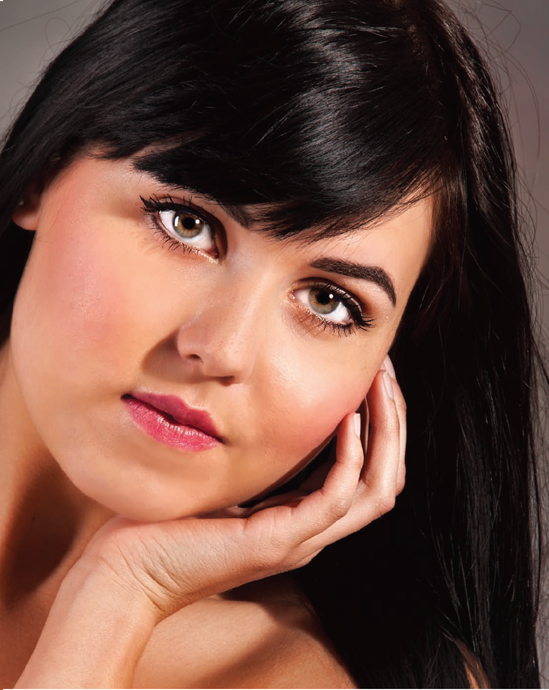
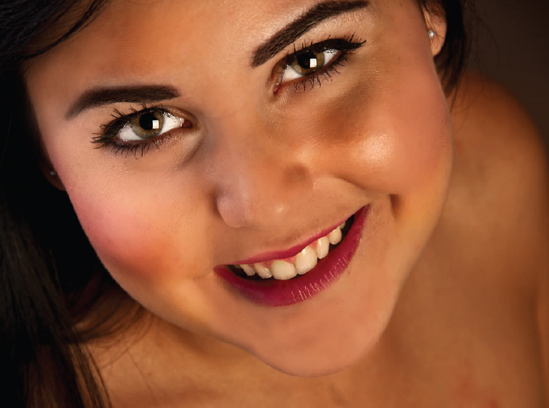
This lovely model is lit by a single strip light—you can see its reflection in her eyes. A large white board positioned to the left of the model provided "fill" lighting, so that the shadows on the left side weren't too deep.
200mm, 1/125 of a second at f/5.6 and ISO 200, hand held
There are many different kinds of light that can be used to make portraits; these different light sources can sometimes be mixed and matched with great effectiveness. It's important to be aware of the possibilities when you are thinking about a shot.
Many great portraits are made using natural daylight light. As I've explained, there are an infinite number of variations within the category of natural light. Natural light can be modified to create a more uniform light with a fill card that reflects light onto your subject—it can be intensified using a mirror, and it can be diffused. For example, by placing a gauze curtain over a window.
Besides natural light, probably the single most important source of light for portraits is flash. Flash units—also called strobes—come in many varieties, ranging from portable flash units designed to be mounted on your camera, or even built into your camera (see pages 154-157), to larger flash units that are primarily used in a studio (see pages 158-167).
As I've already explained, flash units put out a great deal of light but for a very short amount of time. This has a number of consequences. Generally, the duration of the flash controls the effective length of the exposure—and how motion is rendered—rather than the camera's shutter speed. It also can be hard to know in advance what a flash exposure will do, since you can't see the light until the flash is fired and you make an exposure. The duration of the flash is so brief that you can't really see what it does. In the studio, modeling lights help with this issue by giving a sense of at least the direction of the light before the flash is fired.
Besides flash, there are a number of different kinds of lights specifically designed for photography that do let you see what you are doing with the light. So-called "hot" lights—usually using tungsten incandescent or quartz halogen bulbs—do let you see what you are doing. However, they live up to their name (they get hot), and do not put out as much light as a strobe. LED lighting is a more recent fixed-light idea that has some real advantages over hot lights, but is currently fairly expensive in the sizes necessary to light portraits.
The ability of modern cameras to shoot at high ISOs without excessive noise means that these kinds of light sources have become practical for portraiture in a way that they didn't use to be. You can also use higher ISO settings with light sources around your home that you might not have considered for photography previously—like table lamps, skylights, and so on (see pages 150-153).
This model is lit on the left using a strobe-driven soft box strip, and on the right by a beauty dish mounted on a second strobe unit. The beauty dish is a flash accessory that puts out an adjustable circle of attractively diffuse light with an opaque center—designed, as the name implies, to make people look beautiful.
150mm, 1/125 of a second at f/10 and ISO 100, hand held
The general rule about lighting portraits at home is, try it! There's no penalty for failure, and you'd be amazed at how many great portraits can be made just using light sources you'll find around you.
The light coming through your windows is probably very nice at certain times of day. Take the time to watch its progression through the day so you can find out! If you don't quite like what you see, modify the window light with a piece of inexpensive gauzy fabric, or by opening or shutting curtains.
Need to make a portrait at night? Don't despair. It's amazing what you can do with low wattage incandescent bulbs.
Unlike some models, these work best when they are not naked. In other words, use a lamp shade when possible, or at least drape the lamp with fabric. Look closely at the quality of the light being cast on your subject, and adjust it to make the most attractive portraits.
Avoid fluorescent lighting. In my experience, all fluorescent tubes, including compact fluorescent bulbs—and even when you adjust for the white balance—tend to create very unattractive light. It's hard to overcome the flicker and color casts inherent in this kind of lighting.
Ceiling light fixtures also don't work very well because you can't move the position of the light, and it is always coming straight down—potentially resulting in odd shadows. It's much better to use table or standing lights. You can adjust the height or move around lights of this kind.
Don't hesitate to boost the ISO of your captures to make this kind of portrait. An ISO that would have been out of the question because of noise levels only a short time ago now produces quite acceptable results.
One other idea: if your subject is awake and in motion, and a good source of natural light is not available, you'll probably want to use flash as either a supplementary or primary source of lighting (see the example on page 153).
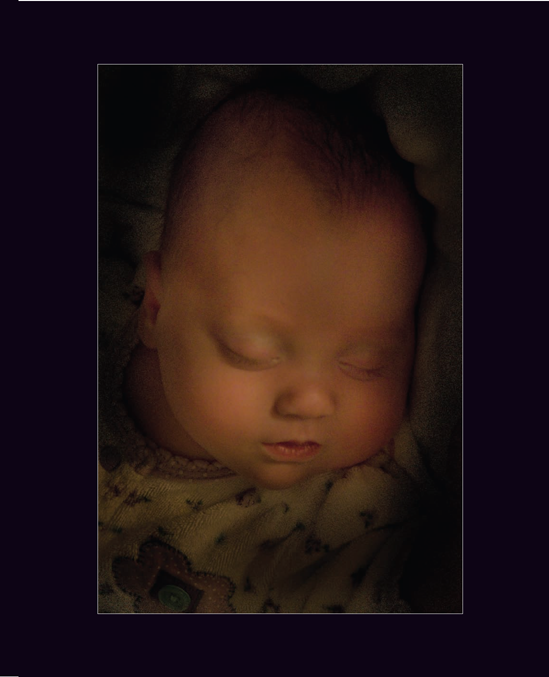
Late at night, my young daughter slept peacefully, her face lit by the mottled light of a 15-watt light bulb. I didn't want to disturb her—all parents of young children will understand that it pays to let sleeping babies lie. So flash was out of the question, as was dragging more lights into the room. Instead, I chose to boost my ISO, and to create an intentionally noisy image that used to advantage the chiaroscuro effect of the low light.
105mm, 1/25 of a second at f/5.6 and ISO 1600, hand held
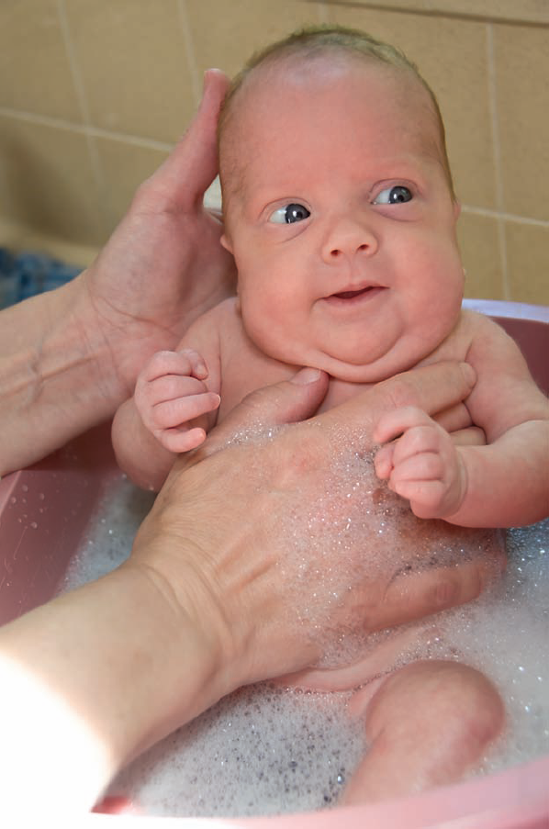
I photographed one of Katie Rose's first baths at home in the kitchen sink using the natural light streaming in through our kitchen skylights. While the baby is lit in bright shade in this photo, you can see the relative strength of the light from the bright patch on her mother's arm in the lower left.
48mm, 1/100 of a second at f/5 and ISO 400, hand held
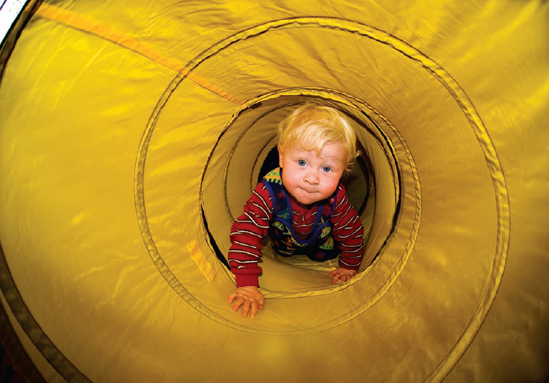
To make this image of Mathew climbing through a tent, I placed the tent in our living room where it would pick up sunlight from the windows. Besides the natural light, the inside of the tent tunnel is lit using my DSLR's built-in flash unit.
I used a fisheye lens to exaggerate the length of the cloth tunnel entrance to the tent.
10.5mm digital fisheye, 1/60 of a second at f/2.8 and ISO 200, hand held
I have to admit: I am not the greatest fan on earth of direct flash. But when you need it to get the shot, there's no substitute. Direct flash is convenient, fast, and capable of stopping motion in its tracks no matter what the ambient light conditions. Furthermore, lighting masters like Joe McNally are capable of linking many small flash units—sometimes hundreds of strobes, generally designed to be used on camera—to create incredibly sophisticated lighting effects (see the Resources section on 234 for further reading if you are interested in this topic).
My own opinion is that direct flash is less important than it used to be as a lighting source. These days it is possible to boost ISO into the thousands, and get quite good results. Therefore, available light works in many situations that would formerly have required a flash—and for digital photographers who know how to adjust their ISO outside of the studio, flash is swiftly becoming a special effect when you are affirmatively looking for the harsh light that direct flash provides.
The biggest downside of direct flash is that the quality of light can be incredibly harsh, with quick fall-off between areas that are illuminated and the background. For specific instructions on using flash units with your camera, check the documentation for your camera and the flash unit. Here are some tips that will help you get the best results when using a direct flash:
Take off your lens shade. Normally, using a lens shade is a very good idea. However, with on-camera flash photography the lens shade itself can cast a very ugly shadow in front of the light emitted by the flash, especially if used with a wide angle lens.
Get the flash unit as far off your camera as possible. A portable strobe mounted on the hot shoe on top of your camera is better than the built-in flash unit. If you can, move the flash unit even further off the camera using a bracket.
Bounce the flash, don't point it directly at your subject. If you are using a flash unit that swivels and angles, point it at a surface that will reflect light back at your subject, or even at the ceiling. This will give you a measure of diffusion.
I used a small flash unit mounted on top of my camera to make this portrait in the low-light conditions of the pizzeria where this portrait subject works. A diffuser placed on the flash head helped to make the light less harsh.
200mm, Nikon SB-800 Speedlight flash unit, 1/30 of a second at f/10 and ISO 200, hand held

Speaking of diffusion, there are many inexpensive diffusers you can add to small flash units. Usually, these diffusers are made of translucent plastic, and snap in place. Adding a diffuser will improve your direct flash result immeasurably by improving the quality of light you are lighting your subject with. Of course, sometimes a scene is unfolding before you and you have to move quickly. In that case, sing praises for the flash that is built into your camera, grab the shots you can, and don't waste those never-to-be-repeated moments fumbling for exactly the right configuration of lighting equipment.
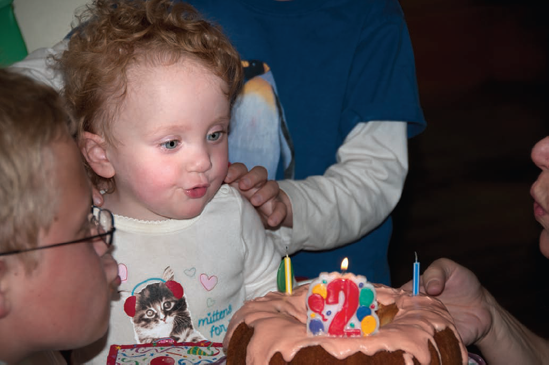
With these shots of Katie Rose blowing out the candles at her second birthday party I used the built-in on-camera flash, and a relatively long lens combined with a moderately high ISO to make sure I didn't miss this once-in-a-lifetime moment.
Below: 75mm, 1/60 of a second at f/5.0 and ISO 500, direct on-camera flash, hand held
Right: 105mm, 1/60 of a second at f/5.3 and ISO 500, direct on-camera flash, hand held

Studio portrait lighting is, of course, a huge topic and one that could fill many books—and I've listed some of the books about studio lighting that I've found helpful in the Resources section on page 234. If you don't have plans to shoot in the studio, you may think that you don't really need to know about this subject. But no knowledge is wasted, and understanding studio portrait lighting is important for even those photographers who have no immediate plans to get into the studio.
First, as I've already explained, studio strobes put out a great deal of light in short bursts. An advantage of this arrangement is that the burst of light stops the motion of your subject irrespective of the shutter speed setting in your camera. However, since you can't see the light (until you inspect your capture in your LCD) it can be hard to gauge the impact of your lighting choices—a situation helped in part with modeling lights on strobe units, which at least show the general direction of lighting if not the quality or real intensity.
The quality of studio lighting units range from very harsh—when a bare reflector is used—to diffuse and gentle through the use of units such as soft boxes. There are many possible ways to control, direct, and modify studio lights, including:
Snoots, which block light into a tight circular area


A simple white background and diffuse lighting created with several soft boxes (using the setup shown in Figure 2 on page 158), as in this shot, makes everything look fairly good. This is the kind of lighting generally used for catalog photography. While most people will look attractive photographed with this setup, you won't get high contrast, moody lighting effects suggestive of strong characterizations.
34mm, 1/160 of a second at f/8 and ISO 100
Looking carefully at the catch lights in the eyes in this portrait, you can see the soft box strip light used to the model's right as the key light. I used a diffused light source (a rectangular "strip" soft box shown reflected in the model's eyes) to the model's left and a hair light above the model in a pretty typical portrait setup like the one shown in Figure 3 on page 161.
200mm, 1/160 of a second at f/10 and ISO 100, hand held
Barn doors, which prevent light spill and allow you to control the precise area of illumination
Beauty dishes, which are a circular light modifier with an opaque center, particularly useful in creating attractive portraits
Umbrellas, which like soft boxes can be used to diffuse light sources
Grids, Cucoloris ("cookies") and related modifiers, which are sheets with cut-outs that can be placed between a light source and the background to create mottled or patterned light
Depending upon the studio, one common arrangement is to use a white background and several diffuse light sources (such as soft box units) to create an overall diffuse light arrangement (see Figure 2 on page 158).
The arrangement shown in Figure 2 has very little in the way of shadows, makes most people or objects look almost as if they are floating in space, and is generally flattering light. Many catalogs are shot in this kind of light, as no great changes are required between shots.
This lighting arrangement is also very forgiving as to the positioning of camera and subject. You can stand almost anywhere and still get a good shot, although you do have to pay attention to the background to make sure your framing hasn't ventured beyond its boundaries.
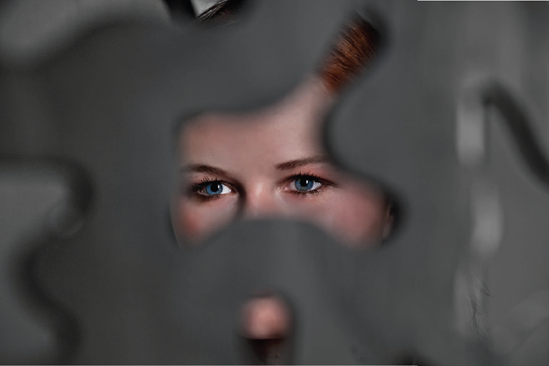
In this photo, a model is seen looking through a cucoloris. A cucoloris—also called a cookie—is a sheet of cut-outs. The cut-outs are put in front of a light and used to project shadows. These shadows can be used to create a regular pattern for a background, or simulate motion or a leafy canopy.
Cookies have been constructed out of a number of different kinds of materials. The cucoloris shown here is a thin piece of wood with repeated versions of the same shape cut out of it.
You can see the results of using this cucoloris to project a background in the photos on pages 165-167.
200mm, 1/160 of a second at f/8 and ISO 200, hand held
The downside to this kind of lighting is that it isn't very distinctive. One portrait will be pretty much lit like any other, and nothing about character is revealed. After a while, this can get pretty boring.
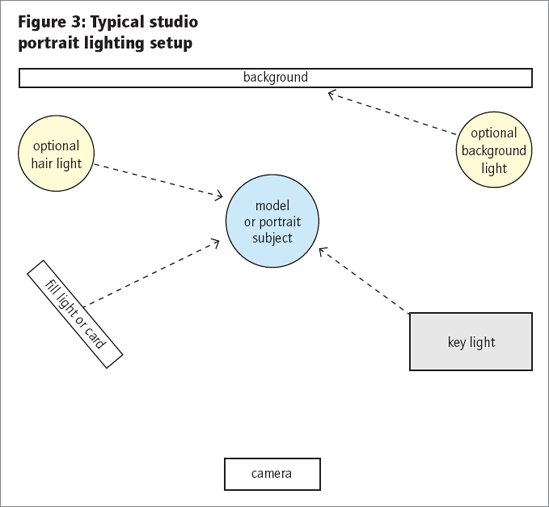
Figure 3 on page 161 shows a fairly typical lighting setup for portraiture. This lighting setup is a bit more complex than the catalog lighting arrangement I described earlier, but it also allows for a great deal more variation in the lighting.
A key light or primary light is shown in Figure 3 on page 161 to the right of the subject. (This light could be positioned either to the left or the right, of course.) The key light might be a diffused light source such as a soft box strip, light bounced off an umbrella, or a beauty dish.
It's a good idea to set the key light up before the other lighting is arranged. You'll want to make sure its height is appropriate for your subject: a standing portrait needs a higher light source than a seated or lying portrait. Put the light too high, and you'll get ugly nose shadows; place it too low and you risk "monster" lighting.
A rule of thumb is to position the key light so you just start seeing the catch lights— reflected light from the lighting source—in the subject's eyes.
A well positioned key light is, well, the key to good portrait lighting.
A second light—not as strong as the key light—balances the key light on the other side of the subject (sometimes a reflecting fill card rather than a light is used for this purpose), and a third light from above illuminates the subjects hair, and helps to separate the subject from a dark background if necessary. Sometimes a fourth light is used to light the background, if this effect is desired. Both the third and fourth lights are weaker than the key and fill lights.
With this general portrait setup, you can vary the pose and background, and generally create attractive lighting to suit most portrait subjects.
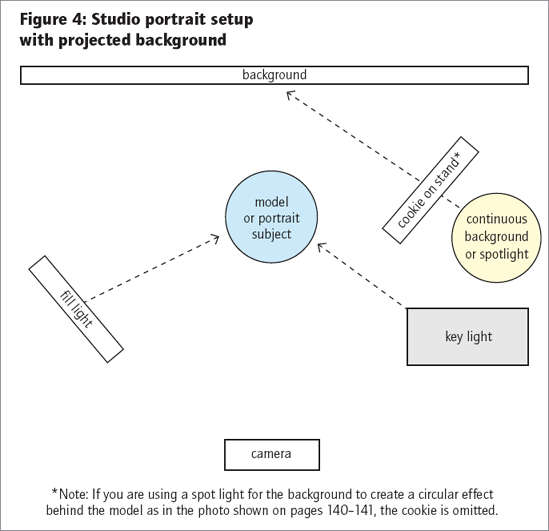
A variation on the typical studio portrait setup is shown in Figure 4 on page 164.
The arrangement in Figure 4 features a light or white background. As in the more typical portrait photography setup, a key light is set to one side and slightly above the subject. The shadows on the side that are not lit by the key light are ameliorated with fill, either using a second light or by reflecting light onto the subject.
In this setup, one light is specifically used to project onto the light background. The projection can be a circular spot, or a regular or irregular pattern—using either a dedicated spot light or a modifier such as a cucoloris.
In this arrangement, the position of the photographer in relationship to the subject and the light is crucial. There won't be that many options as to where you can stand, or in which direction you need to point your camera. You should monitor your results carefully as you go along, because slight variations in pose and position can make or break a photo made with this style of lighting.
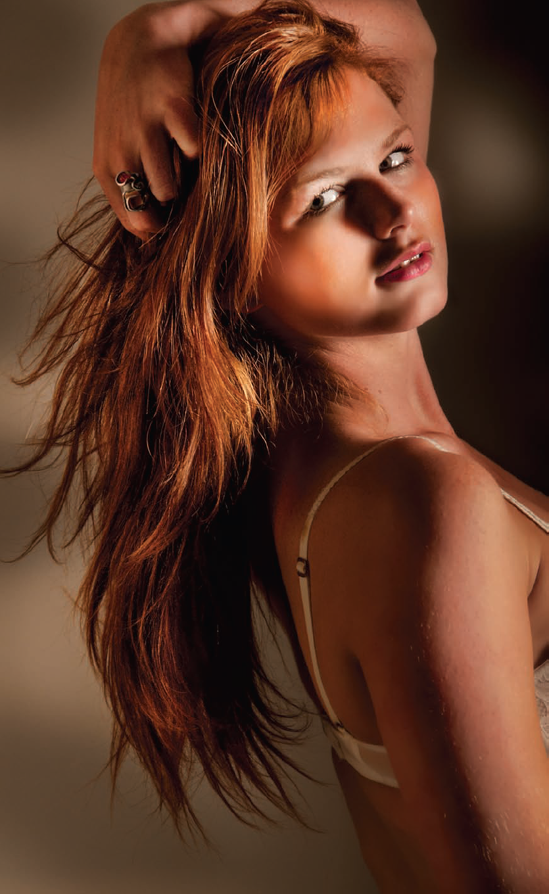
In this shot, a strip light provides glowing and attractive illumination of the model and her mane of hair, while a continuous spotlight behind a cookie adds dappled light.
Dragging the shutter at 1/30 of a second completes the picture by lightening the background relative to how it would be rendered at the faster flash synch shutter speed. At the slower shutter speed the pattern cast by the cucoloris on the white seamless paper creates an interesting background effect. The lighting setup for this shot is shown above in Figure 4.
105mm, 1/30 of a second at f/5.6 and ISO 200, hand held
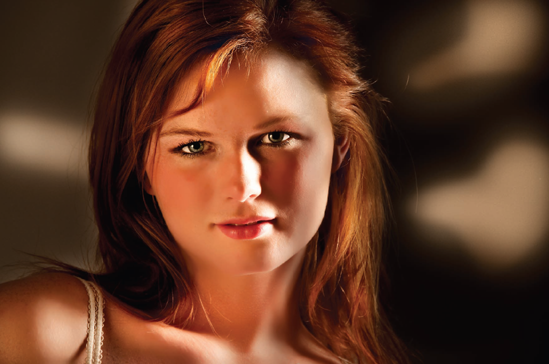
I wanted to make sure that the shadow cast by a cookie was really visible in this photo. So I used shutter drag to expose so that the background had enough contrast.
Here's how this idea works: the studio lights are only illuminating the model. However, you can use any shutter speed you want as long as it is below the camera's flash-synch shutter speed, and it will not have an impact on the exposure of the model—which is controlled by the duration of the flash, not how long the shutter is open.
The background, however, is not illuminated by the flash. At my top flash synch speed (1/160 of a second) it would have been almost entirely dark, but at 1/30 of a second the shadow cast by the cucoloris is attractive with lights and darks. The lighting setup for this photo is shown in Figure 4 on page 164.
150mm, 1/30 of a second at f/5.6 and ISO 200, hand held