
01
What is Lightroom?

The Lightroom Paradigm
Before Lightroom came on the scene in early 2007, I had many kinds of programs in my workflow arsenal. Of course, I had many workflow needs: I had to organize thousands of images; I needed to develop them, export them in various ways, and print them; I needed to create and save collections of images for submissions to clients; and I needed a different program for each step. For developing alone I used up to five different applications, not including Adobe Photoshop and a slew of Photoshop plug-ins. My workflow was complicated, to say the least. Fortunately, Adobe recognized the problem that photographers needed a more integrated tool, and Lightroom was conceived to meet that need. Today, Lightroom is almost all that I use. There are rare occasions when I still need Photoshop, such as using advanced masking techniques or compositing images, but these uses are out of the norm. Lightroom is virtually the only tool I need and use. And now that Lightroom 6 or CC allows us to merge photos into panoramas and combine images for HDR without the need to have or use Photoshop (see Chapter 6 and the section called “Raw HDR Blending and Panorama Stitching”), I’ll use it even less.
Orientation Through Modularization
Lightroom is in fact designed to handle all of the steps of a photographer’s workflow, and Lightroom’s Modules guide us through each step along the way. Although there are seven different modules, they can easily be broken down into two basic types—Input Modules and Output Modules. The Input Modules are where we generate organizational or developmental details about our images, and also keep track of their locations; the Output Modules are for distributing our images in one form or another.
Input Modules
- Library Module: The Library Module is the heart of the program and the Lightroom Catalog. It is here that you’ll manage and organize all of your files. You’ll be able to input information such as keywords, ratings, copyright information, and caption information, and keep track of the folders and hard drives where your images are stored. This is where you organize and manage your archive.
- Develop Module: The Develop Module is a powerful image processor and raw converter. Basically, it is the same tool as Adobe Camera Raw (ACR) that’s bundled with Photoshop. However, if you happen to be already familiar with that, you’ll notice there are big differences with the user interface. So, they do not look the same. The Lightroom Develop Module is a terribly sophisticated processing tool capable of broad-stroke adjustments, fine-tuned adjustments, or fine detail adjustments to localized and specific areas of an image that makes the need for Photoshop as a photo editor almost obsolete.
- Map Module: The Map Module is a tool that either maintains and tracks or generates geo-locational information about your images. The core of this module is an interactive map that shows where in the world your images were taken if GPS information was gathered while shooting, or you can manually place images on the map to generate GPS information.
Output Modules
- Book Module: Naturally, the Book Module is for creating photo books; it works with the book printing service Blurb (www.blurb.com). In Lightroom 4, Adobe fully integrated what was previously a stand-alone Blurb Lightroom plug-in into the program as its own Module. With this Module there are many easy-to-use book layout templates, and you can send the book directly to Blurb for printing or publish it as a PDF right from the module. Unsurprisingly, laying out a book is an art unto itself, so the more time you spend designing it, the better the book will be.
- Slideshow Module: The Slideshow Module allows you to generate image slideshows by creating custom looks and gives you the option of playing your show with music that is stored on your computer. Your slideshow can be played live from your computer through a projector or monitor, or you can export your slideshow as a high-definition video, which can also be shown live, or uploaded to YouTube or somewhere online.
- Print Module: The Print Module can render prints at any size that your printer can produce. It accommodates ICC color management workflow, and printing templates can be created and saved for reproduction at any time. You can make a contact sheet (a sheet of wallet-size images), and you can gang-run many images onto one sheet of paper.
- Web Module: The Web Module is a convenient tool for creating Flash- or HTML-based Web galleries that you can FTP (a method of uploading files called File Transfer Protocol) to a personal Web site. You can create custom looks and templates in a myriad of styles.
Lightroom 6 vs. Lightroom CC
As of the release of Lightroom 6 in April 2015, Lightroom is being sold with the option of buying it outright (a perpetual license), or to buy it on a subscription basis—sort of. It’s actually not a new offering at all; Lightroom is just branded differently now. We’ve had the ability to use Lightroom with either option with Lightroom 5. Lightroom is just officially offered as one or the other with the release of Lightroom 6. And so the question is … what should you get?
Well, even though the tool is no different with either package, they may be, or will likely be, different in the future. Lightroom 6 may be the final full release option—meaning, as Adobe continues to add features and new tech to Lightroom CC (the subscription version), the list of new features and tech being added to Lightroom 6 will slow, and eventually stop. Their paths will diverge, and Lightroom CC will eventually become the more updated of the two versions— especially when and if Lightroom 7 is released.
For me, I see no reason in shying away from the subscription-based service, but instead see reasons to jump in. In addition to the promise of new features and tech as they roll out, you get the added use of the Adobe Cloud and the ability to sync your Lightroom Catalog with your portable devices. Plus, as of the writing of this book, I’m getting Lightroom and Photoshop CC for $9.99 per month—not a bad price. Ultimately, I suggest jumping into Lightroom CC without hesitation. I suppose one of the big fears of going with subscription-based use is the worry that you could get locked out of your catalog if the subscription lapses. Well, this is not the case. Adobe has stated this will not happen—but you will lose partial use of your catalog. Again, the main difference between Lightroom CC and 6 is that one can be owned outright, and the other subscribed to. So the first step for you is deciding which choice is best, or which you are more comfortable with.
What Is a Lightroom Database?
Ultimately, Lightroom is an all-encompassing image management application database. And if there were one thing I’d like every photographer to understand before creating their first Lightroom Catalog, before learning all the ins and outs of all the different Modules, it would be what databases are and how to use them. It’s this feature more than any other that distinguishes Lightroom from other programs, and if you can wrap your head around what a database is and how it works, you will be well on your way to mastering workflow in Lightroom.
In a nutshell, a database is an organized collection of data. Databases can create, define, update, query, administrate, and manage relationships between individual assets, groups of assets, or an entire archive of assets. The prime function of a database is to keep information organized in one place for a user to access and utilize, but databases do require maintenance and input from the user to work. The user needs to know and train a database where to store assets, how to store them, how to define and label them, and how they are searchable. With this understood, it makes sense to think about your Lightroom database as a place to work with your entire image archive, or to organize your whole body of work. Bearing this in mind, it also makes sense to create a workflow using one catalog for your whole image archive. This of course is a general rule to encourage you to keep all your images in one catalog, but that doesn’t mean that it never makes sense to have more than one catalog. I use three with my workflow. I have my commercial work organized in one catalog, I have personal photos covering family events and time with friends in another, and then I have a catalog on my laptop that I use to ingest and keyword images while I’m traveling. But the guiding principle is to keep all your images together in one catalog. Furthermore, if you decide on a workflow that uses many catalogs, or a catalog for every shoot you do, keep in mind that Lightroom does not have the ability to search images in more than one catalog at a time. You would miss the benefit of having a database at your fingertips. So, One Catalog to Rule Them All, I say.
Alas, the fact that Lightroom is a database is also what makes it perplexing to many new photographers. Lightroom is unlike your typical software program, and as a teacher of Lightroom and workflow seminars I’ve noticed that photographers often try to use Lightroom just like any old program. Most software is designed to perform a particular function or task, or to work directly on a file. For example, a word processor edits text files, Photoshop edits photos, and a file browser allows you to sift through images on a hard drive. Lightroom works differently. Lightroom rarely works directly with your files, and you certainly never open your image in Lightroom. Instead, Lightroom works with reference files that are generated when you import your photos, so even though you are seeing your image, you aren’t really seeing your image. You’re seeing a Preview—confusing, I know, but that’s what’s different and great about Lightroom.

1.1
The old card catalog system in a public library references books stored somewhere on a shelf in the library. Lightroom works in a similar way. It too is a catalog that references images “somewhere else,” whether that other place is your primary hard drive or another storage device. Therefore, the thumbnails and the images you see in Lightroom are Previews—representations of your actual files, not the files themselves.
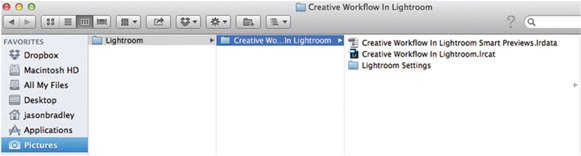
This should help us wrap our heads around how this works: a Lightroom file has the extension .lrcat (which stands for Lightroom Catalog), and it’s common to compare Lightroom files to catalogs found in a public library (see Figure 1.1)—and a library catalog, as we know, is a reference tool. It contains information about the books in the library, such as what their titles are, are they fiction or nonfiction, where you can find the books in the library, and whether or not they are checked out. It’s understood and obvious that the catalog is not the book itself, and this is how Lightroom works. Lightroom records and references your images stored somewhere outside of itself, like on a hard drive, on a CD or DVD, a thumb drive, or wherever. Additionally, the .lrcat file is always accompanied by a set of files called .lrdata (as shown in Figure 1.2), and these files are where a lot of the reference information and image Previews are stored and maintained. So, as we import files into Lightroom, Lightroom records the location of our files and creates the Previews that we see in the Library Module and develop in the Develop Module. We are primarily working with these Preview files, and not our actual image files.
1.2
Unless directed otherwise, Lightroom’s default location for your catalog (your .lrcat file) is your Pictures folder on your computer. This is true whether you use a Mac or a PC.
Where Is My Catalog? Where Are My Files?
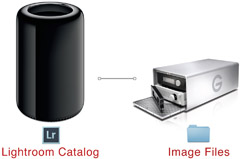
When you start Lightroom for the first time, or whenever you create a new catalog, you’ll be asked where you want to store your catalog (your .lrcat and .lrdata files). The default location is in your computer’s Pictures folder—regardless if you’re on a Mac or PC—but you have the option of storing your catalog wherever you like. I suggest taking Adobe’s lead in this regard. Keeping the catalog directly on your computer helps keep things running faster. The only thing to keep in mind is that as your archive grows, so will the size of your catalog. It only grows at a fraction of the rate at which your actual image file archive grows, but it does grow nonetheless. I mention this because I’ve seen photographers who run computers with limited resources purposely store their catalog on their external drives with their images to save room—but I suggest not doing this. If the resources are limited on your computer, you will get far better performance if you free up room on your computer’s hard drive, or upgrade your computer’s hard drive, making ample room for your catalog and for the size of your catalog to grow. Personally, I want my catalog to run as fast as possible, so I keep it in my Pictures folder.
For similar performance reasons, I suggest storing your image files on external hard drives in a simple folder system—whether you are working on a laptop or not (see Figure 1.3). Image files can take up a lot of space, and if you’re not paying close attention to your available hard drive space, you run the risk of it filling up. Believe it or not, I’ve had many students come to me in a panic because their computers locked up on them and they didn’t know why—and it was because they filled their computer’s hard drive with images and didn’t store them on external hard drives.
1.3
Most photographers will keep their catalog on the computer (Lightroom’s default location) in their Pictures folder, and their images on an external hard drive.
Staying Oriented
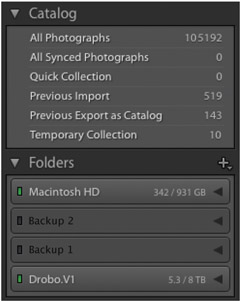
So, how can we stay oriented when storing catalogs here, and keeping images there, while working with Lightroom? If we aren’t seeing our images when we are working in our Lightroom Catalog, how will we know what we are looking at when working in Lightroom? The answer is in knowing the difference between your Catalog Panel and your Folder Panel in the Library Module. Once you do, it’s easy to distinguish the difference between your catalog of images and the folders where your images actually reside. Naturally, your Catalog Panel is your archive; it’s all your images that have ever been imported. The All Photographs View in Figure 1.4 shows that there are 105, 192 images in the Catalog Panel, and all those images can be found on the hard drives found in the Folder Panel. You can also view Previous Import, Current Import (if an import is in progress), Recent Export, Current Export, or Quick Collection. To say it another way, the Catalog Panel references the Folder Panel in Lightroom like a card catalog in a library references the books on the shelf.
The Folders Panel shows you which hard drive your images are on, their folder structure, and whether or not that hard drive is plugged into your computer. I love this part, and this is truly what makes Lightroom different from a typical software program. You can see your file and even work on your file even if the hard drive that your image is on isn’t plugged in. Of course, how much work you can do, and what kind of work depends on the kind of preview you generate while importing your image—but more on that later. Know this for now: if a hard drive is plugged in or is readable by your computer it will show as lit up with a green light. If the hard drive is not plugged in, the hard drive will not have a green light and will be dimmed (see Figure 1.4).
1.4
The Catalog Panel references your whole archive regardless of what drive it is on or whether that drive is plugged in. The Folder Panel keeps track of what drives your images are stored on and shows you if your drives are plugged in or not.
How to find Missing Folders and Files
Lightroom doesn’t care how you structure your folders; it simply keeps track of them and your files in whatever structure they’re in. Think of it like this: when you are importing your images into Lightroom, you are establishing a relationship between your catalog and your folders—and the image files they contain. Thus, if that link is broken between Lightroom and your file, Lightroom gets confused. So how do we break this link?
The easiest way to confuse Lightroom, to mess with that established relationship, is to change either your folder’s location or your image files location outside of the Lightroom environment. And so … do not move images or image folders around behind Lightroom’s back. If you decide later you want to move assets from one location to change your folder workflow, that’s fine. But move them from within Lightroom’s Folder Panel, otherwise Lightroom will then lose its connection to that file or folder. If by chance you do this accidentally (I’ve done it many times), Lightroom will tell you an asset is missing in a few ways.
The easiest way to determine if a file is missing is by looking at its thumbnail in the Grid View of your Library Module. If you see a small exclamation point in the upper right corner of your image thumbnail, it means Lightroom doesn’t have a connection to your file (see Figure 1.5a). To fix this slight dilemma, click on the exclamation point to launch a dialog asking if you want to Locate the missing file. If you are in fact missing just one file, go for it—but you may find that you aren’t just missing one file, but all of your files in a given folder.
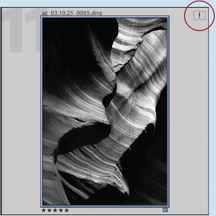
1.5a
A small exclamation point icon indicates Lightroom has no connection to the file.
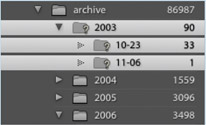
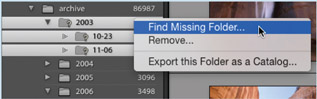
To figure out if an entire folder is missing, you’ll need to check with your Folder Panel in the Library Module. First go to the Folder Panel where Lightroom thinks your image file resides. An easy way of getting there is to Right Click (PC), or Control Click (Mac), on your image thumbnail to launch the context menu. Near the top will be an option to Show in Folder in Library. Selecting that will take you to where you want to go. Next, look for a small question mark on your Folder’s icon (as shown in Figure 1.5b) to determine if Lightroom has lost its connection to the folder. If you see it, you’ll need to locate the missing folder by Right Clicking (PC), or Control Clicking (Mac), on the folder name. The context menu will then show you the option to Find Missing Folder, as shown in Figure 1.5c.
1.5b
A question mark on a Folder icon indicates Lightroom has no connection to an entire folder.
1.5c
Going to Find Missing Folder in the folder’s context menu will help you find your folder.
Needless to say, having your files not connecting to Lightroom may occasionally be intentional, so it’s not always bad when you see said exclamation points and questions marks. For example, you may be working in your catalog without having your external drives plugged in. In this case, the lack of connection to Lightroom becomes a feature instead of a problem.
A Brief History of the Photographer’s Catalog
Professional photographers have been organizing image libraries long before Lightroom or computers. Consider the file cabinet shown in Figure 1.6 for example. I affectionately think of the file cabinet system as the Lightroom workflow of yesteryear. It was something akin to this where many photographers kept their archive, or in other analogous storage containers. Photographers kept their images in binders, storage boxes, and on shelving systems. The point was that the originals were kept in a physical location. And for photographers who kept large libraries of images, a labeling and cataloging system was used to some extent to maintain organization. Naturally, the larger the library, the more intricate the labeling and cataloging system needed to be. In Figure 1.6, we can see that labeling is not just for file cabinets. As a cabinet drawer is opened, notice that the dividers are also named, slide-containing sleeves are labeled, and even the individual slides are labeled with specific information about what the image is, who the author is, along with copyright information, and more. Everything from the cabinet down to the individual slide is marked with descriptive terminology.
Of course, things got easier as computers and technology evolved, and many professional photographers began using digital catalogs to keep track of their stored files as an alternative. I know many photographers who either created custom catalogs or used programs such as Microsoft Access and Filemaker to keep track of their archives. Eventually, software programs like Extensis Portfolio and Expression Media emerged on the market that were specifically designed as cataloging tools for graphic artists or photographers. Still, the underlying idea was the same for the film photographer managing their archive—label everything from the cabinet all the way down.

1.6
Whether you are using Lightroom or analog files, the key to cataloging any group of assets is to have a labeling system that can categorize large and small groups of assets, while maintaining the ability to distinguish individual files.
When I first started using digital cameras, my organizational habits didn’t change with my camera. Why should they? Using a labeling hierarchy worked for countless photographers thus far— so why fix what isn’t broken? So, I created a file called Images on my computer’s desktop, and I stored everything inside this virtual file cabinet as shown in Figure 1.7. I created subfolders that had categories emulating a file cabinet organization, breaking everything down geographically or taxonomically. I would have a category named Animals followed by pinnipeds, followed by types of pinnipeds. I would have a Shark folder followed by types of sharks, and on, and on. Unfortunately, I soon found myself managing folders as much as managing the images themselves—and this is a common problem with digital photographers. Amateurs, hobbyists, and pros are taking more pictures than ever before. We can take 1,000 images on one card as opposed to 36 frames on a roll of film, and everyone is creating archives as extensive as any pro. Thus, knowing what do to with all these files is more important than ever, and I suggest the unthinkable: get rid of all those folders!
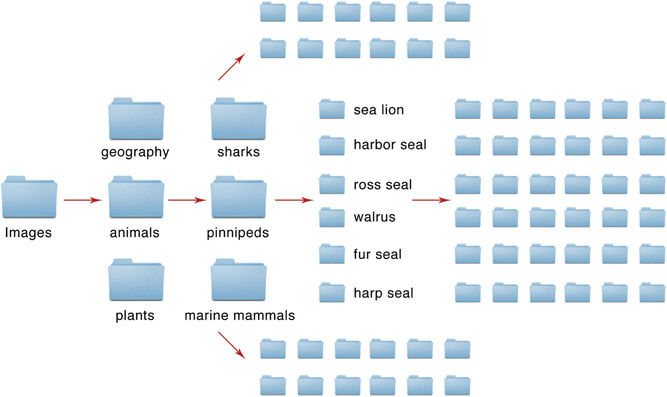
1.7
If we use folders to organize our photographic lives, staying organized and finding our photos when we need to find them will be challenging at best. With Lightroom we have the opportunity to embed location and subject categories directly into the file instead of labeling a folder.
One Folder to Rule Them All
With Lightroom, I don’t rely on naming folders to maintain organization, and I don’t care much at all about folder structure. I still have my Images folder, but inside everything is organized by year automatically during import. Everything shot from 2014 is placed in the 2014 folder, and everything in 2013 in the 2013 folder, and so on (see Figure 1.8). If this sounds complicated, you are welcome to make a folder and label it The Dawn of Time, and then everything you’ve ever shot can get thrown in there. My point is that organization can be done differently with a database, and this is one of the big paradigm shifts of using Lightroom. If you have an existing folder structure in place that you’ve developed, and that works for you and your workflow, that allows you to find images faster, you are of course welcome to keep that. But you don’t have to, and I’m suggesting there’s an easier way.

1.8
Instead of labeling folders categorically, Lightroom can automatically organize your folders by date during import.
The overriding goal with using a file cabinet, with labeling everything, with naming folders on our computer, with creating categories and varieties of subcategories, is to maintain order and to be able to find our images when we need them. What other reason could there be? We can still label our image files categorically with a single-folder Lightroom workflow, but instead of labeling a folder, or a virtual file cabinet or sleeve of slides, we can embed the categorical information directly to the file as something called metadata. And metadata is the fuel that drives your Lightroom database.
NOTE: Windows and Mac systems can get really sluggish with too many files in a single folder. The number needed to slow your computer down is pretty large (many thousands), but this is partly why I recommend a by date subfolder hierarchy. Ultimately my point here is that how you organize can and should change if you are relying on folder nomenclature to maintain organization.
What Is Metadata?
1.9
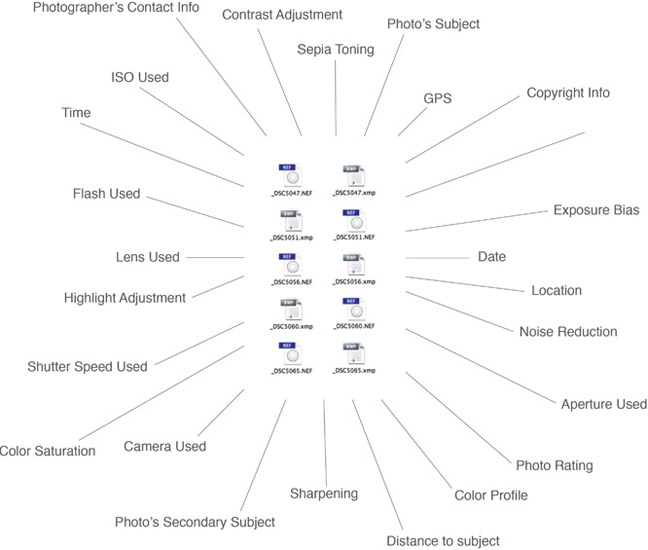
Metadata is stored in the catalog or with the original file, depending on how the Preferences are set. If you are using your native raw format such as NEF for Nikon, or CR2 for Canon, then Adobe will create an .xmp sidecar file to store your metadata as shown here. If you are using DNGs with Lightroom, then no sidecar file is necessary.
Metadata simply means data about data. Figure 1.9 illustrates an anatomical breakdown of a modern digital file. Like the labels placed on the file cabinets and drawers shown previously in Figure 1.6, metadata is basically descriptive information about the image. Metadata can be basic categories of information, but it can also be date and time information, size or dimensions of the file, the shutter speed that was used or other camera settings, the copyright information associated with the file, GPS coordinates, how the file was developed, and how the file is rated and organized with other files. Metadata can describe anything and everything about our photos, and because Lightroom has the ability to search and filter through metadata in a variety of ways, the naming conventions of your folders become less of an issue. But what is important is knowing what types of metadata there are, how to properly and consistently apply it to your images, and how Lightroom can filter through it.
Types of Metadata
There are basically two types of metadata we use with Lightroom: developmental and organizational. Developmental metadata is created when an image is worked on in the Develop Module. Since Lightroom works with Preview files, if a photo is given contrast, saturation, brightness, or any adjustment, the adjustment isn’t made to the actual photo. Instead, the adjustments are saved as a set of instructions to be applied to the photo once it’s exported, printed, or published in some manner. The developmental metadata is stored in the catalog and with the original source file if Lightroom’s Preferences are set accordingly (see Figure 1.22 later in this chapter).
Organizational metadata is created when changes are made to a file in the Library or Map Modules, and there are different types of organizational metadata. There is IPTC metadata, EXIF metadata, GPS metadata, keywords, and Attributes, and there are image labels. Let’s look at these in more detail.
- IPTC: The International Press Telecommunications Council, or IPTC, develops standards for the interchange of digital media between organizations. There are many fields available on an IPTC metadata form, but I use it exclusively for attaching copyright status, licensing availability, and my contact information to all my images. And with Lightroom, we can create an IPTC preset that automatically adds these details to our images during import.
- EXIF: Exchangeable image file, or EXIF, is a metadata standard that covers details about what camera and camera settings were used such as ISO, aperture, shutter speed, geolocational information (GPS), date and time information, and an embedded JPEG Preview that’s created for viewing photos on the back of our camera while shooting. Naturally, this kind of metadata is automatically generated and requires no work on your part other than making sure the date and time settings on your camera are correct.
- Keywords: Words or phrases that describe what’s in our photos are keywords, and there are basically two types: global and specific. I usually add global keywords while importing new images into Lightroom; these can refer to all images being imported. I add specific keywords after images have been imported into Lightroom; these refer to the specifics in certain images like subject matter or a specific location. In Chapter 4 we’ll go over keywording in greater detail, but keywords are where we want to spend our time in terms of organization. In fact, keywords are what permit us to do away with the labeling folders paradigm. Figure 1.10 shows the Keywording Panel next to the old file cabinet. Of course, both systems organize images categorically, but digital files have their keywords embedded in them, so the need to organize by other means is minimized.
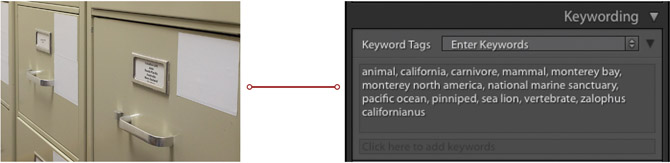
1.10 There is no difference in the type of labels photographers attach to keywords today vs. decades ago. Today, of course, the metadata environment contains much more information and it is easier and faster to filter through sets of images, or to find an individual photo.
- Labels: Labels are the Star Ratings, Flags, and Colors that we can attach to our files to distinguish them from one another. After images have been imported and keyworded during your workflow, the next step is to further organize them for output applications or for time spent in the Develop Module. Although it should be pointed out that Star Ratings, like keywords and IPTC metadata, can be saved directly to the file, while Color Labels and Flags can only be saved at the catalog level.
- Geolocational Metadata (GPS): There are a few ways we can apply GPS coordinates directly to our image files. Some cameras come equipped with GPS tracking technology. Apple iPhones, for example, embed GPS metadata into image files. Cameras that don’t have that capability, like my Nikon SLRs, can use accessories that plug into the camera that provide GPS coordinates. But if you don’t have the capability to generate GPS information in-camera, you can drag-and-drop sets of images onto specific locations on the global map provided in Lightroom’s Map Module. I won’t go into the Map Module in this book, but GPS information is an additional way to keep track of where your images were taken, although I don’t suggest that it replace the idea of applying keywords that name the specific location. Use GPS as another way to enrich your file.
Extensible Metadata Platform (XMP)
Metadata that we generate in Lightroom, such as keywords and developmental metadata, are stored in a metadata standard called XMP (extensible metadata platform), which was created by Adobe some years ago. If you shoot raw files, most raw files have a restricted proprietary architecture that doesn’t permit data storage. Thus, Lightroom creates an .xmp sidecar file that accompanies your original file and stores all of your keywords and developments (see Figure 1.11). Of course, this means that if you lose, throw away, or transfer your raw file to another folder, hard drive, or submit it to a third party without the .xmp sidecar, you will lose all of your developments and keywords. To avoid the use of sidecar files, you can use other file formats such as JPEG, TIFF, PSD, and DNG, which don’t have such restrictions—metadata can be written directly to the file. This is just one of the benefits of converting to DNG as your working raw file format, as you import raw files into Lightroom—but we’ll talk in more detail about DNGs in Chapter 2.
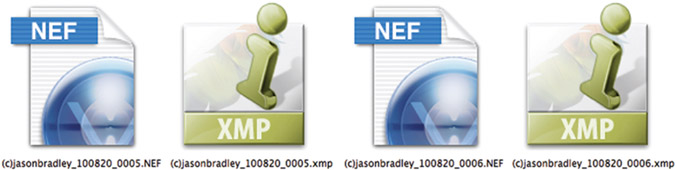
1.11
Out-of-the-camera raw file formats are typically proprietary and metadata cannot be written directly to the file. As a result, Adobe needs to create an .xmp sidecar file to store your data. Be careful: if the sidecar is lost or moved out of the same folder as the source file, Lightroom will not be able to see your developments or your file’s keywords.
The Magic of Filtration
In Chapter 3, in the section The Big Punch Line, I’ll go into detail about how to filter through images, but let’s first understand what filtering means in terms of organization. All this stuff I’ve been saying about folders, file cabinets, categorical organization, and how Lightroom works differently than a typical software program begins to make sense once we learn what filtering through images is and how to do it. Or to put it in database speak, querying groups of images based on a specific criteria. In this respect, Lightroom can be thought of as a search engine—and a really good one. When you type search criteria in Google to find something, you are basically querying a large database of keywords or metadata. Type in “puppies” and you’ll get all kinds of Web sites, videos, and images that have the keyword “puppies” associated with it. Filtering with Lightroom works the same way. We give Lightroom certain search criteria, and it filters through our archive like Google filters through the Internet.
The point is, by using keywords, we are still creating categories and subcategories of labels. We are still classifying everything from top to bottom like the days of the file cabinet, we are just building searchability directly into the file through keywords—but with metadata instead of with a folder structure that becomes challenging to manage over time. And given that metadata is much more than just keywords, our capability of sifting through our library can become something more dynamic than ever before. Figure 1.12 shows a list of all the different categories we can use to query our Lightroom library, and this doesn’t even begin to illustrate how we can search for things when we search by multiple criteria.
Setting up Lightroom
Lightroom’s Preferences
One of the first ways we can get Lightroom working the way we want is to go through and set Lightroom’s Preferences and Catalog Settings. Yes, there are two groups of settings to go through; the reason for that is because the Preferences are global settings and Catalog Settings are specific to each catalog you create. Lightroom’s Preferences and Catalog Settings are subjective and how to configure them should be based on your needs and your workflow. Most people leave the Preferences and Catalog Settings at their default with minor modifications, but there are key sections that I want to point out so you can decide what best fits your workflow. Needless to say, I’ll explain my suggestions as I go, because knowing how to configure the Preferences helps us to understand how Lightroom works.
The Preferences and Catalog Settings dialogs are accessed via the menu, and the path is slightly different between Macs and PCs. The screenshots found here are taken while working with an Apple operating system, but I’ve listed the different paths in the text. While working with a Mac, go to Lightroom Menu > Preferences, or Lightroom Menu > Catalog Settings as shown in Figure 1.13. When working with Windows, you’ll start from the Edit Menu instead. The first thing you’ll notice is that there are six sections to configure in the Preferences dialog. Let’s go through each one.
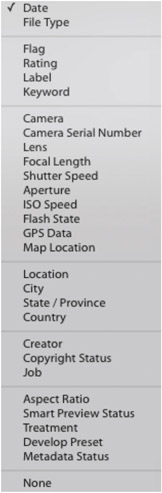
1.12
Today we can search through our images not only by the labels or categories that we apply, but that our cameras also apply.
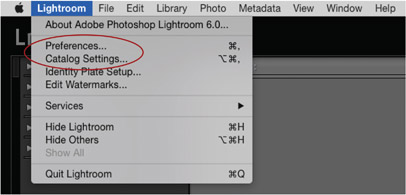
1.13
You can access Lightroom’s Preferences and Catalog Settings by going through the Lightroom Menu with Macs, or by starting with the Edit Menu for Windows. For access by using quick keys, use Command-Comma for Mac or Control-Comma for Windows.
NOTE: Setting our Preferences and Catalog Settings can help us get Lightroom to work the way we want, but in terms of optimizing Lightroom’s performance, there are many things that we can do. If you visit Adobe’s Web site (http://helpx.adobe.com/lightroom/kb/optimize-performance-lightroom.html) you’ll find a long list of tips to help Light-room work as efficiently as possible.
General Section
Each section of the Preferences dialog contains subsections for configuring Lightroom in different ways. Starting with the General section, notice that there are five subsections: Default Catalog, Import Options, Completion Sounds, Prompts, and Catalog Settings (see Figure 1.14). In Default Catalog, I like the default setting of loading the most recent catalog, but if you have created more than one catalog, you are welcome to choose whichever you prefer to use each time Lightroom starts. In Import Options, I leave all the boxes checked, but you may consider unchecking Treat JPEG files next to raw files as separate photos. If you shoot raw plus JPEG images simultaneously, you may want quick access to those smaller files. Other than that, it doesn’t really matter, and for most photographers I recommend to not shoot raw plus JPEG. With Lightroom, we can batch process raw images as JPEGs whenever we like, so I believe the raw plus JPEG workflow is mostly unnecessary. For the Completion Sounds, well, I’m a cat person, but do whatever your little heart desires.
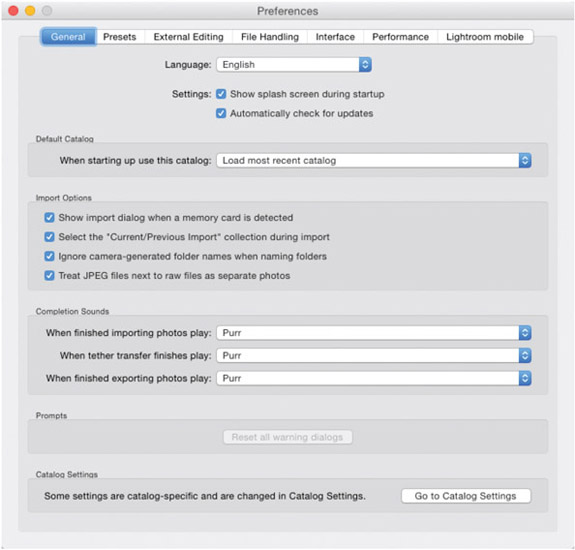
1.14
Here is how I set the General section of Lightroom’s Preferences.
Presets Section
There are three subsections in Presets: Default Develop Settings, Location, and Lightroom Defaults (see Figure 1.15). Under Default Develop Settings, I leave only Make defaults specific to camera serial number checked, which allows me to set a particular look or camera profile to a particular camera. This matters only if you work with more than one camera—Lightroom identifies your cameras by serial number through the EXIF metadata. If you’d rather not have that capability be camera specific, you have the option of choosing a custom look based on shooting in high ISO vs. low ISO conditions by checking the box below. Leaving the Apply auto boxes unchecked doesn’t mean you can’t apply such automations. In fact, the B&W Panel and Basic Panel in the Develop Module each have Auto buttons you can push whenever you like. In the Location subsection, I prefer keeping the Store presets with this catalog box checked. This doesn’t really matter too much either way, except that the Preset folders are stored with the catalog and are therefore a little easier to find when needed. The Lightroom Defaults subsection is filled with buttons to reset different areas of your catalog as needed.
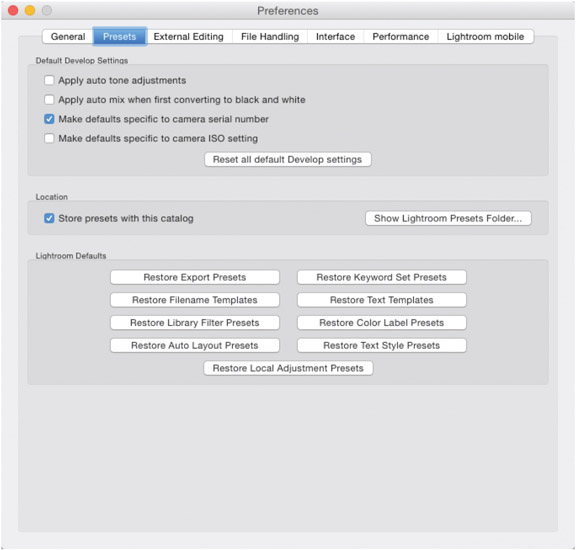
1.15
Here is how I set the Presets section of Lightroom’s Preferences.
External Editing Section
This preference category lets you control how you want your images rasterized for editing in Photoshop or another external editing program of your choice. For file handling, I’ll let my selected boxes speak for themselves, with the Resolution box being the only consideration. I typically shoot with the final print as my goal, so if your goal is similar, I suggest setting your resolution to be friendly with your printer. You can choose 360ppi for Epson printers and 300ppi for Canon printers, but other than this, leaving the Resolution at its default is just fine (see Figure 1.16).
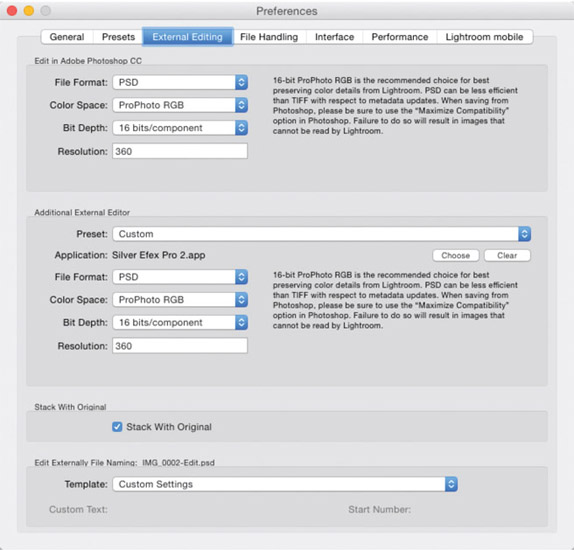
1.16
Here is how I set the External section of Lightroom’s Preferences. I use 360 ppi simply because it’s more compatible with my Epson printer; 300 ppi is more compatible with Canon printers.
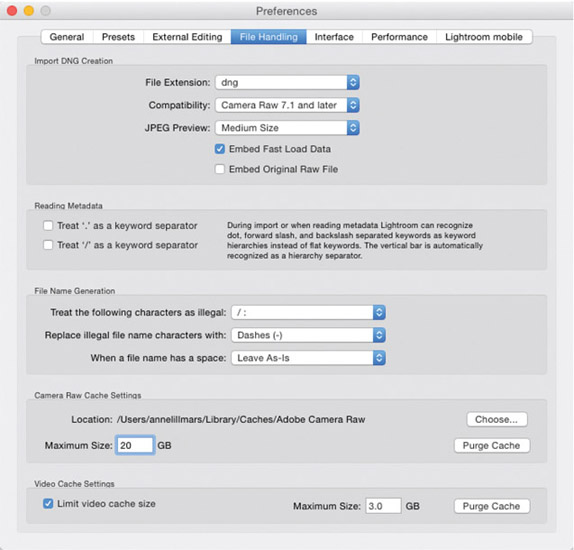
File Handling Section
Under Import DNG Creation, I like to leave all my extensions lowercase, like all my keywords. I also leave Compatibility at its newest version. In this case, the newest version is Camera Raw 7.1. If you know you are working with other people or programs with older versions of Lightroom or Adobe Camera Raw, then change your compatibility accordingly, but I don’t suggest that because you can also export DNGs with earlier compatibility.
Some photographers who are still worried about using DNG, or about losing access to their original raw file structure, check Embed Original Raw File. But I personally see very little benefit in this, and it significantly increases the size of your files.
1.17
Here is how I set the File Handling section of Lightroom’s Preferences. Embedding Fast Load Data is suggested to increase Develop Module performance.
Under Camera Raw Cache Settings, I suggest changing Maximum Size to at least 20GB, but this should be left up to you based on your computer’s resources and the size of the library you are working with. Cached memory allows Lightroom to quickly access raw Preview information to work faster with the Develop Module (see Figure 1.17). If you have limited resources on your computer, you do have the option of choosing a different Locationabove your Maximum Size text box. Under your Camera Raw Cache Settings are Video Cache Settings, which are similar to your raw file cache and help optimize performance. So, if you shoot more video than stills, I would consider increasing the 3GB default to a similar 20GB or more.
Preferences: Interface
Here are a few visual customizations you can play with. Most of these are your preference, but I have found that choosing Medium Gray with Pinstripes, in Backgrounds, is the least visually distracting (see Figure 1.18a).
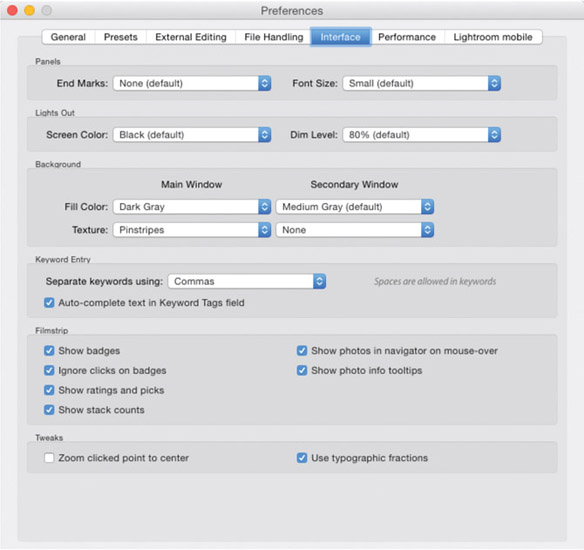
1.18a
Here is how I set the Interface section of Lightroom’s Preferences. These are mostly cosmetic, but I’ve found these settings for the Background to minimize visual distraction while working with images in the Develop Module.
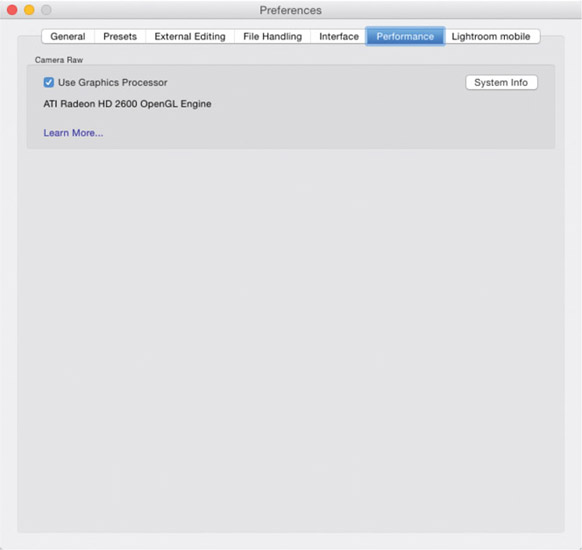
Preferences: Performance
This section is fairly straightforward. Simply check Use Graphics Processor, and if your hardware is compatible, Lightroom will automatically engage your GPU (Graphics Processing Unit) while working in the Develop Module (see Figure 1.18b). If your hardware is not compatible, Lightroom will guide you to Adobe’s Web site to see how you can upgrade your hardware to take advantage of this feature. I suggest considering doing so, as it greatly speeds up performance in the Develop Module.
Also check with the Creative Workflow in Lightroom online resources at https://www.routledge.com/products/9780415745024 to familiarize yourself with Lightroom’s minimum requirements and other tips on optimizing your catalog’s performance.
1.18b
Simply check the Use Graphics Processor box to engage this new feature to Lightroom 6/CC. If your graphics card is compatible it will work automatically.
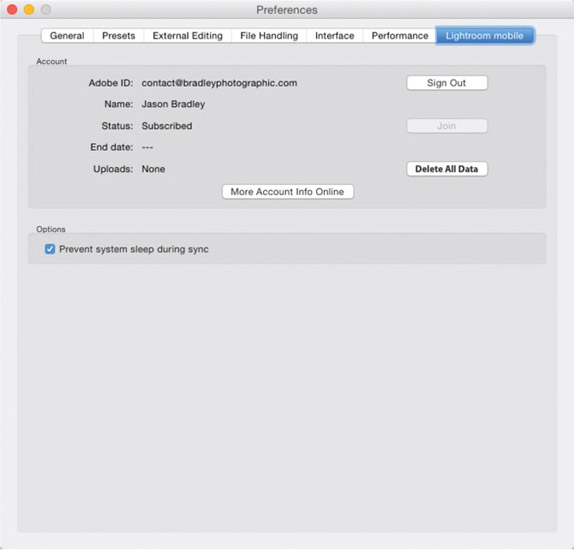
Preferences: Lightroom Mobile
This section of your Preferences is where you can either create an Adobe account or sign in so you can synchronize your images with your mobile device through Adobe Creative Cloud (see Figure 1.19 on the following page). Lightroom Mobile works with Apple iPhone and iPad devices, as well as Android devices. Go to Chapter 8 and check out the section “Developing With Lightroom Mobile” to see more on how Lightroom Mobile works.
1.19
Lightroom Mobile is available only with Lightroom CC. Purchasing Lightroom 6, or a perpetual license isn’t compatible with cloud services.
Lightroom’s Catalog Settings
As stated before, the Catalog Settings are organized separately from the Preferences so we can configure settings for each catalog we have, vs. configuring settings for how Lightroom is configured overall. You can open your Catalog Settings from a couple of areas; go to the Lightroom Menu (Mac), or to the Edit Menu (PC), but you can also access it from within your Preferences. Go to the General section, and at the bottom is a Go to Catalog Settings button as shown previously in Figure 1.14.
TIP: You can also access Catalog Settings by using the quick keys: Command-Option-Comma (Mac) or Control-Alt-Comma (PC).
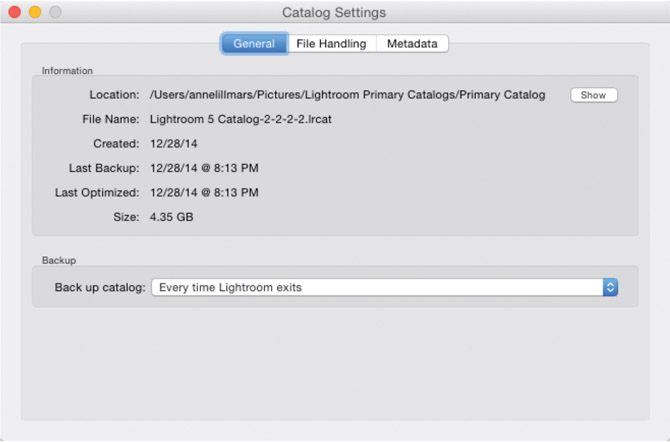
Catalog: General
In the General section within Catalog Settings, the Information box shows us details about our catalog such as where it’s located, when it was last backed up, and its size (see Figure 1.20). Most important is the Backup box at the bottom. I’ll urge several times throughout this book to make sure your images and your catalog are properly backed up. This drop-down menu allows you to set Lightroom to prompt you to back up every time you exit, which I suggest. You don’t necessarily need to back it up each time, but being reminded to is a fine idea. How often you back up depends on how often you are using Lightroom, and how much work you do with your catalog when you do. So you’ll need to be the judge. Just make sure you are backing up your catalog to a different hard drive than where your actual catalog is stored. Do not back up your catalog in the same location as where your actual catalog is stored. See the Chapter 2 section “Backing Up Your Catalog” to see more on catalog backups.
1.20
The General section of the catalog allows you to set how often Lightroom prompts you to backup your catalog.
Catalog: File Handling
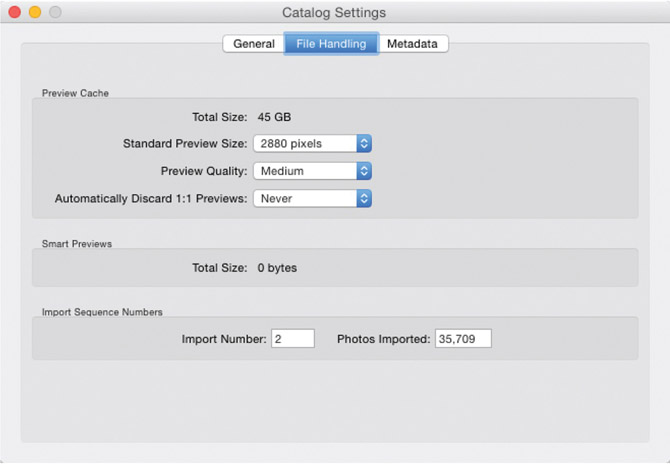
The File Handling section is where we can set parameters for our image Previews. First, we can set the Standard Preview Size, and I suggest keeping it as small as you can relative to the size or resolution of your monitor. Keeping the preview small keeps the size of your Preview File Cache down, which in turn helps speed up performance. Adobe recommends that you choose the amount that is closest to the longest edge of your screen resolution, but not shorter than it. I have a high-resolution NEC monitor that has a horizontal resolution of 2560, so I’ve set the Preview size to 2880 as shown in Figure 1.21 (see the following page). Next, I prefer to keep my Previews at a Medium quality to keep the file sizes smaller, and I set Lightroom to Never discard 1:1 Previews.
Under Import Sequence Numbers, these boxes tell you how many Imports you have performed and how many photos you have imported into your catalog over time. These numbers come in handy when we are naming files and creating Filenaming Templates. In Chapter 2 in the section “Using The Filename Template Editor,” I explain the difference between Image #s, Sequence #s, and Import #s, and how they can affect a file’s name. Of course, you can click inside the boxes at any time to change the numbers to whatever you like.
1.21
Here is how I set the File Handling section of Lightroom’s Catalog Settings. I suggest setting the Preview Cache relative to the resolution of your display.
Catalog: Metadata
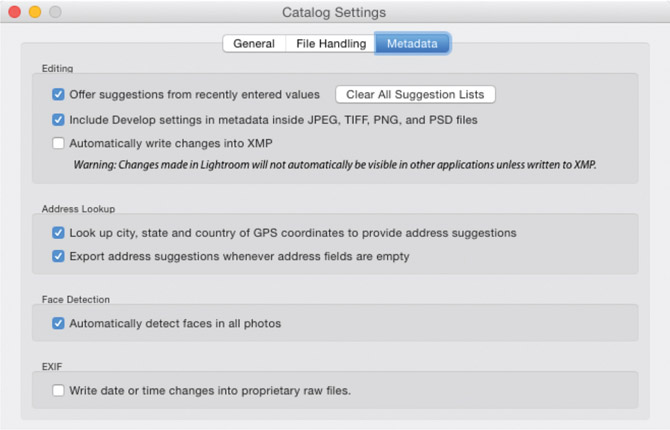
The most important box here, (see Figure 1.22) in my opinion, is the Automatically write changes into XMP box. I leave this unchecked, but there is a payoff and a consequence to doing so. When you leave it unchecked Lightroom will run faster, but your metadata will also not be automatically saved to your file. Don’t worry; your catalog keeps track of all your metadata. Another important check box is closer to the bottom under Face Detection. If you intend to use Face Detection on a fairly regular basis, I suggest keeping this checked so Lightroom can index your files to all the faces, ultimately making your People View (see “Viewing Choices” later in this chapter) move much faster.
1.22
Here is how I set the Metadata section of Lightroom’s Catalog Settings. The Automatically write changes to XMP box is an important one. Leaving it checked means all your metadata will be saved to the catalog and directly to your file.
Saving Metadata Manually
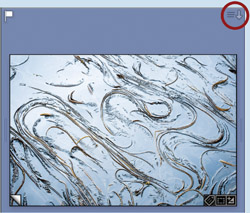
You can save metadata directly to your files manually, as you go, and there are a couple ways to do it. First, you need to identify whether or not your file has metadata changes that need to be saved, or that have not been saved to the file itself. Look for an arrow in the upper right corner of your image’s thumbnail in the Library Grid View, as shown in Figure 1.23. If you click the arrow, you’ll be asked if you want to save your changes to disk. Hit the Save button to save your metadata. Additionally, you can select a set of images with unsaved metadata and use quick keys: Command-S (Mac) or Control-S (PC) to save your metadata. Needless to say, the hard drive where your images reside needs to be plugged in in order for your changes to be saved to disk. But I do feel I should clarify that metadata is always saved on the catalog level automatically, and as changes are made to an image file as the change is made.
1.23
The small arrow indicates metadata changes have been made and saved in the catalog only.
The Lightroom Interface
Lightroom’s Basic Architecture
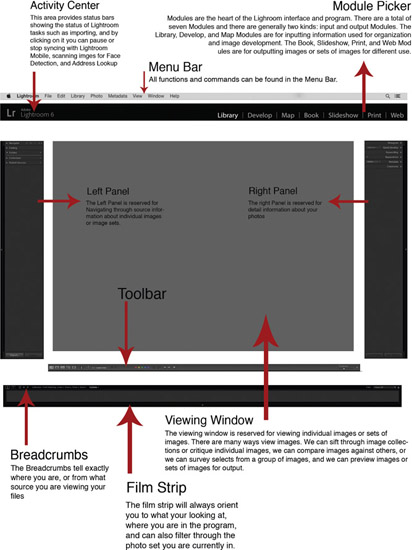
Lightroom has a simple and easy-to-understand interface, and its architecture is comprised of nine basic elements. Of course, the subtext to Lightroom’s architecture changes as you switch between Modules, but the Menu Bar, Module Picker, Left Panel, Right Panel, Filmstrip, Viewing Window, Breadcrumbs, Toolbar, and Activity Center all remain static regardless of which Module you are working in. As a result, it’s easy to stay oriented with Lightroom and throughout each phase of your workflow. Figure 1.24 shows a breakdown of each of these architectural elements followed by explanations of what they do.
Module Picker
The Module Picker requires no explanation, really, but … to enter a specific phase of your workflow like developing images, creating slideshows, or printing, simply click on a specific module to work on your image or images in that mode. Even though the basic architecture containing Panels, a Viewing Window, a Filmstrip, a Toolbar, and a Main Menu stays the same, the details of much of these change from module to module.
Panels
There are two panels on each side of the user interface. The Left Panel is generally reserved for navigational information and the Right Panel for detail information about your image or images. Even though their positioning remains fixed regardless of the module you’re in, the subpanels are totally different with each module. For example, the Left Panel while in the Library Module will have Folders and Catalog subpanels you can navigate through, in the Develop Module you’ll have Presets and History subpanels instead. To get familiar with all of Lightroom’s subpanel varieties, I suggest clicking through all of the modules and watching how the subpanels change.
Viewing Window
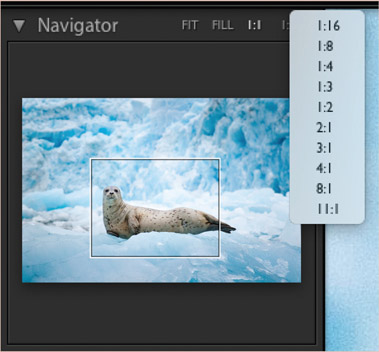
The Viewing Window is quite versatile and allows you to review images or groups of images in many ways. You can sift through thumbnails of large image sets, or compare or survey small sets of images. You can compare before and after versions while developing, soft proof images before printing, watch videos, view print or book layouts, review slideshow templates, or browse Web galleries—and much more. You can also view your images small or up to an 11:1 view ratio that allows you to see the individual pixels in your image.
Filmstrip and Breadcrumbs
The Filmstrip does quite a bit. Its obvious feature is to maintain thumbnail views of your images while working with images in any
1.24
Lightroom’s basic architecture is simple and doesn’t change from Module to Module.
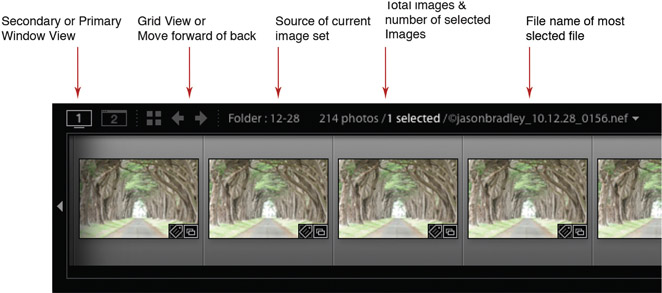
view, but you can also filter through images. The Breadcrumbs (see Figure 1.25) keep you oriented to where you are and what you’re looking at. The Breadcrumbs are found directly above the image thumbnails on the left side of the Filmstrip, as shown in Figure 1.24. You can control a secondary display such as a projector or second monitor; you can navigate back to your Library Grid View or forward or back through your images; you can determine if you are looking at your All Photographs View in your catalog, or if you’re looking in a specific folder or a Collection; and you can see how many images are in that source, how many you currently have selected, and what the name of your Most Selected image is. If you ever forget what set of images you are looking at, look at the Filmstrip to orient yourself. On the right side of the Filmstrip you have an image Filter. This is basically the same as the Attribute Filter found in the Library Filter bar that allows you to filter by Flags, Star Ratings, and Color Labels. In addition you have a small drop-down menu to the right of the Attributes that allows you to choose from Lightroom-supplied or user-generated filter presets. I suggest that you consider this a quick access point for filtering images, while the Library Filter should be considered the main hub. We’ll go into greater detail on how to filter through images in Chapter 3’s “The Big Punch Line.”
1.25
If you ever need to know where you are in Lightroom, look to the Filmstrip. It will show you what images are selected; in what folder, part of the catalog, or Collection you are looking; and the name of the most selected image in your view.
Toolbar
The Toolbar offers tools for doing specific forms of work on your images, and tools in the Toolbar can change depending on which module you are working in. Figure 1.26 shows all of the available tool sets for each module. On the right side of the Toolbar is a small arrow that reveals all of the potential tools. If the tool is checked, then it will show in the Toolbar. Conversely, you can hide specific tools by unchecking them.
Menu Bar
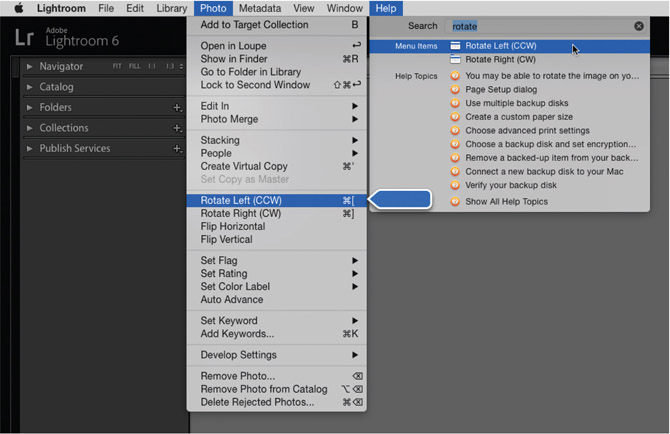
The Menu Bar is your anchor throughout each module, and like all software menus is located at the top left of your user interface. Everything you’ll ever want to do in the program can be found one way or the other in the Menu Bar. If you want to work on an image, a set of images, or your whole catalog, you can find your way through the Menu Bar. And here’s a big tip … because there’s a lot of stuff in Lightroom, because there are a lot of features that will be hidden to you at times, the Help Menu will help you find exactly what you need. Even though I’ve written a book on Lightroom, that doesn’t mean I remember where everything is. I still use the Help Menu all the time. If you type what you’re looking for into the Help Menu, it will show you exactly where you need to go (see Figure 1.27).
1.26
Here is a list of all the available tools for the Toolbar.
1.27
While looking for how to rotate one of my photos, I type “rotate” into the Help Menu. If I then scroll over the Menu Item of choice, an arrow will point to exactly where I need to go. Of course, if a Menu Item is not available, the system offers a list of Help Topics you can research. To figure out how to do what you need, simply click on the one that best fits your task and you’ll be taken to the appropriate Help Center—you will need to be on an Internet connection to work with Help Topics.
TIP: Even though I provide a list of essential quick keys in the back of this book, you can teach yourself the quick keys for the features and tools you use the most by looking to the Menu Bar. Most all of Lightroom’s quick key commands can be found in there. Simply open one of the menus and notice the symbols to the right of the menu action item (see Figure 1.28).

Viewing Choices
Lightroom has many ways to view images. Although each view can be accessed through the Main Menu, quick access has been set up by way of the Toolbar as shown in Figure 1.29a. Depending what module you are in, you can compare and survey sets of images to assist your editing process, so you can quickly find the best images from your recent shoots and imports. You can view your images small or large—and so large that you can see the individual pixels. You can also see images while darkening the rest of the Lightroom interface to get an undistracted view. You can compare before and after versions while in the Develop Module, or you can look for badge icons on your image thumbnails in the Library Module, to see what work has been done to your file, if any.
1.29a
The Library Module Viewing Modes.
Viewing Modes: Library Module
Grid View: You can find the Grid View icon while in the Library Module. On the left-hand side of the Toolbar, you’ll see four different viewing modes, with the first in line being the Grid View. Grid View is for seeing small or medium-size thumbnails in a particular set such as a Collection, a specific folder, or through any view in the Catalog Panel.

1.29b
Loupe View: Right next to the Grid View icon is the Loupe View icon. When selected, your image will fit your viewing window. You can adjust the size of your view by double-clicking on your image or using the Zoom slider found in the Toolbar (see Figure 1.30).

TIP: On the right side of the Toolbar is a small triangle and drop-down menu, as shown in Figure 1.26 on page 31. You can select or deselect menu items to hide or reveal tools in the Toolbar.
Compare View: To the right of the Loupe View icon is the Compare View icon. This is a great tool for comparing one specific photo against other photos (see Figure 1.31). I usually use this tool for images that are very similar, when I need to analyze the finer details of the composition such as sharpness or depth-of-field to determine which one is the keeper. The idea in Compare View is to select a set of images, and then select a Target image vs. a Candidate, or a set of candidates if you want to compare more than two images. Compare View also offers a set of icons that appear on the Toolbar and allow you to zoom in to compare the fine details. Keeping the lock closed ensures the Candidate zooms in and out with the Target image.

Survey View: To the right of the Compare View icon is the Survey View icon (see Figure 1.32). Like Compare View, Survey View is great for looking at sets of similar images, but Survey View is better for a quick review without the need for detail analysis. You can also quickly remove images from the Survey by clicking on the small X at the lower right corner of an individual photo to narrow down your selection.

People View: Lastly, to the right of the Survey View is the new People View feature released with Lightroom 6 (see Figure 1.33). People View allows you to access facial recognition tools. However, Facial Recognition in Lightroom works with keywords, so I will discuss the details of how this new Lightroom feature works in Chapter 3, in “Face Detection and Person Keywords.” But for now, selecting People View triggers a view to see the faces found in your images. Lightroom does need to index your files before the faces can be seen, so you may only see some faces right away. Either way, the thumbnails in People View can be tagged with People Keywords, and the Face Detection feature does allow you to keyword people in your library much faster than before.

TIP: Also found in the Toolbar is the Zoom View slider shown in Figure 1.34. By moving the slider back and forth you can increase or decrease the size of your image in the Viewing Window.

Viewing Modes: Develop Module
TIP: It’s safe to say that I use the quick keys associated with cycling through the Library Views more than any other. For Grid View hit the G key; for the Loupe View hit the E key; for the Compare View hit the C key; for the People View hit the O key, and for the Survey View hit the N key. These quick paths to your different viewing modes will work from any module.
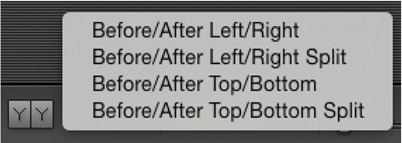
Before/After: There are only two basic views in the Develop Module, the default Loupe View and the Before/After View. Although it’s apparent this view is for analyzing before and after views while developing images, you can line up those comparisons in different ways. If you click the arrow just to the right of the Before/After icon, a submenu will appear with the choices as shown in Figure 1.35.
TIP: When zooming into images, look to the Navigator Panel at the top of the Left Panel in the user interface. The Navigator shows you where in the image you’re zoomed in by showing you a small box (see Figure 1.36). You can grab the box and move it around to modify your view, and you can also change the magnification of your view by cycling through the options on the right of the panel header.
Minimizing Distraction
As the different viewing modes help us analyze our photos as we go, they also help us view our work without distraction. As we photographers know, how an image is framed matters in terms of how the image is experienced. For example, the experience of an image placed on a white background is different than if it were placed on a black background. Likewise, an image placed on a busy background could be distracting, while placing it on a neutral background could keep the focus on the image. Thus, Lightroom does have a couple of tricks for viewing our images on neutral backgrounds to help our experience as we are analyzing our work.
Lights Out
Lights Out is a mode (shown in Figure 1.37) that allows you to darken the background around an image or a set of selected images to completely isolate your view from any surrounding elements. Although Figure 1.37 shows two views, there are actually three: Lights On, Lights Dim, and Lights Off. To cycle through the different views, go to Windows Menu > Lights Out, and then choose your mode. You can also toggle through them by tapping on the L key.
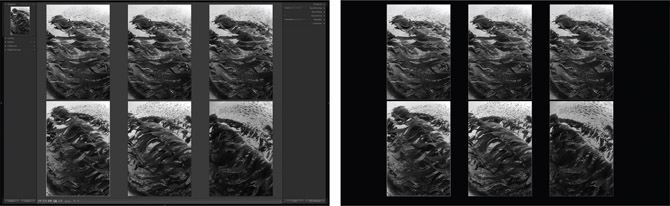
1.37
To cycle through different Lights Out modes, simply tap the L key to darken the background.
Full Screen Mode
As you thumb through your image library for whatever reason, you’ll inevitably want to see some photos larger to critique them. In addition to Loupe View, there’s also Full Screen Mode, which fills your monitor with a selected image and darkens the background (as shown in Figure 1.38, see the following page). You can stay in Full Screen Mode and use your arrow keys to cycle through the images in your current set. Go to Windows Menu > Screen Mode and select Full Screen Preview. You can cycle back and forth by tapping on the F key. Of course, when looking at Full Screen Mode in the Windows Menu, you’ll notice that Full Screen Mode is just one of four different views. To cycle through the other views, you can either click on them while in the Windows Menu, or you can use quick keys: Control-Shift-F (PC) or Command-Shift-F (Mac).
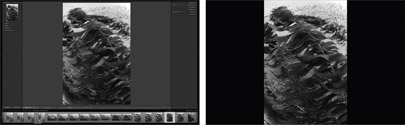
1.38
You can cycle through images with a Full Screen Mode that fills the screen with your most selected image and blackens out the background for an unobstructed view.
Customizing Views
In addition to all the viewing alternatives that let us interact with our images in different ways, we can also customize how both the Library and Develop Modules look, to fit the needs of our individual workflows.
Library Module Viewing Options
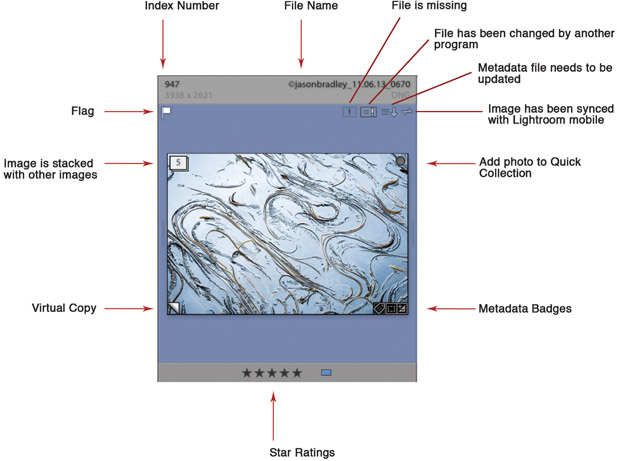
While in the Library Module’s Grid View, Lightroom’s default is to show image thumbnails with tiny badge icons that indicate whether your image has been adjusted, labeled or grouped, or they simply show basic status and file name information. See Figure 1.39 for an anatomical breakdown of such icons. Keep in mind that if you scroll your mouse over any one of these and leave it there, Lightroom will reveal a small context window telling you what it is, so don’t feel obligated to memorize the figure.
1.39
Your image thumbnails are filled with an array of badges and tags that can identify work that’s been done to your file and what the status of the file is, and that provide some basic ID info about the image.
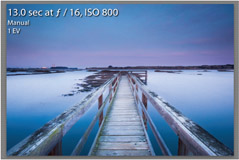
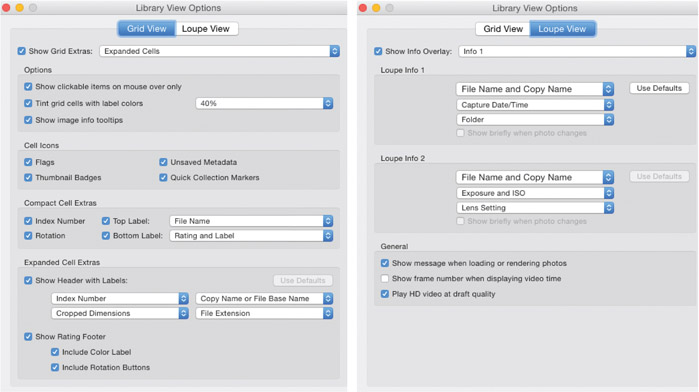
While in Loupe View, you have the option of seeing your photos with information overlays as shown in Figure 1.40. But you can customize what you see in either the Grid or Loupe Views. To launch the Library View Options dialog, use the quick keys: Command-J (Mac), or Control-J (PC) (see Figure 1.41). First notice that at the top of the dialog you have two section options— Grid View and Loupe View— and each provides different options for customization. For Grid View, I suggest simply going through the check boxes to get familiar with the different options, while turning things on and off and watching things change. It’s a great way to get comfortable with Lightroom’s user interface. The image overlays that you can customize in the Loupe View section can be shown automatically when your photo changes or when you first enter Loupe View, or you can manually turn them on or off by hitting the I key while in Loupe View.
1.40
Image overlays are customizable; you can cycle through them by tapping on the I key.
1.41
You can launch the Library View Options by hitting the quick keys Command-J (Mac) or Control-J (PC).
Hiding Panels and Headers
If you ever need more screen real estate to view an image or a set of images, in any view, you can increase the size of your viewing window by hiding your side panels, your header, and your Filmstrip. If you go to Windows Menu > Panels, you can select Toggle Side Panels or Toggle All Panels. You can also tap on the Tab key to hide the side panels, or tap on Shift-Tab, to hide all panels.
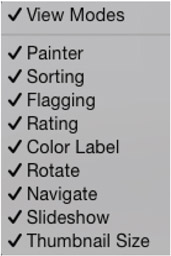
You can also hide individual panels by going to the small triangles that reside in the center of each edge of Lightroom interface. If you click on one it will hide just that panel, header, or the Filmstrip. If you Right-Click (PC), or Control-Click (Mac) on any of the triangles, a context menu will appear allowing you to choose to Auto Hide & Show, Auto Hide, to manually click on each panel to hide, or to Sync With Opposite Panel. Syncing them allows clicking on just one of the triangles to hide both.
Personally, whether using my small laptop screen or my large monitor in my home studio, I much prefer to keep everything but my header with my Module View in Auto Hide & Show mode. Doing so means the default mode of my viewing window hides my side panels, maximizing my Viewing Windows real estate. Visiting either the Left or Right Panel then just becomes a matter of scrolling over one of the triangles on each side.
1.42
If you Right-Click (PC), or Control-Click (Mac) on any Right Panel, or Left Panel header, you’ll reveal a submenu with different options for hiding or revealing your different panels.
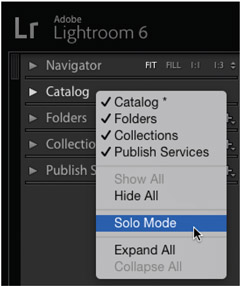
Modifying Subpanels
Within the Left and Right Panels, you can change what subpanels appear as well as how many are open at a time. Go to either panel and Right Click (PC) or Control Click (Mac) on any subpanel header to bring up the context menu as shown in Figure 1.42. Notice that you can check or uncheck the subpanel names to hide or reveal them. You can also choose to quickly Hide All the subpanels or Show All the subpanels. Then there’s my favorite, Solo Mode. Solo Mode lets you open only one subpanel at a time. You can also choose to Expand All or Collapse All subpanels.