
10
Exporting
Exporting Files and Catalogs
Exporting images is the phase of our workflow where we can create a multitude of different digital versions for the endless ways we photographers distribute our work in the digital age. We may need to make large, high-resolution versions for submissions to clients, photo labs, or to Blurb to make books. We may need to create small, low-resolution versions for emailing, or uploading to Instagram or Facebook. We may need to make versions for our Web site that are optimized for retina displays as well as mobile phones. Whatever the case, virtually all of our needs are achieved by exporting in one form or another from Lightroom, and in one of a couple of ways. We can use the Export dialog, or we can use Publish Services to automatically connect our Collections to social media outlets and outside services.
An Introduction to the Export Dialog
With this opening section of Chapter 10, please allow me a bit of time on my soapbox. I’d like to make an appeal to Adobe, and to the kind engineers of this wonderful Lightroom program: please consider making the Export dialog its own Module. Exporting is an absolutely essential part of every digital photographer’s workflow, and I think I can say with confidence that more Lightroom users are familiar with and use Lightroom’s Exporting features as much, or more than, most of the other output Modules. Additionally, there’s a lot to the Export dialog that, in my humble opinion, makes it worthy of its own Module. This concludes my soapbox rant—thank you. My personal feeling aside, the Export dialog is a robust, feature-filled tool that does a great job fulfilling most of your output needs.
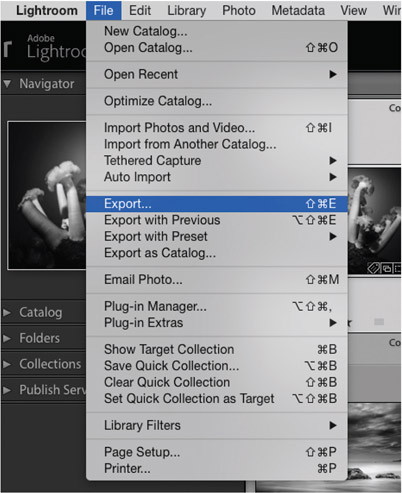
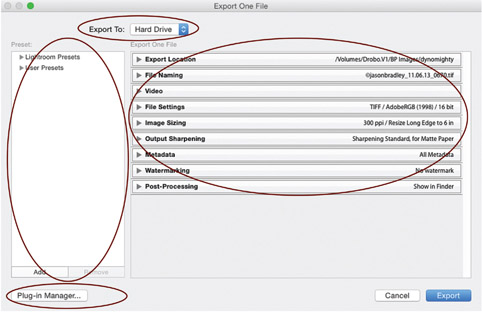
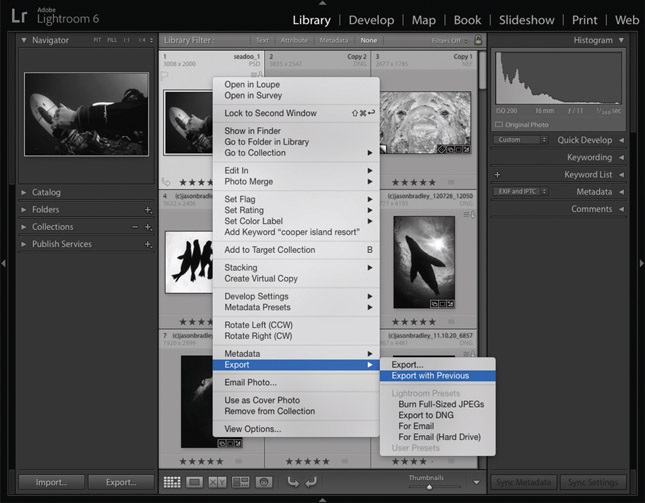
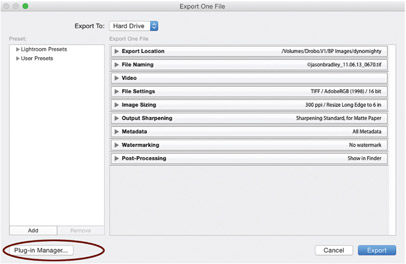
There are a few ways to launch the Export dialog through the main menu, go to File > Export (see Figure 10.1), use quick key Control-Shift-E (PC) or Command-Shift-E (Mac) or click the Export button in the lower left of your user interface after you’ve selected images in the Library Module. We can break down the Export dialog into four main sections (see Figure 10.2). At the top of the dialog there is the Export To section; just below and on the left is the Preset section; to the of that right is a series of Settings Panels; and on the bottom left of the dialog box is the Plug-in Manager button. The workflow for exporting goes as follows: first choose where you are exporting to, select a preset if needed, and then go through the Settings Panels one by one from the top down.
10.1
To open the Export dialog, go to File > Export, use quick key Control-Shift-E (PC) or Command-Shift-E (Mac), or click the Export button in the lower left of the user interface after selecting images in the Library Module.
10.2
The Export dialog has four distinct sections. There is the Export To drop-down, Presets, Settings Panels, and the Plug-in Manager.
Export To
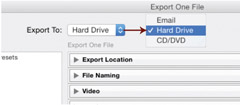
There are a few options for where you can export to (see Figure 10.3): you can send your images to an email client such as Apple Mail, Microsoft Outlook, or Mozilla Thunderbird; you can send them to a location on your hard drive in a folder; or you can burn them onto a CD or DVD. Depending on your output location choice, you’ll notice a slight change in the configuration of the Settings Panels, shown in Figure 10.4. The difference is that you simply have a couple additional choices when exporting to a hard drive: you’re given the extra options of choosing an Export Location and File Renaming, and you have the option of choosing between a set of post-processing commands (but we will explore that that later).
10.3
When exporting images, you can choose to have them sent directly to an email client, to a folder on your hard drive, or to a CD/DVD.

10.4
Choosing Export To: Email or CD/DVD has one configuration for the Settings Panels, while Export To: Hard Drive has another.
Export to email: Unlike exporting to a folder or hard drive, exporting to email requires a little setup before you start. But once everything’s configured, exporting to email becomes a quick process. Let’s do this step by step.
- First, choose an image or a group of images to export and then go to the Lightroom Presets section of the Export dialog and select the Preset For Email, as shown in Figure 10.5. This preset will set all of your Settings Panels to produce a small JPEG appropriate for emailing (later in this chapter we’ll discuss creating User Presets if you want to have an email preset with different settings).
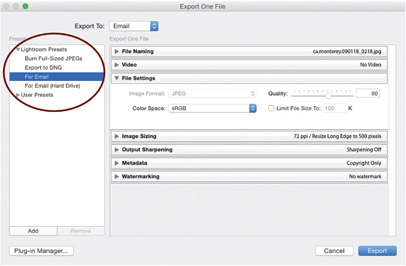
10.5 Using the For Email Lightroom Preset automatically sets your Export To location, your File Settings Panel, and your Image Sizing Panel.
- Next, hit the Export button in the lower right of the dialog to launch the Lightroom Email Client as shown in Figure 10.6.

10.6 The Lightroom Email Client allows you to choose from email accounts you’ve authorized Lightroom to access. If you’re drafting your first email in Lightroom, you’ll be taken to the Lightroom Email Account Manager (see Figure 10.7) to establish which accounts Lightroom can access.
- Then click on the From drop-down menu and select Go To Email Account Manager to begin adding your email account information (see Figure 10.7). You’ll need to click the Add button in the lower left corner to begin the process. If you’re not sure what your email account settings are, visit your email client’s Preferences and you’ll likely find what you’re looking for under something that says Settings or Accounts.
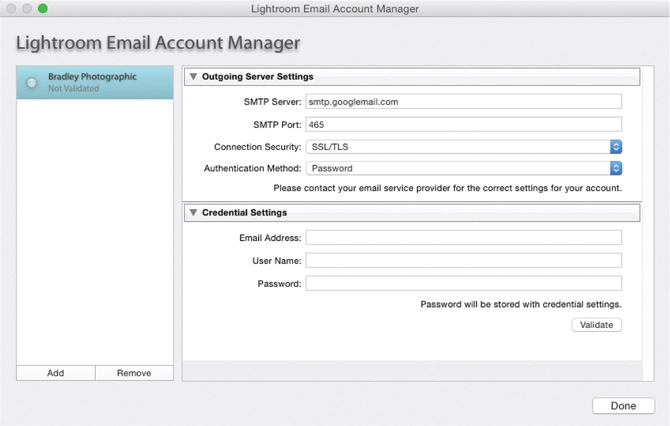
10.7 After you hit the Export button when you Export To: Email for the first time, you’ll see the Email Account Manager. Here you connect Lightroom to your email account, so all future exports by email will be seamless.
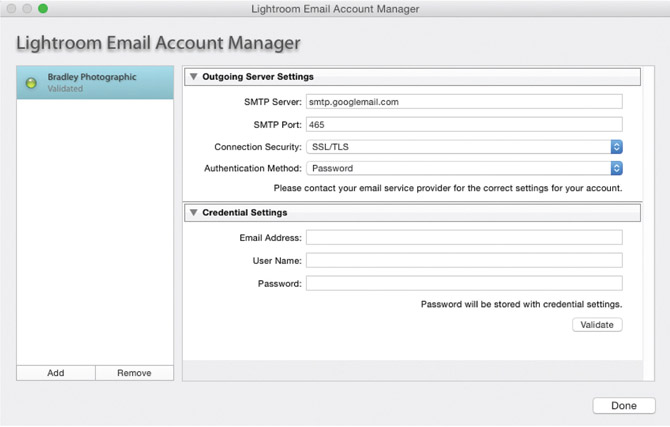
- Once you’ve added all of your email account information, click the Validate button in the lower right corner of the Email Account Manager and wait for a green light to appear next to your email user name (shown in Figure 10.8 on the following page). After you’re validated, click Done and you can start typing email messages along with sending your images from then on—just select Export To > Email and Lightroom will take you right to your email account. Of course, you can add several accounts if you have more than one or are sharing a catalog.
10.8
After adding your email settings (and they have been validated), the Email Account Manager will show the name of your email account in the upper left corner with a green light. You’re ready to go!
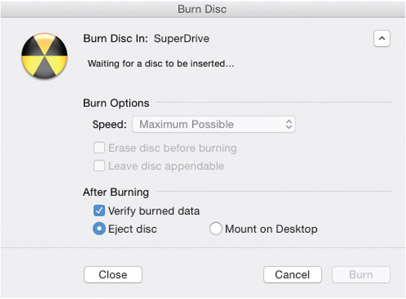
Export to CD/DVD: Exporting to a CD/DVD is pretty simple, but I’d bet not many of you still use CDs or DVDs for transmitting images. Regardless, here’s how it works. After going through your Settings Panel to configure your export, hit the Export button and your computer’s disc drive will either eject for you to insert a disc, or will prompt you to do so (see Figure 10.9). You’ll then be prompted to name the disc if it hasn’t been preformatted. Done!
10.9
When exporting to CD/DVD, after you’ve configured your settings and hit Export, you’ll either be prompted to insert a disc, or your disc drive will eject for you.
Export to Hard Drive: Exporting to Hard Drive is by far the most common method I use to export files, and I suspect the most common choice for you as well. To Export To: Hard Drive, you simply choose a folder to export your files to—or create a new folder while configuring your export. So, starting with the Export Location, let’s go through the settings for each Panel step by step as if we were creating a few different types of exports.
TIP: You can also access the Export dialog through any image thumbnail in the Library Module’s Grid View, or from the Filmstrip. If you Right-Click (PC) or Control-Click (Mac) on a thumbnail, you launch a submenu where you can find Export halfway down (see Figure 10.10).
Export Location Panel
Our first step when exporting to a hard drive is to tell Lightroom which hard drive and which folder we want to export to. Thus, the first choice in the Export Location Panel is Export To. Clicking on its drop-down menu reveals three choices (see Figure 10.11 on the following page): Specific folder, Choose folder later, or Same folder as original photo. The Choose folder later option just prompts you to choose a location after you hit the Export button. If your choice is Specific folder, you’ll need to click on the Choose button below to specify your export folder. The choices for the rest of the panel are fairly self-explanatory. You can add photos to a subfolder; you can have them added to the catalog; if they are part of a stack, they can be added to the stack; or if the file already exists in the destination folder with the same file name, you can tell Lightroom what to do. For this choice, I always want Lightroom to prompt me or Ask what to do.
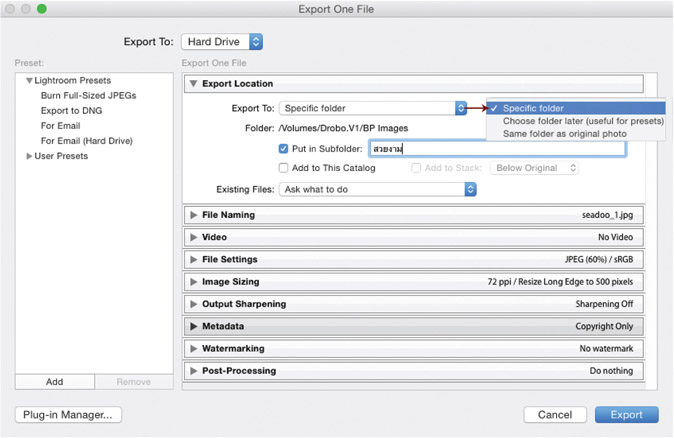
10.11
When exporting to a hard drive, you need to begin by choosing which hard drive and folder you’ll be exporting your images to.
File Naming Panel
When exporting to any source, you have the option of configuring the file names of your export. Personally, I don’t ever rename files I’m exporting—especially if I’m exporting images for submission to a client. If my images are ever referenced back to for licensing, or some kind of sale, it just complicates things if they are referenced back to me with a file name that’s different than that of the original image. In that case, I’d have to ask the client to further explain the image or send me back a thumbnail, which puts the client out. On rare occasions though, new file names are needed. Photo contests and exhibition juries sometimes like files named a certain way, in which case you can use the File Naming Panel to configure a new name for your outgoing files (see Figure 10.12).
The File Naming Panel works with existing file naming templates, or you can, of course, create new templates as needed. If you check the Rename To box, you can click on the drop-down menu to the right to choose an existing template, or click Edit to launch the Filename Template Editor to create your new template. (See Chapter 2: Using the Filename Template Editor for more detailed information.)
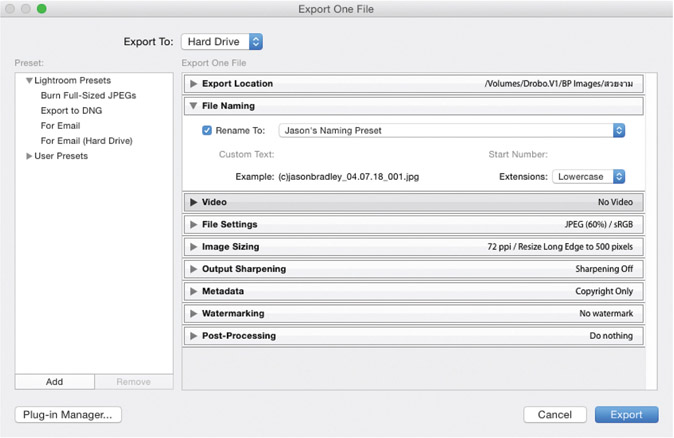
10.12
When using the File Naming Panel, you have access to any File Naming Presets you may have previously created, or you can create new ones to accommodate your specific export.
Video Panel
To export video, there are a couple of choices. Of course, the first step in the Video Panel is to check the Include Video Files check box, as shown in Figure 10.13 on the following page. Next, open the Video Format drop-down menu to choose H.264, DPX, or Original, unedited file. DPX stands for digital picture exchange and is a standard bitmap uncompressed format that was derived from Kodak Cineon. Think of DPX like the video world’s TIFF file, as it was designed in part to support device independence. Consequently, DPX files can be much larger than the original file format imported into Lightroom. If you are exporting video for commercial use, DPX is your format.
Most photographers want to export video for posting on YouTube, Vimeo, or somewhere on the Internet. I suggest using the H.264 video format for your social sharing and Web use output because it’s a compressed format. Think of H.264 like the video world’s JPEG file. Next, simply choose the Quality setting of your choice from the drop-down menu just below. To the right of the Quality drop-down there are sample target resolutions to help you decide how big or small you want your exported video to be. Or to say it another way, Low, Medium, High, and Max are different compression settings.
NOTE: If you only have video files selected for export, the rest of the Settings Panels below the Video Panel are grayed out (except for Post-Processing), and their settings not available.
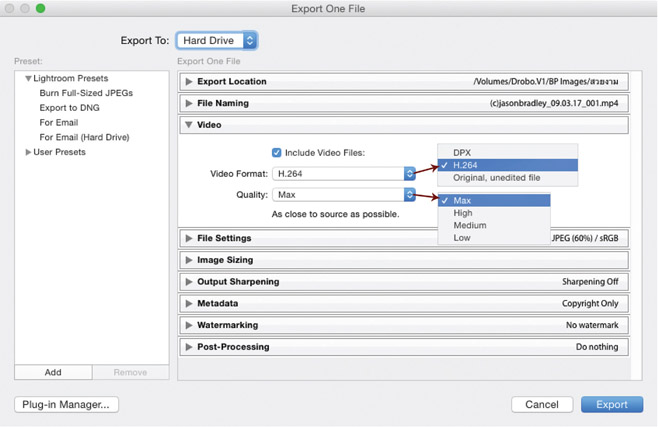
10.13
If you’ve included video in your selection of files to export, you can configure your video settings by first checking the Video Files check box and then next choosing your desired format of H.264 or DPX.
File Settings
Arguably the most important Settings Panel, File Settings allows you to choose what file format you’re exporting to. You can export your image as a DNG, TIFF, PSD, JPEG, or export a copy of the original file. Since each choice is different from the next, each choice has its own configuration for the File Settings Panel. So, let’s go through each option individually.
Image Format: JPEG
I think its safe to say the JPEGs are the most universally used image format today. Virtually all computers, portable devices, and apps can read them. I use them as a submission format to many professional clients for high-resolution output, and I certainly use JPEGs for all of my Internet file sharing. However, I only use JPEGs for professional submissions if the client is reproducing the image in a magazine or a newspaper. I would not submit JPEGs for any kind of large scale, or fine-art reproduction; TIFFs or PSDs are a much better choice for that. Bearing this in mind, I also almost always export JPEGs with the color space sRGB. It’s a small color space that was originally designed to work industry wide with color monitor gamut, so it tends to look fairly consistent from one monitor to another. Of course, there are instances where a client wants a specific color space from me, in which case I’ll select the requested color space from the Color Space drop-down.
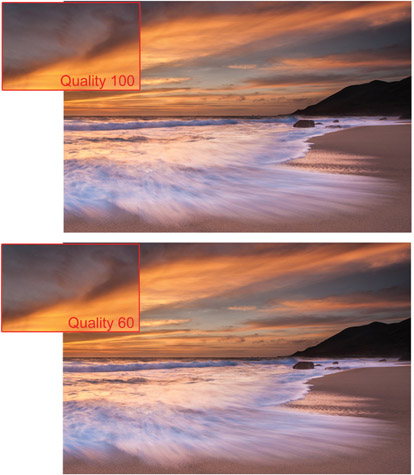
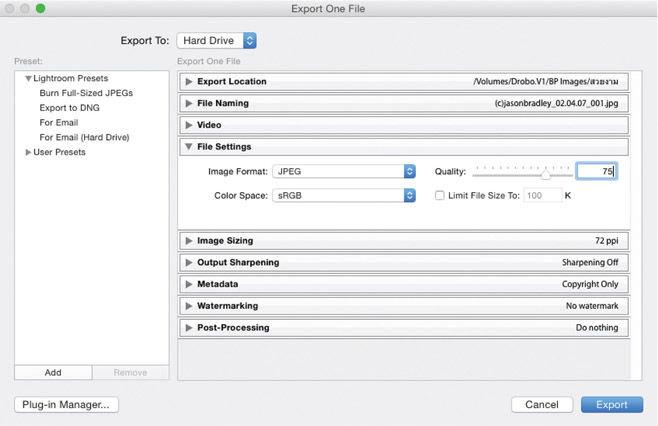
If you are concerned about file size of your JPEGs, you can minimize that by reducing the Quality slider. In essence, what the Quality slider does is ramp up the JPEG compression algorithm the more you reduce the quality. This is another one of those things where there seems to be many schools of thought as to what the best quality vs. file size is. Personally, I suggest never compressing a JPEG for professional submissions of any kind. If a client wants to do that, let them, but I much prefer to provide a good-quality image initially. However, I’ve found that for any kind of uploading I do to the Internet for social media, or other Web use, that using a quality as low as 60 seems to work just fine. There is a difference in file size and quality, but for the resolution settings we generally use for Web output (which we’ll get to next in the Image Sizing Panel), you would be hard pressed to notice the difference. If you have concerns, do an export with your Quality set to 60 (see Figure 10.14 to see the quality difference between 60 and 100), and one set to 100 to determine if you can notice a difference. Personally, I keep my Quality at 75 as shown in Figure 10.15 on the following page. I feel it’s a great compromise in quality and file size. It reduces the file size by more than half, but any quality shift is almost undetectable. Admittedly, I am not too worried about this topic overall. JPEGs are inherently small, unless you are using cameras with large high-megapixel sensors. My Nikon D800E exports a 19MB file, while my D700 exports a file less than 5MB. It’s all relative.
10.14
When exporting as a JPEG, the sRGB Color Space is the best choice when taking your image to the Web. To help keep the file size manageable, I will set my Quality slider as low as 60. As you can see, the difference is hard to spot.
10.15
I set my quality slider to 75 when making JPEG’s for the web. Even though the previous Figure illustrated that quality set to 60 is almost undetectable, I tend to back off on settings some as a habit.
Image Formats: TIFF and PSD
TIFF (Tagged Image File Format) and PSD (Photoshop Document), are both uncompressed file formats. I don’t really recommend one over the other in terms of quality; they are both very similar for your standard digital photo. Some photographers prefer TIFF, which is thought to be a more archival format because it’s openly documented, as opposed to PSD, which is proprietary. This is funny because both are owned by Adobe. Plus, TIFF offers compression options that PSD does not, but these can also noticeably slow the TIFF file down as you work with it in Lightroom or with other software. However, when exporting from Lightroom you’re only offered lossless ZIP compression, as shown in Figure 10.16.

10.16
When exporting TIFF files you have the option of choosing Compression: ZIP. ZIP is considered a lossless type of compression that has no effect on the quality of the image. Compressing it does slightly slow down the performance of the file as you open it in Lightroom or other software programs.
Most importantly, if you are exporting images as either format you are likely in need of maintaining the highest quality you can. So, I suggest putting your attention on making sure your Color Space and Bit Depth are set appropriately. The best way to do this is to be clear for whom you are exporting the image and by what means they’ll be using or printing it, then talk to them about the best settings for export. Speaking generally, if you are exporting images for further editing, you’ll likely want to export with a ProPhoto Color Space and 16-bit color. If you are sending the files to an outside photo lab or to a client for printing, chances are using the Adobe RGB Color Space 16-bit color is fine. Whatever your situation, when you are exporting an image that requires a bit more care than just throwing a JPEG on Facebook, it’s normal and expected to ask these questions of anyone you may be working with on a project. Additionally, it never hurts to send a 16-bit file as opposed to an 8-bit file, but it can always do some good. Unless you are clear no additional edits to your photo will be made and it’s going straight to an 8-bit output device, I suggest exporting your file as 16-bit.
One word of caution: if you are exporting a layered TIFF or PSD that you’ve previously created in Photoshop, exporting it out of Lightroom will flatten your layers if you export it as a TIFF or PSD. If you want to maintain your layered format, you have to save it as Original, instead of TIFF or PSD. But please note that if you have added further Lightroom edits to those TIFFs or PSDs, then you’ll lose those edits if you export your file as Original—confusing and frustrating, but true.
Where did your Rendering Intent Go?!?
In Chapter 9, in the “Soft Proofing” section, I highlighted the Soft Proof as an important phase of a printer’s workflow. It’s a critical step for the photographer who wants to ensure that the print they’re making looks like the print that they developed. Additionally, we have the option of using Perceptual or Relative rendering intents as part of the Soft Proofing process (see Figure 10.17), which handles how colors are processed as the file is sent to print. Unfortunately, Lightroom doesn’t offer the ability to choose a rendering intent when exporting files, so if you happen to be a photographer who’s not printing at home and is using outside labs, but still needs to Soft Proof the work, then I suggest to Soft Proof using the Perceptual rendering intent, as Lightroom doesn’t offer the choice of Relative vs. Perceptual during export. Alternatively, if you have a specific need and Relative is required for one of your images, you can always open your image in Photoshop and convert your images to the target profile there.
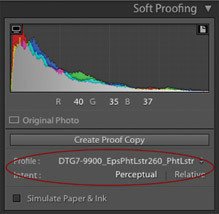
Image Formats: DNG and Original
You can export raw files as raw files in a couple of ways: Image Format: DNG, or Image Format: Original. Choosing Original simply exports the file from the state it was in when it was originally imported into Lightroom. That file may be a DNG, NEF, CRW, or another raw format that you’ve developed in Lightroom. So, what you’ll export is a raw file of that same format with no developments attached. It’s the equivalent of resetting the file in the Develop Module and exporting it. Of course, if you’ve converted your Adobe Camera Raw format (like CRW, NEF, or some other) to DNG on import, choosing Original will not convert it back to its original format. Finally, if you are exporting a JPEG, TIFF, or PSD, then choosing Original is not an option for exporting a raw file. You can’t make a raw file from a non-raw file. However, you can choose to export to Image Format: DNG from a non-raw file. Doing so has no real benefit for the quality of the image, but it does allow you to save metadata to the XMP without needing to create sidecar files.
If you want to export a raw file with the work you’ve done in the Develop Module attached, then DNG is your option. As you choose Image Format: DNG in the File Settings Panel, you’ll notice the panel changes as shown in Figure 10.18 (see the following page). The two things to consider when exporting a DNG are its Compatibility, and how to manage the JPEG Preview. I suggest just leaving these at their defaults unless you have a specific reason in your workflow for doing otherwise. For instance, the Compatibility option is needed only if you know you are sharing files with someone whose resources aren’t up-to-date—meaning, they only have and can have older versions of Camera Raw. Below, in JPEG Preview, you can choose to provide no JPEG preview, or a medium or a full size preview; using the default Medium setting is fine, and it doesn’t create much of a change in your file’s size. You do have the option to Use Lossy Compression; if you choose that option, the Image Sizing Panel opens up for you to adjust the Long Edge or Megapixels of your export. This of course is an optional way of additionally reducing your DNG’s file size, and it allows you to create small-size raw files for easy and fast transport over email and the Internet.

10.18
When exporting a raw file, you are faced with choices of Compatibility and JPEG Preview size. I suggest using the default settings as shown unless you have certain reasons in your workflow for other settings.
NOTE: In Chapter 2, in “The Benefits of DNG,” I discussed the nature of the DNG file and what it means to Embed Original Raw File. Doing so isn’t a recommended part of your workflow, but if you are already embedding the original format—such as NEF, CRW or another manufacturer’s raw format—you also have the option of embedding it on export. Keep in mind that if you do, this will increase your files size.
Image Sizing
After your output format has been established, this panel is where you decide the actual size of your image. The funny thing about this panel is that it’s sometimes best understood by explaining what it doesn’t do instead of what it does do. Some of what this panel does, and some of the suggestions and rumors that have proliferated in the photo community, is confusing. And so, before I jump into how to configure your settings for this panel, please allow a little prologue.
I get that for every thousand photographers out there you’ll find a thousand workflows, but there are only a handful of reasons why photographers export their images. Most commonly, photographers want to export their work for printing; as submissions to clients; for some kind of use on the Internet like social media, blogging, or Web galleries; or they may need to batch export images as smaller sizes for a quick view or submission. However, regardless of how or where the images are to be sent, knowing the language of units, of inches or centimeters vs. pixels, is really the core of this panel. But regardless of the export type, my experience is that photographers typically either want to maintain their image’s native aspect ratio, or they want to size their image to fit the needs of a client, or to fit better in a standard frame size.
Image Sizing With Consideration for Aspect Ratio
10.19
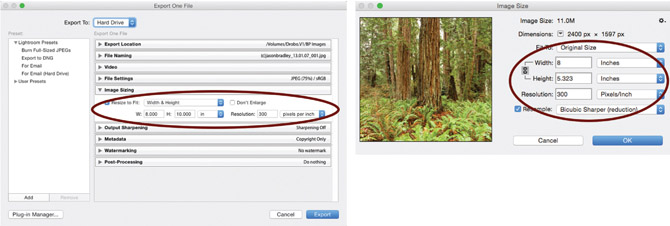
If the aspect ratio of your image does not match your intended aspect ratio when specifying the Width & Height, the size of your exported image will not match. Here is an image exported as an 8×10, but when analyzed in Photoshop, the size is different.
Admittedly, considering aspect ratio while exporting from Lightroom can be confusing. For example, some photographers just want to export their Nikon or Canon file as an 8×10 and send it to a lab, but an 8×10 from a 35mm format DSLR is a cropped image. It’s not the native aspect ratio, and if you want to see your entire image, this is a problem. Instead, 8×12 is a more compatible size for the 35mm aspect ratio. However, many photographers just want an 8×10 because that is a well-known, standard size. The problem with using Lightroom’s Export dialog to try to export an 8×10 from a 35mm aspect ratio is that you can’t: even if you configure your settings as Resize to Fit: Width & Height > 8 inch × 10 inch > Resolution: 30, (as shown in Figure 10.19), the result is a 8×5.323 image. This is often confusing and frustrating for photographers, and I honestly don’t understand why the option to control Width Height is offered if it couldn’t be delivered. You will get the same results if you try this with the setting Resize to Fit: Dimensions as well. The only difference between these two is that Width & Height take into account the current orientation of the image, while Dimensions does not. With this in mind, if you want an 8×10 from a 35mm aspect ratio, or any kind of custom cropping, it’s best that you create that version of your image in the Develop Module using the Crop Overlay tool (see Chapter 6 Figure 6.9). The irony is that if you are doing that, then all you’ll need to do on export is focus your attention on setting Resize to Fit from the Long Edge, or Short Edge of the image instead of Width & Height as shown in Figure 10.19. There’s no need to set the width and the height.
To further confuse things, digital photo paper sizes don’t match the 8×10 or the 35mm aspect ratio. In the US for example, photo paper is sold in 8.5×11 sheets, which obviously doesn’t match 8×10. Furthermore, if you want to make an 8-inch-long print from your 35mm aspect ratio, then you’ll be making an 8×12, which needs to be made on a 11×17 sheet. I refer to this as the hot dog and the bun problem—one never seems to fit with the other. So as previously explained, if you need to crop to a specific aspect, don’t do that on export but instead create that aspect ratio in the Develop Module. And if you want some clarity on how to create different print sizes, with different cameras, while maintaining their native aspect ratio, then refer the chart in Figure 10.20. This chart shows a series of different sizes of many cameras’ aspect ratios. Additionally, the last column on the right shows standard US frame sizes. Hopefully this helps to reconcile the hot dog and bun world we live in, just a bit.
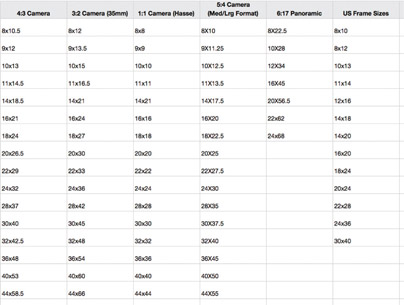
10.20
If you intend to export your image at a certain size while maintaining its native aspect ratio, you refer to this chart to see what the varying sizes are based on the type of camera and sensor your using.
Image Sizing With Consideration for Inches and Centimeters
After choosing an option like Resize to Fit: Long Edge vs. Short Edge, we can then set the units for export by either inches or centimeters. This kind of export should be specifically thought of as produced for a print. It is an image that has a physical presence as opposed to pixel numbers. The thing with the language of physical size is that we also must indicate the density of how an image is created, which is the resolution. For example, we define resolution in the Export dialog as pixels per inch (ppi) as shown in Figure 10.21, but those pixels in the language of printing are usually referred to as dots per inch (dpi). With that understood, could you imagine an 4-inch print made with 300 dpi as opposed to 3 dpi? I think it’s safe to say the 3 dpi print wouldn’t look good (see Figure 10.22). This doesn’t take into account that a client may want something for digital use and ask you for a 2-inch image with no other parameters, but not all clients know what they are asking for—my apologies to all my potential clients out there. But if we are exporting with consideration to inches or centimeters, then we are talking about a physical space that must be defined along with the resolution. So, the follow-up question to the client asking for the 2-inch image is: What resolution do you need? Of course, if that client intends that image for digital use, the request would be better made in the language of pixels as opposed to inches. (But who’s going to argue with a client, right?) Bearing all this in mind, if you are exporting an image to make an 8-inch-long print, a 16-inch, or any size, specify that and then make sure your Resolution setting is sufficient for the printer your using. 300ppi is generally used as the standard when using any print lab, but it naturally depends on the

10.21
Digital resolution is determined in terms of pixels per inch (ppi), or per centimeter. This is not to be confused with dpi (dots per inch), which is a term referring to print resolution instead of digital.
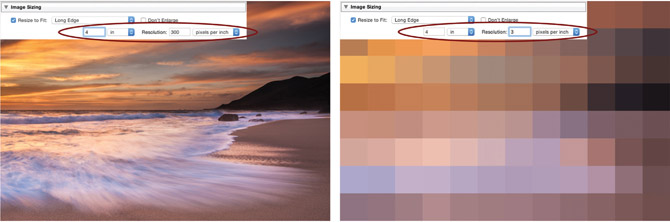
10.22
The first image was exported at 4-inches wide at 300ppi, while the second version of the same image was at 4 inches at 3ppi. The difference is not subtle. When exporting with respect to a physical size, like inches or centimeters, determining a resolution is crucial.
output machine. Digital ink jet printers have native resolutions of 300 or 360, but if you are sending an image to a client for news print then resolution can be as low as 175 dpi. Naturally, if you’re not sure what equipment your image is intended for, or what this setting should be, I suggest to simply ask who you are working with if they have suggested settings for resolution—but you can’t go wrong with using 300ppi as a default.
NOTE: For those of you coming from a Photoshop workflow, you may be wondering what the options are for image interpolation—meaning, when increasing the size of your image in Photoshop, or reducing, you are given a series of options for how that image is resampled (see a view of the Image Size dialog in Figure 10.23). These options don’t exist when upsizing an image in Lightroom, but that’s okay. Instead Lightroom offers an under-the-hood method of upsizing photos that works more efficiently with raw files than standard bicubic interpolation.
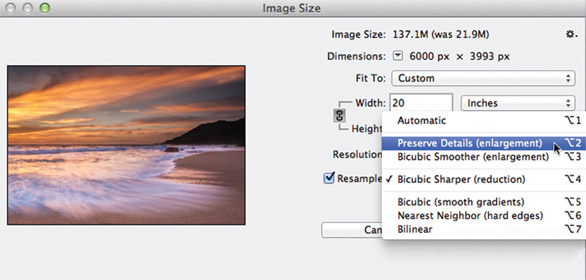
Image Sizing With Consideration for Pixels, and the 72ppi Myth
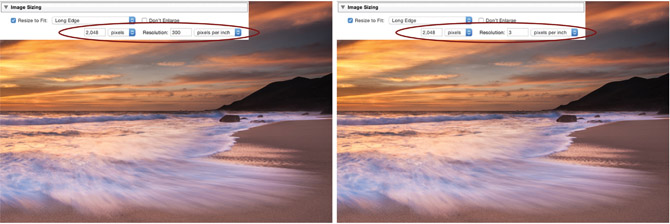
I think it’s safe to say that the most common need for exporting photos is to export them for some sort of digital use. For better or worse, modern photographers share more digitally than they print. And in the digital world, the common language is not inches or centimeters—it’s pixels. Whether or not you are using an Apple iPhone, an iPad, a laptop, or a large, high-resolution monitor to view images, a digital display’s resolution is defined by the number of pixels it contains. However, there’s a myth that’s proliferated in the digital photography world about how to properly size an image for digital displays. Many photographers have been taught that if you are going to the Web, then you should use 72 ppi because that’s the standard pixel density of computer monitors. Lately things have changed, and photographers consider retina displays because of the proliferation of Apple’s high-resolution screens, which can show 326 ppi. So, now photographers are taught to set their resolution to 326 ppi to match the pixels. So here’s the mix up: if you are setting pixels, then setting the resolution is redundant. For example, let’s say I want to export images for my iPad mini retina display, which has a resolution of 2048×1526 pixels. What I’ll do is set my Image Sizing Panel to Resize to Fit: Long Edge and 2048 Pixels, but will pay no mind to what my Resolution setting is. Figure 10.24 shows two examples of how I’ve exported an image with this pixel setting with both 300ppi and with 3ppi. But each exported photo shows no difference in quality or file size. Both image are 16MB, and there is literally no difference in image quality.
10.24
The first image shows an exported image with the pixel length set to 2048 and 300ppi, and the second image also has a pixel length of 2048, but the Resolution is set to 3ppi. Unlike choosing a physical specification like inches or centimeters, choosing resolution when specifying pixels has no effect on the quality or size of the file.
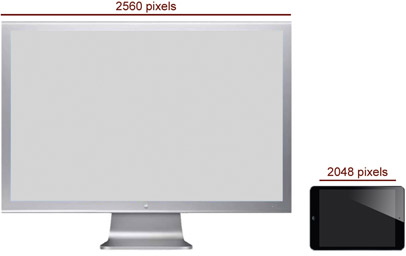
10.25
To further illustrate the distinction between exporting by physical size vs. pixels, pixels and pixel count can in fact be various sizes. Here are two very different displays in terms of size, but similar in terms of pixel count. The large 27-inch display has a horizontal pixel count of 2560, while the very small display of the iPad mini has similar horizontal pixel count of 2048.
Here’s how you can think of this in order to tie together the language of inches or centimeters vs. pixels. A digital display is manufactured with a given set of pixels, and different size screens can have the same amount of pixels. For example, an iPad mini retina display has a 7.9-inch-diagonal display size and contains 2048×1536 pixels (display sizes are typically given with this diagonal measurement). However, I own a very nice wide-gamut, 27-inch NEC computer monitor that sells for over $1500, and this monitor contains 2560×1440 pixels (see Figure 10.25). This means that a large 27-inch monitor has almost the same amount of pixels as a small iPad mini. But, they do not have the same pixel density per square inch, and it’s pixel density that makes a retina display a retina display. It’s because Apple fits so many pixels into a small space that we can then calculate that there are 326 pixels per square inch. My NEC, however, with almost the same amount of pixels on a much larger screen, has a pixel density of 109 pixels per square inch. So, inches and physical specifications go hand-in-hand with ppi, but when defining things by pixels, you only need to specify the pixels.
Unfortunately, things just got crazier in the world of displays. In 2014, Apple announced that it will offer iMacs with a 5000-pixel retina display. Now we can buy 27-inch displays with pixel resolution of 5120×2880; that’s a pixel density of almost 220ppi, which is more than doubled the industry standard for computer display resolution. I said “unfortunately” because we photographers are always nervous about socially sharing high-resolution images, but we also want our images to look good when we share them—and these kinds of monitors fuel this kind of fear. So your job is now to balance on what display you are exporting for vs. how big you’re willing to share your work with the public. Personally, I’m going to stick with exporting my images for high-resolution portable devices, at resolutions of 2048 pixels wide, for the time being.
Image Sizing with Consideration for Size
When sizing an image for export, the file size in terms of megabytes is sometimes a consideration. For me, this is a much more rare consideration, but it has come up when I’m trying to send images to someone with a goal of keeping the images at a certain size for easy transport. In this case we can adjust the image by way of Megapixels, or by Percentage as shown in Figure 10.26. If adjusting the image by megapixels, you just add say the number 4 if you intend to create a 4 MB file. Although, you usually end up with something like a 3.7 MB file, as the science of compression isn’t exact. Choosing by way of Percentage allows a file size relative to the size of the original file. So if you have 20 MB raw files, choosing 50% leaves you with a 10 MB file.

10.26
In addition to exporting files by way of pixels, inches, or centimeters, you can also choose by way of Megabytes or Percentage. Open the drop-down menu that says Percentage here to choose between the two.
Output Sharpening Panel
In Chapter 7, in the “Input and Output Sharpening” section, I highlighted the difference between these two approaches. Input Sharpening should be performed independently of the final output size of the image, while Output Sharpening is done in addition to, and with consideration for, both the size of the final output and the medium by which the image will be viewed. Before the days of Lightroom and exporting images with the automation this program provides, sharpening an image would typically be performed after it was sized for a particular kind of output. The thing is, the method and math by which you sharpen a 600-pixel-wide image for viewing on the Web is very different than how you would sharpen a 16-inch wide, 300 dpi print for printing on glossy paper. But thank goodness for progress. Today we simply set the parameters for our output, and Lightroom automatically applies the sharpening algorithm based on the resolution and intended medium, as shown in Figure 10.27.
NOTE: The same kind of sharpening options are offered in the Print Job Panel in the Print Module, except for the option of Screen. That additional option is only offered here in the Export dialog.
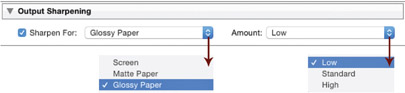
10.27
The parameters for setting Output Sharpening have been highly simplified. You only need to specify the general medium and magnitude of the sharpening algorithm.
Metadata Panel
This panel allows you to control the metadata you want applied to your image during export. In Figure 10.28, opening the Include drop-down menu reveals options for limiting your metadata in certain ways, or selecting All Metadata. Additionally, there are three check boxes below to Remove Person Info, Write Keywords as Lightroom Hierarchy, or Remove Location Info. Needless to say, if you are posting images to the Web from home and don’t want to advertise your exact address to the world, then removing location info is probably a good idea.

10.28
You can include some or all of your metadata with your exported files. Typically the check boxes for Remove Person Info and Remove Location Info are what photographers like to remove from an image.
Watermarking
Watermarking is a popular way to brand your image when pushing it out to the Web. It’s a way of telling anyone that it’s your image. Hopefully branding your images helps deter image thieves, but it also is a way of telling viewers who you are in case they want to buy or use your image for one reason or another. Considering, I tend to not like the kinds of watermarks that cover the whole image. But this is my humble little opinion. You will need to decide what kind of watermark works best for you, while balancing your desire to protect your photo with your desire to brand your photo for recognition. Regardless of how you design your watermark, your watermarking journey begins with opening the Watermark Editor. If you check the Watermark box shown in Figure 10.29, you can then open the neighboring drop-down menu and click on Edit Watermarks, which launches the Watermark Editor shown in Figure 10.30. All the work for creating a watermark is done on the right side of the Watermark Panel. Like many things in Lightroom, I suggest to start at the top and work your way down. First you need to decide if you want to create a template that uses a Text or a Graphic watermark.

10.29
To add a Watermark, check the watermark box and then choose between a premade Watermark or click on Edit Watermarks to launch the Watermark Editor.
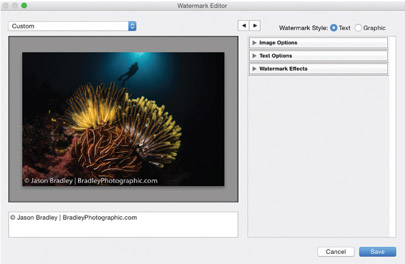
10.30
The Watermark Editor is the main control center for creating and selecting watermarks. You can also access the Watermark Editor from outside the Export dialog. At any time you can go to Lightroom Menu > Edit Watermarks to launch the Watermark Editor.
Textual Watermarking
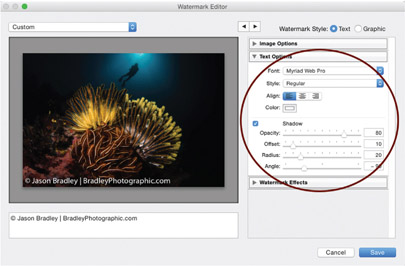
To create a text-based watermark, simply click on the Text radio button. You can ignore the Image Options Panel and go straight to the Text Options Panel (see Figure 10.31). This panel is simple to understand and is very much like configuring the look of text from any basic text editor. You can control what font you want to use, its style—such as Bold, Light, or Oblique— its alignment, and even its color. To edit your text, go the bottom of the Watermark Editor and type in the text box under the viewing window.
10.31
When creating a text-based watermark, you can control the Font, Style, Alignment, Color, and Shadow effects, if you choose to add one.
Graphic Watermarking
Start by clicking on the Graphic radio button and then go to the Image Options Panel to choose a graphic. Your graphic can be only a JPEG or PNG file type; in my case, in Figure 10.32, I’ve used my company logo with the words All Rights Reserved underneath. After you’ve selected an image, the next step is to configure the Watermark Effect Panel.
TIP: Remember, raw files are unprocessed files, so you cannot add watermarks to DNGs or if you export as an Original file format. The files must be exported as TIFF, JPEG, or PSD to apply a watermark.
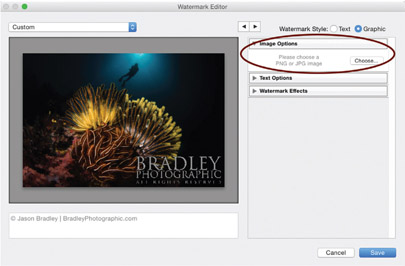
10.32
If you want to add a company logo, you can select the Graphic radio button instead of Text and attach your JPEG or PNG logo.
Watermark Effects
Regardless if you use a graphic logo or a text watermark, this panel allows you to design the position and the presence of your watermark (see Figure 10.33 on the following page). The Opacity section allows you to play with fading your logo out. The Size section allows you to choose how big or small the image is in the frame. If you choose to manually adjust the size with the slider, the Proportional radio button activates so the size will be the same size from image to image. Alternatively, you can click the radio buttons below to Fit or Fill the watermark in the frame. Personally, I’m into the consistency of things, so I much prefer to use the slider along with Proportional. Finally, you can position the watermark against the edge of the frame in the Inset section, and even anchor it to a particular area of the frame.
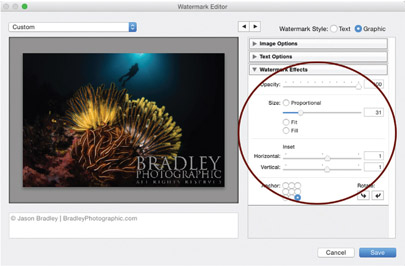
10.33
Whether you create a text or graphic-based watermark, you can adjust the Opacity, Size, and its Inset from the edges of the image, or you can Anchor your watermark to a specific zone of the frame.
Saving Your Watermark
Akin to saving any kind of new template in Lightroom, once you’ve configured the setting to your liking, you can either hit the Save button on the bottom right, or go back to the drop-down menu in the upper left corner of your Watermark Editor and select Save Current Settings as New Preset (see Figure 10.34). You’ll then name your new Preset, and from then on your new template will shown up in the Watermarking Panel in the Export dialog. Your watermarking has now been automated.
TIP: The arrows at the top of the Watermark Editor are used for cycling through a selection of images so you can sample the watermark against different images.
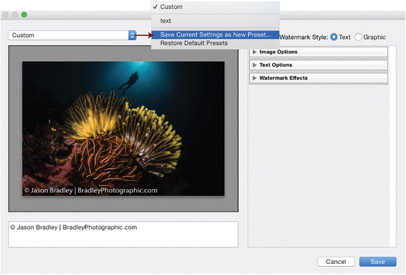
10.34
Once your watermark settings are configured, you can save your settings by going to the drop-down menu in the upper left corner of the Watermark Editor and selecting Save Current Settings as New Preset.
Post-Processing Panel
The Post-Processing Panel is pretty simple. It provides options for actions that can be taken after the image has been exported, as shown in Figure 10.35. You can choose to Do Nothing, Show in Finder (or Show in Explorer if you use a Windows PC), or open in an external editor. Showing in Finder or Explorer simply means that you’ll be taken directly to the folder that your image was exported to. I almost always choose this option so I can verify my image was exported as set. However, at the bottom of the choices there is the option to Go to Export Actions Folder Now. This can be a very useful tool if Photoshop plays a role in your workflow. You have the option of creating Droplets, which are Photoshop actions that work independently from Photoshop— meaning that you create them in Photoshop, but they can be used outside of the program. Thus, if you want to incorporate Droplets into your Lightroom workflow, you would need to create them in Photoshop and then store them in Lightroom’s Export Actions folder. Naturally, to see the location of that folder, you can select the option in the Post-Processing Panel to Go to Export Actions Folder Now.

10.35
The Post Processing Panel allows you to choose what you what action you want Lightroom to take after your export such as Do nothing, Show in Finder, Open in Adobe Photoshop CC, and so on.
Plug-in Manager
The Plug-in Manager button found in the lower left corner of the Export dialog allows you to install third-party plug-ins that expand the reach of your exports beyond your personal email, hard drive, or CD/DVD. There are all kinds of plug-ins out there that can connect you to Facebook, SmugMug, Twitter, 500px, Flickr, Behance, Photoshop.com, and many more. A couple of popular pages to look for plug-ins include Jeffrey Friedl’s Jeffrey’s Lightroom Goodies (http://regex.info/blog/lightroom-goodies) and Adobe’s Add-Ons page (https://creative.adobe.com/addons). Of course, many developers out there have made plug-ins, so you will have no shortage of choices if you do an Internet search on Lightroom export plug-ins. Either way, once you’ve obtained and downloaded a plug-in to use, click on the Plug-in Manager button to launch the Lightroom Plug-in Manager (see Figure 10.36). To add a Plug-in, simply click on the Add button at the bottom of the Plug-in Manager (see Figure 10.37), and then choose the plug-in location. Note that after you download a plug-in, you can store them in what ever folder you like on your computer. Lightrooom doesn’t care where they are. But I suggest, in the spirit of good workflow and organization, that you make a folder to keep all your plug-ins together. Lightroom can add them from any location.
10.36
There are many plug-ins available on the Internet to help with exporting images to specific services or social media outlets. Once you’ve downloaded a needed plug-in, click the Plug-in Manager button in the Export dialog to launch the Plug-in Manager.
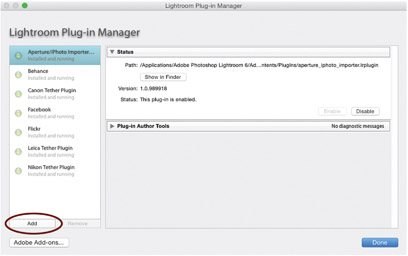
10.37
To add a plug-in the Plug-in Manager, click on the Add button in the lower left of the dialog and then locate your downloaded plug-in.