
02
Importing

Before your First Import
Renaming Files
I’ve seen photographers name files in all sorts of ways. I’ve seen file names created to brand the images with the photographer’s name, with the name of the location in which the image was taken, and when it was taken, and I’ve seen file names created with all sorts of sequence numbers, keywords, or date and time configurations. But here’s the thing: whatever naming configuration you like, or whatever you choose to do, there should be one overriding goal. Each photo should have a unique name.
One of the benefits of databases is that they are adept at filtering out assets that relate to each other and assets that don’t. But in addition to finding sets of images with similar attributes, we clearly will also need to search for individual images. We will need to find photos that are unique from all others. For this, it’s wise to make sure all of your photos have an attribute that distinguishes it from every other photo in your archive. I’ve found that the easiest way to do this is to rename all your files in a unique way. I name my files with a copyright symbol followed by my name and then a date and sequence number as follows: ©jasonbradley_140315_001. Moreover, the image number should increase with each photo imported and continue to increase with each upload. Otherwise, you’ll open the door for some duplicate file names.
Following are the steps for creating a File Renaming Template using the same naming configuration I use. At the end of the day, you can use your own arrangement. Using a date followed by an ever-increasing sequence is an idea for creating unique file names, but if you have your own that works, be my guest. Again, the overriding goal is uniqueness. Once your template is created, you can use that template to rename all your images while importing or at any time. You shouldn’t ever need to change your template again. Lightroom refers to your EXIF metadata to add the date numbers, without ever needing to recalibrate your template. Of course, if the date settings on your camera are incorrect, your dates in your file names will be too.
Using the Filename Template Editor

2.1 To rename files or to create a new template, go to Library Menu > Rename Photo.
- To create a Filename Template, you’ll first need to find your template editor. You can access it either through the Library Menu as shown in Figure 2.1, or you can go through the File Naming Panel while you are importing images into
Lightroom (see Figure 2.2). Click on the Template drop-down menu to see your selection of templates.

2.2 You can also find or create a Filename Template during import and in the File Renaming Panel.
- To get to the Filename Template Editor from the main menu, or while importing, click on the Template drop-down menu and click Edit, as shown in Figure 2.3.

2.3 Click on the Template drop-down menu, and then select Edit to launch the Filename Template Editor.
- In the Filename Template Editor shown in Figure 2.4, there are Image Name, Numbering, Additional and Custom sections, and each section is designed to set a criterion for your naming configuration. On top sits a text editor, so you can type in custom text and select Insert to add your choices for dates, sequence numbers, or other parts of your custom naming arrangement.

2.4 A view of the Filenaming Template Editor.
TIP: Instead of having a fixed name or word as part of your naming configuration, you can opt to create custom text with each import, or each time you rename files. To do so, click the Insert button next to Custom Text shown in Figure 2.4. A space will then be reserved for custom text each time you change file names. As you Import files into Lightroom, Figure 2.5 illustrates where you can enter such custom text in the File Renaming Panel. Keep in mind you can always check the sample file name shown at the bottom of the File Renaming Panel to see a sample of your file name in order to verify your intended name before initiating the import.
- Next, enter a date arrangement. Lightroom gives you several options for dates, and all are fine with me as long as you use the month, day, and year (see Figure 2.6). Since our goal is uniqueness, just the year, or just the year and month, won’t cut it. I select the YYMMDD option, which names the image with the year first, then the month and then the day. Why put the year first? As you search for an image by numerical values, it will look at the first set of numbers for organization. Sure, we write checks with a month/day/year configuration, but if your computer sorted based on that, everything would be organized by month, which doesn’t make sense.

2.6 In the Sequence and Date Panel, click on the Date drop-down menu to see these options.
- Following the date, click on one of the available Image # arrangements (see Figure 2.7). Honestly, using 001 vs. 00001 doesn’t matter much, but Image # vs. Sequence # or Total # does matter. Image # is the best choice of the three for creating a unique file name. Choosing Sequence #, will number files sequentially, but it will reset to 1 with each upload. Total # adds the total number of images being uploaded to the file name. Meaning, if you’re uploading 50 photos, it will tag each photo in the upload with the number 50. However, Image # is always unique. If the first import brings in fifty images, then the images will be named 1 through 50. If the second upload is another fifty, then the next batch is 51 through 100, and so on. It’s an ever-increasing number with each upload.

2.7 I use Image # for my filenames as they add an ever-increasing number to your image’s filename with every import.
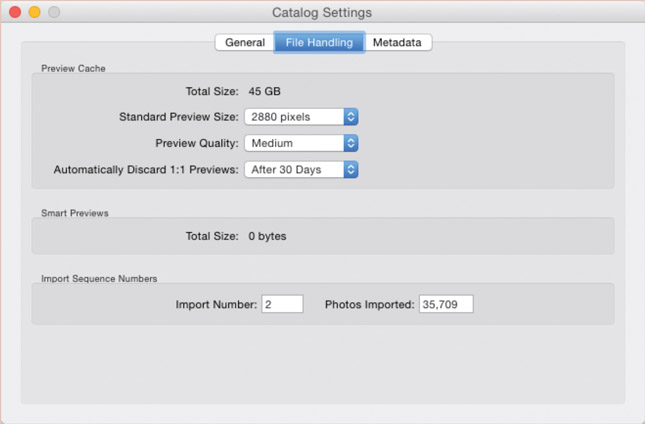
TIP: You can manage the starting number for your Image # sequence by visiting the Catalog settings (Figure 2.8). Go to Lightroom Menu > Catalog Settings > File Handling Panel for Macs; or go to the Edit Menu > Catalog Settings > File Handling Panel for PCs. Lightroom tracks the total number of files imported in the Photos Imported box—and you can change this if you like.
- Once your file name is configured to your liking, check the Example just above the text editor to verify everything looks good. Then click on the Preset drop-down menu at the top of the Filename Template Editor. Select and click on Save Current Settings as New Preset and name your new template something fashionable and cool like I have clearly done in
Figure 2.9. Click the Create button and then the Done button. From now on your new File Naming Template will be available with each import.

2.9 As you complete your Filename Template’s configuration, click on Save Current Settings as New Preset, and then name your template as a final step.

Creating a Metadata Preset
While some metadata is specific to a file—like a keyword describing the photo’s subject—there is some metadata that is not photo specific and that we will want to attach to all of our files. Copyright information, author information, our contact information, and our Web site’s URL are examples of metadata that we want with all of our files. Sure, it might be obvious who takes our pictures since it’s that guy or gal in the mirror, but this info isn’t necessarily for us. In today’s electronic age, where photos are shared on the Internet much more than they are printed, our photos can reach a lot of people quickly. Thus, adding your info to all your photos tags the photos as yours as they are shared electronically.
I add IPTC metadata to all my files. IPTC stands for the International Press Telecommunications Council and is a London-based consortium of news agencies. Like XMP and EXIF, IPTC is a metadata platform designed to store author information. The steps to creating a Metadata Preset are similar to how we created a File Renaming Template. Go to Metadata Menu > Edit Metadata Presets, as is shown in Figure 2.10. A Preset editor will appear with many panel options. You can fill out what you like here, but I just fill out the IPTC Copyright and IPTC Creator Panels. Of course, go through the form to see what the options are; some will fit your needs and workflow more than others. Once your Metadata Preset is configured the way you like, go to the drop-down menu at the top and select Save Current Settings as New Preset. A small text editor opens for you to name your new preset (See Figure 2.11).

2.10
To add IPTC metadata to your images, go to your Metadata Presets through the Metadata Menu > Edit Metadata Presets.
NOTE: Although there are many schools of thought on proper labeling for copyright, I want viewers of my files to know that my image is available for licensing and protected under copyright law. Thus, I type “Rights Managed • All Rights Reserved” in the Rights Usage Terms box in the IPTC Copyright Panel (see Figure 2.11). “Rights managed” tells the viewer that if they want to use the image, it is available for licensing; “all rights reserved” is a way of saying, “don’t touch my stuff” (in a friendly way, of course). After configuring your IPTC metadata, open the drop-down menu at the top of the Edit Metadata Presets Panel and select Save Current Settings as New Preset, then name your preset as you like.

The Benefits of DNG
One of the options available while importing files, and while archiving your photos, is deciding how to archive them. What I mean is, we can choose to store and back up our photos using native raw formats such as NEF for Nikon and CRW for Canon, or we can use Adobe’s DNG format. When importing photos into Lightroom, we can choose to simply copy our images, or to “Copy as DNG.” DNG is an acronym for digital negative, and is an openly documented and openly licensed raw file format, unlike the aforementioned options, and there are several benefits to using DNG.
Eliminates Industry Fear Factor
Many photographers (including myself) are uneasy about the fact that not only are raw files from most of our cameras proprietary, but no two camera models produce the same kind of raw file; meaning, raw files change and evolve over time. A Nikon D100 camera produced a raw NEF file that has one type of structure, while a modern Nikon D800’s NEF file has its own structure. Bearing this in mind, there is no guarantee that camera manufacturers are willing or even able to support old obsolete raw formats in the future. As floppy disks gave way to hard drives and are no longer supported, old raw file formats may too lack support in the future. DNG is thus Adobe’s attempt to level the playing field by offering a more open format. But in addition to alleviating fear, there are other benefits to converting images to DNG.
Smaller File Sizes
DNG file formats are smaller than native raw formats. When you convert to DNG, your new format will be approximately 20% smaller than your original file size. Don’t worry; you will not lose any image quality at all, as there is no discarding of pixels or any kind of loss of image quality, but you will lose some proprietary metadata such as your manufacturer’s color profiles. As a result, you may lose your ability to work with your manufacturer’s software to browse and edit your photos. For example, Nikon produces a program called Capture NX2 that is offered for editing Nikon raw NEF files, but Capture NX2 will not work with DNGs. Personally, I’m okay with the idea of discarding proprietary metadata and foregoing the ability to work with such programs. I’m a Lightroom user all the way. Moreover, other third-party raw converters support the DNG format, so you’re not restricted to working within the Adobe universe. You just restrict yourself from working within your manufacturer’s.
No Sidecar Files
Using DNG also eliminates the need for using sidecar files. If you have edited any of your raw files using Lightroom, you may have noticed something weird appearing in your image’s folder. Since native raw formats such as NEF for Nikon and CRW for Canon are proprietary, Adobe isn’t allowed to write metadata directly to the file. So, for Adobe to save your organizational and developmental metadata, an XMP sidecar file is created. Lightroom automatically generates these sidecar files, and they are stored in the folder with the original file, and with the same name as the original file—except for the file name extension, which is changed to .xmp (see Figure 2.13).
NOTE: You do have the option of using DNG while saving your original raw file structure, which will keep your proprie tary metadata intact. But be aware you will lose the benefit of smaller file sizes that come with converting to DNG. In fact, your file size will increase. I don’t recommend this, but it is an option if you have reasons for keeping your original raw format. To do this, you’ll need to set your preferences accordingly. Go to Lightroom Menu > Preferences > File Handling (Mac), or go to the Edit Menu > Preferences > File Handling (PC), and then check the Embed Original Raw File check box (See Figure 2.12). Lightroom’s default setting is to have this box unchecked or not to Embed Original Raw File. Choosing to embed your original raw file will increase your file’s size.

The need for and use of XMP sidecar files creates a problem— admittedly, a minor one—but as images are shared or moved, the sidecar file must accompany the original file. They can’t be separated. If they are, you’ll lose the metadata associated with that file. This means that all the keywords, all the developing, and all the IPTC information will be gone. Of course, there’s the visual distraction of looking in your folders and seeing twice as many files. Personally, I like to keep things simple. Since DNG is a more open format, metadata can be written directly to those files, eliminating the need for sidecars and the danger of losing them. Simple!

2.13
Each Nikon raw NEF file has an XMP file accompanying it with the same name. Lightroom creates this sidecar file to store metadata.
The Speed of DNG
In Lightroom 4, something called “Fast Load Data” was introduced as an additional feature to the DNG. Having this option selected is a Lightroom Preferences default, so you need not take any action to ensure your files are embedded with it. You can turn it off, but I don’t know why you would. Fast Load Data creates a Preview file that’s only a couple hundred kilobytes on average and that is different than the cached Preview file used in the Library Module. The benefit is that DNG files will load much faster in the Develop Module.
TIP: Converting to DNG while importing slows down the process because converting is an extra step. If you are in a hurry to get your files imported, you can skip the Copy as DNG step during import and convert the files later. To convert to DNG after an import, or at any time, select the images you want to convert and go to Library Menu > Convert Photos to DNG.
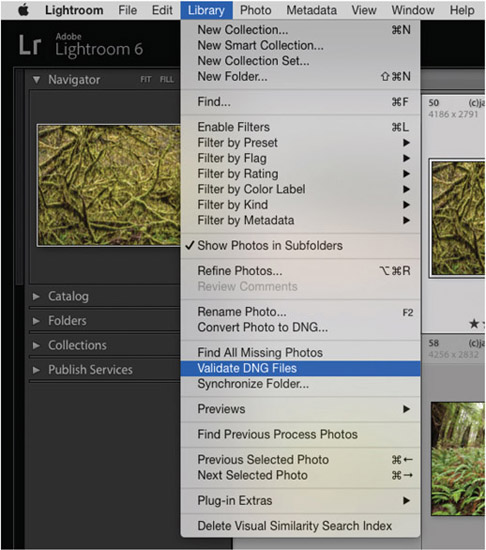
Validating Your DNG Files
Although validating DNG files has long been a benefit of this format, being able to validate DNG files wasn’t something we could do with Lightroom until Lightroom 5. In essence, as you use Copy as DNG during import, or if you convert to DNG at any point with Lightroom, a checksum or hash is created. You can think of it as a portrait or a profile of your data at the time of conversion. From then on, you can run the Validate DNG Files command from the Library Menu at any time to have Lightroom check if anything has changed in your raw files (see Figure 2.14). It’s a great feature to guard against data corruption. If corruption is discovered during a Validation process, start looking to your back-up hard drives to recover your files. I suggest running DNG Validation before and after each backup to ensure your backups are good. Needless to say, Lightroom has no functionality for validating other raw file formats.
2.14
After you have converted your image to DNG within Lightroom, you can validate your DNG file to test its integrity during data transfers, or if you’re concerned with files degrading over time while being stored.
Importing your Files
Whether you are new to Lightroom or a veteran, there are different workflow needs for importing images. There will be a need to not only import new images, but to also bring images in from existing folders somewhere on your computer or external hard drive. You may want to tether your camera directly to your computer while shooting so you can review and catalog while you are shooting, or you may be working with multiple catalogs. Either way, let’s start with a basic import from a camera or card reader. At some point every photographer almost certainly takes this step.
Importing Images From a Memory Card
To import new images into Lightroom, plug your camera or your card reader into your computer with Lightroom already open— using a card reader with USB 3.0 is much faster. Lightroom will detect the new files and launch the Import dialog automatically. Admittedly, sometimes I get inpatient if my computer is in a slow mood, but I can always manually start the import by clicking on the Import button in the lower left area of the Library Module.

2.15
Staying true to Lightroom’s overall architecture, the Import dialog comes with Right and Left Panels, Viewing Windows, and a method for orienting yourself as you view your images in different ways and sequences. To launch the Import dialog manually use the quick keys Shift-Command-I (Mac) or Control-Shift-I (PC).
One of the first things you should notice as the Import dialog opens is that its architecture is the same as the rest of the program (see Figure 2.15). There is the Left Panel for navigating and the Right Panel for the details, and the main Viewing Window with the ability to see images as thumbnails or larger (you can change your thumbnail size or the sort order of your files). The top of the interface orients us, telling us where our images are coming from, where they are going, and how they are getting there. Let’s go through an import step by step. All these areas and features will reveal themselves as we start to import files into Lightroom.
Selecting a Source
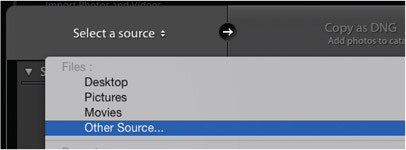
As Lightroom automatically launches when it detects the presence of a memory card, it also automatically selects the source where your files are coming from. The name of your camera (such as “Nikon D800”) will appear, but it can also say “No Name,” depending on what camera you use and how it formats media cards. Either way, if your image files appear in the window, you’re good. If they don’t, you can manually search for your memory card or other device by clicking on the small black arrow, clicking on Other Source (see Figure 2.16), and then navigating through your folder hierarchies.
2.16
Naturally, in order for Lightroom to import a set of images, it needs to be directed to where those images are coming from. Look to the upper left corner of the Import dialog’s user interface and click on Select a Source, then select Other Source to locate you image folder.
Copying Files

2.17
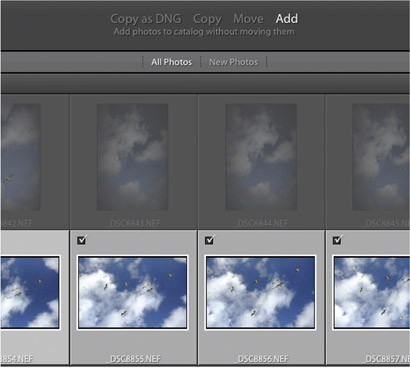
When ingesting images from a memory card, Lightroom only offers the options of Copy as DNG or Copy. For safekeeping, Adobe leaves removing images and reformatting cards in your hands.
Once a source is selected, we need to determine how our images will be imported. There are four options, but when importing images from a camera or card reader we can select from two of the four: Copy as DNG or simply Copy. Adding or moving images either erases them from their original location, or adds them from where they are without moving them to another hard drive or folder. Neither option is desirable when importing from a memory card, which is why Adobe has taken those options away and grayed them out (as shown in Figure 2.17). If we were to Move images from our memory cards to our hard drives, Lightroom would erase our files on the card, which isn’t desirable because it’s advised to reformat memory cards in your camera instead of erasing a card before taking it back out into the field for shooting. Yes, there is a distinction between formatting a card and erasing a card; it’s often advisable to format them to help with the memory card longevity. Moreover, if you ever need to recover files from a memory card, recovery from a formatted card is much more likely than from an erased card. To Add images during import performs no copy or movement of image files to a hard drive, let alone a backup drive. They would be just left on the card that you intend to put back in your camera to shoot with—no good.
If you shoot raw files, I suggest selecting Copy as DNG while importing, but you should be aware that doing so is an extra step and slows down the import process. It doesn’t slow it much, and 90% of the time this is not an issue for me, but on occasion I am in a hurry to upload my files for one reason or another. Understand that if you ever are short of time, you can always just Copy files and then convert them to DNG at a later time.
Selecting a Target
Look to the upper right area of the Import dialog to determine your target, or where your images will be copied. Naturally, if you ever decide to Move files while importing instead of copying, you’ll also need to determine a target (see Figure 2.18). Click on the arrow to start navigating through your hard drives and folder hierarchies to select the proper location. As suggested in Chapter 1, in the section “One Folder To Rule Them All,” it’s wise to have one folder called Images or something similar to put all your files in. I suggest this whether you are working on location with a temporary catalog or importing images directly into your main archive catalog.

2.18
When manually selecting a destination location and folder for your imported images, click in the area in the upper right corner of your Import dialog’s user interface and click Other Destination to navigate to your desired location.
File Handling Panel
Once we know where our images are coming from, where they are going, and how they are getting there, lets zero in on the details. Let’s start from the top of the Right Panel, look at the File Handling subpanel and work our way down. First, we’ll need to determine the kind of Previews that we want to render.
Previews
As mentioned in Chapter 1, Lightroom references your images stored somewhere else, like a card catalog in a library references books on a shelf. To do this Lightroom needs to generate and cache Previews for all your files. You can choose to generate small or Minimal Previews. You can use the Embedded & Sidecar Preview that’s generated in-camera, or you can generate a slightly larger Standard Preview or a full 1:1 Preview (see Figure 2.19).
Not surprisingly, there are pros and cons with each choice. While on one hand using the already embedded Previews are the fastest choice for importing because Lightroom doesn’t need to generate anything, you will have to wait for Previews to render later when editing and developing your images. On the other hand, you can generate larger or full 1:1 Previews, but that does slow down your import time and increases the size of your .lrdata file (see Chapter 1’s section “What Is a Lightroom Database?” to understand .lrdata files). Ultimately, I suggest importing with Minimal or Embedded Previews if you need to import quickly. If you’re not in a hurry I think generating a 1:1 Preview is the way to go. Note that if you choose something other than 1:1 Previews, you can generate them at any time. Simply select your images in the Library Module that you want to create new previews for and go to Library Menu > Previews > Build 1:1 Previews.

2.19
You can choose the size of the Previews that you want to create as you import your files. Choosing Minimal or Embedded & Sidecar are better for importing quickly, but seeing full screen versions of your files becomes a bit slower. Choosing Standard or 1:1 allows for faster full-screen viewing, but slows down the initial import.
Building Smart Previews
Next, we can tell Lightroom whether or not we want to make something additional called Smart Previews. If a hard drive is unplugged from our computer that contains an image we want to work on, we can work with the image preview to some extent. We can add some metadata such as keywords and caption information, but if we want to work on the image in the Develop Module, Lightroom typically needs to see the source file, or the hard drive where that file resides needs to be plugged in. The key word here is typically. In Lightroom 5 Adobe created a loophole for this rule called Smart Previews. If we check the Build Smart Previews box in the File Handling Panel, we gain the ability to work on and develop our files even if they are offline. This can come in quite handy for photographers who need to be portable with their workflow. Additionally, when Lightroom 5.4 came out, we also saw the release of the Lightroom Mobile App for the iPad, iPhone, or Android device, which provided another path for offline raw file development. The Mobile App requires Smart Previews, so we can develop and sync sets of images with our Desktop catalog through the Collections Panel. Ultimately, a Smart Preview uses a lossy DNG technology that was introduced in Lightroom 4, and the good news is we can develop raw files offline or with the Mobile App, while maintaining all of the benefits of a raw file workflow.
NOTE: If you are using a computer with limited resources, keep in mind that generating 1:1 Previews for all of your files will take up added hard drive space. One obvious solution would be to update your hard drive to gain more storage capacity, but you can also discard 1:1 Previews if you need. To do so, select a folder of images or a set of images and then go to Library Menu > Previews > Discard 1:1 Previews.
To read more about Lightroom Mobile, visit the Creative Workflow in Lightroom online resource: https://www.routledge.com/products/9780415745024.
NOTE: You don’t have to decide upon import if your images are worthy of building Smart Previews. You can build or discard Smart Previews at any time in one of two ways. To build them through the main menu, go to the Library Menu > Previews > Build Smart Previews (as shown in Figure 2.20). You can follow the same path to discard Smart Previews for an image selection. Lightroom will also generate Smart Previews automatically as you sync image Collections with your mobile device.

Importing Suspected Duplicates
After importing images into Lightroom, sometimes we will forget to reformat our memory cards before starting another shoot— it happens to all us photographers at one point or another. Consequently, when we import from that card again, the new images will be on it in addition to the already imported images. Lightroom guards against reimporting files when you check the Don’t Import Suspected Duplicates box (see Figure 2.19). Even if you’ve renamed a file, Lightroom suspects the file is a duplicate by looking at the EXIF metadata and the date and time stamp of the photo. I always leave this box checked. There may be the very rare exception to this where a photographer purposely wants the same image in two locations and worked on separately, but other than that I see little reason to uncheck this box (see Figure 2.21).
2.21
When the Don’t Import Suspected Duplicates box is checked, Lightroom detects duplicates and grays them out so they can’t be checked for import.
Make a Second Copy To
If checked, this feature tells Lightroom to make a second copy to a second hard drive (see Figure 2.22). However, having Lightroom create a second copy has its pros and cons. For example, after an import, you’re going to organize and develop your images, but all the work you do to that file can only be reflected, or saved, on your primary hard drive, not your backup. Lightroom does not have the ability to synchronize primary files with backup files. It’s something that I hope Adobe puts attention on in future versions, but it is admittedly a challenging thing to incorporate in a program such as this. So, check this box to direct Lightroom to make a backup, but if weeks later you have a hard drive crash and need to perform a recovery, don’t expect your changes to be there when you import your backup into a new catalog.

2.22
When checking the Making a Second Copy To box, Lightroom will copy your import to a second location of your choice. This is a good opportunity to make a backup copy of your work, but if you are copying files as DNG, Lightroom will not generate DNGs for the backup.
To make a second copy, check the Make a Second Copy To box and then click on the folder path directly below, or click on the small triangle to the right. I suggest having a folder on your backup drive named similarly to your primary drive. Use something like “Images” or “Photos” and just dump them in there (note: the name should be similar to what’s on your primary drive). Lightroom will organize your images on your backup drive by putting them in a folder that says “Imported on [month, day, year].” Additionally, your backup files will not be converted to DNG if you are converting them while importing, and they will not have any keywords added to them, but they will be renamed with the same template as your primaries.
Add to Collection
New to the File Handling Panel with Lightroom 6 is the ability to add incoming images directly to a Collection. Simply check the box and either go through and choose from your list of existing collections, or hit the (+) symbol that appears once you’ve checked Add to Collection to create a new Collection (see Figure 2.22).
File Renaming Panel
In “Renaming Files,” earlier in this chapter, I talk about how to create Filenaming Templates from both within the Import dialog and without. Simply check the Rename Files check box and select your previously created Filenaming Template from the Template drop-down menu. To create a new template, click on the Template drop-down menu and then click on Edit.
The Extensions drop-down menu near the bottom of the panel allows you to choose a treatment for your file name’s extension. You can have everything be lowercase, uppercase, or left as-is if you aren’t converting to DNG. Personally I choose all lowercase in the spirit of keeping things consistent. In fact I like everything lowercase. My file names and all my keywords are kept lowercase. With keywords, I don’t want to try and remember what I capitalized or what I should capitalize. So I choose lowercase here to keep everything consistent.

2.23
Developmental Presets can be found in the Develop Module. Some are supplied by Adobe and we can also create our own. Either are available to apply to our files during an import.
Apply During Import Panel
As we get into the Develop Module we will learn how to see our work through Developmental Presets. A Developmental Preset is basically a predetermined look and feel for a photograph, or a predetermined set of adjustments that can be quickly added to a photo. When in the Develop Module, the Presets subpanel can be found in the top of the Left Panel and contains a large list of Adobe-supplied looks, as shown in Figure 2.23. If you move your cursor over the various presets, you can see a Preview of the preset in the Navigator subpanel directly above. Additionally, you can add custom User Presets to the list that will also show up in the Import dialog. If you have presets you like and want to apply to your images during upload, simply pull down the Develop Settings drop-down menu and choose your favorite.
Using a process akin to renaming files, we created a metadata preset earlier in this chapter in the section Creating a Metadata Preset. To apply your custom preset during import, click on the Metadata drop-down menu and choose your custom template. You can also access the Edit Metadata Presets dialog to create a new custom preset by selecting Edit Presets and then following the steps covered earlier in this chapter (see Figure 2.10).
As you are adding new images to your catalog, this is the point where you can add global vs. specific keywords. Meaning, if you have people in some photos, but other photos are landscapes, you shouldn’t add keywords describing the people because that wouldn’t apply to the landscape images. But if all the images were shot at the Grand Canyon, then grand canyon, family trip, and Arizona could be keywords that apply to everything in the upload. Naturally, you can add specific keywords after your import.
2.24
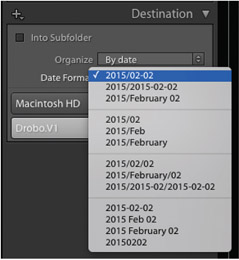
The Destination Panel can choose the destination location for your import akin to the upper right corner of the Import dialog’s interface, so don’t do both and confuse yourself. However, you can choose here to organize your import by a date configuration of your choice, which works off your file’s EXIF metadata.
Destination Panel
The Destination Panel may be a bit confusing at first glance. It can look as though we are being prompted a second time to direct Lightroom where we want to put our photos. In part we are, but more importantly is that we can establish how Lightroom is going to organize our photos while importing—meaning that we can have Lightroom put our images into a subfolder, we can have Lightroom use existing folder structures, or we organize by date. As I have said a few times in this book, folder organization is unimportant if we are keywording properly. But if Lightroom can do it and do it well, why not? I let Lightroom organize my files by date, and although there are many date configurations available, I choose the top one in the list shown in Figure 2.24. Either way, once a configuration is chosen, there is nothing left for us to do. Lightroom automatically organizes our images in date files, based on the dates embedded in the camera’s EXIF metadata. Of course, if the camera’s date isn’t correctly set, then the folders will reflect the incorrect date. Admittedly, I choose the top date simply cause it’s the top one and that’s easy to remember, but you are welcome to use what you like. Simply click on the Date Format drop-down menu to select your desired format.
TIP: You can simplify the view of the Destination Panel so it doesn’t look like you have to choose a destination folder a second time. Notice the Destination Panel is the only panel with a plus symbol in its header. If we click on it, we are given a couple of View Options. Choosing Affected folders only limits what we see to the organizational information only (see Figure 2.25).

Saving Import Presets
Once you have everything configured the way you want in the Import dialog and from subpanel to panel, all that’s left is to hit Import and sit back and watch Lightroom do what Lightroom does. The good news is that Lightroom defaults to the settings used in the last upload. So the next time you upload images from a card, everything you did in each subpanel will be set the same way. Still, I suggest going through everything to make sure everything is set accordingly. But like many things in Lightroom, you can speed up your workflow by making a preset for a specific import configuration. At the bottom of the Import dialog, you’ll find a small tab with the heading Import Preset. Click on the drop-down menu on the right of the tab, then click on Save Current Settings as New Preset and name your new preset accordingly (see Figure 2.26). Logically, the next time you import images into Lightroom, instead of going through all the subpanels one-by-one to verify your settings, you can go down to the same drop-down menu to choose your import preset.

2.26
After you have configured your Import to your liking, you can save all of the Import settings as a Preset. Look to the bottom middle of the Import dialog user interface to find the Import Preset section, and then click on Save Current Settings as New Preset.
TIP: The Import dialog has a simplified view that can be accessed by hitting the small arrow icon in the lower left corner of your Import dialog user interface. Clicking it shrinks the interface to a much smaller box showing only the most essential settings (see Figure 2.27).

Checklist: Importing From Card Reader or Camera
Without a doubt, remembering all the steps to upload is a lot. Here is a checklist to help you remember all of the little steps along the way as you import images from a memory card.
Import Dialog Header
- 1. Select where you are importing images from.
- 2. Select to Copy as DNG upon import.
- 3. Select what hard drive you are importing images onto and place them in one simple folder.
File Handling Subpanel
- 4. Render Previews as Minimal for a quicker upload, or render them as 1:1 Previews enabling you to navigate through your image library more quickly.
- 5. Make sure Don’t Import Selected Duplicates is checked.
- 6. Check Make a Second Copy To, and then choose the destination where Lightroom should place your backup. I also suggest using a single folder. Lightroom will create subfolders for your backups automatically labeled by date.
File Renaming Subpanel
- 7. Check Rename Files and select your premade custom file naming template.
- 8. Choose your Extension options: Lowercase, Uppercase, or Leave as-is. I use all lowercase.
Apply During Import Subpanel
- 9. Apply your custom metadata template upon import. I typically skip the Develop Setting option, but feel free to add a Developmental Preset if you like.
- 10. Add global keywords that can apply to everything in the current upload. You can apply specific keywords later.
Destination Subpanel
- 1. Leave the Into Subfolder box unchecked.
- 2. Go to the Organize drop-down menu and choose the option to organize By Date, then select your desired date configuration.
- 3. Double-check all your settings and click Import.
- 4. Create an import template if needed.
Importing Images From Your Computer or a Hard Drive
In addition to importing directly from a card reader or camera, you may also need to import images from other sources. You may want to migrate images from old hard drives, or you may want to import images from a folder without moving them from their existing location. The steps for either are almost the same as importing directly from a card reader or camera, but there are some key differences. First, we have to manually choose where our images are coming from since Lightroom doesn’t auto detect that. Then, instead of copying the images, either as DNGs or in their native format, you can Move or Add the files to your catalog. On one hand, unlike copying files, to Move files will put them in a new location while removing them from their original one. On the other hand, to Add images will import files into the catalog without moving or copying them, but instead leaves them exactly where they are with their current folder structure, in the format they are in, and with the file name they have. In fact, if you click Add, the Destination and File Renaming subpanels actually disappear.
So, if you are moving photos, I suggest going through all the subpanels in the Right Panel one-by-one as if you were importing from a card reader or camera. You can move your images to the same folder that the rest of your archive is in. You can organize them by date so they have the same folder structure. You can decide what kind of Previews you want to render, and you can apply new file names and metadata if they are needed. If you are adding files, then you just need to go through the two remaining panels.
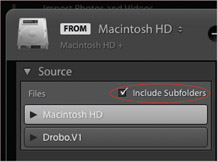
TIP: After manually searching for an image folder to import files to it’s possible to click on the folder, but not see all of the images in that folder. This slightly confusing thing may be happening because you have the Include Subfolders check box left unchecked. Look for it at the top of the Left Panel in the Import dialog as shown in Figure 2.28 and check it off so Lightroom can see all of the folders within folders too.
Moving Photos Between Catalogs
In Chapter 1, I spoke about the value of using Lightroom as a database and using one catalog to organize and keep track of all of your work. However, that doesn’t mean that you should never use more than one catalog. Ultimately, how many you decide to use depends on your needs, but I use a total of three catalogs for my workflow. I have my primary catalog for my commercial work, a personal catalog for family images and events, and a third catalog that I keep on my laptop for ingesting and keyboarding images while I’m travelling. I always keep my personal images separate from my commercial work, but my travel catalog is intended to do just the opposite. For this catalog, my intention is to begin organizing, flagging, labeling, and creating Collections, so when I return from the field I can migrate photos from my laptop and my portable hard drives to my home computer and primary catalogs. But there’s a catch! Only some organizational metadata is saved to the file, so if I import files directly from another folder that have been previously organized by another catalog, I not will see all of my metadata. Flags, Color Labels, Virtual Copies, and Collections are all important tools used for the organizational workflow, but they will not be seen if the files are simply imported directly from a folder. Luckily, Lightroom provides us the ability to Import from Another Catalog, as an alternative to importing from a hard drive or folder. Thus any work we’ve done previously on a file in one catalog will be reflected in another catalog.

2.29
In addition to importing from cards or existing folders on your computer or external hard drive, you can also import images directly from another catalog. Importing from another catalog is a great way of ingesting images and maintaining some of the catalog-based work that isn’t saved to metadata, such as Color Labels, Virtual Copies, Collections, and Flags.
To Import from Another Catalog. Go to File Menu > Import from Another Catalog (see Figure 2.29) to bring up the ImportFrom Catalog dialog. You can view the images set for importing in the Preview window, and you can uncheck images you don’t wish to import. In the Catalog Contents window, you’ll find the folders where the images are and you can also uncheck whole folders to exclude them from importing. Underneath is where you can choose how to handle the files for the import. If you wish to bring in new files, and have them join the folder structure of the target catalog, the best option to use is to Copy new photos to a new location and import (see Figure 2.30). Logically, you’ll need to then tell Lightroom where you want to copy those images.

2.30
When working with the Import From Catalog dialog, I suggest to Copy new photos to a new location and import, as your File Handling option.
Keeping your Files Safe
Storage Redundancy
After lots of research and after talking with lots of experts, I’ve come to the conclusion that there are two types of hard drives in existence today: hard drives that have crashed, and hard drives that are going to crash. I want you to think about this sad fact as just part of a photographer’s life. Failing hard drives happen, and the sooner you get this, the sooner you’ll adopt storage redundancy. For starters, I’d suggest creating a primary storage drive, a backup, another backup, and even another backup. Triple redundancy should be thought of as the minimum for safety, and then further adding cloud backups can provide an even broader safety net with the added benefit of having remote access to some or all of your image files. So, whether you are in the field or working in your home studio, think triple redundancy.
Hard Drive Basics
The modern data storage drive comes in two basic flavors. There are hard disk drives (HDD) and solid-state drives (SSD). HDDs are equipped with a hard plate, which is a rapidly spinning magnetic metal or glass plate. And when I say rapidly, most HDDs spin at 5400 RPM or 7200 RPM (revolutions per minute). High-speed 7200-RPM drives have faster read and write speeds, so if you want better performance, go with 7200 RPMs. SSDs have no moving parts and are therefore more durable, quieter, have faster read and write times, use less power, and are more shock resistant. SSDs haven’t quite replaced HDDs yet, but it may not be long before they do. The two big hold-ups for SSD world domination are price and longevity, but both are getting better. This gap between the two will shrink, but as of now HDDs are king.
TIP: Another type of drive called a solid-state hybrid drive (SSHD) is also starting to emerge on the market. Hybrid drives contain small SSDs along with standard HHD (spinning hard drive disk), and they work by pushing your most frequently used files to the SSD part of the drive, making your overall experience faster, while the bulk of your data is actually stored on the spinning part of the drive.
Hard drives come in different shapes and sizes: there are 3.5-inch and 2.5-inch drives, internal and external drives, RAID and Drobo hard-drive arrays, NAS drives, and there are desktop hard drives and portable drives. Of course, the big question is… what should you use? Or, do you have the right kind of setup? The answer, logically, is that it depends on your workflow needs. But for every photographer building an archive, I have two big suggestions: store your images on high performance external drives, and make sure your drive systems have built-in redundancy to protect against hardware failure.
TIP: When investing in fast hard drives, make sure their connectivity supports fast data transfers. Currently USB 3.0, USB C and Thunderbolt are the fastest solutions, but USB 3.0 is the most widely supported as of the writing of this book. But that will soon change, and I suspect USB Type-C will likely soon take over.
RAIDs and Drobos have the ability to protect against hard drive failure. For example, you can buy a RAID system with two hard drives in it, where hard drive A is mirrored on to hard drive B. So in the case that hard drive A fails, you have a backup ready to go. You can also buy RAID or Drobo arrays with two, four, or eight or more hard drive bays in them for extra storage and extra protection. But let me caution you, don’t treat fault-tolerant hard drive arrays like RAIDs and Drobos as the same as backup. They are not. RAID arrays and Drobo arrays can fail completely as well. Personally, I use a G-RAID Mini (which comes packed with two hard drives) plus another G-tech portable drive while in the field, and I have two completely separate Drobo arrays at my home studio—and that’s just to start.
Creating a Backup Workflow
Regardless of what portable hard drives and hard drive arrays you invest in, or the kind of workflow you create, the practice of backing everything up multiple times is key. Here are some general recommendations for how not to just store, but save your archive of work.
TIP: G-tech (www.g-technology.com) makes an impressive portable RAID called the G-RAID Mini, which can provide storage redundancy on the go, in addition to your backup (see Figure 2.31).

The Large vs. Small Image Archive
Creating one backup formula for every photographer to follow is challenging because every photographer is different. But I’ve found that there are generally two kinds of data users: some store a lot of data, and some store small amounts of data. Of course these terms are mine, they are relative in their meaning, and their meaning changes as hard drive capacities grow and their prices shrink. Storing data, and lots of data, is becoming easier by the day. Bearing this in mind, there are photographers who create and store a lot of files and need 2TB of storage capacity or more, and there are those who will be just fine with 2TB or less of storage. The point in distinguishing each type of user is not to separate the pros from the hobbyists. Instead, it makes it easier to distinguish a simplistic backup workflow from one that’s a bit more complex. Photographers who have more data simply should establish more protocols for managing that data. If your image archive is your livelihood, investing more in its security makes sense.
Hard drive arrays such as RAIDs and Drobos are a sensible choice for photographers with large archives. They add another layer of protection in your storage workflow and are designed to work with a lot of data. However, the photographer with smaller libraries can consider simpler options. For example, a single 2TB hard drive can store more than 100,000 20MB files. For many photographers, that’s a pretty big library of work, and dragging-and-dropping whole archives could create backups without being terribly time consuming. If you did that with a 10TB archive, though, your computer could be running a backup for days and days, and dragging-and-dropping won’t cut it.
Many photographers who have large archives and can’t work with the wait-time associated with dragging-and-dropping data to create a backup instead use synchronization software to facilitate the backup. With synchronization software, you can easily back up only data that’s been changed or added, as opposed to all of the data every time, making your backup life much simpler. Again, the alternative could be terribly time consuming with a large archive of work. Ultimately my point is this: storage redundant boxes like RAIDs are essential for the photographer with a large archive, while the photographer with the smaller library has more freedom to consider either a RAID or a simpler set of hardware, coupled with easier techniques for backing up the work. Either way, the most important piece of the workflow is the backup because all sorts of things can mess with our data.
The Hazards of Data Corruption
In addition to hard drives failing, data can also degrade. For example, bit rot is a rare but corrosive problem that can infect our hardware without our knowledge. Then there is my biggest personal challenge: the human brain. Photographers are in fact only human, and we can make mistakes when working with our data like accidentally deleting an image or many images without knowing it. And such an unknown accident can work its way through our backup system. Lastly, the hard drive is just the final home of our data transfer workflow, but other hardware is at play. Luckily, the more we know, the more we can protect ourselves.
The term bit rot describes the situation when a hard drive decays or dies slowly over time instead of fails outright. The problem with bit rot is that some or most of your photos may appear fine, but under the hood things are very wrong. The big problem with bit rot is that if you create a backup of your infected data, then you have backed up the bit rot—data recovery in the event of a hard drive failure becomes a problem. The trick in creating a backup is making sure that your backup is as flawless as possible.
As far as the human brain goes, I must admit I’ve made terrible mistakes, and more than once. On a couple of occasions I’ve thrown away large chunks of valuable image files. But fortunately for my ego, what I’m referring to is not unheard of, and I do practice safe backup. Here’s a scenario: what if you delete a set of images by accident? What if you tell Lightroom to Delete From Disk thinking only a couple of images are selected but in fact you had a couple thousand? The thought is crazy, I know, but such a thing has happened to me, and I didn’t catch my mistake for several days. I had no idea that I had done this. I was in a panic at first, to say the least, but I was able to recover all the images from memory cards that were not yet reformatted. In addition, there are ways to accidentally erase organizational and developmental metadata from large groups of images. This is obviously not as catastrophic, but it certainly can be frustrating. Either way, if your catalog changes in a way that you did not intend, you then run the risk of feeding your backups with lost or deleted data.
Although bit rot and human error may be exceptions to the rule, it’s safe to say that using faulty cables or bad card readers are not. There have been many times I’ve done a visual inspection of a recent import and troubleshot my way through my workflow to isolate my problem as one of these components. There are two rules that I go by when transferring data: (1) once I click Import, or once I initiate some kind of data transfer, I don’t move or touch any of the hardware involved until the data transfer is finished; (2) I never edit or delete images in camera. Editing your work in camera and doing a lot of deletions increases your risk or corrupting files, and for similar reasons it’s also advised not to fill a card completely. Most importantly, never reformat a card until your backup is verified!
Safeguarding Against Data Corruption
Hopefully, I’ve scared you just a little bit. I wouldn’t say that I rule by fear, but it certainly is one of the perks of the job! Fun quips aside, my goal is to help you maximize the integrity of your backups. Important as the backup is, it’s not the only trick for safeguarding your data. I further suggest doing things like archiving your files in the DNG format so you can validate them, consider using synchronization software for those that have larger archives, doing visual inspections of all your imports, and creating in-camera backups when possible.
Validating DNGs

2.32
File corruption can occur during your initial import of raw files, or at any time thereafter from phenomena such as bit rot. Although bit rot is a rare thing, converting to DNG and then validating your files every so often will help alert you of any changes in your files’ integrity over time.
TIP: Leica and Hasselblad cameras will shoot DNG, but you still need to select Copy as DNG during import to later be able to validate the DNG file. As of the writing of this book, Leica and Hasselblad are not embedding the checksum necessary for DNG Validation.
If we choose Copy as DNG while importing images into Lightroom, we can then Validate our files at any time thereafter to make sure nothing has changed in the file. This is a fantastic feature for ensuring our data hasn’t been corrupted from bit rot or from a data transfer. But let me be clear: validating your images just after an import or a conversion to DNG will NOT tell you if you’ve uploaded a good file. You can actually import a file into Lightroom and successfully convert that file to DNG with certain types of corruption. Figure 2.32 shows a series of images that had been sitting in my catalog for months before I noticed that they were bad. The reason this can happen is because the checksum that checks or validates your DNG file isn’t created until the file is converted to a DNG by Lightroom, and some types of corrupt files can be converted to DNG. See the section “Validating Your DNG Files” (including Figure 2.14) earlier in this chapter to see the steps for DNG Validating.
Synchronizing Data
As an alternative to using Lightroom to transfer your data from a memory card to a hard drive, or to create your backup as you import, you can use synchronization software to move your data instead. Synchronization software is designed to move your data for you while ensuring it is done safely and efficiently. There are many companies out there that make backup software, but you want to make sure the software you choose does a few key things. First, make sure your software is actually synchronizing data and not just copying data. If it just copies, you can drag and drop files to replace them on your own. Synchronizing data instead looks at all your files and detects where changes have been made. If files have been moved, if they’ve been renamed, or if the folders they are in have been renamed, it should verify the data being transferred byte for byte. Most importantly, it should detect modifications in both directions and alert you to any conflicts.
Being appropriately alerted about conflicts helps ensure that there is no loss of data due to human error, bit rot, or bad cabling. I use ChronoSync (www.econtechnologies.com) for Mac for creating my backups: it’s affordable, easy to use, has detailed log analysis tools, and in addition to synchronizing files with backup drives, it can create bootable backups. If you use a PC, consider a popular synchronization program such as SyncBack—but as I said, there are many on the market. For photographers with large amounts of data, I highly suggest using synchronization software to create and manage backups. Dragging-and-dropping an archive with many terabytes of data to create a backup every few weeks is inefficient and could be very time consuming.
NOTE: When using an in-camera backup memory card, keep in mind that your backup memory will be limited to the size of your card. Don’t use two different sizes. Additionally, if you have one high performance card, and one slow performance card, your camera’s performance can be affected.
Visual Inspections
Even though Validating DNGs and data synchronization could make any paranoid photographer such as me sleep more easily, there is nothing better than a good old visual inspection when first importing your images. The bottom line is that as you import raw files into Lightroom and Copy as DNG, if you generate Standard Previews of your images and they all look good after a visual inspection, then your images are good to go. It does take a bit of time to make Standard Previews, but if you really want to get some sleep, this is the only pill that truly works.
2.33
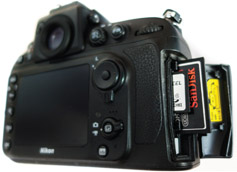
Many cameras today come equipped with two card slots. These can be configured so you can take extra pictures, but you can also configure one card to be a backup for the other.
In-Camera Backups
A lot of cameras today offer two card slots (as shown in Figure 2.33). Sure, one use for this is to take more pictures during a shoot, but cameras also offer the option of using the second card as a backup where every image is written to both cards. If you do this kind of workflow, I suggest having your backup as big as or bigger than your primary card—otherwise your backup will fill before your primary card and the remaining photos you take will not be backed up. I try to do this whenever I can, and I do not reformat either the primary or backup card until I know all my images are backed up properly on multiple hard drives.
The Yearly Backup
The yearly backup is a simple but easy step that creates another layer of redundancy that lets me sleep very well at night. Every year I make a complete backup of all my images and catalog, and I do it on a brand-new hard drive, leaving last year’s backup on its own drive. Yes, that means I am backing up my older images every time, but frankly, hard drives are getting cheaper all the time, so this extra layer of redundancy helps. Not to mention, this easily covers the ongoing concern of how long hard drives really last. Figure 2.34 illustrates what I do every year.

2.34
Every year I create a new backup of all my images and my catalog on a new disk, then store that disk next to the disks I have made in previous years. Hard drives today are cheap enough that generating a new backup each year is a reasonable thing to add to your workflow. It’s guaranteed to make sure your data is safeguarded against failed drives, bit rot, human error, or any other kind of corruption or loss.
Cloud Services and the Fourth Backup
Cloud services are places where you can store data on the Internet, and like hard drives they are becoming cheaper by the day. Cloud services are great because as you put data on the cloud, it can become available to multiple devices, and you can even share specific images or groups of images with other people, depending on the service you use. Dropbox has become a popular cloud option because it easily syncs with the computers and devices in your workflow, and you can share files and folders with other people. But to be honest, few cloud services are perfect, and thus should typically be thought of as an alternative or optional backup instead of a primary backup. The overriding reason for such nonperfection is that we are often at the mercy of Internet bandwidth (upload and download speed) with most cloud services. For example, the average Internet upload speed—Internet speeds vary with location and type of service like DSL vs. cable Internet—is 5 megabits per second at my home studio, so it takes approximately 2 seconds to upload a megabyte. If I upload 500GB of files, which is not a large archive of images, it would take me more than eleven days of uninterrupted uploading to get all that data onto the cloud. Dropbox’s storage ceiling is 500GB, while other cloud options like Backblaze, Carbonite, and Jimmy Drive (to name a few) offer huge to limitless storage capacities, but when dealing with Internet bandwidth it almost doesn’t matter. However, cloud backups are far from worthless. Some services will send you a hard drive to upload up to a terabyte of data, and then you can sync smaller chunks of data as you add it to your computer and hard drives. Crash Plan (www.code42.com/crashplan) is such a service and it has become popular with photographers and businesses as an easy-to-use cloud backup option. Personally, I use the cloud to share files and to store what I call my “working files,” instead of the bulk of my data.
Working files are a subset of my main archive and are my most valuable images—either personally or commercially. For example, let’s say I have 200,000 images, but I actively market, print, or like 2,000 of them. This subset of 2,000 images is my “working files,” and if I have some catastrophic failure along my backup pipeline, I know my best stuff is okay and safe on the cloud. I also suggest that you use the cloud to back up all of your developed raw files, so in case of a catastrophic failure, you know that you haven’t lost all that time and sweat put into developing.
Backing Up Your Catalog
In addition to backing up all of your files, you can and should also back up your Lightroom Catalog. In Chapter 1, in the “Lightroom’s Catalog Settings” section, I showed you how to set the frequency for how often Lightroom asks you set catalog backups. Again, let the frequency for how often you actually do it be based on how much work you’re doing in your catalog, but I at least have Lightroom prompt me each time I exit. It just works best with my poor old memory.
Depending on how you’ve set your Catalog Settings, Lightroom will automatically launch the Back Up Catalog dialog as shown in Figure 2.35. The drop-down menu at the top allows you to reconfigure how often Lightroom asks you to back up if needed. Below that is the important part, where you choose your Backup Folder. Needless to say, do not back up your Lightroom Catalog to your Pictures Folder, which is the default location for your catalog. Instead, I suggest storing it on the external drive where I’ve also suggested that you store your images. All you need to do is choose the location, and Lightroom will separate and organize each of your backups in a date folder so you’ll easily know when your last backup was (see Figure 2.36). And directly under your Backup Folder choice are two check boxes that I suggest to always leave checked. Leaving them checked tests the integrity of your catalog before backing it up and optimizes your catalog as part of the backup process—optimizing will make your catalog faster and will work more efficiently. Of course, if you are in need of a quick backup, you can uncheck these boxes to speed things up.

2.35
You can set Lightroom to ask you how often you want to back up your catalog, and to ask you as you open your catalog, or as you close your catalog.

2.36
As Lightroom backs up your catalog, it automatically separates each backup by date.
A Profile of a Backup Workflow
So far, we’ve covered how we need to have multiple backups of our work, how we need to take precautions against hardware failure and data corruption, and that there may be a couple ways of approaching a backup based on how much data we have. But how do we put this into practice? How do we customize a workflow for ourselves? Well, like so many answers in this chapter, it all depends on your personal needs and the hardware you own. But to help you sink your teeth into this information just a little better, to help you begin to tailor your own list of steps and protocols for your workflow, let me profile what I do with my workflow step by step beginning on the following page. Figure 2.38 (see pages 74 and 75) shows a diagram of how my data flows through my hardware, and is followed by a list to explain each step in detail.
Migrating Files between Travel Catalogs and Home/Studio Catalogs
Lightroom’s default location for storing a catalog is in your Pictures folder, regardless if you use PC or Mac, and typically I suggest following Lightroom’s lead (see Chapter 1 section “Where Is My Catalog? Where Are My Files?”). But for the photographer who’s migrating images from a travel catalog to a home/studio primary catalog, there is logic in storing it elsewhere. If you are such a photographer, like I am, there are a couple of ways to migrate your files over. Needless to say, in order to Import from Another Catalog, a target catalog needs to be able to see and communicate with a source catalog. So there are a couple of paths you can take.
- Path 1: Instead of storing your catalog in the default Pictures folder, you store it on your portable external hard drive with your images. Thus, when you migrate images from your travel catalog to one of your primary catalogs, all you need to do is go to File Menu > Import from Another Catalog, and then direct Lightroom to the catalog on your portable hard drive. Needless to say, if you left your travel catalog on your laptop in your Pictures folder, having your two catalogs speak to each other would be a bit more complex.
- Path 2: Personally, I like keeping my catalogs in my Pictures folder, so before migrating images to my primary catalog, I’ll drag-and-drop my travel catalog onto my portable drives. Then, akin to Path 1, I’ll plug my portable drives into my home/studio computer, open one of my primary catalogs, and then select Import from Another Catalog to migrate my files over. Either method will work just fine, but the trick to this approach is to make sure that you are copying your .lrcat and all of your .ldata files, or you can just drag-and-drop your whole Lightroom folder over as shown in Figure 2.37.

2.37
Before migrating images from your travel catalog and portable hard drives to your home/studio catalog and hard drives, I suggest copying your catalog and your .lrdata files to your portable drive first.
For starters, I mostly shoot on location and away from my home studio. As a result, my workflow is all about first ingesting and backing up my work with my laptop and portable drives, and then migrating the work I’ve done with my travel catalog to my home-studio computer and archive catalog. Needless to say, not all photographers have two computers. Look to the sidebar following my workflow steps for a couple of tips on how to modify my workflow for working with a single computer.

2.38
Here’s a hardware profile of my storage and backup workflow from working with my laptop in the field, to moving images into my main catalog and archive. Only after my images have been properly archived (or backed up) do I reformat my memory cards.
- I use two memory cards whenever possible—best results are had when using a backup card of the same size and speed as the primary card.
- With Lightroom open on my laptop, I’ll connect my primary and backup drives (I use a G-Tech RAID mini as my primary, and a G-Tech G-Drive EV as my backup), then my card reader, then I’ll insert my card into the reader. Opening Lightroom first ensures that the Import dialog opens automatically after I insert the memory card.
-
As I import images into my Lightroom travel catalog, I’ll select Copy as DNG, rename my files using my personal File Naming Template, add a Metadata Template and global keywords, tell Lightroom to create Standard Previews, and direct Lightroom to Make a Second Copy to my backup drive. If I’m in a hurry, I’ll convert to DNG and create Standard Previews later, but the best way to be sure I have no data corruption is to run Standard Preview and do a visual inspection of my import.
3.5. After all images have been imported and I’ve done some work on the catalog, I back up my catalog onto my G-RAID mini.
- After shooting on location, I’ll copy my catalog and all of my .lrdata files to my portable G-RAID mini. Since some metadata cannot be saved to file (like Flags, Color Labels, Collections, and Virtual Copies), copying the catalog allows me to transfer such organizational metadata to my primary catalog on my home-studio computer.
- From my home-studio computer, I’ll open Lightroom and go to File > Import From Another Catalog, and then direct Lightroom to the travel catalog that my G-RAID mini. This allows me to import images while also ingesting catalog-level metadata associated with those images.
- All files are directed to my Drobo and are organized with my existing archive. Immediately after importing all photos from the travel catalog, I’ll validate my DNG files to make sure there has been no change in any of my data during the transfer. 6.5. My primary catalog is backed up as needed to my Drobo.
- I’ll use ChronoSync to synchronize my recent import with my back-up hard drive.
- Once per year (at least) I’ll back up my complete archive onto a new drive without overriding any previously made complete backups. These drives are kept off site. If I’m shooting a lot I’ll do this every six months or so.
- As I’ve identified my most valuable files, or my “working files,” I’ll back those up to my cloud service.
- Only after all files have been archived and backed up do I reformat my memory cards in my camera.
TIP: For photographers with large amounts of data, I suggest backing up onto a second RAID or Drobo using synchronization software, and then keeping that backup off site.
Adaptations for a Single Computer Workflow
Interestingly enough, I suggest changing very little with your backup workflow if you own a single computer vs. my two-computer workflow diagramed in Figure 2.38. Of course, “single computer users” can mean you either own just a laptop, or it could mean that you own just a desktop computer. Either way, here are three different modification paths based on diversity of hardware or size of your archive.
Path 1: Using a laptop
If you are not using solely a laptop for your workflow, then I would suggest two minor modifications to my workflow presented in Figure 2.38. The first one may be obvious, in that you only need to keep one catalog. There is no need for a “travel” catalog like I use. Second, if you are shooting on location, you can do everything I’m doing in my workflow minus the 5th step. The modification here would be to plug your portable drives into your Drobo or RAID drives, and then use Lightroom to simply move image folders from one drive to the other by dragging-and-dropping within the Folder Panel in the Library Module. And I’ll repeat this last part again because it’s important. Never move images from one folder to another outside of Lightroom. Instead, move images from one drive to another within Lightroom’s Folder Panel. Doing so is simply a matter of dragging and dropping a folder or a group of folders from one drive to another as shown in Figure 2.39. Note that as Lightroom moves the images, they will be erased from their original location.

Path 2: Using a desktop
Some of you may not shoot enough on location to warrant the use of a laptop or a robust portable workflow. Using a few memory cards may be all you need. As a result, you can modify my workflow by eliminating steps 2, 3, and 4, and just plug your card readers directly into you desktop. The size of your archive should help dictate how you are creating your backups. Using synchronization software is something I always suggest for those with large amounts of data. Remember to validate your DNG with your backups as you go!
Path 3: Working with a small archive
Whether you are working with only a laptop or only a desktop with your workflow, some of you may be working with archives where 2TB of storage is more than enough. If this is you, the easier, more affordable option is in the cards. Buying 2TB external hard drives is simple enough these days, so investing in a few of those for your primary, backup, and offsite backups, is feasible. Getting by with dragging-and-dropping new data to your backups, as well as dragging-and-dropping entire backups, is also more feasible with smaller archives. But as I’ve now suggested with every workflow, make sure you’re validating your work as you go so as not to save corrupted data or override good data.