
Chapter 8. Rootkits
Prashant Pathak
8.1 Introduction
Symantec Security Response defines a rootkit as follows [337]:
A rootkit is a component that uses stealth to maintain a persistent and undetectable presence on the machine.
The term “rootkits” originally referred to a modified set of commonly used UNIX utilities such as ps, ls, login, passwd, and netstat. These kits were trojaned copies of original programs used by attackers to hide their traces on a victim machine. Once the victim machine was compromised, the attacker used these kits to replace original programs. The modified versions hide specific system information such as processes, files, ports, registry, and disk space related to the rootkit, thereby concealing the presence of the rootkit.
Rootkits are usually installed along with malicious programs such as backdoors or trojans. These components are installed without user consent or knowledge. Typically, rootkits are installed by an intruder after breaking into a victim machine. In some cases, the user is enticed to execute the malicious program. Once installed, the malicious program can log keystrokes, grab passwords, open a backdoor channel (allowing an attacker to access and control the infected machine remotely), send spam messages, or convert the machine to a zombie on a bot network. To avoid detection, a rootkit is used to hide the presence of the malicious program on the victim machine.
A basic rootkit uses clever tactics to feign CPU, memory, and disk usage in an effort to avoid user suspicion. For example, a rootkit can add the CPU usage of a malicious program to the system idle process, which may result in the user not suspecting the presence of the malicious process (of course, most users may not even know how to examine and interpret the list of processes running on a machine). The rootkit can also hide the resources and data structures related to the malicious program such as the underlying process and file. As discussed later in the chapter, some rootkits actively hide from security software—for example, antivirus (AV) and intrusion prevention systems (IPS)—by modifying the underlying operating system (OS) structures. Thus security software that utilizes any of the application programming interface (API), that internally uses these modified structures, will be ineffective in detecting the presence of the rootkit. Hence, specialized anti-rootkit software, which can scan and interpret the data structures directly, is required in such cases.
Rootkits, by definition, are not necessarily malicious, but are more often than not used for malicious purposes. In some cases, rootkits can be used for legitimate purposes. For example, on corporate machines, a rootkit can be used to hide (benign) backup directories. These directories store backup data and might be hidden to avoid their accidental deletion by the user.
Rootkits have also been distributed by legitimate corporations for enforcing copyright protection. In October 2005, it was discovered that Sony BMG used rootkit technology as part of its Extended Copy Protection (XCP) software. The XCP software was distributed along with certain copy-protected music CDs [362]. The Digital Rights Management (DRM) software, a component of XCP, was installed on the user system. This software prevented the user from making illegal copies of the content-protected CDs. For the DRM software, all file names began with $sys$. Moreover, it used rootkit technology to hide any process, files, and registry whose names began with $sys$. Once malware writers were aware of this rootkit technology, Backdoor.Ryknos [332] and Trojan.Welomoch [342] were seen in the wild. These threats used file names and registry values beginning with $sys$, and the DRM technology then mistakenly hid the malicious files.
In August 2007, it was discovered that Sony’s MicroVault USB drives USM-F and USM-FL series included a rootkit as part of its installation software [42, 470]. The MicroVault USB drives supported biometric fingerprint authentication to verify the identity of the user. However, to be effective the authentication software needs to be installed on the user’s PC. This software component hides all files from the folder in which it is executed. The authentication software was originally intended to hide the fingerprinting authentication data from tampering. However, any malware can package this software to hide its files.
8.2 Evolution of Rootkits
Even though rootkits have been known to exist for UNIX systems since the early 1990s, the first public appearance of rootkits for Linux systems came in 1996, when “Linux Rootkit” was released. This rootkit contained modified versions of system executables such as ps, login, passwd and netstat, which replaced the original executables on disk. The modified executables concealed the presence of the rootkit. However, these modifications were easily detected by integrity protection software that verifies the checksums of files.
The next generation of rootkits used loadable kernel modules (LKMs) to gain access to the kernel. LKMs are modules that are dynamically loaded into the OS kernel to extend its functionality. Once loaded into the OS kernel, they can access and modify kernel structures such as the system call table, which are otherwise inaccessible even to the root user. However, the rookit can be detected by using the lsmod command or by reading the /proc/ modules file. Thus the next generation of rootkits used techniques to write directly to kernel virtual memory. Because these rootkits were not loaded as a module, they were not present in the loaded module list, making such modifications harder to detect. The rootkits also hid themselves by modifying the Linux Virtual File System data structures. Any queries made to these data structures would not indicate the presence of these rootkits.
Proof-of-concept rootkits for Windows systems started appearing in early 1999. However, it was not until the Slanret incident [317] in 2002 that Windows rootkits started to appear in the wild. An administrator discovered a suspicious driver file called ierk8243.sys. This file was later known as Slanret [347] [IERK, Backdoor-ALI] by antivirus software vendors. This driver file was causing random “blue screen of death” (BSOD) crashes on a cluster of Windows 2000 machines that the administrator maintained at Ontario University. It was later discovered that the university network was compromised by an attacker who had uploaded the rootkit to the server.
Since 2002, the number of Windows rootkits seen in the wild has steadily grown. According to several security software vendors, rootkits are next-generation security threats whose numbers are steadily on the rise. A report published by McAfee in 2006 [24] stated the number of malware using rootkit techniques had grown by more than 600% in the past three years. According to the statistics collected by Microsoft Windows Malicious Software Removal Tool (MSRT) in 2006 [67], on the 5.7 million systems that were cleaned by the tool, 14% of the systems contained a rootkit. This finding is evidence that rootkits are a serious threat and are not restricted to academic research or proof-of-concept code.
Figure 8.1 shows a flowchart depicting the evolution of Windows rootkits. The first generation of Windows rootkits were user-mode applications that patched the address space of user-mode processes to hide their presence on a system. These rootkits modified every process’s address space so as to effectively remain hidden. Hacker Defender [114] is the most popular example of such rootkits. However, these rootkits could be easily detected by scanning in kernel mode.
Figure 8.1. The evolution of rootkits. As rootkits evolved, they used techniques at lower and lower levels of the system start-up sequence to hide themselves.

The second generation of rootkits used kernel-mode hooks—a technique used to intercept system calls and interrupts, thereby transferring control to the rootkit code. These rootkits actively monitored and modified the output to effectively hide themselves each time they gained control through a hook.
The third generation of rootkits patched OS kernel structures to hide threads, processes, and services. These rootkits needed to execute only once to modify the kernel structures. Because they operated in kernel mode, they posed a significant challenge to detect. A popular technique used to identify such rootkits is known as cross-view detection. In this technique, a list of objects is obtained from two different sources and compared. Any differences in the two lists reveal the existence of a rootkit. Nevertheless, in some cases it is not possible to reliably obtain information from two different lists, so this approach might not always work.
The fourth generation of rootkits uses advanced techniques such as loading during the boot sequence, using virtual machine–based architectures, and modifying BIOS memory and flash memory on PCI cards. The BIOS and PCI-based rootkits rely on reflashing the flash memory present on these devices. Because most BIOS and PCI cards prevent reflashing the flash memory, the installation success achieved by such rootkits varies. Virtual machine–based rootkits (VMBR) run at a layer lower than the operating system. These rootkits compel the native operating system to execute in a virtual environment as a guest operating system. Therefore, once such rootkits are successfully installed, they cannot be detected by any security software running inside the (guest) operating system. Newer 64-bit architectures such as AMD Pacifica and Intel VT-x (Vanderpool), which implement virtual machines at a hardware layer, make it challenging to detect the virtual machine from a guest operating system. One unfortunate consequence is that VMBRs on such architectures are difficult to detect and thus pose a significant challenge.
In this chapter, we describe rootkit techniques for both Windows- and Linux-based systems. We also present the techniques used by advanced rootkits such as BIOS rootkits, virtual machine–based rootkits, and PCI-based rootkits. We conclude the chapter by describing some rootkit defense techniques.
8.3 User-Mode Windows Rootkits
User-mode rootkits affect individual processes on a system. These rootkits modify certain locations in the address space of the target process. To make such modifications, these rootkits must access a process’s address space and their success is determined by their ability to do so. Certain security software applications prevent other applications from obtaining access to the address space of a process, thereby generically blocking these rootkits.
The following sections describe the functionality of user-mode rootkits and the various techniques used to achieve this functionality. User-mode rootkits successfully hide themselves in a process by loading the rootkit code into a target process and modifying the execution paths to transfer control to the rootkit code.
8.3.1 Loading the Rootkit into a Target Process
The first step that user-mode rootkits need to perform is to load the rootkit code into a remote process by accessing the address space of the process. The methods commonly used to gain access to the address space of a remote process include DLL injection and remote code injection [226].
DLL Injection
In the DLL injection technique, a Dynamic Link Library (DLL) file is loaded into the address space of a running process. The following techniques are often used to load a DLL into a remote process:
• Creating remote threads
• Using Windows hooks
• Using AppInit_Dlls registry
Creating Remote Threads. We now describe how to create a remote thread in a target process that loads a DLL file into the target process. The CreateRemoteThread API is used to create remote threads in a process. By using specific parameters to this API, a dll file can be loaded into the address space of a remote process. The following code snippet shows the prototype of this API:
HANDLE WINAPI CreateRemoteThread(
HANDLE hProcess,
LPSECURITY_ATTRIBUTES lpThreadAttributes,
SIZE_T dwStackSize,
LPTHREAD_START_ROUTINE lpStartAddress,
LPVOID lpParameter,
DWORD dwCreationFlags,
LPWORD lpThreadId,
);
Referring to this function prototype, the lpStartAddress is the start address of a function that takes a single parameter, and lpParameter is the address of the parameter to the function. The LoadLibrary API is a function that accepts a single parameter. This API is used to load a DLL file into the address space of a process. The prototype for the LoadLibrary API is shown here:
HMODULE WINAPI LoadLibrary(
LPCTSTR lpFileName
);
The LoadLibrary API can be executed in a remote process by creating a remote thread using lpStartAddress as the address in the LoadLibrary API and lpParameter as the name of a DLL file. The LoadLibrary API would then load the DLL file into the remote process. However, to load a DLL using the LoadLibrary API, the parameter lpFileName should be present in the address space of a remote process. The memory for the DLL file can be allocated in the remote process using virtual memory allocation functions such as VirtualAllocEx. The WriteProcessMemory API can then used to copy the contents of the DLL file into the newly allocated memory of the remote process.
Using Windows Hooks. Windows uses asynchronous messages to notify applications of system events such as keyboard input and mouse clicks. An application can register to explicitly receive these messages using Windows hooks. These hooks are callback procedures that are invoked whenever a particular event occurs on a system. As mentioned briefly in Chapter 1, such hooks are commonly used by keyloggers to capture keystrokes and mouse clicks. The hook procedures are inserted into the hook chain and are invoked in LIFO (last-in, first-out) order; that is, the procedure installed last is the first procedure invoked.
The scope of these hooks can be either local or global, depending on the type of hook. A thread can install these hooks locally and receive messages for events generated within a particular thread. Similarly, an application can request to install a global hook and receive events for all the threads running on the same desktop. Given that processes’ memory address spaces are protected from one another, to use a global hook, the hook function should be located inside a DLL file.
The following SetWindowsHook API is used to install a hook procedure into the hook chain:
HHOOK SetWindowHookEx(
int idHook,
HOOKPROC lpfn,
HINSTANCE hMod,
DWORD dwThreadId
);
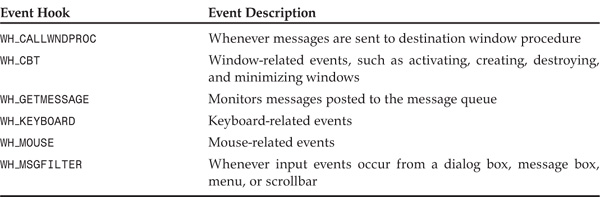
The idHook parameter is a unique identifier used to identify the type of hook function to install. The most commonly used hook types are shown in Table 8.1. Whenever an event occurs on a system, the operating system performs a check to determine whether any hook procedure exists in the hook chain for this particular event. If such a hook exists, the OS attempts to transfer control to the hook procedure. In cases where the hook procedure is not present in the corresponding address space of a process, the OS maps the procedure into the address space using a DLL file before transferring control to the hook procedure. The hook procedure can then choose either to return directly or to send the event to the next hook procedure in the chain to process. Thus the SetWindowsHook API is used to load a DLL file by using hooks into a remote process.
Table 8.1. Hook types commonly used in the setWindowsHookEx API.
Using AppInit_Dlls Registry. The AppInit_Dlls registry value is of string (REG_SZ) type and is found in the following registry key:
HKEY_LOCAL_MACHINESoftwareMicrosoftWindowsNTCurrentVersionWindows
The AppInit_Dlls value contains NULL-terminated DLL file names separated by commas. Whenever a new process is started, certain DLLs, such as user32.dll and kernel32.dll, are loaded into the address space of the process. During the initialization of user32.dll, the AppInit_Dlls are loaded using LoadLibrary. As there are very few instances where an application is not linked with user32.dll, AppInit_Dlls are loaded into any application that is dynamically linked with user32.dll. Thus adding a DLL name to this registry value can load the DLL into any user-mode application’s address space.
Remote Code Injection
In the remote code injection technique, code is injected remotely into a running process. The memory for the code in a remote process is allocated using virtual memory allocation functions such as VirtualAllocEx. The WriteProcessMemory API is then used to copy the code into the newly allocated memory in a remote process. Given that the code is injected dynamically into an executing process, the base address for the injected code cannot be predicted beforehand. Hence, the injected code cannot use global data variables and static strings, as these are allocated in the data section.
8.3.2 Modifying the Execution Path
Having described how code is inserted into the address space of a target process, we now describe how to affect the execution path via IAT hooks and inline function patching (also known as detours).
IAT Hooks
Windows executables do not contain the entire code that would allow them to execute as a process independently. Instead, to reduce the size of executables and improve performance, code that is commonly used is shared among different processes using DLL files. During compilation, a stub code is generated for all the API calls that are imported from the shared DLL files. These stub functions are located in a section of the process code identified as the import address table (IAT). The Windows loader binds function addresses imported from other DLLs at load time and resolves the addresses in the IAT.
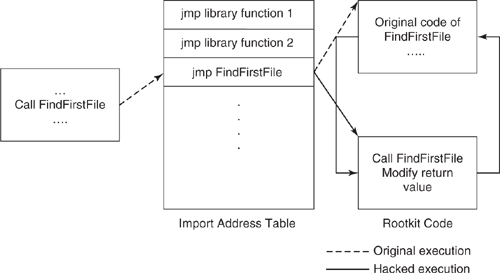
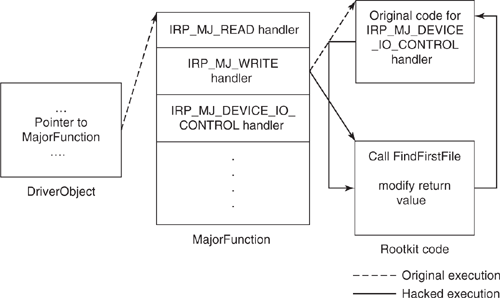
As shown in Figure 8.2, the process executes a call into the IAT. The IAT contains branch instructions (e.g., jmp FindFirstFile) to addresses that are resolved at load time. Once the rootkit code is loaded into a remote process using any of the techniques mentioned earlier in this section, it can access the portable executable (PE) header of the process. By parsing this header in memory, the rootkit code can discover the mapped addresses of the IAT functions. The address of any IAT function to be hooked can then be modified to point to the injected code [176]. Once the IAT function is hooked, the rootkit code will be invoked every time the function call is made. The rootkit code may choose either to return an error code or to call the original function and then modify the return values so as to effectively hide its presence.
Figure 8.2. An example demonstrating the FindFirstFile hook in the IAT table. In the normal execution, represented by the dashed arrow, the original code of FindFirstFile executes. In the hacked execution, represented by the solid arrow, the address of the IAT function to be hooked is modified to point to the rootkit code. As a result, the rootkit code executes every time the original function is called.
The APIs related to process, file, directory, and registry enumeration are the most commonly hooked ones. In some cases, service-related APIs are hooked to hide services.
For an attacker, the major disadvantage of using this technique is that the presence of IAT hooks can be easily detected. This technique also suffers from the following limitations:
• Delay imports. Delay imports are a technique in which the loading of a DLL file into a process and the resolution of API addresses is delayed until an actual function call is made. The DLL file is linked but not loaded until the first call to the function is executed. After the first function call, the DLL file is loaded into the address space of a process and the addresses are resolved. Delay imports pose significant difficulty for IAT hooks, as these hooks have to be placed after the process has invoked a call to the function.
• Manually loading DLLs. A process can explicitly load the DLL file using the LoadLibrary and GetProcAddress APIs to obtain the address of a function in the DLL file to use. Such functions will not have an entry in the IAT of the process. Because there is no import table in the PE header, IAT hooks cannot be used in such conditions.
Inline Function Patching (Detours)
The technique of modifying IAT hooks, as described earlier, is one way to amend the execution path to allow rootkit code to execute. However, instead of hooking the call paths to a target function, it may be easier to take control of the target function itself. By modifying the target function, the rootkit code can then be executed irrespective of the manner in which the target function is invoked. This technique is known as inline function patching.
In this approach, the first few instructions of the target function are overwritten with an unconditional branch to a detour (new) function [187]. The original instructions are copied to a different location known as the trampoline. The number of bytes required for an unconditional branch at the start of the function may not align with the instruction boundary. In cases where an unconditional branch overwrites an instruction partially, the entire original instruction is copied into saved instructions, as shown in Figure 8.3. After copying the branch instruction, the rest of the instruction is filled with NOPs to avoid crashes that may be caused by the presence of invalid opcodes. Hence the trampoline contains the original instructions of the target function followed by an unconditional branch to a particular offset in the original function.
Figure 8.3. An example demonstrating inline patching of the FindFirstFile API in a process. The modified version of FindFirstFile contains an unconditional branch (jmp) instruction that transfers control to the detours function. The detours function calls the trampoline, which stores the instructions in the original version of FindFirstFile. The four NOPS are included to ensure instruction boundary alignment because the unconditional branch requires 5 bytes, whereas the trampoline for FindFirstFile requires 9 bytes.

Each time the original function is invoked, an unconditional branch transfers control to the detours function. The detours function may choose either to return an invalid status or to call the original function and modify the return parameters. If the detours function needs to call the original routine, it simply calls the trampoline function. These instructions transfer control to the original target function using an unconditional branch instruction. After the original function completes the execution, control is transferred to the detours function. The detours function then modifies the output values so as to hide itself.
An example of patching an inline function for the FindFirstFile API is shown in Figure 8.3. In the figure, 5 bytes are needed for a branch (jmp) instruction. However, the first three instructions of the FindFirstFile API occupy 9 bytes. Because the instruction boundary (5 bytes) does not align with the first three instructions (9 bytes), the first three instructions are copied to the trampoline. The first 5 bytes of this API are then overwritten with a jmp instruction and the remaining 4 bytes are filled with NOPs. Thus, whenever the FindFirstFile API is invoked, the detours function gets control. It can then invoke the original API via the trampoline and modify the return parameters to hide its presence.
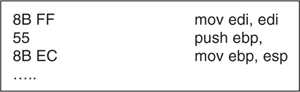
To simplify the patch process, on Windows XP SP2 and later operating systems, the first instruction of a library function is a dummy instruction consisting of exactly 2 bytes, as shown in Figure 8.4. Hence, on such systems, the first three instructions of any library consist of 5 bytes that exactly match the length of a jmp instruction. The padding of instructions helps rootkits that use inline function patching, as they can copy and overwrite the first 5 bytes of any API. The padding of the instructions also saves trouble for Microsoft, which uses the detours technique to support hot patching (the ability to run updated code without the need to reboot the system).
Figure 8.4. The FindFirstFile API on Windows XP SP2 with a 5-byte prologue. The first instruction is a 2-byte (dummy) instruction.
This technique does not suffer from the limitations of IAT hooks, because the rootkit code overwrites the instructions of a target function and, therefore, executes every time the target is invoked. When the target function is not exported, however, elaborate techniques have to be used to discover the address of the function dynamically to patch the system successfully.
8.4 Kernel-Mode Rootkit Techniques
Unlike user-mode rootkits, kernel-mode rootkits affect all processes on a system. Consequently, they are usually more powerful than user-mode rootkits. Given that security software such as antivirus and intrusion prevention software also runs in kernel mode, kernel-mode rootkits have the potential to avoid detection. This section describes various kernel-mode rootkit techniques in detail.
8.4.1 Interrupt Descriptor Table Hooks
Whenever an interrupt occurs, the processor saves its context and transfers control to an interrupt service routine (ISR), which services the interrupt request. Once an interrupt is serviced, control switches back and the processor resumes original execution. The interrupt descriptor table (IDT) stores the addresses of the ISR for every interrupt supported on the system. In the Intel architecture, the IDT contains 8-byte descriptors (shown in Figure 8.5), each of which stores the segment selector and the offset of an ISR to execute. The IDTR register points to the memory location containing the base address of the IDT.
Figure 8.5. The format of an IA-32 interrupt descriptor. The descriptor contains both a segment selector and an offset.

It is possible to hook all interrupts by allocating a new descriptor table and modifying the value of the IDTR register to point to the newly created table. Alternatively, to hook a specific interrupt, the offset value corresponding to the particular ISR may be modified in the descriptor table. The interrupts are first disabled to avoid synchronization issues while the offset value is modified in the IDT. The interrupts are subsequently enabled after the offset value is modified.
Whenever an interrupt occurs, control is transferred to the rootkit code first, which can then choose either to return an error code or to execute the original ISR. The commonly targeted interrupts are 0x2E (system call), Invalid Opcode, PageFault, and General Protection (GP). To avoid changing the stack layout, the IDT hooks use a branch instruction instead of a call instruction to transfer control to the rootkit code. Because the call instruction cannot be used, control cannot be returned to the IDT hooks. Hence, the usual technique of calling the rootkit code and modifying the return values will not work for these hooks and, therefore, has limited advantages. For example, this technique can target certain processes (e.g., AV scanners, intrusion prevention software systems) and prevent them from obtaining the process list by blocking process enumeration system calls such as ZwQuerySystemInformation. An example of hooking the keyboard interrupt (0x31) is presented below.
IDT Keyboard Hook Example. On most systems, the Windows kernel uses entry 0x31 in the IDT to store the address of the keyboard ISR. This routine is invoked every time a key is pressed or released. By modifying the keyboard ISR address to point to a custom routine, execution may be modified effectively as shown in Figure 8.6. This technique is most commonly used by keyloggers.
Figure 8.6. An IDT hook-based keylogger. The keyboard ISR is changed so that rather than executing the original keyboard ISR (dashed arrow), the modified keyboard ISR is executed (solid arrow). The modified ISR can log keystrokes and then call the original keyboard ISR.
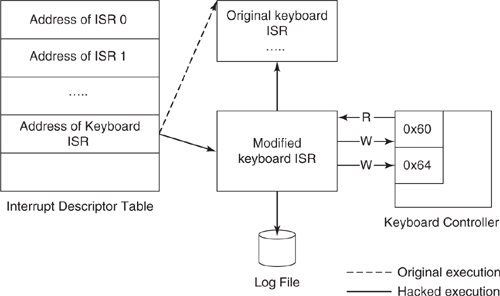
The modified keyboard ISR can then read the scan code for the key pressed or released directly from the keyboard controller port 0×60. The scan code is placed back into the controller output buffer by issuing a command to port 0×64 and then writing the actual keystroke to port 0×60 [176]. The modified keyboard ISR then logs the keystroke to a file and calls the original keyboard handler routine. In this way, the keylogger uses the IDT hook for a keyboard interrupt.
On multiprocessor systems, each processor has its own IDT. Hence, it is necessary to hook the IDT entries on all processors; otherwise, the rootkit would be ineffective. On single-processor systems, synchronization issues while modifying the IDT are resolved by disabling the interrupts. This technique cannot be applied on multiprocessor systems. On multiprocessor systems, the privilege level of the processor is raised to DISPATCH_LEVEL by scheduling a deferred procedure call (DPC). Once the privilege level for all processors has been raised to DPC, the IDT is modified. As soon as the DPC call returns, the processor privilege is reset to a lower privilege level.
8.4.2 System Call Hooks
In this technique, the execution path is modified by replacing the system service handler (KiSystemService/KiFastSystemService), with rootkit code such that it is executed for every system call. The techniques used to replace the address of the system service handler include INT 0x2E hooks and SYSENTER hooks.
INT 0x2E Hooks. The interrupt 0x2E is a software interrupt that is reserved for system calls on Windows platforms. User-mode applications running on Windows NT/2K systems use this interrupt to make a system call—that is, to transfer control from user to kernel mode. The processor, upon executing the interrupt 0x2E, performs a lookup in the IDT and transfers control to the system service handler ISR. This routine would look up the system service descriptor table (SSDT) and transfer control to the appropriate system call [162]. By modifying the offset value of the descriptor, the rootkit code is executed every time a system call is made.
SYSENTER Hooks. Given that using software interrupts usually requires at least two memory accesses to transfer control to kernel mode, the SYSENTER instruction was introduced in the Intel Pentium III architecture to speed up the transfer. The IA32_SYSENTER_EIP model-specific register stores the address of the routine to execute when the SYSENTER instruction is executed [192]. On hardware platforms that support this instruction, user-mode applications running on Windows XP/Vista use this instruction to transfer control from user mode to kernel mode. When the SYSENTER instruction executes, control is transferred to this routine, which looks up the SSDT and transfers control to the appropriate system call.
SYSENTER hooks are placed by modifying the value of IA32_SYSENTER_EIP register to point to a rootkit routine. By modifying this value, the rootkit code is called each time a system call is made.
As mentioned in Section 8.3.2, the INT 0x2E and SYSENTER hooks suffer from the same limitations as IDT hooks—namely, they cannot call the rootkit code and modify the return parameters, because control never reaches these hooks. Thus these hooks have limited utility and are used mainly for entirely blocking the system call for a particular process.
8.4.3 System Service Descriptor Table Hooks
Hooking the SSDT is by far the most popular rootkit technique used by malware writers owing to its effectiveness and simplicity. Even security software such as antivirus and firewall applications hook into this table to receive notifications about events like file creation and opening of ports.
The address of the system service table is stored in the SSDT, whose structure is shown in Figure 8.7. The first entry in the SSDT refers to the system service table that stores the addresses of the system call routines in Ntoskrnl—for example, ZwCreateFile and ZwOpenKey. The “number of system calls” entry represents the maximum number of system calls that are supported on a system. The “parameter table entry” points to a table that stores the number of parameters used by each system call. The global variable KeServiceDescriptorTable stores the base address of the SSDT [176].
Figure 8.7. The structure of the system service descriptor table. The base address of the SSTD is stored in the global variable KeServiceDecriptorTable. The entries in the SSTD include a pointer to the system service table, the number of system calls, and a pointer to the parameter table.

Whenever a system call is made, the system service handler obtains the value of KeServiceDescriptorTable using a per-thread structure. The base address of the system service table is retrieved using the SSDT stored in KeServiceDescriptorTable. The address of a system call routine is calculated using the base address of system service table and the offset of the system call stored in each register. The system service handler then transfers control to the actual system service routine.
It is possible to hook all system calls by modifying the system service table entry in the SSDT or by modifying the KeServiceDescriptorTable to point to a new SSDT, which contains a different value of the system service table entry. To hook individual system calls, the offset value corresponding to the system call is modified in the system service table. However, the SSDT has different memory protections and is write-protected to prevent modifications. Writing to this memory location without turning off memory protection would result in a BSOD (blue screen of death).
The following techniques are used to first gain write access to the system service table:
• Using the CR0 register. The operating system kernel enforces write protection on kernel pages that contain important data structures. The write-protect (WP) bit in control register zero (CR0) determines whether this protection is applied to kernel readonly pages. When the WP bit is set, write protection is enforced on readonly pages; when it is off, the write protection is disabled. Hence a driver loaded in kernel mode can disable the write protection by resetting this bit in the CR0 register [404].
• Modifying the MDL. Every memory region in Windows is represented with a memory descriptor list (MDL). The MDL contains a start address, end address, and memory protections. It is possible to change permissions on the MDL corresponding to the SSDT table by modifying the MDL flags to include MDL_MAPPED_TO_SYSTEM_VA [176].
Using SSDT hooks, whenever the original system call is executed, the rootkit code is invoked. The rootkit code can then call the original system call and modify the output parameters to hide its presence. As an example, Figure 8.8 shows a trace to demonstrate the difference in code paths before and after the hook. The address of the ZwOpenKey system call is modified in the system service table to point to the rootkit code. Whenever ZwOpenKey executes, the system service handler transfers control to the rootkit code. The rootkit then invokes the original system call. Once the call returns, it modifies the output values to hide its presence.
Figure 8.8. Hooking the ZwOpenKey function in the system call table. Note the two execution paths. The original path is denoted by a dashed arrow and the hacked path by a solid arrow. In the hacked path, the address of ZwOpenKey has been modified and points to rootkit code. When ZwOpenKey executes, the system service handler gives control to the rootkit code. At the end of its execution, the rootkit code invokes the original ZwOpenKey system call and modifies the output values to hide its presence.

8.4.4 Thread-Based SSDT Hooks
SSDT hooks are simple to install and affect all processes in a system. Because the change is global, the presence of these hooks can be easily detected. The original addresses of all system calls can be retrieved by parsing the kernel on-disk image. By comparing the real addresses with the in-memory addresses of the system call routines, the presence of an SSDT hook can be readily discerned. A variation of this technique—namely, thread-based SSDT hooks—can be used to make this modification more difficult to detect.
Every thread in a system has a per-thread structure called the KTHREAD block. This structure contains per-thread information such as stack, TLS array, execution time, and a pointer to the SSDT structure known as the system service table, as shown in Figure 8.9.
Figure 8.9. The partial KTHREAD structure containing a pointer to the system service table. The KTHREAD structure contains per-thread information.

The SystemServiceTable entry points to the SSDT structure, similar to the global variable KeServiceDescriptorTable. As mentioned in Section 8.4.3, the system service handler (also known as KiSystemService/KiFastSystemService) uses the SystemServiceTable pointer in the KTHREAD block to retrieve the base address of the system service table that is used in the computation of the system call routine to be executed. Control is then transferred to the system call routine to be executed.
Given that the SystemServiceTable entry in the KTHREAD block is used to retrieve the value of the SSDT, modifying this entry for a specific thread can alter the thread’s system call routine execution. The modified entry might, for example, point to a new system service table containing a different system call routine address than the original table. Because this modification is on a per-thread basis, to be effective it needs to be applied for all threads on a system. The resulting change will not be globally visible, making such modifications harder to detect.
8.4.5 System Call Code Patching
The technique known as system call code patching is very similar to the user-mode inline function patching technique described in Section 8.3.2. Because the system call code is patched in the kernel, this modification affects all processes running on the system that uses the patched system calls.
In this technique, similar to the inline function patching technique, the first few instructions are copied to a different location. If the first few instruction bytes do not align on an instruction boundary, then an additional instruction is copied to a different location. The starting instructions of a system call are then replaced and extra bytes are padded with NOPs to match the instruction boundary. Whenever the system call is invoked, control is transferred to the rootkit code. The rootkit can then invoke the original system call and modify the return values to hide its presence.
Because each system call does not use the same prologue, system call patching needs to properly identify and replace complete instructions. Copying or leaving an incomplete instruction may lead to the dreaded BSOD. To properly patch the system call, the first few bytes have to be disassembled or the opcodes of instructions hard-coded and compared to see if they match the instructions in the system call. Also, different operating system versions, updates, and service packs make this technique challenging to implement owing to the difficulty in identifying the instructions.
Another technique commonly used in patching system call code is to replace the instructions with invalid opcodes instead of far calls. This will generate an Invalid Opcode exception. If a rootkit randomizes the instructions that are copied to overwrite the first few bytes, it can be extremely difficult to detect this modification [348].
8.4.6 Layered Drivers
The Windows Driver Model (WDM) uses a layered model for devices. The devices are layered over one another to form a device stack, as shown in Figure 8.10 [361, 459]. The driver that owns a device is responsible for handling events generated for that particular device. On receiving a request for a particular device, the input/output (I/O) manager creates an interrupt request packet (IRP) and sends it down the device stack. Each driver that owns a device on the device stack is given a chance to handle this request. A driver can choose to simply return, request to be notified on completion of the request, service the request by itself, or pass the IRP request to the driver below it.
Figure 8.10. The file system device stack along with driver objects. Some rootkits take advantage of the device stack to install file system, keyboard, or network drivers. Such rootkits can then intercept events and modify the output.

Once the IRP request is serviced, control transfers to an upper layer driver only if the driver has explicitly requested to be notified upon completion. Some rootkits use this layered-driver model to install drivers on the file system, keyboard, or network stack. The layered-driver rootkit can then intercept events and modify the output, thereby changing the behavior of the underlying system.
File System Filter Driver Rootkit
A file system filter driver receives events related to file system changes such as loading of file volumes and creation and deletion of files and directories. The driver can use these event notifications to identify cases where an application is attempting to access the files. For example, an antivirus product can use the file system driver to prevent creation of malicious files. Similarly, a rootkit can use this layered-driver model to hide itself by modifying the output such that the files it hides appear to be nonexistent on the system.
The following are methods by which a driver might be attached to a device stack:
• Using class drivers. The class drivers are loaded by the operating system at boot time after the initialization of the base driver. A driver can attach to a particular class of drivers using the registry key
HKLMSystemCurrentControlSetControlClass
added to the USB device stack by creating a value "UpperFilter" = <DriverName> under the following registry key:
HKLMSystemCurrentControlSetControlClass
{36FC9E60-C465-11CF-8056-44553540000}
• Dynamically attaching using the API. Instead of using a registry key, a driver can be added dynamically to the device stack using the Windows kernel API routines such as IoAttachDeviceToDeviceStack, shown here:
PDEVICE_OBJECT IoAttachDeviceToDevicesStack(
IN PDEVICE_OBJECT SoureceDevice,
IN PDEVICE_OBJECT TargetDevice
);
This routine takes the target device object and attaches it to the source device.
• Dynamically attaching to the desired device. A driver can attach to the device stack by obtaining the device object and then manually walking through the stack until it reaches the desired object. By changing the AttachedDevice field, the driver is attached to the device stack.
Once a rootkit attaches itself to the file system device stack, it can intercept IRPs (events) generated by file open, create, write, and delete operations. The rootkit can then determine the file name and the type of access being performed on it using values on the IRP stack. If the file name matches the name that the rootkit is hiding or protecting, the rootkit can simply return an error status or remove the file name from the output. The files that are hidden by filter drivers can be accessed by bypassing the file system stack altogether and accessing the NTFS driver directly.
Example: Rootkit Using a Keyboard Filter Driver
In this example, a rootkit uses a keyboard filter driver to log keystrokes. The keyboard filter driver can attach itself to a low-level port driver or an upper-level keyboard class driver. The driver can intercept scan codes, translate them to ASCII, and log them to a file [55, 468].
The I/O manager on a read request for the keyboard device creates an IRP and sends it down the stack to the keyboard controller driver. In Figure 8.11, the IRP is first sent to the DriverFilter driver object, then to DriverKbdClass, and finally to Driveri8042prt. At this point, the IRP does not yet contain a scan code for the keystroke. Each driver can set a callback using the IoSetCompletionRoutine API that causes the driver to be notified when the next-level driver has completed the requested operation [176].
Figure 8.11. The keyboard device stack along with driver objects. The IRP request is sent first to the DriverFilter driver and makes its way down to Driveri8042prt. Upon processing the keystroke, the i8042prt keyboard controller driver stores the scan code corresponding to the keystroke and transmits it back to the I/O manager.

The keyboard controller driver i8042prt, after processing the keystroke, stores the scan code in the IRP and sends it back to the I/O manager. Every driver that has set the completion routine will be notified of the IRP on its way back. The keyboard filter driver can then retrieve scan code for the keystroke from the IRP. However, as the callback is running at Interrupt Request Level > PASSIVE_LEVEL, it is not possible to log the keystrokes to a file. One solution to this problem is to use a dedicated system thread running at PASSIVE_LEVEL to log keystrokes to a file and to use shared memory between the driver and the system thread. With this approach, the keyboard filter driver will be able to log every keystroke typed by looking into the contents of the IRP on its way up to the I/O manager.
8.4.7 IRP Patching
Every driver has a specific structure—namely, the DRIVER_OBJECT—associated with it. The DRIVER_OBJECT structure contains the address of the MajorFunction as well as the other fields shown in Figure 8.12. The MajorFunction table stores the addresses of dispatch routines that are invoked when the driver receives an IRP. The IRP major function codes are used as an index into this table. The IRPs handle events such as create, read, write, query, set, and cleanup operations.
Figure 8.12. The DRIVER_OBJECT structure. Appropriately modifying the addresses of the dispatch routines in MajorFunction and FastIoDispatch can cause the rootkit code to execute each time an event occurs. This process is described in Figure 8.13.

The FastIoDispatch table stores the addresses of the dispatch routines if the driver supports fast I/O. Only file system drivers and network-layered drivers support fast I/O and hence have these addresses set. By modifying the addresses of the dispatch routines in MajorFunction and FastIoDispatch tables, the rootkit code is invoked each time an event occurs, as shown in Figure 8.13. This technique is popular in rootkits and other types of malware to patch TCP/UDP IRPs, thereby avoiding detection by a firewall.
Figure 8.13. Patching the IRP_MJ_DEVICE_IO_CONTROL handler. The rootkit code executes in the hacked execution, denoted by the solid arrow.
IRP patching consists of two major steps. The first step is to locate the address of the IRP function table of a driver. The second step is to modify the return parameters to hide.
Locating the Address of the IRP Function Table. The DeviceObject for a named object is retrieved by using the IoGetDeviceObjectPointer. As mentioned in Section 8.4.6, the DeviceObject contains the address of the DriverObject that owns this device. Once the DriverObject is obtained, the IRP function table can be retrieved easily from the driver object.
Modifying the Return Parameters. Similar to the outcome with IDT hooks, in the IRP patching technique, control is not returned to the rootkit code and, therefore, the rootkit code cannot modify the output parameters. The reason: Once the IRP is handled by the lower-layered drivers, the upper-layered drivers are not notified of the completion. The upper-level drivers are notified only when they specifically request to be notified, after the next-lower-level driver has completed the IRP processing. The IoSetCompletionRoutine API is used to notify the upper-layered drivers when the requested operation is completed.
The rootkit code, after patching the IRP handler, can use the IoSetCompletionRoutine to cause it be notified for the specific IRP that it wishes to process. Next, the rootkit code calls the original IRP handler, which is then passed down the device stack. Once the IRP is completed by the lower-layered driver, the rootkit code is notified. The rootkit code can examine the output at this point and remove itself from the return values to hide its presence.
8.4.8 Direct Kernel Object Manipulation
Direct kernel object manipulation (DKOM) techniques modify kernel memory structures without using any standard API calls. As certain structures (which could be as small as 4 bytes) are modified without using standard APIs, it is a nontrivial task to identify such modifications. These techniques can be used to hide processes, drivers, and services.
Unlinking a Process from the Process List. The Windows scheduler is a thread-based scheduler that maintains a doubly linked list of thread objects for scheduling. The kernel also maintains a doubly linked list of active process objects that can be queried using the standard API (for example, ZwQuerySystemInformation). The Windows task manager uses this API to obtain a list of currently running processes. A process object can be deleted by modifying the forward and backward pointers in the linked list [293]. By removing the process from this list, the process is effectively hidden, as shown in Figure 8.14.
Figure 8.14. Hiding a process from the active process list. The process is removed from the doubly linked list of active process objects. Consequently, enumerating processes using the standard API will fail to show the existence of the hidden process. However, the process will still be scheduled because the scheduler uses the thread list for scheduling.

The process enumeration in user and kernel modes using the standard API will fail to reveal the existence of the hidden process. The process will still be scheduled, however, as the scheduler does not use the process list for scheduling, but uses the thread list instead.
Unlinking a Process from PspCidTable. Every process in a Windows kernel is represented with a per-process structure known as the EPROCESS block. This structure contains information related to the process such as its process ID (PID), threads, quota usage, and a pointer to a handle table—namely, ObjectTable. The ObjectTable contains a linked list of handles to processes and threads in a system; the kernel maintains a global variable called PspCidTable that points to the first element in this list. This list is queried by the NtOpenProcess, and PsLookupProcessByProcessId APIs to determine the existence of process/threads. A process can be deleted from this list by modifying the forward and backward pointers [375]. Nevertheless, removing a process from this list would still cause the process to be listed using process enumeration APIs. Removing a process from the PspCidTable list would cause the open process APIs to fail to obtain a handle on the hidden process.
Some commercial anti-rootkit technology makes use of this list indirectly by calling NtOpenProcess on all process PIDs in the valid range and then comparing the result with the data obtained from the process enumeration APIs.
Unlinking Drivers from the DriverObject List. The DRIVER_OBJECT, as described in Section 8.4.7, has a DriverSection field that maintains a doubly linked list of all loaded drivers. A driver receives a pointer to its DRIVER_OBJECT in its DriverEntry (start-up) routine. At start-up, a driver can parse the linked list stored in the DriverSection and unlink itself from the list. This would cause the driver to be hidden from all user- and kernel-mode enumeration APIs (e.g., EnumDeviceDrivers and PsLoadedModuleList) that use this list.
Unlinking Services from the SCM List. Whenever a service is created, it is registered with the service control manager (SCM). The SCM maintains a linked list of services registered with it. When the status of a service is queried, the SCM parses this linked list to find information about the particular service. By using DKOM, it becomes possible to delete the service-related entry in this linked list. Once a service is removed from the list, all service enumerations in the user and kernel modes fail to detect the presence of the service [469].
8.4.9 Hiding Threads from the Scheduler
The FU rootkit hides a process by unlinking it from the process list (as described in Section 8.4.8). The hidden process will still be executed, however, because the Windows scheduler is a thread-based scheduler—that is, it uses thread objects for scheduling. Processes hidden with the FU rootkit are identified by enumerating all the threads in the ready and wait state queues and comparing them with the threads obtained from processes in the process list. If the threads are removed from the ready and wait state queues, then they are never scheduled because the scheduler never sees those threads. By contrast, if a new kernel thread is created that acts as a scheduler to run the hidden threads, then those threads would run even though they are invisible to the actual scheduler. It is necessary to modify NtYieldExecution to give time quantum to hidden threads and to implement a swapper to swap each thread’s pages into memory [1].
8.4.10 Redirecting Virtual Memory Access
Redirection of virtual memory access is popularly known as the shadow walker technique or desynchronizing the split translation look-aside buffer approach [384]. This technique relies on a split translation look-aside buffer (TLB), where separate TLBs exist for instructions and data, as shown in Figure 8.15. This approach is used to hide pages in memory by allowing execute (code) access to a rootkit page but redirecting the data access (read/write) to a different page. Ironically, this technique is based on the PaX project [416], which prevents buffer overflows by effectively making the stack and data pages non-executable.
Figure 8.15. Code/data TLB desynchronization. Separate TLBs exist for instructions and data, which can be leveraged to hide pages in memory.

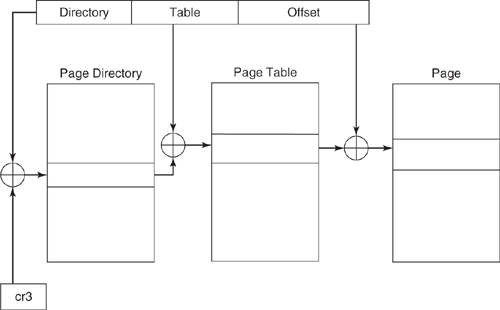
Modern operating systems support virtual memory so as to present an unlimited view of the memory address space. The CPU always uses virtual addresses to reference memory locations. The virtual addresses are translated into physical addresses using the hardware-supported paging mechanism. The paging mechanism, in turn, uses page tables to convert virtual addresses to physical addresses. The paging mechanism for the Intel architecture is shown in Figure 8.16.
Figure 8.16. The paging mechanism for the Intel architecture. The page tables are used in paging translation.
Given that it is not possible to store all pages that correspond to the entire virtual memory space in memory simultaneously, pages are swapped out and new pages are swapped into memory by the page fault handler whenever needed. Thus, to access a page, at least three memory references are needed and an additional two disk I/O accesses are needed if the page tables are swapped out of memory. To avoid this overhead for every memory access, most hardware CPUs (such as those provided by Intel and AMD) store this translation in an internal TLB cache. As long as the translation is found in the TLB cache (a TLB hit), the translation is relatively fast. If the translation is not present in the cache (a TLB miss), the translation is calculated by accessing page tables and stored in the TLB for future access. Because the TLB cache is extremely small, the entries are replaced if a page is not accessed for a long period of time.
The sequence of steps that occur in a paging mechanism are described next:
If the translation is found in the TLB, then it is converted directly to a physical address.
In the event of a TLB miss, a page fault occurs and control is transferred to the page fault handler.
The page fault handler checks whether the virtual address is valid.
If the address is valid, the page fault handler loads the corresponding page into memory and stores the translation in the TLB.
Control is transferred to the original instruction that triggered the page fault.
In this technique, an IDT hook is placed for the page fault interrupt. Every page to be hidden is marked “not present” so that any access to these pages triggers a page fault if the translation is not present in the TLB. Hence, whenever the rootkit pages are accessed, control is transferred to the rootkit code via the page fault hook.
Hiding Code Pages. To hide code pages, the TLBs are desynchronized such that the virtual address is mapped to the correct physical address in case of execute access. In case of read/write access, the virtual address is mapped to a different physical address.
Whenever control is transferred to the rootkit handler, a test is performed to compare the values of the address that caused the page fault with the current execution pointer (EP). In this way, the rootkit can determine if the page fault was due to execute access or read/write access. In case of execute access, control is transferred to the original page fault handler and the execution resumes normally. In case of read/write access, the rootkit code manually loads a page that does not correspond to the rootkit page, thereby effectively hiding the contents of the code page.
This scheme is feasible when separate caches exist for code and data access. For code access, the original translation is stored so that the proper contents execute. For data access, by contrast, the translation is mapped to a different physical address. These translations are cached in TLB entries after the first access and remain until they are flushed, thereby resulting in very little performance overhead.
Hiding Data Pages. To successfully hide a page containing data, the rootkit has to differentiate access to the page by itself from access to the page by an external application, such as anti-rootkit software. A simple approach to hide a data page is to produce a page fault on every data access and then provide for redirection if the data access corresponds to the data page that the rootkit is hiding. Unfortunately, this approach results in significant performance overhead—it causes a page fault for every data access.
To avoid this overhead, the rootkit can selectively choose to load a data page manually when required. During this access to the data page, the rootkit needs to ensure that it has exclusive access to the page. Thus, whenever the rootkit needs to access the data page, it gains exclusive access to the system, thereby preventing an application running at higher privilege from accessing the actual data page. The rootkit then flushes the TLB entry in the cache corresponding to the data page, to avoid reading the redirected page itself. It then manually loads the correct translation corresponding to the data page. Once the rootkit has finished accessing the data page, the TLB entry is purged to prevent an external application from reading the actual page. The rootkit then relinquishes control of the system to allow execution of other applications. Hence both code and data pages are effectively hidden in memory using this technique.
8.4.11 Loading Kernel Drivers Without SCM
A rootkit that utilizes the service control manager (SCM) to load drivers into the kernel address space needs to create a registry key in the hive:
HKEY_LOCAL_MACHINESystemCurrentControlSetxxx<ServiceName>
The SCM uses this registry key during the initialization of the driver object, and the registry key is passed as a parameter to the entry point of the driver. Hence, to successfully hide its presence, the rootkit has to hide service keys along with files related to the rootkit. Alternatively, a rootkit can use other entry points to load drivers into the kernel address space without registering with the SCM.
Loading a Driver Using SystemLoadAndCallImage. A kernel driver can be loaded without registering with the SCM by using an undocumented API—namely, ZwSetSystemInformation. The prototype of ZwSetSystemInformation is
NTSYSAPI NTSTATUS NTAPI ZwSetSystemInformation(
IN SYSTEM_INFORMATION_CLASS SystemInformationClass,
IN OUT PVOID SystemInformation,
IN ULONG SystemInformationLength)
typedef struct _SYSTEM_LOAD_AND_CALL_IMAGE{
UNICODE_STRING ModuleName;
} SYSTEM_LOAD_AND_CALL_IMAGE, *PSYSTEM_LOAD_AND_CALL_IMAGE
By calling the ZwSetSystemInformation API with SystemLoadAndCallImage as SystemInformationClass and SystemInformation pointing to the SYSTEM_LOAD_AND_CALL_IMAGE structure, a module is loaded into the kernel address space [175]. ModuleName contains the path for the module image to be loaded. A driver loaded by this technique does not register with the SCM, so scanning for the running services and drivers using the SCM would not reveal the existence of this driver.
Writing to Physical Memory. The Windows Object Manager is responsible for maintaining access to all objects in the operating system. In the Windows OS, every resource—processes, files, directories, and ports—are represented as objects. The DevicePhysicalMemory object represents physical memory on a system. The Windows 2K and later operating systems do not allow user-mode applications to write to physical memory directly. Only ntvdm.exe (the DOS 16-bit emulator application) can write directly to physical memory in user mode. This capability is probably intended to maintain backward compatibility for 16-bit DOS applications; in the DOS operating system, any application was allowed to write to physical memory directly. Hence, writing to physical memory can give an attacker significant advantages.
The following steps are needed to successfully write to physical memory [71]:
Restricted permissions. The
DevicePhysicalMemoryobject is accessible in read mode to all user-mode processes but accessible in write mode only to processes running withSYSTEMprivileges. By default, the administrator does not have write access to this object. However, processes executing with administrator privileges can obtain access to this object by modifying Access Control List (ACL) settings. Once write access is obtained, it becomes possible to write to arbitrary physical address locations.Mapping virtual to physical addresses. The CPU uses virtual addresses, so these addresses need to be mapped to physical addresses. In kernel mode,
MmGetPhysicalAddressis used to convert virtual addresses to physical addresses. However, the routine shown in Figure 8.17 is a near-implementation of this API that can be used to map virtual addresses to physical addresses.Figure 8.17. Custom code to translate a virtual address to a physical address—a near-implementation of the
MmGetPhysicalAddressAPI.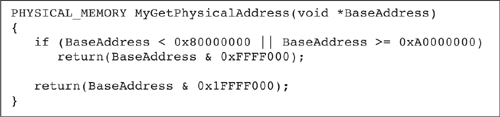
Installing Call Gates. To execute kernel code from user mode, a call gate has to be installed. In the Intel IA-32 architectures, call gates are used to execute a routine at a predefined address using a far call. To install this kind of call gate in the GDT table, kernel-mode privileges are needed. By directly writing to physical memory, it is possible to create an entry in the GDT table. Once the call gate is installed, code can be executed in kernel mode by making a far jump to the handler specified in the call gate.
The following cases require kernel mode to modify changes to the system. By using this technique, the changes are made from user mode by using a call gate:
• Allocate memory in kernel mode using a call gate handler and modify SSDT entries to point to the allocated memory by writing to physical memory directly. With this approach, the system call table is hooked without loading a kernel driver.
• Modify the process list using a call gate handler to hide certain processes by unlinking them from the process list.
8.5 Linux Rootkits
Besides being written for the Windows operating system, rootkits are available for common variants of the UNIX operating system such as Linux, BSD, and Solaris. In this section, we describe rootkit techniques that apply to the Linux OS. Many of the techniques described here are similar to those used with other UNIX variants and, in some cases, to techniques used with the Windows OS. Nevertheless, some rootkit techniques, such as executable replacement rootkits (described in Section 8.5.1), are specific to UNIX and are not commonly seen in Windows. The following rootkit techniques are explored in this section:
• Executable replacement rootkits (Section 8.5.1)
• Loadable kernel module (LKM) rootkits (Section 8.5.2)
• Runtime kernel patching rootkits (Section 8.5.3)
• Virtual File System (VFS) rootkits (Section 8.5.4)
8.5.1 Executable Replacement Rootkits
Executable replacement rootkits replace or modify on-disk executables of commonly used administrative utilities to hide their presence. Typically, the rootkit replaces the /bin/login utility to create backdoor access. The /bin/login program runs every time a user logs in using a terminal or through remote access. The program checks the user ID and matches the password input by the user against the password stored in the password file. The rootkit-replaced login program can bypass these security checks. Besides the login program, several other programs, such as du (disk utilization), ls (contents of file system), ps (process list), and lsmod (enumerate loaded modules), can be replaced so as to hide the presence of the rootkit [376].
Instead of replacing the executables entirely, some rootkits infect the on-disk images of certain executable types (e.g., system object files) [423]. One such technique is to infect loadable kernel modules (LKMs), which are object files loaded dynamically into the kernel. The LKMs use the Executable and Linking Format (ELF) and consist of sections including the .symtab, which contains symbols needed by the linker. The key symbol in this table is init_module, which is the routine used to initialize the module. When the module is dynamically loaded, the loader searches the .symtab section and retrieves the address of this module. The loader then calls this routine to initialize the module. The rootkit can modify the .symtab section by changing init_module’s symbol address to point to the rootkit code. When the loader transfers control to init_module, control is actually transferred to the rootkit first. This technique is not limited to init_module, however, but rather can be extended to replace any of the exported routines.
8.5.2 Loadable Kernel Module Rootkits
Loadable kernel modules are modules that can be loaded dynamically into the Linux kernel. These modules extend the functionality of the kernel, without requiring modifications to the kernel’s base image distributions. LKMs are analogous to device drivers in the Windows OS. They work by dynamically loading drivers into a running kernel and are typically used to load device drivers, file system drivers, and network drivers that provide additional support for the rootkit. Once loaded into the kernel, LKMs can modify critical kernel structures. Unfortunately, this functionality can be abused by rootkits to hide their presence on the system.
The most commonly modified structure targeted by LKM rootkits is the system call table (exported as sys_call_table) [164, 314, 318]. This technique is similar to the use of SSDT hooks in Windows. With this technique, LKM rootkits redirect a system call to rootkit code by modifying the address stored in the system call table entry. It then becomes possible to hide system activities related to the rootkit, such as processes, files, and ports opened by the rootkit. For example, to redirect the read system call to rootkit code, the LKM can modify the system call table as follows: sys_call_table[SYS_read] = rootkit_read. The rootkit can hide its process by modifying the system table entry for the SYS_getdents system call. The ps command, which enumerates running processes, internally uses the getdents system call to get the directory entries from the proc directory (which contains the directories related to each running process based on the PID). The LKM rootkit can remove the PID from the output or return fake values for the rootkit’s PID.
LKMs are detectable by listing the current loaded modules via the lsmod command, which internally uses the read system call to read the /proc/modules file. Thus, to effectively hide the module from listing, the rootkit needs to hook the read system call in sys_call_table.
Another technique that hides a module is manipulating the “module” structure, which the kernel uses to store information for all modules. This structure is not exported by the kernel; rather, the only means by which this structure is accessible is through an LKM’s init routine, init_module(). The init_module function is present in a loadable module, which uses the “module” structure as a parameter. Thus it is possible to manipulate the module structure fields such as those for the name and usage count, related to the rootkit, such that even the kernel is ignorant of the rootkit module’s existence [314].
8.5.3 Runtime Kernel Patching Rootkits
In certain cases, LKM support might not be built into the kernel, which would prevent loading an LKM rootkit. In this case, the rootkit can patch the running kernel to insert its image (usually as an LKM object file) into the kernel memory [50]. The kernel’s virtual memory is accessible using the device /dev/kmem and, therefore, can be used for runtime LKM rootkit loading, even without LKM support.
The kmem device contents can be searched to locate the desired kernel structures by using symbol addresses publicly exported in /proc/ksyms or by using the /System.map file generated during kernel compilation. For example, it is possible to locate the task_struct structure using the kstat symbol address in the ksyms symbol file. In certain cases, the System.map file might not be present on a system, or the symbol might not be publicly exported in the ksyms file, or the ksyms file might not be present when LKM support is not included in the kernel.
A rootkit module can use the runtime patching technique to hide itself by modifying the “module” structure in memory. However, the “module” structure’s symbol is not exported. In this case, certain search techniques can be applied based on the module structure field, such as the address of the module name string. A first search pass on the memory can locate the module name and store its address. This address can then be used during a second search pass to locate the module’s entry in the module structure. This technique can be used to hide a rootkit module.
A rootkit can also modify the sys_call_table structure in memory to hijack system calls [192]. Similar to what happens with the module structure, the system call table structure is also not exported. As we are aware, system calls are made using the int 0x80 interrupt on Linux systems, and a system call number is stored in the EAX register before making the interrupt. Also, the interrupt descriptors containing the interrupt’s entry point are stored in the interrupt descriptor table (IOT). Thus, by locating the IDT (by using an instruction such as SIDT), the 0x80 interrupt’s entry point can be obtained. The 0x80 interrupt typically uses the instruction call sys_call_table(,eax,4). A disassembly of this instruction can be used to obtain the sys_call_table address, and this address can be searched in the kernel memory. In this way, the rootkit can locate sys_call_table by searching for this address in the kernel memory, and it can then modify the required system call entries to redirect a system call to the rootkit code.
A rootkit can also load kernel modules by directly inserting them into kernel memory. The main challenge with this approach is to find kernel memory that is not used by the running kernel and is not overwritten by a memory operation (such as kmalloc). The solution is based on the kmalloc pool start address’s alignment to a page boundary. This leaves a memory gap between the start address and the actual start of kmalloc memory, where the LKM can be inserted. However, the LKM might not fit in this bit of memory. The rootkit can overcome this limitation by inserting bootstrap code in this unused memory region, which would contain code to allocate kernel memory for the LKM. In this way, the LKM rootkit can be loaded into kernel memory even without LKM support.
8.5.4 VFS Rootkits
VFS rootkits modify the virtual file system structures to redirect system calls to rootkit code without modifying the sys_call_table entries. The Linux Virtual File System (VFS) is a kernel component that enables the handling of file system operations across several kinds of file systems, such as EXT2, EXT3, and NTFS. Thus VFS provides a layer of abstraction between the program that makes the file-handling system call and the actual file system implementations.
VFS achieves a common file model using data structures such as the file object, inode object, and dentry object. The file object structure is created for any directory or file when accessed by a process. One of the fields in this structure is a pointer to the file_operations structure (f_op). The file_operations structure, in turn, contains pointers to functions specific to the file system type (e.g., NTFS).
Whenever a read is requested on a file, the SYS_read system call is invoked. The system call then gets the function pointer in the file object structure for the read function as file->f_op->read(..), which is an indirect call to the file system–specific read. A rootkit can modify VFS structures, such as the read function pointer described earlier, to point to the rootkit code [298]. Using this method, the rootkit can hide itself without the need to modify the sys_call_table entries.
Another VFS data structure that is often modified by rootkits is the inode object structure. The inode structure also contains function pointers to inode operation functions such as lookups (used for certain directory enumerations). To hide a process, the rootkit can change the function pointer for the /proc directory’s lookup function. The rootkit can then hide a process by modifying the process directory’s inode structure.
8.6 BIOS Rootkits
The Basic Input/Output System (BIOS) is the firmware code that is executed first when a PC is powered on. It runs power-on self-test (POST) code, followed by code to control the keyboard and screen display. After a series of initialization of devices and memory, the BIOS locates the master boot record (MBR) of the target drive and transfers control to the code located in the boot sector. Initially, BIOSs were distributed on ROM cards, although most of today’s BIOSs are contained on EEPROM cards. Since early 1998, BIOS has also supported power management routines and adheres to Advanced Configuration and Power Interface (ACPI) standards [171].
Based on motherboard settings, it is possible to write to BIOS flash memory. On some motherboards, such as the Intel SecureFlash, unsigned updates to the system BIOS flash memory are disallowed. On a vast majority of motherboards, writing to the BIOS is not allowed by default. This protection can be turned off by setting a jumper on the motherboard or by using a hardware setup program. Once the protection is disabled, a rootkit can write to the BIOS such that it can survive reboots. A rootkit technique using an ACPI-compliant BIOS is described here.
The ACPI is an industry-standard interface developed to provide robust OS-controlled power management and advanced configuration (OSPM). ACPI-compliant hardware platforms use the ACPI control method’s virtual machine language (AML) to execute. Conversely, hardware OEM vendors define objects and write control methods in ACPI Source Language (ASL); these methods are translated into AML using an ASL translator. The AML instructions are executed by the AML interpreter that is supported on an ACPI-compliant OS. Figure 8.18 shows a schematic diagram of the ACPI-supported OS.
Figure 8.18. A schematic diagram of an operating system that supports ACPI.

On ACPI-compliant systems with BIOS reflashing enabled, it is possible to write code into BIOS such that it survives reboots. The rootkit code can be written in Assembly Language (ASM) directly or written using the higher-level ASL, which can then be translated into ASM and written to the BIOS [166]. By creating new opcodes in ASM, the work function corresponding to the opcode can be executed.
Because BIOS can access system memory, the ASL objects can arbitrarily modify kernel memory. For example, an ASL object can overwrite critical kernel structures that can lower system security settings. Given that the BIOS has smaller memory storage and uses special language (not machine language instructions), the usual hook-based rootkit techniques will not work in this case. If the rootkit modifies firmware, however, it can survive reinstallation of the OS and will then be difficult to remove other than by reflashing the BIOS contents.
8.7 PCI Rootkits
The Peripheral Component Interconnect (PCI) bus specification provides a standard for peripheral devices to communicate with the CPU. The PCI bus connects peripheral devices (e.g., graphics cards, wireless cards) to the computer system. The PCI device can contain initialization code in the expansion ROM. The expansion ROM, in turn, can contain the images required to initialize various architectures in a single ROM. The devices should adhere to the configuration space header as shown in Figure 8.19.
Figure 8.19. Type 00h configuration space header.

During the POST process, PCI devices are queried to determine whether the expansion ROM base register is implemented in the configuration space. If this register is implemented, then POST maps the ROM image to main memory and determines whether the first two bytes are AA55. If this signature is found, then ROM is present. POST should then find a ROM image that matches the device ID and vendor ID in the configuration space. To provide compatibility with PC architectures, the second byte contains the initialization code size, as shown in Figure 8.20.
Figure 8.20. ROM header extensions. To ensure compatibility with the PC architecture, the second byte contains the initialization code size.

On Windows systems, to write to the expansion ROM of PCI cards, an input/output privilege level (IOPL) of 3 is required. Most user-mode applications have an IOPL value of 1. To obtain a higher IOPL, a process can set SeTcbPrivilege using the NtSetInformationProcess API. Alternatively, the rootkit can install a kernel driver to gain write privileges for PCI devices. Once the IOPL value of 3 is attained, the rootkit is written onto the expansion ROM.
At the next system start-up, the BIOS executes the POST process, which queries PCI devices and transfers control to the initialization code in the expansion ROM. Hence, control is transferred to the PCI rootkit. At this point, however, the rootkit is running in real mode (16-bit). The biggest challenge in PCI/BOOT rootkits is to maintain control during the operating system boot process and to regain control after the OS starts in protected (32-bit) mode. To regain control, real-mode interrupt vector table (IVT) entries are hooked. Some well-known examples of using IVT hooks are interrupt 13h (lower-layer disk services) and interrupt 10h. The rootkit invoked via real-mode interrupt hooks can patch the operating system loader to gain even stronger control, as in a BOOT rootkit. In this way, PCI rootkits may be used as an effective stealthing mechanism.
8.8 Virtual Machine–Based Rootkits
Virtual machine–based rootkits (VMBRs) modify the system such that the entire operating system, including user applications, is run in a virtualized environment. Hence any security applications running on the original operating system will now run in a virtualized environment. The rootkit itself runs outside the virtual machine. Thus VMBR rootkits are at an advantage when compared to security software, as they can execute at a layer lower than security software. Based on the type of virtualization support used by VMBR rootkits, they are classified as either software-based VMBRs (discussed in Section 8.8.1) or hardware-assisted VMBRs (discussed in Section 8.8.2).
8.8.1 Software-Based VMBRs
In software-based virtual machines, the virtualization support is provided by the Virtual Machine Monitor (VMM). The VMM runs on the native (i.e., host) operating system. The operating system that runs in a virtual environment is referred to as the guest operating system. There are no real CPU instructions that can be used to transfer control from host to guest operating system.
The VMM manages access to the underlying hardware and creates virtual devices to be used by the guest operating system. It interfaces with the real hardware by using the host operating system services. The VMM provides an abstract interface to the guest operating system via virtual devices. For its part, the guest operating system interfaces with the emulated hardware as if it were executing on a real machine. These interactions are trapped by the VMM and emulated in software. In short, the guest operating system runs in a virtualized environment without any modifications.
The software-based VMBR was first introduced by SubVirt, a proof-of-concept technology developed by University of Michigan researchers with support from Microsoft [215]. SubVirt uses two popular virtual machine monitors, VMware and VirtualPC. On a Windows system, Virtual PC is installed and the target OS is run inside Virtual PC. By contrast, the rootkit and malicious applications execute on host operating systems. On Linux systems, VMWare is used as the VMM and the target OS runs inside VMware. Once the VMM is installed, the images can be downloaded to the target system. Figure 8.21 depicts the workings of a software-based VMBR.
Figure 8.21. Software-based VMBR. Before infection, the operating system runs as normal on top of the hardware platform. After infection, the operating system runs as a guest on top of a VMM. The VMBR installs a new host operating system in which the malicious code runs. Because the malicious code runs on the host operating system, it is not visible to the guest operating system.

To allow the VMM to gain control of the operating system after a reboot, the boot order of the host operating system is modified. The VMM then starts the guest operating system, thereby allowing the target operating system to run on the VMM. The VMM silently transfers control to the host operating system. After the host operating system is started, the rootkit can then start malicious applications that run outside the target operating system.
8.8.2 Hardware-Assisted VMBRs
Newer 64-bit architectures such as AMD Pacifica and Intel VT-x support virtualization at the hardware layer. This support is provided by means of CPU instructions that can be used to transfer control between the virtual machine and the host. The virtual machine architecture is designed to support running multiple virtual machines on a single hardware platform, as shown in Figure 8.22. The VMM (also known as the hypervisor) is a system software component that controls the execution of multiple guest operating systems. BluePill, a proof-of-concept hardware-assisted VMBR for AMD, was introduced by Joanna Rutkowska, a renowned security researcher [364]. Another proof-of-concept hardware-assisted VMBR for Intel was introduced by Dino Dai Zovi [495].
Figure 8.22. Hardware-supported VMBR. Multiple guest operating systems, whose execution is controlled by the hypervisor, can run on the underlying hardware platform.

The processor supports at least two modes: VM (nonprivileged) mode and non-VM (privileged CPU or ring 0) mode. The hypervisor runs in non-VM mode and the guest operating system runs in a virtualized (VM) mode. The VMRUN (AMD)/VMLAUNCH (Intel) instruction launches a virtual machine, as shown in Figure 8.23. This instruction can be executed only in a privileged (non-VM) mode. After this instruction is executed, the hypervisor is suspended and the CPU saves the hypervisor state in main memory. The CPU initializes the virtual machine state from the virtual machine control structure (VMCS) passed as an argument to this instruction. Control is then transferred to the guest operating system until an intercept occurs, which causes the control to be transferred back to the hypervisor. The hypervisor resumes its execution at the next instruction after VMRUN/VMLAUNCH.
Figure 8.23. The hypervisor and guest operating system after execution of the VMRUN/VMLAUNCH instruction. The state of the hypervisor is saved in main memory. The virtual machine state is initialized from the virtual machine control structure (VMCS), which is passed as an argument to VMRUN/VMLAUNCH. The guest OS then retains control until an intercept occurs.
The VMCS contains settings that determine when control is transferred back to the hypervisor. The hypervisor can explicitly set intercepts to transfer control in case of certain interrupts and when particular instructions are executed. For certain sensitive instructions such as CPUID and RDMSR, control is transferred implicitly to the hypervisor. Although more than one hypervisor may be installed on a system, the hypervisor that is installed first has complete control over the system. There is no hardware bit or register that would help software running in the guest operating system to determine whether it is running in a virtualized environment.
The hardware-assisted VMBR takes advantages of this architecture to run at a layer lower than that used by the rest of the operating system. Its sets the VMCS and executes the VMRUN/VMLAUNCH instruction. After this instruction executes, the VMBR is in suspended mode and acts as a hypervisor. The operating system executing natively is then forced to execute in a virtualized environment. The VMBR acts as a hypervisor and monitors for events generated from the guest operating system. For example, it can detect instances where a guest operating system is attempting to detect that it is running in a virtualized environment.
For example, a guest operating system can use the SIDT instruction to detect the presence of a virtual machine. The SIDT instruction retrieves the base address of the IDT and can be executed in nonprivileged mode. On software-emulated virtual machines, such as VMWare, the IDT of the guest operating system differs from the IDT of the host system. In this situation, the SIDT instruction is used to detect the presence of a software-emulated virtual machine on a pre-hypervisor architecture (also known as Red Pill) [363]. However, a hypervisor-assisted VMBR can request an intercept when the SIDT instruction is executed, and modify the output to resemble execution on a native system.
Emulating VMRUN/VMLAUNCH. To avoid easy detection, the VMBR needs to either emulate the VMRUN/VMLAUNCH instruction or modify the registers to lie about the hypervisor support in the underlying hardware. To emulate this instruction, which can be executed only in non-VM mode, the VMBR running as hypervisor can trap the fault and create a new virtual machine. The VMBR then acts as a conduit between the guest operating system and the VM created by the guest operating system [364].
8.9 Rootkit Defense
This section describes some of the techniques used for the prevention and detection of rootkits. No single approach can effectively guard against all rootkits. Instead, a combination of techniques is needed to provide adequate protection against rootkits.
8.9.1 Rootkit Prevention
The best defense against rootkits is to prevent their installation on the system. As described in this chapter, rootkits modify several important system resources to successfully hide their presence. Thus denying access to such resources could thwart rootkit installation. This section identifies some of the techniques that could prevent rootkit infection.
Denying Write Access to the Process Address Space
As described in Section 8.3.1, for user-mode rootkits to be successful, they must have write access to the target process’s address space. By denying write access to a process address space, then, the process is protected from being infected by user-mode rootkits. However, some Microsoft components require write access to a process address space to ensure successful updates. Selectively allowing access to a process address space poses significant challenges.
Denying Write Access to Physical Memory
As described in Section 8.4.11, one way to load a kernel driver without using SCM is to write directly to physical memory. In Windows, physical memory is represented by the device DevicePhysicalMemory. There are few instances that require write access to this device in user mode. Given this fact, preventing write access to this device in user mode could prevent loading of kernel drivers using physical memory. By default, write access to this device is disabled in Windows Server 2003 but not in other versions of Windows.
Using PatchGuard Protection
Kernel patch protection (PatchGuard) is a protection mechanism developed by Microsoft to prevent unauthorized modifications to key kernel data structures and to the kernel code itself [68]. PatchGuard checks the integrity of the protected structures at regular time intervals and generates a blue screen of death (BSOD) once it detects a modification. Given that many key structures that PatchGuard protects are modified by rootkits, PatchGuard helps to thwart certain kernel-mode rootkits. Note that PatchGuard protection also interferes with many current implementations of software security products such as antivirus and firewall products, as these software products commonly patch the structures protected by PatchGuard.
PatchGuard is currently supported on 64-bit platforms such as Windows Server 2003 x64, Windows XP x64, Windows Vista x64, and Windows Server 2008 x64. The user access control (UAC) and signed driver loading security features [68], which were introduced in Windows Vista to provide protection against malware, also protect against rootkits.
Preventing ROM Updates
On some motherboards, such as Intel SecureFlash, unsigned updates to BIOS are disabled. The write access to BIOS is controlled via jumper settings and can be turned off. Thus, by disallowing writes to BIOS using one of these techniques, BIOS rootkits could be thwarted. Similar techniques of disallowing unsigned updates and writes to PCI flash memory could be used to protect against PCI rootkits.
8.9.2 Rootkit Detection
A rootkit, by definition, is invisible: It hides itself by modifying several key system structures. Thus it should be impossible to detect a complete rootkit that uses effective hiding techniques, as the detection software cannot get an unhidden view of the system. Luckily, so far we have not seen such a complete rootkit. This section describes some techniques that are used to detect rootkits on a system.
Cross-View Detection
The cross-view detection technique is the most popular mechanism for rootkit detection and is used by many rootkit detection software solutions [60, 112]. In this approach, two separate views are obtained for the same system resource and compared for discrepancies. For example, to detect hidden files, one list is generated using a Windows API such as FindFirstFile or FindNextFile. Another list is generated by reading the on-disk NTFS structures and parsing the structures to enumerate file information. Files that are present in one list but missing in the other are then reported as hidden files.
Similarly, to detect hidden processes, one list is obtained using a Windows API such as FindProcessFirst or FindProcessNext. The second list is generated by querying the object handle table (PspCidTable). Any discrepancies are reported as hidden processes.
The basic assumption made by this approach is that the resource is not visible in one list but visible in the other list. This assumption could be wrong if the rootkit modifies the second list, in which case there would not be any differences in the lists. For example, the rootkit might also remove the process information from the object handle table, so that this technique would not be successful in detecting hidden processes.
Virtual Machine Detection
It is difficult to identify a perfect VMBR, in which the detection software is running at a layer above the rootkit and not below it. However, using subtle techniques, it becomes possible to detect the presence of a virtual machine. This does not guarantee the presence of VMBR, but merely confirms the presence of a virtual machine, which could have been installed for legitimate purposes.
As an example, consider the challenges in detecting BluePill, a hardware-assisted VMBR. The BluePill author claimed that detecting this rootkit was impossible when she demonstrated the prototype developed for Windows Vista executing on an AMD 64-bit Pacifica system [364]. This claim generated a wave of controversy as researchers started challenging the undetectability claim. Several timing-related solutions were proposed, where a timer is used to measure the latency in execution of certain instructions with and without a virtual machine. An obvious problem with this approach is the lack of a baseline for comparing the instruction timings.
Another approach is to use the TLB cache for detecting the presence of a virtual machine [117]. In this approach, TLBs are filled by accessing certain known pages and then a CPUID instruction is executed. This instruction causes a trap if it executes in a hypervisor; as a result, some of the TLBs are flushed. After the execution of this instruction, the known pages are accessed again. If there is a significant difference in the timing before and after executing a CPUID instruction, it indicates the presence of a virtual machine.