
Chapter 8
Managing with Microtasks
In This Chapter
![]() Knowing which jobs to break down into microtasks
Knowing which jobs to break down into microtasks
![]() Going through the microtasking process
Going through the microtasking process
![]() Taking the plunge with Mechanical Turk
Taking the plunge with Mechanical Turk
When you start to microtask, looking carefully at a large job and breaking it down into small tasks that the crowd can carry out, you probably won’t have to worry about the details of the job. You give your job to a crowdsourcing firm. This firm prepares it for a crowdmarket, places it on that market, and then returns the complete job to you.
Microtasking is both the simplest and most demanding form of crowdsourcing: simple because it produces simple little tasks that should be easy to describe and easy to do; demanding because it’s often hard to create those little tasks.
This chapter gives you a full picture of the microtasking process. Even though you personally may not prepare jobs for microtasking, you’ll find it useful to see how microtasking is done and how microtasking platforms prepare jobs to be microtasked. Microtasking has the potential to have the greatest impact on businesses and organisations because it expands the scope of work, allowing you to do things you couldn’t do before.
Identifying Tasks That You Can Microsource
Microtasking has limitations. Some jobs can’t easily be microtasked, and some can’t be microtasked at all. You can’t easily microtask the design of an annual report, for example, nor can you microtask the work of finding a new way to store food in tropical climates.
 In preparing a job for microtasking, you expend a substantial amount of effort, so always begin by checking that the job’s suitable for microtasking. Good candidates for microtasking are jobs that tick three boxes:
![]() Volume: You’ve a large volume of work to do. If a job involves a small amount of data, you can probably handle the work with macrotasking or maybe even a crowdcontest.
Volume: You’ve a large volume of work to do. If a job involves a small amount of data, you can probably handle the work with macrotasking or maybe even a crowdcontest.
![]() Independence: You can break the job down into tasks that people can do independently of the whole. If the data can’t be handled independently, such as when you’re sorting a list, then you may need a more structured organisation to handle your task.
Independence: You can break the job down into tasks that people can do independently of the whole. If the data can’t be handled independently, such as when you’re sorting a list, then you may need a more structured organisation to handle your task.
![]() Human judgement: You need a person doing this, not a machine. If the job doesn’t require human judgement, such as the simple application of a formula to a list of numbers, look for a computer program to do the work.
Human judgement: You need a person doing this, not a machine. If the job doesn’t require human judgement, such as the simple application of a formula to a list of numbers, look for a computer program to do the work.
So, if a job requires you to process a large amount of data, and if that data can be processed one unit at a time, and if it requires human intelligence to process that data, it’s a good job to microtask.
 Emily’s the programme director of a non-profit organisation that’s engaged in international education. The programme takes teenagers from Eastern Europe and Central Asia to other countries. The students live with a host family and attend school. Emily has to find potential host families for 200 students. From experience, she knows that the easiest way to find hosts is to approach leaders of youth organisations for recommendations. In the past, Emily’s been able to find one host family for every two leaders that she contacted. So Emily needs to contact 400 leaders of youth organisations.
This job meets the aforementioned criteria to be a good candidate for microtasking:
![]() Volume: Emily has to process a lot of data. She needs to sort through a lot of web pages and directories to find the 400 names. If she needed only 40, she may have been able to assign the task to an assistant or to a macrotask worker. However, 400 is beyond the ability of a single person.
Volume: Emily has to process a lot of data. She needs to sort through a lot of web pages and directories to find the 400 names. If she needed only 40, she may have been able to assign the task to an assistant or to a macrotask worker. However, 400 is beyond the ability of a single person.
![]() Independence: Each name can be gathered independently of the rest.
Independence: Each name can be gathered independently of the rest.
![]() Human judgement: No simple directory of national youth organisations exists. Emily needs to locate a youth organisation, identify the leader of the group, and find the leader’s email address or phone number.
Human judgement: No simple directory of national youth organisations exists. Emily needs to locate a youth organisation, identify the leader of the group, and find the leader’s email address or phone number.
This kind of job is often called list enrichment or contact generation, because it's similar to generating contacts for a salesperson. It's been adapted to microtasking and is offered by a number of crowdsourcing firms such as CrowdFlower (www.crowdflower.com) and BusinessLeads.com (www.businessleads.com).
By using a list-enrichment service, you’re completely isolated from the crowd. In the example, Emily describes the information that she’s seeking, including the type of youth leader, the countries or areas in which to look, and the required info: name, title, email address and phone number.
Knowing How the Microtasking Process Works
Even though you can microtask through a crowdsourcing company, knowing how to prepare your own microtask is useful. By understanding how to prepare microtasking jobs, you’re not only able to do things that aren’t standard services, but you’re also able to recognise jobs that can be modified to utilise standard crowdsourcing services.
Keeping tasks short and simple
Design your microtasks to be short and simple. Microtask workers try to get the most of out of the crowdmarket and often look for short and simple work. These kinds of jobs allow them to use one of two strategies to get the largest payments:
![]() Intersperse tasks among other work. Crowdworkers intersperse tasks when they’re doing crowdwork at their place of work or are doing something else on the Internet. (Many crowdworkers are already employed by organisations.) They jump back and forth between tasks. Therefore, they’re looking for simple tasks that don’t require them to review the instructions each time.
Intersperse tasks among other work. Crowdworkers intersperse tasks when they’re doing crowdwork at their place of work or are doing something else on the Internet. (Many crowdworkers are already employed by organisations.) They jump back and forth between tasks. Therefore, they’re looking for simple tasks that don’t require them to review the instructions each time.
![]() Do a long series of the same tasks. The workers who devote more time to crowdwork realise that they need a little time to understand all the steps of a task fully. Therefore, they want to work on a large number of these tasks, so that they can learn to do them faster and therefore get more money.
Do a long series of the same tasks. The workers who devote more time to crowdwork realise that they need a little time to understand all the steps of a task fully. Therefore, they want to work on a large number of these tasks, so that they can learn to do them faster and therefore get more money.
 If your job has a small number of tasks, offer a slightly higher price for each task than you might think appropriate for the work. If you don’t, your job may stall in the crowdmarket. The crowd often avoids jobs with small numbers of tasks. Crowd members conclude that they won’t have enough opportunity to learn how to do your job quickly. To encourage them to take the tasks in a small job, offer a little more money.
Creating the basic task
In creating a microtask, you need to determine what you want from the job as a whole and then from each individual task. In most cases, the complete job produces a complex set of data. You assemble this final product from the results of each individual task.
Design your tasks around the idea of doing the same work on different inputs. You supply the crowd with a single set of instructions. The crowd members apply those instructions to different data and give you the results.
In Emily’s example (see the earlier Identifying Tasks That You Can Microsource section), her microtasks are the tasks of finding the names of youth leaders and their contact information. She has a common set of instructions for each task. She names a location and asks the crowd to identify a youth leader in that area. She then asks the crowdworkers for specific information about that person.
Finding the basic data
After you create the task, you need to identify the basic data to give to the crowdmarket. I suggest organising the data for microtasks in a spreadsheet – the common tool for preparing microtasks and for communicating with microtask platforms. When designing microtasks in a spreadsheet, use the rows to stand for the microtasks and the columns to stand for the different kinds of information that you’re trying to get from the crowd.
In Emily’s example (see the earlier Identifying Tasks That You Can Microsource section), she has one basic piece of data at the centre of her microtask: the location where she’s trying to identify a youth leader. That location is represented by a US postal code or zip code. She’s trying to find a youth leader in that area who might help her find a family to take an exchange student. In order to complete the microtasks, Emily seeks four pieces of information from the crowd: the youth leader’s name, employer, title and email address. She organises that information in a spreadsheet as follows:
![]() Column 1 contains the postcode data that Emily is giving to the crowd, and is labelled zip. This column holds the input data for the microtasks. Emily provides the US zip codes of the areas where she wants to place students. In this dataset, she identifies ten zip codes, and hence has ten microtasks.
Column 1 contains the postcode data that Emily is giving to the crowd, and is labelled zip. This column holds the input data for the microtasks. Emily provides the US zip codes of the areas where she wants to place students. In this dataset, she identifies ten zip codes, and hence has ten microtasks.
The remaining columns contain the information that Emily will receive back from the crowd:
![]() Column 2 is for the leader’s name.
Column 2 is for the leader’s name.
![]() Column 3 is for the leader’s employer.
Column 3 is for the leader’s employer.
![]() Column 4 is for the leader’s title.
Column 4 is for the leader’s title.
![]() Column 5 is for the leader’s email address.
Column 5 is for the leader’s email address.
Figure 8-1 shows a spreadsheet for ten of Emily’s microtasks.
To get your microtasking project underway, upload your spreadsheet to a microtasking platform such as Amazon's Mechanical Turk (www.mturk.com) or MobileWorks (www.mobileworks.com). The microtasking platform uses the information in your spreadsheet to create microtasks and offer them to the crowd. The crowdworkers never actually see your spreadsheet. They see just your instructions and the data that you provide in the spreadsheet for each task. The crowdworkers complete their work and enter the results in a field on their screens. When they click a button to finish the task, the platform stores the new information in the appropriate row of its version of the spreadsheet.
When the crowdworkers have completed all your microtasks, the information they’ve provided fills every row of your spreadsheet. At that point, you can download the completed spreadsheet from the platform so that you can use it. Most platforms also allow you to download it even when only some of the tasks are done.

Figure 8-1: An example microtask spreadsheet.
 Most microtasking platforms upload or download information in a form that’s technically known as a comma-separated values (.csv) format. When downloading, your spreadsheet program such as Excel, Quattro Pro or Smartsheet will read the .csv file as if it were an ordinary spreadsheet file. You’ll never know the difference. When uploading, you may sometimes have to save your microtasks in a .csv format so that you can upload them to the microtask platform. Just go to the Save As menu in your spreadsheet, find the .csv or commaseparated values file type and save your microtasks in that format.
Writing the instructions
Writing instructions for the crowdworker is your next step.
If you skip over to Chapter 11, you can find a detailed discussion of how to write instructions for the crowd. Writing instructions specifically for microtasking, though, has a few special considerations. Microtasks can quickly become complex and confusing, despite your efforts to keep them simple.
In Emily’s example (see the earlier Identifying Tasks That You Can Microsource section), Emily writes instructions as follows:
You’re asked to find a youth leader in a specific part of the country. That youth leader can be a scout leader, a church youth leader or any other adult who leads an organisation that provides social services to children between 10 and 16 years of age. You shouldn’t include individuals who work with children in the criminal justice system or who work with children who are physically ill, physically handicapped or mentally handicapped.
1. Above you will find a zip code. Find the name of a Girl Scout troop, Boy Scout troop, 4-H club or similar organisation located in that zip code.
2. For this organisation, find the name, title and email address of its leader.
3. Do not use email addresses that go to the organisation. Give only an email address that goes to the leader.
Despite these seemingly clear instructions, a crowdworker may find a youth group in one zip code but whose leader lives in another. For cases such as this, Emily should set out specific instructions that ask the crowd to find a group in that particular zip code and say that where the leader lives doesn’t matter.
As a rule, keep microtasking instructions as simple as possible. If you write instructions that are too detailed, you discourage potential workers. You may also increase the number of errors, because the instructions may confuse the workers. For example, using the example of labelling photographs, you may want to include the instruction:
If the photograph includes both people and landscape, judge which is more prominent, people or landscape, and label the photograph as such.
For some kinds of microtasks, you may want to have an action that catches all microtasks that can’t be easily processed by your instructions and tells workers to label them in a way that allows you or an assistant to review all of them:
If a picture is neither a portrait nor a landscape, label it as neither.
This strategy is most useful when the number of exceptions is likely to be few.
Pricing the tasks
Before you place your microtasks on the task market, you need to set a price for each one of them. The easiest way to set this price is to estimate the amount of time that it takes a crowdworker to do a single task. When you know how long the task should take, you can price the task at a level that gives crowdworkers a specific hourly wage.
The current research into crowdworkers with general skills suggests that these workers are looking to earn between $5 and $12 an hour, or roughly £3 to £8. If you offer a task that takes 4 minutes from accepting the task to submitting the result, the worker can do at most 15 of these tasks an hour. If you want to offer a wage of $6 an hour, you have to offer $6 ÷ 15, or $0.40 (£0.26) per task.
In general, the formula for pricing a microtask is:
Price per task = Target wage × (Minutes required for each task ÷ 60 minutes)
In microtasking, the crowdmarket doesn’t always work in the way that you might expect. If you increase the price that you offer for tasks, the work will likely be done more quickly. However, a higher price doesn’t necessarily improve the quality of the work. Higher prices attract bad workers to the tasks as well as good workers.
Training and validating workers
Before you release your microtask to the crowdmarket, prepare a way to train and validate the workers. The easiest approach is to have the crowdworker do a job that you’ve already completed and hence one that you know the right answer to.
Alena asks the crowdworker to click on a URL that takes her to a video taken from a traffic camera. She asks the worker to count the number of cars in the video. If the crowdworker’s number equals the number that Alena counted, Alena allows the worker to start working on real tasks. If the numbers don’t match, Alena asks the worker to do a second training step.
Some organisations require crowdworkers to complete a certain number of tasks correctly before they can do microtasks for pay. Many microtasking companies create a YouTube video to show crowdworkers how to do the microtasks.
Checking the results
You need to check the results you receive for accuracy. Depending on the task, you probably accept a degree of error: 5 or 10 per cent, say, but no more.
If you microtask naively by simply posting a request on a crowdmarket without worrying about reviewing the responses you receive, you’re likely to find that the bulk of the responses are wrong or unusable.
A student of mine, an ardent hockey fan, wanted to write a paper that required some detailed information that he could only get from professional hockey players. To contact the hockey players, he created microtasks that asked for email addresses for the Washington Capitals players. He placed the tasks one evening and got results the next day. All the results gave the email address for the box office of the Washington Capitals, an address that was no use to him. He rewrote his microtask, explaining that he was trying to get in direct contact with each player or the agent who represented the player. He asked to have each task done by three different people and he raised the price that he was offering for each task, to encourage the microtaskers to spend some time looking for the email address on the web. This time, he got useful information for all but a couple of the players. However, for each player, he still got at least one address that wasn’t correct.
In some cases, identifying incorrect work is easy. You see email addresses that lack all proper elements, answers that don’t respond to questions or text that has clearly been borrowed from other sources. However, in most cases, identifying mistakes and errors is difficult without actually testing the results. If you’re asking for email addresses, for example, you might get email addresses that look plausible but which are actually fake. When you try to use them, the email is returned quickly with the error ‘address not known’. You might also get email addresses for people who share the same name as the individual you’re trying to contact. The Internet has made the world a small place, and many people are out there have the same names as hockey players, youth leaders, world politicians or even distinguished Broadway actors.
In microtasking, bad results are either intentional or accidental mistakes. Intentional mistakes come from members of the crowd who aren’t capable of, or not interested in, producing good work. Accidental mistakes come from workers who believe they’re doing the right thing but are actually creating the wrong result.
You can aim to minimise intentional mistakes by getting the highest quality crowd to work on your tasks. To get the highest quality crowd, you need to qualify the workers. Most people qualify the crowd by giving potential crowdworkers a sample task for which the qualifier already knows the correct answer. When an individual gets the correct answer, the qualifier lets that crowdworker take her microtasks.
Even when you qualify your crowd, though, you can still face problems. Crowdworkers may spend extra time to do the qualifying task but then go on to do a poor job on the work that you give them. To counteract this, some crowdmarkets monitor their workers by slipping qualifying tasks into the workstream. Every now and then, all workers do a qualifying task – a task with a known answer – without knowing that they’re doing such a task. They will be paid for it as if it were a real task, but if they fail to do many of these tasks correctly, the crowdmarket excludes them from doing more of your tasks.
On most microtask crowdmarkets, you can exclude specific workers from your tasks who have produced bad work in the past.
Getting a high quality crowd, though, won’t remove all errors and bad work. To ensure the best possible results, you have to test the results. One way to do this is to go through and try to use the results as you intended. This process is obviously slow and doesn’t work well for jobs that have a large number of microtasks.
A second way to test the results of your microtasks is to ask that each task be done three times. You then compare the results. If the results agree, take the common result. If two results agree and one does not, accept the result from the two that agree. If all three disagree, reject all three answers and ask that the task be done three more times.
 Duplicating, triplicating or even quadruplicating tasks doesn’t guarantee that you get correct results for your microtasks, even if all the results agree. Crowdworkers can still agree on bad answers. And on top of that, duplicating work increases the cost of the work. If you ask for each task to be done three times, you triple the cost of the job.
You can find more about identifying bad microtasking work in Chapter 16. In that chapter, I look at how to divide work and assemble different kinds of crowds to catch errors and correct them.
As well as the advice I give you in Chapter 16, always bear in mind that you can improve the quality of your microtasks by paying close attention to the fundamentals: writing clear and concise instructions; guiding workers through the task; training workers to do your task as best they can; creating a process to review and test all work; and excluding workers from your tasks who regularly produce bad results.
Assembling the work
The last step of microtasking is to assemble the results from the individual tasks into your final product. In some cases, you have nothing to do. The goal of your job was to produce a database, such as a database of contact information for youth leaders. The crowdmarket sends you that database, usually in spreadsheet form.
In other cases, such as in Alena’s example (see the earlier section Training and validating workers), your final product is a statistical analysis of the data you’ve received. You get the data in some form, usually a spreadsheet, and do the analysis on the results yourself.
But in other cases, you need to assemble a complete product from the results of the crowdmarket. For example, you may decide to translate a large document by breaking it into paragraphs and sending those paragraphs to the crowdmarket for translation. When the tasks are done, you have to put those paragraphs in order to create the final document. You might do this work yourself or you might hire a macrotask worker to do this job.
Most crowdmarkets, including Amazon’s Mechanical Turk and CrowdFlower (which also uses Mechanical Turk), have a special system interface, which is known as an application programming interface (API). These APIs allow you to write a program that sends data directly to the crowdmarket and gets the answers back. You can create a program that automatically breaks a large problem into small tasks, send the tasks to the crowdmarket, retrieve the results from those tasks, and assemble the final result. Needless to say, this kind of program requires sophisticated IT staff.
Working through an Example with Mechanical Turk
You don't know nothing about microtasking, to borrow phrasing from Mr Mark Twain, until you've mastered a crowdsourcing platform called Amazon's Mechanical Turk (www.mturk.com). Mechanical Turk is currently the most widely used platform in crowdsourcing and is really a sophisticated crowdmarket, a place where crowdsourcers look for workers to do their tasks. It's regularly used by firms that offer crowdsourcing services to the public. (Puzzled about the name? Take a look at Chapter 3, where I explain its origins.)
Throughout this section, I take you through setting up Emily’s task (see the earlier section Identifying Tasks That You Can Microsource) on Mechanical Turk.
Creating the task
You need to design the form that Mechanical Turk will use to present the task to the crowdworker and to collect the data. To do this, you need to log on to Mechanical Turk as a requester. Here’s what to do:
1. Go to www.mturk.com.
2. Click on the Requester (or Get Results) link.
3. Log on to Amazon Turk (if you haven’t signed up yet, go through the sign-up process).
4. Click on Get Started link.
5. Click on the type of task you want to create (Data Collection).
6. Click on the Get Started button.
When you complete these steps, Mechanical Turk creates a new data collection project. When it creates the project, Mechanical Turk uses an example that collects data about restaurants. You can modify this example so that it’ll do what you want it to. Instead of collecting information about restaurants, Emily wants to collect information about youth leaders.
Describing the basic properties
After you click the Get Started button you see a screen that enables you to describe the basic properties of your project. Here, you give your project a name (which you use to find your project on Mechanical Turk), a title (which is displayed to the crowd), a longer description of the project, and keywords for the project.
The crowdworkers use the name, title, description and keywords to find your microtasks and decide whether they’re going to do them. Spend enough time on these elements so that they’re accurate and sound engaging.
Changing the qualities of your microtasks
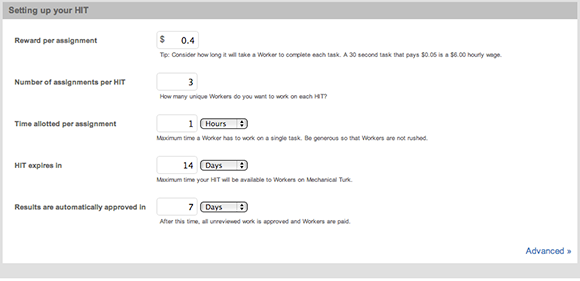
After you describe the basic properties of your microtasks, you move to a screen that asks you for the basic properties of your tasks, or Human Intelligence Tasks (HITs), as Mechanical Turk calls them. I provide an example of this screen in Figure 8-2.
For your first job, you can take the values that Mechanical Turk recommends. The only one that you may consider changing is the first value, which sets the amount of time allotted to this task. If the crowdworker doesn’t complete the job within this time, Mechanical Turk cancels the task and returns it to the market. This value is more than an estimate of the amount of time required to do the work. It includes the time for bathroom breaks, coffee refills and email responses. You should be generous. The default value, one hour, is fine for short tasks. However, expand it to two or three hours for longer tasks.
Reproduced with permission from Amazon.com.
Figure 8-2: Setting the qualities of your microtask in Mechanical Turk.
Sorting pay, replication and deadline
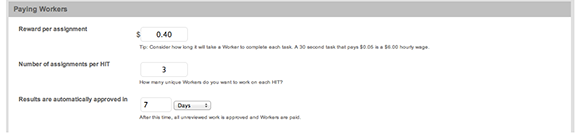
At the bottom of the screen, you can set the payments for the workers. In case you guess too low or too high, you can change these values later. Figure 8-3 shows this part of the screen.
Reproduced with permission from Amazon.com.
Figure 8-3: Worker payments screen on Mechanical Turk.
You first need to set the price for each task.
A task worker may be able to search the web, identify a youth leader, and copy the information in about three minutes. If she works continuously, she can do 20 tasks an hour. A price of $0.40 would give her a wage of $8 an hour. That value may be a reasonable starting point. Efficient crowdworkers can do a search and copy task in 90 seconds, which produces a wage of $16 an hour.
After setting the price, you need to set the number of assignments or replications. Many times, you replicate the microtasks to check the work and produce the best possible work, with two or three workers doing each task and you then comparing the results. If the workers all produce the same result, you have some confidence that they all did the work correctly.
In Emily’s case, she doesn’t replicate the microtask to check the results, because each member of the crowd may find a different result for the same task. One member of the crowd may find a Girl Scout troop at a public school, another may find a Girl Scout troop at a Catholic School, a third may find a 4-H Club on the edge of the region, and another may find a Young Achievers’ Club, something Emily hadn’t considered. Still, even though Emily may not want to replicate each microtask to check the accuracy of the work, she may want to do it to get more information. Her experience has taught her that maybe only one of every two youth leaders is able to help her place a student. Therefore, she may want to do each task three times so that she potentially has three different contacts for each area.
Finally, you need to identify a deadline for accepting the results from the crowdworkers. Normally, Mechanical Turk stores the results. You can review these results and decide which ones to accept and which ones to decline. However, if you get distracted or forget about your job, you have workers who are going to be getting impatient about being paid. You have to set a date that allows the system to approve any completed task that you’ve not reviewed. By default, Mechanical Turk sets this date to be seven days after the task is completed.
Crowdworkers normally like to be paid within 24 or 48 hours. If you can keep this deadline short, you get a better reputation among Turkers.
Laying out the work
Your next task, should you choose to accept it, is to prepare a screen for each microtask. The crowdworkers will work from the microtask screen you create. From it, they’ll get the basic instructions for the microtask and will enter the information that they find back into it.
To create a microtask screen in Amazon Mechanical Turk, you need to prepare a description of what you want in Hypertext Markup Language (HTML) – a computer language for websites and web pages. (You can use HTML to create a web page, set the colour of the background, the size and font of the text, and the location of pictures.) If this first mention of something as alien-sounding as HTML makes you want to run for the hills, don’t panic! If you don’t know anything about HTML, you may want to take a look at HTML, XHTML and CSS For Dummies by Ed Tittel and Jeff Noble (Wiley). But, in truth, you don’t need to know much about HTML to set up a microtask screen, because I have the following trick up my sleeve. It may seem tricky at first, but do it once or twice and you’ll be a past master in no time.
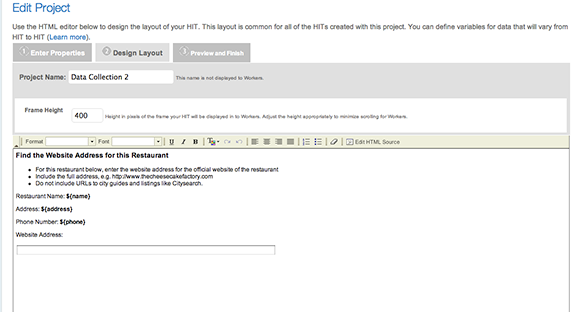
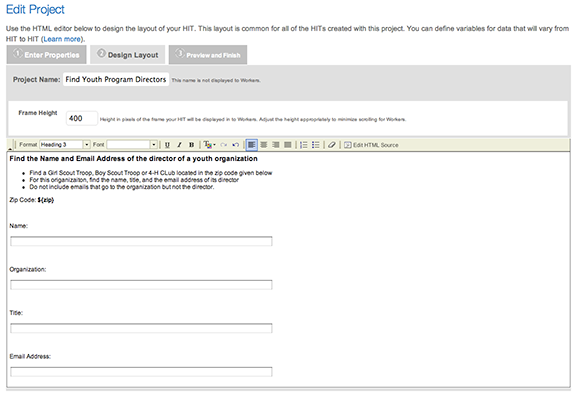
If you’re completely new to HTML, a neat trick for creating a new microtask screen in HTML is to do what programmers have been doing for generations: instead of trying to learn some new piece of technology from the ground up, just look for an existing example that does something similar to what you want to do, copy that example and modify it so that it does what you need. Simple! Fortunately, when Mechanical Turk creates your job, it automatically generates a microtask screen for its example (the one that asks the crowd to find the address of a restaurant’s web page). You can modify this screen. In this example, which you can see in Figure 8-4, the screen shows the instructions for the crowdworker in a bulleted list, and the name, address and phone number of the restaurant. After searching for and finding the address of the restaurant’s web page, the crowdworker then enters it in the relevant field on the screen. (You can find it by clicking on the Design Layout tab on the Edit Project screen.)
Reproduced with permission from Amazon.com.
Figure 8-4: A sample microtask screen from Mechanical Turk.
Emily needs a screen that’s slightly different – a screen that gives the crowdworker a single piece of information (the zip code) instead of three, and takes four pieces of information in return, instead of one. And the information she needs to obtain is different, too. The way for Emily to create her own screen is to take the screen generated automatically by Mechanical Turk and edit the underlying HTML code. That way, she doesn’t have to do it all from scratch.
To edit the underlying HTML code, Emily needs to take these steps:
1. Click on the button that says Edit HTML Source.
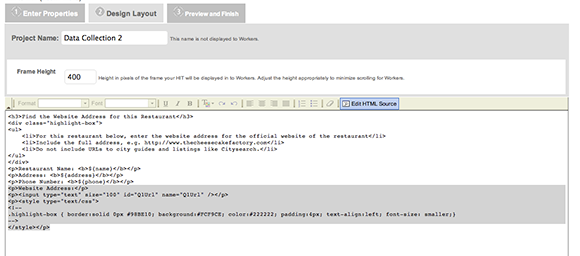
This button is on the far right-hand side of the grey task bar that runs through the middle of the screen. After clicking that button, the original HTML source screen appears, as is displayed in Figure 8-5.
When you first look at the code in Figure 8-5, it may look like a jumble and make no sense. Compare it carefully with the microtask screen in Figure 8-4, though, and it start to makes sense. You start to be able to identify the text that you need to modify in order to generate a microtask screen that works for you.
2. Edit the HTML code for the title of your page.
When you look at the HTML code, you see text that contains HTML tags. You can identify the HTML code because it's filled with tags. Tags are little commands that describe how the text should work. You can identify them because they begin and end with angle brackets, < and >. HTML tags usually come in pairs. One tag tells Mechanical Turk to start doing something and the next one tells it to stop. For example, the <b> tag indicates that the text which follows it should be in bold type and the </b> tag indicates that the bold text should stop there. Likewise, the <i> tag indicates that the text which follows it should be italicised and the </i> tag brings the italics to a stop. Any tag containing a forward slash is paired to an earlier tag that is identical but without a slash.
Reproduced with permission from Amazon.com.
Figure 8-5: The HTML source for microtasking screen.
At the top of the white area in Figure 8-5 is the HTML code <h3>Find the Website Address for this Restaurant</h3> that creates the title at the top of the microtask screen in Figure 8-4. However, you need to change the title of the microtask screen to read <h3>Find the name and email address of the director of a youth organisation</h3>. To make the change, simply erase the information between the two HTML tags (the <h3> and the </h3> tags) and replace it with the new title.
3. Edit the HTML code that describes your instructions.
A few lines down, between the <li> and </li> tags, are the three lines of instructions for the sample microtask. The first line of instruction reads <li> For this restaurant below, enter the address of the official website</li>. You need to replace these lines with your own instructions. To do this, delete the text between these two tags and replace them with your own instruction. Your instruction might begin <li> For the zip code below, find the name of an organisation that provides services to children between the ages of 12 and 16</li>. (If you don't need three lines of instructions, you can delete one or two of them. If you need to add an extra line of instruction, just start it with <li> and then type in your instruction, ending the line with </li>.)
4. Edit the informational HTML codes.
Currently, the screen gives three pieces of information: name, address and phone number. Again, by looking closely at the code here, you can see that it presents the name of the restaurant with the code <p>Restaurant Name: <b> ${name} </b> </p>. To modify the HTML code to give the zip code for the region, you simply change that line to read <p>Zip Code: <b> ${zip} </b> </p>. (You use ${zip} to represent the zip code, because zip is the name in the top line of your spreadsheet in Figure 8-1.) You can then delete the next two lines, which present the address and phone number – pieces of information you don't need the crowd to collect.
5. Create the fields that the crowd will use to enter the information you require from them.
Currently, the Mechanical Turk has only one field – Website Address. Because you want the crowd to enter the name, title, employer and email addresses of the youth leaders, you need to create three more fields.
To do this, you need to work with the HTML code highlighted in grey at the bottom of Figure 8-5. The code here creates fields on the main screen. To create three new fields, you have to copy that code and duplicate it three times.
6. Modify the fields that the crowd will use so that the fields work the way you want them to.
For each of the four fields (name, employer or organisation name, title and email address) you need to modify three elements of the code: the title given to the field, the field ID and the field name. Figure 8-6 identifies those three elements.

Reproduced with permission from Amazon.com.
Figure 8-6: Changing the Mechanical Turk example.
To modify the first field so that it'll receive the name of one of a youth worker, you simply need to change <p>Website Address:</p> to <p>Name:</p>. You also change Q1URL to name in both the field ID and the field name. (You use name because that word is in the first row of your spreadsheet (see Figure 8-1).)
After you modify the first field, go ahead and make similar changes to the second to identify it as the field that'll receive the organisation information. You simply change <p>Website Address:</p> to <p>Organisation:</p>. You also change Q1URL to organisation in both the field ID and the field name.
Similarly, for the third field, change <p>Website Address:</p> to <p>Title:</p>. You also change both references to Q1URL to title.
Finally, for the last field, you change <p>Website Address:</p> to <p>Email Address:</p>, and change both references to Q1URL to email.
Congratulations – you’ve now modified the HTML code and created a microtask screen! You should be able to see the result by clicking on the Preview tab. The final microtask screen should look like Figure 8-7.
Reproduced with permission from Amazon.com.
Figure 8-7: The microtask screen created for the youth leader example.
Starting with a test run
After describing your tasks and creating your microtask screen, you’re ready to start microtasking with a test run. Always start your job with a small test run. Put 10 or 15 tasks to the market to test whether the crowd engages with them and does the work well. You can find story after story of people who sent a job to Mechanical Turk with 10,000 or more microtasks that failed miserably. The problem in these instances was that the instructions were confusing or perhaps the prices they set were wrong. Something went bad.
Be ready to fail with Mechanical Turk, but fail on the cheap. Always do a test run.
The size of the job is determined by the amount of data that you give to Mechanical Turk. To do a small test job, use a small spreadsheet with only ten rows, such as the one I show in Figure 8-1. To have Mechanical Turk read this file, you need to save it in Comma Separated Value format, which is often called .csv format. You can save it in this format within a spreadsheet program.
When you’re ready to launch your microtask job, return to the Create Job page, where you’ll see a list of the jobs that you’ve created. To get your job started, click the New Batch button. Mechanical Turk asks you to upload your file of data. It then analyses your data and determines the cost of the job. Start with a short trial run of 15 microtasks (five zip codes, with three contacts per zip code). You’re going to offer $0.40 (£0.25) for each microtask, for a total of $6 (£3.75). Mechanical Turk adds a 10 per cent fee, so the grand total will be $6.60 (£4.15). Mechanical Turk requires you to pay the amount in advance, so make sure you have your credit card ready before you start the job.
When you’ve paid for the microtasks with your credit card, you’re ready to go. Click the button marked Publish HITS in the lower right-hand corner and Mechanical Turk will take your microtasks and send them to the crowd.
Don’t start jobs that you can’t stop. If you need to stop your microtasks in Mechanical Turk, you do so by going to the Manage tab. Click on that tab and you’ll see a list of all the jobs, which Mechanical Turk identifies as batches, that you’ve submitted to Mechanical Turk. The list shows how many tasks you submitted and how many have been completed by the crowd. If you hit the Cancel this Batch button, Mechanical Turk will stop your job. If the crowd is still doing some of your tasks, it’ll be allowed to complete them. However, the crowd will no longer be able to start new tasks.
Reviewing the work and retrieving the results
After starting the job and giving the crowd time to find and complete the tasks you’ve set, you need to see how much the crowd has accomplished, review the work done and download the results.
Reviewing your microtasks on Mechanical Turk is easy: just go to the home page and then to the Requester page, where you click on the Manage tab, which takes you to the Manage page. There, you can see how many of your jobs are on the Mechanical Turk market and how many of the tasks are complete.
If you have more than one job on Mechanical Turk, each is described in a little rectangle on the screen. When you’re ready to review the results from any job, just click on the Results button in the upper right-hand corner of the rectangle.
The Results screen shows you the results of all the completed microtasks within a job (which Mechanical Turk calls batches). You can review each individual task to determine whether it’s been properly done. If you think it’s been properly done, you can approve it. Approving a task triggers Mechanical Turk to pay the crowdworker who completed the task. If you think a task hasn’t been done properly, you can reject it. When you reject a result, Mechanical Turk doesn’t pay the crowdworker, and it returns the task to the market so that another crowdworker may attempt it.
When you reject a task, Mechanical Turk asks you the reason for your rejection. Most commonly, task results are rejected because the crowdworker didn’t follow the instructions or produce a result that met the crowdsourcer’s requirements. Be sure that you have a sound reason when rejecting a task; if you don’t, the crowdworker can appeal your rejection.
From the Results screen, you can also download the results of the tasks. In the upper right-hand corner of the screen is a button named Download CSV. When you click on this button, Mechanical Turk downloads the results from your tasks to your computer’s hard drive. From there, you can read these results with a spreadsheet program. The spreadsheet looks exactly like your original spreadsheet, except that all of the blank cells are now filled with data.
Congratulations, you’ve completed your first job on Mechanical Turk!
Reviewing the prices of your microtasks
From the Manage screen, you can review the prices you paid for the microtasks and the hourly wages that the crowdworkers earned by doing your task. In a test run for Emily’s example, the workers took about two minutes, on average, to complete a single microtask. At $0.40 (£0.26) per task, they therefore earned an average of $12.30 (about £7.80) an hour.
This average hourly wage enables you to set the prices for your tasks. Setting your prices is important because, ultimately, the market will determine whether your tasks are priced too low or too high. If you price them too low, the crowd won’t take them. Price them too high and you may pay too much for each task.
To get the price right, you may find it useful to compare the average hourly wage for your tasks with the minimum hourly wage in your country. In the USA, for example, the minimum wage is $7.25 (£4.60). If the average hourly wage you set for your tasks gets close to that figure, you may find that the crowd tends to avoid your tasks. Of course, however, Mechanical Turk is a global marketplace. The minimum wage for workers in one part of the world is not the same as the minimum wage in other parts of the world.