Widgets
Clicking on the Widgets icon in the toolbar opens the Widgets panel. Widgets give you the ability to control Csound with a graphic panel that you design yourself. You can use the knobs and sliders you create in the Widgets panel either to set the starting values of sound parameters or to interact with Csound’s instruments while they’re playing. What you can’t do quite so easily is record your real-time knob and slider movements on one pass and then have them play back on subsequent passes. It’s possible to do this, but you’ll need to do a fair amount of programming in order to accomplish it, because CsoundQt won’t do it right out of the box. (Cecilia 4.2 has this capability; see Chapter 9, “Front Ends,” for more on Cecilia.)
The best way to learn to use widgets may be to open up and study the example .csd files that illustrate their use. The Examples > Widgets menu provides access to more than 15 example files, which you can freely edit. You can’t save the files in the Examples folder back to their original locations, however. You have to use Save As to save them in your own location. This ensures that the examples will remain intact.
In this section, rather than walk through the examples, we’ll explore how to create and use widgets. The general process is as follows:
1. Open the Widgets panel.
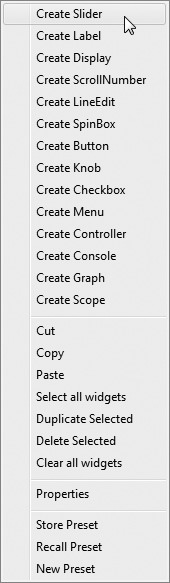
2. Right-click (Mac: Control-click) in the panel and create a widget, using one of the choices in the pop-up menu (see Figure 5.5).
3. The Properties box for the new widget will open automatically. In the Properties box, give the widget a unique and easy-to-remember channel name.
4. In your code, use the invalue opcode to receive k-rate data from that channel.
The pop-up menu will give you a choice of 14 different types—Slider, Label, Display, ScrollNumber, LineEdit, SpinBox, Button, Knob, Checkbox, Menu, Controller, Console, Graph, and Scope. The Slider and Knob types should be easy to understand. The Label type is strictly for adding useful text to your panel: It doesn’t transmit values to Csound. And the Console widget appears not yet to do anything at all. The other types are more complex, so we’ll look at them in more detail.
All of the Properties boxes for widgets let you set their X and Y positions and the width and height for the widget. However, not all of these parameters affect all widgets. Changing the width or height of a checkbox, for instance, does nothing, because a checkbox has a fixed size. The X (horizontal) and Y (vertical) positions will be calculated in pixels from the upper-left corner of the Widgets panel. (If you remember Cartesian coordinates from trigonometry, you’ll understand that the Y value is actually -Y in Cartesian coordinates, because larger Y values will move the object further down on the panel. This is fairly standard in computer graphics.)
With sliders and knobs, setting the minimum and maximum values that will be needed by your code is a good idea. At present, the knobs and sliders have no minimum resolution value. That is, they output a different value for each pixel through which they move. You can produce a more coarse resolution in the Csound code if you need to, but if you need finer resolution the way to get it is to make the widget larger. If you only need a few values, such as 1.00, 2.00, 4.00, and 8.00, you’ll probably find that a row of buttons or checkboxes will give you a better interface. (See below for how to do this.)
Figure 5.5 The pop-up menu for creating widgets. Also in this menu are some useful editing commands and the ability to store and recall presets for the current widget configuration.
The LineEdit widget may be of limited value. The example file in the Examples directory illustrates two ideas. One simply echoes the text you type back to a Display widget. The other allows you to play tones from the QWERTY keyboard by typing single characters into a LineEdit, which is immediately cleared. You could also use this widget to enter a filename before running your .csd file, after which an instrument would load an audio file from disk; but there would most likely be more graceful ways to accomplish the same thing.
The SpinBox widget lets you type numerical input values and also select them using up and down arrows. This widget is sometimes convenient, because the up and down arrows have a resolution (which is set in the Properties box using, obviously, the Resolution parameter). In version 0.6, typing values into a SpinBox doesn’t work too well, but the problem has been resolved in version 0.7.
The Menu widget lets you create a named list of options (such as, perhaps, “saw,” “square,” “triangle,” and “sine” for a waveform selector menu), which will appear on a drop-down menu. These will be transmitted to the invalue opcode as integers 0, 1, and so on, in the order in which you list them in the Items field in the Properties box. Items should be separated by commas, but without spaces:
saw, square, triangle, sine
Button widgets can transmit either a value (via outvalue) or a score event. The value to be transmitted is set in the Value box (see Figure 5.6). If the Latch checkbox is checked, the button acts as a toggle: Clicking it once will send the value, and clicking it a second time will send a value of zero. If the checkbox is not checked, the mouse-down event when you click will transmit the value, and the mouse-up event will transmit zero.
Figure 5.6 The Properties box for CsoundQt’s Button widget. Choose the type of button you want by using the Type drop-down menu.
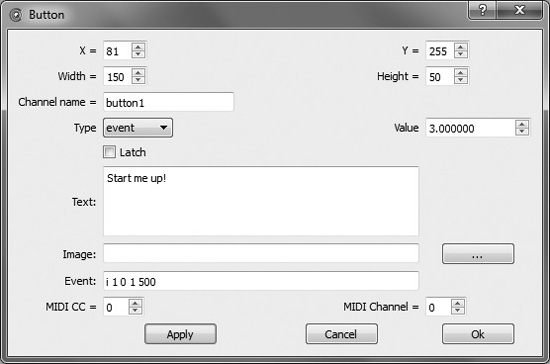
If you choose the event type for a button, you should type a score event in the Event field. This event will be transmitted to Csound each time the button is clicked. (The Latch box is ignored with events.) The value for p2 in the event will normally be zero, in which case the event will start immediately—but if you enter a non-zero value for p2, the event will be delayed.
Controller widgets are visually attractive and come in several types, as illustrated in the demo in the Examples menu. They can operate like vertical or horizontal sliders, or they can be configured as X/Y mouse control surfaces. The latter can display either crosshairs or a point. The background of these widgets is always black, but the foreground color can be edited. You can choose the type of Controller you want (fill, llif, line, crosshair, or point) from the Type drop-down in the Properties box. Both the fill and llif types create solid bars of color that you can drag across the black background with the mouse; the difference is whether the background is to the left/bottom or to the right/top. The horizontal or vertical movement of the fill depends entirely on the Width and Height parameters of the Controller. Whichever is larger will determine the direction of active movement.
To use the Graph widget, you need to enter the command --displays in the Additional Command Line Flags field in the Run tab of the Configuration box and check the associated checkbox. If you do this, a graph widget will display the f-tables generated by a running .csd file. You can use the drop-down menu in the widget to choose a table to display.
Channel names don’t strictly need to be unique. If you create two sliders with the same channel name, for instance, you’ll find that you can grab and move either of them with the mouse, and that each of them will follow the movements of the other. There’s probably no reason to do this. You might imagine that it would be useful to create a bank of buttons, as mentioned above, give each button its own output value, and give all of the buttons the same channel name. Unfortunately, this technique doesn’t yet work. If you try it, you’ll find that the output value received by Csound’s invalue opcode will always be the value set in the Properties box for the first-created button, no matter which button you click. This behavior may change in the next release. In the meantime, the way to get the desired result is to create four buttons with different channel names and then write Csound code that will adjust the desired variable to the desired value.
As a way of illustrating how to get data out of widgets, let’s look at an example that does that. Create four buttons. In their Properties boxes, give them display text of 1.0, 2.0, 4.0, and 8.0, the corresponding output values, and the channel names button1, button2, button4, and button8. Then create this instrument:
  instr 1
  kcurrentbutton init 1
  kbutton1 invalue “button1”
  kbutton2 invalue “button2”
  kbutton4 invalue “button4”
  kbutton8 invalue “button8”

  if kbutton1 != 0 then
   kcurrentbutton = kbutton1
  endif
  if kbutton2 != 0 then
   kcurrentbutton = kbutton2
  endif
  if kbutton4 != 0 then
   kcurrentbutton = kbutton4
  endif
  if kbutton8 != 0 then
   kcurrentbutton = kbutton8
  endif
  asig oscil 0.25, 200 * kcurrentbutton, 1
  outs asig, asig
  endin
Only one button can output a non-zero value at a time, because you have only one mouse. (This code may fail with future versions of Csound designed for multi-touch devices.) The buttons will let you choose the octave of the tone.
Designing a Widgets Panel
The point of origin of a newly created widget will be wherever you right-clicked to create it. When you create a widget, its Properties box will open automatically; in this box you can edit both the point of origin and the X and Y dimensions. You can also make changes in the size and position by entering widget edit mode (using Ctrl+E or the command in the Edit menu) and moving or resizing the objects graphically. The size of widgets can be controlled by clicking and dragging on the red handle in the lower-right corner, and the position of the widget can be changed by clicking on it and dragging.
Right-click menu options in the Widgets panel offer further editing possibilities. If one widget partially or completely obscures another, you can use the Send to Back command. The Align, Distribute, and Center commands in this menu can be used after selecting several objects to tidy up a layout.