Chapter 8
Spinning with CDs
In This Chapter
![]() Considering designs of CD decks
Considering designs of CD decks
![]() Locating the right tune and cue point using different CD deck controls
Locating the right tune and cue point using different CD deck controls
![]() Starting the CD and making pitch corrections
Starting the CD and making pitch corrections
![]() Trying out additional CD deck features
Trying out additional CD deck features
The great thing about mixing with CDs if you beatmatch is that the only way the beats of two tunes can drift out of time is if you haven’t correctly set the pitch. When the pitch is right and the beats are in sync, all you have to worry about is the mix, not dodgy motors on cheap turntables.
This chapter discusses the various controls on CD decks and how CD DJs use them to do the same thing as vinyl DJs do, and how they use them to take mixing to another level of creativity.
Getting to know the DJ CD Deck
A CD deck meant for DJ use is different from the one that sits sandwiched in a home hi-fi system. The main differences are:
- The layout of the CD deck is different.
- Controls and displays help you search and find exact start points in tunes.
- Pitch controls enable you to alter the speed at which the CD plays.
- Rugged designs prevent the CD from skipping.
DJ CD decks have many more improvements (see the later section ‘Taking Advantage of Special Features’); these design features are what separate domestic from DJ.
Laying out the design
CD decks come in a few different models, and although the functions and ease of use vary depending on the layout of the CD deck, these various designs allow you to mix music no matter what genre you play. Rock, pop, indie, house or wedding DJs can use any of the CD decks I mention in this section. The only DJ who may demand something more specific is the scratch DJ.
Twin CD decks
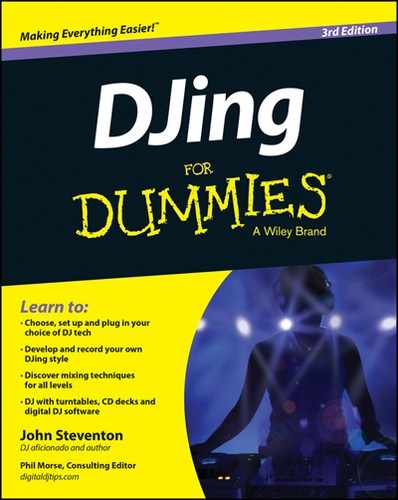
Twin CD decks (shown in Figure 8-1) are split into two halves. The top part is a control panel with two sets of time displays, playback and cue controls, a pitch slider and pitch bend, and a jog wheel for each deck to help search through music on the CD. Together, these controls let the DJ find the right place in the track, start it playing, set the pitch controls to match beats if beatmatching, return to the cue point, start the tune with a press of a button, and adjust the speed briefly with the pitch bend if the beats aren’t properly matched.
The control panel is linked by a cable to the other half of the unit: two CD players that use a ‘tray’ system (like a home CD player) to take the CDs in and eject them when you’re done.
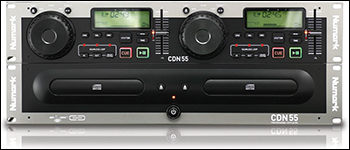
Figure 8-1: The Numark CDN55 twin CD deck.
Twin CD with a built-in mixer
Twin CD decks like the Numark CD MIX 1 (shown in Figure 8-2) take the twin CD design one step further; instead of a separate twin CD unit and a mixer, everything comes together as one piece of equipment. This design is good on paper, but because the mixer that’s included with this kind of setup is quite basic (especially in the case of the CD MIX 1), you limit yourself in creativity by going down this route.
This design is good for the party/wedding DJ, who may only use the mixer to set the volume of both the CD players, and perform a very simple, very quick mix from one CD to the other. But because the mixer is basic – mainly because of a lack of EQ (equaliser) controls – it doesn’t give you full control over the sound of the mix.
 This CD and mixer combination does look good financially when you start as a DJ, but beatmatching DJs will soon yearn for a new mixer, and this is a problem because even though you can send the outputs of the CD decks on this combined CD player/mixer unit to another separate mixer, you’re still stuck with the original mixer lumped together in a big box of plastic and metal with the CD decks. The mixer is always part of your setup, whether you use it or not.
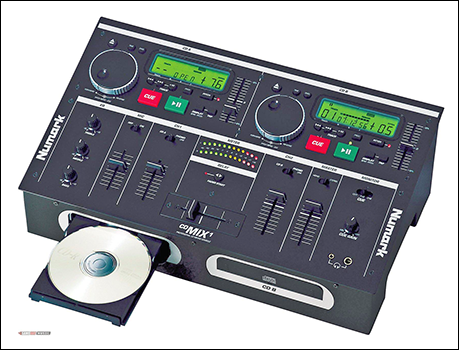
Figure 8-2: Numark’s CDMIX 1; good value unless you want more functionality.
Single CD decks
Single CD decks don’t tend to use the tray design that the twin units use. Older CD decks used a top-loading design, where the top of the deck was hinged and opened up for you to insert the CD, but the newer CD decks use a slot on the front of the unit, which automatically takes in and spits out the CD using motors (similar to the CD player you may have in your car stereo).
The controls on offer on single CD decks are similar to the twin units, except the pitch slider may be a lot longer (which offers you finer control) and the jog wheel is bigger, helping you find cue points (start points) on the CD with ease. Single CD decks may also have a host of other controls to enhance the mix, such as loops, reverse play and hot cues (see ‘Taking Advantage of Special Features’ later in this chapter).
Scratch DJs and CD decks
Innovations in CD technology have given the scratch DJ the ability to scratch on CD, but doing it well, with ease, comes at a price.
The first thing that affects how well you’re going to be able to scratch on the CD deck is the size of the jog wheel used to perform the scratch. Scratch DJs need large jog wheels that they can scratch with as though they were using normal records. This means that the jog wheels on twin CD decks, which are sprung and only turn 90 degrees left and right, aren’t suitable for the scratch DJ.
The Pioneer CDJ range uses large jog wheels. Figure 8-3 shows the Pioneer CDJ-900.
Figure 8-3: The Pioneer CDJ-900 single CD deck.
 The jog wheel aside, the most important thing the scratch DJ needs from a CD deck is for the CD to sound like a record when being scratched. Unsuitable CD decks just stutter and stop when the DJ turns the jog wheel, but the ones suitable for scratch DJs sound identical to a record player when you play the music backwards and forwards with the jog wheel.
Navigating the CD
The biggest difference between vinyl DJing and CD DJing is how you find a start (cue) point in a tune, and then how you start the tune playing. With vinyl, finding the cue is easy: pick the side of the record that your desired tune is on, look at the groove, place the needle near to where you want to start, move the record backwards and forwards to hear the precise cue point and then hold the record stopped at that point. The hardest part when DJing with vinyl, especially beatmatching, is starting the record at the right time so the beats play in time with the beats on the other tune instantly.
 CD DJing is the complete opposite of vinyl DJing. After you’ve found the correct cue point, starting the tune in time is extremely easy: all you need to do is press the start button, and if you’re beatmatching press it in time with the other beats. Locating the precise cue, however, can be a bit more difficult. Finding the cue on a CD means locating the right track on the CD, scanning (fast-forwarding or rewinding) through the track to find the general area you want to start from, and then fine-tuning the cue by playing the CD forwards or backwards by the smallest of amounts.
Although navigating the CD doesn’t sound particularly difficult, CD decks don’t have a visual reference other than the time display to help you know where (or when) you are in the tune in order to set the cue. Wave displays, such as the simple one shown in Figure 8-4, have a series of peaks and troughs to show the louder and quieter parts of the tune, and can help with this problem.

Figure 8-4: The wave display on the discontinued, but popular Pioneer CDJ1000 MkIII.
 Keep the inlay covers or written tracklists with your CDs to help you find the track number for a certain tune. Reading what’s on the CD when it’s spinning inside the CD player is rather hard! Putting all your CDs together in a case with the tracklists makes reading the track names and numbers easier, and saves time and frustration when trying to find the track you want to play next in the mix.
Different CD decks have slightly different sets of controls to find the cue, using one or (more commonly) a mixture of the following designs:
- Buttons
- Jog dials
- Platters
Buttons
CD decks with very basic controls only use buttons to navigate the CD. You use one pair of + and – buttons to go through the track numbers on the CD to locate the correct tune to play, and a second pair to search through the CD and fine-tune the cue point.
After you’ve found the correct tune with the first set of buttons, the longer you hold down search buttons, the faster the tune plays in either direction. If you just tap the search button, the CD plays frame by frame (a frame is the smallest time change that the CD deck can give you), which enables you to locate the exact cue.
Repeatedly tapping the search button makes the music play in slow-mo, but because the CD deck repeats each frame you stop on over and over again until you move on, the sound you hear is like a broken CD. This digital noise can initially lead to difficulty in hearing where you are in the tune, making it hard to set a precise cue. Listen out for a change in the sound that’s playing; when the sound suddenly has more bass to it as you step through frame by frame, you’re likely to be on the bass drum.
The cue point you want to set if you’re beatmatching is likely to be one of the bass drums in the tune – see Chapter 14.
Using buttons to find the cue is quite laborious and takes patience and a good memory of the tune to do quickly. However, developing the knack for finding the cue this way doesn’t take long, and although the cheaper budget CD decks tend to use only buttons, as long as you can find the precise cue when you need to then nothing’s wrong with this basic design.
Jog dials
The jog dial on a twin CD deck is between 7 and 12 centimetres in diameter, and is normally made of two parts: an outer ring and an inner disc (see Figure 8-5).
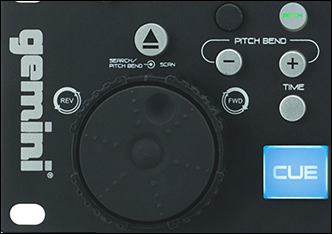
Figure 8-5: The jog dial on a twin CD deck.
CD decks with jog dials still tend to use buttons to help you find the track you want to play on the CD, but often a sprung outer ring on the dial replaces the search button you find on cheaper CD decks to find the general area in the tune you want to start from. How far you turn the ring left or right changes how fast the tune searches backwards or forwards. When released, the ring returns to the centre position, playing the music at the speed you set with the pitch control.
An inner disc inside the outer sprung ring makes fine-tuning the cue a lot easier. Most of these CD decks are designed so that their inner disc gives a little click as it turns, with each click representing a frame in the music. By spinning this disc backwards and forwards quickly, you can play the music in slow-mo and then turn the disc more slowly to play the music more slowly and find the exact frame. When scanning through the track frame by frame, you do still hear a digital repetition of the frame you’re on, so you still need concentration, a knack and a good ear to hear properly, but it’s a lot easier than only using buttons to do the same thing.
The jog dial on a twin CD deck is small and quite fiddly to use, but single CD decks that use a similar sprung jog dial tend to have much larger dials because the top of the deck has more room – and this increased workspace makes fine-tuning the cue easier.
Platters
The introduction and subsequent mass adoption of CD decks with large control platters in the early 2000s gave the functionality of the vinyl turntable, revolutionising the world of CD DJing.
CD decks with motorised rotating platters (as found on the Denon DJ SC3900 – see Figure 8-6) can still be found, but they aren’t as common as CD decks with manual platters (as found on Pioneer CDJ decks) that only turn and affect the music when you touch the platter. Both designs help CD DJs find the cue in the same way as a vinyl DJ does, by controlling the CD just like a record on a turntable, spinning the platter back and forth to find the general area of the tune. You can still use track skip and search buttons to locate the general area in a specific tune and then use the platter to fine-tune the cue point like you would with a record on a turntable, playing it backwards and forwards until you find the exact place.
More importantly, when you are locating the cue, these decks emulate the exact analogue sound you hear if you’re using vinyl, rather than the stuttering digital broken CD sound you get on other CD decks. This means they’re the perfect design for the scratch DJ who wants to use CDs.
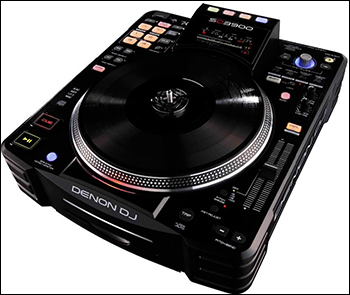
Figure 8-6: The Denon DJ SC3900 uses a platter with a direct-drive motor to give the DJ a similar feeling to the control of traditional vinyl.
Adjusting the Pitch
As with vinyl DJing, for a beatmatching DJ, locating start points and starting the tune in time is only part of the task. The other important part is using the pitch control to adjust playback speed to make the bass beats of tune you want to play next in the mix play at the same time as the tune currently booming out of the speakers.
The good news is that the pitch slider on CD decks acts in exactly the same way as on a turntable (refer to Chapter 6). Pitch controls have improvements, such as adjusting the range from 4 per cent to 100 per cent or more, but the principle is the same: moving the slider towards you (into the + area) makes the tune play faster; away from you (the – area) makes the tune play more slowly. (Check out Chapter 14 for more on the basics of using pitch control when mixing.)
However, if you set the pitch control slightly too fast or too slow and the beats start to drift, you can’t push the CD like you can a record (even if you could touch it, the CD would skip). So pitch bend controls are on hand to get the tracks back in time. These controls may be different depending on the CD decks you’re using:
- Buttons: Usually found on twin CD decks but sometimes used on single decks, two buttons (one marked + and one marked –) temporarily speed up or slow down the tune when you press them. The longer (and sometimes harder) you press the button, the greater the pitch bend you achieve. When you let go of the button, the CD returns to the speed you originally set with the pitch control.
- Small jog ring: Found on a number of twin CD decks, there’s usually a button or switch that changes the function of the sprung outer ring from search to pitch-bend. You turn the jog ring to the right to go slightly faster, and to the left to go slower. How far left or right you turn the ring affects how large a pitch bend you get. When you return the ring to the centre position, the CD plays at the set pitch again.
- Large jog wheel: Depending on your CD deck, the large jog wheel may work in exactly the same way as the small jog ring. In the case of the expensive CD decks with platters, you can temporarily adjust the speed at which the tune plays at as if the CD were a piece of vinyl.
With vinyl, if you need the record to run faster you can make the record turn faster, or if you need to slow it down you can add some resistance to the side of the deck. It’s exactly the same with older CD decks like the Denon DNS3500, which have motorised platters: push the platter to play it faster, or run your finger along the side to slow it.
The Pioneer CDJ range have become the most common CD decks found in clubs, and they have a ring around the edge of the platter which is used as a pitch bend. Turn it clockwise to speed up the tune, or anticlockwise to slow it down. Importantly, it’s only when the ring moves that any change happens to the CD – and how fast you move the ring directly affects the amount of pitch bend. This means that quickly spinning the ring forwards or backwards by a couple of inches is normally all it takes to get the beats back in sync if they’ve only slipped a little.
No matter what method you use to adjust the error in beat sync, remember to change the pitch control to reflect your adjustment. If you needed to briefly slow down the tune and the beats are drifting farther and farther apart, make sure that you reduce the pitch control slightly, and increase it if you needed to speed up. Otherwise, because you haven’t set the speed of the tunes exactly in time, you’ll need to keep using the pitch bend to get the beats back in time. If the error you needed to fix it was just a starting error, use the pitch bend and don’t worry about altering the pitch control unless you hear the beats starting to drift out of time.
Smoothing Out Vibrations
When you buy your CD decks be sure to do a little research and make sure the ones you’re choosing have a good anti-skip feature. Fortunately, nearly all CD decks designed for DJing have some level of anti-skip; you can hit or throw some CD decks across the room without the CD skipping; others deal well with sound vibrations, but if you’re too rough with them the CD will skip.
It’s still a good idea to minimise vibrations, though, and part of this is considering where you’ll place your CD decks and what they’ll sit on. Choose something heavy and solid that won’t transfer any sound vibrations into the chassis of the CD deck, which may cause it to skip. Also try to put the decks somewhere you won’t easily bump into them. (Siting them so they overhang your desk at waist height is asking for trouble.)
Lastly, put some thought into speaker location. Avoid placing your speakers on the same piece of furniture that your CD decks are on, because bass vibrations may travel through the solid surfaces and cause the CDs to skip.
Working with the Cue
No matter what format you use to DJ with – CD, vinyl, computer software or an app on your phone – the basic concepts of DJing and of beatmatching remain the same: find a precise starting point (the cue); if beatmatching, set the pitch control so that the beats of your tunes play at the same speed; start the tune playing; and if beatmatching, make sure the beats play at the same time. The choice you make about what format to use only affects the mechanics of how you go about each stage.
I describe how to use the pitch control and pitch bend function to beatmatch on CD decks in Chapter 14, but finding the cue, starting from it and returning to it on CD needs a dedicated explanation.
The four steps to properly work with the cue are:
- Locate the cue.
- Store the cue.
- Check the cue.
- Start the tune from the cue.
Locating the cue
No matter what controls your CD deck has (see ‘Navigating the CD’, earlier in this chapter), you need to locate the precise cue. If you often start from similar parts of the track, take note of what the time display reads and write that info next to the track title on the inlay sleeve.
Some CD decks (like the Pioneer CDJ-900 and CDJ-2000) have memory cards that can save the cue points that you set on your CDs. This means that you can return to a stored cue point almost immediately after you pop the CD into the deck.
If you haven’t written down or stored a cue point for a tune yet, here’s how to use the controls to find the cue:
- Use the search controls to get close to where you want to set the cue. If the tune doesn’t automatically start playing when you release the search control, press play so that you can hear the music.
- When you’re near to the cue point, press play again to pause the music, then use the jog controls (buttons, dials or platters) to slowly go through the tune to find the exact start point of the first bass drum of a bar or phrase, guitar riff, vocal chant or whatever piece of music you want to start from.
When fine-tuning the cue, if you want to start on a bass drum, you’ll hear the sound change to have more bass frequencies as the drum hits. Experiment with setting the cue before or on this sound, to see how this affects your timing when you press play. It may only be one hundredth of a second difference, but it can make all the difference between starting beats in or out of time.
Storing the cue
After you’ve found your cue point, you need to store that position to the CD deck. On some CD decks, when the CD is in pause mode and you’ve located the exact cue, you simply need to press play to set the cue point, and if you ever need to return to it, just press the cue button again. Pioneer CD decks are different in that you press the cue button to store the cue when you’ve found it. Read the manual that comes with your CD decks so you know what method to use to store the cue.
Checking the cue
Start your tune, and if you find that you haven’t set the cue accurately enough, return to the cue point and use the jog controls to fine-tune the cue and store this new updated cue.
After you’ve found and successfully stored the preferred cue, you need to return the CD to that cue point, ready to start the tune in the mix. This may just be a case of pressing the cue button, but sometimes the state the CD deck was in before you pressed cue affects what happens afterwards. On some CD decks, if you’re in play mode when you press cue, the CD returns to the cue point and restarts playing from there, or if you’re in pause mode, pressing cue returns you to the cue point and the CD stays paused. However, on Pioneer CD decks, pressing cue in pause mode resets the cue to where you are at that instant – which can be frustrating if you’re not used to it!
This is why it’s exceptionally important that you learn how your CD decks operate. Read the manuals that came with your CD decks so you don’t accidentally press the wrong button at the wrong time!
Starting the tune
Starting tracks on CD is a lot easier than on vinyl. When the tune that’s playing through the speakers gets to where you want to start the new tune, press play on the new tune and then go to the mixer to mix between tunes. If you’re a rock DJ or a party DJ, once you’ve mixed in that tune, you won’t spend much time adjusting settings on the CD deck. You may use some of the special features (see the next section) to create a new feel, but in most cases you’ll have finished setting cues or adjusting pitch controls.
If you’re beatmatching, listen to the bass beat from the other tune. Try to block out the rest of the music and focus on the boom from the bass, almost like meditation – this will help you press start on the new tune in time with the bass beat on the track that’s currently playing. Pressing the button exactly on the beat takes practice, but take comfort that it’s nowhere near as hard as starting tunes in time on a turntable.
If you prefer a challenge and still want to start tunes like with vinyl, CD decks with motorised platters can let you do this. Find the cue point, hold the platter still and then let go, or give a little push to start the tune.
Taking Advantage of Special Features
DJ CD decks improve on home CD players by adding pitch controls, rugged designs and better navigation, but that’s not where the improvements end.
Digital music file playback
As music has become easier to buy online and download it makes sense that a lot of the music you purchase as a DJ is as files you download from iTunes or other online stores like Beatport. (See Chapter 4 if you need tips on buying online.)
CD players that allow you to play downloaded music that you’ve burnt to writable CDs (CD-R or CD-RW) aren’t unique to the DJ CD deck: home and car CD players have been able to do this for a long time. However, a feature that negates the need for a CD disc and reads music directly from USB hard drives, iPods and flash cards is a great addition to DJ CD decks.
CD decks such as the Pioneer CDJ-2000 Nexus (pictured in Figure 8-7) and the Denon DJ SC3900 still allow you to play CDs and CD-Rs, but connecting external hard drives give you access to thousands of tunes, all without needing to worry about ejecting and storing individual CDs.
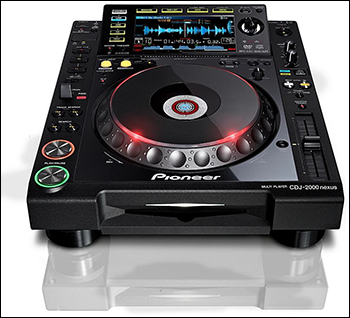
Figure 8-7: The CDJ-2000 Nexus is packed full of features, including digital file playback and a large screen to navigate the library.
The important thing to investigate when looking CD decks that all you to play writable CDs is how well the display and controls let you navigate the large library you’re using. If you have a CD with eight tracks burnt onto it, it’s hard to get too lost finding a track; even if you’re unsure what one you need to play, you only need to skip through eight tracks to find it. If you’ve just connected an iPod containing 6,000 tunes, it may take a little longer to go through them one by one … Most CD decks that allow connection of external hard drives have large screens to help you sift through your library in even the darkest, dingiest of DJ booths.
Master tempo
Master tempo isn’t unique to CD decks; it’s available on a lot of turntables and in most DJ software too. It enables you to speed up or slow down a tune without changing the key that the music was recorded in. So if you play Barry White and pitch him up (speed up the tune) by 16 per cent, he still sounds like Barry, whereas decks without master tempo make him sound like a chipmunk.
Some CD decks do this better than others. The more you speed up the track, the harder it can be for some CD decks to keep the pitch the same, and some can suffer terribly from digital noise problems if you try scratching with master tempo turned on. If you think you’ll use this feature a lot, be sure to get a demonstration of it working on the CD deck you’re buying.
Hot cues
Normally labelled 1, 2, 3 or A, B, C, hot cues are extra cue points that you can set on the fly, which means that you don’t have to stop or pause the CD in order to set them. Doing so takes a little hand–ear coordination, but setting and then returning to these cue points is very simple.
You can then use hot cues to jump around the CD, instantly playing different parts of a tune, or even jump to a hot cue that you’ve set in another track on the CD! Repeatedly pressing the same hot cue button returns to that cue point each time you press the button, playing the same part over and over.
Loop
The loop function plays a discrete part of a tune from an in point (that you can set anywhere in the tune) to an out point (that you also need to set). When you hit the loop button, the music plays from the in point to the out point, then from in to out over and over again, until you stop the loop.
Looping intros and outros or sections of a tune can extend the mix and subtly remix the tune to make something different, or looping part of a build-up to extend it adds variety to the mix. If the build-up is a drum roll, set it as a loop and edit the length of the loop so it gets shorter and shorter; the shorter the loop gets, the more frantic the breakdown sounds, and you can work the crowd into a frenzy before finally ending the loop or hitting a hot cue button and crashing back into the powerful beats of the tune.
Loop controls vary in their ability to help you get it right. If you’re looping one bar of beats and haven’t hit the in and out points exactly on the beat, you’ll hear a stutter/jump of beats each time the loop restarts. Some CD decks automatically adjust the loop for you; others let you edit the loop points and fix any issues; whereas with some CD decks you need to get it right first time, every time.
You can use loops creatively to keep a good part of a track repeating, or you can use this feature as a safety net. If you haven’t had time to set up the next track in the mix yet and you’re approaching the end of a tune, you can repeat a section of the end of the tune, giving you the time to set up and mix in a new tune. (This shouldn’t ever happen, but you may spend too long talking to the wrong person and run out of time.)
If you’re the type who always runs out of tune, you can try saving a hot cue earlier in the track and then trigger it to jump back and repeat the last minute. This can be easier than using loop controls, because if you’re about to run out of tune it’s easy to get flustered and begin to panic, which can make it difficult to set accurate in and out points in a loop – but you do need to plan ahead.
Sample banks
Similar to the loop function, instead of setting in and out points, you can record a section of the music into sample banks (memory contained on the CD deck) to play back as and when you like.
You can use these samples in as many ways as you can think of. You can loop them or play them on their own, and on some CD decks you can also play them over the CD that you took the sample from, letting you remix a track or mix into another tune on the same CD deck. The creative possibilities are endless.
Reverse play
Reverse play is possible, and a nice gimmick with vinyl, but CD decks give you a lot more control. For starters, some CD decks let you choose whether you want the CD to go into reverse just like a turntable or instantly. If a record is at 0 pitch at 33 revs per minute (rpm), it needs to slow down from 33 rpm to 0 and then accelerate from 0 to 33 rpm in reverse. Some CD decks offer the same de-acceleration and acceleration sound, but also the choice to instantly reverse the tune without any delay.
Beats-per-minute counters
Instead of needing to buy an external beats-per-minute (bpm) counter or a mixer with beat counters built into it, many CD decks calculate and include the beats per minute of a tune you’re playing in the time display area.
Like with any bpm counter, it can be easy to rely on this calculation rather than use your ears when beatmatching. Try to avoid falling into this trap, otherwise the first time you use equipment that doesn’t have a bpm counter, you won’t be able to beatmatch very well.
Digital DJ software control
Denon, Numark, American DJ, Pioneer, Reloop and many other DJ CD deck manufacturers have models that can control music playback in software that supports MIDI (musical instrument digital interface) and USB connections, instead of relying on time coded control discs. Check that the digital DJ software you use allows this before buying CD decks for this purpose.
Having Fun Experimenting
Many more features are available on CD decks, and each year a new piece of equipment with a brand new innovation escapes into the DJing community, so it’s easy to lose track of what your CD deck is capable of.
If you’re unsure what your CD decks can do or how best to utilise their functions, read the manual, go to clubs to see them in action and check out video clips on websites. Between reviews on manufacturers’ websites and personal reviews on magazine websites and on YouTube, you should be able see the deck you love doing all the things you didn’t know it could do.
Or just toss the manual under the bed and experiment for a while. Then, after you’re thoroughly confused, try to find that manual again …