Chapter 1
Quick Setup Guide
This chapter contains the essential information you need to get your Canon EOS 70D prepped and ready to go. You’ll learn how to use a few of the basic controls and features, and how to transfer your photos to your computer. If you want a more complete map of the functions of your camera, skip ahead to Chapter 2.
Pre-Flight Checklist
The initial setup of your 70D is fast and easy. You just need to learn a few controls, charge the battery, attach a lens, and insert a Secure Digital card.
Charging the Battery
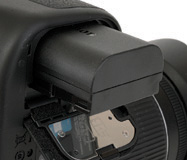
When the battery is inserted into the LC-E6 charger properly (it’s impossible to insert it incorrectly), a Charge light begins glowing orange-red. When the battery completes the charge, a second lamp turns green, approximately two hours later. When the battery is charged, remove it from the charger, flip the lever on the bottom of the camera, and slide the battery in. (See Figure 1.1.) To remove the battery, you must press a gray lever, which prevents the pack from slipping out when the door is opened.
Figure 1.1 Insert the battery in the camera; it only fits one way.
Introducing Menus and Navigation Controls
You’ll find descriptions of most of the controls used with the 70D in Chapter 2, which provides a complete “roadmap” of the camera’s buttons and dials and switches. However, you may need to perform a few tasks during this initial setup process, and most of them will require the MENU button, Main Dial, and the multi-controller. The next section describes how to access features and navigate using the touch screen.
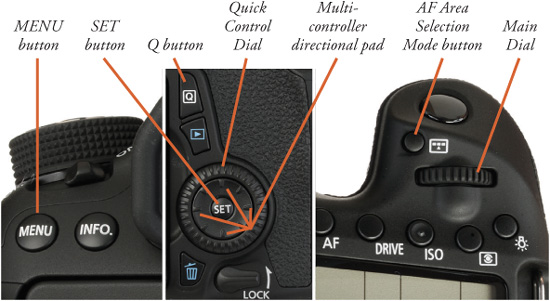
![]() Access menus. You can produce the 70D’s main menus by pressing the MENU button, located at the far-left corner of the back of the camera (and shown at left in Figure 1.2).
Access menus. You can produce the 70D’s main menus by pressing the MENU button, located at the far-left corner of the back of the camera (and shown at left in Figure 1.2).
![]() Navigate among menus. Use the Quick Control Dial or the multi-controller directional pad in the center of the Quick Control Dial (seen in the middle in Figure 1.2) to move within the menu system. Press SET to activate choice or confirm selection.
Navigate among menus. Use the Quick Control Dial or the multi-controller directional pad in the center of the Quick Control Dial (seen in the middle in Figure 1.2) to move within the menu system. Press SET to activate choice or confirm selection.
![]() Main Dial. This dial (shown at right in Figure 1.2) can often be used to move highlighting left and right, say, to scroll among the main menu heading tabs.
Main Dial. This dial (shown at right in Figure 1.2) can often be used to move highlighting left and right, say, to scroll among the main menu heading tabs.
![]() Quick Control button. The Quick Control button (Q button) (shown in upper center in Figure 1.2) produces a Quick Control menu (described later), which offers fast access to many adjustments.
Quick Control button. The Quick Control button (Q button) (shown in upper center in Figure 1.2) produces a Quick Control menu (described later), which offers fast access to many adjustments.
Figure 1.2 Your basic controls include the MENU button (left); SET button, Q button, Quick Control Dial, and multi-controller directional pad (center); and Main Dial (right).
Mastering the Touch Screen
When a menu or adjustment screen is displayed, you will probably elect to use the 70D’s touch screen to make your changes. Optionally, you can resort to the physical controls that provide the equivalent functions, including the available buttons and multi-controller. However, I think that once you become familiar with the speed with which the touch screen allows you to make these adjustments you’ll be reluctant to go back to the “old” way of doing things.
The 70D’s touch screen is capacitive rather than resistive, making it more like the current generation of smart phones than earlier computer touch-sensitive screens. The difference is that your camera’s LCD responds to the electrical changes that result from contact rather than the force of pressure on the screen itself. That means that the screen is able to interpret your touches and taps in more complex ways. It “knows” when you’re using two fingers instead of one, and can react to multi-touch actions and gestures, such as swiping (to scroll in any direction), and pinching/spreading of fingers to zoom in and out. Since you probably have been using a smart phone for a while, these actions have become ingrained enough to be considered intuitive. Virtually every main and secondary function or menu operation can be accessed from the touch screen. However, if you want to continue using the buttons and dials, the 70D retains that method of operation.
Here’s what you need to know to get started:
TIP: YOUR CHOICE
Throughout this book I may not explicitly say “tap the screen (or use the button)” for every single operation, in order simplify descriptions and avoid extra verbiage. I’m assuming that once you master the touch screen using the information in this section, you’ll make your own choice and use whichever method you prefer.
![]() Enable/Disable touch features. As I’ll explain in Chapter 3, you can enable or disable touch operation in the Set-up 3 menu under the Touch Control entry, and turn the click sound the touch feature makes on or off using the Beep setting in the Shooting 1 menu.
Enable/Disable touch features. As I’ll explain in Chapter 3, you can enable or disable touch operation in the Set-up 3 menu under the Touch Control entry, and turn the click sound the touch feature makes on or off using the Beep setting in the Shooting 1 menu.
![]() Tap to select. Tap (touch the LCD screen briefly) to select an item, including a menu heading or icon. Any item you can tap will have a frame or box around it. Figure 1.3 shows the taps needed to select a menu tab and specific entry within that menu.
Tap to select. Tap (touch the LCD screen briefly) to select an item, including a menu heading or icon. Any item you can tap will have a frame or box around it. Figure 1.3 shows the taps needed to select a menu tab and specific entry within that menu.
Figure 1.3 Tap menu tabs or entries to select them.
![]() Drag/swipe to select. Many functions can be selected by touching the screen and then sliding your finger to the right or left until the item you want is highlighted. For example, instead of tapping, you can slide horizontally along the main menu’s tabs to choose any Shooting, Playback, Custom, or My Menu tab, and slide vertically to choose an individual menu entry.
Drag/swipe to select. Many functions can be selected by touching the screen and then sliding your finger to the right or left until the item you want is highlighted. For example, instead of tapping, you can slide horizontally along the main menu’s tabs to choose any Shooting, Playback, Custom, or My Menu tab, and slide vertically to choose an individual menu entry.
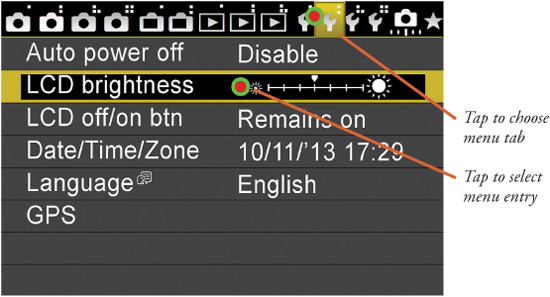
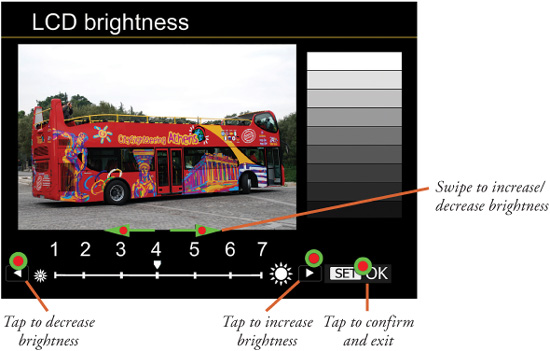
![]() Drag/swipe to adjust scales. Screens that contain a sliding scale (say, to make an image brighter or darker) can be adjusted by dragging. Figure 1.4 shows how you can drag along the LCD Brightness scale to select a value or, alternatively, tap the left/right arrow icons to either side of the scale. (Note that you can also press the left/right multi-controller pad if you prefer.)
Drag/swipe to adjust scales. Screens that contain a sliding scale (say, to make an image brighter or darker) can be adjusted by dragging. Figure 1.4 shows how you can drag along the LCD Brightness scale to select a value or, alternatively, tap the left/right arrow icons to either side of the scale. (Note that you can also press the left/right multi-controller pad if you prefer.)
Figure 1.4 Tap or swipe to adjust sliding scales.
![]() Drag/swipe to scroll among images. In Playback mode, as you review your images you can drag your finger left and right to advance from one image to another. Figure 1.5 shows you can use either one finger to scroll or two fingers to jump among playback images.
Drag/swipe to scroll among images. In Playback mode, as you review your images you can drag your finger left and right to advance from one image to another. Figure 1.5 shows you can use either one finger to scroll or two fingers to jump among playback images.
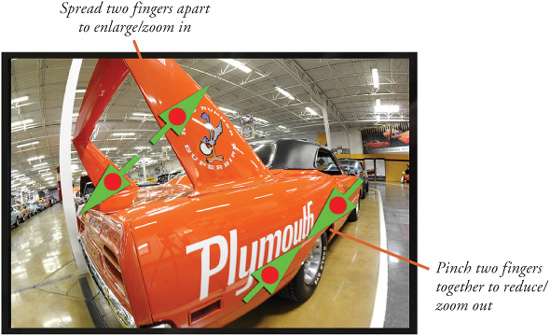
![]() Pinch to reduce/enlarge. During playback, you can use two fingers to “pinch” the screen to zoom out from single-frame display to multiple thumbnails, and spread those two fingers apart to zoom in again to a single frame and magnified image. (See Figure 1.6.)
Pinch to reduce/enlarge. During playback, you can use two fingers to “pinch” the screen to zoom out from single-frame display to multiple thumbnails, and spread those two fingers apart to zoom in again to a single frame and magnified image. (See Figure 1.6.)
Figure 1.5 Swipe left or right with one finger to scroll among images; swipe with two fingers to jump.
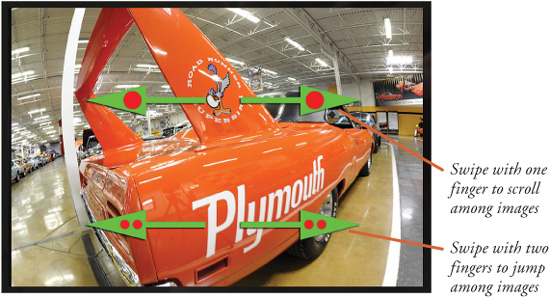
Figure 1.6 Spread two fingers apart to enlarge/zoom in, or pinch two fingers together to zoom out/view thumbnails.
![]() Avoid “protective” sheets, moisture, sharp implements. The LCD uses capacitive technology to sense your touch, rather than pressure sensitivity. LCD protectors or moisture can interfere with the touch functions, and styluses or sharp objects (such as pens) won’t produce the desired results. I have, in fact, used “skins” on my 70D’s LCD with good results (even though the screen is quite rugged and really doesn’t need protection from scratches), but there is no guarantee that all such protectors will work for you.
Avoid “protective” sheets, moisture, sharp implements. The LCD uses capacitive technology to sense your touch, rather than pressure sensitivity. LCD protectors or moisture can interfere with the touch functions, and styluses or sharp objects (such as pens) won’t produce the desired results. I have, in fact, used “skins” on my 70D’s LCD with good results (even though the screen is quite rugged and really doesn’t need protection from scratches), but there is no guarantee that all such protectors will work for you.
As I noted, the choice of whether to use the traditional buttons or touch screen is up to you. I’ve found that with some screens, the controls are too close together to be easily manipulated with my wide fingers. The touch screen can be especially dangerous when working with some functions, such as card formatting. In screens where the icons are large and few in number, such as the screen used to adjust LCD brightness, touch control works just fine. Easiest of all is touch operation during Playback. It’s a no-brainer to swipe your finger from side to side to scroll among images and pinch/spread to zoom out and in.
Setting the Clock
The first time you use the 70D, it may ask you to enter the time and date. (This information may have been set by someone checking out your camera on your behalf prior to sale.) Rotate the On/Off switch on top of the camera to the On position. Automatic sensor cleaning takes place (unless you specifically disable this action) as the 70D powers up. The camera will remain on or in a standby mode until you manually turn it off. After a period of idling (which you can adjust from 1 to 30 minutes, or disable, in the Set-up 2 menu), the 70D goes into the standby mode to save battery power. Just tap the shutter release button to bring it back to life. The automatic sensor cleaning operation does not occur when exiting standby mode.
NOTE
I’m introducing you to the navigational controls first in this Quick Start, but most functions can be selected (often more quickly) using the 70D’s touch screen.
Just follow these steps, using the controls shown in Figure 1.2.
1. Press the MENU button, located in the upper-left corner of the back of the 70D.
2. Rotate the Main Dial (near the shutter release button on top of the camera) until the Set-up 2 menu is highlighted. It’s marked by a wrench with two dots next to it, as shown in Figure 1.3.
3. Use the up/down multi-controller directional buttons to move the highlighting down to the Date/Time/Zone entry, and press the SET button.
4. You can rotate the Quick Control Dial (the large wheel located to the right of the back LCD monitor) to select, in turn, the month, day, year, hour, minutes, and seconds.
5. When each setting is highlighted, press the SET button, then rotate the Quick Control Dial to adjust the value up or down. A pair of up/down pointing triangles appears above the value. Press SET again to confirm.
6. Repeat Step 5 to adjust the other date and time parameters.
7. Scroll to the date format line located under the Date/Time listing, press SET, and use the same procedure to adjust the way dates are displayed (that is, mm/dd/yy, yy/mm/dd, or dd/mm/yy).
8. Scroll down to the Daylight Savings icon and turn that option on or off, as appropriate, and then finish by moving to the Time Zone field and selecting the city in your current zone.
9. When all parameters are entered, highlight OK and press SET to confirm and exit.
Mounting the Lens
If your 70D has no lens attached, you’ll need to mount one before shooting:
1. Select the lens and loosen (but do not remove) the rear lens cap.
2. Remove the body cap on the camera by rotating the cap toward the release button.
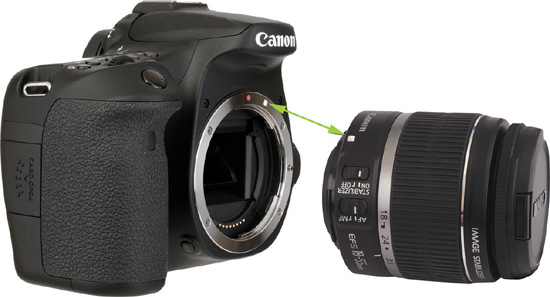
3. Once the body cap has been removed, remove the rear lens cap from the lens, set it aside, and then mount the lens on the camera by matching the alignment indicator on the lens barrel (red for EF lenses and white for EF-S lenses) with the red or white dot on the camera’s lens mount. (See Figure 1.7.) Rotate the lens away from the shutter release until it seats securely.
Figure 1.7 Match the indicator on the lens with the white or red dot on the camera mount to properly align the lens with the bayonet mount.
4. Set the focus mode switch on the lens to AF (autofocus). If the lens hood is bayoneted on the lens in the reversed position (which makes the lens/hood combination more compact for transport), twist it off and remount with the “petals” facing outward. A lens hood protects the front of the lens from accidental bumps, and reduces flare caused by extraneous light arriving at the front element of the lens from outside the picture area.
Adjusting Diopter Correction
Those of us with less than perfect eyesight can often benefit from a little optical correction in the viewfinder. Your contact lenses or glasses may provide all the correction you need, but if you are a glasses wearer and want to use the 70D without your glasses, or use your glasses with your camera but can benefit from some additional correction, you can take advantage of the camera’s built-in diopter adjustment. It can be varied from −3 to +1 correction. Press the shutter release halfway to illuminate the indicators in the viewfinder, then rotate the adjacent dioptric adjustment knob (see Figure 1.8) while looking through the window until the indicators appear sharp.
If the available correction is insufficient, Canon offers 10 different Dioptric Adjustment Lens Series E correction lenses for the viewfinder window. If more than one person uses your 70D, and each requires a different diopter setting, you can save a little time by noting the number of clicks and direction (clockwise to increase the diopter power; counterclockwise to decrease the diopter value) required to change from one user to the other. There are 18 detents in all.
Inserting and Formatting a Secure Digital Card
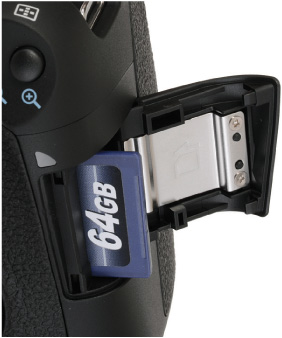
Slide the door on the right side of the body toward the back of the camera to release the cover, and then open it. (You should only remove the memory card when the camera is switched off, but the 70D will remind you if the door is opened while the camera is still writing photos to the memory card.)
Insert the memory card with the label facing the back of the camera, as shown in Figure 1.9, oriented so the edge with the gold contacts goes into the slot first. Close the door, and your pre-flight checklist is done! (I’m going to assume you remember to remove the lens cap when you’re ready to take a picture!) When you want to remove the memory card later, just press the memory card edge, and it will pop right out.
I recommend formatting the memory card before each shooting session, to ensure that the card has a fresh file system, and doesn’t have stray files left over. Format only when you’ve transferred all the images to your computer, of course. To format a memory card, press the MENU button; rotate the Main Dial, located on top of the camera, just behind the shutter release button (or use the left/right multi-controller pad); choose the Set-up 1 menu (which is represented by a wrench icon with a single dot next to it); use the up/down multi-controller pad to navigate to the Format Card entry; and choose SET to access the Format Card screen. Press the left/right multi-controller pad again to select OK and choose SET one final time to begin the format process.
Figure 1.8 Viewfinder diopter correction from –3 to +1 can be dialed in.
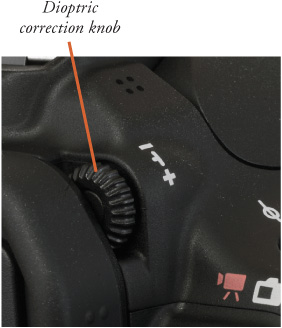
Figure 1.9 The memory card is inserted with the label facing the back of the camera.
Selecting a Shooting Mode
You can choose a shooting method from the Mode Dial located on the top right of the Canon EOS 70D. (See Figure 1.10.) There are Basic Zone automatic and Scene shooting modes, in which the camera makes virtually all the decisions for you (except when to press the shutter). The camera also offers four Creative Zone modes, which allow you to provide input over the exposure and settings the camera uses.
Turn your camera on by flipping the power switch (located to the right of the Mode Dial) to On. Next, you need to select which shooting mode to use. If you’re very new to digital photography, you might want to set the camera to Scene Intelligent Auto (the green frame on the Mode Dial) or P (Program mode) and start snapping away. Either mode will make all the appropriate settings for you for many shooting situations.
![]() Scene Intelligent Auto/Full Auto. In this mode, marked with a green A+ icon, the EOS 70D makes all the exposure decisions for you, and will pop up the flash if necessary under low-light conditions.
Scene Intelligent Auto/Full Auto. In this mode, marked with a green A+ icon, the EOS 70D makes all the exposure decisions for you, and will pop up the flash if necessary under low-light conditions.
![]() Flash Off. This mode is like Scene Intelligent Auto with the flash disabled. You’ll want to use it in museums and other locations where flash is forbidden or inappropriate. It otherwise operates exactly like the Auto setting but disables the pop-up internal flash unit.
Flash Off. This mode is like Scene Intelligent Auto with the flash disabled. You’ll want to use it in museums and other locations where flash is forbidden or inappropriate. It otherwise operates exactly like the Auto setting but disables the pop-up internal flash unit.
Figure 1.10 The Mode Dial includes both Basic Zone and Creative Zone settings.

![]() CA. This Creative Auto mode is basically the same as the Full Auto option, but, unlike the other Basic Zone modes, allows you to change the brightness and other parameters of the image. The 70D still makes most of the decisions for you, but you can make some simple adjustments using the Creative Auto setting screen that appears when you press the Quick Control button. You can find instructions for using this mode and the other shooting modes in Chapter 4, and a brief summary below.
CA. This Creative Auto mode is basically the same as the Full Auto option, but, unlike the other Basic Zone modes, allows you to change the brightness and other parameters of the image. The 70D still makes most of the decisions for you, but you can make some simple adjustments using the Creative Auto setting screen that appears when you press the Quick Control button. You can find instructions for using this mode and the other shooting modes in Chapter 4, and a brief summary below.
With the dial in the SCN position, you can also select any of seven additional Special Scene modes. Turn the Mode Dial to the SCN position, then press the Q button (or tap the Q icon in the lower left of the LCD monitor screen). You can then rotate the Quick Control Dial or Main Dial to choose one of the following Scene modes:
![]() Portrait. Use this mode when you’re taking a portrait of a subject standing relatively close to the camera and want to de-emphasize the background, maximize sharpness, and produce flattering skin tones.
Portrait. Use this mode when you’re taking a portrait of a subject standing relatively close to the camera and want to de-emphasize the background, maximize sharpness, and produce flattering skin tones.
![]() Landscape. Select this mode when you want extra sharpness and rich colors of distant scenes.
Landscape. Select this mode when you want extra sharpness and rich colors of distant scenes.
![]() Close-up. This mode is helpful when you are shooting close-up pictures of a subject from about one foot away or less.
Close-up. This mode is helpful when you are shooting close-up pictures of a subject from about one foot away or less.
![]() Sports. Use this mode to freeze fast-moving subjects.
Sports. Use this mode to freeze fast-moving subjects.
![]() Night Portrait. Choose this mode when you want to illuminate a subject in the foreground with flash, but still allow the background to be exposed properly by the available light. Be prepared to use a tripod or an image-stabilized (IS) lens to reduce the effects of camera shake.
Night Portrait. Choose this mode when you want to illuminate a subject in the foreground with flash, but still allow the background to be exposed properly by the available light. Be prepared to use a tripod or an image-stabilized (IS) lens to reduce the effects of camera shake.
![]() Handheld Night Scene. The 70D takes four continuous shots and combines them to produce a well-exposed image with reduced camera shake.
Handheld Night Scene. The 70D takes four continuous shots and combines them to produce a well-exposed image with reduced camera shake.
![]() HDR Backlight Control. The 70D takes three continuous shots at different exposures and combines them to produce a single image with improved detail in the highlights and shadows.
HDR Backlight Control. The 70D takes three continuous shots at different exposures and combines them to produce a single image with improved detail in the highlights and shadows.
If you have more photographic experience, you might want to opt for one of the Creative Zone modes, indicated on the Mode Dial by letters M, Av, Tv, and P, plus B.
You can change some settings when the shooting settings display is shown on the screen (press the INFO. button to the left of the viewfinder window if you want to make the display visible). Press the Quick Control button and then tap the touch screen or use the directional keys to navigate to the setting you’d like to adjust. (See Figure 1.11.) The available adjustments change, depending on what Basic Zone or Creative Zone exposure mode you’re using.
Figure 1.11 Some settings can be made quickly when the shooting settings display is visible.
Choosing a Creative Zone Mode
Creative Zone modes let you apply a little more creativity to your camera’s settings. These modes are indicated on the Mode Dial by letters P, Tv, Av, and M.
![]() M (Manual). Select when you want full control over the shutter speed and lens opening, either for creative effects or because you are using a studio flash or other flash unit not compatible with the 70D’s automatic flash metering.
M (Manual). Select when you want full control over the shutter speed and lens opening, either for creative effects or because you are using a studio flash or other flash unit not compatible with the 70D’s automatic flash metering.
![]() Av (Aperture-priority). Choose when you want to use a particular lens opening, especially to control sharpness or how much of your image is in focus. The 70D will select the appropriate shutter speed for you. Av stands for aperture value.
Av (Aperture-priority). Choose when you want to use a particular lens opening, especially to control sharpness or how much of your image is in focus. The 70D will select the appropriate shutter speed for you. Av stands for aperture value.
![]() Tv (Shutter-priority). This mode (Tv stands for time value) is useful when you want to use a particular shutter speed to stop action or produce creative blur effects. The 70D will select the appropriate f/stop for you.
Tv (Shutter-priority). This mode (Tv stands for time value) is useful when you want to use a particular shutter speed to stop action or produce creative blur effects. The 70D will select the appropriate f/stop for you.
![]() P (Program). This mode allows the 70D to select the basic exposure settings, but you can still override the camera’s choices to fine-tune your image.
P (Program). This mode allows the 70D to select the basic exposure settings, but you can still override the camera’s choices to fine-tune your image.
Quick Control Screen: Basic Zone Modes
When using Basic Zone modes, your options are different. When you activate the Quick Control screen by pressing the Quick Control button, one of several different screens will appear on your LCD.
Scene Intelligent Auto/Auto (No Flash)
In either of these modes, a screen will pop up. Your only choices with Scene Intelligent Auto are any drive mode (Single shooting, Continuous shooting, etc.), and Auto Flash control. In Auto (No Flash) mode you can choose only a drive mode. Rotate the Main Dial or use the touch screen or the left/right multi-controller pad to toggle between these two options. Press the Quick Control button again to exit.
Creative Auto Mode
When the Mode Dial is set to Creative Auto, a screen like the one shown in Figure 1.12 appears. You can then do one of three things:
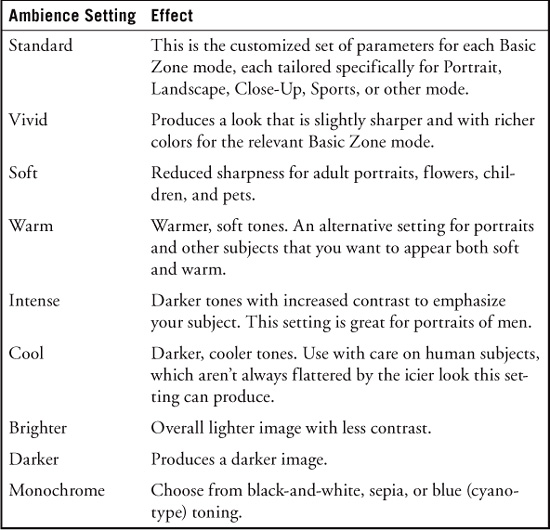
![]() Change shooting parameters by ambience. When the top box on the screen is highlighted, it will display the most recent “ambience” setting you’ve selected (Standard, unless you’ve made a change). Ambience is a type of picture style that adjusts parameters like sharpness or color richness to produce a particular look.
Change shooting parameters by ambience. When the top box on the screen is highlighted, it will display the most recent “ambience” setting you’ve selected (Standard, unless you’ve made a change). Ambience is a type of picture style that adjusts parameters like sharpness or color richness to produce a particular look.
![]() Press the left/right multi-controller or rotate the Main Dial and select from among: Vivid, Soft, Warm, Intense, Cool, Brighter, Darker, or Monochrome.
Press the left/right multi-controller or rotate the Main Dial and select from among: Vivid, Soft, Warm, Intense, Cool, Brighter, Darker, or Monochrome.
![]() Once you’ve selected your ambience, if you want to change its intensity, press the multi-controller in the down direction to highlight Effect.
Once you’ve selected your ambience, if you want to change its intensity, press the multi-controller in the down direction to highlight Effect.
![]() Rotate the Main Dial or use the multi-controller left/right buttons to change the Effect to Low, Standard, or Strong. Press the Quick Control button to exit.
Rotate the Main Dial or use the multi-controller left/right buttons to change the Effect to Low, Standard, or Strong. Press the Quick Control button to exit.
Figure 1.12 Quick Control screen in Creative Auto mode.
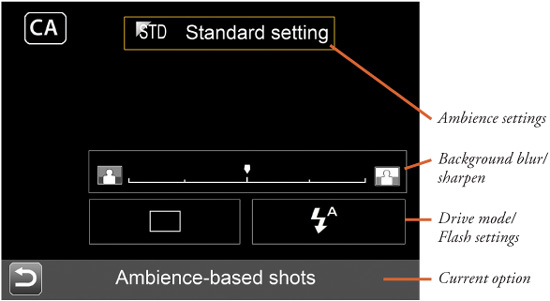
![]() Press the down directional button on the multi-controller to highlight Background: Blurredfl> Sharp. Then, rotate the Main Dial to adjust the amount of background blurring. The 70D will try to use a larger f/stop to reduce depth-of-field and blur the background, or a smaller f/stop and increased depth-of-field to sharpen the background.
Press the down directional button on the multi-controller to highlight Background: Blurredfl> Sharp. Then, rotate the Main Dial to adjust the amount of background blurring. The 70D will try to use a larger f/stop to reduce depth-of-field and blur the background, or a smaller f/stop and increased depth-of-field to sharpen the background.
![]() Press the down directional button on the multi-controller to highlight Drive mode/Flash firing. Then choose SET to pop up the Drive mode/Flash firing screen. In this screen, you can rotate the Main Dial to change among the various drive modes, or use the left/right multi-controller buttons to switch among flash modes.
Press the down directional button on the multi-controller to highlight Drive mode/Flash firing. Then choose SET to pop up the Drive mode/Flash firing screen. In this screen, you can rotate the Main Dial to change among the various drive modes, or use the left/right multi-controller buttons to switch among flash modes.
Other Basic Zone Modes
When you select one of the other Basic Zone modes, your options are similar to those in Creative Auto mode:
![]() Change shooting parameters by ambience. After pressing the Q button, when the top box on the screen is highlighted, it will display the most recent “ambience” setting you’ve selected.
Change shooting parameters by ambience. After pressing the Q button, when the top box on the screen is highlighted, it will display the most recent “ambience” setting you’ve selected.
![]() Use the touch screen or the left/right multi-controller buttons, or rotate Main Dial and select from among: Vivid, Soft, Warm, Intense, Cool, Brighter, Darker, or Monochrome, the same choices available in Creative Auto mode.
Use the touch screen or the left/right multi-controller buttons, or rotate Main Dial and select from among: Vivid, Soft, Warm, Intense, Cool, Brighter, Darker, or Monochrome, the same choices available in Creative Auto mode.
![]() Once you’ve selected your ambience, if you want to change its intensity, highlight Effect.
Once you’ve selected your ambience, if you want to change its intensity, highlight Effect.
![]() You can then use the touch screen or rotate the Main Dial to change the Effect to Low, Standard, or Strong. Press the Quick Control button to exit.
You can then use the touch screen or rotate the Main Dial to change the Effect to Low, Standard, or Strong. Press the Quick Control button to exit.
![]() Highlight Default Settings. This option is available only if you’re using Portrait, Landscape, Close-Up, and Sports modes. The prompt in the blue box at the bottom of the screen will change to Shoot by Lighting or Scene Type. You can then use the touch screen or rotate the Main Dial to cycle through Default setting, Daylight, Shade, Cloudy, Tungsten Light, Fluorescent Light, or Sunset. You can also choose SET and see a menu listing each of these options simultaneously.
Highlight Default Settings. This option is available only if you’re using Portrait, Landscape, Close-Up, and Sports modes. The prompt in the blue box at the bottom of the screen will change to Shoot by Lighting or Scene Type. You can then use the touch screen or rotate the Main Dial to cycle through Default setting, Daylight, Shade, Cloudy, Tungsten Light, Fluorescent Light, or Sunset. You can also choose SET and see a menu listing each of these options simultaneously.
![]() Highlight Drive mode/Self-timer. In this screen, you can press the left/right multi-controller pad or rotate the Main Dial to switch between the available drive mode (either Single shot or Continuous shooting, depending on the Basic Zone mode selected) and 10 Second Self-timer/Remote.
Highlight Drive mode/Self-timer. In this screen, you can press the left/right multi-controller pad or rotate the Main Dial to switch between the available drive mode (either Single shot or Continuous shooting, depending on the Basic Zone mode selected) and 10 Second Self-timer/Remote.
Find your desired ambience in Table 1.1.
If you set ambience in Live View mode, the 70D will provide a preview image that simulates the effect your ambience setting will have on the finished image.
Choosing a Metering Mode
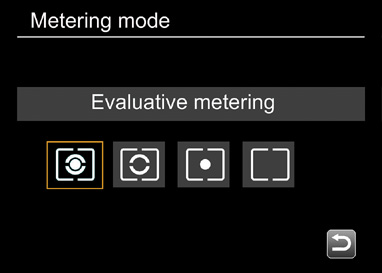
You might want to select a particular metering mode for your first shots, although the default Evaluative metering (which is set automatically when you choose a Basic Zone mode) is probably the best choice as you get to know your camera. To change metering modes when using a Creative Zone mode, you’ll need to press the Metering button on top of the camera or use the Q button.
Use the left/right multi-controller pad to highlight the choice you want. Then choose SET to confirm your choice. The options are shown in Figure 1.13:
![]() Evaluative metering. The standard metering mode; the 70D attempts to intelligently classify your image and choose the best exposure based on readings from 63 different zones in the frame, with emphasis on the auto-focus points.
Evaluative metering. The standard metering mode; the 70D attempts to intelligently classify your image and choose the best exposure based on readings from 63 different zones in the frame, with emphasis on the auto-focus points.
![]() Partial metering. Exposure is based on a central spot, roughly nine percent of the image area.
Partial metering. Exposure is based on a central spot, roughly nine percent of the image area.
![]() Spot metering. Exposure is calculated from a smaller central spot, about 3.8 percent of the image area.
Spot metering. Exposure is calculated from a smaller central spot, about 3.8 percent of the image area.
![]() Center-weighted averaging metering. The 70D meters the entire scene, but gives the most emphasis to the central area of the frame.
Center-weighted averaging metering. The 70D meters the entire scene, but gives the most emphasis to the central area of the frame.
Figure 1.13 Metering modes (left to right) Evaluative, Partial, Spot, Center-weighted.
Choosing a Focus Mode
You can easily switch between automatic and manual focus by moving the AF/MF switch on the lens mounted on your camera. However, if you’re using a Creative Zone shooting mode, you’ll still need to choose an appropriate focus mode. If you’re using a Basic Zone mode, the focus method is set for you automatically.
To set the focus mode, you must first have set the lens to the AF position (instead of the manual focus MF position). Then press the AF button on top of the camera repeatedly until the focus mode you want is selected (see Figure 1.14). Finally, Choose SET to confirm your focus mode.
Figure 1.14 Set Autofocus mode.
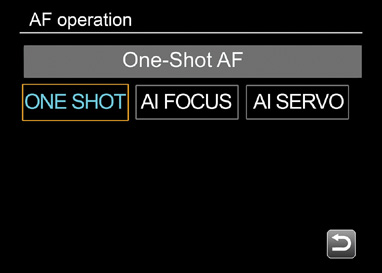
The three choices available in Creative Zone modes are as follows:
![]() One-Shot. This mode, sometimes called single autofocus, locks in a focus point when the shutter button is pressed down halfway and the focus confirmation light glows in the viewfinder. The focus will remain locked until you release the button or take the picture. If the camera is unable to achieve sharp focus, the focus confirmation light will blink. This mode is best when your subject is relatively motionless. Portrait, Night Portrait, and Landscape Basic Zone modes use this focus method exclusively.
One-Shot. This mode, sometimes called single autofocus, locks in a focus point when the shutter button is pressed down halfway and the focus confirmation light glows in the viewfinder. The focus will remain locked until you release the button or take the picture. If the camera is unable to achieve sharp focus, the focus confirmation light will blink. This mode is best when your subject is relatively motionless. Portrait, Night Portrait, and Landscape Basic Zone modes use this focus method exclusively.
![]() AI Focus. In this mode, the 70D switches between One-Shot and AI Servo as appropriate. That is, it locks in a focus point when you partially depress the shutter button (One-Shot mode), but switches automatically to AI Servo if the subject begins to move. This mode is handy when photographing a subject, such as a child at quiet play, which might move unexpectedly. The Flash Off Basic Zone mode uses this focus method.
AI Focus. In this mode, the 70D switches between One-Shot and AI Servo as appropriate. That is, it locks in a focus point when you partially depress the shutter button (One-Shot mode), but switches automatically to AI Servo if the subject begins to move. This mode is handy when photographing a subject, such as a child at quiet play, which might move unexpectedly. The Flash Off Basic Zone mode uses this focus method.
![]() AI Servo. This mode, sometimes called continuous autofocus, sets focus when you partially depress the shutter button, but continues to monitor the frame and refocuses if the camera or subject is moved. This is a useful mode for photographing sports and moving subjects. The Sports Basic Zone mode uses this focus method exclusively.
AI Servo. This mode, sometimes called continuous autofocus, sets focus when you partially depress the shutter button, but continues to monitor the frame and refocuses if the camera or subject is moved. This is a useful mode for photographing sports and moving subjects. The Sports Basic Zone mode uses this focus method exclusively.
Selecting an AF Area Selection Mode
The Canon EOS 70D uses 19 different focus points to calculate correct focus. In any of the Basic Zone shooting modes, the focus point is selected automatically by the camera. In the Creative Zone modes, you can allow the camera to select the focus point automatically, or you can specify which focus point should be used. There are three AF Area Selection modes. They are as follows:
![]() Single-point AF (Manual Selection). You can choose one AF point for focus.
Single-point AF (Manual Selection). You can choose one AF point for focus.
![]() Zone AF (Manual Zone Selection). Select any of five different focus zones, each with multiple focus points.
Zone AF (Manual Zone Selection). Select any of five different focus zones, each with multiple focus points.
![]() 19-point Automatic Selection AF. The camera will choose the focus point for you. This mode is always used in Basic Zone exposure modes.
19-point Automatic Selection AF. The camera will choose the focus point for you. This mode is always used in Basic Zone exposure modes.
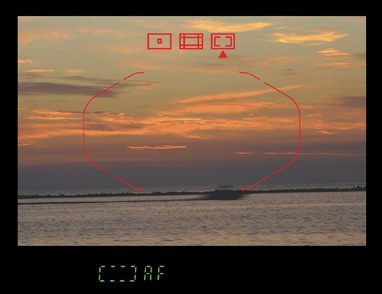
To get up and running with this Quick Start, you should set the 70D to 19-point Automatic Selection AF mode. If you want to choose an individual point or zone yourself, just follow these steps:
1. Make sure the lens AF/MF switch is set to AF.
2. Tap the shutter release to activate the focus system.
3. Press the AF Area Selection Mode button shown earlier in Figure 1.2. The current focus selection indicators will be highlighted in red.
4. Continue pressing, if necessary, until the focus selection mode you want has an up-pointing triangle underneath it, as seen in Figure 1.15.
As explained in Chapter 4, you can use C.Fn II-07 to limit the AF area selection modes available, and C.Fn II-08 to adjust the controls used to choose the selection mode. When choosing a focus point manually, the viewfinder indicator will display SEL AF (for Single-point selection) or [ ] AF (for the other two modes) at the bottom of the frame.
Figure 1.15 Select your focus selection mode.
In the single-point manual selection mode, press the focus point selection button (in the upper-right corner of the back of the camera) or the focus point selection mode button. Then, use the multi-controller to move the active focus point around the frame. If you press SET, the AF center point will be selected. You can also rotate the Main Dial to move the focus point to the left or right in the middle row of sensors, and rotate the QCD to move up and down rows. In zone AF mode, rotating either the Main Dial or Quick Control Dial will switch from zone to zone in a loop.
While automatic point selection works well and is often best for moving subjects, manual point selection can be quite useful when you have time to zero in on a particular subject. This mode is certainly your best choice when you want to focus precisely on a subject that is surrounded by fine detail. Keep in mind that the portion of the sensor used to autofocus is not precisely represented by the rectangle shown in the viewfinder, so if you’re focusing on, say, the near eye of a portrait subject turned at a 45-degree angle with a wide aperture, you might end up focusing on the bridge of their nose instead. You’ll want to keep the actual focus area in mind in situations where focus is that critical.
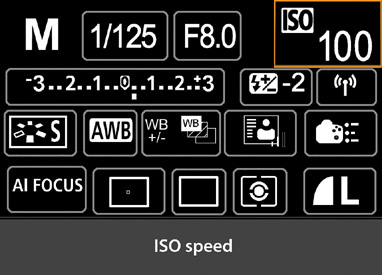
Adjusting ISO
If you like, you can custom-tailor the ISO sensitivity setting. To start out, it’s best to set ISO to ISO 100 or ISO 200 for daylight photos, and ISO 400 for pictures in dimmer light. You can adjust ISO now by pressing the ISO button (shown earlier in Figure 1.2) and then navigating with the touch screen or either the Main Dial or Quick Control Dial until the setting you want appears on the LCD.
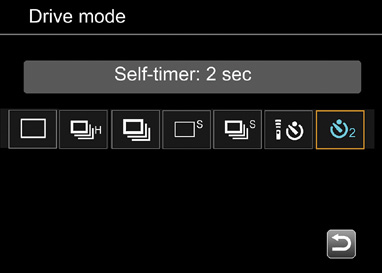
Using the Self-Timer
If you want to set a short delay before your picture is taken, you can use the self-timer. Press the Drive button on top of the camera, and rotate the Main Dial or QCD until the Self-timer: 10-sec/Remote control (which also can be used with the optional and RC-6 infrared remote controls) or Self-timer: 2 sec/remote is highlighted (see Figure 1.16). Select SET to confirm your choice, and a self-timer icon will appear on the shooting settings display on the back of the 70D. Press the shutter release to lock focus and start the timer. The self-timer lamp will blink and the beeper will sound (unless you’ve silenced it in the menus) until the final two seconds, when the lamp remains on and the beeper beeps more rapidly.
Figure 1.16 Drive modes: Single shooting, High-speed continuous, Low-speed continuous, Silent single, Silent continuous, 10-second self-timer/remote, 2-second self-timer/remote
Canon recommends slipping off the eyepiece cup and replacing it with the viewfinder cap, in order to keep extraneous light from reaching the exposure meter through the viewfinder “back door.” I usually just shade the viewfinder window with my hand (if I’m using the self-timer to reduce camera shake for a long exposure) or drape a jacket or sweater over the back of the camera (if I’m scurrying to get into the picture myself).
Reviewing the Images You’ve Taken
The Canon EOS 70D has a broad range of playback and image review options, including the ability to jump ahead 10 or 100 images at a time. Here is all you really need to know, as shown in Figure 1.17:
![]() Display image. Press the Playback button (marked with a blue right-pointing triangle just below the Q button) to display the most recent image on the LCD in full-screen Single Image mode. If you last viewed your images using the thumbnail mode (described later in this list), the Index display appears instead.
Display image. Press the Playback button (marked with a blue right-pointing triangle just below the Q button) to display the most recent image on the LCD in full-screen Single Image mode. If you last viewed your images using the thumbnail mode (described later in this list), the Index display appears instead.
![]() View additional images. Use the left and right directional keys or swipe the touch screen left or right to view the next or previous image. Use a two-finger swipe to jump quickly among the images.
View additional images. Use the left and right directional keys or swipe the touch screen left or right to view the next or previous image. Use a two-finger swipe to jump quickly among the images.
![]() View image information. Press the INFO. button repeatedly to cycle among overlays of basic image information, detailed shooting information, or no information at all.
View image information. Press the INFO. button repeatedly to cycle among overlays of basic image information, detailed shooting information, or no information at all.
![]() Zoom in on an image. When an image is displayed full-screen on your LCD, magnify the image by spreading two fingers apart on the touch screen, or reduce the image to thumbnails by pinching two fingers together on the touch screen. You can also press the Magnify button repeatedly to zoom in. The Magnify button is located in the upper-right corner of the back of the camera, marked with a blue magnifying glass with a plus sign in it. The Index/Reduce button, located to the left of the Magnify button, zooms back out. Press the Playback button to exit magnified display.
Zoom in on an image. When an image is displayed full-screen on your LCD, magnify the image by spreading two fingers apart on the touch screen, or reduce the image to thumbnails by pinching two fingers together on the touch screen. You can also press the Magnify button repeatedly to zoom in. The Magnify button is located in the upper-right corner of the back of the camera, marked with a blue magnifying glass with a plus sign in it. The Index/Reduce button, located to the left of the Magnify button, zooms back out. Press the Playback button to exit magnified display.
Figure 1.17 Review your images.
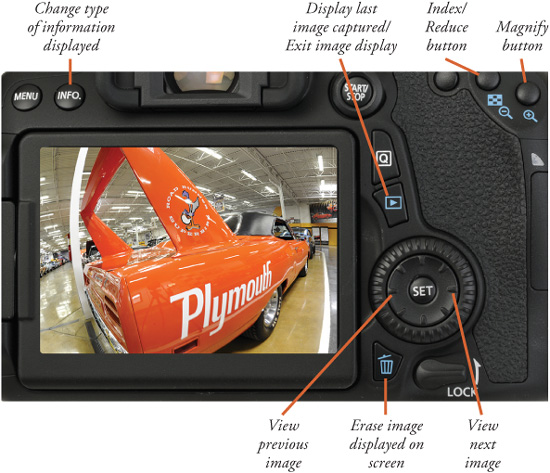
![]() Scroll around in a magnified image. Use the left/right/up/down multi-controller keys or swipe the touch screen to scroll around within a magnified image. If you’re using the touch screen, tap the “Return” arrow icon to go back to a single-image display.
Scroll around in a magnified image. Use the left/right/up/down multi-controller keys or swipe the touch screen to scroll around within a magnified image. If you’re using the touch screen, tap the “Return” arrow icon to go back to a single-image display.
![]() View thumbnail images. You can also rapidly move among a large number of images using the Index mode described in the section that follows this list. The Index/Reduce button in full-frame view switches from single image display to display of four or nine reduced-size thumbnails. To change from a larger number of thumbnails to a smaller number (from nine to four to single image, for example), press the Magnify button until the display you want appears. You can also tap the highlighted image on the touch screen to view a full-screen rendition of that thumbnail.
View thumbnail images. You can also rapidly move among a large number of images using the Index mode described in the section that follows this list. The Index/Reduce button in full-frame view switches from single image display to display of four or nine reduced-size thumbnails. To change from a larger number of thumbnails to a smaller number (from nine to four to single image, for example), press the Magnify button until the display you want appears. You can also tap the highlighted image on the touch screen to view a full-screen rendition of that thumbnail.
![]() Jump forward or back. You can set the jump increment in the Playback 2 menu. (I’ll explain all the jump options in Chapter 3.) Once a jump increment has been selected, you can leap forward or back that number of pictures by rotating the Main Dial or by swiping the touch screen from left to right with two fingers. If using the Main Dial, turn it counterclockwise to review images from most recent to oldest, or clockwise to start with the first image on the memory card and cycle forward to the newest, using the jump size you’ve selected.
Jump forward or back. You can set the jump increment in the Playback 2 menu. (I’ll explain all the jump options in Chapter 3.) Once a jump increment has been selected, you can leap forward or back that number of pictures by rotating the Main Dial or by swiping the touch screen from left to right with two fingers. If using the Main Dial, turn it counterclockwise to review images from most recent to oldest, or clockwise to start with the first image on the memory card and cycle forward to the newest, using the jump size you’ve selected.
Cruising Through Index Views
You can navigate quickly among thumbnails representing a series of images using the 70D’s Index mode. Here are your options:
![]() Display thumbnails. Press the Playback button to display an image on the color LCD. If you last viewed your images using Index mode, an Index array of four or nine reduced-size images appears automatically. If an image pops up full-screen in single-image mode, press the Index/Reduce button once to view four thumbnails, or twice to view nine thumbnails. You can switch between four, nine, and single images by pressing the Index/Reduce button to see more/smaller versions of your images, and the Magnify button to see fewer/larger versions of your images.
Display thumbnails. Press the Playback button to display an image on the color LCD. If you last viewed your images using Index mode, an Index array of four or nine reduced-size images appears automatically. If an image pops up full-screen in single-image mode, press the Index/Reduce button once to view four thumbnails, or twice to view nine thumbnails. You can switch between four, nine, and single images by pressing the Index/Reduce button to see more/smaller versions of your images, and the Magnify button to see fewer/larger versions of your images.
![]() Navigate within a screen of index images. In Index mode, use the up/down/left/right directional keys or the touch screen to move the blue highlight box around within the current index display screen. Swipe the scroll bar at the right of the touch screen to scroll down or up.
Navigate within a screen of index images. In Index mode, use the up/down/left/right directional keys or the touch screen to move the blue highlight box around within the current index display screen. Swipe the scroll bar at the right of the touch screen to scroll down or up.
![]() View more index pages. To view additional index pages, rotate the Main Dial. The display will leap ahead or back by the jump increment you’ve set in the Playback 2 menu (as described in Chapter 3), 10 or 100 images, by index page, by date, or by folder.
View more index pages. To view additional index pages, rotate the Main Dial. The display will leap ahead or back by the jump increment you’ve set in the Playback 2 menu (as described in Chapter 3), 10 or 100 images, by index page, by date, or by folder.
![]() Check image. When an image you want to examine more closely is highlighted, press the Magnify button or tap the thumbnail on the touch screen until the single image version appears full-screen on your LCD.
Check image. When an image you want to examine more closely is highlighted, press the Magnify button or tap the thumbnail on the touch screen until the single image version appears full-screen on your LCD.
Using the Built-in Flash
The built-in flash is easy enough to work with that you can begin using it right away, either to provide the main lighting of a scene or as supplementary illumination to fill in the shadows. The 70D will automatically balance the amount of light emitted from the flash so that it illuminates the shadows nicely, without overwhelming the highlights and producing a glaring “flash” look.
The flash will pop up automatically when using any of the Basic Zone modes except for Landscape, Sports, or No Flash modes. In Creative Zone modes, just press the flash button on the left side of the camera (from shooting position). When using these modes, the flash functions in the following way:
![]() P (Program mode). The 70D selects a shutter speed from 1/60th to 1/200th second and appropriate aperture automatically.
P (Program mode). The 70D selects a shutter speed from 1/60th to 1/200th second and appropriate aperture automatically.
![]() Tv (Shutter-priority mode). You choose a shutter speed from 30 seconds to 1/200th second, and the 70D chooses the lens opening for you, while adjusting the flash output to provide the correct exposure.
Tv (Shutter-priority mode). You choose a shutter speed from 30 seconds to 1/200th second, and the 70D chooses the lens opening for you, while adjusting the flash output to provide the correct exposure.
![]() Av (Aperture-priority mode). You select the aperture you want to use, and the camera will select a shutter speed from 30 seconds to 1/200th second, and adjust the flash output to provide the correct exposure. In low light levels, the 70D may select a very slow shutter speed to allow the flash and background illumination to balance out, so you should use a tripod.
Av (Aperture-priority mode). You select the aperture you want to use, and the camera will select a shutter speed from 30 seconds to 1/200th second, and adjust the flash output to provide the correct exposure. In low light levels, the 70D may select a very slow shutter speed to allow the flash and background illumination to balance out, so you should use a tripod.
![]() M (Manual mode). You choose both shutter speed (up to 1/200th second) and aperture, and the camera will adjust the flash output to produce a good exposure based on the aperture you’ve selected.
M (Manual mode). You choose both shutter speed (up to 1/200th second) and aperture, and the camera will adjust the flash output to produce a good exposure based on the aperture you’ve selected.
Transferring Photos to Your Computer
You can transfer the photos you’ve taken to your computer for printing, further review, or image editing. Your 70D allows you to print directly to PictBridge-compatible printers and to create print orders right in the camera, plus you can select which images to transfer to your computer.
For now, you’ll probably want to transfer your images either by using a cable transfer from the camera to the computer or by removing the memory card from the 70D and transferring the images with a card reader. The latter option is usually the best, because it’s usually much faster and doesn’t deplete the battery of your camera. However, you can use a cable transfer when you have the cable and a computer, but no card reader (perhaps you’re using the computer of a friend or colleague, or at an Internet café).
To transfer images from the camera to a Mac or PC computer using the USB cable:
1. Turn off the camera.
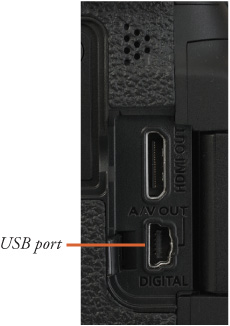
2. Pry back the rubber cover that protects the 70D’s USB port, and plug the USB cable furnished with the camera into the USB port. (See Figure 1.18.)
3. Connect the other end of the USB cable to a USB port on your computer.
Figure 1.18 Images can be transferred to your computer using a USB cable plugged in to this port.
4. Turn on the camera. Your installed software usually detects the camera and offers to transfer the pictures, or the camera appears on your desktop as a mass storage device, enabling you to drag and drop the files to your computer.
To transfer images from a memory card to the computer using a card reader:
1. Turn off the camera.
2. Slide open the memory card door, and press on the card, which causes it to pop up so it can be removed from the slot.
3. Insert the memory card into your memory card reader. Your installed software detects the files on the card and offers to transfer them. The card can also appear as a mass storage device on your desktop, which you can open, and then drag and drop the files to your computer.