Your a6600 is equipped with a built-in wireless communication system that includes a whole collection of impressive abbreviations, acronyms, and buzzwords—and functions to match! Wi-Fi, NFC, and Bluetooth have arrived, so you can easily and quickly transfer files from your camera to a smartphone or computer, upload to Facebook, control your camera remotely, and perform other tasks. This chapter provides an introduction to connecting your camera to other devices using the Network menu. Then, we’ll move on to the Playback menu to discuss some of the options available when reviewing images.
Network Menu
The section explains the basic functions on the Network menu, in order, although you won’t necessarily be using them in this order. For example, you can assign a name to a device in the Network 2 menu before you use the functions in the Network 1 menu. (See Figure 5.1.) I’ll summarize all the entries first, and then later cover the major options in logical/functional order rather than the order they appear in the menus. Detailed networking/information technology topics and software operation discussions are beyond the scope of this book, which is primarily a photography tome, not a software tutorial, so some sections may provide just an overview. Consult the PlayMemories Home and Imaging Edge/Imaging Edge Mobile help files for detailed descriptions of how to transfer, post-process, and organize your stills and videos. Because the Network menu entries are functions, the settings all relate to your own camera/device configuration, so I won’t provide any “My preference” notes for them.
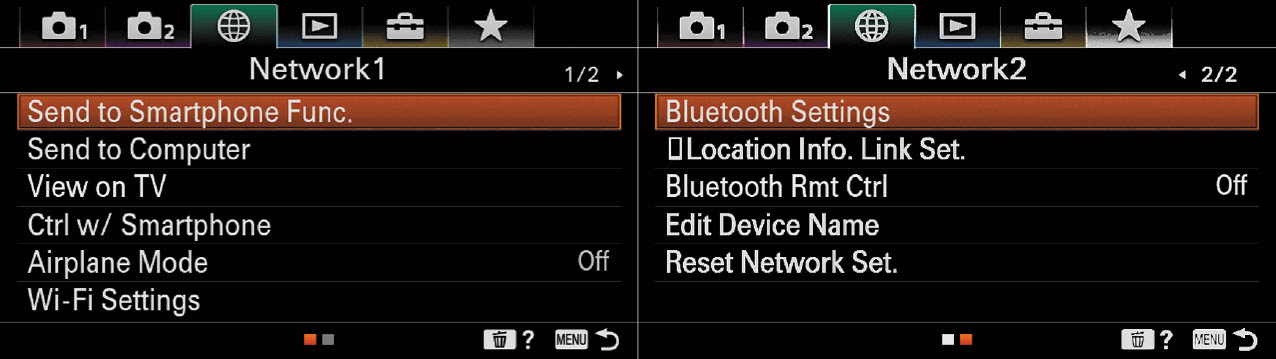
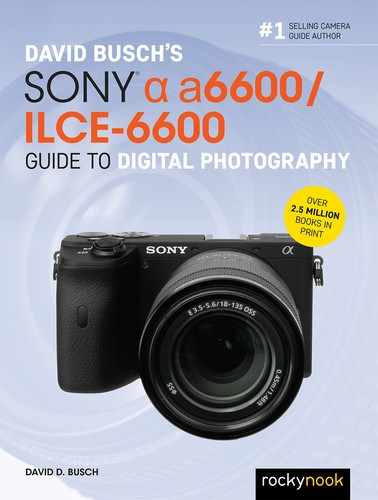
Figure 5.1 The Network 1 and 2 menus.
The Network menu contains the following entries:
Page 01
- Send to Smartphone Function
- Send to Computer
- View on TV
- Control with Smartphone
- Airplane Mode
- Wi-Fi Settings
Page 02
- Bluetooth Settings
- Location Info Link Settings
- Bluetooth Remote Control
- Edit Device Name
- Reset Network Settings
Send to Smartphone Function
Options: Send to Smartphone (Select on This Device, Select on Smartphone); Sending Target (Proxy Only, Original Only, Proxy & Original)
Using the Imaging Edge Mobile app (which replaces the PlayMemories Mobile app you may have used with your previous Sony camera) on your smart device, you can transfer still photographs, XAVC X video, and slow- or quick-motion movies from your camera’s memory card. This entry lets you specify whether the files to be transferred are selected on the camera or on the smart device, and whether you transfer the original file only, or, in the case of videos, a proxy (lower-quality, faster transfer) movie only, or both the original and proxy. (See Chapter 4 for a description of proxy recordings in the Camera Settings II-01 menu.)
The Imaging Edge Mobile app allows you to choose the Image Copy Size for stills, original, 2MB, or VGA, so you can speed up transfer, if necessary, by selecting a smaller file size. RAW files are converted to JPEG before transmission. 4K video, XAVC S movies recorded at 120/100p, and AVCHD movies cannot be transferred at all. Only the proxy movies can be sent. Be aware that your smart device may not be able to play back some files; even if they transfer fine, your phone or tablet may not be able to display them. That’s a limitation of the destination device, not your a6600. You may need to find a third-party gallery app for your Android or iOS device that can handle a wider variety of files.
Note that when the Fn button’s Playback behavior is set to its default value, pressing it while a still image or movie is displayed summons the Send to Smartphone function and This Image, All With This Date, and Multiple Images options, bypassing this menu. That’s a speedy shortcut. But if you don’t transmit to your smart device often, you can safely redefine the Fn button to another behavior for Playback, as this menu entry is always available.
Send to Computer
Options: None
This entry starts the transfer of all the images on your memory card, or a particular folder, to your computer using the PlayMemories Home application on your computer. The camera will attempt to use the Wi-Fi connection you’ve established earlier, or a USB connection if you link the a6600 to your computer with a USB cable. PlayMemories Home is the Windows/Mac counterpart to the Imaging Edge Mobile (previously PlayMemories Mobile) app on your smart device. Don’t confuse the two! Once the USB connection is established, PlayMemories Home will provide instructions on completing the transfer. Proxy movies cannot be transferred using this facility.
Software Shuffle
Sony is constantly updating its free software, which may cause some confusion, especially since it has done a little renaming of some key applications as they are upgraded. For advanced editing functions offered by Imaging Edge and PlayMemories Home, consult the official documentation provided by Sony. As I noted in the introduction, I’m devoting the pages allotted for this book to functions and features of the a6600 camera and its key accessories, rather than software tutorials and advanced networking procedures.
Here’s a quick summary of the available software:
- Imaging Edge. This is the suite of three applications that runs on Mac and Windows computers. The trio includes Viewer (for browsing, filtering images by rating, and creating time-lapse movies); Edit (used to crop/straighten images, adjust their brightness and color, and convert RAW files into JPEG or TIFF formats); and Remote (for taking photos with a camera tethered by USB cable to your computer).
- PlayMemories Home (Mac and Windows). This older software allows you to manage and perform simple edits on your PC or Mac. (See Figure 5.2.) I suspect this program will eventually be folded into the Imaging Edge suite, and may even have been by the time this book is published. (If so, nevermind!) Shared features of the versions available when this book was written include:
- Import images from the camera into your computer.
- Playback and view images imported into your computer.
- Organize/search images by camera/lens used, or other attributes.
- Share images by uploading them to the PlayMemories Online cloud.
- Edit movies by trimming or merging them.
- Add effects, including background music and subtitles to movies.
- PlayMemories Home (Windows version only). Some functions are available only with the Microsoft Windows version of the PlayMemories software:
- Organize and view images/videos on the computer on a calendar by shooting date.
- Edit and correct images through trimming and resizing.
- Create Blu-ray or AVCHD discs for XAVC S–format movies. You must have a Blu-ray/DVD burner to create the discs.
- Upload images to a network service over an Internet connection.
- Imaging Edge Mobile. This is a replacement for PlayMemories Mobile on your smart device; indeed, if you already have the previous app on your device, it will be automatically replaced the next time you perform an update. Its functions include Remote Shooting (to preview, change settings, and take photos with your smart device) and Transfer Images/Movies (you can select files to transfer from the smart device or the a6600). As noted above, the functions/features of the Imaging Edge Mobile app may change by the time this book is published. In addition, the app has had problems in some areas with iOS 13.0 (and later versions). Sony’s software is not the only imaging app affected, and there have been a flurry of iOS updates to purportedly fix the broken features. I’m assuming everything will be hunky-dory by the time this book hits the shelves.
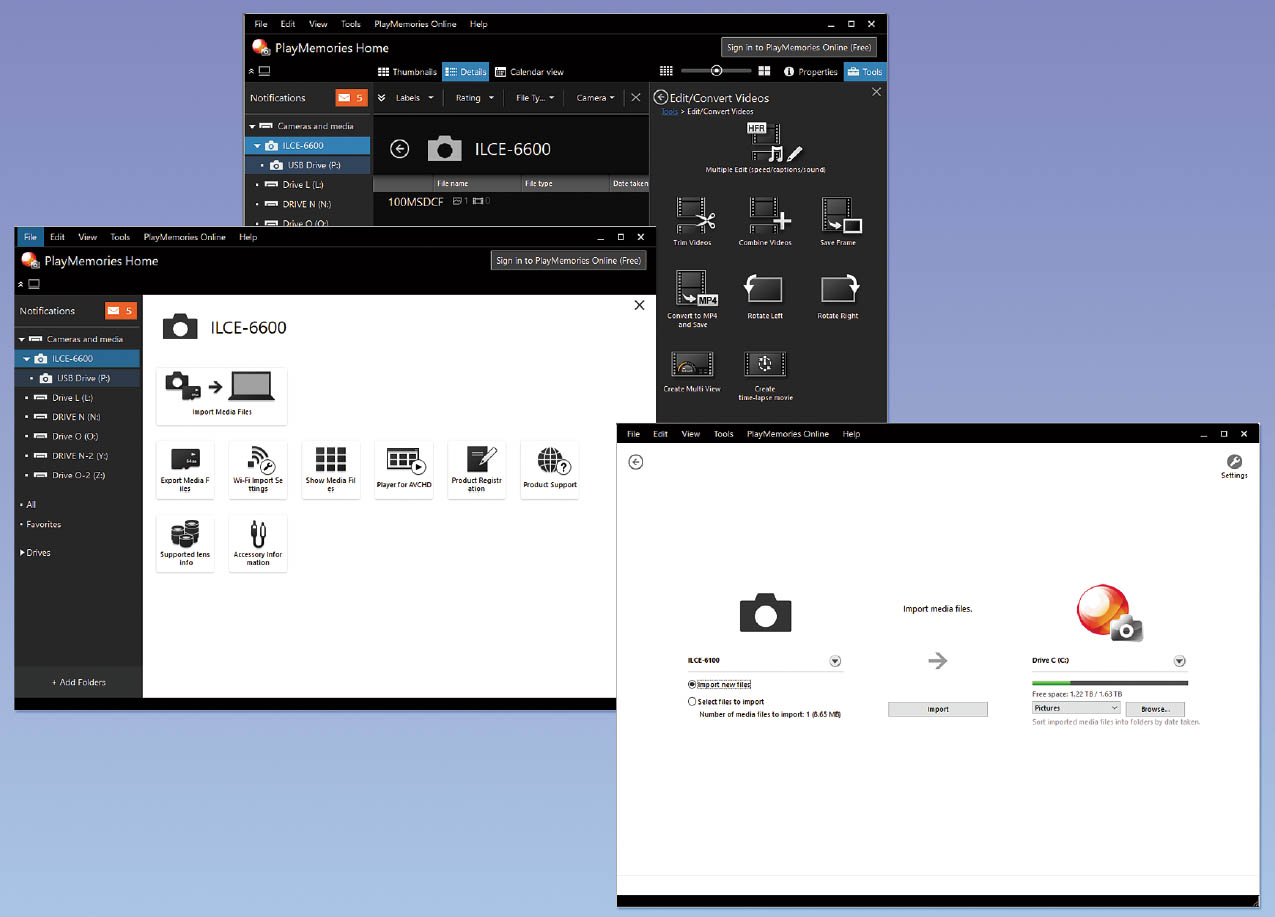
Figure 5.2 The Windows version of PlayMemories Home Version 6.0.00.
VERSION FLUX
Sony is in the midst of revising its software to account for the latest 64-bit platforms for both Windows and Mac computers, as well as for new features added to its newest cameras. As a result, both the PlayMemories Home and Imaging Edge Windows/Mac OS may have different functions from those I describe in this book. The latest PlayMemories Home software as I write this is Version 6.0.00 (Windows, 64-bit) and 5.5.01 (Mac OS 10.12-10.14, 32-bit). Note that as I write this, Sony supports the Macintosh version only on Sierra, High Sierra, and Mojave releases only. From macOS Catalina forward, only 64-bit applications can be used. Sony has not announced (yet) whether a new version of PlayMemories Home (for the Mac) will be introduced after the 5.5.01 release was discontinued in March 2020.
View on TV
Options: Connect to TV; Slideshow settings
You don’t need to hard wire your network-enabled smart TV to the a6600 to transfer still images. This entry allows you to set up displays and slide shows wirelessly, selecting images, the display interval, playback size, and any special effects. Movies cannot be transferred using this facility. Operations controlled from the TV vary by model, so you’ll need to consult your DLNA-compatible smart TV’s manual to make the best use of this feature.
The HDTV and camera must be logged into the same Wi-Fi access point. Then, press the Play button on the camera, followed by the MENU button. Navigate to this menu entry, and press the Center button. The camera will search for the Wi-Fi connection to your HDTV, connect, and then commence playback. You can then press the left/right directional buttons to move from one image to another, and the down button to switch playback devices or adjust slideshow options.
Control with Smartphone
Options: Control with Smartphone (On, Off); Smartphone Connection (Display QR Code); Always Connected (On, Off)
You can control your camera using your smart device and a Wi-Fi connection. This entry turns the feature on or off, displays a QR code to quickly link the camera and device, and specifies whether, once activated, the camera remains connected to the smartphone at all times (draining your battery significantly) or maintains the link only when you connect manually. Note that Control with Smartphone must be Off when controlling the a6600 using a USB connection with Imaging Edge or PlayMemories Home software.
Airplane Mode
Options: On, Off
Choosing On disables wireless functions; Off enables them. Use this to save power, or when required (as when boarding an airplane).
Wi-Fi Settings
Options: WPS Push, Access Point Settings, Display MAC Address, SSID/PW Reset
This entry includes features for connecting the a6600 to a Wi-Fi access point, either semi-automatically using WPS Push or by manually registering by entering the SSID name of the access point and entering security information. You can also view the device’s MAC Address. Each device on a network has a unique Media Access Control number. You generally have no need to know this, unless you want to block a device from your network and use the MAC address to identify the unwanted device.
SSID/PW Reset deletes the current SSID and password. You might want to do this for security reasons (say, you load/give/sell your a6600 to someone else) or need to start over in registering your camera with a network. Reset Network Settings removes all network settings from the camera.
Bluetooth Settings
Options: Bluetooth Function (On, Off); Pairing; Display Device Address
Your a6600 can access the GPS information available from your smartphone and embed that data in your image files using low-energy Bluetooth connectivity. Use this, and you no longer have to wonder where you took a photo; the GPS data can be displayed by many applications, including Lightroom’s Map tab. This entry allows you to turn off Bluetooth sharing, pairing your phone with your camera, and displaying the device’s address. Keep in mind that when you initialize your camera, as described in Chapter 6, pairing settings are canceled as well.
Location Information Link Settings
Options: Location Info Link, Auto Time Correction, Auto Area Adjustment
This entry allows the a6600 to access the location information from your smartphone, after you’ve enabled Bluetooth connectivity in the previous entry. One of the cool features is to use the Auto Time Correction option to allow your smartphone’s (very) accurate time information to be used to set the time and date used by your camera. It’s the “let’s synchronize our watches” version for the 21st century. You can also activate Auto Area Adjustment, so the camera “knows” where it is and uses the correct time zone. Turn this on if you want to embed in your image files the local time when you took a picture; turn it off if you’d prefer the time reflect your “back home” norm.
Bluetooth Remote Control
Options: On/Off
The Sony RMT-P1BT remote control operates by Bluetooth LE (low-energy) radio signals. This remote, at a little less than $80, is not as inexpensive as infrared remote controls, drains much less juice from your camera, has a range of about 16 feet, and isn’t dazzled by bright sunlight (which can give IR remotes fits). It can start/stop movie recording, too.
Edit Device Name
Options: Change Device Name
By default, the label applied to your camera is ILCE-6600. You can change it to something else, if, say, you own three or four a6600’s and want to differentiate between them—or simply want to personalize your camera’s “name.”
Reset Network Settings
Options: Reset and Reboot
Changes all network settings to their factory defaults and reboots your a6600.
Remotely Controlling Your Camera
If you’re using a computer to connect to your camera, the PC Remote function of the Imaging Edge Remote module is the easiest, fastest way to shoot tethered. You can also shoot remotely from your smart device using the Imaging Edge Mobile software, which you can download from your country’s Sony website. For casual remote-control shooting, whether you want to exercise some creative options (to get unusual viewpoints), you are stalking wildlife, or are a double-naught spy, your smartphone and camera will do the job.
Once you’ve connected your camera to the smartphone, there are a limited number of settings you can make from the smartphone, but you can always use the controls on the camera itself to make additional adjustments. You can change White Balance, switch from single to continuous shooting, adjust ISO, make exposure compensation settings, activate the self-timer, and use a menu. You can also select an f/stop or shutter speed if using Aperture Priority or Shutter Priority (respectively), or select both f/stop and shutter speed when using Manual exposure. Tap the “shutter button” icon at the bottom of the app screen and take a picture. If you have specified Always Connected under the Control with Smartphone entry in the Network 1 menu, you’ll always be ready to go when the camera and smartphone are in proximity.
Using PC Remote
As I noted, your other option for controlling your camera remotely is using the PC Remote function of Imaging Edge Remote. It’s actually quite easy to use. That’s especially true when using a direct USB connection rather than Wi-Fi link. The USB connection is much easier to set up and is typically faster, although it requires using a computer instead of your smart device. This section will show you everything you need to know to begin shooting your camera by remote control using the PC Remote function. Just follow these steps:
- 1. Disable Control with Smartphone. Access this entry from the Network 1 menu and turn it off if you have previously activated it.
- 2. Enable PC Remote. In the Setup 4 menu, choose USB Connection and select PC Remote for the USB function.
- 3. Configure PC Remote. In the Setup 4 menu, select the PC Remote Settings entry and press the center button.
- 4. Choose Still Image Save Destination. Select PC only, PC+Camera, or Camera only. Opt for PC only if you will be doing a lot of shooting and don’t want to let your memory card fill up. Choose PC+Camera to automatically back up your shots to two locations. With Camera only, no images are saved on your computer.
- 5. Set RAW+J PC options. This is available only if you’ve selected PC+Camera as your still image destination, and RAW & JPEG as your File Format. You can save both RAW & JPEG to the computer, JPEG only (for faster transfer; especially important if you are using Wi-Fi rather than a faster USB connection), or RAW only.
Once you’ve set up your connection, launch the Imaging Edge Remote application. Double-click on the connection you want to see (see Figure 5.3, left) and the Remote application will appear. A live image as seen through the a6600’s lens appears and a panel with all the settings you can make is shown at far right in the figure.
You can control most shooting aspects, including shooting mode, shutter speed, aperture, ISO settings, and exposure compensation, along with file format, aspect ratio, white balance, focus settings, and more. A live histogram is shown, and you can specify the folder where your files are stored on your computer.
Figure 5.3 Using the Remote application on your computer.
Making a Wireless Connection
For this section, I’m basing my descriptions in this chapter on the assumption that you are not an IT specialist, and don’t need (or want) to compare the advantages of WEP versus WPA security, and would rather not set IP addresses yourself. Alternatively, I will assume that if you are an IT specialist and find these topics compelling, you already know most of what you need and would rather not hear it from me, again. As Thoreau once said, “Simplify, simplify!” (but without explaining the redundant “Simplify”).
If you want to connect using your smartphone or tablet, the first thing you should do is venture over to your smart device’s app store and download the Imaging Edge Mobile app, which I described earlier in this chapter. (If you already have the older PlayMemories Mobile app, it will be upgraded to the newer version during your next update.) Then follow the instructions below for connecting through NFC or Wi-Fi. The a6600 has an additional option for linking your smartphone to the camera through Bluetooth so GPS information can be embedded in your photographs.
Camera/Device: NFC Connection
If you have an Android device, connecting with NFC is your simplest option. NFC stands for Near Field Communication, a wireless access method found in Android-based smartphones and tablets. It’s not available with iOS devices, although Apple Pay uses it to send your money hither and yon. Once you’ve installed the PlayMemories Mobile app on your device, linking the a6600 and the device is as simple as tapping the area on your phone containing its transceiver with the camera’s transceiver (located under the “N” mark on the right side of the hand grip). Just follow these steps:
- 1. Turn on NFC on your smart device. Cancel any sleep or lock-screen functions so the device will not disconnect before you are finished shooting.
- 2. Access the Control w/Smartphone entry in the camera’s Network 1 menu and make sure the feature is On.
- 3. Power up the a6600. The NFC “N” mark will display on the camera’s screen, indicating that NFC is available.
- 4. Tap the matching NFC mark on the camera with your device for several seconds. If either the camera or phone are in a third-party case, you may need to remove the case to make the connection.
- 5. Once connected, the Imaging Edge Mobile application on the phone should launch automatically.
- 6. You can now preview the a6600’s image on your smartphone, take pictures using it as a remote control, and transfer your shots from the camera to your device.
- 7. To transfer images, choose Send to Smartphone Functions from the Network 1 menu, select Send to Smartphone, and select images. Use NFC to connect the camera to the phone if not already linked.
Camera/Device: Wi-Fi Connection
Wi-Fi connections are slightly more complicated and can be used both for Android and iOS smartphones using QR codes. Just follow these steps:
- 1. Choose Control w/Smartphone from the Network 1 menu and choose the Smartphone Connection choice from the screen that appears. (See Figure 5.4, left.) The device is represented by a smartphone icon.
- 2. A QR code will appear on the camera’s LCD. (See Figure 5.4, right.)
- 3. Launch Imaging Edge Mobile. You’ll see a screen like the one at left in Figure 5.5. Tap Scan QR Code on the camera.
- 4. A screen appears (see Figure 5.5, center). Choose whether to scan the Wi-Fi QR Code or the NFC code of the camera. You can dismiss this screen from appearing again by choosing Don’t Show This Again from the screen that pops up next.
- 5. A capture window will appear on the smartphone. Center it over the code on the LCD monitor of the a6600 to allow the smartphone to capture the code. (See Figure 5.5, right.)
- 6. If your phone requires installing a profile, follow the remaining instructions to add it. You may have to enter your device’s passcode and confirm installation.
- 7. The smart device will connect with the a6600 and display a screen asking if you want to Join the connection. Choose OK to complete the link. Some operating systems may ask you to install a Profile on your phone or tablet the first time you connect to a Sony camera, and you may be asked to confirm the SSID in a screen shown at right in Figure 5.5 and a password.
- 8. When installation is complete, you will be instructed to select the a6600’s “hot spot” as your Wi-Fi connection, and then restart Imaging Edge Mobile.
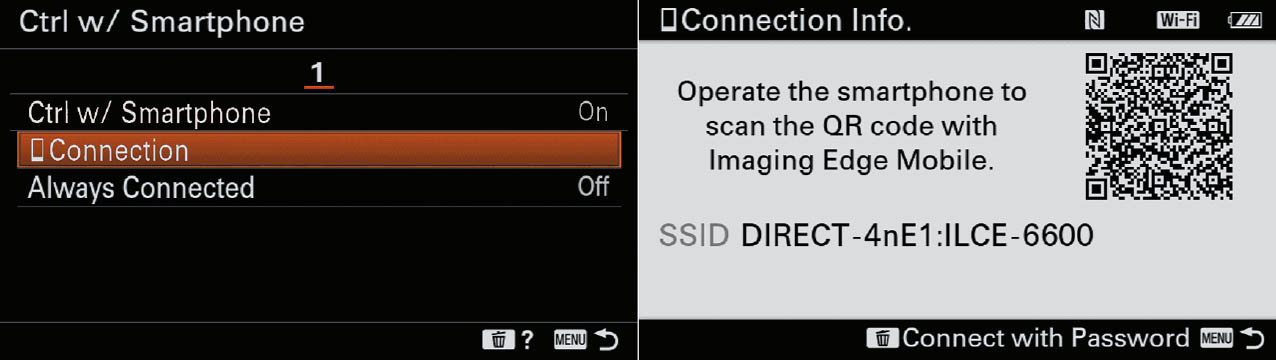
Figure 5.4 Choose Smartphone Connection (left) and a QR code will appear on the a6600’s LCD monitor (right).
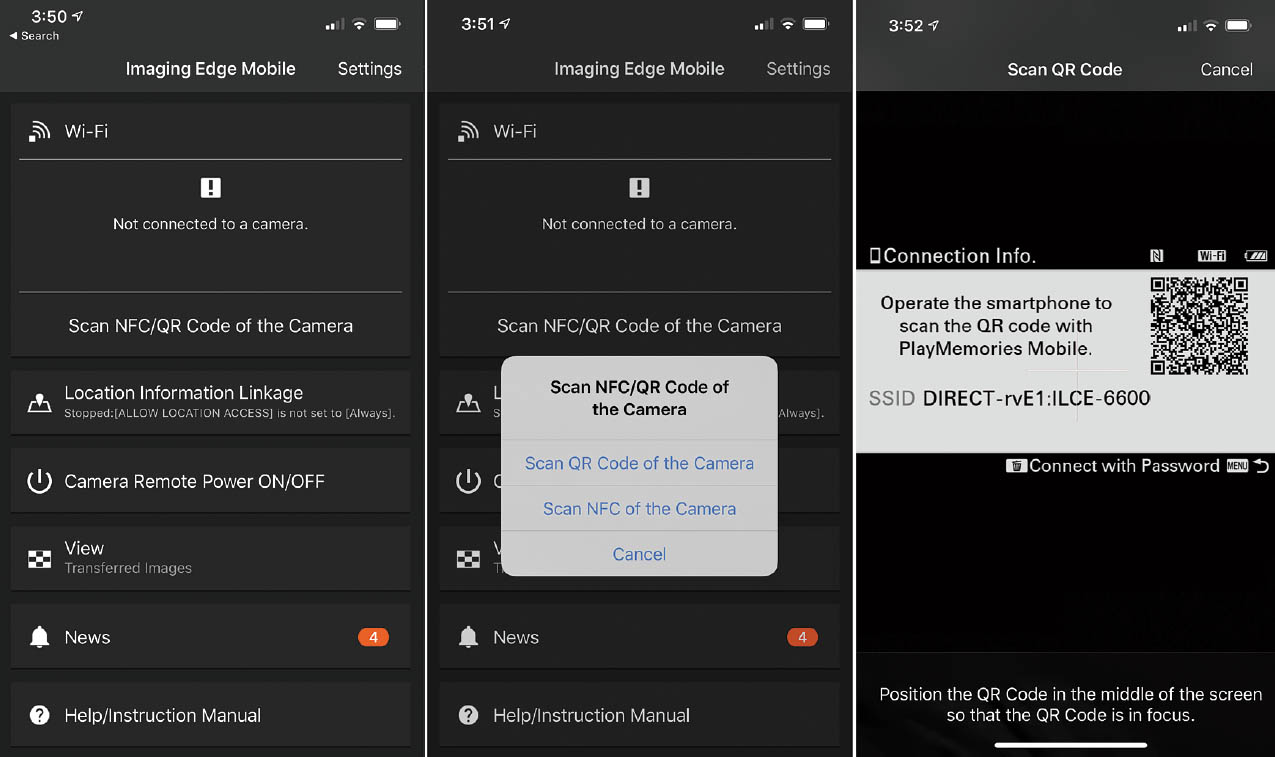
Figure 5.5 Select Scan NFC/QR Code of the Camera (left), start the scan (center), and point the device’s camera at the QR code on the a6600’s LCD (right).
Using WPS Push
Wi-Fi Protected Setup works only when you’re in range of a network provided by a wireless router that is equipped with a WPS button. Not all are. Examine your router and look for a button labeled WPS, or with a ![]() symbol. Or, find the owner’s manual for your router or use a Google search (try “routername manual PDF”) to locate the WPS button, if one is available. Some routers that support WPS provide it with software instead of a physical button; in that case, you’ll need to access the router’s control panel using a computer and click the button on the WPS page. The WPS Push tactic is great, but it would not work at a Wi-Fi hotspot in a supermarket, for instance, since the network owner is unlikely to use the WPS feature for hundreds of customers.
symbol. Or, find the owner’s manual for your router or use a Google search (try “routername manual PDF”) to locate the WPS button, if one is available. Some routers that support WPS provide it with software instead of a physical button; in that case, you’ll need to access the router’s control panel using a computer and click the button on the WPS page. The WPS Push tactic is great, but it would not work at a Wi-Fi hotspot in a supermarket, for instance, since the network owner is unlikely to use the WPS feature for hundreds of customers.
WHAT’S WPS?
The abbreviation WPS indicates Wi-Fi Protected Setup. This is a security standard that makes it easier and quicker to connect a device, including your a6600, to a wireless home network. It eliminates the need to key in the password. Because it’s possible for an aggressive hacker to recover the WPS PIN number, some experts suggest turning the router’s WPS feature off when you’re not actually using it; this may not be possible with all router models but check the owner’s manual for the one you own.
- 1. Access the Network 1 menu and choose Wi-Fi Settings. If your router provides WPS, scroll to the WPS Push item in the camera’s Wi-Fi settings menu (the top entry at left in Figure 5.6) and press the center button.
- 2. Press the router’s WPS button. A screen will appear advising you to press the router’s WPS button within two minutes. When you press the button (or use the software) to do so, the camera should be able to establish connectivity.
- 3. Confirm registration. Once the connection is established, a screen reporting “Registered. SSID network name” appears. Press the center button to confirm.

Figure 5.6 Access Point Settings can be used to select an access point/hotspot (left). The camera displays the available networks that are within range (right).
Registering Manually
You can also select an access point manually when within range of a wireless network; you’ll need to know the network password, if one is in place, to do so. Just follow these steps:
- 1. Access the Network 1’s Wi-Fi Settings entry. Scroll to Access Point Set, seen just below WPS Push at left in Figure 5.6. Press the center button. A Wi-Fi Standby screen will appear confirming that the camera is searching for available access points.
- 2. Wait for the camera to find your network. The a6600 will find the nearby access points (networks) in less than a minute. (See Figure 5.6, right.) If there is more than one network or available access point, all of those found will be shown. If your smartphone has a hotspot feature and it’s turned on, that “network” may appear as well.
When several networks are displayed, some may belong to nearby businesses or your neighbors, and you can ignore them (their signal strength is probably weaker than your own network in any case, even if your neighbor’s network is not protected by a password). In my case, my wireless router resides in my office; in other, more distant rooms is a wired access point, and, on the second floor, a wireless repeater. Scroll to the one you intend to use and press the center button to confirm.
- 3. Input the password (if necessary). The next screen that appears may have a field for entering your network password, if your router/access point is set up to require one. If not, proceed to Step 4. Otherwise, press the center button and enter the password. When finished, highlight OK and press the center button.
- 4. IP Address Setting. The next screen will appear, showing the IP Address Setting as Auto and Priority Connection as Off. These defaults should work perfectly. Select OK and press the center button. A screen will appear showing the camera trying to connect to the network.
If the Auto IP Address Setting option does not work, and you have some networking expertise, change from Auto to Manual, and a screen appears that allows you to enter the IP address, Subnet Mark, and Default Gateway. You can safely leave the Priority Connection parameter set to Off. Fortunately, you probably won’t have to resort to these additional steps.
- 5. Confirm connectivity. After the Wi-Fi connectivity has been made, a screen will appear confirming that your network has been registered. An orange dot will appear next to the connected network. If you get a screen with a note stating cannot authenticate, or that the input value is invalid, you’ll need to start again at step 1; make sure you have the correct password for the network and be extra careful when keying it in. Remember that when a capital letter is required, you must use the shift feature (an arrow pointing upward) on the virtual keyboard.
- 6. Try it again later. After you have established Wi-Fi connectivity, you can revert to using the a6600 as usual; a touch of the shutter release button returns it to shooting mode. The camera will retain the connection to the network until you turn it off or it goes into power-saving sleep mode; Wi-Fi is then temporarily disconnected. When you’re ready to use Wi-Fi again, activate the a6600 while in range of the same network, scroll to Access Point Settings in the Wireless menu, and press the center button. The camera will quickly find your network to re-establish Wi-Fi connectivity.
If you’re connecting to a public Wi-Fi hotspot, the steps should be the same, but you’ll most likely find a screen that requires you to agree to the hotspot’s terms and conditions. Some hotspots may not require you to enter a password.
Selecting an Access Point Manually
If the desired access point (network) is not displayed on the screen as described in Step 2 above, you may need to enter it yourself. Just follow these steps:
- 1. Choose Manual Setting. Scroll down to Manual Setting and press the center button.
- 2. Select Manual Registration. Press the center button to begin the manual registration process. The screen shown at right in Figure 5.7 appears.
- 3. Enter SSID. On the Manual Registration screen, there’s a field for entering the SSID name of the access point (network) you plan to use. Press the center button when this field is visible, and the virtual keyboard appears. Enter the data. When you’re finished press the center button.
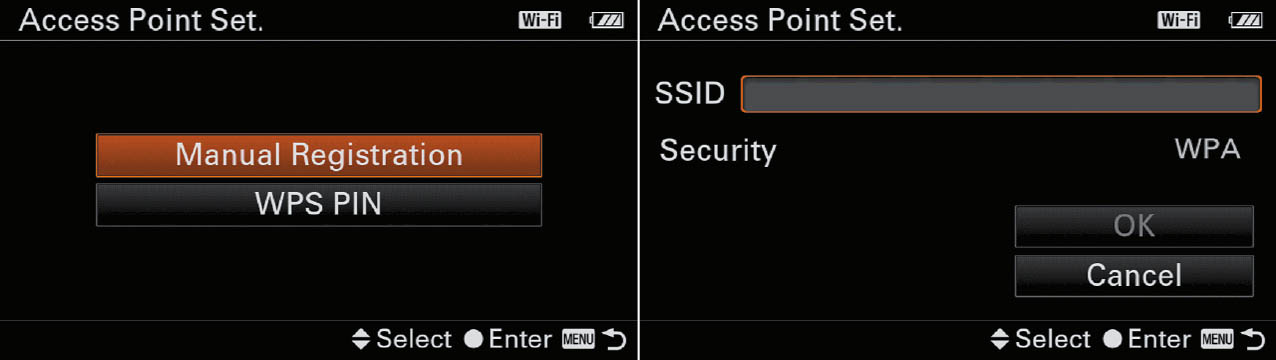
Figure 5.7 Manual registration (left) requires you to complete extra steps, including the SSID (right).
- 4. Change Security (if necessary). Again, if you have some networking expertise, you’ll know if the security setting on your router is WPA (Wi-Fi Protected Access, the default), WEP (Wired Equivalent Privacy, an older, easily “hacked” protection scheme), or None (effectively, no security). If you want to change the Security setting, highlight that field and press the center button. Select your choice and press the MENU button to return.
- 5. Enter password. The next screen will ask for your password, which you can enter using the virtual keyboard.
- 6. Enter WPS PIN (if necessary). If your WPS connection requires a PIN, you can enter it.
Take care not to lose the network connection by inadvertently using the Initialize or the Reset Network Settings item of the Wireless menu. If you do so, the camera will eliminate all your network settings and you’ll need to repeat the steps in this section.
Connecting with Bluetooth
The good news is that Sony has finally brought simple Bluetooth LE connections to its camera line, allowing you to share GPS data from your phone with the a6600. You can use devices with Android 5.0 versions or later compatible with Bluetooth 4.0 and later; and Apple devices including iPhone 4s (and later) or iPad (3rd generation and later). The camera will embed the data in the EXIF image information, making it available for mapping and other applications that can access it.
I love Bluetooth—my smartphone is linked to my vehicle’s hands-free calling feature, the soundbar on my smart TV, and the remote control I use to snap photos with my iPhone’s camera. My Fitbit tells my health app how well I slept the night before using a Bluetooth connection, and my wireless headphones allow me to listen to music or take calls without removing the phone from my pocket. When I play “music,” (I’ve been told it’s debateable) my bass guitar “talks” to my amp from 16 feet away, with no cable required.
The bad news—and it isn’t really bad—is that you need to temporarily forget your traditional way of connecting to a new Bluetooth device. Do not try to pair your a6600 with your smart device using your smart device’s Settings screen. If you accidentally do so, you’ll need to use your phone’s Bluetooth Forget Device command and start over. Your a6600 connects to your phone or tablet using the Imaging Edge Mobile app and can’t link up any other way. Make sure your Bluetooth Remote Control setting, described earlier, is set to Off. While your camera can be paired with as many as 15 different devices, it can share location information with only one smartphone and can’t connect to two devices simultaneously. Then, just follow these steps (and remember that when you use the Setup menu’s Initialize command, your Bluetooth connects are removed, too):
- 1. Select Bluetooth Settings from the Network 2 menu. The screen shown at left in Figure 5.8 appears.
- 2. Highlight Pairing and press the center button. The screen shown at right in Figure 5.8 pops up.
- 3. Launch the Imaging Edge App. Choose Location Image Linkage to produce the screen shown at left in Figure 5.9.
- 4. Select OK and the screen shown at right in the figure appears. It displays any cameras you’ve already linked (in my case a Sony a6600), and currently non-paired cameras, including my a7R IV. Highlight the a6600’s label (it appears as ILCE-6600) and choose OK to begin pairing.
- 5. Imaging Edge and your camera will link up.
- 6. The matching Location Information Linkage menu entry in the camera’s menu system, which I described earlier in this chapter, allows your a6600 to automatically set itself to the correct time, and determine your current geographical area. You’ll never have to adjust your Date/Time and Area Setting entries in the Setup 5 menu as long as you keep your phone linked to the camera.
- 7. If you encounter difficulties, make sure your phone/tablet’s Bluetooth is enabled, Airplane Mode on the camera is Off, and the camera is not connected to other devices. Choose Reset Network Settings in the Network 2 menu and try pairing again.

Figure 5.8 Select pairing (left) and the camera will display the screen shown at right.

Figure 5.9 Choose Location Information Linkage (left) then choose the a6600 camera to begin pairing (right).
Viewing Images on a TV
As with any current digital camera, it’s possible to view JPEG photos and video clips on an HDTV when you connect the a6600 to the TV using an HDMI cable. This is an extra-cost accessory. Buy the Type D cable with a micro HDMI connector at one end (for plugging into the camera) and a conventional HDMI plug (to connect to the TV’s HDMI port) at the other. An inexpensive cable is fine; there’s no need to pay more for one of the premium brands unless you need a cable that’s longer than about 6 feet. Make the cable connection and you can now display photos and movies on the oversized screen.
After the Wi-Fi connection has been made with a Digital Living Network Alliance/DLNA-compatible (network-enabled or Wi-Fi-Direct-enabled) HDTV, you can use this menu item, on the second screen of Wireless options. Use it to display photos on the HDTV without cable connection after Wi-Fi connectivity has been confirmed. The benefit of Wi-Fi Direct is that you do not need to register your access point on the camera before doing so; in other words, the TV need not be connected to the network if you are using Wi-Fi Direct. Movie clips cannot be transferred to a TV for display over Wi-Fi; to show those, connect the camera to the HDTV using an optional Type D HDMI cable.
Use the menu options to instruct the camera as to which device (TV) it should send to, which photos to display (all or only those in a specific folder), and whether the display time should be long or short if using the slide show feature. Press the center button if you do want to use the slide show feature. At any time, you can move to another image for the display by scrolling to the left or right.
It’s also possible to transfer JPEG photos, but not videos, to an HDTV without cable connection. If you have a networked TV (or a network-friendly game machine such as PlayStation or Xbox), you can view the images in your camera on that display without using the HDMI cable.
Of course, the HDTV must be DLNA (Digital Living Network Alliance) compliant and it must first be connected to your home network via Wi-Fi as per the instructions that came with the device. The a6600 must also be communicating with your network via Wi-Fi, of course. (Use the steps provided earlier.)
![]()
TIP There is an exception to the DLNA rule. Some HDTVs are Wi-Fi Direct enabled; if yours is, then it need not be connected to your network. Mine is not, so I have not been able to try this feature.
There are simply too many types of Wi-Fi-enabled HDTVs to provide full specifics on exactly how you’ll transfer JPEGs to the device. Sony’s published documents specifically recommend their Bravia HDTV, as you might expect, but you can use any DLNA- (or Wi-Fi-Direct-) enabled TV. A Bravia HDTV does provide a few extra display features that are possible only when using a Sony camera.
In any event, start by accessing the View on TV item in the camera’s Network menu and press the center button. The camera will confirm the Wi-Fi connection to your network and it will search for a compatible TV. Be sure to consult your TV’s instructions for setting the media display component to receive information from the camera. When connectivity with the TV has been confirmed, you can begin the sharing process using connection controls like those described earlier in this chapter.
Sending Files to a Smart Device
To transfer files from your camera to a smartphone or tablet, the device must be running the free Imaging Edge Mobile app for Android or iOS; you can get it from your usual app store. After you have downloaded the app (for iOS or Android) and are running it in your smart device, you can send one or more images to the smart device. (The app, and hence the camera’s Wi-Fi features like this one, are not available in a few countries where many aspects of Internet use are restricted.) This feature does not work for video clips.
- 1. Turn on the camera and the smart devices. Launch the Imaging Edge app and ensure that both the a6600 and the smart device have been connected, as described earlier.
- 2. Access an image you want to transfer. Press Playback and navigate to a file you want to transfer. Press the Send to Smartphone (Fn) button. If your camera and device are not connected, the camera will offer to make the connection and display a QR code that can be scanned using the Imaging Edge Mobile app on your device.
- 3. Choose image(s) to transfer. A screen like the one in Figure 5.10 appears asking whether you want to transfer the currently displayed image, all still photos with this date, or multiple images. When you press the center button after choosing This Image or All With This Date, the camera will connect to your device and begin executing the transfer.
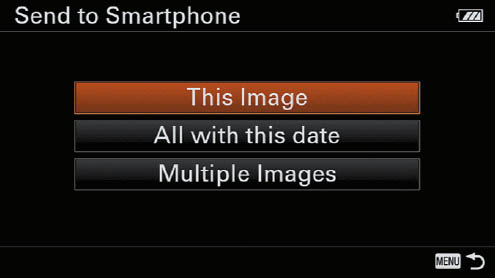
Figure 5.10 Choose which images to transfer.
Note: All With This Date will be offered even if you have changed View Mode to Folder View or one of the movie modes in the Playback 3 menu (described later in this chapter). If you want to send images spanning more than one date, select Multiple Images. You can then review any image on your memory card and mark it by pressing the center button. When finished selecting multiple images, press MENU to execute.
- 4. View images. After the smart device has completed importing files from the a6600, you can view the thumbnails on its screen. Naturally, you can enlarge any photo so it fills the device’s screen.
- 5. Use the smart device to share photos, etc. You can now use any of the smart device’s capabilities: modify any of the images, send it to friends via e-mail, upload it to any website, and so on.
Note that you can also send photos from your camera to your smart device using the Send to Smartphone Functions entry of the Network 1 menu. (See Figure 5.11, left.) That method has additional options.
- Selection platform. You can choose whether to select the photos you want to send from your smart device or from your camera. If you elect to choose them from the smart device, the a6600 will download thumbnails for you to preview while making your selection.
- Movies or proxies. You can also choose whether to transfer movies by sending only the original video clip, its proxy (if you opted to record one), or both proxy and original. (See Figure 5.11, right.)
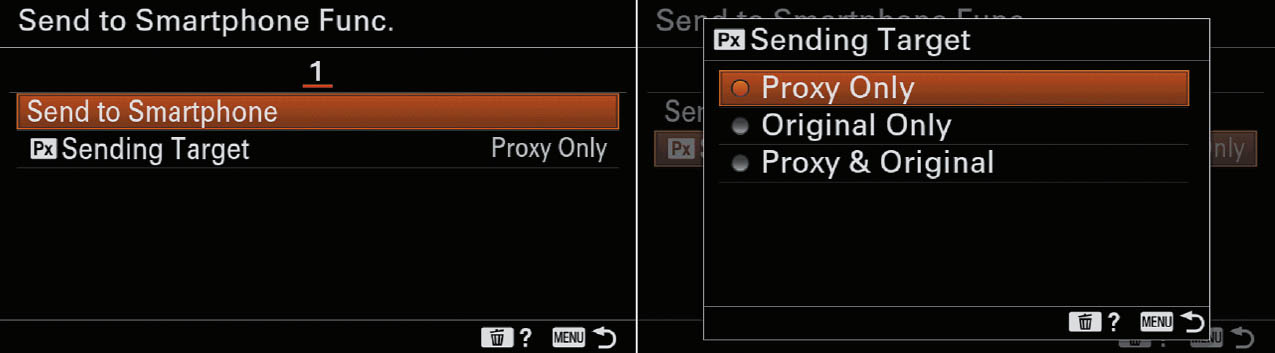
Figure 5.11 Select additional parameters.
Remote Control with Your Smartphone
Shooting photos remotely with your a6600 is the next best thing to shooting tethered using Lightroom. All you need is your camera and your smartphone. You can also shoot remotely using the new, free Imaging Edge software, which you can download from your country’s Sony website. For casual remote-control shooting, whether you want to exercise some creative options (to get unusual viewpoints), you are stalking wildlife, or are a double-naught spy, your smartphone and camera will do the job.
Once you’ve connected your camera to the smartphone, the screen shown at left in Figure 5.12 appears. There are a limited number of settings you can make from the smartphone, but you can always use the controls on the camera itself to make additional adjustments. You’re stuck with the exposure mode (such as P, A, S, or M) already set on the a6600. But you can change White Balance, switch from single to continuous shooting, select an f/stop or shutter speed if using Aperture Priority or Shutter Priority (respectively), or select both f/stop and shutter speed when using Manual exposure. Adjust ISO, make exposure compensation settings, activate the self-timer, and use a menu like the one shown at right in the figure. If your lens has a power zoom button, you can zoom from your phone, too. Note the GPS indicator at center left (it looks like a satellite) indicating that location information from your linked smartphone is being recorded. Tap the “shutter button” icon at bottom center and take a picture. If you have specified Always Connected under the Control with Smartphone entry in the Network 1 menu, you’ll always be ready to go when the camera and smartphone are in proximity.

Figure 5.12 Shooting by remote control.
Playback Menu
This menu controls functions for deleting, protecting, displaying, and printing images. Tip: While you can access the Playback menu at any time using the Menu system, you can bring it up on your screen more quickly just by pressing the Playback button first, then the MENU button, which causes the most recent Playback menu page you’ve accessed to appear. Note that most of the entries in the Playback menus are functions, not settings, and so have no useful “default” values.
The entries available in the three Playback menus are as follows:
Page 01
- Protect
- Rotate
- Delete
- Rating
- Rating Set (Custom Key)
- Specify Printing
Page 02
- Photo Capture
- Enlarge Image
- Enlarge Initial Magnification
- Enlarge Initial Position
- Continuous Playback for Interval
- Playback Speed for Interval
Page 03
- Slide Show
- View Mode
- Image Index
- Display as Group
- Display Rotation
- Image Jump Setting
Protect
Options: Multiple Images, All with (Current View Mode), Cancel All Images
This is the first entry in the Playback menu. (See Figure 5.13.) You might want to protect certain images or movie clips on your memory card from accidental erasure, either by you or by others who may use your camera from time to time. This menu item enables you to tag one or more images or movies for protection, so a delete command will not delete it. Protected files are marked with a key symbol. (Formatting a memory card deletes everything, including protected content.) This menu item also enables you to cancel the protection from all tagged photos or movies. If all you want to do is protect/unprotect the image currently on the screen, just press the center button during playback.

Figure 5.13 Playback 1 menu.
To use this feature, make sure to specify whether you want to do so for stills or movies; use the View Mode item in the Playback 3 menu (described later) to designate the desired view mode. There, you can select from Date View, Folder View (Still), AVCHD View, XAVC S HD View, or XAVC S 4K View to see only items matching that parameter.
Then, access the Protect menu item, choose Multiple Images, and press the center button. An image (or thumbnail of a movie) will appear; scroll among the photos or videos using the control wheel to reach the photo you want to tag for protection; press the center button to tag it with an orange check mark at the left side of the image. (If it’s already tagged, pressing the button will remove the tag, eliminating the protection you had previously provided.)
After you have marked all the items you want to protect, press the MENU button to confirm your choice. A screen will appear asking you to confirm that you want to protect the marked images; press the center button to do so. Later, if you want, you can go back and select the Cancel All Images option to unprotect all the tagged photos or movies.
Rotate
Options: None
When you select this menu item, you are immediately presented with a new screen showing the current or most recently reviewed image along with an indication that the center button can be used to rotate the image. (This feature does not work with movies.) Scroll left/right to reach the image you want to rotate. Successive presses of the center button will now rotate the image 90 degrees at a time. The camera (and some software, such as Imaging Edge) will remember whatever rotation setting you apply here. You can use this function to rotate an image that was taken with the camera held vertically, when you have set Display Rotation to Manual. Press the MENU button to exit.
Delete
Options: Multiple Img., All with (Current View Mode)
Sometimes we take pictures or video clips that we know should never see the light of day. Maybe you were looking into the lens and accidentally tripped the shutter. Perhaps you really goofed up your settings. You want to erase that photo now, before it does permanent damage to your reputation as a good photographer. Unless you have turned Auto Review off in the Camera Settings II-07 (Display/Auto Review 2) menu, you can delete a photo immediately after you take it by pressing the Trash key (Delete button). Also, you can use that method to delete any individual image that’s being displayed on the screen in Playback mode.
However, sometimes you need to wait for an idle moment to erase all pictures that are obviously not “keepers.” I sometimes do this during halftime when shooting sports, to eliminate a series of continuous shots I know were a waste of storage space. This menu item makes it easy to remove selected photos or video clips (Multiple Images), or to erase all the photos or video clips taken, sorted by your currently active view mode (such as folder or date). (Change the type of view using the View Mode option, described later.) Note that there is no delete method that will remove images tagged as Protected.
To remove one or more images (or movie files), select the Delete menu item, and use the up/down directional buttons, control dial, or the control wheel to choose the Multiple Images option. Press the center button, and the most recent image using your currently active view (Date View, Folder View [Still], Folder View [MP4], or AVCHD View) will be displayed on the LCD.
Scroll left/right through your images and press the center button when you reach the image you want to tag for deletion; an orange check mark appears. You can press the DISP button to see more information about a particular image. You can also press the AEL/Thumbnail button to view thumbnails of multiple images and select them in that mode.
When you’re satisfied (or have expressed your dissatisfaction with the really bad images), press the MENU button, and you will be asked if you’re sure you want to proceed. The number of images marked for deletion is shown on the screen. Highlight OK and press the center button to confirm your decision. The images (or video clips) you had tagged will now be deleted. If you want to delete everything on the memory card, it’s quicker to do so by using the Format item in the Setup menu, as discussed later in this chapter.
Rating
Options: One to five stars, Off
This setting lets you apply a quality rating to still images (but not movies) you’ve shot. You can also use the rating system to represent some other criteria. Simply select this menu item (or define a custom key as a dedicated Rating button, as described next). You can use this entry to give images one, two, three, four, or five stars, or turn the rating off. The Image Jump function (described later in this chapter) can display only images that have been given a specific rating, or any rating at all. Suppose you were photographing a track meet with multiple events. You could apply a one-star rating to jumping events, two stars to relays, three stars to throwing events, four stars to hurdles, and five stars to dashes. Then, using the Image Jump feature, you could review only images of one type. I personally find this type of use more helpful than simply critiquing my own work.
With a little imagination, you can apply the rating system to all sorts of categories. At a wedding, you could classify pictures of the bride, the groom, guests, attendants, and parents of the couple. If you were shooting school portraits, one rating could apply to first grade, another to second grade, and so on. Given a little thought, this feature has many more applications than you might think. Ratings can be used to specify images for a slide show, too, or to select images in Digital Photo Professional.
To use the Ratings menu entry, follow these steps:
- 1. Choose the Rating menu item.
- 2. The most recently viewed image appears.
- 3. Press the center button, and an icon appears, flanked by left/right triangles. (See Figure 5.14, left.)

Figure 5.14 You can apply one to five stars or turn ratings off (left). If you rarely use a particular star value, you can deactivate it when using a Custom Key (right).
- 4. Use the left/right controls to scroll among Off, and the individual star settings available. (You can specify which ratings can be applied, as I’ll describe shortly.)
- 5. Press MENU to confirm and exit.
- 6. The star rating (if any) that you’ve applied will henceforth be overlaid on the image each time you review it.
Rating Set (Custom Key)
Options: Activate any (or all) star ratings
This is a clever option that allows you to specify which star ratings can be applied when rating images using a defined Custom Key for the Rating function. For example, if you’re rating by quality and don’t deign to mark your really bad images, you can disable the * or ** star values. Thereafter, you’ll only need to consider ***, ****, or ***** ratings.
For this to work, you must apply the Rating behavior to a custom key of your choice, as I described in Chapter 4. After that, you can visit this menu entry, shown in Figure 5.14, right, and highlight individual star values. Press the center button to mark/unmark them, then highlight Enter and press the center button again to confirm and exit. When rating an image using the Custom Key, just press the key multiple times. The ratings change to the next available value each time you press the key. (This should be your default way of applying ratings!)
Specify Printing
Options: Multiple Images, Cancel All, Print Setting
Most digital cameras are compatible with the DPOF (Digital Print Order Format) protocol, which enables you to tag JPEG images on the memory card (but not RAW files or movies) for printing with a DPOF-compliant printer; you can also specify whether you want the date imprinted as well. Afterward, you can transport your memory card to a retailer’s digital photo lab or do-it-yourself kiosk or use your own DPOF-compatible printer to print out the tagged images in the quantities you’ve specified.
Choose multiple images using the View Mode filters described earlier to select to view either by Date or by Folder. Press the center button to mark an image for printing with an orange check mark next to the image, and the MENU button to confirm when you’re finished. The Print Setting entry lets you choose to superimpose the date onto the print. The date will be added during printing by the output device, which controls its location on the final print.
Photo Capture
Options: Capture video frame
This menu entry, the first in the Playback 2 menu, can be accessed only when you’re playing back a video clip. (See Figure 5.15.) You can use it to extract a still frame from a movie you’ve captured. Just follow these steps:
- 1. Select the movie. In Playback mode, navigate to the movie you want to clip from.
- 2. Press MENU. Choose Photo Capture from the Playback 2 menu. The first frame of the video will appear, along with a display offering playback controls.
- 3. Play video. Press the center button to start playback of the video at normal speed.
- 4. Select frame. Allow the movie to play to the approximate location containing the desired frame. You can use the following controls:
- Up button. Plays back slowly so you can monitor the action easily.
- Forward/Reverse. Press the left/right buttons to move to next frame/previous frame.
- 5. Pause. When you reach the location of the desired frame, press the center button again to pause playback at that point.
- 6. Press Down button to save frame. A message “Processing” appears while the frame is being saved to your memory card.
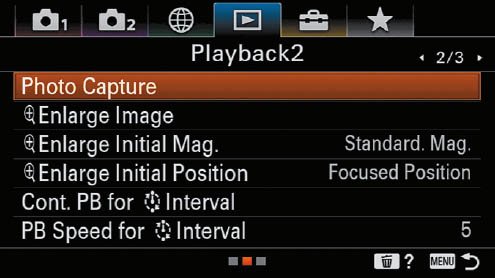
Figure 5.15 Playback 2 menu.
Enlarge Image
Options: Zoom In, Zoom Out
Whenever you are playing back still images (not movies), you can use this menu entry to magnify the image. (You can also double-tap the touch screen to zoom in.) The a6600 will try to zoom in on the point used to focus the image, if possible, and will zoom into the center of the frame if not. Press the Magnify/AF/MF button to zoom in. The MENU button exits. Use the control wheel to zoom in and out, and you can scroll around inside the enlarged image using the control wheel’s directional controls. Rotate the control wheel to view the next or previous image (respectively) at the same magnification. Press MENU or the center button to exit. The initial magnification of the image is set using the entry that follows.
Enlarge Initial Magnification
Options: Standard Magnification, Previous Magnification
Default: Standard Magnification
Here you can choose the initial magnification used by the Enlarge Image entry. Use Standard Magnification to always see any image you magnify at the same zoom level. This is a good choice if you magnify from time to time to closely examine an image and may want to zoom in or out to view more or less of your subject matter. When you select Previous Magnification, the enlargement resumes at the most recent level used. For example, if you are checking focus of your images as you shoot and zooming in tightly, it’s convenient to return to the same zoom level for each successive image.
Enlarge Initial Position
Options: Focused Position, Center
Default: Focused Position
By default, whenever you magnify an image during playback, the a6600 centers the enlargement around the area in the frame where focus was achieved. That’s often the best choice, because when evaluating an image during playback, focus is the parameter most often checked. However, I prefer the enlargement positioned in the center of the frame, so I can move the magnifying window around anywhere I like. That setting potentially minimizes the amount of “travel” if the previous area I examined is located some distance in the frame from my new area of interest.
Continuous Playback for Interval
Options: Plays back interval shots
Use this setting to play back a sequence of images you captured using the Interval feature described in Chapter 9, or when shooting with the Continuous drive mode. Select the image or image group you want to view, and then press the center button to display the images. Press the center button again to pause during playback, or to resume playback. Change the playback speed by rotating the control dial or control wheel while you are watching. You can also adjust playback speed using the menu entry described next. If you want to create a movie from the sequence, use the Imaging Edge software, as outlined in Chapter 9.
Playback Speed for Interval
Options: Playback speeds from 1 (Slow) to 9 (Fast)
Default: 5
Although you can adjust the speed of playback for interval sequences while viewing the interval sequence (as described above), you can also set a value to be used automatically. You can still speed up or slow down while watching your sequence. The camera accomplishes playback speed by skipping frames, depending on the speed requested. The faster playback goes, the jerkier the motion will appear.
Slide Show
Options: Repeat (On/Off), Interval: 1 second, 3 seconds, 5 seconds, 10 seconds, 30 seconds
Use this menu option, the first in the Playback 3 menu (see Figure 5.16) when you want to display all the still images on your memory card in a continuous show. You can display still images in a continuous series, with each one displayed for the amount of time that you set. Choose the Repeat option to make the show repeat in a continuous loop. After making your settings, press the center button and the slide show will begin. You can scroll left or right to go back to a previous image or go forward to the next image immediately, but that will stop the slide show. The show cannot be paused, but you can exit by pressing the MENU button.
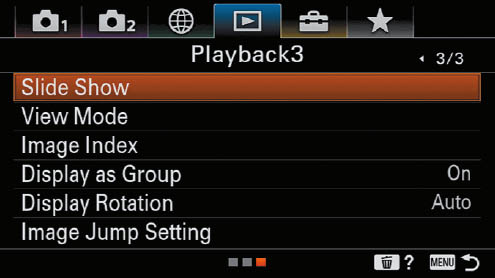
Figure 5.16 Playback 3 menu.
View Mode
Options: Date View, Folder View (Still), AVCHD View, XAVC S HD View, XAVC S 4K View
Adjusts the way the camera displays image/movie files, which is useful for reviewing only certain types of files, or for deleting only particular types, as described above. You can elect to display files by Date View, Folder View (still photos only), AVCHD View (just AVCHD movies), or XAVCS clips in both HD (high-definition) and 4K modes.
Image Index
Options: 12, 30
You can view an index screen of your images on the camera’s LCD by pressing the down directional button (Index button) while in Playback mode. By default, that screen shows up to 12 thumbnails of photos or movies; you can change that value to 30 using this menu item. Remember to use the View Mode menu item first, to identify the folder that the index display should access; by default, it will show thumbnails of still photos, but you might want to view thumbnails of your movie clips instead. When viewing an index, highlight the bar at the left side of the screen and use the control wheel’s directional controls to move quickly among available thumbnails. Press the center button to switch to View Mode quickly.
Display as Group
Options: On, Off
Default: On
If you shoot sports, you’ll love this feature. The a6600 is smart enough to know that when you shoot a burst of images in continuous shooting mode it would be helpful to group them all together. That makes it easy to evaluate the first shot in a particular set of images captured sequentially, without having to wade through all of them. When set to On, the camera groups images in a burst together, and overlays a “stack” icon on the group, so you’ll know you are viewing/evaluating only the first image in that burst. The View Mode must be set to Date View to use this feature. Set this option to Off and you’ll be shown every picture you captured, one by one, during image review.
Display Rotation
Options: Auto, Manual, Off
Default: Auto
You can use this function to determine whether a vertical image is rotated automatically during picture review. If you want to rotate the image more, use the Rotate entry, described earlier.
- Auto. The image will be shown in the orientation indicated by information in the image, no matter how the camera itself is rotated during picture review. For example, a vertical image will be shown in the correct orientation, as shown at top left in Figure 5.17 when the camera is held horizontally. It will be shown smaller in size to fit the long dimension of the image into the short dimension of the screen. Rotate the camera 90 degrees, and the a6600 will automatically rotate the photo so it’s still shown in the correct orientation, but it will now fill the LCD screen, as you can see in Figure 5.17, top right.

Figure 5.17 Display Rotation Auto (top); Manual (center); Off (bottom).
- Manual. With this setting, the image is always displayed on the LCD in the same orientation it was taken. That is, a vertically oriented photo will be displayed in a smaller size, just as it is when using Auto, as shown at center left in Figure 5.17. However, when you rotate the camera during picture review, the a6600 does not automatically rotate the image at the same time, so it will be shown with an incorrect orientation (see Figure 5.17 center right).
- Off. With this setting, both vertical and horizontal images are displayed to fill the screen as much as possible with the image. Vertical shots are larger, as shown at bottom left in Figure 5.17, but the camera must be rotated to view them in the correct orientation (see Figure 5.17, bottom right).
Image Jump Setting
Options: Select Dial/Wheel; Image Jump Method (One by One, Protect Only, Rating Only [All], Rating Only [1–5 stars, or Without Rating Only])
Default: Select Dial/Wheel: Dial; Image Jump Method: One by One
You can select which control to use when scrolling among images during playback, either the Control Dial or Control Wheel. The default method, One by One, is usually most convenient, but it would have been nice if Sony had provided options other vendors use that allow jumping ahead by 10 or 100 images. This feature is much better than nothing, as you can elect to jump only between Protected images, images that have been rated, or images with particular star ratings. That allows you to “mark” images that you want to evaluate later, using either the protection attribute or a star rating.