Of the primary foundations of great photography, only one of them—the ability to capture a compelling image with a pleasing composition—takes a lifetime (or longer) to master. The art of making a photograph, rather than just taking a photograph, requires an aesthetic eye that sees the right angle for the shot, as well as a sense of what should be included or excluded in the frame; a knowledge of what has been done in the medium before (and where photography can be taken in the future); and a willingness to explore new areas. The more you pursue photography, the more you will learn about visualization and composition. When all is said and done, this is what photography is all about.
The other basics of photography—equally essential—involve more technical aspects: the ability to use your camera’s features to produce an image with good tonal and color values; to achieve sharpness (where required) or unsharpness (when you’re using selective focus); and to master appropriate white/color balance. It’s practical to learn these technical skills in a time frame that’s much less than a lifetime, although most of us find there is always room for improvement. You’ll find the basic information you need to become proficient in each of these technical areas in this book.
The final and most rewarding stage comes when you begin exploring advanced techniques that enable you to get stunning shots that will have your family, friends, and colleagues asking you, “How did you do that?” These more advanced techniques deserve an entire book of their own, but there is plenty of room in this chapter to introduce you to some clever things you can do with your a6600.
Exploring Ultra-Fast Exposures
Fast shutter speeds (such as 1/1000th second) can stop action because they capture only a tiny slice of time: a high-jumper frozen in mid-air, perhaps. The Sony a6600 has a top shutter speed of 1/4000th second for ambient light exposures. Electronic flash can also freeze motion by virtue of its extremely short duration—as brief as 1/50000th second or less. When you’re using flash, the short duration of the actual burst of light can freeze a moving subject; that can also give you an ultra-quick glimpse of a moving subject when the scene is illuminated only by flash.
The a6600 is fully capable of immobilizing all but the very fastest movement if you use a shutter speed of 1/4000th second (without flash). The top speeds are generally overkill when it comes to stopping action; I can rarely find a situation where even 1/4000th second is required to freeze high-speed motion. For example, each of the images shown in Figure 9.1 required a shutter speed of just 1/2000th second to freeze the action.

Figure 9.1 A shutter speed of 1/2000th second will freeze most action.
Virtually all sports motion can be frozen at 1/2000th second or a slower shutter speed, and for many sports a shutter speed of 1/500th of a second or even much slower is actually preferable—for example, to allow the wheels of a racing automobile or motorcycle, or the propeller on a classic aircraft, to blur realistically.
There may be a few situations where a shutter speed faster than 1/4000th second is required. If you wanted to use an aperture of f/1.8 at ISO 100 outdoors in bright sunlight, say, to throw a background out of focus with the shallow depth-of-field available at f/1.8, a shutter speed of 1/4000th second would more than do the job. You’d need a faster shutter speed only if you set a higher ISO, and you probably wouldn’t do that if your goal were to use the widest aperture possible. Under less than full sunlight, I doubt you’d even need to use a shutter speed of 1/4000th second in any situations you’re likely to encounter.
Electronic flash works well for freezing the motion of a nearby subject when flash is the only source of illumination. Since the subject is illuminated for only a split second, you get the effect that would be provided by a very fast shutter speed and also the high level of light needed for an exposure. This feature can be useful for stopping the motion of a nearby subject.
Of course, as you’ll see in Chapter 13, the tiny slices of time extracted by the millisecond duration of an electronic flash exact a penalty. To use flash, the a6600 employs a shutter speed no faster than 1/250th second, which is the fastest shutter speed—called sync speed—in conventional flash photography with your a6600 camera.
You can have a lot of fun exploring the kinds of pictures you can take using very brief exposure times, whether you decide to take advantage of the action-stopping shutter speeds (between 1/1000th and 1/4000th second) or the brief burst of light from flash that can freeze the motion of a nearby subject. Here are a few ideas to get you started:
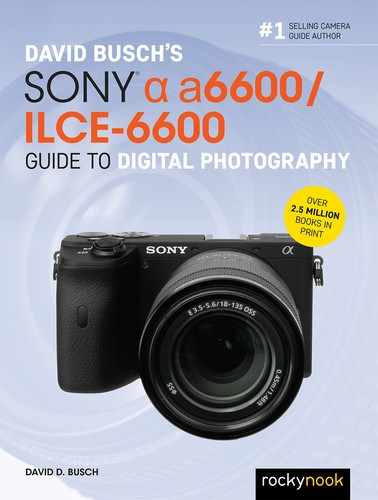
- Take revealing images. Fast shutter speeds can help you reveal the real subject behind the façade, by freezing constant motion to capture an enlightening moment in time. Legendary fashion/portrait photographer Philippe Halsman used leaping photos of famous people, such as the Duke and Duchess of Windsor, Richard Nixon, and Salvador Dali, to illuminate their real selves. Halsman said, “When you ask a person to jump, his attention is mostly directed toward the act of jumping and the mask falls so that the real person appears.” Try some high-speed portraits of people you know in motion to see how they appear when concentrating on something other than the portrait. (See Figure 9.2.)
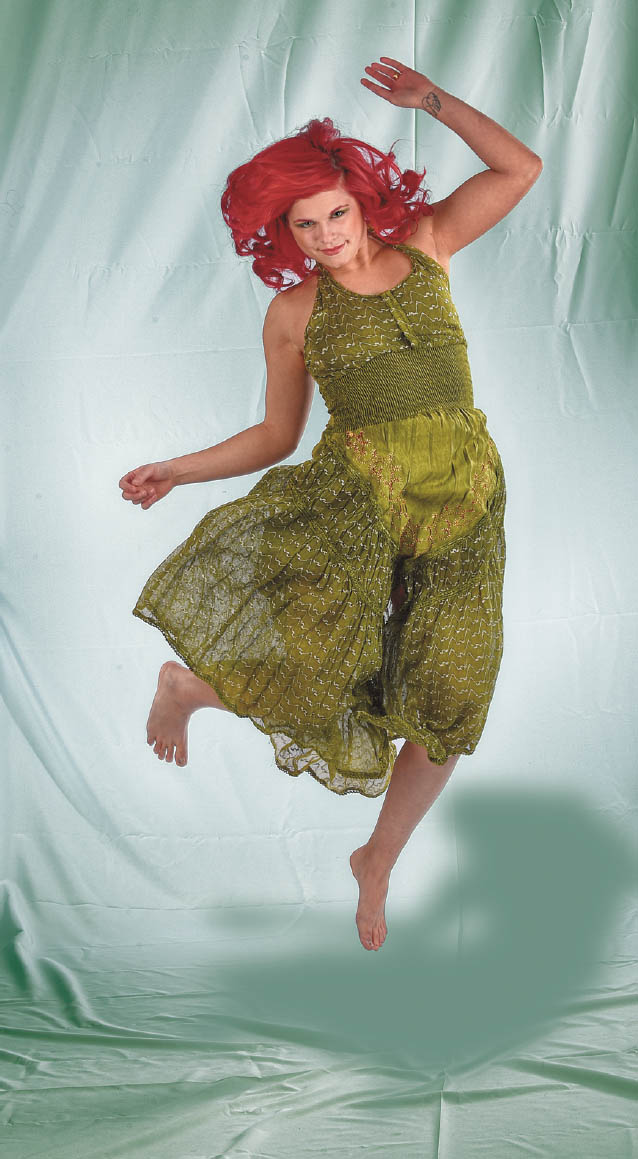
Figure 9.2 Fast shutter speeds can freeze your subject at the top of a jump.
- Create unreal images. High-speed photography can also produce photographs that show your subjects in ways that are quite unreal. A helicopter in mid-air with its rotors frozen or a motocross cyclist leaping over a ramp, but with all motion stopped so that the rider and machine look as if they were frozen in mid-air, makes for an unusual picture. (See the frozen rotors at top in Figure 9.3.) When we’re accustomed to seeing subjects in motion, seeing them stopped in time can verge on the surreal.
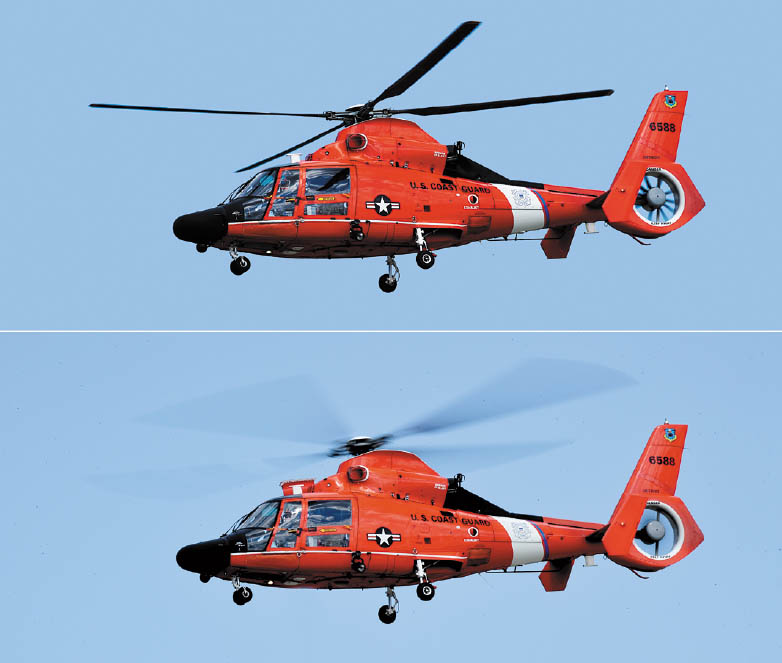
Figure 9.3 Freezing a helicopter’s rotors with a fast shutter speed makes for an image that doesn’t look natural (top); a little blur helps convey a feeling of motion (bottom).
Figure 9.4 A large amount of artificial illumination and an ISO 1600 setting made it possible to capture this shot at 1/2000th second without use of electronic flash.
- Capture unseen perspectives. Some things are never seen in real life, except when viewed in a stop-action photograph. MIT professor Dr. Harold Edgerton’s famous balloon burst photographs were only a starting point for the inventor of the electronic flash unit. Freeze a hummingbird in flight for a view of wings that never seem to stop. Or, capture the splashes as liquid falls into a bowl, as shown in Figure 9.4. No electronic flash was required for this image (and wouldn’t have illuminated the water in the bowl as evenly). Instead, a clutch of high-intensity lamps bounced off a green card and an ISO setting of 1600 allowed the camera to capture this image at 1/2000th second.
Long Exposures
Longer exposures are a doorway into another world, showing us how even familiar scenes can look much different when photographed over periods measured in seconds. At night, long exposures produce streaks of light from moving, illuminated subjects like automobiles or amusement park rides, as you can see in Figure 9.5. Or, you can move the camera or zoom the lens to get interesting streaks from non-moving light sources, such as holiday lights. Extra-long exposures of seemingly pitch-dark subjects can reveal interesting views using light levels barely bright enough to see by. At any time of day, including daytime (in which case you’ll often need the help of neutral-density filters to make the long exposure practical), long exposures can cause moving objects to vanish entirely, because they don’t remain stationary long enough to register in a photograph.
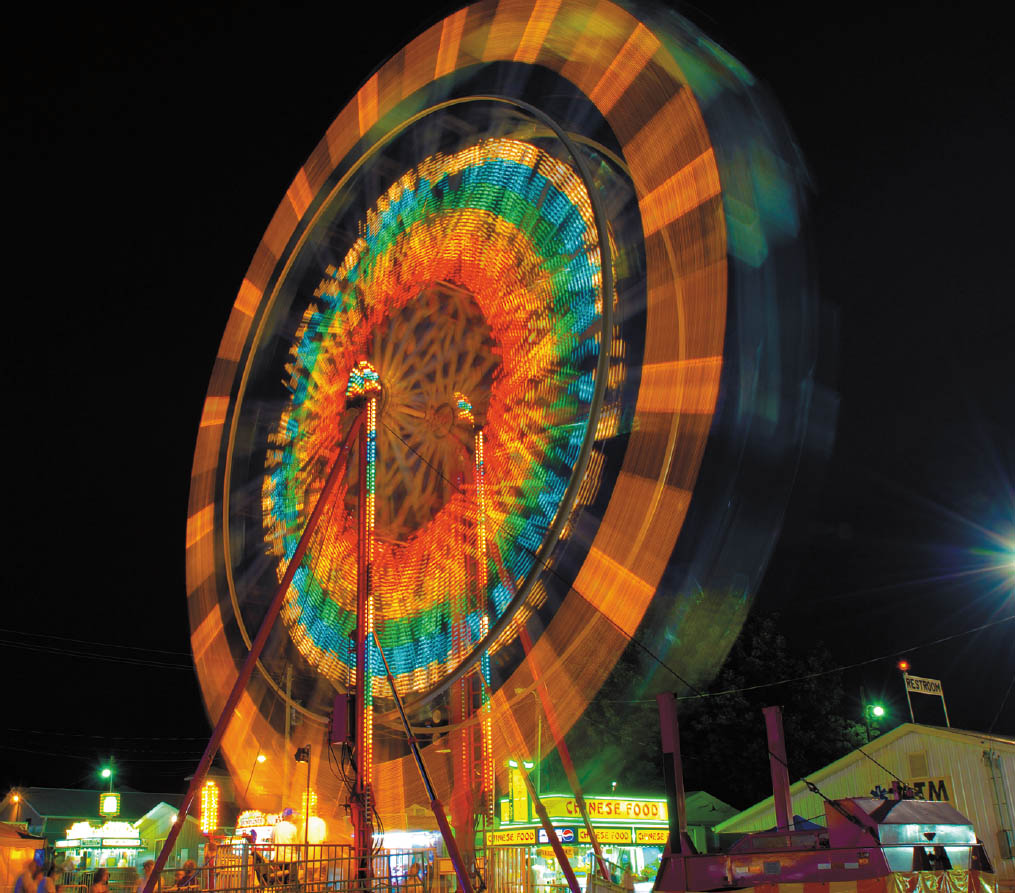
Figure 9.5 Long exposures can produce interesting streaks of light.
Because the a6600 produces such good images at longer timed exposures (and at even longer bulb exposures), and there are so many creative things you can do with long-exposure techniques, you’ll want to do some experimenting. Get yourself a tripod or another firm support and take some test shots with long exposure noise reduction both enabled and disabled in the Camera Settings I-01 menu (to see whether you prefer low noise or high detail) and get started.
As I noted in Chapter 7, you can make exposures as long as 30 seconds when using P, A, or S modes. In Manual exposure mode, bulb exposures can be even longer. The Bulb option is not available if you’re using Silent Shooting, or any mode that captures multiple images with the single press of the shutter release, such as continuous shooting, self-timer (continuous), or continuous bracketing. In Bulb mode, hold down the shutter release for the duration of the exposure, or use a wired release with a locking button, such as the Sony RM-VPR1 ($50).
If you want to experiment with long exposures, here are some things to try:
- Make people invisible. One very cool thing about long exposures is that objects that move rapidly enough won’t register at all in a photograph, whereas the subjects that remain stationary are portrayed in the normal way. That makes it easy to produce people-free landscape photos and architectural photos at night, or even in full daylight if you use one or more dark neutral-density filters to allow an exposure of at least a few seconds. At ISO 100 and f/16, for example, a pair of 8X (three-stop) neutral-density filters will allow you to make an exposure of nearly two seconds on a sunny day. Overcast days and/or even more neutral-density filtration would work even better if daylight people-vanishing is your goal. They’ll have to be walking very briskly and across the field of view (rather than directly toward the camera) for this to work. At night, it’s much easier to achieve this effect with the 20- to 30-second exposures that are possible in low light without any filter.
- Create streaks. If you aren’t shooting for total invisibility, long exposures with the camera on a tripod can produce some interesting streaky effects. Even a single 8X ND filter will let you shoot at f/22 and 1/6th second in daylight. Indoors, you can achieve interesting streaks with slow shutter speeds, which is a technique I often use when photographing ballet dancers.
![]()
TIP Neutral-density filters are gray (non-colored) filters that reduce the amount of light passing through the lens, without adding any color or effect of their own.
- Produce light trails. At night, car headlights, taillights, and other moving sources of illumination can generate interesting light trails. Your camera doesn’t even need to be mounted on a tripod; hand-holding the camera for longer exposures adds movement and patterns to your trails. If you’re shooting fireworks, a longer exposure—with the camera on a tripod—may allow you to combine several bursts into one picture.
- Blur waterfalls, etc. You’ll find that waterfalls and other sources of moving liquid produce a special type of long-exposure blur, because the water merges into a fantasy-like veil that looks different at different exposure times, and with different waterfalls. Cascades with turbulent flow produce a rougher look at a given longer exposure than falls that flow smoothly. Although blurred waterfalls and rapids have become almost a cliché, there are still plenty of variations for a creative photographer to explore.
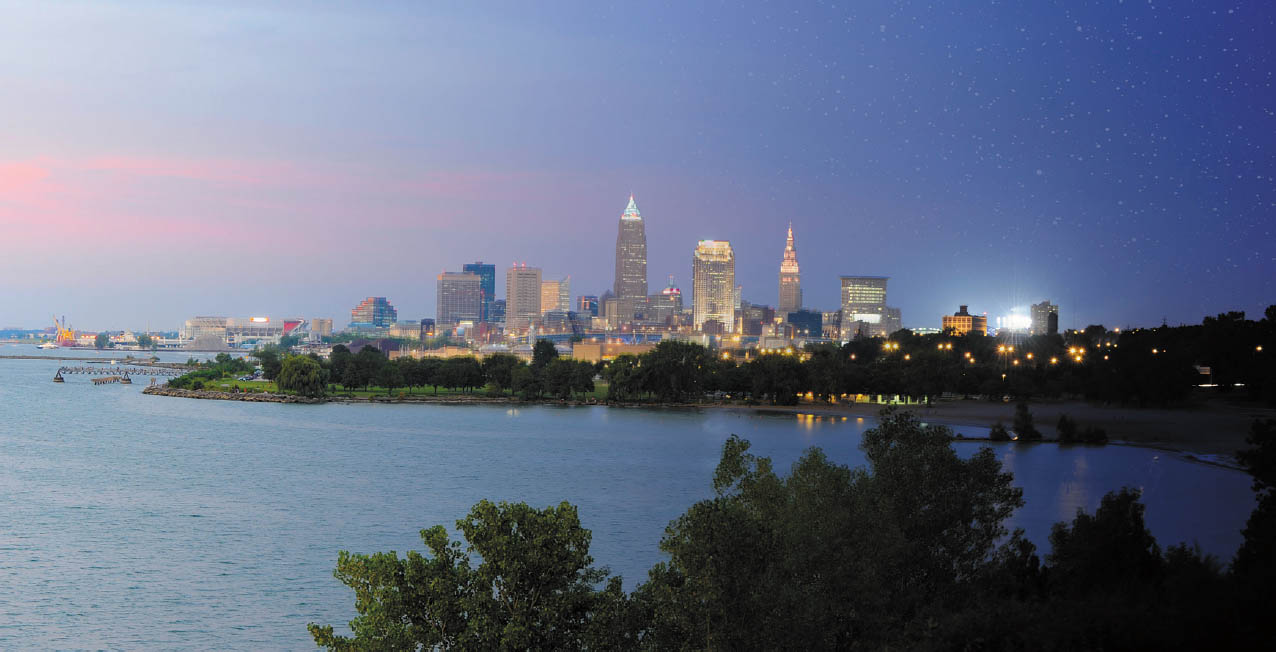
Figure 9.6 A long exposure transformed this night scene into a picture apparently taken at dusk.
- Show total darkness in new ways. Even on the darkest, moonless nights, there is enough starlight or glow from distant illumination sources to see by, and, if you use a long exposure, there is enough light to take a picture, too. I was visiting a Great Lakes park hours after sunset but found that a several-second exposure revealed the skyline scene shown in Figure 9.6, even though in real life, there was barely enough light to make out the boats in the distance. Although the photo appears as if it were taken at twilight or sunset, in fact the shot was made at 10 p.m.
Continuous Shooting
The a6600’s continuous shooting modes are indispensable for the sports photographer, and useful for anyone photographing an event in which, even if you have lightning-fast reflexes, a decisive moment may occur a fraction of a second after you’ve completed an exposure. The a6600 is capable of capturing images continuously at up to (and note that qualification) 11 frames per second, so you can shoot consecutive images non-stop until the camera’s buffer fills. At an air show I covered earlier this year, I took more than 1,000 images in a couple hours. I was able to cram hundreds of Large/Fine JPEGs on a single memory card. That’s a lot of shooting. Given an average burst of about eight images per sequence at the camera’s highest frame (nobody really takes 15 to 20 shots or more of one pass, even with a slow-moving aerobatic aircraft as shown in Figure 9.7), I was able to capture more than 100 different sequences like the one shown before I needed to swap cards. For some types of action (such as football), even longer bursts come in handy, because running and passing plays often last 5 to 10 seconds; there’s also a change in character as the action switches from the quarterback dropping back to pass or hand off the ball, then to the receiver or running back trying to gain as much yardage as possible. (See Figure 9.8.)
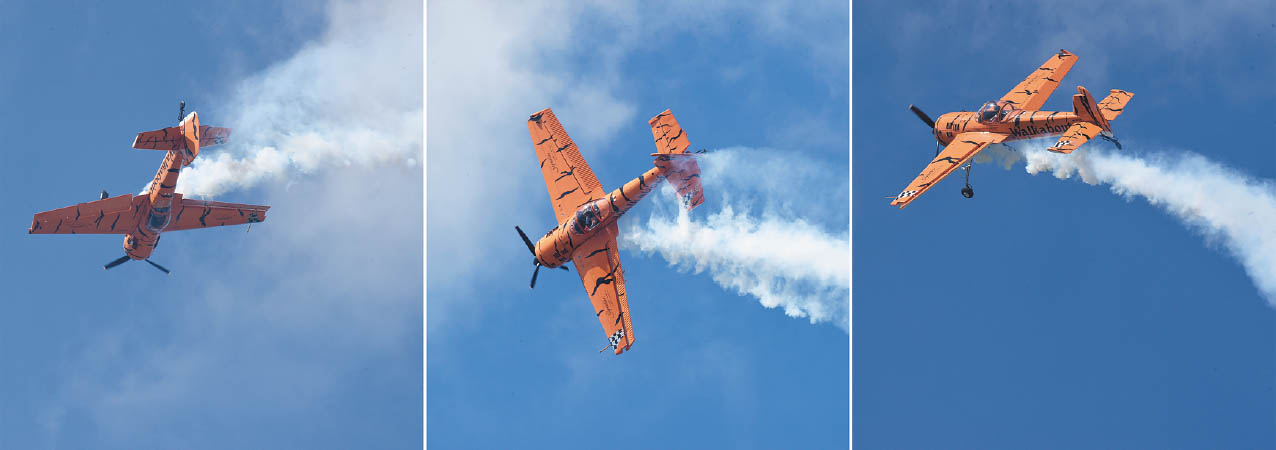
Figure 9.7 Air shows make a perfect subject for continuous bursts.
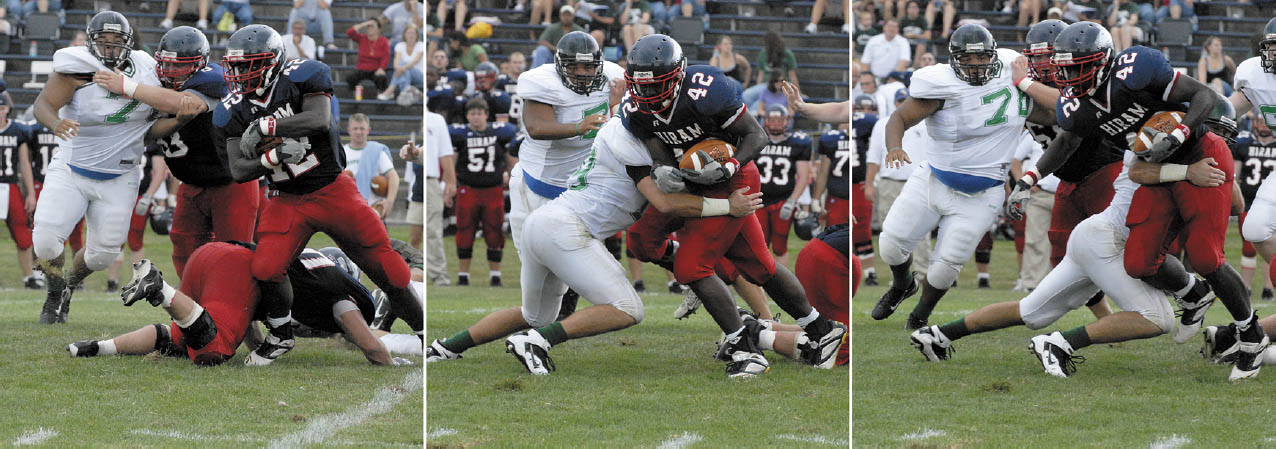
Figure 9.8 Continuous shooting allows you to capture an entire sequence of exciting moments as they unfold.
To use the a6600’s continuous advance mode, press the drive button (left directional button), access the Function menu, or go to the Drive Mode entry in the Camera Settings I-03 menu. Then navigate to the Cont. Shooting option. Press the left/right buttons to select Hi+ (11 fps), Hi (8 fps), Mid (6 fps), or Lo (3 fps). The camera takes advantage of the electronic front curtain shutter to produce the highest frame rates, and actually slows down in Hi, Mid, or Lo modes if you have turned it off.
Continuous shooting is not available if you’re applying the Rich-tone Monochrome Picture Effect; if you select a scene mode other than Sports Action; when DRO/Auto HDR is set to Auto HDR; when ISO is set to Multi Frame NR; or if your battery level is low.
Once you’ve activated continuous shooting, just press and hold the shutter release button while the sequence you want to capture is underway. You can also use the Touch Shutter function, as described in Chapter 4, to specify a focus point and shoot continuously. Just keep your finger in contact with the LCD monitor until the sequence is finished. (Touch Shutter also works with the Sports Action scene mode.)
When you’ve finished your sequence, the a6600 may continue to write images in its buffer to the memory card until all are safely stored away. Continuous images are first shuttled from the sensor into the a6600’s internal memory buffer, then doled out to the memory card as quickly as the card can write the data. The internal “smart” buffer can suck up photos much more quickly than the memory card and, indeed, some memory cards are significantly faster or slower than others.
In general, you won’t have to worry about having continuous shooting disabled due to a full buffer; the a6600 is usually able to keep pace at the highest frame rates even when capturing RAW files. The capture rate may slow slightly with longer sequences. Of course, RAW files are larger than JPEG images, and the camera accommodates that aspect by capturing 12-bit RAW rather than full-range RAW files when using Continuous shooting, the Sports Action scene mode, and Silent Shooting.
Fast Autofocus
Remarkably, the a6600 is able to autofocus between shots in many cases. If you set the AF mode (in the Function submenu) to AF-C (Continuous autofocus) and AEL w/Shutter in the Camera Settings I-09 menu to Off or Auto, then autofocus should be available in all continuous drive modes, but only as long as the subject is covered by the active focus detection point(s) and the aperture is not smaller than f/11. This feature is useful when a moving subject is approaching the camera or moving away from it; the a6600 will continuously adjust to focus on the subject as the distance changes, so the entire set of photos should be sharply focused.
Because it takes time to open and close the iris of the lens, if an f/stop smaller than f/11 is used, the camera does not refocus in Hi+, Hi, or Mid modes. Instead, the a6600 focuses for the first image in a burst, then keeps that focus point for subsequent shots. Moreover, in Hi+ and Hi modes, the image is not displayed in real time (you see a previous shot); in Mid or Lo modes, you’ll be looking at the actual image as it is captured.
Silent Shooting
One thing I can guarantee any time you are firing off shots at many frames per second using the a6600’s mechanical shutter is that bystanders will make comments about the rapid-fire machine-gun noises emanating from your camera. Your first impulse may be to consider using the camera’s cool “Silent Shooting” mode found in the Camera Settings II-04 menu. It is a virtually silent mode, although Sony cautions that you may still hear some noise, particularly when you register faces for Face Registration, or capture a particular custom white balance.
In practice, the a6600 is silent enough that Sony emphasizes that it is your responsibility to take your subjects’ privacy considerations into account. That’s because, lacking the conventional mechanical shutter’s click, it’s easy to take photos of someone—even at close range—without them knowing you’re doing it. Indeed, I sometimes find I am not fully aware I’ve taken a picture, because the viewfinder/LCD monitor image barely flickers between continuous shots.
The following functions are not available for you to use in tandem with “Silent Mode”: Flash shooting, Auto HDR, Picture Effect, Picture Profile, Long Exposure NR, e-Front Curtain Shutter, Bulb shooting, or Multi Frame NR. That being said, it is great when you don’t want to scare off an animal or insect, or you wish to be a little more incognito (disclaimer: within privacy considerations, of course!).
Oddly enough, Silent Shooting can be activated regardless of whether the e-Front Curtain shutter is activated or disabled. Once you turn Silent Shooting On, the electronic front-curtain shutter is disabled (if currently active), and the e-Front Curtain Shutter setting is grayed out.
Playback
It can be tedious individually reviewing a gazillion images captured in a long sequence. So the a6600 offers a Display as Group entry in the Playback 3 menu (as explained in Chapter 5). When the View Mode (located in the same menu) is set to Date View and Display As Group is set to On, you’ll be shown a “stack of images” representing all the shots in a sequence. (Images captured using interval shooting will also be stacked.) To view individual images, press the center button when a stack is displayed during picture review. Press the center button again to return to stacked view when you want to move on to the next image or continuous stack. Note: If View Mode is not set to Date View, images cannot be grouped and displayed, even if Display as Group is enabled. Be aware that if, during playback, you delete a group all the images in that sequence will be trashed.
Customizing White Balance
Back in the film days, both color transparency and color negative (“print”) films were standardized, or balanced, for a particular “color” of light. Most were balanced for daylight but you could also buy “tungsten” balanced color negative and transparency film for shooting under incandescent lamps that produced light of an amber color. This type of film had a bluish color balance, intended to moderate the effect produced by light that was amber. Digital cameras like the Sony a6600 can be adjusted for specific white balance options suitable for particular types of illumination.
This is important because various light sources produce illumination of different “colors,” although sometimes we are not aware of the difference. Indoor illumination tends to be somewhat amber when using light bulbs that are not daylight balanced, while noonday light outdoors is close to white, and the light early and late in the day is somewhat red/yellow.
White balance is measured using a scale called color temperature. Color temperatures were assigned by heating a theoretical “black body radiator” (which doesn’t reflect any light; all illumination comes from its radiance alone) and recording the spectrum of light it emitted at a given temperature in degrees Kelvin. So, daylight at noon has a color temperature in the 5,500- to 6,000-degree range. Indoor illumination is around 3,400 degrees. Hotter temperatures produce bluer images (think blue-white hot) while cooler temperatures produce redder images (think of a dull-red glowing ember). Because of human nature, though, bluer images are actually called “cool” (think wintry day) and redder images are called “warm” (think ruddy sunset), even though their color temperatures are reversed.
Take a photo indoors under warm illumination with a digital camera sensor balanced for cooler daylight and the image will appear much too red/yellow. An image exposed outdoors with the white balance set for incandescent (tungsten) illumination will seem much too blue. These color casts may be too strong to remove in an image editor from JPEG files. Of course, if you shoot RAW photos, you can later change the WB setting to the desired value in RAW converter software; this is a completely “non-destructive” process so full image quality will be maintained.
Mismatched white balance settings are easier to achieve accidentally than you might think, even for experienced photographers. I’d just arrived at a Dwight Yoakam concert after shooting some photos indoors with electronic flash and had manually set WB for Flash. Then, as the concert began, I resumed shooting using the incandescent stage lighting—which looked white to the eye—and ended up with a few shots like Figure 9.9, left. Eventually, I caught the error during picture review and changed my white balance. Another time, I was shooting outdoors, but had the camera white balance still set for incandescent illumination. The excessively blue image is shown in Figure 9.9, right.
Figure 9.9 An image exposed indoors with the WB set for electronic flash will appear too reddish (left); using the incandescent setting outdoors makes an image too blue (right).
The Auto White Balance (AWB) setting, available from the White Balance entry in the Camera Settings I-11 menu, Function menu, or a key defined with that function, examines your scene and chooses an appropriate value based on its perception of the color of the illumination and even the colors in the scene. However, the process is not foolproof (with any camera). Under bright lighting conditions, it may evaluate the colors in the image and still assume the light source is daylight and balance the picture accordingly, even though, in fact, you may be shooting under extremely bright incandescent illumination. In dimmer light, the camera’s electronics may assume that the illumination is tungsten, and if there are lots of reddish colors present, set color balance for that type of lighting. With mercury vapor or sodium lamps, correct white balance may be virtually impossible to achieve with any of the so-called presets. In those cases, you should use flash instead, or Custom WB with JPEGs, or shoot in RAW format and make your corrections after importing the file into your image editor with a RAW converter.
The a6600 provides many WB presets, each intended for use in specific lighting conditions. You can choose from Daylight, Shade, Cloudy, Incandescent (often called Tungsten by photographers), four types of Fluorescent (Warm White, Cool White, Day White, and Daylight), and Flash. However, the a6600 also offers a method for setting a desired color temperature/filter as well as a custom WB feature.
The Daylight preset provides WB at 5,200K, while the Shade preset uses 7,000K to give you a warming effect that’s useful in the bluish light of a deeply shaded area. The chief difference between direct sun and an area in shade, or even incandescent light sources, is nothing more than the proportions of red and blue light. The spectrum of colors used by the a6600 is continuous, but it is biased toward one end or the other, depending on the white balance setting you make.
However, some types of fluorescent lights produce illumination that has a severe deficit in certain colors, such as only particular shades of red. If you looked at the spectrum or rainbow of colors encompassed by such a light source, it would have black bands in it, representing particular wavelengths of light that are absent. You can’t compensate for this deficiency by adding all tones of red. That’s why the fluorescent setting of your a6600 may provide less than satisfactory results with some kinds of fluorescent bulbs. If you take many photographs under a particular kind of non-compatible fluorescent light, you might want to investigate specialized filters intended to be mounted on your lens for use under various types of fluorescent light, available from camera stores, or develop skills in white balance adjustment using an image editor or RAW converter software program. However, you do get four presets for fluorescent WB with the a6600 and one of these should provide close to accurate white balance with the common types of lights.
It’s when you find that AWB and the various presets simply cannot produce pleasing white balance in certain lighting conditions that you’ll need the other options (discussed shortly): use the white balance adjustment feature, set a specific color temperature, or calibrate the WB system to set a custom white balance.
Fine-Tuning Preset White Balance
After you scroll to any of the WB options (AWB, Daylight, Shade, etc.), pressing the right directional button reveals the White Balance Adjustment screen, with a grid, shown in Figure 9.10. This feature allows you to fine-tune the white balance by biasing it toward certain colors. Use any of the four directional keys to move the orange dot (cursor) from the center of the grid: upward to bias the WB toward green (G), downward toward magenta (M), right toward amber (A), or left toward blue (B). You can move the cursor seven increments (although Sony doesn’t reveal exactly what those increments are) in any of the four directions.
Figure 9.10 Use this feature when you want to fine-tune white balance when using AWB or any of the presets.
Naturally, you can also move the orange dot to any point within the grid: toward amber/magenta, for example. While biasing the WB, examine the scene in the LCD or viewfinder preview display; stop making adjustments when the white balance looks fine. Tap the shutter release to escape from the WB settings adjustments. Let’s look at the options in more detail:
- Cooler or warmer. Pressing the left/right directional buttons changes the white balance to cooler (left) or warmer (right) along the blue/amber scale. There are seven increments, and the value you “dial in” will be shown in the upper-left corner of the screen as an A-B value (yes, the labels are reversed from the actual scale at the right side of the screen). The red dot will move along the scale to show the value you’ve selected. Typically, blue/amber adjustments are what we think of as “color temperature” changes, or, “cooler” and “warmer.” These correspond to the way in which daylight illumination changes: warm at sunrise and sunset, very cool in the shade (because most of the illumination comes from reflections of the blue sky), and at high noon. Indoor light sources can also be cooler or warmer, depending on the kind of light they emit.
- Green/magenta bias. Press the up/down buttons to change the color balance along the green (upward) or magenta (downward) directions. Seven increments are provided here, too, and shown as vertical movement in the color balance matrix at the right of the screen. Color changes of this type tend to reflect special characteristics of the light source; certain fluorescent lights have a “green” cast, for example.
- Either or both. Because the blue/amber and green/magenta adjustments can be made independently, you’re free to choose just one of them, or both if your fine-tuning requires it.
- Never mind. If you want to cancel all fine-tuning and shift back to neutral, just press the MENU button to cancel. The red dot in the color chart will be restored to the center position.
Setting White Balance by Color Temperature
If you want to set a specific white balance based on color temperature, choose C. Temp/Filter in the White Balance menu and press the right button. You’ll next see a display of color temperatures arrayed along the bottom of the screen. Press the right button a second time to view an adjustment screen similar to the one shown in Figure 9.10, but with a scrolling list of color temperatures displayed along the right edge of the screen. Here’s how to use this feature.
- Change color temperature. Rotate the control wheel on the camera back to select a specific color temperature in 100K increments, from 2,500K (a level that makes your image much bluer, to compensate for amber illumination) to 9,900K (a level that makes images much redder to correct for light that is extremely blue in color). The live preview changes as you scroll to give you an indication as to the white balance you can expect at any K level. If you have a color temperature meter accessory, or reliable tips that guide you in making the optimal setting, this WB feature will be particularly useful. Even if you don’t have that accessory or useful information, you may want to experiment with this setting using the live preview, especially if you are trying to achieve creative effects with color casts along the spectrum from blue to red.
- Fine-tune the color temperature. In addition to color temperature, you can change the blue/amber or green/magenta bias, exactly as described earlier; move the cursor in any direction with the directional keys. If you change your mind, press the MENU button to cancel the bias adjustments you’ve made.
This feature corresponds to the use of CC (Color Compensation) filters that were used to compensate for various types of lighting when shooting film. When you use C. Temp/Filter, the color filter value you set takes effect in conjunction with the color temperature you set. In other words, both of these settings work together to give you very precise control over the degree of color correction you are using.
Setting a Custom White Balance
If you often shoot in locations that are illuminated by artificial light of unusual colors, the best bet is to set a custom white balance. This calls for teaching (calibrating) the WB system to render white as white under a specific type of illumination. When white is accurately rendered, other colors will look accurate as well. You can use this feature under more common types of lighting too; it’s very useful under tungsten lamps, for example, when the Incandescent WB option does not adequately correct for the amber color of the light. Custom WB is the most accurate way of getting the right color balance, short of having a special meter that gives you a precise reading of color temperature. It’s easy to do with the a6600. Just follow these steps:
- 1. Navigate to White Balance in the Camera Settings I-11 or Function menus.
- 2. Use the directional buttons or the control wheel to scroll up/down through the list of white balance options until the Set icon is highlighted. Don’t select the Custom 1, Custom 2, or Custom 3 entries, located just above it. These are white balance memory register “slots” you can use to store customized white balance settings.
- 3. Press the center button. The LCD will display a message telling you to press the shutter button to capture the white balance data. (Custom 1, 2, and 3 are used later to choose a custom WB setting you have saved; Custom Set creates that setting.)
- 4. Point the camera at a white object (such as a sheet of white paper) large enough to fill the small circle that’s displayed in the center of the frame. Your target must be in the same light as the subject you plan to photograph, not in some entirely different part of the scene where the illumination is different.
- 5. Press the shutter release button. The target (such as the sheet of white paper) that you had aimed at, as well as the custom white balance data, appears on the LCD or EVF screen. (The image is not recorded to the memory card.)
- 6. The white balance of the target you photographed will appear at the bottom of the screen, along with an invitation to choose one of the three registers to store that setting. Rotate the control wheel to specify the register and press the center button to enter it and return to live view.
- 7. Press the center button to return to the live view on the LCD. Henceforth, you can select that Custom register to load a particular set of white balance parameters.
Using Creative Styles
I introduced the Creative Style feature, located in the Camera Settings I-11 menu in Chapter 3. To recap, the a6600 gives you 13 Creative Style presets: Standard, Vivid, Neutral, Clear, Deep, Light, Portrait, Landscape, Sunset, Night Scene, Autumn Leaves, Black and White, and Sepia. Each has its own settings for attributes of contrast, saturation, and sharpness, but you can adjust any of those three aspects, making, say, the Vivid preset even more vivid.
You also are given six “Style Box” settings, preceded by a number: 1: Standard, 2: Vivid, 3: Neutral, 4: Portrait, 5: Landscape, 6: Black & White. Any or all of these can be redefined to take on the attributes of any of the 14 standard presets, and then adjusted further in terms of contrast, saturation, and sharpness, so you can, in effect, have two slightly different, say, Vivid settings, or multiple versions of the Landscape style. The number prefixes help you differentiate among Style Box settings.
The six basic Creative Styles, which exist in both Preset and numbered Style Box versions, have these attributes:
- Standard. This is, as you might expect, your default setting, with a good compromise of sharpness, color saturation, and contrast. Choose this, and your photos will have excellent colors, a broad range of tonal values, and standard sharpness that avoids the “over sharpened” look that some digital pictures acquire.
- Vivid. If you want more punch in your images, with richer colors, heightened contrast that makes those colors stand out, and standard sharpness, this setting is for you. It’s good for flowers, seaside photos, any picture with expanses of blue sky, and on overcast days where a punchier image can relieve the dullness.
- Neutral. Reduces saturation and sharpness to produce images with more subdued tones. Use this if you plan on tweaking your photos in an image editor and you want a basic image without any of the enhancements of the other styles.
- Portrait. You’ll get reduced saturation, contrast, and sharpness for a more “gentle” rendition that often works well for people pictures, especially skin tones. This style is a good choice if you’re planning on fine-tuning those aspects of your JPEG photos in your computer and don’t want the camera to overdo any of them.
- Landscape. As with the Vivid setting, this option boosts saturation (especially in blues and greens) and contrast to give you rich scenery and purple mountain majesties, even when your subject matter is located far enough from your camera that distant haze might otherwise be a problem. There’s extra sharpness, too, to give you added crispness when you’re shooting fall colors, for example.
- Black & White. This is useful if you want to shoot monochrome photos in the camera, so you won’t need to modify color photos in software. This style will allow you to change the contrast and sharpness, but not the saturation (because there are no colors to saturate).
As mentioned earlier, those six are repeated without the number prefix, and augmented with seven additional Creative Styles, which can be adjusted, but not renamed:
- Clear. Sony recommends this style for “clear tones” and “limpid colors” in the highlights, especially when you’re capturing “radiant light.” The description is a bit artsy, but I’ve found this style useful for foggy mornings and other low-contrast scenes.
- Deep. Darker and more somber images result from this style.
- Light. Recommended for bright, uncomplicated color expressions. I like it for high-key images with lots of illumination and few shadows.
- Sunset. Accentuates the red tones found in sunrise and sunset pictures.
- Night Scene. Contrast is adjusted to provide a more realistic night-time effect.
- Autumn Leaves. Boosts the saturation of reds and yellows for vivid fall colors.
- Sepia. Provides a warm brownish, old-timey tone to images.
To adjust the level of Contrast, Saturation, and/or Sharpness for any Creative Style, scroll to a style you want to use (in the Camera Settings I-11 menu) and use the left/right keys to display a line at the bottom of the screen showing the available adjustments of the three parameters. (See Figure 9.11.) Use the left/right directional buttons to scroll among Contrast, Saturation, and Sharpness. With the parameter you want to modify highlighted, press the up/down directional buttons to change the values in a range of –3 to +3. Press the center button to confirm.
Figure 9.11 Adjusting a Creative Style.
Here is a summary of how changing the parameters in a Creative Style will affect your images:
- Sharpness. Increases or decreases the contrast of the edge outlines in your image, making the photo appear more or less sharp, depending on whether you’ve selected 0 (no sharpening), +3 (extra sharpening), to –3 (softening). Remember that boosting sharpness also increases the overall contrast of an image, so you’ll want to use this parameter in conjunction with the contrast parameter with caution.
- Contrast. Compresses the range of tones in an image (increase contrast from 0 to +3) or expands the range of tones (from 0 to –3) to decrease contrast. Higher-contrast images tend to lose detail in both shadows and highlights, whereas lower-contrast images retain the detail but appear more flat and dull, without any snap.
- Color Saturation. You can adjust the richness of the color from low saturation (0 to –3) to high saturation (0 to +3). Lower saturation produces a muted look that can be more realistic for certain kinds of subjects, such as humans. Higher saturation produces a more vibrant appearance but can be garish and unrealistic if carried too far. Boost your saturation if you want a vivid image, or to brighten up pictures taken on overcast days. (Remember, however, Vivid and Landscape provide high saturation even at the zero level.) As I noted earlier, saturation cannot be changed for the Black & White Creative Style.
To modify Creative Styles, just follow these steps:
- 1. Access Creative Style menu. Use the Camera Settings I-11 menu entry or press the Fn button and navigate to the Creative Style entry.
- 2. Choose a style to apply. In the Creative Style screen, the styles are shown in the left-hand column. (You must scroll down to see all of them.) If you want to modify one of the styles shown, press up/down to highlight that style, and press the center button to activate it.
- 3. Select a parameter to modify. You can adjust the contrast, saturation, and sharpness of any of the styles in the left column. Highlight the style you want to adjust/replace and press the right directional button.
- 4. Select an attribute to change. The icons at the bottom of the image area represent (left to right): Image Style, Contrast, Saturation, and Sharpness. Press left/right to highlight the attribute you’d like to modify.
- 5. Enter your adjustments. To change the style that appears in the box you selected at left, highlight the Image Style icon and press up/down to choose one of the 13 styles.
- 6. Make other adjustments. To modify the currently selected style, press the left/right directional buttons to highlight Contrast, Saturation, or Sharpness, described earlier, then press up/down to add/subtract from the default zero values.
- 7. Confirm and exit. Press the center button to confirm your changes. If you redefined one of the six slots, that style will appear in the listing in the left column henceforth and can be selected quickly by following Steps 1 and 2 above.
Don’t confuse the Picture Effects feature with the Creative Styles. The Picture Effects are intended to provide special effects in-camera, such as Pop Color, Posterization, and Retro Photo. Since I have discussed them in detail in Chapter 3, I won’t do so here.
Interval Shooting
I introduced you to interval shooting in Chapter 3, where I listed all the options and settings in the Camera Settings I-03 menu’s Interval Shooting Function entry. As I noted there, with previous Sony cameras, this very popular feature has previously required a special app or external device to trigger successive shots over a specific period of time. Today, interval shooting is built right into your a6600’s capabilities (and has been added to some earlier Sony models via a firmware upgrade).
This section will help you get the most from this capability, and provide some ideas for setting up and capturing your own sequences. There is a lot more to interval shooting than you might think. Here are a few ideas to get you started:
- Time-lapse nature movies. Although interval shooting captures a series of still images, which you can view one at a time, it’s easy to combine a set of consecutive exposures to create a time-lapse movie. This technique is often used to good effect in nature films, such as Walt Disney’s pioneering The Living Desert. I’ll show you how to create a time-lapse movie later in this chapter.
- Star trails. You don’t need interval shooting to capture images of the heavens—a long exposure will suffice. However, still photos of the sky longer than a certain length produce blurry images (even if the camera is mounted on a tripod), due to the rotation of the Earth and the apparent “movement” of the stars. You can, however, use interval photography to capture a series of sharp star images over a period of time and combine them into a sweeping star trail image. I’ll show you how to do that later in this chapter, as well.
- Sunsets. I shoot plenty of sunset photos, particularly in Florida during the winter, and find that images taken at different times as the sun sinks below the horizon often look dramatically different. Interval shooting is particularly useful for capturing the elusive “green flash,” a phenomenon in which the sun changes color (usually green, but other colors are possible) for one or two seconds. If you take one photo every second or two for a long enough period, you have a better chance of capturing the green flash—if it happens at all. (It doesn’t always appear.)
The green flash is caused by the separation of the light into different colors as it is refracted through the thickest section of atmosphere (much like the way a prism or raindrops creates a rainbow). The shorter wavelengths of blue, indigo, and violet are scattered by the atmosphere, while the longer red, orange, and yellow colors are absorbed, making the “middle” color, green, most visible for a few seconds. (I knew that the mnemonic ROY G. BIV would come in handy after elementary school!)
- Capture the decisive moment. You know deer and other wildlife wander into your backyard to munch on the delectables in your garden during the daytime. It would almost be worth the loss of lettuce to capture a few images of them—but you don’t have four or five hours to waste waiting for them to show up. (I know erecting a “Deer Crossing” sign doesn’t work; it appears the animals either can’t read, or ignore them.) Instead, set up your camera (indoors, and shoot through a window if you wish), take a series of photos, and then review them to find your prize photo.
- Documentation. Use your imagination, and you’ll discover dozens of ways to document things using sequences of photos take at intervals. Wondering how hard your friends worked at helping you re-roof your garage? You can capture an entire workday with shots taken every ten minutes or so to create a hilarious series showing who spent the most time hammering, and who took the most frequent beer breaks (and ended up hammered). How often do you toss and turn at night? A dim nightlight can provide enough illumination to capture images at intervals and see if you slept like a log, or rolled like one.
- Self-portraits. You can use your self-timer to take a self-portrait or two—but what if you wanted to shoot 30 or 40 shots of you mugging for the camera or assuming different poses? Choose an interval of 10 seconds or more, and you can take as many consecutive photos of yourself—or someone else—without the need to press the shutter button each time.
Interval Shooting Checklist
Interval photography is not a technique where you can get your best shots by winging it. The shooting process can be—and usually is—lengthy, so you don’t want to spend two hours driving to a location, then 10 minutes or 10 hours capturing a sequence to discover poor planning has ruined your final results. This section provides some tips for preparing for your interval or time-lapse shooting session.
- Know your subject. If you plan to shoot a sunset, make sure you know exactly when the sun will set, so you can arrive early enough to set up your equipment and adjust your camera. You can Google the necessary information, but an app for Android and iOS devices called The Photographer’s Ephemeris can tell you exactly when a celestial event will occur, and even provide you with a map that will help you calculate your best location. If, say, you want to shoot the sun setting behind a lighthouse, the app will tell you the precise spot to stand, and when. If you’re capturing the ebb and flow of tides, you’ll need to know the time of high and/or low tides at a specific location. Don’t forget to scout the location ahead of time, too.
- Use a sturdy tripod. If you don’t have a sturdy tripod, take along an empty sack (I use the lightweight mesh bags that oranges come in), fill it with rocks when you arrive at your location, and hang it from the center column of your tripod to add ground-hugging weight. Successful interval photography calls for a camera that doesn’t move between shots so the successive images show what has changed between intervals. That’s not to say that some interesting photos can’t be taken by panning and/or moving the camera between intervals. You want to avoid unwanted movement, and save intentional movement for experimental photography.
- Have a fully charged battery or another power source. Interval photography drains the a6600’s batteries at an alarming pace. For long sequences, you’ll want to use a charged battery or external power. Turn off picture review to reduce power consumption.
- Make sure the camera is protected from the elements, accidents, and theft.
- Consider Disabling Long Exposure Noise Reduction. As you’ll recall from Chapter 3, when Long Exposure NR is enabled, the a6600 takes an additional dark “comparison” frame using the same exposure time so sensor noise can be removed. If you’re taking a 20-second exposure at intervals of less than 40 seconds, you do not want the camera to follow the original shot with an additional 20-second dark frame. That’s true whenever the total time required for the original/dark frame exposures is longer than your interval. You’ll have to accept a little noise to maintain your shooting rate. Of course, if you are taking a 20-second exposure once a minute, there’s no problem and Long Exposure NR can be left on.
- Focus manually. There aren’t many common interval-shooting situations in which I’d want to have focus change from shot to shot. Perhaps you’re expecting a herd of deer to cavort through your garden and would like the camera to attempt to focus on the nearest beast. Most of the time, however, consistent manual focus is best. Choose whether you want to focus on the foreground, middle range, or background, and set your focus point there. If you’re capturing photos of, say, a flower opening, use the Focus Magnifier to help you choose the precise plane of focus. Depth-of-field can be used creatively with small apertures (to increase the range of sharpness) or large f/stops (to allow selective focus).
- Manual exposure—or not? If you set exposure manually, each picture you take will use the same ISO, f/stop, and shutter speed setting. If the light remains even during the sequence, that can be a good thing. If the light changes (say, throughout a day), that can be bad, or distracting, or, in some cases, add a certain desirable look. Your a6600’s Interval Photography setting for Autoexposure Tracking Sensitivity can be used to fine-tune exposure. If autoexposure is active, you can specify a fast response to changes (High), or opt for slower adjustments using the Medium or Low sensitivity settings.
Know that quick changes in exposure can be distracting, especially when combining shots into a time-lapse movie. If you want to see dramatic light shifts as your scene lightens or darkens, use Manual Exposure and set the shutter speed, ISO, and aperture to give the correct “normal” exposure.
- Choose an interval. The time between each shot can be important. If you wait too long, you may miss an important event; choose a very brief interval, and you can end up with too many photos that are almost identical and lacking in the time-lapse effect. The interval is especially important if you intend to combine your shots into a time-lapse movie. With, say, slow-moving clouds, one shot every 10 seconds may produce a majestic march across the sky; fast-moving clouds can require taking one picture every three to five seconds. Sunsets work best with 30-second intervals; I get good results using 60-second gaps between shots when shooting the stars.
To add Charlie Chaplin–like movement to pedestrians, one shot every second or two does the job. (Fun fact: The cameras used for Chaplin’s comedies were hand-cranked at frame rates of around 14 to 16 frames per second; when projected at the eventual standard of 24 fps, the motion was speeded up. To compensate, Chaplin later had some frames duplicated in printing to simulate the 24 fps rate—while the motion was less frenetic, it became jerkier in the process.)
- Choose number of shots to capture. For practical reasons, you need to know how long it will take to capture your sequence. When you’ve chosen an interval and number of shots, the a6600 displays the total elapsed time, but common sense will tell you that if you are shooting one frame every 10 seconds (six per minute), if you want to capture 60 minutes’ worth of action, you’ll need to take 360 shots. Conversely, if you plan to convert your images into a movie, you’ll know that at, say, 30 frames per second, your 360 images will provide a movie only 12 seconds in length! Obviously, for time-lapse movies, you’ll probably be capturing a lot more than 360 images; the a6600 allows as many as 9999 frames—about 5.5 minutes’ worth at 30 fps.
- Choose your start time. Use this setting to delay the start of image capture, from 0 minutes, 0 seconds (begin immediately) to 99 minutes, 59 seconds. While you may want to begin shooting immediately, you should still set a short delay (say 20 seconds) as a start time so the camera can settle down in its tripod perch. If you want to begin capturing an event, say, a sunset, in 10 minutes, you can specify that much of a delay, and spend the intervening time setting up other cameras, performing other tasks, or chatting with your companions about how great your photos are going to be.
A REMINDER
The interval cannot be shorter than the shutter speed; for example, you cannot set one second as the interval if the images will be taken at two seconds or longer.
Settings Recap
I detailed all seven major settings for the Interval Shooting Functions entry of the Camera Settings I-03 menu in Chapter 3. Here’s a quick recap:
- Interval shooting. Choose On or Off to enable/disable the feature. You’ll want to keep this setting at Off until you are ready to begin interval shooting.
- Shooting start time. Use this setting to delay the start of image capture, from 0 minutes, 0 seconds (begin immediately) to 99 minutes, 59 seconds.
- Shooting interval. Specify how often an image should be captured.
- Number of shots. This setting determines the total number of exposures in a time-lapse sequence. You can choose from 1 to 9999 shots. A message at the bottom of the screen will display how long it will take to capture the number of shots you specify using the shooting interval you’ve chosen.
- Autoexposure Tracking Sensitivity. Select from High, Mid (Medium), or Low sensitivity.
- Silent Shooting in Interval. Choose On or Off. If you select On, the a6600 will operate silently, which allows capturing your sequence in “stealth” mode if you need it.
- Shoot Interval Priority. When shooting sequences using Program or Aperture Priority modes, the a6600 will adjust the shutter speed to provide the correct exposure. That may result in a shutter speed that is longer than the specified interval. Choose Off for this setting and the a6600 will go ahead and expose for the correct amount of time, skipping the shot that would have taken place.
Choose On, and when another interval exposure is due, the a6600 will terminate the previous shot (underexposing it) and begin the next one on schedule. You might use the On option if you feel that just dropping the poorly exposed image from the sequence produces the best series. You may be able to avoid the underexposure by activating Auto ISO Sensitivity, and selecting a minimum shutter speed that is shorter than the interval time. In that case, the camera will increase the ISO setting (if necessary) to produce the correct exposure using the automatically selected shutter speed. The chief drawback is that increasing the ISO automatically may also increase the amount of noise in your image. Significant changes in graininess may detract from your sequence or time-lapse movie.
Viewing Your Interval Sequences
You can view your sequences as if they were a time-lapse movie in the camera. You can also create an actual time-lapse movie from your photos; I’ll describe that in the section following this one. To view your sequence as a movie in the camera, just follow these steps:
- 1. Choose speed. In the Playback 2 menu, select Playback Speed for Interval and choose a speed from 1 (slow) to 9 (fast).
- At the slowest speed, the a6600 will display each frame you took one after the other, so you’ll see every image captured. The apparent speed of motion will be determined by length of the interval between each frame, and, to a certain extent, the size of the image file. That is, motion captured with larger intervals will appear to be moving faster, so sequences shot at 10-second intervals will seem “slower” than those taken at 20-second intervals. In addition, you may need to take into account how many images can fit into the camera’s buffer as they are displayed. Images captured in Large JPEG Extra Fine format may take longer to display than those captured in Small JPEG Standard format. In most cases, the difference in speed will be much less than the difference caused by the interval.
- At faster speeds, the a6600 “skips” frames, playing back every second, third, fourth, etc., image, producing faster apparent motion, but also resulting in a jerkier appearance. In effect, faster playback speeds decrease the interval between shots.
- 2. Select Continuous Playback. Navigate to the Continuous Playback for Interval entry in the Playback 2 menu. Scroll to the sequence of images you captured, and press the center button. The camera will display the images in order quickly, at the speed you’ve specified.
Time-Lapse Movies
It’s easy to convert your sequence of images into a time-lapse movie. All you need is the Viewer module from the free Imaging Edge software suite. It can quickly convert your individual frames into a Full HD (1920 × 1080) or Ultra HD (3840 × 2160) MP4 video clip. Just follow these steps.
- 1. Deposit sequence in a folder. Copy all the frames you want to use to a new folder on your computer. You’ll find it easier to select them if they are located in their own folder. Your images can be RAW or JPEG files.
- 2. Launch Viewer. The left-hand panel displays your computer’s directory tree. Select the drive and folder that contain your files.
- 3. Sort files. In the Viewer’s Tools menu, choose Sort > Sort by Date and Time Taken.
- 4. Select All. Press Control-A (Command-A on a Mac) to select all the files in the folder. Note that you must have at least 15 images to create a time-lapse movie.
- 5. Commence processing. In the Tools menu, choose Create Time Lapse Movie (see Figure 9.12, left).
Figure 9.12 Select images and start process (left). Select options (right).
- 6. Select options. The screen shown at right in Figure 9.12 appears. There are four adjustments you can make.
- Output method. In general, you can leave the Apply Each RAW File’s own settings to each RAW file marked. The app will use the parameters you specified in the camera for white balance, etc. If, for some reason, the RAW settings differ among your files, you can apply the parameters for an image you select (say, the first one in a sequence) and apply them to all subsequent frames.
- Save Format. Here you can choose a color space and/or compression level for your video. I recommend going with the defaults. If you needed an extra-high-quality movie, you could change to Compression Level 1.
- Save In. Select a folder to save your video to, and specify a filename. You can use the original filename or select various combinations of Date Taken, Date and Time Taken, and a 5-digit number generated by the program.
- Trimming. Here you can specify the aspect ratio of your movie. For greatest compatibility with other video you may want to add or intercut, choose the 16:9 ratio standard for HD movies. You can also select 4:3, 3:2, or 1:1 aspect ratios, or tell the program to use whatever proportions the a6600 was set to when the stills were captured.
- 7. Click Next. If you’re working with JPEG still photos instead of RAW images, the program will suddenly come to the conclusion that no further processing (adjusting white balance and so forth) is required, and tell you “Some of the selected images will not be processed because they do not have to be developed or are in unsupported formats.” Ignore this message if Sony’s programmers haven’t corrected this bug in your current release of the Imaging Edge software. The program will tell you which files it skipped (basically, all your JPEG images), and invite you to click Next once again to proceed.
- 8. Edit settings. The Edit screen, shown at left in Figure 9.13, appears. It has several options that you can reveal from drop-down lists.
- Time Lapse Setting. This panel is shown at far left in Figure 9.13. You can adjust playback speed from 1X to 16X, and view the total time recorded, although with the most recent copy of Viewer that I used, the speed didn’t seem to vary as described. Look for a fix in a future update of the software.
- Music. Allows you to select music tracks on your computer, and to download additional music from Sony’s website (see Figure 9.13, center right).
- Music Settings. Here you can balance the volume of the music you added with the soundtrack already recorded on your video. That allows you to have the music predominate, fade in, fade out, and/or loop continuously during playback. (see Figure 9.13, far right).
- 9. Save your work or produce a movie. You can stop working at this point and return to this point by clicking Save Project. It’s a good idea to do this, just in case your final video needs to be tweaked and redone. When you’re ready to produce your time-lapse clip, click Next.
- 10. Specify filename, folder, and format. When the Save screen shown in Figure 9.14 appears, you can type in a new filename for your movie, specify a different directory to save your file in, or choose one of three movie formats:
- 4K. This choice produces a 2160p/30 fps MP4 video clip in XAVC S format. (You can read about various video formats and parameters in Chapter 10.) You’ll need a 4K-compatible display to view this UHD movie.
- Good for Viewing on a TV or Computer. This is usually your best choice, as it delivers a 1080p/30 fps MP4 file in AVC format, viewable on any HDTV or modern-day computer screen that can handle Full HD.
- Smaller Size for Easier Uploading. Choose this to create a Standard HD 720p/30 fps MP4 clip in AVC format. This creates a much smaller file that can be transferred over the Internet, and uploaded to YouTube more easily.
- 11. Click Save. The program will create your video clip and store it in the specified folder. The process may take some time, but a progress bar (seen at center in Figure 9.14) will keep you updated.
Star Trails
Star trails are another great application for interval shooting. As I noted earlier, you can shoot the night sky using long exposures with your a6600 mounted on a tripod. However, because of the rotation of the Earth, longer exposures will record the apparent motion of the celestial objects through the sky, producing a light trail. If you use a very, very long exposure, the light trail will record as continuous streaks, centered around the Polaris (the North Star) in the northern hemisphere and Sigma Octantis (which is, unfortunately, too dim to be easily seen with the naked eye) in the southern hemisphere.
Such long exposures can result in excessive noise and sensor overheating, so it’s more common for photographers to take a series of individual exposures and combine them to produce a single star trail image. If you want your stars to appear as reasonably sharp points, you’ll need to keep the exposure short enough that their movement in the sky isn’t apparent. Fortunately, there’s a simple formula you can use to calculate that exposure time, the “500 Rule.” Divide 500 by the focal length of your lens to determine the longest exposure (in seconds) before stars start to produce a blurred trail. For example, with a 50mm lens, the longest exposure would be 10 seconds (500 divided by 50). Capturing the complete canopy of stars generally requires a wider viewing perspective. With the 16mm wide-angle setting exposures could be as long as roughly 30 seconds.
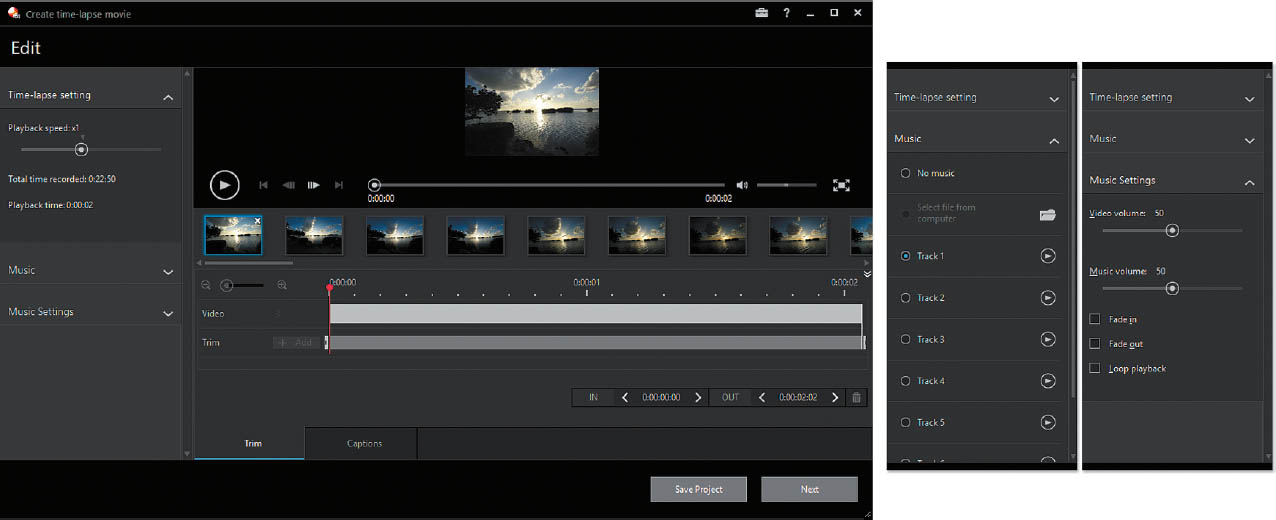
Figure 9.13 Edit time-lapse settings (left); add music (center right); select music settings (far right).
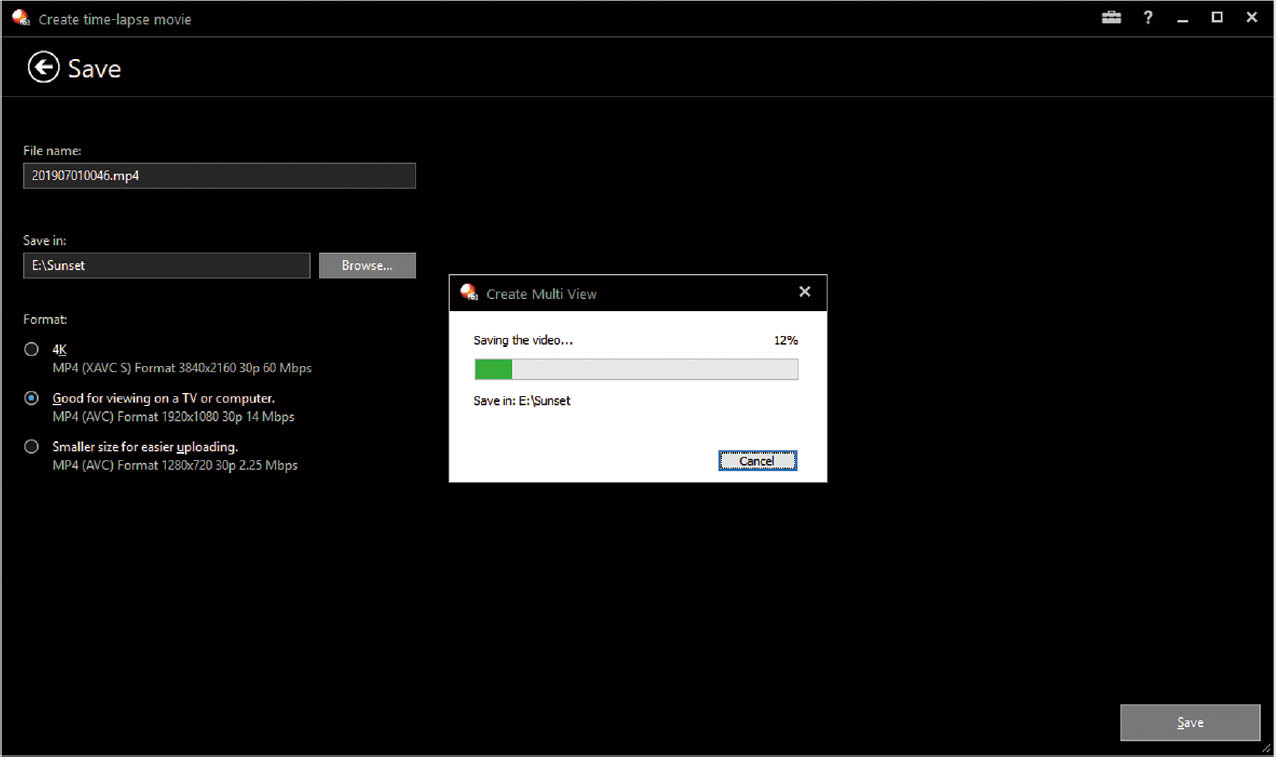
Figure 9.14 Choose filename, folder, and movie format.
For Figure 9.15, I set my camera to ISO 200, and used a basic exposure of 30 seconds at f/5.6. I selected an interval of 32 seconds and 170 total exposures, which totals about 90 minutes. Noise reduction was OFF! Then, I followed these steps, using Photoshop:
- 1. Transfer files to a folder. Select a folder on your computer, and copy all your files to that location.
- 2. In Photoshop: Choose Files > Scripts > Load Files into Stack.
- 3. Browse to folder. Click the Browse button and navigate to the folder where your images are stored.
- 4. Click OK. Photoshop will create a file with one layer for each of your captured images.
- 5. Select All layers. Then click Layer Blending Options from the Layers palette, and choose Lighten.
- 6. Flatten image. You’ll want to flatten your image (the multi-layer file will be huge!). You’ll end up with an impressive star trail image.
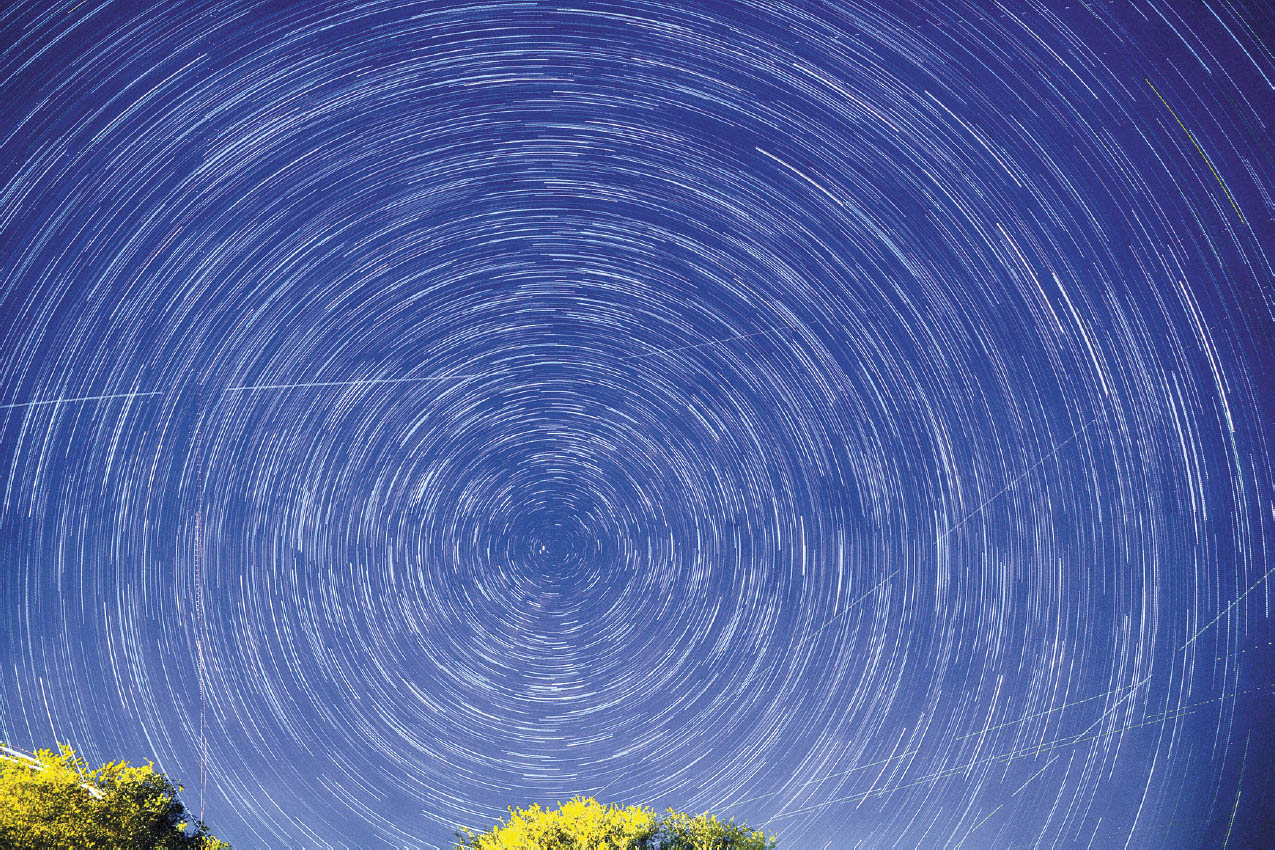
Figure 9.15 Capturing a star trail.