Photography is a form of visual art that uses light to shape the finished product. The photographer may have little or no control over the subject (other than posing human subjects) but can often adjust both viewing angle and the nature of the light source to create a particular compelling image. The direction and intensity of the light sources create the shapes and textures that we see. The distribution and proportions determine the contrast and tonal values: whether the image is stark or high key or muted and low in contrast. The colors of the light (because even “white” light has a color balance that the sensor can detect), and how much of those colors the subject reflects or absorbs, paint the hues visible in the image.
As a Sony photographer, you must learn to be a painter and sculptor of light if you want to move from taking a picture to making a photograph. Most of the time, you’ll be working with available or ambient light, perhaps with reflectors or other modifiers, or even some additional continuous light sources, such as incandescent or fluorescent lamps. But at times you’ll want to turn to one of the most versatile sources of illumination you have available, the brief, but brilliant snippets of light we call electronic flash. This chapter will show you the differences between working with continuous illumination and working with flash and explain how to use the flash capabilities of the Sony a6600.
Why Flash?
Flash sometimes gets a bad rap, but that’s usually prompted by photographers who make poor use of the capabilities electronic flash offers. In some respects, working with continuous lighting instead is easier and more predictable. Conventional lighting is exactly what you might think: uninterrupted illumination that is available all the time during a shooting session. Daylight, moonlight, and the artificial lighting encountered both indoors and outdoors count as continuous light sources (although all of them can be “interrupted” by passing clouds, solar eclipses, a blown fuse, or simply by switching off a lamp). Indoor continuous illumination includes both the lights that are there already (such as incandescent lamps or overhead fluorescent lights indoors) and fixtures you supply yourself, including photoflood lamps or reflectors used to bounce existing light onto your subject.
On the face of things, electronic flash may be uncomfortably different from what we are used to, and sometimes considered difficult to use. In practice, you can use flash in all the same ways you use continuous lighting to shape your images, and, in some cases, take advantage of its special properties, such as its action-freezing short duration. Electronic flash is notable because it can be much more intense than continuous lighting, lasts only a brief moment, and can be much more portable than supplementary incandescent sources. It’s a light source you can carry with you and use anywhere.
Of course, your Sony a6600 does not have a built-in flash of any sort. There are several reasons for that. The company wanted to make the a6600 camera exceptionally compact, and a built-in flash would have added bulk. In addition, even though Sony upgraded the size and power of the a6600’s NP-FZ100 battery, the features of the camera alone do a good job of consuming all that extra juice during a shooting session. With a camera like the a6600, a pop-up flash (which most advanced photographers would likely use only as fill or to trigger off-camera units wirelessly) would provide an unacceptable amount of extra drain. So, any electronic flash used with these cameras is necessarily an external flash with its own power supply, which happily solves the power drain situation while reducing red-eye and other effects of on-camera flash.
Before moving on to discussing flash in detail, here’s a quick comparison of the pros and cons of continuous illumination versus flash:
- Lighting preview—Pro: continuous lighting. With continuous lighting, such as incandescent lamps or daylight, you always know exactly what kind of lighting effect you’re going to get. If you’re using multiple lights, you can visualize how they will interact with each other. With electronic flash, the general effect you’re going to see may be a mystery until you’ve built some experience.
- Lighting preview—Con: electronic flash. Compact portable flash units often do not provide a “modeling light” function, although studio flash typically do.
- Exposure calculation—Pro: continuous lighting. Your camera has no problem calculating accurate exposure for continuous lighting, because the lighting remains constant and can be measured through built-in light meters that interpret the light reaching the sensor. The amount of light available just before the exposure will, in almost all cases, be the same amount of light present when the shutter mechanism is opened to take the shot. The Spot metering mode can be used to measure brightness in the bright areas of the scene and the dark areas; if you have a bit of expertise in this technique, you’ll know whether it would be useful to bounce some light into the shadow areas using a reflector panel accessory.
- Exposure calculation—Con: electronic flash. A flash unit provides no illumination until it actually fires so the exact exposure can’t be measured by the a6600’s exposure sensor before you take a photo. Instead, the light must be measured by metering the intensity of a pre-flash triggered an instant before the main flash, as it is reflected back to the camera and through the lens.
- Evenness of illumination—Pro/con: continuous lighting. Of continuous light sources, daylight, in particular, provides illumination that tends to fill an image completely, lighting up the foreground, background, and your subject almost equally. A sunlit scene may have shadow areas too, of course, so you might need to use reflectors or fill-in light sources to even out the illumination. Barring objects that block large sections of your image from daylight, the light is spread fairly evenly. Indoors, however, continuous lighting is much less likely to be evenly distributed. The average living room, for example, has hot spots and dark corners. But on the plus side, you can see this uneven illumination and compensate with additional lamps.
- Evenness of illumination—Con: electronic flash. Electronic flash units, like the continuous light provided by lamps, don’t have the advantage of being located 93 million miles from the subject as the sun is. Because of this factor, they suffer from the effects of their proximity.

Figure 13.1 A light source that is twice as far away provides only one-quarter as much illumination.
The inverse square law, first applied to both gravity and light by Sir Isaac Newton, dictates that as a light source’s distance increases from the subject, the amount of light reaching the subject falls off proportionately to the square of the distance. In plain English, that means that a flash or lamp that’s 12 feet away from a subject provides only one-quarter as much illumination as a source that’s 6 feet away (rather than half as much). (See Figure 13.1.) This translates into relatively shallow “depth-of-light.”
- Action stopping—Pro: electronic flash. When it comes to the ability to freeze moving objects in their tracks, the advantage goes to electronic flash. The brief duration of the emitted light serves as a very fast “shutter speed” when the flash is the main or only source of illumination for the photo. In other words, this effect is possible when shooting in a dark area without much, if any, lighting provided by ambient sources but assumes that the subject is not beyond the range of the flash.
In flash photography, your camera’s shutter speed (called sync speed in flash photography) is set to 1/160th second, but when flash is the primary light source, the effective exposure time will be the 1/1000th to 1/50000th second or less; this is the actual duration of the flash illumination. As you can see in Figure 13.2, it’s possible to freeze motion with flash of very short duration. The only fly in the ointment is that, if the ambient light is strong enough, it may produce a secondary “ghost” exposure, as I’ll explain later in this chapter.
- Action stopping—Con: continuous lighting. Action stopping with continuous light sources is completely dependent on the shutter speed you’ve dialed in on the camera. And the speeds available are dependent on the amount of light available and your camera’s ISO sensitivity setting. Outdoors in daylight, there will probably be enough sunlight to let you shoot at 1/1600th second and f/6.3 with a non-grainy ISO of 400. That’s a fairly useful combination of settings if you’re not using a super-telephoto with a small maximum aperture.
But indoors, the reduced illumination quickly has you pushing your a6600 to its limits. For example, if you’re shooting indoor sports in a dark arena, there probably won’t be enough available light to allow you to use a 1/1600th second shutter speed unless you use a lens with an extremely wide aperture, such as f/1.8, with, say, the Sony Sonnar T* FE 55mm f/1.8 ZA. You can also specify a very high ISO setting, and accept that image quality may suffer. (In truth, the gym where I shoot indoor basketball allows me to do so at 1/500th second at f/4 using ISO 1600.) In many indoor sports situations, you may find yourself limited to a shutter speed of 1/500th second or slower.

Figure 13.2 Electronic flash can freeze almost any motion because of its extremely short duration.
- Flexibility—Pro: electronic flash. The action-freezing power of electronic flash, at least for nearby subjects in a dark location, allows you to work without a tripod; that provides extra flexibility and speed when choosing angles and positions.
- Flexibility—Con: continuous lighting. Because incandescent and fluorescent lamps are not as bright as electronic flash, the slower shutter speeds required (see “Action stopping,” above) mean that you may have to use a tripod more often, especially when shooting portraits. The incandescent variety of continuous lighting gets hot, especially in the studio, and the side effects range from discomfort (for your human models) to disintegration (if you happen to be shooting perishable foods like ice cream).
Electronic Flash Basics
Until you delve into the situation deeply enough, it might appear that serious photographers have a love/hate relationship with electronic flash. You’ll often hear that flash photos are less natural looking, and that on-camera flash in most cameras should never be used as the primary source of illumination because it provides a harsh, garish look. Some photographers strongly praise available (“continuous”) lighting while denouncing electronic flash.
As I noted at the beginning of this chapter, that bias is against bad flash photography. Indeed, flash—often with light-modifying accessories—has become the studio light source of choice for many pro photographers. That’s understandable, because the light is more intense (and its intensity can be dialed up or down by the photographer), freezes action, frees you from using a tripod (unless you want to use one to lock down a composition), and has a snappy, consistent light quality that matches daylight. (While color balance changes as the flash duration shortens, some Sony flash units can communicate to the camera the exact white balance provided for that shot.) And even conservative photographers will concede that electronic flash has some important uses as an adjunct to existing light, particularly to fill in dark shadows.
How Electronic Flash Works
The electronic flash you use will generally be connected to the camera by slipping it onto the hot shoe or linked by a cable connected to an adapter mounted on the shoe. In all cases, the flash is triggered at the instant of exposure, during a period when the sensor is fully exposed by the shutter.
The a6600 has electronic shutter options, which I’ll describe later, and a conventional vertically traveling physical shutter that consists of two curtains. The front curtain opens and moves to the opposite side of the frame, at which point the shutter is completely open. The flash can be triggered at this point (so-called front-curtain sync, which is the default mode), making the flash exposure. Then, after a delay that can vary from 30 seconds to 1/160th second, a second, rear curtain begins moving across the sensor plane, covering up the sensor again. If the flash is triggered just before the rear curtain starts to close, then the optional rear-curtain sync is used. In both cases, though, a shutter speed of 1/160th second is (ordinarily) the maximum that can be used to take a photo, because that’s the speed at which both the front and rear curtains are tucked out of the way, leaving the entire full frame exposed to capture the flash burst.
Figure 13.3 illustrates how this works, with a fanciful illustration of a generic shutter (your a6600’s shutter does not look like this). As an exposure is made using the conventional (non-electronic) shutter, the curtains move as follows:
- 1. Both curtains open. With a mirrorless camera like the a6600, the sensor remains completely exposed, so that the image that’s being captured can be viewed on the electronic viewfinder and LCD monitor.
- 2. Front curtain closes. As the exposure begins, the front curtain rises to cover the sensor.
- 3. Prior image is dumped. When the sensor is completely covered, the preview image is dumped, resetting the pixels so that the exposure can begin.

Figure 13.3 A focal plane shutter has two curtains, the lower, or front curtain, and an upper, rear curtain.
- 4. Front curtain begins to descend. As the front curtain drops, the sensor is gradually exposed to light, and the ambient exposure (using the available light in the scene) begins.
- 5. Front curtain continues to descend. More of the sensor is uncovered, and the ambient exposure continues.
- 6. Both curtains open. With the sensor fully exposed, the electronic flash’s brief burst can fill the frame.
- If this burst takes place as soon as the curtains are fully open, then front-curtain sync, which is the default, has been used. Following the flash, the sensor continues to be exposed for the length of the exposure, which can range from 1/160th second to 30 seconds (or longer, with a Bulb exposure).
- The burst can also take place at the very end of the exposure, just before the rear curtain starts to descend. This is called rear-curtain sync.
- When the exposure is finished, the rear curtain descends and the captured image is conveyed off the sensor to the camera’s internal buffer, and thence to your memory card. The rear curtain then ascends to the top of the frame, exposing the sensor again and a preview image for the next picture appears in the EVF and LCD monitor.
Keep in mind that the a6600 always defaults to front-curtain sync unless you explicitly select another sync mode using the Fn button or Flash Mode entry in the Camera Settings I-10 menu.
And Now for Something Completely Different . . .
If you’ve absorbed that, things are about to get really interesting. The a6600 has special modes available from the Camera Settings II-04 menu, in which either the physical front curtain or both the physical front curtain and the rear curtain are simulated electronically. Only one of the two modes can be used with flash.
- Electronic shutter. The a6600 has an all-electronic shutter that can be activated by selecting Silent Shooting in the Camera Settings II-05 menu. In that case, both the physical front and rear curtains are replaced by electronic equivalents. Exposure is started and stopped electronically, with no curtains at all. Silent Shooting is indeed silent; I’ve had other photographers watching me snap away in that mode ask me whether I was really taking pictures at all. It is an excellent mode for religious ceremonies and other events where even the quiet click of the e-Front Curtain might be intrusive.
As I described in Chapter 10, silent shooting’s rolling shutter captures the image line by line (as opposed to a global shutter that grabs the image in one fell swoop) and is subject to the same unwanted side effects found in video cameras, including wobble/Jell-O effect in hand-held shots, diagonal skewing, smear, and other defects. But the most important complication, in terms of the subject of this chapter, is that the electronic shutter cannot be used with flash at all. If you have a flash mounted and powered up and press the shutter release, it won’t go off when the electronic shutter is active. Indeed, the Flash Mode options in the Camera Settings I-10 menu are grayed out and unavailable.
- e-Front Curtain Shutter. Recall that the sensor of a mirrorless camera is always exposed and feeding its image to the EVF and LCD monitor; in order to capture an image within a specified period of time, the sensor needs to stop collecting the image so the exposure can begin. In normal operation, as described above, when you press the shutter release down all the way, the shutter closes and the camera dumps the image you were previewing, resetting the pixels and leaving the sensor blank and ready to capture an exposure. When the e-Front Curtain Shutter is enabled, the physical front shutter doesn’t close: the image is dumped electronically, and then the sensor immediately begins capturing an image. The physical rear curtain shutter then closes at the end of the exposure.
The advantages of the electronic front curtain are that the camera can respond more quickly with less shutter lag, there is no possibility of vibration caused by the physical shutter bouncing at the end of its travel (this was a significant problem with the original a7 series), and an electronic front curtain shutter is quieter. As the a6600 is mirrorless, these cameras are already quieter than dSLR models, which have a mirror flapping about before and after the exposure.
However, an electronic front curtain shutter can exhibit problems with certain lenses and very fast shutter speeds. In such cases, when you are using an unusually wide aperture, such as f/1.8, some areas of the photo may exhibit a secondary (ghost) image. The aperture of an affected lens requires the diaphragm’s “leaves” to travel a greater distance, and there may simply not be enough time. An overexposure may result. If you encounter that problem, turn the e-curtain option off; otherwise, you can do as I do and leave it on all the time.
Avoiding Sync-Speed Problems
Using a shutter speed faster than the maximum sync speed can cause problems. Triggering the electronic flash only when the shutter is completely open makes a lot of sense if you think about what’s going on. To obtain shutter speeds faster than 1/160th second, the a6600 exposes only part of the sensor at one time, by starting the rear curtain on its journey before the front curtain has completely opened. That effectively provides a briefer exposure as the slit of the shutter passes over the surface of the sensor. If the flash were to fire during the time when the front and rear curtains partially obscured the sensor, only the slit that was actually open would be exposed.
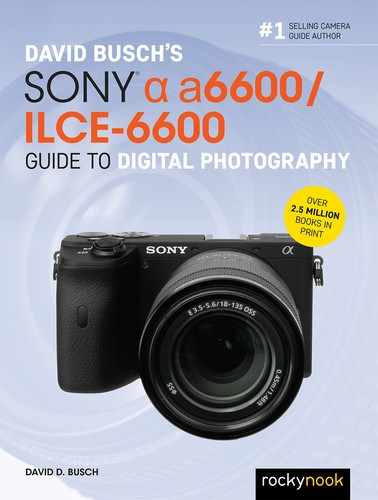
You’d end up with only a narrow band, representing the portion of the sensor that was exposed when the picture was taken. For shutter speeds faster than the top sync speed, the rear curtain begins moving before the front curtain reaches the bottom of the frame. As a result, a moving slit, the distance between the front and rear curtains, exposes one portion of the sensor at a time as it moves from the top to the bottom. Figure 13.4 shows three views of our typical (but imaginary) physical focal plane shutter. At left is pictured the closed shutter; in the middle version you can see the front curtain has moved about 1/4 of the distance down from the top; and in the right-hand version, the rear curtain has started to “chase” the front curtain across the frame toward the bottom.
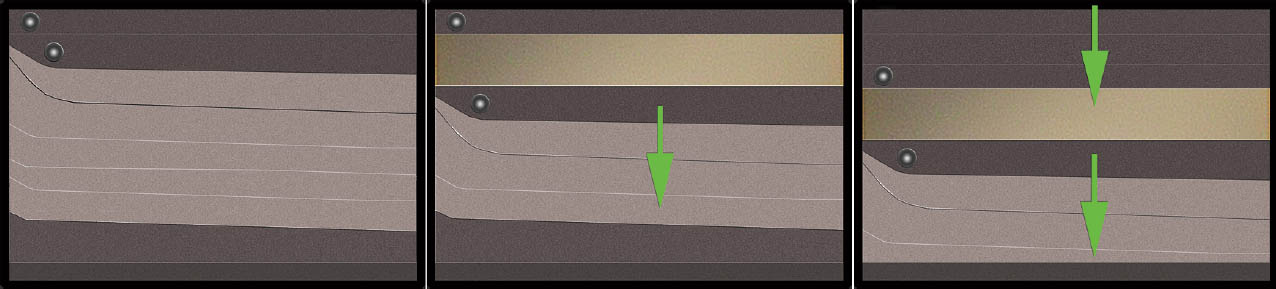
Figure 13.4 A typical exposure being made using the conventional physical shutter.
If the flash is triggered while this slit is moving, only the exposed portion of the sensor will receive any illumination. You end up with a photo like the one shown in Figure 13.5. Note that a band across the bottom of the image is black. That’s a shadow of the rear shutter curtain, which had started to move when the flash was triggered. Sharp-eyed readers will wonder why the black band is at the bottom of the frame rather than at the top, where the rear curtain begins its journey. The answer is simple: your lens flips the image upside down and forms it on the sensor in a reversed position. You never notice that, because the camera is smart enough to show you the pixels that make up your photo in their proper orientation during picture review. But this image flip is why, if your sensor gets dirty and you detect a spot of dust in the upper half of a test photo, if cleaning manually, you need to look for the speck in the bottom half of the sensor.

Figure 13.5 If a shutter speed faster than 1/160th second is used with flash, you can end up photographing only a portion of the image.
I generally end up with sync speed problems only when shooting in the studio, using studio flash units rather than my Sony dedicated unit. That’s because if you’re using either type of “smart” flash, the camera knows that a strobe is attached, and remedies any unintentional goof in shutter speed settings. If you happen to set the a6600’s shutter to a faster speed in S or M mode, the camera will automatically adjust the shutter speed down to the maximum sync speed as soon as you attach and turn on an external flash (or prevent you from choosing a faster speed if the flash is powered up). In A or P, where the a6600 selects the shutter speed, it will never choose a shutter speed higher than 1/160th second when using flash.
But when using a non-dedicated flash, such as a studio unit plugged into a PC/X terminal adapter attached to the hot shoe, the camera has no way of knowing that a flash is connected, so shutter speeds faster than 1/160th second can be set inadvertently.
Note that the a6600 can use a feature called high-speed sync that allows shutter speeds faster than the maximum sync speed with certain external dedicated Sony flash units. When using high-speed sync, the flash fires a continuous series of bursts at reduced power for the entire duration of the exposure, so that the illumination is able to expose the sensor as the slit moves.
HS sync is set using the controls that adjust the compatible external flash units, which include the HVL-F60M/RM, HVL-F58AM, HVL-F56AM, HVL-45RM, HVL-F43AM/HVL-F43M, HVL-F32M, and HVL-F36AM. (Note that all flashes ending in AM use the older Minolta-style foot and cannot be mounted on the a6600 without an inexpensive Sony ADP-MAA adapter.) High-speed sync cannot be used when working with multiple flash units. When active, the message H appears on the LCD panel on the back of the flash. You’ll find complete instructions accompanying those flash units.
Ghost Images
The difference might not seem like much, but whether you use front-curtain sync (the default setting) or rear-curtain sync (an optional setting) can make a significant difference to your photograph if the ambient light in your scene also contributes to the image. At faster shutter speeds, particularly 1/160th second, there isn’t much time for the ambient light to register, unless it is very bright. It’s likely that the electronic flash will provide almost all the illumination, so front-curtain sync or rear-curtain sync isn’t very important.
However, at slower shutter speeds, or with very bright ambient light levels, there is a significant difference, particularly if your subject is moving, or the camera isn’t steady. In any of those situations, the ambient light will register as a second image accompanying the flash exposure, and if there is movement (of the camera or subject), that additional image will not be in the same position as the flash exposure. It will show as a ghost image and, if the movement is significant enough, as a blurred ghost image trailing in front of or behind your subject in the direction of the movement.
As I mentioned earlier, when you’re using front-curtain sync, the flash goes off the instant the shutter opens, producing an image of the subject on the sensor. That happens whether you’re using the mechanical shutter or the optional electronic Front Curtain option from the Camera Settings II-4 menu. Then, the shutter remains open for an additional period (which, as I’ve noted, can be from 30 seconds to 1/160th second). If your subject is moving, say, toward the right side of the frame, the ghost image produced by the ambient light will produce a blur on the right side of the original subject image, making it look as if your sharp (flash-produced) image is chasing the ghost. For those of us who grew up with lightning-fast superheroes who always left a ghost trail behind them, that looks unnatural (see Figure 13.6).
So, Sony provides rear- (second-) curtain sync to remedy the situation. In that mode, the shutter opens, as before. The shutter remains open for its designated duration, and the ghost image forms. If your subject moves from the left side of the frame to the right side, the ghost will move from left to right, too. Then, about 1.5 milliseconds before the rear shutter curtain closes, the flash is triggered, producing a nice, sharp flash image ahead of the ghost image.
EVERY WHICH WAY, INCLUDING UP
Note that although I describe the ghost effect in terms of subject matter that is moving left to right in a horizontally oriented composition, it can occur in any orientation, and with the subject moving in any direction. (Try photographing a falling rock, if you can, and you’ll see the same effect.) Nor are the ghost images affected by the fact that modern shutters travel vertically rather than horizontally. Secondary images are caused between the time the front curtain fully opens, and the rear curtain begins to close. The direction of travel of the shutter curtains, or the direction of your subject, does not matter.

Figure 13.6 Front-curtain sync produces an image that trails in front of the flash exposure (top), whereas rear-curtain sync creates a more “natural-looking” trail behind the flash image (bottom).
Slow Sync
Another flash synchronization option is slow sync, which is actually an exposure option that tells the a6600 to use slower shutter speeds when possible, to allow you to capture a scene by both flash and ambient illumination. To activate Slow Sync, press the Fn button, navigate to the flash options, and choose Slow Sync. Or, make the same selection from the Flash Mode entry in the Camera Settings I-10 menu.
Then, the exposure system will try to use longer shutter speeds with the flash, so that an initial exposure is made with the flash unit, and a secondary exposure of subjects in the background will be produced by the slower shutter speed. This will let you shoot a portrait of a person at night and, much of the time, avoid a dark background. Your portrait subject will be illuminated by the flash, and the background by the ambient light. It’s a good idea to have the camera mounted on a tripod or some other support or have SteadyShot switched on to avoid having this secondary exposure produce ghost images due to camera movement during the exposure. (See Figure 13.7.)
Because Slow Sync is a type of exposure control, it does not work in Manual mode or Shutter Priority mode (because the a6600 doesn’t choose the shutter speed in those modes). It is not disabled in those modes: you can still select it using the Camera Settings menu or Function menu, but your shutter speed will not be changed.
Determining Exposure
Calculating the proper exposure for an electronic flash photograph is a bit more complicated than determining the settings by continuous light. The right exposure isn’t simply a function of how far away your subject is, even though the inverse square law I mentioned does have an effect: the farther away the subject is, the less light is available for the exposure. The a6600 can calculate distance if you’re using lenses with a distance encoder chip, which detects the position of the focusing mechanism as focus is locked in just prior to exposure. The component transmits this information to the camera, which can use it to determine the distance to the subject, and, therefore, much flash output is required to illuminate the scene. This Advanced Distance Integration (ADI) delivers high-precision flash metering that is unaffected by the reflectance of subjects or backgrounds.

Figure 13.7 Without slow sync, ambient light may not be sufficient to balance with the flash exposure (left). When slow sync is activated, longer shutter speeds are selected, allowing the ambient light to register, too (right).
But, of course, flash exposure isn’t based on distance alone. Various objects reflect more or less light at the same distance so, obviously, the camera needs to measure the amount of light reflected back and through the lens. Yet, as the flash itself isn’t available for measuring until it’s triggered, the a6600 has nothing to measure.
The solution is to fire the flash twice. The initial shot is a pre-flash that can be analyzed, then followed by a main flash that’s given exactly the calculated intensity needed to provide a correct exposure. As a result, the primary flash may be longer for distant objects and shorter for closer subjects, depending on the required intensity for exposure. This through-the-lens evaluative flash exposure system uses distance information, and it operates whenever you have attached a Sony dedicated flash unit to the a6600, and a lens that provides the necessary distance integration information.
Flash Modes
There are several flash modes available in the Camera Settings I-10 menu:
- Flash Off. The flash never fires; this may be useful in museums, concerts, or religious ceremonies where electronic flash would prove disruptive. This option is not available in P, A, S, or M mode; if you do not want the flash to fire, turn it off.
- Auto Flash. The flash fires as required, depending on lighting conditions. Not available in P, A, S, or M mode because flash always fires in these modes if it’s attached and powered up.
- Fill-Flash. When this option is set, the flash will always fire when set to P, A, S, or M modes, using one of the two Auto modes or in SCN modes where flash is not disabled. The camera balances the available illumination with flash to provide a balanced lighting effect. (See Figure 13.8.)
- Slow Sync. The camera combines flash with slow shutter speeds; the nearby subject can be illuminated by flash, but during the longer shutter speed, there’s enough time for the darker surroundings (lit by ambient light) to record on the sensor.

Figure 13.8 The owl (left) was in shadow. Fill flash (right) brightened up the bird, while adding a little catch light to its eye.
- Rear Sync. Fires the flash at the end of the exposure time, after the ambient light exposure has been made, producing more satisfying photos of moving subjects when using a long exposure; light trails will be behind the “ghost” image, as illustrated earlier in Figure 13.6.
- Wireless. This is available from a separate entry in the Camera Settings I-10 menu. (On and Off are your options.) Wireless allows an optional external flash or flash trigger mounted on the camera’s multi interface shoe to activate one or more external flash units that support wireless off-camera flash; there’s no need for any cable connection between the camera and the remote flash unit. I’ll explain the Sony wireless system later in this chapter.
Flash Exposure Compensation
This is a feature discussed previously in Chapter 3. It’s important to keep in mind how the camera’s exposure compensation system works when you’re using electronic flash. To activate exposure compensation for flash, visit the Flash Comp. item in the Camera Settings I-10 menu or use the Function menu, and set the amount of plus or minus compensation you want. It’s especially useful when using flash outdoors for fill, as you can adjust the flash output just enough to fill in shadows. (See Figure 13.9.) This function is not available when using Intelligent Auto mode. When you find that your flash photos are too dark even after you have set the highest amount of compensation, then the flash simply cannot provide more power; you must move closer to the subject, or use a wider aperture, or set a higher ISO, or take all of these steps. Note too that when a subject is extremely close to the camera, even a –3 setting may not prevent an excessively bright image. You’ll probably have to reduce your ISO setting in that case.

Figure 13.9 Set flash exposure compensation.
Flash exposure compensation affects only the amount of light emitted by the flash. If you want to adjust the brightness of the ambient light exposure, you would also need to use the conventional exposure compensation feature. In fact, you can use both features at the same time to get a brighter subject and a darker background, or vice versa. Let’s say you’re taking a photo of a friend posing against a light-toned background such as a white cabana on a beach. A plus exposure compensation setting (perhaps +1 when using multi-segment metering) will ensure that the cabana won’t be underexposed while a –1/3 or –2/3 flash exposure compensation will ensure that shadows on your friend’s face will be lightened by a very gentle burst of flash. This is an advanced technique that requires some experimentation but can be valuable when used with some expertise.
Red Eye Reduction
When using semi-automatic or manual exposure modes, red-eye reduction is available if Red Eye Reduction is On in the Camera Settings I-11 menu (as described in Chapter 4). The flash will fire a burst before the photo is actually taken as you depress the shutter release button. That will theoretically cause your subjects’ irises to contract (if they are looking toward the camera), thereby reducing the red-eye effect in your photograph.
Using an External Electronic Flash
As I write this, Sony offers six accessory electronic flash units that are compatible with the a6600’s multi interface shoe: the HVL-F60M, its radio-wireless-capable sibling the HVL-F60RM, and the HVL-45RM, HVL-F43M, HVL-F32M, and HVL-F20M. These external units can be mounted on the camera, connected to the camera’s multi interface shoe with a cable (I’ll detail how later) or (except for the HVL-F20M) used off-camera with wireless connectivity when triggered by another external flash used as a controller/master. Each can also function as the controller/master mounted on the camera to trigger other flash units wirelessly.
In addition, there are earlier Sony flash units designed for the older Minolta/Sony proprietary hot shoe. They can be used with the a6600 camera if you purchase an inexpensive adapter, such as the Sony ADP-MAA (about $25). Or, you can skip the adapter and use wireless-compatible legacy flash units off-camera in wireless mode, triggered by an on-camera master/controller. Although they are discontinued, I’ll describe some of these earlier flash units because you may already own one or can find one used at a price that’s hard to resist. I don’t recommend the legacy flash/adapter approach, because older units operate using a more limited communication protocol, which I’ll describe later. But because some of you may have an older flash or can pick one up used at a decent price, it doesn’t make sense to pretend that these discontinued models don’t exist, because they still can work with your a6600, especially as remote/slave units.
LET’S BE FRANK . . .
Although one of my jobs is to show you how to get the best from your wise decision to purchase a Sony camera, I’m not a cheerleader for the company. It’s done a great job in responding to customer requests for features and upgraded gear, but Sony is still playing catch-up in the flash arena. It’s been especially slow in providing affordable radio control flash options (as I’ll note later in the chapter). The introduction of the HVL-F60RM in February 2018 added options, but at $600, many will not find it affordable.
The sheer volume of third-party options for gear makes it impossible to cover all of them in detail. So, I have generally devoted the available space to Sony products in this book, with the exception of a discussion of additional lens options. In terms of full-featured TTL-compatible third-party electronic flash units for your a6600, there are a number of excellent third-party products you should check out. Godox, in particular, makes good Sony-friendly flash which are marketed under the Godox name as well as rebranded for other vendors. Although I own Sony flash units, more often than not I use my Godox flash setup (which includes two Godox AD200 battery-operated studio monolights with TTL exposure metering).
Guide Numbers, Hot Shoes, and More
Before I describe the flash units themselves, there are a few aspects you need to understand in order to compare electronic flash. If you’re a veteran Sony (or Minolta) shooter, you can skim over this section, or skip it entirely. Those new to photography or the Sony realm should find this information useful.
Guide Numbers
The first thing you need to learn when comparing flash units is that Sony incorporates the Guide Number (GN) of each flash in the product name. So, what’s a Guide Number? The GN designation derives from the good old days prior to automatic flash units and through-the-lens flash metering, when flash exposures had to be calculated mathematically. Those days are very long ago, indeed, as Honeywell introduced Auto/Strobonar flash units way back in the 1960s.
Guide numbers are a standard way of specifying the power of a flash when used in manual, non-autoexposure mode. Divide the guide number by the distance to determine the correct f/stop to use at full power. With a GN of 197 at ISO 100, you would use an aperture of around f/19.7 for a subject that’s 10 feet from the camera (197 divided by 10), or around f/9.5 for a subject at a distance of 20 feet. Because most countries in the world use metric measurements, guide numbers are given using values for both meters and feet. Thus, Sony’s HVL-F60M/RM unit has a guide number of 60/197 in meters/feet, and the 60 GN is incorporated into the unit’s product name.
The Guide Number data is most useful for comparing the relative power of several flash units that you’re considering. According to the Inverse Square Law, a flash unit with a GN of 200 (in feet) puts out four times the amount of light as one with a GN of about 100. If your accessory flash has a zoom head, which can change coverage to match the focal length setting of your lens, the GN will vary according to the zoom setting, as wider zoom settings spread the same light over a broader area than a telephoto zoom setting.
Hot Shoes
Starting in 1988, Minolta phased in a proprietary hot shoe, the so-called iISO shoe, which was supposedly more rugged and secure than the original ISO 518 shoe, based on a design that dates back to 1913, when it was used to attach viewfinders to a camera (electronic flash hadn’t been invented yet). No other vendors, including Canon and Nikon, embraced Minolta’s design and continued to use the industry-standard shoe. The ISO 518 standard doesn’t specify any electronic connections between camera and flash, other than the “dumb” triggering circuit, so when sophisticated electronic flash units with TTL metering and other capabilities were developed, each vendor created their own hot shoe version with the necessary electrical contacts for their cameras and flash units. The chief consequence for non-Minolta/Sony shooters was that you could mount dedicated flash units from one brand onto the ISO 518 shoe of another vendor’s camera, and trigger that flash in manual, non-TTL mode.
When Sony purchased Konica Minolta’s camera technology it began redesigning legacy features, and the old iISO hot shoe came under scrutiny. In 2012, Sony introduced a 21+3-pin hot shoe which it dubbed the multi interface shoe, which resembles a standard ISO 518 hot shoe with its “dumb” contacts. However, tucked away at the front of the shoe are additional electrical contacts that allow intelligent TTL flash metering communication between the camera and flash, and much more. (See Figure 13.10.) For example, a whole series of stereo microphones from Sony and others, designed to plug into the multi interface shoe, are available. As I noted earlier, you can purchase adapters that allow you to connect older iISO flash to the a6600, or to attach new-model flash units to a camera that has the original iISO hot shoe.
Figure 13.10 The foot of current Sony flash units and other accessories is designed to fit the Sony multi interface shoe.
Cable Connections
In some cases, you can get your external flash off the camera without using a wireless connection by linking an HVL-F60M/RM and a6600 with a physical cable. The gear needed for the hook-up can be costly, so I don’t recommend it, but if you want to go that route, here’s the way to go. Purchase the Sony FA-CS1M multi interface shoe adapter (about $40). It slides into the a6600 camera’s multi interface shoe and has a four-pin TTL socket on the front. Connect that socket to a matching four-pin outlet located on the underside of the HVL-F60M/RM, beneath a protective terminal cap, using a 4.9-foot FA-MC1AM cable ($60). If you need more length, the FA-EC1AM extension cable ($50) adds another 4.9 feet to your connection. The HVL-F43M does not have the four-pin socket and connecting it to a cable requires some additional adapters, so you’re better off not going that way.
While using multiple flash units provides a way to work with illumination that’s not locked into your a6600’s accessory shoe, you don’t need to own more than one flash unit to improve your results. Simply removing your flash from the camera and elevating it higher and off to one side can give you pleasing directional lighting, bounce lighting, and other effects.
I often use a flash connecting cable (available in 1.5- and 3-foot lengths from Vello, Metz, and other vendors) as shown in Figure 3.11. I can hold the camera in my right hand and hold and position the flash with my right hand. Such cables also offer a tripod-style mount on the bottom of the flash mount, so you can secure the off-camera flash to a light stand or tripod. The cable is compatible with the a6600’s TTL metering system. You’ll find such a plug-and-play configuration easier to use than any multi-flash setup. Remove your flash from the camera, re-connect through the cable, and shoot.

Figure 13.11 Using a cable connection for off-camera flash.
HVL-F60M/RM Flash Units
Sony now has two top-of-the-line flash units, the HVL-F60M, which uses optical triggering only, and the HVL-F60RM, which is compatible with both optical and radio control. The F60M version is currently listed at $600, but the price will probably come down a tad now that its $600 radio-friendly sibling has been introduced. Other than optical/radio control, the two units are physically and functionally identical. The F60M model is shown in Figure 13.12. The duo are the most powerful units the company offers, with an ISO 100 guide number (GN) of 60 in meters or 197 in feet at ISO 100. As I noted earlier, the GN does not indicate actual flash range but it’s useful when comparing several flash units in terms of their general power output.
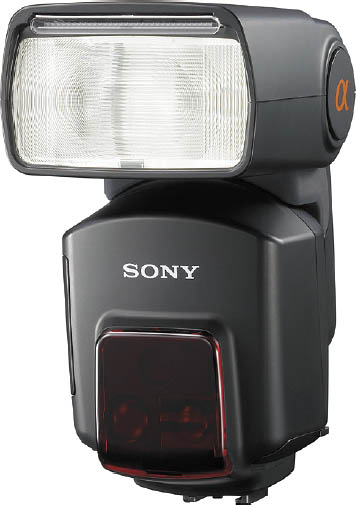
Figure 13.12 The Sony HVL-F60M is the top-of-the-line external flash unit and includes a bonus LED light for video.
Like all Sony multi interface shoe flash units except the HVL-F20M, the F60M/F60RM automatically adjusts the zoom head to vary the angle of coverage to suit the lens focal length in use. You can zoom the head manually instead, if you prefer. A built-in slide-out diffuser panel boosts wide-angle coverage so it’s suitable for photos taken at short focal lengths with the 10-18mm zoom. There’s also a slide-out “bounce card” that can reflect some light forward even when bouncing the flash off the ceiling, to fill in shadows or add a catch light in the eyes of your portrait subjects. This dust- and moisture-resistant 21-ounce unit uses four AA batteries but can also be connected to the older FA-EB1AM external battery adapter, which has room for 6 AA batteries for increased capacity and faster recycling.
You may find the FA-EB1AM available at reduced prices, as it was recently replaced by the FA-EB1 ($250). The new pack is compatible with both the F60M and F60RM units, and capable of accepting either four or eight AA batteries in replaceable magazines, for up to 660 flashes with speedy recycle times of 0.6 seconds. When connected to the flash, it becomes the unit’s primary power source.
ANOTHER GOODIE
Along with the F60RM flash and FA-EB1 battery pack, Sony has introduced the FA-RG1 Multi Interface Shoe Rain Guard, which prevents water from seeping into the electrical contacts of the camera.
Regardless of power source, the F60M/RM automatically communicates white balance information to your camera, allowing the a6600 to adjust WB to match the flash output. It also offers a dedicated video light that can be useful for a bit of extra illumination if the subject is close to the camera. When you point the flash head upward, the trio of LED video illuminator lamps are revealed.
You can use this large unit as a main flash or allow it to be triggered wirelessly by another compatible flash unit. A pre-flash burst of light from the triggering master/controller unit causes a remote flash unit to fire. When using flash wirelessly, Sony recommends rotating the unit so that the flashtube is pointed to the location where light should be directed, while the front (light sensor) of the flash is pointed toward the camera. In wireless mode, you can control up to three groups of flashes, and specify the output levels for each group, giving you an easy way to control the lighting ratios of multiple flash units.
Those who are frustrated by an inability to use a shutter speed faster than 1/160th second will love the High-Speed Sync (HSS) mode that allows for flash at 1/500th to 1/4000th second! (HSS is also available with the HVL-F45RM, HVL-F32M, and the discontinued HVL-F43M, HVL-58AM, and HVL-F36AM.) This is ideal when you want to use a very wide aperture for selective focus with a nearby subject with flash; HSS at a fast shutter speed such as 1/1000th second is one way to avoid overexposure. The Mode button on the back of the flash is used to choose either TTL or Manual flash exposure. You can then use the MENU button and plus/minus keys to activate HSS mode; HSS appears in the unit’s data panel as confirmation of the mode.
Keep in mind that flash output is much lower in High-Speed Sync than in conventional flash photography. That’s because less than the full duration of the flash is used to expose each portion of the image as it is exposed by the slit passing in front of the sensor. As a result, the effective flash (distance) range is much shorter.
In addition, HSS will not work when using multiple flash units or when the flash unit is set for left/right/up bounce flash or when the wide-angle diffuser is being used. (If you’re pointing the flash downward, say, at a close-up subject, HSS can be used.)
This flash unit can provide a simulated modeling light effect at two flashes per second or at a more useful (but more power-consuming) 40 flashes per second for 4 seconds for 160 continuous mini-bursts. In wireless off-camera flash, the HVL-60M/RM can function as the main (on-camera) flash in wireless mode or it can be the remote flash, triggered wirelessly by another compatible flash unit, as discussed earlier.
HVL-F45RM Flash Unit
If you want an on-camera flash capable of triggering external flash units optically and by radio control and are intimidated by the price of the HVL-F60RM, this flash is an affordable ($400) option. It also can be triggered wirelessly by an optical master, by another HVL-F45RM or an HVL-F60RM mounted on the a6600, or by the Sony FA-WRC1M Wireless Radio Commander mounted on the camera. When using radio control, it uses 14 channels to communicate with up to 15 flash units in five groups. It has a guide number of 45/148 (meters/feet) at ISO 100, and a fast 2.5-second recycle time. Its zoom head adjusts for the field of view from 24mm to 105mm (perfect for the a6600’s kit lens) and has an LED video light.
HVL-F43M Flash Unit
This less pricey ($328) electronic flash (shown in Figure 13.13) shares many of the advanced features of the HVL-F60M/RM but has a lower guide number of 43/138 (meters/feet). Features shared with the high-end unit include HSS, automatic white balance adjustment, and automatic zoom with the same coverage of focal lengths and the slide-out diffuser, as well as a built-in bounce card. Its quick-shift function allows you to direct the flash upward or to the side by rotating the head. This unit also can be used in wireless mode as a master/controller or remote/slave, and it also offers the quick-shift bounce feature. The HVL-F43M is a tad lighter (at 12 ounces) than its bigger sibling and runs on four AAs. This flash replaces the similar HVL-F43AM unit, which uses the older iISO hot shoe.
HVL-F36AM Flash Unit
Although discontinued, you can easily find this versatile flash available online or in used condition. It uses the old iISO hot shoe, so you’ll need an adapter. The guide number for this lower-cost Sony flash unit is (surprise!) 36/118 (meters/feet). Although (relatively) compact at 9 ounces, you still get some big-flash features, such as wireless operation, auto zoom, and high-speed sync capabilities. Bounce flash flexibility is reduced a little, with no swiveling from side to side and only a vertical adjustment of up to 90 degrees.
HVL-F32M Flash Unit
The $300 HVL-F32M is Sony’s lowest-cost wireless-compatible electronic flash unit. (See Figure 13.14.) It features a high-speed synchronization mode, wireless control, and automatic white balance compensation. In wireless mode, it can be used only on Channel 1 (as I’ll describe shortly) but can function as both a master/controller and remote/slave. The flash is powered by a pair of AA batteries and it is resistant to both dust and moisture. Those who love to use bounce flash will like the built-in bounce sheet and retractable wide-angle panel that spreads the light to cover the equivalent of a 16mm lens.
HVL-F20M Flash Unit
The least-expensive Sony flash (see Figure 13.15) is the HVL-F20M ($150), designed to appeal to the budget conscious, especially those who need just a bit of a boost for fill flash, or want a small unit (just 3.2 ounces) on their camera. It has a guide number of 20 at ISO 100, and features simplified operation. For example, there’s a switch on the side of the unit providing Indoor and Outdoor settings (the indoor setting tilts the flash upward to provide bounce light; with the outdoor setting, the flash fires directly at your subject). This flash can serve as a master/controller on the a6600 to trigger off-camera flash units wirelessly but cannot be used as a remote/slave flash. There are special modes for wide-angle shooting (use the built-in diffuser to spread the flash’s coverage to that of a lens with a very wide field of view or choose the Tele position to narrow the flash coverage to that of a 50mm or longer lens for illuminating more distant subjects). While it’s handy for fill-flash, owners of a Sony a6600 camera will probably want a more powerful unit as their main electronic flash.

Figure 13.13 The Sony HVL-F43M is a more affordable external flash unit.

Figure 13.14 The Sony HVL-F32M is a more affordable external flash unit.

Figure 13.15 The HVL-F20M flash unit is compact and inexpensive.
You may not use your flash very often, but when you do, you want it to operate properly. The problem with infrequent flash use is that conventional nickel-metal hydride batteries lose their charge over time, so if your flash unit is sitting in your bag for a long time between uses, you may not even be aware that your rechargeable batteries are pooped out. Non-rechargeable alkaline cells are not a solution: they generally provide less power for your flash and replacing them can be costly. The Energizer Lithium Ultimate AA batteries last up to three times longer, but they sell for about $10 for four.
I’ve had excellent luck with a battery developed by Panasonic called eneloop cells. They retain their charge for long periods of time—as much as 75 percent of a full charge over a three-year period (let’s hope you don’t go that long between uses of your flash). They’re not much more expensive than ordinary rechargeables and can be revitalized up to 1,500 times. They’re available in capacities of 1500 mAh to 2500 mAh. I use the economical models with 1900 mAh capacity.
Wireless Flash
Because the Sony a6600 lacks a built-in flash, in order to trigger flash wirelessly, you’ll need to own at least two compatible flash units, such as the HVL-F60M/RM, HVL-45RM, HVL-F43M, HVL-F32M, or HVL-F20M. One flash will be connected to the camera through the multi interface shoe and serves as the master flash or controller.A second (and additional) flash unit can be triggered wirelessly, with full exposure control. It is a limited range (about 16 feet) but a useful unit if you want your primary illumination to come from the off-camera flash, and, perhaps, use a less powerful on-camera flash as the master. In that mode, the HVL-F20M makes a workable controller/master, especially since it is the least-expensive Sony flash unit. But keep in mind that it cannot be used as a remote/slave flash unit.
To use wireless flash with optical triggering just follow these steps (I’ll address radio control later):
- 1. Connect the controller flash unit to the a6600. Slide it all the way into the multi interface shoe so the connection is solid. Lock it in position.
- 2. Position additional flash(es). Sony flash units come with a mini-stand that lets you set the flash on a table or other surface. You can also purchase third-party adapters so the off-camera flash can be mounted on a light stand or tripod. In a pinch, you can press a helper into service to hold your supplementary flash units. The remote units must be able to “see” the master/controller’s pre-flash signal, either directly or by bouncing off another surface in the room.
- 3. Power up flash and camera. Note that when you turn off the camera, the flash turns off as well; you don’t need to manually turn both on or off simultaneously if you want to save power during a shooting session.
- 4. Switch camera and attached master/controller flash to wireless mode. Use the Camera Settings menu’s Flash Mode option or select Flash mode from the Function menu. Select Wireless (WL). Once the camera is set to wireless mode, press the shutter release halfway, and the attached powered-up flash automatically shifts into wireless mode as well.
- 5. Set one or more remote/slave flash unit(s) to wireless mode and choose options. Turn on the unit and follow the instructions supplied with your flash unit to switch to wireless mode, then select either controller (master) mode or remote (slave) mode. Then, choose a group and channel, which I’ll explain in the next section. An alternate way of setting your off-camera flash to remote mode is to mount them on the camera, power up, choose Wireless (WL) from the Camera Settings menu’s Flash Mode entry and press the shutter release halfway to transfer the setting to the flash. You can then remove the flash and a red LED on the flash will start blinking to let you know the flash is ready to use in wireless mode.
- 6. Test your connection. Press your defined AEL button, and the controller will emit a burst, which the remotes will respond to with a flash of their own about half a second later.
Key Wireless Concepts
Here are some key concepts you must understand before jumping into wireless flash photography:
- Controllers. The flash that communicates with and triggers all wireless flash units is called the controller in Sony nomenclature. It’s more common within the photographic industry to use the term master, however, so I tend to use both terms together to avoid confusion. Because the a6600 does not have a built-in flash, wireless communication requires one controller/master to be connected to the camera’s multi interface shoe.
- Remotes. The flash units that are controlled wirelessly are called the remotes by Sony, or slaves. There can only be one controller/master flash, but you can have multiple remote/slave units. All the remotes triggered by a controller/master must use the same channel, but flashes using a particular channel can be divided into one of two remote groups, and their power levels specified by group.
- Channels. Sony’s wireless flash system offers users the ability to determine on which of up to four possible channels (depending on the flash’s capabilities) the units can communicate. (The pilots, ham radio operators, or scanner listeners among you can think of the channels as individual communications frequencies.) The channels are numbered 1, 2, 3, and 4, and each flash must be assigned to one of them. Moreover, in general, each of the flash units you are working with should be assigned to the same channel, because the remote/slave flash units will respond only to a controller/master flash that is on the same channel. Note that the HVL-F20M cannot be used as a remote/slave flash, and when used as a controller/master flash, you must use its sole channel, Channel 1.
The channel ability is important when you’re working around other photographers who are also using the same system. Photojournalists, including sports photographers, will encounter this situation frequently as Sony cameras make in-roads in these pro arenas. Each Sony photographer sets flash units to a different channel so as to not accidentally trigger other users’ strobes. (At big events with more than four photographers using Sony flash, you may need to negotiate.) I use this capability at workshops I conduct where we have two different setups. Photographers working with one setup use a different channel than those using the other setup and can work independently even though we’re at opposite ends of the same large room.
- Groups. Sony’s wireless flash system lets you designate multiple flash units in two separate groups, dubbed RMT (which is selected for all flashes by default) and RMT2 (which must be specified explicitly to change individual flashes from the default RMT group). All the flashes in all the groups use the exact same channel and all respond to the same master controller, but you can set the output levels of each remote/slave group separately. So, flash in RMT might serve as the main light, while those in RMT2 might be adjusted to produce less illumination and serve as a fill light. It’s convenient to be able to adjust the output of all the units within a given group simultaneously. This lets you create different styles of lighting for portraits and other shots.
Note that these two groups consist only of remote flashes. Your on-camera controller/master flash is effectively a third group. If the controller is a low-powered unit like the HVL-F20M, it may not contribute much to the exposure at all (or, perhaps just add a little fill if pointed directly at your subject); a more powerful unit can become a potential third group. You could, for example, point the on-camera flash at a ceiling or wall to provide additional diffuse illumination.
If you’re using only one group, all the flashes in the RMT group are automatically adjusted based on the settings you specify for the controller/master, such as flash exposure bracketing and/or flash exposure compensation.
- Flash ratios. This ability to control the output of one flash (or set of flashes) compared to another flash or set in groups allows you to produce lighting ratios. You can control the power of multiple off-camera flash to adjust each unit’s relative contribution to the image, for more dramatic portraits and other effects. Ratios are available with flash units that use the new CTRL+ protocol (described next).
- Flash protocols. Older Sony flash units, including the HVL-F20M, used a particular protocol to communicate. More recent units, such as the HVL-F60M/RM, HVL-45RM, HVL-F43M (with multi interface shoe), HVL-F58AM, HVL-F32M, and HVL-F32AM/HVL-F43AM (both with the old-style shoe) all have an enhanced protocol for communicating with compatible flash, called CTRL+. They can also revert to the older protocol (CTRL) to be compatible with older flash as well. Because the HVL-F20M uses the original Sony protocol, it cannot be used to adjust flash ratios, as described above.
- Metering. In wireless flash mode, advanced distance integration (ADI) is not used (the distance between the flash and subject can’t be determined by the off-camera flash), and Sony’s P-TTL flash metering is used instead.
Setting Channels and Remote Groups
To specify the channels and remote groups used by each flash in optical mode, you must use the flash unit’s controls and menu system to do so. As an introduction to what’s involved, I’m going to list the procedures for the two most commonly used flash, the HVL-F60M/RM and HVL-F43M. For the HVL-F45RM and other Sony wireless-compatible flash units, consult the manual furnished with your strobe.
Setting the HVL-F60M/RM
To choose the group on the HVL-F60M/RM, just follow these steps:
- 1. Press the Mode button to display the Mode screen.
- 2. Rotate the control wheel or use its directional buttons to highlight WL RMT.
- 3. Press the Fn button and use the control wheel to select the group, either TTL Remote or TTL Remote 2.
- 4. Press the control wheel center button to confirm your changes.
To choose the channel on the HVL-F60M/RM, just follow these steps:
- 1. Press the Menu button. The Menu screen appears.
- 2. On Page 1, select the entry to change. Use the control wheel to highlight the entry you want to adjust.
- 3. Select the wireless channel by highlighting WL CH and pressing the control wheel center button. Then use the control wheel to choose Channel 1, 2, 3, or 4. Press the center button again to confirm your choice.
- 4. You can also adjust the protocol if needed. Highlight the WL CTRL entry and press the control wheel center button. Use the wheel to select CTRL+ if you are using only compatible flash units (HVL-F60M/RM, HVL-F43M, HVL-F32M, HVL-F58AM, HVL-F32AM, or HVL-F43AM) or CTRL if you are using other flash units in your setup. Press the Menu button again to confirm your choice.
Setting the HVL-F43M
To choose the group on the HVL-F43M, just follow these steps:
- 1. Press the Fn button. CTRL or RMT will be blinking.
- 2. Press the right directional arrow on the flash as needed to highlight RMT or RMT2.
- 3. Press Fn to confirm your choice.
To choose the Channel on the HVL-F43M:
- 1. Hold down the Fn button for more than three seconds. The first Camera Setting item (CH01 HSS) is displayed.
- 2. Press the flash’s left/right directional buttons to change to C02: Wireless Channel.
- 3. Press the up/down buttons to select the channel 1, 2, 3, or 4.
- 4. Press the Fn button again to confirm your choice.
- 5. You can also adjust the protocol, if needed. Hold down the Fn button for more than three seconds and use the left/right buttons to select C03: Wireless Controller Mode. You can choose 1 (CTRL, the old protocol) or 2 (CTRL+, the new protocol). Press Fn to confirm your choice.
Setting Ratios
Once you’ve set up one or more flash for the RMT group, and one or more for the RMT2 group, you can adjust the ratio used between them.
Ratios with the HVL-F43M
Just follow these steps when using the HVL-F43M as the controller or remote/slave. Remember that all flashes in all remote groups must be set to the same channel, as described previously:
- 1. The easiest way to set ratios is to mount the controller/master and remote/slave units on the camera in turn. With each flash mounted on the camera set to Wireless Flash as described earlier, press the Mode button on the flash to display WL.
- 2. Press the Fn button, then press the left/right directional buttons until CTRL and RATIO are both blinking.
- 3. Press the Fn button again. The line at upper right will display:
CTRL RMT RMT1
1 : 1 : 1
- 4. Use the left/right directional buttons to move the highlighting to CTRL. When CTRL is highlighted, you can press the up/down buttons to choose the relative power of that flash, compared to the others, from 1, 2, 4, 8, 16, or - - (the latter disables the flash). For example, a setting of 16:1:4 would specify that the flash mounted on the camera has 1/16th the power of the RMT group, while the RMT2 group would have 1/4 the power of the RMT group. Selecting - - disables that flash or group. You might want to do that so that the on-camera flash doesn’t contribute to the exposure, even though it will still fire a pre-flash to trigger the remote/slave units (see Figure 13.16).
- 5. Press the TTL/M button to display TTL.
- 6. Repeat for each flash.
Ratios with the HVL-F60M/RM
Just follow these steps when using the HVL-F60M/RM as the controller or remote/slave. Again, all flashes in all remote groups must be set to the same channel, as described previously:
- 1. You can mount each flash on the camera and set the ratios. Press the Mode button to produce the Mode screen and select WL CTRL.
- 2. Press the Fn button to access the Quick Navi screen and use the control wheel to highlight WL CTRL. Press the control wheel center button to access the dedicated settings screen.

Figure 13.16 Set ratios on the HVL-F43M.
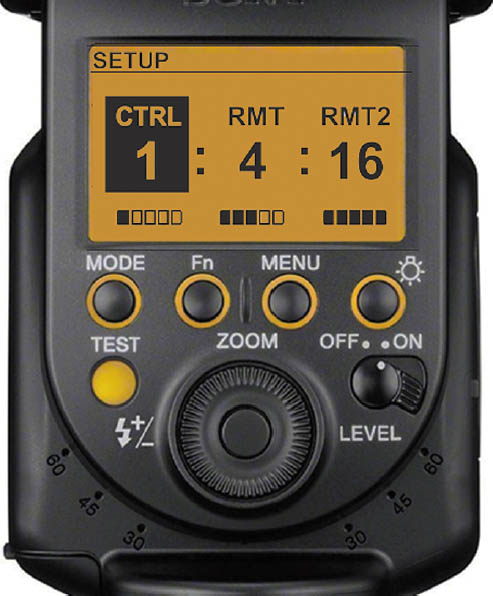
Figure 13.17 Set ratios on the HVL-F60M/RM.
- 3. Use the control wheel to highlight RATIO. Press the center button to access your choices, Ratio: Off (the controller flash does not contribute to the exposure), TTL Ratio, and Manual Ratio. You can highlight TTL Ratio and use the control wheel to choose ON.
- 4. Press the center button to return to the indicator screen.
- 5. Press the Fn button to display the Quick Navi screen and choose the Wireless Lighting Ratio control indicator located at middle left of the screen. Press the control wheel center button, then use the control wheel to change the lighting ratio of each group. Rotate the control wheel to choose the relative power of each flash, compared to the others, from 1, 2, 4, 8, 16, or - -. The - - setting disables that group. (See Figure 13.17.)
- 6. Press the center button when finished.
Radio Control
Your Sony electronic flash communicate with each other using optical control, via the pre-flashes emitted before the actual exposure takes place. That type of linking requires line-of-sight communication between master and remote units and works only over limited distances. Early in 2016 Sony introduced its wireless radio commander/receiver duo, which gives you a much greater range, many more channels to work with, and more control. Unfortunately, Sony’s radio control solution is expensive, making it impractical for all but the most avid (and well-heeled) shooters. I expect it will be more popular among professionals who can justify the expense, and those, such as photojournalists, who need the flexibility of a larger number of channels to avoid conflicts with other photographers covering the same event.
To properly equip yourself, you’ll need:
- Commander. You’ll need one HVL-F60RM flash, HVL-F45RM flash, or FA-WRC1M wireless radio commander ($398) for every camera you want to equip with radio control. The radio-compatible flash or commander reside in the hot shoe of the a6600 and are used to trigger the off-camera electronic flash.
- Flash units. You must have at least one Sony flash from those listed above for the wireless commander to trigger. Ideally, you’ll have several to allow you to configure multi-light setups, so plan on spending $250 to $600 for each remote flash.
- Receivers. As I write this, only the HVL-F60RM and HVL-F45RM can be triggered by radio controls. So, if you’re using any other wireless-compatible (optical only) flash, it must be connected to a FA-WRR1 wireless radio receiver ($200). The flash units are not sensitive to radio controls on their own.
- Light stands or an assistant. The wireless commander generally resides on the multi interface shoe of your camera, so you’ll need light stands to accept each receiver, which has its own hot shoe your flash is attached to. Alternatively, you can enlist the aid of an assistant to hold the receiver/flash in proper position.
- VMC-MM1 Multi Terminal cable (optional). This $28 cable allows you to connect another one of those $200 wireless receivers to a second (or third . . .) camera so the auxiliary cameras fire in unison with the flash and main camera. This very cool feature will appeal to sports and news photographers covering events.
Each commander transmitter can support up to 15 receivers in any combination of flash units and slave cameras, with your choice of 14 different channels (reducing those conflicts at the next presidential convention you cover in 2020). All the devices on a particular channel can be divided up among as many as five different groups, so you could conceivably have a dozen or more flash units spread among all those groups to provide very sophisticated lighting effects, over a range of more than 98 feet (30 meters).
But wait! There’s more. The HVL-F60RM, HVL-F45RM, and FA-WRC1M wireless radio commanders give you Manual, TTL, and Group control of flashes, and power adjustment from full power (1/1) to 1/256th power in 1/3-stop increments. The 3.3-ounce commander and 3-ounce receiver each run on two AA batteries. While I don’t expect to see many a6600 owners springing for this system, it’s nice for ambitious photographers to know that these capabilities are there for them to grow into. Eventually, Sony will introduce additional radio-capable flash units and commanders, probably at more affordable prices.