16 |
The EOS R5 and R6 are awesome video machines, although the upscale R5 has some extra features that will be especially prized by professional videographers. The R5 can shoot 8K DCI video at up to 30 frames per second using the DCI (Digital Cinema Initiatives) specification, while the R6 can “only” capture video at up to 4K UHD at no more than 60 fps.
The R5’s capabilities become more impressive when you know that DCI is a consortium of the major motion-picture studios, including Metro-Goldwyn-Mayer, Paramount Pictures, Sony Pictures Entertainment, 20th Century Fox, Universal Studios, The Walt Disney Company, and Warner Brothers. The DCI specification and 8K compatibility, coupled with the R5’s support for RAW video, means that the R5 can be decked out as a professional video camera in every sense of the word. Since 8K video produces a heck of a lot of data, you can see why the R5 was endowed with its super-fast CFexpress card slot.
Not that the R6 is a slacker. Like its sibling, it has headphone and microphone jacks, focus peaking and zebra exposure indicators, and can capture both Canon Log (C-log) or HDR PQ video with view assist for both (so you can playback high-dynamic range clips on the camera or an HDMI monitor).
Although videography merits a book of its own, I hope to provide you with a good introduction to your camera’s movie-making prowess in this chapter and the next.
Getting Started
Shooting movies on the spur of the moment is easy, even if you are currently in any still shooting mode. With both the R5 and R6, all you need to do is press the Movie button (located on top of the camera to the southwest of the shutter release and marked with a red dot). To stop shooting, press the button again. That’s all there is to it.
If Scene Intelligent Auto is selected as your movie mode, the camera tries to detect what type of scene is being captured and displays an icon representing the selected scene in the upper-left corner of the display. There are many possible icons. Scene selection takes into account background (bright, bright/backlit, blue sky, blue sky/backlit, sunset, spotlight, and dark), as well as subject (people, people in motion, nature/outdoors, in motion, and close-up). The camera can also detect when the camera is mounted on a tripod and activate scene modes with longer shutter speeds to help brighten the background.
While Scene Intelligent Auto is fine for casual use, if you need the most flexibility and full control over your settings, you’ll want to switch to one of the “official” movie modes. The R5 and R6 switch to movie mode and begin shooting in one of two ways.
R6 Video in a Nutshell
Here’s what you need to get started shooting video with your EOS R6.
- 1. Enter movie mode. Rotate the Mode Dial to the Movie position.
- 2. Access the Movie Shooting 1 menu. The R6 changes the movie mode using the Shooting Mode entry in the R6 version of this menu. (See Figure 16.1, left.) It’s the first entry. Press SET and the screen shown in Figure 16.1, right, appears.
- 3. Choose exposure method. By default, Movie Auto Exposure is selected. If you’d rather use Manual exposure, rotate any of the dials or use the Multi-controller to highlight Movie Manual Exposure and press SET. You’ll only need to return here when you want to change exposure mode. Note: You can also choose exposure mode using the Q button when the Mode Dial is in the movie position.
- 4. Focus on your subject. You’ll want to focus, either manually, or using autofocus. By default, Movie Servo AF is active. Press the shutter button halfway to focus using the current AF method.
- 5. Start/Stop recording. Press the Movie Shooting button or tap the red dot in the upper-right corner of the screen. (See Figure 16.2.) Stop recording by pressing the button or tapping the dot again.
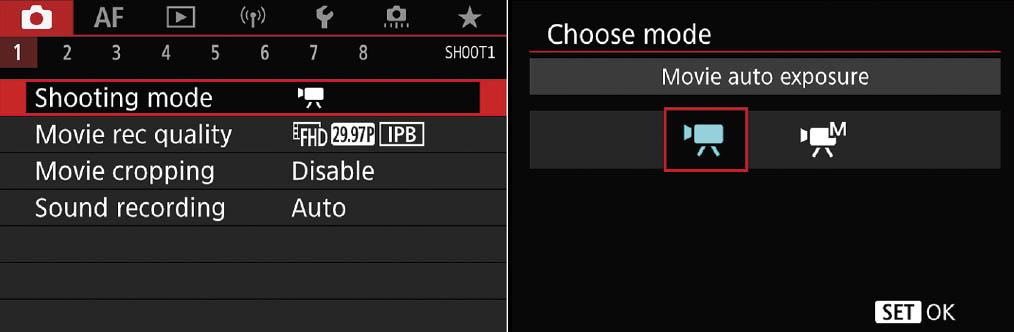
Figure 16.1 Choosing Movie shooting modes.

Figure 16.2 The Movie shooting screen with information displayed.
R5 Video Overview
Your R5 does not have a Mode Dial like the R6. By this time, you’ve learned how to use the camera’s MODE button and displays to switch among available modes. Just follow these steps:
- 1. Press the MODE button. You’ll need to press the MODE button to produce the selection screen that displays your options.
- 2. Switch to Movie mode. If you’re in still shooting mode, you’ll need to press the INFO button to toggle into Movie mode. The array of choices is shown in Figure 16.3. In the top row, from left to right they are Scene Intelligent Auto (A+), Program AE, Shutter-priority, Aperture-priority, and Manual Exposure.

Figure 16.3 Movie shooting modes for the R5.
- 3. Adjust exposure. In Scene Intelligent Auto and Program AE mode, the camera will adjust exposure for you. If you select Tv or Av mode, you can specify shutter speed or aperture, respectively. In M mode, you can select both. In the bottom row are the three Custom shooting movie modes, C1, C2, and C3.
- 4. Focus on your subject. You’ll want to focus, either manually or using autofocus. By default, Movie Servo AF is active. Press the shutter button halfway to focus using the current AF method.
- 5. Return. Use the Return arrow to confirm and exit.
- 6. Start/Stop recording. Press the Movie Shooting button or tap the red dot in the upper-right corner of the screen (shown earlier in Figure 16.2). Stop recording by pressing the button or tapping the dot again. As with still photo screens, you can press the INFO button to change the type and amount of information displayed.
Movie Shooting Menus
In Still photography mode, the R6 has a ninth Photo Shooting menu. I did not describe it, because its settings are available in the full Movie Shooting menus when the R6 is in Movie mode. In that mode, a revised set of eight Movie Shooting menus appear on both the R6 and R5. (In Scene Intelligent Auto mode, there are only two, with a subset of the features I’ll describe next.)
Some of the entries in the Movie Shooting menus have exact counterparts for those available for still shooting. As they were explained in detail in Chapter 11, I won’t repeat that information here. Those duplicate entries that I don’t address in this chapter are marked with an asterisk in the list below. The rest are new or different, and I’ll explain them in more detail later in this chapter.
Here are the options found in the Movie Shooting menus:
Movie Shooting 1
- Shooting Mode (R6 only)
- Movie Recording Quality
- Movie Cropping
- Sound Recording
Movie Shooting 2
- Exposure Compensation *
- Movie ISO Speed Settings
- HDR PQ Settings *
- Auto Lighting Optimizer *
- Highlight Tone Priority *
- Av 1/8-stop Increments
- Movie Auto Slow Shutter
Movie Shooting 3
- White Balance *
- Custom White Balance *
- WB Correction *
- Picture Style *
- Canon Log Settings
- Clarity *
Movie Shooting 4
- Lens Aberration Correction *
- High ISO Speed Noise Reduction *
Movie Shooting 5
- HDR Movie Recording
- Time-lapse Movie
Movie Shooting 6
- Movie Self-timer
- Remote Control
Movie Shooting 7
- IS (Image Stabilizer Mode)
- Shutter Button Function for Movies
- Metering Timer *
- Zebra Settings
- Shooting Information Display
- VF Display Format
Movie Shooting 8
- Overhead Control
- HDMI Display
- Time Code
Shooting Mode (R6 only)
Options: Movie Autoexposure (default), Movie Manual Exposure
This is the first entry in the R6’s version of the Movie Shooting 1 menu, shown earlier at left in Figure 16.1 You have just two options, Movie Autoexposure and Movie Manual Exposure.
Movie Recording Quality
Options: Movie Recording Size, High Frame Rate
Your camera has a large number of video recording quality settings, including ultra-high-resolution 4K video, and, with the R5, 8K video as well. (See Figure 16.4.) I’ll explain the use of these settings in more detail later in this chapter, but, in brief, your choices include the following.
- Movie recording size. This is the resolution of the movie: 8K (R5 only), 4K, and Full HD. The actual resolution and movie area varies, depending on recording quality and movie crop settings. The R5 uses 8K-D/4K-D and 8K-U/4K-U designations to differentiate between cinema and television aspect ratios (proportions). (Discussed under “8K/4K Split Personalities” in the next section.)
Note: When you scroll down the quality modes with the R5, you can enable 4K HQ (High Quality) mode, which brings up additional modes: 4K-D Fine and 4K-U Fine, with 29.97P, 24.00P, and 23.98P frame rates and All-I, IPB, and IPB Lite compression options.
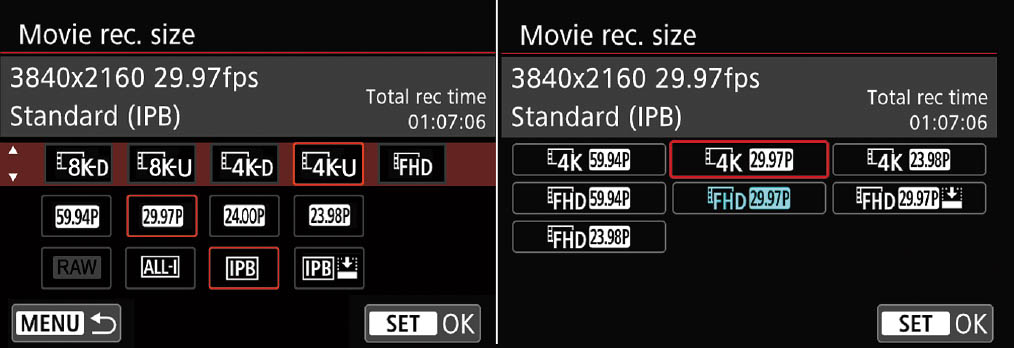
Figure 16.4 Movie Recording Quality settings; R5 (left) and R6 (right).
- High Frame Rate. The number of individual frames or fields captured per second. These are commonly expressed as 120 fps, 60 fps, 30 fps, and 24 fps (in NTSC mode, used in North American, Japan, and other countries); frame rates (100 fps, 50 fps, and 25 fps) are different in Europe and other areas using the PAL specification. Note that the actual frames-per-second is a fraction less than the nominal value, as I’ll explain below.
Note: When you scroll to enable High Frame Rate movies, your video is captured at 119.9P (NTSC) or 100.0P (PAL), but is played back at 29.97/25.00 fps speeds, resulting in 4X slow motion (one second of action takes four seconds to play back.) However, if you output your video from the camera through the HDMI port, it will be displayed in 2X slow-motion format, instead. High Frame Rate movies are recorded with ALL-I compression in both 4K and Full HD formats with the R5, and IPB compression in Full HD only with the R6.
Sound is not recorded, and clips are limited to 7 minutes, 29 seconds. Time codes are not recorded when Count Up is set to Free Run (as described later). Flickering may be noticeable under fluorescent or LED light sources.
- Compression Method. To save space and reduce demands on the transmission rates of the captured frames to your storage device, each frame is compressed, using either ALL-I or IPB formats. The R5 uses both All-I and IPB, while the R6 uses only IPB. “IPB Lite” versions using lower bit-rate capture are available for both the R5 and R6, and are represented by an icon with a downward pointing arrow like the one shown at far right in the bottom row of Figure 16.4, left, and the far right middle of Figure 16.4, right. I’ll explain these in more detail later.
All movies, except for RAW (R5 only) are stored using the MP4 format as the “container” for your video files, with the MPEG4 AVC/H.264 codec (coder/decoder). MP4 is an international standard and widely supported/used and recorded using progressive scan, described shortly. MP4 files receive the .MP4 extension, while RAW files captured by the R5 are represented by a .CRM extension. R5 owners can choose RAW+MP4 to record in both formats.
Movie Cropping
Options: Disable (default), Enable
The actual area of the sensor’s full image size that is captured is always cropped to a certain extent when shooting movies. Because the FHD, 4K, and 8K aspect ratios are 16:9 rather than the 3:2 ratio used for still photography, a certain amount is cropped off the top and bottom of your frame. The remaining area may be further cropped depending on your movie mode and the lenses you are using. This setting gives you some control over the image crop used. The croppings used for the R5 and R6 vary, so I’ll explain them after I first provide an overview of what Movie Cropping does.
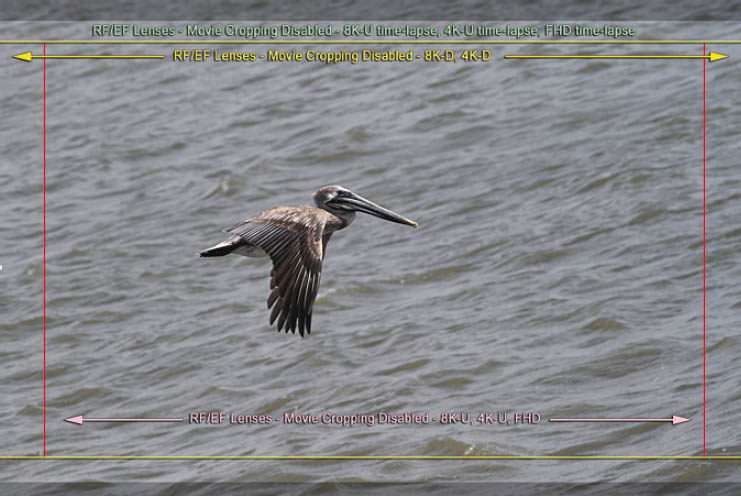
Figure 16.5 Video image areas for the R5 with Movie Cropping disabled.
- Movie Cropping: Disable. This mode is suitable for use with RF-mount and EF-mount lenses attached using an adapter (typical full-frame lenses). The image areas for the R5 with Movie Cropping disabled are shown in Figure 16.5 and are represented by green, yellow, and red lines. The image areas for the R6 with Movie Cropping disabled are shown in Figure 16.6 and are represented by green and yellow lines.
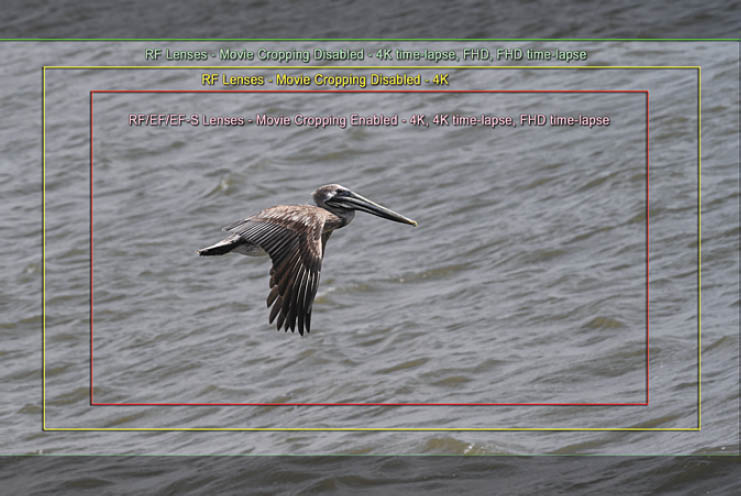
Figure 16.6 Video image areas for the R6 with Movie Cropping disabled (green and yellow lines) and enabled (red box).
- Movie Cropping: Enable. With this setting, your video is always cropped, and the resulting image area corresponds to that of Canon APS-C lenses with the EF-S designation. The image areas for the R5 with Movie Cropping enabled are shown in Figure 16.7, and are represented by green, yellow, and red lines. The image area for the R6 with cropping enabled was shown earlier in Figure 16.6, delineated by the red lines.
Note: High Frame Rate movies cannot be captured with the R5 or R6 when using EF-S lenses or when Movie Cropping is set to Enable. An additional slight crop is applied when using Movie Digital IS. If you’re working with the R5, 8K and 4K movies cannot be captured when EF-S lenses are mounted on the camera.
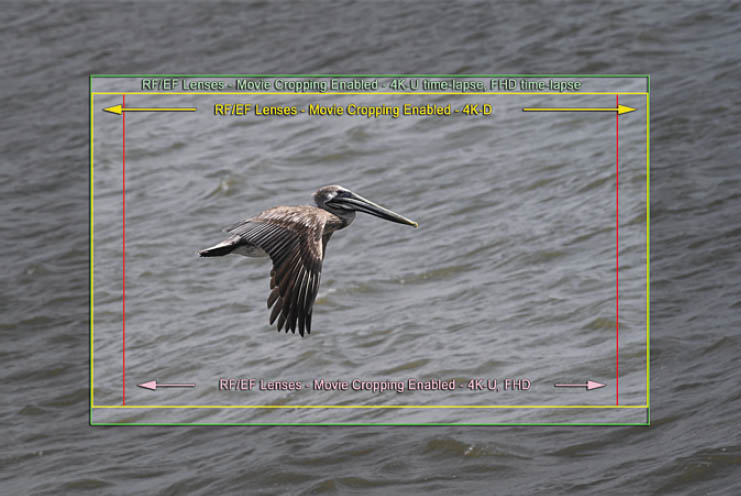
Figure 16.7 Video image areas for the R5 with Movie Cropping enabled.
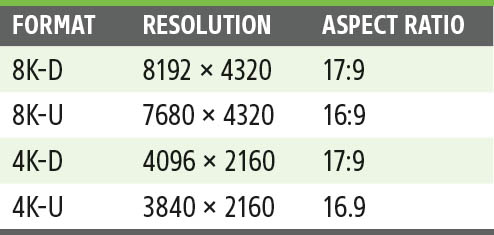
8K/4K Split Personalities (R5 Only)
Welcome to the confusing world of ultra-high-definition video—and beyond. Just when you may have become comfortable with 4K video (most new televisions are compatible with it), Canon’s video-adept EOS R5 takes you one step beyond, to a world where both 4K and its 8K (four times the resolution) counterpart come with two different resolutions and aspect ratios.
Canon labels these by appending a D (for the Cinema DCI standard used for digital motion pictures) or U (for the UHD standard used for television display). The variations use the same number of rows of pixels as their counterparts (height on the screen), but a different width. The red vertical lines in Figures 16.5 and 16.7 illustrate how much less “wide” the 8K/4K-U formats are. Table 16.1 shows you the difference.
Sound Recording
Options: Sound Recording: Auto (default), Manual, Disable; Wind Filter: Auto (default), Disable; Attenuator: Disable (default), Enable
This setting lets you choose Auto, Manual, or Disable; plus, Enable or Disable the wind filter and attenuator. In Movie Scene Intelligent Auto (A+) mode, only On (Auto level) or Off are available. Left/right balance cannot be adjusted. (See Figure 16.8.)
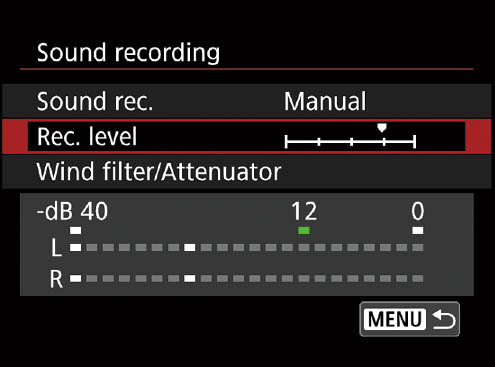
Figure 16.8 Sound recording options.
- Auto. Audio level is set for you.
- Manual. Choose from 64 different sound levels. Select Rec Level and rotate the QCD-1 while viewing the decibel meter at the bottom of the screen to choose a level that averages –12 dB for the loudest sounds. (See Figure 16.8.) If the recording level reaches the 0 point at the far right of the scale, your sound will be quite distorted.
- Disable. Shoot silently, and add voice over, narration, music, or other sound later in your movie-editing software. Note that if you are connected to an external device, including recorders using HDMI, sound is not output when sound recording is disabled in the camera.
- Wind Filter/Attenuator. Enable to reduce the effects of wind noise on the built-in microphone. This also reduces low tones in the sound recording. If wind is not a problem, you’ll get better quality audio with this option disabled. Even better is to use an external microphone with a wind shield. The Attenuator suppresses distortion caused by loud noises, which can affect audio even when Auto sound level is in use.
You can use the built-in stereo microphone or plug in a stereo microphone into the 3.5mm jack on the left side of the camera. An external microphone is a good idea because the built-in microphone can easily pick up camera operation, such as the autofocus motor in a lens. Headphones are useful for monitoring sound. Press the Q button, select Headphone, and rotate the Main Dial to adjust headphone volume.
Movie ISO Speed Settings
Options: ISO Speed, ISO Speed Range, Max for Auto, Time-lapse Max for Auto
This is the first movie-specific entry in the Movie Shooting 2 menu. (See Figure 16.9.) (The first entry, Exposure Compensation, as well as several others in this menu, function the same as in Still photo mode and are not covered in this chapter.) You can separately specify ISO parameters for movie shooting using this entry. Select a specific ISO speed or specify limits on the range of ISO settings and shutter speeds that the camera selects automatically. The subentries, shown in Figure 16.10, include:
- ISO Speed. In Movie Auto mode (R6) or in Movie Scene Intelligent Auto (A+), P, Av, and Tv modes (R5) ISO is set automatically in the range of ISO 100–25,600. Specific ISO speeds can only be set if the R5 or R6 is using the Movie Manual exposure method, as described at the beginning of this chapter.
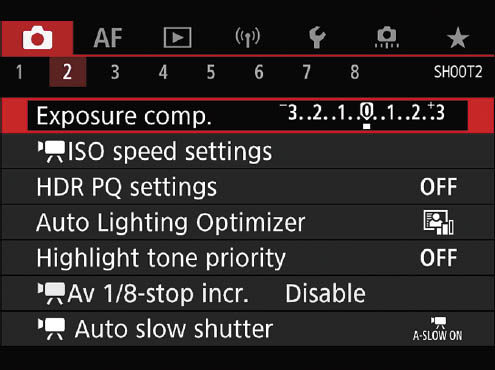
Figure 16.9 The Movie Shooting 2 menu.
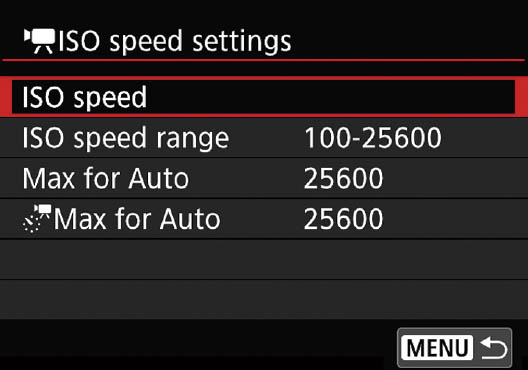
Figure 16.10 Movie ISO Speed Settings.
In Movie M (Manual exposure) mode, you can select a specific ISO speed from ISO 100 to 25,600. However, you can expand the manual setting range to ISO 51,200 (R5) or ISO 204,800 (R6) using the ISO Speed Range setting described next. Oddly enough, Manual exposure mode also has an Auto setting. The latter effectively gives you an autoexposure mode when using manual exposure: you select the shutter speed and aperture manually, and the camera adjusts the ISO to produce the right exposure.
- ISO Speed Range. You can specify an ISO range for both minimum available settings and the maximum available settings.
- • Minimum. You can set the minimum sensitivity from ISO 100 to ISO 12,800. The high end remains at 12,800 even if Highlight Tone Priority (found in both the Movie and Still Shooting 2 menus) is set for an expanded range.
Note: The minimum speed is set to ISO 400 for Auto exposure when Canon Log is enabled. The ISO 100 and ISO 200 settings can still be specified manually, but they are labeled as expanded L settings, indicating that some quality loss should be expected.
- • Maximum. You can specify a maximum available ISO of up to ISO 51,200 (R5) or ISO 204,800 (R6). The Highlight Tone Priority setting has no effect on this.
I find myself using this feature frequently to keep me from accidentally switching to a setting I’d rather (or need to) avoid. For example, at concerts I may switch from ISO 1600 to 6400 as the lighting changes, and I set those two values as my minimum or maximum. Outdoors in daylight, I might prefer to lock out ISO values lower than ISO 100 or higher than ISO 800.
- Max for Auto. This is the equivalent “safety net” for Auto ISO operation for a maximum setting.
- Time-lapse Max for Auto. Set the maximum ISO for 4K/Full HD time-lapse movie shooting in Program, Tv, Av, or Manual exposure mode and ISO Auto. The default maximum is 12,800, but you can specify another value between ISO 400 and 25,600.
Av 1/8-stop Increments
Options: Disable (default), Enable
This is the next movie-oriented entry shown earlier in Figure 16.9. RF-mount lenses have apertures that can be controlled much more precisely than those found in EF/EF-S lenses, and Canon takes advantage of that by offering the ability to adjust f/stops in increments of 1/8th stop. While such fine increments are not essential for still photography, when movie shooting it’s important to have consistent exposure, especially with sequences of shots. This feature is available only in the two Movie exposure modes in which you have full control over the aperture—Av and M modes. Choose Enable to allow selection in 1/8th stop increments rather than the 1/2- or 1/3-stop jumps you may have set in the Custom Functions 1’s Exposure Level Increments entry. This feature does not work with EF or EF-S lenses.
Movie Auto Slow Shutter
Options: Auto Slow On (default), Auto Slow Off
Use this setting to allow the camera to select a slower shutter speed no faster than 1/30th second when shooting with Program or Av (Aperture-priority) at a frame rate of 60p. (I’ll provide more detail on how choice of frame rates affects your movies later in this chapter.) You can select Enable or Disable. Here’s the difference:
- Disable. Frame rates of 1/60th second or faster will be chosen in Program and Av exposure modes when shooting 60p video. The video will be smoother and more natural looking, and individual frames will be sharper because of this “higher” shutter speed. However, under low light, your video may appear to be underexposed.
- Enable. Shutter speeds of 1/30th second or slower are enabled, producing better-exposed movies that may have less noise (because a lower ISO setting may be used). However, moving subjects may be blurry or leave a visible “trail” caused by the longer exposure.
Canon Log Settings
Options: Canon Log, View Assist, Color Matrix, Characteristics, Color Space
This is the only Movie Shooting–specific entry in the Movie Shooting 3 menu, which is not illustrated with a figure for that reason. Canon Log, or C-log is a type of gamma adjustment, which allows capturing as much useful tonal information as possible, thanks to the non-linear way in which humans perceive light and color. In plain English, C-log allows the camera to squeeze as much of the original scene’s dynamic range as possible into a video file with as many as 10 bits of information. It produces a “flat”-looking, low-contrast image that looks horrible when viewed before it’s post-processed in a suitable professional video-editing program, such as DaVinci Resolve, Adobe Premiere Pro, or Apple Final Cut Pro. It’s then processed during editing to create a rich, full-range video.
Theoretically, the basic Canon Log profile allows an increased tonal (dynamic) range of about 800 percent, or 12 f/stops at sensitivity settings of ISO 400 or above. (The ISO boost is needed to allow the Dual Pixel CMOS sensor to capture the extra detail in the highlights and shadows.) Canon has added a “View Assist” function available from the HDMI entry in the Setup menu that allows you to view a “corrected” version in the camera before actual processing (called grading) has taken place. Log profiles space the data captured more equally among the number of stops of exposure captured, using a predetermined number of stops, with colors desaturated (“flatter”-looking) to eliminate over-saturated parts of the scene that would interfere with corrective grading.
The technology underlying Canon Log is beyond the scope of this book, which emphasizes camera features over software processing, but videographers who perform post-processing grading will appreciate the ability to use a system of 10 “look-up tables” (called LUTs in video parlance) that substitute appropriate values to correct the recorded image’s gamma and color space for viewing on an external monitor. Canon provides useful LUT data on their website for downloading.
You should know that Canon upped the ante with its 1.3.0/1.3.1 firmware updates (and any later updates offered after this book went to press). A new Canon Log 3 profile was added with additional advantages over the original basic Canon Log profile. C-Log3 doubles the base ISO rating to 800, which effectively tells the camera to use one stop less exposure to capture a greater number of highlights. C-Log3 does a better job of not clipping black values, producing better results in shadows during grading. Compared to Canon Log, C-Log3 offers a bit more dynamic range, improved shadows, and is more compatible with the look-up tables used with Canon’s Cinema EOS models.
To capture movies with Canon Log, follow these steps:
- 1. Use Manual exposure. Change the Movie Shooting mode to Manual exposure.
- 2. Navigate to Canon Log Settings. In the Movie Shooting 3 menu, access the Canon Log Settings entry.
- 3. Select Canon Log (shown in Figure 16.11) and choose: Canon Log: On—C.LOG/C.LOG3. Use either C-Log or C-Log3 when recording 10-bit video to the internal memory card or to an external recorder. As I mentioned, C-Log3 was added with the Firmware 1.3.0/1.3.1 update and provides that longer dynamic range. In either case, the output will be at the recording quality specified in the Movie Shooting 1 menu. R5 owners can capture RAW or RAW (Light) video using C-Log3, too. Output will be “clean” uncompressed YCbCr 4:2:2 video using the BT709/BT2020 color space. I’ll explain these later on. To disable Canon Log recording, choose Off.
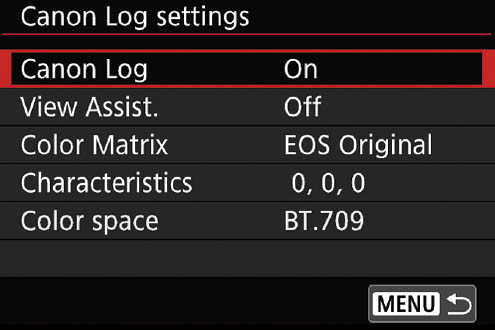
Figure 16.11 Canon Log options.
- 4. Optionally, set View Assist. Your C-Log video saved to your memory card will appear darker and lower in contrast when viewed on the camera’s LCD screen. Turning View Assist On provides a clearer display, although it does not affect the video files themselves. It is not used during playback.
- 5. Set Color Matrix. Advanced videographers may want to specify how colors are reproduced, using the Cinema EOS Original rendition colors created by Canon’s professional video cameras. The Neutral setting mimics the colors provided by the neutral setting of Canon’s pro video cameras.
- 6. Adjust Characteristics. Think of these characteristics as additional Picture Controls for Canon Log video. You can specify Sharpness, Strength, Saturation, or Hue using familiar Picture Control–style sliders.
- 7. HDMI Color Space. Choose BT.709 or BT.2020 as your color space for HDMI output. These are definitions defined by ITU-R (International Telecommunication Union Radio Communication Sector, if you’re an acronym junkie) to define characteristics of high-definition television signals, including resolution, frame rates, bit depth, and various color specifications. If you need to choose between them, you’ll already know why and don’t need further instruction from me.
- 8. Choose ISO speed, shutter speed, and aperture.
- 9. Record your video, storing on the internal memory card or an external video recorder.
HDR Movie Recording
Options: Disable (default), Enable
As none of the entries in the Movie Shooting 4 menu are movie-specific, we continue our discussion with this option, the first in the Movie Shooting 5 menu. (See Figure 16.12.)
This setting simply turns HDR movie recording on or off. There are no additional settings to make. I’ll discuss HDR movie making later in this chapter, but the important things to note here are the other settings that preclude HDR shooting. Highlight Tone Priority, Canon Log, Movie Digital IS, and Movie Cropping must be disabled. Movie recording quality is fixed at FHD 29.97P IPB. You’ll find more HDR movie information near the end of this chapter.
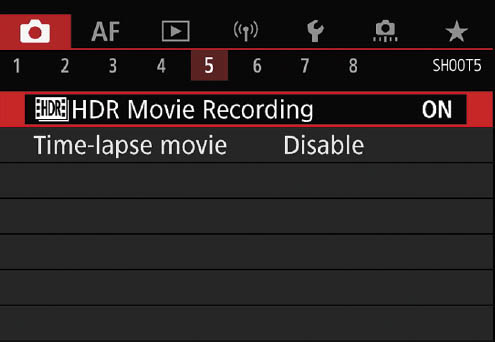
Figure 16.12 The Movie Shooting 5 menu.
Time-lapse Movie
Options: Time-lapse: Disable (default), Enable; Interval, Number of shots, Movie Recording Size, Auto Exposure, Screen Auto Off, Beep As Image Taken
Time-lapse photography isn’t just for nature photographers who want to show the miracle of a flower bud gradually opening to its full blossoming glory. Time-lapse has hit the mainstream, and an amazing number of movies and television shows use it to represent the passage of time, whether it’s the march of the sun across the sky in the daytime or the changing seasons. Canon has placed this technique within your grasp, as well.
I explained the process in some detail in Chapter 6, and won’t repeat that information here. I’ll give you just a quick recap of the key settings, the first five of which are shown in Figure 16.13.

Figure 16.13 Time-lapse options.
- Time-lapse. Choose Enable to begin setup, or Disable to deactivate the option.
- Interval. You can choose the interval between shots, up to 99 hours, 59 minutes, and 59 seconds.
- Number of shots. Enter the number of shots you want in the sequence, from 2 up to 3,600. The expected elapsed time for the entire sequence will be shown near the bottom of the screen. If the playback time is displayed in red, that means the memory card doesn’t have enough space, or, if the card is not formatted in exFAT, your settings will result in a file size greater than 4GB. (Don’t worry; all SDXC and CFexpress cards are automatically formatted in the camera in exFAT. Only SDHC and cards not formatted in the camera are susceptible.) Recording will stop when the card is full or the maximum file size is reached.
- Movie Recording Size. You can choose 4K 29.97P (NTSC)/4K 25.00P (PAL), or FHD 29.97P/25.00P (NTSC/PAL, respectively). The R5 will also let you choose 8K 29.97P/25.00P (NTSC/PAL, respectively). ALL-I compression is used in all cases.
- Auto Exposure. You can choose:
- • Fixed 1st Frame. Metering takes place and the exposure is set for the first frame and used for all subsequent frames. You’d use this setting when you want the exposure to remain constant, even if lighting changes.
- • Each Frame. Metering is performed for each shot in the sequence. A time-lapse movie of a city skyline from dawn to dusk will reflect the correct exposure for each stage of the day.
- Screen Auto Off. You’ll need to scroll down to see this entry and the next. Here you can Disable automatic dismissal (the screen will turn off after about 30 minutes), or choose Enable to turn off the screen 10 seconds after shooting begins and you’ve had time to check your framing and exposure.
- Beeper. Enable or disable the Beep As Image Taken feedback feature (the electronic shutter used is silent).
Movie Self-timer
Options: Off (default), 10 seconds, 2 seconds
This is the first entry in the Movie Shooting 6 menu. (See Figure 16.14.) This is a handy feature that delays the beginning of movie capture for either 10 or 2 seconds. It gives you time to get in front of the camera yourself (choose 10 seconds if you need to comb your hair; 2 seconds if you’re ready to go or don’t care). If you don’t have a remote release, this setting also can be used to let the camera settle down after you’ve stabbed the Movie button with your index finger. (Tip: don’t stab!)
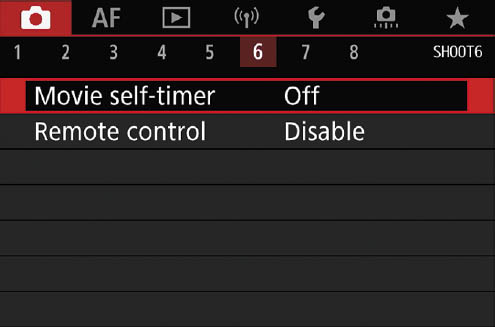
Figure 16.14 The Movie Shooting 6 menu.
Vloggers could also use this feature for an impromptu session, but probably wouldn’t need it, as those serious enough to use an R5 or R6 (instead of a smartphone) probably also are adept at using editing tools to snip out the offending rush to make the scene.
Remote Control
Options: Disable (default), Enable
You’ll need to enable your camera to use a remote control to start/stop movie making. Both the R5 and R6 are compatible with the Remote Controller RC-6 and Wireless Remote Control BR-E1. The R5 can use the wired Remote Switch RS-80N3/TC-80N3, while the counterpart for the R6 is the Remote Switch RS-60E3. Consult the manual that came with your remote to learn each device’s options.
IS (Image Stabilizer Mode)
Options: Off (default), On, Enhanced
This is the first entry in the Movie Shooting 7 menu. (See Figure 16.15.) Although your camera relies on the image stabilization built into some RF- and EF/EF-S-mount lenses, it can supplement this optical image stabilization (OIS) with an electronic version called Movie Digital IS that can be activated when shooting video.
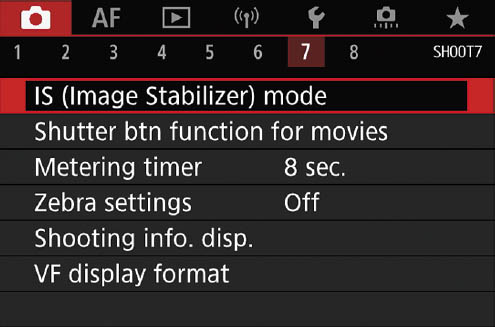
Figure 16.15 The Movie Shooting 7 menu.
Digital image stabilization takes advantage of the fact that cropped video frames contain some image information outside the boundaries of the actual frame displayed. The camera is able to monitor movement and compensate for it by shifting the pixels of the entire frame slightly so that subject matter that is not moving remains in the same relative position in the frame. That is, if the camera image shakes a few pixels to the left, the frame area is moved an equivalent amount the same number of pixels to the right. Because some pixels at the edges of the frame must be trimmed to compensate for this adjustment, the resulting movie is slightly cropped, adding a small amount of magnification. If you’re using EF-S lenses, or have selected the Movie Cropping feature, additional cropping/magnification is applied.
You must use this feature in conjunction with the built-in optical image stabilization of your lenses that have stabilization (it won’t work if your lens has IS and it is turned off). Canon provides a list of lenses that are compatible with what it terms “combination IS” (when both digital and optical image stabilization are combined). Movie IS does not work with lenses with a focal length greater than 800mm and is not recommended with tilt/shift (TS-E), fisheye, or third-party lenses. Your options are as follows:
- Off. No digital IS is applied. Use this setting when the camera is mounted on a tripod.
- On. A great deal of camera shake will be corrected; the image will be slightly cropped, producing a slight magnification effect. This setting works best with wide-angle lenses.
- Enhanced. Even more pronounced camera shake is compensated for, and the image will be magnified a bit more. Use this as a last result, as there may be a noticeable blurring of the image while viewing and an increase in visual noise.
Shutter Button Function for Movies
Options: Half-press: Metering+Movie Servo AF (default), Metering+One-Shot AF, Metering Only; Fully-press: No Function (default), Start/Stop Movie Recording
This entry allows you to define a function for the shutter button during movie shooting, overriding any setting you may have specified using the Custom Functions 3 menu’s Customize Buttons options. Separate behaviors can be set for a half-press and full press of the button.
- Half-press. You can choose:
- • Metering plus Movie Servo AF. Use this default setting to initiate metering and autofocus using the shutter button when you want the camera to continually track and refocus on a moving subject.
- • Metering plus One-Shot AF. Constant refocusing may be distracting, especially in static shots in which only the camera moves. If you’d prefer that focus remain on your initial subject, use this entry to start metering and AF using the shutter release button.
- • Metering Only. Choose this option when you want to use the shutter button solely to initiate metering.
- Fully-press. You can choose:
- • Start/Stop Movie Recording. This definition allows you to use a full press of the shutter release to start/stop movie recording. You may find it convenient to use the same button to trigger both still photos and movies. Since it’s not possible to shoot stills while shooting movies, assigning the movie function to the shutter release is a viable option. (You can, however, extract single frames from your videos if you need a still.)
- • No function. With this default setting, a full press has no function.
Zebra Settings
Options: Zebra Off (default), On; Zebra pattern (Zebra 1, Zebra 2, Zebra 1+2); Zebra 1 Level (5–95 percent), Zebra 2 Level (50–100 percent)
This feature warns you when highlight levels in your image are brighter than a setting you specify in this menu option. It’s somewhat comparable to the flashing “blinkies” that digital cameras have long used during image review to tell us, after the fact, which highlight areas of the image we just took are blown out.
Zebra patterns are a much more useful tool because you are given an alert before you take the picture and can specify exactly how bright too bright is. The Zebra feature has been a staple of professional video shooting for a long time, as you might guess from the moniker assigned to the unit used to specify brightness: IRE, a measure of video signal level, which stands for Institute of Radio Engineers.
When you want to use Zebra pattern warnings, access this menu entry, choose your pattern, and specify an IRE brightness value from 5 to 100 (depending on pattern selected). Once you see the results on your display, you can adjust your exposure settings to reduce the brightness of the highlights, as described in Chapter 4.
So, exactly how bright is too bright? A value of 100 IRE indicates pure white, so any Zebra pattern visible when using this setting indicates that your image is extremely overexposed. Any details in the highlights are gone and cannot be retrieved. Settings from 70 to 90 can be used to make sure facial tones are not overexposed. Generally, Caucasian skin falls in the 80 IRE range, with darker skin tones registering as low as 70, and very fair skin or lighter areas of your subject edging closer to 90 IRE. Once you’ve decided the approximate range of tones that you want to make sure do not blow out, you can set the camera’s Zebra pattern sensitivity appropriately and receive the flashing striped warning on your display. (See Figure 16.17.) The pattern does not appear in your final image, of course—it’s just an aid to keep you from blowing it, so to speak. Maximum brightness value can vary, depending on your Canon Log, Highlight Tone Priority, Picture Style, and HDR-PQ settings.
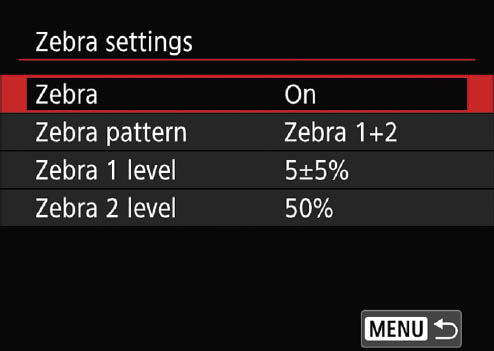
Figure 16.16 Zebra options.
Your adjustments, shown in Figure 16.16, include:
- Zebra. Choose On or Off to enable/disable display of Zebra patterns during movie shooting.
- Zebra Pattern. There are two Zebra patterns to choose from: right-slanting diagonal lines as seen in Figure 16.17, and left slanting. These appear over areas that exceed your specified brightness level. You can also elect to show Zebra 1+2, which shows an overlapping pattern where the two warnings merge. That allows you to see areas that represent a combination of the two levels.
- Zebra 1 Level. You can set the Zebra 1 display from 5 to 95 percent (with plus/minus 5 percent tolerance).
- Zebra 2 Level. The Zebra 2 level can be specified from 50 to 100 percent.
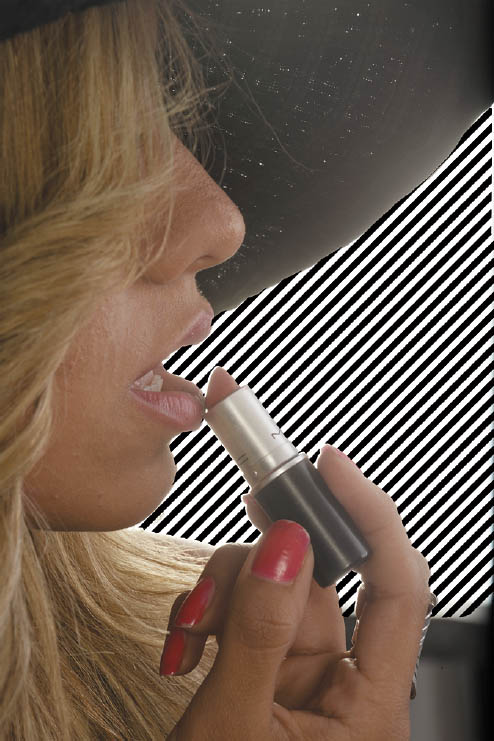
Figure 16.17 The flashing stripes show an area is overexposed using this Zebra 2 warning.
Shooting Information Display/Viewfinder Display Format
Options: Screen Information Settings, VF Info/Toggle Settings, Grid Display, Histogram Display, Focus Distance Display
Options: Display 1, Display 2
These two entries function virtually identically to their Still photography counterpart and, indeed, any settings you make in still or movie modes are used in the other mode as well. The only difference is found in the Shooing Information Display entry, as the movie version does not have the Viewfinder Vertical Display option, nor apply it if enabled in still mode.
Overheat Control
Options: On (default), Off
This is the first entry in the Movie Shooting 8 menu. (See Figure 16.18.) The sensor is energized and memory card storage is active continuously as you preview or capture video. Autofocus, exposure metering, and other functions are also hard at work. Shooting 4K and 8K (with the R5) video at high speeds and fast transfer rates generates a lot of heat. This Overheat control helps prevent the camera from becoming over-warm and, perhaps damaging the sensor while idling. If these concerns don’t worry you, you can switch from the default On setting to Off. Your chief gain is faster response when you resume capture, and improved display on the standby screen.

Figure 16.18 The Movie Shooting 8 menu.
HDMI Display
Options: Camera+External (default), External Only
When directing video to an external device, you can choose whether your output is displayed on your camera and on the external device, or only on the external recorder or monitor.
- Camera+External. Movie display is shown on the camera and the other device connected through the HDMI port. In this mode, recording on the camera’s memory card is not possible. The HDMI shows the video only, with no information overlays, and is used to display menus and playback. The camera displays the video as it’s being captured, along with informational overlays summoned by the INFO button. Menus and playback aren’t shown on the camera.
You might want to use this mode to be able to monitor your recording at the camera, as well as on the HDMI device (which may be physically separated and connected by a long cable).
- External Only. This shows video, information, menus, and playback image on the external device only, and nothing on the camera itself.
Time Code
Options: Count Up, Start Time Setting, Movie Rec. Count, Movie Play Count, HDMI, Drop Frame
Advanced video shooters find SMPTE (Society of Motion Picture and Television Engineers)-compatible time codes embedded in the video files to be an invaluable reference during editing. To oversimplify a bit, the time system provides precise hour:minute:second:frame markers that allow identifying and synchronizing frames and audio. The time code system includes a provision for “dropping” frames to ensure that the fractional frame rate of captured video (remember that a 24 fps setting actually yields 23.976 frames per second while 30 fps capture gives you 29.97 actual “frames” per second) can be matched up with actual time spans.
As I noted in the introduction to this book, I won’t be covering the most technical aspects of movie shooting in great detail (including time codes, raw HDMI streaming, etc.). If you’re at the stage where you’re using time codes, you don’t need a primer, anyway. However, the Time Code submenu, shown in Figure 16.19, does include the following options:
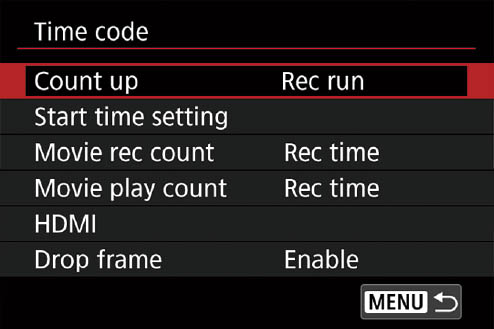
Figure 16.19 Time Code options.
- Count Up. Choose Rec Run, in which the time code counts up only when you are actually capturing video, or Free Run (also known as Time of Day), which allows the time code to run up even between shooting clips.
The latter is useful when you want to synchronize clips between multiple cameras that are shooting the same event. When using Free Run, even if the cameras record at different times, you’ll be able to match the video that was captured at the exact same moment during editing. When Free Run is selected, the time code will always be recorded to the movie file (except for HFR clips).
- Start Time Setting. Normally, the camera uses its internal clock to specify the hours:minutes:seconds, with frames set to :00 when you begin shooting. This entry allows you to manually enter any hour:minute:second:frame of your choice, or to Reset the start time to 00:00:00:00.
- Movie Rec. Count. Here you can decide whether to display the elapsed time for the current clip on the LCD, or the Time Code while capturing video.
- Movie Play Count. This gives you the same choices during playback, allowing you to choose elapsed time or Time Code.
- HDMI. You can select Enable to append the time code to the HDMI video output, or Disable to not add it to the output. The Record Command output, when Enabled, allows the camera’s Stop/Start action to sync with the external recording device. When Disabled, starting and stopping are controlled by the external recording device.
- Drop Frame. As I mentioned, the 30 fps setting yields 29.97 actual frames per second, 60 fps gives you 59.95 frames per second, and HFR provides 119.9 fps, causing a discrepancy between the actual time and the time code that’s recorded. Choose enable, and the camera will skip some time code numbers in drop-frame mode at intervals to eliminate the discrepancy. When disabled, you may notice a difference of several seconds per hour.
Movie Autofocus Menus
When you’ve switched to one of the movie shooting modes, a revised set of four Movie Autofocus menus (see Figure 16.20) appear with a total of 17 entries. Most are identical to their exact counterparts for still shooting and were explained in Chapter 12, and, again, I won’t repeat those descriptions here.
Instead, I’ll explain the differences and describe the three new entries, which relate to differences in autofocus when shooting movies. Your other movie AF settings, such as AF Method, will be familiar to you from still shooting. First the menu differences:
- AF 1 Menu. The Still and Movie AF 1 menus are virtually identical, except that the Movie version does not include AF Operation (One-Shot/Servo selection) or Continuous AF. There is one new entry, Movie Servo AF, which I’ll describe shortly.
- AF 2 Menu. The Still and Movie AF 2 menus are identical, except that the Movie version does not include the AF-Assist Beam Firing entry.
- AF 3 Menu. The Still photo AF 3 menu does not exist in Movie mode, and is replaced by the entries that were in the AF 4 menu for still shooting. The Movie rendition of this menu has two new entries, Movie Servo AF Speed and Movie Servo Track Sensitivity (discussed shortly) and does not have the Stills menu’s Orientation Linked AF point. (In general, movies are shot in a fixed horizontal orientation.)
- AF 4 Menu. This Movie menu is identical to the Stills AF 5 menu, except there is no Initial Servo AF Point for Face Detect entry.
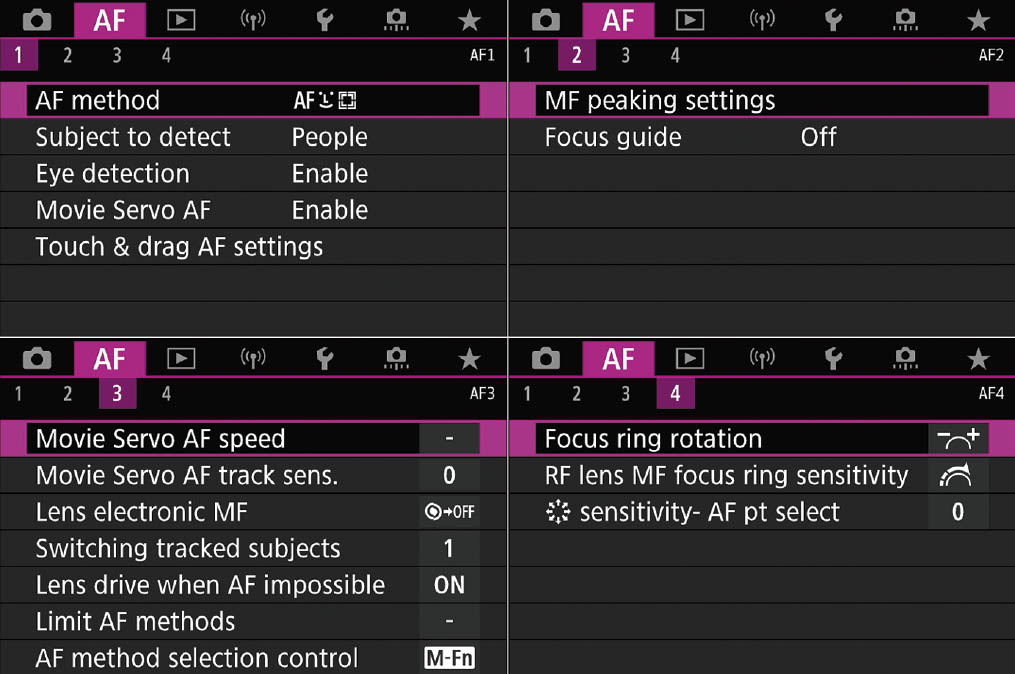
Figure 16.20 The Movie Autofocus menus.
Movie Servo AF
Options: Enable (default), Disable
With either camera, this function operates similarly to Continuous AF described in Chapter 12, but, when enabled, uses only Movie Servo AF. When disabled, you can initiate autofocus by pressing the shutter button halfway or the AF-ON button. When active, focus is adjusted constantly without the need to press the shutter release halfway. To lock focus or pause continuous focusing (say, to eliminate the sound of the lens’s motor as it refocuses), tap the Servo AF icon at the lower left of the LCD screen. Tap again to resume. Movie Servo AF will also be reactivated if you press the MENU or Playback buttons, or change the AF method. You can specify how the camera responds using the Movie AF Speed entry, described next.
Movie Servo AF Speed
Options: When Active, AF Speed
This choice is available when Movie Servo AF is set to Enable. The function is also enabled when using lenses released after 2009 that have USM or STM motors. Your choices are as follows:
- When Active. Always On activates the AF adjustment speed setting automatically before and during movie shooting. The During Shooting AF choice makes the speed adjustment active only when you are capturing video. (See Figure 16.21, top.)
- AF Speed. Highlight this option and press SET. You can then adjust the AF speed using the touch screen, QCD-1, or directional controls along a sliding scale from Slow (–7 to 0) to Standard (0) to Fast (+1 to +2). (See Figure 16.21, bottom.)
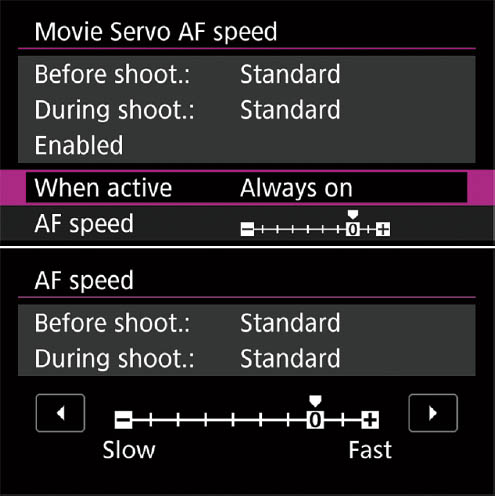
Figure 16.21 Movie Servo AF speed settings.
Movie Servo AF Tracking Sensitivity
Options: –3 (Locked On) to +3 (Responsive)
Here you can specify how quickly the Movie Servo AF tracking locks onto a moving subject. Movie Servo AF must be enabled. It’s similar to the Tracking Sensitivity that you can set in the Autofocus 1 menu, as described in Chapter 12. As with its still photo counterpart, changing the tracking sensitivity can come in useful when an intervening subject passes through the frame in front of the subject you were capturing. It’s also helpful when panning. A sliding scale can be adjusted from Locked On (–3 to –1) to Responsive (+1 to +3) or standard at the 0 position. (See Figure 16.22.) Locked On tells the camera to stick with the subject currently in focus—like that referee at a football game, or a passerby in an urban scene. Responsive settings tell the camera to switch to track a subject located at the current focus point, even if it’s the same subject now moving toward you at a rapid rate, or a different subject that comes into view.
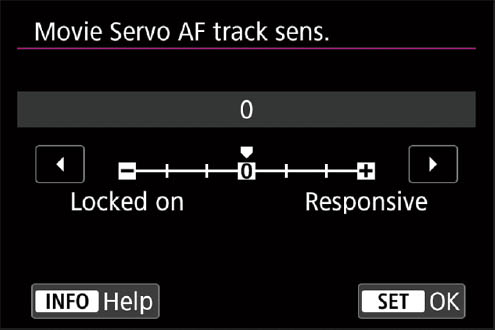
Figure 16.22 Movie Servo AF tracking sensitivity settings.
Compression, Resolution, and Frame Rates
I’ve explained how to make and use settings first, and saved explanations of some of the technical terms for now. The information in this section will help you make your choices. Even intermediate movie shooters can be confused by the number of different options for compression, resolution, and frame rates. This section will help clarify things for you.
Compression
Compression is easiest to understand, so I’ll get it out of the way first. As I mentioned earlier, the camera stores files using the standard H.264/MPEG-4 codec (“coder-decoder”). For many of the Movie Size options listed earlier, you can select either ALL-I or IPB compression methods (either Standard or Light).
- ALL-I (All Intraframe). This mode, available only with the R5, is useful for editing and post-processing. In this mode, the camera takes each individual frame that you shoot and attempts to compress it before writing the frame to your memory card. You can think of ALL-I compression as a series of still images, each squeezed down by discarding (hopefully) redundant information. While this compression method is not the most efficient way to reduce file size, because individual frames are stored in their entirety, the resulting files are easier to edit.
However, the reduced compression puts extra demands on your camera and memory card as video is stored, especially when shooting 4K movies. Canon says that transfer rates average 480Mb/s when using ALL-I for UHD video. IPB compression (discussed next) requires only one-quarter that transfer rate—120Mb/s.
- IPB (Standard). This is a newer compression method that is considered Standard by Canon, is available for the R5 and, with IPB (Light), is the only option for the R6. It uses interframe compression; that is, only certain “key” frames are saved, with other frames “simulated” or interpolated from information contained in the frames that precede and succeed them. I-frames are the complete or intraframes (the only kind used by ALL-I compression); P-frames are “predicted picture” frames, which record only the pixel changes from the previous frame (say, a runner traveling across a fixed background); B-frames are “bi-predictive picture” frames, created by using the differences from the preceding and following frames. This interpolation produces image quality that is a bit lower and which requires more of your camera’s DIGIC X processing power, but file sizes are smaller.
Video encoded using IPB must be converted, or transcoded to a format compatible with your video-editing software. The compression scheme can produce more artifacts, particularly in frames with lots of motion throughout the frame. I use this method only when the ability to shoot longer is very important.
- IPB (Light). It is recorded at a bit rate that is lower than IPB (Standard), producing files that are smaller, transfer more quickly, have higher playback compatibility, and provide longer maximum shooting times. If you don’t need the maximum resolution possible, this choice can be very useful.
“CLEAN” HDMI OUTPUT
The video is directed through the HDMI port with embedded time code to an external monitor or recorder. As mentioned earlier, you can simultaneously display the video on the color LCD as it is recorded to your memory card. You can choose whether to display the captured image and scene and camera shooting information on the LCD as you shoot. This capability allows professional videographers (or other advanced shooters) more latitude in color correction through the enhanced color space, improved monitoring during the shoot, and more versatile post-production workflow. You can, for example, synchronize the camera’s video capture with the start/stop of the external video recorder.
Movie files are limited to 4GB in size if you are using an SDHC card (those with a capacity of 32GB or less). Such cards are formatted using the FAT32 file system, which cannot store files larger than 4GB. If a clip stored on such a card reaches that size, the camera will create a new file and continue shooting. The separate files must be viewed separately and/or combined in a movie editor.
On the other hand, SDXC cards (with capacities of 64GB or more) and CFexpress cards (used by the R5) are formatted in the camera using the exFAT file system and files can exceed 4GB. However, your computer’s operating system may have some restrictions on file size.
In any case, the maximum recording time for a movie clip (other than High Frame Rate movies) is 29 minutes, 59 seconds, regardless of file size. (High frame rate clips are limited to 7 minutes, 29 seconds.) Movie shooting will stop automatically, but you can begin shooting a new movie immediately. The EOS Movie Utility can merge multiple MOV files into one longer file. You can also use third-party movie-editing software to edit and combine your clips.
ALL-I files will reach the 4GB limit in about five minutes at 685MB/minute. So, if you really need to capture a continuous shot in one file (say, a performance), you might want to use IPB. The 4GB limitation is not as noxious as you might think, and you can continue capture without, in practice, an interruption. Roughly 30 seconds before the 4GB file size is reached, the elapsed shooting time/time code displayed on the LCD will begin blinking. If you continue past 4GB, a new movie file will be created automatically. This process continues until you’ve reached the maximum shooting time of 29 minutes, 59 seconds (established because some jurisdictions classify equipment that can capture more than 30 minutes as “camcorders” at higher tax rates). You can patch two or more clips together in editing. Note that the camera will not switch to your second memory card during capture even if Auto Switch Card is activated.
Resolution
Resolution choices are a little less techie:
- 8K-D (8192 × 4320). This is the wide-screen DCI format available with the R5 only, as described earlier in this chapter.
- 8K-U (7680 × 4320). This is the 16:9 aspect ratio UHD format for 8K video, also described earlier in this chapter.
- 4K (3840 × 2160). This ultra-high-definition format is the wave of the future, even if content and display choices are limited at present. As you advance in the video world, you’ll probably find yourself shooting 4K a lot, even if you intend to distribute Full HD video. Many editors swear that 4K video converted to Full HD is better than Full HD video captured natively. This format is available with the R6, and is known as 4K-U (for ultra-high definition) on the R5.
- 4K-D (4096 × 2160). This is the “wide-screen” Digital Cinema Initiatives (DCI) format available on the R5 only.
- 1920 × 1080 (1080p). This resolution is so-called “full HD” and is the maximum resolution displayed when using the HDTV format. Many monitors and most HD televisions can display this resolution, and you’ll have the best image quality when you use it. Use this resolution for your “professional” productions, especially those you’ll be editing and converting to nifty-looking DVDs. However, the top-of-the-line resolution requires the most storage space, approximately 235 to 685 megabytes per minute, as mentioned earlier. This means you can fit a collection of individual clips amounting to no more than about 22 minutes of recording (using ALL-I compression with the R5), or 1 hour 4 minutes (using IPB) on a single 16GB memory card.
Frame Rate
In the digital camera world, in which all video is shot using progressive scan with no interlaced scan option, frame rates are easy to choose. (Interlacing is a capture method in which even/odd numbered lines of each frame are captured alternately; with progressive scan, all the lines in a frame are captured consecutively.) Fortunately, one seemingly confusing set of alternatives can be dispensed with quickly: The 50/25 fps and 60/30 fps options can be considered as pairs of video-oriented frame rates. The 60/30 fps rates are used only where the NTSC television standard is in place, such as North America, Japan, Korea, and a few other places. The 50/25 frame rates are used where the PAL standard reigns, such as Europe, Russia, China, Africa, Australia, and other places. For simplicity, I’ll refer just to the 60/30 frame rates in this section; if you’re reading this in India, just convert to 50/25.
The third possibility is 24 fps, which is a standard frame rate used for motion pictures. Keep in mind that the rates are nominal. A 24 fps setting yields 23.976 frames per second; 30 fps gives you 29.97 actual “frames” per second. As I mentioned earlier, the R5’s and R6’s High Frame Rate option captures video at 119.99 fps or, nominally, 120 fps for NTSC and 100 fps for PAL. (See the section that follows for more on High Frame Rate video.)
The difference lies in the two “worlds” of motion images—film and video. The standard frame rate for motion picture film is 24 fps, while the video rate, at least in the United States, Japan, and those other places using the NTSC standard, is 30 fps. Computer-editing software can handle either type and convert between them. The choice between 24 fps and 30 fps is determined by what you plan to do with your video.
The short explanation is that shooting at 24 fps gives your movie a “film” look, excellent for showing fine detail. However, if your clip has moving subjects, or you pan the camera, 24 fps can produce a jerky effect called “judder.” A 30 or 60 fps rate produces a home-video look that some feel is less desirable, but which is smoother and less jittery when displayed on an electronic monitor. I suggest you try both and use the frame rate that best suits your tastes and video-editing software.
Another consideration that we can’t do much about is the difference between a rolling shutter and global shutter. In progressive scan mode, each line is captured one after another, so that a moving subject may have perceptibly relocated (part of it anyway) during the capture of a frame. The rolling shutter may produce Jell-o-like effects with such motion. A global shutter, like those used in professional video cameras, captures the entire frame at once, eliminating that problem. Without benefit of a global shutter, we at least need to be aware of the possible result when shooting action.
High Frame Rate Video
The High Frame Rate slow-motion video option allows you to capture movies that play back at 1/4 speed—not slow enough to highlight the flaws in your golf swing, but enough of a special effect to allow you to add Baywatch-style running sequences to your next Dwayne Johnson (or David Hasselhoff) parody.
The cool feature comes at a cost. Your high-definition video is Standard HD (1280 × 720) resolution and is silent. The maximum recording time is 7 minutes, 29 seconds, which should be sufficient for most purposes; a longer slo-mo clip would be excruciating to watch. Autofocus is disabled, so Movie Servo AF is out of the picture, and the high frame rate renders digital IS non-functional as well.
The slow-motion secret, of course, is that the video is recorded at nominally 120p (actually 119.9) for NTSC and 100p (PAL), and then played back as if it were captured at 30/25 fps. So, each frame is displayed for 4X longer than the time at which it was actually captured. The resulting sequences are pretty good, although you can expect some flickering when shooting under fluorescent or LED lighting, and other weirdness when outputting to HDMI. Time codes are not recorded when Count Up is set to Free Run. Canon cautions you to check your Movie Recording Size Setting once you’ve disabled High Frame Rate video.
HDR Movies
You can extend the dynamic range of your movies in high-contrast situations by shooting HDR movies. Effectively, this mode is a type of in-camera bracketing to provide an expanded dynamic range and improved highlight rendition. The Movie Recording Size setting under Movie Recording Quality must be set to Full HD 29.9P IPB or Full HD 25.00P IPB. Highlight Tone Priority and Time Lapse Movies must be disabled.
Then, press the Q button to produce the movie version of the Quick Control screen, and navigate to the HDR setting at the bottom of the right-hand column. Scroll down to the HDR Movie Shooting entry and enable it. Then shoot a movie conventionally. Multiple frames are merged to create an HDR movie. You may see excessive noise or some distortion, so you’ll want to experiment with this feature to see how useful it is to you.
You should be using an RF- or EF-mount lens to shoot HDR movies in Full HD. If you’re using EF-S lenses with an adapter or when you use the Movie Cropping entry, movies are recorded in Standard HD. HDR movies are not available when using Highlight Tone Priority, Canon Log, or when shooting time-lapse movies.
Exposure Options
You can select fully automatic exposure, elect to specify exposure manually, or choose a shutter speed or aperture setting that you prefer for creative reasons. The system will select an ISO speed for you automatically in all cases, generally sticking to the range ISO 100–12,800. (Some oddball exceptions are applied for various combinations of exposure mode and ISO speed settings made in the Shooting 2 menu.) Exposure can be locked with the * button, and cancelled with the AF-point selection button located to the right of the * button.
The R6 has only Program and Full Manual exposure modes, while the R5 offers a complete range of exposure adjustments. Here are your options:
- Fully automatic exposure. The camera will automatically select an appropriate exposure for you if the mode selected is Scene Intelligent Auto, P (program auto exposure), or B (bulb exposure). Note that B will not produce a bulb or time exposure; the camera defaults to P when you use the B position. The idea is to prevent you from losing video capture capabilities if you accidentally select B by mistake. In Scene Intelligent Auto, the camera will analyze your subject and select a Scene type and display it on the upper-left corner of the LCD monitor.
- Shutter-priority AE. You can choose Tv, exactly as you do when shooting still photographs, and specify a shutter speed, with some limitations. The camera will select an appropriate aperture for you. The available shutter speeds will depend on the frame rate, primarily because you can’t (logically) choose a shutter speed that is longer than the length of time needed to expose an individual frame. For example, at 30/25/24 fps, you cannot use a shutter speed longer than 1/30th second. At 60/50 fps, the longest shutter speed available is 1/60th second. In all cases, shutter speeds shorter than 1/4000th second (1/8,000th) are unavailable.
Choosing the shutter speed yourself offers two advantages. Even though each frame is captured in about 1/60th–1/30th second, slicing up the time the sensor is exposed to light allows capturing video in a much broader range of lighting conditions. Outdoors in full daylight, 1/30th second would produce an overexposure even with a very small f/stop and an ISO 100 sensitivity setting. In addition, opting for a higher shutter speed allows you to freeze action within each individual frame, reducing or eliminating blur. You might want to use 1/500th second when shooting movies of sports, or stick to 1/30th second when you want to include a little motion blur in your video for effect.
- Aperture-priority AE. Select Av, and you can choose an f/stop that will allow you to maximize or minimize depth-of-field for creative effects. There is no limitation on your f/stop selection. However, you should avoid switching to a different aperture while capturing video, as the sudden change can provide a jarring effect.
- Manual exposure. Choose M and you can specify ISO speed, shutter speed, and aperture.
- • ISO. Press the ISO/Flash Exposure Compensation button on top of the camera to view the ISO speed setting screen. Adjust with the Main Dial. Choose Auto and the camera will select an appropriate ISO based on the shutter speed and aperture you have selected. During Manual exposure, the * button locks ISO at its current setting if you have selected Auto.
- • Shutter speed. Use the Main Dial to select a shutter speed, within the limitations described under Shutter-priority AE earlier.
- • Aperture. Use the Quick Control Dial 1 to adjust aperture.
When choosing shutter speed or aperture, you can monitor exposure using the exposure level scale at the bottom of the LCD screen. For an additional check, you can press the INFO button to view a live histogram.
More on Shutter Speeds
You might think that setting your camera to a faster shutter speed will help give you sharper video frames. But the choice of a shutter speed for movie making is a bit more complicated than that. As you might guess, it’s almost always best to leave the shutter speed at 1/30th or 1/60th second, and allow the overall exposure to be adjusted by varying the aperture and/or ISO sensitivity. We don’t normally stare at a video frame for longer than 1/30th or 1/24th second, so while the shakiness of the camera can be disruptive (and often corrected by your camera’s in-lens and in-body image stabilization), if there is a bit of blur in our subjects from movement, we tend not to notice. Each frame flashes by in the blink of an eye, so to speak, so a shutter speed of 1/30th or 1/60th second works a lot better in video than it does when shooting stills. Even shots with lots of movement are often sufficiently sharp at 1/60th second.
Higher shutter speeds introduce problems of their own. If you shoot a video frame using a shutter speed of 1/250th second, the actual moment in time that’s captured represents only about 12 percent of the 1/30th second of elapsed time in that frame. Yet, when played back, that frame occupies the full 1/30th of a second, with 88 percent of that time filled by stretching the original image to fill it. The result is often a choppy/jumpy image, and one that may appear to be too sharp.
The reason for that is more social imprinting than scientific: we’ve all grown up accustomed to seeing the look of Hollywood productions that, by convention, were shot using a shutter speed that’s half the reciprocal of the frame rate (that is, 1/48th second for a 24 fps movie). Professional movie cameras use a rotary shutter (achieving that 1/48th-second exposure by using a 180-degree shutter “angle”), but the effect on our visual expectations is the same. For the most “film-like” appearance, use 24 fps and 1/60th-second shutter speed.
Faster shutter speeds do have some specialized uses for motion analysis, especially where individual frames are studied. The rest of the time, 1/30th or 1/60th of a second will suffice. If the reason you needed a higher shutter speed was to obtain the correct exposure, use a slower ISO setting, or a neutral-density filter to cut down on the amount of light passing through the lens. A good rule of thumb is to use 1/60th second or slower when shooting at 24 fps; 1/60th second or slower at 30 fps; and 1/125th second or slower at 60 fps.
Playback and Editing
Select a movie during playback and press SET to commence viewing. As a movie is being played back, press the SET button again to pause and produce a screen of options at the bottom of the screen. When the icons are shown, use the QCD-1, touch screen, or directional controls to highlight one, and then press the SET button to activate a function. Left to right at the bottom of the figure in the upper-left corner of Figure 16.23, they are as follows:
- Playback. Begins playback of the movie or album. To pause playback, press the SET button again. That restores the row of icons so you can choose a function.
- Slow motion. Displays the video in slow motion.
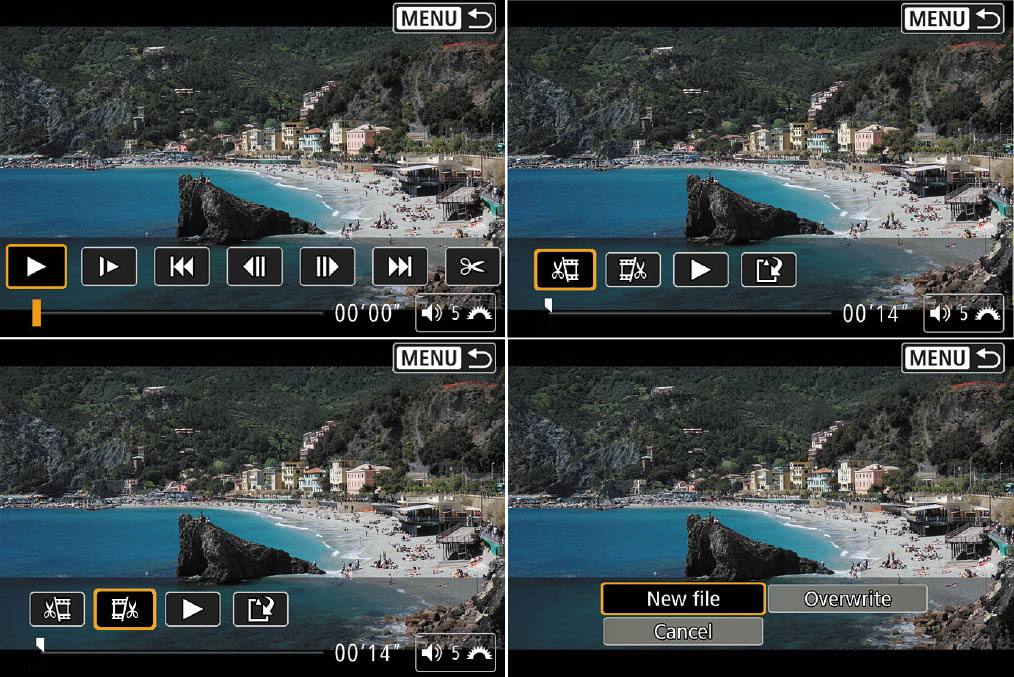
Figure 16.23 Playback and editing options.
- First frame. Jumps to the first frame of the video, or the first scene of an album’s first video snapshot.
- Previous frame. Press SET to view previous frame; hold down SET to rewind movie.
- Next frame. Press SET to view next frame; hold down SET to fast forward movie.
- Last frame. Jumps to last frame of the video, or the last scene of the album’s last video snapshot.
- Edit. Summons an editing screen.
- Frame grab (not shown). This icon is located to the right of the Edit scissor icon, and is available only when a 4K movie is being viewed. You can grab the displayed frame and save it as a JPEG image. I’ll explain Frame Grab at the end of Chapter 17.
- Playback position. A bar at the bottom of the screen shows the amount of the clip that has been played so far.
- Playback time. In minutes and seconds with Movie Play Count: Rec Time enabled.
- Volume. Rotate the Main Dial to adjust the volume of the audio.
- Menu. Return to single-image display of the movie.
When you select Edit, the screen shown at upper left in Figure 16.23 appears. While reviewing your video, you can trim from the beginning or end of your video clip. Press SET to pause the video at the edit position, and select the scissors symbol. The icons that appear have the following functions:
- Cut beginning. Trims off all video prior to the current point. (See Figure 16.23, upper right.)
- Cut end. Removes video after the current point. (See Figure 16.23, lower left.)
- Play video. Play back your video to reach the point where you want to trim the beginning or end.
- Save. Saves your video to the memory card. A screen appears offering to save the clip as a New File, or to Overwrite the existing movie with your edited clip. (See Figure 16.23, lower right.)
- Menu. Exits editing mode.
- Adjust volume. Modifies the volume of the sound.