14 |
In the last three chapters, I introduced you to the layout and general functions of the menu system, with specifics on how to customize your camera with the Shooting, Autofocus, and Playback menus. In this chapter, you’ll learn how to work with the Set-up menu. If you’re jumping directly to this chapter and need some guidance in how to navigate the menu system, review the first few pages of Chapter 11. Otherwise, you’re welcome to dive right in.
Set-up Menu Options
There are five amber-coded Set-up menu screens where you adjust how your camera behaves during your shooting session, as differentiated from the Shooting menu, which adjusts how the pictures are taken. Your choices include:
Set-up 1
- Record Functions+Card/Folder Sel.
- File Numbering
- File Name
- Format Card
- Auto Rotate
- Add Movie Rotate Information
- Date/Time/Zone
Set-up 2
- Language
- Video System
- Help Text Size
- Beep
- Headphone Volume
- Power Saving
- Eco Mode
Set-up 3
- Screen/Viewfinder Display
- Screen Brightness
- Viewfinder Brightness
- Screen/Viewfinder Color Tone
- Fine-Tune Viewfinder Color Tone
- UI Magnification
Set-up 4
- HDMI Resolution
- Touch Control
- Multi-Function Lock
- Shutter at Shutdown
- Sensor Cleaning
Set-up 5 (R6 Only)
- Reset Camera
- Custom Shooting Mode (C1–C3)
- Battery Information
- Copyright Information
- Manual/Software URL
- Certification Logo Display
- Firmware
Set-up 5 (R5 Only)
- Reset Camera
- Custom Shooting Mode (C1–C3)
- Save/Load Camera Settings on Card
Set-up 6 (R5 Only)
- Battery Information
- Copyright Information
- Manual/Software URL
- Certification Logo Display
- Firmware
Record Functions+Card/Folder Sel.
Options: Record Stills/Movies Separately; Stills Recording Options; Movie Recording Options; Stills Record/Play; Movie Record/Play; Folder Options
My preference: N/A
This is the first entry in the Set-up 1 menu (see Figure 14.1). The EOS R5 and R6 give you (sometimes) a bewildering number of options for specifying which card and folder your still photographs and movie clips are stored on. You can store still photos on one card and movies on another, automatically switch between them, give priority to one card over another, and change the default folder naming scheme. I’ll explain each of your options, shown at left in Figure 14.2, one at a time.
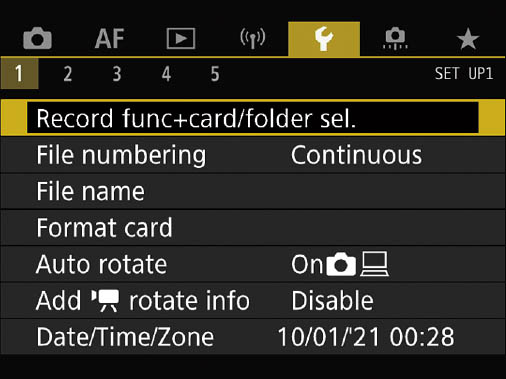
Figure 14.1 The Set-up 1 menu.
Record Stills/Movies Separately
Your choices for this sub-entry are Enable and Disable. If you select Enable, then storage and playback is strictly segregated: movies will always be stored on Card 1 and still photos will always be stored on Card 2. Indeed, if a designated card is full or a slot has no card, then that type of file cannot be captured. If you press the Playback button while in still photo mode, the camera will display only the images on Card 2 (and no movies), while in movie mode, Playback will consist only of movie files.
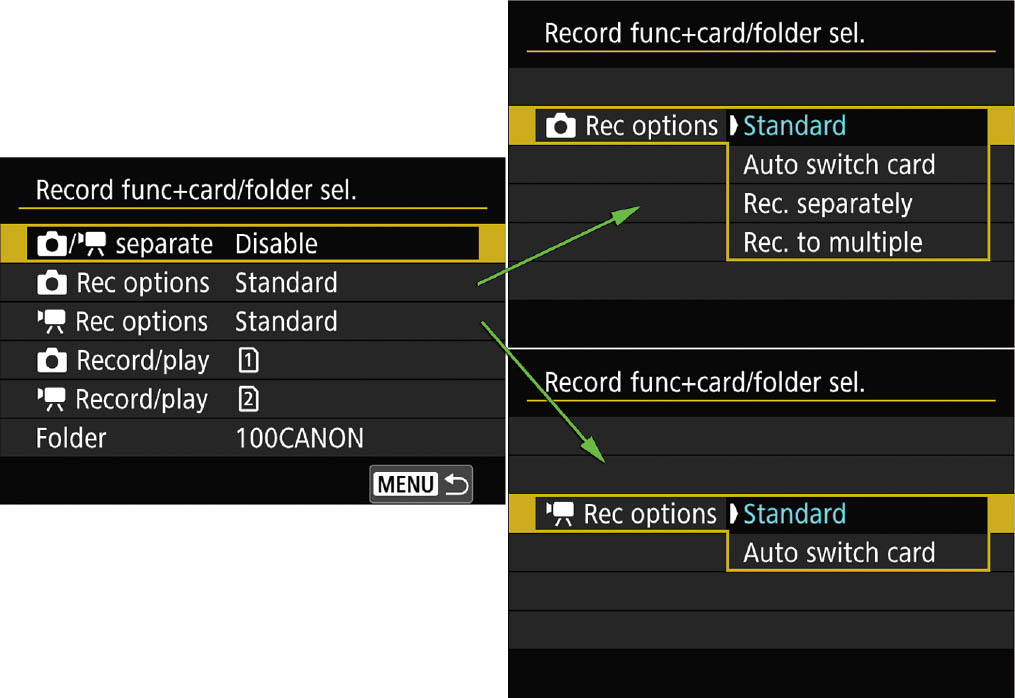
Figure 14.2 Record Functions+Card/Folder Sel. (left); Stills Recording Options (upper right); Movie Recording Options (lower right).
This option is a good choice for making sure your still and movie files stay separate. The downside is that you don’t have any overflow or backup features. If a card fills up, the camera won’t switch to the other card, and you can’t record a backup copy of each file on the alternate media. If you use this option, you may want to use your fastest memory card in Slot 1, particularly if you shoot 4K or 8K video. And for high-speed continuous shooting, you’ll want to make sure you have a fast card in Slot 2.
When this sub-entry is enabled, the two Recording options and Record/Play options (described shortly) are unavailable.
Stills Recording Options
This setting determines how still photos are handled. There are four possibilities:
- Standard. In this mode, still photos are always stored to the card selected in the Stills Record/Play entry (described shortly). If the card fills, you can’t take any more still photos.
- Auto switch card (overflow). Stills are recorded in the card specified by the Stills Record/Play entry. If recording stops because the designated card is full, when you resume stills will be recorded on the other card instead. This is a handy automatic overflow feature that effectively increases the number of photos you can take without “reloading” with a new card. The only drawback is that your stills and movies are no longer kept separate.
- Record separately (backup). This is a backup option that allows you to store a pair of images, one on each memory card, using different Image Quality settings for each. The dual files will have the same file number, so you can easily identify your pairs. When you enable this feature, the Image Quality entry in the Shooting 1 menu changes (see Figure 14.3, left). You can choose an individual slot (as seen at center in the figure), and choose Image Quality using a screen like the one shown at right in the figure.
This option is quite flexible. For example, you could specify JPEG for Card 1 and RAW for Card 2 in order to keep them separate. If you’d rather have two identical copies, you can select JPEG twice (or RAW twice). If you wanted a full-resolution RAW or JPEG file and a more compact S1 or S2 version (say, for low-bandwidth sending by email), you could do that, too.
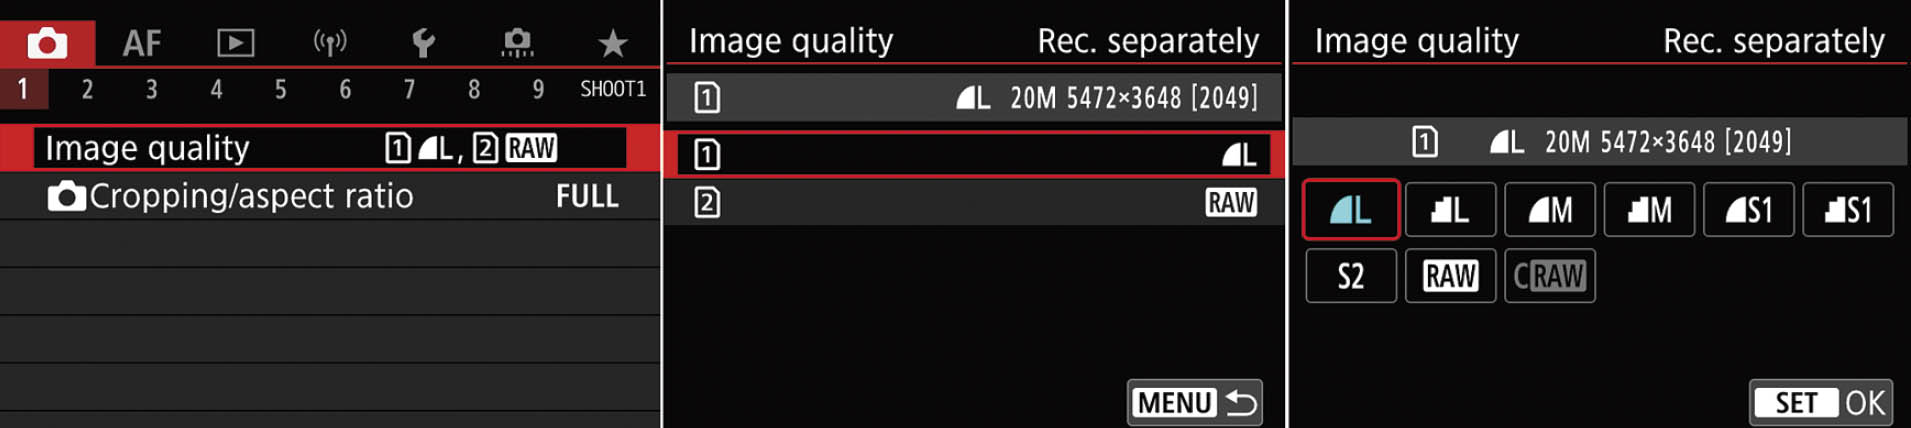
Figure 14.3 Specify different Image Quality settings for each memory card (left); choose card slot (center); select format and resolution (right).
- Record to multiple (backup). This is the express version of one of the backup options described above: identical copies of your still photos at the same Image Quality setting are recorded on Card 1 and Card 2. With this choice and the Record Separately option the number of shots available will reflect the space available on the card with the least amount of remaining storage. With both options, if either card fills, you’ll need to insert a different card to continue recording.
Movie Recording Options
This setting determines how movie clips are handled. There are just two possibilities for the R6 and three for the R5:
- Standard. In this mode, movies are always stored to the card selected in the Movies Record/Play entry (described shortly). If the card fills, you can’t capture more movie clips.
- Auto switch card (overflow). Movies are recorded in the card specified by the Movie Record/Play entry. If recording stops because the designated card is full, when you resume movies will be recorded on the other card in a new folder.
- 1 RAW, 2 MP4 (backup) (R5 only). With this setting a RAW movie is recorded to Card 1 and an MP4 movie to Card 2, using the same file number for each. When either card fills, recording stops until a new card is inserted.
Stills Record/Play, Movie Record/Play
By default, stills are recorded on Card 1 and movies are written to Card 2. You can change these designations and assign a priority if you like. This setting allows you to determine which card is used to record stills, and assign a priority using the INFO button. (See Figure 14.4.) Here are your possibilities:
- Standard/Auto Switch Card modes. If you’ve set Still Recording options or Movie Recording options to Standard or Auto Switch card, you can choose which card is used for recording and for playback. Press the INFO button to give the selected card priority. When Priority is enabled, the camera switches to the priority card when cards are removed or inserted.
- Record Separately/Record to Multiple/1 RAW 2 MP4 (R5 only). If you’ve selected Record Separately/Record to Multiple (or, with the R5 when 1 RAW, 2 MP4 are selected), only Playback options are available. Choose Card 1 or Card 2, and press INFO to assign that card priority. When Priority is enabled, the camera switches to the priority card when cards are removed or inserted.
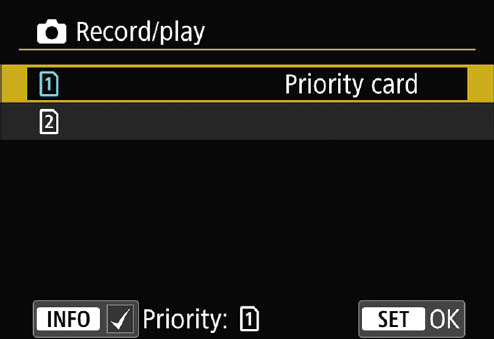
Figure 14.4 Select destination and priority.
Folder Options
Choose this menu option to create a folder where the images and video you capture will be stored on your memory card, or to switch between existing folders. By default, folders are given a three-digit number followed by five letters (CANON). A folder can contain up to 9999 images. When full, a new folder is created automatically. Folder numbers from 100 to 999 can be created. You can also create folders on a properly formatted memory card within the main DCIM folder. Just follow these steps:
- 1. Select Folder. Access the option from the Record Function+Card/Folder Sel. menu shown in Figure 14.2.
- 2. View list of available folders. The Select Folder screen pops up with a list of the available folders on your memory card, with names like 100CANON, 101CANON, etc. (See Figure 14.5, left.)
- 3. Choose a different folder. To store subsequent images in a different existing folder, use the touch screen or directional controls to highlight the label for the folder you want to use. When a folder that already has photos is selected, two thumbnails representing images in that folder are displayed at the right side of the screen, as shown at left in the figure.
- 4. Confirm the folder. Choose SET to confirm your choice of an existing folder.
- 5. Create folder. If you’d rather create a new folder, highlight Create Folder in the Select Folder screen and choose SET. The name of the folder that will be created is displayed, along with a choice to Cancel, OK (creating the folder), or Change Folder Name (see Figure 14.5, center). Choose SET to confirm your choice.
- 6. Change folder name (optional). If you want to assign a new folder name, such as 101EOSR5, you can do so in the screen shown at right in Figure 14.5. You can use upper and lowercase letters, plus the underscore character.
- 7. Exit. Press MENU to return to the Set-up 1 menu.
With a little imagination (and caution, to avoid creating “bad” folder names), you can develop some useful folder names, and switch among them at will. I find this capability especially useful when working with very large cards, because I can do a great deal of organizing right on the card itself. Perhaps I have some images in a particular folder that I use as a “slide show” for display on my camera’s LCD screen. Or, I might want to sort images by location or date. For example, I could use 104_USA_, 105SPAIN, 106FRANC, or 107GBRIT to indicate the location where the images were shot. Note that two folders cannot share the same three-digit number, even if the remaining five characters are different.
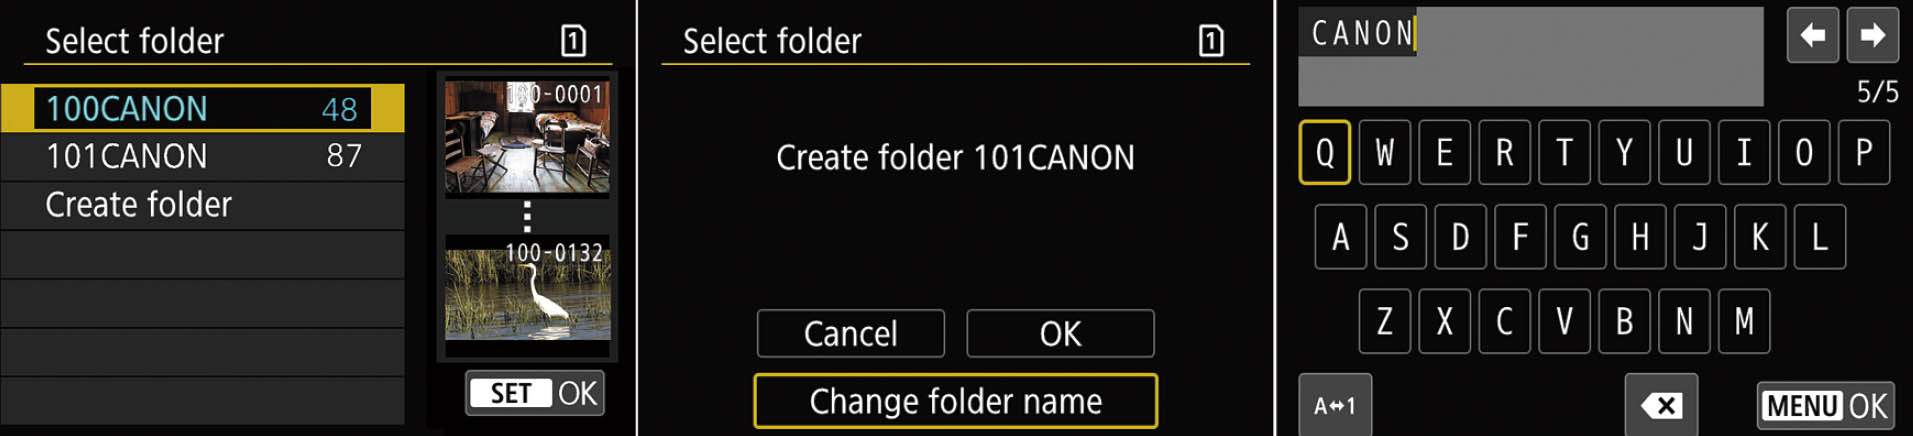
Figure 14.5 Choose a folder or create a new one.
File Numbering
Options: Numbering: Continuous (default), Automatic Reset; Manual Reset
My recommendation: Continuous
A file number will be automatically applied to each picture you take, using consecutive numbering for all your photos over a long period, spanning many different memory cards, starting over from scratch when you insert a new card, or when you manually reset the numbers. Numbers are applied from 0001 to 9999, at which time the camera creates a new folder on the card (100, 101, 102, and so forth), so you can have 0001 to 9999 in folder 100, then numbering will start over in folder 101.
The camera keeps track of the last number used in its internal memory. That can lead to a few quirks you should be aware of. For example, if you insert a memory card that had been used with a different camera, numbering may start with the next number after the highest number used by the previous camera. (I once had a brand-new Canon camera start numbering files in the 8,000 range.) I’ll explain how this can happen next.
On the surface, the numbering system seems simple enough: In the menu, you can choose Continuous, Automatic Reset, or Manual Reset. Here is how each works:
- Continuous. If you’re using a blank/reformatted memory card, the system will apply a number that is one greater than the number stored in the camera’s internal memory. If the card is not blank and contains images, then the next number will be one greater than the highest number on the card or in internal memory. (In other words, if you want to use continuous file numbering consistently, you must always use a card that is blank or freshly formatted.) Here are some examples:
- • You’ve taken 4,235 shots with the camera, and you insert a blank/reformatted memory card. The next number assigned will be 4,236, based on the value stored in internal memory.
- • You’ve taken 4,235 shots with the camera, and you insert a memory card with a picture numbered 2,728. The next picture will be numbered 4,236.
- • You’ve taken 4,235 shots with the camera, and you insert a memory card with a picture numbered 8,281. The next picture will be numbered 8,282, and that value will be stored in the camera’s menu as the “high” shot number (and will be applied when you next insert a blank card).
- Automatic Reset. If you’re using a blank/reformatted memory card, the next photo taken will be numbered 0001. If you use a card that is not blank, the next number will be one greater than the highest number found on the memory card. Each time you insert a memory card, the next number will either be 0001 or one higher than the highest already on the card. Note that when your Folder number reaches 999 (that’s potentially a lot of folders on one card!) and that folder has 9999 images, you will not be able to continue shooting until you replace the card with a different one.
- Manual Reset. A new folder is created numbered one higher than the last folder, and restarts the file numbers at 0001. Then, the camera uses the numbering scheme that was previously set, either Continuous or Automatic reset, each time you subsequently insert a blank or non-blank memory card. When performing a manual reset, you are offered the option to change the folder name used to something other than the default CANON, or whatever five characters you have specified previously.
File Name
Options: Change User Setting 1, Change User Setting 2
My recommendation: N/A
Like other cameras in the Canon product line, the R5 and R6 automatically apply a file name with a four-digit alphanumeric string, followed by the four-digit image number, such as BE3B0001.jpg, BE3B001.hif, or BE3B0001.cr3 to your image files as they are created. The first four characters are set at the factory and are unique to your camera. However, you can also create two personal User Settings, numbered 1 (with four characters of your choice) and 2 (with three). You can use this menu option to change the names applied to your photos—but only within certain strict limitations. In practice, you can change only four of the eight characters, the BE3B (or your camera’s counterpart) portion of the file name, using rules and industry conventions, such as those set by the Design Rule for Camera File System (DCF) specification.
DCF limits file names created by conforming digital cameras to a maximum of eight characters, plus a three-character extension (such as .jpg, .hif, or .cr3) that represents the format of the file. The eight-plus-three (usually called 8.3) length limitation dates back to an evil and frustrating computer operating system that we older photographers would like to forget (its initials are D.O.S.), but which, unhappily, lives on as the wraith of a file-naming convention.
Of the eight available characters, four are used to represent, in a general sense, the type of camera used to create the image. Canon defaults to your factory-set initial four characters. The remaining four are used for numbers from 0000 to 9999, which is why your numbering “rolls over” to aaaa4000 again when the 9999 number limitation is reached. When the camera rolls off the factory assembly line, it is configured to provide a choice of three different file-naming schemes:
- Factory Preset Code. This is unique to your camera. Every camera has a different preset code. When active, your images will be given names like (in my case) aaaa 0001.jpg when using the sRGB color space. If you switch to Adobe RGB, by industry convention the first character is replaced with an underline, yielding _EOS0001.jpg or _EOS001.cr3, or similar names. You cannot change the factory preset code, but you can switch to one of the alternate naming schemes, as I’ll show you next. This is a pretty cool feature, making it easy to tell which of your many R5 or R6 cameras (it could happen!) was used to take a given image.
- User Setting 1. This is one of two user-definable alternative naming schemes. As the camera comes from the factory, it is set to IMG_0001.jpg/cr3/mov (for video) if you’re using the sRGB color space, or _IMG0001.jpg, etc., for Adobe RGB. However, you can specify all four initial characters for this setting, and end up with something like EOSR0001.jpg instead, when using sRGB. The underscore still replaces the first characters in the file name when you’re using Adobe RGB. So, if you choose OHIO, you’ll see OHIO0001.jpg for sRGB and _HIO0001.jpg with Adobe RGB.
- User Setting 2. This second user-definable setting allows you to specify only the first three of the four initial characters. The default is IMG for those characters. The camera uses the fourth position for a code representing the image recording quality. So, if your initial three letters are ABC, you might end up with file names like _BCL0001.jpg or ABCL001.jpg. The codes are as follows:
- • L. Large Fine JPEG, Large Standard JPEG, or RAW.
- • M. Medium Fine JPEG, Medium Standard JPEG, or M RAW.
- • S. Small 1 Fine JPEG, Small 1 Standard JPEG, or S RAW.
- • T. Small 2 JPEG.
- • _ (underscore). The file is a movie, and quality setting is not indicated.
Redefining User Settings 1 and 2
To change the two User Settings from their defaults, navigate to the File Name screen, as shown at left in Figure 14.6. Then, follow these steps:
- 1. Access menu entry. Highlight the User Setting you want to modify and press SET. The screen shown at right in Figure 14.6 appears.
- 2. Remove old entry. Tap the <x (backspace icon) at lower right on the screen, or press the Trash button at the lower-right corner of the camera’s rear panel repeatedly until the previous entry is removed. A vertical line will be shown at the current cursor position.

Figure 14.6 Left: Customize and choose your file naming scheme. Right: Enter text here.
- 3. Select characters. Use the touch screen or the Multi-controller joystick to navigate to the first character you want to choose. Only uppercase letters, an underscore, and numerals are available. You can also move the cursor with the Main Dial, and select characters with the QCD-2 or QCD-1. Press the character or press SET to enter the highlighted character.
- 4. Choose remaining characters. The cursor will advance to the next position, and you can repeat Step 3 to enter the remaining characters (a total of four for Setting 1 and three for Setting 2). You can always press the Trash button to remove one or more characters you’ve entered in error. You cannot use an underscore for any character; that’s reserved for the camera’s use.
- 5. Finish. Press MENU to confirm your text entry, or INFO to cancel.
- 6. Review. The updated definitions are shown at the bottom of the screen, as seen at left in Figure 14.6.
Selecting a Naming Scheme
Once you’ve defined your naming alternatives to your satisfaction, you can switch among them at any time during a shooting session. Just access the File Name screen from the Set-up 1 menu, highlight File Name at the top of the screen, and press SET. You can then choose the factory preset code, User Setting 1, or User Setting 2, as shown in Figure 14.6. Renaming a user setting is so easy that I sometimes do it on the fly during a shoot. If you don’t need to differentiate between different cameras or models, you can change the characters to anything else that suits your purposes, including your initials (DDB_ or JFK_, for example) or even customize for a particular shooting session (EUR, GER, FRA, and JAP when taking vacation trips). You can also use the file name flexibility to partially overcome the 9999 numbering limitation. You could, for example, use the template EO1 to represent the first 10,000 pictures you take, and then EO2 for the next 10,000, and EO3 for the 10,000 after that.
That’s assuming you don’t rename your image files in your computer. In a way, file naming verges on a moot consideration, because it applies only to the images as they exist in your camera. After (or during) transfer to your computer you can change the names to anything you want, completely disregarding the 8.3 limitations (although it’s a good idea to retain the default extensions). If you shot an image file named IMG_4832.jpg in your camera, you could change it to Paris_EiffelTower_32.jpg later. Indeed, virtually all photo-transfer programs, including Photoshop Elements Transfer, allow you to specify a template and rename your photos as they are moved or copied to your computer from your camera or memory card.
I usually don’t go to that bother (I generally don’t use transfer software; I just drag and drop images from my memory card to folders I have set up), but renaming can be useful for those willing to take the time to do it.
Format Card
Options: Format Card, Low Level Format
My recommendation: N/A
Use this item to erase everything on your memory card and set up a fresh file system ready for use. When you select Format Card, a display appears allowing you to choose Card 1 or Card 2. When you’ve specified your card, the screen shown in Figure 14.7 pops up, displaying the capacity of the card, how much of that space is currently in use, and two choices at the bottom of the screen to Cancel or OK (proceed with the format). Press the Trash button if you’d like to do a low-level format. That’s a more basic format that removes all sectors from the card and creates new ones, which can help speed up a card that seems to be slow (because the camera must skip over “bad” sectors left behind from previous uses). An orange bar appears on the screen to show the progress of the formatting step.
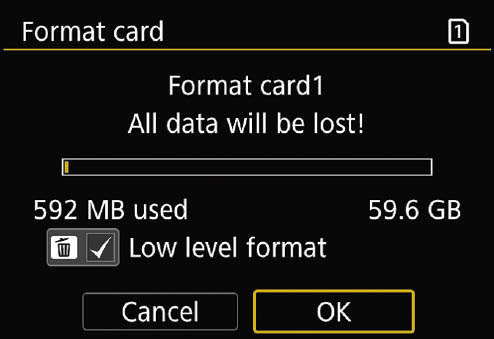
Figure 14.7 Formatting a memory card.
Auto Rotate
Options: On: Camera, Computer (default); On: Computer Only; Off
My recommendation: Camera, Computer
You can turn this feature On or Off. When activated, pictures taken in vertical orientation are rotated on the display screen so you don’t have to turn the camera to view them comfortably. However, this orientation also means that the longest dimension of the image is shown using the shortest dimension of the display, so the picture is reduced in size. You have three options. The image can be auto-rotated when viewing in the camera and on your computer screen using your image-editing/viewing software (this choice is represented by a pair of camera/computer screen icons). The image can be marked to autorotate only when reviewing your image in your image editor or viewing software (just a computer screen icon is used). This option allows you to have rotation applied when using your computer, while retaining the ability to maximize the image on your display in the camera. The third choice is Off. The image will not be rotated when displayed in the camera or with your computer. Note that if you switch Auto Rotate off, any pictures shot while the feature is disabled will not be automatically rotated when you turn Auto Rotate back on; information embedded in the image file when the photo is taken is used to determine whether autorotation is applied.
Add Movie Rotate Information
Options: Enable, Disable (default)
My recommendation: Disable if you don’t transfer your video to smart devices often
Thanks to smartphones, movies aren’t all horizontal anymore. While video has traditionally been shot in landscape orientation, users of smart devices have been happily rotating their phones and tablets to record movies in both horizontal and vertical modes. This setting allows you to automatically add information to your video clips that indicate which side is up, so they can be played back in the same orientation on their devices. This setting does not apply to video played back on the camera or through an external monitor connected via an HDMI cable. EOS R5 owners should note that rotation information is not available for movies recorded in RAW or RAW+MP4.
Date/Time/Zone
Options: Date, Time, Zone, Daylight Savings
My recommendation: N/A
Use this option to set the date and time, which will be embedded in the image file along with exposure information and other data. As first outlined in Chapter 1, you can set the date and time by following these steps:
- 1. Access this menu entry from the Set-up 2 menu.
- 2. Rotate the QCD-1 to move the highlighting down to the Date/Time entry.
- 3. Press the SET button in the center of the QCD-1 to access the Date/Time setting screen.
- 4. Rotate the QCD-1 to select the value you want to change. When the gold box highlights the month, day, year, hour, minute, or second format you want to adjust, press the SET button to activate that value. A pair of up/down pointing triangles appears above the value.
- 5. Rotate the QCD-1 to adjust the value up or down. Press the SET button to confirm the value you’ve entered.
- 6. Repeat steps 4 and 5 for each of the other values you want to change. The date format can be switched from the default mm/dd/yy to yy/mm/dd or dd/mm/yy; you can turn Daylight Savings time on or off, and choose an appropriate time zone.
- 7. When finished, rotate the QCD-1 to select either OK (if you’re satisfied with your changes) or Cancel (if you’d like to return to the Set-up 2 menu without making any changes). Press SET to confirm your choice.
- 8. When finished setting the date and time, press the MENU button to exit, or just tap the shutter release.
Language
Options: 29 languages
My recommendation: N/A
This is the first entry on the Set-up 2 page. (See Figure 14.8.) Choose from 29 languages for menu display, rotating the Quick Control Dial 1 or using the Multi-controller joystick until the language you want to select is highlighted. Press the SET button to activate.

Figure 14.8 The Set-up 2 menu.
Video System
Options: For NTSC, For PAL
My recommendation: N/A
This setting controls the output through the HDMI cable when you’re displaying images on an external monitor. You can select either NTSC, used in the United States, Canada, Mexico, many Central, South American, and Caribbean countries, much of Asia, and other countries, or PAL, which is used in the UK, much of Europe, Africa, India, China, and parts of the Middle East.
VIEWING ON A TELEVISION
Canon makes it quite easy to view your images on a high-definition television (HDTV). Purchase the optional HDMI Cable HTC-100 (or equivalent HDMI Micro C cable) and connect it to the HDMI OUT terminal just below the USB Type-C port on the left side of the camera.
Connect the other end to an HDMI input port on your television or monitor (my 42-inch HDTV has three of them; my 26-inch monitor has just two). Then turn on the camera and press the Playback button. The image will appear on the external TV/HDTV/monitor and will not be displayed on the camera’s LCD. Most HDTV systems automatically show your images at the appropriate resolution if you set HDMI Resolution to Auto using the Set-up 4 entry described later in this chapter.
Help Text Size
Options: Small (default), Large
My recommendation: Large
When you first begin using your camera, you may find yourself pressing the INFO button when the INFO Help message is displayed below a menu. Pressing it will pop up a screen with information on how to choose options for that menu item. You won’t need this help after you’ve had your camera for a while, but as long as you avail yourself of this aid, you might as well have it displayed in large, clear text. You can press the up/down directional controls to scroll within the help text display.
Beep
Options: Enable (default), Touch Screen, Disable
My preference: Disable
An internal beeper provides a helpful chirp to signify various functions, such as the countdown of your camera’s self-timer, when an image is in focus, and during touch operations. You can switch it off entirely if you want to avoid the beep because it’s annoying, impolite, or distracting (at a concert or museum), or undesired for any other reason. In the Beep screen, choose Enable to activate, Disable to silence all beeps, or Touch To Silence (which silences the beep only during touch screen operations), as you prefer. Press SET to activate your choice and exit.
Headphone Volume
Options: 16 levels from 0 to 15 (default is 8)
My recommendation: N/A
You can change the volume of audio sent to headphones through the camera’s headphone port by rotating the QCD-2 or QCD-1, or using the Multi-controller joystick. There are 16 levels available from 0 to 15. You’ll find headphones particularly useful to check the sound quality being recorded by your camera’s built-in microphone or an external mic, when Sound Recording is enabled and High Frame Rate is disabled. Both are located in the Movie Shooting 1 menu.
Power Saving
Options: Display Off: Default, 1 min.; Auto Power Off: Default, 1 min.; Viewfinder Off: Default, 3 min.
My recommendation: Display: 3 min.; Auto Power Off: 5 min.; Viewfinder Off: 3 min.
This setting allows you to adjust how long your camera remains active before features are turned off to save power. As I noted with the Eco Mode explanation, intelligent power saving can be crucial with mirrorless cameras. This option is more useful and flexible than Eco Mode; you have three choices:
- Display Off. In this case, by “display,” Canon is referring to the LCD screen. You can specify a delay of 15 seconds to 30 minutes. While the default value is 1 minute, as long as I have a spare battery or two with me, I’m more comfortable with a longer delay of 3 minutes. That gives me time to stop and think about what I am doing if I am working with menus or reviewing an image on the LCD. In special cases, longer delays are appropriate, say, if you have the camera on a tripod and are monitoring a live scene while waiting for wildlife or another subject to appear before taking a picture. If Eco Mode is active, this setting and Auto Power Off are disabled.
- Auto Power Off. This setting controls the amount of time the camera can remain idle before powering down. You can bring the system back to live by tapping the shutter button. I usually set this option for five minutes, but set a longer delay when shooting sports or taking street photos and I want the camera to be ready for a quick shot.
- Viewfinder Off. Power savings from switching off the electronic viewfinder are relatively minimal, which is why your only options are 1 minute, 3 minutes, and Disable. Regardless of the setting, the viewfinder reactivates when you bring the camera up to your eye, so a three-minute delay is reasonable. If you’re in sports or photojournalism mode, you might want to disable automatic power down. Eco Mode doesn’t turn off the viewfinder, so if Eco Mode is active, you can still use this setting to specify a delay of your choice.
Eco Mode
Options: On, Off (default)
My recommendation: Carry multiple batteries so you don’t have to worry about this
Your mirrorless camera is inherently more power hungry than traditional dSLRs you may have used. The sensor is energized any time you are using the viewfinder or LCD screen (rather than only when capturing a photo), and the EVF and LCD themselves suck up juice. Based on Canon’s own specifications, you may expect to shoot only 370 exposures or capture just 2 hours, 20 minutes of movies with a single fully charged battery.
When Eco Mode is enabled, the LCD screen (but not the viewfinder) darkens drastically if the camera is not used for approximately two seconds, and turns off completely after 10 seconds. To reactivate, tap the shutter release to gain yourself another 2/10 seconds of LCD viewing. While Eco Mode is a thoughtful feature on Canon’s part, in practice it can be a major inconvenience, especially if you are using the LCD to compose your image (say, the camera is mounted on a tripod). In such cases, you’d definitely want to make sure Eco Mode is turned off. Even better, you can turn Eco Mode off and leave it off for the rest of your life though the simple expedient of buying a reasonable number of batteries. Swapping power cells every few hours is preferable to losing your LCD image at a critical moment. I use this feature only when I am down to my last battery (due to unforeseen circumstances, or, stupidity) and want to squeeze every bit of juice I can out of my remaining LP-E6NH.
Screen/Viewfinder Display
Options: Adjust viewfinder/LCD screen switching
My recommendation: N/A
This is the first entry in the Set-up 3 menu. (See Figure 14.9.) Canon has managed to fix an annoyance that has vexed many mirrorless camera owners—the tendency of the display to automatically switch from LCD screen to viewfinder at inopportune moments. The eye sensor located under the viewfinder window can activate the viewfinder when your face—or, unfortunately, anything else—approaches the eyepiece. If your camera is mounted on a tripod, just reaching for the MENU button can trigger the switch.
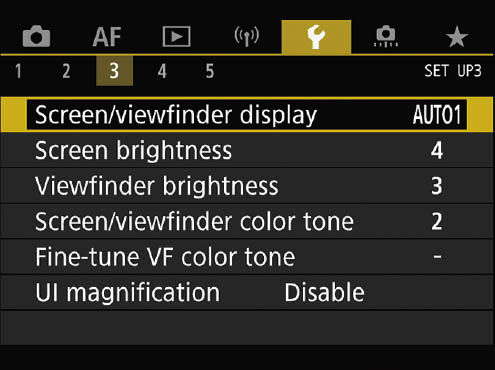
Figure 14.9 The Set-up 3 menu.
This setting has four useful modes:
- Auto1: If the LCD screen is swiveled out from the camera body, always use the LCD, even if something approaches the eye sensor. When the screen is folded back to the normal position, switch to the viewfinder when your eye nears the sensor. Effectively, this disables switching to the EVF only when the screen is swiveled out.
- Auto2: Use the LCD for display whether the screen is in the normal position or swiveled out, but switch to the viewfinder if your eye or something else approaches the viewfinder/eye sensor. In other words, the display switches regardless of the position of the screen.
- Viewfinder: Always use the viewfinder for display.
- Screen: Always use the LCD screen for display. If you’d like to toggle between this setting and the last, you can define a button to perform the switch, using the Customize Button entry in the Custom Functions 3 menu, described in Chapter 15.
Screen Brightness/Viewfinder Brightness
Options: Adjust brightness of viewfinder and/or LCD screen
My recommendation: N/A
These next two entries function identically, to let you adjust the LCD screen and viewfinder, respectively. In general, you’ll find yourself tweaking the LCD screen more frequently, to make it more visible under bright illumination outdoors—or less visible indoors. At concerts, I tend to review my images using the electronic viewfinder; if I want to share images with a companion, I often dial down the brightness of the LCD screen to the minimum to avoid disturbing the other paying customers who might not be as interested in my results.
Use the example image and the gray patches shown (see Figure 14.10) to decide whether the brightness is satisfactory. The thumbnail shows the last image viewed during Playback, so you can actually “calibrate” your display for your current shooting environment. You want to be able to see both the lightest and darkest steps at top and bottom of the gray scale, and not lose any of the steps in the middle. Brighter settings use more battery power, but can allow you to view an image on the LCD outdoors in bright sunlight. When you have the brightness you want, press the SET button to lock it in and return to the menu.
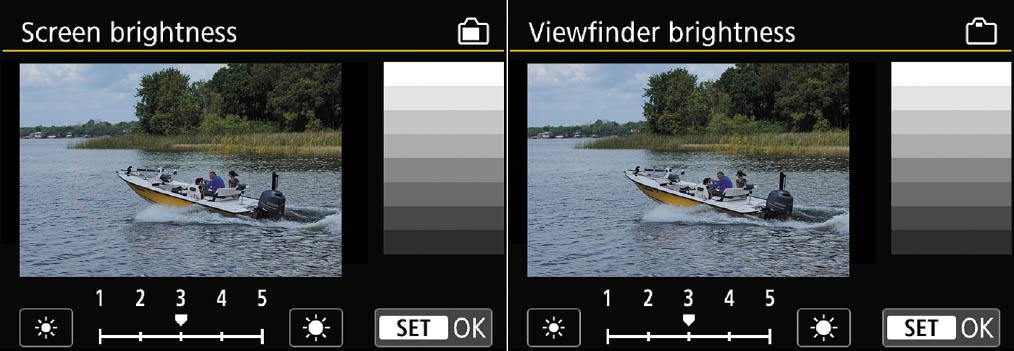
Figure 14.10 Adjust electronic viewfinder and LCD screen brightness for easier viewing under varying ambient lighting conditions.
Screen/Viewfinder Color Tone
Options: 1: Warm tone, 2: Standard (default), 3: Cool tone 1, 4: Cool tone 2
My recommendation: 2: Standard
You can use this setting to adjust the approximate color balance of the viewfinder and LCD monitor to your taste. It works similarly to the Display Brightness entry: bring the camera up to your eye to adjust the viewfinder and look at the LCD screen to set its color tone. You’d use this option if you consistently find that your images are warmer or cooler than what you view, and want to have a (slightly) more accurate preview image. (Neither display will match your final image precisely, especially when you are shooting RAW, because the display shows a JPEG version regardless of the format you choose.)
To set the color, activate this entry, and the last image you played back will be displayed. You should use the ambient lighting conditions you want to standardize on. Then, highlight 1: Warm tone, 2: Standard, 3: Cool tone 1, or 4: Cool tone 2, and press SET.
Fine-Tune Viewfinder Color Tone
Options: Blue/Amber, Green/Magenta adjustments
My recommendation: N/A
If you want to really tweak your viewfinder’s color tone, this entry allows you to adjust bias along the blue/amber and green/magenta axes, just as you can do with color balance settings (described in Chapter 11). As you evaluate the playback image through viewfinder, you can use the Multi-controller joystick to move the color balance zero point in all four directions. A grayscale is displayed at the bottom of the screen for reference. Press SET to confirm when you’re satisfied with the setting.
UI Magnification
Options: Enable, Disable (default)
My recommendation: Disable
If you find you sometimes have trouble viewing menus under less than perfect viewing conditions with the standard user interface (UI), you can double the size of menu screens by enabling this option. Then, just double-tap the LCD screen to increase the size of the display, and double-tap again to return to the normal display. When the user interface is enlarged, other touch screen operations are disabled and you must use the camera controls to make your settings.
HDMI Resolution
Options: Auto (default), 1080p
My recommendation: 1080p if your device accepts it
This is the first entry in the Set-up 4 menu. (See Figure 14.11.) As I mentioned earlier, you can output to an external monitor or video recorder using a cable that has an HDMI Mini-C connector to fit the camera and a standard HDMI connector on the other end to link to your device. You can set this option to Auto, in which case the camera will attempt to ascertain the correct resolution for the connected device, and then direct its output in that format. There may be some delay while the appropriate resolution is achieved, but if you know your device can accept 1080p video, you can go ahead and select that setting to avoid the time lag.
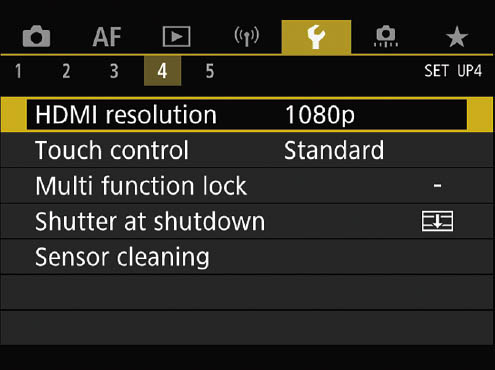
Figure 14.11 Set-up 4 menu.
The only problem with this procedure is that the system has a nasty habit of not adjusting to the correct resolution for some devices, complicated by the fact that you cannot then select the right setting yourself. I’ve encountered several devices, including my BlackMagic Intensity Shuttle capture device, that the camera is unable to recognize automatically, and which require a setting that Canon does not allow you to make manually. I checked with Canon and they offer no solution; there is no way to manually specify a resolution other than 1080p. I ended up using a $20 MavisLink USB-to-HDMI video capture device, and the free OBS Studio software to grab the screens shown in this book.
Touch Control
Options: Standard (default), Sensitive, Disable
My recommendation: Standard
Here you can specify how sensitive the touch screen is to your taps and strokes. Note that the screen responds to changes in capacitance (changes in an electrical charge), rather than pressure, so using a stylus or other object instead of a finger isn’t advised. Moisture or protective covers for the LCD screen may also interfere with touch operation, although I’ve had no problems with GGS screens available from Amazon and elsewhere. If you find that your everyday handling frequently triggers unwanted actions, you can disable touch control entirely if you never want to use it. Otherwise, set the amount of sensitivity that works best for digital control, so to speak. While Standard works best for most, those who use touch control frequently may want to try the Sensitive setting. However, at that setting, very rapid, light movements may not register.
Multi-Function Lock
Options: Main Dial, Quick Control Dial 2, Quick Control Dial 1, Multi-controller, Touch Control, Control Ring
My recommendation: N/A
Your camera includes a multi-function lock button located just north east of the QCD-2. Slide it to the right when you want to prevent the use of the Main Dial, Quick Control Dial 2, Quick Control Dial 1, Multi-controller, Touch Controls, or Control Ring from accidentally changing a setting.
You can select any or all six of the controls to lock, while freeing the others (or none) to act normally. I use this sometimes when I am using manual exposure, especially when I’m fumbling around in a darkened environment, and don’t want to unintentionally manipulate my settings. The Multi-Function Lock screen has one option for each control; highlight the control and press SET to lock or unlock it. A check mark appears next to the control’s name when it’s locked, and an L/Lock indicator appears in your displays. In Scene Intelligent Auto mode, only touch control can be locked. (See Figure 14.12.)
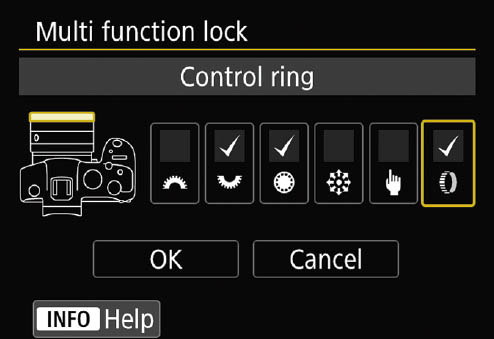
Figure 14.12 Lock any or all of these six: Main Dial, Quick Control Dial 2, Quick Control Dial 1, Multi-controller, Touch Control, and Control Ring.
Shutter at Shutdown
Options: Closed (default), Open
My preference: Closed
Some first-time mirrorless camera owners freak out the first time they remove a lens and are confronted with a naked, unprotected image sensor. Those owners do not own an EOS R5 or R6. Canon intelligently has the camera close the shutter when powered down, preventing dust or even worse artifacts from landing on your sensor. The only time I disable this useful feature is when I am shooting acoustic concerts or other venues where silence is golden and the camera shuts down at intervals to preserve battery power. By keeping the shutter open and using the electronic shutter, the only sounds you’ll hear come from the almost-imperceptible whirr of the autofocus motor.
Sensor Cleaning
Options: Auto Cleaning, Clean Now (default), Clean Manually
My recommendation: N/A
One very useful feature is the automatic sensor cleaning system that reduces or eliminates the need to clean your camera’s sensor manually using brushes, swabs, or bulb blowers. Canon has applied anti-static coatings to the sensor and other portions of the camera body interior to counter charge build-ups that attract dust. A separate filter over the sensor vibrates ultrasonically each time the camera is powered on or off, shaking loose any dust, which is captured by a sticky strip beneath the sensor.
Use this menu entry to enable or disable automatic sensor cleaning on power up (select Auto Cleaning to choose) or to activate automatic cleaning during a shooting session (select Clean Now). You can also choose the Clean Manually option to open the shutter and clean the sensor yourself with a blower, brush, or swab. If the battery level is too low to safely carry out the cleaning operation, the camera will let you know and refuse to proceed, unless you use the optional AC Adapter Kit ACK-E6N with the DC Coupler DR-E6.
Reset Camera
Options: Basic Settings, Other Settings
My recommendation: N/A
This, the first entry in the Set-up 5 menu, includes choices to let you return most settings to their default values. (See Figure 14.13, left and right.) You can choose Basic Settings, which restores the default adjustments for camera shooting functions and menu settings. Regardless of how you’ve set up your camera, it will be adjusted to One-Shot AF mode, Automatic Face+Tracking AF-point selection, Evaluative metering, Single Shot drive mode, JPEG Fine Large image quality, Automatic ISO, sRGB color mode, Automatic White Balance, Auto Lighting Optimizer Off, and Standard Picture Style. Any changes you’ve made to exposure compensation, flash exposure compensation, and white balance will be canceled, and any bracketing for exposure or white balance nullified. Custom white balances and Dust Delete Data will be erased.
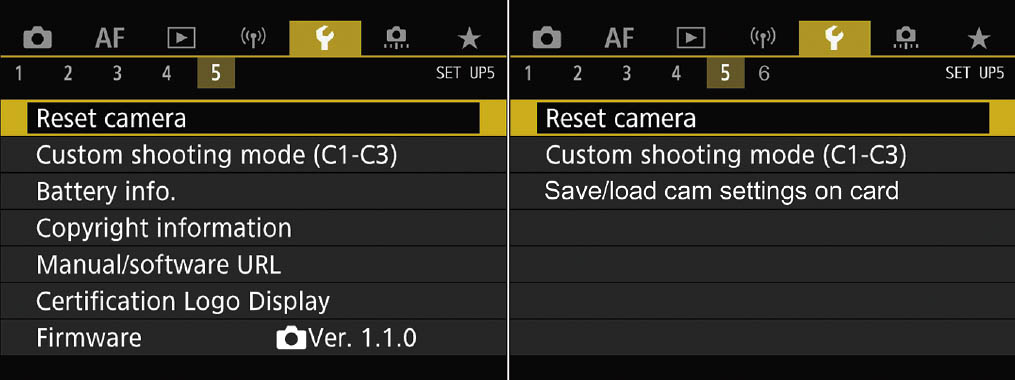
Figure 14.13 The Set-up 5 menu for the R6 (left) and R5 (right).
The other settings that can be reset here include: Root Certificate, Communications Settings, Shooting Information Display, Custom Shooting Modes, Copyright Information, Custom Functions (Customize Buttons and Customize Dials will be retained), Custom Controls (clears Customize Buttons and Customize Dials), and My Menu. You’ll also find a Clear Customized Settings in the Custom Functions 3 menu and Clear All Custom Functions in the Custom Functions 5 menu, as explained in Chapter 14.
CHANGE OF MENU
The original Set-up 5 menu was identical for both the R5 and R6. However, Canon added a new entry to the R5 version Save/Load Settings On Card, and split the menu into two.
Custom Shooting Mode (C1–C3)
Options: Register Settings; Clear Settings; Auto Update Settings: Enable, Disable
My recommendation: N/A
Custom Shooting modes are not cancelled by the Reset Camera commands. This entry allows you to register your current camera shooting settings and file them away in the C1, C2, or C3 positions and access them when pressing the MODE button. Doing this overwrites any settings previously stored at that position. You can also clear the settings for any of the three MODE positions individually, returning them to their factory default values.
Register your favorite settings for use in particular situations. I have stored settings for sports, portraits, and landscapes. If you switch to C1, C2, or C3 and forget what settings you’ve made for that slot, just press the INFO button to view the current settings. Keep in mind that My Menu settings are not stored individually. You can have only one roster of My Menu entries available for all the Mode Dial’s positions.
This menu choice has only three options: Register Settings (which stores your current settings in your choice of C1, C2, or C3), Clear Settings (which erases the settings in C1, C2, or C3), and Auto Update Settings. When the latter is set to Enable, any changes you make to your settings in C1, C2, or C3 modes will be stored in that memory slot; use Disable to preserve your registered setting as-is, ignoring any changes you made while using that Custom Shooting mode. Note that you must use this menu entry to clear your settings.
To perform these tasks, just follow these steps:
- 1. Make your settings. Set the camera to an exposure mode other than Scene Intelligent Auto.
- 2. Access Camera user settings. Navigate to the Custom shooting mode option in the Set-up 5 menu, and press SET.
- 3. Choose function. Choose Register Settings if you want to store your camera’s current settings in C1, C2, or C3; or select Clear Settings if you want to erase the settings stored in either location. Press SET to access the settings screen for your choice.
- 4. Store/Clear settings. The individual screens for storing/clearing are virtually identical. Use the QCD-1 to highlight Custom Shooting Mode: C1, Custom Shooting Mode: C2, or Custom Shooting Mode: C3, and press SET to store or clear the settings for that position. (You’ll be given a choice to proceed or cancel first.)
- 5. Auto update. Keep in mind that if you change a setting while using one of the custom shooting modes and want to retain the new settings, your stored settings can be automatically updated to reflect the modifications. Select Auto Update Set. and choose Enable to activate this option. If you’d rather retain your custom settings until you manually decide to update, select Disable instead.
- 6. Exit. When you confirm, you’ll be returned to the Set-up 5 menu. Press the MENU button or tap the shutter release button to exit the menu system entirely.
Save/Load Camera Settings On Card (R5 only)
Options: Save to Card, Load from Card, Apply Name to Settings
My recommendation: N/A
You can save your current settings, including shooting functions, menu settings, and Custom Function settings, to a memory card as a special file that can be reloaded into your R5, or migrated to another R5. This entry has two settings, Save to Card and Load From Card. While saving you can press the INFO button to apply a specific 8-character name to these settings, using the standard text-entry screen. Note that you can load settings only to your own or another R5; different Canon cameras that can save settings are not compatible. If you’ve updated the firmware on this or the other camera, the settings cannot be restored; the camera must have the same firmware used originally to save the settings. Up to 10 sets of settings can be stored on an individual memory card.
Battery Information
Options: Register, Delete Info.
My recommendation: N/A
This entry is the third on the Set-up 5 menu of the R6, and first on the Set-up 6 menu of the R5 (see Figure 14.14). It is an exceptionally useful feature that allows you to view battery condition information and performance, and track the data among several different batteries. Your camera can keep track of multiple LP-E6, LP-E6N, or LP-E6NH batteries because each of them is given a unique serial number (which is either printed on or available on a sticker you can affix to the battery). The camera reads this serial number and stores information about each of the batteries that you use and have “registered” separately. I always recommend owning at least two and, preferably three or more batteries. That’s especially true if you use a battery grip. I also own other Canon cameras which use the same battery, so I’m able to justify four batteries to shuttle between my multiple cameras.

Figure 14.14 The Set-up 6 menu for the R5.
This feature makes it possible to see exactly how each battery you own is performing, allows you to rotate them to even out the usage, and helps you know when it’s time to replace a battery. When you select this menu choice, a Battery info screen like the one shown at left in Figure 14.15 appears, with a wealth of information (if you use two LP-E6/E6N packs in a grip, such as the BG-R10, information about both packs will appear):
- Battery position. The second line of the screen includes an icon that shows where the battery currently being evaluated is installed (usually the hand grip if you’re not using an add-on battery grip).
- Power type. Next to the position icon is an indicator that shows the model number of the battery installed, or shows that the DC power adapter is being used instead.
- Remaining capacity. The Battery check icon appears showing the remaining capacity visually, along with a percentage number that reads out in 1 percent increments. You can use this as a rough gauge of how much power you have remaining. If you’re in the middle of an important shooting session, you might want to switch to a fully charged battery at the 25–33 percent level to avoid interruptions.
- Shutter count. Displays how many times the shutter has been actuated with the current charged battery. This info can help you learn just how much certain features cost you in terms of power. For example, if a battery has only 50 percent of its power remaining, but you’ve taken only a few dozen photos, you know that your power is being sapped by picture review, lots of autofocus, frequent image stabilization because of lower shutter speeds, or (a major culprit) that flip-up flash you’ve been using. While in most cases knowledge is power, in this instance knowledge can help you save power, with a tip-off to use fewer juice-sapping features if the current battery pack must be stretched as far as possible.
- Recharge performance. This indicator shows how well your battery pack is accepting and holding a charge. Three green bars mean that the pack’s performance is fine; two bars show that recharge performance is degraded a little. A red bar indicates that your pack is on its last legs and should be replaced soon. To lengthen the service time of your batteries, you might want to rotate usage among several different packs, so they all “age” at roughly the same rate.
Registering Your Battery Packs
The camera can “remember” information about up to six LP-E6-series battery packs, and provide readouts of their status individually. To register the battery currently in your camera, follow these steps:
- 1. Access the Battery Info. screen.
- 2. Press the INFO button, located to the left of the LCD screen.
- 3. Information about the current battery, including its serial number and the current date, will be shown on a new screen (see Figure 14.15 left).
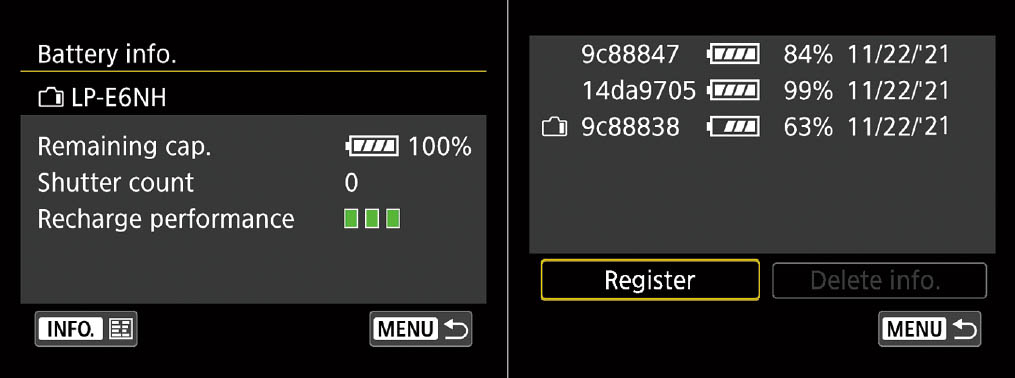
Figure 14.15 View the battery type and position, remaining capacity, number of pictures taken with the current charge, and the performance of your pack (left). Register a new battery (right).
- 4. Choose Register to log the battery; if the pack has already been registered, you can choose Delete Info. to remove the battery from the list. (You’d want to do this if you already had registered the limit of six batteries and want to add another one.)
- 5. Press SET to add the battery to the registry.
- 6. If you’re deleting a battery, the camera shows you a Battery Info. delete screen instead. (You can delete a battery pack without having that battery installed in the camera—which could come in handy if you lose one.) Just select the battery (by serial number) and delete.
- 7. Press MENU to back out of any of the Battery Info. screens.
- 8. Once a battery has been registered, you can check on its remaining capacity at any time (even if it isn’t currently installed in the camera) from the Battery info page. (See Figure 14.15, right.) The camera remembers and updates the status of each registered battery whenever it is inserted in the camera. The date the battery was last used is also shown.

TIP Use this info with caution, however, as a given battery may have self-discharged slightly during storage and, of course, you may have fully recharged it since the last time it was inserted in the camera. However, this data can be useful in tracking the remaining capacity of several different battery packs during a single shooting session, or over the course of several days when you’re not recharging the packs after each session.
Copyright Information
Options: Display Copyright Information, Enter Author’s Name, Enter Copyright Details, Delete Copyright Information
My recommendation: N/A
Here’s where you can give yourself credit for the great photos you’re shooting with your camera:
- Display Copyright Info. Enable or disable embedding copyright information in your image files. If you’re a double-naught secret agent who wants to submit spy photos anonymously, you’ll definitely want to disable copyright information.
- Enter Author’s Name. You can add your own name (up to 63 characters) to each image file, using a screen like the one shown in Figure 14.6 (right), except with a larger array of alphanumeric characters, using the procedure described earlier in this chapter.
- Enter Copyright Details. You can add more information using the expanded character set. Up to 63 characters can be entered. Note that no copyright symbol is available. While some use a lowercase c within parentheses, technically the correct notification would be (Copyright) or (Copr.).
- Delete Copyright Information. This removes all the data you’ve entered and gives you a clean slate, so to speak.
Manual/Software URL
Options: None
My recommendation: N/A
This entry displays a URL you can type in to access manuals and software for your camera, as well as a QR code you can scan with your smart device to whisk you off to the same web page.
Certification Logo Display
Options: None
My recommendation: N/A
This is an information-only screen, which allows Canon to add certification data (similar to what is printed on the bottom panel of the camera) via a firmware upgrade, and without the need to manufacture new stickers for the camera bottom.
Firmware
Options: Update Firmware
My recommendation: N/A
You can see the current firmware release for camera-compatible accessories in the menu listing. If you want to update to a new firmware version, insert a memory card containing the binary file, and press the SET button to begin the process.