12 |
This chapter contains descriptions of some of the more esoteric options available for the complex autofocus systems found in the EOS R5 and R6. Many of these are the settings that you’ll probably set once and forget for a while, or, at least until you decide to make a significant change in your camera’s autofocus behavior.
As much as I would have liked to present one huge, 100-page chapter on autofocus, it made more sense to describe the basic functions and settings in-depth in Chapter 5, and retain the lesser-used AF menu descriptions here with the camera’s other menus. I think the need to jump back and forth will be minimal, although, as with any camera guide, you may need a review of other chapters from time to time as a refresher.
AF Menu Options
The entries listed in the AF menus vary, depending on your shooting mode. In still photography modes other than Scene Intelligent Auto, the full list of 26 items is distributed among AF tabs numbered AF 1 to AF 5. In Scene Intelligent Auto mode, a simplified roster of only 10 of those entries is available. The settings accessible when using Scene Intelligent Auto are marked with an asterisk below.

NOTE I’ll explain the 19 AF entries available in Movie mode in more detail in Chapter 16. Some 17 of them are the same as their still photo counterparts, with two additional settings to adjust Movie Servo AF speed and tracking sensitivity.
AF 1
- AF Operation
- AF Method
- Subject to Detect *
- Eye Detection *
- Continuous AF *
- Touch & Drag AF Settings *
AF 2
- MF Peaking Settings
- Focus Guide *
- AF-Assist Beam Firing *
AF 3
- Servo AF Characteristics
AF 4
- Lens Electronic MF
- One-Shot AF Release-priority
- Switching Tracked Subjects
- Lens Drive when AF Impossible
- Limit AF Methods
- AF Method Selection Control
- Orientation Linked AF Point
AF 5
- Initial Servo AF Point for Face Tracking
- Focus Ring Rotation *
- RF Lens MF Focus Ring Sensitivity *
- Multi-controller Sensitivity AF point Select*
- Electronic full-time MF
AF Operation
Options: One-Shot AF (default), Servo AF
My preference: N/A
This menu entry, the first in the AF 1 menu (see Figure 12.1) is an alternative to using the QCD-1 or M-Fn button options to set autofocus operation. If the AF/MF switch on the lens is set to MF, then only MF appears in this entry and the other two are not available. Reminder: when focus is achieved, the focus point turns green or blue (in Servo mode); if focus cannot be achieved, the point turns orange. To recap:

Figure 12.1 The AF 1 menu. Note: Movie Servo AF appears on the R5 menu only when in Movie mode.
- One-Shot AF. Single autofocus locks in a focus point when the shutter button is pressed down halfway. Green boxes will appear when the image is in focus at the active focus points, or orange if the camera is unable to achieve sharp focus. You’ll hear a beep when focus is locked in if Beep is not disabled in the Set-up 2 menu. The focus will remain locked until you release the button or take the picture. If sharp focus cannot be achieved, a picture will not be taken even if you press down the shutter release all the way.
- Servo AF. This continuous autofocus mode sets focus when you partially depress the shutter button, but continues to monitor the frame and refocuses if the camera or subject is moved. The focus area turns blue when focus is achieved (there is no beep), or orange if the camera is unable to focus. Pressing the shutter release down all the way takes a picture even if sharpest focus has not been achieved.
AF Method
Options: Face+Tracking (default), Spot AF, 1-point AF, Expand AF area, Expand AF area: Around, Zone AF, Large Zone AF (Vertical), Large Zone AF (Horizontal)
My preference: N/A
You can use this menu entry instead of the Quick Control screen or M-Fn button options. You can check focus with 6X/15X (R5) or 5X/10X (R6) magnified views by pressing the Magnify/Reduce button in all modes except Face+Tracking.
Your choices, as explained in more detail in Chapter 5 are as follows:
- Face+Tracking. Intelligent algorithms are used to locate and focus on human faces, and track them and refocus if your subject moves. If no face is found, it will use all the focus points within the frame. You can select the initial position for autofocus when using Servo AF.
- Spot AF. Allows you to manually select a single, reduced-size AF point.
- 1-point AF. Allows you to manually select a single AF point.
- Expand AF area. You can manually select a single AF point, as well as the four points located above, below, and to the left/right of it. In Servo mode, the camera will first focus using a single point, then track using the surrounding points if needed.
- Expand AF area: Around. You can manually select a single AF point, as well as up to eight points surrounding it (above, below, left, right, and diagonally from the selected point).
- Zone AF. AF points are segregated into square-shaped zones that cover about one-sixth of the frame, and you can select which zone to use. In this Zone mode and the two that follow, the camera will seek out faces and attempt to focus on them.
- Large Zone AF (Vertical). AF points are segregated into larger, vertically oriented zones, and you can select which zone to use.
- Large Zone AF (Horizontal). The AF points are located with a larger horizontally oriented zone that you specify.
Subject to Detect
Options: People (default), Animals, No Priority
My preference: People
This entry determines the priority for tracking subjects in Face+Tracking, Zone AF, and Large Zone AF (Vertical or Horizontal) autofocus methods.
- People. The camera first looks for faces or heads of humans on which to focus. At some distances or shooting angles, it may have problems locating faces, and may then focus on and track parts of human bodies instead.
- Animals. The camera is most successful seeking out faces or bodies of dogs, cats, or birds, and then focusing on/tracking them.
- No Priority. The camera doesn’t give focus/tracking preference to people or animals; all types of subjects have equal priority.
Eye Detection
Options: Enable (default), Disable
My preference: N/A
This setting turns Eye Detection AF on or off, as described in Chapter 5. In use, an AF point is displayed around a detected human or animal eye. Eye Detection is available only with One-Shot AF and the Face+Tracking AF method. Temporarily disable Eye Detection AF by pressing the AF Point Selection button, followed by the INFO button. Press INFO a second time to reactivate Eye Detection.
Continuous AF
Options: Enable, Disable (default)
My preference: N/A
When Continuous AF is enabled, the camera refocuses all the time (even in One-Shot mode) until you press the shutter release halfway. Then it refocuses (and locks, in One-Shot mode) and resumes refocusing (in Servo mode) until you press the shutter release all the way. The net effect is that when you’re ready to take a picture, the camera has focused and refocused continually and therefore should be ready for the final focusing when you take the photo. Canon warns that if you want to switch to manual focus when Continuous AF is active, you should turn the camera off first, slide the lens switch to MF, and then turn the camera back on.
Touch & Drag AF Settings
Options: Touch & Drag AF: Enable, Disable (default); Positioning method: Absolute, Relative (default); Active Touch Area: Whole Panel, Right (default), Left, Top, Bottom, Top Right
My preference: When enabled, I prefer Relative Positioning and Whole Panel Active Touch Area.
As I’ve mentioned before, your touch screen can be useful even when you’re working exclusively with the electronic viewfinder. When you access this entry, the screen shown in Figure 12.2 appears, giving you three options:
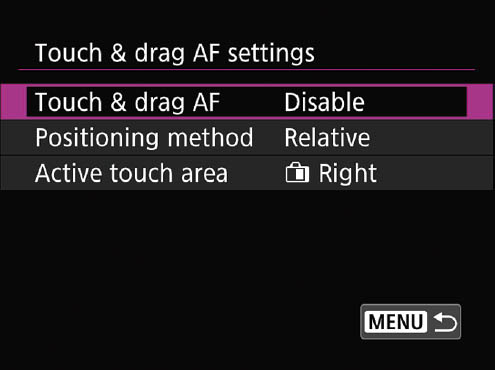
Figure 12.2 Touch & Drag options.
- Touch & Drag AF. Choose Enable to activate, or Disable to turn the feature off. When enabled, you can touch and drag according to the parameters that follow. In Face+Tracking mode, a round orange frame appears in the viewfinder while you are dragging. As soon as you are satisfied with that position, lift your finger and the frame changes to a square frame and tracking of the subject begins. Press the Trash button to cancel selection of that subject.
- Positioning method. You have two options for this setting:
- • Absolute. While looking through the viewfinder, touch the LCD screen with a finger on the active area and drag to any position on the screen. The AF point will move to that location. This option may be more precise, but it requires you to be aware of approximately where you are touching the screen. When the active touch area (as described below) is the whole panel, that’s not difficult, but the behavior is more touch and go (so to speak) with smaller screen active areas.
- • Relative. You can touch and drag anywhere within the active area and move the AF point in that direction by an amount corresponding to the size of the motion.
- Active Touch Area. It’s simplest if you select Whole Panel, so the entire LCD screen is active for the Touch & Drag feature. However, you can choose to make only the left, right, top, or bottom halves active, or the top-right corner. A smaller area requires less dragging to move the focus point to a particular location but is also less precise. The Whole Panel choice is generally more accurate, even if a bit slower than the alternatives.
MF Peaking Settings
Options: Peaking: On, Off (default); Level: High (default), Low; Color: Red (default), Yellow, White
My preference: On, High, Red
Although located in the Autofocus 2 menu (see Figure 12.3), MF Peaking Settings deals only with manual focus and is therefore available only when focusing in Manual modes. Focus peaking is a technique that emphasizes the outlines of the area in sharpest focus with a color that can be red, white, or yellow. The colored area shows you at a glance what will be very sharp if you take the photo at that moment. If you’re not satisfied, simply change the focused distance (with manual focus). As the focus gets closer to ideal for a specific part of the image, the color outline develops around hard edges that are in focus. You can choose how much peaking is applied (High or Low), select a specific accent color (Red, Yellow, or White), or turn the feature off.
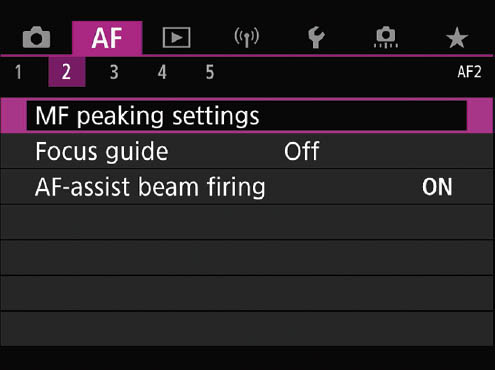
Figure 12.3 The AF 2 menu.
Peaking Color allows you to specify which color is used to indicate peaking when you use manual focus. White is the default value, but if that color doesn’t provide enough contrast with a similarly hued subject, you can switch to a more contrasting color, such as red or yellow. Peaking is not shown in magnified view or in the HDMI output you direct to an external monitor or recorder. It may be difficult to see the outlines at high ISO settings or when Canon Log is activated.
Focus Guide
Options: On, Off (default)
My preference: On
This is another useful manual focus (only) tool that overlays a guide within the image frame that shows you which direction you need to move the focus ring, and roughly how much. You can relocate the focus guide to a desired portion of the screen (press the AF Point button and use the directional controls) or tap the screen to move it. Pressing the SET button (or the Return icon at the upper-right corner of the touch screen) places the guide frame in the center. I provided more information on using the Focus Guide, along with illustrations, in Chapter 5.
AF-Assist Beam Firing
Options: Enable (default), Disable, LED AF-assist beam only
My preference: LED AF-assist beam only
This setting determines when bursts from a compatible external electronic flash or the camera’s built-in LED are used to emit a pulse of light that helps provide enough contrast for the camera to focus on a subject. You can select Enable to use the camera’s LED or an attached Canon Speedlite to produce a focus assist beam. Use Disable to turn this feature off if you find it distracting. Keep in mind that if you select Enable and the Speedlite’s own AF-Assist Beam Firing is set to Disable, the AF-assist beam will not be emitted (the flash’s setting takes precedence).
- Enable. The AF-assist light is emitted by the camera’s LED or an attached, powered-up external flash whenever light levels are too low for accurate focusing using the ambient light.
- Disable. The AF-assist illumination is disabled. You might want to use this setting when shooting at concerts, weddings, or darkened locations where the light might prove distracting or discourteous.
- LED AF-Assist Beam Only. Some Canon flash units have an LED AF-assist lamp. Select this option to activate only the Speedlite’s beam. If your flash does not have an LED, the camera’s LED will be used instead. Again, if you’ve turned off the external flash’s AF-assist beam using its own controls, this function is disabled.
Servo AF Characteristics
Options: Case 1 (default), Case 2, Case 3, Case 4, Auto
My preference: N/A
This entire menu is used to select from among five different factory preset “Cases” with autofocus settings suitable for various types of action scenes. You can also modify those presets to adjust the sensitivity of the camera during tracking of moving objects, its response to acceleration and deceleration, and how quickly it switches between autofocus points as subjects move through the frame. The icons (see Figure 12.4) provide pictogram reminders showing the types of action each Case is designed to cover. Highlight the Case you want to use and press SET to confirm. To change any of the parameters, press the RATE button and use the QCD-1, touch screen, or Multi-controller joystick to adjust the sliding indicator. The camera provides helpful information about each Case at the press of the INFO button, and you can read my own detailed recommendations for this menu in Chapter 5. To recap, the parameters you can change are listed below. To reset these parameters to their default values, highlight the Case, press RATE, and then press the Trash button.
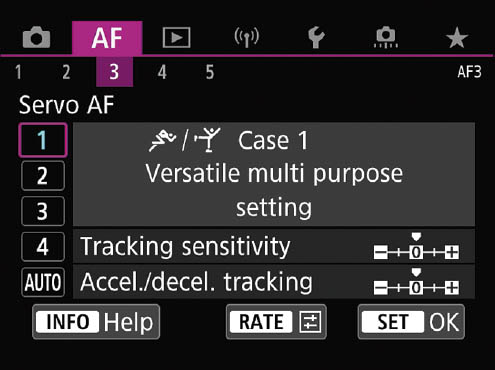
Figure 12.4 The AF 3-1 menu.
- Tracking sensitivity. Determines how swiftly the AF system refocuses on a new subject that enters the focus area. Your choices are –2 (Locked On) to +2 (Responsive). Negative numbers allow you to retain focus on the original subject even if it briefly leaves the area covered by the focus points, making tracking easier. Positive numbers switch more quickly to a new subject.
- Acceleration/deceleration tracking. Determines how the AF system responds to sudden acceleration, deceleration, or stopping. Your choices are 0 (constant speed) to 2 (sudden changes).
While you can adjust these parameters for any Case, you may find their default values useful:
- Case 1: Versatile multi-purpose setting. All-purpose setting that works well with many moving subjects, including motor sports and track, especially with subjects moving toward or away from you.
- Case 2: Continue to track subject, ignoring possible obstacles. Excellent for football and other sports where an intervening subject may pass in front of your primary subject. The camera will delay refocusing on the new object long enough to resume following the original subject.
- Case 3: Instantly focus on subjects suddenly entering AF points. Ideal when you’re photographing a static scene, waiting for a moving subject, such as the winner of a race, a skier, or bicyclist.
- Case 4: For subjects that accelerate or decelerate quickly. I prefer this Case for basketball and soccer because you can have players racing toward you one instant, and crossing your field of view the next.
- Case A: For erratic subjects moving quickly in any direction. This Automatic setting is my choice for hockey games and anything that involves skates—as well as small children and pets. It’s also excellent for that most difficult of subjects: birds in flight.
See Chapter 5 for step-by-step instructions for adjusting the values of any of the five AF Cases.
Lens Electronic MF
Options: Disable after One-Shot AF, One-Shot AF→Enabled (default), One-Shot AF→Enabled (Magnify), Disable in AF
My preference: One-Shot AF→Enabled
This is the first entry in the AF 4 menu. (See Figure 12.5.) You may need this entry’s capabilities if you frequently use EF-/EF-S-mount lenses with an adapter. A limited number of extra-fast Canon prime lenses and one zoom—all of them L lenses with USM or STM motors—feature super-sensitive electronic manual focusing rings you can use to fine-tune focus after focus has been locked in using One-Shot AF. You might want to disable the use of this ring when using one of the compatible lenses, because even a casual bump against the ring can change focus significantly.
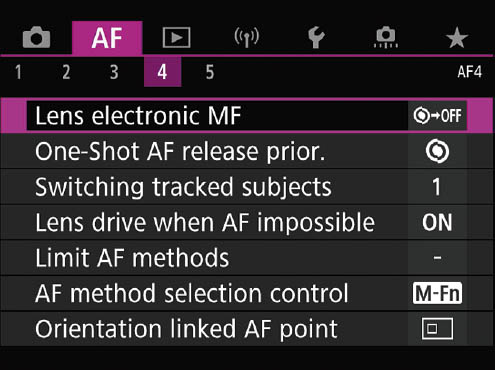
Figure 12.5 The AF 4 menu.
NOTE Even if you’ve enabled One-Shot AF→Enabled (Magnify), the LCD screen or viewfinder display may not be magnified when you turn the focus ring while pressing the shutter button halfway following a shot. If that happens, release the shutter button, wait for the magnified display, and then press the shutter release halfway again while turning the focus ring. (This is a rather esoteric capability; I don’t expect many readers of this book to need it.) The lenses in question are as follows as of this writing:
EF50mm f/1.0L USM
EF85mm f/1.2L USM
EF85mm f/1.2L II USM
EF500mm f/4.5L USM
EF50mm f/1.8 STM
EF300mm f/2.8L USM
EF400 f/2.8L USM
EF400mm f/2.8L II USM
EF28-80mm f/2.8-4L USM
EF24-105mm f/3.5-5.6 STM
EF600mm f/4L USM
EF1200 f/5.6L USM
EF200mm f/1.8L USM
EF40mm f/2.8 STM
You have three choices:
- Disable after One-Shot AF. Manual focus is disabled. Use this when you are satisfied with the focus set by the camera’s autofocus system and don’t want to manually tweak it. Remember that if you truly want to use manual focus and bypass the AF system entirely, just slide the AF/MF switch on the lens to the MF position.
- One-Shot AF:Enabled. When active, you can continue to hold the shutter release halfway, while adjusting focus manually. I use this when shooting portraits with my EF 85mm f/1.2 lens at a large aperture, allowing me to zero focus in on the near eye of a subject seated on a diagonal angle.
- One-Shot AF:Enabled (Magnify). When active, you can continue to hold the shutter release halfway, while adjusting focus manually. Rotate the lens focus ring to magnify the area being focused as you make adjustments.
- Disable in AF. Turns off the feature entirely.
One-Shot AF Release-priority
Options: Release-priority, Focus-priority (default)
My preference: Release-priority for sports, Focus-priority for most other subjects
This setting can be used to specify whether One-Shot AF uses focus-priority (the default) or release-priority. I explained the use of these alternatives in Chapter 5.
Switching Tracked Subjects
Options: Disable, Enable (slow) (default), Enable
My preference: Enable (slow)
This feature determines how quickly the camera switches AF points to track a new subject that intervenes in Face+Tracking, Zone AF, or Large Zone AF (Vertical or Horizontal) AF methods. For example, if you’re shooting a football game as a running back is breaking through the line and a referee bolts along the sideline in front of you. With this feature set to Enable, the camera will very quickly switch to the ref, and then should return its attention to the running back—but often, not quickly enough. A better choice would be to use Disable, so that the camera briefly ignores the referee, who is likely to have moved on in a second or two. Focus tracking will remain on your running back. With the default value, Enable (slow), response is delayed. Your options include:
- Disable (0). At the 0 setting, the camera will lock onto the initial subject and follow it until it leaves the frame. Use this setting when you know you’ll have intervening subjects often and are certain that you want to ignore them. Many sports events fall into this category.
- Enable (slow) (1). At the 1 setting, response to movement is a bit slower, so that the camera doesn’t constantly refocus as subjects move about the frame. This is the default and should be used when there is only moderate movement, and especially if the movement is across the width or height of the frame (rather than coming toward you or away from you), and when you’re using a small f/stop, because the increased depth-of-field will eliminate the need for most re-focusing.
- Enable (2). At the 2 setting, the camera quickly responds to new subjects that cross the frame. This is the best setting to use for fast-moving subjects, such as sports or frenetic children, as long as you don’t expect intervening subjects. The camera will smoothly follow your subjects. It works well when subjects within the frame are at significantly different distances.
Lens Drive when AF Impossible
Options: On: Continue focus search (default); Off: Stop focus search
My preference: Stop focus search
When a scene has little inherent contrast (say, a blank wall or the sky) or if there isn’t enough illumination to allow determining contrast accurately (in low light levels, or with lenses having maximum apertures of less than f/5.6), a lens may be unable to achieve autofocus. Very long telephoto lenses suffer from this syndrome because their depth-of-field is so shallow that the correct point of focus may zip past during the AF process before the AF system has a chance to register it.
Use this setting to tell the camera either to keep trying to focus if AF seems to be impossible or to stop seeking focus. Your choices are as follows:
- On: Continue Focus Search. The camera will keep trying to focus, even if the effort causes the lens to become grossly out of focus. Use this default setting if you’d prefer that the lens keep trying. Sometimes you can point the lens at an object with sufficient contrast at approximately the same distance to let the AF system lock on, then reframe your original subject with the hope that accurate focus will now be achieved.
- Off: Stop Focus Search. When this option is selected, the camera will stop trying to focus uselessly, allowing you to attempt to manually bring the subject into focus. This setting is best for very long telephoto lenses (around 400mm and up), because they encounter AF difficulties more than most lenses, and are less likely to benefit from extended “hunting.”
Limit AF Methods
Options: Face+Tracking, Spot AF, 1-point AF, Expand AF area, Expand AF area: Around, Zone AF, Large Zone AF (Vertical), Large Zone AF (Horizontal)
My preference: All options checked
Here you can choose which of the AF-area selection modes are available. In effect, you can enable the modes you use most often, and disable those that you rarely or never work with. The 1-point AF mode cannot be disabled, however, and is displayed with a permanent check mark.
When you access this entry, a screen with all modes is displayed (see Figure 12.6). Use the QCD-1 or directional controls to highlight a mode you want to activate/deactivate and press SET. A check mark above the icon indicates that the mode will be available. Select OK to confirm your choices. To cycle among the modes you’ve checked, press the AF Point Selection button on the upper-right corner of the back of the camera and press the M-Fn button until the mode you want to use is selected.
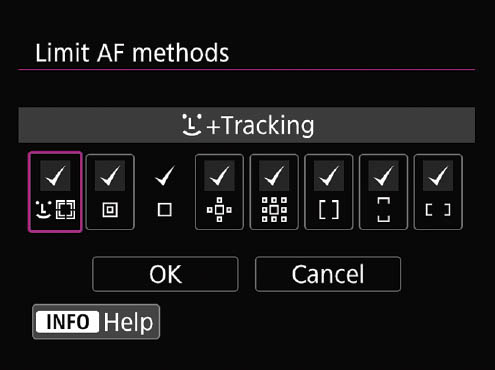
Figure 12.6 Enable or disable any of AF Area Selection modes.
AF Method Selection Control
Options: AF Point Selection/M-Fn buttons (default), AF Point Selection/Main Dial
My preference: AF Point Selection/M-Fn buttons
With this setting, you can customize the controls used to choose an autofocus point manually, perhaps making the selection easier or more intuitive for you, or (as is the default) making this process require the use of two controls so that it can’t be done accidentally.
Your choices are as follows:
- AF Point Selection button/M-Fn button. To change the AF point that is active, you must press the AF point selection button (to the immediate right of the * button), then press the M-Fn button multiple times to select the mode you want.
- AF Point Selection button/Main Dial. When this option is chosen, you must press the AF point selection button and rotate the Main Dial (or tilt the Multi-controller joystick to either side) to select your selection mode.
Orientation Linked AF Point
Options: Same for both vertical and horizontal (default), Separate AF points: Point Only
My preference: Separate AF Points: Point Only
If you have a preference for a particular manually selected AF point or Zone AF frame when composing vertical or horizontal pictures, you can specify that preference using this menu entry, by choosing Separate AF Points. Or, you can indicate that you want to use the same mode/point in all orientations (Same for Both Vert/Horiz). If you’d like to differentiate, there are different orientations to account for:
- Same for both vertical and horizontal. The AF-area selection mode and the AF point or zone that you select manually are used for both vertical and horizontal images.
- Separate AF points: Point Only. The AF area mode remains the same regardless of camera orientation, but you can specify a different AF point in manual point selection modes for each of three orientations. The specified point will remain in force even if you switch from one manual selection mode to another. The orientations are as follows:
- • Camera held horizontally. This orientation assumes that the camera is positioned so the view-finder/shutter release are on top.
- • Camera held vertically with the grip/shutter release above the Mode Dial.
- • Camera held vertically with the Mode Dial above the grip/shutter release.
I provided instructions for setting your focus points and illustrations in Chapter 5 and won’t repeat that information here.
Initial Servo AF Point for Face+Tracking
Options: Initial AF Point Set for Face+Tracking; AF Point Set for 1-point AF, Expand AF, Expand AF: Around; Auto (default)
My preference: Auto
Do you feel that your AF-point selection is too automated for you? If you’d like to regain a little control, because you feel you know exactly where your subject is most likely to reside in the frame, this is the override for you. You can manually specify the starting point that will be used in AI Servo (continuous autofocus) mode when the AF Method is set to Face+Tracking.
If you’re confused, this description of your options should clear things up:
- Initial AF Point Set for Face+Tracking. When Servo AF starts to focus in Face+Tracking mode, it will first use the AF point you specify here before seeking other points as it evaluates your scene. You could use this option when you know that your main subject will probably be located in a particular area of the frame (say, a distance runner approaching from the left), but still want the camera to refocus as the subject moves. This helps reduce AF confusion from movement elsewhere in the frame that is not your main subject.
- AF Point Set for 1-point, Expand AF Area, Expand AF Area: Around. If you are using one of these three AF methods, and then switch to Face+Tracking, Servo AF initially uses the AF point you specified after you’ve activated Face+Tracking. This can be a convenient mode to use because you can define a button to switch from another mode to Face+Tracking, using a defined Custom Control. I’ll explain the use of Custom Controls in Chapter 13.
- Auto. The initial AF point for Servo AF when using Face+Tracking is determined by the camera. I find this option to be the simplest and least prone to unintended errors.
Focus Ring Rotation
Options: Normal (clockwise), Reverse direction (counterclockwise)
My preference: Normal
Some shooters prefer to have the focus ring rotate in the opposite direction when changing focus from near to far. Usually, they are photographers coming from another vendor, such as Nikon, that uses the reverse rotation. If you want your R5 and R6 to focus more closely when rotating clockwise, choose Normal. If you would prefer to rotate counterclockwise to focus more closely, choose Reverse Direction. My day job involves extensive use of both Canon and Nikon cameras, as well as Sony (which conforms to the Canon convention), I’ve learned to work with the rotational direction native to the system I happen to be using.
RF Lens MF Focus Ring Sensitivity
Options: Varies with rotation speed (default), Linked to rotation degree
My preference: Varies with rotation speed
Because your RF lenses use focus by wire, it was easy for Canon to program your R5 or R6 to change the degree of focus adjustment during manual focus, based on how quickly you are rotating the focus ring. When you turn the ring slowly—usually because you are fine-tuning the focus plane, perhaps during macro or portrait photography—the point of focus changes slowly. But when you turn the ring rapidly—say to follow-focus a speedy athlete—the camera focuses over a larger range for each degree you rotate the focus ring. That behavior is usually ideal, and is the default for your camera.
However, videographers have found this feature not helpful under some conditions. That’s because, unless a lens is optimized for video shooting, zooming with a particular lens may not necessarily be linear. Alternating between small focus jumps and large ones, depending on the speed of rotation, doesn’t work well when the goal is to pull or push focus. That’s a technique used during a shot to focus the viewer’s attention first on one object, and then on another one that gradually (or quickly) snaps into focus. In such cases, it’s preferable to have a given amount of rotation produce the same amount of focus change. Videographers often use accessories around the focus ring and markings that show where focus should begin an end during a shot. Linking sensitivity to rotation ensures that this refocusing happens smoothly regardless of speed.
I tend to use the default setting to vary sensitivity with rotation speed, when I am shooting stills and most video, and switch to the other option only when a more linear behavior is important.
Multi-controller Sensitivity AF Point Select
Options: -, 0, +
My preference: N/A
If you find that the Multi-controller joystick doesn’t respond appropriately when you use it to select an AF point with your thumb, you can change the sensitivity with this setting. Choose Minus to cause the focus point to move more slowly than normal, or Plus to move it more quickly. This is strictly a personal preference that depends on how dexterous you are with your thumb.
Electronic Full-Time MF
Options: Enable, Disable
My preference: N/A
This setting enables or disables manual focus adjustment using the focusing ring when certain lenses, shown earlier under the Lens Electronic Manual Focus entry, are attached.
- Enable. Manual focus adjustment is available at all times when the camera is powered up, no matter what your setting is under Lens Electronic Manual focus, described earlier. In effect, this means you can always use manual focus with the listed lenses whether the camera is set for One-Shot or Servo AF.
- Disable. Manual focus adjustment is available only according to the settings you have made under the Lens Electronic Manual Focus setting.