5Mastering Still Photography
Although much of this book is devoted to showing you how to use your drone’s automated tools to take still photos and capture video with only minimal intervention, I’m going to devote a great deal of space to techniques for using your drone as a mobile camera, applying traditional photographic concepts to capture your creative vision. This chapter and the next will help you master your Mavic’s Auto and Pro modes, so you can apply a full range of techniques to your photography. I’m going to include some photography basics for those who were avid pilots before they became aerial photographers. Those of you already well-versed in photography will also discover some things in this refresher that you might not have thought about from an aerial perspective.
I’m going to start out with the basics of exposure, Mavic-style. Serious photographers will find that the typical Auto mode exposure settings—as determined by the camera’s exposure meter and intelligence—need to be adjusted to account for your creative decisions or to fine-tune the image for special situations. For example, many times your main light source—usually the sun—may be within the frame or, at least behind the subject, whether it’s a structure, trees, or something else. As a result, you’ll end up with backlighting, which often results in an overexposed sky or other background and/ or an underexposed subject. The Mavic’s electronics recognize backlit situations nicely, and can properly base exposure on the main subject, producing a decent photo.
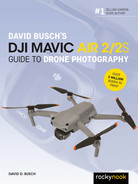
But what if you want to underexpose the subject, to produce a silhouette effect, as seen in Figure 5.1? You can use the Mavic’s EV adjustment to apply exposure compensation to override its Auto exposure setting to get the look you want. The more you know about how to use your drone’s camera, the more you’ll run into situations where you want to creatively tweak the exposure to provide a different look than you’d get with a straight shot.
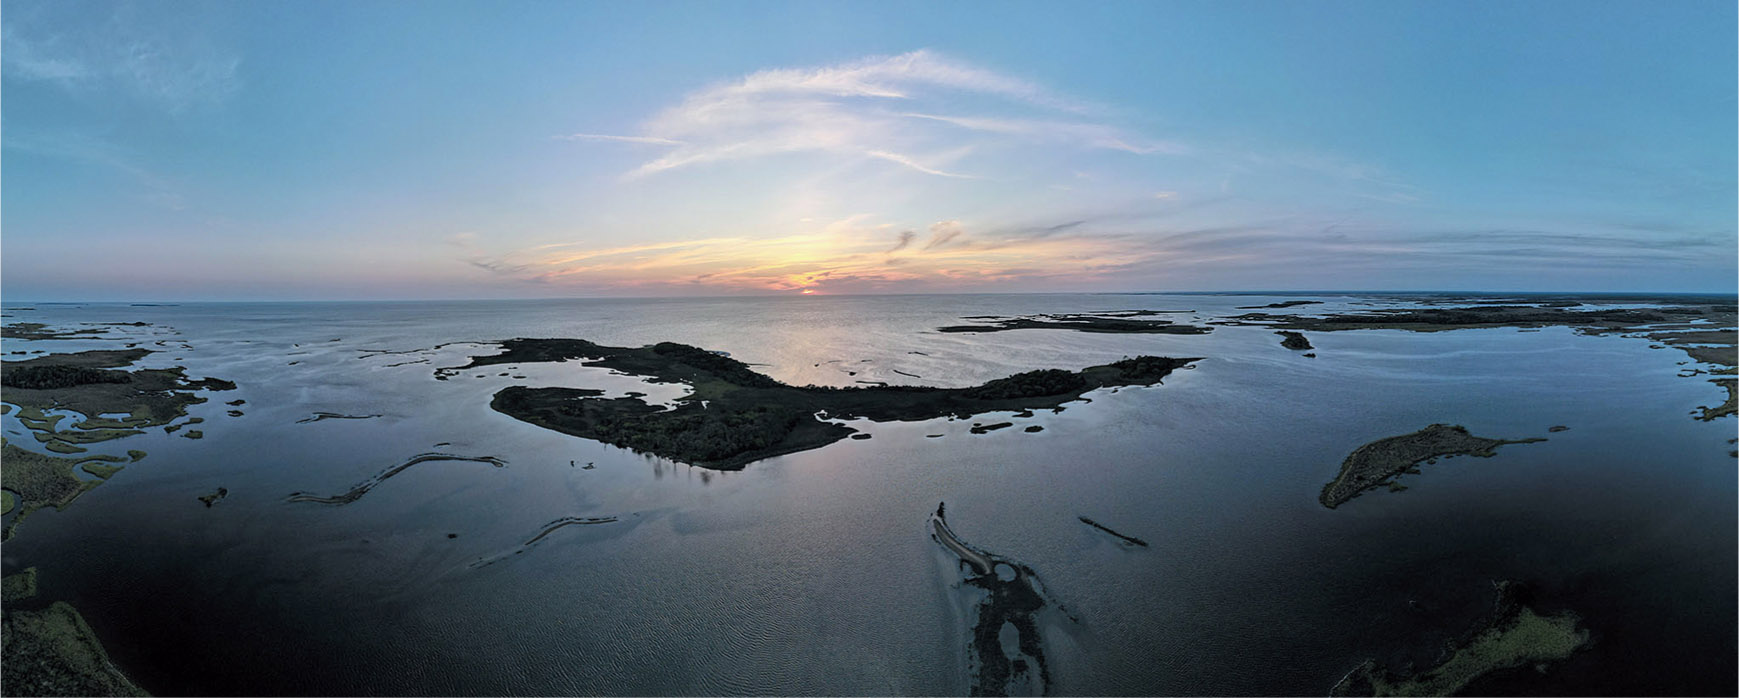
Figure 5.1 You may need to make exposure adjustments to get the silhouette or other effect you are looking for.
Your Basic Controls
In addition to the flight controls I’ve already described in the earlier chapters of this book (and the additional flight parameters I’ll be discussing later on), your Mavic Air 2/2S has a certain number of capabilities that deal directly with still photography and video capture. They range from your file-format choices and storage options to autofocus/manual focus.
This chapter shows you the fundamentals of using the settings available with your Mavic Air 2/Air 2S, so you’ll be better equipped to override the defaults when you want to or need to. After all, correct exposure is one of the foundations of good photography, along with accurate focus and sharpness, appropriate color balance, freedom from unwanted noise and excessive contrast, as well as pleasing composition.
I’ll be helping you with all of these. You have a great deal of control over each of them, although composition is entirely up to you. You must still frame the photograph to create an interesting arrangement of subject matter, but all the other parameters are basic functions of the camera. You can let your camera set them for you automatically, you can fine-tune how it applies its automatic settings, or you can make them yourself, manually. The amount of control you have over exposure, sensitivity (ISO settings), color balance, and other image parameters make the camera a versatile tool for creating images.
In the next few pages, I’m going to give you a grounding in the basics of exposure, either as an introduction or as a refresher course, depending on your current level of expertise. When you finish this chapter, you’ll understand most of what you need to know to take creative photographs in a broad range of situations with the camera. As I said in the Introduction to this book, my aim is to provide a grounding in drone photography, rather than just provide a user’s manual for a particular model DJI aircraft.
Auto Mode Options
When you tap on the Camera Mode icon at lower right in the screen to activate Auto mode, your choices are limited to those shown in the three screen variations illustrated in Figure 5.2. In all three, Air 2S owners (only) can tap on the AF icon seen at upper right of each variation to switch from AF (autofocus) to MF (manual focus). I’ll explain focus options later.
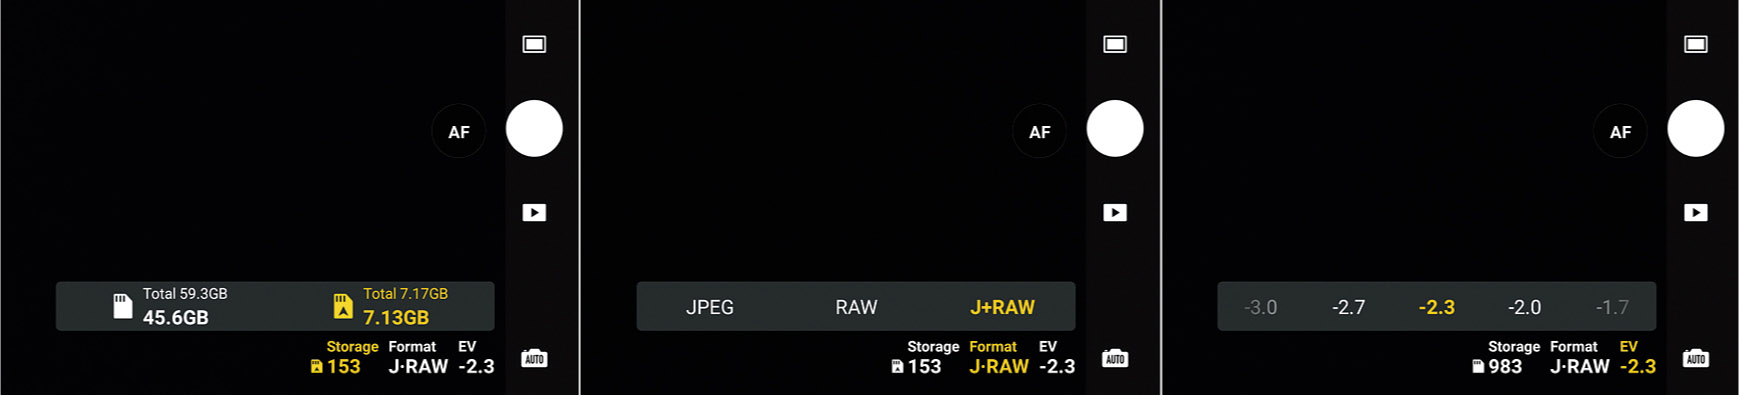
Figure 5.2 Storage (left), format (center), and exposure controls (right).
At the bottom-right corner of the screen are the three exposure controls available in Auto mode, labeled Storage, Format, and EV. When you tap on each of those labels, you gain access to the following adjustments:
- ■Storage. One or two icons shaped like an inverted microSDXC memory card appear. (See Figure 5.2, left, which shows the Air 2S screen.) If you don’t have a memory card inserted in the aircraft, a single icon representing the drone’s internal storage will appear. The icon has the same upward-pointing icon DJI uses to represent the drone itself in the map display. If a microSDXC card is installed, a second icon (lacking the “drone” symbol) will be shown.
- The amount of total storage and available storage for each is shown next to the icon. The currently active storage location is highlighted in orange. You can tap the icon you want to use as the drone’s storage to switch between them. The total number of photos you can expect to take with the selected storage using the current format (in this case 153) is displayed under the Storage label.
- The Mavic Air 2/2S each have 8GB of internal storage, which is generally enough for an average still photography session. Video clips, especially 4K movies, consume considerably more space, of course. If you expect to capture files totaling more than 8GB, or want to be able to swap cards or transfer to your computer with a card reader, you’ll definitely need to use a microSDXC card.
- ■Format. Click on the Format label, and the options shown in Figure 5.2, center, pop up. You can choose JPEG alone, RAW, or both JPEG and RAW. As I’ll explain shortly, JPEG files are the most compact, while RAW files allow more flexibility in post-processing. While saving both types simultaneously gives you the best of both worlds, storage is slower.
- ■Exposure Value. When you click the EV label, you’re given the opportunity to add or subtract up to three stops of exposure, in one-third stop increments, as seen in Figure 5.2, right. In effect, you’re telling the drone to use slower or faster shutter speeds to increase or decrease the amount of light reaching the sensor. I’ll explain exposure compensation shortly, too.
Pro Mode Options
When you tap on the Camera Mode icon at lower right in the screen to activate Pro mode, a much wider range of adjustments become available, giving you a greater degree of creative control. I’ve drawn a green box around the relevant labels in Figure 5.3 (the boxes do not appear on your screen). At center right is an AF label (available on the Air 2S only), which indicates that the camera is set for autofocus; tap it to switch to manual focus, in which case a “mountain” icon replaces the AF label. I’ll explain the Air 2S’ AF options later; for now I’m going to concentrate on the other camera settings within the three green boxes at the bottom of the screen in the figure. Here are the parameters available in the left-most box, shown in Figure 5.4, left:
- ■White Balance. You can trust your drone’s electronics to select an appropriate white balance using the Auto setting. You’ll find that works most of the time, particularly if you do most of your shooting outdoors in daylight. Alternatively, you can choose a color temperature manually (in Kelvin) from 2,400K to 10,000K. I’ll explain white balance in more detail later.
- ■Format. This entry functions like its Auto mode counterpart. Choose JPEG alone, RAW, or both JPEG and RAW.
- ■Size. Choose 16:9 and your still images will be cropped and saved in the same aspect ratio (proportions) as your video clips. That can be useful if you intend to mix video and still photos in a presentation and want to retain the same look. Or, you can choose to put the full image area of your sensor to work for your stills and select the 4:3 aspect ratio (Air 2) or 3:2 aspect ratio (Air 2S). This setting is not available in Video mode.
- ■Storage. In Pro mode, this option is used exactly as it is in Auto mode. One or two “SD card” icons appear, along with capacity information. Tap either the internal storage icon or the external storage icon (if installed) to specify where files should be saved.
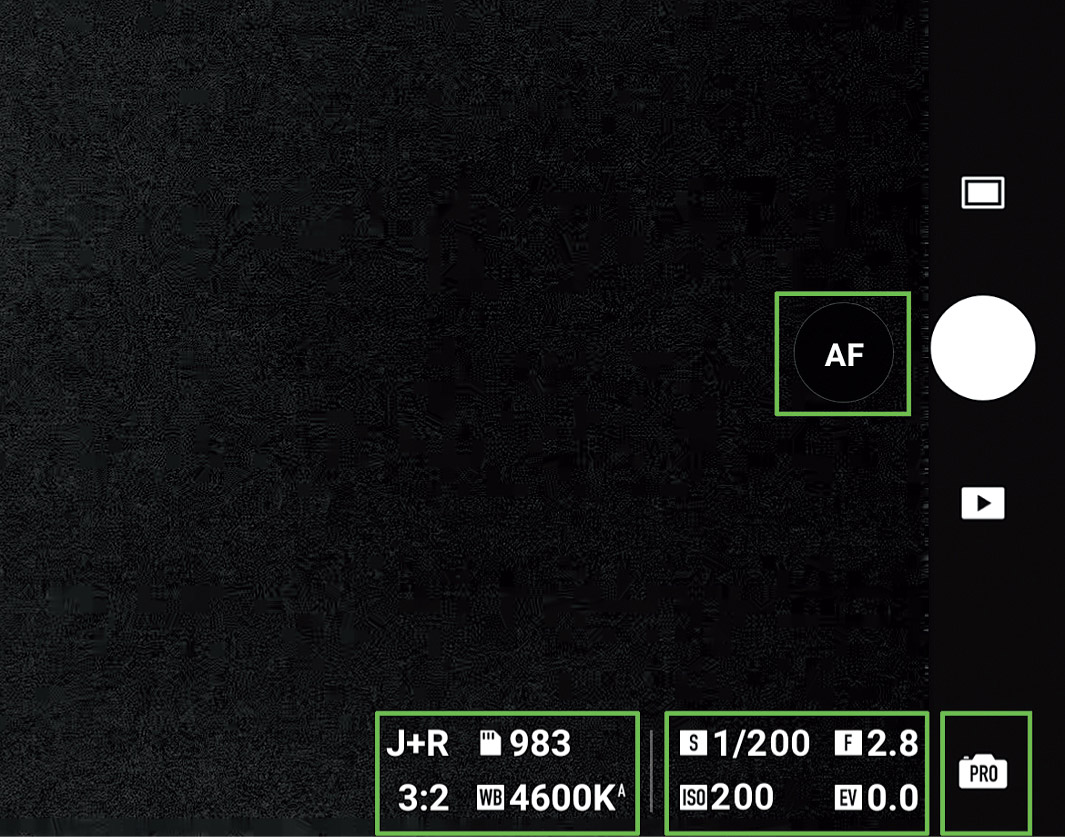
Figure 5.3 Pro mode options.
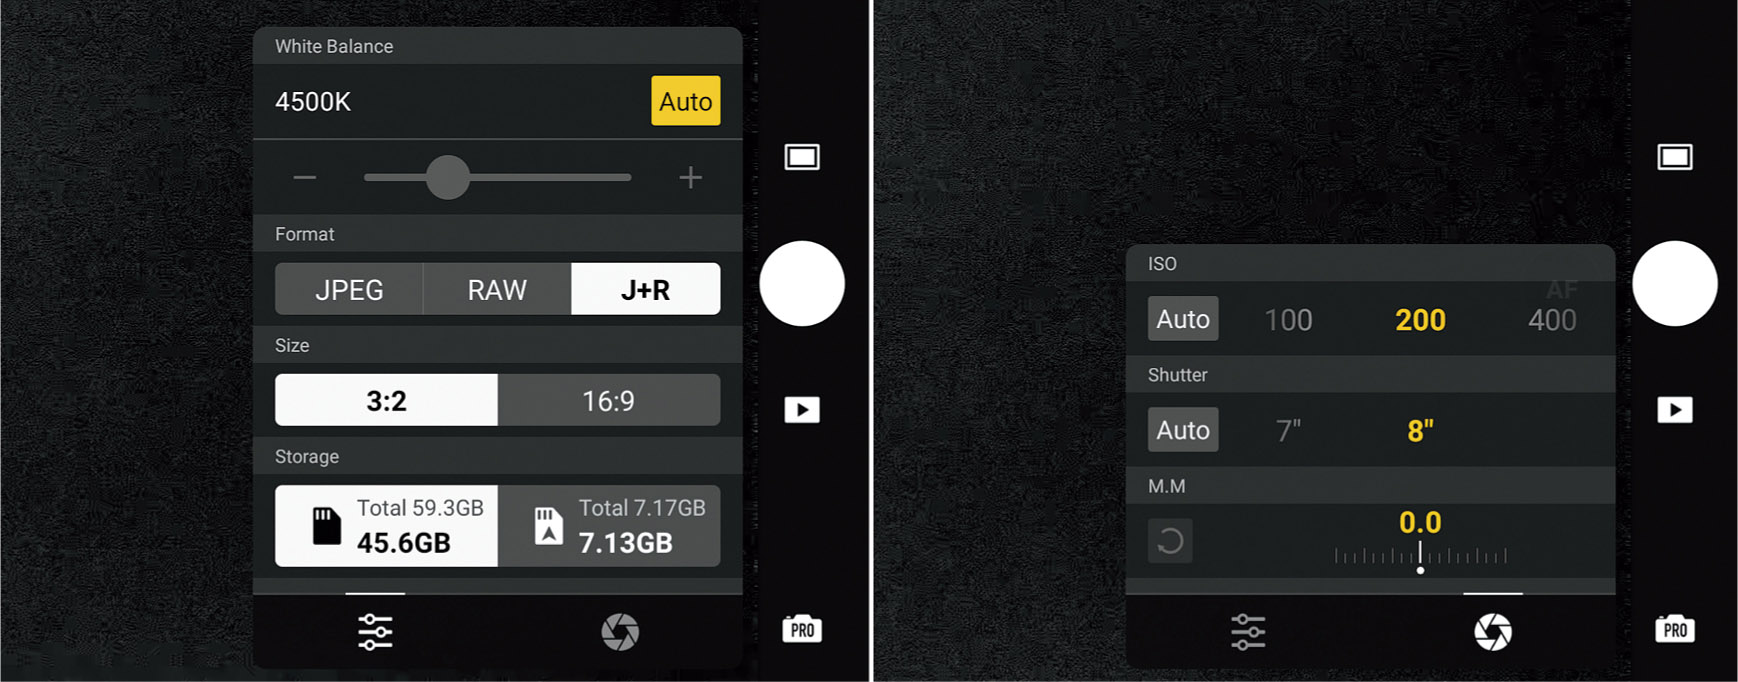
Figure 5.4 Camera adjustments (left) and Exposure adjustments (right).
Exposure adjustments are available from the center box (highlighted in green in Figure 5.3), shown in Figure 5.4, right:
- ■ISO Setting . Your Mavic can calculate an appropriate ISO sensitivity given your selected or automatically chosen shutter speed when this is set to Auto. You can also specify a fixed ISO in the range ISO 100 to ISO 12800. There are some drawbacks to using higher ISO settings, including increased noise, as I’ll explain later.
- ■Shutter Speed. You can choose shutter speeds from 1/8000th second to 8 full seconds, or allow the camera to select a speed for you by setting this to Auto. Believe it or not, your drone’s stabilization features are effective at shutter speeds much longer than you, a mere human, would be able to hand-hold a conventional digital camera. Because the Mavic’s camera has no adjustable aperture, you’ll be using shutter speed, ISO, and, at times, neutral-density filters to achieve optimal exposure. As you’ll learn, in video mode shutter speed changes are used less and ND filters more because faster shutter speeds produce unwanted jerkiness in movies.
- ■EV. When either Shutter Speed or ISO are set to Auto, or when both are in Auto mode, you can override their settings by applying exposure compensation, expressed as EV (Exposure Value) changes. I’ll explain EV in more detail later in this chapter.
White Balance
As I noted above, you probably won’t need to adjust white balance very often when shooting outdoors in daylight, as the Mavic’s Auto White Balance (AWB) setting does a pretty good job of interpreting available light. You may want to choose a specific white balance setting to create a special effect at dawn or dusk, or in unusual situations where you’ll be shooting under artificial light. If you have experience with conventional still photography or videography, you probably have a basic understanding of color balance.
White balance is important because various light sources produce illumination of different “colors,” although sometimes we are not aware of the difference. Artificial illumination tends to be somewhat amber when using light bulbs that are not daylight balanced, while noonday light outdoors is close to white, and the light early and late in the day is somewhat red/yellow.
White balance is measured using a scale called color temperature. Color temperatures were assigned by heating a theoretical “black body radiator” (which doesn’t reflect any light; all illumination comes from its radiance alone) and recording the spectrum of light it emitted at a given temperature in degrees Kelvin. So, daylight at noon has a color temperature in the 5,500- to 6,000-degree range. Indoor illumination is around 3,400 degrees. Hotter temperatures produce bluer images (think blue-white hot) while cooler temperatures produce redder images (think of a dull-red glowing ember). Because of human nature, though, bluer images are actually called “cool” (think wintry day) and redder images are called “warm” (think ruddy sunset), even though their color temperatures are reversed.
If a photo is taken under warm illumination with a sensor balanced for cooler daylight the image will appear much too red/yellow. An image exposed in daylight with the white balance set for warm artificial light will seem much too blue. These color casts may be too strong to remove in an image editor from JPEG files. Of course, if you shoot RAW photos with your drone in DNG format, you can later change the WB setting to the desired value in RAW converter software; this is a completely “non-destructive” process so full image quality will be maintained.
If you want to set a specific white balance based on color temperature, you can deactivate the Auto setting and choose a specific temperature, from 2,400K (a level that makes your image much bluer, to compensate for amber illumination) to 10,000K (a level that makes images much redder to correct for light that is extremely blue in color).
JPEG, RAW, or Both?
Your Mavic Air 2/2S has the capability of saving its still image files in either JPEG or RAW format, or both simultaneously. Both are standard formats that can be read by a wide variety of image-editing and processing software applications. Unlike Nikon, Canon, Sony, and most other makers of conventional digital cameras, DJI does not use a RAW format proprietary to the company. Your Mavic’s RAW files are saved in plain old Adobe DNG (Digital Negative Image) format, which can be loaded into your software and then saved in JPEG, TIF, PSD, or any other raster image format you like.
If you choose to tell your drone to save still images in JPEG, its digital image processing (DIP) chip will take the captured sensor data and convert it into a bitmap. With the Air 2S, that will consist of a 5472 × 3648–pixel (20MP), 8-bit image. The Air 2 will save either an 8000 × 6000–pixel (48MP) or 4000 × 3000–pixel (12MP), 8-bit image, depending on how you have set the resolution. In any case, the exposure and other settings you specified are applied and their values embedded in the file’s metadata, called EXIF (Exchangeable Image File Format). Most image editors and EXIF utilities can read this information should you later need to refer to it.
The EXIF data includes the camera maker, model number, serial number, image size, lens information, and exposure data. (See Figure 5.5, left.) The latitude, longitude, and altitude extracted from the GPS data is also available. (See Figure 5.5, center.) If, for some reason you’re curious, DJI also embeds data about the absolute altitude and relative altitude, and gimbal orientation. (See Figure 5.5, right.). Interestingly enough, the geographic coordinates are presented in both degrees, minutes, and seconds and decimal degrees.
Your drone’s RAW files are image files that have not yet had applied the settings specified at the time of exposure. You’ll sometimes be told that RAW files are the “unprocessed” image information a camera produces before it’s been modified. That’s nonsense. RAW files are no more unprocessed than camera film is after it’s been through the chemicals to produce a negative or transparency. A lot can happen in the developer that can affect the quality of a film image—positively and negatively—and, similarly, your digital image undergoes a significant amount of processing before it is saved as a RAW file.
A RAW file is more like a film camera’s processed negative. It contains the digitized sensor information with no compression, no sharpening, nor application of other settings. Your preferred settings are stored with the RAW file so they can be applied when the image is converted to a form compatible with your favorite image editor. However, using RAW conversion software you can override those settings and apply settings of your own. Figure 5.6 shows three of the panels available when converting a Mavic’s DNG file in an image editor.
At left you can see an adjustment being made to white balance. Select Custom and you can tweak the Temperature slider to specify a different color temperature (actually, the blue/amber bias) and the Tint slider to adjust green/magenta bias. The same panel includes sliders for exposure, contrast, highlights, shadows, whites, blacks, clarity, vibrance, and saturation. The center panel histogram display has tools for adjusting the curve that controls shadows, highlights, and midtones separately. At right, you can see the sliders for enhancing sharpening and applying noise reduction. These capabilities are useful for those who are adept at (or want to master) image editing.
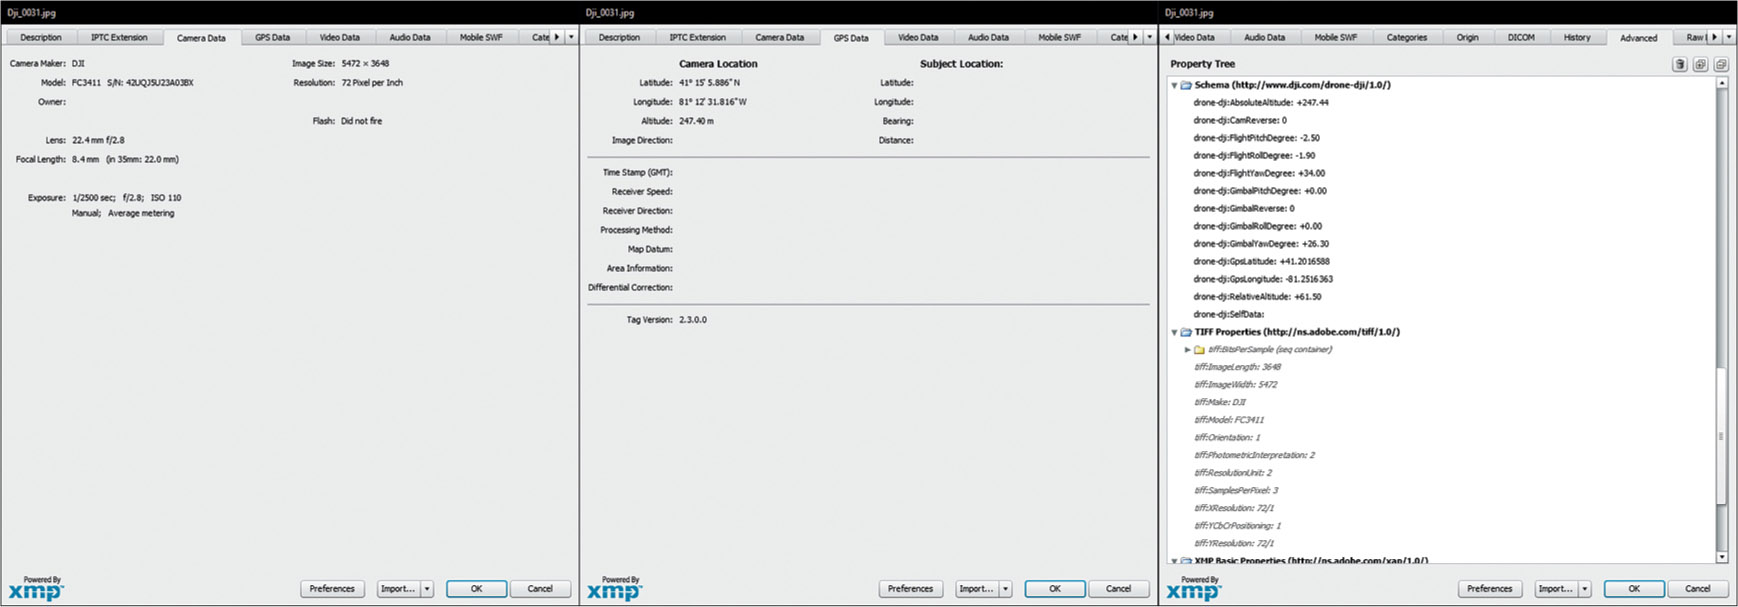
Figure 5.5 EXIF data from a typical JPEG file.
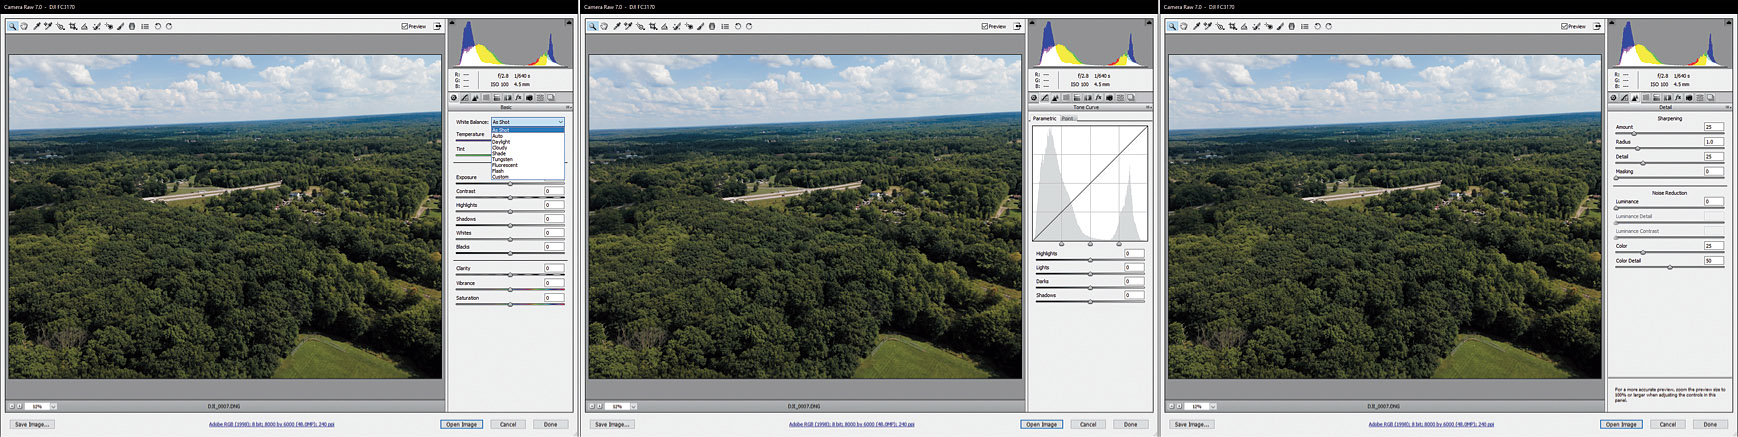
Figure 5.6 Some of the adjustments you can make to your Mavic’s DNG/RAW files.
RAW exists because sometimes we want to have access to all the information captured by the camera before the camera’s internal logic has processed it and converted the image to a standard file format like JPEG. RAW doesn’t save as much space as JPEG. But what it does do is preserve the information captured by your camera after it’s been converted from analog to digital form. Of course, the RAW format preserves the settings information.
So, why don’t we always use RAW? Although some aerial photographers do save only in RAW format, it’s more common to use RAW plus JPEG, or just shoot JPEG and avoid RAW altogether. That’s because having only RAW files to work with can significantly slow down your workflow. While RAW is overwhelmingly helpful when an image needs to be fine-tuned, in other situations, working with a RAW file—when all you really need is a good-quality, untweaked image—consumes time that you may not want to waste. For example, RAW images take longer to store on the memory card, and require more post-processing effort, whether you elect to go with the default settings in force when the picture was taken, or just make minor adjustments.
JPEG was invented as a more compact file format that can store most of the information in a digital image, but in a much smaller size. JPEG predates most digital SLRs and was initially used to squeeze down files for transmission over slow dialup connections. Even if you were using an early dSLR with 1.3-megapixel files for news photography, you didn’t want to send them back to the office over a modem (Google it) at 1,200 bps.
Getting a Handle on Exposure
If you’ve been using a conventional digital camera for a while, you know how important correct exposure is. In one sense, exposure is an even more important consideration with drone photography, because all the images and video you capture are not easily subject to retakes. If a scene or sequence is overexposed, underexposed, too contrasty, or plagued by flat lighting, once you’ve landed it’s virtually impossible to go back aloft and capture the exact same view with corrected settings. Even if you manage to return to the same coordinates, there are bound to be some differences. Greek philosopher Heraclitus of Ephesus was right: you can’t step into the same river twice, or reproduce the same aerial perspective multiple times.
Fortunately, your Mavic Air 2/2S gives you a considerable amount of control over exposure, with tools that are probably familiar to you if you’re a veteran digital photographer. You can select shutter speed, aperture, and ISO sensitivity, and use the drone’s default averaging metering scheme or an optional “spot” mode (it’s a rather large spot). There’s a live histogram available to view so you can see exactly how the tones in your image are being captured. It’s easy to bracket still photos to produce multiple images with slightly different exposure settings, too.
You don’t cede control by opting for the Mavic’s autoexposure system, either. As I mentioned earlier, you can override the AE setting by adding or subtracting exposure compensation in one-third stop increments. I know some of you are experienced photographers, while others are still learning how to enjoy the photo features of their drone and need some grounding in fundamentals. So, consider the next sections as a refresher for the veterans and an introduction for newer drone photographers. It’s always tricky serving the needs of a broad audience.
Basics of Exposure
In the most basic sense, exposure is all about light. Exposure can make or break your photo. Correct exposure brings out the detail in the areas you want to picture, whether you’re trying to capture details of a construction site for aerial progress shots or detailing the range of colors in an overhead view of vibrant fall foliage, providing the range of tones and colors you need to create the desired image.
Poor exposure can cloak important details in shadow or wash them out in glare-filled featureless expanses of white. However, getting the perfect exposure requires some intelligence—either that built into the drone’s camera electronics or the smarts in your head—because digital sensors can’t capture all the tones we can see. If the range of tones in an image is extensive, embracing both inky black shadows and bright highlights, we often must settle for an exposure that renders most of those tones—but not all—in a way that best suits the photo we want to produce.
If you’re a photo enthusiast, you’re probably aware of the traditional “exposure triangle” of aperture (quantity of light and light passed by the lens), shutter speed (the amount of time the shutter is open), and the ISO sensitivity of the sensor—all working proportionately and reciprocally to produce an exposure. The trio is itself affected by the amount of illumination that is available. So, if you double the amount of light, increase the aperture by one stop, make the shutter speed twice as long, or boost the ISO setting 2X, you’ll get twice as much exposure. Similarly, you can increase any of these factors while decreasing one of the others by a similar amount to keep the same exposure. Of course, with your Mavic drone, only two of the three legs can be adjusted directly, as the aperture is fixed at f/2.8.
The traditional exposure triangle is shown in Figure 5.7. Working with any of the three legs (aperture, shutter speed, or ISO sensitivity), involves trade-offs:
- ■Aperture. Larger f/stops (the smaller numbers, like f/2.8) provide less depth-of-field, while smaller f/stops (larger numbers, like f/11 or f/16) increase depth-of-field. As I noted, you don’t have to worry about the effects of this leg of the triangle, since the Mavic Air 2 and 2S do not have an adjustable physical aperture. Yes, you can simulate its effect on the exposure with neutral-density filters, but filters don’t change depth-of-field.
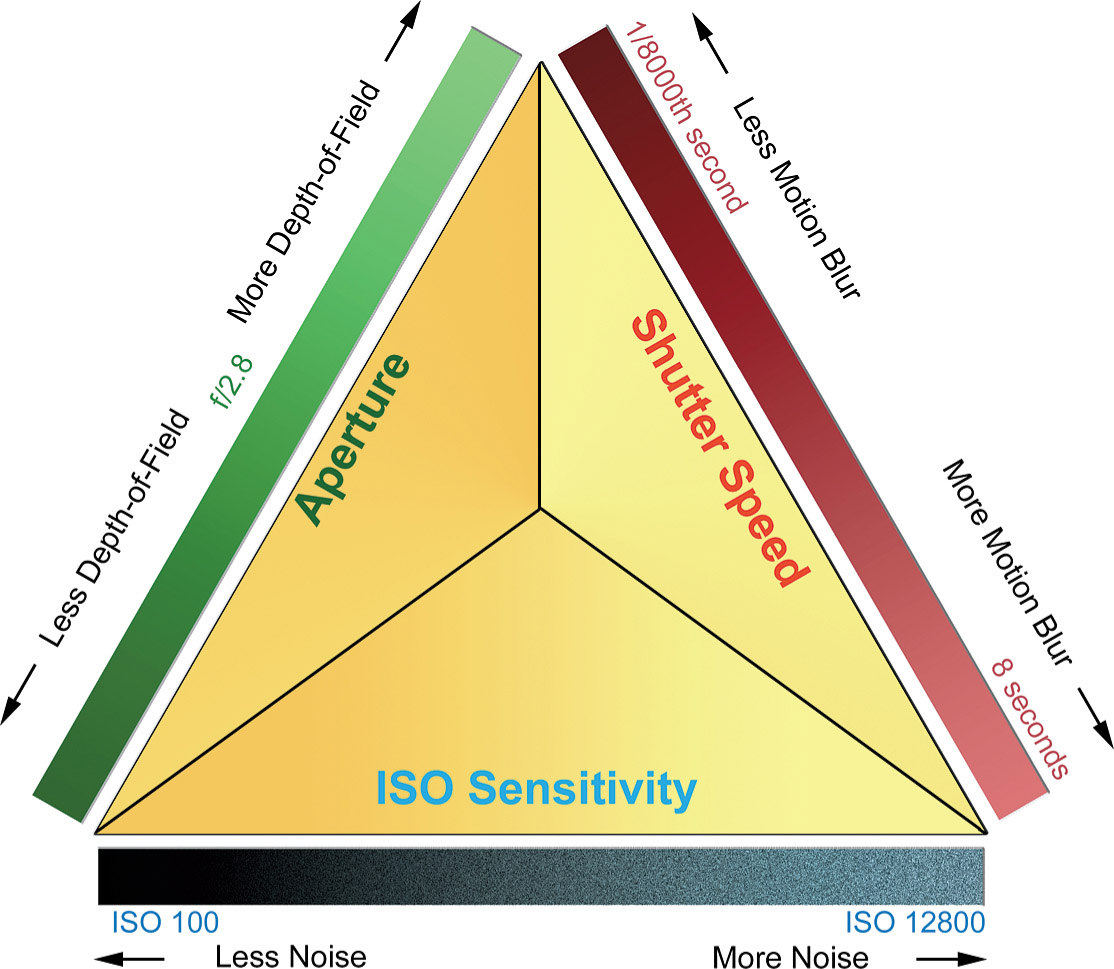
Figure 5.7 The traditional exposure triangle includes aperture, shutter speed, and ISO sensitivity.
- ■Shutter speeds. Shorter shutter speeds (like 1/250th or 1/500th second) do a better job of reducing the effects of camera/subject motion, while longer shutter speeds (such as 1/30th second) make that motion blur more likely.
- ■ISO sensitivity. Higher ISO settings increase the amount of visual noise and artifacts in your image, masking detail. Lower ISO settings reduce the effects of noise.
If you’re a photo enthusiast who has experience with conventional still cameras, you might mourn the loss of the options when an adjustable aperture is available. Since you are always shooting at f/2.8, reducing the intensity of the light reaching the sensor with a neutral-density filter is inconvenient, and can’t be done in mid-flight. You’ll need to plan ahead, or bring your drone back to home and mount the filter when needed. The fixed f/stop is a limitation, but at the same time it offers some advantages:
- ■Faster shutter speeds. Because the aperture is fixed at f/2.8, you’ll be using motion-freezing faster shutter speeds for still photography, eliminating blur even beyond what the drone’s image stabilization features can provide. At the lowest ISO setting, ISO 100, you’ll probably be shooting at speeds in the 1/1250th second range or faster, which will largely eliminate most blur from subject motion and from camera (drone) shake.
- Even so, note that brisk shutter speeds are not an advantage when shooting video. As I’ll explain in Chapter 7, viewers are conditioned to see a small amount of blur as objects move from frame to frame, resulting in what is called a “cinematic” look. When individual frames are razor-sharp, however, the lack of transitional blur produces a hyper-realistic, jittery look that viewers find unsettling. For the best video quality, you’ll want to use neutral-density filters to reduce the amount of light reaching the sensor and allowing shutter speeds no faster than twice the frame rate (60, 30, or 24 frames per second).
- ■Depth-of-field. The range of sharpness of an image (depth-of-field) changes as the aperture is adjusted. Relatively larger f/stops, such as f/2.8, produce less depth-of-field than smaller stops, such as f/8 or f/11. Because your drone’s aperture never changes, the depth-of-field remains exactly the same shot to shot and video clip to video clip. In practice, that’s more of an advantage for movie shooting, where unwanted changes in focus plane and depth-of-field may be distracting. I’ll explain depth-of-field in more detail later.
- ■Less diffraction. Small f/stops cause some minimal sharpness lost due to a phenomenon called diffraction. “Small” is relative and is affected by the size of the sensor. I won’t bore you with diffraction limitation formulas, but the bottom line is that with a sensor the size of the one found in the Air 2S, diffraction starts to affect the image at about f/5.6 and smaller (larger numbered) f/stops. The effect is gradual as the aperture is reduced. The good news is that at f/2.8, there should be no image loss from diffraction at all. In this sense, your drone’s fixed f/stop is a very good thing.
Dynamic Range
Getting the perfect exposure can be tricky because your Mavic’s sensor, like all image-capture devices, can’t capture all the tones we can see. If the range of tones in an image is extensive, embracing both inky black shadows and bright highlights, the sensor may not be able to capture them all. Sometimes, we must settle for an exposure that renders most of those tones—but not all—in a way that best suits the image we want to produce. You’ll often need to make choices about which details are important, and which are not, so that you can grab the tones that truly matter in your image. That’s part of the creativity you bring to bear in realizing your photographic vision.
For example, look at three bracketed exposures presented at left in Figure 5.8. For the image at upper left, the darker areas and shadows are well exposed, but the brightest highlights—chiefly the sky—are seriously overexposed. The version at upper center does a better job on the clouds, sea, and land, but the three are still unbalanced. At lower left, the sky looks great, but the land portions are much too dark. The camera’s sensor simply can’t capture detail in both dark areas and bright areas in a single shot.
With digital camera sensors, it’s tricky to capture detail in both highlights and shadows in a single image, because the number of tones, the dynamic range of the sensor, is limited. That’s one reason why it’s a good idea to master using RAW format. However, the solution, in this case, was to resort to a technique called High Dynamic Range (HDR) photography. With HDR still images, multiple shots at different exposure settings are used to extract the best detail from each and combine them, resulting in an image like the one seen at right in Figure 5.8.
Your drone can accomplish much the same thing automatically using the Smart Photo setting in still photography mode, and when working with any of the HDR Panorama modes (Vertical, Wide, 180 Degree, and Sphere.) You can also capture a bracketed set of images taken at exposure increments you specify, and combine them using an image editor such as Photoshop, or a specialized HDR tool like Photomatix. I’ll explain exposure bracketing shortly.

Figure 5.8 A set of bracketed exposures (left, top to bottom) that can be combined using HDR processing to produce the image seen at right.
Choosing an Exposure Mode
To calculate exposure automatically, you need to tell the camera what to measure (this is called the metering mode) and what adjustments should be used (ISO sensitivity, shutter speed, or both) to set the exposure. Together they provide your exposure mode.
If you’re a conventional camera veteran, you know about metering modes. Digital cameras typically have three or more metering modes. The most sophisticated is Matrix/Evaluative mode, in which various parts of the scene are compared to determine what kind of scene it is and measure exposure from the most important subject. That’s distinctly different from Averaging mode, in which the illumination of the entire frame is examined and exposure is based on the average brightness. Additional modes include Partial or Spot metering, in which all or most of the exposure is based on giving the most weight to measurements from a relatively small portion of the frame.
Your Mavic generally uses the Averaging mode by default. That’s because aerial scenes often include important areas located throughout the frame rather than concentrated in one spot, which is typical with, say, portrait or macro close-up photo subjects that are common fodder for conventional digital cameras. So, Averaging works quite well most of the time.
If you do want to base your exposure on a certain subject within the frame, your drone offers a metering mode that DJI calls Spot, although it actually is more of a Partial metering scheme because the area measured is not the typical 3 to 5 percent of the frame used for traditional Spot metering. Because DJI feels you won’t need Spot metering very often, it’s activated on a per-capture basis:
- ■Activate touch focus/spot metering. Touch the controller screen with your finger on the area you want to meter. An icon like the one shown at left in Figure 5.9 appears as you hold your finger down on the screen.
- ■Press to focus/meter. With the Mavic Air 2S, the icon will appear as a square with the cross-hairs that represent focus. (The Air 2 is fixed-focus only.) As you press down, the Mavic will calculate the correct exposure and, with the Air 2S, will in addition focus on the area within the square.
- ■Adjust brightness. A vertical line with the sun icon representing brightness will appear to the right of the focus/metering square. The “sun” will initially be in the center of the line. You can drag it upward or downward to adjust the exposure, producing a brighter image (drag upward) or darker image (drag downward). You are, in effect, changing the Exposure Value (EV) and applying exposure compensation.
- ■Lock exposure. Keep your finger in place until the Auto Exposure Locked indicator appears (see Figure 5.9, right).
As you might expect, because exposure is adjusted using only shutter speed and ISO sensitivity (plus ND filters), your Mavic doesn’t have an exact counterpart to the Program Auto, Shutter-priority, and Aperture-priority modes you may be familiar with when using conventional still cameras. Next is a rundown on the choices you do have in Pro mode.

Figure 5.9 Focus and meter at a selected location (left); hold down to lock exposure (right).
Auto ISO/Auto Shutter Speed (Program Mode)
When you set both ISO and shutter speed to Auto mode, the drone will choose a shutter speed that will effectively counter any camera motion and typical subject motion, and then adjust the ISO to provide what it deems to be an appropriate sensitivity. This behavior is similar to what you get with the Program mode of digital cameras, except that dSLR and mirrorless cameras will adjust the aperture. The recommended exposure can be overridden if you want, using the EV adjustment described above. You’d use this mode:
- ■When you’re learning to use your drone. Set the camera to Auto ISO/Auto Shutter and you can concentrate on learning how to navigate and use your Mavic’s photo and video options.
- ■When you’re in a hurry to get a grab shot. The Mavic will do a pretty good job of calculating an appropriate exposure for you, without any input from you.
- ■When no special shutter speed or aperture settings are needed. If your subject doesn’t require special anti- or pro-blur techniques, and noise levels aren’t important, use this mode as a general-purpose setting.
Auto ISO/Manual Shutter Speed (Shutter-Priority Mode)
You select a shutter speed and the drone will choose an ISO sensitivity that will provide the correct exposure. This is similar to the S or Tv modes you may be used to. Perhaps you’re shooting still photos of fast-moving subjects and you want to use the absolute fastest shutter speed available. In other cases, you might want to use a slow shutter speed to add some blur to a sports image that would be mundane if the action were completely frozen. Motor sports and track-and-field events particularly lend themselves to creative use of slower speeds. For example, if you were shooting stills of a motorcycle race (with permission, from a safe angle, not in a stadium nor above any spectators), your shots will have more excitement if the spinning wheels are slightly (or dramatically) blurry. This shutter-priority mode gives you some control over how much action-freezing capability your camera brings to bear in a particular situation.
- ■To reduce blur from subject motion. Set the shutter speed of the camera to a higher value to reduce the amount of blur from subjects that are moving. The exact speed will vary depending on how fast your subject is moving and how much blur is acceptable.
- ■To add blur from subject motion. There are times when you want a subject to blur, say, when shooting waterfalls with the camera set for a one- or two-second exposure.
- ■To add blur from camera motion when you are moving. Say your drone is following some running wildlife or humans. You might want to set the camera to take still shots at 1/60th second, so that the background will blur.
- ■To reduce blur from camera motion when you are moving. In other situations, the drone itself is in motion and you want to minimize the amount of blur caused by the motion of the camera.
Manual ISO/Auto Shutter Speed (Aperture-Priority Mode)
In this mode, you choose a fixed ISO sensitivity and allow the camera to adjust the shutter speed to arrive at an appropriate exposure. This option resembles the aperture-priority mode you may have used with your dSLR or mirrorless digital camera, except that you don’t get to choose the aperture, which is fixed at f/2.8 and the shutter speed is varied. ISO is locked at the setting you choose, which means that regardless of the shutter speed chosen by the drone, the noise levels and contrast that are dependent on ISO setting will remain consistent.
Manual ISO/Manual Shutter Speed (Manual Mode)
Part of being an experienced photographer comes from knowing when to rely on your camera’s automation (Auto mode, or Pro mode with Auto ISO, Auto Shutter Speed, or both) and when to set exposure manually. Still photography with drones in full manual mode can be tricky, though, because lighting conditions can change rapidly due to the environment (the sun slipping behind some clouds), or simply because the landscape changes dramatically as your flight path takes you over new terrain.
Still, manual exposure can come in handy in some situations. You might be wanting to achieve a silhouette effect, and find that none of the exposure modes or EV correction features give you exactly the look you want, even with Spot metering. In Manual mode you can set the exact ISO and shutter speed required, supplemented by neutral-density filters if necessary.
Adjusting EV
Making EV adjustments is a way of applying exposure compensation to override the shutter speed and ISO settings calculated by the camera. You can add or subtract exposure in 1/3-stop increments, thereby making your image brighter or darker than if you’d allowed the Mavic to choose its settings automatically.
I showed you how to apply EV changes when Auto camera mode is active earlier in this chapter. In Pro mode, there are two ways to override the drone’s exposure settings, using Touch Focus/Metering, as described above, and manually applying plus or minus values using the exposure controls shown in Figure 5.10.
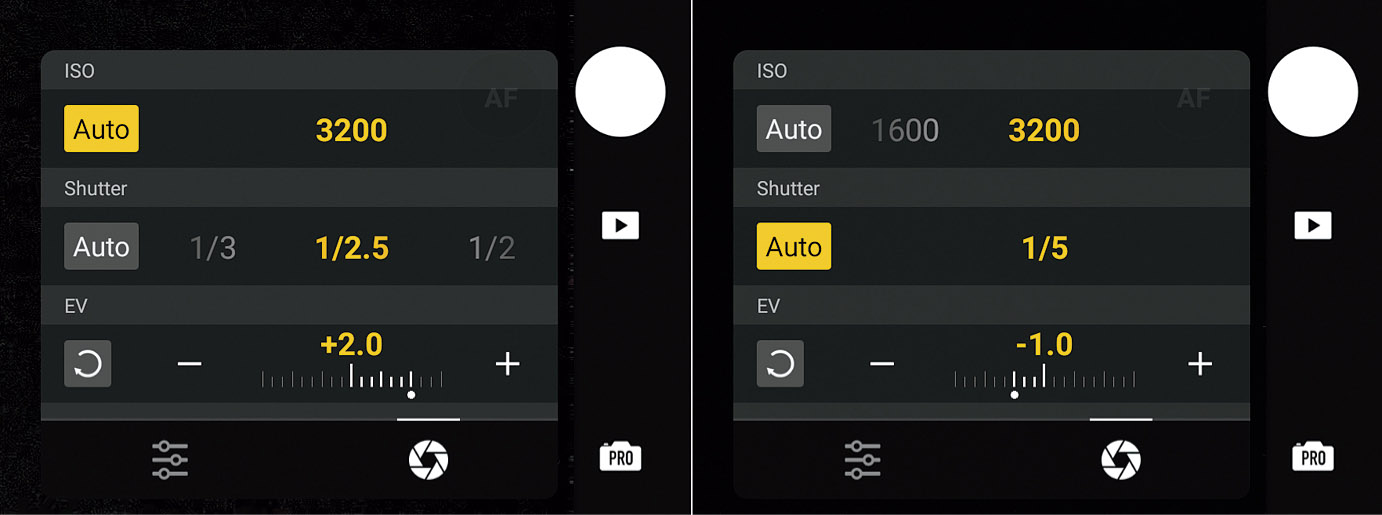
Figure 5.10 Only ISO changes as you add/subtract EV (left). Shutter speed changes while ISO remains constant (right).
As I mentioned earlier, when either Shutter Speed or ISO are set to Auto, or when both are in Auto mode, you can override their settings by applying exposure compensation, usually expressed in terms of EV (Exposure Value) changes. When you click the EV label, you’re given the opportunity to add or subtract up to three stops of exposure, in one-third stop increments.
- ■Shutter Speed: Auto. If Shutter Speed is set to Auto, then the shutter speed will increase or decrease while the ISO remains fixed as you add or subtract EV.
- ■ISO: Auto. If ISO is set to Auto, the ISO setting will change instead with the shutter speed remaining constant.
- ■Shutter Speed/ISO: Auto. If both are in Auto mode, then both will be adjusted.
- ■Shutter Speed/ISO: Manual. If you’ve disabled Auto adjustments for both shutter speed and ISO, then you are in Manual Metering mode, indicated by the M.M. label applied above to this EV setting, and EV changes are not possible.
Is Visual Noise a Problem?
With conventional cameras, the graininess we call “noise” can be an important concern. Visual image noise is that random grainy effect that some like to use as a special effect, but which, most of the time, is objectionable because it robs an image of detail even as it adds that “interesting” texture. This noise is caused by three different phenomena:
- ■Sensor area. You’ll often see assertions that larger sensors are subject to less visual noise because the individual photosites (pixels) are larger. That’s not correct. Some types of noise are actually a function of the total image area of the sensor; it makes no difference how the sensor is divided up into individual pixels. Larger sensors do allow more pixels and higher effective resolutions, but the actual noise levels of a given sensor size are the same whether it’s a 12MP sensor or 24MP sensor. It’s the increase in total area that lowers noise levels. Figure 5.11 shows the relative sensor sizes of a variety of digital camera digitizers, from a 36 × 24mm full-frame sensor to the 6.4 × 4.8mm sensor of the Mavic Air 2.
- As you might guess, the Mavic Air 2 and 2S have more visual noise resulting from sensor size than cameras with much larger sensors. In practice, you’re more likely to see noise caused by sensor size than from length of exposure or high ISO.
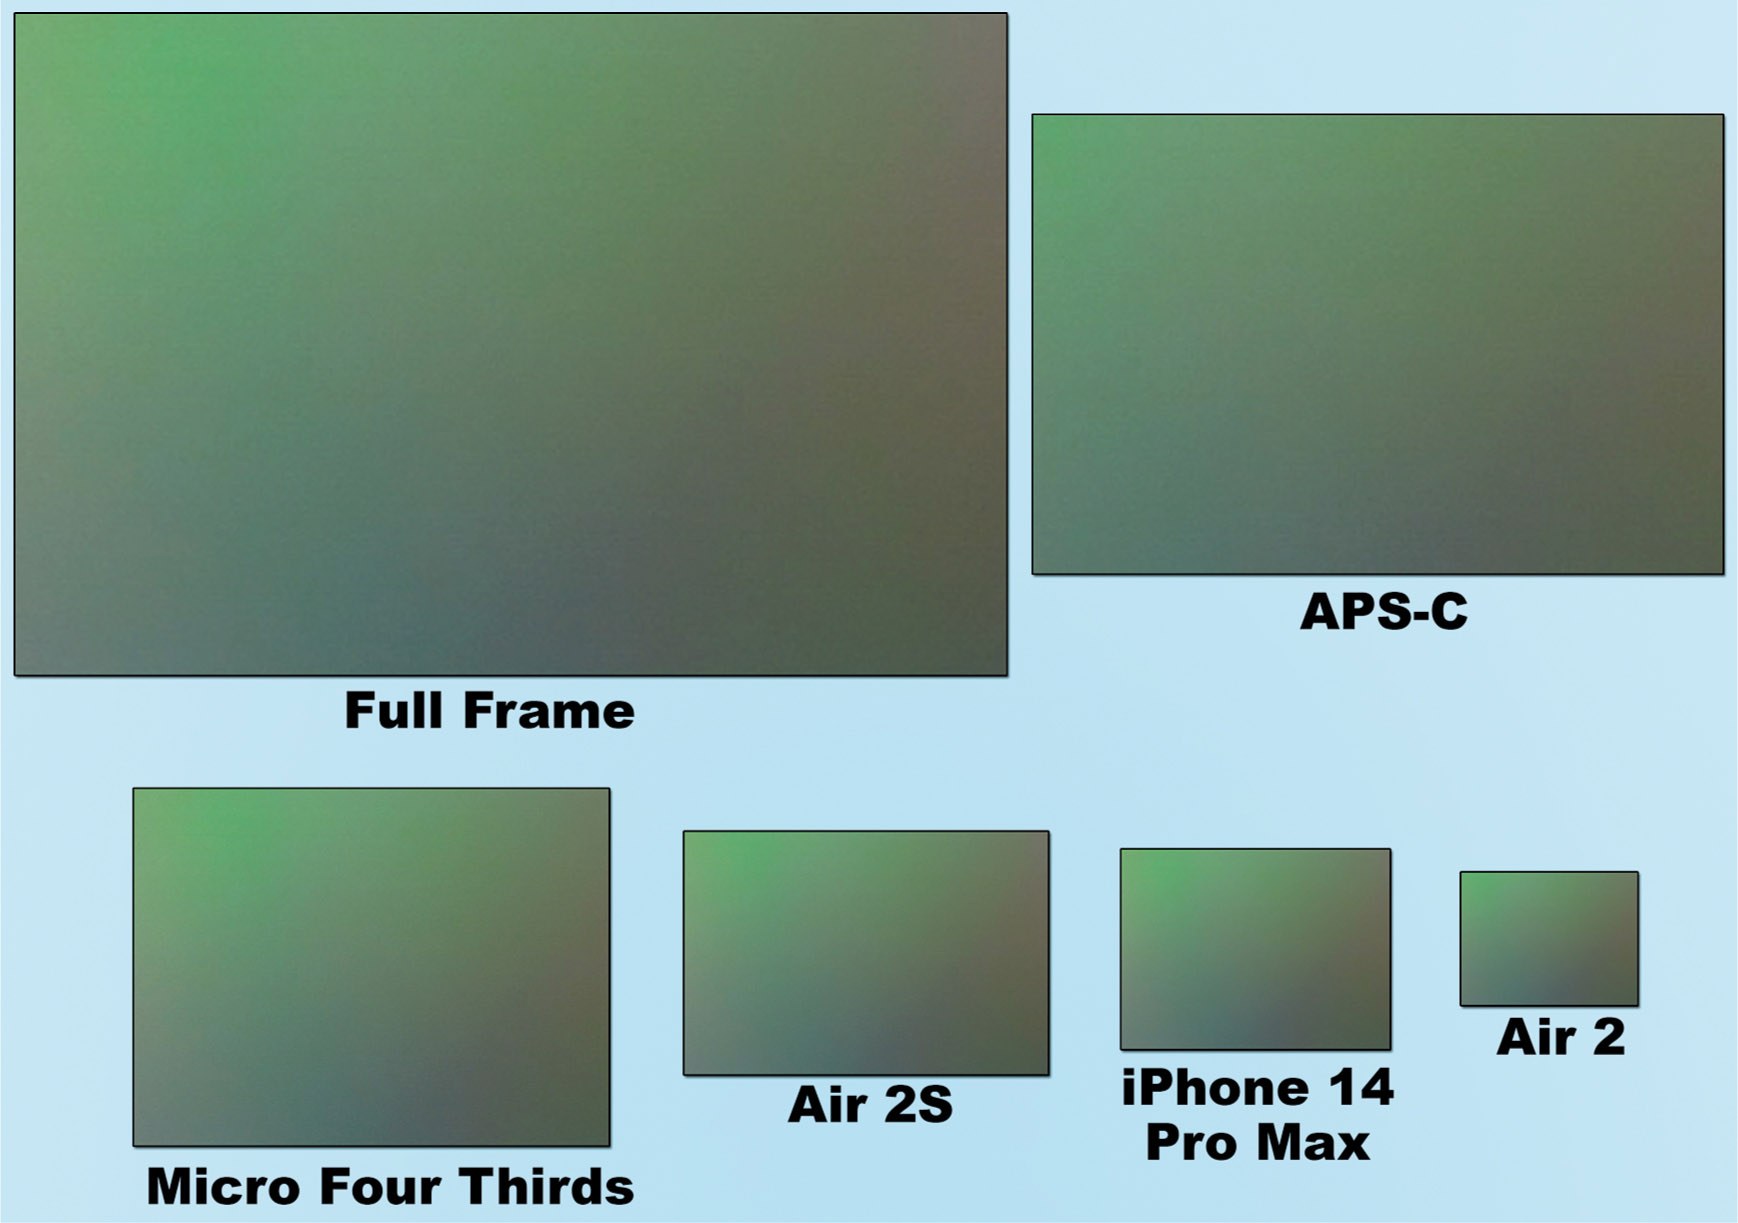
Figure 5.11 Comparing sensor sizes.
- ■Exposure time. Longer exposures allow more photons to reach the sensor, increasing your ability to capture a picture under low-light conditions. However, the longer exposures also increase the likelihood that some pixels will register random phantom photons, often because the longer an imager is “hot,” the warmer it gets, and that heat can be mistaken for photons. CMOS imagers, like the ones found in the Air 2/2S contain millions of individual amplifiers and analog/ digital converters, all working in unison. Because all these circuits don’t necessarily process in precisely the same way all the time, they can introduce something called fixed-pattern noise into the image data.
- The good news is that it’s unlikely you’ll be capturing many images using long exposure times. Video shutter speeds are 1/30th second or shorter, and the vast majority of your still photos will be taken at even briefer shutter speed settings—frequently 1/1250th or faster. In any case, the longest exposure time available with your Mavic is 8 seconds, a duration that does not produce much long exposure noise.
- ■High ISOs. This kind of noise commonly first appears when you raise your camera’s sensitivity setting above ISO 1600. This kind of noise appears as a result of the amplification needed to increase the sensitivity of the sensor. Because your sensor has twice as many green pixels as red and blue pixels, such noise is typically worse in areas that have red, blue, and magenta tones, because the green signals don’t have to be amplified as much to produce detail. While higher ISOs do pull details out of dark areas, they also amplify non-signal information randomly, creating noise.
- Your done is capable of using ISO settings that venture into the “noisy” zone. The Mavic Air 2 can use up to ISO 6400 for video and 12MP still photos (ISO 3200 in 48MP mode), while the Air 2S can use up to ISO 6400 for video and ISO 12800 for still photos (both in Manual exposure mode). You’ll rarely need those lofty settings, however, thanks to the fixed f/2.8 aperture. Under dim sunlight, you’d need an exposure of 1/8000th second at f/2.8 to push ISO to 3200 or an exposure of 1/4000th second at f/2.8 to require ISO 6400 at dusk.
If you do encounter objectionable noise in any of your still photos, most image-editing software includes noise-reduction features that will reduce the graininess, while masking a little detail.
Autoexposure Bracketing
Bracketing is a method for shooting several consecutive exposures using different settings, as a way of improving the odds that one will be exactly right. Before digital cameras took over the universe, it was common to bracket exposures, shooting, say, a series of three photos at 1/125th second, but varying the f/stop from f/8 to f/11 to f/16. In practice, smaller than whole-stop increments were used for greater precision. Plus, it was just as common to keep the same aperture and vary the shutter speed, although in the days before electronic shutters, film cameras often had only whole-increment shutter speeds available. Figure 5.12 shows a typical bracketed series.
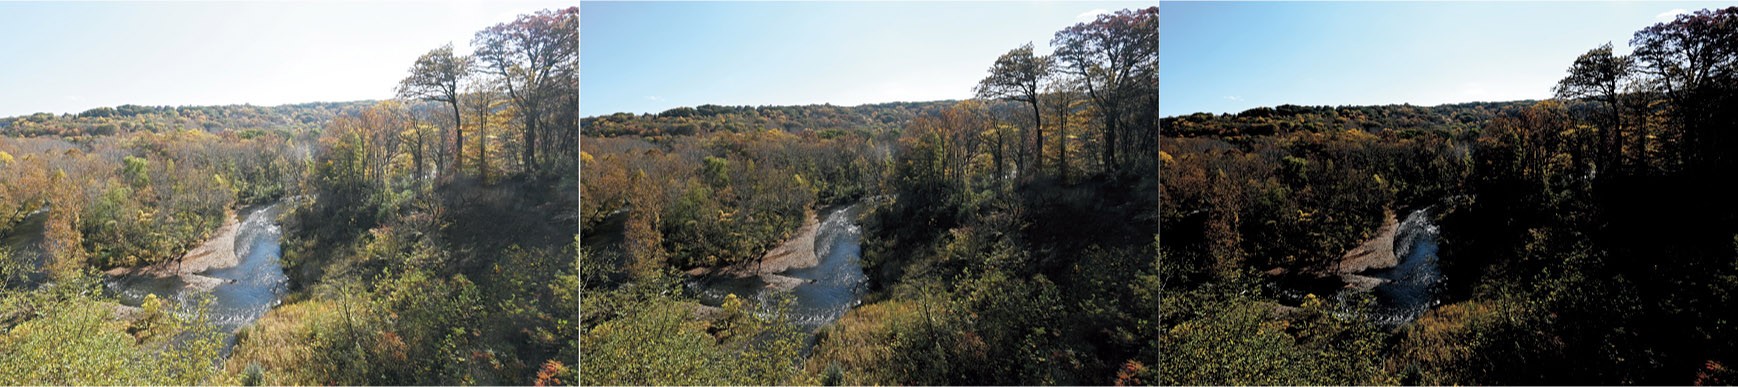
Figure 5.12 In this bracketed series, you can see underexposure (left), metered exposure (center), and overexposure (right).
Bracketing exposures automatically with your Mavic Air 2/2S couldn’t be easier. AEB (Autoexposure bracketing) is one of the shooting choices available from Photo mode, as you can see in Figure 5.13. You can specify either 3 or 5 shots, and when you press the shutter icon/button, the drone automatically shoots a burst of the specified length, each at a different exposure value—one at the standard exposure, and the others with more or less exposure. For each, the shutter speed will change to provide the necessary exposure adjustment for the series.
- ■3 shots. The camera will capture one image at the base or standard exposure (usually the metered exposure). It then takes one additional shot that provides 2/3 stop more and one with 2/3 stop less exposure relative to that “base” image.
- ■5 shots. The camera captures one image at the base exposure, and then shots at 2/3 and 1 1/3 stops less and 2/3 and 1 1/3 stops more than the base exposure.
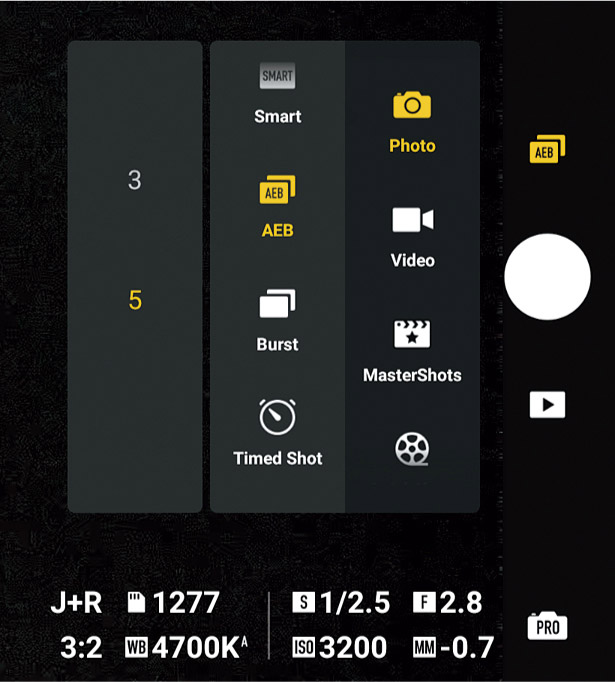
Figure 5.13 Choose 3 or 5 bracketed shots.
Note that I used the term base exposure rather than metered exposure. Most of the time, the initial shot will, indeed, be the one calculated by the drone based on your exposure settings, in exactly the way you might expect in both 3-shot and 5-shot modes:
- ■Shutter Speed Auto/ISO Auto. Both shutter speed and ISO will be adjusted to produce the over- and underexposures. You can safely use this mode if you have plenty of light, because there will be no danger of using a shutter speed that is too low to counter movement or an ISO sensitivity that will produce a noisy image.
- ■Shutter Speed Auto/ISO Manual. The ISO will remain at the setting you specify, and the shutter speed will be adjusted to produce less or more exposure around the base exposure. Use this mode when capturing bracketed images for manual HDR processing (described next), because all your images will have similar noise characteristics.
- ■Shutter Speed Manual/ISO Auto. The shutter speed is constant at the setting you select, and ISO will be adjusted to produce the bracketed images. Use this mode when you want to freeze motion by locking in a fast shutter speed. Noise may vary between shots, particularly in 5-shot mode, but should not be objectionable if light levels are not low.
While your drone’s bracketing feature is easy to use, it does have limitations, which you may notice if you have done a lot of bracketing with conventional cameras. Unlike its non-aerial counterparts, the Mavic Air 2/2S camera doesn’t allow changing the increment between shots from the default 2/3-stop values. Some cameras let you choose increments of 2 to 6 whole stops, which gives you a more dramatic bracket spread, and up to nine separate shots rather than just 3 or 5. That flexibility can come in very handy with manual HDR photography.
One thing you can do, however, is bias your bracketing sequence toward over- or underexposure, simply by adding exposure compensation. Say you’ve already captured a set of bracketed exposures and they all are too dark or too light. In Pro mode, simply tap plus or minus EV (up to three stops in either direction), and the Mavic will then adjust the metered setting upward or downward and use that as the base for the 3-shot or 5-shot bracketed sequence. This technique compensates, somewhat, for the inability to change the size of the increment; you’re not getting more shots, but they are all biased in a more useful direction.
Working with HDR
High dynamic range (HDR) photography has been quite the rage for quite a while now, especially since vendors, including DJI, have been building HDR features into their devices. Entire books have been written on the subject. It’s not really a new technique—film photographers have been combining multiple exposures for ages to produce a single image of, say, an interior room while maintaining detail in the scene visible through the windows. Your Mavic does include a built-in HDR capability—SmartShots—but you can generally get better results melding images manually.
Suppose you wanted to photograph an offshore lighthouse as sunset approached, but found that if you exposed to represent the water accurately, the dramatic sky tones were overexposed, as shown at left in Figure 5.14. Reducing exposure to darken the sky also makes the water look murky and lacking in detail, as seen at right in Figure 5.14. The solution is to capture multiple bracketed images, as described previously, and then combine them in an image editor or one of the stand-alone HDR processing utilities that are available.

Figure 5.14 It’s not possible to capture both the sky and water in the same image with one exposure.
That’s what I did. I grabbed a five-shot bracketing sequence with shutter speed set on manual at about 1/320th second. The ISO is set to Auto to allow adjusting the ISO sensitivity during the bracketing. I used Photoshop’s Merge to HDR Pro plug-in to combine four of the exposures, as shown in Figure 5.15. The resulting HDR image is Figure 5.16.
When working with HDR, there are a few things to keep in mind:
- ■Moving objects may produce ghosts. Even if the drone hovers steadily, there may be some subject motion between shots, producing “ghost” effects. For my example shot, a few birds, a flag on the lighthouse, and the relatively calm surface of Lake Erie were the only things that moved—only slightly—between exposures, so no ghosts are obvious.
- ■Misalignment. Your Mavic may still shift almost imperceptibly between shots, but most HDR utilities feature an Auto Image Align function that does a good job of realigning your multiple images when they are merged. However, it can’t do a perfect job, particularly with repetitive patterns that are difficult for the camera’s “brains” to sort out. Some misalignment is possible.
- ■Unwanted cropping. Because the processor needs to be able to shift each individual image slightly in any (or all) of four directions in Auto Image Align mode, it needs to crop the image slightly to trim out any non-image areas that result. Your final image will be slightly smaller than one shot in other modes.
- ■Weird colors. Some types of outdoor lighting, including fluorescent and LED illumination, “cycle” many times a second, and colors can vary between shots. You may not even notice this when single shooting, but it becomes more obvious when using any continuous shooting mode, including HDR mode. The combined images may have strange color effects.
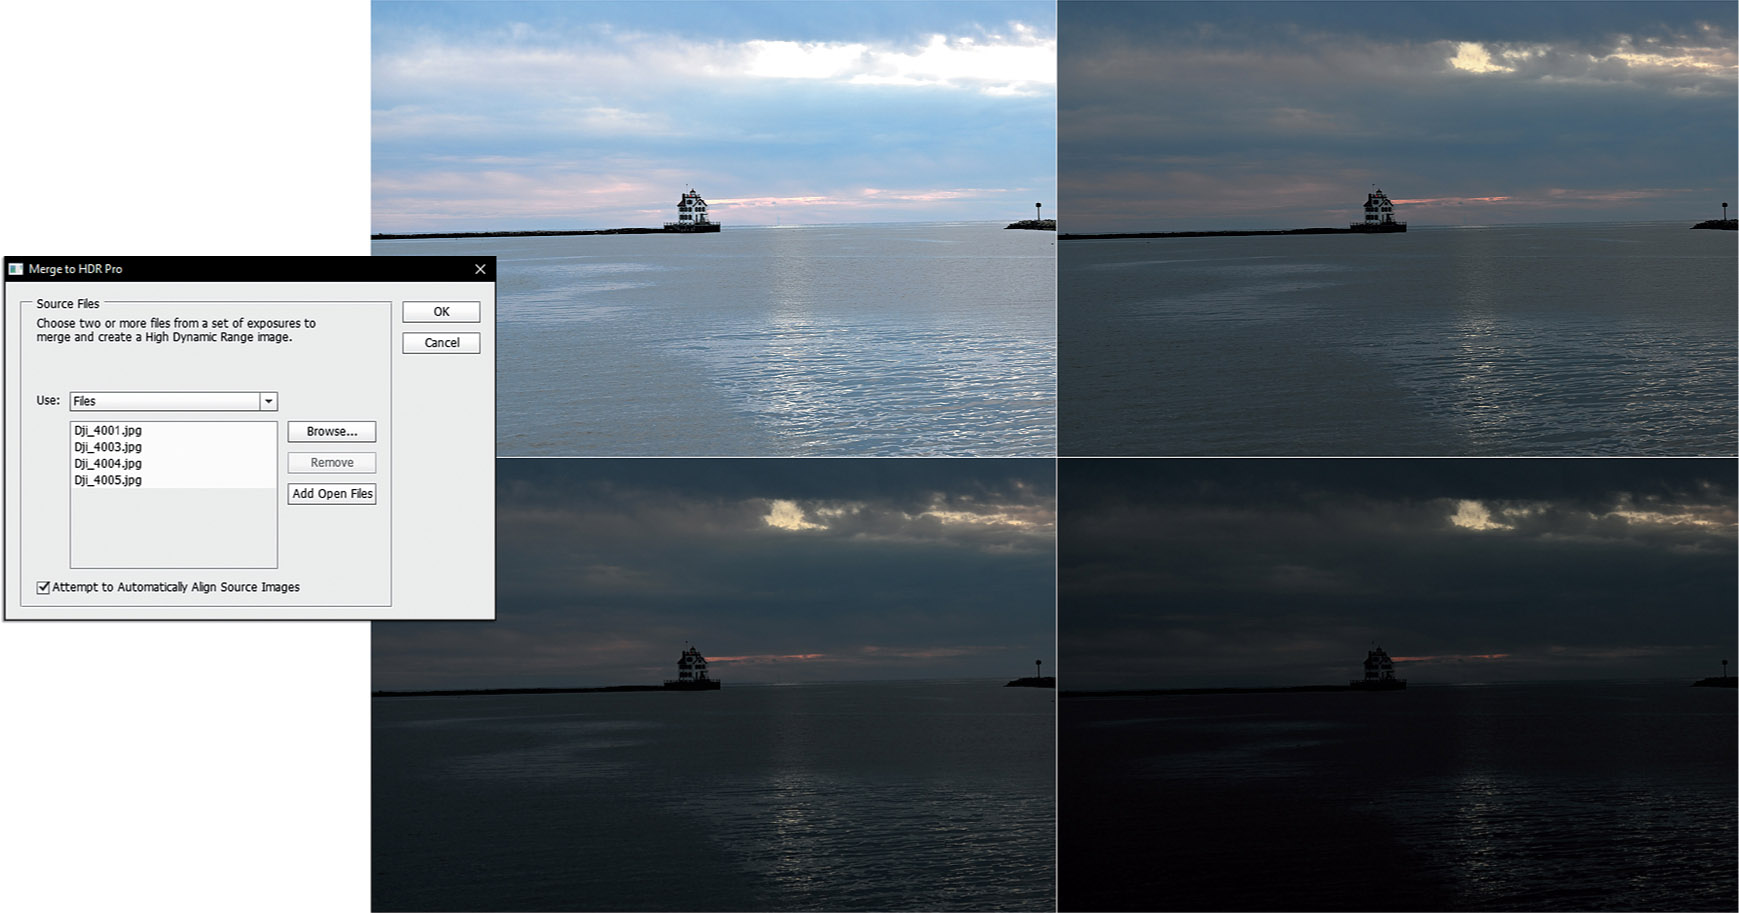
Figure 5.15 Multiple exposures using different values can be combined in an image editor like Photoshop.

Figure 5.16 The combined image has more detail in bright and dark areas of the scene.
Fixing Exposures with Histograms
While you can often repair poorly exposed photos in your image editor, your best bet is to arrive at the correct exposure when your drone takes the original picture, minimizing the tweaks that you have to make in post-processing. However, you can’t always judge exposure just by simply looking at the preview image on the screen of your controller, nor the review image when you tap the Playback icon to see an image you’ve already captured. Ambient light may make the screen difficult to see, and its rendition is not very accurate in any case.
Fortunately, you have two tools that allow you to evaluate exposure prior to capturing an image. One of these is the Overexposure Warning, which you can activate by accessing the System Settings menu (represented by three dots in the upper-right corner of the controller’s display). Tap the Camera tab and scroll down to the Overexposure Warning switch (see Figure 5.17). Once activated, you’ll view a “zebra stripe” pattern in any area of the frame that will be overexposed (see Figure 5.18).
Depending on the importance of the “clipped” detail marked with the zebra stripes, you can adjust exposure or leave it alone. For example, if all the striped areas are in a background that you care little about, you can forget about them and not change the exposure, but if such areas appear in important details of your subject, you may want to make some adjustments.
Zebra stripes can be distracting, and don’t provide any information other than warning that some areas are overexposed. A less intrusive tool for evaluating exposure is the histogram, a type of graph that represents the amount of tones at a particular brightness level, so you can gauge the exposure in the shadows, midtones, and highlights. An example is shown in Figure 5.19.

Figure 5.17 Turn on Overexposure Warning in the System Settings screen.

Figure 5.18 Overexposed areas will be highlighted with zebra stripes.
The horizontal axis represents each of 256 different tones, from the darkest blacks (zero) at the left end of the graph, to the brightest whites (255) at the right end. The curve of the graph is produced by vertical bars that represent the relative number of pixels at each of the 256 values. It’s important to note that the 256 tones are not equally distributed. Only 1/32 of the available tones are contained in the left-most fifth of the graph, the second, third, fourth, and fifth sections are allocated 1/16, 1/8, 1/4, and 1/2 of the tones, respectively.
The bottom line is that the darkest shadow areas are represented by very few different tones, while highlights are allocated 16 times as many values. That’s why it’s much more difficult to recover detail in shadows than it is in highlights; there isn’t much information in dark areas in the first place. I’ll show you how to use that information shortly.

Figure 5.19 A histogram is a graph representing the distribution of tonal values in shadows, midtones, and highlights.
There are two ways to work with histograms. Your first line of defense should be to monitor the histogram shown on the screen of your controller. It is a “live,” brightness (or luminance) histogram, which shows how the tones are arranged before and during capture, in real time. You can also view the distribution of your tones in your image editor, as all of them include a histogram feature you will find helpful in post-processing still images. However, it’s better to get your exposure correct in the first place rather than try to fix it afterward.
Your first step is to activate the Mavic’s histogram feature. Just follow these steps:
- 1.Access System Settings. Tap the System Settings trio of dots in the upper-right corner.
- 2.Navigate to the Camera tab. Tap the Camera tab and scroll down to activate the Histogram switch, seen in Figure 5.20.
- 3.Exit. Tap the Back icon or press the Back button (if present on your controller) to exit.
- 4.Position histogram. The histogram will appear on the screen, as in Figure 5.21. Touch your finger to the histogram and drag it anywhere you like on the screen.
- 5.Hide histogram. If you don’t want to view the histogram, tap the X in its upper-left corner.
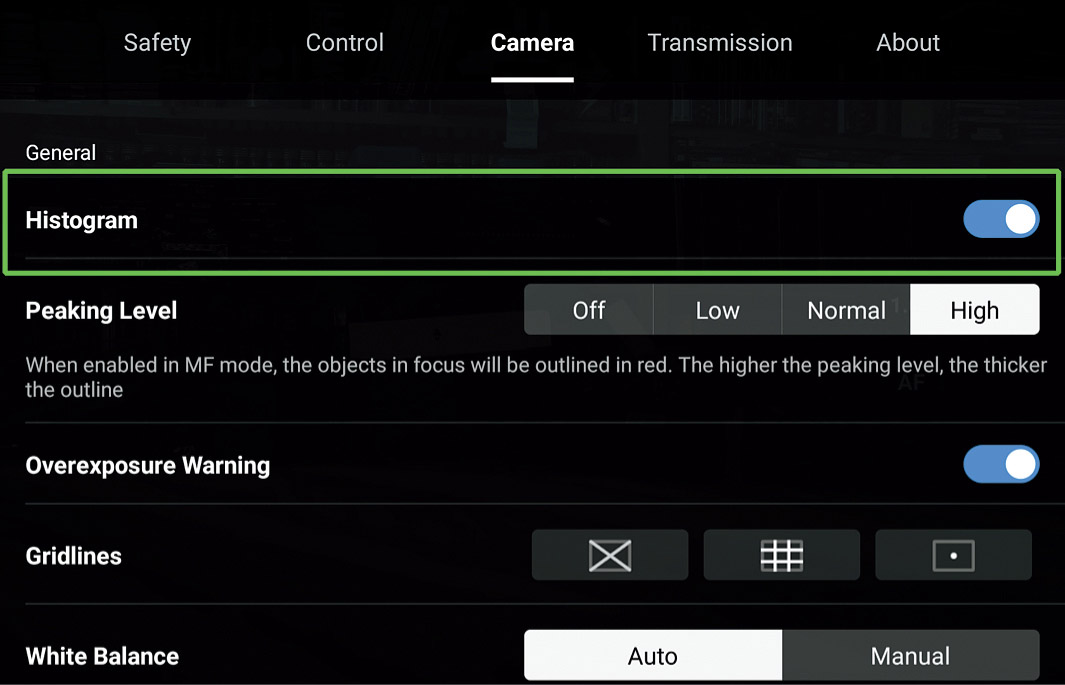
Figure 5.20 Activate the histogram from the Systems Settings menu.

Figure 5.21 The live histogram will appear superimposed on the screen.
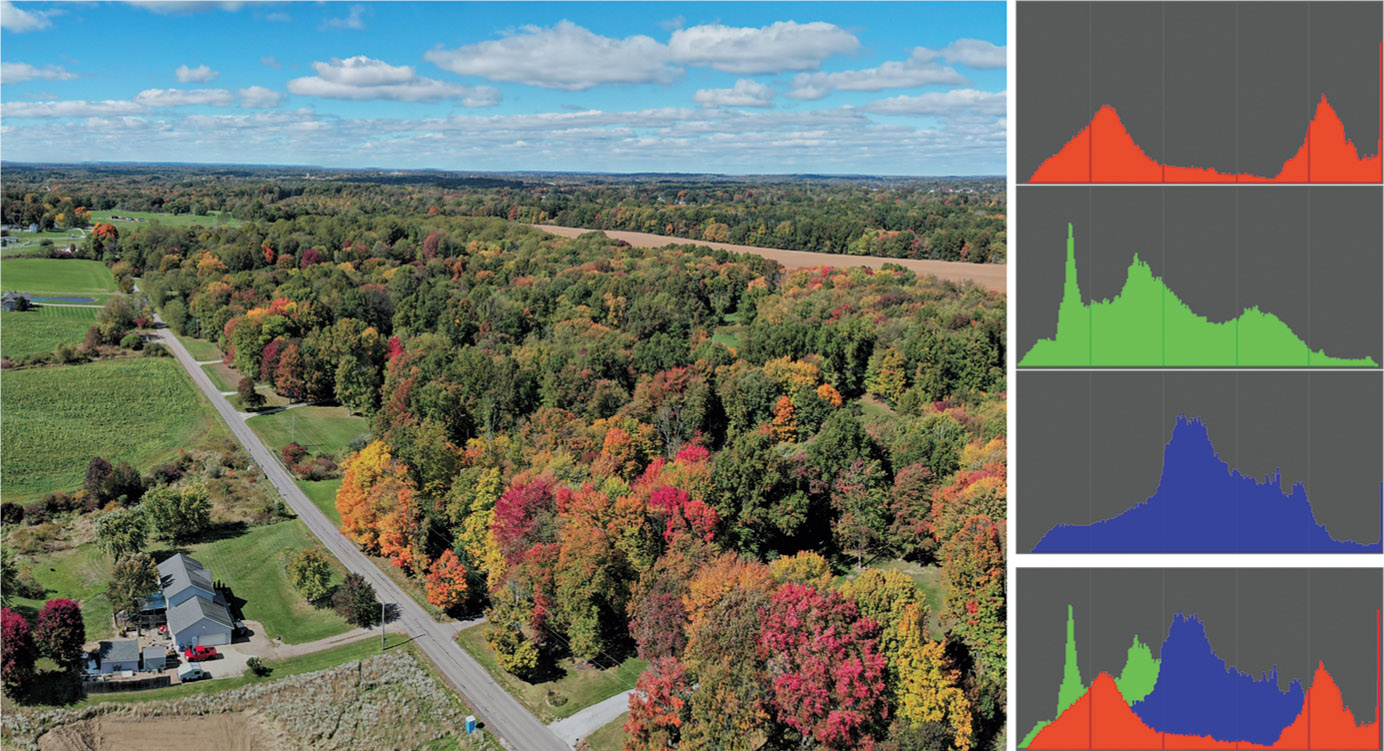
Figure 5.22 RGB histogram with separate channels (upper right); RGB channels superimposed (lower right).
Histograms and Contrast
Your camera’s histograms are a simplified display of the numbers of pixels at each of 256 brightness levels, producing an interesting “mountain range” shape in the graph. As I mentioned earlier, each vertical line in the graph represents the number of pixels in the image for each brightness value, from 0 (black) on the left to 255 (white) on the right. The vertical axis represents the number of pixels at each level on a scale that is compressed or expanded to more or less fill the available vertical area of the graph.
Although histograms are most often used to fine-tune exposure, you can glean other information from them, such as the relative contrast of the image. Figure 5.23, top, shows a generic histogram of an aerial image having normal contrast. In such an image, most of the pixels are spread across the image, with a healthy distribution of tones throughout the midtone section of the graph. That large peak at the right side of the graph represents all those light tones in the sky. A normal-contrast image you shoot may have less sky area, and less of a peak at the right side, but notice that very few pixels hug the right edge of the histogram, indicating that the lightest tones are not being clipped because they are off the chart.
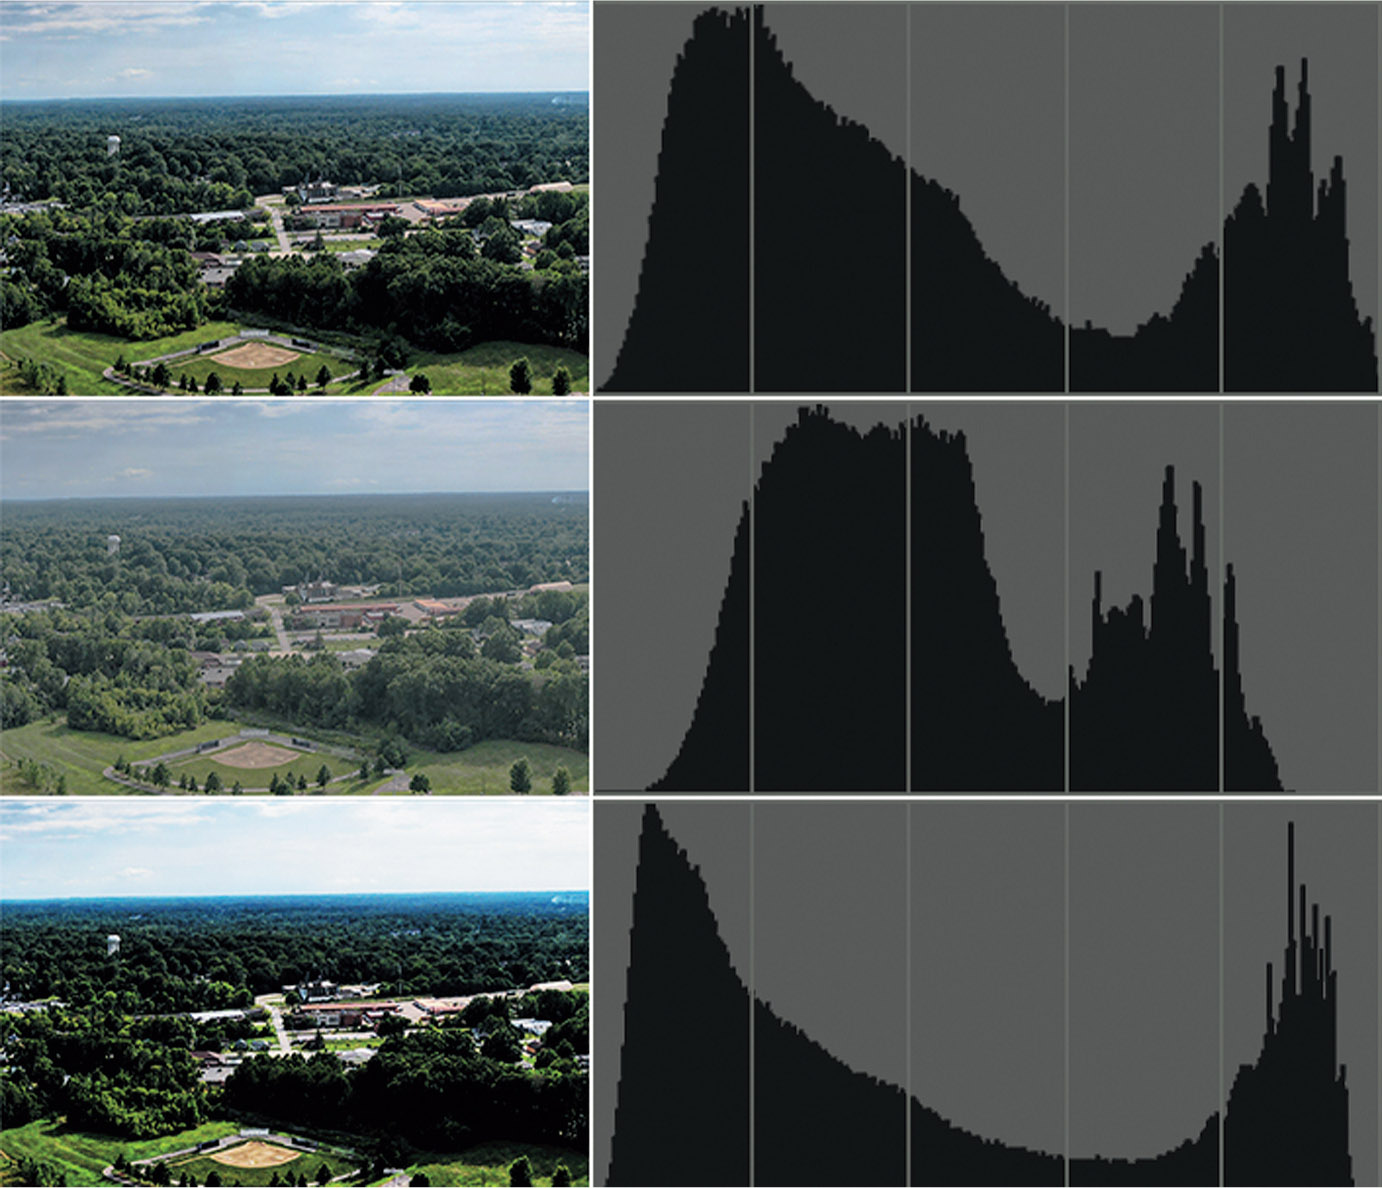
Figure 5.23 Top: This image has fairly normal contrast, even though there is a peak of light tones at the right side representing the sky. Center: This low-contrast image has all the tones squished into one section of the grayscale. Bottom: A high-contrast image produces a histogram in which the tones are spread out.
With a lower-contrast image, like the one shown in Figure 5.23, center, the basic shape of the previous histogram will remain recognizable, but gradually will be compressed together to cover a smaller area of the gray spectrum. The squished shape of the histogram is caused by all the grays in the original image being represented by a limited number of gray tones in a smaller range of the scale.
Instead of the darkest tones of the image reaching into the black end of the spectrum and the whitest tones extending to the lightest end, the blackest areas of the scene are now represented by a light gray, and the whites by a somewhat lighter gray. The overall contrast of the image is reduced. Because all the darker tones are actually a middle gray or lighter, the scene in this version of the photo appears lighter as well.
Going in the other direction, increasing the contrast of an image produces a histogram like the one shown in Figure 5.23, bottom. In this case, the tonal range is now spread over the entire width of the chart, but, except for the bright sky, there is not much variation in the middle tones; the mountain “peaks” in the midtones are not very high at all. When you stretch the grayscale in both directions like this, the darkest tones become darker (that may not be possible) and the lightest tones become lighter (ditto). In fact, shades that might have been gray before can change to black or white as they are moved toward either end of the scale.
The effect of increasing contrast may be to move some tones off either end of the scale altogether, while spreading the remaining grays over a smaller number of locations on the spectrum. That’s exactly the case in the example shown. The number of possible tones is smaller, and the image appears harsher.
With drone photography there is very little you can do to adjust contrast. In daylight, the sunlight you have is the sunlight you have to use to capture your images. If lighting is too harsh, the best you can hope for are some clouds that will soften the illumination and fill in inky shadows. However, understanding contrast as displayed by the histogram can be useful when you need to match the shots you take today with those you capture on some other day. When I’m shooting construction progress images, I like to have light with good contrast to better show the details. I try to shoot at the same time of day for consistency, and perhaps wait, if necessary, for the same kind of light contrast when taking each set of images.
Histograms and Exposure
The important thing to remember when working with the histogram display in your camera is that changing the exposure does not change the contrast of an image. The curves illustrated in the previous three examples remain exactly the same shape when you increase or decrease exposure. I repeat: The proportional distribution of grays shown in the histogram doesn’t change when exposure changes; it is neither stretched nor compressed. However, the tones as a whole are moved toward one end of the scale or the other, depending on whether you’re increasing or decreasing exposure. You’ll be able to see that in some illustrations that follow.
So, as you reduce exposure, tones gradually move to the black end (and off the scale), while the reverse is true when you increase exposure. The contrast within the image is changed only to the extent that some of the tones can no longer be represented when they are moved off the scale.
What you can do is adjust the exposure so that the tones that are already present in the scene are captured correctly. Figure 5.24, top, shows the histogram for an image that is badly underexposed. You can guess from the shape of the histogram that many of the dark tones to the left of the graph have been clipped off. There’s plenty of room on the right side for additional pixels to reside without having them become overexposed. So, you can increase the exposure (either by changing the shutter speed, ISO, or by adding an EV value) to produce the corrected histogram shown in Figure 5.24, center.
Conversely, if your histogram looks like the one shown in Figure 5.24, bottom, with bright tones pushed off the right edge of the chart, you have an overexposed image, and you can correct it by reducing exposure. In working with histograms, your goal should be to have all the tones in an image spread out between the edges, with none clipped off at the left and right sides. Underexposing (to preserve highlights) should be done only as a last resort, because retrieving the underexposed shadows in your image editor will frequently increase the noise, even if you’re working with RAW files. A better course of action is to expose for the highlights, but, when the subject matter makes it practical, fill in the shadows with additional light, using reflectors, fill flash, or other techniques rather than allowing them to be seriously underexposed.

Figure 5.24 Top: A histogram of an underexposed image may look like this. Center: Adding exposure will produce a histogram like this one. Bottom: A histogram of an overexposed image will show clipping at the right side.
A traditional technique for optimizing exposure is called “expose to the right” (ETTR), which involves adding exposure to push the histogram’s curve toward the right side but not far enough to clip off highlights. The rationale for this method is that extra shadow detail will be produced with a minimum increase in noise, especially in the shadow areas. As I noted earlier, half of a digital sensor’s response lies in the brightest areas of an image, and so require the least amount of amplification (which is one way to increase digital noise). ETTR can work, as long as you’re able to capture a satisfactory amount of information in the shadows.
Exposing to the Right
Instead, you want to add exposure—as long as you don’t push highlights off the right edge of the histogram—to brighten the shadows. Because there are roughly 8,000 tones available in the highlights, even if the RAW image looks overexposed, it’s possible to use your RAW converter’s Exposure slider (such as the one found in Adobe Camera Raw) to bring back detail captured in that surplus of tones in the highlights. This procedure is the exact opposite of what was recommended for film of the transparency variety—it was fairly easy to retrieve detail from shadows by pumping more light through them when processing the image, while even small amounts of extra exposure blew out highlights. (Note: I’ve rounded the numbers a bit for simplicity.) You’ll often find that the range of tones in your image is so great that there is no way to keep your histogram from spilling over into the left and right edges, costing you both highlight and shadow detail. Exposing to the right may not work in such situations. A second school of thought recommends reducing exposure to bring back the highlights, or “exposing to the left.” You would then attempt to recover shadow detail in an image editor, using tools like Adobe Camera Raw’s Exposure slider. But remember, above all, that this procedure will also boost noise in the shadows, and so the technique should be used with caution. In most cases, exposing to the right is your best bet.
Focus Pocus
With conventional cameras, correct focus is both a major concern and a creative tool. Enthusiasts working with dSLRs or mirrorless interchangeable-lens cameras need to achieve sharp focus with a variety of subjects, and, in addition, use selective focus techniques as a creative tool to emphasize subjects or blur backgrounds. Drones, too, need to be able to focus accurately. This next section will tell you everything you need to know (or, perhaps, more than you need to know) about focus.
Simply put, focus is the process of adjusting the camera so that parts of our subject that we want to be sharp and clear are, in fact, sharp and clear. We can allow the Mavic Air 2S to focus for us, automatically, or we can choose to focus manually. With conventional cameras, manual focusing is especially problematic because our eyes and brains have poor memory for correct focus. That’s why your eye doctor conducting a refraction test must shift back and forth between pairs of lenses and ask, “Does that look sharper, or was it sharper before?” in determining your correct prescription. Too often, the slight differences are such that the lens pairs must be swapped multiple times.
Fortunately, sharp focus with the Mavic Air 2/2S does not generate the same trepidation you feel at the optometrist or with your traditional camera. Due to the physics of your drone’s camera and the type of images you’ll typically be capturing, excellent focus is usually very easy to achieve. DJI’s own manual virtually ignores the subject of focus completely. I’m going to provide the missing information and a bit of background that will help you understand focus and how it works completely.
The reason that accurate focus is not generally an issue with drones like your Mavic is that they typically have quite generous depth-of-field (DOF), which is the range of subject matter that is acceptably in focus. Technically, there is just one plane within your picture area, parallel to the back of the camera’s sensor that is in sharp focus. That’s the plane in which the points of the image are rendered as precise points. At every other plane in front of or behind the focus plane, the points show up as discs that range from slightly blurry to extremely blurry. In practice, the discs in many of these planes will still be so small that we see them as points, and that’s where we get depth-of-field. Depth-of-field is just the range of planes that include discs that we perceive as points rather than blurred splotches. The size of this range increases as the aperture is reduced in size (which is not a factor with your drone’s fixed f/2.8 aperture) and is allocated roughly one-third in front of the plane of sharpest focus, and two-thirds behind it. The range of sharp focus is always greater behind your subject than in front of it. (See Figure 5.25.)
In addition to the aperture, the size of the sensor affects depth-of-field. Smaller sensors use shorter focal length lenses to achieve the same field of view. DJI describes the focal length of your drone’s lens as an equivalent to the focal length of a lens providing the same field of view on a full-frame (“35mm”) sensor measuring 36 × 24mm.
Using that convention, the lens of the Mavic Air 2 projects an image onto its 6.4 × 4.8mm sensor that has the equivalent field of view of a 24mm f/2.8 wide-angle lens. The slightly wider lens installed on the Air 2S produces an image on its larger 13.2 × 8.8mm sensor that provides the same field of view as a 22mm f/2.8 lens on a full-frame camera. Both are wide-angle lenses, and with their respective sensor sizes provide an enormous depth-of-field range.
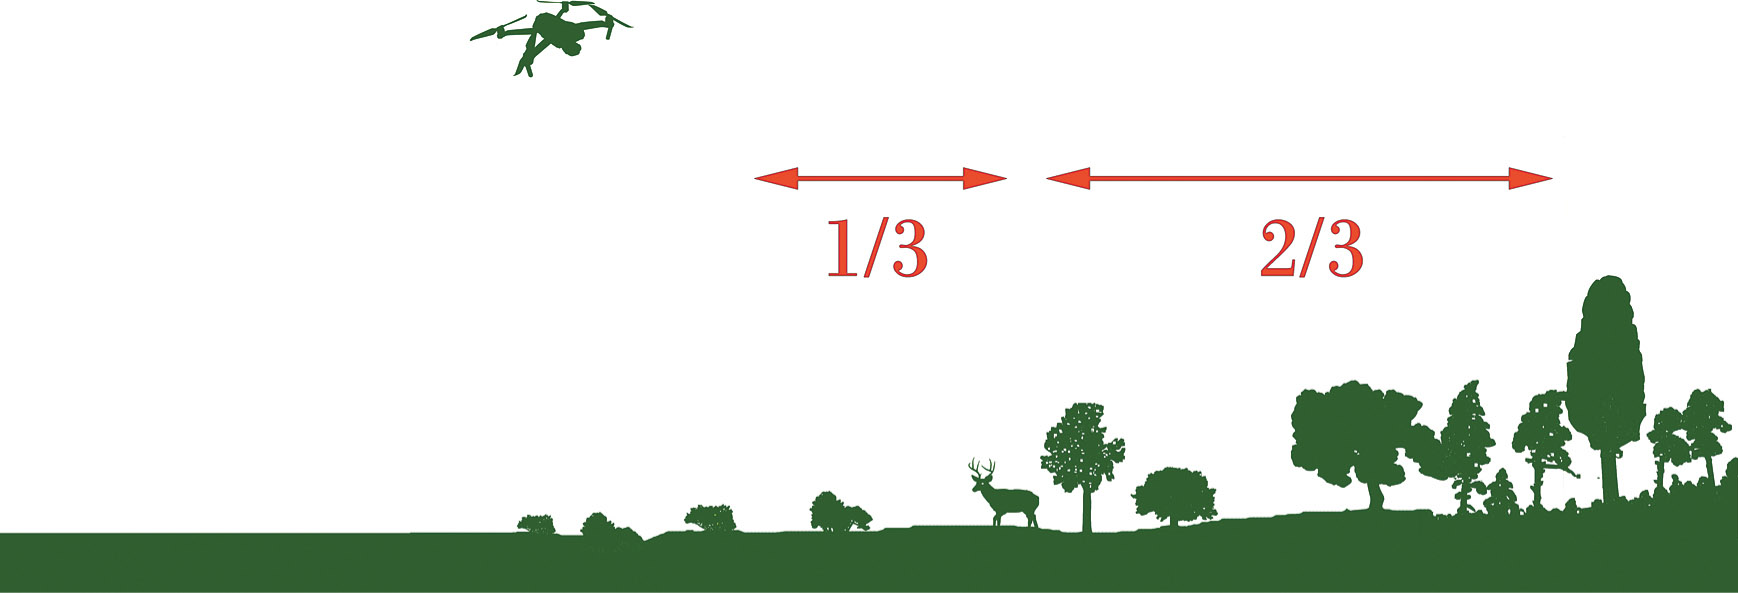
Figure 5.25 The range of sharp focus is greater behind your subject than in front of it.
How enormous? Our perception of sharpness in an image depends on how close we are to that image, and how large it is. If you’re looking at a print of one of your aerial images, its sharpness will be affected by the size of that print (say, it’s a 16 × 20-inch print rather than an 8 × 10-inch print) and how close you are to it. (Of course!) That’s because an image consists of a zillion tiny little points, which you can think of as pinpoints of light in a darkened room. When a given point is out of focus, its edges decrease in contrast and it changes from a perfect point to a tiny disc with blurry edges (remember, blur is the lack of contrast between boundaries in an image). (See Figure 5.26.)

Figure 5.26 When a pinpoint of light (left) goes out of focus, its blurry edges form a circle of confusion (center and right).
When the disc grows large enough that we can see it as a blur rather than as a sharp point then a given point is viewed as being out of focus. You can see, then, that enlarging an image, either by displaying it larger on your computer monitor or by making a large print, also magnifies the size of each circle of confusion. Moving closer to the image does the same thing. So, parts of an image that may look perfectly sharp in a 5 × 7–inch print viewed at arm’s length, might appear blurry when blown up to 11 × 14 inches and examined at the same distance. Take a few steps back, however, and the image may look sharp again. This is true for all viewing methods, for example, when you’re viewing an image on a monitor. (Of course the sharpness will be limited by the resolution of the display, too.)
To a lesser extent, the viewer also affects the apparent size of these circles of confusion. Some people see details better at a given distance and may perceive smaller circles of confusion than someone standing next to them. For the most part, however, such differences are small. Truly blurry images will look blurry to just about everyone under the same conditions.
Table 5.1 shows the DOF for each drone when manually focused at distances of 100, 200, and 300 feet. In calculating the depth-of-field, the assumption was made that the viewer would be looking at an 8 × 10–inch print at a distance of about 10 inches. The website Cambridge in Color has an online calculator you can use to determine the depth-of-field for any size print or display at any viewing distance. Check out https://www.cambridgeincolour.com/tutorials/dof-calculator.htm.

The bottom line is that at normal aerial distances, both the Mavic Air 2 and Air 2S have prodigious amounts of depth-of-field, and at common altitudes everything farther away than 30 feet will be acceptably sharp. As a practical matter, you generally won’t be shooting much closer than that—your drone’s obstacle avoidance alarms will go nuts if you try to fly too close to a subject. However, some creative perspectives call for a more intimate approach to a subject. Commercial drone pilots may have a need to get close, say, to inspect a cell tower or inspect the roof of a dwelling. Fortunately, while the Mavic Air 2 is fixed-focus, the Air 2S does allow both automatic and manual focus.
Both focus modes with the Air 2S rely on contrast detection, which involves identifying the transitions between edges in an image. In Figure 5.27, left, the striations in the rocks are soft and blurred because of the low contrast between them. Whether the cracks in the stone are horizontal, vertical, or diagonal doesn’t matter in the least; the focus system looks only for contrast between edges, and those edges can run in any direction at all.
At the right in Figure 5.27, the image has been brought into sharp focus, and the edges have much more contrast; the transitions are sharp and clear. Although this example is a bit exaggerated so you can see the results on the printed page, it’s easy to understand that when maximum contrast in a subject is achieved, it can be deemed to be in sharp focus. Your eye can visually evaluate contrast when you are focusing manually, just as the drone itself seeks the sharpest plane in autofocus mode.
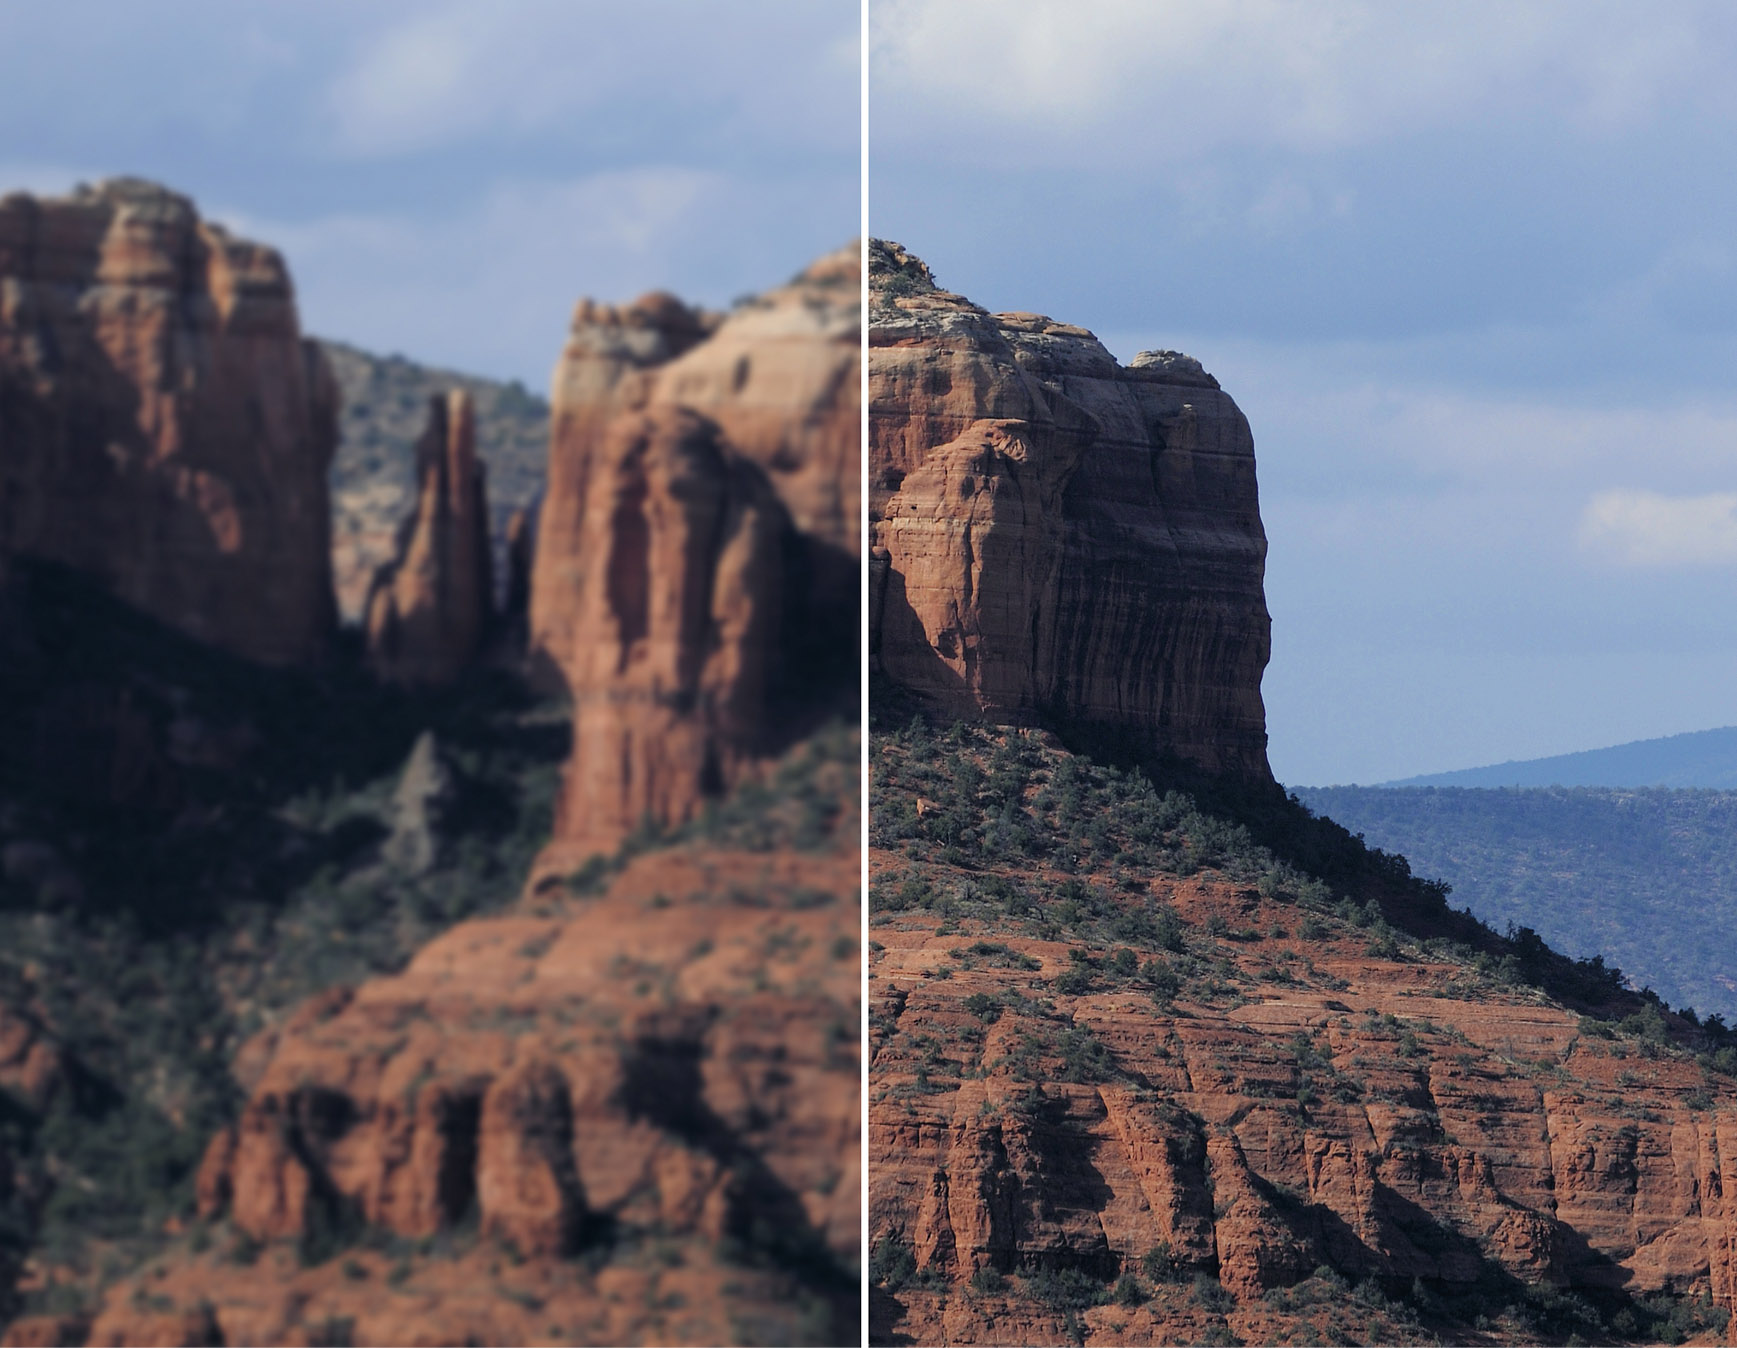
Figure 5.27 Edges are soft in an out-of-focus image (left). When edge contrast is highest, the image is in focus (right).
Autofocus and Manual Focus (Air 2S Only)
While the Mavic Air 2 is fixed focus, the Mavic Air 2S will automatically focus when in AF mode. An icon located to the immediate left of the shutter release icon on the controller screen will display either AF or an outline of a mountain range (which represents manual focus). Tap the icon to toggle between the two.
In AF mode, the Air 2S will select a focus plane automatically. You can choose a particular subject to focus on by pressing a fingertip on that subject. The aircraft will focus on the subject within the yellow target shown in Figure 5.28, while calculating exposure at the same time. As I described earlier in this chapter, you can slide the “sun” icon upward or downward to add or subtract exposure compensation, and hold your finger down to lock exposure.
When you’ve toggled to MF, you can drag a yellow marker up and down a scale that has a mountain icon at its top (for distance subjects) and an icon of a person at the bottom (for close focusing). (See Figure 5.29.) You can visually evaluate manual focus on the screen of your controller, or take advantage of the drone’s Focus Peaking feature. You can activate Peaking Level in the System Settings menu’s Camera tab (shown earlier in Figure 5.20). Choose Low, Normal, or High levels.
When activated, the drone will look for sharp edges for you, and outline them in red. The higher the peaking level, the thicker the outline will be, as shown in Figure 5.30. I use the highest level under bright, ambient-light conditions, because the red highlighting is much easier to view. However, the glowing red edges can make viewing your image difficult once focus has been achieved. DJI does not give you a choice of accent color (some platforms let you choose from blue, yellow, and red), so the contrast between edges can be difficult to discern if your subject has a great deal of red detail, which is the case in the autumn example used for the figure.
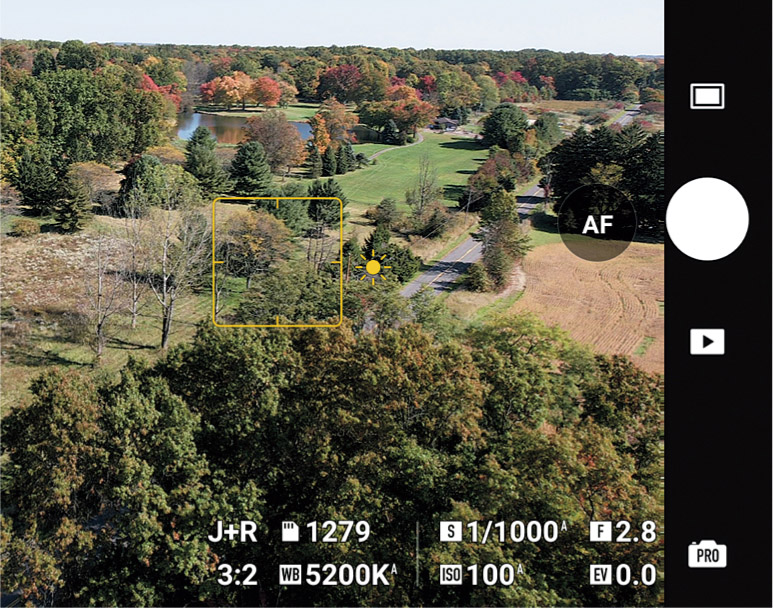
Figure 5.28 Focus on a desired point in the frame while measuring exposure.

Figure 5.29 Manual focusing.

Figure 5.30 Focus peaking accentuates edges.
Working with Filters
Filters are an important tool for both still photography and video. They can be used to reduce the amount of light reaching the sensor so that longer shutter speeds can be used to add a blur effect to still photography, or to produce the desired cinematic “look” in video. Filters can take advantage of polarization to darken skies, enrich colors, and eliminate reflections. Special effects filters can produce unusual images not available with post-processing in image editors. And, at times, a filter can provide protection for your drone’s camera lens. This section will take a closer look at the common application of filters for aerial photography.
 | NOTE Some specialized types of filters may not be available for both the Mavic Air 2 and Air 2S. The Air 2 and Air 2S filters are not interchangeable between models. If you purchase a set separately, make sure you order the correct type. |
The two most critical factors when choosing a particular type of filter for your drone are the quality and the weight of the filter itself. Cheap filters will degrade the image quality of your stills and affect the sharpness of your video clips. Don’t go for the least expensive filter you can find, particularly if it’s a filter you will be using often.
Your filters should be designed to fasten onto the lens of your drone’s camera using the same mounting system as DJI “official” filters, and the frame should be of lightweight aluminum or other material. You want a solid and reliable fit while not adding extra weight or balance issues to the drone’s camera/gimbal component.
Neutral Density
There are times when you can have too much light. When reducing ISO isn’t enough to get the desired shutter speed, you need a neutral-density filter to block additional light. ND filters, as they’re known, come in a variety of “strengths,” and vendors use somewhat confusing nomenclature to define how much of the light is blocked. You’ll see neutral-density filters from one manufacturer labeled according to something called a filter factor, while others, from different vendors, are labeled according to their optical density. There are actually no less than four variations of naming schemes, all equally cryptic; and even if you understand the difference, you still probably won’t know which is which, or why.
For example, one of the ND filters I own of a particular value is labeled, by different manufacturers, with the following names: ND8, 8X, ND 0.9, and “Three Stop.” All four monikers mean that the filter reduces the amount of illumination by three full f/stops. If the correct exposure were 1/500th second at f/8 without any filter at all, you’d need an exposure of 1/60th second at f/8 with the filter in place.
Because fast shutter speeds produce an undesirably hyper-realistic look in video, neutral-density filters are especially important when shooting movies. I’ll cover their application in more detail in Chapter 7. The Mavic Air 2 and Mavic Air 2S Fly More combos include sets of ND filters. My Air 2 combo came with three: labeled ND16, ND64, and ND256 (4, 6, and 8 stops, respectively). The Air 2S combo included ND4, ND8, ND16, and ND32 filters (reducing the light by 2, 3, 4, and 5 stops, respectively). DJI also sells an expanded set for the Air 2S with ND64, ND128, ND256, and ND512 filters (6, 7, 8, and 9 stops).
Third-party vendors sell their own ND filters alone or in combinations. Several companies, such as Freewell and PGYTECH, offer variable neutral-density filters, which allow you to dial in 2- to 5- or 6- to 9-stop density by rotating a ring around the filter’s circumference. Some ND filters are sold that also serve as polarizers (which I’ll discuss shortly).
A special kind of neutral-density filter—the split ND or graduated ND filter—is a unique tool for landscape stills and video. In some scenes the sky can be significantly brighter than the foreground and well beyond the ability of the camera’s sensor to capture detail in both. An ND filter that is dark at the top and clear at the bottom can even out the exposure, restoring the puffy white clouds and clear blue sky to your images. These filters can be tricky to use.
Here are some factors to keep in mind:
- ■Don’t tilt. The transition in the filter should match the transition between foreground and background, so you’ll want to avoid FPV (first-person view), in which the image rotates as the drone rolls during turns.
- ■Watch the location of your horizons. The ND effect is more sharply defined with a split ND filter than with a graduated version, but you need to watch your horizons in both cases if you want to avoid darkening some of the foreground. That may mean that you have to place the “boundary” in the middle of the image to properly separate the sky and foreground.
- ■Watch the shape of your horizons. A horizon that’s not broken by trees, mountains, buildings, or other non-sky shapes will allow darkening the upper half of the image more smoothly. That makes seascapes a perfect application for this kind of neutral-density filter. However, you can use these filters with many other types of scenes as long as the darkening effect isn’t too obvious. That makes a graduated ND filter a more versatile choice, because the neutral-density effect diminishes at the middle of the image.
Polarization
Polarizing filters are useful in many ways. Light becomes polarized (and therefore susceptible to the effects of a polarizing filter) when it is scattered by passing through a translucent medium. So, light from a clear-blue sky becomes polarized when it passes through the dust-laden atmosphere. Light striking, passing through, and reflecting off water also becomes polarized. The same is true of many other types of objects, including foliage, and the partially transparent paint on an automobile body (think about it: that’s why cars need several coats of paint). Nontransparent or translucent objects, like the chrome trim on the automobile, aren’t transparent, and don’t polarize the light. However, if the light reflecting from the metal has already been partially polarized (that is, it is reflected skylight), you still might be able to see a reduced amount of glare reduction with a polarizing filter.
How does it work? A polarizer contains what you can think of as a tiny set of parallel louvers that filter out all the light waves except for those vibrating in a direction parallel to the louvers. The polarizer itself consists of two rings; one is attached to the lens, while the outer ring rotates the polarizing glass. This lets you change the angle of the louvers and selectively filter out different light waves.
A polarizing filter can be mounted on the camera to replace the empty frame that surrounds the lens. Rotate the frame to remove it, then attach the polarizer to the same mount. A ring around the outside of the filter allows adjusting the amount of polarization. (See Figure 5.31.)
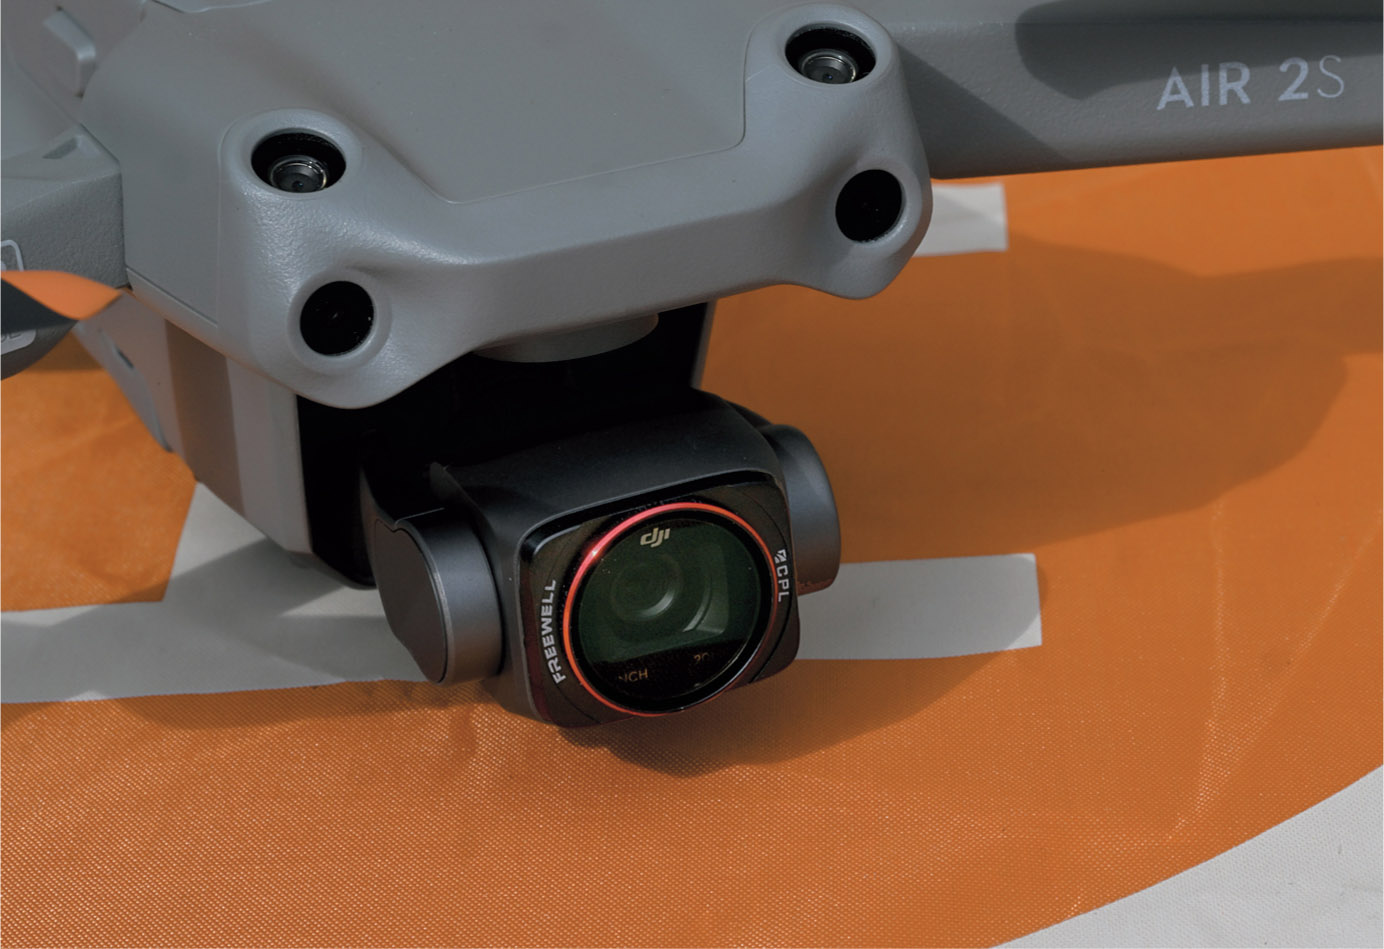
Figure 5.31 The filter replaces the empty frame on the camera.
You can rotate the ring until the effect you want is visible, but polarizers designed for use with drones will have a pair of marks on the rim of the filter that can be rotated to produce the best effect. Keep in mind that the amount of glare reduction depends heavily on the angle from which you take the photograph, and the amounts of scattered light in the reflections (which is determined by the composition of the subject). Polarizers work best when the sun is low in the sky and at a 90-degree angle from the camera and subject (that is, off to your left or right shoulder). Blue sky and water, which can contain high amounts of scattered light, can be made darker and more vibrant as glare is reduced. You can also reduce or eliminate reflections from windows and other nonmetallic surfaces.
As you might expect, polarizing filters solve problems and enhance images in several ways. Let’s look at them:
- ■Reduce or eliminate reflections. Polarizing filters can reduce or eliminate reflections in glass, water, lacquer-coated objects, non-conducting surfaces, and plastic. They don’t have any effect on reflections on metallic surfaces.
- ■Increase contrast. A polarizing filter is the only filter that can increase contrast in color imagery by eliminating those pesky reflections.
- ■Darken pale skies. Polarizing filters block a lot of light (as much as two f/stops), and because the effect is strongest when dealing with polarized light (such as light in the sky), this can help darken pale skies considerably. At the same time, it will also make clouds stand out more strongly.
As you gain experience, you’ll learn what types of scenes benefit from polarization, and what types do not. Look at Figure 5.32, which shows two different shots taken with my Air 2S about 10 minutes apart from approximately the same location. (I had to land the drone after capturing the first image and install the filter to take the second shot.)
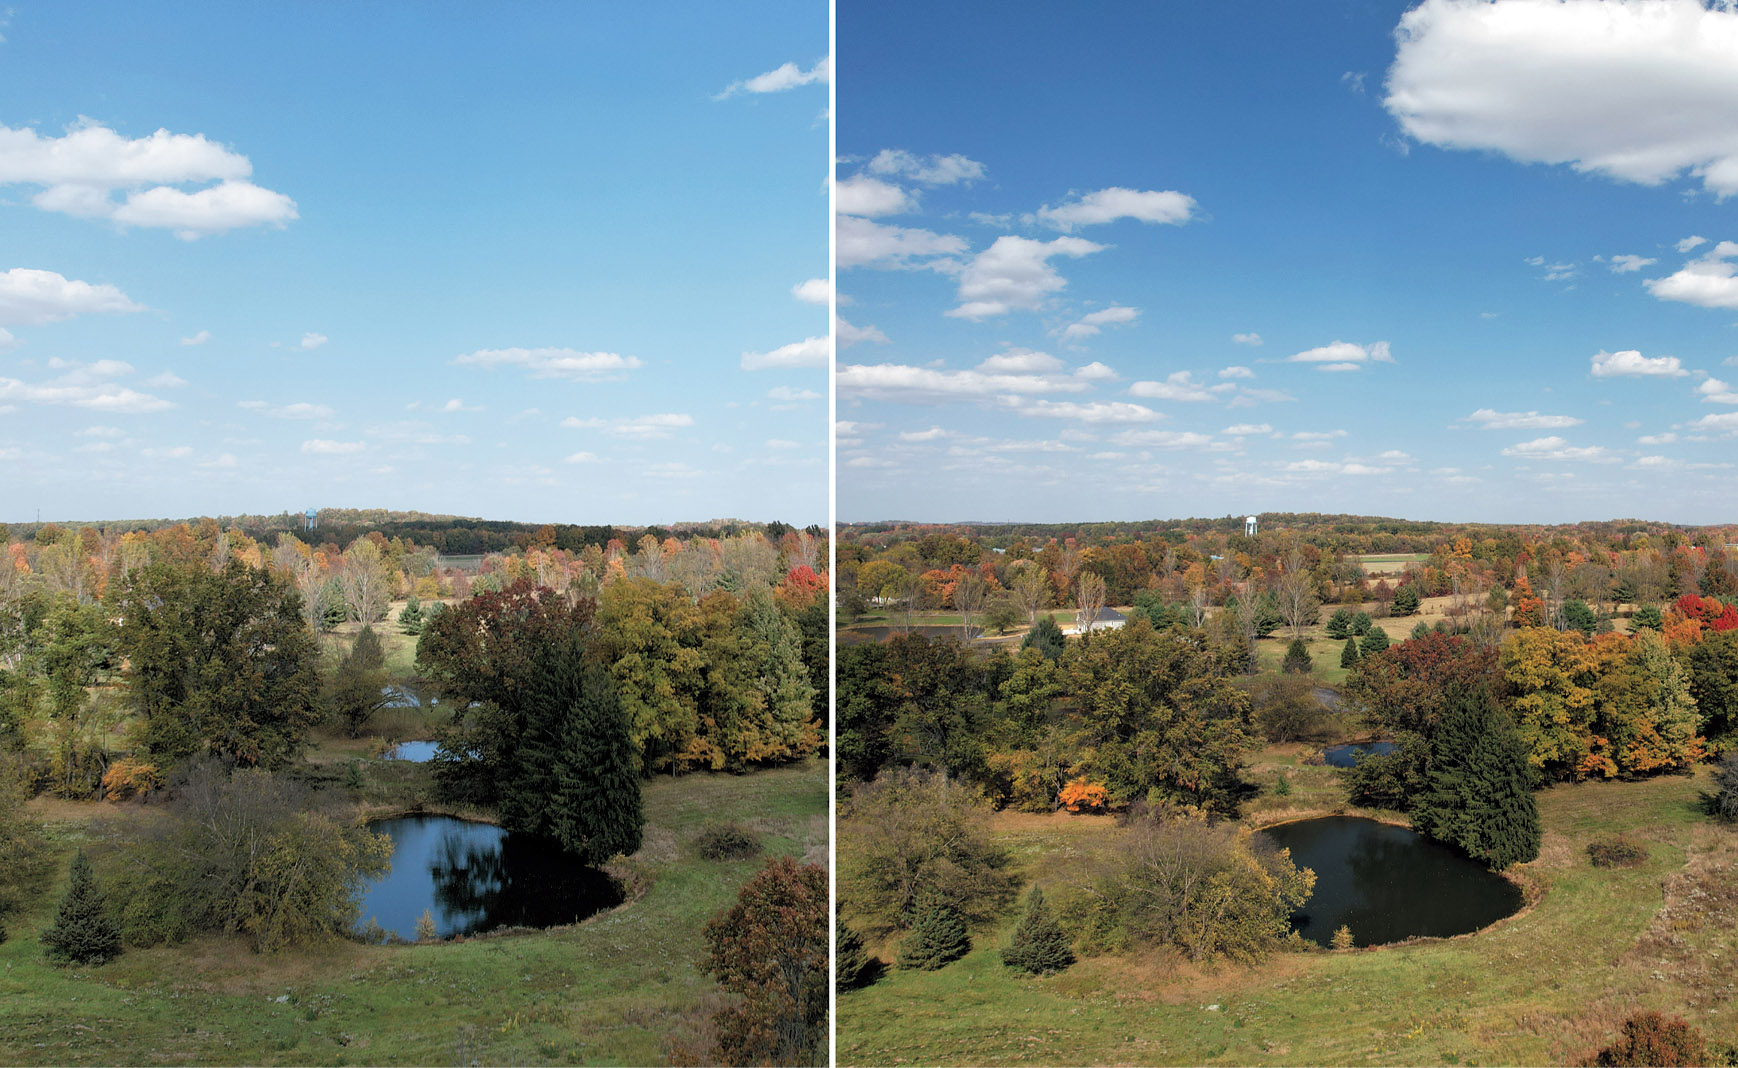
Figure 5.32 Unpolarized image (left); the same scene using a polarizer (right).
In the version at left, reflections in the ponds in the center provide a reverse image of the trees that surround them. The image at right, with the polarizer in place, has a darker sky and the colors of the autumn leaves are richer. But the reflections of the trees are gone. That makes the ponds look duller and flat. I would have gotten a better picture by not using the polarizer and, perhaps, increasing saturation of the trees and sky in post-processing.
One thing to watch out for is the use of polarizers with wide-angle lenses, such as the 24/22mm optics installed on the Air 2S and Air 2. Polarizers work best when the camera is pointed 90 degrees away from the light source, and provides the least effect when the camera is directed 180 degrees from the light source, as when the light source is behind you. With longer lenses, the field of view is narrow enough that the difference in angle between the light source and your subject is roughly the same across the image field.
But the wide-angle lenses of your Air 2S and Air 2 have a field of view of 88 and 84 degrees, respectively. It’s possible for subjects at one side of the frame to be oriented exactly perpendicular to the light source, while subject matter at the opposite side of the frame will actually face the light source (at a 0-degree angle). The possibility is even more acute when shooting panoramas, which can extend the field of view to 180 degrees. With such broad perspectives, everything in between will have an intermediate angle. In this extreme case, you’ll get maximum polarization at one side of your image, and a greatly reduced polarization effect at the opposite edge. Use caution when using a polarizer.
Filters for Protection
Several vendors offer UV filters for the Air 2/2S. Do you really need to use a filter to protect your camera’s lens? I have a definitive answer: yes, no, and maybe.
Each of the three answers can be persuasive. No matter how careful you are, if you’re not using a filter, some dust, mist, or other foreign substances can get on your lens during a flight, particularly if you are flying during bad weather or a dust storm kicks up unexpectedly. Your drone may suffer a “soft” crash. (I’ve collided with trees more than once, and my drone tumbled through the branches before hitting the ground without actually suffering any real damage.) In such cases, a filter can shield your lens from dust and debris, and absorb a few light scratches during minor collisions, assuming the gimbal itself is not harmed.
If you’re clumsy, cleaning a filter may be safer than cleaning the lens itself. If you don’t know how to clean a lens, or don’t have the proper tools, the more often you have to clean your lenses, the greater the likelihood of leaving cleaning marks or clumsily rubbing off some of the vital multi-coating that helps prevent lens flare. Again, a filter may be appropriate for those who need to protect their camera from themselves.
As far as UV removal is concerned, it’s known that general-purpose UV and skylight filters have little to no effect in the digital sensor world, so a UV filter offers nothing but a bit of protection, while adding weight to your gimbal. Lower-quality filters can degrade the image due to aberrations and flare. Why reduce the quality of every image you take to guard against an accident that may never happen?
My recommendation is to use a filter, such as an ND or polarizer, when you need to filter something. When conditions merit, the ND or polarizer you already have in place will serve as lens “protection.” If unfavorable weather threatens, a UV filter can be useful.
Do It Yourself
If you like to experiment, you can make your own filters, using the empty frame around the lens as your filter holder. Carefully cut a piece of filter material to fit and mount it on the camera. Colored gelatin filters, pieces of fine window screen (for sunstar/starburst effects), and other experimental filters can be constructed and used to produce new and interesting special effects.