4Your First Flight
I’ve been writing guidebooks like this one for almost 20 years, and I’ve found that there are a significant number of readers who can’t resist jumping ahead to a chapter like this one, eager to spread their wings (or, in this case, propellers), and, to mangle metaphors, hit the ground running with their shiny new photography tool. If you’ve skipped earlier chapters, I urge you to proceed with caution as you work your way through the following sections. And, if you havent skipped the chapters, I also urge you to proceed with caution, as well.
That’s because, unlike most photographic equipment you may be used to, newbie errors committed while using a drone won’t just result in blurry, poorly composed, or improperly exposed photos. Despite all the smarts and failsafes built into your aircraft, carelessness can change an enjoyable photo excursion into a crashing disappointment. It’s important to keep in mind that more than your drone is at stake: personal injury, property damage, as well as legal and financial issues can result from a lack of preparation and caution. Fortunately, my job is to do everything I can to help you enjoy success from your very first flight, so, don’t hesitate to review the suggestions found in the first three chapters if you find you have a question.
Activate Your Drone
Activation is required before you can use your drone, its remote controller, and batteries. It’s a good idea to perform this step before you leave your home base to begin your flight. Activation, firmware updates, and downloading of maps requires a reliable Wi-Fi connection. Although activation of the aircraft and controller is done only once, firmware updates happen fairly frequently. Some are mandatory to the extent that the DJI Fly app will not allow your drone to take off until the update is installed. It can be extremely frustrating to arrive at the site where you plan to fly, only to discover that your aircraft is effectively disabled until you’ve installed a software update. Your smart device’s Internet connection or Wi-Fi hotspot may not be available or reliable every single time, so it’s always best to check for firmware updates before you leave for a flight.
Activation is the first step, and begins with setting up an account with DJI. I’ve found the easiest way to do that is by registering ahead of time on a computer by navigating to https://www.dji.com/. There, click on the Profile icon in the upper-right corner of the screen and choose Register, as shown at left in Figure 4.1. Enter your email address, specify a password, agree to the privacy/terms-of-use provisions, and, once you’ve verified that you are not now, nor have ever been, a card-carrying automaton, your account will be created. (See Figure 4.1, right.)

Figure 4.1 Create an account at the DJI website.
To activate, first assemble your aircraft by attaching the control sticks to your remote control (and connect your smart device if using the standard RC-N1 controller), as described in Chapter 2. Unfold your drone. Remember that the top/front motor/prop booms are pulled toward the front of the drone first, and the bottom/rear booms pulled downward and toward the back after that. (Do in the reverse order when repacking the aircraft for transport.) Attach the propellers if you have not already done so.
Next, energize the remote control by pressing the power button once, then again, holding it down for two seconds so it will turn on. Perform the same short press/long press sequence on the power button of the Intelligent Flight battery mounted on your Mavic Air 2/2S to bring the aircraft to life. I always power up the remote and drone in that order by habit, dating back to when it wasn’t a good idea to have a drone powered up with no remote ready to control it. These days you don’t have to worry about your aircraft doing anything undesirable prior to connection, but it’s still a good plan to turn the controller on first.
When the remote is on, the DJI Fly app should launch itself automatically, assuming you have already installed it on your smart device. (The DJI Fly app is preinstalled in the RC Pro and RC controllers.) If you have not already installed the DJI Fly app, this is a good example of why skipping Chapters 1–3 is not the most efficient procedure. The first screen you’ll see will ask you to activate/register your equipment with DJI. Follow the screen prompts, entering the email address and password you used when you signed up with DJI as suggested earlier. You can also register now, if necessary.
Once activated, you may see a notification of the availability of a firmware update appear in the upper-left corner of the DJI Fly app, as seen in Figure 4.2, upper left. Tap the Update label and follow the prompts and progress displays, seen at upper right and lower left in the figure. You’ll be informed when the update is complete (see Figure 4.2, lower right). Firmware activation may be required for the aircraft itself, the controller, and batteries. For example, when DJI finally updated the DJI RC controller for compatibility with the Air 2S, it required downloading a firmware patch.

Figure 4.2 Installing a firmware update.
Preflight Checklist
Once your gear has been activated and all recommended firmware updates installed, you’re ready for your first flight. You’ll want to perform a preflight checklist to double-check that you and your aircraft are ready to go. Here’s a list that I follow:
- ■Check propellers. Examine your drone’s propellers, making sure that none of them are chipped, cracked, or show any damage, and that they are mounted on the motor hub that matches their color coding (or lack thereof). Your propellers are carefully balanced to ensure stability in flight, and any damage can affect the quality of the still or video images the drone produces or, in the worst cases, result in failures that can end in a crash.
- ■Battery charge. Press the power button on the Intelligent Flight battery to check its charge level. You’ll want to maximize your flight time, and ensure your drone will have enough juice to return to home safely before you take off. Now is the time to check your other batteries to make sure your spares are also fully charged. Most outings last more than the 31–34 minutes a single battery may allow, so it’s good to know ahead of time whether you have enough extra batteries to continue flying when your first one has pooped out.
- ■Battery condition. Look for cracks, swelling, puffiness, or any other physical indication that the battery has seen better days. Lithium Polymer batteries heat up as they dispense energy and, despite the built-in safeguards, can be damaged.
- ■Fuselage and gimbal. Check the body of the drone and the gimbal-mounted camera for damage.
- ■Extra storage. Have a microSD card of sufficient capacity and transfer speed installed. Video uses a lot more storage than stills, with 4K movies being the most demanding. Make sure you have enough storage available for your planned flight.
- ■Weather conditions. Even though weather may be sunny and mild now, it may change. I always check the weather app on my smartphone to see if rain, storms, or wind conditions are on the horizon (so to speak). UAV Forecast, available for both iOS and Android, provides a good profile of wind speeds at various altitudes. You may find that winds may be calm at ground level, but gusts that are more than the aircraft can handle are raging aloft.
- ■“Ground Truth” check. Maps and apps don’t tell you everything you need to know about your flight area. Remote sensing technology using satellites or aircraft uses visual ground truth checks to confirm that what you see is what you got. It’s a good idea for drone pilots to visually check your surroundings, as well, so you know where obstacles such as trees, utility towers, buildings, and other hazards may be ahead of time. You may very well spot some things that aren’t detected by your drone’s sensors or apps, or which aren’t readily visible from the aircraft’s camera during flight.
- ■Mission plan. What do I hope to accomplish with this flight? Are there specific shots or video clips I want to shoot? Or, do I just want to get up in the air and see what looks good? Any planning you do now, before you take off, means less time expending battery power in the air deciding what to do next, and can result in a safer flight.
- ■Physical and mental well-being. It’s a good idea to remain mindful of your own condition, as flying a drone requires alertness and a degree of concentration. Did you get enough sleep last night? Are you in a good mood and not distracted? Do you take a medication that might interfere with your responses? We tend to exclude ourselves from the flight-worthy equation, but our own well-being nevertheless deserves attention.
- ■Good to go? The last step will be to use the B4UFLY app to see if you are cleared to fly and make sure you have the permissions, authorizations, and certification required to take off in this area. As a recreational flyer, you won’t often require any special clearances and will be using uncontrolled airspace. The B4UFLY app will inform you of any NOTAMs or other restrictions and let you know that it’s okay to take off.
Finding Suitable Locations for Take-off/Landing
One of the most engaging parts of drone flying is locating places to fly your aircraft. You’ll want a place that is visually interesting, accessible, with minimal obstacles or hazards to make safe takeoffs and landings challenging. You’ll want favorable weather conditions, too. Your flight must take place in uncontrolled airspaces, or controlled air spaces in which you have authorization to fly. You’ll need to maintain line-of-sight requirements, and consider having an observer with you to help track your drone visually. An ideal location won’t cause problems with other legalities, such as flying over people. Even with all these considerations, finding places to put your Mavic Air 2 or Air 2S through its paces can be a lot of fun. Here are some suggestions.
Your Backyard
Those of you who don’t live in an apartment, condominium, townhouse, on a boat, or in a cave may have an excellent site for the initial flight of your Mavic Air 2 or Air 2S. If you’re lucky enough to have a backyard and friendly neighbors, your own property may be the best location from which to do your first exploration of your drone’s capabilities.
I’m fortunate to live just outside the city limits of a small town, in a house on 1.65 acres with a cornfield as my neighbor on the east, and separated from my congenial neighbors on the west by a stand of 40-foot-tall pine trees. They can’t even hear my drone take off, just like I don’t know when their band (F.O.G.) is practicing in their basement. I’ve done a lot of drone testing (and experienced my first crashes into the pine trees as a newbie) at home for years.
If you have the opportunity to perform your first flights on your own property, you’ll enjoy the freedom of using your drone any time you want, at the spur of the moment, with ready access to resources (your home computer, Wi-Fi system, AC power to charge batteries, and so forth) you might not have out in the field. When I was getting ready for my own first flights, I noticed an old saucer sled in the garage and took it out to act as my very first take-off/landing pad.
Of course, your backyard isn’t limited to drone-training purposes. You can record a backyard party (don’t fly directly above your guests), check out the condition of your home’s roof, enjoy a bird’s-eye view of your abode and property, shoot video selfies (called “dronies”), or capture footage for your next homemade action movie. Just remember that privacy laws still apply. Your neighbors may have told you they won’t be disrupted by your drone flights, but they still wouldn’t appreciate you taking pictures through their windows. (It’s not legal.)
Near the Water
As you gain confidence with your drone, you’ll be less apprehensive about using it in more adventurous locations, especially those near bodies of water. It can be chilling the first time you send your aircraft out to sea to snag an offshore image like the one shown in Figure 4.3, but an unintentional water landing is no more likely than a crash into an on-shore obstacle. There are many water-oriented locations that are great for drone photography. For example, many beach towns still allow drone use in and around boardwalks.
Lighthouses, especially historic beacons, are perfect subjects for your aircraft’s camera. Many are located right on the shore, or built on a hill near the shore, giving your drone a spectacular view with an engaging backdrop. You’ll find dozens in your area if you live near a coast, and, for those inland, a visit to the east or west coast of the United States or any of the states bordering the Gulf of Mexico are worth the trip. There are dozens of lighthouses adjacent to the Great Lakes, too.
When shooting near water, you do need to pay attention to wind (just like pilots of any other type of aircraft). Gusts at the shore of large lakes can be strong at certain times of day, and of less concern at others. Breezes are generally present because the land and water heat up and cool at different rates, and the difference in temperatures in adjacent areas creates the wind. Your drone is powerful enough to handle a great deal of air movement, whether it’s caused by the drone’s motion as it navigates the sky, or by Mother Nature while the aircraft hovers. (See “Wind Resistance” later in this chapter.)

Figure 4.3 Offshore photography provides a unique point of view.
Smaller bodies of water and rivers are likely to be more friendly for drone flight and can make excellent subjects. Just remember that a river may cross into Class B airspace when near a seaport or airport and you’ll need to request Low Altitude Authorization and Notification Capability (LAANC) permission, as mentioned in Chapter 2.
National Parks and Federal Lands (No-No! and Maybe)
The rules are very clear when it comes to areas administered by the National Parks Service (NPS). Don’t even think about trying to fly your drone in any national park in the United States without permission. The prohibition also includes national monuments, national recreation areas, national historic sites, national seashores, national memorials, and other areas administered by the NPS.
As of August 20, 2014, launching, landing, or operating an unmanned aircraft from or on all lands and waters administered by the National Park Service (NPS) is prohibited. By “unmanned aircraft” the NPS means a device that is used or intended to be used for flight in the air, including model airplanes, quadcopters, or drones that are used for any purpose, including for recreation or commerce. Unless you’re Ken Burns working on a documentary or conducting scientific research, don’t expect to easily get written approval from the park superintendent to bypass this restriction. Violations can result in up to six months of time in jail plus a fine of up to $5,000.
You’ll want to be careful when flying adjacent to national parks and related areas so you don’t wander into forbidden space. Drone operators have tried to bypass the restrictions by taking off from private property, but regulations covering wildlife disturbance and the need to keep your drone within visual line of sight makes the attempt to circumvent the rules risky. The B4UFLY app will clearly warn you about any NPS lands in your vicinity, so it’s fairly difficult to accidentally violate the regulations. (See Figure 4.4.)

Figure 4.4 B4UFLY will warn you about prohibited areas.
The rules are not as clear-cut when it comes to federal lands administered by other federal agencies, such as the Forest Service and Bureau of Land Management (BLM). Your drone may be allowed in some national forests and in some Bureau of Land Management areas that aren’t designated as wilderness. You still need to follow guidelines like these:
- ■Never fly over or in close proximity to any fire operation, which may disrupt aerial firefighting operations and create hazardous situations.
- ■Avoid Forest Service aircraft flying at low altitudes to perform natural resource management. The local Ranger District Office can provide information about scheduled flights in the area.
- ■Do not fly over congressionally designated wilderness areas or primitive areas.
- ■Do not fly over or near wildlife. Intentional disturbance of animals during breeding, nesting, rearing of young, or other critical life history functions is not allowed unless approved as research or management.
- ■Follow state wildlife and fish agency regulations on the use of your drone to search for or detect wildlife and fish.
- ■Launch the drone more than 100 meters (328 feet) from wildlife to avoid disturbing them. Do not approach animals or birds while flying.
State Parks
You’ll find that the use of drones in state parks varies from state to state, so you’ll need to look into the regulations for your particular area. I escape my frigid home state each winter to take photographs for my books in various locations in Florida, a state which has some of the best state parks I’ve ever encountered. Many of them have modest admission fees (which provide the funding that makes these parks outstanding), so I purchase an annual pass each year. Although I enjoy capturing the birds, wildlife, and scenery in these parks with my still cameras, drone photography in any of them is forbidden.
Back home, however, there are no specific laws forbidding flying over state parks. However, each park has the right to establish and enforce its own rules. They can ban take-offs or landings inside the park, or restrict the areas in which you fly. All of them have park rangers cruising around at regular intervals, and I’ve never had a problem, at least with drones. (I’ve been reprimanded about not having a sufficient number of life vests for an inflatable watercraft I was about to launch.) Other drone pilots I’ve talked to have been advised to not fly in certain locations. If a state you wish to fly in does not have an overall ban against drones in its parks, you should be good to go if there are no signs at the entrance to the park that mention drone aircraft.
Other Parks and Public Areas
In general, many areas have no restrictions on drone flights, while others have had to enact regulations due to increased unmanned aircraft use in their areas. In general, you are allowed to fly your drone in public areas, such as public parks, if you adhere to the limitations and the restrictions set by the FAA regarding drone flight. But just don’t assume that your local parks are free to use for your flights. Do some research to see what your state and local governments allow regarding drones. For example, Cleveland, Ohio has an outstanding network of metro parks, but only three specific areas are designated for drone usage, all of them large, open fields. However, I’ve successfully taken photos in many public parks, at schools, and a variety of other areas throughout my state and in others. I’m careful not to fly over people or be a nuisance to others enjoying the area.
Even if a location is a public space, if a disaster or event requiring emergency response personnel unfolds, the area may be automatically assigned Temporary Flight Restrictions (TFR), sometimes with little or no advance notice. In that case, drones are not allowed to enter that airspace. A violation could result in a fine, or worse, and interfere with efforts to save life.
Special Events
You may be tempted to emulate the Goodyear Blimp to get a bird’s-eye view of a sporting contest, stadium concert, or an exciting NASCAR race. However, as a recreational drone user, it is illegal for you to fly your drone near one of those locations, generally from one hour before it begins to one hour after its conclusion. Even so, it can be fun to capture an image of your favorite venue at other times, when no spectators or workers are present, as seen in Figure 4.5.

Figure 4.5 Shooting a typical stadium.
Mastering the Controls
Nothing is more exciting than seeing your drone take flight for the first time and watching it ascend skyward to become a buzzing tiny dot above you. It’s time to take that step, send your aircraft aloft, and capture your first aerial images. The following sections will get you airborne.
Choosing a Flight Mode
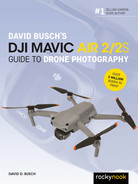
Your Mavic Air 2/2S has four different flight modes, three of which, Normal, Sport, Cine/Tripod, are selectable using a switch on the controller. (See Figure 4.6.) The fourth, ATTI, is selected automatically when all of the conditions required for one of the three Standard modes is not available. The next sections provide an overview of these flight modes.
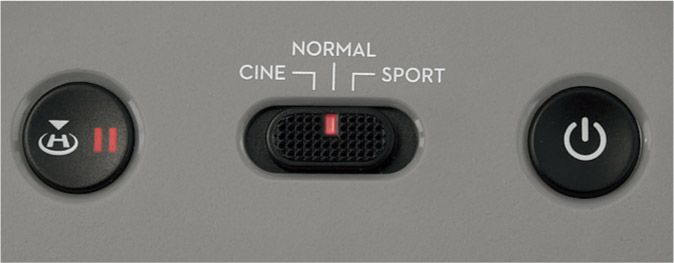
Figure 4.6 Choose a flight mode.
Normal Mode
N-Mode, the center position of the three-way sliding Flight Mode switch on the controller, is the default mode of your drone, and will be the one you will spend the most time using. I highly recommend using N-Mode for your first flight and suggest you don’t experiment with one of the more specialized flight modes until you’ve had experience flying your aircraft at its default settings.
This mode is optimized for a broad range of flight types. It deploys its full complement of tools to orient and stabilize its flight. GNSS (Global Navigation Satellite System) is used when satellite signals are strong enough, working in tandem with the Mavic’s vision system to provide robust obstacle sensing and avoidance. The vision system includes pairs of Forward, Backward, and Downward sensors, plus, with the Air 2S, two Upward sensors. Two 3D infrared modules provide additional sensing that’s particularly useful when landing or flying indoors (where geolocation may not be available).
In N-Mode, the top speed for the Mavic Air 2 (without benefit of tailwinds) is 26.7 mph/43 kph, while the Air 2S is slightly faster at 33.5 mph/54 kph.
Sport Mode
If N-Mode gives you Tesla-like object-avoidance features, then S-Mode is the NASCAR of Mavic drone photography. It relies heavily on the skills of the pilot to direct and navigate. Only GNSS is used for positioning and orientation, and automatic obstacle sensing and avoidance is disabled, so you’ll need to remain alert and fully in command of your aircraft’s movement.
The advantage of S-Mode is that, freed from its obstacle avoidance tether, the drone is agile and more responsive to small control stick adjustments, and has a slightly higher maximum speed of 42 mph/68 kph. Because of the faster motion in Sport mode, the minimum distance for braking is 98 feet/30 meters.
Here are some things to think about before tackling Sport Mode:
- ■Master your controls. When maneuvering your drone in S-Mode, you frequently won’t have time to stop and think about which control stick to move next, or in what direction. Your controls should be second nature to you, and you should understand how the Mavic responds to adjustments. You’ll need to know how quickly the drone can stop and how rapidly it turns, ascends, and descends. You must know how to handle radio interference, signal loss, and unexpected gusts of wind.
- ■Monitor battery levels. S-Mode depletes your batteries much more quickly, generally due to the increase in flying speed, as well as the rapid ascents and descents typical of many Sport Mode maneuvers. Consider using your newest, most robust Intelligent Flight batteries to extend the time you can remain aloft, and then monitor the remaining flight time on your controller’s display.
- ■Obstacle avoidance. In S-Mode, all obstacle avoidance features are disabled, because it’s unlikely the aircraft’s systems could react in time given the increased responsiveness and speed. Obstacle avoidance isn’t perfect even in N-Mode and the demands of Sport Mode reduce the feature’s efficacy considerably. So, pay extra attention to your surroundings so you can identify and evaluate hazards visually and compensate to protect your drone from damage while preserving the safety of living creatures within your flight zone.
- ■Adjust Return to Home settings. Your drone’s Return to Home (RTH) function still operates in S-Mode, but obstacle avoidance doesn’t. You can initiate RTH manually, or the Mavic will activate the feature should your battery reach low or critical levels. However, automatic RTH won’t avoid potential hazards as it returns. When returning, the drone will first ascend to an altitude you specify before making its way back to its Home location. It’s a good idea to make sure this altitude is appropriate for your current environment before takeoff, and then, once RTH has commenced, monitor your drone’s position to ensure it can land without interference.
- ■Choose your environment. S-Mode is best used in open places with few hazards to worry about while using the enhanced speeds and responsiveness of this mode. In addition to obstacles, you should be extra aware of any wind and weather conditions that might affect your flight.
Cine/Tripod Mode
Depending on the age of your controller, this position on the mode switch may be labeled either C (for Cine) or T (for Tripod). The two modes are quite similar. Tripod mode allows adjusting the maximum speed of the drone. In Cine mode, performance is comparable to Normal mode, but the top speed of the drone is limited to 11 mph/18 kph, which gives you more of a consistent, stable flight needed for video capture.
This cinematic mode, as you might expect from its name, is especially useful for capturing video. Braking distance is longer and smoother; if you don’t use a control stick after a flight maneuver, the drone will slow down before stopping, rather than stopping immediately. When rotating the drone left or right, the yaw movement maximum speed is reduced, producing a smoother pan.
ATTI Mode
Other DJI drones had a selectable ATTI mode, but now it’s automatically selected when the drone is unable to use its vision systems, compass, or GNSS signal. This Attitude mode is equivalent to manual control and must be used when automatic positioning systems are not available. You’ll need to manipulate the controls yourself to maintain a stable hover, and constant altitude and position. ATTI is most often invoked when the drone is experiencing a strong source of signal interference, or flying under an overhead obstacle. ATTI mode kicks in indoors, too. Once GPS stabilization is lost, you’ll be fully in charge of the aircraft’s flight.
Checking Airspace
One of the last things you should do before actually taking flight is to check to see if it is legal to fly in the airspace you plan to use, and, if necessary, obtain the required authorizations to operate in a particular area. As I mentioned, your best friend is the FAA’s B4UFLY app for iOS and Android. Other airspace apps are available, including Aloft Air Control (formerly Aloft and Kittyhawk), which is offered by the same company that produced B4UFLY for the FAA.
B4UFLY provides a succinct screen like the one in Figure 4.7, telling you that you’re clear for takeoff along with any advisories for your area. Other functions are available if you scroll down, as seen in Figure 4.8:
- ■Additional information. If you scroll down, you can view additional information, such as nearby airports or hospitals (which may have a heliport) and their distance from you. (See Figure 4.8, upper left.)
- ■Submit Data. At the bottom of the same screen is a tab used to submit data for your current location. Those updates are generally made only by authoritative agencies sharing verifiable ground rules and advisories. However, the app states that submitters can include Drone Operator, Concerned Citizen, Property Owner, or Government Agency.
- ■Checklist. This feature simply displays reminders about FAA registration, drone labeling requirements, and the Trust and Safety Test (TRUST), with links to the appropriate sites.
- ■Notify and Fly. You can “file” a flight plan using this facility, starting with the screen shown at upper right in Figure 4.8. You can then enter the type of flight (Recreational, Commercial, Government, or First Responder) (see Figure 4.8, lower left), and, finally, share your flight with other users of the app. (See Figure 4.8, lower right.)

Figure 4.7 B4UFLY tells you when you’re clear for takeoff.

Figure 4.8 Additional information (upper left). Filing a notification of your flight plans (upper right, and lower left/ right).
You’ll switch to the DJI Fly app before taking off. Even before you fly, the app will display a minimap, as seen at left in Figure 4.9. If you find the minimap intrusive, you can tap the L-shaped icon in the lower-left corner to reduce it to an icon, shown at right in the figure. I’ll explain how to use the on-screen maps shortly. You should know that tapping on the minimap will enlarge it to full size, as seen in Figure 4.10. The screen will display a map of your local area, with the drone’s home point and location indicated by an H icon and blue arrow. The drone camera’s live view will be reduced to a thumbnail, as seen at lower left in Figure 4.10. Within the full-size map you can use two fingers to zoom in and out. As you zoom out, the wider area shown on the full map will display any restricted areas, shaded blue, gray, yellow, and orange in the figure. You can review the restrictions in the map and then zoom back in to your local area before you take off.

Figure 4.9 Minimap (left) and map icon (right).

Figure 4.10 Zoom out from the full-size map to see restricted zones in your area.
LAANC and Geofencing
Up until this point I’ve emphasized the importance of understanding controlled and uncontrolled airspace. Recreational drone users will do most of their flights within uncontrolled airspaces. However, non–Part 107-certified pilots are allowed to fly under 400 feet in controlled areas near airports if they receive an airspace authorization from the FAA before they fly.
In order to operate in these air spaces, authorization must be obtained in advance, using a system set up by the FAA called Low Altitude Authorization and Notification Capability (LAANC). Fortunately, LAANC is a system that’s not that difficult to navigate. Prior to LAANC, drone pilots needed to submit a request to the FAA DroneZone website, and wait from seven days to several months to receive authorization. Using Aloft Air Control or one of several different alternative apps it is now possible to get that authorization in near real time. Authorizations are available from 726 airports nationwide. If the airport you want to fly near is not on the LAANC list, you can use the manual process at the FAA’s DroneZone site.
When using the utility, you’ll need to enter the location where you want to fly, date, time, duration of the flight, planned altitude, and whether you’ll be flying under commercial or recreational exceptions. (See Figure 4.11, left.) Scroll down to view the advisories (shown in Figure 4.11, center), and then proceed. If you receive your authorization (see Figure 4.11, right), you can review your information and submit to log your flight. Alternatively, you may receive a notice that your pre-check failed and you were denied, or that conditional approval is available.

Figure 4.11 Using Aloft Air Control’s access to LAANC authorizations.
LAANC requests are cross-checked against multiple data sources, including UAS Facility Maps, Special Use Airspace Data, Airports and Airspace Classes, and includes Temporary Flight Restrictions (TFRs) and Notices to Airmen (NOTAMS). However, it is still your responsibility to check weather conditions and check for restrictions at the time you fly.
Geofencing
However, LAANC is not the only obstacle governing where you can and cannot fly your Mavic drone. DJI has decided that further protection is needed. The company obviously has a vested interest in making sure drones are used wisely without becoming annoying nuisances and subject to even more restrictions than those already in place. So, DJI has embedded in the firmware of its drones a system called Geofencing, which effectively locks you out of flying in forbidden zones. In effect, even if you intend to blatantly ignore flight restrictions, your drone may refuse to comply. You’ll need to use DJI’s own system to unlock the virtual fence with permission and proof of authorization.
Geofencing in general is not new or proprietary to DJI. The term refers to an invisible barrier set up around a particular geographic area, large or small, and used by software or firmware to define the borders of operation for a device or utility. A geofence can trigger a signal in your dog’s collar when he tries to wander outside the confines of your yard. Organizations may use a geofence to determine whether its vehicles remain within an assigned perimeter. Geofencing is even used by marketers to serve up targeted ads on your smart device.
In terms of drones, a geofence is useful for preventing a remotely controlled aircraft from accidentally or intentionally entering a restricted or unsafe airspace. DJI’s Geospatial Environment Online (GEO) provides updated guidance about areas where flight may be limited due to regulations or safety concerns. DJI’s Flysafe website is your tool to view and unlock the areas on the company’s Geo Zone map.
Geo Zones belong in different categories, including borders between countries, sensitive locations such as prisons and power plants, and controlled airspaces. Some areas may have temporary restrictions due to stadium sports events, forest fires, or emergencies. Some zones may not be restricted, but will include warnings about potential risks.
When you log into the website (https://dji.com/flysafe), you can view the defined zones at various safety and security risk levels, and, if necessary (and allowed), unlock them so your Mavic will be able to cross the virtual fence into them. You can discover which places are entirely safe for flight, or you may discover your flight involves low-risk zones that can be easily unlocked. Those assigned higher risks require submitting credentials to guarantee compliance.
DJI’s Geo Zones will prevent you from flying into certain zones, or even from taking off. However, those with verified DJI accounts can temporarily unlock some of those areas. So, your first step will be to make sure you have a registered account with DJI. When you visit the Flysafe page, you’ll find some videos on safe operations and one on how to unlock a Geo Zone. When you click on Geo Zone Map, you’ll be shown a map of your current location and the restricted zones in that area, along with a code describing what each colored area on the map represents. (See Figure 4.12.) You can click on the map to enlarge it to full screen. (See Figure 4.13.) You can choose whether it shows Restricted, Altitude, and Authorization Zones, or click boxes next to Warning Zones and Enhanced Warning Zones to view even more details. (See Figure 4.14.)

Figure 4.12 Viewing the Geo Zone map.

Figure 4.13 The Geo Zone map can be enlarged to full screen.
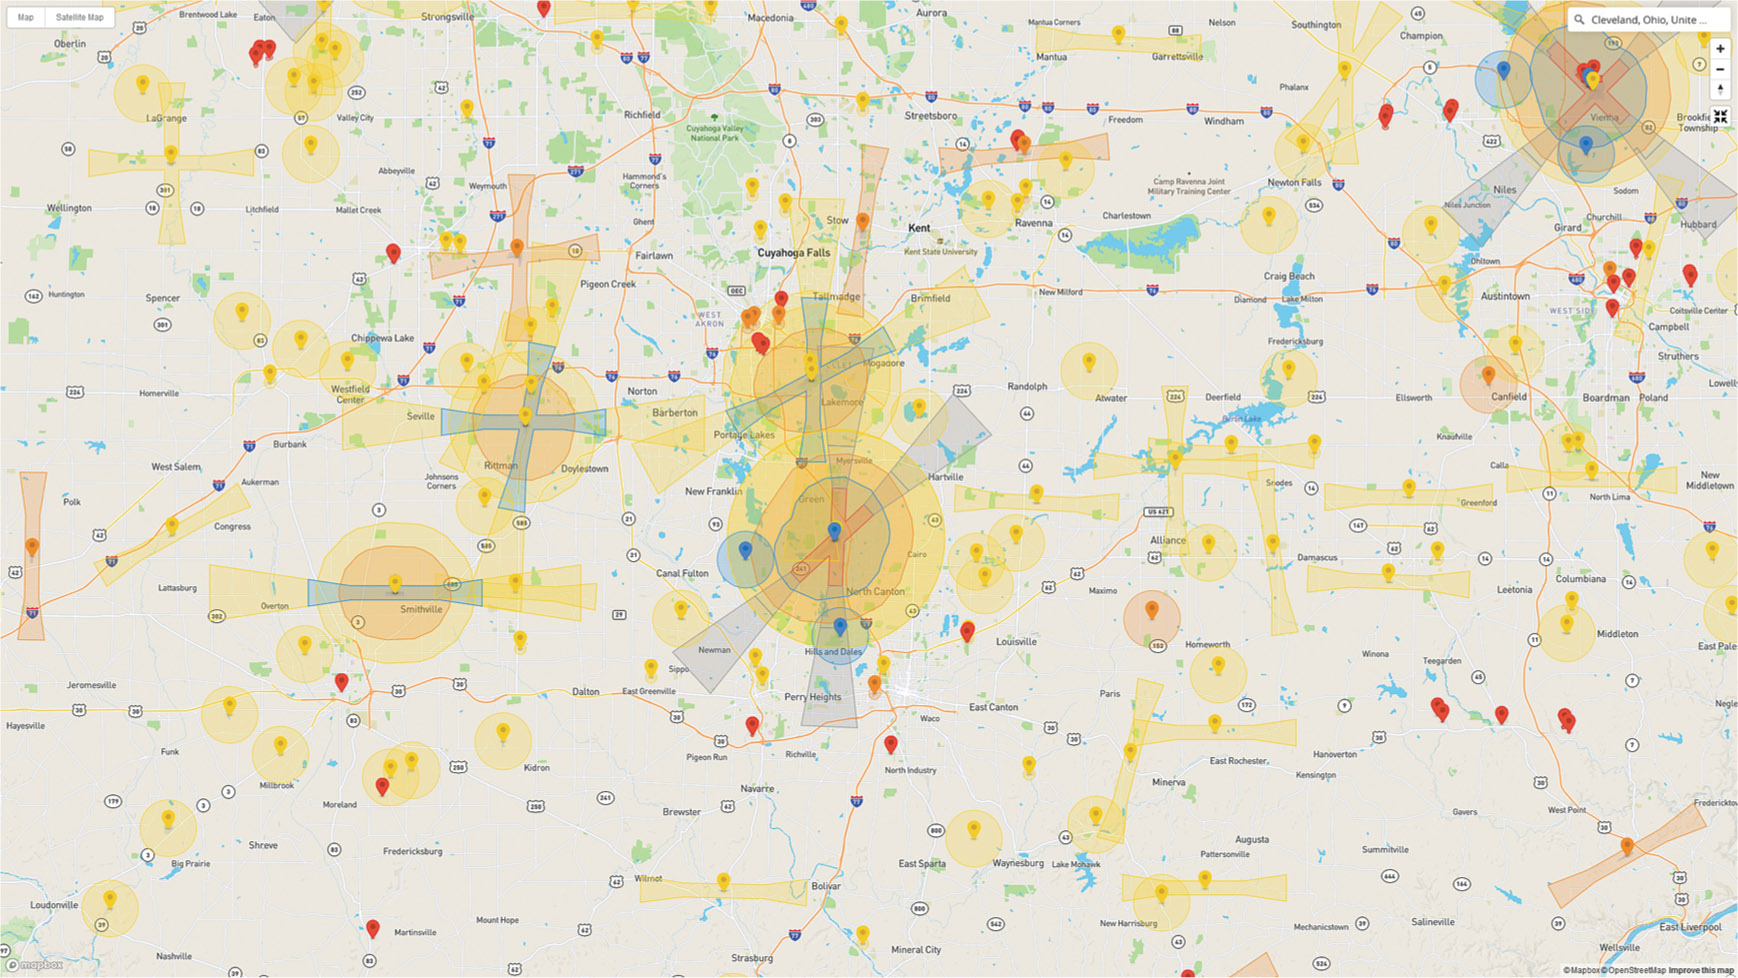
Figure 4.14 Extra Warning Zones can be displayed.
The key zones are these:
- ■Restricted Zones. These areas are shown in light red and represent air space in which you cannot fly.
- ■Altitude Zones. Shaded in gray, these areas indicate that the height of your planned flight may be regulated.
- ■Authorization Zones. Blue represents areas that require FAA permission to enter, using LAANC, Aloft Air Control, or another app.
- ■Warning Zones. Yellow-shaded areas can be flown through without LAANC authorization, but the DJY Fly app will give you an on-screen warning.
- ■Enhanced Warning Zones. These amber areas don’t require LAANC authorization, but have been locked by DJI’s GEO fencing. You’ll need to use GEO’s procedure to unlock them.
If you encounter a GEO zone that you need to unlock, you can do so by following these steps:
- 1.Sign in. On your computer, log into your previously created DJI account.
- 2.Access Unlock. Scroll down the page and click on Unlock a Zone. If this is your first time attempting to unlock a zone, you’ll be asked to fill out an Authentication Application to set up a Personal Account, Organization Account, or Permitted Organization Account. You’ll need to supply information about yourself; your drone, including remote controller serial number; DJI account email; and other data.
- 3.Click New Unlock Request. At the Unlock page you’ll see a list of all your previous requests. When you click on New Unlock Request, you’ll need to confirm responsibility on a disclaimer page.
- 4.Choose Custom or Zone Unlocking. Custom Unlocking requires specifying just the area planned for your flight. Zone Unlocking gains access to the entire Warning Zone. Click Confirm.
- 5.Drone/Pilot Information. In either case you’ll need to fill in your drone and pilot information if you haven’t done it already in Step 2.
- 6.Access Map. In the search bar, type in the location you want to unlock.
- 7a.Specify area (Custom Unlock). Simply draw a circle around the area to be unlocked, provide the altitude you will fly to, your reason for wanting to unlock the zone, and the time and date of the flight. Click Submit.
- 7b.Specify area (Zone Unlock). On the map, click within the zone you want to unlock, specifying the date, time, and reason for wanting to unlock the zone. You may be asked to upload proof of authorization. Click Submit.
- 8.View results. You will receive an Unlock notice or denial. If approved, you’ll receive an email with an approval number, along with a link to unlock your aircraft. The link will provide you with instructions for unlocking with your specific DJI drone model and controller.
- 9.Go fly. You are free to take off and land within the unlocked zone.
Launching
Once you’ve assembled and checked your drone and deemed it ready for flight, checked to see that there are no restrictions, and then selected a Flight Mode, you should be good to go. The next step at your flight location will be to launch your drone skyward. Just follow these steps:
- 1.Determine launching “pad.” Set your drone down on a flat, relatively smooth surface such that the aircraft can sit level with nothing that can interfere with the movement of the gimbal, such as tall grass. When I am launching close to my vehicle, if no other suitable site is available, I sometimes put my Mavic on top of my car, as shown in Figure 4.15. It’s actually large enough that the automatic RTH feature can touch down right in the middle of the surface as it returns. However, the steel in the vehicle top can interfere with the aircraft’s compass, so you’re usually better off with an alternative site. (You should avoid proximity to large metal objects whenever recalibrating your compass, too.)
- You can also launch from the pavement in parking lots, or a designated landing pad you carry with you. A wide range of pads are available commercially, but I most often use a saucer sled that originally lived in my trunk during winter, but now resides there year-round for drone use. Note: You may see videos of drone pilots launching their aircraft while holding it or resting it in the palm of their hand. Some even land the drone by catching it. This showboating is not a good idea, and could cause injury to the pilot or, even worse, damage to the drone or gimbal.
- 2.Power up drone and controller. Press the power button on each once, then hold down for about two seconds to turn them on. The DJI Fly app on your device should launch automatically, but if it doesn’t you can do so manually. On the RC-N1 controller, a screen like the one shown at upper left in Figure 4.16 appears. With the DJI RC and RC Pro controllers a DJI Fly icon will appear on the home screen. You can tap it to launch the DJI app as required.
Figure 4.15 Launch from a suitable flat surface.

Figure 4.16 Connecting the Mavic with the controller (top row); taking off (bottom row).
- 3.Select aircraft. The first time you use a controller with your drone, you will need to tap the Connection Guide icon in the first screen, then choose DJI Air 2 or DJI Air 2S to command the app to look for your aircraft. (See Figure 4.16, upper center.) You’ll be reminded to set up the aircraft properly while the app searches. (See Figure 4.16, upper right.)
- Note: On subsequent flights, the paired controller and drone should connect automatically without the need for Step 3.
- 4.Await All Clear. When the controller and Mavic are connected, a screen appears. (See Figure 4.16, lower left.) The app will notify you Takeoff Permitted if all is clear, or provide advisories if it is not. The status LEDs on the aircraft will blink green indicating the Home Point has been recorded.
- 5.Take off. Tap the Takeoff icon (it’s the yellow oval with upward-pointing arrow) to produce the Auto Take Off panel. Press and hold the center of the Take Off circle until the Auto Take Off commences. The ring around the circumference of the circle will gradually turn green during the countdown for takeoff. You can tap the X at right in the panel to abort during the countdown.
- Manual takeoff: You can also take flight manually simply by gently pressing the left control stick forward.
- 6.Flight begins. The drone ascends to a height of 1.2 meters (about 4 feet) and updates the Home position used during automatic Return to Home. (See Figure 4.16 lower center.)
- 7.Enable Precision Landing (optional). The Mavic Air 2/2S both have a Precision Landing capability that can be used during automatic Return to Home when the flight is finished. To activate the feature, ascend to a height of approximately 21 feet and pause for about 10 seconds to allow the drone to scan and record the features of the terrain around the Home Point. As long as you don’t change the Home Point manually, the Mavic will be able to land within a foot or two of your take-off point at the end of your flight. I’ll explain Precision Landing and other automatic Return to Home features later in this chapter.
- 8.You’re aloft! You’re ready to begin your flight. You’ll notice a map located in the lower-left corner of the controller’s screen. You can tap it to enlarge the map to fill the screen and reduce the camera view to the map’s former footprint. (See Figure 4.16, lower right.) Tapping the small camera view restores it to full screen.
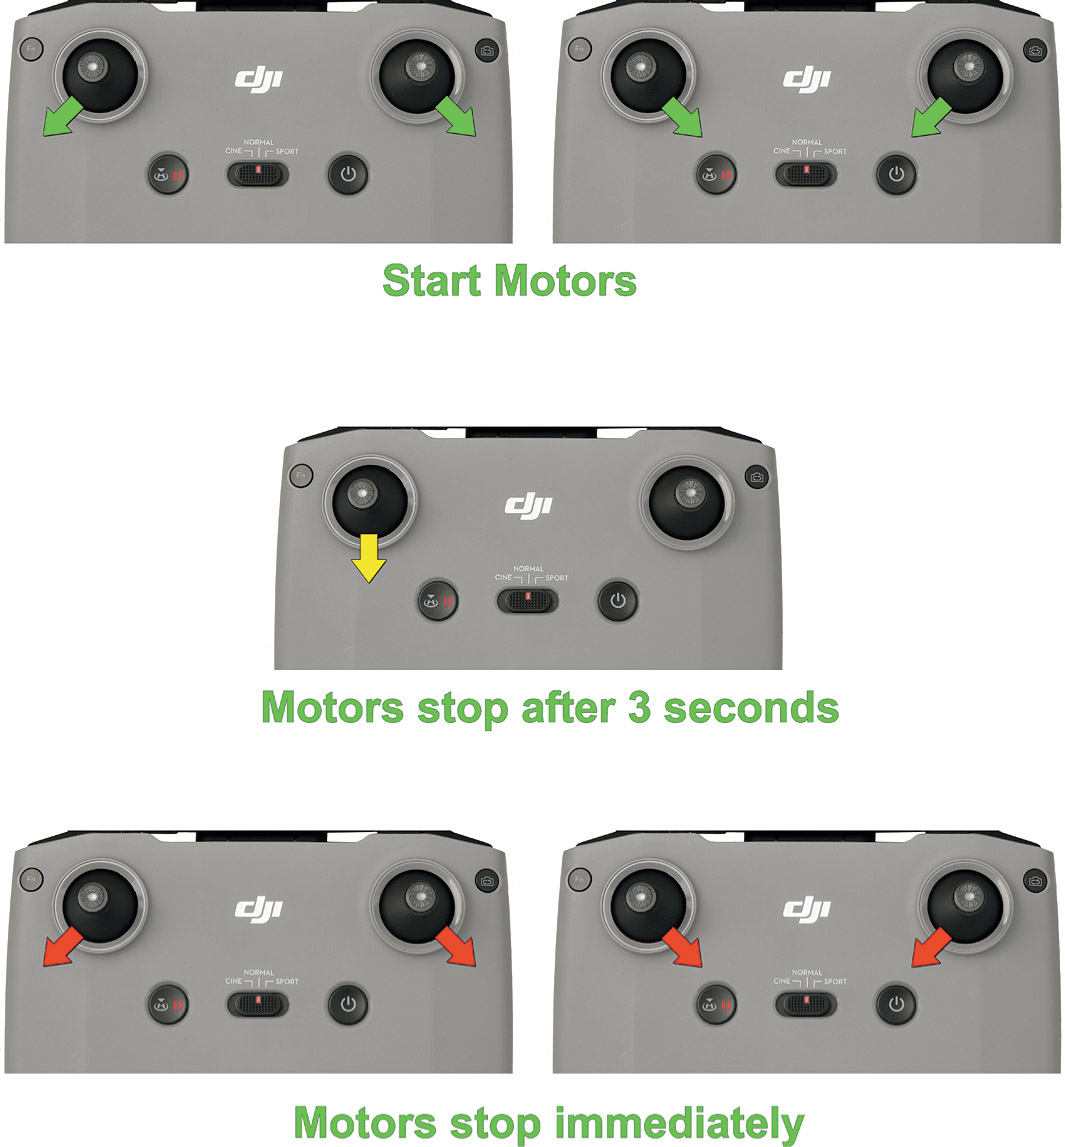
Figure 4.17 Manually stopping and starting the Mavic’s motors.
Controlling Your Drone
Unless you’re a private pilot or a fan of computer aircraft “trainer” software like Microsoft Flight Simulator, you’re probably intimidated when you’re shown the (relatively) simple array of gauges, instruments, switches, and controls found in light aircraft, and flabbergasted by the hundreds of components on the flight deck of a commercial aircraft like the Boeing 767. Fortunately, your Mavic Air 2/2S has far fewer controls to monitor while flying, although you’ll discover quite a few options hidden away among the major controls.
Now that your drone is hovering overhead, it’s a good time to review the controls at your disposal. I trust you’ve read the earlier chapters thoroughly before heading out to the airfield, so you’re already fairly comfortable with the location of the physical controls on your radio controller. If you need a review, there are detailed photos of the DJI RC-N1, DJI RC, and DJI RC pro in Figures 3.15, 3.16, and 3.17 in Chapter 3. For this recap, I’m going to use the RC-N1 as an example.
Using the Control Sticks
Learning to use the control sticks individually and in concert is the key to precise navigation of your Mavic Air 2/2S. As I mentioned in Chapter 3, all DJI controllers are programmed to use Mode 2 adjustments by default, with the left stick controlling up and down motion when pressed forward and backward, and horizontal rotation (yaw) by pushing left and right. The right stick can be pressed forward and back to move in those directions (from the perspective of the front of the drone), or to “slide” horizontally left and right when pushed in those directions. Figure 4.18 provides a visual reference. Mode 2 is not proprietary to DJI, of course; it is more or less a standard mode used by drones and controllers from other manufacturers.

Figure 4.18 Using the control sticks.
The farther you press a given stick in any direction, the greater the speed with which the drone carries out your command. That’s why you should be careful about your enthusiasm if you really don’t want abrupt/fast movements. That’s especially true when you want to capture smooth video, or are flying amidst a significant number of hazards. Pressing any stick diagonally produces a combination of the two types of movement controlled by that stick: you can ascend (or descend) while rotating, or move forward/backward at an angle. If you release a control stick it returns to its centered position and if you want to halt motion quickly you can press the Pause/Return to Home button located to the left of the Flight Mode switch.
You’ll want to master the use of each control stick so you can direct your drone to fly on the exact paths you want, smoothly, and without encountering other objects. As you’ll learn, the Mavic’s obstacle avoidance feature is good, but not perfect.
- ■Left stick: Forward/Back: Ascend/Descend. All four motors increase or decrease speed equally as you push the stick forward or back, lifting your drone upward, or allowing it to reduce altitude, respectively. If you want the aircraft to rise or descend while maintaining the same horizontal viewing angle, be careful to orient the stick straight ahead or straight back. Even small motions in the diagonal direction can cause the Mavic to rotate slightly. With practice, you’ll be able to do this smoothly.
- ■Left Stick: Side to Side: Panning/Yaw. As I noted, DJI sometimes calls horizontal rotation through the top-to-bottom axis “pan,” but “yaw” is the more common term. When you press the stick from side to side, motors in opposing corners rotate at different speeds, using the differential in torque to allow the drone to spin. Just move the left stick to the left to rotate counterclockwise, and to the right to rotate clockwise.
- ■Right Stick: Forward/Back. Pressing the right stick toward the front of the controller moves the drone forward, relative to the front of the aircraft. Moving it toward the back of the controller sends the drone in the reverse direction. This movement results from the rear motors spinning faster or slower than those in front, causing the nose or rear of the drone to dip down while moving forward or backward (respectively).
- ■Right Stick: Side to Side: Move Left/Right. Horizontal movement within the same plane (so to speak) is produced when the motors on one side both rotate faster than those on the other side. The aircraft “rolls” slightly as it slides in the direction of the lower side. Move the remote controller’s right stick to the left or right to move your drone horizontally in those directions. Although some drones are capable of rolling completely over, your Mavic is not. Trust me, that’s a good thing.
Using the DJI Fly Control Screen
The heart of the Mavic Air 2/2S’s flight options are accessible from a screen similar to the one shown in Figure 4.19, which illustrates the display for the Mavic Air 2S. The Air 2 display is slightly different, and I’ll point out the distinctions below.
- ■Flight mode. This indicator shows the current setting of the Cine/Tripod/Normal/Sport switch.
- ■System Status bar. This text screen displays several different status messages, such as Take Off Permitted, Flight Altitude Restricted, Take Off with Caution (no GPS), or, when aloft, In Flight. You should heed any warnings shown prior to takeoff.
- ■Battery information. This indicator consists of a circular icon (Air 2S) or battery icon (Air 2) that displays the percentage of battery power remaining and an estimate of the available flight time, in minutes and seconds. The flight time display will show 00’00” until takeoff, and once shown will update during the flight. Tap the Battery Information icons to see additional time estimates, including Until RTH, Until Forced Landing, Until Battery Depleted (Air 2S), Battery Voltage, or Battery Temperature (Air 2).
- ■Video downlink signal strength. Although the Air 2 and Air 2S use slightly different icons, both show the relative strength of the video downlink connection between the drone and the remote controller. Tap its icon to see a text readout, e.g., Strong RC Signal.

Figure 4.19 The DJI Fly screen when the drone is connected to the remote controller.
- ■Vision Systems status. With the Air 2S, this indicator consists of two parts. The left side shows the status of the Forward and Backward Vision Systems. The upper or lower half of that icon will turn red if the Front or Rear Vision Systems are not available. The right side shows the status of the Upward and Downward Vision Systems, also using white/red readouts. The Air 2’s equivalent displays only the Forward and Backward Vision System status, and it is located to the left of the GPS/GNSS icon.
- ■GNSS status. Displays the current GNSS/GPS signal strength and the number of satellites linked. When the icon is white, the signal is strong, and the drone’s Home Point can be updated. If satellite signals aren’t strong, which may be the case in congested areas or buildings, or other obstructions block signals, you can wait a minute or two, then ascend to about 100 feet and hover until additional satellites are acquired. At that point, the home point data can be reset.
- ■System settings. Tap the three dots representing System Settings, and a tabbed menu with five headings appears: Safety, Control, Camera, Transmission, and About. (See Figure 4.20.) I’ll explain all the options within these tabs in Chapter 6.
- ■Shooting modes. Tap this icon to produce a menu similar to the one shown in Figure 4.21, which allows you to select one of the available shooting modes (which will be explained in detail in Chapter 5):
- •Photo: Single, 48MP (Air 2 only), Smart Photo, AEB, Burst, Timed Shot.
- •Video: Normal, Slow Motion, HDR (Air 2 only.)
- •Master Shots (Air 2S only): Master Shots operates automatically, although you can adjust the length of the sequence and choose one of the canned templates.
- •Pano: Sphere, 180 Degrees (Air 2S only), Wide Angle, Vertical.
- •Quickshots: Dronie, Circle, Helix, Rocket, Boomerang, Asteroid.
- •Hyperlapse: Free, Circle, Course Lock, Waypoints.

Figure 4.20 System Settings.

Figure 4.21 Shooting modes.
- ■Shutter release/Record button. You can tap this button to take a photo or start/stop video recording. I tend to use the physical button located on the top-right edge of the controller, but the virtual button is here if you want it.
- ■Playback. Tap this button to activate Playback mode so you can review and export captured videos and still photos. (See Figure 4.22.)
- ■Camera modes. When you’ve selected Photo as your shooting mode, as described earlier, you can tap this camera icon to toggle between Auto and Pro exposure modes. In Auto mode, the current EV exposure adjustment will be displayed to the left of the camera icon. In Pro mode, the shutter speed, f/stop, ISO setting, and EV are displayed. You can tap that display to make adjustments for any of them, except for aperture, which is fixed at f/2.8 and shown for informational purposes only.

Figure 4.22 Playback mode.
- ■microSD card information. Shows the remaining number of photos you can take in Photo mode, or the available movie recording time in video mode. Tap the icon to view the total capacity in gigabytes for storing internally or on any microSD card that has been inserted in the drone.
- ■Flight telemetry. You’ll be using this readout frequently while your drone is aloft, as it provides several key pieces of information.
- •Height from the Home Point. The indicator marked H shows the current altitude of your aircraft, helping you keep track of how high the drone is above your current surroundings. It’s very useful if you want to shoot from the same altitude on different occasions. For example, when I am taking construction progress photos, I always launch from the same takeoff point, and then ascend to the altitudes used for the most recent shots, say, 100 feet, 200 feet, or some other elevation. Note: The readout will turn red when you’ve reached your maximum altitude, accompanying a voice reminder and the Max Altitude Reached text shown earlier in Figure 4.19.
- •Distance from Home Point. When your Mavic is directly overhead, this will display 0.0 feet, and change to reflect any horizontal movement away from that point. When returning to home, this indicator is a good way of knowing when the drone is directly above you again and descending.
- •Horizontal/Vertical Speed. The two numbers above the Height and Distance indicators show the speed of the aircraft.
- ■Attitude indicator. You can cycle between this display and the minimap (described next), or view a full-screen version of the map. I’ll show you how shortly. The Attitude (not Altitude) indicator is shown in Figure 4.23. It includes icons that show the position and orientation of the aircraft, the remote controller, and current Home Point, relative to the points of the compass shown along the icon’s periphery, and the tilt angle of the drone. Before takeoff, they will all be clustered together; after takeoff they will separate and may be viewed on the minimap.
- You can tap the L symbol at lower left in the figure to collapse the Attitude indicator to a thumbnail icon, or the Map symbol at right to switch to the minimap.

Figure 4.23 Attitude display.
- ■Minimap. The relative location of the drone, controller, and Home Point are seen on this small map that’s inset in the lower-left corner of the screen when you are not using the Attitude indicator. The map is useful for keeping track of where the Mavic is located during its flight. I introduced you to this useful display earlier in Figure 4.9.
- ■Full-screen map. If you want to see a full-screen version, tap the minimap and the map will expand, as shown at right in Figure 4.24. The aircraft’s view is reduced to a small inset, as seen in the figure, so you can still monitor what the camera is seeing. The full-screen map has map layers.
- ■Auto Takeoff/Return to Home/Landing. This icon provides functions for takeoff, landing, and returning your drone to its Home Point. Tap the icon and when the function activation screen appears (the one for Takeoff is shown), press and hold your finger in the circle until the DJI Fly app responds. The drone will then takeoff, return to home, or land, as appropriate.
- ■APAS status. Shows the current APAS status. The icon will be red if APAS is not functioning, or green if all is well.
- ■Back. Tap this button to back out of menu operations. The DJI RC Pro remote controller has a physical Back button you can use instead.

Figure 4.24 Cycling among the Attitude display, minimap, and full-screen map.
Capturing Still Photos and Movies
Once you are comfortable navigating your Mavic Air 2/2S in the air, it’s time to begin taking images. Your aerial camera, despite its tiny size, is remarkably versatile and capable of impressive imagery. But for your first flight, you can use its automated features to capture stills and videos using just a few controls. Once you’ve reached a location with some interesting subject matter, just follow these steps to take your initial still photos and videos:
- 1.Fly to your location. You’ve learned how to ascend, descend, fly forward or back, and rotate your drone. Take off and maneuver your drone to the location where you want to take a photo, ascending or descending to the desired height, and rotating the aircraft in the required direction.
- 2.Adjust viewing angle. When the drone is in place, you’ll want to adjust its viewing angle upward or downward to frame the subject you want to capture. Rotate the Gimbal Dial, located on the left side of the top edge of the controller to adjust the shooting angle. Figure 4.25 shows the position of the Gimbal Dial with the DJI RC-N1, DJI RC, and DJI RC Pro.
- You can also use camera view by pressing down on the screen until an adjustment bar appears. You can drag the bar up and down to control tilt of the camera with your finger. I’ll explain more about how to use the gimbal shortly.

Figure 4.25 Top panel controls on the remote.
- 3.Choose your shooting mode. Tap the Shooting Mode icon shown earlier in Figure 4.19. A menu will pop up like the one seen in Figure 4.26. The right-hand column displays the various shooting modes, including Photo, Video, MasterShots (Air 2S only), Quick Shots, Hyperlapse, and Panorama. I’ll explain each of these in more detail in Chapter 5.
- 4.Select shot option. The left-hand column will display the options for the type of shot you’ve chosen. The figure shows Photo options, which include Single, 48MP (Air 2 only), Smart, AEB (auto exposure bracketing), Burst, and Timed Shot.
- 5.Specify Camera mode. Your Mavic can choose the appropriate exposure settings for you in Auto mode, or you can specify shutter speed, ISO sensitivity, and exposure compensation yourself in Pro mode. For your first stills or movies, I recommend sticking with Auto mode. Check out the Camera Mode icon in the lower-right corner of the screen (refer to Figure 4.19 if necessary for its location) and, if necessary, tap it to switch from Pro mode to Auto mode. I’ll explain Pro mode in detail in Chapter 5.

Figure 4.26 Shooting menu.
- 6.Capture image/movie. You can tap the shutter button icon on the screen, or press the relevant button on the top surface of the controller. With the RC-N1, that would be the Shutter/Record button seen in Figure 4.25. The RC and RC Pro controllers have separate Movie Record buttons on the left side for video, and Focus/Shutter buttons on the right side, also seen in Figure 4.25. (Don’t worry about focus; with the Mavic’s wide-angle perspective and likely distance between the drone and its subject, virtually everything will be in focus.)
- 7.Hurry up and wait. A progress indicator arc will cycle around the shutter button icon screen while the still image or movie is being captured. You are locked out of taking another picture until the process is finished and the icon turns green again.
Changing Viewing Angle with the Gimbal
The Air 2/2S drone’s gimbal can move in three directions, and does so automatically when stabilizing an image, or to automatically provide a First-Person View (FPV) during flight, as I’ll describe shortly. The gimbal can also be adjusted electronically by you, as the pilot, to change the view of the aircraft’s camera. Just tap the screen until the scales shown in Figure 4.27 appear. You can drag upward or horizontally with your finger to tilt or pan the gimbal’s view. The gimbal has a specific range of movement limited by the drone’s software (it is mechanically capable of an even greater range that isn’t particularly useful).

Figure 4.27 Drag up or horizontally to change the gimbal’s view.
Here is the adjustable range of movement:
- ■Tilt. The gimbal can be tilted from horizontal (with the camera looking straight ahead) downward 90 degrees (so the camera can display what is directly under the aircraft).
- By default, the gimbal cannot tilt upward, because that orientation would capture an image of the propellers. However, you can override that setting in the DJI Fly Control menus to allow upward tilt of up to 24 degrees.
- ■Yaw/Pan. The drone uses this side-to-side rotation as it stabilizes the image in flight, or performs other functions, such as shooting a series of images from different angles to produce the frames stitched together to create a panorama. This movement is limited to plus or minus 80 degrees horizontally.
- ■Roll. The gimbal can roll independently of the aircraft during flight for image stabilization purposes, or to provide a First-Person View. You cannot adjust roll manually. It is mechanically limited to plus or minus 45 degrees, which, effectively will never be needed.
Adjusting the Gimbal
There are five basic kinds of adjustments you can apply to the gimbal’s operation. You can access these parameters by tapping the Settings icon, represented by three dots in the upper-right corner of the screen. The Settings screen has five tabs: Safety, Control, Camera, Transmission, and About. I’ll describe the settings in each of them later in this book. For now, tap the Control tab to view the screen shown in Figure 4.28.

Figure 4.28 Basic gimbal adjustments.
Here are your gimbal adjustments:
- ■Gimbal mode. The gimbal has two operational modes:
- •Follow mode. During flight, the gimbal adjusts so that the camera’s view remains constant as the aircraft rolls slightly while moving. In effect, the horizon remains level while you are seeing the live view or capturing images/video, as seen at left in Figure 4.29. You’ll be using this mode virtually all of the time.
- •FPV Mode. The gimbal synchronizes the camera’s view with the orientation of the camera, providing a First-Person View. Your live view appears as if you were riding onboard the aircraft yourself. When the drone pivots while changing direction, your view changes to match. (See Figure 4.29, right.) This mode is used in drone racing with drones that are compatible with FPV goggles. At the time this was written, DJI does not officially support FPV goggles, and says that this mode is not on their high-priority list. Nevertheless, you should be on the alert for firmware updates and other options that may become available after this book goes to press.

Figure 4.29 Follow Mode view (left); First-Person View (right).
- ■Allow Upward Gimbal Rotation. As I mentioned above, this option allows overriding the gimbal’s limitation against tilting upward up to 24 degrees. Tap the switch next to this entry to turn the capability on or off.
- ■Advanced Gimbal Settings. These enhanced settings allow you to specify parameters for Normal, Sport, and Cine modes. The adjustments that appear when you tap this option include:
- •Pitch Speed. How quickly the gimbal rotates to adjust pitch/tilt.
- •Pitch Smoothness. Determines how evenly the pitch/tilt movement is applied.
- •Yaw Rotation Speed. Applies to side-to-side rotation of the gimbal while panning.
- •Yaw Smoothness. Evenness of panning motion.
In Figure 4.30 you can see the default values set for each of these in Normal, Sport, and Cine modes. A Reset label at the bottom may be tapped to return the values to their defaults.
- ■Gimbal Calibration. From time to time, you may need to recalibrate your gimbal so that its orientation coincides with the orientation of the aircraft, i.e., when the drone is level, the gimbal should be level, too.
- ■Recenter Gimbal. This command allows you to recenter the gimbal when needed. Just tap the Recenter Gimbal label shown earlier at the bottom of Figure 4.28. You can also recenter the gimbal by pressing a custom button. With the RC-N1 remote, press the Fn button twice. The C1 button on the RC and RC Pro remotes perform the same function.

Figure 4.30 Advanced gimbal adjustments.
As you might guess, the gimbal is a high-precision device and should be treated with respect. Here are some aspects to keep in mind:
- ■Don’t obstruct the gimbal’s movement when the aircraft is powered up. Be sure to remove the transparent gimbal protector before turning the drone on. When you set the drone on its launch site, make sure there are no objects (including grass or weeds) that would interfere with the gimbal as it orients itself on power up.
- ■Use the gimbal protector between flights. When power is off, it is okay to reorient the gimbal manually so it is centered when you put the protector on. Always keep the protector mounted between flights and when transporting your drone.
- ■Protection mode. If the gimbal is obstructed on its launch pad, it may go into protection mode and you’ll receive a message that the aircraft cannot take off. Turn the drone off and clear the obstruction before powering up again. Protection mode may be invoked if the aircraft is on uneven ground, or the gimbal experiences an external jolt.
- ■Heavy clouds, fog, and moisture. A wet gimbal may not operate, but should work fine when dried out. Dust or sand are also not a friend of your drone.
- ■Collisions. Any sort of collision or impact may damage the gimbal enough to require repair, or produce abnormal operation. DJI drones are fairly robust, however. One of my earliest flights with my Air 2 resulted in a crash into the top branches of a maple tree, causing the drone to tumble down through the boughs to a rough landing on the ground. The aircraft has operated perfectly since then, with only a few grass stains to show for it. (Lesson learned: don’t experiment with a QuickShot video at too low an altitude; side-to-side obstacle avoidance in that mode is not available.)
- ■Recalibrate. If recalibration of the gimbal is necessary, you’ll be led step-by-step through the procedure, which isn’t difficult.
Aerial Navigation
With a conventional piloted aircraft, a human being is onboard during flight and is able to visually monitor the surrounding airspace and use a variety of instruments to precisely determine the craft’s location and altitude in order to navigate from one place to another. With a UAV like the Mavic Air 2/2S, the remote operator must depend even more heavily on technology to plot a course; the visual “window” on the nearby sky is limited to the drone camera’s adjustable, but limited view.
Your primary tool for navigating will be GNSS, short for Global Navigation Satellite System, which, up until now, I have sometimes referred to as GPS. Most of us are already familiar with GPS; many use GPS systems in our cars, wrist fitness bands, and depend on them to Find My Phone when we want to know the current location of our devices.
In truth, GNSS is the correct broad term that encompasses the full range of global satellite-based positioning, navigation, and timing (PNT) systems. The familiar GPS (Global Positioning System) technology developed by the United States is just one particular type of GNSS service. Others include GLONASS (Global Navigation Satellite System, owned by Russia) and Galileo, a project of the European Union. All three are world-wide services that use a constellation of satellites, and your Mavic Air 2/2S is able to take advantage of all of them.
A drone must have at least four of those satellites in view to triangulate (quadrangulate?) its position with the most accuracy. Using GPS alone, it can access 30 different satellites; add in GLONASS or Galileo, and the number of visible satellites is almost double, increasing both speed and accuracy. It’s said that GLONASS provides more positional precision in mountainous areas, while Galileo is better in urban surroundings. The ability to use all three means that, when using its GNSS capabilities, your Mavic probably has a better idea of where it is than you do.
Unfortunately, GNSS isn’t always available. Satellite signals can be blocked by tall buildings, dense forests, or tunnels, and it’s not always available in some areas as the satellites in low-Earth orbits (GPS and GLONASS) or higher orbits (Galileo) progress around the globe. In addition, while GNSS can report where your aircraft is flying, it can’t tell you anything about trees, power lines, tall buildings, or other hazards, nor provide feedback on the surface where you’re planning to land. In such cases, the Mavic Air 2/2S’s vision and infrared sensor technologies are invaluable.
Wind Resistance
Image stabilization is a marvelous thing. My decades of experience taking pictures with still cameras both hand-held and on tripods makes the ability of drones like the Mavic Air 2/2S to capture sharp images at shutter speeds that are measured in seconds, rather than fractions of seconds, truly miraculous. It’s even more remarkable when you consider that your aircraft’s gimbal is also called on to automatically swivel at high precision when it captures complex panorama images that are then stitched together seamlessly to provide ultra-wide-angle rectilinear or spherical views of your subject.
The drone performs this magic while compensating for the movement of air that is always present. That’s true whether the aircraft is flying forward, backward, sideways, or in combination, or hovering while being affected (or even buffeted) by the prevailing winds that are a continuing factor. As a result, the Mavic’s wind resistance, or ability to maintain a desired position against a blowing wind, is important.
A drone’s wind resistance is affected by several factors:
- ■Weight. Heavier drones offer better inertia for improved stability in strong winds.
- ■Size. If a weight increase comes in a larger form factor, a larger drone will have more surface area to catch the wind.
- ■Shape. A drone with a sleek aerodynamic shape will have lower drag coefficients, allowing them to move through the air—or have air move past them—more readily.
- ■Power. A more powerful motor can produce sufficient speed to counter the effects of wind, but potentially at the cost of some size and weight, chiefly from the need for a larger, heavier battery.
- ■Hardware/software design. Your drone includes an inertial measurement unit (IMU) that combines gyroscopes and accelerometers to provide data that can be used to calculate the aircraft’s position and velocity. Its GPS chip increases the accuracy of those measurements. These hardware components work with the drone’s software to make real-time corrections for shifts in position caused by the wind.
Even with your Mavic’s wind-resistance capabilities, you’ll quickly discover that a drone nevertheless can become unstable in high winds. Unexpected updrafts near mountains or high buildings can produce undesired and unexpected gains in altitude. Dust carried by the wind can compromise your drone’s object-avoidance sensors. Strong winds can do more than give you shaky images and increased battery drain. Winds can directly or indirectly damage your drone.
DJI is kind enough to tell you, approximately, what kind of wind will be beyond your Mavic’s ability to compensate efficiently. A quick glance at the specifications for your drone will reveal it is rated to resist wind traveling at 10 to 10.7 meters/second, which equates to roughly 38 kilometers per hour or 24 miles per hour. Unfortunately, actual wind speeds mean very little to the average non-pilot until they reach the levels seen in weather broadcasts that feature hapless reporters who are shown drenched while dodging flying stop signs during a hurricane. When you’re on site and ready to fly your drone, you might need a smartphone app to tell you just how much breeze to expect. The free version of Aloft Air Control does, as it tells you the current speed of the wind, the direction it’s coming from, and the variability of gusts. I’ve been using UAV Forecast lately, which provides a much better picture of the winds at various altitudes.
Fortunately, there is a helpful specification used to describe wind-speed resistance of drones called the Beaufort scale, with levels ranging from 0 (complete calm) to 12 (hurricane). Drone wind resistance is expressed using these levels, with the Mavic Air 2 and Air 2S both assigned Level 5, which equates to winds from 19 to 24 miles per hour. (I’ve found that more of my readers can relate to “miles per hour” than “kilometers per hour” or even the knots used to designate air and maritime speeds.) The higher the Level number, the better a drone can perform in strong winds. A drone that can withstand Level 5 winds is better than one that can only handle Level 4 velocities.
The Beaufort scale is valuable because you can use visual cues, like those I list in Table 4.1, to estimate approximately how fast the wind may be blowing at your current location. It is not an exact or objective scale; it was developed to replace totally subjective, not very useful evaluations like, “Wow, it’s blowing really hard!” Devised in 1805, it was originally expressed using descriptions of how the sea appeared under various conditions. Land-based descriptors ultimately came into use, and slightly more precise measurements of actual wind speeds in miles/kilometers per hour and knots were eventually applied. Today, the scale is most often used in the United States for weather purposes when issuing small craft advisories (Force 6 or 7), gale warnings (Force 8 or 9), storm warnings (Force 10 or 11), and hurricane-force wind warnings (Force 12).

Bringing it All Back Home
Once you’ve successfully captured your first photos and/or videos, the final milestone will be to retrieve your drone, bringing it back from its maiden flight to a safe landing at its original location (“Home”) or another spot of your choosing. It’s actually quite easy to bring your Mavic back to you manually, and when I was first starting out, I liked to perform at least some of the final steps myself. I quickly learned to trust my aircraft’s smarts and use the automatic Return to Home (RTH) feature most of the time, particularly when conditions allow using Precision Landing. In this section, I’m going to show you how to avoid obstacles and achieve a smooth, safe landing, even under less-than-perfect conditions.
You’ll be landing your drone when you reach one of several potential stages of your flight:
- ■Mission complete. You’ve accomplished the goals you set when the flight began, whether it was to test a particular feature, give yourself additional experience with your Mavic, or you completed your aerial survey or photographic mission.
- ■Environmental changes. I often find myself performing an informal “abort” when unexpected weather appears, sometimes in the form of strong winds or rain. Smoky conditions can be found in park areas where fires occur or controlled burns are staged. The latter are intentional fires used to remove dead or invasive plantlife, reduce insect populations, or even to prevent destructive wildfires.
- ■Depleted battery. Even if there are other aerial tasks you want to complete, it’s prudent to land for a replacement battery when your current Intelligent Flight battery doesn’t have enough juice remaining to finish your mission. I start thinking about returning when the DJI Fly indicators show five minutes or less flight time available.
- ■Urgencies/Emergencies. An unexpected Temporary Flight Restriction (TFR) in your area calls for immediate movement to a different area, or, more likely, just bringing your drone home. A nearby civil emergency requiring first responders may require retrieving recreational drones from the surrounding area.
- ■Equipment malfunctions. Losing a radio link to your drone won’t happen frequently, but if you do experience communication problems or other equipment malfunctions, it’s a good idea to land your drone and find out exactly what the problem is. Fortunately, your Mavic has built-in features that allow it to backtrack and/or land autonomously if you experience controller problems.
You can always retrieve and land your drone manually, directing the aircraft to fly from its current location to your position using the flight controls and the DJI Fly app’s map feature to view icons representing the drone, its recent flight path, the home point, and the location of the controller (and yourself). Once the drone is directly overhead, you can use the Gimbal Dial to point the camera straight down, and monitor your descent visually until the aircraft is a dozen or so feet off the ground. You can then carefully descend to a safe landing in an area clear of obstacles and debris.
However, most of the time, the Mavic Air 2/2S’s automatic Return to Home features will perform any or all of the necessary steps for you. The next sections will show you how to use your drone’s three varieties of Return to Home: Smart RTH, Low Battery RTH, and Failsafe RTH.
No Place Like Home
The automatic RTH modes bring the aircraft back to the last registered Home Point that was recorded by the geopositioning system, which includes the GNSS satellite signal and the drone’s compass. By default, the Home Point is registered as the first location where the drone received an acceptable GNSS signal, which is indicated by the white “satellite” icon seen at upper right in Figure 4.31. The number of satellites available (in this case 26) are shown to the right of the icon. When the icon is red, as seen at lower right, the Home Point cannot be recorded.
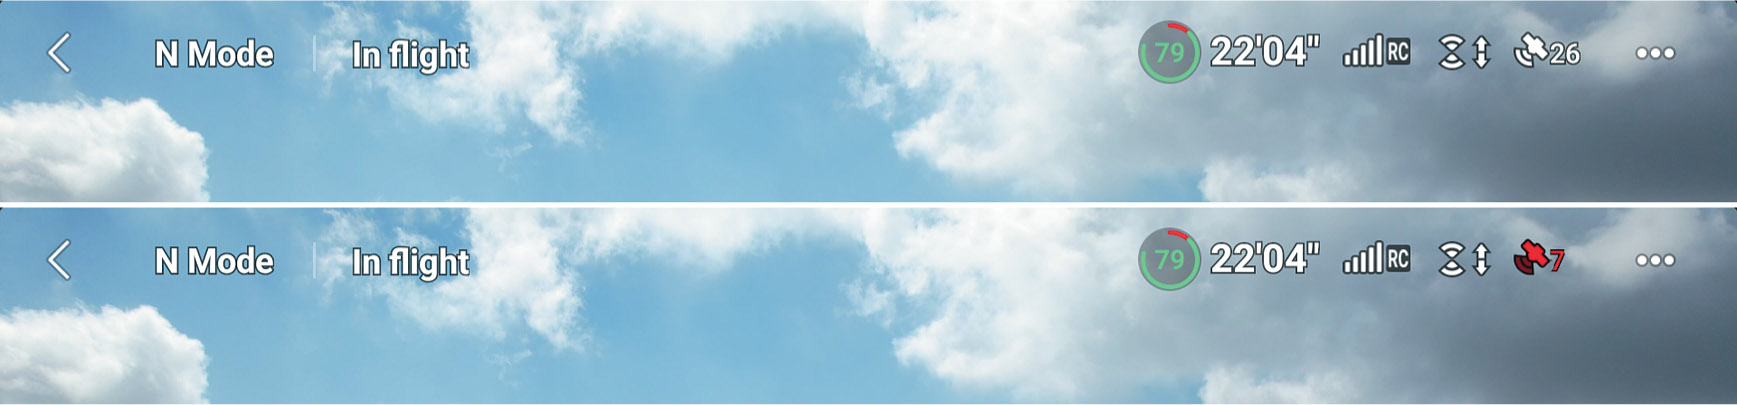
Figure 4.31 Automatic Return to Home is available when GNSS satellite signals are strong (top), but not when too few (or none) are linked to your drone (bottom).

Figure 4.32 A full-screen map appears when you tap on the minimap.
During flight, the Home Point and your flight path so far can be viewed by tapping on the minimap to produce the full-screen map shown in Figure 4.32. The camera view will be reduced to a smaller thumbnail in the lower-left corner. With the full map you can view the location of the drone itself, the controller, current Home Point, and flight path information. Although the basic view is in map mode, you can change to a satellite view or combined map/satellite representation.
The Home Point can be set in several ways:
- ■Automatically at takeoff. When you use the automatic takeoff feature described earlier, the drone will ascend and record its location as the RTH position.
- ■Using the map. If you tap the minimap to enlarge it to full screen, you can tap the Home Point icon at right to reset it to the current drone location. Keep in mind that the new Home Point may not be located above a safe landing point, so you may have to perform the actual landing manually.
- ■Safety menu. Tap the Systems Settings trio of dots at the upper-right corner of the screen, then chose the Safety tab. Scroll down to Update Home Point, as shown in Figure 4.33, and access the setting screen seen in Figure 4.34. You can drag the Home Point to a new location. You might do this if you were yourself moving around and preferred to have the drone return to the position where you are currently, rather than your original spot. As noted, the new Home Point may not be above a safe landing point.

Figure 4.33 Resetting the Home Point in the Safety menu.

Figure 4.34 Drag the Home Point to a new location.
There are three additional related settings (also shown in Figure 4.33) you should update or check while browsing through the Safety tab:
- ■Auto RTH Altitude. This is an important safety feature. It tells the Mavic to ascend to a specified height before beginning the Return to Home sequence. That’s because RTH does not retrace the drone’s original flight path, which avoided any obstacles such as trees or structures. So, if the drone simply moves horizontally to a position above the original launching site it may encounter intervening hazards. It’s smarter to tell the aircraft to ascend to a known safe altitude before it begins returning.
- Of course, setting an altitude that is needlessly high will deplete the drone’s battery more quickly. You can set the Auto RTH Attitude to provide the safety margin you feel comfortable with, and can even adjust it before every flight if you want to. I generally set the preset altitude to about 250 feet, which is much higher than the forest canopies where I shoot (only giant redwoods and sequoias are taller).
- ■Maximum Altitude. You may want to limit how high your drone flies, as it can be difficult to maintain a visual line of site at the highest altitudes. In any case, your drone isn’t permitted to fly higher than 400 feet above ground level, so you should set your maximum altitude below that.
- ■Maximum Distance. Again, your ability to keep your drone within your line of sight limits the horizontal distance you can cover. While it’s likely that your remote controller can maintain contact with the aircraft for distances far beyond those you will encounter, the extra range is simply to ensure that you will be able to control the drone even if the signal is weak. You can specify a maximum distance or rely on your common sense to avoid sending your Mavic too far astray.
Smart RTH
If the GNSS signal is strong enough, you can use Smart RTH to return to the Home Point automatically. Just tap the RTH icon at left in the DJI Fly app, or press the RTH button on the remote control until you hear a beep. Then, the aircraft will begin its return using either Straight Line RTH or Power Saving RTH.
The Straight Line procedure results in the drone flying horizontally until it is directly above the Home Point, then descending vertically to the Home Point, landing, and powering the motors down.
- ■Home Point: Close. If the drone is less than 5 meters/16 feet from the Home Point, the drone lands immediately, and the motors stop.
- ■Home Point: Intermediate. If the drone is 5–20 meters/16–66 feet (Air 2) or 5–50 meters/16–164 feet (Air 2S), the drone flies to the Home Point at its current altitude, lands, and the motors stop.
- ■Home Point: Distant. If the drone is further than 20 meters/66 feet (Air 2) or 50 meters/164 feet (Air 2S), the drone ascends to Auto RTH Altitude. If its current height is higher than Auto RTH Altitude, it remains at that altitude. In either case the aircraft flies to the Home Point, lands, and the motors stop.
As long as the drone is more than 16 feet from the Home Point when RTH is initiated, you’ll be given a choice of landing options.
Power Saving RTH
Your Mavic Air 2/2S may switch from Straight Line RTH and instead assume a more direct, diagonal flight path that is shorter and takes less time to complete. This Power Saving RTH procedure is triggered automatically when the drone’s initial return position is too distant and the altitude is too high from the home point. (The exact distances and altitudes vary depending on the terrain.) The aircraft calculates the best flight path and flies at a dive angle (16.7 and 14 degrees for the Air 2 and Air 2S, respectively) directly to the Home Point, where it lands and the motors stop. However, the aircraft will return to Straight Line RTH if the remote controller signal is lost or the vision systems become unavailable, or the right stick is pulled downward. The Power Saving RTH is triggered rarely, so you may never encounter it.
Low Battery RTH
Aerial daredevils (you know who you are) who tend to test the limits of their drones may accidentally (or intentionally) extend their flights to the point that the amount of battery power needed to safely return to home may be questionable. Fortunately, your Mavic Air 2/2S will intervene at an appropriate time and automatically initiate the Low Battery RTH procedure. You’ll receive a warning like the one shown in Figure 4.35.
If you don’t respond to the warning within 10 seconds, the drone will automatically begin to return to the Home Point. However, if there isn’t enough juice to return to the Home Point, the aircraft will land immediately from its current position. You cannot cancel this automatic landing, but you can use the remote controller to adjust the path of the drone during its forced landing.
However, you can completely cancel a non-forced automatic return using the RTH/Flight Pause button. Just be aware that if you continue to fly the aircraft may not be able to land safely and will crash. Under most circumstances, you should allow the Low Battery RTH feature to do its job.

Figure 4.35 Low Battery RTH will be triggered automatically when your Intelligent Flight battery is nearly depleted.
Failsafe RTH
In general, you’ll find the range of your DJI remote controller will be sufficient to maintain contact with your Mavic even if you wander beyond typical visual line-of-sight limits. Even so, adventurous fliers may lose contact with their drone from time to time, and signals can be lost from interference, especially if tall buildings or other structures intervene. I can say from experience that nothing causes panic quicker than losing control of your favorite aerial photography platform.
Fortunately, DJI has you covered. If the Home Point was successfully registered and your drone’s compass is functioning properly, should the aircraft lose the remote controller signal for more than 11 seconds this Failsafe RTH will be triggered automatically. The procedure has multiple safeguards that integrate to land your drone as safely as possible.
First, the Mavic will retreat along its previous flight path for up to 164 feet and then enter the Straight Line RTH procedure as described above. The aircraft may regain radio contact as it does so. The return will proceed in one of three ways:
- ■Home Point: Close. If the drone is less than 20 meters/66 feet (Air 2) or 50 meters/164 feet (Air 2s), the drone flies back to the Home Point at the current altitude, lands, and the motors stop.
- ■Home Point: Distant at lower altitude. If the drone is further than 20 meters/66 feet (Air 2) or 50 meters/164 feet (Air 2s), and the current altitude is lower than the preset Auto RTH Altitude, it will ascend to the specified height, fly to the Home Point, land, and the motors stop.
- ■Home Point: Distant at higher altitude. If the drone is further than 20 meters/66 feet (Air 2) or 50 meters/164 feet (Air 2s), and the current altitude is higher than the preset RTH altitude you specified, the drone flies to the Home Point at its current altitude, lands, and the motors stop.
Managing Return to Home
Because the Return to Home procedures are automated, your Mavic takes control of certain functions, giving you limited override capabilities. Pausing or canceling the process, or making some adjustments to the flight may be your only options. If the drone enters a restricted GEO zone during the return, it may descend until it exits that zone and then resume flight to the Home Point, or it may hover in place awaiting instructions from you.
Keep in mind that the Mavic will be unable to return to the Home Point if the GNSS signal is unavailable or weak. Should satellite contact be lost after RTH is initiated, the drone will hover in place for a period of time, giving you a chance to resume control, and then descend and land if you do not. Safe return may be affected by high wind speeds, too.
During an automated return, you cannot adjust the orientation of the aircraft or direction of flight. You can, however, use the remote controller to change the speed and altitude of the aircraft. If you need more control, say, because you want to perform the landing yourself, cancel the RTH by tapping the X icon on the screen. When RTH is initiated, you’ll be offered choices of how to proceed (see Figure 4.36, top). If the drone detects an obstacle underneath it that makes the site unsuitable for landing, a warning to assume control will appear. (See Figure 4.36, bottom.) I’ll describe landing protection in more detail shortly.
One trick to keep in mind is that you can change the Home Point, even while the RTH procedure is underway. Perhaps you forgot how far you’ve moved since your drone originally was sent aloft and realize you want to retrieve it at your new location. Just visit the Safety menu tab, as described earlier, and specify the new, more appropriate Home Point.

Figure 4.36 Landing options.

Figure 4.37 Button customization.
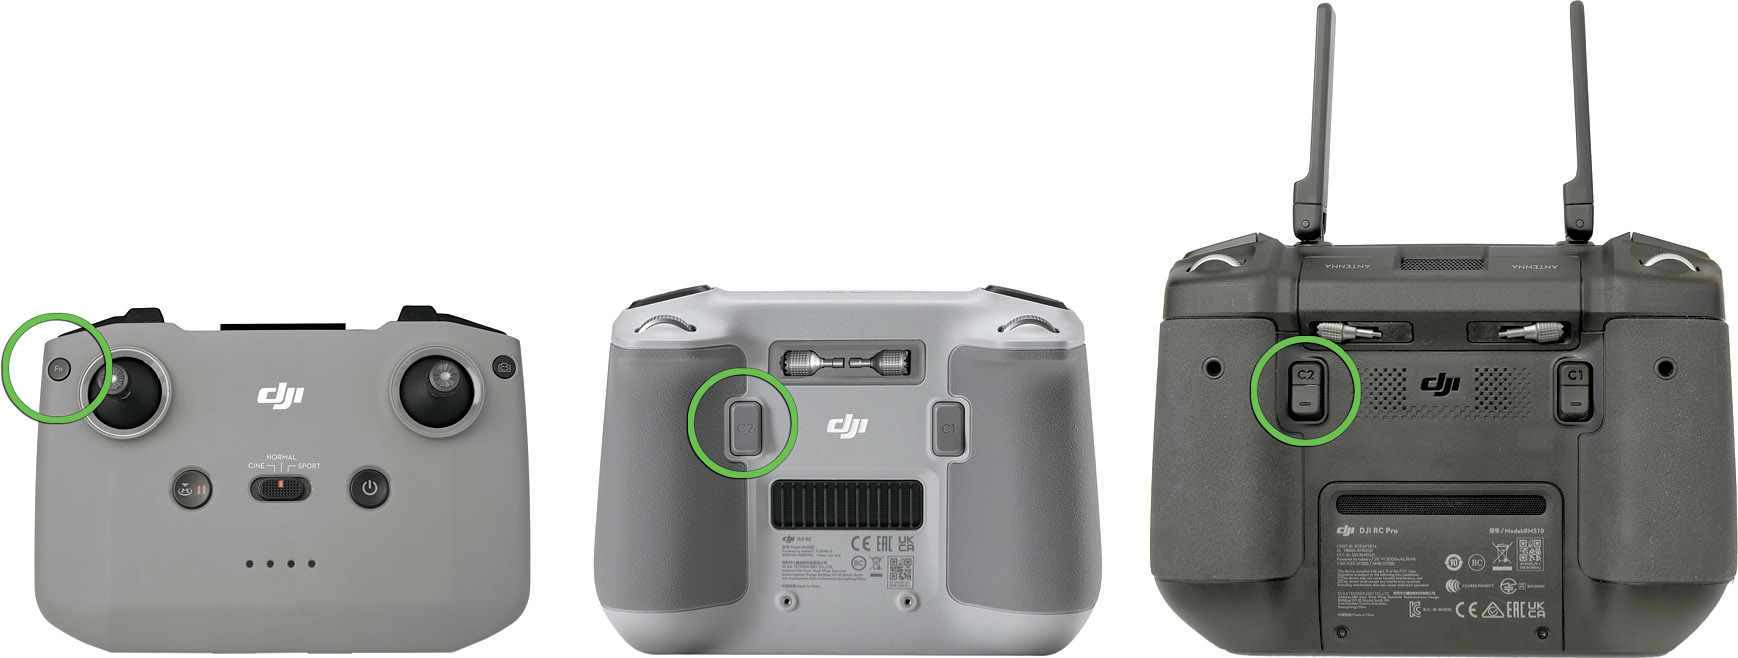
Figure 4.38 Default/recommended LED On/Off button.
Obstacle Avoidance during RTH
As you might hope, your Mavic Air 2/2S uses its obstacle-avoidance capabilities to bypass hazards that it encounters during the Return to Home process, right up to, and including landing. Here are some considerations to keep in mind:
- ■Obstacles: Front/Rear. The aircraft will brake to avoid a collision, and then reverse direction to a safe distance. If the drone was ascending when the obstacle was detected, it will then continue to ascend. If the drone was flying horizontally, it will ascend an additional 16 feet and then resume its former direction.
- ■Obstacles: Below. If a hazard is detected below the drone while descending, it will not proceed.
- ■Obstacles: Side/Above. Hazards located at either side of the drone cannot be detected or avoided. The Air 2S can detect and avoid obstacles in the airspace above it, but the Air 2, which lacks the topside vision sensors, cannot. In any case, you’ll want to monitor the return to watch for these obstacles.
Landing Protection will be activated during Smart RTH, Low Battery RTH, and Failsafe RTH. The drone’s visual systems are disabled during the actual landing, so you should monitor the process yourself. Precision Landing, described shortly, provides an extra measure of protection. During automated RTH, the following procedures are used:
- ■Monitor Terrain. The drone will monitor the terrain below and attempt to land only on a suitable surface. If the landing spot is not appropriate, the warning shown earlier in Figure 4.36 appears, giving you the opportunity to take over control.
- ■Smart RTH. The aircraft will carefully land. If Landing Protection is not available, a landing prompt will appear when the aircraft is within 20 inches of the ground. Pull down the left stick or tap the Auto Landing slider on the screen to land.
- ■Low Battery RTH/Failsafe RTH. The drone will hover at about 6.5 feet and wait for you to confirm that it’s safe to land by pulling down the left stick for one second or tapping the Auto Landing slider.
Precision Landing
Precision Landing is a very cool feature that you may want to use all the time. It costs you nothing other than a few seconds of your time and a tiny amount of battery power. The feature works by having the drone carefully scan the landing area for the Home Point for a few seconds after takeoff. On return, it looks to see if the current terrain matches and, if so, will make a precise landing that’s remarkably close to the original takeoff point (often directly within the area of a landing pad, if you use one). (See Figure 4.39.)
To activate Precision Landing, once your drone has taken off, ascend vertically to a point about 23 feet above the ground. The Mavic will automatically scan the terrain and retain the data during the flight. Then, when a Smart RTH is activated, the aircraft will return to the Home Point and execute a Precision Landing, moving horizontally while it descends to line up with the scanned landing point. During the automated landing, you can move the control sticks in any direction to cancel the

Figure 4.39 Your drone can return to its takeoff location with Precision Landing.
Precision Landing. The aircraft will then descend only vertically, and you can adjust its movement manually. Here are some considerations to keep in mind:
- ■Don’t change the Home Point. If you change the Home Point during the flight, the drone will be unable to execute a Precision Landing over the now-unfamiliar terrain.
- ■Don’t move horizontally before scan is complete. You must ascend to about 23 feet with no horizontal movement for the scan to be accurate.
- ■Terrain must be distinctive. The scan needs to detect unique features of the landing spot. A field of grass or uniform pavement won’t work. This is a good reason to use a portable landing pad.
- ■Terrain must be unchanged. Don’t make any changes at the landing spot. If you do, the drone may not be able to recognize it on its return.
- ■Lighting and light contrast is important. If the illumination is too dark or too bright, the terrain scan may not be useable.
Transferring Photos and Movies
Unlike the casual snapshooter who ends up with April showers, May flowers, summer vacation photos, Thanksgiving dinner, and New Years’ Eve celebrations—or maybe several years’ worth of each—residing on their digital camera’s memory card, as an enthusiast you’re going to want to put your best aerial shots to good use. So transferring them from your drone to your computer or smartphone will be a must.
Fortunately, retrieving your Mavic’s images and video clips is easy. However, there’s one sticky point to be aware of. At the time I write this (and I hope DJI has a fix in the near future), it’s not possible to apply a continuous numbering system that spans multiple cards or sessions, as you can with virtually every conventional digital camera. When you replace or format a card, your drone will start numbering over again at DJI_0001. So, you may need to copy each set of similarly numbered files into a separate folder to avoid duplicate numbering (at best), or overwriting existing files (at worst). Some image file transfer programs, such as Adobe Photoshop Elements Organizer, allow you to rename files as they are copied to your computer. (See Figure 4.40.) You can then use the day’s date or another identifier to give each file a unique name.

Figure 4.40 An image transfer program can rename files for you, avoiding duplicate names.
When it comes to transferring files without a special transfer program, you have three alternatives available:
- ■USB connection. Plug a suitable USB Type-C cable into your drone’s USB port, connect the other end to your computer, and the Mavic’s internal storage and memory card (if installed) will appear on your desktop as another storage drive. You can drag and drop from your aircraft directly onto a folder on your computer.
- ■Card reader. If you’ve elected to store your stuff on a removable memory card you can simply remove the card and insert it into a compatible microSDXC card reader to copy onto your device.
- ■Direct upload to your smartphone or tablet. You can direct the drone to upload a low-resolution version of your captures to your smartphone. I use this a lot, especially when I am working with the RC-N1 controller, which uses my iPhone as its screen and have companions I want to share my work with.
- Within the DJI Fly app, tap on the System Settings trio of dots and navigate to the Camera tab. At the very bottom, you’ll see a Cache When Recording switch, and a Max Video Cache Capacity entry below it. (See Figure 4.41.) Flip the switch on and choose the amount of storage you want to devote to this file cache. The DJI Fly app will transfer a low-resolution version of your files to your phone. The transfer is relatively slow—especially for video—and your drone and device must both be powered up and depleting their batteries, and the memory consumed by your cache can’t be used for anything else.
- You don’t need to set a large cache size; when the available space is used up, older files will be deleted automatically to make room.

Figure 4.41 Your drone can create a cache backup of your files on your smart device.