8Menu Reference
The Systems Settings screen in the DJI Fly app has five individual menu tabs that let you specify adjustments for the most important settings that apply to your Mavic Air 2 or Air 2S’s flight modes. You can access the screen any time your controller is connected to your aircraft by tapping the three dots in the upper-right corner of the Camera View screen, or, if you have the DJI RC Pro controller, by pressing the 5D button.
The Systems Settings screen can still be viewed when not connected to your drone by tapping the Connection Guide label on the DJI Fly introductory screen, and then tapping on Camera View within the guide. That will take you to the camera view, even though no drone is connected, and you can then tap the three dots in the upper-right corner to view the Systems Settings screen. This chapter provides a reference to the key settings available with the System Settings screen. You’ve been using many of them already as you learned to fly your drone, but you’ll encounter some new ones here for functions like gimbal calibration. I’ll provide a brief overview of commands discussed elsewhere in this book and not duplicate the explanations from earlier chapters. I’m providing longer descriptions of the others.
Safety Menu
Tap the leftmost tab in the Systems Settings screen to produce the Safety menu, shown in Figure 8.1. It’s a scrollable menu and you won’t see all the entries at once, as in the figure.
The Safety menu has entries for making obstacle avoidance settings, flight protection, calibrating sensors, battery information, and other functions. Some settings can be made by tapping a label, toggling a switch, or moving your finger along a slider. If an entry has a > symbol at its right edge, you can tap that symbol to view a sub-entry with additional settings.
Obstacle Avoidance Action
This is where you tell your drone what to do when it encounters an obstacle. You can tell it to use its sensors and GNSS data to calculate a safe route around the obstacle, or stop, hover in place, and await further instructions from you. You can also disable obstacle avoidance completely (it is disabled automatically in Sport mode). You might want to turn it off under some circumstances, as it may be too sensitive when, say, flying through a group of trees. If you’re certain you can avoid the obstacles manually, working without the drone’s safety net is an option.

Figure 8.1 Safety menu.
Display Radar Map
When enabled, this map can appear in the lower-left corner of the screen. Once you’ve taken off and the Home Point has been updated, you’ll be able to view the location of key components, shown in Figure 8.2.
- ■Drone. The blue and white arrowhead icon shows the location of the drone.
- ■Attitude. The horizontal or slanted lines indicate the tilt of the drone when it is banking into a turn or trying to maintain position against winds. If you see the lines tilting when the drone should be hovering or moving straight forward or backward, it may mean that the aircraft is fighting strong winds. The lines will be in the upper half when the drone is moving forward (the nose is tilted down) and in the lower half (the nose is tilted up) when moving backward.
- ■Remote control. The blue and white dot shows the position of the remote control in relation to the Home Point. In practice, it may remain very close to and overlap the Home Point on the map and only diverge when you move away from it. The arrow on the dot indicates the direction in which the controller is pointed.
- ■Compass direction. In Figure 8.2, North, as it relates to the drone’s orientation, is shown at the lower-right edge of the map.
- ■Enlarge/Reduce radar map. Tap the L shape at lower left to reduce the map to an icon.

Figure 8.2 Displaying the radar map.
Auto RTH Altitude
As explained in Chapter 4, the automatic RTH features enable the drone to return it its last registered Home Point, by default registered as the first location where the drone received an acceptable GNSS signal. When you invoke automatic RTH, the best procedure is to have the aircraft first ascend to an altitude that is high enough to allow it move horizontally without encountering any obstacles.
You can use this slider to define how high the drone will rise before starting to return. The higher the altitude, the longer the return will take and the greater amount of battery power that will be consumed. You can decide for yourself what a general-purpose safe altitude is, or change it to suit your specific circumstances.
Update Home Point
You can update the Home Point at any time by tapping on the Camera View map or by using this entry, which allows you to switch the Home Point to the current location of the drone, to the current location of the remote control, or to a position you specify by dragging the H icon on the map.
Max Altitude/Max Distance
These two entries allow you to drag the sliders to specify the maximum altitude the drone can rise to, and the maximum distance it can travel away from you. The altitude should be set to no higher than 400 feet above ground level. You can set a lower limit if you like. Keep in mind that you must keep your drone within your line of sight when setting the distance level. Under dim lighting conditions, especially twilight, your drone’s auxiliary LED light or the required add-on strobe (for night flying) can help you maintain line of sight at greater distances.
Compass Calibration
From time to time you’ll need to recalibrate your drone’s compass. As I’ve mentioned before, the presence of metallic objects can interfere with the compass’s operation and calibration. Large metal objects or even the rebar in concrete slabs can affect it, so you should move as far away from such interference when recalibrating. I usually visit a nearby open field with nothing around the drone except vegetation.

Figure 8.3 Compass calibration.
The drone needs to be at least five or six feet above ground level when you begin the process. You’ll see screens like the ones shown in Figure 8.3. Follow the prompts and rotate the Mavic until calibration is complete. Some sticklers for precision recommend recalibrating before every flight, but, in practice, you need to do so only if you move more than 50 miles from your last flight or are in a location roughly 1,000 feet higher. The drone’s “memory” of magnetic North may be off a bit if fyou’ve changed your locale by that much. DJI has programmed the drone to suggest recalibration after a particular period of time has passed since the last update.
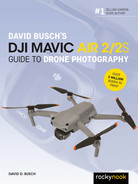
IMU Normal
Inside your drone is a compact self-contained module called the Inertial Measurement Unit (IMU), which uses an accelerometer, barometer, gyroscope, and thermometer to provide the information that is necessary to keep your Mavic stable and level during its flight. From time to time it may need to be calibrated using this entry.
The IMU contains four essential components that measure the drone’s temperature, angular velocity, external forces, and the attitude (tilts and rotation) of your drone:
- ■Thermometer. Your Mavic is rated to be operated in temperatures ranging from 32 to 104 degrees F (0 to 40 degrees C), although flight time may be drastically reduced (by 75 percent or more) at low temperatures. Operating the aircraft generates heat from the batteries. The IMU’s thermometer tracks temperatures.
- ■Accelerometer. Accelerometers measure a drone’s change of velocity in a single direction, as when you fly forward or backward, or ascend or descend.
- ■Barometer. This component measures atmospheric pressure as a way to determine your drone’s altitude.
- ■Gyroscope. Accelerometers can’t measure twisting or rotational movement, so a gyroscope (a tiny spinning disk inside your drone) is used to measure angular velocity along the x, y, and z axes (pitch, roll, and yaw).
You won’t need to recalibrate the IMU often, but you will want to do so if the app gives you a notice that calibration is needed, if you see the drone is leaning to one side while hovering, or when you’re flying in a new location (as I recommended for compass calibration). If you’ve have had a minor crash, it’s a good idea to calibrate, even if there appears to be no damage to the drone.
Recalibrating your drone’s IMU is easy. All you need is a flat, level surface on which to rest the drone, avoiding proximity to metal, concrete, or electronic devices that can interfere with the components’ readings. You should have at least 50 percent battery power. The process will take from 5 to 10 minutes. With the gimbal cover removed, access the IMU Normal entry to view the screen shown at upper left in Figure 8.4. Once you start, you’ll be prompted to place the aircraft on the flat surface in the orientations shown in the figure.
Battery Info
This entry gives you a great deal of useful battery status information, including the amount of charge remaining in the three individual cells inside each Intelligent Flight Battery and the current voltage and temperature. The latter can be useful for spotting overheating, which can occur when the drone is operated vigorously. You can also see the battery serial number and cycle count. (See Figure 8.5.) If you have lots of batteries, you may want to track them so their usage can be spread evenly. If your batteries are stored with the correct charge, roughly 60 percent, and at normal temperatures, they should each be good for at least 200 discharge/charge cycles.
Auxiliary LED
The LED on the underside of the drone can provide useful illumination when landing under dim lighting and help you maintain line of sight as twilight approaches. However, it is not a substitute for the required strobe light used for late twilight and night flight. You can make an adjustment here so the LED will turn on automatically when needed on overcast or dark conditions. Or, you can turn it On or Off from this entry.
Unlock GEO Zone
I described geofencing and DJI’s system of geo zones in Chapter 4. You must obtain an unlocking license for each zone using the DJI web page (https://dji.com/flysafe). You can then view and activate your licenses using this entry.
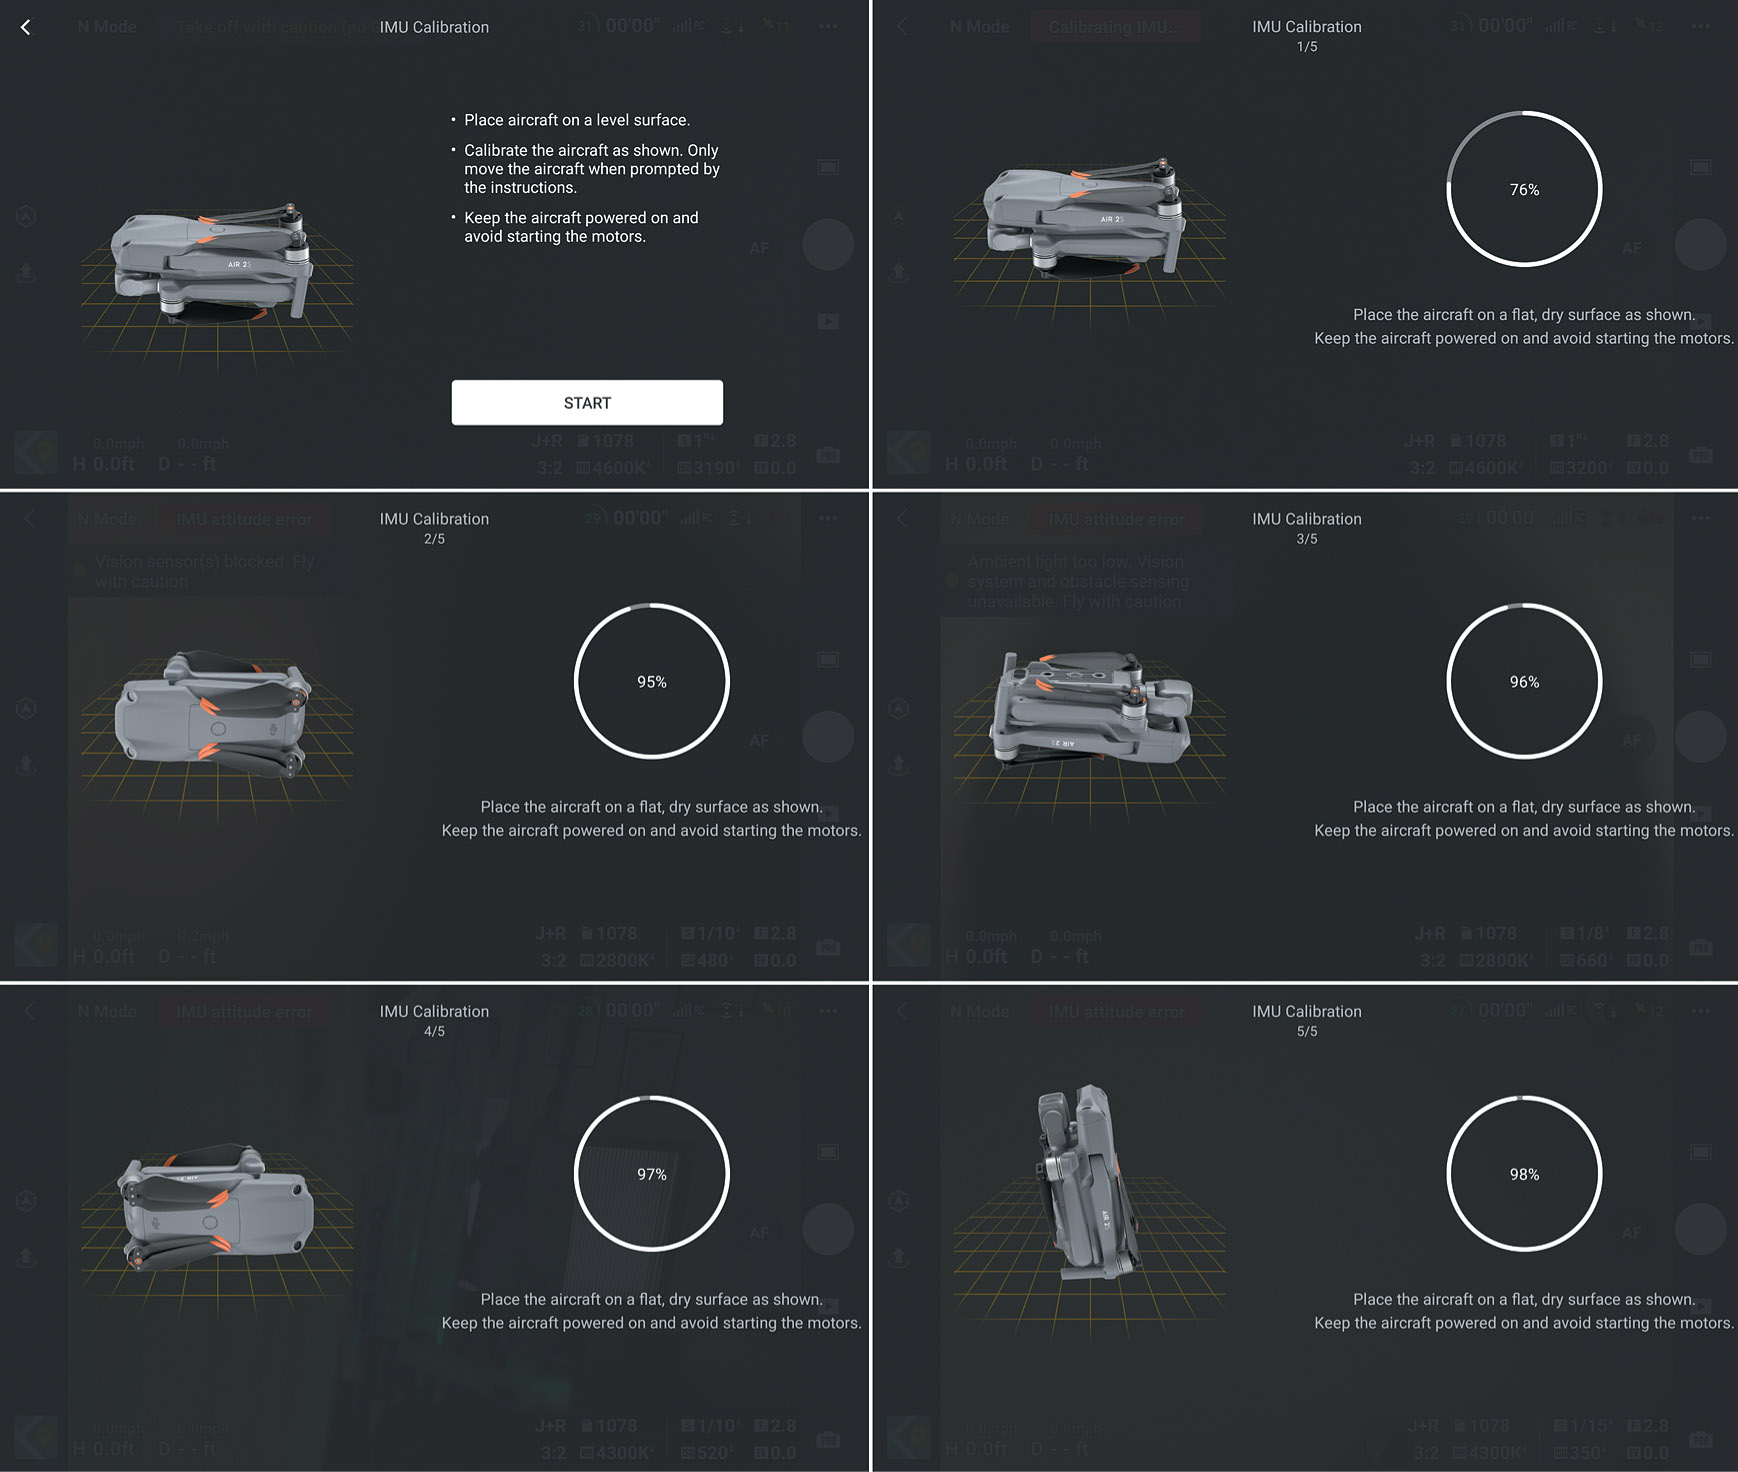
Figure 8.4 IMU calibration.

Figure 8.5 Battery status.
Find My Drone
With any luck, you’ll never have to use this feature, but, if the next-to-worst thing happens (a crash that causes harm to the drone, a person, or property is the worst), you may lose track of exactly where your drone is located. Your misfortune might be caused by flying the drone to the limits of its battery capacity, forcing a landing when the battery reaches a critical low point. The drone may have lost both its GNSS signal and connection to your remote. There may have been a malfunction of the drone itself, or a flyaway in which the aircraft takes off for parts unknown for a variety of reasons.
If the drone is still powered up and has a GPS signal, this Find My Drone entry may be your first line of defense. The screen shown in Figure 8.6 appears showing the last known location of the drone (a blue triangle) and you, the operator (a blue dot). You can tap the box seen at lower right in the figure to prompt the aircraft to begin flashing its lights and emitting a beeping sound. On the right side of the screen is a “stacks” icon you can use to select the map layers you want visible.

Figure 8.6 Find My Drone.
Advanced Safety Settings
The Advanced Safety Settings entry has three parts, shown in Figure 8.7, which specifies how the drone behaves when the remote signal is lost, provides emergency propeller stop instructions, and activates the AirSense feature:
- ■Signal Lost. In practice, your drone will not often lose its signal from the remote controller when you have a clear visual line of sight (VLOS) with the aircraft. It can happen if you wander too far, but it’s more common to lose the signal because of some interference, particularly from buildings that block the drone’s reception. This entry enables you to tell the drone what to do when the signal is lost and not quickly restored.
- You can select RTH, the default, in which case the drone will backtrack and return following the procedures I outlined in Chapter 4. If you choose Descent, the aircraft will reduce its altitude, which is often sufficient to restore the connection between it and your controller. You can also opt to have the drone hover in place. When that happens, if the signal isn’t restored quickly, you’ll want to move yourself (and the controller) in the direction you think the drone is located, which often may be all you need to reestablish the connection.
- ■Emergency Propeller Stop. There is no function to access here; it’s for your information only. The screen displays an illustration showing how to stop the propellers in an emergency, by pulling the right control stick down and diagonally to the right, and the left control stick down and to the left. You can also pull the left and right sticks down and to the left and right (respectively). As you can imagine, the drone will crash, which may be your best-case scenario in the event of an impending collision that will cause property damage or injury.
- ■AirSense. At the bottom of the screen is a toggle you can use to turn the AirSense feature on or off. When enabled, the DJI Fly app will display red-highlighted warnings in the upper-left corner of the Camera View screen when there are manned aircraft in nearby airspace.
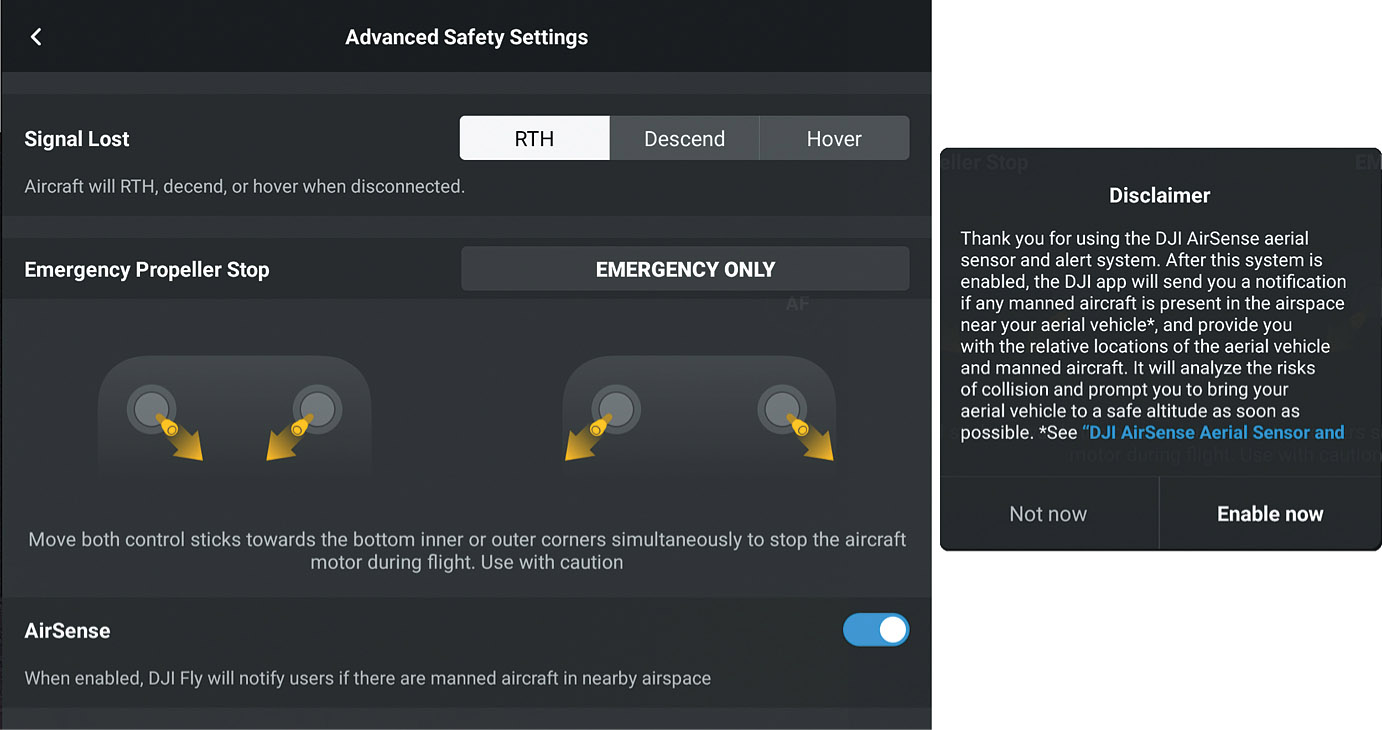
Figure 8.7 Advanced Safety Settings.
Control Menu
The Control tab in the System Settings menu contains a dozen entries you can use to fine-tune the operation of your Mavic Air 2 or Air 2S. As with all the menu tabs described in this chapter, only a portion is displayed on the screen of your controller at one time. You’ll need to scroll down to see all the options shown in Figure 8.8.
Units
This entry is a simple region-centric option that allows you to specify how distances and speeds are displayed on the controller’s screen when using DJI Fly. You can select either of two metric representations—meters or kilometers—for distance/speeds, or the Imperial system of feet and miles, which are officially used in the USA, Liberia, and Myanmar, but linger on for some measurements in Great Britain (where the Imperial system originated) and a few former Commonwealth nations, including Canada and India. You’ll choose the system that is most comfortable for you.
Subject Scanning
As described in Chapter 7, subject scanning is a feature that allows the drone to identify and mark potential video subjects with a green highlight box. You can tap the box to lock in that subject for focus/tracking, or draw a square around it on your controller’s screen to define your own subject.
Gain & Expo Tuning
This entry (shown in Figure 8.9) is an advanced tool for changing the sensitivity of the Mavic’s response to control movements (Gain) and the exponential curves (Expo) that determine the range in which your adjustments are applied. Ordinarily, recreational flyers won’t ever need to make any changes here, but as you gain experience you may want to fine-tune your drone’s response when capturing cinematic video or high-performance flight in Sport mode. You have separate options for the aircraft itself and for the gimbal.
- ■Maximum Angular Velocity. This setting controls how quickly the drone rotates when the yaw stick (the left stick in Mode 2) is pressed left or right. The default is 40 degrees per second in Normal mode, with slower movement in Cine mode contrasted with a faster response in Sport mode, as seen in Table 8.1.

Figure 8.8 Control menu tab.
Figure 8.9 Gain & Expo Tuning.
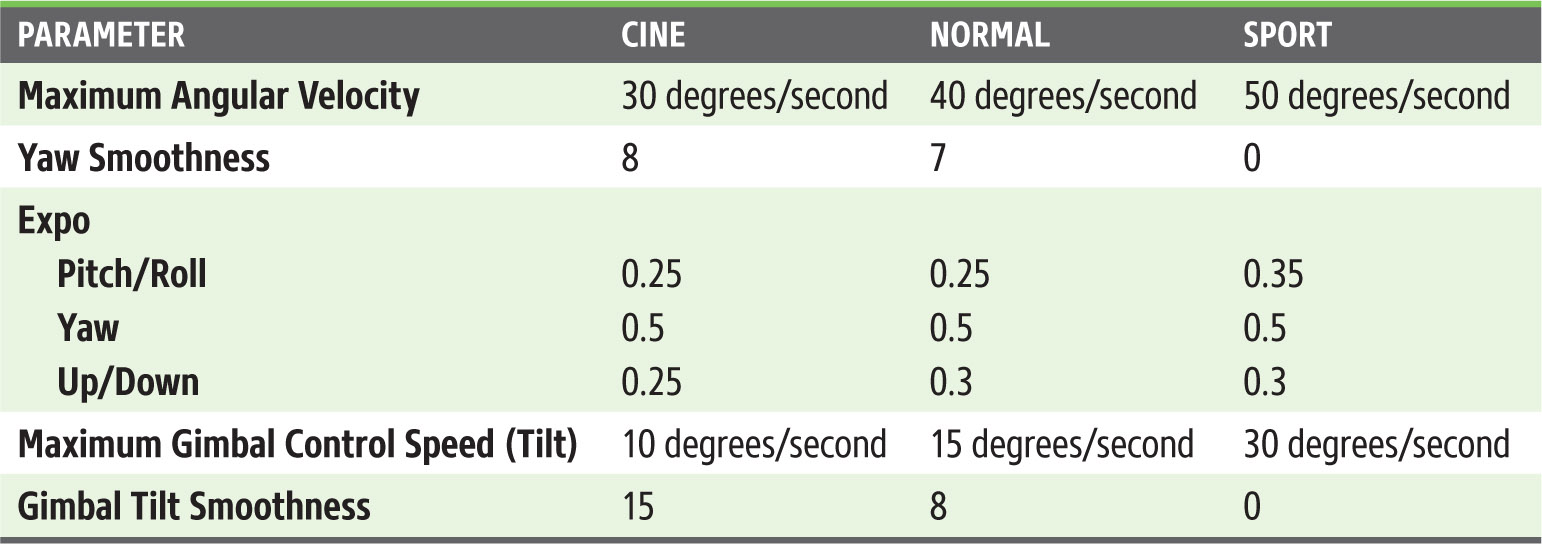
- ■Yaw Smoothness. This determines how smoothly the aircraft rotates using the velocity specified above. The available range is from 0 to 100, and a little goes a long way, as Cine mode uses a value of just 8.
- ■Expo. The exponential curves setting requires a little explanation. Check out the graph midway down in Figure 8.9, which has red, blue, and green lines representing pitch/roll, yaw, and up/ down motion, respectively. Straight lines from lower left to upper right in the graph would represent the same amount of adjustment from each end of the control stick’s movement from either extreme to the midpoint.
- But instead of that unchanging response, the exponential curves are steeper at the extremes, meaning the response is much faster, then tapering off to neutral in the middle. As a result, when a stick is pressed to its furthest point (far left/right or top/bottom), the change is quick, while in the areas toward the middle, where most flight adjustments take place, are slower. That gives you more precise control around the neutral position in the center, where most of your actual flight adjustments take place. A mere finger twitch won’t send your drone far off course, but when you need to make large adjustments, the aircraft will respond immediately. You can make adjustments from 0.1 to 0.9, and can see from the table that only relatively small changes to the curves are needed.
- ■Maximum Control Speed (Tilt). This is the first of two gimbal adjustments. Here you can change the number of degrees per second the gimbal will move when rotating the Gimbal Dial. Select from 1 (for slow gimbal movement) to 100 (extremely fast) tilts. Keep in mind that by default the gimbal can only be tilted 90 degrees from horizontal, unless you activate Allow Upward Gimbal Rotation, as described shortly.
- ■Gimbal Tilt Smoothness. This determines the smoothness of the gimbal’s rotation when using the Gimbal Dial. You can choose values from 0 to 30. Coordinate this setting with the speed control above to produce the combination of speed and smoothness you need for your video.
- ■Reset Current Settings. Returns all the Gain and Expo settings to the defaults shown in Table 8.1.
Gimbal Mode
Your Mavic Air 2 or Air 2S defaults to Follow mode, in which the gimbal remains horizontal as the drone rolls slightly right or left during a turn, or tilts up or down when moving forward or backward. FPV (first-person view) mode locks the gimbal in the straight-ahead position, allowing the camera to tilt along with the drone, providing the perspective of what you’d see in an aircraft performing those maneuvers. I provided an example illustration in Chapter 4. FPV mode is used most for special effects, including MasterShots (with the Air 2S) or drone racing.
Allow Upward Gimbal Rotation
Ordinarily, the gimbal does not tilt up, as this would allow the drone’s wide-angle lens to photograph the propellers. So, downward tilt is limited to 90 degrees from horizontal. If you enable Upward Gimbal Rotation, you’ll be able to rotate the camera upward a limited amount—up to 24 degrees.
Gimbal Calibration
If your gimbal isn’t providing the correct orientation, you can calibrate it using this entry. In the first screen, shown in Figure 8.10 upper left, you’ll be asked to place the aircraft on a flat, level surface and choose to use Auto or Manual calibration. When you select Auto, you’ll be prompted to position the drone in various orientations, including on its side, upside down, and facing in different directions (see Figure 8.10, upper right), until calibration is complete (see Figure 8.10, lower left). You can also perform a manual calibration, as seen in Figure 8.10, lower right.

Figure 8.10 Gimbal calibration.
Recenter Gimbal
There are times when you want to return the gimbal/camera view to the default centered position. You can do it from this menu entry if you like. A better solution is to define a button to perform the task, such as a double press of the Fn button on the RC-N1 remote controller. I’ll show you how to customize buttons shortly.
Stick Mode
Those piloting DJI drones and those from many other manufacturers generally use what is called Stick Mode 2, which makes the left stick control up and down motion (throttle) and horizontal rotation (yaw), while the right stick controls forward/backward movement (tilt) and side to side movement (roll). You can select from two other modes if you happen to prefer them or have been using them with other aircraft, or create your own custom configuration. (See Figure 8.11.)
Those who have previously used weight shift aircraft (such as ultralights) may have the altitude control on the right and prefer to retain that orientation. Mode 1 does that: pressing the left stick forward and back moves the aircraft forward and back; pressing the right stick forward and back increases/decreases the altitude. Keep in mind that you will quickly develop muscle memory for any mode you settle on, and if you don’t select Mode 2, you may not be able to use other folks’ drones comfortably.
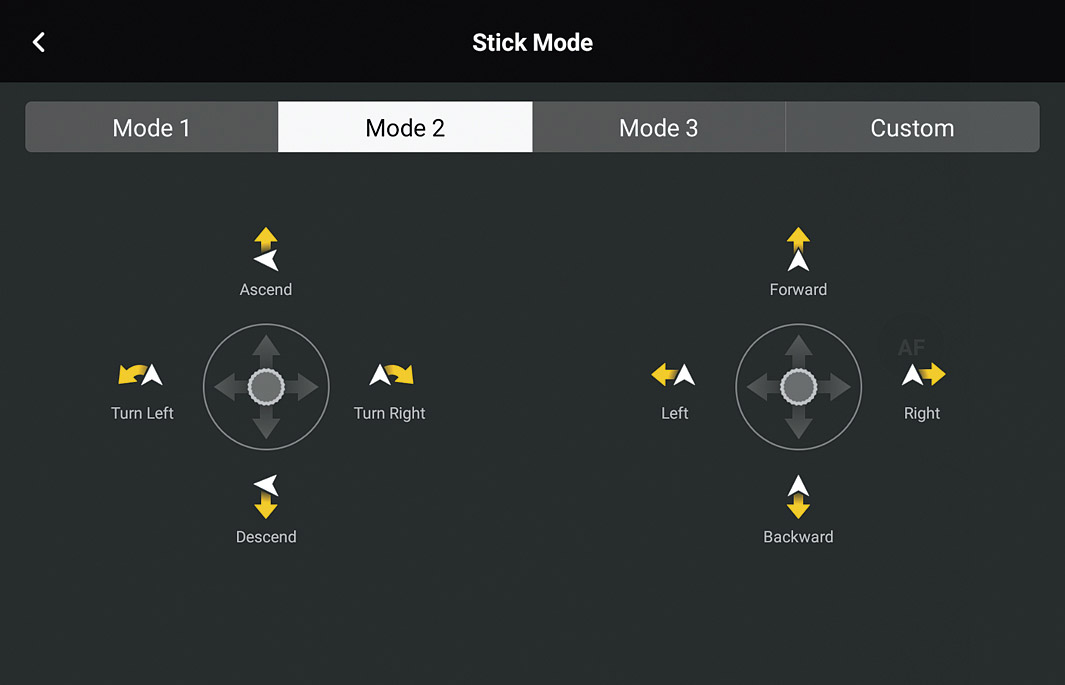
Figure 8.11 Stick Mode.
Button Customization
You can create custom definitions for a variety of buttons on your radio remote, with the behaviors and available buttons varying depending on which controller you are using. The DJI RC-N1 has only a single Fn button that can be customized for either a single press or a double press. Your choices include Recenter Gimbal, Auxiliary LED, Toggle Maps/Live View, Gimbal Follow/FPV Mode, Advanced Camera Settings, AE Lock/Unlock, Hyperlapse Cruise Control, Increase EV, and Decrease EV. The DJI RC includes both C1 and C2 buttons on the back of the unit with a variety of behaviors available.
The DJI RC Pro has three custom buttons, C1, C2, and C3 and a 5D “joystick” that can be tilted in multiple directions like the control sticks, or pressed inward as if it were a button. While the RC Pro has two dials, only the right dial can be programmed. You can specify a behavior for spinning the dial or for spinning the dial while custom buttons C1, C2, or C3 are depressed. Figure 8.12 shows the main Button Customization screen for the DJI Remote Pro, while a typical definition screen is shown in Figure 8.13.
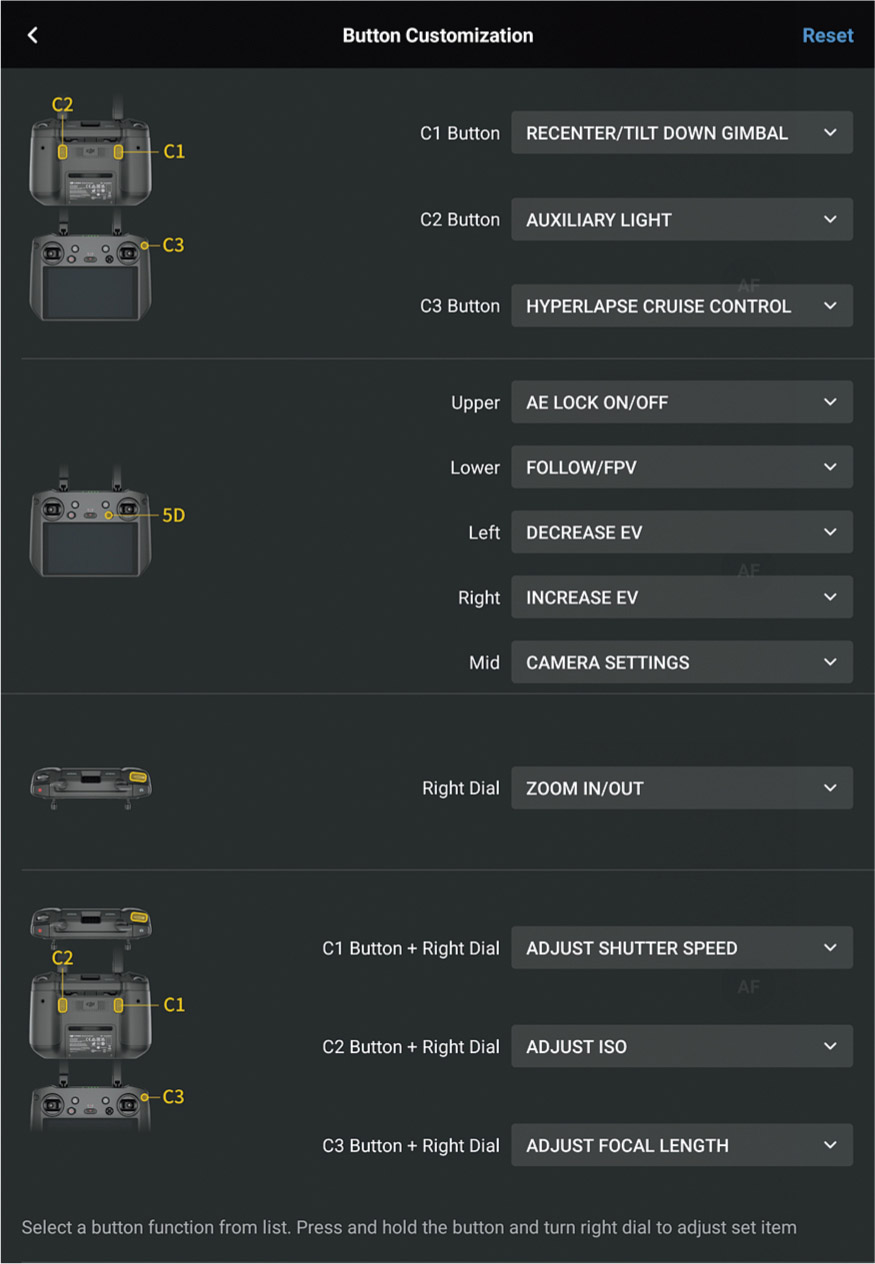
Figure 8.12 Define a custom button.
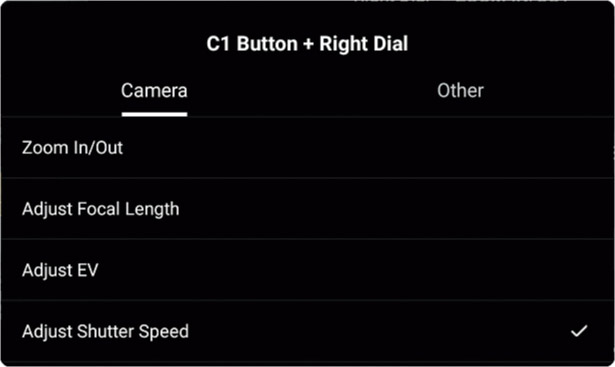
Figure 8.13 Choose the button’s behavior.
RC Calibration
It’s important that your remote is calibrated such that when your dial(s) are rotated to their far left/ right positions, or either control stick is in its neutral center point, or pushed to their extremes at right, left, up, or down, the controller “knows” that position accurately. This entry allows you to rotate your dials and manipulate the sticks while the controller “observes” what you’ve done and sets itself to reflect the positions accurately during flight. Figure 8.14 shows the screens for the DJI RC Pro.

Figure 8.14 RC calibration.
Flight Tutorial
The DJI Fly app has some tutorials available in Camera View, in addition to the Academy videos accessible from the initial screen of the application. You can view three screens labeled Pre-Flight Check, seen at top and bottom in Figure 8.15 before tapping the Start Tutorial panel (at lower right in the figure) to few the full tutorial. Recommended as a review if you haven’t completed reading this book.
Re-pair to Aircraft (Link)
If you use multiple remote controls with a single aircraft or use the same remote with other DJI drones, you may sometimes need to re-pair/bind the remote and your drone by following the prompts this command supplies. Although there is a method of re-pairing by simultaneously pressing the RC-N1’s Fn, Shutter/Record button, and Photo/Video toggle buttons, the function is carried out so infrequently that few will remember the combination when needed. This entry, highlighted in blue at the bottom of the Camera menu tab, is easy to access.

Figure 8.15 Flight tutorial.
Camera Menu
The Camera menu tab includes entries that allow you to make photographic- and video-oriented adjustments to the drone and its storage. The entries in Still photo mode are shown in Figure 8.16. The bottom five (Gridlines, White Balance, Storage, Cache While Recording, and Maximum Video Cache Capacity), plus Reset Camera Parameters, also appear in all other shooting modes (Video, MasterShots [Air 2S only], QuickShots, Hyperlapse, and Pano). The entries located above Gridlines may appear depending on your shooting mode and are shown in Table 8.2.

Figure 8.16 Camera menu.

Size
In Photo mode, you’ll use this setting to specify whether still pictures are taken using the full area of the sensor, or cropped. You can select the 3:2 aspect ratio, as shown in Figure 8.16 for the Air 2S, or the 4:3 proportions of the Air 2. If you’d prefer to have your still images cropped to match the view provided for video, choose 16:9 instead.
As I noted above, in Video mode, this entry is replaced by the Format, Color, Color Display Assist, Coding Format, and Video Subtitles entries seen in Figure 8.17 (top), and discussed in depth in Chapter 7. In Figure 8.17, bottom, you’ll find the additional Shot Frame option, also explained in Chapter 7. I won’t repeat any of that information here.

Figure 8.17 Video and Hyperlapse settings.
Anti-Flicker
Those who shoot with conventional still cameras probably have noticed that shots they take in certain gymnasiums or arenas have inconsistent exposure, wildly varying color, or banding. The reason is that certain types of artificial lighting actually have a blinking cycle that is imperceptible to the eye, but which the camera can capture.
You’ll encounter the same effect with your drone when capturing aerial stills or videos in which that kind of artificial lighting is seen. This setting, when enabled, detects the frequency of the light source that is blinking, and tries to sync capture at the moment when the flicker has the least effect on the final image or frame.
Histogram/Peaking Level/Overexposure Warning
I explained the use of these three evaluation tools in detail in Chapter 5 and will not duplicate that information here. All three apply equally to still photo and video modes.
- ■Histogram. The live histograms your Mavic Air 2 or Air 2S can display on the screen while you shoot can be useful in determining the correct exposure for your still images and video. You can enable/disable the histogram here.
- ■Peaking Level. When using manual focus (with the Air 2S), the color highlighting offered by your drone’s Focus Peaking can provide the visual cues you need to judge correct focus. Choose Off, Low, Normal, or High levels of edge highlighting.
- ■Overexposure Warning. The “zebra” stripes produced by this tool can show you which areas of your image will be overexposed.
Gridlines
Markers superimposed on your frame (and which don’t appear in your finished image) can help in composing or aligning your image. You can have your choice of Rule of Thirds, X, and Crosshair, or combine any two or all three, as shown in Figure 8.18.
White Balance
You can choose an appropriate white balance for your stills and video. Choose Auto to let the Mavic calculate an appropriate balance or select Manual and use a slider to specify color balance on the Kelvin scale from 2,000 to 10,000.
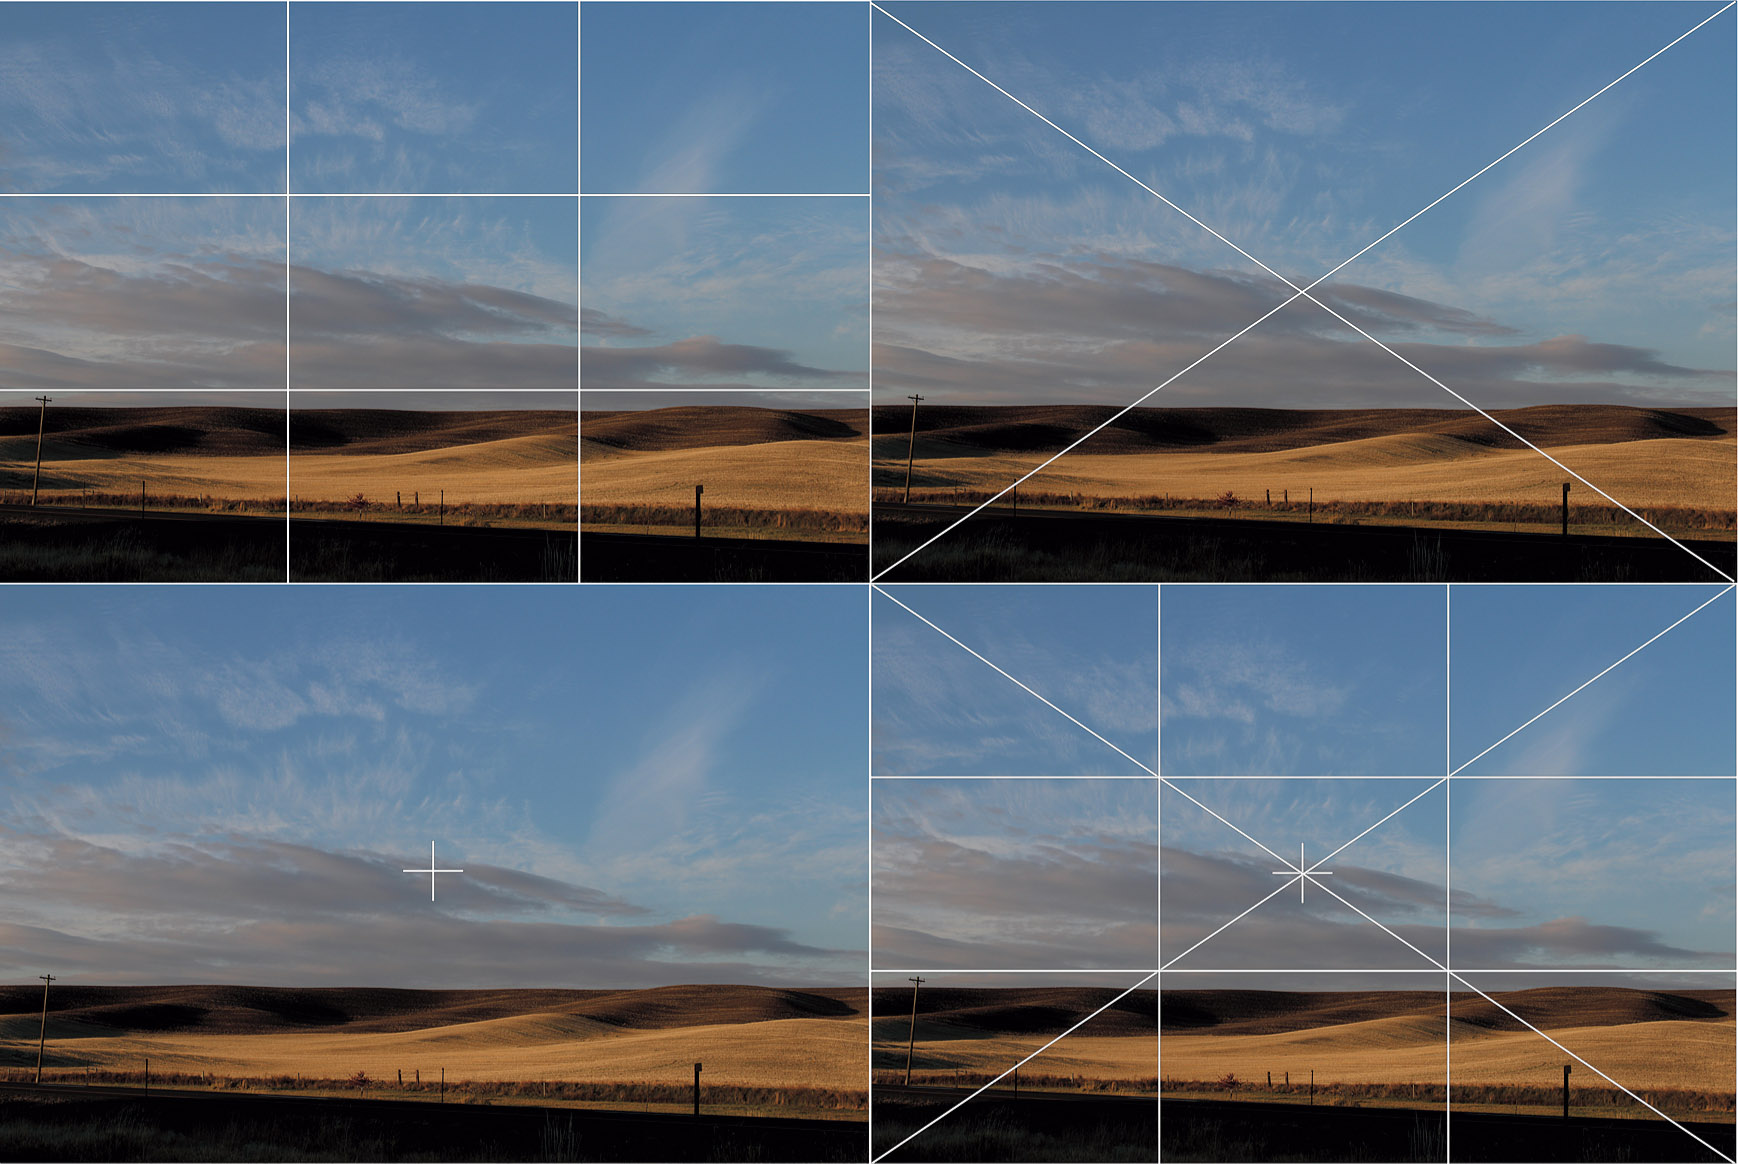
Figure 8.18 Available markers include Rule of Thirds (upper left), X (upper right), Crosshair (lower left), or a combination (lower right).
Format
The Storage area of the Camera menu tab displays the total amount of space available and amount remaining for storage on both the microSD card in the drone (if present) and the aircraft’s own 8GB internal memory. Click on the blue-highlighted Format label and the screen shown in Figure 8.19 appears. You can choose either the SD card or Internal storage and tap Format to reformat the media. Note that when you reformat a card (or insert a new card), the Mavic’s file number system reverts back to zero.

Figure 8.19 Format external or internal storage.
Cache When Recording
Your Mavic stores any still photos or videos you capture on the aircraft’s media during flight, and you can transfer those full-resolution files to your controller or computer for viewing, sharing, or post-processing. If you can also activate this feature, the drone will create a low-resolution version of the video clips to transmit to your remote control for viewing any time, even while the Mavic is still in the air. You can enable or disable that feature here. It’s useful to be able to review your shots quickly without needing to download the large original file. Unless my memory card is starting to fill up, I leave this capability turned on.
Max Video Cache Capacity
You can specify how much of the available on-board storage of your drone to dedicate to storage of cached videos, from 2GB to 16GB, or allow the app to select an appropriate amount for you. If you are directing storage to an installed microSD card that’s reasonably large, say, 128GB, you can be generous. But if you anticipate using most of your available storage for video on a single flight (perhaps you’re capturing 5.4K video or long sequences), limiting caching or turning it off completely may be a good idea.
Reset Camera Parameters
Use this to reset all camera settings to their factory defaults.
Transmission Menu
The Transmission menu tab (see Figure 8.20) contains five entries that control certain features of your remote control’s operation, including any live-streaming platforms you use, HDMI output, definition, radio frequencies used, and channel selection mode.
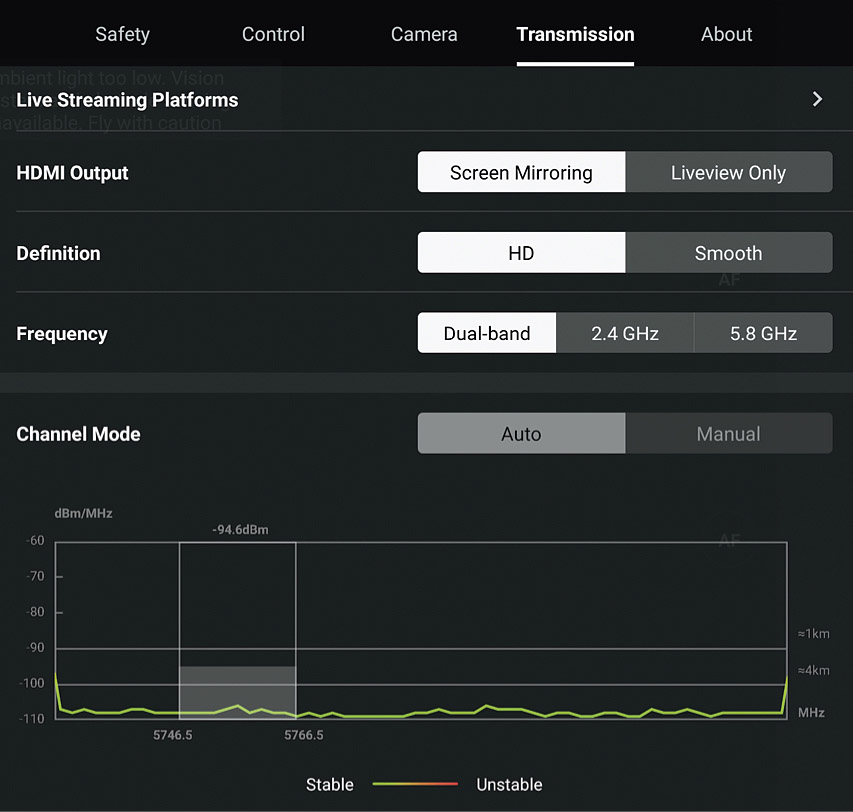
Figure 8.20 Transmission menu tab.
Live-Streaming Platforms
Believe it or not, you can actually live stream what your drone is seeing to your social media platform, including YouTube, using RTMP (Real-Time Messaging Protocol). You’ll need to retrieve your streaming “key” (not password) and fill it in, along with the social media URL, in the RTMP Address field shown in Figure 8.21. Choose your resolution and bit rate, and if your Internet connection can handle it, you’ll soon be sharing your exploits with admirers worldwide (as well as potential bad actors and the FAA, so be careful about where, when, and what you stream).

Figure 8.21 Activating live streaming.
HDMI Output
If you have a controller that offers HDMI output to a monitor or recording device, this menu option appears allowing you to choose Screen Mirroring, which is basically a screenshot that displays everything on your screen including information overlays. Or, you can select “clean” output by opting for live view only, so only the actual scene being captured will be displayed and/or recorded on the external device.
Definition
Here you can choose the type of output transmitted to your controller, either high-definition 1080p video or smoother, reduced resolution 720p video.
Frequency/Channel Mode
Your drone can transmit its data to your remote control using two different radio frequencies, 2.4GHz or 5.8 GHz, or it can access both as required. Each frequency band has its own set of advantages. In either case you should keep in mind that the orientation of your controller’s antennas can also be important. It may be necessary to move around until the signal strength displayed on your screen becomes stronger. The graph at the bottom shows the relative signal strength for the current band. You can select the following parameters:
- ■Frequency. You can enable either 2.4GHz or 5.8GHz bands or both:
- •Dual Band. If you choose Dual Band, your aircraft and controller will seek out the best connection for you, and will switch from a weakening signal at one frequency to a stronger signal on the other band automatically.
- •2.4.GHz. The drone will operate only using this band. This frequency can cover a longer distance and is less directional, but cannot carry as much information as 5.8GHz. Many other devices, including Wi-Fi, garage door openers, security cameras, and baby monitors use this frequency, so interference can be a problem. In areas where competing devices aren’t a problem, especially rural areas, 2.4GHz can be extremely reliable.
- •5.8GHz. The drone will use only this band, which can carry larger amounts of data, but doesn’t travel as far. Its range can be limited by interference with trees, concrete, and steel. Nevertheless, because there are fewer devices competing for its wavelength, it is often the best choice in urban areas and modest distances. If you have problems getting a strong link to your drone with 2.4GHz, you can switch to this frequency.
- ■Channel Mode. You can select Auto switching or choose to select the band manually.
- •Auto. This option is available only if 2.4GHz or 5.8GHz are selected under Frequency, and disabled if Dual Band is enabled.
- •Manual. When this option is selected, Dual Band disappears from the Frequency entry and you can then select 2.4GHz or 5.8GHz manually by tapping that setting.
About Menu
This menu tab provides basic information about your drone and its software, including its name (which you can edit), model number, version numbers of the DJI Fly app, your aircraft and remote control’s firmware, and FlySafe Data. You can check for updates for the latter two, and install them from this screen. Also shown are the serial numbers of the currently installed battery, your Remote ID, Flight Controller, Remote Controller, and Camera. (See Figure 8.22.)

Figure 8.22 About menu tab.
DJI Fly Main Screen
By this time you’ve probably worked with the DJI Fly app enough that you’ve explored all the features available from the main screen. Here’s a recap of their functions (labeled in Figure 8.23):
- 1.Fly Spots. Connects you to DJI FindSpot, where you can check GEO Zones, restrictions, regulations, and other information about specific locations using a useful, searchable map.
- 2.Academy. This gives you access to a treasure trove of videos you can view right on your controller screen, including a beginner guide and vast course library on features, flight safety, and creative ideas.
- 3.Album. Your videos and still photos are accessible from your personal library.
- 4.SkyPixel. DJI touts this web resource as the largest aerial photography community in the world. It’s a rich resource with tools, forums, and galleries for sharing your best work.
- 5.Profile. Provides a link to your DJI Profile, where you’ll find tabs for Device Management, the DJI Forum, DJI Store, Find My Drone utility, and Settings. It also displays the total number of hours of flight time, distance, and number of flights.
- Your flight records synchronize to your DJI account automatically when your controller is connected to Wi-Fi. You can actually view information about individual flights, including date, distance, altitude, and duration.
- 6.Connection Guide. This leads you to connecting your controller to your aircraft.
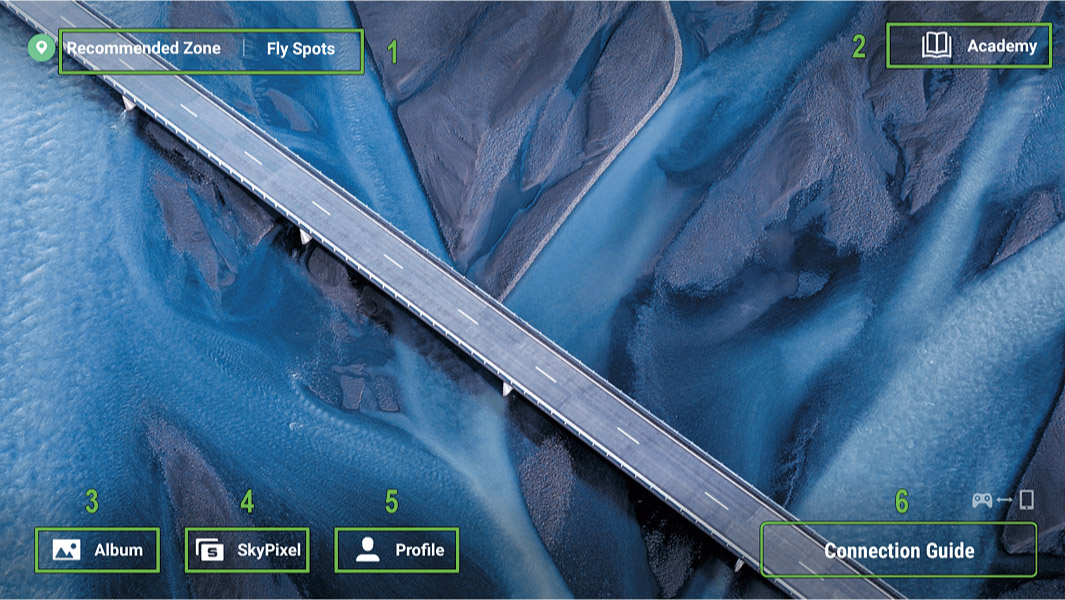
Figure 8.23 DJI app main screen.